


Revision: 04/2021
Copyright © 2016 – 2021
Campbell Scientific
CSL I.D - 1140

Guarantee
This equipment is guaranteed against defects in materials and workmanship.
We will repair or replace products which prove to be defective during the
guarantee period as detailed on your invoice, provided they are returned to us
prepaid. The guarantee will not apply to:
Equipment which has been modified or altered in any way without the
written permission of Campbell Scientific
Batteries
Any product which has been subjected to misuse, neglect, acts of God or
damage in transit.
Campbell Scientific will return guaranteed equipment by surface carrier
prepaid. Campbell Scientific will not reimburse the claimant for costs incurred
in removing and/or reinstalling equipment. This guarantee and the Company’s
obligation thereunder is in lieu of all other guarantees, expressed or implied,
including those of suitability and fitness for a particular purpose. Campbell
Scientific is not liable for consequential damage.
Please inform us before returning equipment and obtain a Repair Reference
Number whether the repair is under guarantee or not. Please state the faults as
clearly as possible, and if the product is out of the guarantee period it should
be accompanied by a purchase order. Quotations for repairs can be given on
request. It is the policy of Campbell Scientific to protect the health of its
employees and provide a safe working environment, in support of this policy a
“Declaration of Hazardous Material and Decontamination” form will be
issued for completion.
When returning equipment, the Repair Reference Number must be clearly
marked on the outside of the package. Complete the “Declaration of
Hazardous Material and Decontamination” form and ensure a completed copy
is returned with your goods. Please note your Repair may not be processed if
you do not include a copy of this form and Campbell Scientific Ltd reserves
the right to return goods at the customers’ expense.
Note that goods sent air freight are subject to Customs clearance fees which
Campbell Scientific will charge to customers. In many cases, these charges are
greater than the cost of the repair.
Campbell Scientific Ltd,
80 Hathern Road,
Shepshed, Loughborough, LE12 9GX, UK
Tel: +44 (0) 1509 601141
Fax: +44 (0) 1509 270924
Email: support@campbellsci.co.uk
www.campbellsci.co.uk

About this manual
Please note that this manual was originally produced by Campbell Scientific Inc. primarily for the North
American market. Some spellings, weights and measures may reflect this origin.
Some useful conversion factors:
Area: 1 in2 (square inch) = 645 mm2
Length: 1 in. (inch) = 25.4 mm
1 ft (foot) = 304.8 mm
1 yard = 0.914 m
1 mile = 1.609 km
In addition, while most of the information in the manual is correct for all countries, certain information
is specific to the North American market and so may not be applicable to European users.
Differences include the U.S standard external power supply details where some information (for
example the AC transformer input voltage) will not be applicable for British/European use. Please note,
however, that when a power supply adapter is ordered it will be suitable for use in your country.
Reference to some radio transmitters, digital cell phones and aerials may also not be applicable
according to your locality.
Some brackets, shields and enclosure options, including wiring, are not sold as standard items in the
European market; in some cases alternatives are offered. Details of the alternatives will be covered in
separate manuals.
Part numbers prefixed with a “#” symbol are special order parts for use with non-EU variants or for
special installations. Please quote the full part number with the # when ordering.
Mass: 1 oz. (ounce) = 28.35 g
1 lb (pound weight) = 0.454 kg
Pressure: 1 psi (lb/in2) = 68.95 mb
Volume: 1 UK pint = 568.3 ml
1 UK gallon = 4.546 litres
1 US gallon = 3.785 litres
Recycling information
At the end of this product’s life it should not be put in commercial or domestic refuse but
sent for recycling. Any batteries contained within the product or used during the
products life should be removed from the product and also be sent to an appropriate
recycling facility.
Campbell Scientific Ltd can advise on the recycling of the equipment and in some cases
arrange collection and the correct disposal of it, although charges may apply for some
items or territories.
For further advice or support, please contact Campbell Scientific Ltd, or your local agent.
Campbell Scientific Ltd, 80 Hathern Road, Shepshed, Loughborough, LE12 9GX,
UK Tel: +44 (0) 1509 601141 Fax: +44 (0) 1509 270924
Email: support@campbellsci.co.uk
www.campbellsci.co.uk

Safety
DANGER — MANY HAZARD S ARE ASSOCIATED WITH INSTALLING, USING, M AINTAINING, AND WORKING ON
OR AROUND TRIPODS, TOWERS, AND ANY ATTACHMENTS TO TRIPODS AND TOWERS SUCH AS SENSORS,
CROSSARMS, ENCLOSURES, ANTENNAS, ETC. FAILURE TO PROPERLY AND COM P LE TE LY ASS E M BLE ,
INSTALL, OPERATE, USE, AND MAINTAIN TRIPODS, TOWERS, AND ATTACHMENTS, AND FAILURE TO HEED
WARNINGS, INCREASES THE RISK OF DEATH, ACCIDENT, SERIOUS INJURY, PROPERTY DAMAGE, AND
PRODUCT FAILURE. TAKE ALL REASONABLE PRECAUTIONS TO AVOID THESE HAZARDS. CHECK WITH YOUR
ORGANIZATION'S SAFETY COORDINATOR (OR POLICY) FOR PROCEDURES AND REQUIRED PROTECTIVE
EQUIPMENT PRIOR TO PERFORMING ANY WORK.
Use tripods, towers, and attachments to tripods and towers only for purposes for which they are designed. Do not
exceed design limits. Be familiar and comply with all instructions provided in product manuals. Manuals are
available at www.campbellsci.eu or by telephoning +44(0) 1509 828 888 (UK). You are responsible for conformance
with governing codes and regulati ons, including safety regulati ons, and the integrity and locati on of structures or land
to which towers, tripods, and any attachments are attached. Installation sites should be evaluated and approved by a
qualified engineer. If questions or co ncerns arise regarding installation, use, or maintenance of tripods, towers,
attachments, or electrical connections, consult with a licensed and qualified engineer or electrician.
General
• Prior to performing site or installation work, obtain required approvals and permits. Comply with all
governing structure-height regulations, such as those of the FAA in the USA.
• Use only qualified personnel for installation, use, and maintenance of tripods and towers, and any
attachments to tripods and towers. The use of licensed and qualified contractors is highly recommended.
• Read all applicable instructions carefully and understand procedures thoroughly before beginning work.
• Wear a hardhat and eye protection, and take other appropriate safety precautions while working on or
around tripods and towers.
• Do not climb tripods or towers at any time, and prohibit climbing by other persons. Take reasonable
precautions to secure tripod and tower sites from trespassers.
• Use only manufacturer recommended parts, materials, and tools.
Utility and Electrical
• You can be killed or sustain serious bodily injury if the tripod, tower, or attachments you are installing,
constructing, using, or maintaining, or a tool, stake, or anchor, come in contact with overhead o
nderground utility lines.
u
• Maintain a distance of at least one-and-one-half times structure height, or 20 feet, or the distance
r
equired by applicable law, whichever is greater, between overhead utility lines and the structure (tripod,
tower, attachments, or tools).
• Prior to performing site or installation work, inform all utility companies and have all underground utilities
marked.
• Comply with all electrical codes. Electrical equipment and related grounding devices should be installed
by a licensed and qualified electrician.
r
Elevated Work and Weather
• Exercise extreme caution when performing elevated work.
• Use appropriate equipment and safety practices.
• During installation and maintenance, keep tower and tripod sites clear of un-trained or non-essential
personnel. Take precautions to prevent elevated tools and objects from dropping.
• Do not perform any work in inclement weather, including wind, rain, snow, lightning, etc.
Maintenance
• Periodically (at least yearly) check for wear and damage, including corrosion, stress cracks, frayed cables,
loose cable clamps, cable tightness, etc. and take necessary corrective actions.
• Periodically (at least yearly) check electrical ground connections.
WHILE EVERY ATTEMPT IS MADE TO EMBODY THE HIGHEST DEGREE OF SAFETY IN ALL CAMPBELL
SCIENTIFIC PRODUCTS, THE CUSTOMER ASSUMES ALL RISK FROM ANY INJURY RESULTING FROM IMPROPER
INSTALLATION, USE, OR MAINTENANCE OF TRIPODS, TOWERS, OR ATTACHMENTS TO TRIPODS AND TOWERS
SUCH AS SENSORS, CROSSARMS, ENCLOSURES, ANTENNAS, ETC.

Part 009528
2G/3G/4G ANTENNA (Wall/Pole Mount) C/W 5M CABLE & SMA CONNECTOR
Part 009960
2G/3G/4G ANTENNA (ENCLOSURE MOUNT) 750-2700 MHz C/W 400 mm CAB (SMA conn)
IMPORTANT INFORMATION FOR USERS OF THE RV50 MODEM PURCHASED IN EUROPE
Modems supplied by Campbell Scientific in Europe will be the international version of the RV50. This
uses the MC7304 radio modules that covers the 3G/4G wavebands more commonly used outside of
North America. The modem also supports the common WCDMA bands and Quad band 2G services.
The modem automatically reconfigures itself for the waveband and services of the local networks
linked to the SIM fitted.
References in this manual to the setup of the modem for the AT&T and Verizon networks should be
used as examples only. Setup for other operators is a similar process using the APN details provider
by them.
Reference is also made in this manual to being able to connect and reconfigure the modem over the
air using the AceManager web interface. Worldwide this feature will only work on some networks and
usually requires the use of a fixed IP service from the airtime provider. For initial setup the
AceManager interface will work with direct Ethernet connections from a pc.
Mounting the RV50
The mounting kit (#32252) shown in this manual is available to special order. The manufacturers DIN
rail mount can also be supplied to special order. The RV50 can also be mounted on any flat surface
providing there is adequate space and suitable matching mounting holes. For fixed installations the
MB3 Mounting bracket (009847) can be used to mount the modem in an enclosure, this uses a Velcro
strap.
Antenna
The antennae described in this manual can be provided to special order, but they are designed for
North American frequencies and will not work effectively on all world frequencies.
In Europe, for use in areas of good reception a single, standard low gain, wideband antenna can be
used; Campbell Scientific offers suitable pole mount or enclosure mount antennae:
Where reception is marginal, higher gain antenna can be used as can an additional diversity
antenna. The antenna would then need to be matched to the waveband used by the preferred cell
phone network. Please contact Campbell Scientific for more information on other antenna options.

Table of contents
1. Introduction 1
2. Precautions 2
3. Initial inspection 3
4. Pre-installation 4
4.1 Establish cellular service 4
4.1.1 Campbell Scientific cellular data service 4
4.1.2 Other service providers 4
4.2 Install the SIM card 5
4.3 Konect PakBus Router setup 6
4.3.1 Get started 6
4.3.2 Set up Konect PakBus Router 7
5. QuickStart 9
5.1 Modules using Konect PakBus Router (private dynamic IP) 11
5.1.1 Configure RV50(X) 11
5.1.2 Enabling PPP mode 14
5.1.3 Set up LoggerNet 16
5.1.4 Test the connection 19
5.2 Modules using a public static IP 19
5.2.1 Configure RV50(X) 19
5.2.2 Additional security (optional but recommended) 22
5.2.3 Enabling PPP mode 23
5.2.4 Set up LoggerNet 24
5.2.5 Test the connection 27
6. Specifications 27
7. Installation 29
7.1 Base station requirements 29
7.2 Data logger site equipment 29
7.2.1 RV50(X) mounting kit 32
7.2.1.1 Mounting the RV50(X) flat on the backplate 32
7.2.1.2 Mounting the RV50(X) on edge to the backplate 32
Table of contents - i

7.3 Wiring and connections 33
7.3.1 Module communications connections 33
7.3.2 Module power connections 34
7.3.3 Antenna connections 35
7.4 Hardware and software setup 36
8. Operation and maintenance 37
8.1 Ports 37
8.2 LED indicator lights 37
8.3 Signal strength and quality 39
8.3.1 Signal strength 40
8.3.2 Signal quality 40
8.4 Rebooting the RV50(X) 41
8.5 Reset the RV50(X) to factory default settings 41
8.6 Recovery mode 41
9. Attributions 42
Appendix A. ACEManager and template files 43
A.1 Additional security (optional but recommended) 46
Appendix B. Controlling power to the RV50(X) 48
Appendix C. Using the RV50(X) Ethernet port 50
Appendix D. Verizon Wireless and AT&T 52
D.1 Verizon Wireless 52
D.2 AT&T 53
Appendix E. Regulatory information 54
E.1 Important information for North American users 54
E.2 RF exposure 54
E.3 EU 55
E.4 Declaration of conformity 55
E.5 RoHS compliance 56
Table of contents - ii

1. Introduction
This manual provides information for interfacing the RV50(X) Sierra Wireless AirLink® 4G LTE
Cellular Modem to Campbell Scientific dataloggers.
The RV50(X) digital cellular modem is manufactured by Sierra Wireless® and supports network
operator switching based on the SIM(s) for use on GSM (Global System for Mobile
Communications) and CDMA (Code Division Multiple Access) networks. The modem is accessed
through the Internet using TCP/IP communications protocol.
Use of the RV50(X) requires a VerizonLTE or AT&T® HSPA+/LTE business account or an
equivalent account from Campbell Scientific or another service provider. For more information,
see Establish cellular service (p. 4)
NOTE:
The RV50 also supports Verizon® CDMA/1xRTT/EVDO and AT&T®HSPA+/LTE accounts.
For additional information on the RV50(X) module, see the Support section of the Sierra Wireless
website.
Before using the RV50(X), please study:
l Safety (p. 59)
l Initial inspection (p. 3)
l Pre-installation (p. 4)
l QuickStart (p. 9)
The RV50(X) module may be configured in one of two ways, depending on the communications
type and needs of the user. ACEmanager, a web based configuration tool is hosted by the RV50
(X). It can be accessed using a web browser over the cellular WAN or locally over Ethernet. A
number of templates will be provided for download to make most configurations very simple
once connected to ACEmanager.
For many applications, the preferred module setup is Point-to-Point Protocol (PPP) mode. In this
mode, the module simply passes IP communications directly to the data logger. This enables
features such as FTP, HTTP, and emailing. QuickStart (p. 9) describes setting up the module for
PPP mode. See the EmailRelay() paper and Blog article with example programs for more
information on emailing.
Alternatively, for applications that just need a connection for data collection and data logger
maintenance or monitoring, setup as a serial server is sufficient. In this mode, the module
RV50(X) Sierra Wireless AirLink® 4G LTE Cellular Modem 1

receives IP communications over the cellular network and converts those to serial (RS-232)
communications to pass on to the data logger. From the data logger perspective, this is no
different than a serial cable connecting it to a computer. For information on configuring the
RV50(X) in serial-server mode, see ACEManager and template files (p. 43)
2. Precautions
READ AND UNDERSTAND the Safety (p. 59) section at the front of this manual.
CAUTION:
This device uses considerably more power than the data logger, see Specifications (p. 27). It
may require a larger power supply, switching power with the data logger, or a combination of
these to ensure the battery is not drained. See Controlling power to the RV50(X) (p. 48) for
program examples of using switched 12V to control power to the RV50(X).
We strongly recommend changing the default RV50(X) ACEmanager password to prevent
unauthorized access and the potential of malware infection. The password can be changed from
the ACEmanager Admin tab.
WARNING:
Failure to set a strong password in the RV50(X) may result in misuse of the modem by
malware or hackers. Significant data overage charges may apply.
To prevent unwanted data usage when using a public static IP, consider doing the following:
l Limit open ports – Limit the number of configured ports that the RV50(X) is listening on.
Open ports increase the chance of unwanted exploitation resulting in higher data usage
and possible equipment misuse.
The ACEManager template provided by Campbell Scientific limits these ports for you. Only
the ports needed for communications with your data logger are opened. It is important to
load the template prior to adding or deleting any additional ports.
l Set Trusted IPs – The RV50(X) Trusted IP list limits devices that the RV50(X) will respond to.
This requires entering the public IP address of each computer that will connect with or
through the RV50(X). Each computer must have an unchanging public IP address set in
ACEManager on the Security tab in the Trusted IPs - Inbound (Friends) field.
RV50(X) Sierra Wireless AirLink® 4G LTE Cellular Modem 2

CAUTION:
Only set a Trusted IP address if you are familiar with the use of IP addresses. Consult
your IT department or Campbell Scientific for assistance.
NOTE:
This setting does not affect outbound connections, only incoming connections.
3. Initial inspection
The RV50(X) ships with the following items:
l (1) grey power cable (from original manufacturer)
l (4) screws and washers (from original manufacturer)
l (1) 2 ft Ethernet cable
l (1) Quick Deploy Guide for private dynamic IP addresses
l (1) Quick Deploy Guide for public static IP addresses
Upon receipt of the RV50(X), inspect the package and contents for damage. File any damage
claims with the shipping company.
Immediately check package contents against the shipping documentation. Contact Campbell
Scientific about any discrepancies.
RV50(X) Sierra Wireless AirLink® 4G LTE Cellular Modem 3

4. Pre-installation
TIP:
Check www.campbellsci.eu to ensure you are using the latest data logger support
software and data logger operating system (OS).
Updating the OS during system setup and testing, or onsite is recommended. Sending an OS
to a remote data logger will interrupt the data logger program. If you have questions, contact
Campbell Scientific for assistance (https://www.campbellsci.eu/support).
4.1 Establish cellular service
For better security, we recommend using Konect PakBus® Router with a private dynamic IP
address. This method allows only incoming PakBus communication. No other incoming
communication is supported. However, all forms of outbound communication from the data
logger are supported, including but not limited to PakBus, email, and FTP.
A public static IP address can also be used. This provides more incoming communication
functionality, but is less secure and more vulnerable to unsolicited traffic.
NOTE:
A public static IP account must be used when the module is set up in serial server mode.
Private dynamic IP accounts do not support the serial server mode.
4.1.1 Campbell Scientific cellular data service
Campbell Scientific can provide subscriptions to cellular service through Verizon, AT&T,
T-Mobile, Vodafone, Telstra, and over 600 other providers worldwide. When this cellular service
is purchased with the module, the module will come pre-provisioned with the required SIM card
and APN. If you have already purchased the RV50(X), call Campbell Scientific to set up service.
4.1.2 Other service providers
While using Campbell Scientific is the simplest way to obtain cellular data service for your
module, you can go directly to a provider. For more information on obtaining service directly
from Verizon and AT&T, see Verizon Wireless and AT&T (p. 52).
RV50(X) Sierra Wireless AirLink® 4G LTE Cellular Modem 4

TIP:
Prepaid cellular data plans may experience service slow downs when data limits are reached.
If file transfer from a cellular-connected data logger works initially, but later has problems,
check for data overage on the cellular plan.
This does not apply to Campbell Scientific cellular data services.
4.2 Install the SIM card
NOTE:
If you purchased cellular service from Campbell Scientific with the module, it will come with
the SIM (Subscriber Identity Module) card already installed. Proceed to Konect PakBus Router
setup (p. 6)
The RV50(X) requires a Mini-SIM (2FF); a smartcard that securely stores the key identifying a
mobile subscriber. You should only need to install the SIM once in the life of the module.
To install the SIM card:
1. Remove the SIM card cover.
2. Note the location of the notched corner for correct alignment. The gold contact points of
the SIM face down when inserting the SIM card as shown in the following figure. Gently
slide the card into the slot until it stops and locks into place. To eject the SIM card, press it
in slightly and release.
3. Replace the SIM card cover.
RV50(X) Sierra Wireless AirLink® 4G LTE Cellular Modem 5
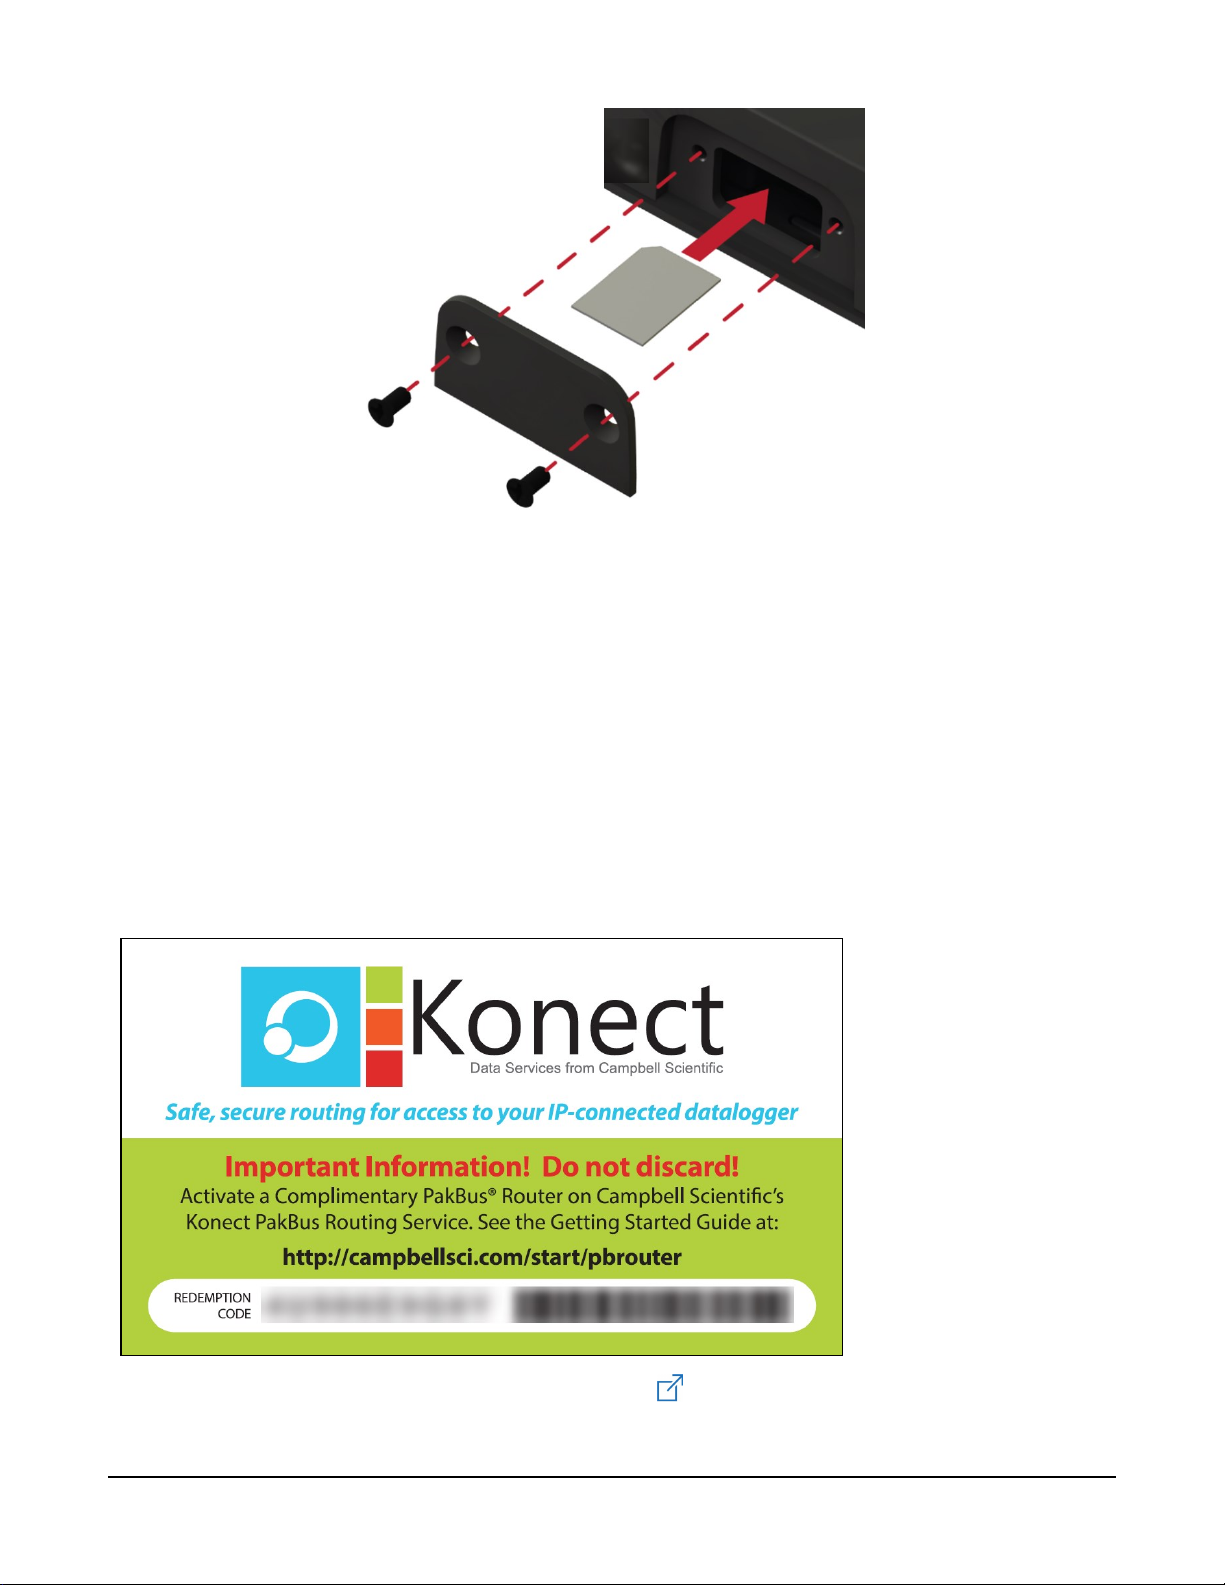
FIGURE 4-1. SIM card installation
4.3 Konect PakBus Router setup
For better security, we recommend using Konect PakBus® Router with a private dynamic IP
address. This method allows only incoming PakBus communication. No other incoming
communication is supported. However, all forms of outbound communication from the data
logger are supported, including but not limited to PakBus, email, and FTP.
4.3.1 Get started
You will need the Konect PakBus Router redemption code that came on a card with the RV50(X).
Open a web browser and go to www.konectgds.eu.
RV50(X) Sierra Wireless AirLink® 4G LTE Cellular Modem 6
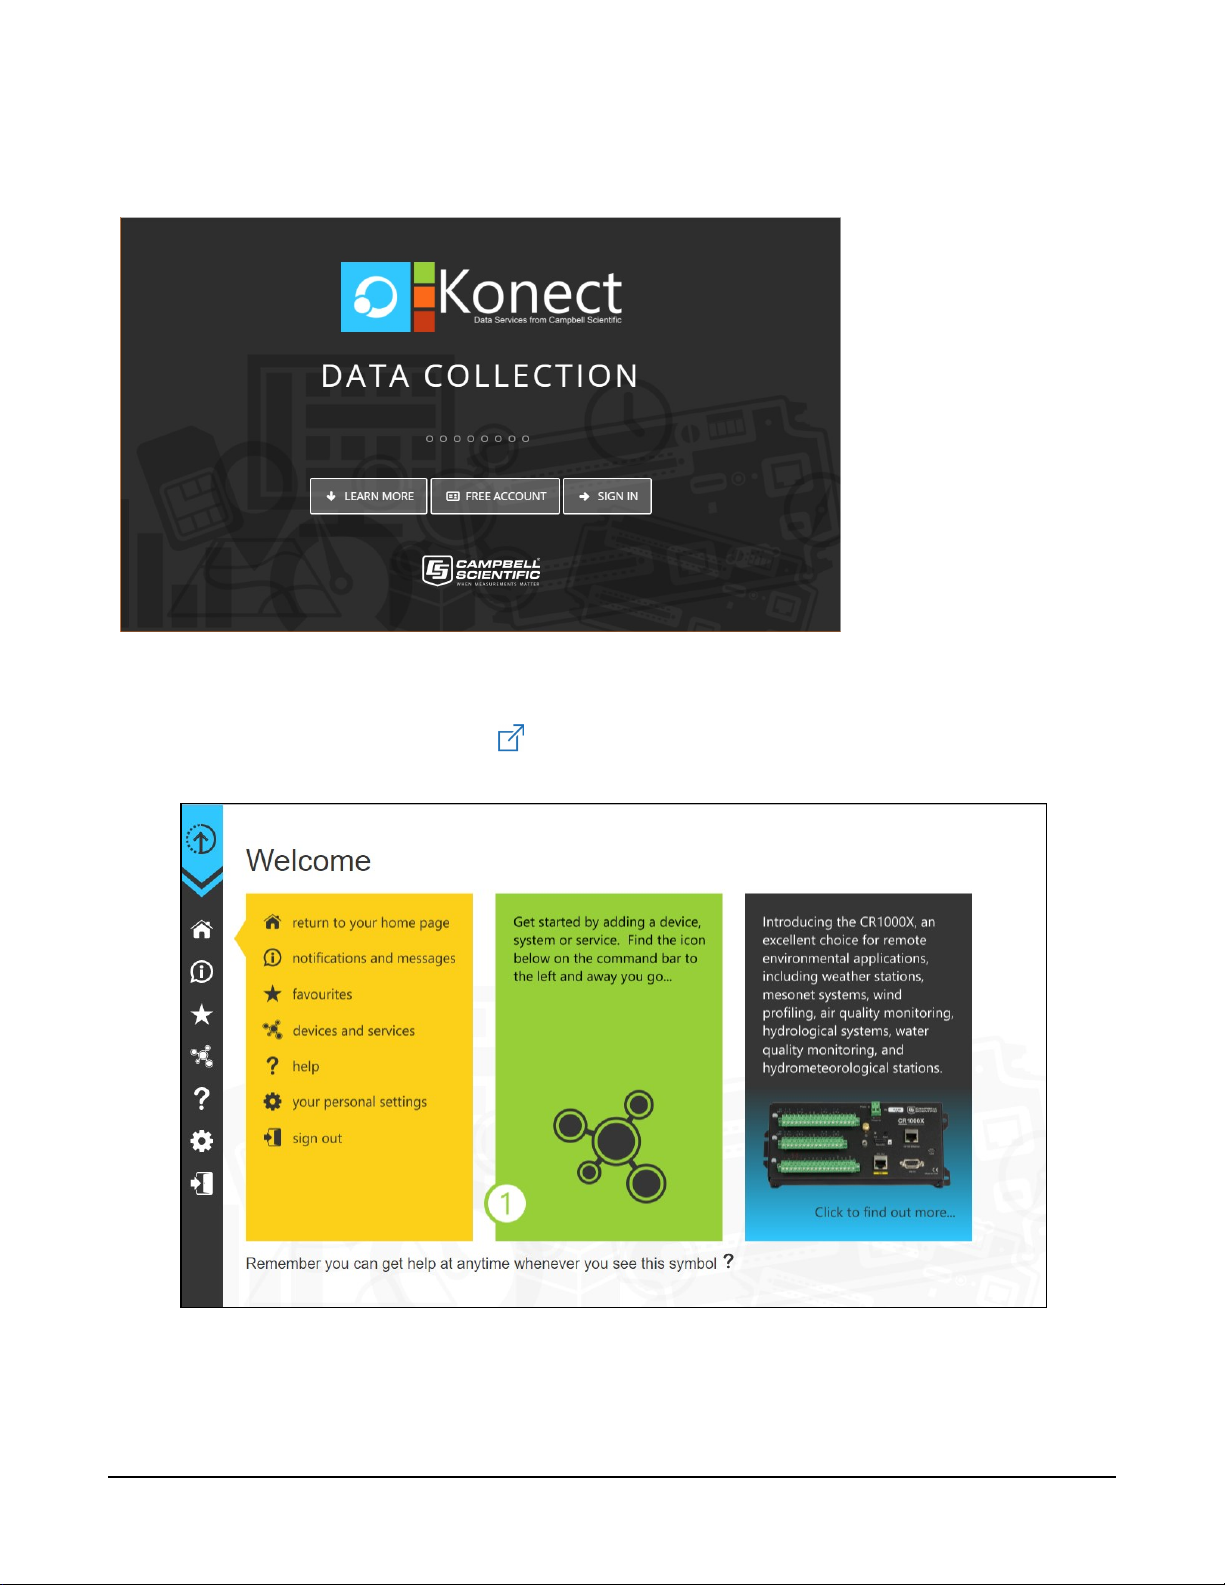
First-time users need to create a free account. After you submit your information, you will receive
two emails up to five minutes apart. One email will contain a Passport ID and the other your
Password. If emails are not received, check your email junk folder.
4.3.2 Set up Konect PakBus Router
1.
Sign in to www.konectgds.eu using your Passport ID and Password found in the two
received emails. Once logged in, you will be at the Welcome page.
RV50(X) Sierra Wireless AirLink® 4G LTE Cellular Modem 7
2.
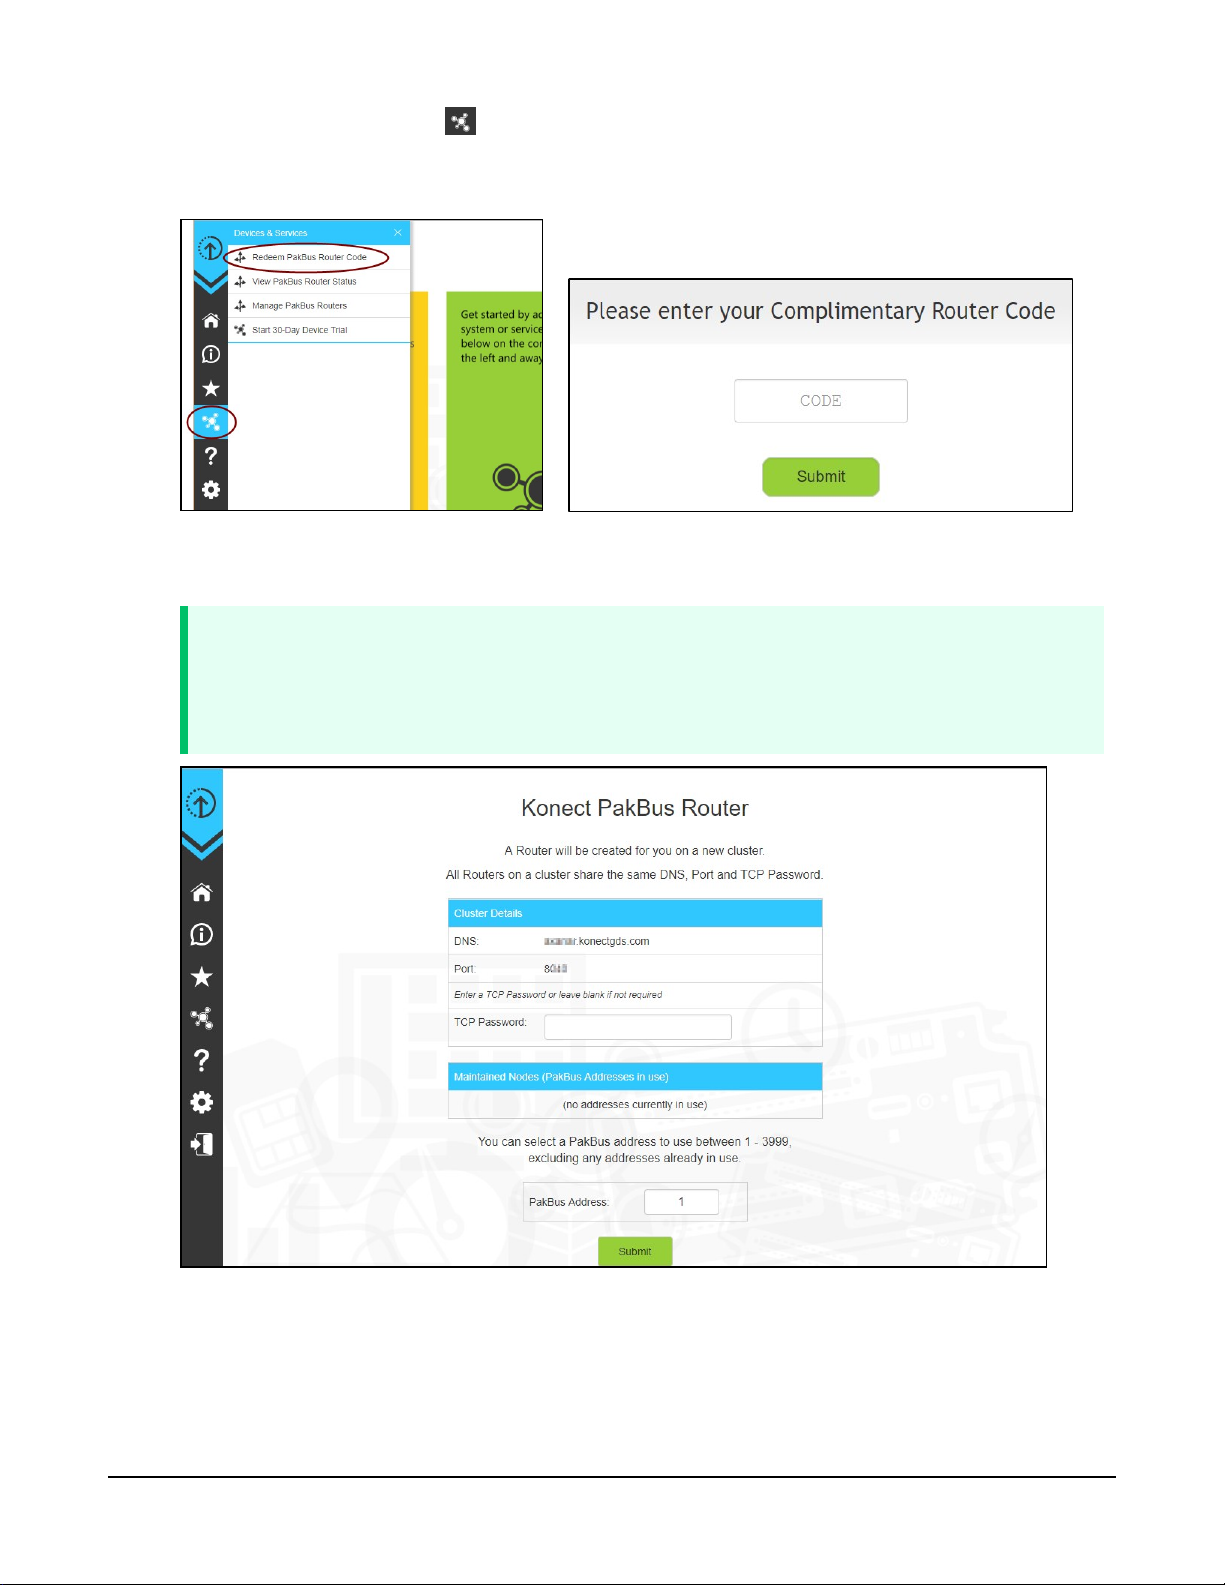
Click Devices and services on the command bar to the left and select Redeem PakBus
Router Code. Enter your complimentary Router Code found on the included card with your
cellular-enabled device and click Submit.
3. The next screen shows the assigned DNS address and Port for the router. Enter a TCP
Password and select a unique PakBus Address for your data logger.
TIP:
Make note of this information; it will be required for data logger configuration as well as
LoggerNet setup. Please note your DNS, Port, TCP Password and PakBus address; you
will need them later.
4. Click Submit.
RV50(X) Sierra Wireless AirLink® 4G LTE Cellular Modem 8

5.
To edit settings at a later date, click devices and services on the command bar and
select Manage PakBus Routers.
NOTE:
The DNS address and Port number, assigned when your account was setup, cannot be
edited.
5. QuickStart
The Provisioning Report received with your Cellular Data Service shows whether the module was
configured with a private dynamic or public static IP address. See the following figures for
examples of Campbell Scientific Provisioning Reports. Other cellular providers should provide
similar information.
RV50(X) Sierra Wireless AirLink® 4G LTE Cellular Modem 9
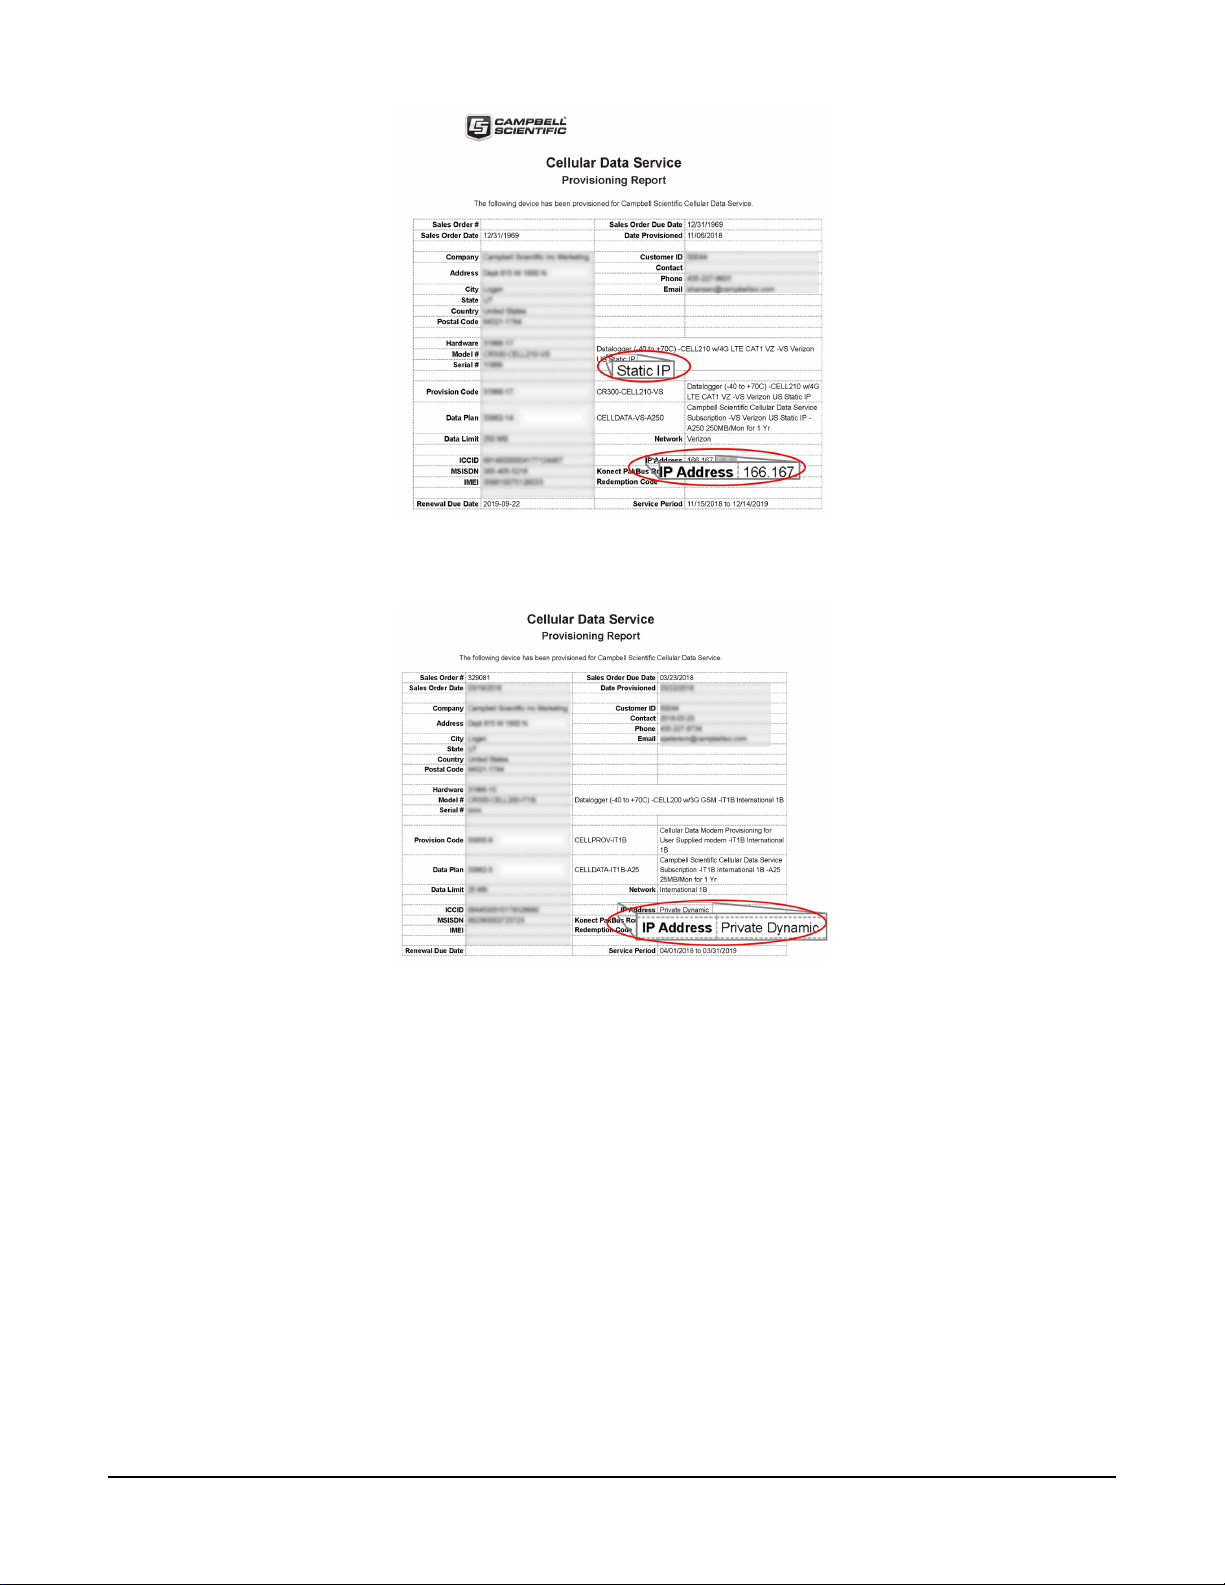
FIGURE 5-1. Static IP provisioning report
FIGURE 5-2. Private dynamic IP provisioning report
Additionally, Campbell Scientific cellular modules configured with a public static IP address will
have two stickers on the module. One sticker will show the module phone number and data plan.
The second sticker will show the static IP address. Campbell Scientific cellular modules configured
with a private dynamic IP address will have one sticker on the module. It will show the module
phone number and data plan.
RV50(X) Sierra Wireless AirLink® 4G LTE Cellular Modem 10
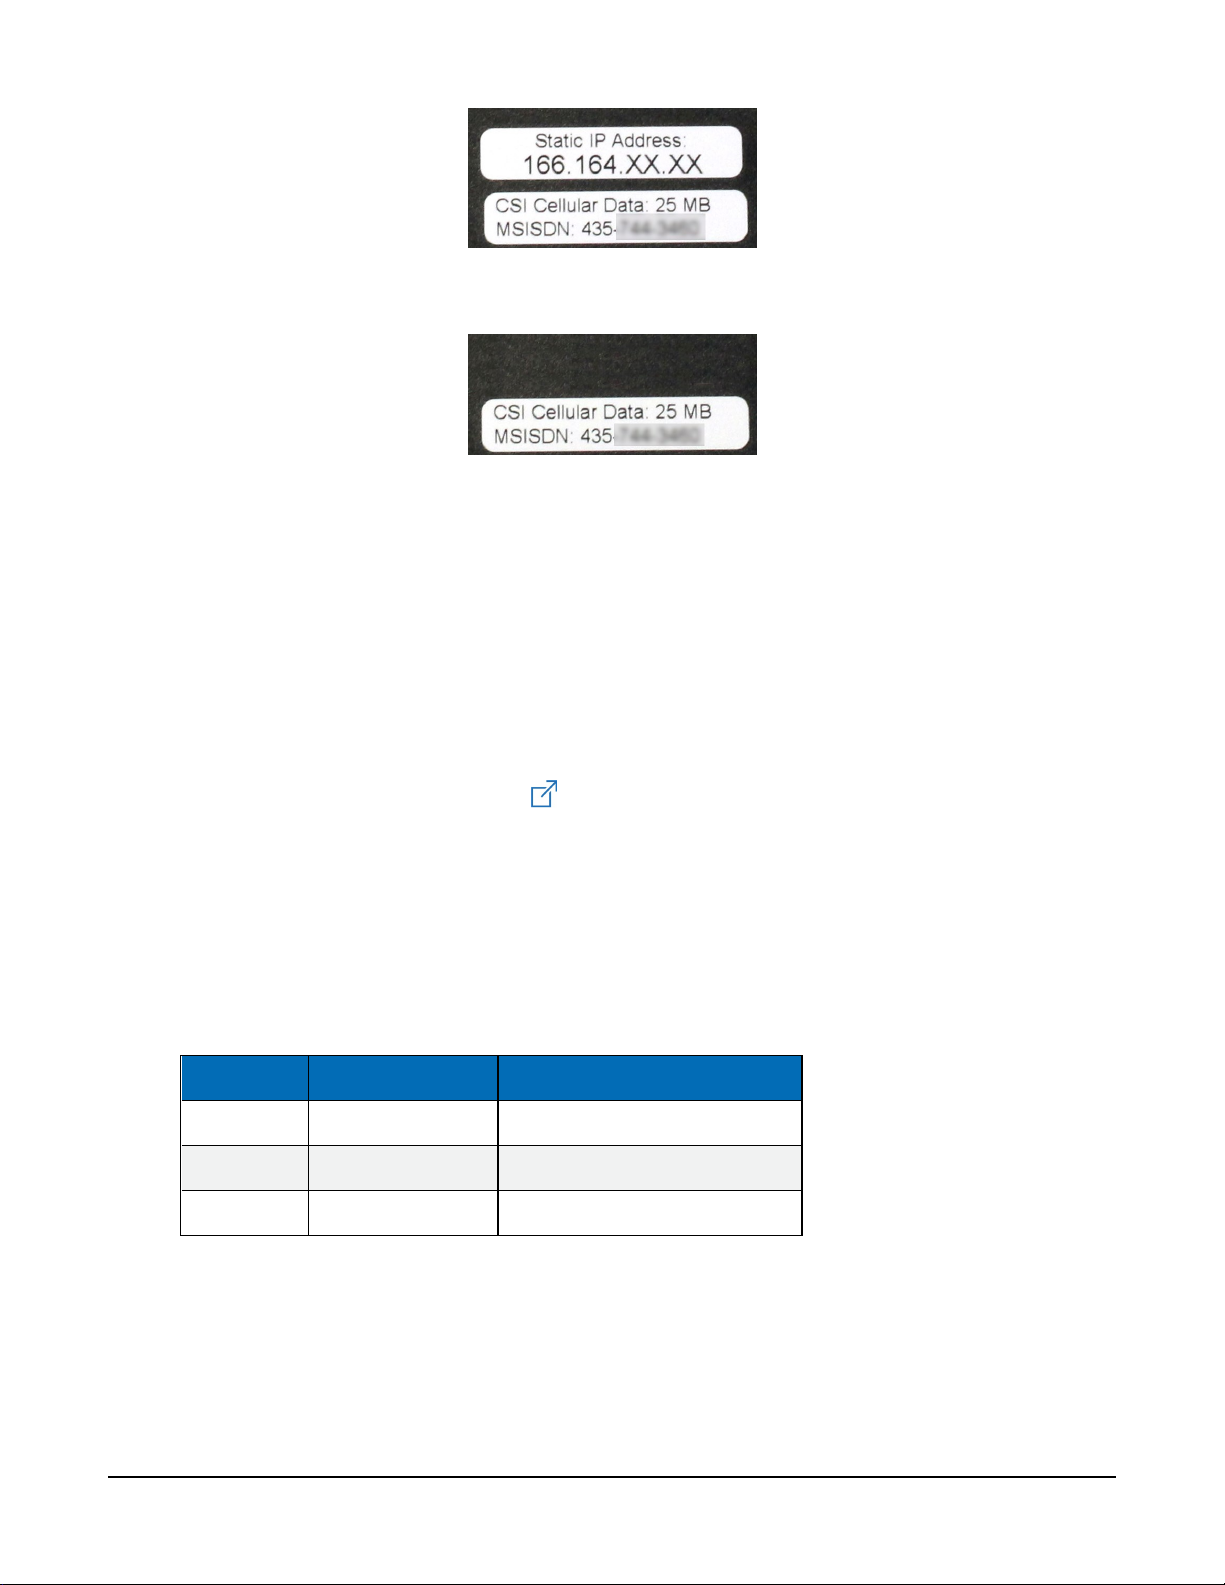
FIGURE 5-3. Module with public static IP address
FIGURE 5-4. Module with private dynamic IP address
5.1 Modules using Konect PakBus Router (private dynamic IP)
5.1.1 Configure RV50(X)
1. Download the collection of RV50(X) configuration templates from
www.campbellsci.eu/downloads and run the executable downloaded.
2. Connect the Cellular antenna.
3. Connect the Diversity antenna, if used. Use of a diversity antenna is recommended, it can
improve system performance. It is required in 4G networks, but not 2G or 3G. Note: If a
Diversity antenna is not used on a 2G or 3G cellular network, use ACEmanager to disable
WAN/Cellular > Network Credentials > RX Diversity.
4. Connect the power cable wires to a power supply.
Wire Colour Function Connect To
Black Ground G
White Enable (On/Off) 12V or SW12V or control port
Red Power (7 to 36 V) 12V
RV50(X) Sierra Wireless AirLink® 4G LTE Cellular Modem 11

5. Connect the power cable to the RV50(X) DC Power input. When the RV50(X) is properly set
up and powered, the status LEDs will turn on. The RV50(X) will begin the
activation/provisioning process and attempt to connect to the mobile network. This
process typically takes 5 to 10 minutes. A successful connection is indicated by a solid green
or solid amber Network LED.
NOTE:
If Campbell Scientific did not provision the RV50(X) or it does not automatically connect
to the network, you may need to to confirm or enter your APN information. Follow
steps 6 through 8 to WAN/Cellular > SIM Slot 1 Configuration > Network Credentials >
User Entered APN.
6. Connect your Windows® computer to the RV50(X) using the supplied Ethernet cable.
CAUTION:
Your computer may use the RV50(X) as a network interface while connected resulting in
cellular data usage. Campbell Scientific recommends disconnecting the computer from
the RV50(X) as soon as configuration is complete.
7. Launch a web browser, and enter https://192.168.13.31:9443 into the address bar. The
ACEmanager login screen should appear in your browser.
NOTE:
RV50(X)s running OS version 4.13 and older had both HTTP port 9191 and HTTPS port
9443 enabled by default. When using HTTP (not HTTPS) with these older OS versions,
enter the IP address using port number 9191, for example, http://192.168.13.31:9191.
8. Look for a sticker on the bottom of your modem with the manufacturer-generated default
password. Log in using User Name = user and that Password. If there is no sticker try 12345
for the password. Make note of the password used so it can be easily referenced when off
site. Remote access to the modem interface will require the password.
TIP:
We strongly recommend changing the default password to prevent unauthorized
access and the potential of malware infection. The password can be changed from the
Admin tab.
WARNING:
Failure to set a strong password in the RV50(X) may result in misuse of the modem by
malware or hackers. Significant data overage charges may apply.
RV50(X) Sierra Wireless AirLink® 4G LTE Cellular Modem 12
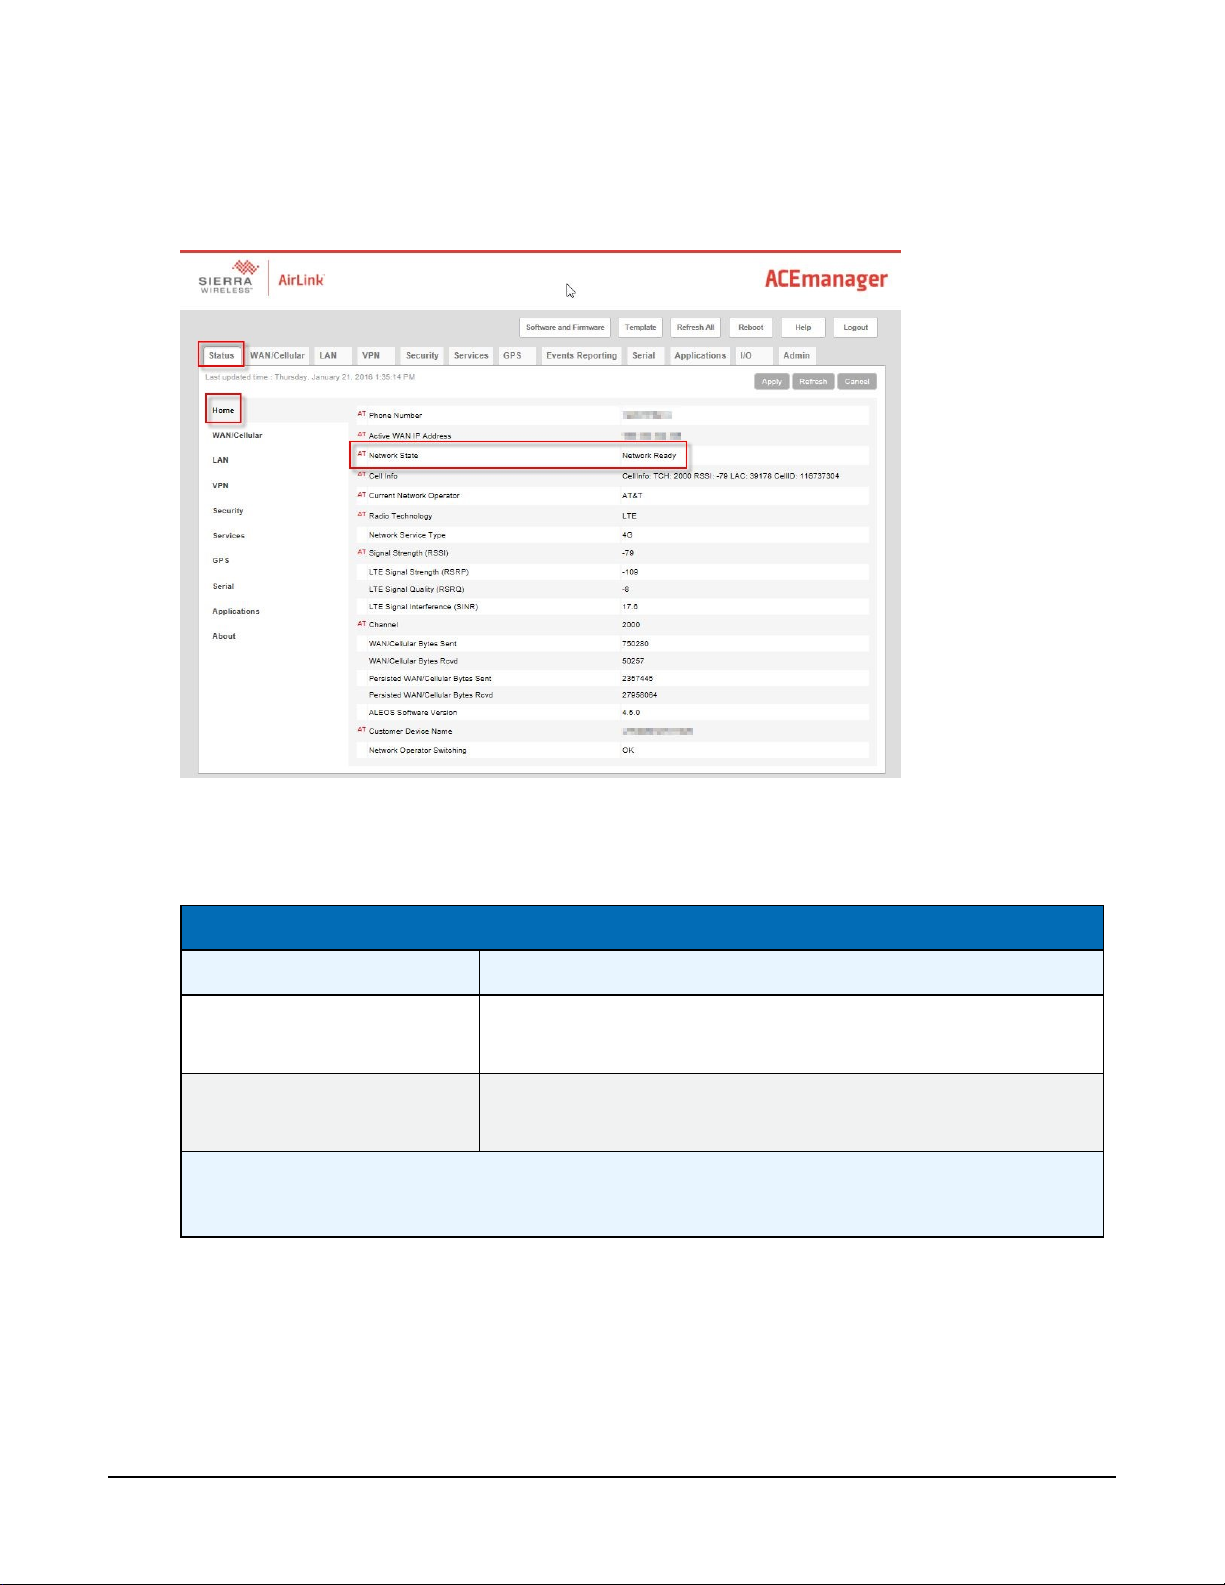
9. Once logged in, check the Status > Home > Network State field. It should read Network
Ready, indicating the RV50(X) is connected to the cellular network. You can easily test the
RV50(X) connection to the Internet by selecting the Admin > Advanced tab and using the
PING tool to ping an Internet server, such as www.campbellsci.eu.
10. Click the Template button in the ACEmanager toolbar. A template application window will
appear. Browse to and upload one of the configuration templates downloaded from
Campbell Scientific.
Template Files
Template File Name Description
Default configuration with RS-232 at 115200 baud and
RV50_115200.xml
Ethernet communication enabled.
1
Default configuration with RS-232 at 9600 baud and
RV50_9600.xml
Ethernet communication enabled.
1
CR1000X series, CR300 series, CR6 series, CR1000, CR3000, CR800 series, CR5000, and GRANITE 6/9/10
2
CR10X, CR10X-PB, CR510, CR510-PB, CR23X, CR23X-PB, and CR200(X) series data loggers
2
11. Reboot the RV50(X) after successfully applying the configuration template. You can do this
by clicking the Reboot button on the ACEmanager toolbar, by momentarily pressing the
Reset button (2 sec), or by temporarily removing power from the RV50(X).
RV50(X) Sierra Wireless AirLink® 4G LTE Cellular Modem 13
 Loading...