

Page 1

NW8002 WEATHER STATION INSTALLATION
INSTRUCTION MANUAL
REVISION: 3/97
COPYRIGHT (c) 1991-1997 CAMPBELL SCIENTIFIC, INC.
Page 2

WARRANTY AND ASSISTANCE
The
NW8002 WEATHER STATION
is warranted by CAMPBELL SCIENTIFIC, INC. to be free from
defects in materials and workmanship under normal use and service for twelve (12) months from date of
shipment unless specified otherwise. Batteries have no warranty. CAMPBELL SCIENTIFIC, INC.'s
obligation under this warranty is limited to repairing or replacing (at CAMPBELL SCIENTIFIC, INC.'s
option) defective products. The customer shall assume all costs of removing, reinstalling, and shipping
defective products to CAMPBELL SCIENTIFIC, INC. CAMPBELL SCIENTIFIC, INC. will return such
products by surface carrier prepaid. This warranty shall not apply to any CAMPBELL SCIENTIFIC, INC.
products which have been subjected to modification, misuse, neglect, accidents of nature, or shipping
damage. This warranty is in lieu of all other warranties, expressed or implied, including warranties of
merchantability or fitness for a particular purpose. CAMPBELL SCIENTIFIC, INC. is not liable for special,
indirect, incidental, or consequential damages.
Products may not be returned without prior authorization. To obtain a Returned Materials Authorization
(RMA), contact CAMPBELL SCIENTIFIC, INC., phone (435) 753-2342. After an applications engineer
determines the nature of the problem, an RMA number will be issued. Please write this number clearly on
the outside of the shipping container. CAMPBELL SCIENTIFIC's shipping address is:
CAMPBELL SCIENTIFIC, INC.
RMA#_____
815 West 1800 North
Logan, Utah 84321-1784
CAMPBELL SCIENTIFIC, INC. does not accept collect calls.
Non-warranty products returned for repair should be accompanied by a purchase order to cover the repair.
815 W. 1800 N.
Logan, UT 84321-1784
USA
Phone (435) 753-2342
FAX (435) 750-9540
www.campbellsci.com
Campbell Scientific Canada Corp.
11564 -149th Street
Edmonton, Alberta T5M 1W7
CANADA
Phone (403) 454-2505
FAX (403) 454-2655
Campbell Scientific Ltd.
Campbell Park
80 Hathern Road
Shepshed, Leics. LE12 9RP
ENGLAND
Phone (44)-50960-1141
FAX (44)-50960-1091
Page 3

NW8002 WEATHER STATION INSTALLATION
INSTRUCTION MANUAL
TABLE OF CONTENTS
PAGE
Warranty ..................................................................................................................................................... i
Introduction..............................................................................................................................................I-1
1. WEATHER STATION DESCRIPTION AND INSTALLATION
1.1 Standard Sensors...................................................................................................................1-1
1.2 Weather Station Site Selection...............................................................................................1-1
1.3 Equipment ..............................................................................................................................1-2
1.4 Mast Installation Instructions.................................................................................................. 1-6
1.5 Power Supply Options............................................................................................................1-9
1.6 Sensor Wiring.......................................................................................................................1-10
1.7 Station Grounding................................................................................................................. 1-10
1.8 SRM-6A Rad Modem ........................................................................................................... 1-13
1.9 Phone Modem Communication............................................................................................ 1-15
1.10 System Check-Out ...............................................................................................................1-15
2. MAINTENANCE
2.1 Weekly....................................................................................................................................2-1
2.2 Monthly...................................................................................................................................2-1
2.3 Moisture..................................................................................................................................2-2
2.4 Maintenance Log Book...........................................................................................................2-3
3. TROUBLE SHOOTING
3.1 Communication Testing..........................................................................................................3-1
3.2 Sensors ..................................................................................................................................3-3
3.3 Datalogger..............................................................................................................................3-5
......................................................................................................................2-1
.........................................................................................................3-1
..................................1-1
FIGURES
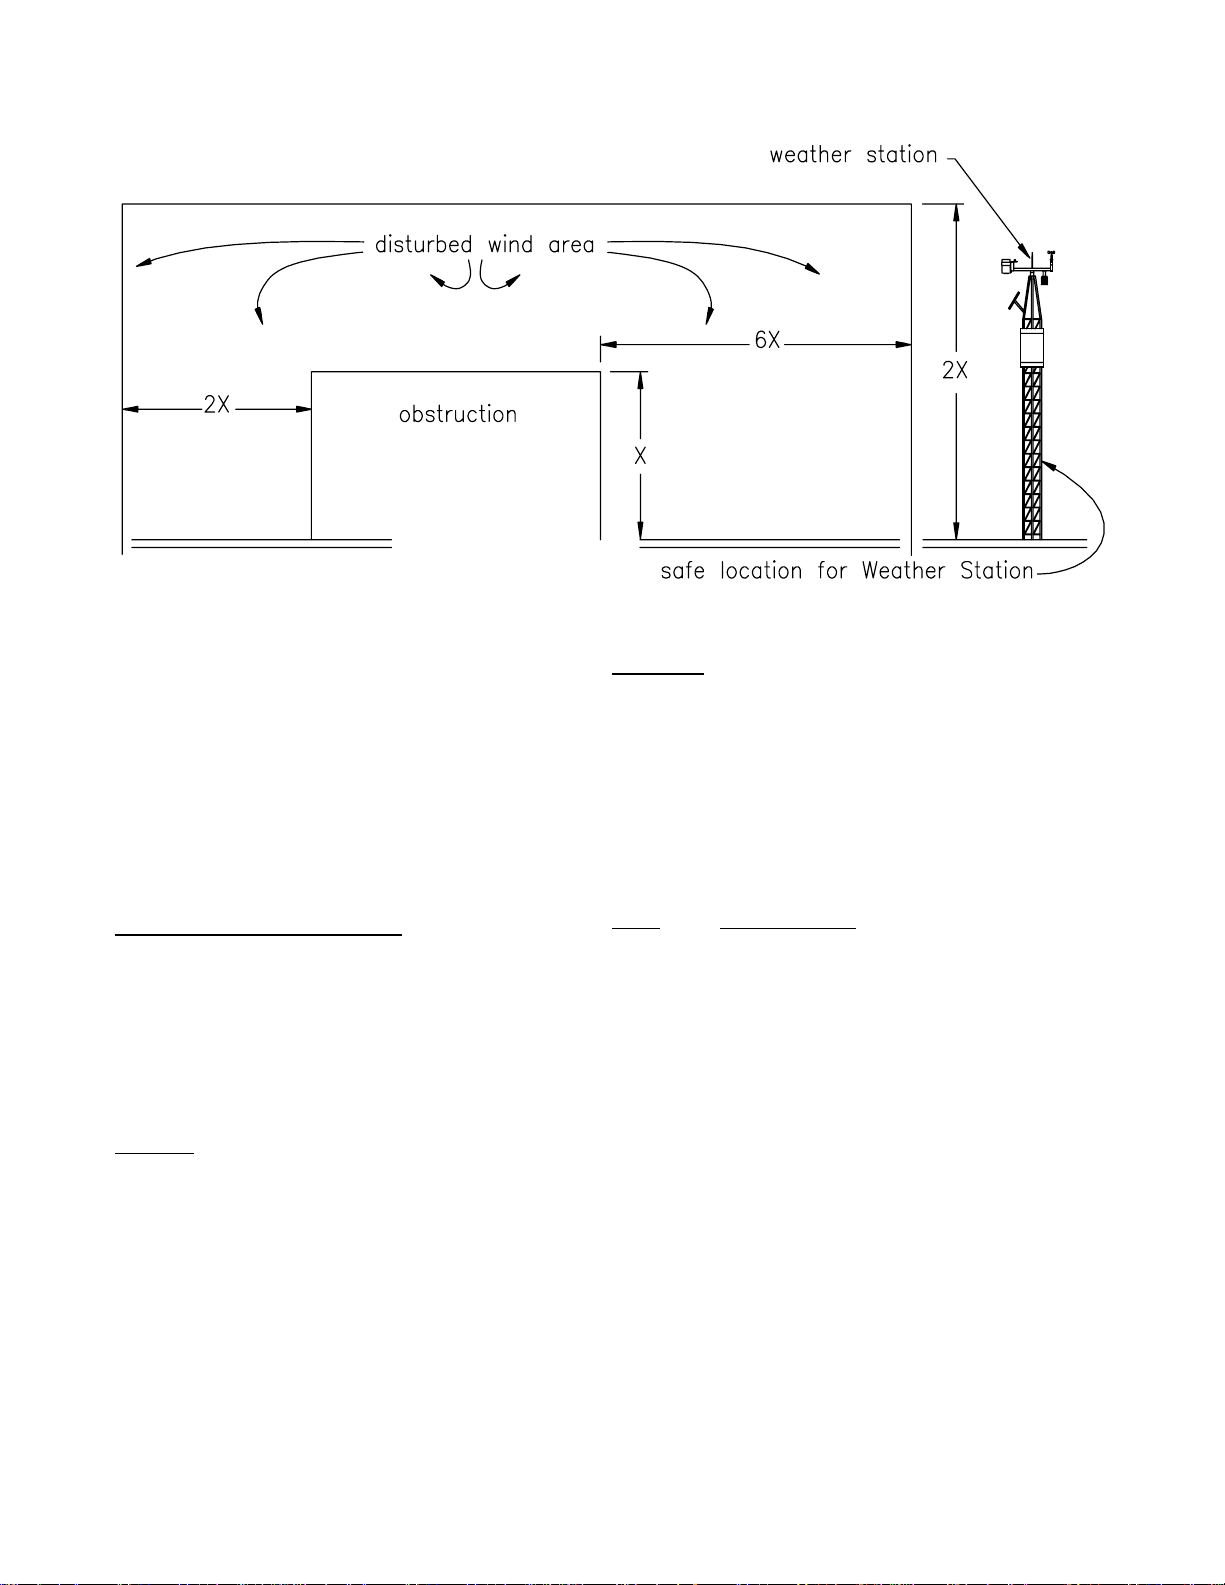
1.2-1 Effect of Structure on Wind Flow............................................................................................1-2
1.3-1 NW8002 Enclosure with RAD Connection.............................................................................1-3
1.3-2 NW8002AC/SP Weather Station Cross Arm Connection...................................................... 1-4
1.3-3 NW8002AC Weather Station .................................................................................................1-5
1.4-1 MW8002 Cement Base..........................................................................................................1-7
1.4-2 NW8002 Tower with Tilt Base................................................................................................ 1-7
1.4-3 NW8002AC/SP Weather Station (Top View).........................................................................1-8
1.4-4 Plumbing NW8002 Tower ......................................................................................................1-8
1.5-1 PS12 Volt Power Supply and Charging Regulator .................................................................1-9
1.6-1 NW8002SP Weather Station................................................................................................ 1-11
1.6-2 NW8002 Weather Station Sensor Connection.....................................................................1-12
1.7-1 NW8002 Station Grounding .................................................................................................1-13
1.8-1 RAD Modem Connection and Grounding............................................................................. 1-14
1.8-2 NW8002 Master Station.......................................................................................................1-15
1.9.1 NE8002 Enclosure with DC112 Phone Modem Option........................................................1-16
2.1-1 Rain Gage ..............................................................................................................................2-1
Page 4

2.3-1 Solar Sensor...........................................................................................................................2-2
2.3-2 6575 Temperature/Relative Humidity Probe ..........................................................................2-2
2.3-3 4831 Temperature/Relative Humidity Probe Assembly..........................................................2-3
3.1-1 RAD Testing Computer End...................................................................................................3-1
3.1-2 RAD Testing Datalogger End................................................................................................. 3-2
3.2-1 4831 Temperature/Relative Humidity Probe Assembly..........................................................3-5
TABLES
1.2-1 Approximate Range, Miles .....................................................................................................1-1
1.5-1 PS12-LA Battery and AC Transformer Specifications..........................................................1-10
3.3-1 Sensor Verification; Accessing CR10 Input Locations ........................................................... 3-6
Page 5
INTRODUCTION
This manual covers both the NW8002AC (115 VAC power only) and the NW8002SP (solar panel)
weather stations. These weather stations are setup to communicate with the NW8000 central computer
over a short haul modem link. The heart of the weather station is the Campbell Scientific, Inc. CR10
Measurement and Control Module. A 2.5 amp hour 12 VDC sealed lead acid battery pack powers the
CR10. A solar panel or 115 VAC power is used to trickle charge the batteries.
SPECIFICATIONS
Power 12 VDC/115 VAC, 60 Hz
Avg. current drain .16 A (115 VAC)
6 mA (solar panel)
Operating
temperature range -25°C to +50°C
Operating relative
humidity range 0 to 100% non-condensing
SENSOR SPECIFICATIONS
Temperature
Range -35°C to +48°C
Accuracy ±4°C, typically better than ±2°C
Relative Humidity
Range 12 - 97% RH
Accuracy ±5%
Wind Speed
Range 0 - 112 mph
Threshold 1.1 mph
Wind Direction
Range 0 - 112 mph
Threshold 1.8 mph
Accuracy +5°
Rain
Orifice 6"
Accuracy 1% at 2"/hr or less
Resolution 0.01 inches
Global Radiation
Linearity 1% up to 3000 Wm
Accuracy ±5% maximum, typically ±3%
NOTE: The black outer jacket of the cables
is Santoprene® rubber. This compound was
chosen for its resistance to temperature
extremes, moisture, and UV degradation.
However, this jacket will support
combustion in air. It is rated as slow
burning when tested according to U.L. 94
H.B. and will pass FMVSS302. Local fire
codes may preclude its use inside buildings.
-2
I-1
Page 6
SECTION 1. WEATHER STATION DESCRIPTION AND INSTALLATION
The weather station is designed to collect weather data for calculation of evapotranspiration of the
surrounding area where it is located. The selection of the weather station site is important; a poor site
will give non representative measurements which result in inacurate ET values.
1.1 STANDARD SENSORS
Sensors with preassigned channels include:
• Wind speed
• Wind direction
• Temperature
• Solar radiation
• Rainfall
• Relative humidity
1.2 WEATHER STATION SITE SELECTION
1. Trees, buildings, or other structures can
greatly influence wind speed and direction
observations. As a rule of thumb, a
structure will disturb the air flow an upwind
distance of about twice the height of the
structure, a downwind distance of about six
times the height of the structure, and a
vertical distance of up to twice the height of
the structure (Figure 1.2-1).
2. The station should be located over the most
typical type of turf used on the course. It
must not be placed over a concrete slab,
parking lot, or unplanted earth. This allows
the temperature and humidity readings to
closely correspond with that of the turf the
ET value is to represent.
3. The radiation shield that covers the probe
provides protection from direct sunlight and
rain. The shield does not protect against
irrigation water should any be sprayed up
into the plates.
NOTE: The weather station should not be
located where sprinklers spray water into
the rain bucket or onto the radiation shield.
4. The Solar Radiation Sensor should be
located so it is not shadowed by
surrounding objects.
5. The weather station should not be placed at
the top of a knoll or mound, but in an area
lower than the surrounding hills if possible.
This lowers the probability of it being struck
by lightning.
6. During installation, extreme care should be
taken to avoid touching or coming near
power lines. Contact could be fatal. Do not
locate the station in the vicinity of overhead
power lines.
7. The distance from the weather station to the
central computer determines the gage of
the wire and the baud rate used. In Table
1.2-1, wire gage, distance, and baud rate
can be determined.
TABLE 1.2-1 Approximate Range, Miles
Data Rate 19 Gage 24 Gage 26 Gage
bps Miles
9,600 5.0 4.0 2.5
1,200 6.5 5.0 3.5
Miles Miles
1-1
Page 7
SECTION 1. WEATHER STATION DESCRIPTION AND INSTALLATION
FIGURE 1.2-1 Effect of Structure on Wind Flow
1.3 EQUIPMENT
The following lists describe the equipment
provided by Campbell Scientific, Inc. and those
materials provided by the user.
1.3.1 MATERIALS PROVIDED BY CSI
SRM-6A RAD Modem
ENC 12/14 Nema 4X Enclosure
101-T Nutone 16V 10 VA Transformer
Packaged Inside The Enclosure: (Figure 1.3-1)
CR10 Measurement and Control Module
SRM-6A RAD Modem
SC932 9 Pin to RS232-DCE Interface
DC112 Optional phone modem (for use
with Mir 5000 systems only,
Figure 1.9-1).
PS12-LA 12 V Rechargeable Battery
Sensors: (Figure 1.3-2)
4776 Li-Cor Solar Radiation Sensor
6575 HMP35C Temperature and
RH Probe
4830 Texas Electronics Rain Gage
5537 R.M. Young Wind Speed
5538 R.M. Young Wind Direction
Hardware:
6885 10' Tower
Crossarm & sensor mounts
Tilt base & anchor bolts
Gill radiation shield
Allen wrench
Electrician putty
Desiccant
1.3.2 MATERIALS SUPPLIED BY USER
ITEM DESCRIPTION
1 Cement
2 All conduit for 16 VAC AC power
3 AC power installation and cable
4 All communication wire from computer
to weather station, see Section 1.8 for
recommended cables
5 6 ft. copper ground rod
6 RS232 Serial Port Card for central
computer
1-2
Page 8
SECTION 1. WEATHER STATION DESCRIPTION AND INSTALLATION
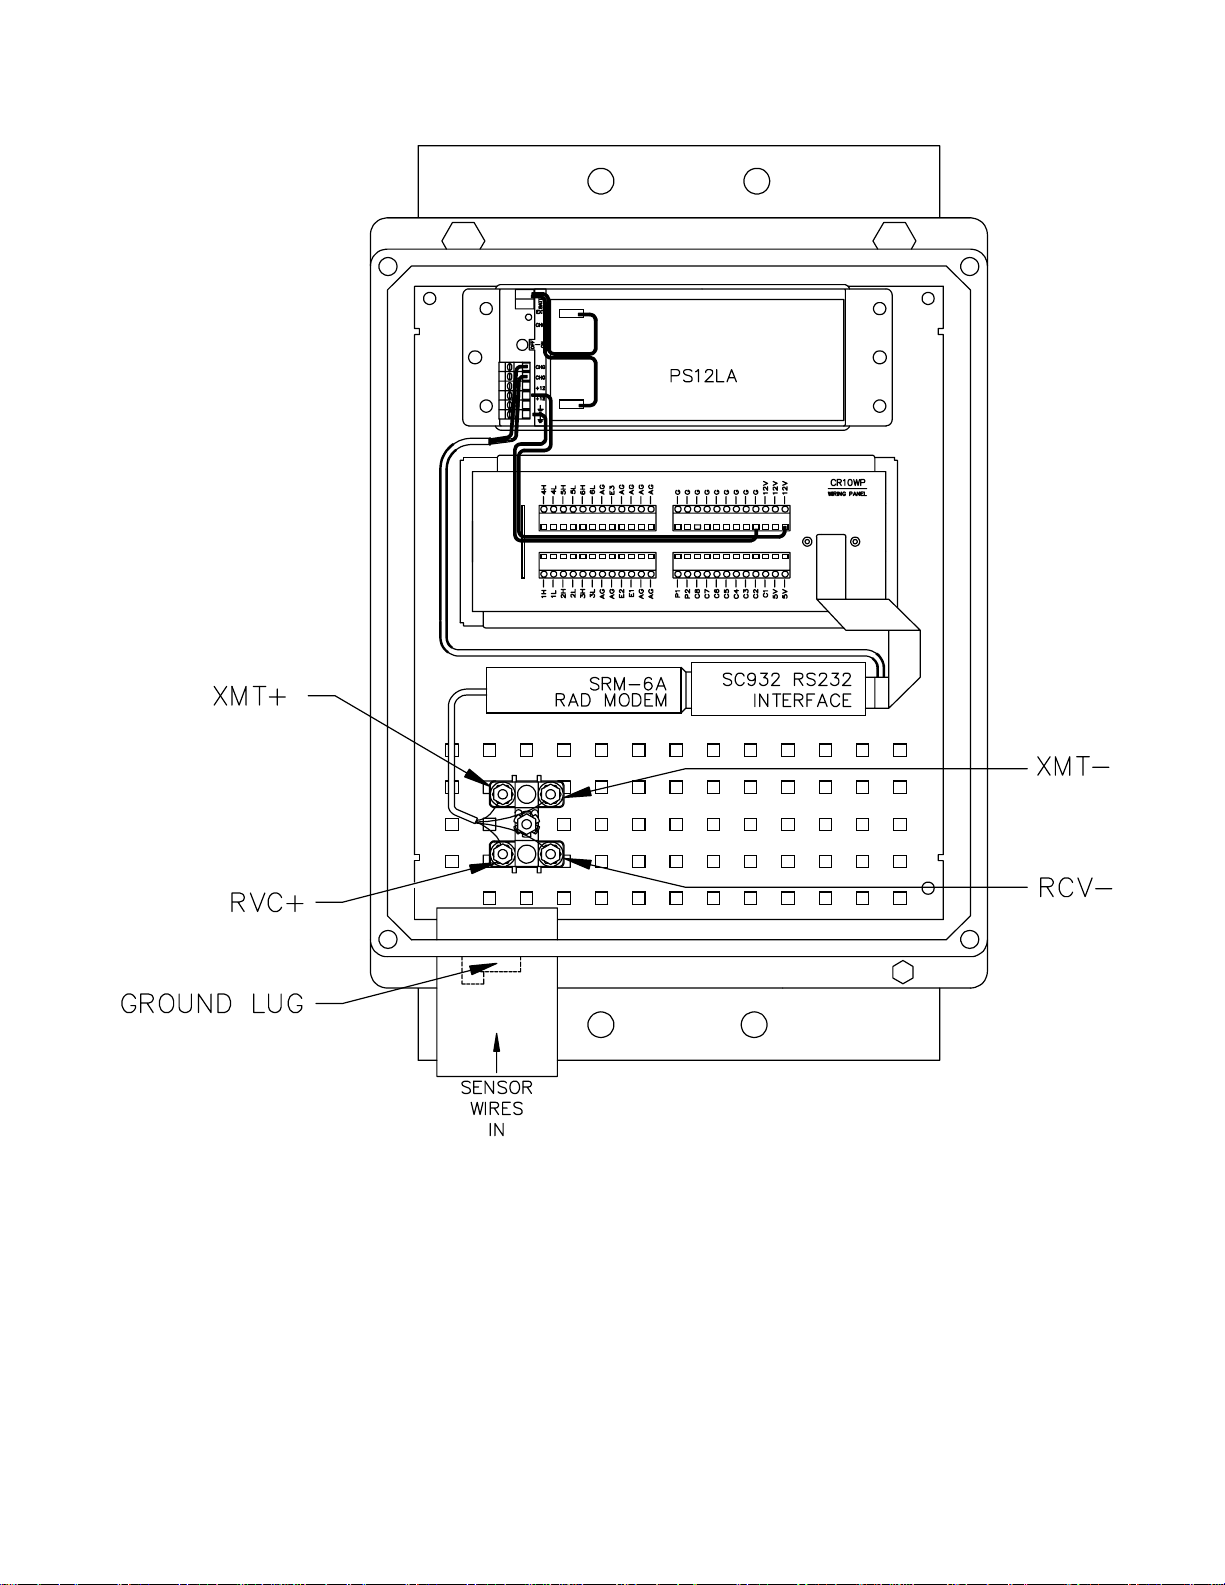
FIGURE 1.3-1. NW8002 Enclosure with RAD Connection
1-3
Page 9
SECTION 1. WEATHER STATION DESCRIPTION AND INSTALLATION
1-4
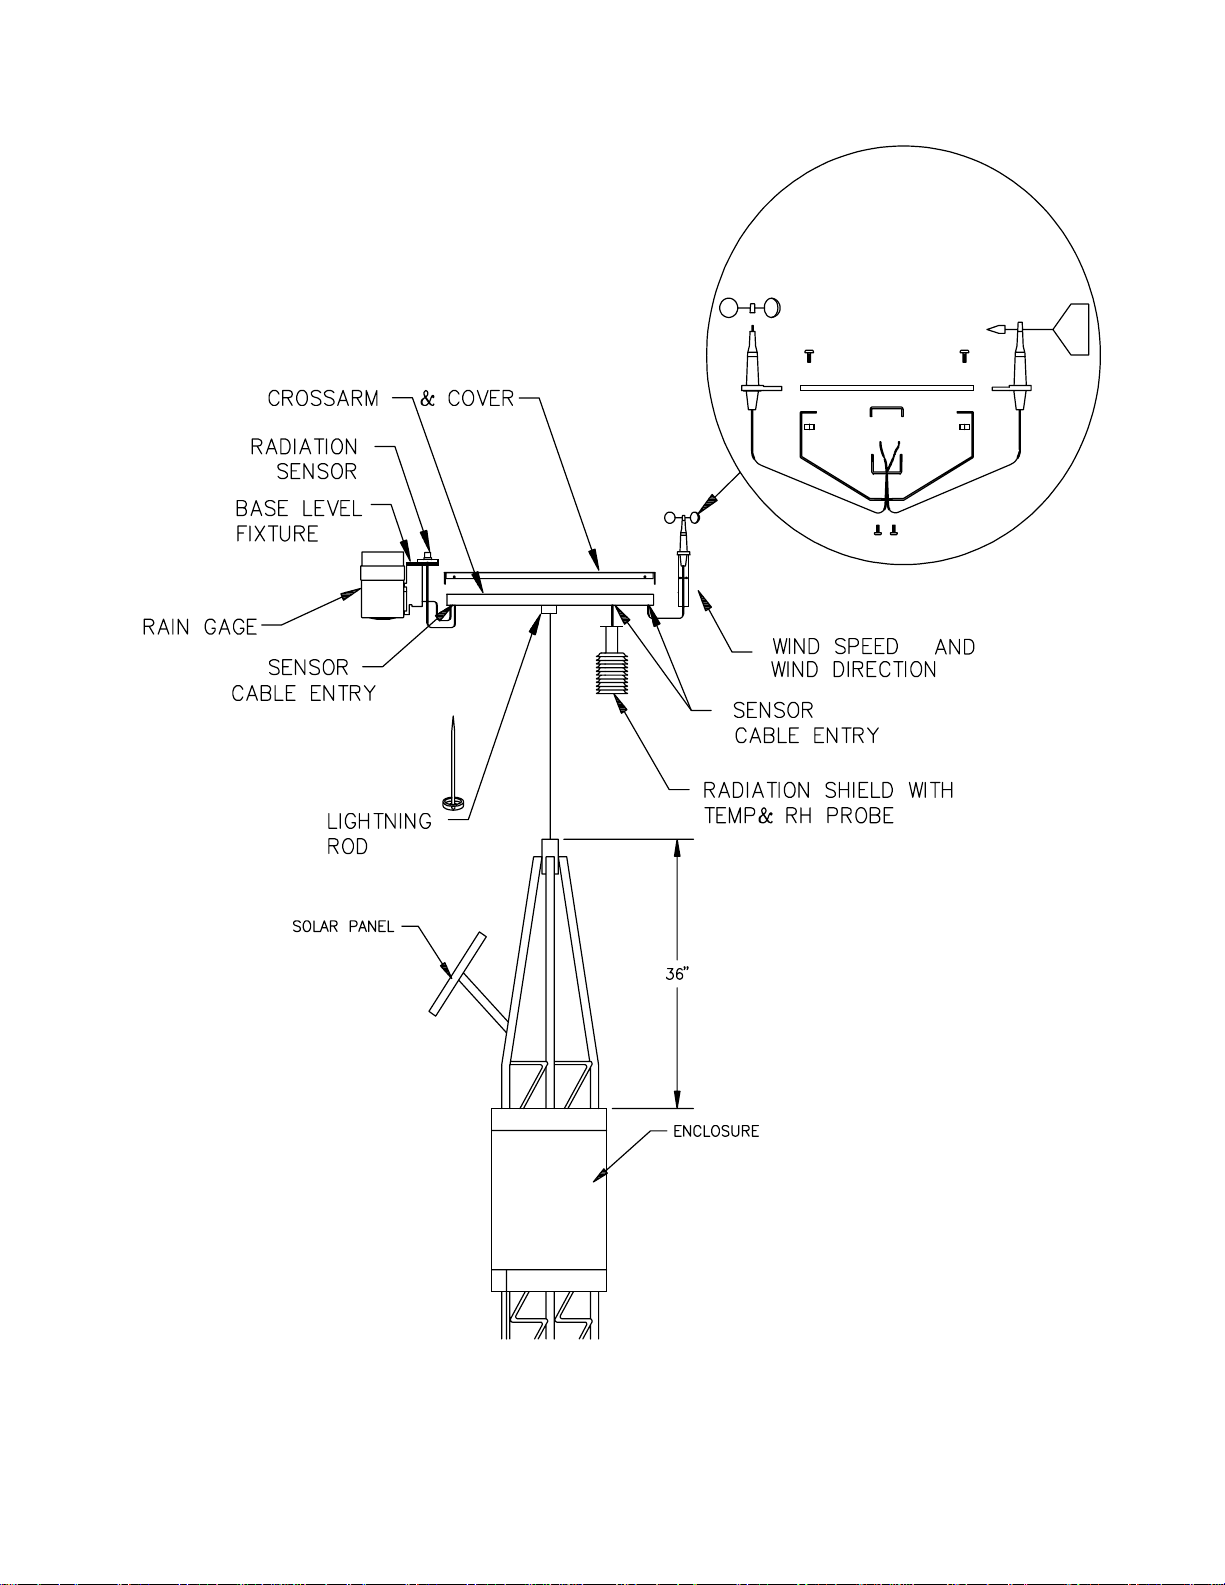
FIGURE 1.3-2. NW8002AC/SP Weather Station Cross Arm Detail
Page 10
SECTION 1. WEATHER STATION DESCRIPTION AND INSTALLATION
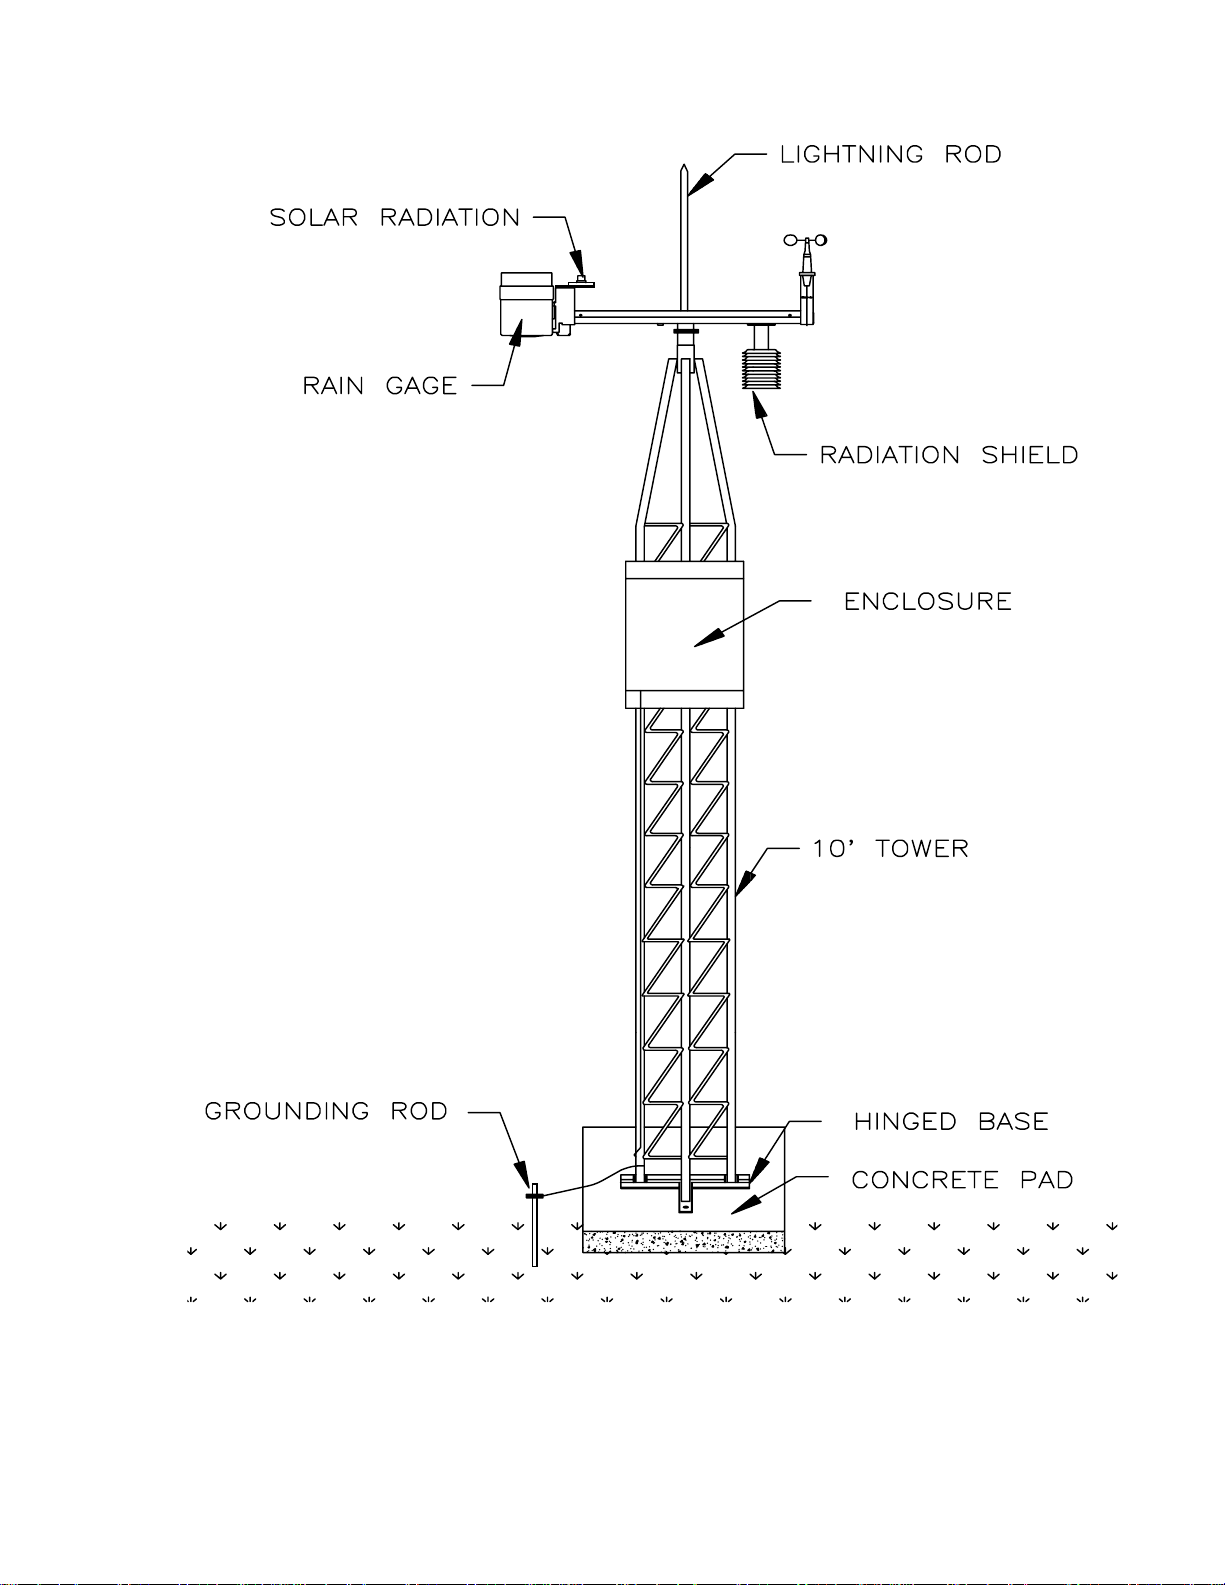
FIGURE 1.3-3. NW8002AC Weather Station
1-5
Page 11

SECTION 1. WEATHER STATION DESCRIPTION AND INSTALLATION
1.4. MAST INSTALLATION
INSTRUCTIONS
The tower mounts on a cement foundation as
shown in figure 1.4-1. Provided with the tower is
a tilt base (figure 1.4-2), anchor bolts, and nuts.
The tilt base will also be used as a template.
Step 1 Dig a 24" square hole that is 24"
deep. These estimates are for heavy soils only;
light, shifting, or sandy soils require a deeper
base (and more cement).
Step 2 Approximately 0.3 cubic yards of
cement is required to fill the hole. While the
cement is setting, assemble the template (tilt
base) and anchor bolts (figure 1.4-1). Set the
anchor bolts in the cement leaving the threaded
end of the bolts a minimum of 2" above the
cement (Figure 1.4-1). This will allow the tower
base to rest on the double nuts about 1 1/4"
above the cement surface. Be sure to level the
base! Allow time for the cement to setup
before mounting the tower.
NOTE: For light, sandy, or shifting soils, the
size of the concrete block should be
increased.
1.4.1 WEATHER STATION ASSEMBLY
To complete the installation of the weather
station, the following tools will be needed.
• screw drivers (regular and Phillips)
• open end wrenches (7/16, 1/2, 9/16)
• level
• pipe wrench
• tape measure
• step ladder (the crossarm is over 10 feet
high requiring a ladder to level sensors)
• compass (recommended for orienting wind
direction sensor)
Step 4 Mount the solar radiation and rain
gage sensors on the opposite side of the
crossarm. Note: Insert the sensor cables
through the grommet slots to the center of the
crossarm and out the 1 1/2" center hole before
mounting the sensors.
Step 5 Mount the radiation shield into the 1
5/8" diameter hole on the underside of the
crossarm. Insert the temperature and Relative
Humidity (RH) sensor into the radiation shield.
Make sure that the temperature and RH sensor
is properly seated into the radiation shield.
Step 6 Apply Teflon pipe dope to the 54" X 1
1/2" mast pipe. Thread the sensor cable
through the mast. Screw the pipe onto the
crossarm and allow pipe to rotate around
sensor cables.
Step 7 Place mast into the tower and secure
the mast with the set screw. Replace the
crossarm cover using the six screws.
Step 8 After the cement has setup, mount
the tower onto the base.
NOTE: align the crossarm on the ground
east-west. The radiation shield and the
wind set should be mounted on the west
side. The wind direction sensor mounts on
the north side and the wind speed on the
south (figures 1.3-2 and 1.4-3). Use a
compass for accurate alignment.
Step 9 Vertical plumb the mast using the
adjustment nuts on the tilt base and the level.
Getting the bottom tower section plumb is very
important. As concrete is poured into the hole,
periodically check the tower for plumb using a
carpenters level and make adjustments as
necessary (Figure 1.4-4).
Step 1 Remove the crossarm cover and
assemble the sensors on the ends of the
crossarm (Figure 1.3-2). Note: For proper
crossarm orientation refer to (Figure 1.4-3).
Step 2 Place the crossarm in front of you
with the 1 5/8" hole on the left (Channel up).
Step 3 Mount the wind set on the left side.
Mount the wind set so that the wind speed is on
the side closest to you.
1-6
Step 10 Level the solar radiation and rain
gage sensors. Attach the lightning rod to the 1
1/2" pipe just below the crossarm.
Step 11 Mount the enclosure on the tower
approximately 36 inches below the crossarm
(Figure 1.3-2).
Page 12
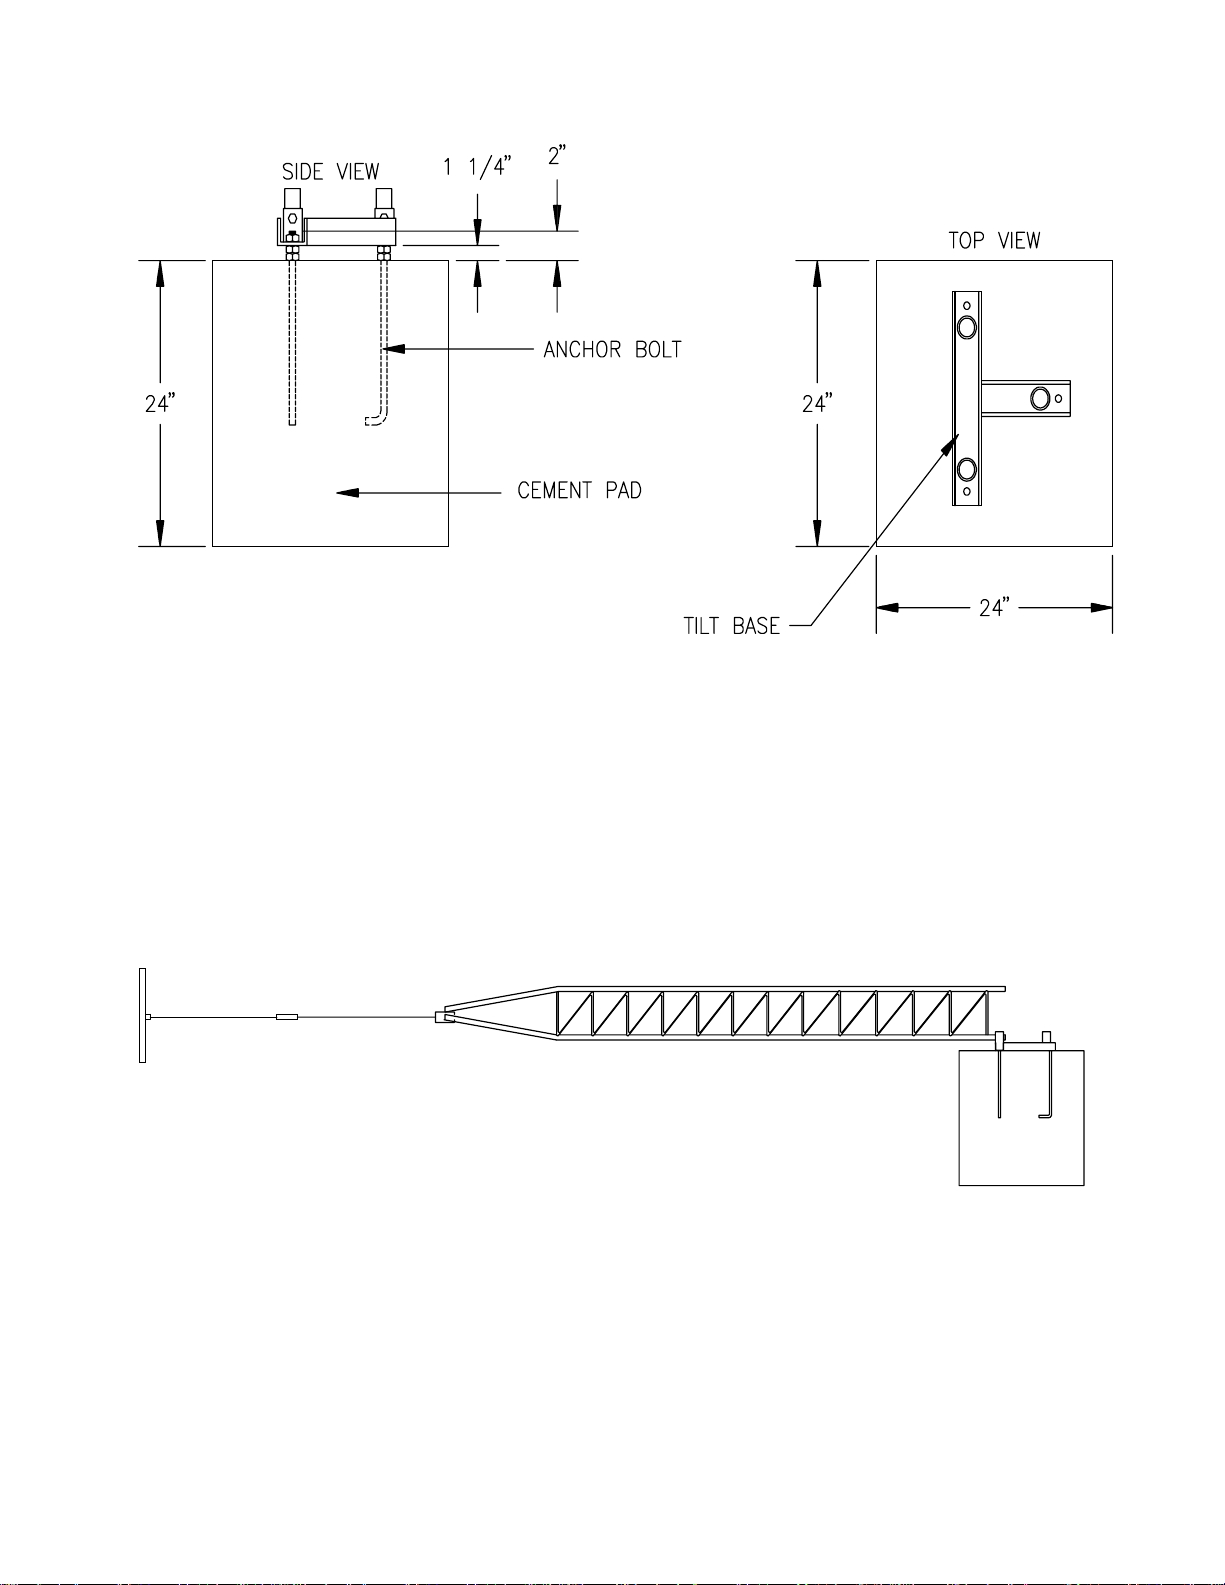
FIGURE 1.4-1. NW8002 Cement Base
FIGURE 1.4-2. NW8002 Tower with Tilt Base
1-7
Page 13

SECTION 1. WEATHER STATION DESCRIPTION AND INSTALLATION
FIGURE 1.4-3. NW8002AC/SP Weather Station (Top View)
1-8
FIGURE 1.4-4. Plumbing NW8002 Tower
Page 14

SECTION 1. WEATHER STATION DESCRIPTION AND INSTALLATION
1.5 POWER SUPPLY OPTIONS
1.5.1 AC POWER
A -120 to 16 VAC Transformer is supplied with
the NW8002 Weather Station. The transformer
must be connected to 120 VAC according to
national and local electrical codes. The
distance that the low level 16 VAC voltage can
be run depends upon the size of the wire used.
A 22 awg wire can be run up to 600 feet. An 18
awg wire can be run up to 1500 feet. It is
recommended to run 110 VAC to the base of
the weather station, and then install the
transformer into a weather tight enclosure
according to electrical codes. The low level 16
VAC voltage is then run up the mast structure to
the PS12-LA.
The PS12 Power Supply provides 12 volts,
regulates incoming AC power, limits current
from the battery, and provides circuitry to
connect an external 12 volt battery. The
terminals on the PS12 are exposed by
unscrewing the two set screws, as shown in
Figure 1.5-1.
The two 12 volt and two ground terminals are
for supplying power to the datalogger or other
12 volt devices.
The two terminals, labeled CHG, are for
connecting a 16 to 20 VAC RMS or solar panel
to charge the batteries.
The ON-OFF switch controls power to the 12V
ports. Charging of the batteries still occurs
when the switch is off. The red charge light is
on when the battery is being charged by AC
power or a solar panel.
NOTE: An AC transformer or solar panel
should be connected to the PS12 at all
times. The charging source powers the
CR10 while float charging the lead acid
batteries. The battery powers the
datalogger if the charging source is
interrupted. The PS12-LA specifications
are given in Table 1.5-1.
FIGURE 1.5-1. PS12 12 Volt Power Supply and Charging Regulator
1-9
Page 15

SECTION 1. WEATHER STATION DESCRIPTION AND INSTALLATION
The two leads from the charging source can be
inserted into either of the CHG ports, polarity
doesn't matter. A transzorb provides transient
protection to the charging circuit. A sustained
input voltage in excess of 40V will cause the
transzorb to limit voltage.
CAUTION: Switch the power to "off" before
disconnecting or connecting the power
leads to the Wiring Panel. The Wiring
Panel and PS12-LA are at power ground. If
12V is shorted to either of these, excessive
current will be drawn until the thermal fuse
opens.
Do not use the external port, labeled EXT, with
the PS12-LA.
TABLE 1.5-1. PS12-LA Battery and AC
Transformer Specifications
Lead Acid Battery
Battery Type Yuasa NA 7-12
Float Life @ 25
Capacity 7.0 amp-hour
Shelf Life, full charge Check twice yearly
Charge Time (AC Source) 40 hr full charge,
AC Transformer
Input: 120V AC, 50/60 Hz
Isolated Output: 16 VAC @ 350 mA
o
C 5 years typical
20 hr 95% charge
max.
1.5.2 SOLAR PANEL
The solar panel is mounted above the
datalogger enclosure facing south (Figure 1.6-
1). The lead wire is routed through the
enclosure base and connected into the two
terminals on the PS12-LA labeled CHG.
Polarity does not matter (Figure 1.5-1). When
the solar panel is connected in, the red LED
light should light, indicating that the batteries are
being charged.
1.6 SENSOR WIRING
Figure 1.3-2 shows how sensor lead wires are
routed through the crossarm and cover. Route
sensor wires through the center hole of the
crossarm, down the mast, and into the base of
the enclosure.
NOTE: The solar radiation sensor has a
large end on the cable. Wire it into the
enclosure first.
Connect sensor wires to the CR10WP wiring
panel as shown in Figure 1.6-2.
Once all wiring is completed, use electricians
putty to seal the cable entry hole.
1.7 STATION GROUNDING
Proper grounding of the station minimizes
damage from electrical transients.
There are inherent hazards associated with the
use of sealed lead acid batteries. Under normal
operation, lead acid batteries generate a small
amount of hydrogen gas. This gaseous byproduct is generally insignificant because the
hydrogen dissipates naturally before building-up
to an explosive level (4%) occurs. However, if
the batteries are shorted, or overcharging takes
place, hydrogen gas may be generated at a rate
sufficient to create a hazard. Campbell
Scientific makes the following
recommendations:
1. A CR10 equipped with standard lead acid
batteries should NEVER be used in
applications requiring INTRINSICALLY
SAFE equipment.
2. A lead acid battery should not be housed in
a gas-tight enclosure.
1-10
A ground lug is provided at the base of the
enclosure (Figure 1.3-1). Everything inside the
enclosure is grounded to the ground lug. A 14
awg or larger ground wire should be run from
the enclosure ground lug to earth ground. The
weather station mast should also be connected
to earth ground (Figure 1.7-1).
Page 16

SECTION 1. WEATHER STATION DESCRIPTION AND INSTALLATION
FIGURE 1.6-1. NW8002SP Weather Station
1-11
Page 17

SECTION 1. WEATHER STATION DESCRIPTION AND INSTALLATION
FIGURE 1.6-2. NW8002 Weather Station Sensor Connection
1-12
Page 18

SECTION 1. WEATHER STATION DESCRIPTION AND INSTALLATION
FIGURE 1.7-1. NW8002 Station Grounding
1.8 SRM-6A RAD MODEM
The SRM-6A Rad Modem consists of two
modems, one at the datalogger site and one at
the computer site. The modem at the
datalogger site is connected to the CR10
through the SC932. The modem at the
computer site is connected to the computer
through a 25 pin RS232 serial port. The two
modems are connected via 4-wire
unconditioned telephone line, or two twisted
pairs. (Figures 1.8-1 and 1.8-2)
1.8.1. INSTALLATION OF RAD MODEM AND
GROUNDING
Figure 1.8-1 shows a typical setup of the RAD
modems. Installation is as follows:
1. Select a direct burial cable with two twisted
pairs. Two recommended types of cable are:
Two Cables: Toro shielded/armored cable
P-7162-D-A-1
or
Anixter F-02P22BPN (Rodent Proof) 22
AWG(tel. 708-677-2600)
2. Disassemble the SRM-6A Modem to
connect the wire. Wiring connections are
made as shown in Figure 1.8-1. Note wires
labeled A and B are one twisted pair of the
cable. Wires labeled C and D are the other
twisted pair. Make sure that the switch
inside both modems is configured for DCE.
3. Transients induced on the communication line
may damage any electronics connected at
either end of the line. To decrease the
chances for damage, spark gaps are installed
at each end as shown in Figure 1.8-1.
NOTE: The SRM-6A at the weather station
is already wired to the spark gaps.
1-13
Page 19

SECTION 1. WEATHER STATION DESCRIPTION AND INSTALLATION
1-14
FIGURE 1.8-1. RAD Modem Connection and Grounding
Page 20

SECTION 1. WEATHER STATION DESCRIPTION AND INSTALLATION
FIGURE 1.8-2. NW8002 Master Station
1.9 PHONE MODEM COMMUNICATION
For use with MIR 5000 Systems only.
DC112 Modem is a 300/1200 baud modem
employing the popular "AT" command set. The
modem is powered and enabled by the
datalogger.
A Hayes or Hayes compatible modem is used at
the computer site to communicate with the
weather station.
The DC112 comes from the factory connected
to the datalogger inside the enclosure (Figure
1.9-1). The burial phone cable is routed
through the base of the enclosure to the surge
protector located inside the enclosure.
The
1.10 SYSTEM CHECK-OUT
Things to double check and verify before
leaving the weather station.
• level of rain gage
• level of pyranometer
• orientation of wind direction sensor
From the computer, each sensor's output
should be checked to make sure it is reading
properly.
1-15
Page 21

SECTION 1. WEATHER STATION DESCRIPTION AND INSTALLATION
1-16
FIGURE 1.9.1 NW8002 Enclosure with DC112 Phone Modem Option
(Use with MIR 5000 Systems Only)
Page 22

SECTION 2. MAINTENANCE
The weather station has been engineered to provide many years of reliable service. Periodic
maintenance, however, is required to help insure that the system performs up to its potential.
The following maintenance schedule is
important in the effective continuous operation
of the weather station. Log notes are included
in order to track the progress of maintenance
and record any problems. If there are any
questions about the following schedule, contact
your Toro distributor for assistance.
2.1 WEEKLY
• Visually inspect the weather station, and all
sensors.
• Check all sensors for visible damage or
debris.
The solar sensor may obtain bird droppings
that may disturb the sensor readings. Be
sure to clean if necessary (Section 2.3.1).
Check the rain gage for debris inside the
funnel (Section 2.2.1).
• Look for possible cable damage on any
sensors, and record all inspection findings
in log section 2.4.
2.2 MONTHLY
2.2.1 RAIN GAGE
Check the rain gage, funnel and tip mechanism.
Be sure screen inside funnel is clean from bird
nests or debris. Remove the rain gage funnel.
The rain gage is assembled in two pieces. The
top portion (funnel) can be removed by pulling
up on the sides. Remove the rain gage funnel.
Be sure that the funnel hole is not clogged with
debris. Observe the tipping mechanism inside
the can, and be sure there are no spider webs
or bugs that have caused the mechanism to
freeze in one position.
FIGURE 2.1-1 6912 Rain Gage
Tip the mechanism from side to side to be sure
that it moves freely. Be sure that upon leaving
the site that the rain gage is level. Leave the
tipping mechanism to one side (note fig). Note
that the tips will be logged by the weather
station as rain.
2.2.2 SOLAR SENSOR
Visually inspect the solar sensor, and clean if
necessary.
(Refer to 2-3 month section for cleaning
procedures).
2-1
Page 23

SECTION 2. MAINTENANCE
2.2.3 TEMPERATURE AND RELATIVE HUMIDITY PROBE
Visually inspect the Temperature/Relative
Humidity Sensor in extreme weather conditions,
and clean if necessary. (Refer to 2-3 month
section for cleaning procedures).
2.2.4 WIND SPEED AND DIRECTION SENSORS
Spin the wind direction and wind speed sensors
to be sure they move freely.
CAUTION!: DO NOT use WD-40 or other
lubricants on the bearings.
2.2.5 MOISTURE
The enclosure should have desiccant in it to
absorb moisture. Moisture on the wiring panel
will cause problems with voltage supplies to the
datalogger.
2.3 2 TO 3 MONTH
2.3.1 VISUALLY INSPECT AND CLEAN THE
SOLAR SENSOR.
NOTE: There are two types of
Temperature/Relative Humidity Sensors
which you may have. Refer to the cleaning
procedures for your particular system
below:
2.3.2 TEMPERATURE/RELATIVE HUMIDITY SYSTEMS SHIPPED AFTER JANUARY 1, 1991
Part Number 6575 Temperature/Relative
Humidity probe requires minimal maintenance
unless there is physical damage or repeated
condensation on the HMP35C Probe. Check
monthly to make sure the radiation shield and
end cap on the sensor are free from debris.
Check the sensor end cap by removing the
sensor from the radiation shield. The sensor is
fastened by a plastic compression screw which
screws into the shield. Loosen the screw
around the sensor and pull the sensor out of the
shield. Check the screen for debris and clean
by removing dirt or dust with a soft brush. If the
end cap is still dirty, contact your Toro
distributor to send a replacement end cap.
Examine the Solar Sensor, and clean if
necessary. The sensor can be cleaned with a
blast of clean, dry, air, a soft bristle, camel hair
brush, or some water. BE CAREFUL NOT TO
SCRATCH THE SURFACE OF THE SENSOR.
In extreme and dusty environmental conditions
it may be necessary to inspect and clean the
sensor on a monthly basis. Check to make
sure that the drain hole next to the surface of
the sensor is clean from debris. Handle the
sensor carefully when cleaning.
FIGURE 2.3-2 6575 Temperature/Relative
Humidity Probe
2.3.3 TEMPERATURE/RELATIVE HUMIDITY (SYSTEMS SHIPPED BEFORE JANUARY 1, 1991)
Visually inspect Temperature/Relative Humidity
Sensor, and clean if necessary.
To inspect and clean the sensor, remove the
sensor from the radiation shield. The sensor is
held inside the radiation shield by two plastic
retainers on the bottom of the shield. Loosen
the screws holding the retainers and rotate the
two retainers to one side so the sensor can be
removed.
FIGURE 2.3-1 6910 Solar Sensor
2-2
Page 24

FIGURE 2.3-3 4831 Temperature/Relative
Humidity Probe Assembly
SECTION 2. MAINTENANCE
sensor is rugged, the function of it is to sense
water vapor in the air; therefore, careful
handling is very important. A gentle clean (oil
free) air blast, or a gentle brush with clean, soft,
camel's hair is best for cleaning.
1) If the chip has a film of dirt, oil, or other
contamination on it, replace the chip.
2) If the clip socket to which the chip is
fastened to is rusty, replace the sensor.
Contact your Toro distributor for sensor or chip
replacement.
Temperature/Relative Humidity
2.4 MAINTENANCE LOG BOOK
The following log notes allow you to keep
records on your system. It also can be very
informative to the distributor should the system
fail.
WEEKLY
The temperature sensor (thermistor) requires
no maintenance. If the screen is removed for
inspecting or cleaning the relative humidity chip,
BE CAREFUL OF THE THERMISTOR WIRE
LEADS, THEY ARE VERY DELICATE!
In a clean air environment, the relative humidity
sensor should perform for up to one year. AS A
RULE, THE RH CHIP SHOULD BE
REPLACED EVERY YEAR. The life span
however, is dependent upon air quality. In
extreme environmental conditions, the RH chip
may need to be replaced every six months or
so.
Cleaning of sensor should be performed every
two months, and more often in extreme
environmental conditions, if necessary. An
environment is considered extreme if
penetrants, insecticides, fertilizers, and other
chemicals are used on a regular basis.
Sensors are extremely sensitive to
contamination by sulfur gases and smoke. Do
not smoke while cleaning the sensor.
To clean the sensor loosen the two retaining
screws and remove the screen. (Figure 2.6-1)
Take the screen off and thoroughly clean the
screen. DO NOT TOUCH THE RELATIVE
HUMIDITY CHIP! Remember that while the
Rain Gage (Inspect and clean if necessary)
Date OK/Comments
_____ ____________________________
_____ ____________________________
_____ ____________________________
_____ ____________________________
_____ ____________________________
_____ ____________________________
_____ ____________________________
_____ ____________________________
_____ ____________________________
_____ ____________________________
_____ ____________________________
_____ ____________________________
2-3
Page 25

SECTION 2. MAINTENANCE
Solar Sensor (Inspect and clean if necessary)
Date OK/Comments
_____ ____________________________
_____ ____________________________
_____ ____________________________
_____ ____________________________
_____ ____________________________
_____ ____________________________
_____ ____________________________
_____ ____________________________
_____ ____________________________
_____ ____________________________
_____ ____________________________
_____ ____________________________
Temperature/RH (Inspect and clean if
necessary)
Wind Speed and Direction (Inspect and spin
each sensor)
Date OK/Comments
_____ ____________________________
_____ ____________________________
_____ ____________________________
_____ ____________________________
_____ ____________________________
_____ ____________________________
_____ ____________________________
_____ ____________________________
_____ ____________________________
_____ ____________________________
_____ ____________________________
_____ ____________________________
MONTHLY
Date OK/Comments
_____ ____________________________
_____ ____________________________
_____ ____________________________
_____ ____________________________
_____ ____________________________
_____ ____________________________
_____ ____________________________
_____ ____________________________
_____ ____________________________
_____ ____________________________
_____ ____________________________
_____ ____________________________
Rain Gage (Inspect and clean if necessary)
Date OK/Comments
_____ ____________________________
_____ ____________________________
_____ ____________________________
_____ ____________________________
_____ ____________________________
_____ ____________________________
2-4
Page 26

SECTION 2. MAINTENANCE
Solar Sensor (Inspect and clean if necessary)
Date OK/Comments
_____ ____________________________
_____ ____________________________
_____ ____________________________
_____ ____________________________
_____ ____________________________
_____ ____________________________
Temperature/RH (Inspect and clean if
necessary)
Date OK/Comments
_____ ____________________________
_____ ____________________________
_____ ____________________________
_____ ____________________________
_____ ____________________________
_____ ____________________________
Wind Speed and Direction (Inspect and spin
each sensor)
2 TO 3 MONTH
Rain Gage (Inspect and clean if necessary)
Date OK/Comments
_____ ____________________________
_____ ____________________________
_____ ____________________________
_____ ____________________________
_____ ____________________________
_____ ____________________________
Solar Sensor (Inspect and clean)
Date OK/Comments
_____ ____________________________
_____ ____________________________
_____ ____________________________
_____ ____________________________
_____ ____________________________
_____ ____________________________
Temperature/RH (Inspect and clean)
Date OK/Comments
_____ ____________________________
_____ ____________________________
_____ ____________________________
_____ ____________________________
_____ ____________________________
_____ ____________________________
Date OK/Comments
_____ ____________________________
_____ ____________________________
_____ ____________________________
_____ ____________________________
_____ ____________________________
_____ ____________________________
2-5
Page 27

SECTION 2. MAINTENANCE
Wind Speed and Direction (Inspect and spin
each sensor)
Date OK/Comments
_____ ____________________________
_____ ____________________________
_____ ____________________________
_____ ____________________________
_____ ____________________________
_____ ____________________________
2-6
Page 28

SECTION 3. TROUBLESHOOTING
Recommended equipment:
Volt/Ohm meter
CR10KD Keyboard Display
PC208 Datalogger Support software
Small screwdriver
When trouble shooting a problem with the
weather station, the system can be divided into
three sections: 1) Communication, 2) Sensors,
and 3) Datalogger. Determine what portion of
the system is failing by asking the following
questions:
1. Is the computer communicating with the
weather station?
YES -- go to question 2.
NO -- go to question 3.
2. Use TERM (PC208 software) to check the
sensor readings. Are the values shown in
TERM consistant with the bad readings
shown by the TORO software?
YES -- go to question 4.
NO -- If the values shown by TERM are within
normal limits, use TELCOM to collect recent
data. If these data are good, there is not a
problem with the weather station and the
communication link.
3. Connect the CR10KD to the weather
station (Section 3.3.1). Will The weather
station communicate with the CR10KD ?
your distributor should sensor need repairing or
replacing.
NO -- If multiple sensors are giving invalid
readings, the datalogger may be the cause.
The datalogger temperature and battery voltage
must be making reasonable measurements in
order for the datalogger to make proper sensor
measurements. Check out the datalogger as
described in Section 3.3. If the datalogger is
OK, Check out all sensors as described in
Section 3.2.
3.1 COMMUNICATION TESTING
3.1.1 TESTING SRM-6A RAD MODEM
COMMUNICATION, SYSTEMS SHIPPED
AFTER JANUARY 1 1991
The modem communication link is divided into
three sections: 1) SRM-6A RAD modem
(computer end), 2) cable from computer
modem to datalogger modem, and 3) SRM-6A
RAD modem with SC932 (datalogger end).
When unable to establish communication with
the weather station, test each of the three
sections.
Before proceeding through the testing
procedures, a terminal emulator software
program, such as "KERMIT", "PROCOMM", or
Campbell Scientific's "TERM" must be used to
communicate through the COM port of the
computer. Once the emulator program is set
up, testing can proceed as follows:
YES -- A communication problem exists; go to
Section 3.1.
NO -- A datalogger or power supply problem
exists; continue with Section 3.3.
4. Is only one sensor giving a bad reading?
YES -- the problem is probably with the sensor.
a. Check sensor leads for damage or
corrosion. Also check leads at terminal strip of
datalogger to be sure that leads are securely
fastened.
b. Use circuit diagrams in Appendix and
Section 2.3 to ohm out defective sensor. Notify
Modem at Computer Test
FIGURE 3.1-1 Rad Testing Computer End
3-1
Page 29

SECTION 3. TROUBLESHOOTING
FIGURE 3.1-2 RAD Testing Datalogger End
1. Disconnect the four conductor cables from
the SRM-6A RAD modem at the computer
end. Inside the SRM-6A, jumper the XMT +
to RCV + and jumper the XMT - to RCV -.
This creates a transmit loop which allows any
key pressed at the computer keyboard to be
seen on the screen. If the key pressed is not
seen, check the following: The COM port
configuration, the 25 pin cable from the
computer to the modem, and the SRM-6A
RAD modem Cable Test (Figure 3.1-1).
2. Reconnect the 4 conductor cables to the
modem at the computer end, and disconnect
the cable from the modem at the datalogger
end. Twist the XMT + wire to RCV + wire,
twist the XMT - wire to RCV - wire. Repeat
the process of step 1 by pressing any key on
the computer keyboard. If the key pressed is
not displayed on the monitor, the cable
connections modem is defective and will need
to be repaired or replaced (Figure 3.1-2).
Modem at Datalogger Test
3. If steps 1 and 2 pass, the modem at the
datalogger is suspect. Disconnect the modem
from the SC932, and bring the modem to the
computer site. Attach the modem to the
computer, and repeat step 1 by jumpering the
terminals of the modem, and pressing a key
on the computer keyboard.
4. Replace the 9 pin cable from the datalogger
to the SC932 modem.
3.1.2 TESTING THE SC95C AND SC95A SHORT HAUL MODEM, SYSTEMS SHIPPED BEFORE JANUARY 1, 1991
A volt meter can be used to check the ring
signal from the calling modem. First,
disconnect the SC95C from the computer. Then
disconnect the wire from the SRC and RET
terminals. Connect the red + lead of the volt
meter to the SRC terminal and the black - lead
to the RET terminal. You should read about 9
volts. Press the ring button and hold it down.
The voltage should now go up to 15V. Release
the button and the voltage will go back down to
9V. This process may be repeated at the
answer modem end to make sure that the ring
signal is making it to the answer modem. This
is done by disconnecting the wires to the
answer modem, and connecting the red + and
black - volt meter leads to the SRC and RET
wires respectively.
If the above tests pass, and communication to
the datalogger still has not been established,
replace the 9 pin cable connected to the
datalogger and the SC95A. If all of the previous
tests pass, most likely the SC95A is damaged,
and will need to be repaired or replaced.
Using a Line Monitor
When unable to establish communication with
the weather station, a line monitor (also called a
"break out box") may be used to test
communications.
If the above tests pass and communication
to the datalogger still has not been
established, go to Sections 3.1 thru 3.3 to
test the datalogger. If the datalogger test
passes, then the SC932 is suspect and will
need to be repaired or replaced.
3-2
To help in observing the Transmit Data and
Receive Data lines, set the baud rate between
the computer and the weather station to 300 or
1200 baud.
Page 30

SECTION 3. TROUBLESHOOTING
The line monitor is connected to the RS232
serial data cable between the computer and
short haul modem. The data line monitor has
seven lights indicating the status of the RS232
serial communication. By observing these lights
in the order given below you may be able to
determine the problems with the computer link.
Pin 6 - DSR Data Set Ready. The short
haul modem holds this line high
all the time.
Pin 20 - DTR Data Terminal Ready. The
software holds this line high.
Pin 4 - RTS Request to Send. When the
computer tries to call the
weather station, it brings the
RTS line high until the call is
answered, or until the computer
stops trying to call.
Pin 5 - CTS Clear To Send.
Pin 8 - CD Carrier Detect. Both CTS and
CD lines come high when the
calling modem receives a
signal indicating that the
weather station answered the
call. If these lines do not come
high, then the communication
cable and wiring connections
should be double checked.
Pin 2 - TD Transmit Data. When the
computer sends commands to
the weather station, the TD light
will flash on. This indicates that
the computer is transmitting out
data.
Pin 3 - RD Receive Data. The weather
station echoes back responses
to the commands that the
computer has sent. The RD
light flash as these responses
are coming in.
3.2 SENSORS
Whenever sensor failure is suspected, the
sensors can be checked with a VOM
(Volt/Ohm meter) to measure for open
circuits (Section 3.2.1), or the CR10KD
(Keyboard Display) can be connected to the
CR10 to check sensor reading values
(Section 3.3.1 & Table 2.1).
3.2.1 OHM METER TESTS OF SENSORS
All sensors that are to be checked, EXCEPT for
the rain gage, should have a measurable
resistance. INFINITE resistance indicates an
open circuit. A sensor with an open circuit
should be sent in for repair.
The sensors which can be checked with an ohm
meter are:
• Anemometer (Wind Speed)
• Wind Direction Indicator
• Pyranometer (Solar Radiation)
• Rain Gage
• Temperature
NOTE: The measurable resistance of each
sensor is NOT intended to determine the
accuracy of the sensor.
For Ohm meter tests of the sensors refer to
sensor schematics in the appendix section.
Wind Speed
Check coil resistance between the black and
clear wires for an OPEN circuit. The coil
resistance should measure between 1200 to
1300 Ohms.
Shorts to Ground - Check the base of the
sensor for moisture, or for any wires that may
have been pinched and exposed.
Wind Direction
The wind direction sensor varies its resistance
as the vane turns. With the Ohm meter
connected to the black and red wires, the
resistance should change from 1K Ohms to 11K
Ohms with a five degree open or dead band.
If infinite resistance is measured, the sensor
needs to be repaired.
With the Ohm meter connected to the black and
white wires, the resistance should read 10K
Ohms. If infinite resistance is measured, then
the potentiometer is bad and should be
replaced.
Solar Radiation
The Solar Radiation Sensor should measure
between 60 Ohms and 100 Ohms. An open
circuit should be the main thing to look for.
3-3
Page 31

SECTION 3. TROUBLESHOOTING
Rain Gage
The Rain Gage has a reed switch that closes as
the tipping bucket tips. To check the Rain
Gage, connect the Ohm meter to the two wires
and tip the bucket VERY SLOWLY past the
center point. As this is done, you should get
some continuity through the circuit. If there is
NO continuity, then the reed switch is probably
bad.
Temperature and Relative Humidity,
Systems shipped prior to January 1, 1991
TEMPERATURE AND RELATIVE HUMIDITY,
SYSTEMS SHIPPED AFTER JANUARY 1,
1991
NOTE: DO NOT
the temperature and relative humidity
probe.
Things to look for if you are experiencing
problems with the temperature and relative
humidity probe:
1. Are both the temperature AND the relative
humidity readings bad? If so, make sure
the radiation shield and sensor endcap are
free from debris. The sensor should also
be removed and the screen taken off to
inspect the screen, RH chip, and thermistor.
2. Is just the temperature reading bad? Again,
make sure the radiation shield and sensor
endcap are free from debris.
3. Is just the relative humidity reading bad? In
this case, the probe needs to be
recalibrated. (Contact Campbell Scientific if
facilities to recalibrate are unavailable.)
In any of the above cases the sensor leads
should be checked for breaks or corrosion
on the connections to the datalogger.
connect an Ohm meter to
container over deionized water for two hours.
After two hours it should read close to 100%
RH. If the readings are greater than 5% off
from 100% the probe needs to be recalibrated
or repaired.
NOTE: DO NOT connect an OHM meter
across the RH (relative humidity) chip, or it
will be damaged.
Things to look for if you are experiencing
problems with the temperature and relative
humidity probe:
1. Are both temperature relative humidity
readings bad?
2. Is just the temperature reading bad?
3. Is just the relative humidity reading bad?
The RH measurement has a temperature
compensation built in to it. Therefore, if the
temperature reading is bad, then the RH
reading is probably bad.
To measure the resistance of the temperature
portion of the sensor, the RH chip (PCRC-11)
must be removed (Figure 3.2-1). Remove the
sensor from the radiation shield. The sensor is
held inside the radiation shield by two plastic
retainers on the bottom of the shield. Loosen
the screws holding the retainers and rotate the
two retainers to one side so the sensor can be
removed. Loosen the two screws from the
protective screen. Take the screen off to
expose the RH chip. HANDLE THE CHIP
CAREFULLY
Remove the chip by carefully grasping the sides
of the chip and pulling it out of the sockets. DO
NOT TOUCH THE RELATIVE HUMIDITY
CHIP! Dirt and oil will give poor readings.
ALSO, BE CAREFUL OF THE DELICATE
THERMISTOR LEADS.
and by the two edges ONLY.
If you are suspecting improper readings, and if
facilities exist, the temperature and relative
humidity probe should be placed in a sealed
3-4
Page 32

FIGURE 3.2-1 4831 Temperature/Relative Humidity Probe Assembly
Measure the resistance of the temperature
probe by connecting the ohm meter across the
red and black leads. The temperature sensor
has a inverse relationship between resistance
and temperature, the higher the ambient
temperature the lower the resistance of the
probe. If the temperature readings are high,
visually inspect the leads of the thermistor to
see if condensation or bugs have caused an
alternate electrical path of lower resistance.
If just the RH readings are bad, then the RH
Chip most likely needs to be replaced.
NOTE:
RH chip replacement.
Contact your Toro distributer for
3.3 DATALOGGER (CR10)
The CR10 is the heart of the weather station, it
measures the sensors, outputs, and converts
the measurements to engineering units. Upon
request from the computer, the CR10 will
transmit the data to the computer. The best
way to check the CR10 is with the CR10KD.
3.3.1 KEYBOARD DISPLAY
The CR10KD is used to check all functions of
the CR10 as well as checking sensor values.
Connect the CR10KD to the 9 pin ribbon cable
inside the enclosure. Upon connection, the
display activates, showing meaningless
numbers. Enter *0, and the display should
show LOG12. The steps in Table 3.3-1 allow
verification of the actual sensor measurements.
When viewing the display, remember that the
CR10 obtains a new measurement every 60
seconds.
3-5
Page 33

SECTION 3. TROUBLESHOOTING
NOTE:
or loose you place, start over by keying the
* symbol.
The weather station should be left in the LOG12
mode to minimize current drain on the batteries.
NOTE: If the battery power is lost, the data
stored in the CR10's Final Memory IS
LOST.
TABLE 3.3-1. Sensor Verification; Accessing
ENTER DESCRIPTION DISPLAY**
*0 Compile program LOG12
*6 Enter input locations 06:0000
A(Adv) CR10 Temperature 01:25.12
A Program Signature 02:4184.9
A Solar Radiation 03:.06540
A Temperature C 04:24.545
A Relative Humidity 05:45.532
A Wind Speed mph 06:4.5400
A Rainfall in inches 07:.03000
If at any time you make a mistake
CR10 Input Locations
Upon connecting the keyboard view locations 1
(CR10 Temperature) and 10 (Battery Voltage).
If the datalogger is not operating properly, the
CR10 Temperature will not record a reasonable
value. The battery voltage should read no less
than 11.76 volts. If either of these conditions
arise, check the power source to the
datalogger. Be sure that the charging light is lit
while the AC or Solar Panel is plugged into the
power supply. If this light is not lit, chances are
that the charging circuit is bad and will need to
be replaced. In this case the batteries will also
most likely be bad and will need to be replaced.
3.3.2 12 VOLT SUPPLY
The 12V battery supply should not be
discharged below 11.76 Volts. If this
occurs, the batteries will be damaged and
will need to be replaced. Check the 12V
supply with a volt meter. (Maintenance
guide)
3.3.3 5 VOLT SUPPLY
On the wiring panel of the CR10 there is a
terminal marked 5V. Check the 5V supply
with a volt meter, measuring between the
5V terminal and ground. This 5V supply
should be 5 0.1 volt. If not, there is a
problem with the CR10.
A Wind Direction 08:120.00
A Total Rain
(Hourly total) 09:.10000
A Battery Voltage 10:12.900
A = Advance
B = Backup
** typical values
3-6
Page 34

APPENDIX A. SENSOR SCHEMATICS
A-1
Page 35

APPENDIX A. SENSOR SCHEMATICS
A-2
Page 36

APPENDIX A. SENSOR SCHEMATICS
A-3
Page 37

APPENDIX A. SENSOR SCHEMATICS
A-4
Page 38

APPENDIX A. SENSOR SCHEMATICS
A-5
Page 39

APPENDIX A. SENSOR SCHEMATICS
A-6
 Loading...