

Page 1
LR4 Four Channel
Latching Relay Module
Revision: 6/12
Copyright © 2010-2012
Campbell Scientific, Inc.
Page 2

Page 3

Warranty
“PRODUCTS MANUFACTURED BY CAMPBELL SCIENTIFIC, INC. are
warranted by Campbell Scientific, Inc. (“Campbell”) to be free from defects in
materials and workmanship under normal use and service for twelve (12)
months from date of shipment unless otherwise specified in the corresponding
Campbell pricelist or product manual. Products not manufactured, but that are
re-sold by Campbell, are warranted only to the limits extended by the original
manufacturer. Batteries, fine-wire thermocouples, desiccant, and other
consumables have no warranty. Campbell's obligation under this warranty is
limited to repairing or replacing (at Campbell's option) defective products,
which shall be the sole and exclusive remedy under this warranty. The
customer shall assume all costs of removing, reinstalling, and shipping
defective products to Campbell. Campbell will return such products by surface
carrier prepaid within the continental United States of America. To all other
locations, Campbell will return such products best way CIP (Port of Entry)
INCOTERM® 2010, prepaid. This warranty shall not apply to any products
which have been subjected to modification, misuse, neglect, improper service,
accidents of nature, or shipping damage. This warranty is in lieu of all other
warranties, expressed or implied. The warranty for installation services
performed by Campbell such as programming to customer specifications,
electrical connections to products manufactured by Campbell, and product
specific training, is part of Campbell’s product warranty. CAMPBELL
EXPRESSLY DISCLAIMS AND EXCLUDES ANY IMPLIED
WARRANTIES OF MERCHANTABILITY OR FITNESS FOR A
PARTICULAR PURPOSE. Campbell is not liable for any special, indirect,
incidental, and/or consequential damages.”
Page 4

Assistance
Products may not be returned without prior authorization. The following
contact information is for US and international customers residing in countries
served by Campbell Scientific, Inc. directly. Affiliate companies handle
repairs for customers within their territories. Please visit
www.campbellsci.com to determine which Campbell Scientific company serves
your country.
To obtain a Returned Materials Authorization (RMA), contact CAMPBELL
SCIENTIFIC, INC., phone (435) 227-9000. After an applications engineer
determines the nature of the problem, an RMA number will be issued. Please
write this number clearly on the outside of the shipping container. Campbell
Scientific's shipping address is:
CAMPBELL SCIENTIFIC, INC.
RMA#_____
815 West 1800 North
Logan, Utah 84321-1784
For all returns, the customer must fill out a "Statement of Product Cleanliness
and Decontamination" form and comply with the requirements specified in it.
The form is available from our web site at www.campbellsci.com/repair. A
completed form must be either emailed to repair@campbellsci.com or faxed to
(435) 227-9106. Campbell Scientific is unable to process any returns until we
receive this form. If the form is not received within three days of product
receipt or is incomplete, the product will be returned to the customer at the
customer's expense. Campbell Scientific reserves the right to refuse service on
products that were exposed to contaminants that may cause health or safety
concerns for our employees.
Page 5

LR4 Table of Contents
PDF viewers: These page numbers refer to the printed version of this document. Use the
PDF reader bookmarks tab for links to specific sections.
1. General Description.....................................................1
2. Specifications ..............................................................1
3. Relay Details ................................................................2
4. Contact Details.............................................................2
4.1 Types ........................................................................................................2
4.2 Relay Contact Life....................................................................................3
5. Manual Toggle Control................................................3
6. LED Indicators .............................................................4
7. Using SDI-12.................................................................4
7.1 SDI-12 Wiring..........................................................................................4
7.2 SDI-12 Addresses.....................................................................................5
7.3 SDI-12 Commands...................................................................................5
7.4 SDI-12 Programming Examples for CRBasic Datalogger.......................7
7.4.1 Reading Relay Status Values..........................................................7
7.4.2 Setting Relay Values.......................................................................7
7.4.3 CR200(X) Programming.................................................................7
7.5 Edlog Set Relay Example.........................................................................8
8. Using Modbus..............................................................9
8.1 Wiring for Modbus...................................................................................9
8.1.1 RS-232............................................................................................9
8.1.2 RS-485..........................................................................................10
8.2 Modbus Baud Rate .................................................................................11
8.3 Modbus Mode.........................................................................................11
8.4 Modbus Address.....................................................................................11
8.5 Modbus Supported Commands...............................................................11
8.6 Modbus Operation..................................................................................11
9. Firmware Update Procedure.....................................12
i
Page 6

LR4 Table of Contents
List of Figures
List of Tables
1. LR4 Latching Relay Module...................................................................... 2
2. Form A - State = 1 ..................................................................................... 2
3. Form A - State = 0 ..................................................................................... 3
4. Form C - State = 1...................................................................................... 3
5. Form C - State = 0...................................................................................... 3
6. Communication Jumpers............................................................................ 9
7. Program Mode Jumper............................................................................. 12
1. SDI-12 Wiring ........................................................................................... 4
2. Modbus/RS-232 Wiring........................................................................... 10
3. Modbus/RS-485 Wiring........................................................................... 10
ii
Page 7

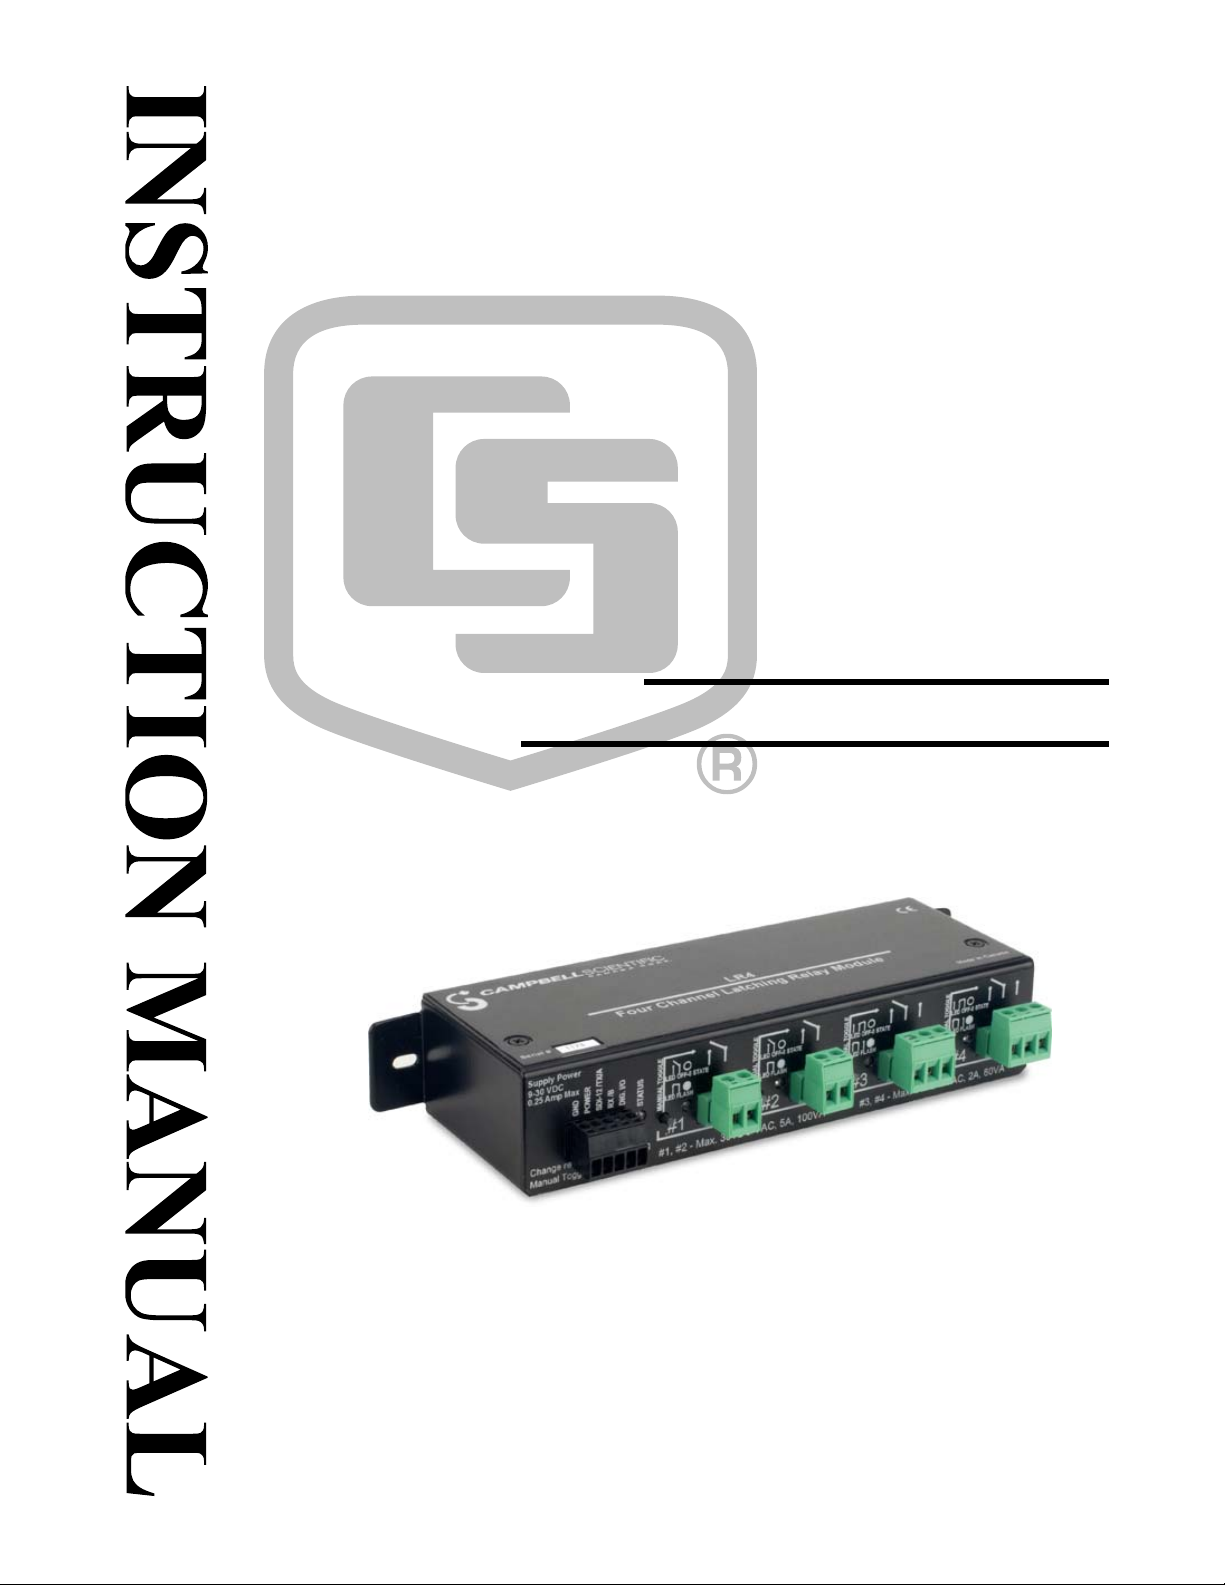
LR4 Four Channel Latching Relay Module
1. General Description
The LR4 module uses latching relays that provide the following benefits:
• Low power consumption
Once the control module changes the state of the relay by applying power
to a coil, power can then be removed as the relay mechanically latches its
state. Conventional relays require the power to be continuously present to
hold a relay in one of its states.
• Relay state is non-volatile
Once a relay is set to a desired state, the relay will remain in that state even
if power is lost to the control module. The only way to change the state of
a relay is to send a valid command that instructs the relay state to be
changed or by using the manual toggle button.
2. Specifications
Supply Voltage: 9 to 30 Vdc
Power Consumption
Quiescent: < 2.0 mA
Peak: < 250 mA
Operating Temperature: -40º to +60ºC
Relay Type: Latching
Communications Hardware: SDI-12, RS-232, RS-485
Protocol: SDI-12 Version 1.3 or ModBus
via RS-232/RS-485 at 19,200 bps
Digital I/O Input Voltage
Maximum: +20 Vdc
Minimum: -12 Vdc
Dimensions: 17.0 x 6.1 x 3.7 cm
(6.7 x 2.4 x 1.5 in)
Weight: 0.48 kg (1.05 lb)
1
Page 8

LR4 Four Channel Latching Relay Module
3. Relay Details
Relay #1 and Relay #2
Contacts: 2 independent Form A (SPST)
Maximum Voltage Ratings: 30 Vdc / 30 Vac
Maximum Current: Not to exceed 100 VA or 5 A
Relay #3 and Relay #4
Contacts: 2 independent Form C (SPDT)
Maximum Voltage Ratings: 30 Vdc / 30 Vac
Maximum Current: Not to exceed 60 VA or 2 A
FIGURE 1. LR4 Latching Relay Module
4. Contact Details
4.1 Types
There are two different contact types on the LR4. One type is referred to as a
Form A and the second is referred to as a Form C. Relays #1 and #2 are type
Form A and Relays #3 and #4 are type Form C. The following figures outline
the differences:
FIGURE 2. Form A - State = 1
2
Page 9

FIGURE 3. Form A - State = 0
FIGURE 4. Form C - State = 1
LR4 Four Channel Latching Relay Module
FIGURE 5. Form C - State = 0
4.2 Relay Contact Life
The expected life of the relays under no load conditions is 50 million
operations. Under load, the life expectancy is reduced to 100,000 operations.
Inductive loads can further reduce the life expectancy of the relay contact.
Proper signal conditioning (clamping diodes) should be considered for
inductive loads.
5. Manual Toggle Control
There is one Manual Toggle push button for each relay. The state of a relay
can be changed by pressing the corresponding button and holding it in place for
2 seconds. If a relay is in the 1 state when a button is pressed, the
corresponding LED will turn on; two seconds later the user will see the LED
go off once the relay has changed to the 0 state. In a quiet environment, a click
can also be heard when the relay changes state. Likewise, if an LED is in the 0
state, the corresponding LED will be off when a button is pressed and then turn
on once the relay has gone to the 1 state. The button must be released and
depressed again to change the state again.
To conserve power, the indicating LEDs flash briefly once every 5 seconds. A
brief momentary push (less than 1 second) of any button will cause the control
module to turn on any LED whose relay is in the 1 state for several seconds.
Only one button should be pressed at a time. Once a relay is controlled
manually, the relay remains in that state until a command or button is used to
change the relay state.
3
Page 10

LR4 Four Channel Latching Relay Module
6. LED Indicators
Five LEDs are on the control module. The main status LED indicates a
successful power up by turning on for one second. Rapid flashing for
approximately 3 seconds indicates a power-up problem. When the status LED
is on, any of the contacts that are in the 1 state will also have its LED on.
In normal operation, the status LED briefly flashes once every 5 seconds. Any
contact in the 1 state will have its LED flash with the status LED. A brief
button press can be used to activate the LEDs for a longer period of time to
observe the relay states. The button press must be less than 1 second to avoid
toggling any of the relays.
7. Using SDI-12
Contemporary dataloggers that support the SDI-12 pro tocol are the CR200Xseries, CR800, CR850, CR1000, CR3000, and CR5000. Retired dataloggers
that support the SDI-12 protocol include the CR200-series, CR510 , CR10(X),
and CR23X.
7.1 SDI-12 Wiring
CAUTION
When the LR4 is controlled via the SDI-12 protocol, the RX/B terminal is not
connected. Often, the DIG I/O terminal is also not connected. The state of the
DIG I/O terminal can be read using SDI-12; it is meant to handle some custom
applications (contact Campbell Scientific for more information).
For SDI-12 communications, the CABLE3CBL three-conductor cable is
recommended to connect the LR4 to the datalogger when t he DIG I/O p or t is
not used. The CABLE4CBL four-conductor cable is recommended when
using the DIG I/O port. Table 1 shows the datalogger con nect i on s.
Power-off the system before wiring the LR4.
TABLE 1. SDI-12 Wiring
LR4 Terminals Function Datalogger Terminal
GND
POWER
SDI-12 /TX/A
RX /B
Power ground and
shield
Positive dc power
source (9-30 Vdc)
SDI-12 signal Cx (control port)
Not used Not used
G
12V
1
4
DIG. I/O (optional) Readable digital input Cx (control port)2
1
Where x is the control port number. Use the dedicated SDI-12 port on
CR5000 datalogger.
2
Where x is the control port number. Use of DIG I/O is for some custom
applications. Contact Campbell Scientific for more information.
Page 11

7.2 SDI-12 Addresses
The LR4 can be set to one of ten addresses (0 to 9) which allows up to ten LR4
modules to be connected to a single digital I/O channel (cont rol po rt ) of an
SDI-12 datalogger.
The LR4 is shipped from the factory with the address set to 0. The address on
the LR4 can be changed by sending an SDI-12 change-address command. The
change address command can be issued from most SDI-12 recorders. For
some Campbell Scientific dataloggers, the SDI-12 transparent mode will need
to be entered to change the address.
When it is necessary to use more than one LR4, it is easiest to use a different
control port for each LR4 instead of changing the address. If additional control
ports are not available, then the address will need to be changed.
To change the address of an LR4 with the default address of 0 to the address of
1, the following command can be sent:
“0A1!”
Only one SDI-12 device should be connected when using the change address
command.
LR4 Four Channel Latching Relay Module
7.3 SDI-12 Commands
The SDI-12 protocol has the ability to support various measurement
commands. The LR4 supports the commands that are listed in the following
table.
The different comman ds are entered as options in the SDI-12 recorder
instruction. The major difference between the various measurement commands
are the data values that are returned.
SDI-12 extended commands are used to set a relay to a desired state.
SDI-12 Command
aM! Status All 4 Relays - 0 or 1
aM1! Status Relay #1 - 0 or 1 State R1
aM2! Status Relay #2 - 0 or 1 State R2
aM3! Status Relay #3 - 0 or 1 State R3
aM4! Status Relay #4 - 0 or 1 State R4
aM5! LR4 Supply Voltage V
aM6! Not completed – Do not use
Command
Function/Description
State
Values Returned
R1, R2, R3, R4 (4
values)
(Volts)
Supply
aM7! Not completed – Do not use
aM8 ! Dig. I/O input state – 0 or 1 Dig. I/O Input State
aM9 ! Not completed – Do not use
5
Page 12

LR4 Four Channel Latching Relay Module
SDI-12 Command
aMC!
Command
Function/Description
Same as aM!
Values Returned
aMCn!
aC! Concurrent Measurements
Status All 4 Relays - 0 or 1
R1, R2, R3, R4 (4
values)
State
aCn! Concurrent Measurements
Same as M1 – M8
aCC!
aCCn!
Concurrent Measurement
Commands with Checksum.
See aM and aM1- aM8
Output is the
Same as M1 – M8
Output is the same
as
aM, aM1-aM8
Checksum is added
aD0! Send Data Dependent upon
command Sent
aV! Verification command S1,S2,V,WD
S1 = BootRom
Signature
S2 = Firmware
Signature
V = Supply
Voltage
Note1
WD = Watch Dog
Errors
aI! Send Identification 013CAMPBELL
LR4 2.0SN
SN = Serial number
(5 digits)
?! Address Query a
aAb! Change Address command b is the new address
aXR;0,R1,R2,R3,R4!
Extended
command
Sets Values of All 4 Relays to
either 0 or 1 state
Where R1 is 0 or 1 for Relay #1
a
Address is returned
with a value of 1.
Where R2 is 0 or 1 for Relay #2
Where R3 is 0 or 1 for Relay #3
Where R4 is 0 or 1 for Relay #4
aXR;N,V!
Extended
command
Set the State of an Individual
Relay.
N is 1-4 corresponding to
a
Address is returned
with a value of 1.
Relays #1 to #4,
V is 0 or 1 state
aR0! Same as aM! Same as aM!
command
aR1! to aR8! Same as aM1! to aM8! Same as M
commands
Where a = address of SDI-12 device.
Where n = numbers 1 to 9
6
Page 13

LR4 Four Channel Latching Relay Module
7.4 SDI-12 Programming Examples for CRBasic Datalogger
The following CRBasic examples can be used with the CR800, CR850,
CR1000, CR3000, and CR5000.
7.4.1 Reading Relay Status Values
The SDI-12 “M” commands can be used to read the status of the LR4 relays.
Alternatively to the SDI-12 “M” commands, the LR4 also supports the “R”
command. The SDI-12 “R” command is available to sensors that can respond
immediately to a measurement request as the LR4 is capable of doing so. This
can be advantageous in reducing the execution time for reading information
back from the LR4.
'Programming line to Read the state of all 4 relays with an M command
SDI12Recorder(RelayReadState(),1,0,"M!",1.0,0)
'Programming line to Read the state of Relay #3 with an M command
SDI12Recorder(RelayState_3,1,0,"M3!",1.0,0)
'Programming line to Read the state of all 4 relays with an R command
SDI12Recorder(RelayReadState(),1,0,"R!",1.0,0)
'Programming line to Read the state of Relay #3 with an R command
SDI12Recorder(RelayState_3,1,0,"R3!",1.0,0)
7.4.2 Setting Relay Values
Relays on the LR4 can only be set in SDI-12 by using extended commands as
follows:
'Set all four relays to the 0 state
SDI12Recorder(SetResult,1,0,"XR;0,0,0,0,0!",1.0,0)
'Set all four relays to the 1 state
SDI12Recorder(SetResult,1,0,"XR;0,1,1,1,1!",1.0,0)
'Set relay #3 to the 0 state
SDI12Recorder(SetResult,1,0,"XR;3,0!",1.0,0)
'Set relay #3 to the 1 state
SDI12Recorder(SetResult,1,0,"XR;3,1!",1.0,0)
7.4.3 CR200(X) Programming
The CR200(X) programming differs from the other CRBasic programming as
follows:
• The channel field does not exist.
• The address field does not exist as the address is placed in the first digit of
the command.
7
Page 14

LR4 Four Channel Latching Relay Module
• The CR200(X) does not support setting all four relays in one command.
The individual relay commands can only be used on the CR200(X).
'CR200(X) Set Relay #4 to State 1.
SDI12Recorder(RelayState_4, "0XR;4,1!", 1.0, 0)
7.5 Edlog Set Relay Example
Although this example is for the CR10X datalogger, the CR510 and CR23X
are programmed similarly. Edlog dataloggers use Instruction 68 after
Instruction 105 to send the extended commands.
;A P68 following this P105 sends extended commands
;Use program control to set the Relay3Val variable to either 0 or 1
1: SDI-12 Recorder (P105)
1: 0 SDI-12 Address
2: 0 Start Measurement (aM!) ;Leave at zero
3: 1 Port
4: 13 Loc [ Relay3Val ] ; This location contains the desired state value
5: 1.0 Multiplier
6: 0.0 Offset
2: Extended Parameters 4 Digit (P68)
1: 88 Option ;Decimal for Character 'X'
2: 82 Option ;Decimal for Character 'R'
3: 59 Option ;Decimal for Character ';'
4: 51 Option ;Deci mal for Char acter '3' ( 49 for#1, 50 for #2, an d 52 for #4 )
5: 44 Option ;Decimal for Character ','
6: 128 Option ;Relay state value from input location
7: 0000 Option
8: 0000 Option
;Read the state of all 4 relays
3: SDI-12 Recorder (P105)
1: 0 SDI-12 Address
2: 0 Start Measurement (aM!)
3: 1 Port
4: 1 Loc [ ReadRel1 ]
5: 1.0 Multiplier
6: 0.0 Offset
8
Page 15

LR4 Four Channel Latching Relay Module
FIGURE 6. Communication Jumpers
8. Using Modbus
The LR4 can operate in a Modbus mode. The three internal jumpers in the
LR4 need to be moved from the SDI-12 position to either the RS-232 or the
RS-485 position for Modbus operation. By default, the LR4 is shipped with
the jumpers set for SDI-12 operation. The jumpers must be moved prior to any
connection with an RS-232 or an RS-485 device (see Section 8.1, Wiring for
Modbus). FIGURE 6. Communication Jum per shows the jumper positions on
the PCB.
To move the internal jumpers:
• Ensure that the LR4 is completely disconnected.
• Remove the cover of the LR4 by removing the two Philips screws.
8.1 Wiring for Modbus
8.1.1 RS-232
RS-232 is supp
dataloggers.
For the Modbus/RS-232 mode, the CABLE2TP 2-twisted pair cable is
recommended to connect
datalogger connections.
orted by the CR200(X), CR800, CR850, CR1000, and CR3000
the LR4 to the datalogger. Table 2 shows the
CAUTION
Your s
LR4.
ystem should be powered down before wiring the
9
Page 16

LR4 Four Channel Latching Relay Module
LR4 Terminals Description Datalogger Terminal
TABLE 2. Modbus/RS-232 Wiring
8.1.2 RS-485
GND
POWER
Power Ground and Shield
Positive DC Power
G
12V
Source (9-30VDC)
SDI-12 /TX/A
Modbus master RS-232
COM port (Rx)
Receive
RX/B
Modbus master RS-232
COM port (Tx)
Transmit
DIG I/O
Not used Not used
The CR800, CR850, CR1000, CR3000, CR510, CR10X, and CR23X
dataloggers can use Modbus via RS-485. Please note that the CR510 and
CR10X require a Modbus operating system.
With the RS-485 mode, one MD485 Multidrop Modem is required. The
MD485 connects to the LR4 via the CABLE2TP cable and connects to the
datalogger via the 18663 Null Modem Cable. Also required is the 14291 Field
Power Cable to connect the LR4 power terminals to the MD485.
The DIG I/O port on the LR4 is not used. Table 3 shows the wiring. For more
information about using the MD485, refer to the MD485 Multidrop Modem’s
manual.
CAUTION
Your system should be powered down before wiring the
LR4.
TABLE 3. Modbus/RS-485 Wiring
LR4 Terminals
GND
Description
Power Ground and
MD485
Terminal
Shield
POWER
Positive DC Power
N/A Red
Source (9-30VDC)
SDI-12 /TX/A
Modbus master
A N/A
(RS-485A)
RX /B
Modbus master
B N/A
(RS-485B)
DIG. I/O
Not Used
14291 Field
Cable Wire
Color
Black
10
Page 17

8.2 Modbus Baud Rate
The default baud rate is 19200. Other baud rates are possible. Consult the
factory if other baud rates are required.
8.3 Modbus Mode
The LR4 supports RTU mode only; the ASCII mode is currently not
implemented.
8.4 Modbus Address
The default address assigned to the LR4 is 51. Other addresses can be assigned
to the LR4 by writing the new desired address to register 9999. Once this is
done, the LR4 will only respond to the new address.
If the address is unknown, the broadcast address (0) can be used to set the
address to a valid range (1 - 247).
8.5 Modbus Supported Commands
Read Holding Registers (0x03)
Write Single Register (0x06)
Write Multiple registers (0x10)
LR4 Four Channel Latching Relay Module
8.6 Modbus Operation
All I/O on the LR4 module are treated as registers. The following are the
register assignments for the LR4:
0001 – Relay #1
0002 – Relay #2
0003 – Relay #3
0004 – Relay #4
0005 – External I/O value (currently set as input-only)
0006 – LR4 supply voltage value in mV. 12250 = 12.25 volts
0007 – Signature of the Boot ROM
0008 – Signature of the Operating Firmware
0009 – The serial number of the LR4
9999 – Can be written to in order to change the LR4’s Modbus address
All of the Modbus registers on the LR4 module are unsigned integers (16-bit
values / single register).
11
Page 18

LR4 Four Channel Latching Relay Module
9. Firmware Update Procedure
FIGURE 7. Program Mode Jumper
The firmware on the LR4 can be updated by using a terminal program such as
Hyperterminal. The LR4 contains an internal female DB-9 connector to
facilitate an RS-232 connection.
Firmware updates should only be performed at an appropriate workstation with
static control procedures in place. Failure to follow the procedures may cause
damage to the device.
• Ensure that the LR4 is completely disconnected.
• Remove the cover of the LR4 by removing the two Philips screws.
• Locate the program mode jumper and move the jumper from Run to Prog
as shown in Figure 7.
• Connect the LR4 to power and ground only (make no other connections as
doing so may interfere with programming).
• Once power is applied, the status LED should remain on.
• Connect the computer to the RS-232 connector inside the LR4.
• Set up Hyperterminal or the communications program that is being used as
follows:
• Baud Rate: 38400
12
• Data Bits: 8
• Parity: None
• Stop Bits: 1
• Flow control: XON/XOFF
• 25-ms line delay (under ASCII setup)
Page 19

LR4 Four Channel Latching Relay Module
• From the Hyperterminal menu, select Transfer Send Text File.
• Select the new download text file and the transfer should begin.
• Initially, the LED should remain constantly on. When data transf
the LED will flash rapidly with each line that is reprogrammed.
• Upon completion, the LED will remain steadily on again.
• If there are any errors, the LED will flash to indicate that a
n error
occurred.
• If an error
is indicated by a flashing LED, cycle power to the LR4 and
attempt the reprogram process again.
• After the reprogramming is successful
, disconnect the LR4 from the power
supply.
• Move th
e jumper back from the Program position to the Run position.
• Re-assemble the device.
• Verify operation of the L
R4.
er begins,
13
Page 20

LR4 Four Channel Latching Relay Module
14
Page 21

Page 22

Campbell Scientific Companies
Campbell Scientific, Inc. (CSI)
815 West 1800 North
Logan, Utah 84321
UNITED STATES
www.campbellsci.com
Campbell Scientific Africa Pty. Ltd. (CSAf)
Somerset West 7129
SOUTH AFRICA
www.csafrica.co.za
Campbell Scientific Australia Pty. Ltd. (CSA)
Garbutt Post Shop QLD 4814
www.campbellsci.com.au
Campbell Scientific do Brazil Ltda. (CSB)
Rua Luisa Crapsi Orsi, 15 Butantã
CEP: 005543-000 São Paulo SP BRAZIL
www.campbellsci.com.br
Campbell Scientific Canada Corp. (CSC)
11564 - 149th Street NW
Edmonton, Alberta T5M 1W7
www.campbellsci.ca
Campbell Scientific Centro Caribe S.A. (CSCC)
300 N Cementerio, Edificio Breller
Santo Domingo, Heredia 40305
www.campbellsci.cc
Campbell Scientific Ltd. (CSL)
Shepshed, Loughborough LE12 9GX
UNITED KINGDOM
www.campbellsci.co.uk
Campbell Scientific Ltd. (France)
3 Avenue de la Division Leclerc
92160 ANTONY
www.campbellsci.fr
Campbell Scientific Spain, S. L.
Avda. Pompeu Fabra 7-9, local 1
www.campbellsci.es
Please visit www.campbellsci.com to obtain contact information for your local US or interna tional representative.
• info@campbellsci.com
PO Box 2450
• cleroux@csafrica.co.za
PO Box 8108
AUSTRALIA
• info@campbellsci.com.au
• suporte@campbellsci.com.br
CANADA
• dataloggers@campbellsci.ca
COSTA RICA
• info@campbellsci.cc
Campbell Park
80 Hathern Road
• sales@campbellsci.co.uk
FRANCE
• info@campbellsci.fr
08024 Barcelona
SPAIN
• info@campbellsci.es
 Loading...