

Page 1

LoggerLink
Mobile App for
Android
Revision: 3/14
Copyright © 2012- 2014
Campbell Scientific, Inc.
Page 2

Table of Contents
Introduction ..................................................................................... 1
Requirements ................................................................................... 1
Getting Started ................................................................................ 1
Datalogger Setup ........................................................................... 2
TCP Connection ...................................................................... 2
Bluetooth Connection ............................................................. 3
Connecting .................................................................................... 5
Connected ...................................................................................... 6
Disconnecting ................................................................................ 6
Datalogger Setup—Settings ............................................................ 7
Connecting ...................................................................................... 9
Current ............................................................................................. 9
Status ............................................................................................. 12
Historic .......................................................................................... 18
Collect Data ................................................................................... 21
Files ............................................................................................... 24
Settings .......................................................................................... 27
Disconnect ..................................................................................... 28
Off-line Files ................................................................................. 28
LoggerLink Settings ...................................................................... 29
End User License Agreement (EULA) for Mobile Applications . 31
i
Page 3

TOC
Introduction
Please read the End User License Agreement (EULA).
LoggerLink for Android™ is a simple yet powerful tool that lets
you communicate directly with your IP-enabled or Bluetoothenabled CR3000, CR1000, CR800-Series, and CR200-Series
dataloggers from your Android device. The app lets you
perform field maintenance tasks such as viewing and collecting
data, setting the clock, and downloading programs.
Requirements
LoggerLink for Android runs on Android 2.2 or greater.
Bluetooth communication requires Android 4.0.3 (Ice Cream
Sandwich) or greater.
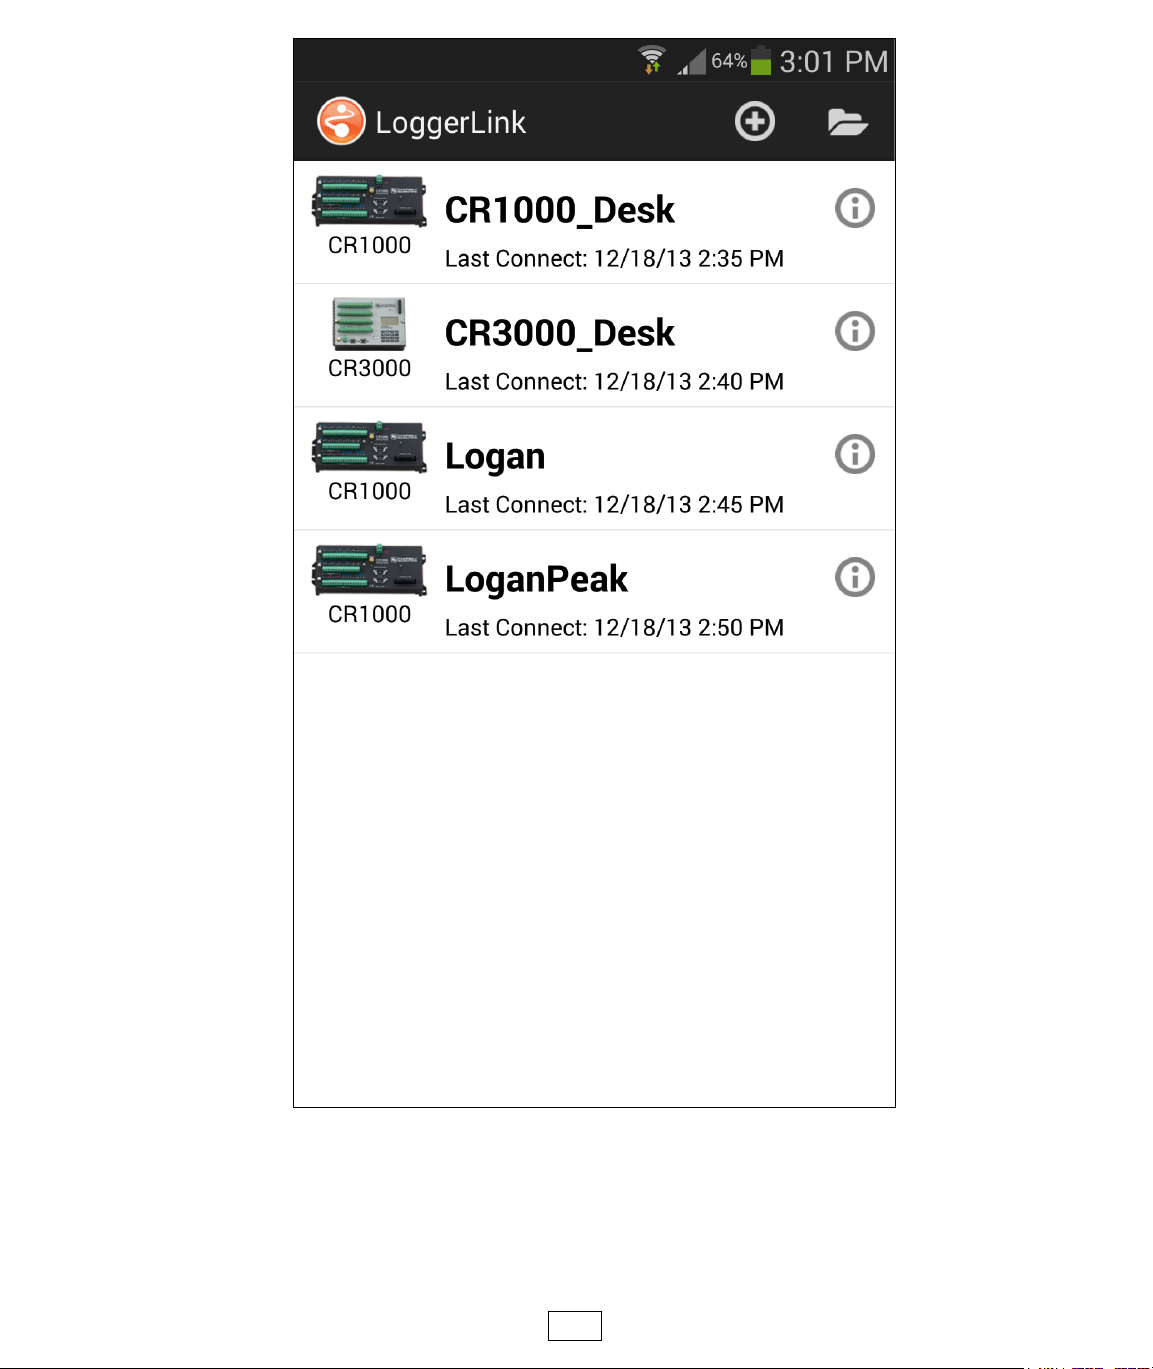
Getting Started
When LoggerLink is launched, you can add new dataloggers by
tapping the “+” button in the upper right corner of the screen.
Note that to use a TCP connection, your Android device must be
connected to a network through which you can reach your
datalogger. To use a Bluetooth connection, you must have an
RS-232 to Bluetooth adapter connected to your datalogger’s
RS-232 port.
Some LoggerLink functions are accessed from your Android
device’s Menu button. If your device does not have a Menu
1
Page 4

TOC
button, these functions can be accessed from the menu button on
the right end of the action bar at the top of the LoggerLink
screen.
Datalogger Setup
Note that you can only specify a TCP or a Bluetooth connection
for a single datalogger. If you enter information in the TCP
Settings, any previous Bluetooth Settings will be cleared. If you
select a Bluetooth connection, any previous TCP Settings will be
cleared.
TCP Connection
Depending on how your datalogger is connected to the
Internet, you may be able to use the UDP or PB discovery
buttons to set up your datalogger.
If your network supports UDP, simply tap the UDP discovery
button next to the TCP Address field. LoggerLink will
return a list of PakBus dataloggers that it discovers. Tap a
datalogger in the list to have its settings automatically filled in
to the Datalogger Setup screen. After manually filling in any
additional settings, tap the Save button to add the datalogger.
If your network does not support UDP, you may be able to use
the PakBus discovery button to set up your dataloggers.
2
Simply type in the IP Address and Port, and then tap the PB
discovery button next to the PakBus Address field.
LoggerLink will return a list of PakBus dataloggers that are
Page 5

TOC
reachable from that IP address. Tap a datalogger in the list to
have its settings automatically filled in to the Datalogger Setup
screen. After manually filling in any additional settings, tap
the Save button to add the datalogger.
If you are not able to use UDP or PakBus discovery, you will
need to manually enter the information about how LoggerLink
will connect to your datalogger.
Bluetooth Connection
Press the Bluetooth button at the top of the screen.
LoggerLink should automatically search for Bluetooth
devices. If not, press the discovery button next to the
Bluetooth Name field. It can take up to 12 seconds for device
names to be returned. Select the Bluetooth device from the
list returned by LoggerLink. Note that you cannot manually
enter the Bluetooth settings. A device must be selected from
the list returned by LoggerLink.
Note that Bluetooth connectivity is supported only in Android
versions 4.0.3 (Ice Cream Sandwich) and higher. The baud
rate of the RS-232-Bluetooth adapter must match that of the
datalogger. Handshaking should be disabled in the adapter.
(If that is not possible, handshaking must be enabled in the
datalogger.) Depending on the adapter, there may be other
settings that need to be set correctly for proper
communication.
3
Page 6

TOC
See the Datalogger Setup section for an explanation of each field
on the Datalogger Setup screen.
After you have finished setting up a datalogger, it will show up
in the list of dataloggers when LoggerLink is launched. You can
view a datalogger’s settings by tapping on the “i” button on the
right side of the datalogger. You can edit a datalogger’s settings
by tapping the “i” button, and then tapping the pencil icon on the
upper right. You can delete a datalogger by tapping the “i”
button, tapping your device’s Menu button, and then selecting
Delete Datalogger.
4
Page 7
TOC
Connecting
To connect to a datalogger, simply tap on it in the list of
dataloggers.
5
Page 8

TOC
Connected
After you have connected with your datalogger, a set of tabs will
appear at the top of the screen. Tapping on these tabs will allow
you to perform different operations on your datalogger such as
viewing data in a tabular or graphical format, monitoring status,
and collecting data.
If you leave LoggerLink or your device goes to sleep while
connected to a datalogger, you will be automatically
disconnected from the datalogger 10 minutes after any
background processes (such as data collection) complete. Note
that if you have Prevent Sleep enabled (see the LoggerLink
Settings section) your device will not automatically go to sleep
while you are connected to a datalogger. You must put the
device to sleep manually or disconnect from the datalogger.
Disconnecting
When you are finished interacting with your datalogger, tap your
device’s Menu button and select Disconnect (or simply tap your
device’s back button) to disconnect and return to the list of
dataloggers.
6
Page 9

TOC
Datalogger Setup—Settings
TCP Settings
Address
The TCP/IP Address of the device you will be
communicating with.
Port
The TCP/IP Port the device is accepting connections on.
This defaults to 6785.
Bluetooth Settings
Note that the Bluetooth Name and Address must be selected
from the list that LoggerLink returns after searching for
Bluetooth devices. They cannot be entered manually.
Name
The Name of the Bluetooth device you will be
communicating with.
Address
The Bluetooth Address of the device you will be
communicating with.
Datalogger Settings
Type
The Type of the datalogger you will be communicating
with.
7
Page 10

TOC
Name
The Name used to identify this datalogger in LoggerLink.
Data files collected from this datalogger will be stored in a
sub-directory with this name.
PakBus Settings
Address
The PakBus Address of the datalogger you will be
connecting to. The valid range is 1 through 4094.
However, PakBus addresses greater than 3999 are typically
reserved for PakBus routing devices and ports.
Neighbor
The PakBus address of the neighbor you will go through to
connect to your datalogger. A value of 0 means you will
connect directly to your datalogger.
Security Code
The Security Code is only required if security has been
enabled on your datalogger. In order for LoggerLink to
connect to a security-enabled datalogger, the security code
of at least level 3 is required. The level 3 security code
allows you to check the clock and collect data. The level 2
security code is required to set the clock or change public
variables. The level 1 security code unlocks the highest
level of security and allows you to change or retrieve the
program as well as change status table variables.
8
Page 11

TOC
TCP Password
If you are trying to connect via TCP to a datalogger with a
TCP Password enabled, you must enter the password in
order for any communications to occur with the datalogger.
Encryption Key
This setting specifies text that will be used to generate the
key for encrypting PakBus messages sent or received by this
datalogger. The key entered here must match the PakBus
Encryption Key setting in the device.
Connecting
To connect to a datalogger, simply tap on the datalogger in your
list of dataloggers or tap the Connect button while viewing the
datalogger’s settings. When connecting to a datalogger, a clock
check is sent to see if communications can be established. On
the first connection, table definitions are retrieved and stored.
Table definitions are only retrieved again, if a change is
detected.
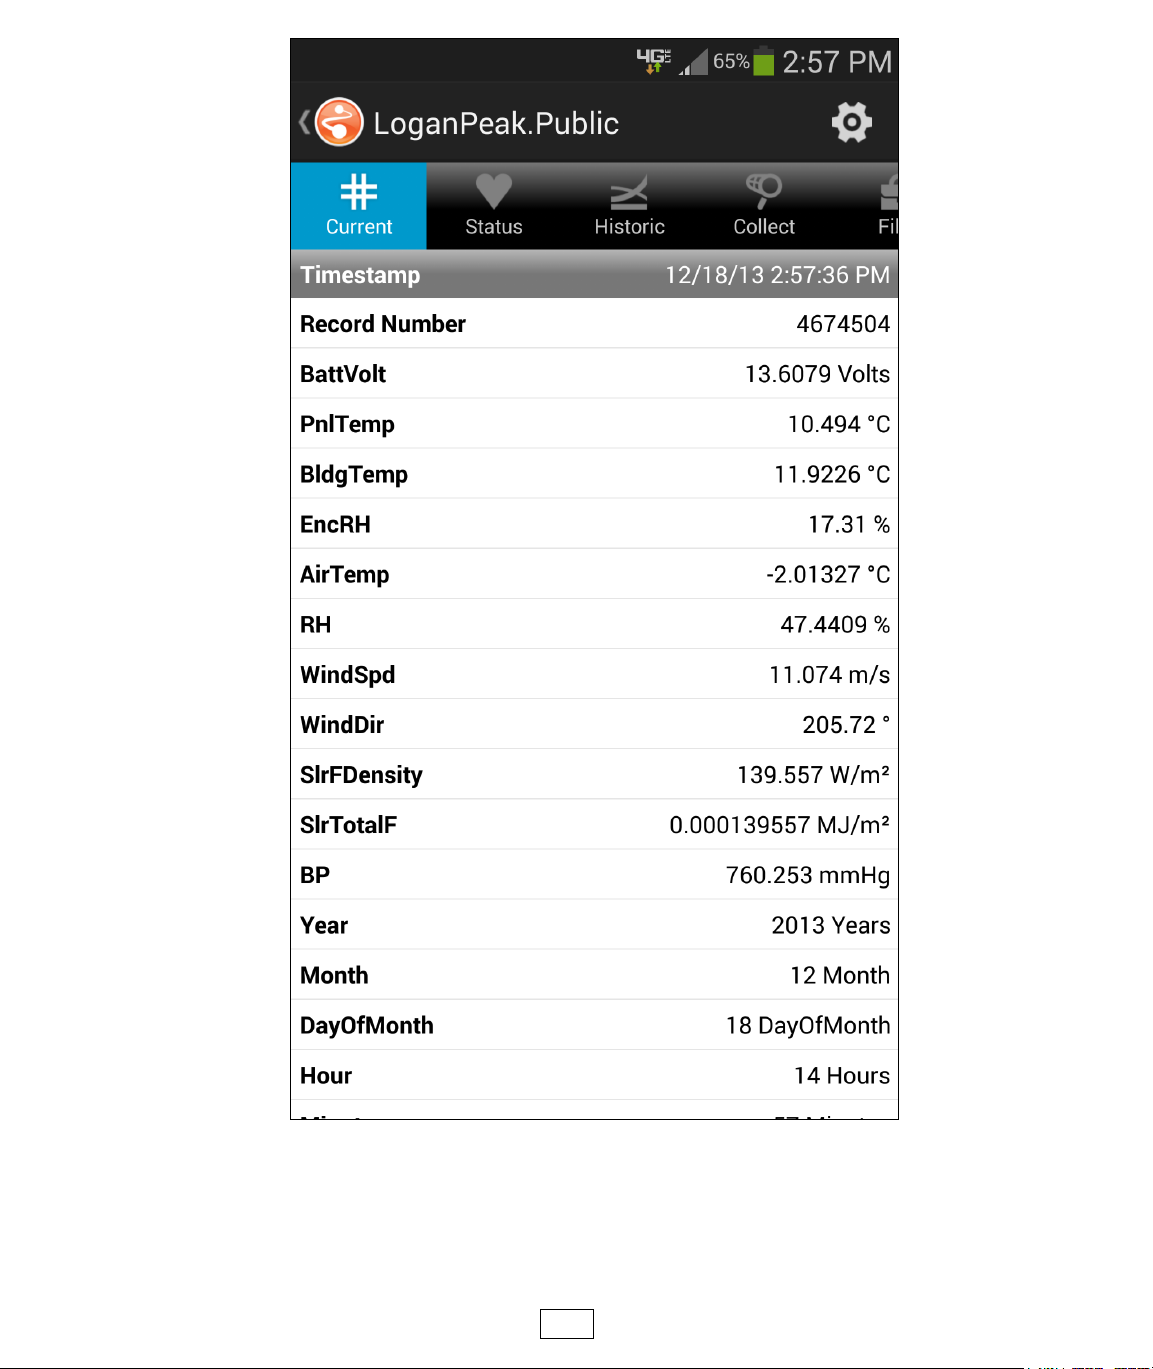
Current
The current page displays the current data record for the selected
table.
9
Page 12
TOC
Tap the icon in the upper right corner to select and configure a
different table.
10
Page 13

TOC
Values are formatted based on type and, by default, include the
units defined in the datalogger program.
Touch and hold a settable value to open a page that allows you
to change the value. Boolean values can be changed by tapping
the On checkbox.
Current Setup
Selected Table
Select the table that will be displayed.
Select Fields
Select the fields that will be displayed.
Polling Interval
Select the interval at which the data will be updated. The
LoggerLink App will never poll faster than 1 time per
second.
Show Units
Use the check box to specify whether or not units are
displayed.
Field Options
Each field may be edited. Tap the button to the right of the
field name. This will display customization options for that
particular field. These options include:
Title
The name that will be displayed for the field.
11
Units
The measurement units that will be displayed for the field.
Page 14

TOC
Precision
The number of digits of precision used. (Only displayed
if the field value is floating point type.)
Status
The status page shows important information about your
datalogger, the current program, errors, card status, the battery,
and the clock. It also allows you to send a program to your
datalogger.
12
Page 15

TOC
13
Page 16

Program Info
TOC
Current
The program currently running in the datalogger.
Started
The date the currently running program was started.
Signature
Signature of the compiled binary data structure for the
current program. This value is independent of comments
added or non-functional changes to the program.
Compile Results
The results reported by the datalogger when it compiled the
currently running program.
Send Program
Click to send a new program file to the datalogger. The file
must be accessible to the LoggerLink App. (Programs to be
sent to your datalogger must be stored on your device in the
Campbellsci/Programs directory. With your device
connected to a computer as a disk drive, you can navigate to
this directory to copy files to your device from the
computer.) When Send Program is clicked, a list of
available files is displayed. When a file is selected, it will
be sent, compiled, and assigned the Run Options of Run
Now and Run on Power-up.
14
Page 17

TOC
Datalogger Info
Station Name
A name assigned to this datalogger. Note that this is the
station name internal to the datalogger. It is not the name
given to the datalogger in LoggerLink.
OS Version
Specifies the version of the operating system currently in the
datalogger.
OS Signature
The signature of the current operating system.
Model No
The type of datalogger.
Serial No
Specifies the datalogger serial number assigned by the
factory when the datalogger was calibrated.
Power Up
The program that is flagged to run when the datalogger is
powered off and back on again.
Compile State
The state of the program after the datalogger tried to
compile it. Possible states are: No Program, Program
Running, Compile Failed, Program Paused, or Unknown.
Panel Temperature
Current panel temperature measurement. This measurement
15
is made in the background calibration.
Run Signature
Signature of the current running program file.
Page 18

TOC
Memory Size
The total amount of SRAM in the datalogger.
Memory Free
The amount of unallocated memory on the CPU (SRAM).
All free memory may not be available for data tables. As
memory is allocated and freed, holes of unallocated
memory, which are unusable for final storage, may be
created.
Errors
Watchdog Errors
The number of internal watchdog errors that have occurred
while running the current program.
Skipped Records
The number of records that have been skipped for a given
table. Skipped records are normally caused by skipped
scans.
Low 12V Count
The number of occurrences of the 12VLow signal being
asserted. When this condition is detected, the datalogger
ceases measurements and goes into a low power mode until
proper system voltage is restored.
Low 5V Count
The number of occurrences of the 5VExtLow signal being
16
asserted.
Page 19

TOC
Skipped Scans
The number of skipped scans that have occurred while
running the current program. Does not include scans
intentionally skipped as may occur with the use of ExitScan
and Do...Loop instructions.
Skipped System Scans
The number of scans skipped in the background calibration.
Skipped Slow Scans
The number of scans skipped in a SlowSequence.
Variable Out of Bounds
The number of times an array was accessed out of bounds.
Battery Info
Battery
The current value of the battery voltage. This measurement
is made in the background calibration.
Lithium
The current voltage of the lithium battery. This
measurement is updated in background calibration.
Card Info
Card Status
Reports the status of the CF card.
Bytes Free
The amount of space still available on the CF card.
17
Page 20

Clock Info
TOC
System
The local time of your device the last time the datalogger
clock was checked.
Logger
The time reported by the datalogger the last time its clock
was checked.
Set Time
Click to set the datalogger clock. You can choose to either
manually set the datalogger clock or to set the datalogger
clock to your device’s clock. An attempt will be made to set
the clock as closely as possible to the desired time, but there
may be some difference due to delay in the communication
link. This option should be used with caution, since it could
result in missing or duplicate timestamps when the
datalogger clock is changed.
Historic
The historic page displays data from a single datalogger table in
graph or tabular form.
18
Page 21

TOC
The first time you open the historic window for a datalogger,
you will automatically be taken to the Historic Setup. This
allows you to select the table and fields to be displayed. An
19
Page 22

TOC
option for showing the legend is also available. You can tap
Data Range to change the data range that will be displayed.
(The default data range is 1 hour.) Once fields have been
selected, you can tap on the name of a field to set the display
options for that field as described below. After completing the
setup, tap Save to display your selected data.
From the main Historic screen, tap Graph or Table at the top to
choose how to display your data. Tap the icon in the upper right
corner to go to Historic Setup and change the table, fields, data
range, or field options.
On a Graph, tap a point on the graph to display the data value
and timestamp at that point. You can zoom in on a part of the
graph by touching the screen with two fingers and then sliding
your fingers apart. You can zoom out by pinching your fingers
together. You can pan the graph by using one finger to drag the
graph to the desired location. A zoomed or panned graph can be
restored by selecting the Restore icon at the top.
On the table, the current data will be displayed in tabular format.
You may sort the data by time simply by tapping the Time
column heading.
Historic Setup
Select Table/Fields
Select the table and fields that will be displayed in the graph
20
and table.
Page 23

TOC
Show Legend
Determines whether a legend is shown on the graph.
Data Range
The range of data to be displayed in the graph and table.
Field Options
Field Title
The title used in the graph legend and the table column
heading.
Graph Axis
Each series can be displayed using the left or right axis of
the graph.
Graph Line Width
The width of the line used for the graph series.
Graph Line Color
The color of the line used for the graph series.
Graph Line Style
The style of the line used for the graph series.
Graph Symbol Size
The size of the symbol used for the graph series.
Graph Symbol Color
The color of the symbol used for the graph series.
Graph Symbol Style
The style of the symbol used for the graph series.
Collect Data
The Collect Data page is used to download data from your
datalogger and store it in data files on your device. These data
21
Page 24

TOC
files can then be viewed, emailed from your device, or opened in
another application.
22
Page 25

TOC
Collected data files are stored on your device in the
Campbellsci/Data/name directory, where name is the name
given to your datalogger when it was added to the LoggerLink
App. With your device connected to a computer as a disk drive,
you can navigate to this directory to copy your data files to the
computer.
Collection Option
Choose whether to Collect All data and overwrite existing
data files or only Collect New data and append the data to
the end of existing data files.
Datalogger Tables
A list of all the datalogger tables that can be selected for
data collection. Select the table(s) you wish to collect and
tap the Collect button. You can view collected data files by
tapping the eye icon next to the table name. While viewing
a data file, you can tap the information icon at the top to get
information about the datalogger that generated the data, the
datalogger program, and the data fields. Tap the historic
icon at the top to graph your data. You will be asked to
select the fields and data range to graph. Tap the share icon
at the top to share the file through email or a file-sharing
application such as DropBox. Tap your device’s Menu
button and then select Delete File to delete the data file.
23
Page 26

TOC
Files
The Files page is used to view the drives on your datalogger as
well as pause/resume the currently running program. You can
also view and edit files on your datalogger, send files to your
datalogger, get files from your datalogger, or set the run options
for a program file on your datalogger.
Current Program
Resume
The Resume button restarts the paused program while
preserving data files.
Pause
The Pause button pauses the currently running program and
preserves data files.
Drives
The drives on the datalogger. Selecting one of the drives
displays a list of all the files on the drive.
File List
You can refresh the list of all drives and files from the
datalogger by tapping the refresh icon in the upper right
corner.
Other functions are available by tapping your device’s Menu
24
button. (If your device does not have a Menu button, the
functions can be accessed by using the menu button in the
Page 27

TOC
upper right corner.) If no files are selected, you have the
option to format the drive or send files to the datalogger from
your device. If you have selected files, you can delete the
selected files from the datalogger or get the selected files from
the datalogger and save them to your device. If only a single
program file is selected, you also have the ability to view the
selected file or set the file’s run options.
Format Drive
Formatting an individual drive on the datalogger will
permanently delete all the files on that drive. If the
currently running program is found on the drive being
formatted, you will not be able to format the drive until the
Run Options on the running program are cleared.
Send File(s)
Files can be sent from your device to the datalogger.
Selecting this option will display a list of local files you can
select to send to the datalogger. (Files to be sent to your
datalogger must be stored on your device in the
Campbellsci/Programs directory. With your device
connected to a computer as a disk drive, you can navigate to
this directory to copy files to your device from the
computer.)
Delete File(s)
After selecting files from the datalogger file list, you can
25
delete the files from the datalogger.
Page 28

TOC
Get File(s)
After selecting files from the datalogger file list, you can get
the files from the datalogger and store them on your device.
(Retrieved files are stored on your device in the
Campbellsci/Data/name directory, where name is the name
given to your datalogger when it was added to the
LoggerLink App. With your device connected to a
computer as a disk drive, you can navigate to this directory
to copy your retrieved files to the computer.)
View File
After selecting a file from the datalogger file list, you can
view the file. While viewing a file, you can make edits.
You can then tap the disk icon on the upper right to save the
file to your device or to the datalogger. This allows you to
edit a program on your datalogger. Note that if you edit the
running program and save it to your datalogger, it will cause
the program to be recompiled. While viewing a file, you
can also tap the share icon on the upper right to share the
file. This will show a list of installed applications that are
registered to handle the current file type. This can be used
to email the file, or, if you have a file-sharing application,
such as Dropbox, this option can be used to get the file to
your computer.
Run Options
When Run Now is selected, the program will be compiled
26
and run in the datalogger. You may also choose to preserve
existing data tables on the datalogger, if there are no
Page 29

TOC
changes to the table structure of the new program. The Run
On Power-up will set this program file to run when the
datalogger loses power and then powers back up.
Settings
The Settings page is used to view and/or change the internal
settings of the datalogger. If needed, each setting has detailed
help available by tapping the “i” button next to the setting.
Writable values will have an arrow next to the value that can be
tapped to change the value. Once changes have been made to
any setting(s), they must be applied to the datalogger by tapping
the Apply button in the upper right corner. Applying changes
stores them to the datalogger. Any setting that has been changed
but not applied will have an asterisk next to the setting name.
When you leave the Settings tab, any changes that have not been
applied will be lost.
The following options are available by tapping your device’s
Menu button while in the Settings window.
Refresh
When the Refresh option is selected, the datalogger settings
will be retrieved and any pending setting changes will be
discarded.
Factory Defaults
When the Factory Defaults option is selected, the datalogger
27
settings will all be set back to their factory default values.
Page 30

TOC
Disconnect
When you are finished interacting with your datalogger, tap your
devices’s Menu button and select Disconnect (or simply tap your
device’s back button) to disconnect. Disconnecting from a
datalogger will end all communications with that datalogger and
take you back to your list of dataloggers.
Off-line Files
Pressing the folder button at the top of the main LoggerLink
screen (i.e., when you are not connected to a datalogger)
will display the files on your device that are associated with
LoggerLink. Tapping the Data folder will display a subfolder for each device that has collected data files or
retrieved image files. Tapping a device sub-folder will
display the data and image files from that device. The Log
folder contains a log file for each device, if logging is
enabled. The Program folder contains all program files
retrieved from all dataloggers. (This folder is also where
you should store program files that you copy from your
computer to your device.) The TableDefinitions folder
holds the table definitions file for each device.
A single datalogger’s files are also directly accessible by
tapping the folder icon at the top of the datalogger’s
information page (i.e., the page that is displayed by tapping
28
the “i” button next to the datalogger in the list of
dataloggers).
Page 31

TOC
Clicking the eye icon next to a file allows you to view that
file. While viewing a program file, you can edit the file and
then tap the disk icon in the upper right corner to save the
file to your device. While viewing a data file, tap the
historic icon at the top to graph your data or the share icon
at the top to share the file through email or a file-sharing
application such as DropBox.
Pressing your device’s Menu button with file(s) selected in a
list of files allows you to delete the file(s) or share the file(s)
through email or a file-sharing application such as DropBox.
If only one file is selected, you also have the option to
rename the file or view the file.
LoggerLink Settings
The following settings for the LoggerLink app can be viewed
and/or set by tapping your device’s Menu button from the main
LoggerLink screen (i.e., when you are not connected to a
datalogger) and selecting LoggerLink Settings.
Settings: Global Address
The PakBus address for this device. Each device in a
PakBus network must have a unique address. Valid PakBus
addresses are 1 through 4094. Typically, software such as
LoggerLink should use a value greater than 3999. This is
29
because, when a neighbor filter is set up, a PakBus
datalogger will answer a Hello message from any device
Page 32

TOC
with an ID greater than 3999, but will ignore devices with
IDs less than 4000 that are not in their neighbor list.
Settings: Prevent Sleep
The Prevent Sleep setting will prevent your device from
going to sleep when connected to a datalogger.
Troubleshooting: Logging Enabled
Enabling logging will create a low level log file of all
communications with a datalogger. Note that enabling
logging will slow down LoggerLink. Logging should only
be enabled, if you are experiencing communication
problems.
Log files are stored on your device in the Campbellsci/Logs
directory. The filename is name.log, where name is the
name given to your datalogger when it was added to the
LoggerLink app. With your device connected to a computer
as a disk drive, you can navigate to this directory to copy
your log files to the computer.
Information: Version
The version of LoggerLink.
30
Page 33

TOC
End User License Agreement (EULA) for Mobile Applications
NOTICE OF AGREEMENT: Please carefully read this EULA.
By installing or using this software, You are agreeing to comply
with the following terms and conditions. If you do not want to be
bound by this EULA, You must promptly remove the Licensed
Application and any versions thereof from your mobile device.
By accepting this agreement, you acknowledge that this
agreement is concluded between You and Campbell Scientific,
Inc. only, and no other third parties. As such, Campbell
Scientific, Inc. is solely responsible for the Licensed Application
and the content thereof, and reserves all rights not expressly
granted to You.
DEFINITIONS: Licensed Application – The mobile application
developed by Campbell Scientific, Inc., that is subject to this
EULA.
Mobile Device – Any smart phone, tablet or other device defined
as a supported device in Campbell Scientific, Inc.’s product
literature, website, or Application Store presence.
Application Store – The Application Store refers to the Apple
Store, Google Play, or other distribution channel for the
Licensed Application.
31
Page 34

TOC
LICENSE FOR USE: The Licensed Application is licensed, not
sold, to you for use under the following terms and conditions:
Scope: This license is limited to a non-transferable license to use
the Licensed Application on any supported mobile device that
You own or control. This license does not allow You to use the
Licensed Application on any device that You do not own or
control, and You may not distribute or make the Licensed
Application available over a network where it could be used by
multiple devices at the same time. You may not rent, lease, lend,
sell, redistribute or sublicense the Licensed Application. You
may not copy, decompile, reverse engineer, disassemble, attempt
to derive the source code of, modify, or create derivative works
of the Licensed Application, any updates, or any part thereof
(except as and only to the extent any foregoing restriction is
prohibited by applicable law). Any attempt to do so is a violation
of the rights of Campbell Scientific, Inc. If You breach this
restriction, You may be subject to prosecution and damages. The
terms of this license will govern any upgrades provided by
Campbell Scientific, Inc. that replace and/or supplement the
original Licensed Application, unless such upgrade is
accompanied by a separate license in which case the terms of
that license will govern.
Consent to Use of Data: You agree that Campbell Scientific, Inc.
may collect and use technical data and related information that is
provided by the Application Store, including but not limited to
technical information about Your device, system and application
32
Page 35

TOC
software, and peripherals, that is gathered periodically to
facilitate the provision of software updates, product support and
other services to You (if any) related to the Licensed
Application. Campbell Scientific, Inc. may use this information,
as long as it is in a form that does not personally identify You, to
improve its products or to provide services or technologies to
You.
MAINTENANCE AND SUPPORT: Campbell Scientific or its
Companies are responsible for any maintenance and support
services with respect to the Licensed Application as required by
law. No other third party, including Apple or Google, has any
obligation to furnish maintenance and support services with
respect to the Licensed Application.
Requests for maintenance, support, or other inquiries should be
addressed to Campbell Scientific, Inc. or a Campbell Scientific
company covering your region, as noted in CAMPBELL
SCIENTIFIC COMPANIES below.
WARRANTIES: Campbell Scientific, Inc. is solely responsible
for addressing any claims You may have relating to the use of
the Licensed Application. The following warranties are in effect
for thirty (30) days from the date of original purchase. These
warranties are not extended by the installation of upgrades.
Campbell Scientific warrants that the software itself will
perform substantially in accordance with the specifications set
forth in the user manual when properly installed and used in a
33
Page 36

TOC
manner consistent with the published recommendations,
including recommended system requirements. CSI disclaims all
other warranties including those implied at law. Campbell
Scientific does not warrant that the software will meet Your
requirements for use, or that the software or documentation are
error free, or that the operation of the software will be
uninterrupted. You expressly acknowledge and agree that use of
the Licensed Application is at Your sole risk and that the entire
risk as to satisfactory quality, performance, accuracy and effort
is with You.
This warranty does not cover any software that has been altered
or changed in any way by anyone other than Campbell
Scientific. Campbell Scientific is not responsible for problems
caused by computer or mobile device hardware, computer or
mobile device operating systems, or the use of Campbell
Scientific’s software with non-Campbell Scientific software or
hardware.
LIMITATION OF LIABILITIES: All warranties of
merchantability and fitness for a particular purpose are
disclaimed and excluded. Your sole and exclusive remedy is set
forth in this limited warranty. In no event shall Campbell
Scientific, Inc. be liable for personal injury, or any incidental,
special, indirect or consequential damages whatsoever,
including, without limitation, damages for loss of profits, loss of
data, business interruption or any other commercial damages or
losses, arising out of or related to your use or inability to use the
34
Page 37

TOC
Licensed Application, however caused, regardless of the theory
of liability (contract, tort or otherwise) and even if Campbell
Scientific, Inc. has been advised of the possibility of such
damages. Campbell Scientific’s aggregate liability arising from
or relating to this agreement or the software or documentation is
limited to the purchase price paid by You.
INTELLECTUAL PROPERTY RIGHTS: In the event of any
third party claim that the Licensed Application or Your
possession and use of that Licensed Application infringes that
third party’s intellectual property rights, Campbell Scientific,
Inc. will be solely responsible for the investigation, defense,
settlement and discharge of any such intellectual property
infringement claim.
LEGAL COMPLIANCE: By accepting this agreement, You
represent and warrant that You (i) are not located in a country
that is subject to a U.S. Government embargo, or that has been
designated by the U.S. Government as a “terrorist supporting”
country; and (ii) are not listed on any U.S. Government list of
prohibited or restricted parties.
COPYRIGHT: This software is protected by United States
copyright law and international copyright treaty provisions. This
software may not be sold, included or redistributed in any other
software, or altered in any way without prior written permission
from Campbell Scientific. All copyright notices and labeling
must be left intact.
35
Page 38

TOC
TERMINATION: This license is effective until terminated by
You or by Campbell Scientific, Inc. Your rights under this
license will terminate automatically with or without notice from
Campbell Scientific, Inc. if You fail to comply with any term(s)
of this license or this EULA. Upon termination of the license,
You shall cease all use of the Licensed Application, and destroy
all copies, full or partial, of the Licensed Application.
36
Page 39

TOC
Campbell Scientific Companies
Campbell Scientific, Inc. (CSI)
815 West 1800 North
Logan, Utah 84321
UNITED STATES
www.campbellsci.com • info@campbellsci.com
Campbell Scientific Africa Pty. Ltd. (CSAf)
Somerset West 7129
SOUTH AFRICA
www.csafrica.co.za • cleroux@csafrica.co.za
Campbell Scientific Australia Pty. Ltd. (CSA)
Garbutt Post Shop QLD 4814
www.campbellsci.com.au • info@campbellsci.com.au
Campbell Scientific do Brasil Ltda. (CSB)
Rua Apinagés, nbr. 2018 ─ Perdizes
CEP: 01258-00 ─ São Paulo ─ SP
www.campbellsci.com.br • vendas@campbellsci.com.br
Campbell Scientific Canada Corp. (CSC)
14532 – 131 Avenue NW
Edmonton AB T5L 4X4
www.campbellsci.ca • dataloggers@campbellsci.ca
Campbell Scientific Centro Caribe S.A. (CSCC)
300 N Cementerio, Edificio Breller
Santo Domingo, Heredia 40305
www.campbellsci.cc • info@campbellsci.cc
Campbell Scientific Ltd. (CSL)
80 Hathern Road
Shepshed, Loughborough LE12 9GX
UNITED KINGDOM
www.campbellsci.co.uk • sales@campbellsci.co.uk
Campbell Scientific Ltd. (CSL France)
3 Avenue de la Division Leclerc
92160 ANTONY
www.campbellsci.fr • info@campbellsci.fr
Campbell Scientific Ltd. (CSL Germany)
Fahrenheitstraße 13
www.campbellsci.de • info@campbellsci.de
Campbell Scientific Spain, S. L. (CSL Spain)
Avda. Pompeu Fabra 7-9, local 1
08024 Barcelona
www.campbellsci.es • info@campbellsci.es
Please visit www.campbellsci.com to obtain contact information for your local US or international representative.
PO Box 2450
PO Box 8108
AUSTRALIA
BRASIL
CANADA
COSTA RICA
Campbell Park
FRANCE
28359 Bremen
GERMANY
SPAIN
 Loading...