

Page 1

LNDB
Revision: 7/10
Copyright © 2010
Campbell Scientific, Inc.
Page 2

Page 3

License for Use
This software is protected by United States copyright law and international
copyright treaty provisions. The installation and use of this software constitutes
an agreement to abide by the provisions of this license agreement.
Campbell Scientific grants you a non-exclusive license to use this software in
accordance with the following:
(1) The purchase of this software allows you to install and use the software on
one computer only.
(2) This software cannot be loaded on a network server for the purposes of
distribution or for access to the software by multiple operators. If the
software can be used from any computer other than the computer on which
it is installed, you must license a copy of the software for each additional
computer from which the software may be accessed.
(3) If this copy of the software is an upgrade from a previous version, you
must possess a valid license for the earlier version of software. You may
continue to use the earlier copy of software only if the upgrade copy and
earlier version are installed and used on the same computer. The earlier
version of software may not be installed and used on a separate computer
or transferred to another party.
(4) This software package is licensed as a single product. Its component parts
may not be separated for use on more than one computer.
(5) You may make one (1) backup copy of this software onto media similar to
the original distribution, to protect your investment in the software in case
of damage or loss. This backup copy can be used only to replace an
unusable copy of the original installation media.
This software may not be sold, included or redistributed in any other software,
or altered in any way without prior written permission from Campbell
Scientific. All copyright notices and labeling must be left intact.
Page 4

Limited Warranty
The following warranties are in effect for ninety (90) days from the date of
shipment of the original purchase. These warranties are not extended by the
installation of upgrades or patches offered free of charge.
Campbell Scientific warrants that the installation media on which the software
is recorded and the documentation provided with it are free from physical
defects in materials and workmanship under normal use. The warranty does not
cover any installation media that has been damaged, lost, or abused. You are
urged to make a backup copy (as set forth above) to protect your investment.
Damaged or lost media is the sole responsibility of the licensee and will not be
replaced by Campbell Scientific.
Campbell Scientific warrants that the software itself will perform substantially
in accordance with the specifications set forth in the instruction manual when
properly installed and used in a manner consistent with the published
recommendations, including recommended system requirements. Campbell
Scientific does not warrant that the software will meet licensee’s requirements
for use, or that the software or documentation are error free, or that the
operation of the software will be uninterrupted.
Campbell Scientific will either replace or correct any software that does not
perform substantially according to the specifications set forth in the instruction
manual with a corrected copy of the software or corrective code. In the case of
significant error in the installation media or documentation, Campbell
Scientific will correct errors without charge by providing new media, addenda,
or substitute pages. If Campbell Scientific is unable to replace defective media
or documentation, or if it is unable to provide corrected software or corrected
documentation within a reasonable time, it will either replace the software with
a functionally similar program or refund the purchase price paid for the
software.
All warranties of merchantability and fitness for a particular purpose are
disclaimed and excluded. Campbell Scientific shall not in any case be liable for
special, incidental, consequential, indirect, or other similar damages even if
Campbell Scientific has been advised of the possibility of such damages.
Campbell Scientific is not responsible for any costs incurred as a result of lost
profits or revenue, loss of use of the software, loss of data, cost of re-creating
lost data, the cost of any substitute program, telecommunication access costs,
claims by any party other than licensee, or for other similar costs.
This warranty does not cover any software that has been altered or changed in
any way by anyone other than Campbell Scientific. Campbell Scientific is not
responsible for problems caused by computer hardware, computer operating
systems, or the use of Campbell Scientific’s software with non-Campbell
Scientific software.
Licensee’s sole and exclusive remedy is set forth in this limited warranty.
Campbell Scientific’s aggregate liability arising from or relating to this
agreement or the software or documentation (regardless of the form of action;
e.g., contract, tort, computer malpractice, fraud and/or otherwise) is limited to
the purchase price paid by the licensee.
Page 5

LNDB Table of Contents
PDF viewers note: These page numbers refer to the printed version of this document. Use
the Adobe Acrobat® bookmarks tab for links to specific sections.
1. Introduction..................................................................1
1.1 Supported Databases.................................................................................1
1.2 Supported Operating Systems...................................................................1
2. Getting Started.............................................................2
2.1 Installing and Starting the LNDB Service ................................................2
2.2 Selecting a LoggerNet Server...................................................................4
2.3 Selecting a Database .................................................................................5
2.3.1 SQL Server Compact ......................................................................5
2.3.2 SQL Server .....................................................................................6
2.3.3 MySQL ...........................................................................................7
2.3.4 Remember and Automatically Login..............................................7
3. Selecting Datalogger Tables....................................... 8
3.1 Station Setup.............................................................................................9
3.2 Table Setup .............................................................................................10
4. Options .......................................................................11
5. Resolving a Conflict .................................................. 12
5.1 Archive Database Table..........................................................................13
5.2 Modify Database Table...........................................................................14
6. Checking Status and Reviewing Data......................15
6.1 Status Tab ...............................................................................................15
6.2 Data Review Tab ....................................................................................16
6.2.1 Deleting or Archiving Tables........................................................17
6.3 Significant Events Tab............................................................................17
6.4 Status Messages Tab...............................................................................18
6.5 Log Files.................................................................................................19
6.6 Status Bar................................................................................................19
7. Importing Data ...........................................................20
7.1 Database Selection..................................................................................20
7.2 Import From............................................................................................21
7.3 Import Into..............................................................................................21
7.4 Data File Columns vs. Database Table Columns....................................21
7.5 Import Requirements ..............................................................................21
7.6 Import .....................................................................................................21
i
Page 6

LNDB Table of Contents
8. Exporting Data ...........................................................22
9. QuickReports .............................................................29
10. Troubleshooting.......................................................36
Appendices
8.1 Database Selection ................................................................................. 23
8.2 Export From........................................................................................... 23
8.3 Export Into ............................................................................................. 24
8.4 Check for Missing Records.................................................................... 25
8.5 Export..................................................................................................... 26
8.6 Select Columns ...................................................................................... 27
8.7 Array Compatible CSV Options ............................................................ 28
8.8 Representation of NULL values ............................................................ 29
9.1 Database Selection ................................................................................. 29
9.2 QuickReports Setup ............................................................................... 32
9.3 Customizing Your Report ...................................................................... 34
9.4 Generating Your Report......................................................................... 35
A. Data Type Mapping.................................................. A-1
B. SQL Commands ...................................................... B-1
ii
Page 7

LNDB
1. Introduction
LNDB moves data from one LoggerNet server into a single database. The two
main components of LNDB are LNDB Manager and LNDB Engine. LNDB
Manager is used to set up a database and select the datalogger data tables that
will be stored in the database. It also provides tools to monitor the LNDB
Engine and to review the database data. LNDB Engine runs as a service and
sends the selected data from the LoggerNet data cache to the database. LNDB
also includes utilities for importing and exporting data.
NOTE
LNDB works with only one LoggerNet server and a single
database. Only one copy of LNDB can be running on a
computer. If you need to work with multiple LoggerNet servers,
you will need multiple copies of LNDB running on separate
computers. Each will also need its own separate database.
1.1 Supported Databases
LNDB has been tested and shown to work with the following databases:
Microsoft® SQL Server® 2005 Express
Microsoft® SQL Server® 2008 Express
Microsoft® SQL Server® Compact 3.5
MySQL 5.0 and MySQL 5.1 (with MySQL 3.51.27 or 5.1.6 ODBC
database driver, note that earlier versions of 5.x ODBC database drivers
have known issues)
NOTES
LNDB may work with other versions of these databases.
An SQL Server Compact database is limited to 4 GB in size. If
you anticipate the need for a larger database, a SQL Server or
MySQL database should be used.
Using a server-based database such as SQL Server or MySQL
will be more robust and may give better performance.
MySQL does not support sub-second data.
1.2 Supported Operating Systems
LNDB runs on Windows® XP, Windows® Vista, or Windows® 7.
1
Page 8
LNDB
2. Getting Started
2.1 Installing and Starting the LNDB Service
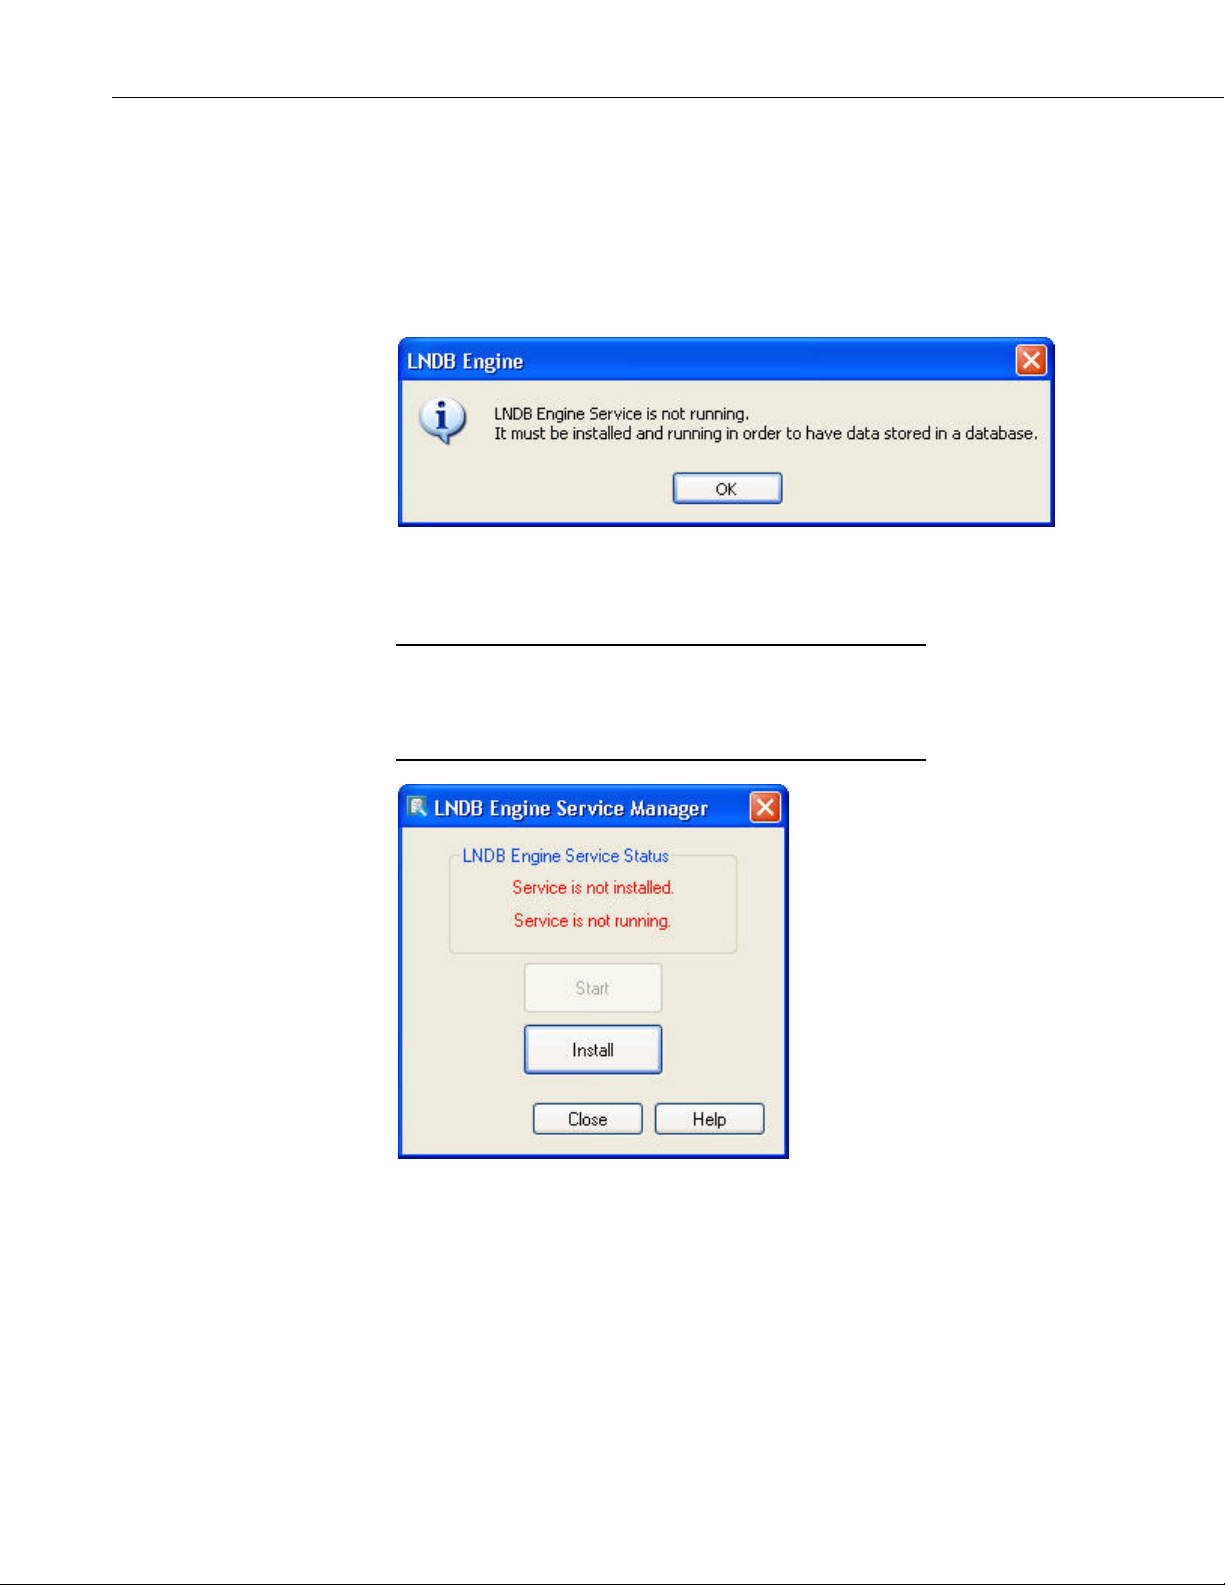
The first time you open LNDB, the following error message will occur
indicating that the LNDB Engine Service is not running.
Once you press OK, the LNDB Engine Service Manager will open. This utility
is used to install LNDB as a service and to enable/disable that service as
required.
NOTE
You must have administrative rights on your computer in order
to run the Service Manager. If you do not have administrative
rights, an error message will be displayed when the Service
Manager tries to open.
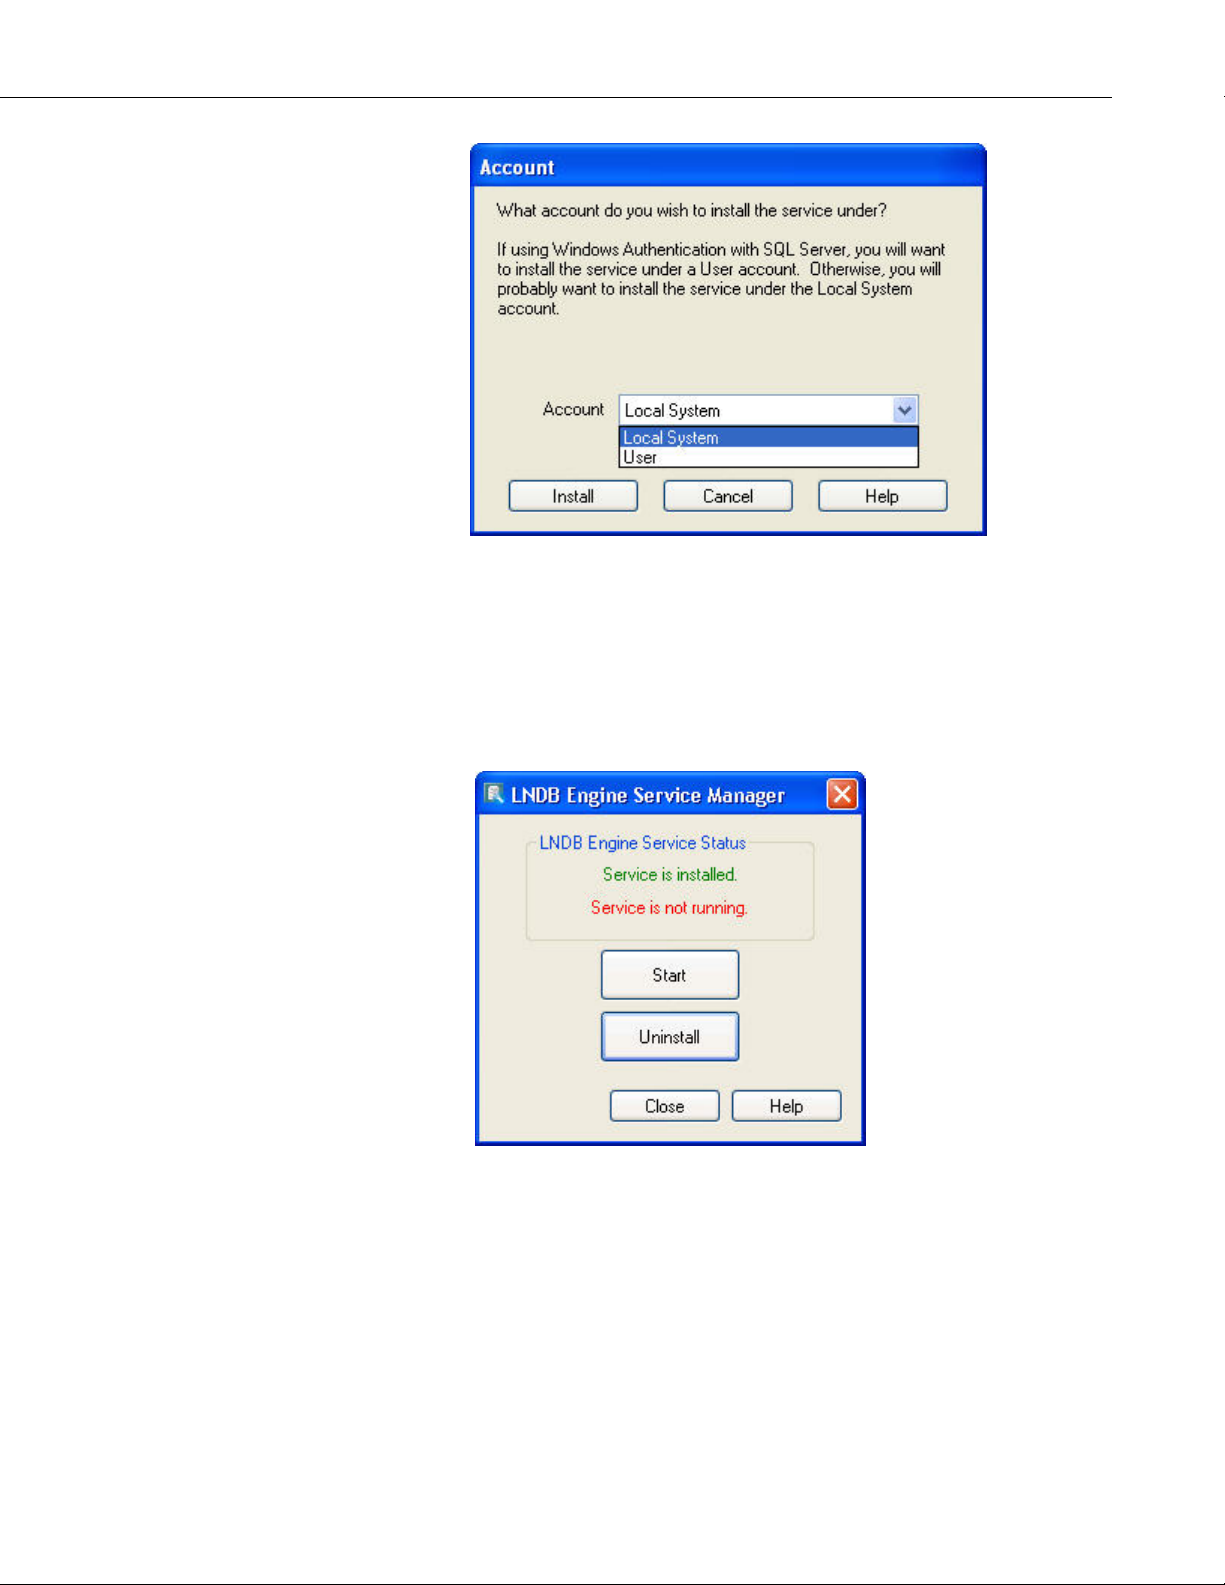
Press the Install button to install LNDB as a service. You will then be asked
what account to install the service under.
2
Page 9
LNDB
You can choose to install the service under the Local System account or under
a User account. Note that a User account is most likely necessary if you are
using Windows Authentication in SQL Server. In most other cases, the Local
System account can be used. If User account is chosen, you will be asked to
provide a username and password.
Once the application is installed as a service, press the Start button on the
LNDB Engine Service Manager window to start the service.
3
Page 10
LNDB
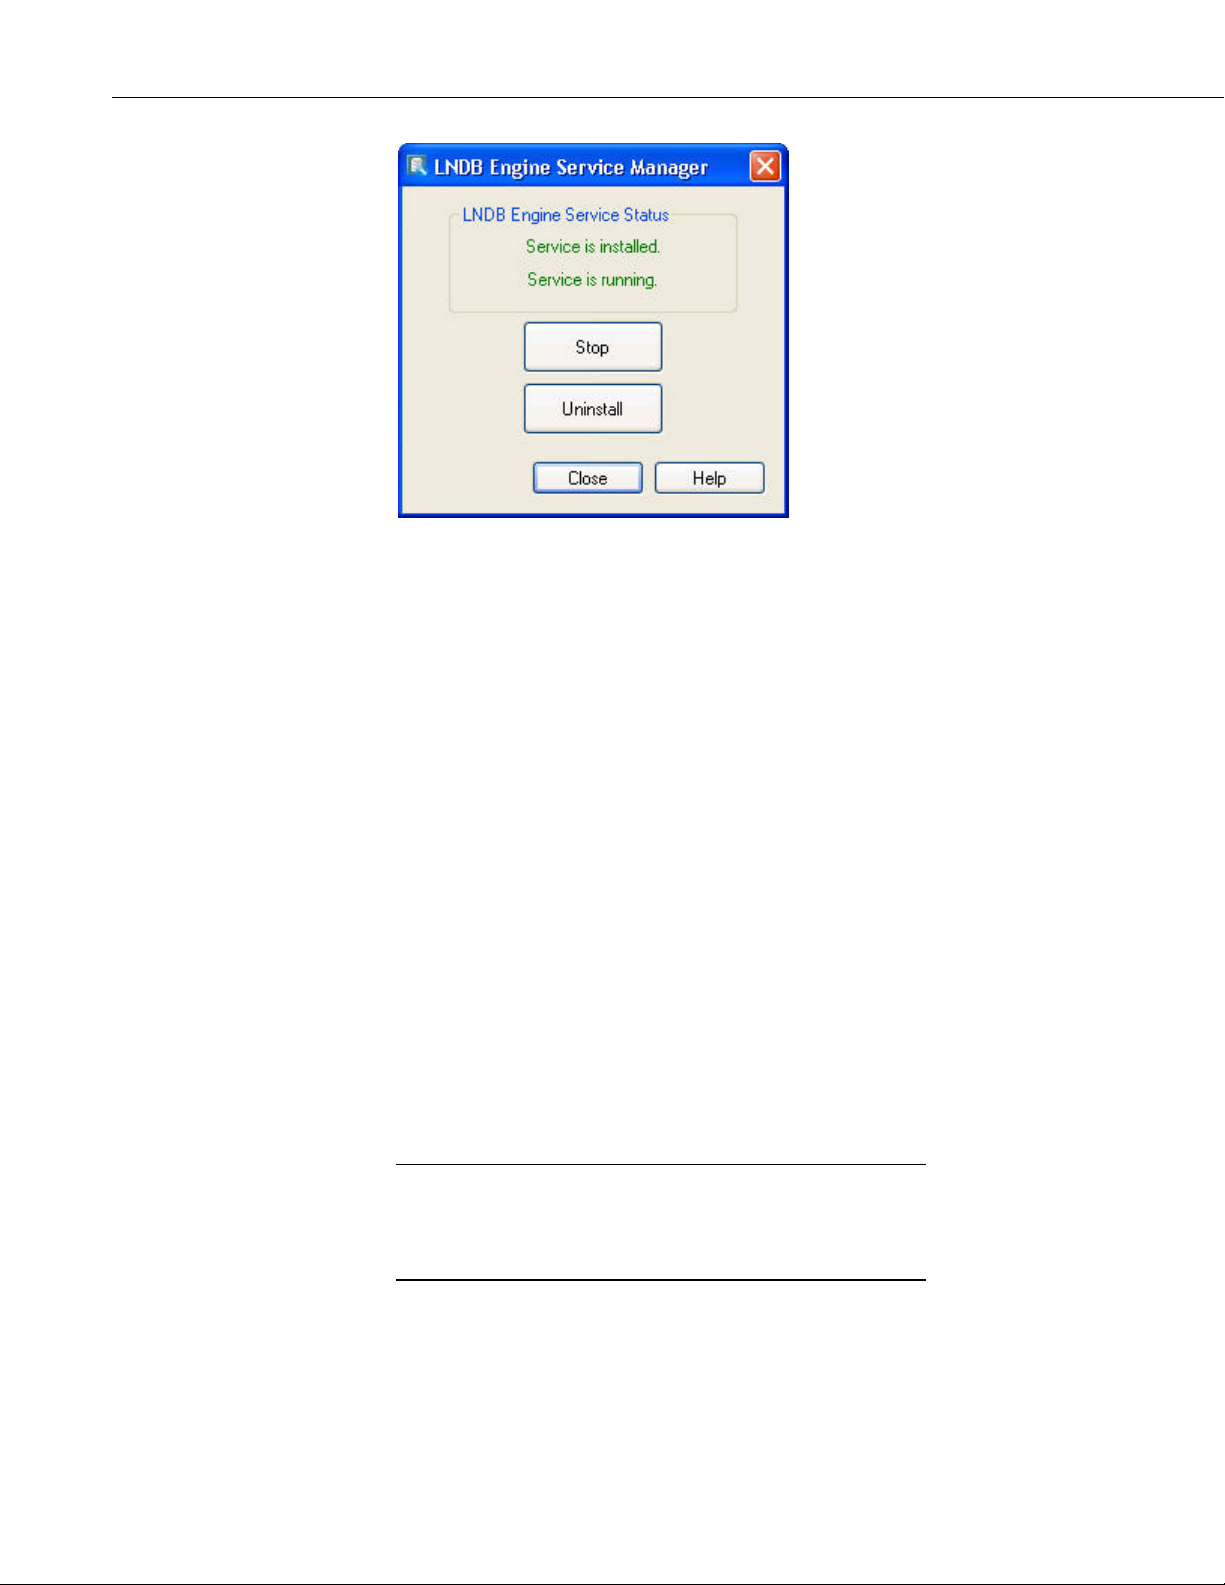
You can then press the Close button to close the LNDB Engine Service
Manager.
Once LNDB is installed as a service, you can open the LNDB Engine Service
Manager from the File | Configure LNDB Engine Service menu item or by
double-clicking on the LNDB Engine Status Label on the Status Bar.
2.2 Selecting a LoggerNet Server
The Login to LoggerNet Server dialog box comes up automatically after
LNDB is installed. It can be opened at any time from the File | Select
LoggerNet Server menu item or by double-clicking on the LN Connection
Status Label on the Status Bar.
This dialog box allows you to specify the computer running the LoggerNet
server to which LNDB should connect. The dialog box has the following
fields:
Server Address - This is the TCP/IP address of the computer
running the LoggerNet server to which you are trying to connect.
This must be the valid name of an existing computer or a TCP/IP
address (in the form ###.###.###.### consisting of the IP network
number, ###.###.###, and the host number, ###). If the software
server resides on the same computer as the client, you can simply
type in LocalHost for the server name.
NOTE
If you have used a command line argument to change
LoggerNet’s default port number, you must specify this alternate
port number when entering the Server Address (e.g.,
LocalHost:6700 or 192.168.7.123:6700).
Username - Your username on the software server.
4
Password - Your password for the software server.
Page 11
LNDB
The User Name and Password fields are required only if your server
administrator has set up security on your system.
Each time you start the client, you will be prompted to enter this
information. However, you can save the login information by
selecting the Remember username and password check box, or
you can select the Automatically login to this server check box to
skip this window and use the information from the last session.
NOTE
All information must be saved for the LNDB Engine. The
Remember username and password check box and the
Automatically login to this server check box apply only to the
LNDB Manager.
2.3 Selecting a Database
The Select Database dialog box comes up automatically the first time LNDB is
opened once the service is installed and started and the server is selected. At
other times, it can be opened from the File | Select Database menu item or by
double-clicking on the DB Connection Status Label on the Status Bar. LNDB
supports SQL Server Compact, SQL Server, and MySQL databases. Once you
select a database, fill in the necessary information, and click OK, a connection
attempt will be made. If the connection succeeds, the database dialog will be
closed and the connection will be used for the application. If the connection
fails, a message will be shown and the Select Database dialog will continue to
be shown.
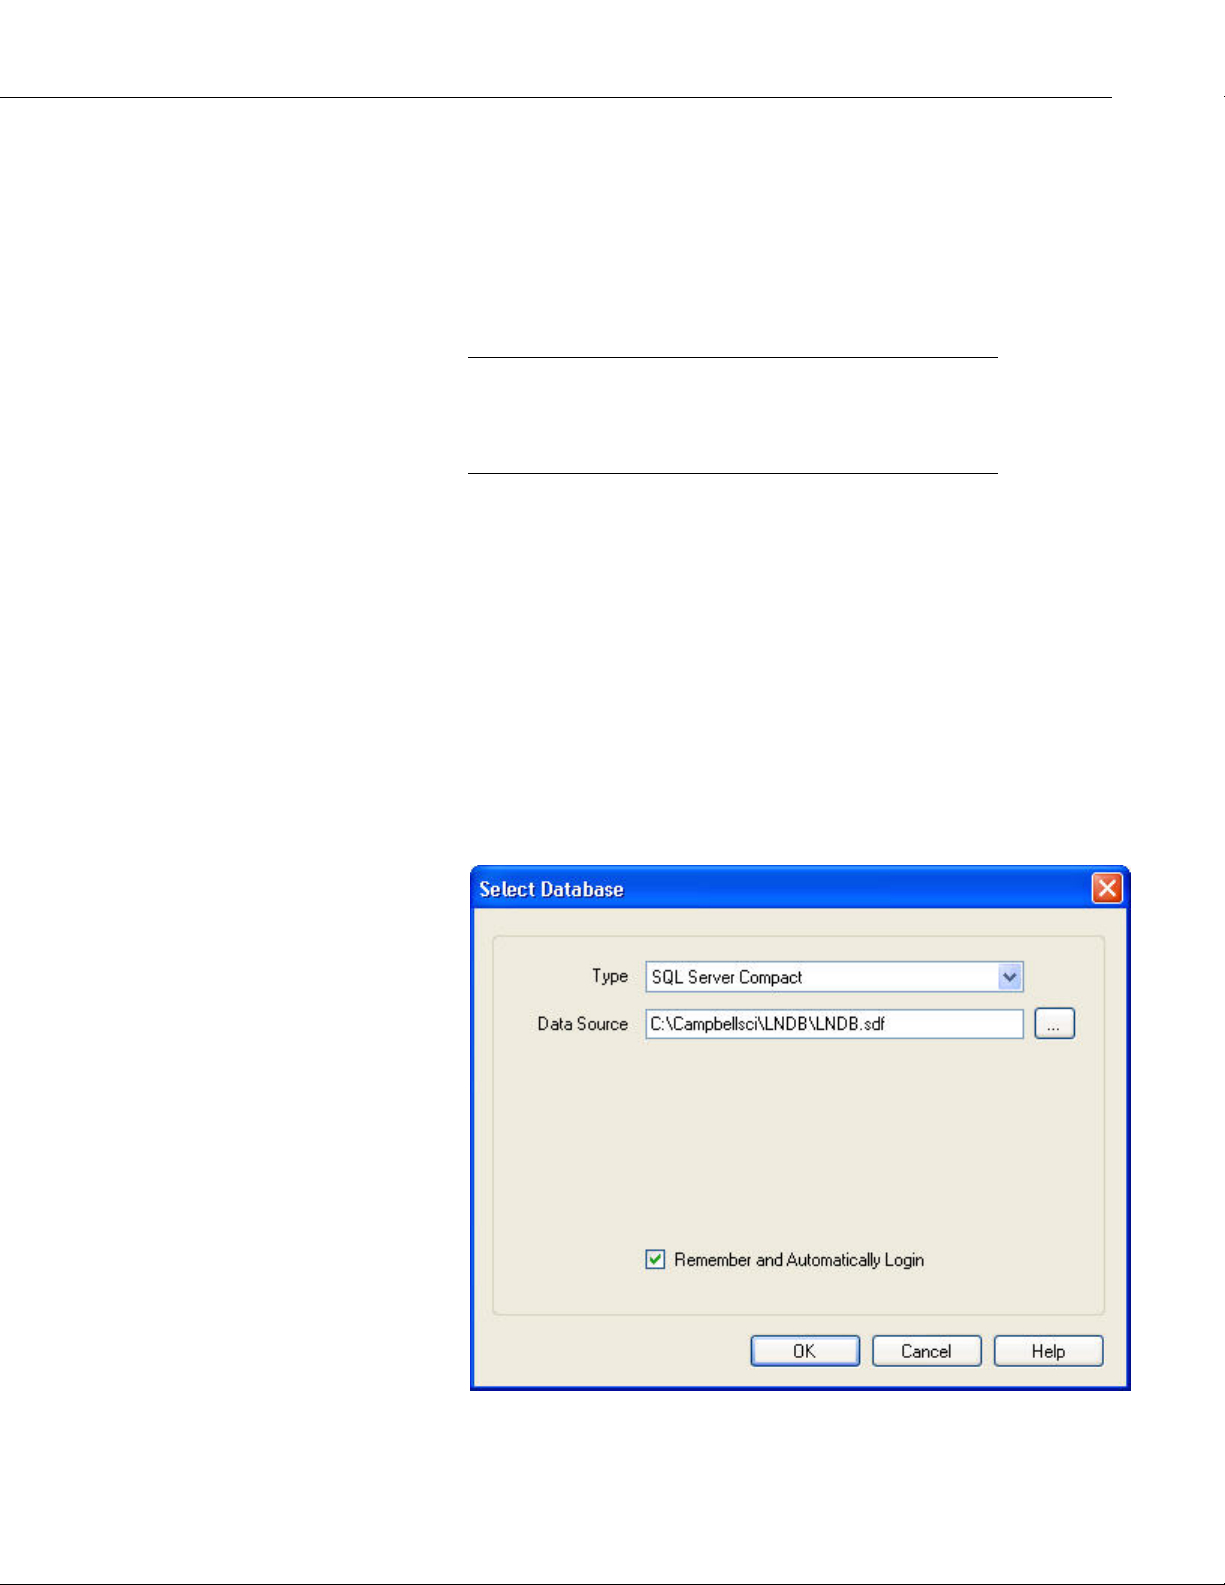
2.3.1 SQL Server Compact
5
Page 12
LNDB
SQL Server Compact is an embedded database that just requires the selection
of a filename. The default location of the database will be <working
directory>\LNDB.sdf. LNDB does not support any encryption or security
options on the SQL Server Compact database. When selecting the database
within the LNDB Manager, the database will be created when the OK button is
pressed.
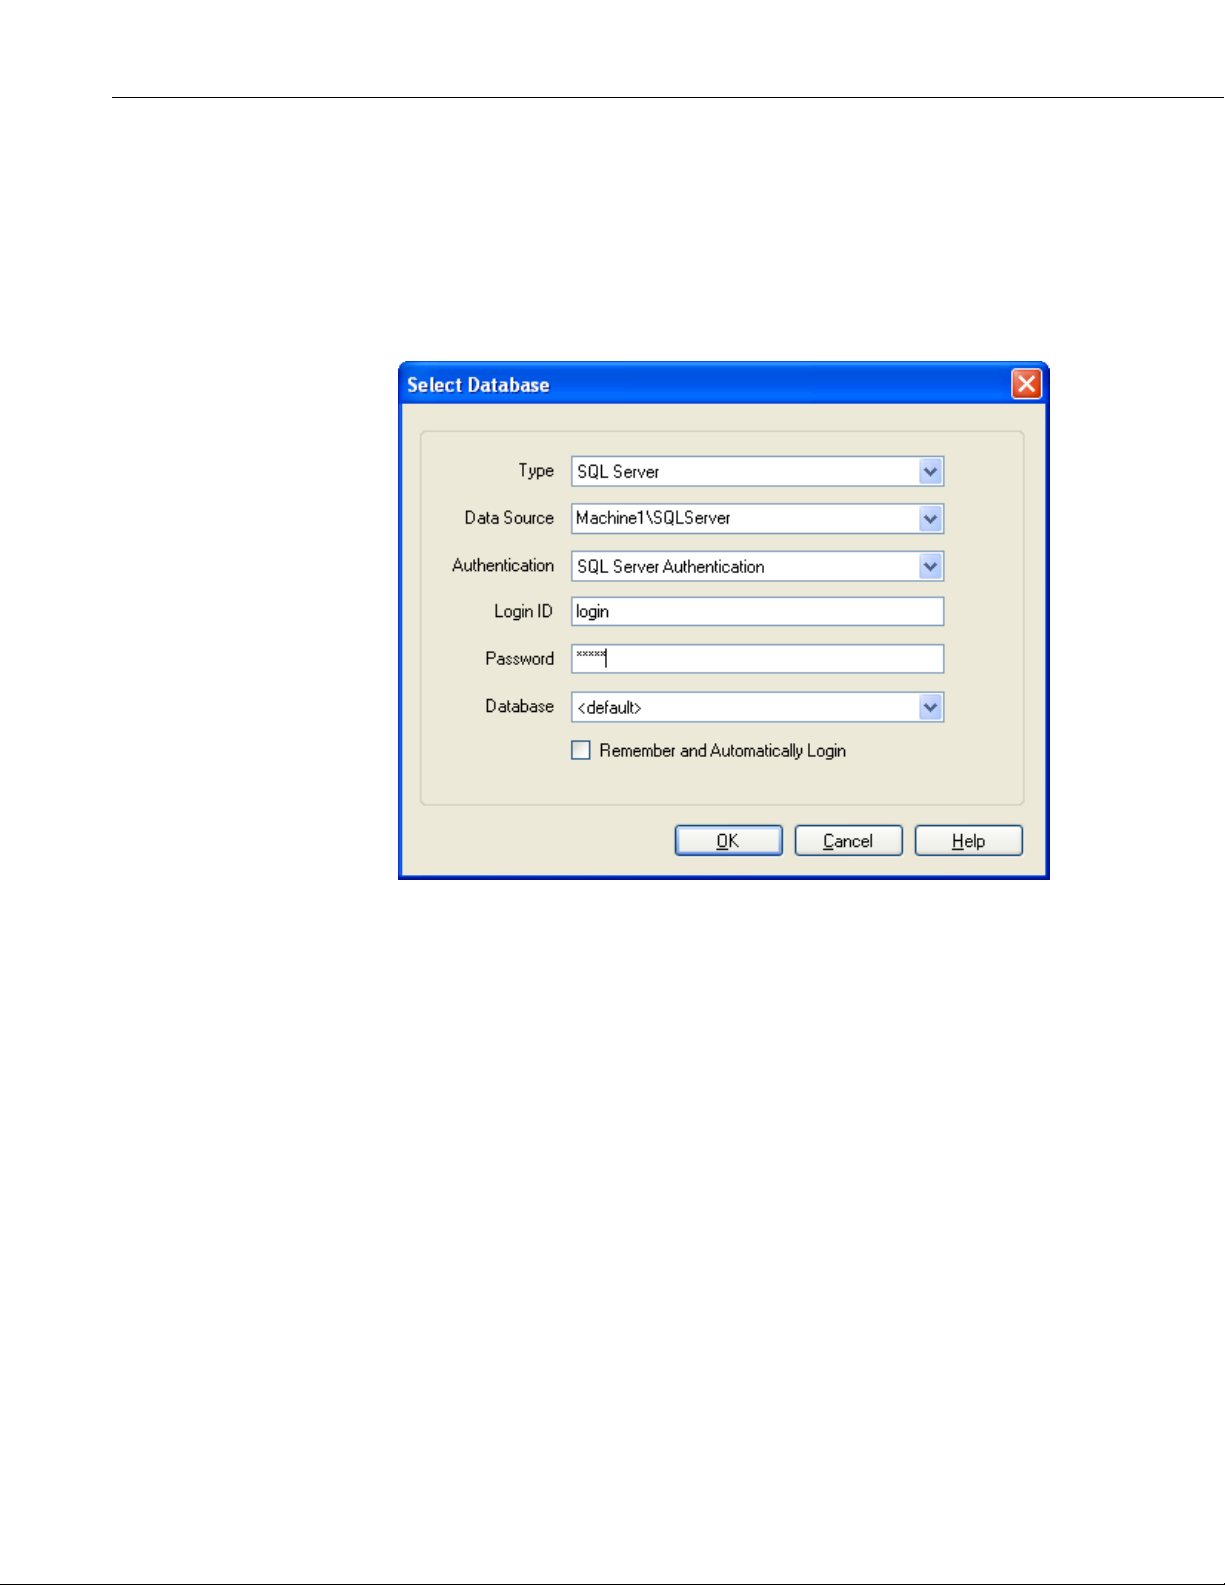
2.3.2 SQL Server
To configure a connection to SQL Server you must select a SQL Server
instance. The list of published SQL Server instances is shown in the Data
Source combo box. You can also type into the Data Source combo box,
because the desired server might not be published. Windows Authentication or
SQL Server Authentication can be selected. Windows Authentication does not
require a username and password, but rather uses Windows user accounts to
authenticate valid users. SQL Server Authentication requires a login ID and
Password and is independent of Windows user accounts. You can select the
<default> database or select a specific database from the Database combo box.
6
Page 13
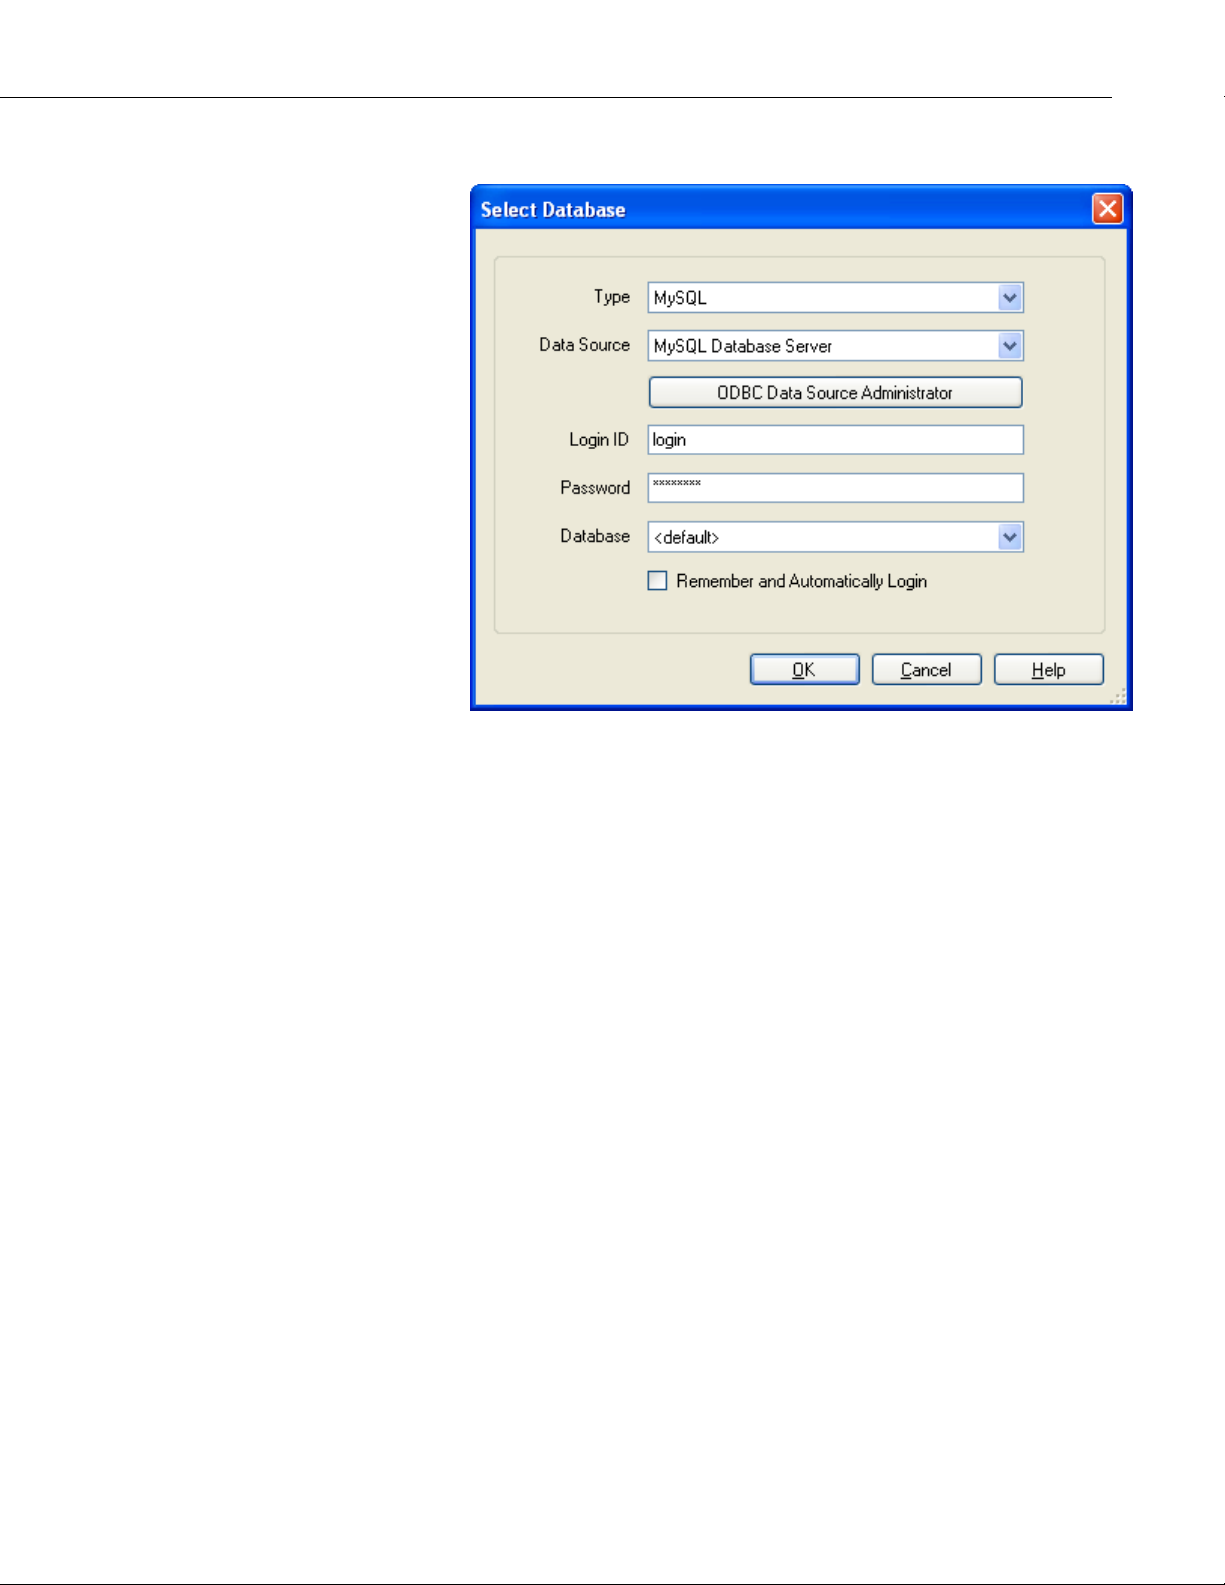
2.3.3 MySQL
LNDB
The MySQL connection is an ODBC connection. You must use the Windows
ODBC Data Source Administrator to configure the database connection.
Currently only system data sources are supported and show in the Data Source
combo box. The Login ID and Password may be optional. They will be set to
blank in the connection string. It has been found that when set to blank, the
login id and password configured in the system data source are used. You can
select the <default> database (default as configured in the data source) or
select a different database.
2.3.4 Remember and Automatically Login
If you select the Remember and Automatically Login check box, the Login
ID and Password will be remembered and the next time the application starts
an attempt will be made to login without showing the dialog again. Regardless
of whether this check box is selected, all other information (Database Type,
Data Source, etc.) will be remembered for all databases.
If you do not check the Remember and Automatically Login check box, the
username and password are still saved so the LNDB Engine can connect to the
database. However, in this case, the username and password are not
automatically filled in on the login dialog box.
7
Page 14

LNDB
3. Selecting Datalogger Tables
The first tab on the main screen is Setup. From this screen, you select the
datalogger tables for which you would like to move data into the database. The
right side of the screen changes depending upon whether a station or a table is
highlighted in the left tree as described below.
If you check a station in the left tree, all final storage tables for the station are
selected. This includes all tables except Public, Status, ports_and_flags, and
__inlocs__. If a table has a conflict and is enabled for storage, its icon and its
parent station’s icon are overlaid with an error icon.
The toolbar at the top of the Setup tab can be used to Select All Final Storage
Tables for all stations or to Deselect All Tables for all stations.
If a change is made to the setup, the Apply and Cancel buttons are enabled.
Press Apply to save the pending edits and restart the engine. Press Cancel to
undo the pending edits.
NOTE
If a station, table or column that is enabled for storage has an
invalid name (i.e., contains ', ", or `), an icon and text indicating
such is placed at the top of the screen. The issue can be resolved
by changing the station name in LoggerNet's Setup Screen or by
changing the table or column name in the CRBasic program.
8
Page 15
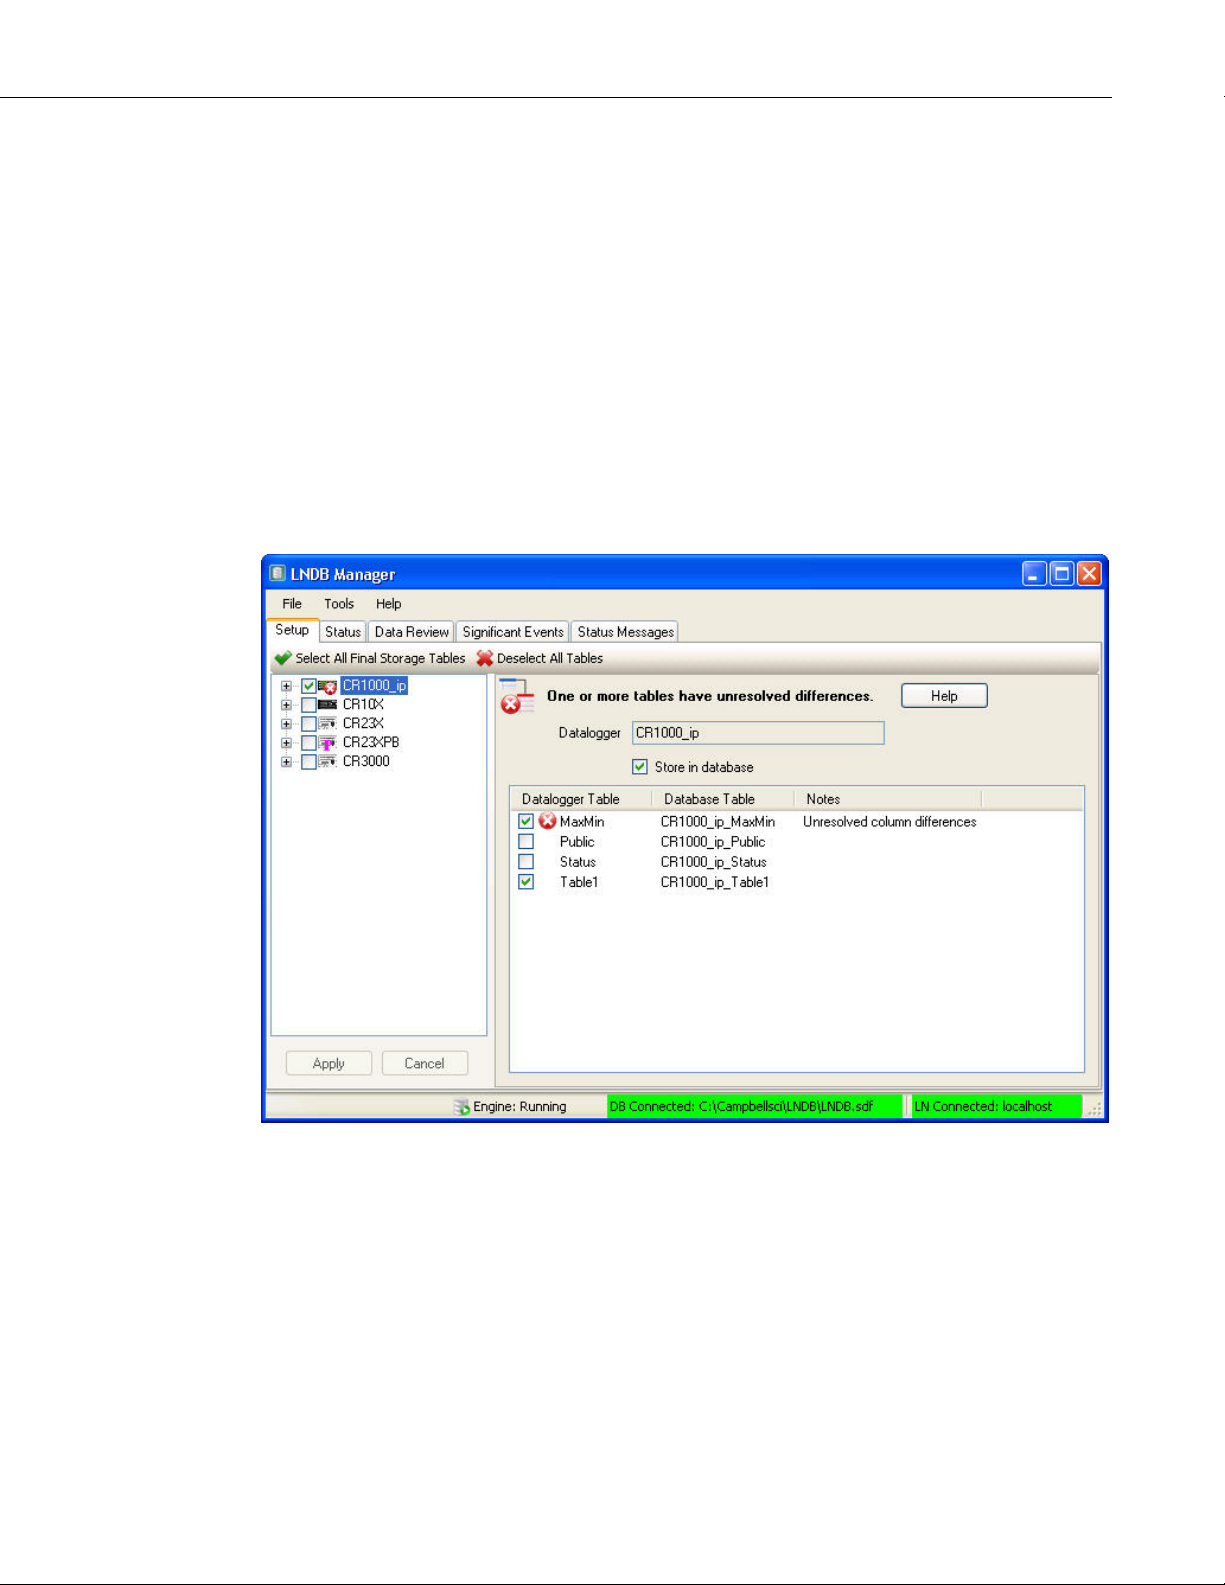
3.1 Station Setup
When a station is highlighted in the left tree, the Station Setup screen is shown.
On the Station Setup screen, tables can be enabled/disabled for storage by
selecting/deselecting the check boxes next to the table names.
A conflict exists for a table when datalogger columns do not match database
columns.
If in "Stop Storing Data" mode (see Section 4.0 Options) and conflicts exist, an
icon is placed next to the table with the conflict. Also a larger icon with bold
text stating there are conflicts is placed at the top of the station setup screen.
To resolve a conflict, right-click on the table name on the right side of the
screen and select Resolve. This brings up the Resolve Table dialog box which
allows you to resolve the conflict. (For more information on resolving a
conflict, see Section 5.)
LNDB
9
Page 16

LNDB
3.2 Table Setup
When a table is highlighted in the left tree, the right side contains the Table
Setup screen. Clicking the Store in database check box will enable storage for
the table.
The datalogger columns and database columns are listed side by side. If the
database table does not currently exist, the name of the column that will be
created is listed next to the datalogger column. If the database table does exist
and you have chosen "Stop Storing Data" or "Modify/Archive Database Table"
when table definitions change, the datalogger columns are matched up with the
database columns. Blank spaces exist where there is not a corresponding
datalogger or database column.
If in "Stop Storing Data" mode, the table is enabled for storage, and a conflict
exists, an icon is placed next to those columns with conflicts. An icon and bold
text stating there is a conflict is also placed at the top of the screen. A
Resolve… button is made visible and can be used to resolve the conflict. (For
more information on resolving a conflict, see Section 5.)
10
Page 17

4. Options
LNDB
The Tools | Options menu item can be used to set the options for LNDB. The
following options are available:
When Tables Change
This tab allows you to determine what will happen when table definitions
change. You can choose from the following options:
Stop Storing Data
Storing data to the database for the individual table stops if
table definitions change. You must manually resolve the
change.
Archive Database Table (continue storing)
The table is automatically archived when table definitions
change. Following the archive, the database table is
automatically recreated and LNDB begins to store data into
the newly created table.
An archive consists of renaming the existing table. The new
name is chosen by attaching "_arch#" to the original name. #
is chosen by starting with 1 and increasing until a table name
is found that does not already exist.
Modify/Archive Database Table (continue storing)
When table definitions change:
New columns are added to the database table. (Previous
rows are filled with NULL.)
Old columns are orphaned. (Columns are left, new records
contain NULL.)
If any column’s process, units, or data type change the table
is archived.
Data Review Options
This tab allows you to select the number of records to be shown in
LNDB’s Data Review tab. The maximum number of records to show
is 100,000.
11
Page 18

LNDB
5. Resolving a Conflict
A conflict exists for a table when datalogger columns do not match database
columns. If in "Stop Storing Data" mode (see Section 4 Options), the conflict
must be manually resolved by selecting the table in the left tree of the Setup
tab and then pressing the Resolve… button on the Table Setup screen.
(Alternately, you can select the datalogger in the left tree of the Setup tab, right
click on the table name on the right side of the screen, and select Resolve.)
12
Clicking the Resolve… button brings up the Resolve Table dialog. You have
two options:
1. Archive Database Table.
2. Modify Database Table. (This option is disabled if a column’s
process, units or data type has changed. The only way to resolve
these conflicts is to archive the database table.)
Once a conflict has been resolved, the conflict icons and bold text are
removed. Storage begins (or continues) for the table once the action(s) have
completed.
Page 19

5.1 Archive Database Table
LNDB
If Archive Database Table is selected, the database table name is shown with
the action stating that the table will be renamed to a specific new name. Press
the Archive Table button to archive the table.
13
Page 20

LNDB
5.2 Modify Database Table
If Modify Database Table is selected, each column that has a conflict is
shown with the proper action displayed. Each action is done when you click
the Execute Actions button.
14
Page 21

6. Checking Status and Reviewing Data
The function of the Setup Tab of LNDB’s main screen is described in Section
3. The other tabs on the main screen can be used to check the status of LNDB
and to review LNDB’s data. The Status Bar at the bottom of the LNDB main
screen can also be used to quickly check the status of the LNDB engine,
database, and LoggerNet server. All of these functions are described below.
6.1 Status Tab
LNDB
The Status tab shows the storage status for each datalogger table. The
following columns are shown:
Database Table - The database table name for each station’s table.
They are grouped by station.
Last Write Time - The last time that data was written to the database
table.
Last Record Timestamp - The timestamp of the last record in the
database table.
Status - There are 3 valid values:
Storing Data - Data for the table is being stored.
15
Page 22

LNDB
Stopped - Conflict: The table has a conflict and storage has
stopped.
Blank - Not storing data for this table.
Last Error - The last database error (insert error, error creating a
database table, or error retrieving the start conditions) for the given
table. This value is only reset when you restart the engine.
The Status columns can be sorted. When you click a column other than the
Database Table column, the grouping of tables by station is removed and the
records are sorted. Click the Database Table column to again group the tables
by station.
When the engine is stopped all engine statistics are cleared.
6.2 Data Review Tab
16
The Data Review tab shows tables and data from the database. When a table on
the left side is selected, the data for the table is shown on the right side. You
can refresh tables or data by clicking the corresponding refresh button.
Page 23

6.2.1 Deleting or Archiving Tables
All database tables except the meta tables (LNDBStationMeta,
LNDBTableMeta, and LNDBColumnMeta) can be removed by clicking the
Delete button or archived by clicking the Archive button. If a meta table is
selected, the Delete and Archive buttons are grayed out.
When you archive a table, you are asked for an archive name. The default
name is <basename>_arch<number>. Basename is the first part of the name
before the first "_arch". Number is the smallest number that makes the table
name unique. The maximum number of characters allowed for the table name
is 64 for MySQL and 128 for SQL Server and SQL Server Compact.
Upon completion of a Delete or Archive, any conflicts for the table are
removed and storage is restarted for the table (if enabled for storage).
LNDB
NOTE
When storage begins for a newly created table, data always
backfills and starts at the oldest available record. It does not start
at the last record from the deleted or archived table. Therefore, a
table may be recreated so quickly after deletion, that it may
appear as if the table was not actually deleted.
The format of timestamp columns is based on the precision of the first two
records shown. If the time has second data, it will be shown. If the time has
sub-second data, it will show 3 or 7 decimal places based on the precision.
6.3 Significant Events Tab
17
Page 24

LNDB
The Significant Events tab shows significant messages. The messages can be
paused by clicking the Pause Messages button. Up to 400 messages are
displayed, after which the oldest is removed when new messages are added. If
you close down LNDB Manager and reopen it, the messages are not lost.
Clicking the Clear Messages button permanently removes the messages. They
are not shown again the next time LNDB Manager is started.
The Significant Events include:
Database Table Created
Database Table Modified
Database Table Archived
Database Table Storage Stopping due to a conflict
Insert Record Failure
6.4 Status Messages Tab
18
The Status Messages tab shows events and the state of the LNDB Engine.
These include the Significant Event messages, data events, LoggerNet events,
database events, etc. The Pause Messages button pauses the displaying of new
messages. These messages are not persistent and ring at 100 messages. When
LNDB Manager closes and reopens, or if you click the Clear Messages
button, the messages clear and are not shown again.
Page 25

6.5 Log Files
6.6 Status Bar
LNDB
LNDB creates three log file types that are stored at <working directory>\logs.
For each log file type, there can be up to ten 1MB files. Once the tenth log file
reaches 1 MB, the oldest file will be overwritten with new messages. The three
log file types are:
Significant.log - Contains the Significant Event messages. (See
Section 6.3 Significant Events Tab.)
State.log - Contains all of the Status Messages. (See Section 6.4
Status Messages Tab.)
<database name>_Failed Inserts.log - Contains SQL insert
statements for all records that failed to be inserted. This log contains
no error information.
The Status Bar at the bottom of the main screen has three status labels:
LNDB Engine Status Label - Shows the state of the LNDB Engine.
DB Connection Status Label - Shows the selected data source and
whether the connection is not connected, connecting, or connected.
19
Page 26

LNDB
You can use the Status Bar as an alternative to LNDB's File menu. Doubleclick on any of the Status Bar labels to bring up the corresponding dialog box
(i.e., the LNDB Engine Status Label to bring up the LNDB Engine Service
Manager, the DB Connection Status Label to bring up the Select Database
dialog box, or the LN Connection Status Label to bring up the Login to
LoggerNet Server dialog box).
7. Importing Data
The DBImport utility, launched from LNDB's Tools | Import Data menu item,
is used to import data from a data file into a database table.
LN Connection Status Label - Shows the LoggerNet host and port
(if not the default port 6789) and whether the connection is not
connected, connecting, or connected.
20
7.1 Database Selection
When launched for the first time, DBImport uses the database selected for
LNDB. You can change this selection using DBImport's File | Select Database
menu item. The DBImport database selection will then be independent of
LNDB's database selection. The database selection dialog is identical to the
one used in LNDB. If you select Remember and Automatically Login, the
login information is only remembered for DBImport.
Page 27

7.2 Import From
The Filename field is used to indicate the file from which data is to be
imported. Only table-based data files are supported and can be imported. Press
the browse button (…) to browse to the desired file.
7.3 Import Into
The Database Table combo box is filled with all tables from the selected
database. Select the table into which the data should be imported.
7.4 Data File Columns vs. Database Table Columns
After a file is selected, the list of data fields from the file is placed in the list
view under the heading Field From File. After a database table is selected, the
list of column names from the database table is placed in the list view under
the heading Database Column.
The data file fields and database columns are matched up. Data file fields that
do not have a corresponding database column have an attached note indicating
that the "Database column is missing". Columns in the database table that do
not have a corresponding data file field have a note indicating that the "Column
does not exist in file".
LNDB
7.5 Import Requirements
A file can be imported if all the data file fields have a corresponding database
table column. This means that there can be extra database columns that do not
have a corresponding data file field. If there are data file fields that do not have
corresponding database columns, a bold note next to the import button
indicates "Fields from the file are not compatible with database table
columns". In this case, the data file cannot be imported into the database table.
No check is made to validate the columns units, process, or data type. If the
data type is not compatible, the insert will likely fail and you will be notified of
the failure.
7.6 Import
Once the data file and database table are selected, press the Import button to
begin importing data. Data import will begin if the file is compatible with the
selected database table as described above.
21
Page 28

LNDB
8. Exporting Data
The DBExport utility, launched from LNDB's Tools | Export Data menu item,
can be used to export data from a database table into a data file.
22
Page 29

8.1 Database Selection
When launched for the first time, DBExport launches the database selection
dialog which allows you to select the database from which to export data. The
database selection dialog is identical to the one used in LNDB. If you select
Remember and Automatically Login, the login information is only
remembered for DBExport.
You can change the database selection at any time using DBExport's File |
Select Database menu item or by double-clicking on the database connection
status panel at the bottom of the DBExport window.
8.2 Export From
Database Table
The Database Table combo box is filled with all tables from the selected
database. Select the table from which the data should be exported.
Columns
LNDB
This list box contains a list of all data columns that will be exported. By
default, the list contains all columns in the selected database table. Press the
Select Columns button to select a custom set of columns. (See Section 8.6
Select Columns.)
Date – Time Range
Start Date/Time and End Date/ Time
These fields are used to determine what data will be exported to the
file. The Start and End controls can be set by the user. When a new
database table is selected the Start time is set to the timestamp of the
oldest record for the table in the database. The End time is set to the
newest. The Lock Current Start - End Times checkbox can be used
to prevent this.
Lock Current Start – End Times
When this check box is selected, the Start and End date/time controls
will not be updated when a new table is selected. They will keep their
current settings.
Include End Record
When this check box is selected, a record that matches the date and
time specified in the End control will be included in the data file. If
the check box is not selected, that record will not be included. To
export the entire set of data this control should be checked.
23
Page 30

LNDB
8.3 Export Into
Filename
The Filename field is used to indicate the file to which data should be
exported. Press the browse button (…) to browse to the desired file.
File Format
The File Format is used to select the format in which the data file should be
saved. Select the desired option from the list box:
TOACI1
Data is stored in a comma separated format. Header information for
each of the columns is included.
TOA5 (ASCII Table Data)
Data is stored in an ASCII comma separated format. Header
information for each of the data values is included, along with field
names and units of measure if they are available. When this option is
selected, the browse button to the right of the field is available.
Pressing this button opens a window from which you can specify
whether timestamps and record numbers are included with each
record.
TOB1 (Binary Table Data)
Data is stored in a binary format. Though this format saves disk
storage space, it must be converted before it is usable in other
programs. When this option is selected, the browse button to the right
of the field is available. Pressing this button opens a window from
which you can specify whether timestamps and record numbers are
included with each record.
CSIXML
Data is stored in XML format with Campbell Scientific defined
elements and attributes. When this option is selected, the browse
button to the right of the field is available. Pressing this button opens
a window from which you can specify whether timestamps and
record numbers are included with each record.
Custom_CSV
Data is stored in a user-defined comma separated format. This option
can be used to produce output files from table data dataloggers that
are similar to those created by mixed array dataloggers. When this
option is chosen, the Array CSV Options button becomes available,
so that you can customize the data string for the CSV file. (See
Section 8.7 Array Compatible CSV Options.)
24
Page 31

8.4 Check for Missing Records
Select an option from this list box to determine whether DBExport checks for
missing records.
No Checking
DBExport does not check for missing records.
Check Time
DBExport checks for missing records based on the data timestamps
and the interval entered in the Table Interval field.
Check Record Number
DBExport checks for missing records based on the record number
sequence.
Check Both
DBExport checks for missing records based on both data timestamps
and record numbers.
LNDB
Table Interval
Specify the interval of the database table. This interval is used to
check for missing records when checking based on time.
25
Page 32

LNDB
8.5 Export
Once the database table, data file, and other options are set, press the Export
button to begin the export. While exporting is in process, you can press the
Abort button to abort the export.
While export is in process, a progress bar will be displayed. Note that the
displayed percentage is based on the Start and End date/times selected and the
timestamp of the record currently being processed. If the Start and End
date/times are in the table and there is a fairly complete set of interval data
between these times, the progress will be fairly accurate. If there are gaps in
the data, or if the Start and/or End date/times are not in the data, or if the data
is event driven (not interval based), the progress bar may not accurately
represent progress.
26
Page 33

8.6 Select Columns
When the Select Columns button is pressed, the Select Columns dialog box
appears.
LNDB
The Available Columns field will list all of the available data columns in the
selected database table that are not currently included for export. To choose a
column to be exported, highlight it and press the right arrow button or,
alternately, double-click the column name. This moves the column heading
into the Selected Columns field. When the dialog box is closed, the columns
will be added to the Columns list and will be included in the export.
Columns can be reordered in the Selected Columns field by dragging and
dropping them to the desired location.
Columns can be removed from the export by moving them back into the
Available Columns field using the left arrow button.
27
Page 34

LNDB
8.7 Array Compatible CSV Options
When File Format is set to Custom_CSV, the browse button next to the field
can be pressed to open the Array Compatible CSV Options dialog box. This
dialog box is used to customize the output file produced by DBExport. It is
most often used to produce output files from table data dataloggers that are
similar to those created by mixed array dataloggers.
If an array ID is desired, select the Include Array ID check box and enter a
value into the field. The value can range from 1 to 1023. The array ID will be
the first value in the array of data.
Select the appropriate timestamp options for the type of timestamp to write to
the file. Each time element will be output as a separate data value in the array
and the data values will be separated by a comma. Selecting Year will output
the year represented by four digits, YYYY (e.g., 2006). The Day will be
represented as a Julian Day. The Hour/Minutes will be represented by four
digits (hhmm). When Midnight is 2400 is selected, the timestamp will reflect
midnight as the current date with 2400 for the Hour/Minutes. Otherwise, the
timestamp will reflect midnight as the next day's date, with the Hours/Minutes
as 0000.
The Max and Min Timestamp Options is used to determine the type of
timestamp that will be used for Maximum and Minimum outputs that include a
timestamp along with the value. You can choose a TOA5 format timestamp
(e.g., 2008-10-27 17:17:33.7), a timestamp that includes Hours/Minutes and
Seconds (produces two values, hhmm and seconds), a timestamp that includes
Hours/Minutes only (hhmm), or a timestamp that includes Seconds only.
28
Page 35

8.8 Representation of NULL values
When the database table being exported contains NULL values, they will be
represented as described in the table below:
NAN representation of NULL values from a database
LNDB
Datalogger
Data Type NAN Value Example
IEEE4 Quiet NAN Ox7FFFFFFF
(2147483647)
LONG Negative
Max(LONG)
SecNano Jan 1 1990 0 DATETIME DATETIME DATETIME
BOOL False 0 BIT(1) BIT BIT
USHORT Zero 0 SMALLINT
string-spec Empty String TEXT NVARCHAR(MAX) NVARCHAR(2048)
-2147483648 INT INT INT
MySQL
Type
FLOAT REAL REAL
UNSIGNED
SQL Server Type
N/A N/A
SQL Server
Compact Type
9. QuickReports
QuickReports, launched from LNDB’s Tools | QuickReports menu item, is
used to design simple reports from an LNDB database. It is very simple and
quick and enables you to generate a new report with just a few mouse clicks.
The report can then be printed or exported to an Acrobat file.
The QuickReports Setup dialog (see Section 9.2) is displayed every time a new
report is created and presents you with a few basic options such as title, time
range, database table, and up to 4 data columns. When you accept the settings
in the QuickReports dialog, the report is then bound to the selected table. You
can customize the report further using each component’s property sheet. The
report can then be saved and run as a report in the Report Preview window.
The Report Preview window paginates the report and gives options to print or
export to an Acrobat file.
The saved report can be loaded in RTMC Pro where it can be modified with
advanced features and components. When the report is saved in RTMC Pro, it
will be saved as a *.rtmc2 project file. This file cannot be loaded in
QuickReports. However, the QuickReports *.rtmq file will not be overwritten.
This file can still be loaded in QuickReports, but it will contain none of the
changes made in RTMC Pro.
9.1 Database Selection
The Database Source Properties dialog box comes up automatically the first
time QuickReports is opened. At other times, it can be opened from the File |
Select Database menu item or by double-clicking on the database portion of
the status bar at the bottom of the QuickReports window. This dialog box is
used to set up the database source for your report.
29
Page 36

LNDB
Source Name
Designates the name that will be used for the database in QuickReports.
Type
The type of database. Choose a type from the drop-down list.
QuickReports supports the same database types as LNDB:
SQL Server Compact
SQL Server
MySQL
The remaining information changes depending on the database type as
described below:
SQL Server Compact
30
The only additional information needed for a SQL Server Compact database
source is the database file to be used. Type in the name directly or press the
button to the right of the field to browse to the database file.
Page 37

SQL Server
LNDB
To select a SQL Server database source you must select a SQL Server
instance. The list of published SQL Server instances is shown in the Data
Source combo box. You can also type into the Data Source combo box,
because the desired server might not be published. Windows Authentication or
SQL Server Authentication can be selected. Windows Authentication does not
require a username and password, but rather uses Windows user accounts to
authenticate valid users. SQL Server Authentication requires a login ID and
Password and is independent of Windows user accounts. You can select the
<default> database or select a specific database from the Database combo box.
The Remember username and password checkbox can be selected to save
the username and password. If this check box is not selected and you are using
SQL Server Authentication, you will be required to enter the username and
password each time a report is opened that uses this database source.
31
Page 38

LNDB
MySQL
The MySQL connection is an ODBC connection. You must use the Windows
ODBC Data Source Administrator to configure the database connection.
Currently only system data sources are supported and show in the Data Source
combo box. The Username and Password may be optional. They will be set to
blank in the connection string. It has been found that when set to blank, the
login id and password configured in the ODBC Data Source Administrator are
used. You can select the <default> database (default as configured in the data
source) or select a different database.
The Remember username and password checkbox can be selected to save
the username and password. If this check box is not selected and the username
and password were not configured in the ODBC Data Source Administrator,
you will be required to enter the username and password each time a report is
opened that uses this database source.
9.2 QuickReports Setup
The QuickReports Setup window comes up automatically after a new data
source has been selected. At other times, it can be opened to edit an existing
report by selecting Edit | QuickReports Setup from the menu or by rightclicking on the chart and selecting QuickReports Setup. It can be opened to
create a new report by selecting File | New Report from the menu.
32
Page 39

LNDB
This window allows you to designate a title for your report, select the data
table that will be used for the report, select the columns of data that will be
displayed, and select the date range that will be displayed.
Title
Specify the title to be displayed at the top of the report.
Data Table
Indicates the data table from which to display data values. Use the Browse
button to open the Data Source Browser and select a table.
Data Column 1 – Data Column 4
Use the drop-down lists to select up to 4 data values to be displayed. (Note that
you can add more data values later. See Customizing Your Report below.)
Begin Date/End Date
Enter the Begin Date/Time and End Date/Time to specify the time period for
which data will be displayed. The Oldest Available Date and Newest
Available Date fields indicate the date range that is in the table and able to be
displayed.
33
Page 40

LNDB
NOTES
By default, the Data Grid can display a maximum of 5000
records. If your selected date range exceeds 5000 records, you
will only see 5000 records in the Data Grid with a note at the
bottom indicating “Max Records Exceeded”. In order to view all
of the records in your date range, you will need to use the Data
Grid’s property sheet to increase Max Records. (See
Customizing Your Report below for more information on using
property sheets to customize your report.)
When using the QuickReports Setup window to edit the date
range for a report, you will lose any customization you have
done to chart traces. If you wish to maintain the customization,
you should edit the date range using the Report Range property
sheet.
9.3 Customizing Your Report
Once you have set up a report using the QuickReports Setup dialog box, you
can customize the report using each component’s property sheets. The
components on a report include the Report Range, Report Title, Report
Subtitle, Logo, Chart and Data Grid. A component’s property sheet can be
opened by double-clicking on the component, by right-clicking on the
component and selecting <Component Name> Properties or by choosing the
component from the Edit menu. For example, to edit the properties of the
chart, double-click on the chart, right-click on the chart and select Chart
Properties, or select Edit | Chart Properties from the QuickReports menu.
NOTE
NOTES
Press the ‘?’ button at the top right of a component’s property box to bring up
the online help about that component’s properties.
You can add traces to the chart using the Add button on the
Series tab of the Chart’s property sheet. Columns can be added
to the Data Grid using the Select Columns button on the Data
Grid’s property sheet.
A component can be deleted from the report by right-clicking on the
component and selecting Delete <Component Name>. For example, to delete
the chart, right-click on the chart and select Delete Chart. Once a component
has been deleted, it can be restored to the report by selecting Edit | Undo from
the QuickReports menu.
Once a report has been closed, you will not be able to restore the
component.
The Undo and Redo functions in QuickReports apply only to
deleting components.
34
Page 41

9.4 Generating Your Report
Once you have set up your report and customized the components, you save
and generate the report by selecting File | Save and Generate Report from the
QuickReports menu. The report is saved as a *.rtmq file.
When a report is generated you will see a preview of the report. From the
toolbar on the Report Preview window you can print the report or export it to
an Acrobat (PDF) file. The Report Preview window has the following toolbar
icons:
LNDB
Displays the first page of the report.
Displays the previous page of the report.
Displays the next page of the report.
Displays the last page of the report.
Prints the report.
Toggles the view of the report between
Print Layout and Full Page Layout.
Exports the report to an Acrobat (PDF)
file.
Sets the zoom level of the report
preview. Choose a value from the dropdown list.
Allows you to search for a designated
search string in the report. Type the
desired search string in the box. Press
Find to find the first occurrence of the
search string. Press Next to find
subsequent occurrences.
This function is only available when in
Full Page Layout.
Brings up the online help for the Report
Preview window.
35
Page 42

LNDB
10. Troubleshooting
Database already opened by a different user
The "Database already opened by a different user" error can occur if Windows
UAC (User Account Control) is on, an application with standard rights
connects to the database first, and then a second application run as an
administrator attempts to connect. With UAC on, the SQL Server CE database
determines that the second application is being run by a different user. This
error can be seen with the LNDB Engine, because it always runs with certain
administrative rights.
To fix this problem, all connections to the database should be closed and then
the connection can be attempted again. If the first application that connects is
run with administrative rights, all other applications with or without
administrative rights can connect.
36
Page 43

Appendix A. Data Type Mapping
Datalogger data types are mapped into database data types differently
depending on the type of database as described below.
SQL Server Compact
Datalogger Data
Type
IEEE4 REAL
FP2 REAL
Long INT
UINT2 INT
String NVARCHAR(2048)
Boolean BIT
Bool8 BIT
Nsec DATETIME Resolution is 3ms
SQL Server
Datalogger
Data Type
SQL Server Compact
Data Type
SQL Server
Data Type
Notes
Notes
IEEE4 REAL
FP2 REAL
Long INT
UINT2 INT
String NVARCHAR(MAX)
Boolean BIT
Bool8 BIT
Nsec
DATETIME or
DATETIME2
Record Timestamp is
DateTime2
(resolution is 100ns).
All others are
DateTime (resolution
is 3ms).
A-1
Page 44

Appendix A. Data Type Mapping
MySQL
Datalogger
Data Type
IEEE4 FLOAT
FP2 FLOAT
Long INT
UINT2
String TEXT
Boolean BIT(1)
Bool8 BIT(1)
Nsec DATETIME
SMALLINT
UNSIGNED
MySQL
Data Type
Notes
MySQL FLOAT data
type only stores 6
digits of precision. The
datalogger stores 7.
MySQL DATETIME
does not support
subsecond information.
A-2
Page 45

Appendix B. SQL Commands
LNDB requires you to have rights to the following commands based on the
database type:
SQL Server Compact
No security available.
SQL Server
Command Usage
Alter Used to add columns to existing data tables
Create Table Creates meta and data tables
Delete tables (only initiated by user in LNDB Manager).
Drop
Also used when creating a temporary meta table during an
archive.
Delete
Insert Meta table and data table inserts.
sp_rename Stored procedure used to rename a table during an archive.
Select Meta table and data table data requests.
Update Used to update meta table records during an archive.
References Used when creating meta tables.
MySQL
Command Usage
Alter
Create Table Creates meta and data tables
Drop
Delete
Deletes meta table records. (Never deletes data table
records.)
Used to add Columns to existing data tables. Also used to
rename data tables.
Delete tables (only initiated by user in LNDB Manager).
Also used when creating a temporary meta table during an
archive.
Deletes meta table records. (Never deletes data table
records.)
Insert Meta Table and data table inserts.
Select Meta Table and data table data requests.
Update Used to update meta table records during an archive.
References Used when creating meta tables.
B-1
Page 46

Appendix B. SQL Commands
B-2
Page 47

Page 48

Campbell Scientific Companies
Campbell Scientific, Inc. (CSI)
815 West 1800 North
Logan, Utah 84321
UNITED STATES
www.campbellsci.com • info@campbellsci.com
Campbell Scientific Africa Pty. Ltd. (CSAf)
PO Box 2450
Somerset West 7129
SOUTH AFRICA
www.csafrica.co.za • cleroux@csafrica.co.za
Campbell Scientific Australia Pty. Ltd. (CSA)
PO Box 444
Thuringowa Central
QLD 4812 AUSTRALIA
www.campbellsci.com.au • info@campbellsci.com.au
Campbell Scientific do Brazil Ltda. (CSB)
Rua Luisa Crapsi Orsi, 15 Butantã
CEP: 005543-000 São Paulo SP BRAZIL
www.campbellsci.com.br • suporte@campbellsci.com.br
Campbell Scientific Canada Corp. (CSC)
11564 - 149th Street NW
Edmonton, Alberta T5M 1W7
CANADA
www.campbellsci.ca • dataloggers@campbellsci.ca
Campbell Scientific Centro Caribe S.A. (CSCC)
300 N Cementerio, Edificio Breller
Santo Domingo, Heredia 40305
COSTA RICA
www.campbellsci.cc • info@campbellsci.cc
Campbell Scientific Ltd. (CSL)
Campbell Park
80 Hathern Road
Shepshed, Loughborough LE12 9GX
UNITED KINGDOM
www.campbellsci.co.uk • sales@campbellsci.co.uk
Campbell Scientific Ltd. (France)
Miniparc du Verger - Bat. H
1, rue de Terre Neuve - Les Ulis
91967 COURTABOEUF CEDEX
FRANCE
www.campbellsci.fr • info@campbellsci.fr
Campbell Scientific Spain, S. L.
Avda. Pompeu Fabra 7-9, local 1
08024 Barcelona
SPAIN
www.campbellsci.es • info@campbellsci.es
Please visit www.campbellsci.com to obtain contact information for your local US or International representative.
 Loading...