

Page 1

INSTRUCTION MANUAL
CS215 Temperature and
Copyright © 2005- 2014
Campbell Scientific, Inc.
Relative Humidity Probe
Revision: 8/14
Page 2

Page 3

Limited Warranty
“Products manufactured by CSI are warranted by CSI to be free from defects in
materials and workmanship under normal use and service for twelve months
from the date of shipment unless otherwise specified in the corresponding
product manual. (Product manuals are available for review online at
www.campbellsci.com.) Products not manufactured by CSI, but that are resold
by CSI, are warranted only to the limits extended by the original manufacturer.
Batteries, fine-wire thermocouples, desiccant, and other consumables have no
warranty. CSI’s obligation under this warranty is limited to repairing or
replacing (at CSI’s option) defective Products, which shall be the sole and
exclusive remedy under this warranty. The Customer assumes all costs of
removing, reinstalling, and shipping defective Products to CSI. CSI will return
such Products by surface carrier prepaid within the continental United States of
America. To all other locations, CSI will return such Products best way CIP
(port of entry) per Incoterms ® 2010. This warranty shall not apply to any
Products which have been subjected to modification, misuse, neglect, improper
service, accidents of nature, or shipping damage. This warranty is in lieu of all
other warranties, expressed or implied. The warranty for installation services
performed by CSI such as programming to customer specifications, electrical
connections to Products manufactured by CSI, and Product specific training, is
part of CSI's product warranty. CSI EXPRESSLY DISCLAIMS AND
EXCLUDES ANY IMPLIED WARRANTIES OF MERCHANTABILITY
OR FITNESS FOR A PARTICULAR PURPOSE. CSI hereby disclaims,
to the fullest extent allowed by applicable law, any and all warranties and
conditions with respect to the Products, whether express, implied or
statutory, other than those expressly provided herein.”
Page 4

Assistance
Products may not be returned without prior authorization. The following
contact information is for US and international customers residing in countries
served by Campbell Scientific, Inc. directly. Affiliate companies handle
repairs for customers within their territories. Please visit
www.campbellsci.com to determine which Campbell Scientific company serves
your country.
To obtain a Returned Materials Authorization (RMA), contact CAMPBELL
SCIENTIFIC, INC., phone (435) 227-9000. After an application engineer
determines the nature of the problem, an RMA number will be issued. Please
write this number clearly on the outside of the shipping container. Campbell
Scientific’s shipping address is:
CAMPBELL SCIENTIFIC, INC.
RMA#_____
815 West 1800 North
Logan, Utah 84321-1784
For all returns, the customer must fill out a “Statement of Product Cleanliness
and Decontamination” form and comply with the requirements specified in it.
The form is available from our web site at www.campbellsci.com/repair. A
completed form must be either emailed to repair@campbellsci.com or faxed to
(435) 227-9106. Campbell Scientific is unable to process any returns until we
receive this form. If the form is not received within three days of product
receipt or is incomplete, the product will be returned to the customer at the
customer’s expense. Campbell Scientific reserves the right to refuse service on
products that were exposed to contaminants that may cause health or safety
concerns for our employees.
Page 5

Precautions
DANGER — MANY HAZARDS ARE ASSOCIATED WITH INSTALLING, USING, MAINTAINING, AND WORKING ON OR AROUND
TRIPODS, TOWERS, AND ANY ATTACHMENTS TO TRIPODS AND TOWERS SUCH AS SENSORS, CROSSARMS, ENCLOSURES,
ANTENNAS, ETC. FAILURE TO PROPERLY AND COMPLETELY ASSEMBLE, INSTALL, OPERATE, USE, AND MAINTAIN TRIPODS,
TOWERS, AND ATTACHMENTS, AND FAILURE TO HEED WARNINGS, INCREASES THE RISK OF DEATH, ACCIDENT, SERIOUS
INJURY, PROPERTY DAMAGE, AND PRODUCT FAILURE. TAKE ALL REASONABLE PRECAUTIONS TO AVOID THESE HAZARDS.
CHECK WITH YOUR ORGANIZATION'S SAFETY COORDINATOR (OR POLICY) FOR PROCEDURES AND REQUIRED PROTECTIVE
EQUIPMENT PRIOR TO PERFORMING ANY WORK.
Use tripods, towers, and attachments to tripods and towers only for purposes for which they are designed. Do not exceed design
limits. Be familiar and comply with all instructions provided in product manuals. Manuals are available at www.campbellsci.com or
by telephoning (435) 227-9000 (USA). You are responsible for conformance with governing codes and regulations, including safety
regulations, and the integrity and location of structures or land to which towers, tripods, and any attachments are attached. Installation
sites should be evaluated and approved by a qualified engineer. If questions or concerns arise regarding installation, use, or
maintenance of tripods, towers, attachments, or electrical connections, consult with a licensed and qualified engineer or electrician.
General
• Prior to performing site or installation work, obtain required approvals and permits. Comply
with all governing structure-height regulations, such as those of the FAA in the USA.
• Use only qualified personnel for installation, use, and maintenance of tripods and towers, and
any attachments to tripods and towers. The use of licensed and qualified contractors is highly
recommended.
• Read all applicable instructions carefully and understand procedures thoroughly before
beginning work.
• Wear a hardhat and eye protection, and take other appropriate safety precautions while
working on or around tripods and towers.
• Do not climb tripods or towers at any time, and prohibit climbing by other persons. Take
reasonable precautions to secure tripod and tower sites from trespassers.
• Use only manufacturer recommended parts, materials, and tools.
Utility and Electrical
• You can be killed or sustain serious bodily injury if the tripod, tower, or attachments you are
installing, constructing, using, or maintaining, or a tool, stake, or anchor, come in contact with
overhead or underground utility lines.
• Maintain a distance of at least one-and-one-half times structure height, 20 feet, or the distance
required by applicable law, whichever is greater, between overhead utility lines and the
structure (tripod, tower, attachments, or tools).
• Prior to performing site or installation work, inform all utility companies and have all
underground utilities marked.
• Comply with all electrical codes. Electrical equipment and related grounding devices should
be installed by a licensed and qualified electrician.
Elevated Work and Weather
• Exercise extreme caution when performing elevated work.
• Use appropriate equipment and safety practices.
• During installation and maintenance, keep tower and tripod sites clear of un-trained or non-
essential personnel. Take precautions to prevent elevated tools and objects from dropping.
• Do not perform any work in inclement weather, including wind, rain, snow, lightning, etc.
Maintenance
• Periodically (at least yearly) check for wear and damage, including corrosion, stress cracks,
frayed cables, loose cable clamps, cable tightness, etc. and take necessary corrective actions.
• Periodically (at least yearly) check electrical ground connections.
WHILE EVERY ATTEMPT IS MADE TO EMBODY THE HIGHEST DEGREE OF SAFETY IN ALL CAMPBELL SCIENTIFIC PRODUCTS,
THE CUSTOMER ASSUMES ALL RISK FROM ANY INJURY RESULTING FROM IMPROPER INSTALLATION, USE, OR
MAINTENANCE OF TRIPODS, TOWERS, OR ATTACHMENTS TO TRIPODS AND TOWERS SUCH AS SENSORS, CROSSARMS,
ENCLOSURES, ANTENNAS, ETC.
Page 6

Page 7

Table of Contents
PDF viewers: These page numbers refer to the printed version of this document. Use the
PDF reader bookmarks tab for links to specific sections.
1. Introduction ................................................................. 1
2. Cautionary Statements ............................................... 1
3. Initial Inspection ......................................................... 1
4. Quickstart .................................................................... 2
5. Overview ...................................................................... 4
6. Specifications ............................................................. 4
6.1 Temperature Measurement................................................................... 5
6.2 Relative Humidity Measurement ......................................................... 5
7. Installation ................................................................... 5
7.1 Wiring to Datalogger ........................................................................... 6
7.2 Datalogger Programming ..................................................................... 6
7.2.1 CRBasic Programming ................................................................. 7
7.2.2 Edlog Programming ...................................................................... 7
7.3 Installation............................................................................................ 8
8. Operation ................................................................... 10
8.1 Sensor Measurements ........................................................................ 10
8.1.1 Measurements at Fast Scan Rates ............................................... 10
8.1.1.1 CRBasic Dataloggers ....................................................... 10
8.1.1.2 Edlog Dataloggers ............................................................ 11
8.1.2 Long Cables ................................................................................ 11
8.1.3 Power Conservation .................................................................... 12
8.2 Measuring Multiple SDI-12 Sensors .................................................. 12
9. Troubleshooting and Maintenance ......................... 12
9.1 Troubleshooting ................................................................................. 12
9.2 Maintenance ....................................................................................... 13
9.3 Calibration.......................................................................................... 13
9.4 Sensor Element Replacement ............................................................. 13
10. Attributions and References .................................... 16
i
Page 8

Table of Contents
Appendices
Importing Short Cut Code Into CRBasic Editor ... A-1
A.
A.1 Importing Short Cut Code into a Program Editor ............................ A-1
A.1.1 CRBasic Datalogger ................................................................. A-1
A.1.2 Edlog ........................................................................................ A-2
B. Example Programs .................................................. B-1
B.1 CRBasic Programs .......................................................................... B-1
B.1.1 Example CR200(X) Program ................................................... B-1
B.1.2 Example Program for CR800, CR850, CR1000, CR3000,
or CR5000 ............................................................................. B-2
B.2 Edlog Program................................................................................. B-3
C. Environmental Performance .................................. C-1
C.1 Tests to Defined Standards .............................................................. C-1
C.2 Exposure to Pollutants ..................................................................... C-1
C.3 Operating Range of RH Element ..................................................... C-2
C.4 Measurement Below 0 °C ............................................................... C-2
D. SDI-12 Sensor Support ........................................... D-1
D.1 SDI-12 Command Basics ................................................................ D-1
D.1.1 Address Query Command (?!) ................................................. D-2
D.1.2 Change Address Command (aAb!) .......................................... D-2
D.1.3 Send Identification Command (aI!) .......................................... D-2
D.1.4 Start Measurement Commands (aM!) ...................................... D-2
D.1.5 Aborting a Measurement Command ........................................ D-2
D.1.6 Send Data Command (aD!) ...................................................... D-2
D.2 SDI-12 Transparent Mode ............................................................... D-2
D.2.1 CR200(X) Series Datalogger Example .................................... D-3
D.2.2 CR1000 Datalogger Example ................................................... D-4
D.2.3 CR10X Datalogger Example .................................................... D-5
Figures
7-1. CS215 and 41303-5A Radiation Shield on a tripod mast .................... 9
7-2. CS215 and 41303-5A Radiation Shield on a CM200 Series
Crossarm .......................................................................................... 9
9-1. Correct fit of sensor element (side view)........................................... 15
9-2. Incorrect fit of sensor element (side view) ........................................ 16
C-1. Normal operating conditions of RH element ................................... C-2
D-1. CR200(X) example of using the SDI-12 transparent mode to
change the SDI-12 address from 0 to 1. ....................................... D-3
D-2. CR1000 example of using the SDI-12 transparent mode to
change the SDI-12 address from 3 to 1. Sensor is connected
to control port 1. ........................................................................... D-4
D-3. CR10X example of using the SDI-12 transparent mode to
change the SDI-12 address from 0 to 1. Sensor is connected
to control port 1. ........................................................................... D-5
ii
Page 9

Tables
Table of Contents
7-1. Datalogger Wiring................................................................................ 6
C-1. Environmental Tests ........................................................................ C-1
D-1. SDI-12 Command and Response Set .............................................. D-1
iii
Page 10

Table of Contents
iv
Page 11

CS215 Temperature and Relative
Humidity Probe
1. Introduction
The CS215 Temperature and Relative Humidity Probe is designed for general
meteorological and other data logging applications. It uses the SDI-12
communications protocol to communicate with any SDI-12 recorder,
simplifying installation and programming.
Before using the CS215, please study
• Section 2, Cautionary Statements
• Section 3, Initial Inspection
• Section 4, Quickstart
2. Cautionary Statements
• READ AND UNDERSTAND the Precautions section at the front of this
manual.
• When opening the shipping package, do not damage or cut the cable
jacket. If damage to the cable is suspected, consult with a Campbell
Scientific application engineer.
• Although rugged, the CS215 should be handled as a precision scientific
instrument.
• Santoprene® rubber, which composes the black outer jacket of the CS215
cable, will support combustion in air. It is used because of its resistance to
temperature extremes, moisture, and UV degradation. It is rated as slow
burning when tested according to U.L. 94 H.B. and passes FMVSS302.
However, local fire codes may preclude its use inside buildings.
3. Initial Inspection
• Check the packaging and contents of the shipment. If damage occurred
during transport, immediately file a claim with the carrier. Contact
Campbell Scientific to facilitate repair or replacement.
• Check model information against the shipping documents to ensure the
expected products and the correct lengths of cable are received. Model
numbers are found on each product. On cables and cabled items, the
model number is usually found at the connection end of the cable. Report
any shortages immediately to Campbell Scientific.
1
Page 12
CS215 Temperature and Relative Humidity Probe
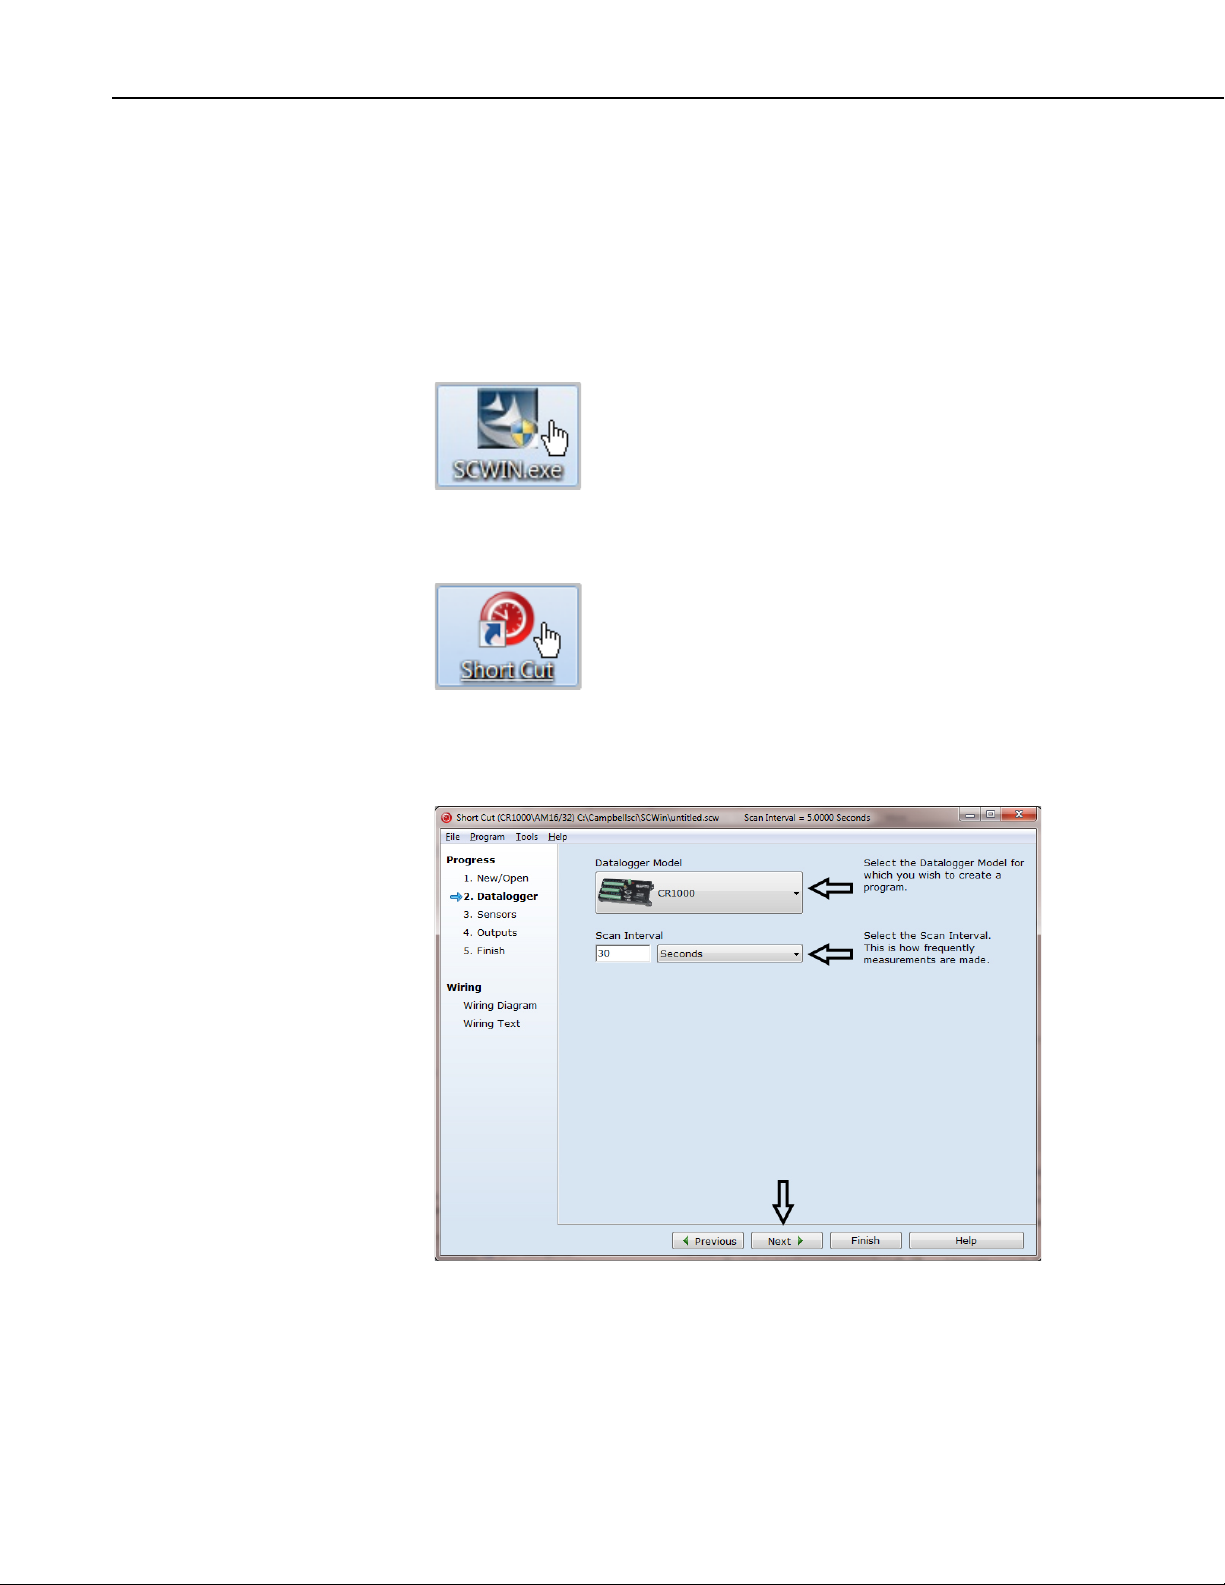
4. Quickstart
Short Cut is an easy way to program your datalogger to measure the CS215
sensor and assign datalogger wiring terminals. Use the following procedure to
get started.
1. Install Short Cut by clicking on the install file icon. Get the install file
from either www.campbellsci.com, the ResourceDVD, or find it in
installations of LoggerNet, PC200W, PC400, or RTDAQ software.
2. The Short Cut installation should place a shortcut icon on the desktop of
your computer. To open Short Cut, click on this icon.
3. When Short Cut opens, select New Program.
4. Select Datalogger Model and Scan Interval. Click Next.
2
Page 13

CS215 Temperature and Relative Humidity Probe
5. Under the Available Sensors and Devices list, select the Sensors |
Meteorological | Relative Humidity & Temperature folder. Select
CS215 Temperature & Relative Humidity Sensor. Click to move
the selection to the Selected device window. Data defaults to degree
Celsius. This can be changed by clicking the Deg C box and selecting
Deg F, for degrees Fahrenheit, or K for Kelvin.
6. After selecting the sensor, click at the left of the screen on Wiring
Diagram to see how the sensor is to be wired to the datalogger. The
wiring diagram can be printed out now or after more sensors are added.
7. Select any other sensors you have, then finish the remaining Short Cut
steps to complete the program. The remaining steps are outlined in Short
Cut Help, which is accessed by clicking on Help | Contents |
Programming Steps.
3
Page 14

CS215 Temperature and Relative Humidity Probe
8. If LoggerNet, PC400, RTDAQ, or PC200W is running on your PC, and the
PC to datalogger connection is active, you can click Finish in Short Cut
and you will be prompted to send the program just created to the
datalogger.
9. If the sensor is connected to the datalogger, as shown in the wiring
diagram in step 6, check the output of the sensor in the datalogger support
software data display to make sure it is making reasonable measurements.
5. Overview
The CS215 probe uses a single chip element that incorporates both a
temperature and an RH sensor. Each element is individually calibrated with
the calibration corrections stored on the chip. The element is easily changed in
the field. The ability to replace the element in the field reduces downtime and
calibration costs.
Electronics within the CS215 control the measurement made by the sensor
element, apply temperature and linearization corrections to the readings, and
present the data via SDI-12 to a datalogger.
A sintered plastic filter minimizes the effects of dust and dirt on the sensor.
The filter is lightweight and hydrophobic, thereby diminishing its effect on the
time response of the sensor.
The probe housing is designed to withstand permanent exposure to all weather
and to fit into a range of radiation shields, including compact shields.
6. Specifications
Features:
Sensor Element: Sensirion SHT75
Supply Voltage: 6 to 16 Vdc
Current Consumption: Typically 120 µA quiescent
1.7 mA during measurement
Diameter: 12 mm at sensor tip, maximum 18 mm at cable end
• Accurate, stable measurements
• Field-changeable element allows on-site recalibration
• Individually calibrated sensor elements require no further adjustment
of the probe
• Low power consumption
• Digital SDI-12 output
• Compatible with Campbell Scientific CRBasic dataloggers:
CR200(X) series, CR800 series, CR1000, CR3000, and CR5000.
Also compatible with Edlog dataloggers: CR500, CR510, CR10(X),
and CR23X
4
Length: 180 mm, including cable strain relief
Housing Material: Anodized aluminum
Page 15

CS215 Temperature and Relative Humidity Probe
Filter Material: Sintered high-density polyethylene, average pore
size 13 µm
EMC Compliance: Tested and conforms to BS EN61326:2002
Calibration: Sensirion SHT75 sensor element is individually
calibrated during manufacture.
6.1 Temperature Measurement
Operating Range: –40 to +70 °C
Accuracy: ±0.3 °C at 25 °C
±0.4 °C over 5 to 40 °C
±0.9 °C over –40 to +70 °C
Response Time
with Filter: 120 s (63% response time in air moving at 1 m/s)
Default Units: Degrees Celsius
6.2 Relative Humidity Measurement
7. Installation
Operating Range: 0 to 100% RH (–20 to +60 °C; see Appendix C,
Environmental Performance)
Accuracy at 25°C: ±2% over 10 to 90%
±4% over 0 to 100%
Short-Term Hysteresis: <1% RH
Temperature
Dependence: Compensated to better than ±2% over –20 to 60 °C
Typical Long-Term
Stability: Better than ±1.0% per year
Response Time
with Filter: <10 s (63% response time in air moving at 1 m/s at
<85% RH)
Environmental
Performance: See Appendix C, Environmental Performance
If you are programming your datalogger with Short Cut, skip Section 7.1,
Wiring to Datalogger, and Section 7.2, Datalogger Programming. Short Cut
does this work for you. See Section 4, Quickstart, for a Short Cut tutorial.
5
Page 16

CS215 Temperature and Relative Humidity Probe
TABLE 7-1. Datalogger Wiring
NOTE
7.1 Wiring to Datalogger
Terminal Terminal
number
A 1 12 V
A 4 Power
B 3 SDI-12
B 4 SDI-12
To use more than one probe per datalogger, either connect the different probes
to different terminals on the datalogger or change the SDI-12 addresses of the
probes and wire them to the same terminal. Using the SDI-12 address reduces
the use of ports on the datalogger and allows probes to be connected in a
“daisy-chain” fashion which can minimize cable runs in some applications.
(See below for limits on the total cable length.)
The SDI-12 address of the CS215 can be set two ways:
Function CR800, CR850,
power
Ground
Data
Ground
CR1000, CR3000,
CR23X, CR10(X),
CR500, CR510
12V 12V Battery+
G G G
Odd Numbered
Control Port (C1,
C3, …)
G G G
CR5000
SDI-12 C1/SDI-12
CR200(X)
• By sending the required commands to the sensors via an SDI-12
recorder/datalogger that allows talk through to the sensor (see
Appendix D.2, SDI-12 Transparent Mode)
• By loading a program into the recorder that sends the required
commands
7.2 Datalogger Programming
Short Cut is the best source for up-to-date datalogger programming code.
Programming code is needed,
• when creating a program for a new datalogger installation
• when adding sensors to an existing datalogger program
If your data acquisition requirements are simple, you can probably create and
maintain a datalogger program exclusively with Short Cut. If your data
acquisition needs are more complex, the files that Short Cut creates are a great
source for programming code to start a new program or add to an existing
custom program.
Short Cut cannot edit programs after they are imported and edited
in CRBasic Editor.
6
Page 17

A Short Cut tutorial is available in Section 4, Quickstart. If you wish to import
Short Cut code into either Edlog or CRBasic Editor to create or add to a
customized program, follow the procedure in Appendix A.1, Importing Short
Cut Code into a Program Editor. Programming basics for CRBasic and Edlog
dataloggers are provided in the following sections. Complete program
examples for select dataloggers can be found in Appendix B, Example
Programs.
7.2.1 CRBasic Programming
The SDI12Recorder() measurement instruction programs CRBasic
dataloggers (CR200(X)-, and CR800-series, CR1000, CR3000, and CR5000)
to measure the CS215 sensor. This instruction sends a request to the sensor to
make a measurement and then retrieves the measurement from the sensor. See
Section 8.1, Sensor Measurements, for more information.
When using a CR200(X), the SDI12Recorder() instruction has the following
syntax:
SDI12Recorder(Destination,OutString,Multiplier,Offset)
For the other CRBasic dataloggers, the SDI12Recorder() instruction has the
following syntax:
CS215 Temperature and Relative Humidity Probe
SDI12Recorder(Destination, SDIPort, SDIAddress, “SDICommand”,
Multiplier, Offset)
For all of the CRBasic dataloggers, the Destination parameter must be an array
of length 2, with the first index for Air Temperature (in °C) and the second for
Relative Humidity (as a percent).
Variations:
• Temperature reported as °C — set Multiplier to 1 and Offset to 0
• Temperature reported as °F — set Multiplier to 1.8 and Offset to 32
7.2.2 Edlog Programming
Edlog dataloggers read the CS215 using the SDI12 Recorder (P105)
instruction.
Please note that Edlog only allocates one input location for the SDI12
Recorder (P105) instruction. Two input locations are required for the SDI-12
M! command. The additional input location needs to be inserted manually
using the Input Location Editor. To get into the Input Location Editor, select
Edit/Input Labels or press the F5 key. Once in the Input Location Editor,
do the following:
1. Choose Edit/Insert Block.
2. After the Insert Block dialog box appears, type in a base name for the
input locations. Each input location will have the base name with an
underscore and a consecutive number.
3. In the Start Address field, type in the number of the first input location.
4. In the Number of InLocs field, type in 2 and select OK.
7
Page 18

CS215 Temperature and Relative Humidity Probe
7.3 Installation
Locate the sensor over an open, level area at least 9 m (EPA) in diameter. The
surface should be covered by short grass or the natural earth surface where
grass does not grow. Sensors should be located at a distance of at least four
times the height of any nearby obstruction and at least 30 m (EPA) from large
paved areas. Sensors should be protected from thermal radiation and
adequately ventilated. Protect the filter at the top of the sensor from exposure
to liquid water. The hydrophobic nature of the filter repels light rain, but
driving rain can force itself into the pore structure of the filter and take time to
dry out.
Standard measurement heights:
• 1.5 m (AASC)
• 1.25 – 2.0 m (WMO)
• 2.0 m (EPA)
See Section 10, Attributions and References, for a list of references that discuss
temperature and relative humidity sensors.
When used in the field, the CS215 must be housed in a radiation shield.
Typically, the 41303-5A six-plate solar radiation shield is used. The white
color reflects solar radiation, and the louvered construction allows air to pass
freely through, thereby keeping the probe at or near ambient temperature.
The 41303-5A attaches to a crossarm, mast, or user-supplied pipe with a 2.5 to
5.3 cm (1.0 to 2.1 inch) outer diameter.
A 41003-5 ten-plate solar radiation shield can also house the CS215 sensor by
using the 18.5 adapter (pn 6637). For this shield, tighten the sensor grip
around the probe where it best matches the size of the grip. (The probe will
also fit directly into most of the R.M. Young shields, where the probe enters
the shield from the top, pointing downwards.)
Both the 41303-5A and the 41003-5 solar radiation shields attach to a
crossarm, mast, or user-supplied pipe with a 2.5 to 5.3 cm (1.0 to 2.1 inch)
outer diameter.
Tools required for installing a radiation shield to a tripod or tower include:
• 1/2-inch open-end wrench
• small screwdriver provided with datalogger
• small Phillips screwdriver
• UV-resistant cable ties
• small pair of diagonal-cutting pliers
1. Loosen the plastic split collar at the base of the shield (reversing the
removable portion if necessary) and gently insert the probe.
2. Tighten the collar until it lightly grips the probe body.
8
3. Continue to push the probe up into the body of the shield until the step in
the tube stops it from going any further.
Page 19

CS215 Temperature and Relative Humidity Probe
41303-5A
CS215
Tripod or Tower Mast
41303-5A
CS215
Tripod or Tower Mast
CM200 Series Crossarm
4. Tighten the collar until it securely grips the probe.
5. Attach the radiation shield to the tripod mast, crossarm, or tower leg using
the supplied U-bolt. See FIGURE 7-1 and FIGURE 7-2 for examples of
shield mounting.
6. Route the cable to the datalogger, and secure the cable to the mounting
structure using cable ties.
FIGURE 7-1. CS215 and 41303-5A Radiation Shield on a tripod mast
FIGURE 7-2. CS215 and 41303-5A Radiation Shield on a
CM200 Series Crossarm
9
Page 20

CS215 Temperature and Relative Humidity Probe
NOTE
NOTE
8. Operation
8.1 Sensor Measurements
CRBasic instruction SDI12Recorder() measures the CS215 sensor using the
Start Measurement (aM!), Concurrent Measurement (aC!), or Continuous
Measurement (aR!) command. In all cases “a” is the address of the sensor and
“!” is the command terminator. The sensor returns two values: temperature in
degrees Celsius and relative humidity as a percentage (0 to 100).
A measurement is initiated with the aM! or aC! command. To these
commands, the sensor responds with the time until the measurement data are
available and the number of values to be returned when one or more
subsequent aD! commands are issued.
When using the aM! command, the datalogger waits the time specified by the
sensor, sends the aD! command, pauses its operation, and waits until either it
receives the data from the sensor or the sensor timeout expires. Because of the
delays this command requires, it is only recommended in measurement scans
of 10 seconds or more.
The aC! command follows the same pattern as the aM! command with the
exception that it does not require the datalogger to pause its operation until the
values are ready. Rather, the datalogger picks up the data with the aD!
command on the next pass through the program. Another measurement request
is then sent so that data are ready on the next scan.
An aR! command switches the sensor to automatically make measurements
and send data every 11 seconds, ±2 seconds, based on the sensor’s internal
clock. If measurements are requested at 2 seconds or faster, the sensor will
increase its measurement rate to approximately every 5 seconds. This
instruction usually takes less than 300 milliseconds to execute. The automatic
measurement mode can only be cancelled by powering down the sensor to reset
it.
See Appendix D, SDI-12 Sensor Support, for additional commands and details
of the SDI-12 protocol.
Only CS215 sensors with serial numbers after E1587 or those with
upgraded firmware support the aR! Command.
8.1.1 Measurements at Fast Scan Rates
8.1.1.1 CRBasic Dataloggers
Using the SlowSequence() function allows the SDI-12 instruction to run as a
background process, causing minimum interference to other measurements that
use the analog hardware. Measuring the sensor in a SlowSequence() section of
the program allows faster programs to run as the main scan.
For the CR5000, use a control port rather than the SDI-12 port to
allow the SDI12recorder instruction to run in the slow sequence.
10
Page 21

8.1.1.2 Edlog Dataloggers
The aM! command takes about 700 milliseconds in total to make a
measurement from the CS215. If it is included in the main program table
(table 1) the program will be delayed for this interval which will limit the
maximum scan rate for fast running programs.
For Edlog dataloggers, it is possible to put the SDI-12 instruction in table 2,
which allows table 1 to interrupt and pause the SDI-12 instruction letting it run
other instructions. However, table 1 cannot interrupt the instruction while
SDI-12 communications are taking place, only when datalogger is waiting for
the sensor to take the measurement. As the initiation of the sensor and also the
transfer of data from the sensor each take approximately 200 milliseconds this
limits the scan rate of table 1 to about 250 milliseconds, and only then if table 1
itself takes little time to execute.
The aC! concurrent measurement command can also be used where the sensor
measurement is initiated with one command and data is collected after a
minimum delay of one second or any time thereafter. With Campbell
Scientific dataloggers, this is done by using the SDI-12 recorder instruction
with the aC! command. The datalogger will return –99999 for the temperature
reading for the call of the instruction that initiates the measurement. At the
next call of the instruction, the datalogger will request the data and record the
correct temperature.
CS215 Temperature and Relative Humidity Probe
8.1.2 Long Cables
Using the aC! command requires more detailed programming to ensure the
out-of-range values are not recorded as real temperatures. It also has similar
limitations to running the instruction in table 2 when trying to make other
measurements at a fast scan rate. This is because the program will still be
delayed by approximately 200 ms for both the initiation of the measurement
and the subsequent reading of data from the sensor. Using the aC! command
can be useful where predictable timing of the program is required (without the
complications of working out how different program tables will interrupt each
other).
Digital data transfer eliminates offset errors due to cable lengths. However,
digital communications can break down when cables are too long, resulting in
either no response from the sensor or corrupted readings. The original SDI-12
standard specifies the maximum total cable length to be 61 m (200 ft). To
ensure proper operation with long cables, follow these guidelines:
• Use low capacitance, low resistance, screened cable (as fitted by Campbell
Scientific) to reach distances of several hundred meters.
• Ensure that the power ground cable has low resistance and is connected to
the same ground reference as the datalogger control ports.
• Be aware that “daisy-chaining” sensors reduces the maximum cable length
roughly in proportion to the number of sensors connected in parallel.
11
Page 22

CS215 Temperature and Relative Humidity Probe
NOTE
8.1.3 Power Conservation
The CS215 draws less than 70 µA of current between measurements. In most
applications, this is insignificant compared to the datalogger and other power
uses, so the sensor can be permanently connected.
In low-power applications, battery power can be conserved by turning the 12 V
supply to the CS215 on just before the measurement (allowing a ‘warm-up’
time of at least 100 ms) and then turning it off afterwards. If available, the
switched 12 V output of the datalogger can be used.
8.2 Measuring Multiple SDI-12 Sensors
Up to ten CS215s or other SDI-12 sensors can be connected to a single
datalogger control port. Each SDI-12 device must have a unique SDI-12
address between 0 and 9.
9. Troubleshooting and Maintenance
All factory repairs and recalibrations require a returned material
authorization (RMA) and completion of the “Declaration of
Hazardous Material and Decontamination” form. Refer to the
Assistance page at the beginning of this manual for more
information.
9.1 Troubleshooting
Symptom: Temperature is reported as –9999 or NAN, and relative humidity is
reported as 0 or as an unchanging value.
Recheck wiring. Verify the green wire is connected to the control port
specified by the SDI12Recorder() instruction. Verify the red wire is
connected to a 12V terminal.
Check the voltage to the sensor with a digital voltage meter. If a switched 12V
terminal is used, temporarily connect the red wire to a 12V terminal (nonswitched) for test purposes.
Verify the probe’s SDI12 address matches the address entered for the
SDI12Recorder() instruction. The default address is 0. The address can be
verified or changed with the commands described in Appendix D, SDI-12
Sensor Support.
Remove the filter tip and verify that the sensing element has been installed
with the proper orientation as described in Section 9.4, Sensor Element
Replacement.
Symptom: Incorrect temperature or relative humidity is reported.
If using the SW12 terminal to power the sensor, verify the program is allowing
a warm-up time of at least 100 ms.
12
Check to see if the filter tip has been contaminated. Replace the filter tip (pn
18142), or clean with distilled water as needed.
Page 23

9.2 Maintenance
CAUTION
NOTE
The CS215 probe requires minimal maintenance.
• Check the radiation shield monthly to make sure it is free from dust and
• Clear the white filter on the end of the sensor of debris. If dirt or salt is
9.3 Calibration
The life of the humidity chip element is quoted as many years with a typical
drift of less than 1% per year when used in ‘clean’ environments. Because it
can be difficult to know what the sensor has been exposed to and because the
element is relatively inexpensive, we recommend replacing the sensor element
at the normal interval you would recalibrate similar probes, e.g. annually.
Replacing the element effectively brings the probe back to a factory calibration
state both for temperature and relative humidity.
CS215 Temperature and Relative Humidity Probe
debris.
engrained into the filter, it should be cleaned with distilled water or
replaced. Make sure the filter is connected firmly with your fingers — do
not over tighten.
If you wish to have an old element’s calibration checked in order to formally
record the probe’s pre-calibration state (pre-sensor replacement), you can
measure its performance by plugging it into another sensor.
9.4 Sensor Element Replacement
To replace the element:
1. Disconnect the sensor from the 12 V power supply.
2. Remove the filter by unscrewing it in a counter-clockwise direction when
looking towards the tip of the sensor.
The filter cap unscrews from the probe. Attempting to pull it
off will destroy it.
3. Wash your hands to avoid getting dirt or grease on the element.
It is virtually impossible to touch and damage the sensing elements
which are enclosed within the black molded plastic at the tip.
However, if dirt, salt, or grease are left on the plastic during the
process of handling the element, it may influence the
measurements made.
4. Identify the sensor element. FIGURE 9-1 shows a side-view of the end of
the probe and sensor element. Before removing the element, carefully
study the probe, note its orientation, and read the following description:
• The element plugs into the black plastic socket that protrudes by about
1 mm from the end of the metal body of the sensor.
13
Page 24

CS215 Temperature and Relative Humidity Probe
CAUTION
CAUTION
• There are eight holes in the socket, while the element only has four
pins.
• The element will work when fitted into either side of socket but must
be installed in one of the two possible orientations to work.
• The correct orientation is with the black molded tip of the element
(that contains the sensing components) mounted directly above the
center of the socket.
• FIGURE 9-1 shows the correct orientation, while FIGURE 9-2 shows
the incorrect orientation.
If the sensor is oriented incorrectly, it will not work. The
element will draw excessive power from the supply and may
be damaged if left powered in this state for more than a few
seconds.
5. Grasp the body of the sensor (this also ensures you are at the same
electrical potential as the element) and, holding the black tip of the
element between your fingertips, pull the element out of the socket. Store
the old element in electrostatic protective packaging if you wish to retain
it.
6. With the element removed, check for dirt and/or corrosion around the
socket. Clean any dirt away using a damp cloth to remove any salts that
might be there.
7. Unpack the replacement element, avoiding static discharges to the element
by making sure you touch the packaging before the element.
8. Either hold the element by the black top of the package (the other end to
the gold plated pins) or use a pair of fine nosed pliers or tweezers to grip
the sensor by the pins. Carefully match the pins to the socket in the end of
probe.
9. Confirm the correct orientation and gently push the pins into the socket
until they will not go in any further.
10. Before replacing the filter element and turning on power to the sensor,
double-check that the sensor is inserted in the correct orientation. Refer to
FIGURE 9-1.
11. Screw the filter back onto the end of the probe, making sure it clears the
sensor element. If the element appears too close to the filter, there is a fair
chance that it has been inserted in the incorrect orientation or that the legs
of the element have been bent. Screw the filter onto the thread and tighten
gently with your fingers.
14
Only tighten the filter approximately an eighth of a turn by
hand when the filter is fully screwed onto the thread. Overtightening the filter will damage it and cause problems in
inserting and removing the probe from some shields.
Page 25

CS215 Temperature and Relative Humidity Probe
Sensor
connector
sticking out of
the end of the
tube
Gold pins
Sensing
Element
Sensing part of
the element.
Print ing on this
side.
Center line of
the sensor
body and
socket
Thread for the
filt er
Gold colored
side o f t he tip
FIGURE 9-1. Correct fit of sensor element (side view)
15
Page 26

CS215 Temperature and Relative Humidity Probe
Sensing part of
element NOT on
the center line
Center line o f the
sensor body
FIGURE 9-2. Incorrect fit of sensor element (side view)
10. Attributions and References
AASC, 1985: The State Climatologist (1985) Publication of the American
Association of State Climatologists: Heights and Exposure Standards for
Sensors on Automated Weather Stations, v. 9, No. 4 October, 1985.
(www.stateclimate.org/publications/state-climatologist/NOAA-NCYSCBOOKS-SC77097/00000029.pdf)
EPA, 2008: Quality Assurance Handbook for Air Pollution Measurement
Systems, Vol. IV, Meteorological Measurements, Ver. 2.0, EPA-454/B-08002 (revised 2008). Office of Air Quality Planning and Standards,
Research Triangle Park, NC 27711.
Goff, J. A. and S. Gratch, 1946: Low-pressure properties of water from -160°
to 212°F, Trans. Amer. Soc. Heat. Vent. Eng., 51, 125-164.
Lowe, P. R., 1977: An approximating polynomial for the computation of
saturation vapor pressure, J. Appl. Meteor., 16, 100-103.
16
Page 27

CS215 Temperature and Relative Humidity Probe
Meyer, S. J. and K. G. Hubbard, 1992: Nonfederal Automated Weather
Stations and Networks in the United States and Canada: A Preliminary
Survey, Bulletin Am. Meteor. Soc., 73, No. 4, 449-457.
Weiss, A., 1977: Algorithms for the calculation of moist air properties on a
hand calculator, Amer. Soc. Ag. Eng., 20, 1133-1136.
WMO, 2008. Guide to Meteorological Instruments and Methods of
Observation. World Meteorological Organization No. 8, 7th edition,
Geneva, Switzerland.
17
Page 28

CS215 Temperature and Relative Humidity Probe
18
Page 29

NOTE
Appendix A. Importing Short Cut Code Into CRBasic Editor
This tutorial shows:
• How to import a Short Cut program into a program editor for
additional refinement
• How to import a wiring diagram from Short Cut into the comments of
a custom program
A.1 Importing Short Cut Code into a Program Editor
Short Cut creates files that can be imported into either CRBasic Editor or
Edlog program editor. These files normally reside in the
C:\campbellsci\SCWin folder and have the following extensions:
• .DEF (wiring and memory usage information)
• .CR1 (CR1000 datalogger code)
• .CR8 (CR800 datalogger code)
• .CR3 (CR3000 datalogger code)
• .CR7 (CR7 datalogger code)
• .DLD (contain code for CR10(X), CR23X, CR500, CR510, 21X, or
CR7(X) dataloggers)
The following procedures show how to import these files for editing.
A.1.1 CRBasic Datalogger
Use the following procedure to import Short Cut code into CRBasic Editor
(CR200(X), CR1000, CR800, CR3000, CR5000 dataloggers).
1. Create the Short Cut program following the procedure in Section 4,
Quickstart. Finish the program and exit Short Cut. Make note of the file
name used when saving the Short Cut program.
2. Open CRBasic Editor.
3. Click File | Open. Assuming the default paths were used when Short Cut
was installed, navigate to C:\CampbellSci\SCWin folder. The file of
interest has a “.CR1”, “.CR8”, “.CR3”, or “.CR5” extension, for CR1000,
CR800, CR3000, or CR5000 dataloggers, respectively. Select the file and
click Open.
4. Immediately save the file in a folder different from \Campbellsci\SCWin,
or save the file with a different file name.
Once the file is edited with CRBasic Editor, Short Cut can no
longer be used to edit the datalogger program. Change the name
of the program file or move it, or Short Cut may overwrite it next
time it is used.
A-1
Page 30

Appendix A. Importing Short Cut Code Into CRBasic Editor
NOTE
5. The program can now be edited, saved, and sent to the datalogger.
6. Import wiring information to the program by opening the associated .DEF
file. Copy and paste the section beginning with heading “-Wiring for
CRXXX–” into the CRBasic program, usually at the head of the file.
After pasting, edit the information such that a ' character (single quotation
mark) begins each line. This character instructs the datalogger compiler to
ignore the line when compiling the datalogger code.
A.1.2 Edlog
Use the following procedure to import Short Cut code into the Edlog program
editor (CR10(X), CR500, CR510, and CR23X dataloggers).
1. Create the Short Cut program following the procedure in Section 4,
Quickstart. Finish the program and exit Short Cut. Make note of the file
name used when saving the Short Cut program.
2. Open Edlog.
3. Click File | Document DLD File. Assuming the default paths were used
when Short Cut was installed, navigate to C:\CampbellSci\SCWin folder.
The file of interest has a “.DLD” extension. Select the file and click
Open. The .dld file, which is a type of ASCII machine code, is imported,
documented, and, when saved, given a “.CSI” extension.
4. Immediately save the file in a folder different from \Campbellsci\SCWin,
or save the file with a different file name.
Once the file is edited with Edlog, Short Cut can no longer be used
to edit the program. Change the name of the program file or move
it, or Short Cut may overwrite it.
5. The program can now be edited, saved, and sent to the datalogger.
6. Import wiring information to the program by opening the associated .DEF
file. Copy and paste the section beginning with heading “-Wiring for
CRXXX–” into the Edlog program, usually at the head of the file. After
pasting, edit the information such that a ; (semicolon) begins each line,
which instructs the datalogger compiler to ignore the line when compiling
the datalogger code.
A-2
Page 31

Appendix B. Example Programs
B.1 CRBasic Programs
B.1.1 Example CR200(X) Program
This example program shows the measurement of a single CS215 and can be
used directly with CR200(X) series dataloggers.
'CR200(X) Series Datalogger
'Program measures one CS215 sensor every 30 seconds and stores the average
'temperature and a sample of relative humidity every 10 minutes.
'Wiring Diagram
'==============
'CS215
' Wire
' Color Function CR200(X)
' ----- -------- ------' Red Power (12V) Battery +
' Green SDI-12 signal C1/SDI-12
' Black Power ground G
' White Power ground G
' Clear Shield AG*
'*AG = Analog Ground (represented by ground symbol on CR200 wiring panel
'Declare the variable array for the measurement
Public TRHData(2)
Alias TRHData(1)=AirTC
Alias TRHData(2)=RH
Units AirTC=Deg C
Units RH=%
'Define a data table for ten-minute data
DataTable(TenMin,True,-1)
DataInterval(0,10,Min)
Average(1,AirTC,False)
Sample(1,RH)
EndTable
'Main Program
BeginProg
Scan (30,Sec) 'Scan every 30 seconds
'CS215 Temperature & Relative Humidity Sensor measurements 'AirTC' and 'RH'
SDI12Recorder(TRHData(),"0M!",1,0)
'Call Data Tables and Store Data
CallTable TenMin
NextScan
EndProg
B-1
Page 32

Appendix B. Example Programs
B.1.2 Example Program for CR800, CR850, CR1000, CR3000,
or CR5000
'Program measures one CS215 sensor every 5 seconds and stores the average
'temperature and a sample of relative humidity every 10 minutes.
'Wiring Diagram
'==============
'CS215
' Wire
' Color Function CR1000
' ----- -------- ------' Red Power (12V) 12V
' Green SDI-12 signal C3
' Black Power ground G
' White Power ground G
' Clear Shield AG*
'Declare the variable array for the measurement
Public TRHData(2)
Alias TRHData(1)=AirTC
Alias TRHData(2)=RH
Units AirTC=Deg C
Units RH=%
'Define Data Tables
DataTable(TenMin,True,-1)
DataInterval(0,10,Min,10)
Average(1,AirTC,FP2,False)
Sample(1,RH,FP2)
EndTable
'Main Program
BeginProg
'Main Scan
Scan(5,Sec,1,0)
'CS215 Temperature & Relative Humidity Sensor measurements 'AirTC' and 'RH'
SDI12Recorder(TRHData(),7,"0","M!",1,0)
'Call Data Tables and Store Data
CallTable(TenMin)
NextScan
EndProg
This program can be used directly with CR800 series, CR1000, CR3000, and
CR5000 dataloggers.
B-2
Page 33

B.2 Edlog Program
The following example is written for the CR10(X). Programs for the CR500,
CR510, and CR23X would be similar. The program below shows a simple
example reading a sensor which has been set up with address 0 (the default)
and connected to control port 1.
;{CR10X}
;Example program for a CS215 sensor on control port 1
;Measures every minute and stores some summary statistics
;once per hour
*Table 1 Program
01: 60 Execution Interval (seconds)
;Measure the sensor on control port 1
;Note you have to manually assign the labels in the Inloc Editor
;to make sure two locations are free.
1: SDI-12 Recorder (P105)
1: 0000 SDI-12 Address
2: 00 SDI-12 Command
3: 1 Port
4: 1 Loc [ Temp ]
5: 1. 0 Mult
6: 0.0 Offset
;Now store some statistics.
2: If time is (P92)
1: 0 Minutes (Seconds --) into a
2: 60 Interval (same units as above)
3: 10 Set Output Flag High (Flag 0)
3: Real Time (P77)
1: 111 Day,Hour/Minute,Seconds (midnight = 0000)
4: Average (P71)
1: 1 Reps
2: 1 Loc [ Temp ]
5: Sample (P70)
1: 1 Reps
2: 2 Loc [ RH ]
*Table 2 Program
02: 0.0000 Execution Interval (seconds)
*Table 3 Subroutines
End Program
Appendix B. Example Programs
B-3
Page 34

Appendix B. Example Programs
B-4
Page 35

TABLE C-1. Environmental Tests
Appendix C. Environmental Performance
This appendix details tests and limitations of the sensor when exposed to extremes of the
environment.
C.1 Tests to Defined Standards
The sensor element has been tested by the manufacturer and found to comply
with various environmental test standards as shown in the table below:
Environment Norm Results
Temperature Cycles
HAST Pressure
Cooker
Salt Atmosphere
Condensing Air
Freezing Cycles Fully
Submerged
Various Automotive
Chemicals
Cigarette Smoke
N.B. The temperature sensor passed all tests without any detectable drift. Package and
electronics also passed 100%
C.2 Exposure to Pollutants
All capacitive sensors are susceptible to pollutants to some degree. The vapors
may interfere with the polymer layers used in the structure of the sensing
element. The diffusion of chemicals into the polymer may cause temporary or
even permanent shifts in both offset and sensitivity.
JESD22-A104-B
–40/+125 °C, 1000
cycles
JESD22-A110-B 2.3bar
125 °C 85%RH
DIN-50021SS Within
– Within
–20/+90 °C, 100cycles,
30min dwell time
DIN 72300-5 Within
Equivalent to 15 years in
a mid-size car
Within
Specifications
Reversible shift by
+2% RH
Specifications
Specifications
Reversible shift by
+2% RH
Specifications
Within
Specifications
After low levels of exposure, in a clean environment the contaminants will
slowly outgas and the sensor recovers. High levels of pollutants may cause
permanent damage to the sensing polymer.
As a general rule, the sensor will not be damaged by levels of chemicals which
are not too dangerous to human health (see TABLE C-1), so damage is not
normally a problem in outdoor applications. Avoid exposing the sensor to
chemicals at higher concentrations.
C-1
Page 36

Appendix C. Environmental Performance
C.3 Operating Range of RH Element
The RH sensor is specified to work over the entire humidity range of 0 to
100% RH for the temperature range –20 to +60 °C. It will give readings over
an extended range as shown in FIGURE C-1 (although the electronics of the
CS215 probe are not specified to operate beyond +70 °C).
When used outside the range of normal conditions or when subject to
prolonged periods of condensation or freezing, the sensor calibration may be
temporarily altered, normally resulting in a change of <+3% RH. Upon
returning to normal conditions, the calibration will settle back to the “standard”
calibration over the course of several days. In laboratory conditions, it is
possible to speed up this process by a reconditioning process, as follows: 80-90
°C at < 5 %RH for 24h (baking) followed by 20 to 30 °C at > 74 %RH for 48h
(re-hydration).
FIGURE C-1. Normal operating conditions of RH element
C.4 Measurement Below 0 °C
The CS215 provides a humidity reading that is referenced to the saturated
water vapor pressure above liquid water, even at temperatures below 0 °C,
where ice might form. This is the common way to express relative humidity
and is as defined by the World Meteorological Organization. If an RH value is
required to be referenced to ice, the CS215 readings will need to be corrected.
One consequence of using water as the reference is that the maximum humidity
that will normally be output by the sensor for temperatures below freezing is as
follows:
100% RH at 0 °C
95% RH at –5 °C
91% RH at –10 °C
87% RH at –15 °C
82% RH at –20 °C
78% RH at –25 °C
75% RH at –30 °C
In practical terms this means that, for instance, at –20 °C the air is effectively
fully saturated when the sensor outputs 82% RH.
C-2
Page 37

TABLE D-1. SDI-12 Command and Response Set
Appendix D. SDI-12 Sensor Support
D.1 SDI-12 Command Basics
SDI-12 commands have three components:
Sensor address (a) – a single character, and is the first character of the
command. The default address of zero (0) can be used unless multiple sensors
are connected to the same port.
Command body (e.g., M1) – an upper case letter (the “command”) followed by
alphanumeric qualifiers.
Command termination (!) – an exclamation mark.
An active sensor responds to each command. Responses have several standard
forms and terminate with <CR><LF> (carriage return – line feed). Standard
SDI-12 commands supported by the CS215 are listed in TABLE D-1.
Name Command Response
Acknowledge
Active
Send
Identification
Change
Address
Address
Query
Start
Measurement
Send Data aD0! a<values><CR><LF>
Start
verification
a! a<CR><LF>
aI! allccccccccmmmmmmvvvxxx...xx<CR><LF>
aAb! b<CR><LF>
?! a<CR><LF>
aM! atttn<CR><LF>
aV! atttn
D-1
Page 38

Appendix D. SDI-12 Sensor Support
D.1.1 Address Query Command (?!)
Command ?! requests the address of the connected sensor. The sensor replies
to the query with the address, a.
D.1.2 Change Address Command (aAb!)
Sensor address is changed with command aAb!, where a is the current address
and b is the new address. For example, to change an address from 0 to 2, the
command is 0A2!. The sensor responds with the new address b, which in this
case is 2.
D.1.3 Send Identification Command (aI!)
Sensor identifiers are requested by issuing command aI!. The reply is defined
by the sensor manufacturer, but usually includes the sensor address, SDI-12
version, manufacturer’s name, and sensor model information. Serial number or
other sensor specific information may also be included.
D.1.4 Start Measurement Commands (aM!)
A measurement is initiated with M! commands. The response to each
command has the form atttnn, where
a = sensor address
ttt = time, in seconds, until measurement data are available
nn = the number of values to be returned when one or more subsequent D!
commands are issued.
D.1.5 Aborting a Measurement Command
A measurement command (M!) is aborted when any other valid command is
sent to the sensor.
D.1.6 Send Data Command (aD!)
This command requests data from the sensor. It is normally issued
automatically by the datalogger after measurement commands aM!. In
transparent mode, the user asserts this command to obtain data.
D.2 SDI-12 Transparent Mode
System operators can manually interrogate and enter settings in probes using
transparent mode. Transparent mode is useful in troubleshooting SDI-12
systems because it allows direct communication with probes. Datalogger
security may need to be unlocked before transparent mode can be activated.
D-2
Transparent mode is entered while the PC is in telecommunications with the
datalogger through a terminal emulator program. It is easily accessed through
Campbell Scientific datalogger support software, but is also accessible with
terminal emulator programs such as Windows HyperTerminal. Datalogger
keyboards and displays cannot be used.
Page 39

Appendix D. SDI-12 Sensor Support
The terminal emulator is accessed by navigating to the Datalogger menu in
PC200W, the Tools menu in PC400, or the Datalogger menu in the LoggerNet
Connect screen.
The following examples show how to use LoggerNet software to enter
transparent mode and change the SDI-12 address of the sensor. The same steps
are used to enter transparent mode with PC200W and PC400 software after
accessing the terminal emulator as previously described.
D.2.1 CR200(X) Series Datalogger Example
1. Connect a single CS215 to the CR200(X) (see TABLE 7-1).
2. In the LoggerNet Connect screen navigate to the Datalogger menu and
select Terminal Emulator. The terminal emulator window will open. In
the Select Device menu, located in the lower left-hand side of the window,
select the CR200Series station.
3. Click on the Open Terminal button.
4. Press the <enter> key until the datalogger responds with the CR2XX>
prompt. At the CR2XX> prompt, make sure the All Caps Mode box is
checked and enter the command SDI12 <enter>. The response SDI12>
indicates that the sensor is ready to accept SDI-12 commands.
5. To query the sensor for its current SDI-12 address, key in ?! <enter> and
the sensor will respond with its SDI-12 address. If no characters are typed
within 60 seconds, then the mode is exited. In that case, simply enter the
command SDI12 again and press <enter>.
6. To change the SDI-12 address, key in aAb! <enter>, where a is the current
address from the above step and b is the new address (see FIGURE D-1).
The sensor will change its address and the datalogger will respond with the
new address. To exit SDI-12 transparent mode, select the Close Terminal
button.
FIGURE D-1. CR200(X) example of using the SDI-12 transparent
mode to change the SDI-12 address from 0 to 1.
D-3
Page 40

Appendix D. SDI-12 Sensor Support
D.2.2 CR1000 Datalogger Example
1. Connect a CS215 to the CR1000 (see TABLE 7-1).
2. In the LoggerNet Connect screen navigate to the Datalogger menu and
3. Click on the Open Terminal button.
4. Press the <enter> key until the datalogger responds with the CR1000>
5. To query the sensor for its current SDI-12 address, key in ?! <enter> and
select Terminal Emulator. The terminal emulator window will open. In
the Select Device menu, located in the lower left-hand side of the window,
select the CR1000 station.
prompt. At the CR1000> prompt, make sure the All Caps Mode box is
checked and enter the command SDI12 <enter>. At the Enter Cx Port 1,
3, 5, or 7 prompt, key in the control port number where the sensor is
connected and press <enter>. The response Entering SDI12 Terminal
indicates that the sensor is ready to accept SDI-12 commands.
the sensor will respond with its SDI-12 address. If no characters are typed
within 60 seconds, then the mode is exited. In that case, simply enter the
command SDI12 again, press <enter>, and key in the correct control port
number when prompted.
6. To change the SDI-12 address, key in aAb! <enter>, where a is the current
address from the above step and b is the new address (see FIGURE D-2).
The sensor will change its address and the datalogger will respond with the
new address. To exit SDI-12 transparent mode, select the Close Terminal
button.
FIGURE D-2. CR1000 example of using the SDI-12 transparent mode
to change the SDI-12 address from 3 to 1. Sensor is connected to
control port 1.
D-4
Page 41

D.2.3 CR10X Datalogger Example
1. Connect CS215 to the CR10(X) (see TABLE 7-1).
2. Download a datalogger program that contains the SDI-12 Recorder
(P105) instruction with valid entries for each parameter. Make sure that
parameter 3 of the P105 instruction matches the control port number
where the sensor is connected.
3. In the LoggerNet Connect screen navigate to the Datalogger menu and
select Terminal Emulator. The terminal emulator window will open. In
the Select Device menu, located in the lower left-hand side of the window,
select the CR10X station.
4. Click on the Open Terminal button.
5. Press the <enter> key until the datalogger responds with the * prompt.
6. To activate the SDI-12 Transparent Mode on control port p, enter pX
<enter>. For this example, key in 1X <enter>. The datalogger will
respond with entering SDI-12. If any invalid SDI-12 command is issued,
the datalogger will exit the SDI-12 Transparent Mode.
Appendix D. SDI-12 Sensor Support
7. To query the sensor for its current SDI-12 address, enter the command ?!.
The sensor will respond with the current SDI-12 address.
8. To change the SDI-12 address, enter the command aAb!; where a is the
current address from the above step and b is the new address. The sensor
will change its address and the datalogger will exit the SDI-12 Transparent
Mode.
9. Activate the SDI-12 Transparent Mode on Control Port 1 again by entering
1X <enter>. Verify the new SDI-12 address by entering the ?! command.
The sensor will respond with the new address.
10. To exit the SDI-12 Transparent Mode, enter *.
FIGURE D-3. CR10X example of using the SDI-12 transparent mode to
change the SDI-12 address from 0 to 1. Sensor is connected to
control port 1.
D-5
Page 42

Appendix D. SDI-12 Sensor Support
D-6
Page 43

Page 44

Campbell Scientific Companies
Campbell Scientific, Inc. (CSI)
815 West 1800 North
Logan, Utah 84321
UNITED STATES
www.campbellsci.com • info@campbellsci.com
Campbell Scientific Africa Pty. Ltd. (CSAf)
PO Box 2450
Somerset West 7129
SOUTH AFRICA
www.csafrica.co.za • cleroux@csafrica.co.za
Campbell Scientific Australia Pty. Ltd. (CSA)
PO Box 8108
Garbutt Post Shop QLD 4814
AUSTRALIA
www.campbellsci.com.au • info@campbellsci.com.au
Campbell Scientific (Beijing) Co., Ltd.
8B16, Floor 8 Tower B, Hanwei Plaza
7 Guanghua Road
Chaoyang, Beijing 100004
P.R. CHINA
www.campbellsci.com • info@campbellsci.com.cn
Campbell Scientific do Brasil Ltda. (CSB)
Rua Apinagés, nbr. 2018 ─ Perdizes
CEP: 01258-00 ─ São Paulo ─ SP
BRASIL
www.campbellsci.com.br • vendas@campbellsci.com.br
Campbell Scientific Canada Corp. (CSC)
14532 – 131 Avenue NW
Edmonton AB T5L 4X4
CANADA
www.campbellsci.ca • dataloggers@campbellsci.ca
Please visit www.campbellsci.com to obtain contact information for your local US or international representative.
Campbell Scientific Centro Caribe S.A. (CSCC)
300 N Cementerio, Edificio Breller
Santo Domingo, Heredia 40305
COSTA RICA
www.campbellsci.cc • info@campbellsci.cc
Campbell Scientific Ltd. (CSL)
Campbell Park
80 Hathern Road
Shepshed, Loughborough LE12 9GX
UNITED KINGDOM
www.campbellsci.co.uk • sales@campbellsci.co.uk
Campbell Scientific Ltd. (CSL France)
3 Avenue de la Division Leclerc
92160 ANTONY
FRANCE
www.campbellsci.fr • info@campbellsci.fr
Campbell Scientific Ltd. (CSL Germany)
Fahrenheitstraße 13
28359 Bremen
GERMANY
www.campbellsci.de • info@campbellsci.de
Campbell Scientific Spain, S. L. (CSL Spain)
Avda. Pompeu Fabra 7-9, local 1
08024 Barcelona
SPAIN
www.campbellsci.es • info@campbellsci.es
 Loading...