

Page 1
DataView II (CD295)
Dual Line Display
Revision: 9/10
Copyright © 2005-2010
Campbell Scientific, Inc.
Page 2

Warranty and Assistance
The DATAVIEW II (CD295) DUAL LINE DISPLAY is warranted by
Campbell Scientific, Inc. to be free from defects in materials and workmanship
under normal use and service for twelve (12) months from date of shipment
unless specified otherwise. Batteries have no warranty. Campbell Scientific,
Inc.'s obligation under this warranty is limited to repairing or replacing (at
Campbell Scientific, Inc.'s option) defective products. The customer shall
assume all costs of removing, reinstalling, and shipping defective products to
Campbell Scientific, Inc. Campbell Scientific, Inc. will return such products
by surface carrier prepaid. This warranty shall not apply to any Campbell
Scientific, Inc. products which have been subjected to modification, misuse,
neglect, accidents of nature, or shipping damage. This warranty is in lieu of all
other warranties, expressed or implied, including warranties of merchantability
or fitness for a particular purpose. Campbell Scientific, Inc. is not liable for
special, indirect, incidental, or consequential damages.
Products may not be returned without prior authorization. The following
contact information is for US and International customers residing in countries
served by Campbell Scientific, Inc. directly. Affiliate companies handle
repairs for customers within their territories. Please visit
www.campbellsci.com to determine which Campbell Scientific company
serves your country.
To obtain a Returned Materials Authorization (RMA), contact Campbell
Scientific, Inc., phone (435) 753-2342. After an applications engineer
determines the nature of the problem, an RMA number will be issued. Please
write this number clearly on the outside of the shipping container. Campbell
Scientific's shipping address is:
CAMPBELL SCIENTIFIC, INC.
RMA#_____
815 West 1800 North
Logan, Utah 84321-1784
For all returns, the customer must fill out a “Declaration of Hazardous Material
and Decontamination” form and comply with the requirements specified in it.
The form is available from our website at
completed form must be either emailed to repair@campbellsci.com
435-750-9579. Campbell Scientific will not process any returns until we
receive this form. If the form is not received within three days of product
receipt or is incomplete, the product will be returned to the customer at the
customer’s expense. Campbell Scientific reserves the right to refuse service on
products that were exposed to contaminants that may cause health or safety
concerns for our employees.
www.campbellsci.com/repair
. A
or faxed to
Page 3

DataView II (CD295) Table of Contents
PDF viewers note: These page numbers refer to the printed version of this document. Use
the Adobe Acrobat® bookmarks tab for links to specific sections.
1. Introduction..................................................................1
1.1 Changes from Version 1 to Version 2 ......................................................1
1.2 Normal Operation Overview ....................................................................1
2. Installation Procedure .................................................2
3. Software........................................................................3
3.1 Computer System Requirements...............................................................3
3.1.1 Minimum Configuration ...................................................................3
3.1.2 Recommended Configuration............................................................3
3.2 Software Installation.................................................................................3
4. Programming ...............................................................5
4.1 PC295 .......................................................................................................5
4.1.1 Operation...........................................................................................5
4.1.2 Online Help .....................................................................................12
4.2 Device Configuration (DEVCONFIG)...................................................12
4.2.1 Operation.........................................................................................13
4.2.1.1 Establishing a Connection ........................................................13
4.2.1.2 Downloading a Program...........................................................13
4.2.1.3 Modifying Settings ...................................................................15
4.2.1.4 Upgrading the Operating System (OS).....................................16
5. Mounting in Enclosure Door.....................................18
6. Shipping Kit................................................................19
7. Hardware ....................................................................20
8. Problems ....................................................................21
9. Temperature Extremes and LCD Adjustment .........23
i
Page 4

DataView II (CD295) Table of Contents
Appendices
A. CD295 Door Kit Assembly Diagram....................... A-1
B. CD295 Mounting Template ..................................... B-1
C. Using Time Stamps .................................................C-1
This is a blank page.
ii
Page 5

DataView II (CD295) Dual Line Display
1. Introduction
The DataView II is a two line, 32 character LCD that displays real time values
from a CR2xx series datalogger along with a pre-defined description string and
units string.
Two buttons allow the user to scroll through the programmed locations that are
updated as often as they are measured. When the user has not pressed a button
within a user-defined period (default 120 seconds), the DataView II switches
to low power mode, drawing a current of less than 1mA.
The DataView II is easily configured using the Windows based PC295W and
DevConfig packages.
NOTE
Throughout this document the terms ‘DataView II’, ‘CD295’
and ‘DataView2’ are used interchangeably.
1.1 Changes from Version 1 to Version 2
The original release of the CD295 operating system (V1.0) and PC295 (V1.0)
supported the CR200-series dataloggers only. Version 2 of the CD295
operating system and PC295 added support for our CR1000, CR800, CR850,
and CR3000 dataloggers, as well as support for their new data types (long
integers, Booleans, strings, and time stamps).
To use the new capabilities, both the CD295 operating system (OS) and PC295
software needs to be upgraded to Version 2. Refer to Section 4.2.1.4 to
upgrade the CD295 OS. To upgrade PC295, uninstall previous software
versions and then follow the procedure provided in Section 3.2.
1.2 Normal Operation Overview
Below is a general description of normal operation of the DataView II
(CD295).
When first powered up, the DataView II displays the following greeting,
Campbell
Scientific
and the backlight will be lit.
After a program has been successfully downloaded, the CD295 is configured
and connected to the datalogger; it is ready for general use. Pressing one of the
buttons on the CD295 will cause the LCD to display something like the
example below.
1
Page 6

DataView II (CD295) Dual Line Display
Description
Temperature
1.234 deg C
The top line contains a string referred to as the ‘Description’, and the second
line contains both the value retrieved from a Public Variable in the datalogger
and a string referred to as ‘Units’. The value displayed on the second line can
be displayed with a user-selectable number of decimal places.
Together, the combination of ‘Description’, Public Variable, ‘Units’ and
number of decimal places, is referred to as a ‘screen’. The CD295 is capable of
holding and displaying up to 30 ‘screens’. There are no limitations on the order
of screens, or which Public Variables are displayed. Pressing the buttons on the
front panel of the DataView II will cause the next (or previous) screen to be
displayed.
The CD295 will attempt to collect a new value from the datalogger under the
following conditions:
• The user has changed ‘screen’
Value
Units
• The scan interval of the datalogger has expired
After some time (default 10 secs), the backlight will turn off, however the text
will remain visible until the unit enters sleep mode (default 120 secs).
Whenever one of the buttons on the front panel is pressed, these two timers
(Backlight timer and Power Down timer) are both reset. As a result, the
DataView II can be woken from sleep mode by pressing either of the buttons.
While in sleep mode the DataView II will continue to respond to PakBus
communications, however the LCD is turned off and no requests are sent to the
datalogger.
2. Installation Procedure
Below is a general guide to the steps involved in configuring and programming
a DataView II (CD295)
1. Using the CD from the CD295 shipping kit, install PC295W and
DevConfig on your computer.
2. Connect the programming cable’s 9-pin D-connector into the CD295 data
cable and the other end into your PC’s serial COM port.
3. Using PC295W and the datalogger program, configure your screens of
your DataView II (DV2 file).
2
4. Using DevConfig send the DataView II program (DV2 file), and change
any settings (e.g., PakBus Address).
Page 7
3. Software
3.1 Computer System Requirements
3.1.1 Minimum Configuration
3.1.2 Recommended Configuration
DataView II (CD295) Dual Line Display
5. Remove the programming cable.
6. Mount the CD295 into your datalogger enclosure.
7. Connect the CD295 data cable to the datalogger’s RS-232 port.
8. Power-up the datalogger and CD295 and verify correct operation.
PENTIUM-class machine with 64 MB RAM running Windows 98.
PENTIUM-class machine with 128 MB RAM running Windows 2000/XP.
3.2 Software Installation
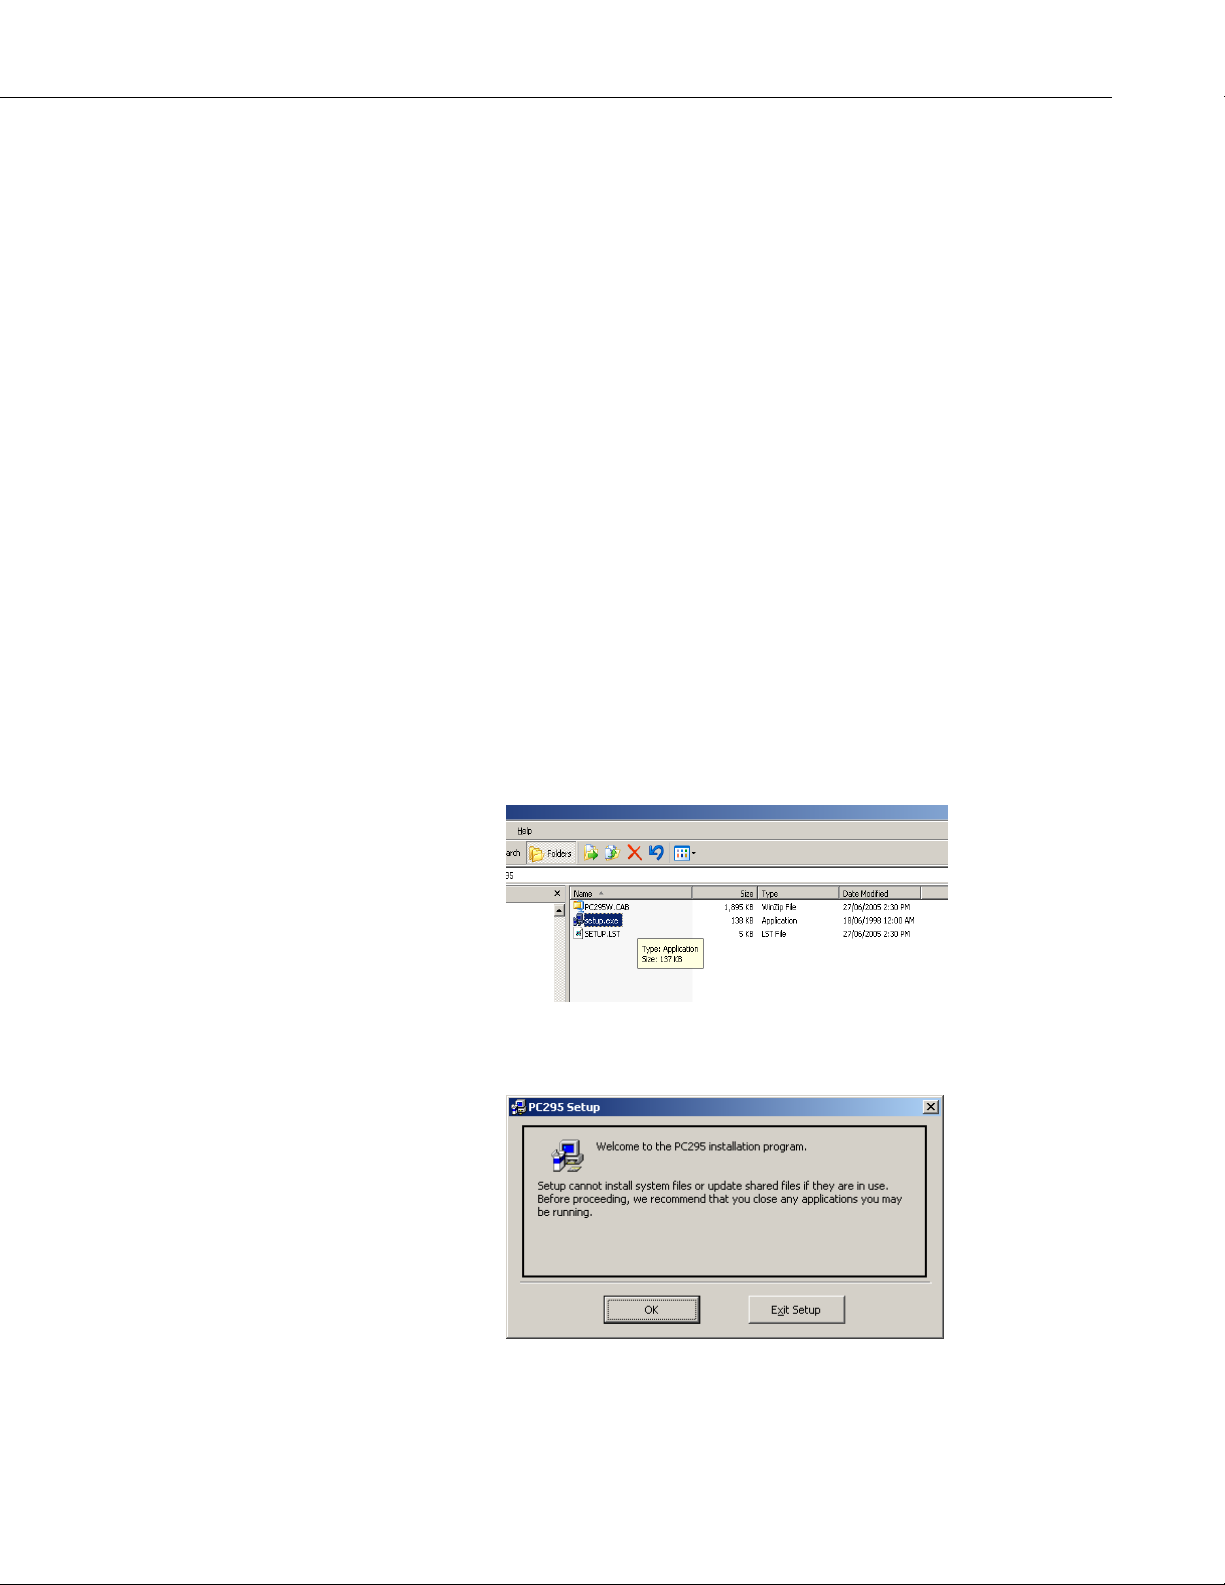
1. To begin the installation of the PC295 software, insert the PC295 CD into
your computer, and locate and open the setup.exe file, which contains the
software to be used.
2. After starting Setup.exe you will be presented with a welcome screen
giving a brief introduction to the software. Click OK.
3
Page 8
DataView II (CD295) Dual Line Display
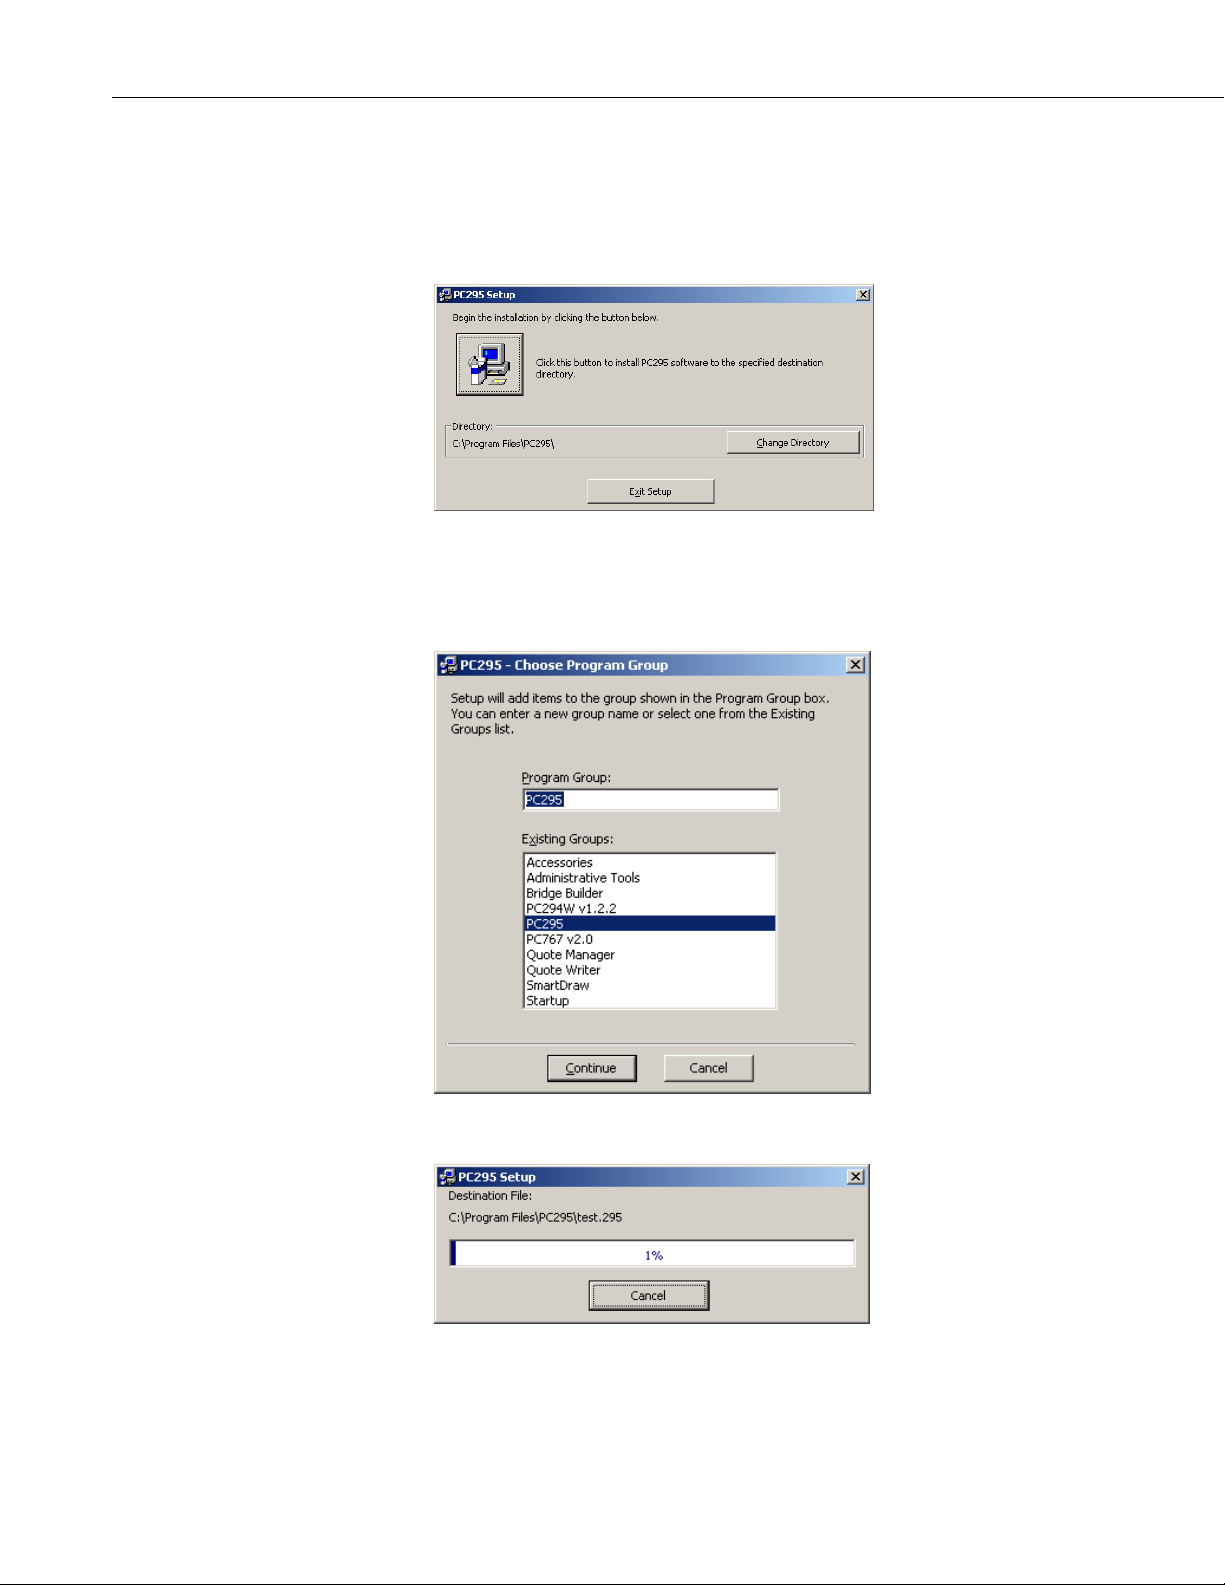
3. The next screen asks where you would like PC295 installed on your hard
disk. If you wish to install into a path other than the default, click “Change
Directory” and use the windows dialog to choose a suitable location. Once
the path is correct, click the Install icon in the top left corner of the
window.
4. The next dialog to appear asks which program group on the start menu,
you would like to add PC295. The default is usually acceptable; however
if not, you are free to choose your preferred program group in this step.
Click Continue.
4
5. File copying will now begin.
Page 9
4. Programming
4.1 PC295
DataView II (CD295) Dual Line Display
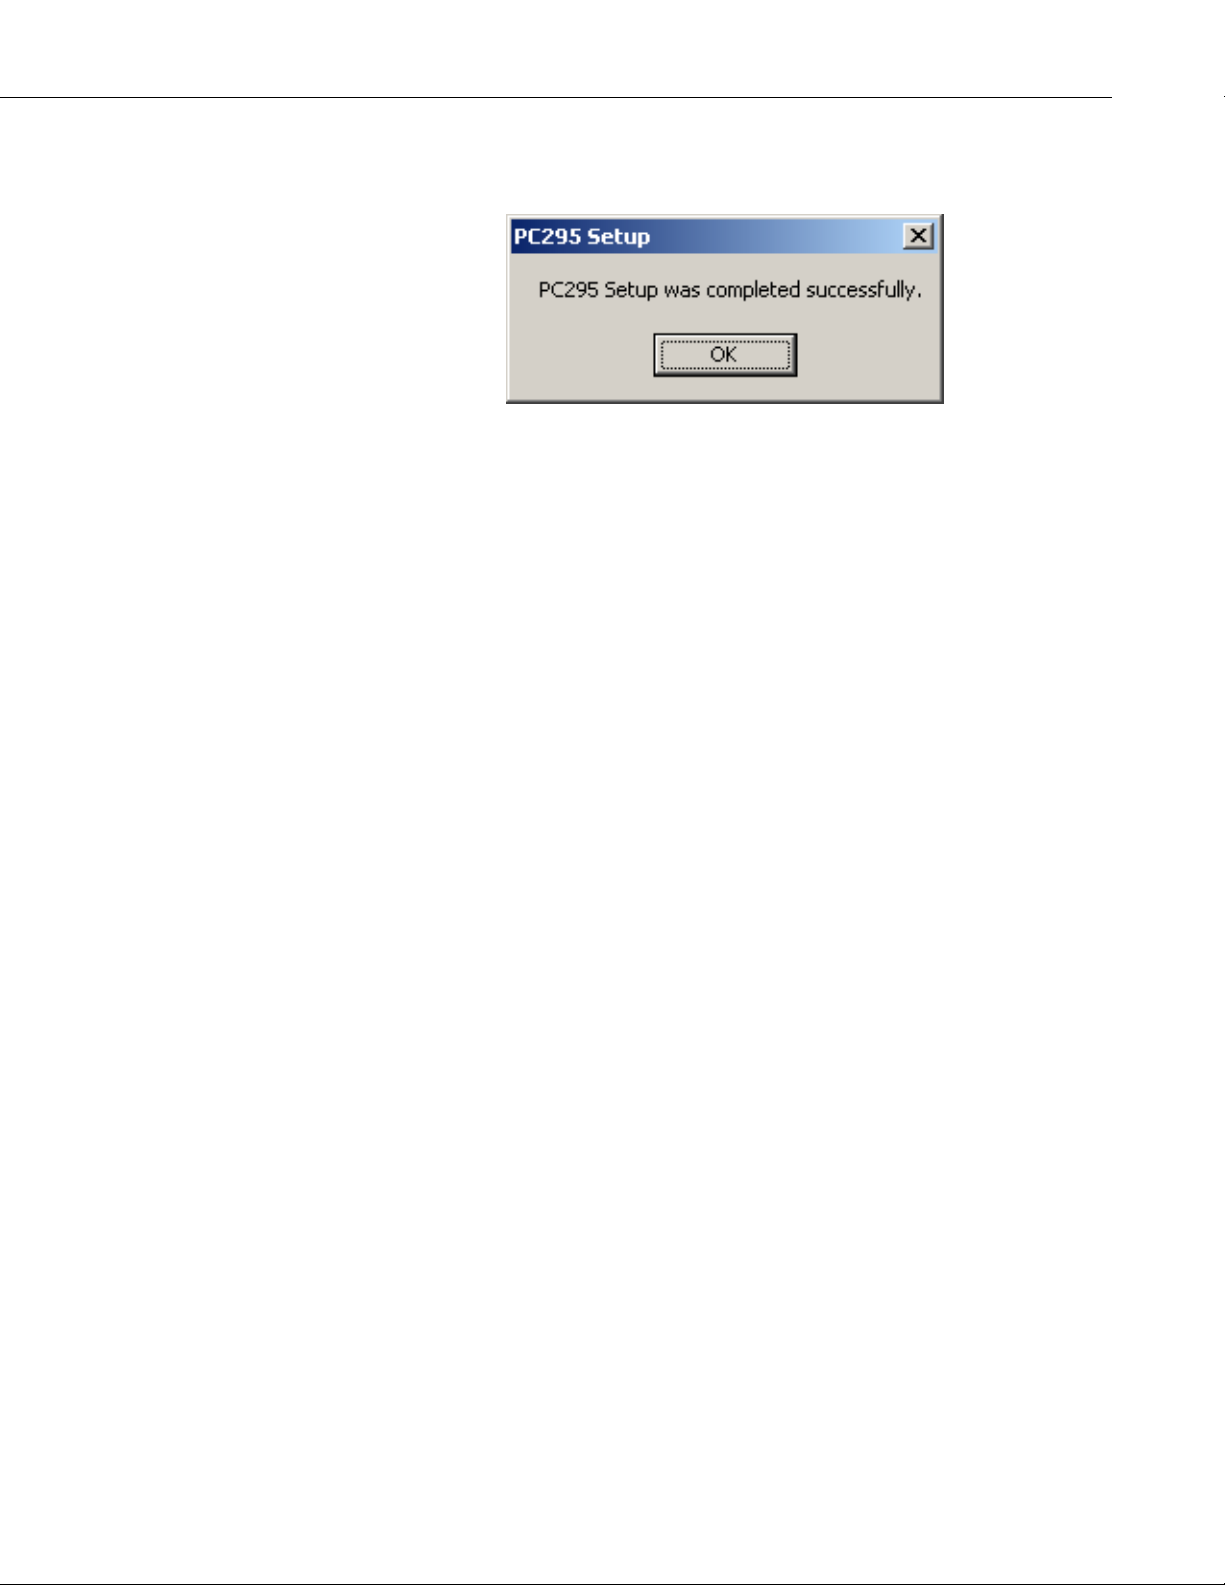
6. Once the Setup is complete, the following window is displayed. You are
now ready to start using PC295. Click OK.
PC295 software is a freeware utility provided by Campbell Scientific Australia
to write programs for the DataView II.
PC295 first reads the datalogger program, to generate the list of Public
Variables and to determine the scan rate of the datalogger. Once this
information has been determined, the user is able to choose a public variable to
display, and can associate ‘Description’ and ‘Units’ strings with it to form a
‘screen’. A group of screens forms a user program, and PC295 saves this
program to disk in a DV2 file.
4.1.1 Operation
By default, the first part of the filename is the same as the datalogger program
from which it was generated. So for example, if you opened station1.cr2 to
create the DataView II program, PC295 would save the program as
station1.dv2. This naming convention is strongly recommended, but not
mandatory.
1. To start PC295, Click Start > Programs > PC295W DataView2
Programming Software > PC295W DataView2 Programming Software.
5
Page 10
DataView II (CD295) Dual Line Display
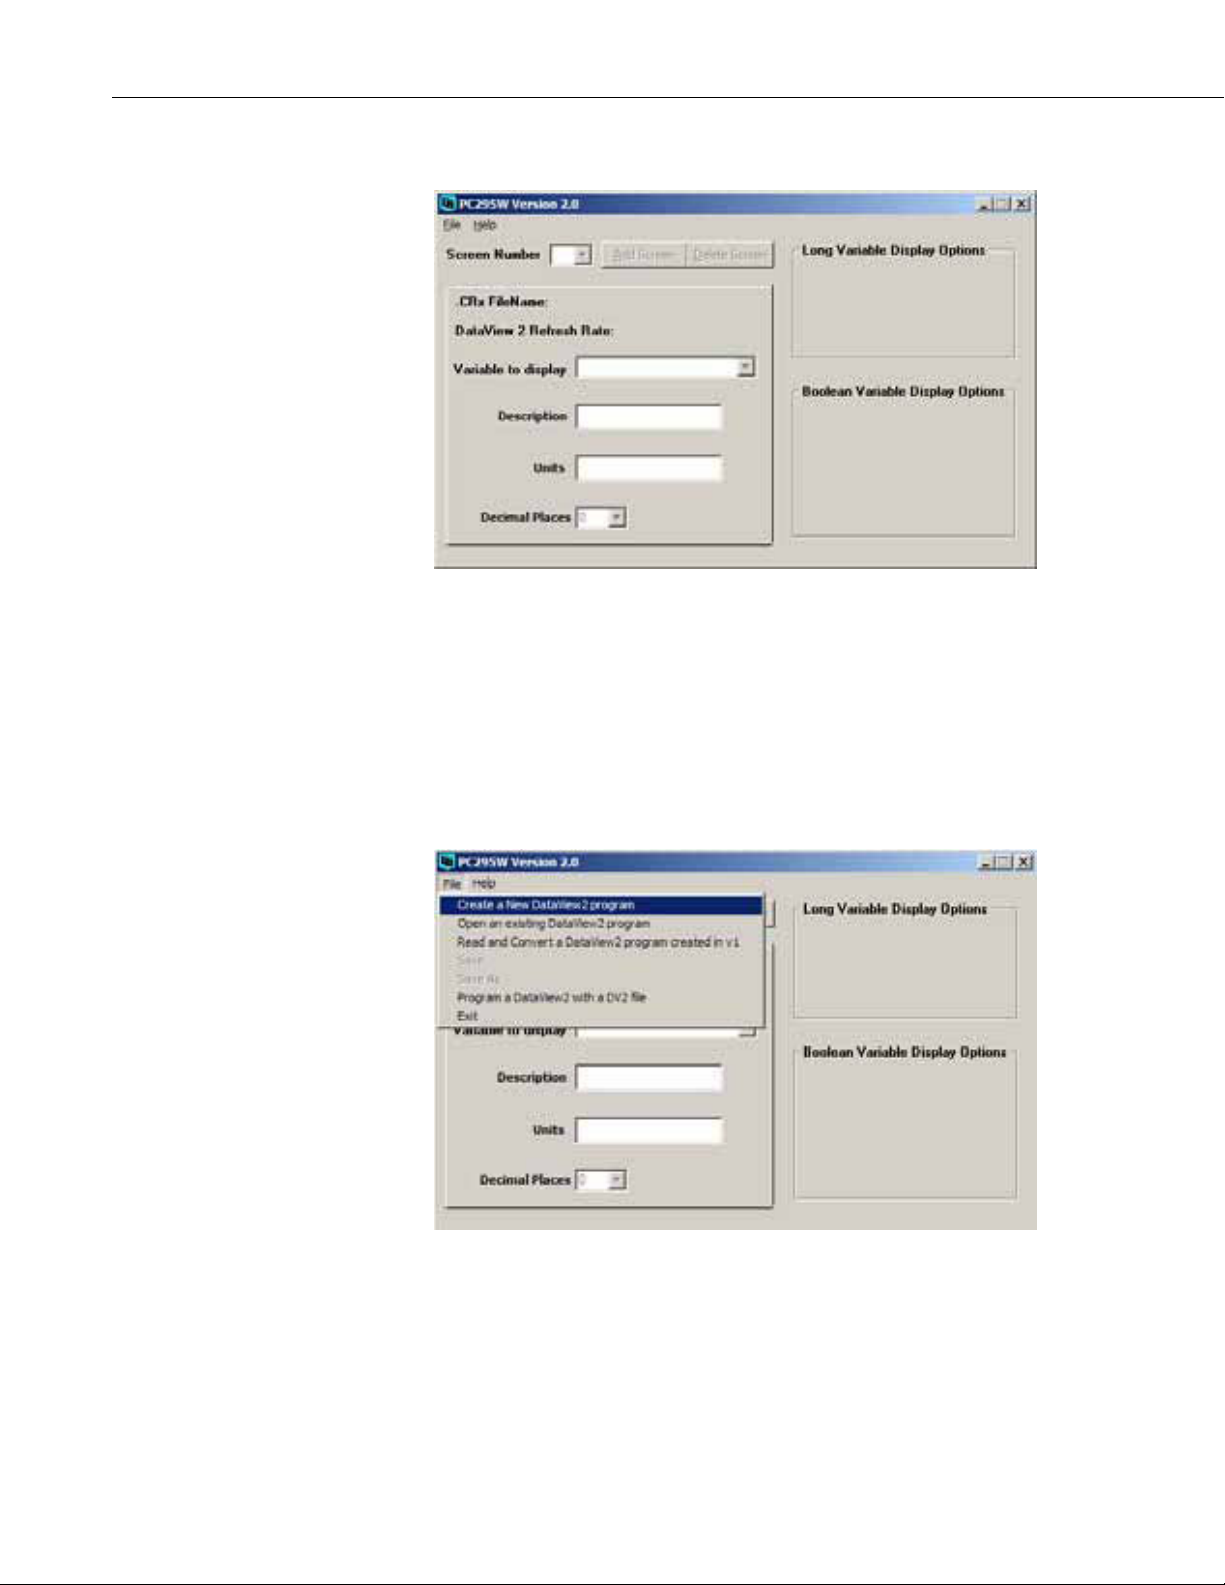
2. Once the PC295 program starts you will see the main screen.
3. The first step in creating a DataView II program is to select ‘Create new
DataView2 Program’ from the File menu. This will open a file browser
window which will allow you to locate the datalogger program (with CR1,
CR2, CR3, or CR8 extension). When the correct datalogger program is
selected, click Open.
If you already have created a DataView II program that you wish to edit,
select ‘Open Existing DataView2 Program’ in the File Menu. A file
browse window will appear. Locate your DataView II program (.295
extension), and click Open.
6
Page 11
DataView II (CD295) Dual Line Display
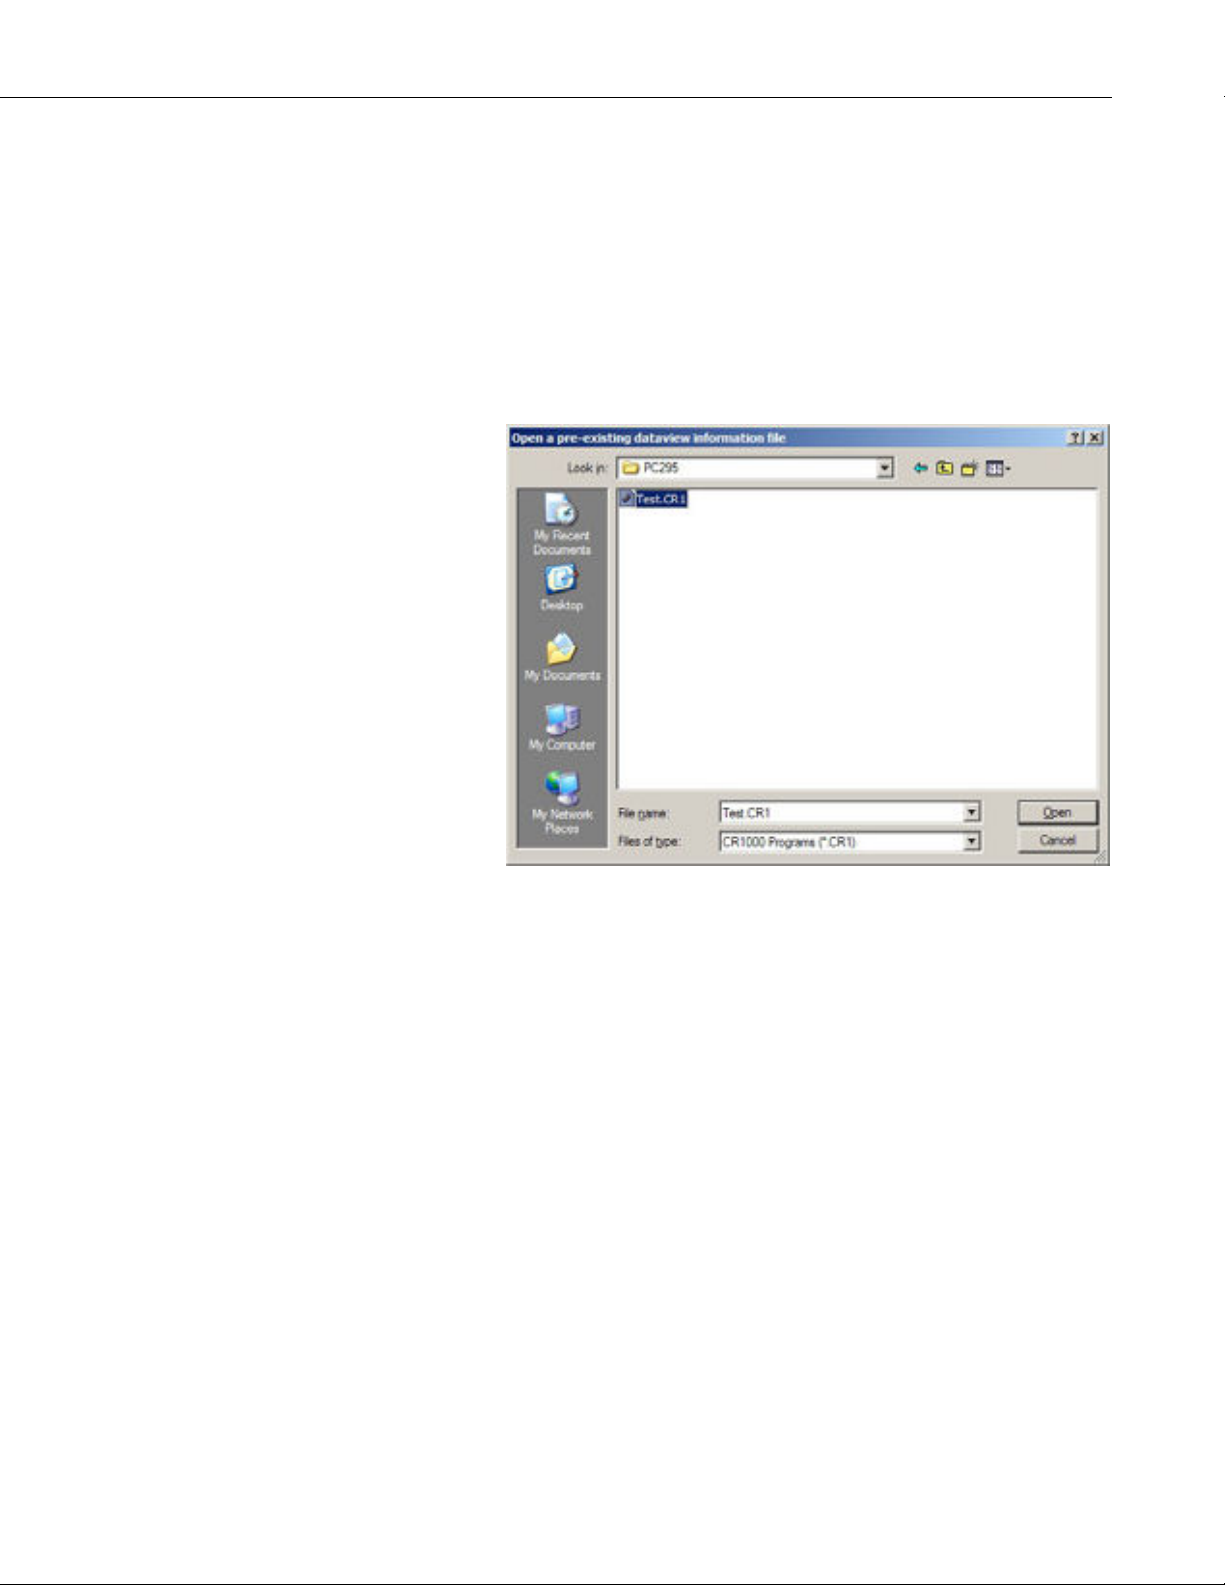
4. If you have chosen to ‘Create a new DataView2 program’, a file browse
window will appear.
To operate correctly, your DataView II needs some information about the
program running in the datalogger to which it will be connected.
PC295 reads the datalogger program file you select at this step, and
extracts information such as the Scan Interval and the list of Public
variable names.
Locate the datalogger program and select Open.
7
Page 12

DataView II (CD295) Dual Line Display
5. PC295 will now return to the main screen, however the ‘CRX FileName’
and ‘DataView 2 Refresh Rate’ will no longer be blank. PC295 has read
your datalogger program, and is now ready for you to create a DataView
II program.
Select the ‘Add Screen’ button.
‘Variable to Display’ has a drop-down list, from which you are able to
choose a Public Variable used in the datalogger program.
6. The ‘Description’ and ‘Units’ fields are free-form text strings that are
displayed on the CD295 along with the value collected from the
datalogger. These fields can be used to provide a user friendly description
and engineering units of the value displayed. It is also possible to choose
the number of decimal places to be used when displaying the value.
Complete the Description, Units and Decimal places.
8
You can now continue adding screens by repeating steps 5 and 6, as many
times as necessary.
Page 13

DataView II (CD295) Dual Line Display
If the variable you have chosen is not floating point, the ‘Display Options’
panes on the right side of the screen will provide multiple options for
displaying the variable. The example below shows the Display Options
for a Boolean variable.
Long integer data types are used to store both integer whole numbers and
time stamps. Choose ‘Numeric’ for the Display Option if your long
integer variable is a whole number. Several display options are offered for
time stamps (see below).
NOTE
The date stamp will only show meaningful values if the long
integers are created correctly. For more information, refer to
Appendix C.
9
Page 14

DataView II (CD295) Dual Line Display
7. If at any time you would like to return to an earlier screen, you can do so
by using the ‘Screen Number’ drop down. Also, if you would like to
delete a screen you can select the screen you would like to delete from the
‘Screen Number’ drop down and click the ‘Delete Screen’ button.
8. After entering all of the screens in your DataView II program, you will
probably want to save your work. Click File > Save As and this will open
a dialog in which you can specify a filename and save your DataView II
program.
If you are modifying an existing program or have already saved your
work, you can select the ‘Save’ option which will not prompt for a new
filename.
10
Page 15

DataView II (CD295) Dual Line Display
9. Once you have completed and saved the DataView II program, you are
ready to download the program into the DataView II itself.
NOTE
To do this you must have the ‘Device Configuration’ utility
installed on your computer. Please ensure that it is installed
before proceeding.
To continue with programming the DataView II (CD295), please refer to
Section 4.2 Device Configuration.
From within PC295, ‘Device Configuration’ can be started through the file
menu. Click File > ‘Program a DataView2 with a DV2 file’.
11
Page 16
DataView II (CD295) Dual Line Display
4.1.2 Online Help
PC295 has two items on the Help menu – ‘PC295’ and ‘About’. About lists the
version number of the PC295 software, and ‘PC295’ contains online help to
guide you through operation of the software. It is a simple step by step guide to
writing your DataView II program.
4.2 Device Configuration (DEVCONFIG)
Device Configuration (DevConfig) is a freeware utility provided by Campbell
Scientific for the configuration of PakBus devices. This tool allows the user to
send programs, upgrade firmware in the device, and modify device settings.
In the case of the CD295, DevConfig allows you to download your program,
and read/modify the following settings:
Version
the operating system version number
CD295 Address
the PakBus address of the DataView II
Logger address
the PakBus address of the datalogger from which the CD295 should
collect values
Logger Security Code
the security of the datalogger – this should always be 0 for the CR200
Power Down Timer
the period of time after which the CD295 should return to sleep mode
Serial Number
the serial number of the DataView
Backlight Timer
the period of time to keep the backlight on
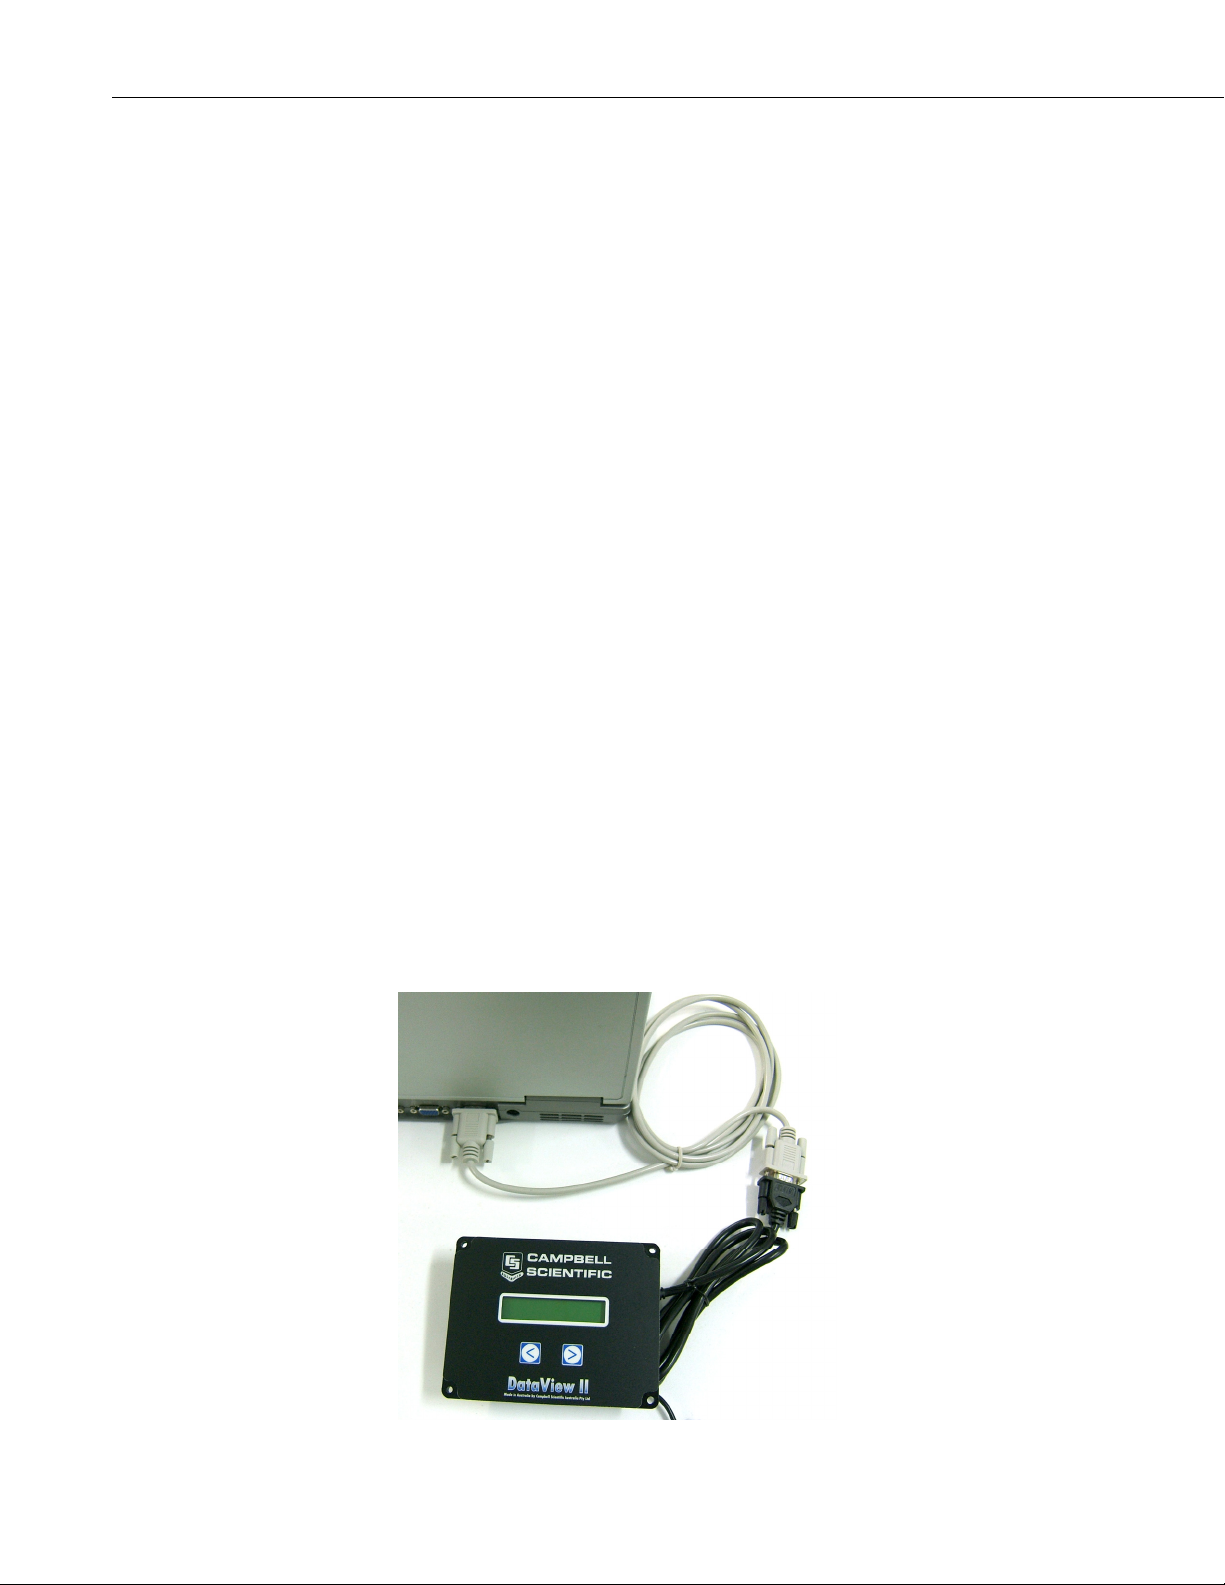
Before using DevConfig, it is important to provide power to your DataView II
(CD295) and connect the serial port of your computer to the CD295, using the
programming cable provided (see figure below).
12
Page 17

4.2.1 Operation
4.2.1.1 Establishing a Connection
1. Start the ‘Device Configuration’ utility.
2. Select CD295 from the ‘Device Type’ on the left hand side of the window.
Verify the Serial Port in the bottom left of the window is correct and Click
the ‘Connect’ button.
DataView II (CD295) Dual Line Display
3. DevConfig will automatically detect the connection speed and PakBus
address of the DataView II. Once detection is complete, 3 tabs should
appear in the window on the right-hand side. These are ‘Program Control’,
‘Send OS’ and ‘Settings Editor’.
The ‘Program Control’ tab is used to send a program to the DataView II,
and is the most commonly used of the three tabs.
As the name suggests, the ‘Send OS’ tab is used to send an Operating
System (OS) to the DataView II. This is used to upgrade the firmware of
the CD295.
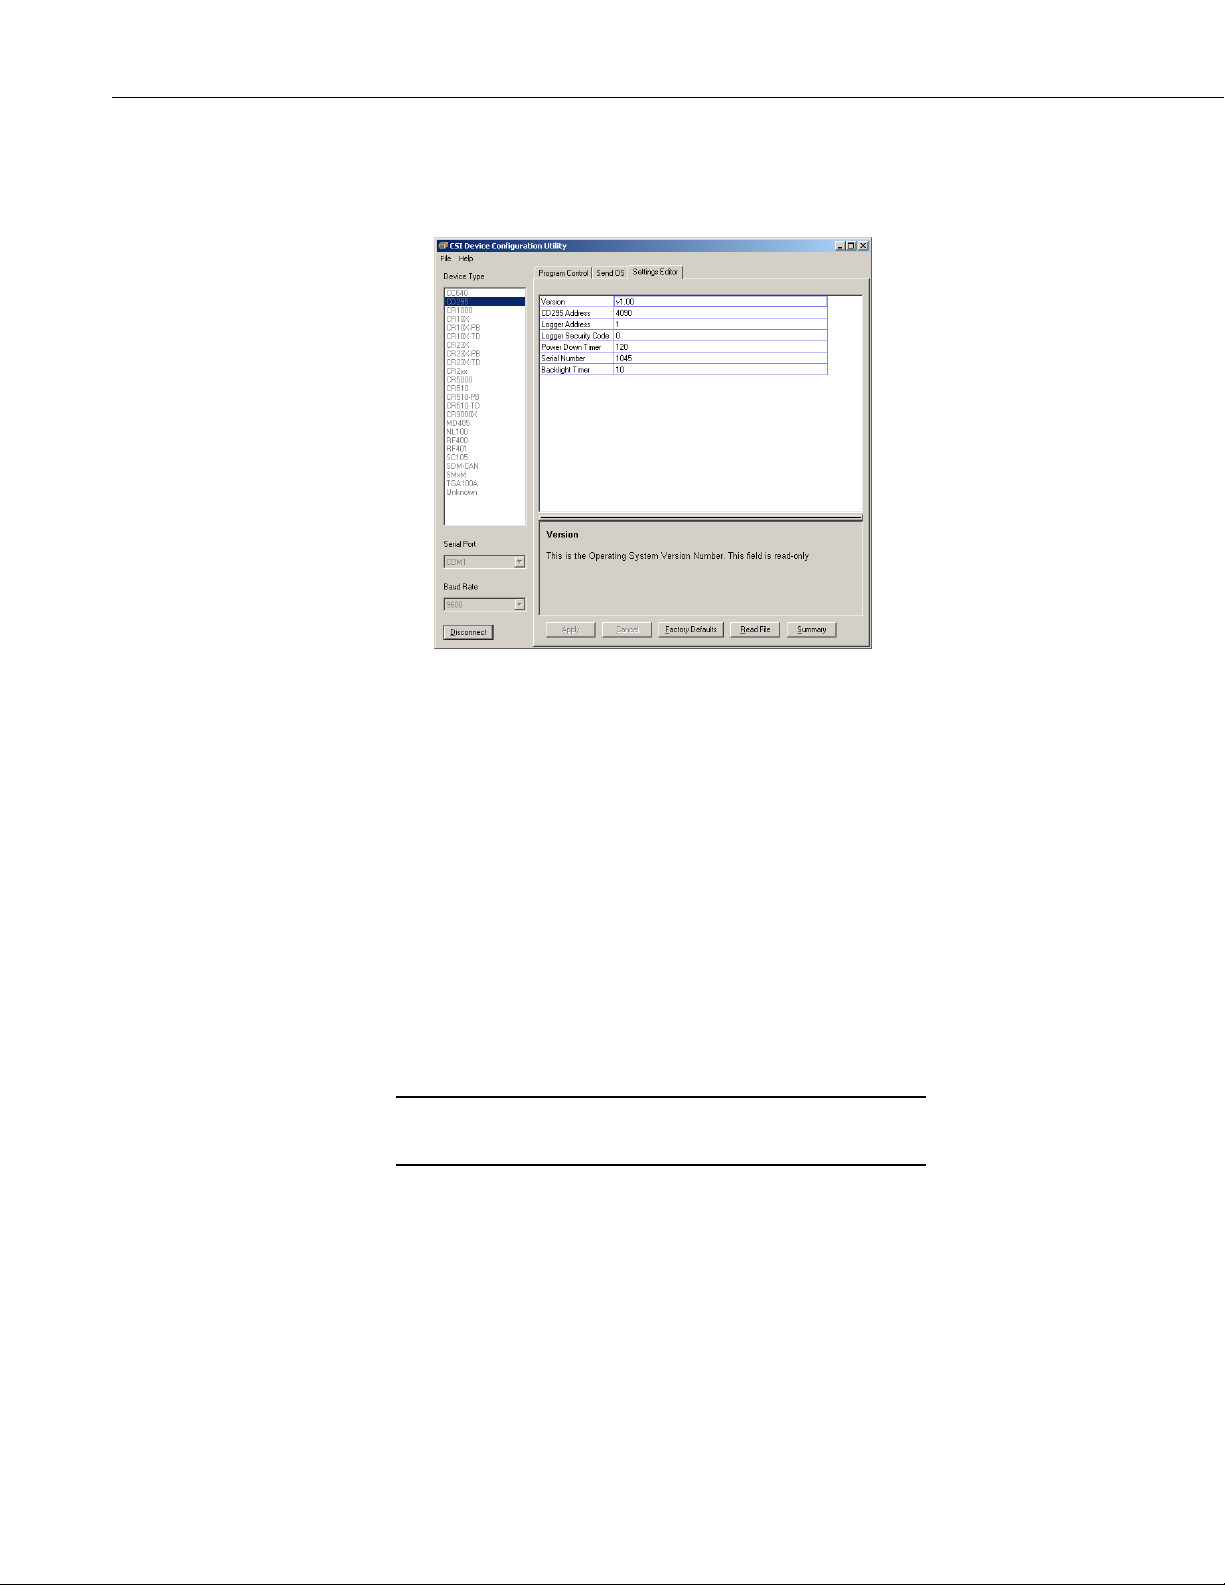
The ‘Settings Editor’ tab is used to read/modify the addresses and timers
mentioned above.
4.2.1.2 Downloading a Program
1. To download a program, ensure that you are already connected to the
CD295 and the ‘Program Control’ tab is selected. Click the ‘Send
Program’ button.
13
Page 18
DataView II (CD295) Dual Line Display
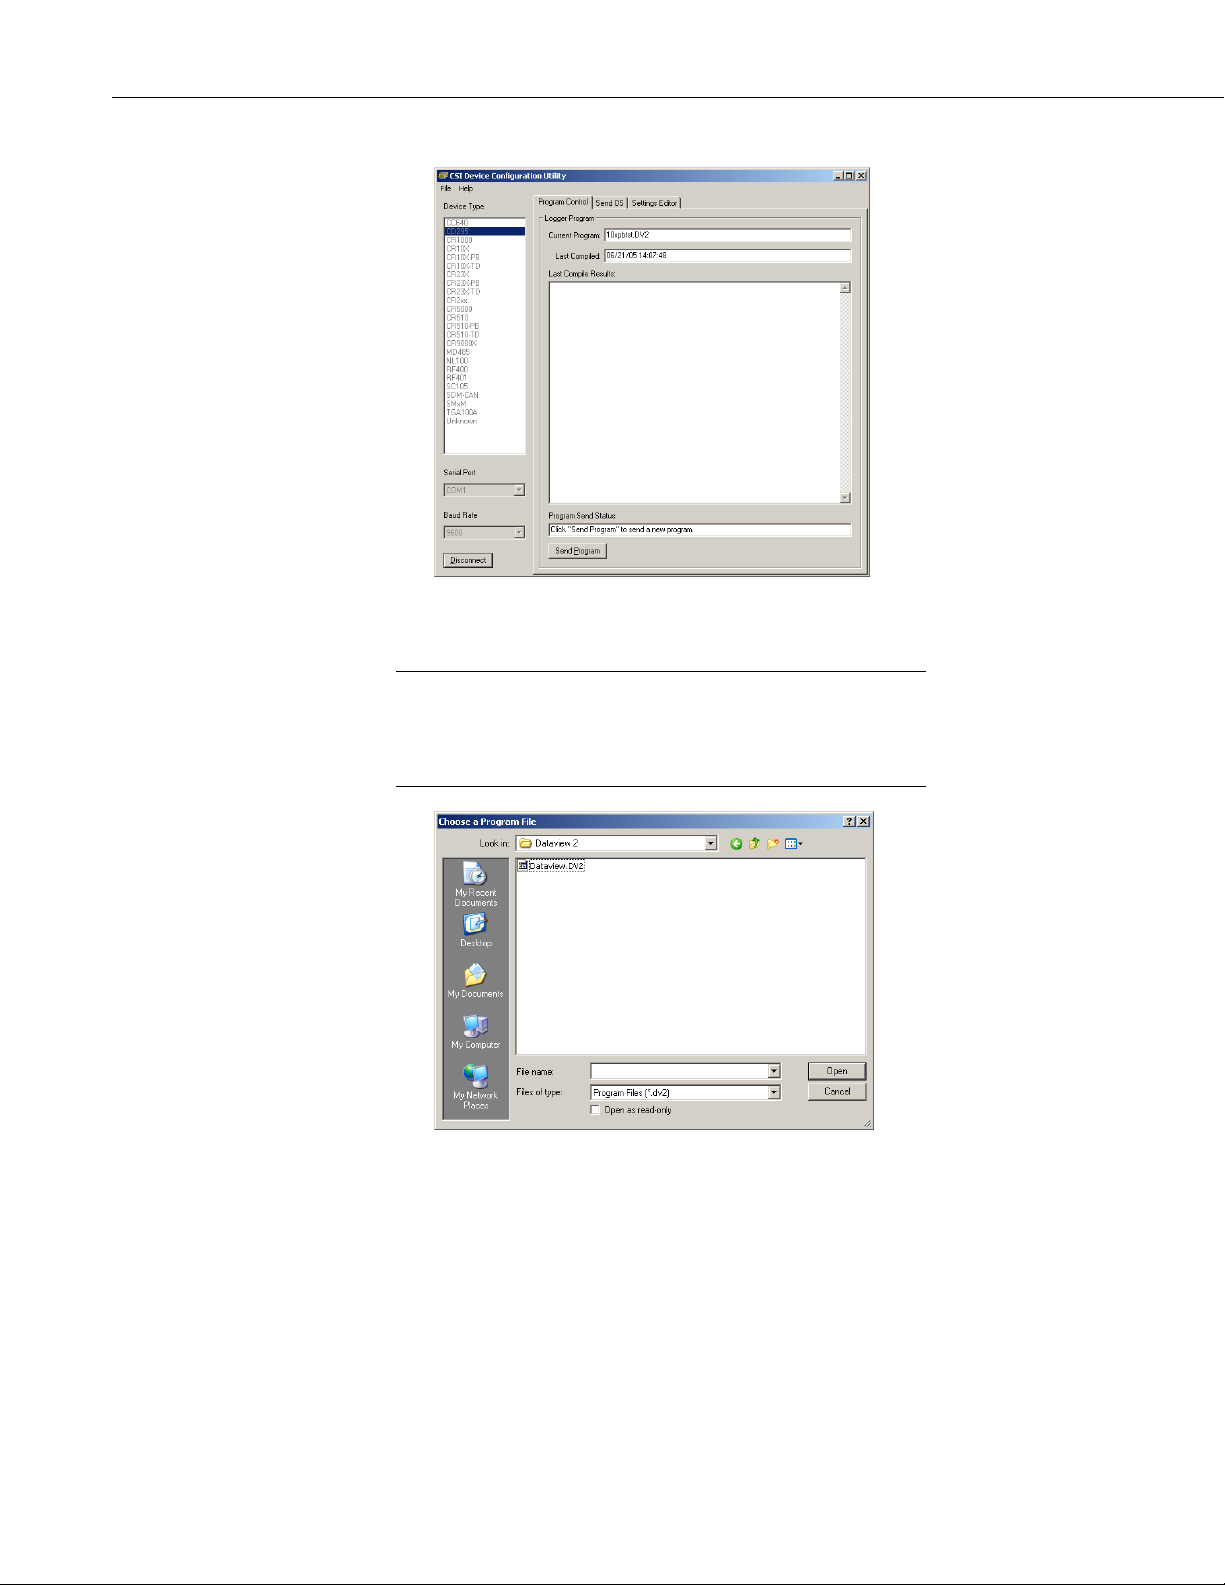
2. A file browser window will appear. Locate the DV2 file you wish to
download and Click Open.
NOTE
When a DataView II program is created, PC295 creates two files
– the DV2 file for download to your DataView II, and a .295 file
which contains internal configuration information for the PC295
program. You should only send the DV2 file to your CD295.
14
Page 19

DataView II (CD295) Dual Line Display
3. DevConfig will download your program to the DataView II and return to
‘Program Control’.
4.2.1.3 Modifying Settings
1. The ‘Settings Editor’ tab allows you to read/modify any device-specific
NOTE
Some settings are read-only, and others have limits on the range
of acceptable values. A description along with the maximum and
minimum values appears in the comments box at the bottom of
the window.
settings in the CD295. To change a setting, double click the settings you
wish to change, and type the new value. Repeat for as many settings as
necessary.
15
Page 20
DataView II (CD295) Dual Line Display
2. After all changes are complete, Click Apply to send the new settings to the
DataView II. After the settings are applied, DevConfig will show the new
values of the Settings from the CD295.
3. If after editing a setting, you wish to discard the changes, Click Cancel.
DevConfig will show the current values of the settings, in order for you to
verify that the changes were discarded.
4. It is possible to return the DataView II to its factory default settings. To do
this, Click ‘Factory Defaults’.
4.2.1.4 Upgrading the Operating System (OS)
From time to time, new operating system(s) for the DataView II may be
released to correct errors in the operating system, or to add new functionality.
To take advantage of this, it is necessary to send the new operating system
(OS) to the DataView II.
1. If you need to send a Operating System to your DataView2, open the
‘Send OS’ tab in ‘Device Configuration’ and select the Send OS button at
the bottom of the window.
NOTE
It is not necessary to ‘Connect’ using DevConfig to send an
operating system.
16
Page 21

DataView II (CD295) Dual Line Display
2. A file browser window will appear. Locate the operating system file (A43
extension), provided by your supplier, and Click Open.
CAUTION
3. After selecting the operating system file, it will be necessary to power
cycle the DataView II. Disconnect the power from the CD295, and
reconnect it.
4. The download will begin, and progress bar should begin to fill.
It is VERY important that the power cable and
programming cable remain connected while the download
is underway. Failure to do so may cause permanent
damage to the CD295.
17
Page 22

DataView II (CD295) Dual Line Display
5. When the download is complete, DevConfig will display a popup to
confirm the success or to notify if there was an error.
6. Once the download is complete, disconnect power from the CD295 for at
least 30 seconds to ensure that it has been completely reset. After this, the
new operating system will run.
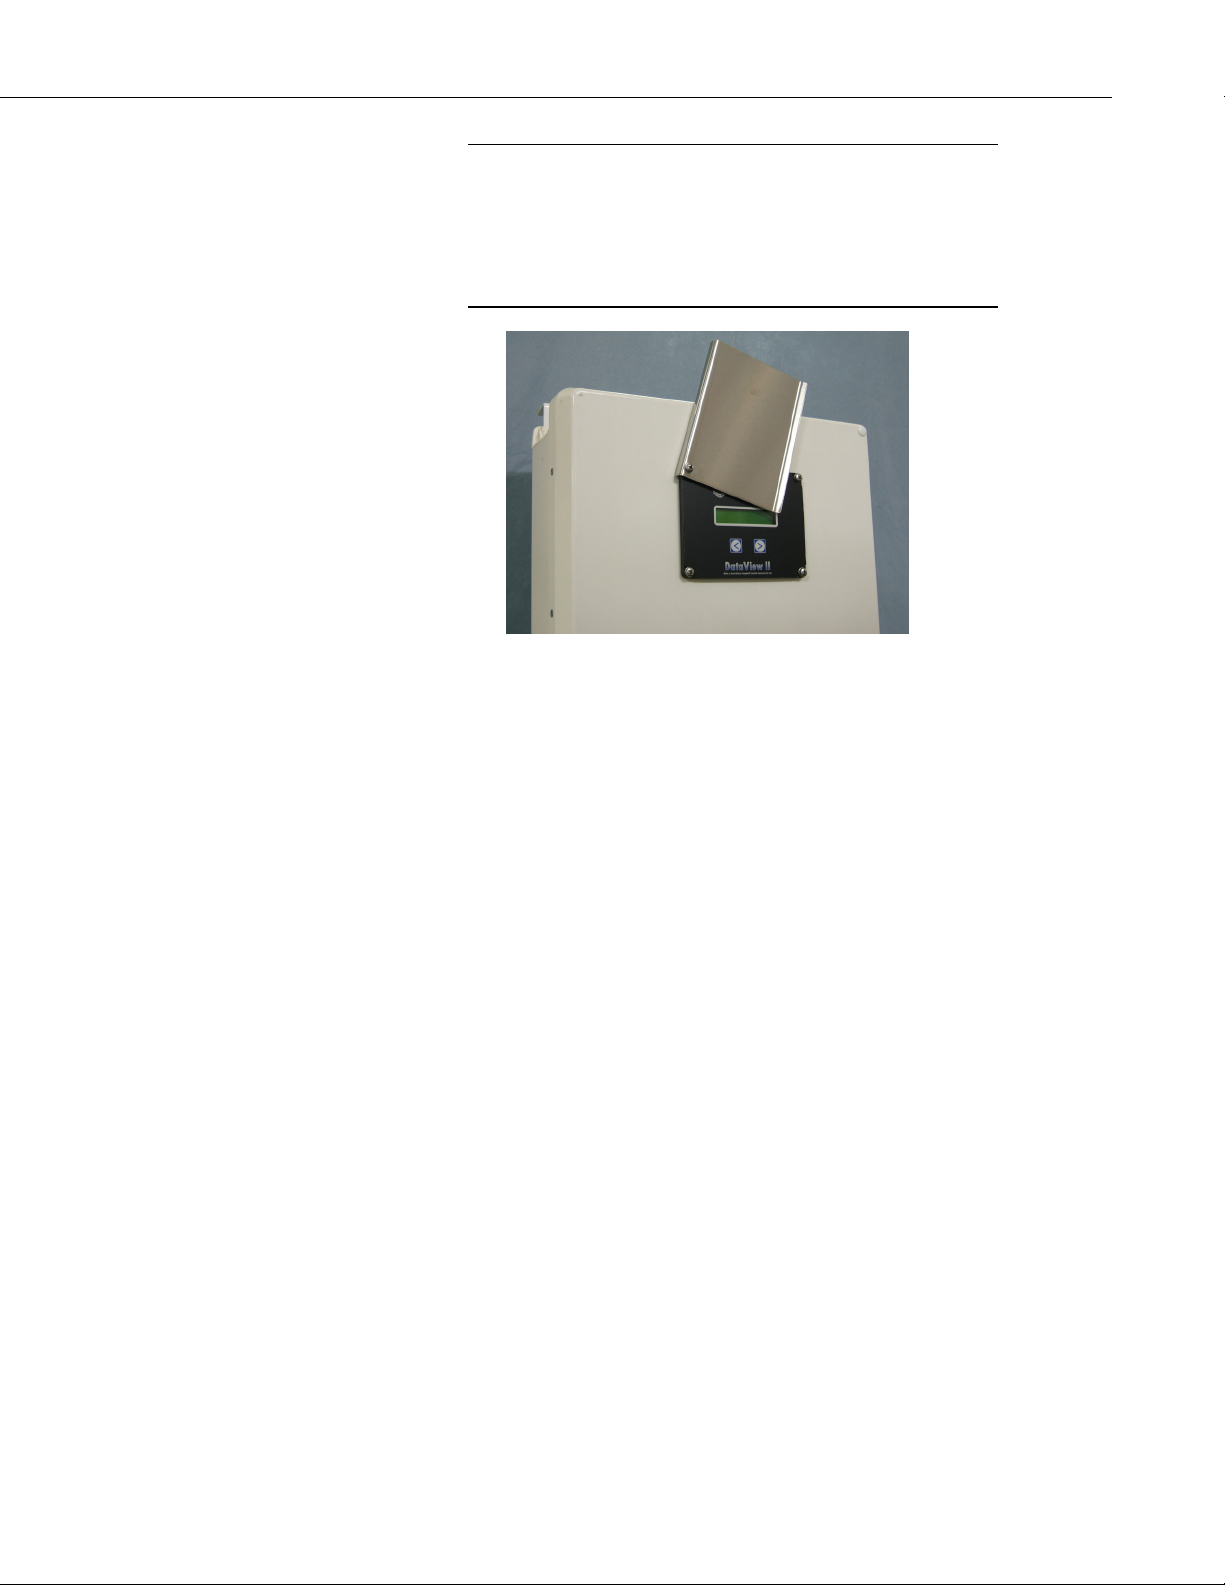
5. Mounting in Enclosure Door
If the DataView II will be exposed to the elements, it is important to fit the
CD295 door kit, as explained below.
1. Use the template provided to mark out the four mounting holes and cut-out
for the CD295.
2. Drill the four corner holes using a 4.5mm drill and cut out the mounting
hole using a jig-saw or nibbler.
3. Apply a thin coating of neutral-cure silicon sealant between the flange of
the CD295 and enclosure door.
4. Use the screws and nuts provided to attach the CD295. Insert the head of
the screw followed by a flat washer through the front of the CD295. On
the inside of the enclosure, fit the rubber o-ring washer then the second
flat washer followed by the dome nut.
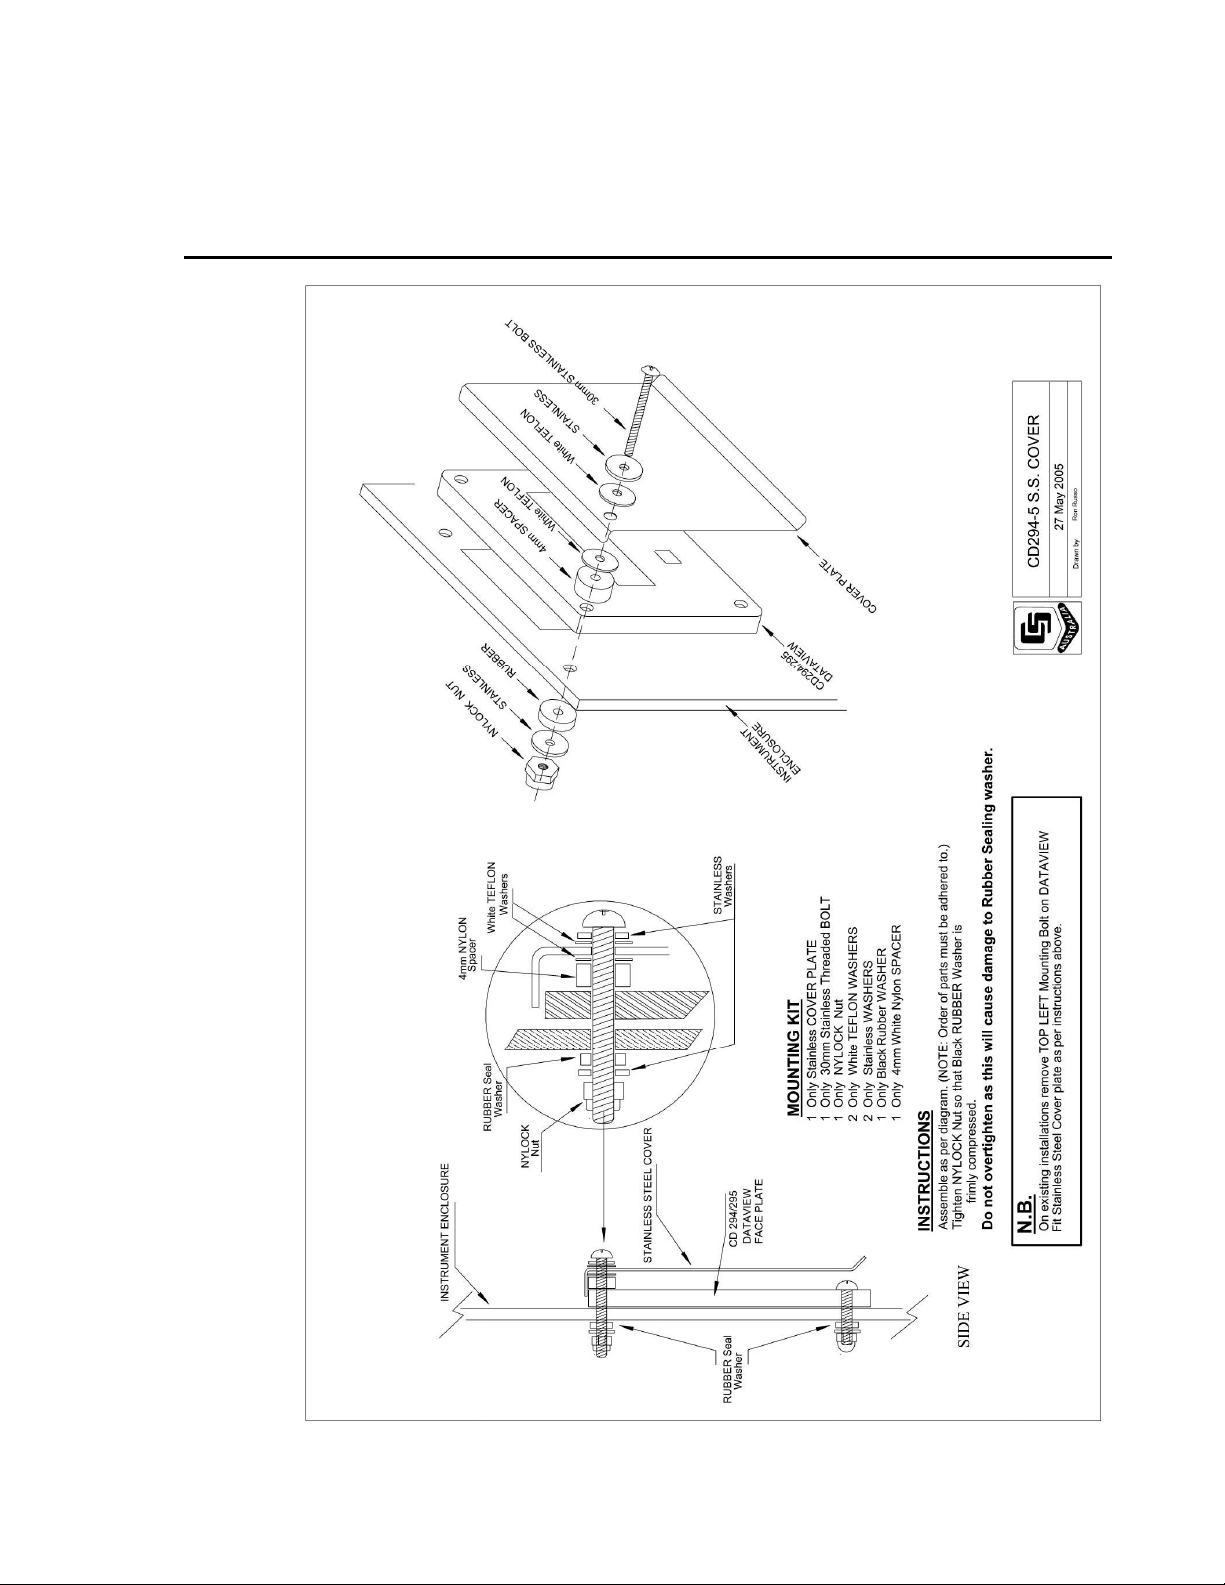
5. If fitted, remove the nut, bolt and washers from the top-left mounting hole
of the CD295 front panel.
6. Remove the ‘nylock’ nut, stainless steel and rubber washers from the bolt
assembly fixed to the CD295 door. At this point, the Bolt assembly
holding tag should be exposed.
7. Insert the bolt assembly through the top-left mounting hole of the CD295
front panel
8. From the inside of the enclosure, fit the rubber washer, stainless steel
washer and ‘nylock’ nut onto the stainless steel bolt assembly.
9. After confirming that all hardware has been fitted in the correct order, tear
off the ‘Bolt Assembly Holding Tag’.
18
10. Tighten the ‘nylock’ nut until the black rubber washer is tightly
compressed.
Page 23
DataView II (CD295) Dual Line Display
NOTE
6. Shipping Kit
If you are fitting the CD295 door kit, only 3 bolts are required to
be fitted at this step. The bolt in the top-left corner of the CD295
front panel is not required. In this case, only fit the remaining
three bolts, and use the longer (30 mm) bolt supplied in the door
kit in the top-left hole. Do not over tighten as this will cause
damage to rubber washer.
See Appendix A for the assembly diagram for the CD295 door kit.
The CD295 DataView II Shipping Kit includes:
• CD295 DataView II display
• CD295 programming cable
• PC295 software on CD
• CD295 Manual
• CD295 Mounting Template
• 4 x stainless steel mounting screws, dome nuts, stainless steel and rubber
washers.
If the CD295 is to be mounted in the front door of an enclosure, the CD295
door kit will also be included. This kit includes:
• CD295 stainless steel door
• stainless steel screw with nylon spacer, PTFE, rubber and stainless steel
washers, and “nylock” nut
• CD295 door mounting diagram
19
Page 24

DataView II (CD295) Dual Line Display
7. Hardware
SPECIFICATIONS
Physical
Width: 130 mm
Height: 100 mm
Depth: 30 mm
Weight: 235 g
Power Supply
8-16 Vdc (12 V nominal)
Power Consumption (at 12 Vdc)
Active with backlight – 30 mA
Active without backlight – 3 mA
Asleep – 1 mA
Communications
Physical protocol - RS232 DTE
Network protocol - PakBus
Configuration protocol - DevConfig
Environmental
Temperature
Operating -20
Asleep -25
Humidity
IP65 when mounted in enclosure door with supplied sealant.
General
No. of screens 30 max
Value update interval 1 – 65535 sec
Backlight period 0 – 60 secs (default 10)
Power down period 5 – 254 secs (default 120)
(255 = never sleep)
CD295 address 1 – 4094 (default 4090)
Logger address 1 – 4094 (default 1)
Description string 16 chars max
Units string 8 chars max
Decimals 0 – 6 digits after decimal
o
C to +55oC
o
C to +70oC
20
Page 25

8. Problems
DataView II (CD295) Dual Line Display
• Symptom
The DataView II displays ‘Waiting’ in every location.
Explanation
This message indicates that the DataView requested a public variable from
the datalogger, but has not yet received a response.
Things to check
Is the DataView II connected to the datalogger?
Check the serial cable from the DataView II to the datalogger.
Does the datalogger have power?
Check the power supply to the datalogger.
Does the PakBus address of the datalogger match the ‘Logger Address’ in
the CD295?
Using DevConfig, check that the ‘Logger Address’ setting in the
DataView II and the PakBus address of the datalogger match (refer to
your datalogger manual).
Is the baud rate of the datalogger’s RS-232 port set to 9600 or auto?
By default, the datalogger’s serial port speed should be suitable for
the CD295. If it has been manually changed, it may need to be
adjusted.
Is this the right version of the DataView program for the datalogger
program?
It is important that the program that is running in the datalogger is the
same as the one used when the DataView II program was written. If
not, then the DataView II program may need to be re-written.
Could the datalogger be too busy to answer?
Consider the execution of the datalogger program, and modify if
necessary.
21
Page 26

DataView II (CD295) Dual Line Display
• Symptom
The DataView II displays ‘Waiting’ in a few (but not all) screens.
Explanation
This message indicates that the DataView requested a public variable from
the datalogger, but has not yet received a response.
If some screens function correctly, then the logger address, is correct,
and the datalogger is answering requests correctly.
Things to check
Is this the right version of the DataView program for the datalogger
program?
It is important that the program that is running in the datalogger is the
same as the one used when the DataView II program was written. If
not, then the DataView II program may need to be re-written.
• Symptom
After sending a program to the DataView II, it displays ‘No program’ and
won’t show any of my screens.
Explanation
The ‘No program’ message indicates that the current program in the
DataView II is incomplete or incorrect.
No permanent harm is done by sending an incorrect file, however it will
not execute.
Things to check
Did you download the correct file?
It is very important that you select the DV2 file that you created with
PC295, and not the 295 file which is only created for internal use by
the PC295 software itself, or any other file on your computer.
Try downloading again.
Could your DV2 file be corrupt?
No software other than PC295 should be used to edit DV2 files. Even
a slight change to the file is enough to cause the CD295 to reject the
program.
Try recreating the DV2 file in PC295, and download it again.
22
Page 27

DataView II (CD295) Dual Line Display
9. Temperature Extremes and LCD Adjustment
The CD295 has been tested to –20ºC. It will perform at this temperature
although the display may be sluggish and dim.
Under temperature extremes, the CD295’s liquid crystal display (LCD) may
become difficult to read. LCD contrast can be adjusted by inserting a small
jeweler’s screwdriver (preferably plastic) into the round hole on the back of the
CD295 cover and adjusting the LCD contrast potentiometer.
23
Page 28

DataView II (CD295) Dual Line Display
24
Page 29
Appendix A. CD295 Door Kit Assembly Diagram
A-1
Page 30

This is a blank page.
Page 31
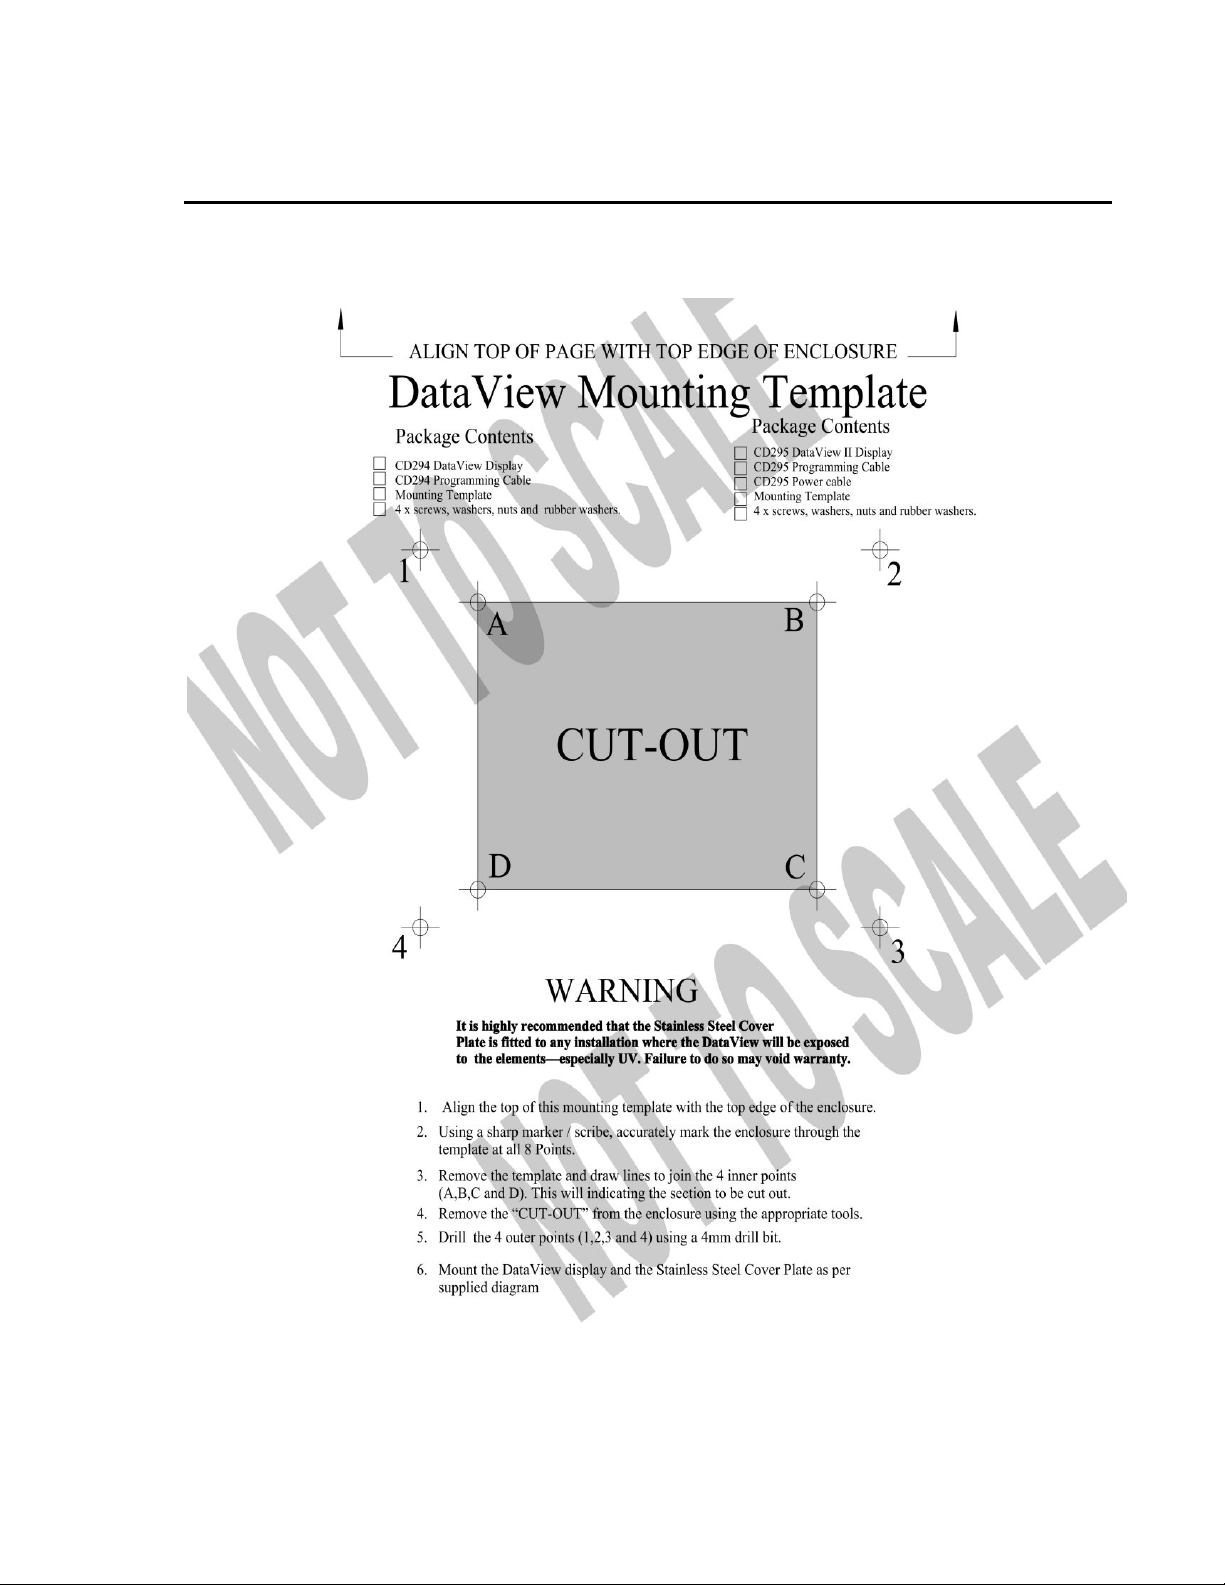
Appendix B. CD295 Mounting Template
(NOT TO SCALE – REFER TO MOUNTING TEMPLATE SUPPLIED
WITH CD295)
B-1
Page 32

This is a blank page.
Page 33

Appendix C. Using Time Stamps
At the time of release of this document, the CRx000 series of dataloggers do
not support variables of a “date” type. Dates are currently recorded in a long
integer as the number of seconds that have elapsed since 1/1/1990 00:00:00.
The DataView II is capable of displaying these values in Gregorian Date
format (i.e. Day, Month, Year etc) in a number of different representations.
Below is an example CR1000 program to record a timestamp for display on a
CD295:
Public Time as Long
BeginProg
Scan (1,Sec,0,0)
Time = Public.TimeStamp(1,1)
NextScan
EndProg
In this case when creating the DataView program in PC295 for this variable the
user should select one of the date representations instead of ‘Numeric Value’ as
per the screenshot below:
In this case the DataView II would display the time as below:
Timestamp
24/01/2007 9:34
Please Note: If this value is displayed using ‘Numeric Value’ the DataView II
would show something like this:
Timestamp
538479240
C-1
Page 34

This is a blank page.
Page 35

Page 36

Campbell Scientific Companies
Campbell Scientific, Inc. (CSI)
815 West 1800 North
Logan, Utah 84321
UNITED STATES
www.campbellsci.com • info@campbellsci.com
Campbell Scientific Africa Pty. Ltd. (CSAf)
PO Box 2450
Somerset West 7129
SOUTH AFRICA
www.csafrica.co.za • cleroux@csafrica.co.za
Campbell Scientific Australia Pty. Ltd. (CSA)
PO Box 444
Thuringowa Central
QLD 4812 AUSTRALIA
www.campbellsci.com.au • info@campbellsci.com.au
Campbell Scientific do Brazil Ltda. (CSB)
Rua Luisa Crapsi Orsi, 15 Butantã
CEP: 005543-000 São Paulo SP BRAZIL
www.campbellsci.com.br • suporte@campbellsci.com.br
Campbell Scientific Canada Corp. (CSC)
11564 - 149th Street NW
Edmonton, Alberta T5M 1W7
CANADA
www.campbellsci.ca • dataloggers@campbellsci.ca
Campbell Scientific Centro Caribe S.A. (CSCC)
300 N Cementerio, Edificio Breller
Santo Domingo, Heredia 40305
COSTA RICA
www.campbellsci.cc • info@campbellsci.cc
Campbell Scientific Ltd. (CSL)
Campbell Park
80 Hathern Road
Shepshed, Loughborough LE12 9GX
UNITED KINGDOM
www.campbellsci.co.uk • sales@campbellsci.co.uk
Campbell Scientific Ltd. (France)
Miniparc du Verger - Bat. H
1, rue de Terre Neuve - Les Ulis
91967 COURTABOEUF CEDEX
FRANCE
www.campbellsci.fr • info@campbellsci.fr
Campbell Scientific Spain, S. L.
Avda. Pompeu Fabra 7-9, local 1
08024 Barcelona
SPAIN
www.campbellsci.es • info@campbellsci.es
Please visit www.campbellsci.com to obtain contact information for your local US or International representative.
 Loading...