

Page 1
INSTRUCTION MANUAL
AVW200-series 2-Channel
Vibrating Wire Spectrum
Copyright © 2008- 2014
Campbell Scientific, Inc.
Analyzer Modules
Revision: 1/14
Page 2

Page 3

Warranty
“PRODUCTS MANUFACTURED BY CAMPBELL SCIENTIFIC, INC. are
warranted by Campbell Scientific, Inc. (“Campbell”) to be free from defects in
materials and workmanship under normal use and service for twelve (12)
months from date of shipment unless otherwise specified in the corresponding
Campbell pricelist or product manual. Products not manufactured, but that are
re-sold by Campbell, are warranted only to the limits extended by the original
manufacturer. Batteries, fine-wire thermocouples, desiccant, and other
consumables have no warranty. Campbell’s obligation under this warranty is
limited to repairing or replacing (at Campbell’s option) defective products,
which shall be the sole and exclusive remedy under this warranty. The
customer shall assume all costs of removing, reinstalling, and shipping
defective products to Campbell. Campbell will return such products by surface
carrier prepaid within the continental United States of America. To all other
locations, Campbell will return such products best way CIP (Port of Entry)
INCOTERM® 2010, prepaid. This warranty shall not apply to any products
which have been subjected to modification, misuse, neglect, improper service,
accidents of nature, or shipping damage. This warranty is in lieu of all other
warranties, expressed or implied. The warranty for installation services
performed by Campbell such as programming to customer specifications,
electrical connections to products manufactured by Campbell, and product
specific training, is part of Campbell’s product warranty. CAMPBELL
EXPRESSLY DISCLAIMS AND EXCLUDES ANY IMPLIED
WARRANTIES OF MERCHANTABILITY OR FITNESS FOR A
PARTICULAR PURPOSE. Campbell is not liable for any special, indirect,
incidental, and/or consequential damages.”
Page 4

Assistance
Products may not be returned without prior authorization. The following
contact information is for US and international customers residing in countries
served by Campbell Scientific, Inc. directly. Affiliate companies handle
repairs for customers within their territories. Please visit
www.campbellsci.com to determine which Campbell Scientific company serves
your country.
To obtain a Returned Materials Authorization (RMA), contact CAMPBELL
SCIENTIFIC, INC., phone (435) 227-9000. After an application engineer
determines the nature of the problem, an RMA number will be issued. Please
write this number clearly on the outside of the shipping container. Campbell
Scientific’s shipping address is:
CAMPBELL SCIENTIFIC, INC.
RMA#_____
815 West 1800 North
Logan, Utah 84321-1784
For all returns, the customer must fill out a “Statement of Product Cleanliness
and Decontamination” form and comply with the requirements specified in it.
The form is available from our web site at www.campbellsci.com/repair. A
completed form must be either emailed to repair@campbellsci.com or faxed to
(435) 227-9106. Campbell Scientific is unable to process any returns until we
receive this form. If the form is not received within three days of product
receipt or is incomplete, the product will be returned to the customer at the
customer’s expense. Campbell Scientific reserves the right to refuse service on
products that were exposed to contaminants that may cause health or safety
concerns for our employees.
Page 5

Table of Contents
PDF viewers: These page numbers refer to the printed version of this document. Use the
PDF reader bookmarks tab for links to specific sections.
1. Overview ...................................................................... 1
1.1 Design Features .................................................................................... 1
1.2 Specifications ....................................................................................... 3
1.3 Communication .................................................................................... 3
1.3.1 Datalogger ..................................................................................... 3
1.3.1.1 PakBus Protocol/Direct RS-232 Connection ...................... 4
1.3.1.2 PakBus Protocol/Wireless Connection ............................... 4
1.3.1.3 PakBus Protocol/MD485 Communication ......................... 4
1.3.1.4 SDI-12 Communication Mode ........................................... 4
1.3.2 Computer ...................................................................................... 5
1.3.2.1 Device Configuration Utility .............................................. 5
1.3.2.2 LoggerNet .......................................................................... 5
1.3.2.3 Terminal Commands .......................................................... 5
1.4 Use with Multiplexers .......................................................................... 5
2. Measurements ............................................................. 7
2.1 Vibrating Wire ..................................................................................... 7
2.2 Temperature ....................................................................................... 10
3. Quick Start Guides ................................................... 11
3.1 One or Two Sensors (no multiplexers) ............................................... 11
3.1.1 Direct RS-232 Connection .......................................................... 11
3.1.2 Wireless Connection ................................................................... 12
3.2 Multiplexers Controlled by AVW200 ................................................ 14
3.2.1 Direct RS-232 Connection .......................................................... 14
3.2.2 Wireless Connection ................................................................... 15
3.3 Multiplexers Controlled by Datalogger .............................................. 17
3.3.1 SDI-12 Communication .............................................................. 17
4. Connections .............................................................. 18
4.1 Sensor Wiring (no multiplexers) ........................................................ 18
4.2 Power and Ground .............................................................................. 19
4.3 Datalogger Wiring (Direct Connection) ............................................. 20
4.4 Wireless Connections (AVW206, AVW211, AVW216) ................... 21
4.5 Multiplexer Wiring ............................................................................. 22
4.5.1 AVW200 Controlling the Multiplexer ........................................ 22
4.5.2 Datalogger Controlling the Multiplexer ...................................... 23
5. Device Configuration (DevConfig) Utility ............... 25
5.1 Connecting to DevConfig................................................................... 25
5.2 Deployment Tab ................................................................................. 26
5.2.1 Communications ......................................................................... 26
5.2.2 Measurement ............................................................................... 29
5.3 Data Monitor ...................................................................................... 30
i
Page 6

Table of Contents
5.4 Send OS ...................................................................................... 32
5.5 Troubleshoot .............................................................................. 33
5.6 Settings Editor ............................................................................ 36
5.7 Terminal ..................................................................................... 36
6. Programming ............................................................. 37
6.1 AVW200 Instruction ......................................................................... 37
6.1.1 Pipeline Mode ............................................................................ 41
6.1.2 Sequential Mode ......................................................................... 41
6.2 SDI-12 Measurements ....................................................................... 42
6.2.1 SDI12 Recorder() Instruction ..................................................... 42
6.2.2 Extended SDI-12 Commands ..................................................... 44
6.2.3 Use with Multiplexers ................................................................ 44
7. Example Programs .................................................... 45
7.1 AVW200() Instruction (no multiplexers) .......................................... 45
7.1.1 Direct RS-232 Connection (two sensors) ................................... 45
7.1.2 Wireless/One Sensor/Resistance Converted to Temperature ..... 46
7.2 AVW200() Instruction Controlling Two Multiplexers ...................... 47
7.3 AVW200( ) Instruction Running in the Pipeline Mode ..................... 48
7.4 AVW200( ) Instruction Running in the Sequential Mode ................. 49
7.4.1 AVW200 Controlling Two Multiplexers in Sequential Mode ... 50
7.4.2 Datalogger Controlling Two Multiplexers in Sequential Mode . 50
7.5 SDI-12 Example ................................................................................ 51
8. Troubleshooting Communication Problems .......... 54
8.1 Unable to Communicate with DevConfig or Terminal Emulator ...... 54
8.2 Datalogger to AVW200 Communication .......................................... 54
8.3 Wireless Communications ................................................................. 54
Appendices
Conversion from Hertz ........................................... A-1
A.
A.1 Displacement Example .................................................................... A-1
B. Thermistor Information ........................................... B-1
B.1 Converting Resistance to Temperature ............................................ B-1
B.1.1 Resistance Conversion Example – Geokon Sensor .................. B-1
B.2 Accuracy and Resolution ................................................................. B-1
C. Antennas, Antenna Cables, and Surge
Protectors for the AVW206, AVW211, and
AVW216 ................................................................. C-1
C.1 Antennas .......................................................................................... C-1
C.2 Antenna Cables ................................................................................ C-5
C.3 Surge Protectors .............................................................................. C-5
C.3.1 Electrostatic Issues ................................................................... C-5
C.3.2 Antenna Surge Protector Kit .................................................... C-6
C.4 Part 15 FCC Compliance Warning .................................................. C-6
ii
Page 7

Table of Contents
D. The Public Table ..................................................... D-1
D.1 Forced Measurement Program ........................................................ D-4
E. Status Table ............................................................ E-1
F. Time Series and Spectrum Graph Information .... F-1
F.1 Good Sensor Examples .................................................................... F-1
F.2 Good Sensors with Noise ................................................................. F-3
G. CR10X Programming Example .............................. G-1
H. Additional Programming Examples ...................... H-1
H.1 AVW200-Controlled Multiplexer ................................................... H-1
H.1.1 Direct RS-232 Connection ....................................................... H-1
H.1.2 Wireless/Sensors with Different Frequencies .......................... H-4
H.2 Datalogger-Controlled Multiplexer ................................................. H-7
I. Using MD485 Multidrop Modems with AVW200
Interfaces ................................................................. I-1
Figures
I.1 Required Settings .............................................................................. I-1
I.2 Connections ....................................................................................... I-2
I.2.1 Datalogger to MD485 ................................................................ I-3
I.2.2 MD485 to MD485 ...................................................................... I-3
I.2.3 MD485 to AVW200 ................................................................... I-4
I.2.4 Multiplexer Connections ............................................................ I-4
I.3 Programming ..................................................................................... I-4
I.3.1 Example Program ....................................................................... I-4
1-1. Network of AVW200s and AM16/32Bs (using a direct RS-232
connection) ....................................................................................... 6
1-2. Network of AVW206s and AM16/32Bs (wireless) ............................. 6
1-3. Network of AVW200 Interfaces (SDI-12) ........................................... 7
2-1. Cutaway of Vibrating Wire Sensor ...................................................... 8
2-2. DevConfig plots showing the AVW200 measurement approach. ...... 10
4-1. Wiring for Sensor Connections .......................................................... 19
4-2. Ground Lug and Power Connectors on the AVW200 ........................ 20
4-3. AVW206 with Whip Antenna ............................................................ 21
4-4. Example AM16/32-series to AVW200 Hookup (multiplexers
controlled by AVW200) ................................................................. 23
4-5. AM16/32B to AVW200 Hookup (AM16/32Bs controlled by
datalogger and using SDI-12) ......................................................... 24
4-6. Multiplexer to Datalogger Power/Control Hookup (multiplexer
controlled by datalogger) ................................................................ 24
5-1. Opening Page in DevConfig .............................................................. 26
5-2. Deployment Communications Editor in DevConfig .......................... 27
5-3. Deployment/Measurement Tab in DevConfig ................................... 29
5-4. Data Display/Public Table in DevConfig ........................................... 30
5-5. Data Display/Status Table in DevConfig ........................................... 31
5-6. Sending an Operating System using DevConfig ................................ 32
iii
Page 8

Table of Contents
5-7. Opening Page of the Troubleshoot Tool ............................................ 33
5-8. Options Tab of the Troubleshoot Tool .............................................. 34
5-9. Graphs for Evaluating Spectral Analysis of a Sensor ........................ 35
A-1. Geokon Calibration Report of a Sensor without a Thermistor ........ A-2
B-1. Temperature Measurement Error at Three Temperatures as a
Function of Lead Length. Wire is 22 AWG with 16 ohms
per 1000 feet. ............................................................................... B-2
B-2. Temperature Measurement Error on a 1000 foot Lead. Wire is
22 AWG with 16 ohms per 1000 feet. ......................................... B-3
B-3. Temperature Measurement Error on a 3000 foot Lead. Wire is
22 AWG with 16 ohms per 1000 feet. ......................................... B-3
B-4. Temperature Measurement Error on a 5000 foot Lead. Wire is
22 AWG with 16 ohms per 1000 feet. ......................................... B-4
C-1. Some FCC Approved Antennas ...................................................... C-4
C-2. Example COAX RPSMA-L Cable for Yagi or Omni Colinear ....... C-5
C-3. Antenna Surge Protector .................................................................. C-5
F-1. Good Sensor with a Narrower Range (200 to 2200 Hz) ................... F-2
F-2. Good Sensor with a Wider Range (200 to 6500 Hz) ........................ F-2
F-3. Good Sensor with Noise (600 to 1800 Hz) ....................................... F-3
F-4. Good Sensor with Noise (450 to 6500 Hz) ....................................... F-4
I-1. Deployment tab in DevConfig with proper MD485 configuration.... I-1
I-2. Point-to-Point MD485-to-AVW200 Network ................................... I-2
I-3. Point-to-Multipoint MD485-to-AVW200 Network .......................... I-2
I-4. MD485 and its connectors. ................................................................ I-3
I-5. MD485-to-MD485 Connections and Grounding ............................... I-4
Tables
2-1. AVW200 Measurement Inputs ............................................................ 8
2-2. AVW200 Measurement Outputs ......................................................... 9
4-1. Datalogger to AVW200 Cable Options ............................................. 20
4-2. 17855 or SC110’s DTE Cable Wiring ............................................... 21
4-3. Datalogger to Spread Spectrum Radio Connections .......................... 22
5-1. AVW206 Power Modes and the Recommended Corresponding
RF401 Power Modes...................................................................... 28
5-2. Terminal Mode Commands ............................................................... 36
6-1. SDI-12 Command Codes ................................................................... 43
7-1. Wiring for Example 7.1.1 .................................................................. 45
7-2. Wiring for Example 7.2 ..................................................................... 47
7-3. Wiring for Example 7.3 ..................................................................... 48
7-4. Wiring for Sequential Mode Examples ............................................. 50
7-5. SDI-12 Command Codes ................................................................... 52
D-1. Description of the Public Table ....................................................... D-1
E-1. Status Fields and Descriptions .......................................................... E-1
iv
Page 9

CAUTION
AVW200-series 2-Channel Vibrating
Wire Spectrum Analyzer Modules
The AVW200 series consist of a base model (AVW200) and three wireless models
(AVW206, AVW211, AVW216). The wireless models combine the AVW200 with a spread
spectrum radio. The different model numbers of the wireless versions are for different
spread spectrum frequency ranges.
Compatible Radios
• AVW206—910 to 918 MHz (US/Canada) RF401
• AVW211—920 to 928 MHz (Australia/Israel) RF411
• AVW216—2.450 to 2.482 GHz (worldwide) RF416
No product using the 24XStream radio, including the AVW216, will be
available for sale in Europe after 1/1/2015 due to changes in EU legislation.
Consequently, purchase of the AVW216 is not recommended for use in
Europe in new networks that may require future expansion.
Throughout this manual AVW200 will refer to all models unless specified otherwise.
Likewise, AVW206 typically refers to all wireless models, and RF401 refers to the
corresponding spread spectrum radio.
1. Overview
The AVW200 module allows the measurement of vibrating-wire strain gauges,
pressure transducers, piezometers, tiltmeters, crackmeters, and load cells.
These sensors are used in a wide variety of structural, hydrological, and
geotechnical applications because of their stability, accuracy, and durability.
Up to two vibrating wire or vibrating strip transducers can be connected to the
AVW200. More sensors can be measured by using multiplexers (see Section
1.4, Use with Multiplexers).
1.1 Design Features
Historically, vibrating-wire sensors suffered from one major problem—
external noise. The AVW200 significantly reduces and, in most cases,
eliminates the problem of incorrect readings due to noise sources. The noise
problems were overcome by advancement in technology and mathematical
processing
from previous time-domain based measurements.
Read more! Vibrating Wire Measurements are discussed in detail in
Section 2.
i
, resulting in frequency based measurements—a complete departure
To simplify programming of the AVW200, engineers implemented firmware to
eliminate several parameters that were necessary in programming the older
Campbell Scientific interfaces (i.e., AVW1, AVW4, AVW100).
i
U.S. Patent No. 7,779,690
1
Page 10

AVW200-series 2-Channel Vibrating Wire Spectrum Analyzer Modules
The eliminated parameters are:
• Number of steps
• Number of cycles
• Time of Swept Frequency
These parameters are now part of the AVW200 internal operating system and
require no user input. The user only needs to input the lower frequency range,
upper frequency range, and excitation voltage of the sensor.
Read more! Detailed programming information is provided in Section 6
.
The AVW200 returns five or six values per measurement. The first value is
the vibrating wire frequency in Hz. The sixth value is the optional thermistor
measurement on Ohms. Values two through five are diagnostic information
giving an indication or validation of the measurement.
(1) = Frequency in Hertz
(2) = SignalStrength in mV_RMS
(3) = Signal/Noise Ratio (unitless)
(4) = Noise Frequency Hz
(5) = DecayRatio (unitless)
(6) = Thermistor output in Ohms of resistance (see Section 2.2, Temperature)
The on-board diagnostics should be monitored to determine faulty wiring,
incorrect frequency range, sensor degradation over time, or to determine faulty
sensors.
Read more! Information on how to use the on-board diagnostics is
provided in Appendix F.
2
Page 11
AVW200-series 2-Channel Vibrating Wire Spectrum Analyzer Modules
1.2 Specifications
1.3 Communication
1.3.1 Datalogger
The AVW200 module is designed to work with and complement Campbell
Scientific dataloggers, as well as data acquisition products from other
manufacturers.
3
Page 12

AVW200-series 2-Channel Vibrating Wire Spectrum Analyzer Modules
1.3.1.1 PakBus Protocol/Direct RS-232 Connection
When using the PakBus protocol, the AVW200() instruction in CRBasic
supports an AVW200 connected to a datalogger via a cable attached to the
AVW200’s RS-232 port. You can run the datalogger AVW200() instruction in
either the pipeline or sequential mode. This instruction is contained in the
following datalogger operating systems:
• CR800std.06 or greater
• CR1000std.15 or greater
• CR3000std.08 or greater
Multiplexers can be controlled by either the AVW200 or the datalogger.
Read more! You can find Quick Start Guides in Section 3
instruction description in Section 6.1, and programming examples in
Section 7.
1.3.1.2 PakBus Protocol/Wireless Connection
An AVW206, AVW211, or AVW216 interface can transmit data to a
corresponding spread spectrum radio that is attached to the datalogger. The
AVW200() instruction in CRBasic supports these wireless interfaces. You can
run the AVW200() instruction in either the pipeline or sequential mode. This
instruction is contained in the following datalogger operating systems:
• CR800std.06 or greater
• CR1000std.15 or greater
• CR3000std.08 or greater
Multiplexers can be controlled by the wireless AVW200.
Read more! You can find Quick Start Guides in Section 3
instruction description in Section 6.1, and a programming example in
Section 7.1.2.
1.3.1.3 PakBus Protocol/MD485 Communication
For situations where wireless communication is impractical, MD485 multidrop
modems may extend the distance between the AVW200 interfaces.
Multiplexers must be controlled by the AVW200.
, AVW200()
, AVW200()
4
Read more! Appendix I
1.3.1.4 SDI-12 Communication Mode
SDI-12 is the only option available for our CR5000, CR10X, and CR23X
dataloggers and non-Campbell Scientific dataloggers. Our CRBasic
dataloggers use the SDI12Recorder instruction and Edlog dataloggers (i.e.,
CR10X, CR23X) use Instruction 105. The SDI12Recorder instruction should
only be run in the sequential mode. When using SDI-12, multiplexers must be
controlled by the datalogger.
Read more! You can find a Quick Start Guide in Section 3.3.1,
SDI12Recorder instruction description in Section 6.2, and a programming
example in Section 7.5.
describes using MD485 modems with AVW200s.
Page 13

AVW200-series 2-Channel Vibrating Wire Spectrum Analyzer Modules
1.3.2 Computer
1.3.2.1 Device Configuration Utility
The Device Configuration (DevConfig) Utility supports AVW200
configuration, operating system download, and vibrating wire spectrum
analysis troubleshooting. To use DevConfig, the AVW200 must be connected
to a PC and a power source. DevConfig is bundled in Campbell Scientific’s
datalogger support software and can also be acquired, at no cost, from
Campbell Scientific’s website. DevConfig 1.10 or greater is required.
Read more! DevConfig is described in detail in Section 5
1.3.2.2 LoggerNet
LoggerNet supports datalogger programming, accesses the status and public
tables, and displays network routing. Please ensure that the AVW200 CRBasic
instruction is included. If using LoggerNet 3.4.1 or lower, the user needs to
download the most recent OS for the datalogger. This installation installs the
required CRBasic files on the user’s computer so that the AVW200 instruction
shows up in the editor.
Read more! Programming information is provided in Section 6
refer to the LoggerNet manual and help.
1.3.2.3 Terminal Commands
You can monitor the AVW200 by entering terminal commands in the terminal
emulator of DevConfig or LoggerNet. HyperTerminal or ProComm can also
be used. The AVW200 needs to be connected to a computer with a standard
RS-232 cable (CSI model 10873).
Read more! Terminal Mode Commands are discussed in Section 5.6
1.4 Use with Multiplexers
For the AVW200 interfaces, the AM16/32B multiplexer is recommended over
its predecessors (i.e., AM16/32, AM16/32A). The AM16/32B has a clocking
mode that can use relay addressing to go directly to a specific channel—
reducing power consumption and wear on the relay switches.
.
. Also,
.
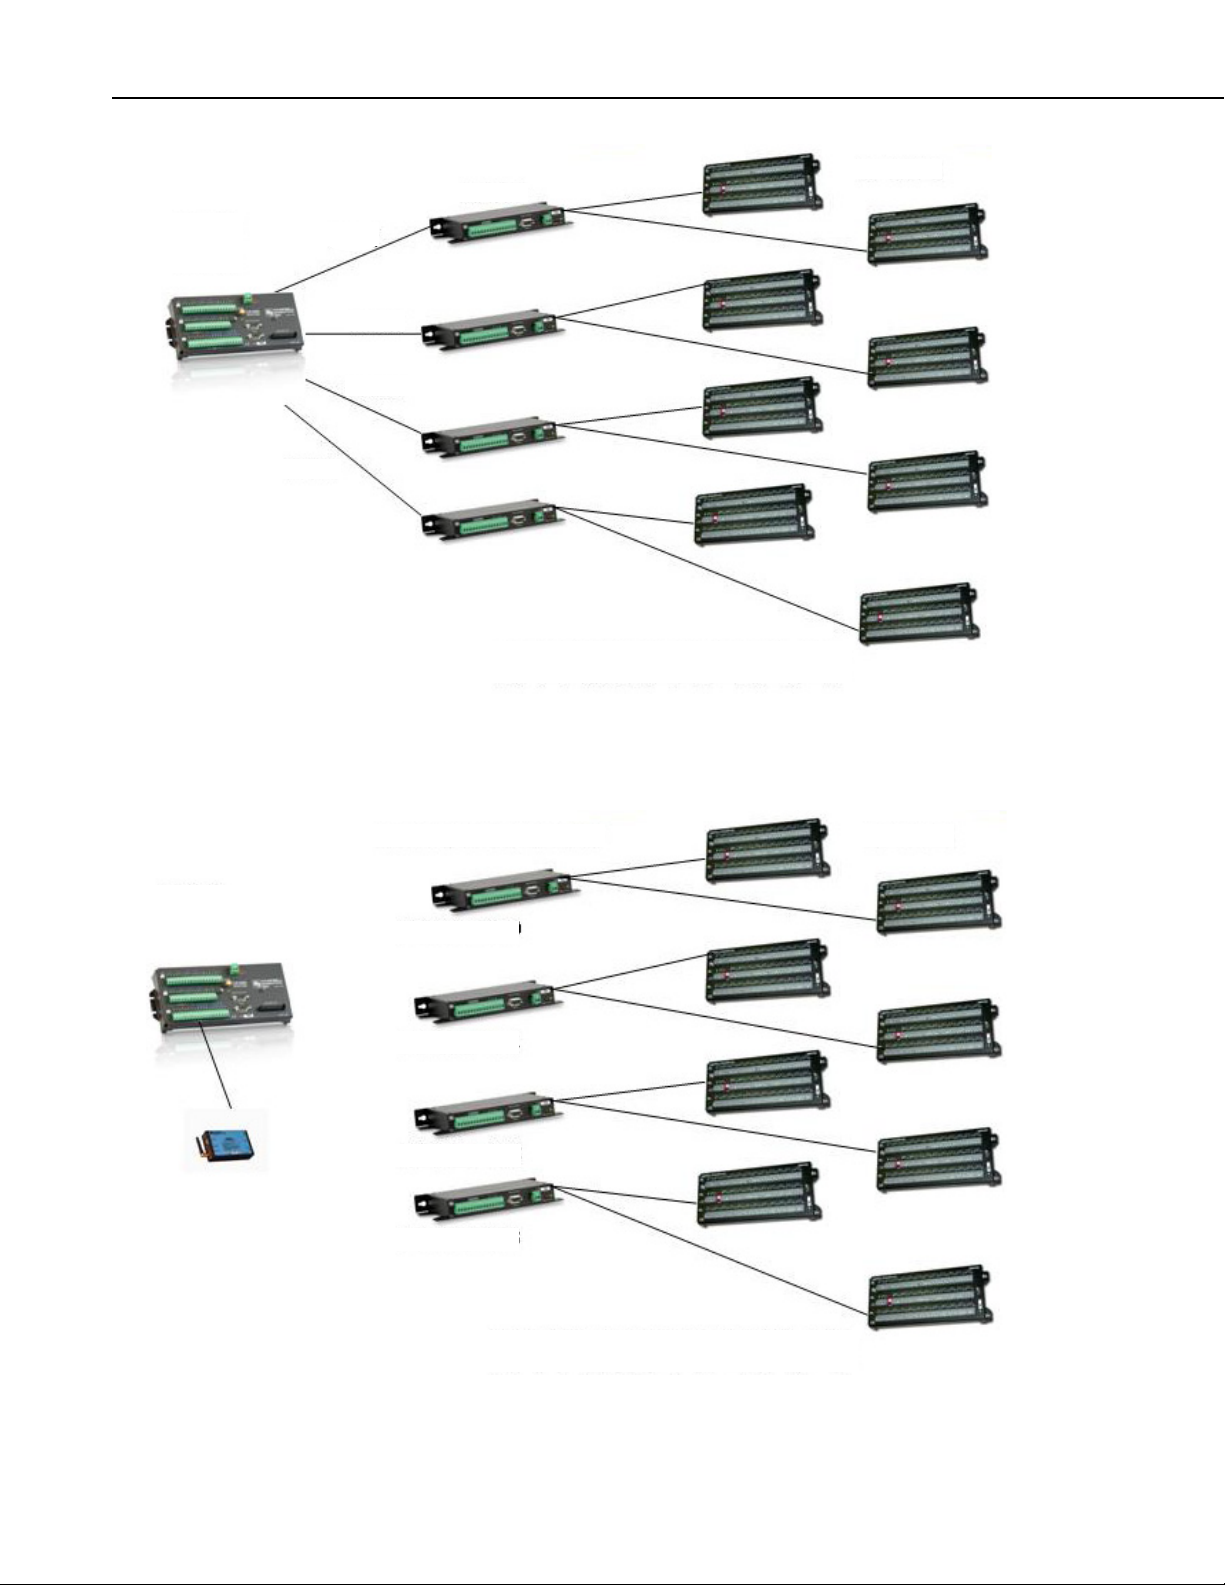
Up to 32 vibrating wire sensors without thermistors or 16 vibrating wire
sensors with thermistors can be connected to one multiplexer. Two
multiplexers can be connected to one AVW200. Using a direct RS-232
connection, up to four AVW200 interfaces can be connected to one CR1000 or
CR3000; up to two AVW200 interfaces can be connected to one CR800 or
CR850. This allows up to 256 vibrating wire sensors (128 with temperature) to
be measured by one CR1000 or CR3000 (see FIGURE 1-1) or 128 vibrating
wire sensors (64 with temperature) to be measured with one CR800 or CR850.
FIGURE 1-2 and FIGURE 1-3 indicate the number of interfaces that can be
connected to one datalogger when using wireless interfaces or the SDI-12
protocol.
Read more! You can find Quick Start Guides in Sections 3.2 and 3.3
wiring information in 4.5, programming information in Section 6, and
programming examples in Section 7.
,
5
Page 14
AVW200-series 2-Channel Vibrating Wire Spectrum Analyzer Modules
CR3000
CR1000
AVW200
COM3 (C5/C6)
COM4 (C7/C8)
AM16/32B
128 – Vibrating Wire Sensors in 4x16 configuration
256
COM1 (C1/C2)
COM2 (C3/C4)
CR3000
CR800, CR850
CR1000
128 – Vibrating Wire Sensors in 4x16 configuration
256
PakAddr = 200
PakAddr = 201
PakAddr = 202
PakAddr = 203
AVW206
AM16/32B
RF401
– Vibrating Wire Sensors in 2x32 configuration
FIGURE 1-1. Network of AVW200s and AM16/32Bs (using a direct RS-
232 connection)
6
– Vibrating Wire Sensors in 2x32 configuration
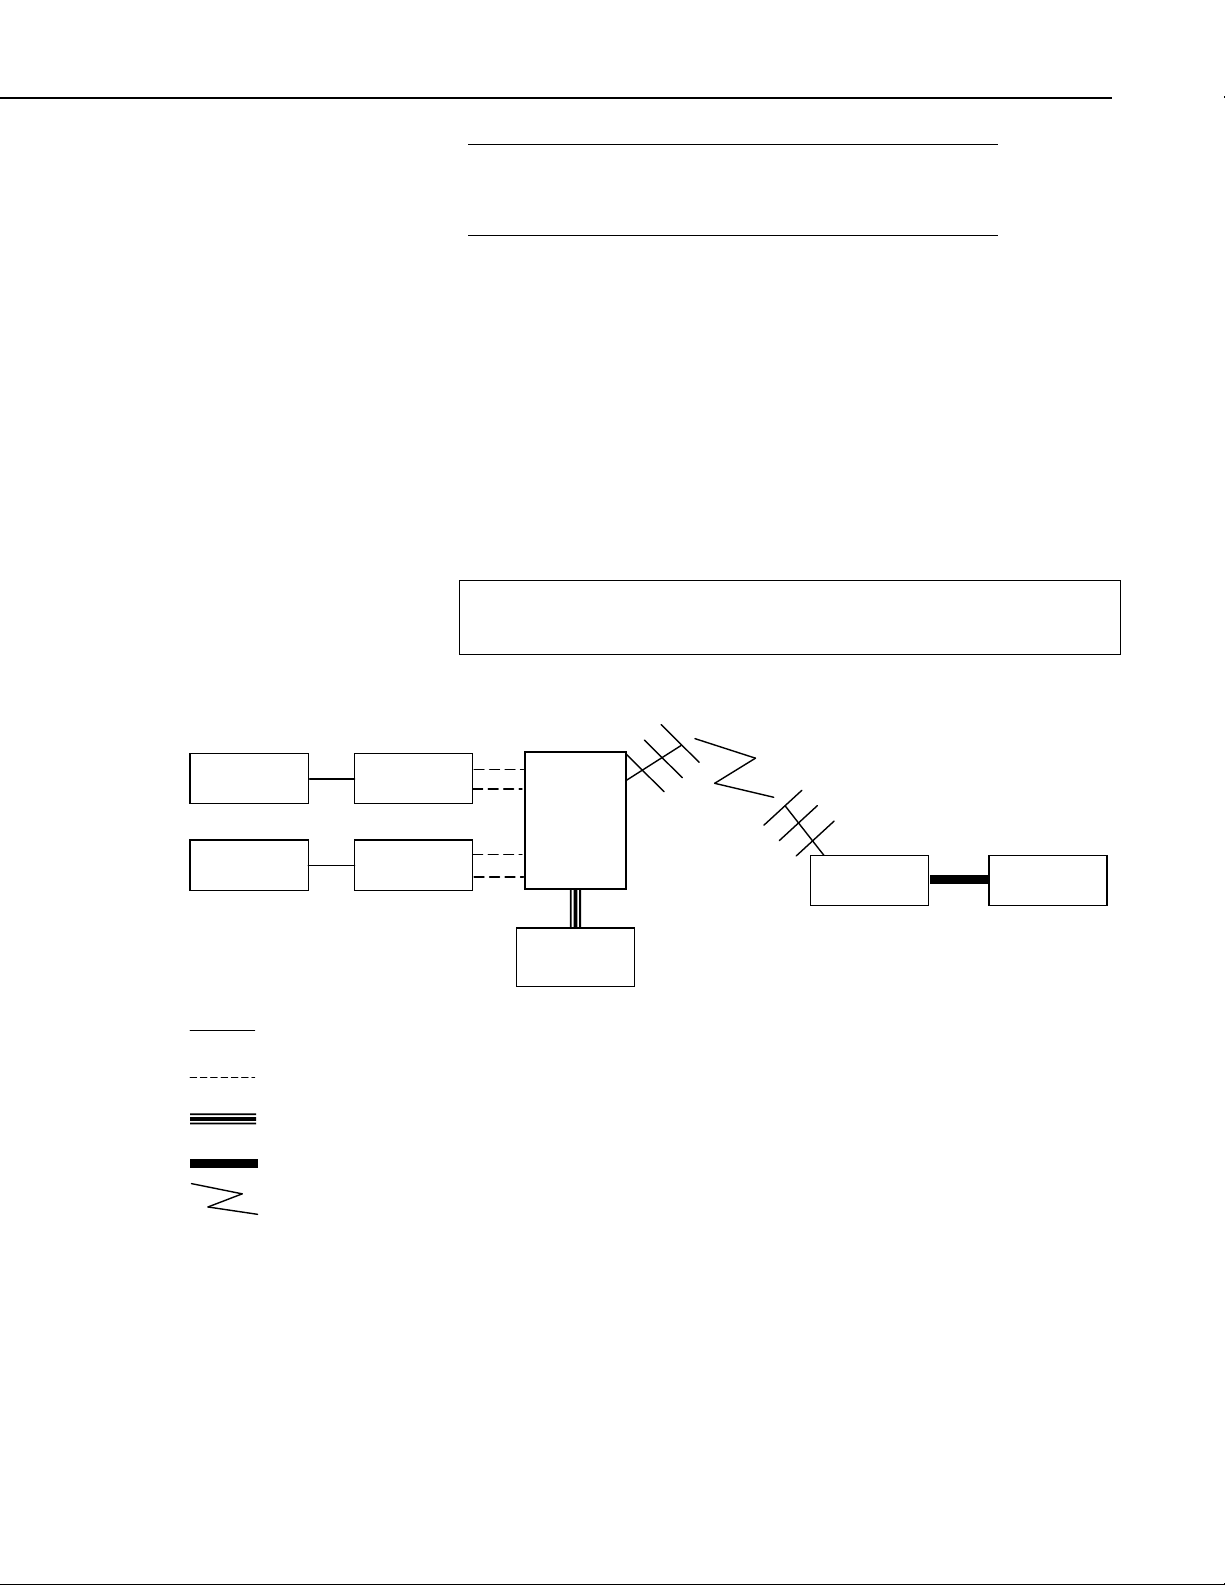
FIGURE 1-2. Network of AVW206s and AM16/32Bs (wireless)
Page 15

AVW200-series 2-Channel Vibrating Wire Spectrum Analyzer Modules
CR10X
CR5000
CR23X
CR800, CR850
CR1000
CR3000
AVW200
SDI-12
AM16/32B
Datalogger MUST Control
Multiplexers in SDI
0
1
2
3
-12 Mode
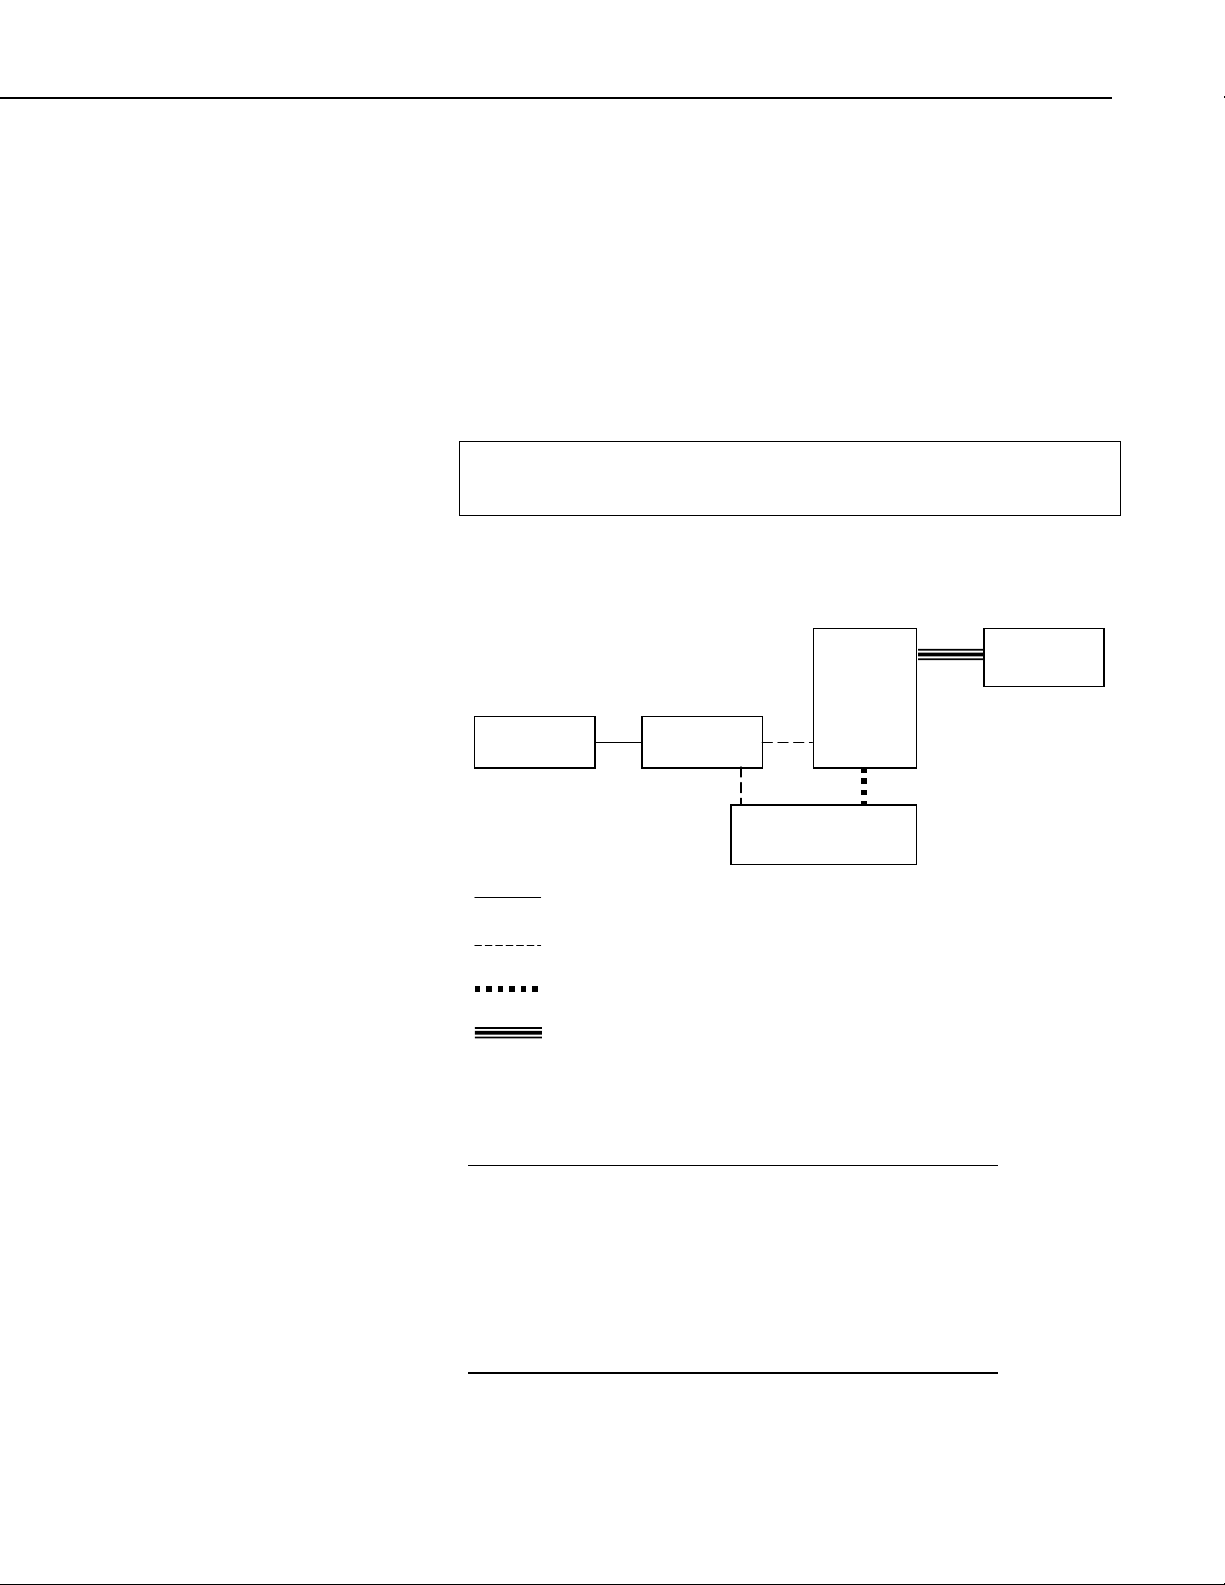
FIGURE 1-3. Network of AVW200 Interfaces (SDI-12)
2. Measurements
2.1 Vibrating Wire
The spectral approach implemented by the AVW200 offers significantly
improved noise immunity when compared to older period-averaging techniques
implemented by other vibrating-wire interfaces (AVW1, AVW4, and
AVW100). Testing revealed more than two to three orders of magnitude better
noise immunity with the AVW200. In addition, the spectral analysis gives
improved frequency resolution (0.001 Hz rms) during quiet conditions.
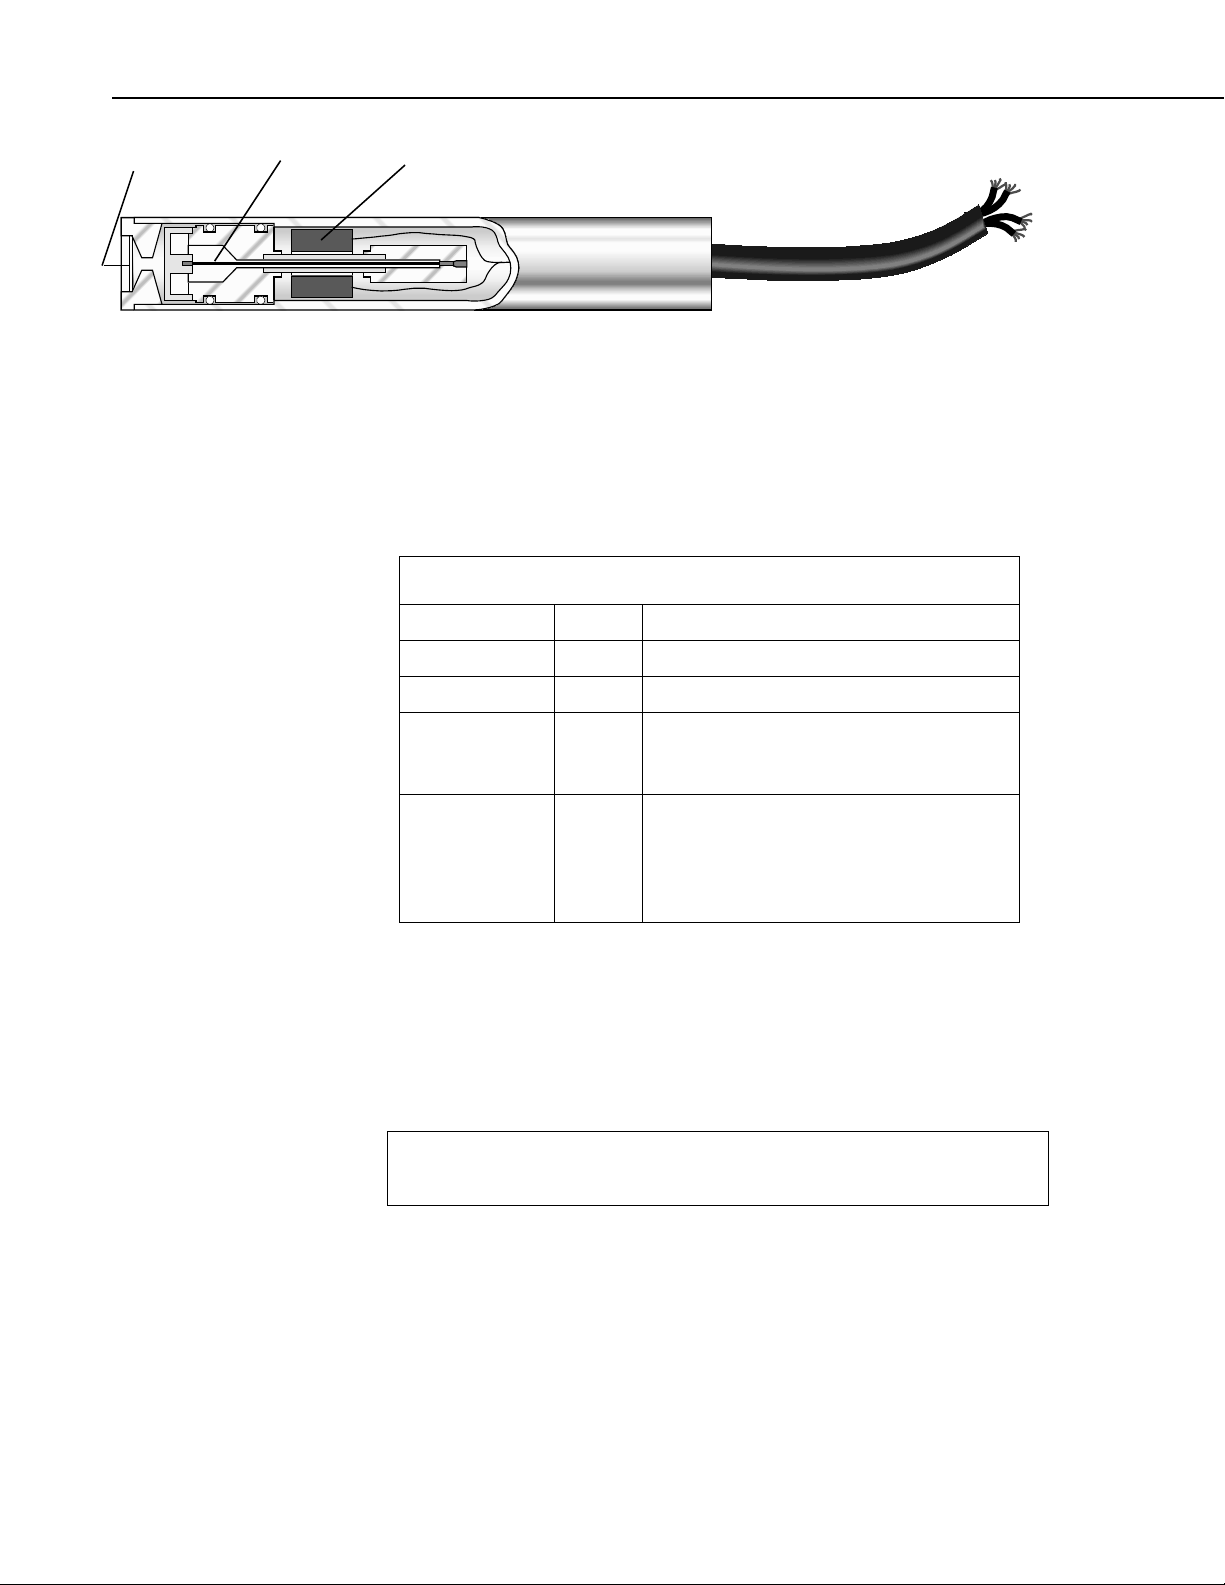
The AVW200 measures the resonant frequency of the taut wire in a vibrating
wire sensor (see FIGURE 2-1) with the following procedure. First, the
AVW200 excites the wire with a swept-frequency excitation signal. Next, the
AVW200 records the response from the vibrating wire. Finally, the AVW200
Fourier transforms the recorded response and analyzes the resulting spectrum
to determine the wire’s resonant frequency. This analysis also provides
diagnostic information indicating the quality of the resonant-frequency
measurement.
7
Page 16
AVW200-series 2-Channel Vibrating Wire Spectrum Analyzer Modules
TABLE 2-1. AVW200 Measurement Inputs
Plucking/
Pickup Coil
Vibrating
Wire
Diaphragm
FIGURE 2-1. Cutaway of Vibrating Wire Sensor
There are three user-determined inputs to the AVW200 measurement process
and five outputs from the measurement process. The input parameters control
the excitation frequency range (BeginFreq and EndFreq) and the excitation
amplitude (ExVolt); see TABLE 2-1. The frequency range supported spans
from 100 Hz to 6500 Hz.
Input Units Description
BeginFreq Hz Minimum excitation and analysis frequency
EndFreq Hz Maximum excitation and analysis frequency
ExVolt Unitless Excitation voltage
1: 5 Volts peak to peak
2: 12 Volts peak to peak
Therm50_60Hz
(see Section 2.2)
Unitless Thermistor measurement parameter
0: No thermistor
measurement
_60Hz Use 60 Hz noise rejection
_50Hz: Use 50 Hz noise rejection
The measurement outputs are resonant frequency, response amplitude, signalto-noise ratio, noise frequency, and decay ratio; see TABLE 2-2. The raw
frequency measurement output of the AVW200 is in Hertz unlike our previous
2
interfaces, which output kHz
or 1/T2 (where T is the period in milliseconds).
The Hertz output is converted to the appropriate units of measurement (e.g.,
pressure, strain, displacement) by using information provided on the sensor’s
calibration report.
Read more! You can find an example of converting Hertz to displacement
in Appendix A and an example program that converts Hertz to
displacement in Section 7.1.2.
8
Page 17

AVW200-series 2-Channel Vibrating Wire Spectrum Analyzer Modules
TABLE 2-2. AVW200 Measurement Outputs
Output Units Description
Resonant Frequency Hz Frequency of the peak response
Response Amplitude mV rms Amplitude of the peak response1
Signal-to-Noise Ratio unitless Response amplitude divided by
1
amplitude of largest noise candidate
Noise Frequency Hz Frequency of largest noise candidate1
Decay Ratio unitless Ending time-series amplitude divided
Thermistor Resistance
by the beginning time-series
amplitude
Ohms On-gage thermistor resistance2
1
(see Section 2.2)
Notes:
1. Use for measurement diagnostics.
2. Optional output, not measured if Therm50_60Hz is set to 0.
When using firmware version Std.04 (or higher) and the Response Amplitude
diagnostic is measured as less than 0.01 mV rms (10 microvolts), the Resonant
Frequency reading will be modified to warn the user about the occurrence of
low signal strength amplitudes. If SDI-12 is used to communicate with the
AVW200-series device, the frequency will be given as -9,999,999 under those
conditions. For all other communication methods, the frequency will be given
as NAN (not-a-number) when experiencing this low signal strength condition.
If the user desires the frequency to be returned as NAN for a higher (i.e., more
pessimistic) threshold than 0.01 mV, this can be done by using an optional
parameter in the AVW200 CRBasic Instruction. See Section 6.1, AVW200
Instruction, for details about how this can be done.
The Resonant Frequency reading is also used to warn the user when there is an
invalid voltage supply in the hardware of the device (firmware Std.04 and
higher). If an internal calibration factor is outside of the expected range, then
the value of -555,555 is returned for the frequency measurement. This
indicates to the user that there is a hardware issue on the device which requires
a factory examination and/or repair. Contact Campbell Scientific for
instructions when this value is given as the Resonant Frequency reading.
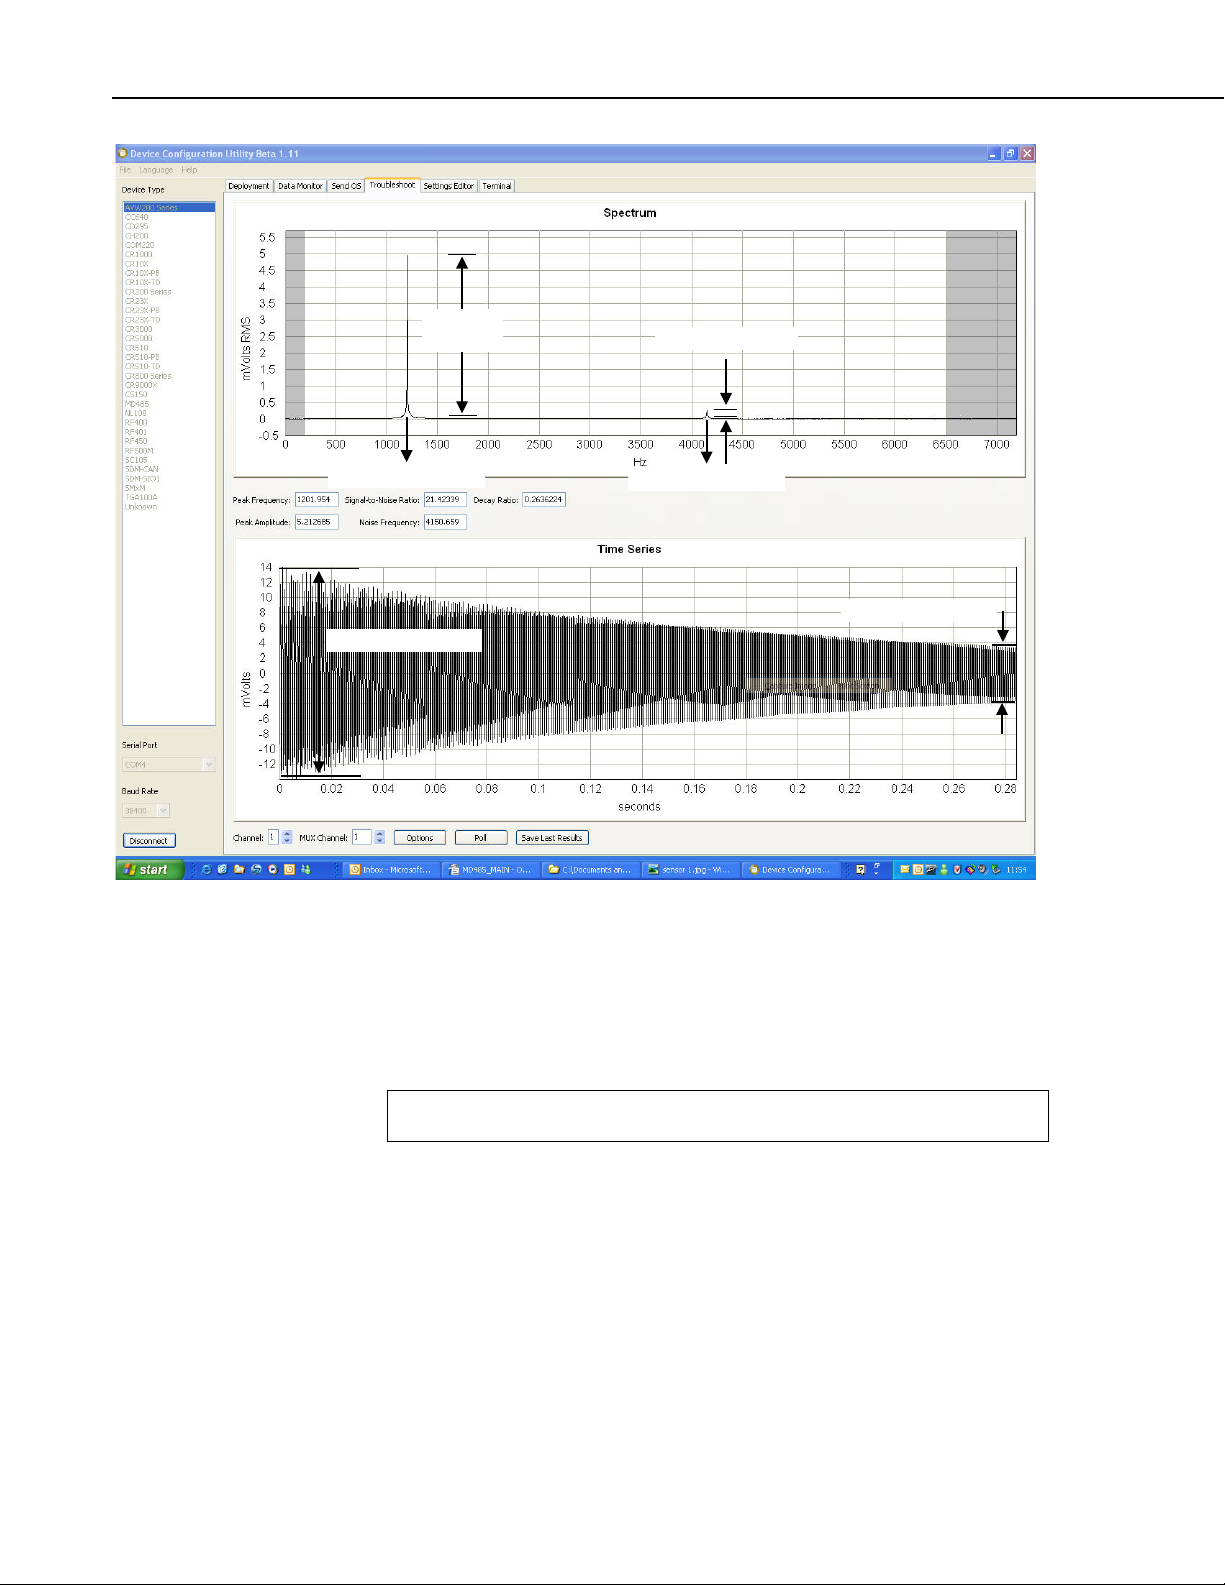
FIGURE 2-2 (a representative output from the Device Configurator’s
Troubleshooter) illustrates the AVW200 measurements. The bottom graph
shows the raw time series data recorded from a vibrating sensor after the sensor
has been excited with the frequency-swept voltage signal, and the top graph
shows the spectrum after the AVW200 has applied the fast Fourier transform
(FFT). In addition to the wire’s resonant frequency, the spectrum shows the
response amplitude, noise amplitude, and noise frequency. The AVW200
computes the signal-to-noise ratio diagnostic by dividing the response
amplitude by the noise amplitude. The AVW200 computes the decay ratio
diagnostic from the time series ending amplitude divided by the beginning
amplitude shown on the bottom graph in FIGURE 2-2.
9
Page 18
AVW200-series 2-Channel Vibrating Wire Spectrum Analyzer Modules
Response
Amplitude
Noise Amplitude
Resonant Frequency
Noise Frequency
Beginning Amplitude
Ending Amplitude
FIGURE 2-2. DevConfig plots showing the AVW200 measurement
Please note that the use of the special FFT algorithm to achieve better noise
immunity does require time for computation, which limits the maximum
vibrating wire measurement rate to 2 seconds per sensor. Running a program
at rates faster than this will result in compile/download errors.
Read more! You can find Troubleshoot tool information in Section 5.5
Appendix F; and detailed programming information in Section 6.
2.2 Temperature
The AVW200 contains a completion resistor for measuring the internal
thermistor contained in many vibrating wire sensors. The thermistor’s
resistance changes with the internal temperature of the sensor. This
temperature can be used to correct errors in the vibrating wire measurement
due to thermal expansion/contraction of the sensor body. The temperature
correction is often used when the temperature of the medium that the sensor is
measuring is changing (e.g. water temperature in a river or shallow lake).
Temperature is calculated by applying the resistance to a known equation such
as the Steinhart-Hart equation. The Steinhart-Hart coefficients for your sensor
are found in the sensor’s user manual.
approach.
and
10
Page 19
AVW200-series 2-Channel Vibrating Wire Spectrum Analyzer Modules
Cable that Comes with Sensor
17855 Pigtailed Cable or
18663 Null Modem Cable
19246 Power Cable
Sensors
AVW200
Sensors
Datalogger
Power
Supply
Read more! You can find an example program that converts resistance to
temperature in Section 7.1.2, and detailed information about the
thermistors in Appendix B.
3. Quick Start Guides
The AVW200 can be used in many types of systems—from simple to complex.
The following quick start guides provide steps used to set up a system for some
example configurations.
3.1 One or Two Sensors (no multiplexers)
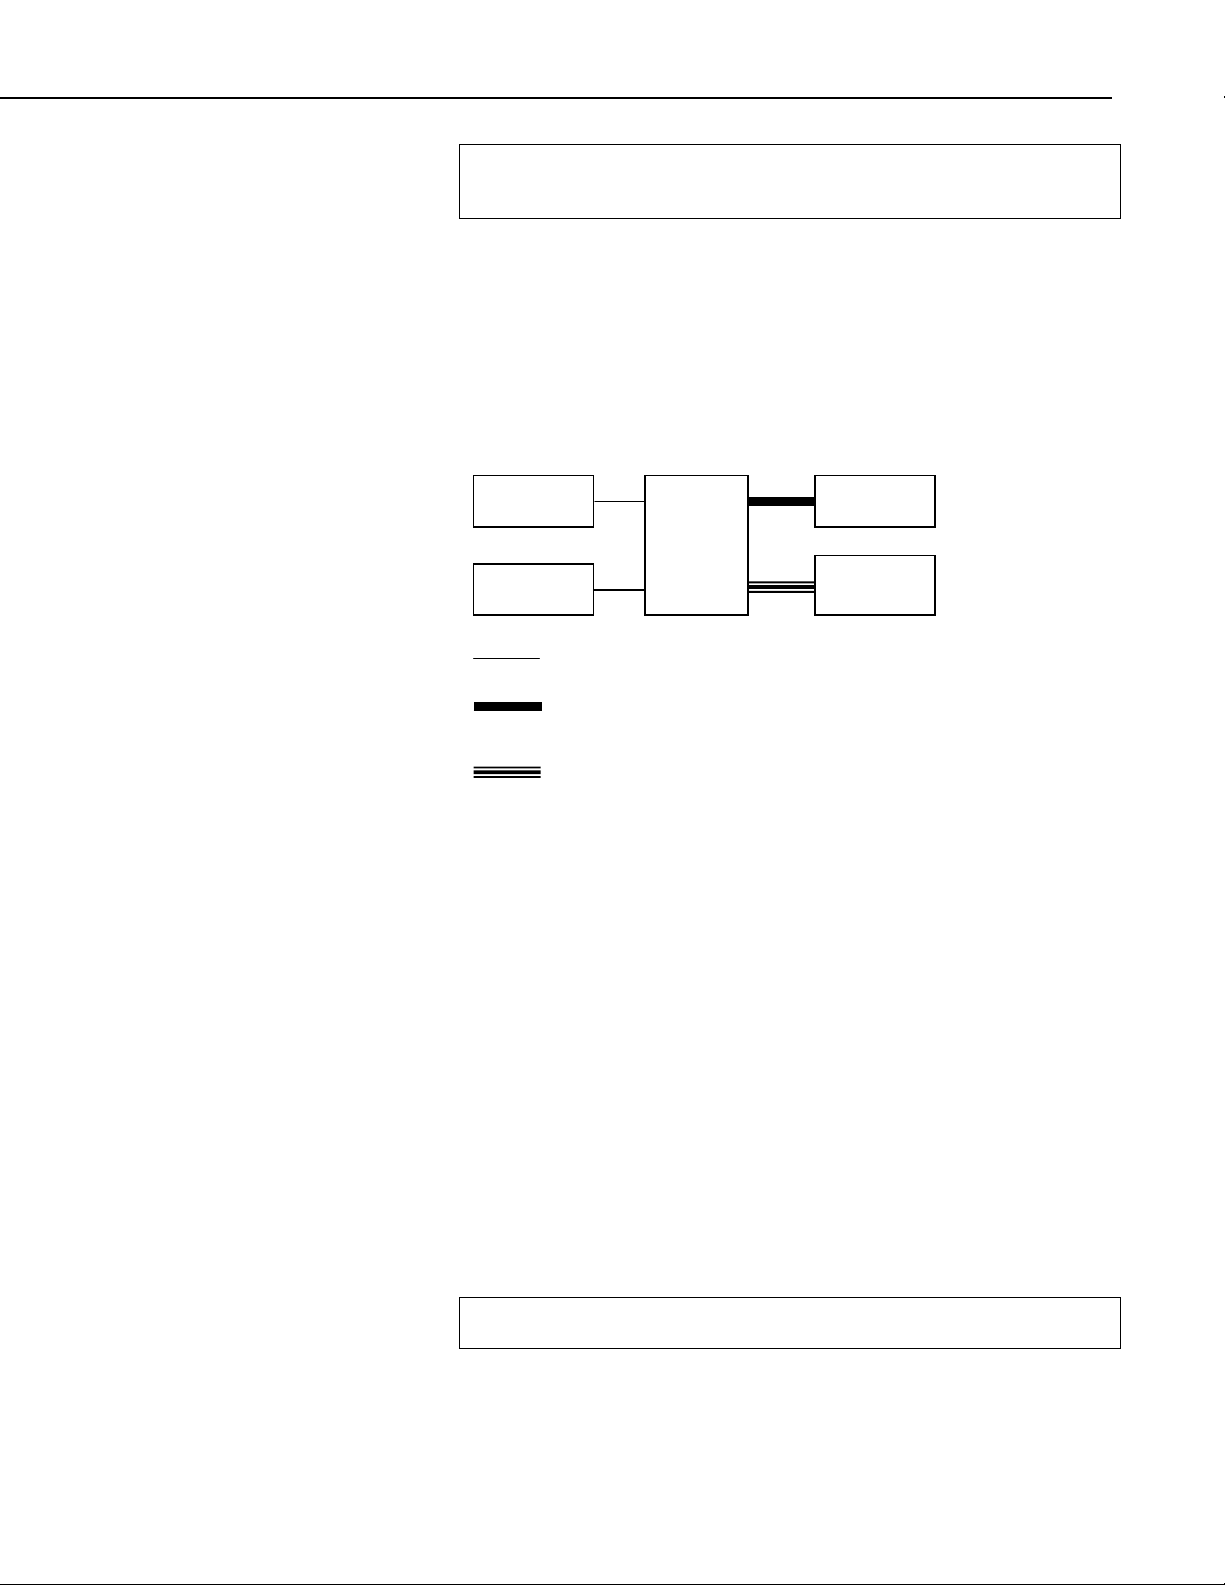
3.1.1 Direct RS-232 Connection
For this simple configuration, the AVW200 can be used straight from the box
(i.e., settings do not need to be changed in DevConfig). The sensor(s) are
attached directly to the AVW200. The AVW200 is connected directly with the
datalogger via the 17855 cable or 18663 cable. The 17855 cable terminates in
pigtails for connection to datalogger control port pairs (C1/C2…C7/C8). The
18663 Null Modem Cable has a DB9 connector for attachment to the
datalogger’s RS-232 port.
The following steps are used to measure the sensor(s):
1. Attach the vibrating wire sensor(s) to the AVW200 as shown in
FIGURE 4-1.
2. Use the 17855 cable to attach the AVW200 to a control port pair on the
datalogger (i.e., C1/C2, C3/C4, C5/C6, C7/C8), or use the 18663 Null
Modem cable to attach the AVW200 to the RS-232 port on the datalogger.
3. Connect one end of the 19246 power cable to the 12V and G terminals on
the AVW200 and the other end to the 12V and G terminals on the
datalogger or external power supply.
Read more! You can find power connection information in Section 4.2
,
and datalogger connection information in Section 4.3.
4. Create a CRBasic program that includes an AVW200() instruction for each
of the sensors.
11
Page 20
AVW200-series 2-Channel Vibrating Wire Spectrum Analyzer Modules
Cable that Comes with Sensor
19246 Power Cable
SC12 CS I/O Cable
Wireless Connection
Sensors
AVW206
Sensors
Power
Supply
Datalogger
RF401
Onsite
Office
NOTE
Check the manufacturer’s specification for the sensors frequency
and excitation range before picking the begin/end frequencies and
excitation voltage.
For example, the following AVW200() instructions can be used to
measure two sensors:
AVW200(Result,Com1,200,200,Dst(1,1),1,1,1,1000,3500,2,_60HZ,1,0)
AVW200(Result,Com1,200,200,Dst(2,1),2,1,1,1000,3500,2,_60HZ,1,0)
Where,
AVW200 connects to datalogger control ports 1 & 2 via 17855 cable
(option Com1)
Begin Frequency = 1000
End frequency = 3500
Excitation voltage = 12 V peak to peak (option 2)
Read more! A thorough description of the AVW200() instruction and its
parameters is provided in Section 6.1. A complete example program that
measures two vibrating wire sensors (no multiplexer) is included in
Section 7.1.1.
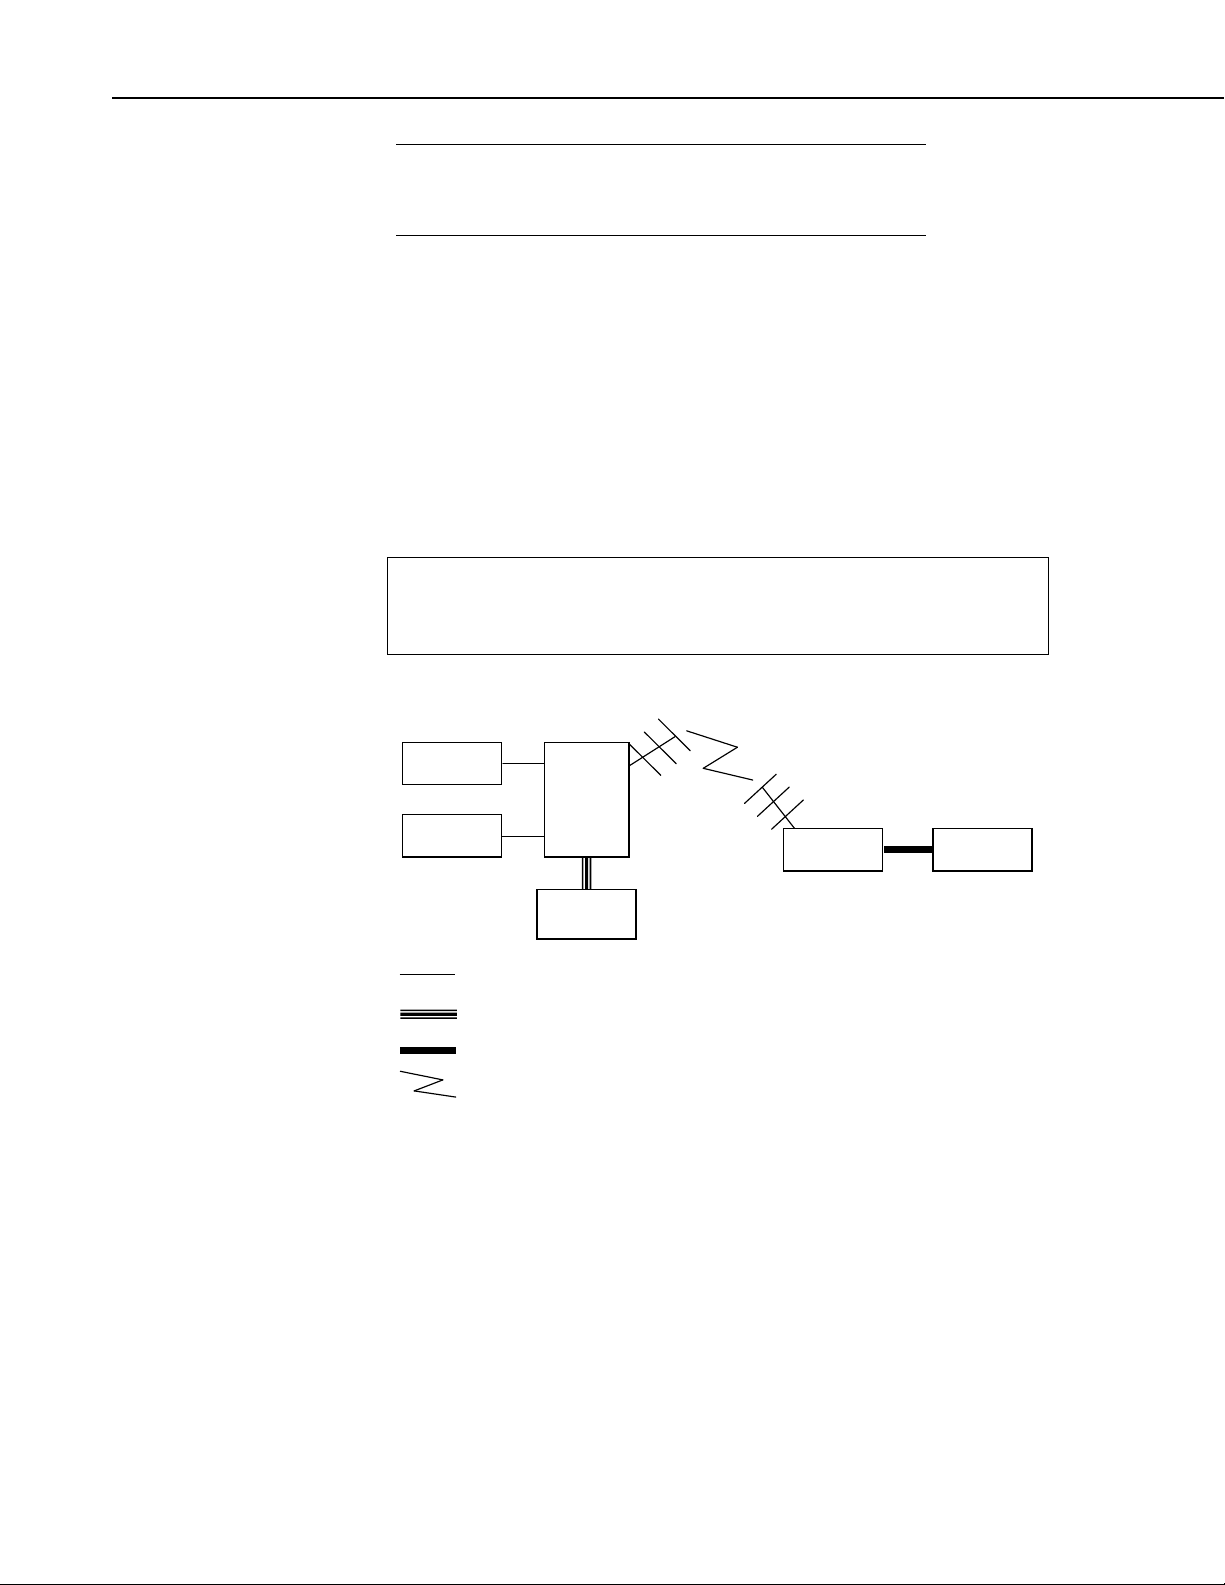
3.1.2 Wireless Connection
12
For this example configuration, the sensor(s) are attached directly to the
AVW206. The AVW206 interface transmits the data to an RF401 spread
spectrum radio that is connected to the datalogger.
At the AVW206 site, do the following steps:
1. Configure the AVW206 for RF communications as described in Section
5.1, Connecting to DevConfig, and Section 5.2.1, Communications.
2. Attach the vibrating wire sensor(s) to the AVW206 as shown in FIGURE
4-1.
Page 21

AVW200-series 2-Channel Vibrating Wire Spectrum Analyzer Modules
NOTE
NOTE
3. Connect an antenna (or antenna cable with Yagi or omnidirectional
antenna attached) to the Antenna Connector on the side of the AVW206.
Read more! Description of our antenna options is provided in Appendix C
4. Use the power cable to connect the 12V and G terminals on the AVW206
to the 12V and G terminals on the PS100 or another power supply.
At the datalogger/RF401 site, do the following steps:
1. Configure the RF401 radio so that its parameters match the AVW206.
The protocol setting for the RF401 must be PB Aware or PB Node.
2. Attach an antenna (or antenna cable with Yagi or omnidirectional antenna
attached) to the Antenna Connector on the RF401.
3. Use the SC12 serial cable to attach the datalogger’s CS I/O port to the
RF401’s CS I/O port. The datalogger’s CS I/O port applies power to the
RF401.
Read more! More information about using spread spectrum radios is
provided in the RF401/RF411/RF416 Spread Spectrum Data
Radio/Modem manual.
4. Create a CRBasic program that includes an AVW200() instruction for each
of the sensors.
.
Check the manufacturer’s specification for the sensors frequency
and excitation range before picking the begin/end frequencies and
excitation voltage.
For example, the following AVW200() instructions can be used to
measure two sensors:
AVW200(Result,ComSDC7,200,200,Dst(1,1),1,1,1,1000,3500,2,_60HZ,1,0)
AVW200(Result,ComSDC7,200,200,Dst(2,1),2,1,1,1000,3500,2,_60HZ,1,0)
Where,
RF401 = configured for SDC7
Begin Frequency = 1000
End frequency = 3500
Excitation voltage = 12 V peak to peak (option 2)
Read more! A thorough description of the AVW200() instruction and its
parameters is provided in Section 6.1. A complete example program that
measures one vibrating wire sensor (no multiplexer) is included in Section
7.1.2.
13
Page 22
AVW200-series 2-Channel Vibrating Wire Spectrum Analyzer Modules
Cable that Comes with Sensor
CABLE4CBL-L Four Conductor Cable
17855 Pigtailed Cable or
18663 Null Modem Cable
19246 Power Cable
Multiplexer
AVW200
Multiplexer
Datalogger
Power
Supply
Sensors
Sensors
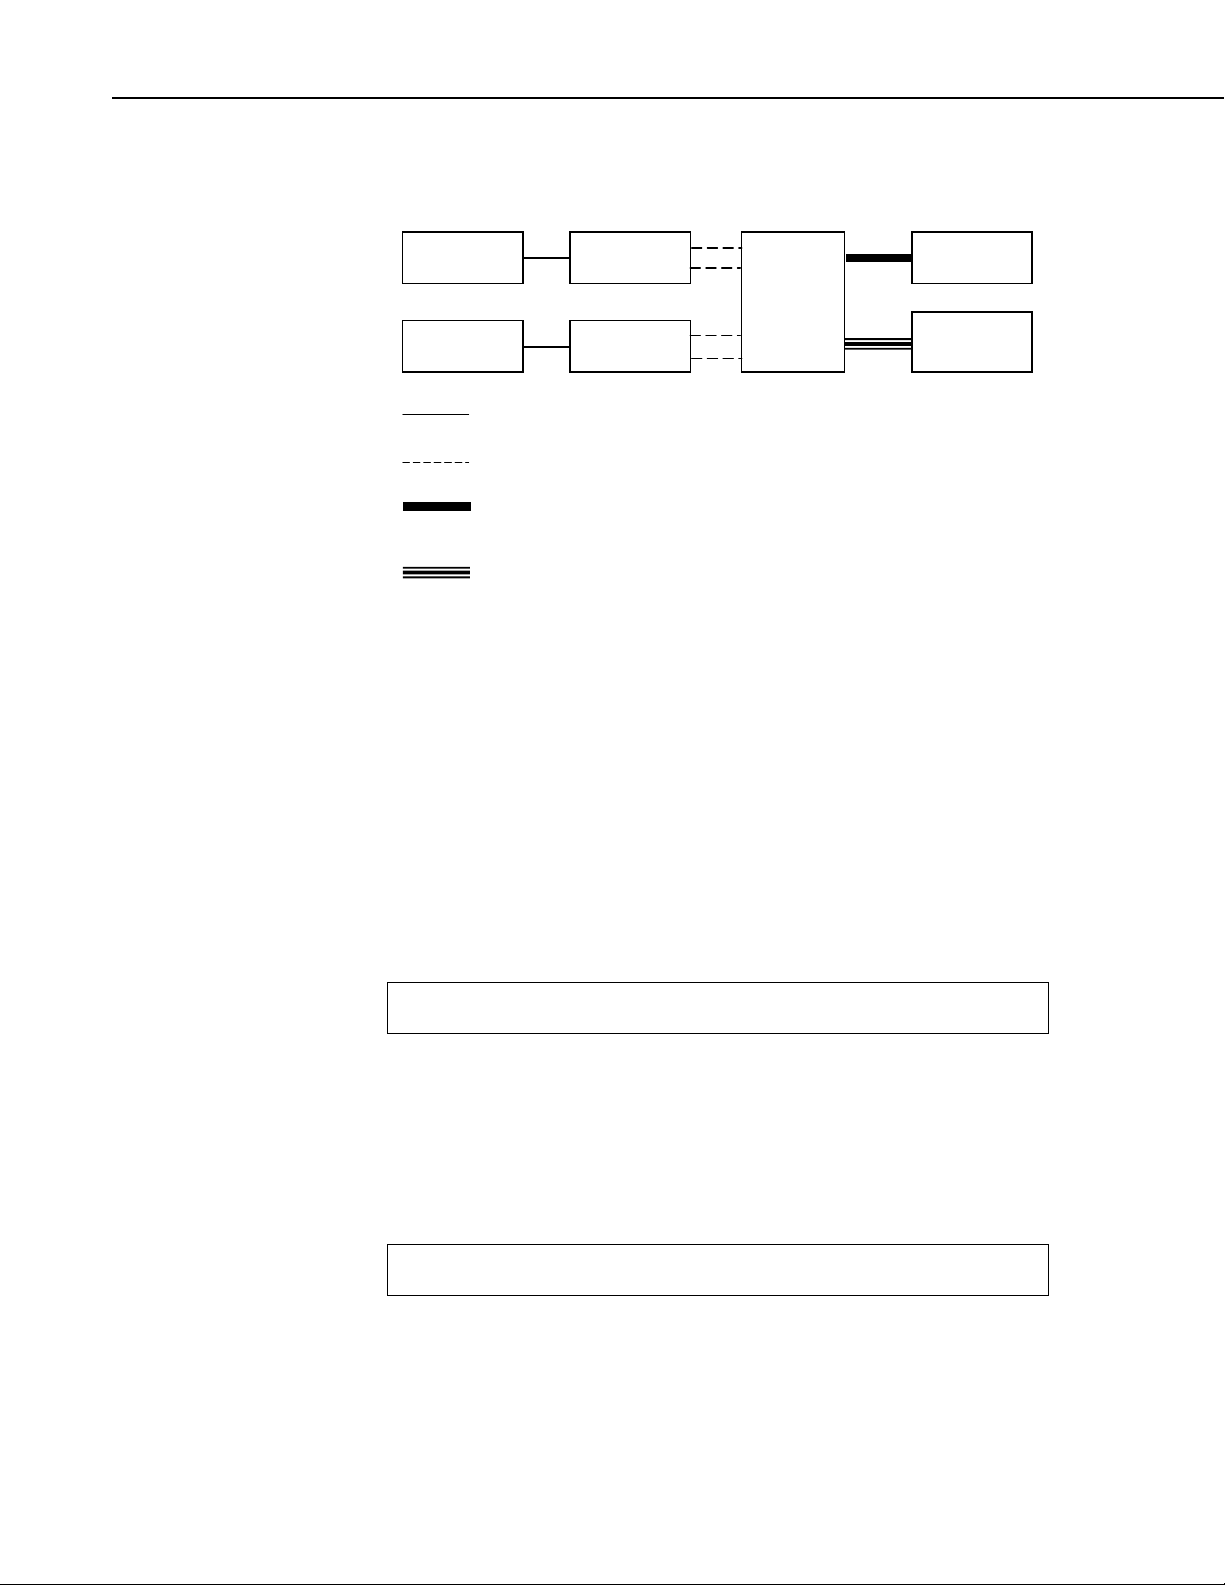
3.2 Multiplexers Controlled by AVW200
3.2.1 Direct RS-232 Connection
For this example configuration, vibrating wire sensors are attached to
multiplexers, which are controlled by the AVW200. The AVW200 is
connected directly with the datalogger.
14
The following steps are used:
1. If you are not using the default multiplexer, go to the
Deployment/Measurement tab in DevConfig and select the multiplexer
you are using (Section 5.1, Connecting to DevConfig, and Section 5.2.1,
Communications). The default multiplexer for the AVW200 is the
AM16/32A.
2. Attach the multiplexers to the AVW200 as shown in FIGURE 4-4.
3. Connect the sensors to the multiplexers.
Read more! Information about connecting the vibrating wire sensors to
the multiplexer is provided in the AM16/32B manual.
4. Use the 17855 cable to attach the AVW200 to control port pairs on the
datalogger, or use the 18663 Null Modem cable to attach the AVW200 to
the RS-232 port on the datalogger.
5. Connect one end of the 19246 power cable to the 12V and G terminals on
the AVW200 and the other end to the 12V and G terminals on the
datalogger or external power supply.
Read more! You can find power and ground connection information in
Section 4.2 and datalogger connection information in Section 4.3.
6. Create a CRBasic program that includes the AVW200() instruction for
each of the multiplexers that the AVW200 will control.
Page 23
AVW200-series 2-Channel Vibrating Wire Spectrum Analyzer Modules
Cable that Comes with Sensor
CABLE4CBL-L Four Conductor Cable
19246 Power Cable
SC12 CS I/O Cable
Wireless Connection
Multiplexer
Multiplexer
Sensors
Sensors
AVW206
Power
Supply
Datalogger
RF401
Onsite
Office
NOTE
Check the manufacturer’s specification for the sensors frequency
and excitation range before picking the begin/end frequencies and
excitation voltage.
For example, the following AVW200() instructions can be used to control
two multiplexers:
AVW200(Data1(),Com1,200,200,mux1(1,1),1,1,16,450,3000,2,_60HZ,1,0)
AVW200(Data2(),Com1,200,200,mux2(1,1),2,1,16,450,3000,2,_60HZ,1,0)
Where,
AVW200 connects to datalogger control ports 1 & 2 via 17855 cable
(option Com1)
Each multiplexer has 16 sensors connected to it.
Begin Frequency = 450
End frequency = 3000
Excitation voltage = 12 V peak to peak (option 2)
Read more! A thorough description of the AVW200() instruction and its
parameters is provided in Section 6.1. Complete example programs that
control two multiplexers are included in Sections 7.2, 7.3, and 7.4.1.
3.2.2 Wireless Connection
For this example configuration, vibrating wire sensors are attached to
multiplexers, which are controlled by an AVW206. The AVW206 interface
transmits the data to an RF401 spread spectrum radio that is connected to the
datalogger.
15
Page 24

AVW200-series 2-Channel Vibrating Wire Spectrum Analyzer Modules
NOTE
NOTE
At the AVW206 site, do the following steps:
1. Use DevConfig to configure the AVW206 for RF communications
(Section 5.1, Connecting to DevConfig, and Section 5.2.1,
Communications).
2. If you are not using the default multiplexer, go to the
Deployment/Measurement tab in DevConfig and select the multiplexer
you are using (Section 5.1, Connecting to DevConfig, and Section 5.2.1,
Communications). The default multiplexer for the AVW206 is the
AM16/32A.
3. Attach the multiplexers to the AVW206 as shown in FIGURE 4-4.
4. Connect the sensors to the multiplexers.
Read more! Information about connecting the vibrating wire sensors to
the multiplexer is provided in the AM16/32B manual.
5. Connect an antenna (or antenna cable with Yagi or omnidirectional
antenna attached) to the Antenna Connector on the side of the AVW206.
Read more! Description of our antenna options is provided in Appendix C
6. Use the power cable to connect the 12V and G terminals on the AVW206
to the 12V and G terminals on the PS100 or another power supply.
At the datalogger/RF401 site, do the following steps:
1. Configure the RF401 radio so that its parameters match the AVW206.
The protocol setting for the RF401 must be PB Aware or PB Node.
2. Attach an antenna (or antenna cable with Yagi or omnidirectional antenna
attached) to the Antenna Connector on the RF401.
3. Use the SC12 serial cable to attach the datalogger’s CS I/O port to the
RF401’s CS I/O port. The datalogger’s CS I/O port applies power to the
RF401.
Read more! More information about using spread spectrum radios is
provided in the RF401/RF411/RF416 Spread Spectrum Data
Radio/Modem manual.
4. Create a CRBasic program that includes the AVW200() instruction for
each of the multiplexers that the AVW200 will control.
.
16
Check the manufacturer’s specification for the sensors frequency
and excitation range before picking the begin/end frequencies and
excitation voltage.
Page 25
AVW200-series 2-Channel Vibrating Wire Spectrum Analyzer Modules
Cable that Comes with Sensor
CABLE4CBL Cable
CABLE3CBL Cable
19246 Power Cable
AVW200
Multiplexer
Power
Supply
Datalogger
Sensors
NOTES
For example, the following AVW200() instructions can be used to control
the multiplexers:
AVW200(Data1(),ComSDC7,200,200,mux1(1,1),1,1,16,450,3000,2,_60HZ,1,0)
AVW200(Data2(),ComSDC7,200,200,mux2(1,1),2,1,16,450,3000,2,_60HZ,1,0)
Where,
RF401 = configured for SDC7
Each multiplexer has 16 sensors connected to it.
Begin Frequency = 450
End frequency = 3000
Excitation voltage = 12 V peak to peak (option 2)
Read more! A thorough description of the AVW200() instruction and its
parameters is provided in Section 6.1. A complete example program that
controls two multiplexers is included in Appendix H.1.2.
3.3 Multiplexers Controlled by Datalogger
3.3.1 SDI-12 Communication
For this example configuration, SDI-12 is used to measure the vibrating wire
sensors. The vibrating wire sensors are attached to multiplexers, which are
controlled by the datalogger.
(1) When using SDI-12, multiplexers have to be controlled by the
datalogger.
(2) SDI-12 is the only option available for our CR10X, CR23X,
and CR5000 dataloggers.
(3) SDI-12 is the only option available for non-Campbell
Scientific dataloggers.
17
Page 26

AVW200-series 2-Channel Vibrating Wire Spectrum Analyzer Modules
NOTE
The following steps are used:
1. Access DevConfig to configure the AVW200 for SDI-12 communications.
Go to the Deployment/Measurement tab in DevConfig and enter the
SDI-12 Address, multiplexer type, begin frequency, end frequency, and
excitation (see Section 5.1, Connecting to DevConfig, and Section 5.2.2,
Measurement).
2. Use a CABLE4CBL-L cable to connect the AVW200 to the multiplexers
(see FIGURE 4-5).
SDI-12 uses the CLK and RESET on the multiplexer instead of
the CLK and RESET address on the AVW200.
3. Connect the sensors to the multiplexers.
Read more! Information about connecting the vibrating wire sensors to
the multiplexer is provided in the AM16/32B manual.
4. Use a CABLE4CBL-L cable to connect the multiplexers to the datalogger
(see FIGURE 4-6).
5. Use a CABLE3CBL-L cable to connect the C1 terminal on the AVW200
6. Connect one end of the 19246 power cable to the 12V and G terminals on
Read more! You can find power and ground connection information in
Section 4.2, and datalogger connection information in Section 4.3.
7. Program the datalogger. Our CRBasic dataloggers use the SDI12Recorder
Read more! The SDI12Recorder instruction is discussed in Section 6.2
An example CRBasic program is provided in Section 7.5, and an example
Edlog program is provided in Appendix G.
4. Connections
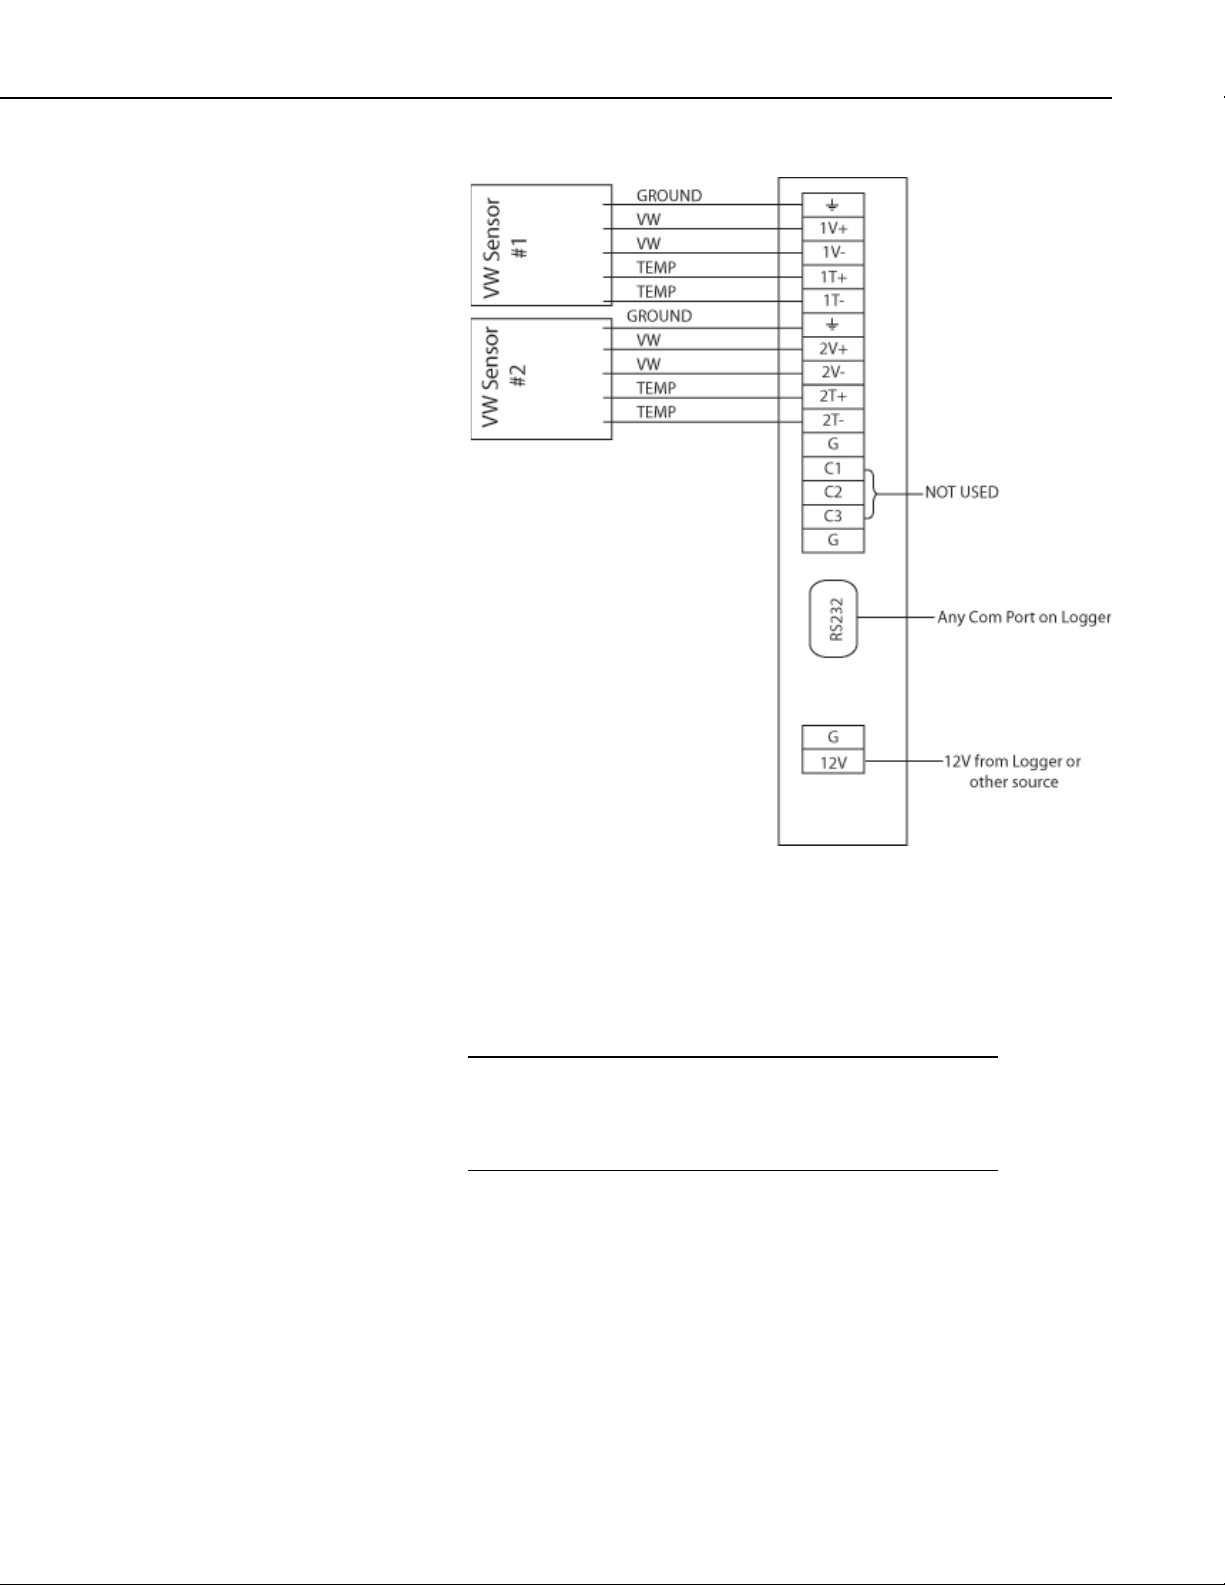
4.1 Sensor Wiring (no multiplexers)
Up to two vibrating wire sensors can be directly connected to the AVW200
(see FIGURE 4-1). Sensor cabling is sold as a part of the sensor (refer to the
sensor manual for wire colors). Cable options for connecting the AVW200 to
the datalogger are listed in TABLE 4-1.
to a control port and ground on the datalogger.
the AVW200 and the other end to the 12V and G terminals on the
datalogger or external power supply.
instruction and Edlog dataloggers (i.e., CR10X, CR23X) use Instruction
105. The SDI12Recorder instruction should only be run in the sequential
mode.
.
18
Page 27
AVW200-series 2-Channel Vibrating Wire Spectrum Analyzer Modules
NOTE
AVW200
FIGURE 4-1. Wiring for Sensor Connections
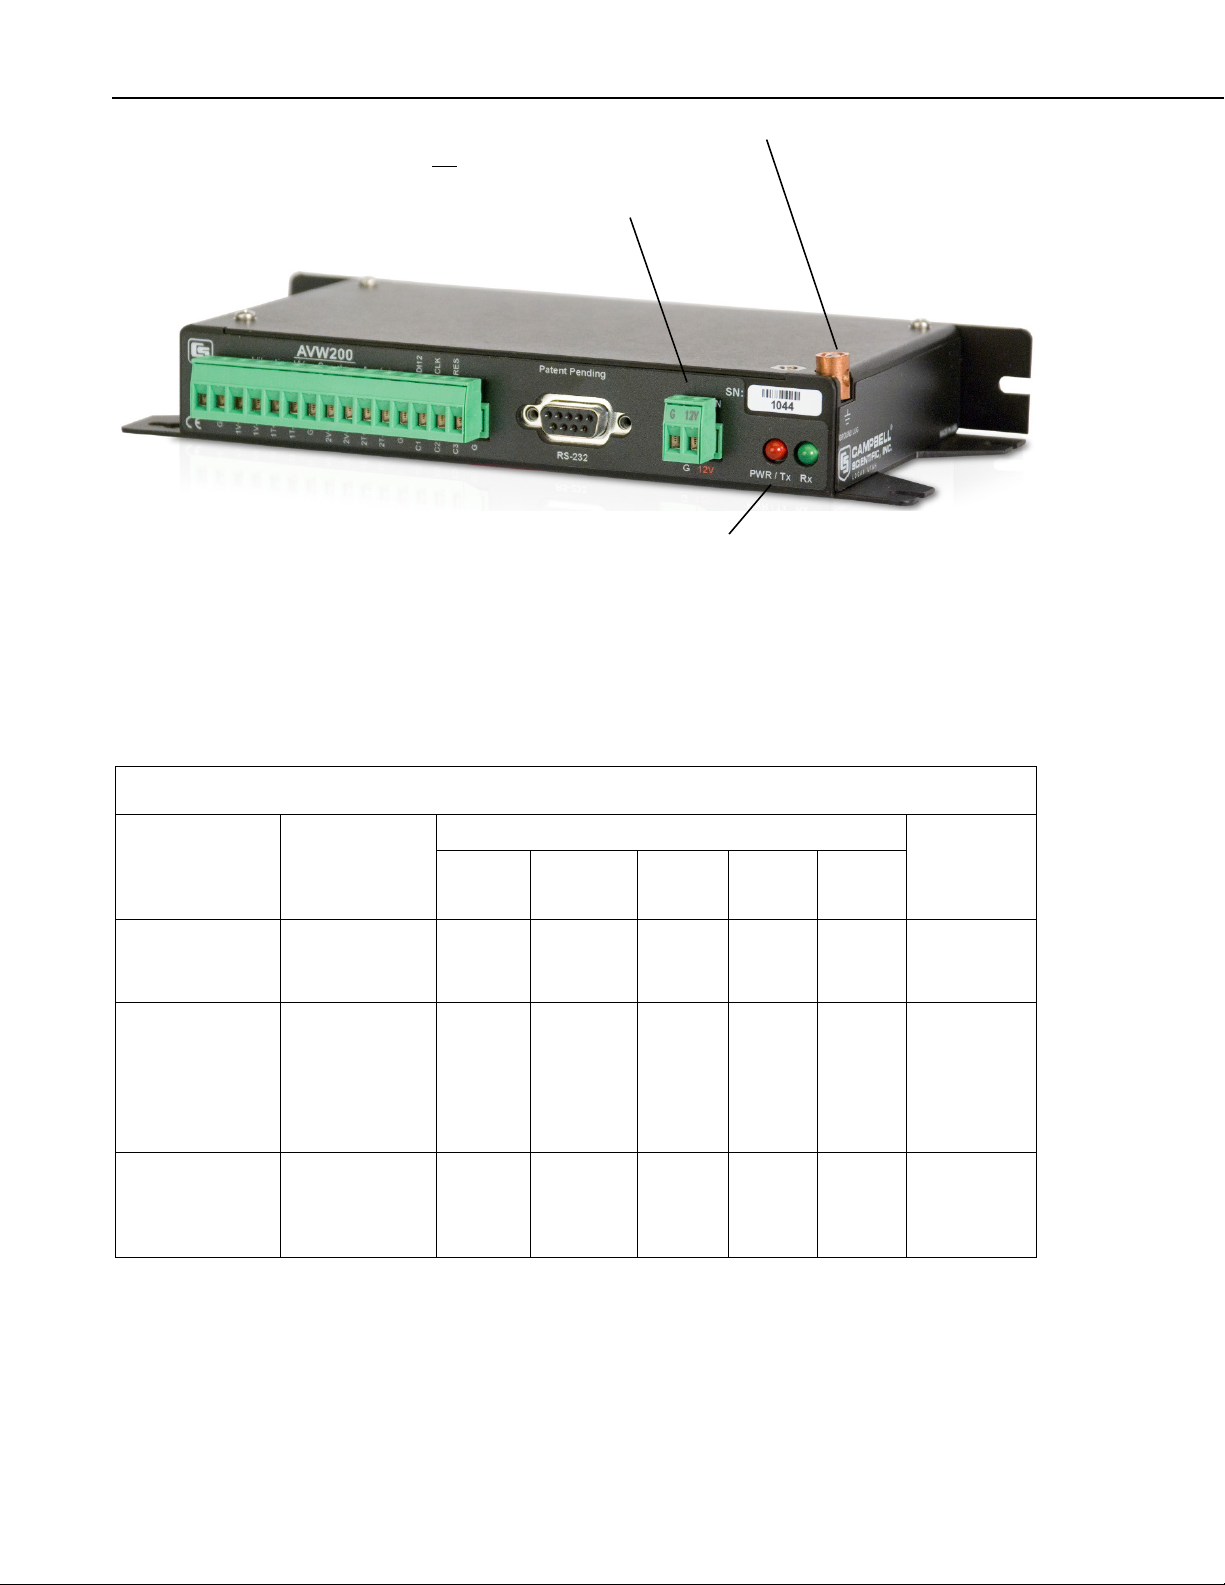
4.2 Power and Ground
Each AVW200 has a ground lug for connection to earth ground and a green
connector for attachment to a power source (see FIGURE 4-2).
Only connect the AVW200 ground lug to earth ground when the
AVW200 is not directly connected to the datalogger. When a
datalogger is in the same enclosure, only connect the datalogger’s
ground lug to earth ground.
The AVW200’s ground lug is connected to earth ground via an 8 AWG wire.
This connection should be as short as possible.
The 19246 power cable is shipped with each AVW200 for connection to a
power source. The cable terminates in pigtails that attach to the 12V and G
terminals on the AVW200 and the power source. Often the AVW200 is
powered by the datalogger, but another 12 Vdc power source may be used.
19
Page 28
AVW200-series 2-Channel Vibrating Wire Spectrum Analyzer Modules
TABLE 4-1. Datalogger to AVW200 Cable Options
Connects to a power source via
19246 power cable
Connects to earth ground via an 8 AWG wire
when
Indicates AVW200 is
connected to a power source
not directly connected to a datalogger
FIGURE 4-2. Ground Lug and Power Connectors on the AVW200
4.3 Datalogger Wiring (Direct Connection)
There are three options for connecting the AVW200 directly to the datalogger
(see TABLE 4-1); the cable is ordered as a common accessory.
Communication
Protocol Cable Used
PakBus (direct
RS-232
connection)
PakBus (direct
RS-232
connection)
SDI-12 CABLE3CBL-L
18663 Null
Modem Cable
17855 or
SC110’s DTE
Cable (pigtail to
DB9; see
TABLE 4-2)
Cable
Datalogger Port for Cable Attachment AVW200
Port for
CR800,
CR850
RS-232 RS-232 N/A N/A N/A RS-232
Control
port pair
(C1/C2
or
C3/C4)
C1 or
C3
and G
CR1000,
CR3000 CR5000 CR10X CR23X
Control
port pair
(C1/C2,
C3/C4,
C5/C6, or
C7/C8)
C1, C3,
C5,
or C7
and G
N/A N/A N/A RS-232
SDI12
and
G
C1
through
C8 and
G
C5
through
C8 and
G
Cable
Attachment
C1 and G
20
Page 29
AVW200-series 2-Channel Vibrating Wire Spectrum Analyzer Modules
TABLE 4-2. 17855 or SC110’s DTE Cable Wiring
Ground Lug
(connect to earth ground
via 8 AWG wire)
Lights up when radio is
powered; blinks when
radio is transmitting
Whip Antenna
Wire Color of 17855
or SC110’s DTE Cable CR800, CR850 CR1000, CR3000
Brown C1 or C3 C1, C3, C5, or C7
White C2 or C4 C2, C4, C6, or C8
Yellow G G
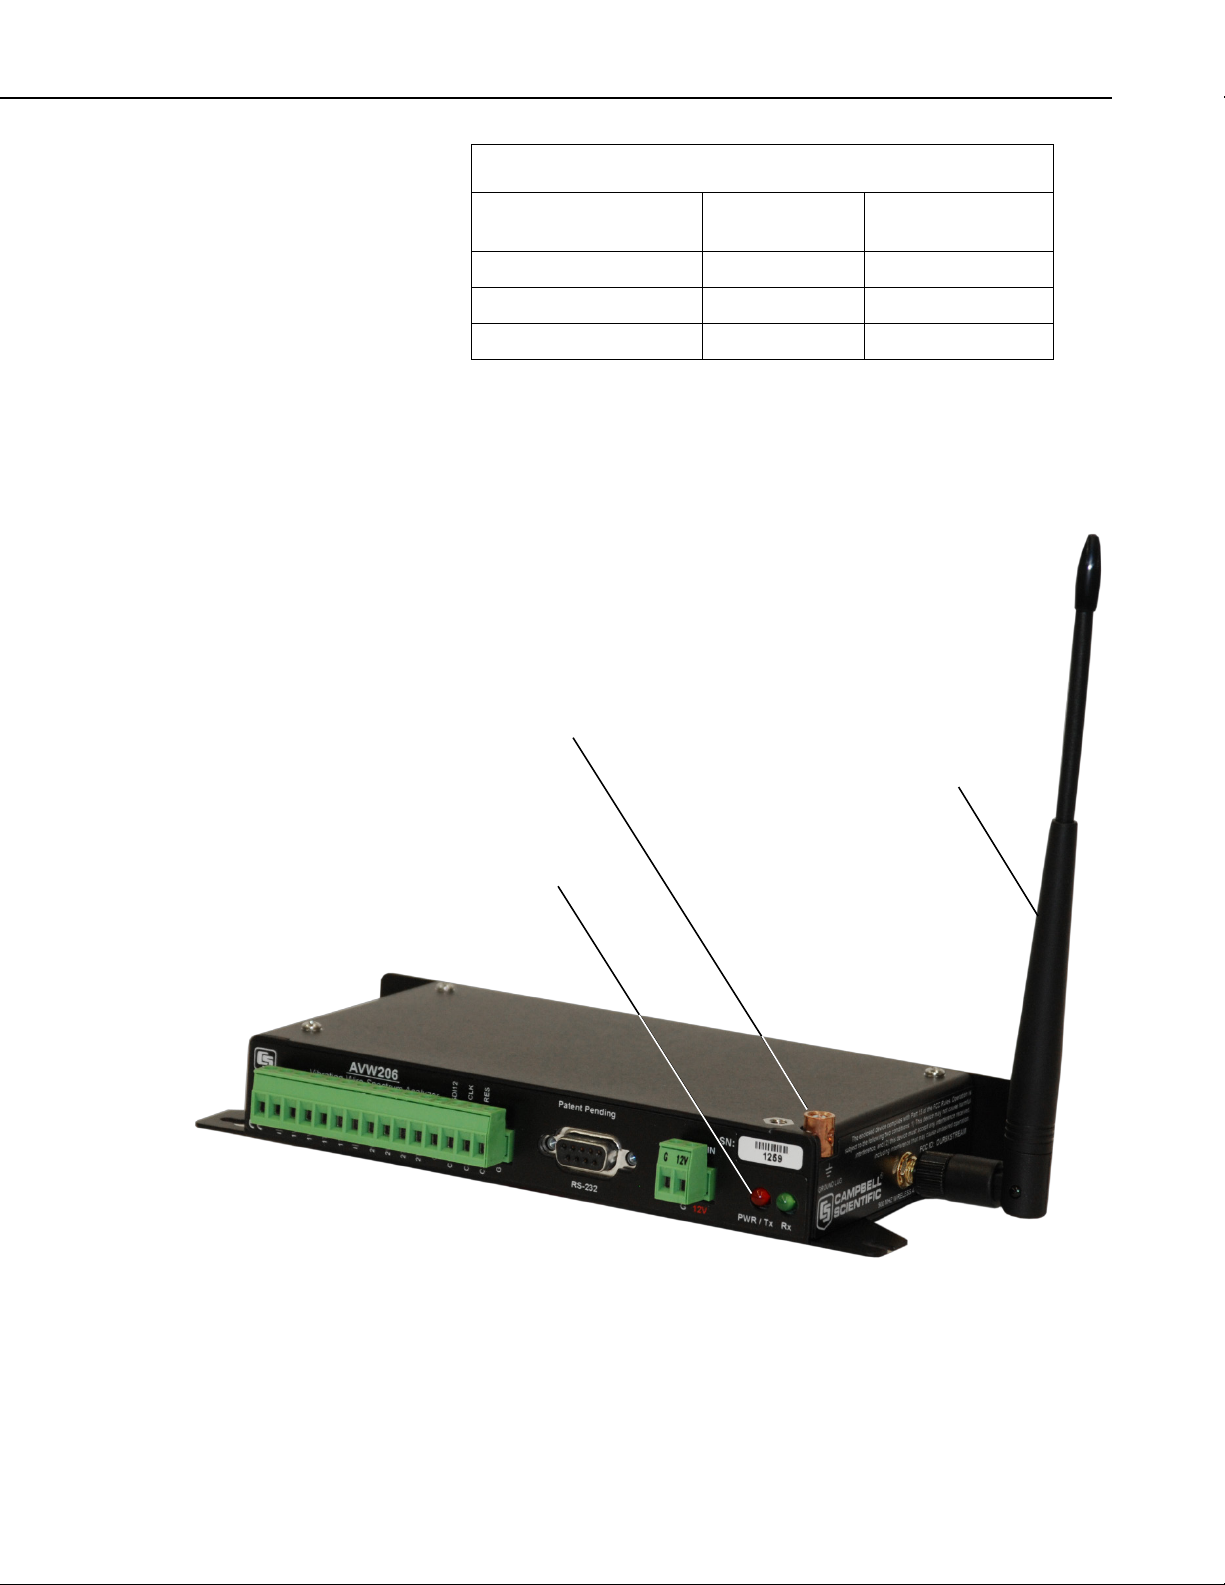
4.4 Wireless Connections (AVW206, AVW211, AVW216)
The connector on the side of the AVW206, AVW211, and AVW216 is for
attaching a whip antenna or an antenna cable (see FIGURE 4-3).
FIGURE 4-3. AVW206 with Whip Antenna
21
Page 30

AVW200-series 2-Channel Vibrating Wire Spectrum Analyzer Modules
TABLE 4-3. Datalogger to Spread Spectrum Radio Connections
NOTES
NOTE
Wireless communication requires the appropriate spread spectrum radio to be
connected to the datalogger (see TABLE 4-3). DevConfig is used to configure
the AVW206, AVW211, or AVW216 for RF communications (Section 5.1,
Connecting to DevConfig, and Section 5.2.1, Communications).
Vibrating Wire
Interface Model
AVW206 RF401 SC12 CS I/O CS I/O
AVW211 RF411 SC12 CS I/O CS I/O
AVW216 RF416 SC12 CS I/O CS I/O
Required Spread
Spectrum Radio
Model
(1) The AVW206, AVW211, and AVW216 are not compatible
with the RF450, RF400, RF410, and RF415 spread spectrum
radios.
(2) For communication between the vibrating wire interface and
spread spectrum radio to be successful, the radio’s Protocol must
be set to PakBus Aware or PakBus Node.
Read more! Description of our antenna options is provided in Appendix
C. More information about using spread spectrum radios is provided in
the RF401/RF411/RF416 Spread Spectrum Data Radio/Modem manual.
Cable used for
datalogger to
radio connection
Radio Port for
Cable Attachment
Datalogger Port
for Cable
Attachment
4.5 Multiplexer Wiring
22
Wire the sensors to the multiplexer according to the multiplexer manual. Other
multiplexer wiring depends on whether the AVW200 will control the
multiplexer or the datalogger will control the multiplexer.
4.5.1 AVW200 Controlling the Multiplexer
For most applications, it is desirable to have the AVW200 control the
multiplexer. A CABLE4CBL or MUXSIGNAL cable connects to the
multiplexer’s COM terminals, and another CABLE4CBL cable or the
MUXPOWER cable connects to the multiplexer’s CLK and RESET terminals
(see FIGURE 4-4).
When two multiplexers are connected to the AVW200, they share
the CLK and RESET lines. Because of this, while one multiplexer
is making measurements, the other multiplexer will advance its
channels but without making any measurements.
Page 31

AVW200-series 2-Channel Vibrating Wire Spectrum Analyzer Modules
FIGURE 4-4. Example AM16/32-series to AVW200 Hookup
(multiplexers controlled by AVW200)
4.5.2 Datalogger Controlling the Multiplexer
When using SDI-12, the datalogger must control the multiplexer. Use the
CABLE4CBL-L cable to connect the AVW200 to the multiplexer if the
vibrating wire sensors contain a thermistor (see FIGURE 4-5). Use the
CABLE3CBL-L or equivalent cable if the vibrating wire sensors do not
contain a thermistor. The CLK and RESET lines on the multiplexer are used
instead of the CLK and RESET lines on the AVW200.
23
Page 32

AVW200-series 2-Channel Vibrating Wire Spectrum Analyzer Modules
AVW200
CABLE
SHIELD
FIGURE 4-5. AM16/32B to AVW200 Hookup (AM16/32Bs controlled by
datalogger and using SDI-12)
A CABLE4CBL-L cable is used to connect the multiplexer to the datalogger
(see FIGURE 4-6).
CR10X,
CR800,
CR850
G G
12 V 12 V 12 V
G G G
C1-C4 C1-C8 C1-C8
C1-C4 C1-C8 C1-C8
CR3000,
CR1000
CR23X,
CR5000
FIGURE 4-6. Multiplexer to Datalogger Power/Control Hookup
(multiplexer controlled by datalogger)
24
Page 33

AVW200-series 2-Channel Vibrating Wire Spectrum Analyzer Modules
NOTES
5. Device Configuration (DevConfig) Utility
Our Device Configuration (DevConfig) utility is bundled in Campbell
Scientific’s datalogger support software and can also be acquired, at no cost,
from: www.campbellsci.com/downloads. DevConfig 1.10 or greater is
required.
DevConfig supports AVW200 configuration, real-time data display, operating
system download, and vibrating wire spectrum analysis troubleshoot. You will
need to configure the AVW200 if you are using RF (PakBus), SDI-12, and RS232 (Terminal Commands). To use DevConfig, the AVW200 must be
connected to a PC and a power source.
(1) The default settings for the AVW200 may be used for many
applications.
(2) DevConfig has built-in help for each setting, which is
displayed at the bottom of the window.
5.1 Connecting to DevConfig
To connect to DevConfig, follow the procedure listed below:
1. Use the 19246 Power Cable (shipped with the AVW200) to connect the
AVW200 to the datalogger's 12 V supply or a regulated external power
source. When connecting the power leads, the ground lead should be
connected first and then the 12 V lead.
2. Connect the AVW200 to a COM port on your computer using the 10873
RS-232 cable (shipped with the AVW200).
3. Open DevConfig.
4. Under Device Type, click AVW200 Series (see FIGURE 5-1).
25
Page 34

AVW200-series 2-Channel Vibrating Wire Spectrum Analyzer Modules
FIGURE 5-1. Opening Page in DevConfig
5. Select the Serial Port matching the COM port on your computer in which
the AVW200 is connected.
6. Press the Connect button. The device may take up to 60 seconds to
respond to DevConfig, and for the current settings to be loaded into the
Settings Editor.
5.2 Deployment Tab
5.2.1 Communications
The Deployment Communications Editor is the active tab when you are first
connected (see FIGURE 5-2). These settings are used for RF communications.
26
Page 35

AVW200-series 2-Channel Vibrating Wire Spectrum Analyzer Modules
NOTE
FIGURE 5-2. Deployment Communications Editor in DevConfig
Certain AVW206 settings must match the RF401 settings for
communications between the interface and radio to be successful.
Description of the Communication Settings follows:
Protocol—choose "PakBus" for the “Protocol” setting. Please note that the
“Protocol” setting for the RF401-series radio must be set to either “PakBus
Aware” or “PakBus Node” for communications to be successful.
PakBus Address—enter a PakBus Address that matches the PakBus address
specified in the CRBasic program that will control the AVW200. Each device
in a PakBus network must have a unique address. Valid settings are 1 - 4094.
RS-232 Baud Rate—enter the baud rate in which you want to communicate.
Hop Sequence—enter the radio ”Hop Sequence” that matches all of the RF401
radios and other AVW206 Interfaces in the network. Valid entries are 0-6.
27
Page 36

AVW200-series 2-Channel Vibrating Wire Spectrum Analyzer Modules
TABLE 5-1. AVW206 Power Modes and the Recommended
Net Address—enter the radio network address that matches all of the RF401
radios and other AVW206 in the network. Valid entries are 0-3
Power Mode—If not using a radio, select “Radio Off” for the Power Mode.
Otherwise, select a power mode that works with the RF401’s power mode (see
Table TABLE 5-1).
Corresponding RF401 Power Modes.
AVW206 Power Mode Recommended RF401 Power Mode
<24 ma Always On <24ma Always On - No header
<4 ma 1/2 Second <24ma Always On - No header
<2 ma 1 Second <24 ma Always On - 1 Sec Header
<0.4 ma 8 Second <24ma Always On - 8 Sec Header
Retry Level—select the desired Retry Level (None, Low, Medium or High)
according to the level of RF ‘collisions’ you expect. This depends on how
many neighboring spread spectrum radios are in and out of your network and
the frequency of transmissions. (For most applications, select Low for the
Retry Level.)
Once the settings have been defined, press Apply to save the changes to the
AVW200.
28
Page 37

5.2.2 Measurement
NOTE
The Deployment/Measurement Tab is used to configure the SDI-12 Address,
multiplexer type, begin frequency, end frequency, and excitation (see FIGURE
5-3).
AVW200-series 2-Channel Vibrating Wire Spectrum Analyzer Modules
FIGURE 5-3. Deployment/Measurement Tab in DevConfig
The Begin Frequency, End Frequency, and excitation parameters
in DevConfig are only used for the RS-232 (terminal commands)
and SDI-12 communication modes. When using the RS-232
(PakBus) or RF (PakBus) communication modes, the settings for
the Begin Frequency, End Frequency, and excitation parameters
are entered in the AVW200() CRBasic instruction (see Section
Programming).
Description of the Measurement Settings follows:
SDI-12 Address—select an address if using SDI-12. Otherwise use the default
value of 0.
6,
29
Page 38

AVW200-series 2-Channel Vibrating Wire Spectrum Analyzer Modules
Multiplexer Type—choose the appropriate multiplexer. The default
multiplexer type is the AM16/32B.
Begin Frequency—if using RS-232 (terminal commands) or SDI-12, enter the
sensor manufacturer’s recommendation for the begin frequency.
End Frequency—if using RS-232 (terminal commands) or SDI-12, enter the
sensor manufacturer’s recommendation for the end frequency.
Excitation—if using RS-232 (terminal commands) or SDI-12, choose either
“5 Volts Peak-Peak” or “12 Volts Peak-Peak” excitation. Use the sensor
manufacturer’s recommendation for the excitation.
Once the settings have been defined, press Apply to save the changes to the
AVW200.
5.3 Data Monitor
The Data Monitor tab in DevConfig can display either the Public Table or
Status Table. The public table displays the current sensor measurement values
as well as the current settings (see FIGURE 5-4).
30
FIGURE 5-4. Data Display/Public Table in DevConfig
Page 39

AVW200-series 2-Channel Vibrating Wire Spectrum Analyzer Modules
Read more! Appendix D lists the fields in the public table and provides a
brief description of each.
The status table contains system operating status information accessible (see
FIGURE 5-5).
Note: DevConfig polls the status table at regular intervals, and then updates the
status information.
FIGURE 5-5. Data Display/Status Table in DevConfig
Read more! Appendix E
variables with brief descriptions.
provides a comprehensive list of status table
31
Page 40

AVW200-series 2-Channel Vibrating Wire Spectrum Analyzer Modules
5.4 Send OS
For most applications, Campbell Scientific does not anticipate that it will be
necessary to download a new operating system to the AVW200. However, if a
new operating system (OS) is required, in order to send a new OS to the
AVW200 you will need Device Configurator (DevConfig) 1.10 or greater.
First connect the RS-232 port of the AVW200 to a serial port on your computer
using a 9-pin serial cable and follow the steps below.
1. Remove power from the AVW200.
2. Open DevConfig.
3. Highlight the AVW200 in the list of devices which appears in the left-hand
portion of the window.
4. Select the COM port to which the AVW200 is connected from the drop
down list box at the bottom left of the window.
5. Click the Send OS tab and follow the directions on the screen (Fig. 5.4-1).
32
FIGURE 5-6. Sending an Operating System using DevConfig
Page 41

AVW200-series 2-Channel Vibrating Wire Spectrum Analyzer Modules
5.5 Troubleshoot
The Troubleshoot tool in DevConfig can be used to evaluate the frequency
spectrum of a sensor and to determine the most appropriate beginning and
ending frequencies for a sensor.
To access the Troubleshoot Tool, use the steps listed below:
1. Follow the connection procedure provided in Section 5.1, Connecting to
2. Click the Troubleshoot tab at the top of the DevConfig opening window
DevConfig.
(FIGURE 5-7).
FIGURE 5-7. Opening Page of the Troubleshoot Tool
3. Click the Options tab at the bottom of the Troubleshoot screen to set the
begin and end frequencies and the excitation voltage you wish to test for a
given sensor (FIGURE 5-8). You may also choose to poll (default) or not
to poll the time series data from this Options window by checking or
unchecking the poll time series box.
33
Page 42

AVW200-series 2-Channel Vibrating Wire Spectrum Analyzer Modules
FIGURE 5-8. Options Tab of the Troubleshoot Tool
4. Select the AVW200 channel either 1 or 2 and the multiplexer channel that
the sensor is attached. If not using a multiplexer, then set the multiplexer
channel to one.
5. Once the appropriate settings have been specified, click OK on the Options
window and click the Poll tab at the bottom of the Troubleshoot window.
The results of the Poll will be displayed on a Spectrum graph and a Time
Series graph (see FIGURE 5-9).
34
Page 43

AVW200-series 2-Channel Vibrating Wire Spectrum Analyzer Modules
NOTE
Response
Amplitude
Noise Amplitude
Resonant Frequency
Noise Frequency
Beginning Amplitude
Ending Amplitude
FIGURE 5-9. Graphs for Evaluating Spectral Analysis of a Sensor
Check the manufacturer’s specification for the sensors frequency
and excitation range before picking the begin/end frequencies and
excitation voltage.
In FIGURE 5-9, the bottom graph shows the raw time series data recorded
from a vibrating wire sensor after the sensor has been excited with the
frequency swept voltage signal and the top graph shows the spectrum after the
AVW200 has applied the FFT. In addition to the wire’s resonant frequency,
the spectrum shows the response amplitude, noise amplitude, and noise
frequency. The AVW200 computes the signal-to-noise ratio diagnostic by
dividing the response amplitude by the noise amplitude. The AVW200
computes the decay ratio diagnostic from the time-series ending amplitude
divided by the beginning amplitude.
Read more! More comprehensive information about the Spectrum and
Time-Series graphs are provided in Appendix F.
6. The results of the poll may be saved by clicking the Save Last Results tab
at the bottom of the window.
35
Page 44

AVW200-series 2-Channel Vibrating Wire Spectrum Analyzer Modules
TABLE 5-2. Terminal Mode Commands
NOTE
5.6 Settings Editor
The Settings Editor in DevConfig can also be used to enter the Deployment
parameters (see FIGURE 5-2). Refer to Section 5.2, Deployment Tab, and
Section 5.3, Data Monitor, for a description of the setting parameters.
5.7 Terminal
You can monitor the AVW200 with terminal commands via the terminal
emulator in DevConfig or LoggerNet. You can also use a terminal emulator,
such as HyperTerminal or ProComm.
To enter terminal commands, first connect the RS-232 port of the AVW200 to
a serial port on your computer using the 10873 RS-232 cable (shipped with the
AVW200). After specifying the appropriate COM port (port to which the
AVW is attached) and communication baud rate (AVW baud rate = 38400),
press Carriage Return (CR) four times or until the AVW200> is returned. A
description of the available terminal commands and the values returned for
each command are listed in the TABLE 5-2.
Command Description Return Values
1 Make VW measurement
on channel 1
2 Make VW measurement
on channel 2
3 Company, Model Info. Company, mode, and PakCode
4 Status Table Status table
5 Public Table Public table
S or s Set the Date/Time Set the date and time
G or g Get the Date/time Get the date and time
Mcmm Make VW measurement
on channel (c) and mux
channel (mm)
H or h Help menu Returns list of commands
6 values (frequency, amplitude,
signal to noise ratio, noise
frequency, decay ratio, thermistor
resistance)
6 values (frequency, amplitude,
signal to noise ratio, noise
frequency, decay ratio, thermistor
resistance)
information
6 values (frequency, amplitude,
signal to noise ratio, noise
frequency, decay ratio, thermistor
resistance)
The Mcmm terminal command was added to OS version STD.02.
Customers with OS version STD.01 can get this terminal
command by downloading a new OS (refer to Section
OS).
36
5.4, Send
Page 45

AVW200-series 2-Channel Vibrating Wire Spectrum Analyzer Modules
CAUTION
NOTE
NOTE
When using the “Mcmm” terminal command, no other
method of measurement should be used or multiplexing will
get out of sequence and measurement errors will result.
Read more! Appendix D lists the fields in the public table and provides a
brief description of each. Appendix E provides a comprehensive list of
status table variables with brief descriptions.
6. Programming
6.1 AVW200 Instruction
If using SDI-12 to communicate with the AVW200, then use the
SDI12Recorder instruction to trigger and retrieve measurements
from the AVW200 (see Section
When using the RS-232 (PakBus) or RF(PakBus) protocol, the datalogger is
programmed using the AVW200 instruction in CRBasic.
6.2, SDI-12 Measurements.)
Please ensure that the AVW200 instruction is included in
LoggerNet. If using LoggerNet 3.4.1 or lower, the user needs to
download the most recent version of the operating system (OS) for
the datalogger. This installation installs the required CRBasic
files on the user’s computer so that the AVW200 instruction
shows up in the editor.
The AVW200 instruction is used to read measurements from one or more
vibrating wire sensors when the sensors are connected to the AVW200
channels directly or connected to a multiplexer that’s attached to the AVW200.
In addition to frequency, diagnostic information is returned for the sensor (see
the Dest parameter).
The datalogger program can run the AVW200 instruction in either the pipeline
mode (Section 6.1.1, Pipeline Mode) or sequential mode (Section 6.1.2,
Sequential Mode). In the pipeline mode, the first execution of the instruction
sets up the AVW200; subsequent execution intervals retrieve the data values. If
different beginning and ending frequencies are required to measure different
types of sensors, use multiple AVW200 instructions with different beginning
and ending frequencies specified in each instruction. The sequential mode
performs each instruction in sequence; waits for each instruction completion;
and then repeats this process for each execution interval. The minimum scan
rate for an AVW200 program is 2 seconds per sensor.
Syntax
AVW200 (Result, ComPort, NeighborAddr, PakBusAddr, Dest, AVWChan,
MuxChan, Reps, BeginFreq, EndFreq, ExVolt, Therm50_60Hz, Multiplier,
Offset, [Optional] AmpThreshold)
Result The Result parameter is a variable that indicates the success
or failure of the datalogger's communication attempt with
the AVW200. If more than one AVW200 is used and the
37
Page 46

AVW200-series 2-Channel Vibrating Wire Spectrum Analyzer Modules
instructions are ran in a sequential mode, a different result
variable should be specified for each AVW200 (see 6.1.2).
The result codes are as follows:
Code Description
0 Communication successful. Values have been
written to the destination array.
>1 Number of communication failures. NAN values
will be stored in the destination array. Resets to 0
upon successful communication.
-3 First communication. Values will be available on
the next scan.
ComPort The ComPort parameter is used to specify the
communications port that will be used to communicate with
the AVW200. Enter a numeric or alphanumeric code:
Alphanumeric Description
ComRS232 AVW200 connects to datalogger’s RS-232
port via 18663 cable
ComME RF401 connects to datalogger's CS I/O
port; RF401 configured as modem enabled
ComSDC7 RF401 connects to datalogger's CS I/O
port; RF401 configured as SDC7
ComSDC8 RF401 connects to datalogger's CS I/O
port; RF401 configured as SDC8
ComSDC10 RF401 connects to datalogger's CS I/O
port; RF401 configured as SDC10
ComSDC11 RF401 connects to datalogger's CS I/O
port; RF401 configured as SDC 11
Com1 AVW200 connects to datalogger's control
ports 1 & 2 via 17855 cable
Com2 AVW200 connects to datalogger's control
ports 3 & 4 via 17855 cable
Com3 AVW200 connects to datalogger's control
ports 5 & 6 via 17855 cable
Com4 AVW200 connects to datalogger's control
ports 7 & 8 via 17855 cable
38
NeighborAddr The NeighborAddr is used to specify a static route to the
AVW200 (e.g., the PakBus address of a "neighbor" device
that the host can go through to communicate with the
AVW200). If 0 is entered, the AVW200 is assumed to be a
neighbor (i.e., the host datalogger can communicate with the
AVW200 directly).
PakBusAddr The PakBusAddr parameter identifies the PakBus address of
the AVW200 with which the host datalogger is trying to
communicate. Valid entries are 1 through 4094. Each
PakBus device in the network must have a unique address.
Dest The Dest parameter is the variable array in which to store the
results of the instruction. Dest is a single-dimensioned array
of 5 or 6 (depending upon whether a thermistor is being
measured) if only one sensor is being measured. Dest is a
multi-dimensioned array of 5 or 6 if multiple sensors are
Page 47

AVW200-series 2-Channel Vibrating Wire Spectrum Analyzer Modules
NOTE
being measured using a multiplexer. The first dimension is
set equal to the number of sensors being measured and the
second dimension is set equal to the number of values
returned for each sensor (5 or 6). For example, to measure 4
sensors with thermistor measurements attached to a
multiplexer, Dest would be declared as Array(4,6). Values
for sensor 1 would be stored in Array(1,1) through
Array(1,6), values for sensor 2 stored in Array (2,1) through
(2,6), etc.
The values returned for each sensor are:
(1) Frequency in Hertz
(2) Amplitude in mV RMS
(3) Signal-to-noise ratio
(4) Noise frequency
(5) Decay ratio
(6) Thermistor in ohms (if measured)
The units and description of these values are provided in
TABLE 2-2.
If communication is unsuccessful, NANs are stored.
When using the CRBasic AVW200 instruction, the signal strength
Amplitude in mV rms ( Dest(2) ) has a minimum resolution of
0.0625 (62.5 microvolts). This means that values between 0.01
and 0.06249 mV (10 and 62.49 microvolts) will be given as 0.
Values between 0.0625 and 0.1249 will be given as 0.0625.
Values between 0.125 and 0.18749 will be given as 0.125, and so
forth. With firmware Std.04 and higher, values less than 0.01 will
be shown as NAN, otherwise as 0.
To see amplitudes with higher resolution, use SDI-12
(Section 3.3.1, SDI-12 Communication), Terminal mode
(Section 5.7, Terminal), or the "Troubleshoot" tab in
DevConfig (Section 5.5, Troubleshoot) to examine signal
strength amplitude values.
AVWChan The AVWChan is the channel on the AVW200 where the
sensor or multiplexer is wired. Valid options are 1 (1V+/-) or
2 (2V+/-).
MuxChan The MuxChan is the channel on the multiplexer where
measurements should start. Valid options are 1 through 32;
anything outside of this range returns an error. Enter 1 if a
multiplexer is not used.
Reps The Reps parameter is the number of measurements to be
made on the multiplexer. This parameter does not affect the
AVW200Chan.
39
Page 48

AVW200-series 2-Channel Vibrating Wire Spectrum Analyzer Modules
BeginFreq The BeginFreq parameter is the starting frequency to use for
the vibrating wire measurement. The minimum value that
can be entered is 100. Refer to the specifications of the
vibrating wire sensor for recommended BeginFreq values.
EndFreq The EndFreq parameter is the ending frequency to use for
the vibrating wire measurement. The maximum value that
can be entered is 6500 (typical sweep range is 450 to 6000).
Refer to the specifications of the vibrating wire sensor for
recommended EndFreq values.
ExVolt The ExVolt parameter is the excitation voltage to be used to
excite the vibrating wire. Valid options are 1 (5 V peak-topeak) or 2 (12 V peak-to-peak).
Therm50_60Hz TheTherm50_60Hz parameter is used to set the integration
time for the thermistor in the vibrating wire sensor.
Code Description
0 No thermistor measurement (5 values returned in
Dest)
_60Hz Use 60 Hz noise rejection (6 values returned in
Dest)
_50Hz Use 50 Hz noise rejection (6 values returned in
Dest)
Multiplier The Multiplier parameter is the multiplier to be used for the
frequency measurements.
Offset The Offset parameter is the offset to be used for the
frequency measurements.
AmpThreshold (for Datalogger OS versions 23 and higher) The
AmpThreshold parameter is an optional parameter that is
used to define a minimum value, in millivolts, for the
amplitude of the signal. If an amplitude less than the
threshold is measured, NAN (not-a-number) will be stored
for the Frequency measurement. If AmpThreshold is
omitted, a default value of 0.01 mV is used. If a value of
less than 0.01 mV is entered for this parameter, the
precompiler will return an error.
Note that the Signal Strength Amplitude ( Dest(2) ) returned
by the AVW200 CRBasic instruction is limited in its
resolution. See the Note for the "Dest" parameter earlier in
this section for more information. To avoid unexpected
results, use a value that is an integer multiple of 0.0625 for
the AmpThreshold parameter.
40
Page 49

6.1.1 Pipeline Mode
NOTE
When the CRBasic program first starts running, the information specified in
the AVW200( ) instruction is sent to the attached AVW200 interface module
via the communication port and PakBus address specified in the instruction.
Along with the instruction's parameter information, the datalogger also sends
its clock information. For every execution interval, the datalogger clock and
measured data are exchanged with the attached AVW200 interface module.
The AVW200 interface module then determines how much time previous to
the datalogger’s interval it should start making the vibrating wire measurement,
so that it completes the measurement series before the datalogger's execution
interval.
A returned “Result” value (the first parameter in the AVW200( ) instruction) of
zero indicates successful communication and tells us that the data values have
been stored in the destination variable. If there is a failure in communication,
the “Result” value increments for each failure and the destination values are
filled with NAN's. The datalogger will retry communications three times
before returning a failed communication or incrementing the result (retries are
every 3 seconds or greater depending on the radio-power-cycle configuration).
A negative value returned for the “Result” variable indicates status information
(e.g., a -3 indicates the AVW200 has not made the first measurement; -4
indicates that no parameter information is available). Multiple AVW200()
instructions can use the same “Result” variable. There is no reason to have
different “Result” variables for a given communication port in the pipeline
mode.
AVW200-series 2-Channel Vibrating Wire Spectrum Analyzer Modules
In the Pipeline mode of operation the AVW200( ) instruction
cannot be in a conditional statement or in a subroutine.
Read more! An example program of the pipeline mode is provided in
Section 7.3.
6.1.2 Sequential Mode
In sequential mode, during each execution interval, the CRBasic program
executes each instruction in sequence (i.e., the first AVW200( ) instruction is
executed through to completion, followed by the second instruction…). The
first AVW200( ) instruction will communicate with the attached AVW200
interface module and tell the AVW200 to make the measurements. The
datalogger will then wait at the AVW200( ) instruction until all of the
measurements are returned for that first instruction, or until the instruction
times out (time out is two times the number of reps). If an instruction times
out, it will make three additional attempts before advancing to the next
instruction. The next AVW200 instruction is then executed.
The result codes returned via sequential mode function the same as they do in
the pipeline mode. However, in sequential mode, it is a good idea to have
different result code variables for each AVW200( ) instruction. This is because
if communication was disconnected between two AVW200( ) instructions, then
data collected via the first instruction would correctly be stored into destination
variables for that instruction. But, because of the break in communication, the
destination variables for the second instruction would be filled with NANs and
the result code would increment (indicating a failed communication). With
different result variables for each AVW200( ) instruction, this situation can be
41
Page 50

AVW200-series 2-Channel Vibrating Wire Spectrum Analyzer Modules
NOTES
detected. Therefore, the result variable for the first instruction would be zero
(indicating successful communication) and the result variable for the second
instruction would increment (indicating a failed communication). In the
pipeline mode this situation does not exist, so the result code variables can be
the same for multiple AVW200( ) instructions on a given communication port.
(1) When running in the sequential mode, programs that contain
multiple AVW200 instructions using the same COM port should
have different “Result” variables for each AVW200 instruction
(e.g. “Result1” and “Result2”) in order to detect and isolate any
communications errors for a given AVW200.
(2) If the AVW200( ) instruction is in a slowsequence, the mode
of operation is always forced to sequential mode.
Read more! Example programs of the sequential mode are provided in
Section 7.4.
6.2 SDI-12 Measurements
For our CR5000, CR10X, and CR23X dataloggers, an SDI-12 instruction must
be used to trigger and retrieve measurements from the AVW200. Our CRBasic
dataloggers (e.g., CR5000, CR1000, CR3000) use the SDI12Recorder
instruction, and Edlog dataloggers (i.e., CR10X, CR23X) use Instruction 105.
The SDI12Recorder instruction should only be run in the sequential mode.
When using SDI-12, multiplexers must be controlled by the datalogger.
Appendix G, CR10X Programming Example, describes Instruction 105 and
provides a CR10X program example.
6.2.1 SDI12 Recorder() Instruction
The values returned from the SDI12Recorder( ) instruction are different
depending on the SDI12 measurement command issued. The SDI12Recorder
instruction sends the command specified by the SDI12Command parameter as
(address)SDI12Command!. The AVW200 always returns six values.
Sytnax
SDI12Recorder ( Dest, SDIPort, SDIAddress, "SDICommand", Multiplier,
Offset )
The SDI12Recorder instruction has the following parameters:
Dest The Dest parameter is a variable in which to store the results
of the measurement. Dest must have enough elements to
store all the data that is returned by the SDI-12 sensor or a
'variable out of range' error will result during the execution
of the instruction.
42
Page 51

AVW200-series 2-Channel Vibrating Wire Spectrum Analyzer Modules
TABLE 6-1. SDI-12 Command Codes
SDIPort The SDIPort parameter is the port to which the SDI-12
sensor is connected. A numeric value is entered:
Code Description
1 Control Port 1
3 Control Port 3
5 Control Port 5
7 Control Port 7
SDIAddress The SDIAddress parameter is the address of the SDI12
sensor that will be affected by this instruction. Valid
addressses are 0 through 9, A through Z, and a through z.
Alphabetical characters should be enclosed in quotes (e.g.,
"0").
SDICommand The SDICommand parameter is used to specify the
command strings that will be sent to the sensor. The
command should be enclosed in quotes. TABLE 6-1 shows
the specific SDI-12 Command Codes and their returned
values.
SDI12 Measurement Command Returned Values
aM!
(Measures both AVW200 Channel 1 and
Channel 2)
1) Chan1 Frequency
2) Chan1 Therm Resistance
3) Chan1 Signal Amplitude mV
RMS
4) Chan2 Frequency
5) Chan2 Therm Resistance
6) Chan2 Signal Amplitude mV
RMS
aM1!
(Measures AVW200 Channel 1; either
this command or the following command
is used for non-Campbell Scientific
dataloggers)
1) Chan1 Frequency
2) Chan1 Signal Amplitude mV
RMS
3) Chan1 Signal-to-Noise Ratio
4) Chan1 Noise Frequency
5) Chan1 Decay Ratio
6) Chan1 Therm Resistance
aM2!
(Measures AVW200 Chan2)
1) Chan2 Frequency
2) Chan2 Signal Amplitude mV
RMS
3) Chan2 Signal-to-Noise Ratio
4) Chan2 Noise Frequency
5) Chan2 Decay Ratio
6) Chan2 Therm Resistance
aV! 1) Battery Voltage
2) Trapcodes
3) WatchDog Counts
aXVWbbbb,eeee,v!
where:
bbbb = Begin Freq (100 < bbbb < 6.5K)
eeee = End Freq (100 < eeee < 6.5K)
v = Excite Voltage (1= 5v and 2 = 12v)
Returns "OK" if accepted
Returns "ERROR" if not accepted
43
Page 52

AVW200-series 2-Channel Vibrating Wire Spectrum Analyzer Modules
If a check summed command fails, a NAN will be returned and the command
will be retried.
Mult, Offset The Mult and Offset parameters are each a constant,
variable, array, or expression by which to scale the results of
the measurement.
6.2.2 Extended SDI-12 Commands
Extended SDI-12 commands can be used to change the beginning frequency,
ending frequency, and excitation voltage of the vibrating wire sensors attached
to the AVW200. However, these extended SDI-12 commands only work for
the next measurement command. By default, standard SDI-12 measurement
commands use the begin/end/excite voltage settings specified in the AVW200
settings using DevConfig (see Section 4, Connections). However, after issuing
an extended SDI-12 command, the next measurement will use the bbbb,eeee
and vvvv values specified in the extended command.
An example of an extended command is: 0XVW450,5000,1! This command
configures the next measurement with Begin Freq=450, End Freq = 5000 and
5Volt excitation. For example, an “aM!” command that immediately follows
an extended command will use the settings specified in the extended command.
The second and remaining measurements will revert back to the settings
specified via DevConfig.
The SDI-12 aI! command is used to obtain information about a specific sensor.
When executed against the AVW200-series device, the following information
is returned:
1. The SDI-12 address of the device (1 character)
2. The SDI-12 implementation version (2 characters, "13" is interpreted as 1.3)
3. The Vendor ID "Campbell" (8 Characters)
4. The Sensor Model "AVW2xx" (6 characters)
5. Sensor Version "000" (3 characters)
6. The Serial Number (up to 13 characters), which is the version of the
currently loaded firmware followed by an equals sign and the device's serial
number (“Std.04=875321")
6.2.3 Use with Multiplexers
The AVW200 interface module cannot control multiplexers in the SDI-12
communication mode. Hence, when communicating with the AVW200 via
SDI-12, multiplexers attached to the AVW200 must be controlled by the
datalogger. This is achieved by using PortSet instructions in the datalogger
program and by connecting the clock and reset lines of the multilplexers to
control ports on the datalogger. When using SDI-12 with the AVW200, the
clock and reset lines on the AVW200 are not used.
44
Read more! Example programs of SDI-12 are provided in Section 7.5.
Page 53

AVW200-series 2-Channel Vibrating Wire Spectrum Analyzer Modules
TABLE 7-1. Wiring for Example 7.1.1
7. Example Programs
This section includes several program examples for our CR1000 datalogger.
Although the examples are for the CR1000, programming for the CR800 and
CR3000 is similar. Appendix G, CR10X Programming Example, has a
programming example for the retired CR10X. More complex programming
examples are provided in Appendix H, Additional Programming Examples.
7.1 AVW200() Instruction (no multiplexers)
7.1.1 Direct RS-232 Connection (two sensors)
TABLE 7-1 shows wiring used for this example.
Datalogger Port for
Cable Attachment
COM1 (control port
pairs C1/C2)
'CR1000 Series Datalogger
'This program measures 2 sensors on the AVW200, 1 on channel 1 and 1 on ‘channel 2
Public PTemp, batt_volt
Public Dst(2,6)
Public result
DataTable (AVW200,1,-1) 'stores data from both sensors into a table named AVW200
DataInterval (0,10,Sec,10)
Sample (6,Dst(1,1),IEEE4)
Sample (6,Dst(2,1),IEEE4)
EndTable
'The CardOut instruction is used to create a new DataTable that will be saved on a compact flash card.
DataTable (AVWcard,1,-1)
CardOut (0 ,-1)
DataInterval (0,10,Sec,10)
Sample (6,Dst(1,1),IEEE4)
Sample (6,Dst(2,1),IEEE4)
EndTable
BeginProg
SerialOpen (Com1,38400,0,0,0)
Scan (10,Sec,0,0)
PanelTemp (PTemp,250)
Battery (Batt_volt)
'Result,comport,neighbor,PBA,Dst,chan,muxchan,reps,begFreq,endFreq,Vx,
'IntegrationTime,Mult,Offset
'sensor 1, channel 1
AVW200(Result,Com1,200,200,Dst(1,1),1,1,1,1000,3500,2,_60HZ,1,0)
'sensor 2, channel 2
AVW200(Result,Com1,200,200,Dst(2,1),2,1,1,1000,3500,2,_60HZ,1,0)
Cable Needed to
connect to AVW200
17855 Cable (pigtail to
DB9 male cable)
AVW200 Port or
Model
RS-232
45
Page 54

AVW200-series 2-Channel Vibrating Wire Spectrum Analyzer Modules
CallTable avw200
CallTable avwcard
NextScan
EndProg
7.1.2 Wireless/One Sensor/Resistance Converted to Temperature
'This is an example of a program used by a CR1000 and AVW206 to one Geokon 4450 VW
'displacement sensor. The sensor provides a frequency, which is converted to displacement, and
'resistance, which is converted to temperature. Polynomial Gage Factors used in this example were
'taken from the calibration sheets of the 4450 sensor. The coefficients used to convert resistance to
'temperature are from the Steinhart-Hart equation.
'The CR1000 communicates with the remote AVW206 through an RF401 radio attached to the
'logger's CS/IO port in SDC7 mode.
'The Pakbus address of the AVW206 used in this example is 15.
'
Public batt_volt,Ptemp
Public VWvalues(6)
Public VWResults
Public Psi,Temp
Alias VWvalues(1) = Freq
Alias VWvalues(2) = Amp
Alias VWvalues(3) = Sig2Noise
Alias VWvalues(4) = NoiseFreq
Alias VWvalues(5) = DecayRatio
Alias VWValues(6) = Therm
Dim Digits
Dim ZeroRding(32)
'Below are coefficients for Steinhart-Hart equation used to convert 'resistance to Temp
Const A=.0014051
Const B=.0002369
Const C=.0000001019
BeginProg
Scan (10,Sec,0,0)
PanelTemp (PTemp,250)
Battery (Batt_volt)
AVW200(VWResults,ComSDC7,0,15,VWvalues(1),1,1,1,1000,2500,2,_60Hz,1,0)
Digits = (Freq/1000)^2 * 1000 'Convert frequency to Digits
'Convert resistance to temp F.
Temp = (1/(A + B*LN(Therm) + C*(LN(Therm))^3)-273.15)*1.8+32
46
Page 55

AVW200-series 2-Channel Vibrating Wire Spectrum Analyzer Modules
TABLE 7-2. Wiring for Example 7.2
'Calculate displacement (inches) from Digits and calibration polynomial
PSI=2.49866e-10*Digits^2 + 8.716e-5*Digits + -.2
NextScan
EndProg
7.2 AVW200() Instruction Controlling Two Multiplexers
TABLE 7-2 shows wiring used for this example. This program measures 16
sensors on each multiplexer.
Datalogger Port for
Cable Attachment
COM1 (control port
pairs C1/C2)
'CR1000
'Declare Variables and Units
Public BattV
Public PTemp_C
'Public Temp_C
Public Data1, Data2
Public Mux1(16,6), Mux2(16,6)
Units BattV=Volts
Units PTemp_C=Deg C
'Define Data Tables
DataTable(VWTable1,True,-1)
DataInterval(0,90,Sec,10)
Sample (96,Mux1(),IEEE4)
Sample (96,Mux2(),IEEE4)
Minimum(1,BattV,FP2,False,False)
EndTable
'Main Program
BeginProg
SerialOpen (Com1,38400,0,0,0)
Scan(90,Sec,1,0)
AVW200(Data1(),Com1, 200, 200, mux1(1,1),1,1,16,450,3000,2,_60HZ,1,0)
AVW200(Data2(),Com1, 200, 200, mux2(1,1),2,1,16,450,3000,2,_60HZ,1,0)
Battery(BattV)
PanelTemp(PTemp_C,_60Hz)
CallTable(VWTable1)
NextScan
EndProg
Cable Needed to
connect to AVW200
17855 Cable (pigtail to
DB9 male cable)
AVW200 Port or
Model
RS-232
47
Page 56

AVW200-series 2-Channel Vibrating Wire Spectrum Analyzer Modules
TABLE 7-3. Wiring for Example 7.3
NOTE
7.3 AVW200( ) Instruction Running in the Pipeline Mode
The following program is an example of how to run the AVW200 with a
CR1000 using multiple AVW200( ) instructions in the pipeline mode of
operation. When this CRBasic program first starts running, the information
specified in the AVW200( ) instruction is sent to the attached AVW200
interface module via the Com1 communication port and PakBus address 200.
Along with the instruction's parameter information, the CR1000 also sends its
clock information. Every 64 seconds, the CR1000 clock and measured data are
exchanged with the attached AVW200 interface module. The AVW200
interface module then determines how much time previous to the CR1000's
interval it should start making the vibrating wire measurement, so that it
completes the measurement series before the CR1000's execution interval.
In the example program below, a multiplexer is attached to each AVW200
channel. Using the multiplexers, sixteen sensors are measured on channel 1
and sixteen sensors are measured on channel 2. Both of the multiplexers will
share the same clock (CLK) and reset (RST) lines on the AVW200.
In this example program, a returned “Result” value (the first parameter in the
AVW200( ) instruction) of zero indicates successful communication and tells
us that the data values have been stored in the destination variable, in this case,
AVWDst(). If there is a failure in communication, the “Result” value
increments for each failure and the AVWDst() values are filled with NAN's.
The datalogger will retry communications three times before returning a failed
communication or incrementing the result (retries are every 3 seconds or
greater depending on the radio-power-cycle configuration). A negative value
returned for the “Result” variable indicates status information (e.g., a -3
indicates the AVW200 has not made the first measurement; -4 indicates that no
parameter information is available). Note that the “Result” variable in both
AVW200( ) instructions are the same. There is no reason to have different
“Result” variables for a given communication port in the pipeline mode.
48
In the Pipeline mode of operation the AVW200( ) instruction
cannot be in a conditional statement or in a subroutine. It is
recommended to place the instruction at the top of the program.
TABLE 7-3 shows wiring used for this example.
Datalogger Port for
Cable Attachment
COM1 (control port
pairs C1/C2)
Cable Needed to
connect to AVW200
17855 Cable (pigtail to
DB9 male cable)
AVW200 Port or
Model
RS-232
Page 57

AVW200-series 2-Channel Vibrating Wire Spectrum Analyzer Modules
NOTES
' Example Program running in the PipeLine mode
' The clock and reset lines of both muxes are connected to the clk and rst ‘lines of the AVW200.
PipeLineMode
Public PTemp, batt_volt
Public Result, AVWDst(32,6)
Const Chan1 = 1 ' AVW200 channel 1
Const Chan2 = 2 ' AVW200 channel 2
Const MuxChan = 1 ' Starting Mux Channel
Const Reps = 16 ' Number of Reps
Const BFreq = 450 ' Begin Frequency
Const EFreq = 6000 ' End Frequency
Const Xvolt = 2 ' 12p-p Volt Excite
BeginProg
SerialOpen (Com1,38400,0,0,0)
Scan (64,Sec,0,0) ' (2 * 32 measurement) = 64 seconds
PanelTemp (PTemp,250)
Battery (Batt_volt)
AVW200(Result,Com1,200,200,AVWDst(1,1),Chan1,MuxChan,Reps,Bfreq,Efreq,Xvolt,_60Hz,1,0)
AVW200(Result,Com1,200,200,AVWDst(17,1),Chan2,MuxChan,Reps,Bfreq,Efreq,Xvolt,_60Hz,1,0)
NextScan
EndProg
7.4 AVW200( ) Instruction Running in the Sequential Mode
Examples 7.4.1 and 7.4.2 run the AVW200 with a CR1000 using multiple
AVW200( ) instructions in a sequential mode of operation. In these example
programs, the first AVW200( ) instruction communicates with the attached
AVW200 interface module using Com1 and PakBus address 200, and tells the
AVW200 to make sixteen measurements. The CR1000 will wait at the
AVW200( ) instruction until the 16 measurements are returned from first
instruction, or until the instruction times out (time out is two times the number
of reps). If an instruction times out, it will try up to three more times before
advancing to the next instruction. The next AVW200 instruction on channel 2
is then executed and repeats the process.
Each AVW200() instruction in the examples uses a different result code
variable. In sequential mode, it is a good idea to have different result code
variables for each AVW200( ) instruction.
(1) When running in the sequential mode, programs that contain
multiple AVW200 instructions using the same COM port should
have different “Result” variables for each AVW200 instruction
(e.g. “Result1” and “Result2”) in order to detect and isolate any
communications errors for a given AVW200.
(2) If the AVW200( ) instruction is in a slowsequence, the mode
of operation is always forced to sequential mode.
49
Page 58

AVW200-series 2-Channel Vibrating Wire Spectrum Analyzer Modules
TABLE 7-4. Wiring for Sequential Mode Examples
TABLE 7-4 shows the wiring used for both Sequential Mode examples.
Datalogger Port for
Cable Attachment
COM1 (control port
pairs C1/C2)
Cable Needed to
connect to AVW200
17855 Cable (pigtail to
DB9 male cable)
AVW200 Port or
Model
RS-232
7.4.1 AVW200 Controlling Two Multiplexers in Sequential Mode
' Example Program running in the Sequential mode with AVW200 controlling
' 2 muxes. The clock and reset lines of both muxes are connected to the clk
' and rst lines of the AVW200.
SequentialMode
Public PTemp, batt_volt
Public Result1, Result2, AVWDst(32,6)
Const Chan1 = 1 ' AVW200 channel 1
Const Chan2 = 2 ' AVW200 channel 2
Const MuxChan = 1 ' Starting Mux Channel
Const Reps = 16 ' Number of Reps
Const BFreq = 450 ' Begin Frequency
Const EFreq = 6000 ' End Frequency
Const Xvolt = 2 ' 12p-p Volt Excite
BeginProg
SerialOpen (Com1,38400,0,0,10000)
Scan (64,Sec,0,0) ' (2 * 32 measurement) = 64 seconds
PanelTemp(PTemp,250)
Battery (Batt_volt)
AVW200(Result1,Com1,200,200,AVWDst(1,1),Chan1,MuxChan,Reps,Bfreq,Efreq,Xvolt,_60Hz,1,0)
AVW200(Result2, Com1,200,200,AVWDst(17,1),Chan2,MuxChan,Reps,Bfreq,Efreq,Xvolt,_60Hz,1,0)
NextScan
EndProg
7.4.2 Datalogger Controlling Two Multiplexers in Sequential Mode
This example program has the datalogger controlling the multiplexers. Note
that the AVW200( ) parameter for reps is one, and x is a index variable in
AVWDst(x,1).
' Example Program running in the Sequential mode with the Datalogger
' controlling the muxes. For this program, the reset line of both muxes is
' connected to datalogger C3. Mux1 clock line is connected to DL C4 and Mux2
' clock line is connected to DL C5.
SequentialMode
Public PTemp, batt_volt, x
Public Result1, Result2, AVWDst(32,6)
50
Page 59

AVW200-series 2-Channel Vibrating Wire Spectrum Analyzer Modules
Const Chan1 = 1 ' AVW200 channel 1
Const Chan2 = 2 ' AVW200 channel 2
Const MuxChan = 1 ' Starting Mux Channel
Const Reps = 1 ' Number of Reps
Const BFreq = 450 ' Begin Frequency
Const EFreq = 6000 ' End Frequency
Const Xvolt = 2 ' 12p-p Volt Excite
Dim tmpavw200(6)
BeginProg
SerialOpen (Com1,38400,0,0,0)
Scan (64,Sec,0,0) ' (2 * 32 measurement) = 64 seconds
PanelTemp (PTemp,250)
Battery (Batt_volt)
PortSet(3, 1) ' Reset High Mux On, both mux's share the RST
Delay(1, 100, mSec) ' before clocking
For x = 1 To 16
PulsePort(4, 2000) ' Advance Mux #1 on C4 port (clock high for 2mSec)
PulsePort(5, 2000) ' Advance Mux #2 on C5 (clock high for 2mSec)
Delay(1, 10, mSec) ' Mux Settling Time
AVW200(Result1,Com1,200,200,tmpavw200(1),Chan1,MuxChan,Reps,Bfreq,Efreq,Xvolt,_60Hz,1,0)
Move(AVWDst(x,1),6,tmpavw200(1),6) ' now copy tmp value to the Dst
AVW200(Result2,Com1,200, 00,tmpavw200(1),Chan2,MuxChan,Reps,Bfreq,Efreq,Xvolt,_60Hz,1,0)
Move(AVWDst(x+16,1),6,tmpavw200(1),6) ' now copy tmp value to the Dst
Next
PortSet(3, 0) ' Reset Low Mux off
NextScan
EndProg
7.5 SDI-12 Example
The following program is an example of how to run the AVW200 with a
CR1000 using the SDI12Recorder( ) instruction. Note that the values returned
from the SDI12Recorder( ) instruction are different depending on the SDI-12
measurement command issued.
For this example, two multiplexers are measured by the datalogger. The
AVW200 interface module cannot control multiplexers in the SDI-12
communication mode. Hence, when communicating to the AVW200 via SDI12, any multiplexers attached to the AVW200 must be controlled by the
datalogger. This is achieved by using PortSet instructions in the datalogger
program (see example below) and by connecting the clock and reset lines of the
multilplexers to control ports on the datalogger. When using SDI-12 with the
AVW200, the clock and reset lines of the AVW200 are not used.
Extended SDI-12 commands can be used to change the begin, end frequencies
and the excitation voltage of the vibrating wire sensors attached to the
AVW200. However, these extended SDI-12 commands only work for the next
measurement command. By default, standard SDI-12 measurement commands
use the begin/end/excite voltage settings specified in the AVW200 settings
using DevConfig. However, after issuing an extended SDI-12 command, the
51
Page 60

AVW200-series 2-Channel Vibrating Wire Spectrum Analyzer Modules
TABLE 7-5. SDI-12 Command Codes
very next measurement will use the bbbb,eeee and vvvv values specified in the
extended command. The second and remaining measurements will revert back
to the settings specified via DevConfig.
An example of an extended command is: 0XVW450,5000,1! This command
will configure the next measurement with Begin Freq=450, End Freq = 5000
and 5Volt excitation. Following the extended command the “aM1!” command
will use the parameters set by the extended command.
TABLE 7-5 shows the specific SDI-12 Command Codes and their returned
values.
SDI12 Measurement Command Returned Values
aM!
(Measures both AVW200 Chan1 &
Chan2)
1) Chan1 Frequency
2) Chan1 Therm Resistance
3) Chan1 Signal Amplitude mV
RMS
4) Chan2 Freq
5) Chan2 Therm Resistance
6) Chan2 Signal Amplitude mV
RMS
aM1!
(Measures AVW200 Chan1)
1) Chan1 Freq
2) Chan1 Signal Amplitude mV
RMS
3) Chan1 Signal-to-Noise Ratio
4) Chan1 Noise Frequency
5) Chan1 Decay Ratio
6) Chan1 Therm Resistance
aM2!
(Measures AVW200 Chan2)
1) Chan2 Frequency
2) Chan2 Signal Amplitude mV
RMS
3) Chan2 Signal-to-Noise Ratio
4) Chan2 Noise Frequency
5) Chan2 Decay Ratio
6) Chan2 Therm Resistance
aV! 1) Battery Voltage
2) Trapcodes
3) WatchDog Counts
52
aXVWbbbb,eeee,v!
where:
bbbb = Begin Freq (100 < bbbb <
6.5K)
eeee = End Freq (100 < eeee < 6.5K)
v = Excite Voltage (1= 5v and 2 =
12v)
Returns "OK" if accepted
Returns "ERROR" if not accepted
Page 61

AVW200-series 2-Channel Vibrating Wire Spectrum Analyzer Modules
' Example Program running SDI12 commands with the Datalogger controlling
' 2 mux's. For this program, the AVW SDI-12 port is connected to DL C1.
' The reset line of both muxes is connected to datalogger C3. Mux1 clock line
' is connected to DL C4 and Mux2clock line is connected to DL C5. The SDI-12
' address of the AVW200 is set to 1.
SequentialMode
Public PTemp, batt_volt
Public Chan1_Val(16,6),Chan2_Val(16,6)
Dim I
BeginProg
Scan (150,Sec,0,0)
PanelTemp(PTemp,250)
Battery(Batt_volt)
PortSet(3, 1) ' Reset High, Mux On, both mux's share this reset port
Delay(1, 100, mSec) ' delay before clocking
' ************ Measure 16 vibrating wire sensor on AVW200 channel 1
For I=1 To 16
' Advance Mux #1 (clock line connected to C4; clock high for 2mSec)
PulsePort(4, 2000)
Delay(1, 10, mSec) ' Mux Settling Time
'measures sensor on channel 1
SDI12Recorder (Chan1_Val(I,1),1,1,"M1!",1.0,0)
Next I
' ************ Measure 16 vibrating wire sensor on AVW200 channel 2
For I=1 To 16
' Advance Mux #2 (clock line connected to C5; clock high for 2mSec)
PulsePort(5, 2000)
Delay(1, 10, mSec) ' Mux Settling Time
'measures sensor on channel 2
SDI12Recorder (Chan2_Val(I,1),1,1,"M2!",1.0,0)
Next I
PortSet(3, 0) ' Reset Low; turn both Muxes off
NextScan
EndProg
53
Page 62

AVW200-series 2-Channel Vibrating Wire Spectrum Analyzer Modules
8. Troubleshooting Communication Problems
8.1 Unable to Communicate with DevConfig or Terminal Emulator
If you are unable to communicate with DevConfig or the Terminal Emulator,
verify that:
(1) The AVW200 is powered. The red LED at the front of the AVW200 will
remain lit for 15 seconds on initial power up and then blink intermittently.
(2) The correct COM port has been selected. The COM port entry is provided
on the lower left corner of the DevConfig screen.
(3) The correct baud rate of the AVW200 has been selected. The default baud
rate of the AVW200 is 38400.
8.2 Datalogger to AVW200 Communication
If the datalogger fails to communicate with the AVW200, verify that:
(1) The AVW200 is powered. The red LED at the front of the AVW200 will
remain lit for 15 seconds on initial power up and then blink intermittently.
(2) The AVW200 PakBus address is different than the PakBus address of the
datalogger.
(3) The AVW200 PakBus address is entered correctly in the AVW instruction
of the datalogger program.
8.3 Wireless Communications
If you can’t connect, check out these possible causes:
1. Verify that the AVW20X is powered. The red LED at the front of the
AVW will remain lit for 15 seconds on initial power up and then blink
intermittently.
2. Active Interface set wrong
The active interface on the radio attached to the DL running the AVW
instruction must match the ComPort specified in the AVW instruction;
e.g., if you are using an RF401 (configured for SDC7) attached to a
datalogger to communicate with a remote AVW206, then the ComPort
specified in the AVW instruction must be SDC7 (or whatever active
interface the RF401 is set for).
3. Low or weak battery voltage or 12 VDC supply voltage
54
The power supply battery may not be charging properly due to solar panel
orientation, poor connection, or due to a charging transformer problem.
The battery itself may have discharged too low too many times, ruining
the battery. Lead acid batteries like to be topped off.
Page 63

AVW200-series 2-Channel Vibrating Wire Spectrum Analyzer Modules
Power supply must be able to sustain at least 9.6 V (datalogger minimum)
even during 75 mA transmitter bursts lasting only a few milliseconds.
4. Lightning damage to RF401 or AVW206
Swap in a known good RF401 or AVW206 with the same settings and see
if this cures the problem. Lightning damage can occur leaving no visible
indications. A “near miss” can cause damage as well as a more direct hit
with evidence of smoke.
5. Lightning damage to antenna and/or cable
Swap in a known good antenna and/or cable. Hidden damage may exist.
6. Moisture in coaxial antenna cable
It is possible that moisture has penetrated inside the plastic sheath of the
coaxial cable. Water inside the cable can absorb RF energy and attenuate
the transmitted signal; the received signal would also be attenuated. It is
difficult to dry out the interior of a coaxial cable. Substitution of a dry
cable is recommended.
Placing a wet cable in a conventional oven at 160°F for a couple of hours
should dry it out. Shield the antenna cable against damage from radiated
heat from the oven element by placing the coiled cable on a large cookie
sheet or a sheet of aluminum foil. See Section 5.3.2 (3.d) for information
on weatherproofing the antenna cable.
7. AVW206 receiver “de-sensing” from nearby transmitter
This problem can be observed from LED behavior when operating a handheld radio near an AVW206 that is receiving collected data from a remote
station. If you key a hand-held 150 MHz or 450 MHz transmitter, even
though its frequency of operation is far removed from the 900 MHz band,
its close proximity to the AVW206 can overwhelm (de-sense) the
AVW206 receiver resulting in failed packets and LoggerNet retries. This
problem could also occur if you located an AVW206 at a site containing
commercial transmitters or repeaters. In general it is best to avoid such
sites, especially the high-power FM or AM transmitter antenna sites
which can change at any time with added equipment.
It is possible to avoid de-sensing in some cases if the RF link is solid
enough due to: the proximity of your remote AVW206(s); high antenna
gains and directionality; high elevation; and sufficient distance separation
between AVW206 and commercial transmitter antenna. Try horizontal
polarization of antennas. A field test in such situations is essential.
8. Insufficient signal strength
There are some things you can try to get that extra few dBs of signal
strength sometimes necessary for a dependable RF link. The drop in
signal going from Winter (no deciduous tree leaves) to Spring sometimes
requires a little more signal.
a. Raise the antenna height using a mast, tower or higher terrain. Often
a little extra height makes the difference.
55
Page 64

AVW200-series 2-Channel Vibrating Wire Spectrum Analyzer Modules
b. Change to a higher gain antenna
c. Change polarization (element orientation) of all antennas in your
network (yagi or collinear) from vertical to horizontal or vice versa.
9. Interference from 900 MHz transmitter
There are some measures you can take to reduce interference from
neighboring 900 MHz transmitters:
a. Move base station as far as possible from offending transmitter
antenna.
b. Install 9 dBd yagi and position station so that offending transmitter is
located behind or to the side of the yagi to take advantage of yagi’s
front-to-back or front-to-side ratio (back and side signal rejection).
c. Change polarization (element orientation) of all yagi and collinear
antennas in your network to see if that reduces effects of offending
transmitter.
10. AVW206 or other radio in the network has the wrong Network Address,
Radio Address, Hopping Sequence, or Standby Mode
It is improbable that an RF401 or AVW206 network that has been
working would ever change address, hopping sequence or other settings.
However, check the settings for the unlikely event this may have
happened. Try “Restore Defaults” and set up RF401 or AVW206 again
from that point.
56
Page 65

Appendix A. Conversion from Hertz
The calibration report provided with each vibrating wire sensor contains the
information required to convert Hertz, the frequency value output by the
AVW200, to the appropriate units (e.g., displacement pressure).
These steps convert Hertz to the appropriate unit (e.g., displacement, pressure):
1. If the values in the Calibration Report are in digits, use the following
equation to convert the AVW200’s frequency values from Hertz to digits.
Digits = (Hz/1000)
2. Use the gage factors and polynomial provided in the Calibration Report to
calculate displacement.
A.1 Displacement Example
FIGURE A-1 provides a calibration report for a displacement transducer. The
following steps convert Hertz (the value output by the AVW200) to
displacement.
2
x 1000
1. Convert Hertz to digits:
Digits = (Freq/1000)
2. displacement = (3.598e-9)*Digits
Therefore,
if Freq = 2400 then:
Digits = (2400/1000)
displacement = (3.598e-9) * (5760)
= 3.875 inches
2
*1000
2
x 1000 = 5760
2
+ (1.202e-3)*Digits + (-3.1682)
2
+ (1.202e-3) * 5760 + (-3.1682)
A-1
Page 66

Appendix A. Conversion from Hertz
A-2
FIGURE A-1. Geokon Calibration Report of a Sensor without a
Thermistor
Page 67

NOTE
Appendix B. Thermistor Information
B.1 Converting Resistance to Temperature
The AVW200 outputs a resistance value for sensors that contain a thermistor.
Temperature is calculated by applying the resistance to a known equation (e.g.,
Steinhart-Hart equation) which converts resistance to temperature.
The Steinhart-Hart equation for converting resistance to degree Celsius is as
follows:
Temperature = 1/(A + B*LN(resistance) + C*(LN(resistance))^3) - 273.15
Where A, B, and C are coefficients for the Steinhart-Hart equation.
The coefficients for the Steinhart-Hart equation are specific to the thermistor
contained in your sensor and are obtained from the sensor manufacturer.
Please see your manufacturer to get the coefficients for their
thermistor.
B.1.1 Resistance Conversion Example – Geokon Sensor
If the coefficients for Steinhart-Hart equation are as follows
A=0.0014051
B=0.0002369
C=0.0000001019
The equation for converting the resistance measurement to degrees Celsius is:
Temperature = 1/(0.0014051 + 0.0002369*LN(resistance) +
0.0000001019*(LN(resistance))^3) - 273.15
If the measured resistance is 2221 ohms, the calculated temperature in degree
Celsius is:
Temperature = 1/(0.0014051 + 0.0002369*LN(2221) +
0.0000001019*(LN(2221))^3) - 273.15
Temperature = 31.98°C
B.2 Accuracy and Resolution
The accuracy of the temperature measurement is a function of the following
factors:
1. Thermistor's interchangeability
2. Resistance of the wire
3. Steinhart-Hart Equation error
B-1
Page 68

Appendix B. Thermistor Information
4. Precision of the bridge resistors
5. Accuracy of the datalogger's voltage measurement
6. Temperature coefficient of the bridge resistors
Errors three through six can probably be ignored. The wire resistance is
primarily an offset error and its affect can be removed by the initial calibration.
Errors caused by the change in wire resistance due to temperature and
thermistor interchangeability are not removed by the initial calibration.
FIGURE B-1 through FIGURE B-4 show how wire resistance affects the
temperature measurement for a Geokon 4500 Vibrating Wire Piezometer.
B-2
FIGURE B-1. Temperature Measurement Error at Three Temperatures
as a Function of Lead Length. Wire is 22 AWG with 16 ohms per
1000 feet.
Page 69

Appendix B. Thermistor Information
FIGURE B-2. Temperature Measurement Error on a 1000 foot Lead.
Wire is 22 AWG with 16 ohms per 1000 feet.
FIGURE B-3. Temperature Measurement Error on a 3000 foot Lead.
Wire is 22 AWG with 16 ohms per 1000 feet.
B-3
Page 70

Appendix B. Thermistor Information
FIGURE B-4. Temperature Measurement Error on a 5000 foot Lead.
Wire is 22 AWG with 16 ohms per 1000 feet.
B-4
Page 71

NOTE
Appendix C. Antennas, Antenna Cables, and Surge Protectors for the AVW206, AVW211, and AVW216
C.1 Antennas
Several antennas are offered to satisfy the needs for various base station and
remote station requirements. These antennas have been tested at an authorized
FCC open-field test site and are certified to be in compliance with FCC
emissions limits. All antennas (or antenna cables) have an SMA female
connector for connection to the AVW206. The use of an unauthorized antenna
could cause transmitted field strengths in excess of FCC rules, interfere with
licensed services, and result in FCC sanctions against user.
An FCC authorized antenna is needed for wireless
communication. The 900 MHz antennas are compatible with the
AVW206 and AVW211. The 2.4 GHz antennas are compatible
with the AVW216. Pick one of the antennas listed below.
CSI Item Number Description
14310 0 dBd ANTENNA, 900 MHz, OMNI ¼ WAVE WHIP,
RPSMA STRAIGHT, LINX, 3.2 inches long.
14204 0 dBd ANTENNA, 900 MHz, OMNI ½ WAVE WHIP,
RPSMA RT ANGLE, ASTRON, 6.75 inches long.
14221 3 dBd ANTENNA, 900 MHz, OMNI COLLINEAR,
ANTENEX FG9023, 24 inches tall, W/FM2 MOUNTS,
fits 1 in. to 2 in. O.D. mast (requires COAX RPSMA-L
or COAX NTN-L)
15970 1 dBd ANTENNA, 900 MHz, INDOOR OMNI ½
WAVE DIPOLE, 10 ft. cable with SMA connector to fit
RF401 Series, window or wall mounted by sticky back,
4 inches wide.
14205 6 dBd ANTENNA, 900 MHz, YAGI, LARSEN
YA6900 TYPE N-F, boom length 17.25 inches, longest
element 7.25 inches, W/MOUNTS, fits 1 in. to 2 in.
O.D. mast (requires COAX RPSMA-L or COAX NTNL)
14201 9 dBd ANTENNA, 900 MHz, YAGI, MAXRAD
BMOY8905 TYPE N-F, boom length 21.4 inches,
longest element 6.4 inches, W/MOUNTS, fits 1 in. to 2
in. O.D. mast (requires COAX RPSMA-L or COAX
NTN-L)
C-1
Page 72

Appendix C. Antennas, Antenna Cables, and Surge Protectors for the AVW206, AVW211, and AVW216
CAUTION
16005 0 dBd ANTENNA, 2.4 GHz, OMNI ½ WAVE WHIP,
RPSMA RT ANGLE, LINX ANT-2.4-CW-RCT-RP,
4.5 inches long.
16755 13 dBd ANTENNA, 2.4 GHz, ENCLOSED YAGI,
allows vertical or horizontal polarization, MAXRAD
WISP24015PTNF, boom length 17 inches, diameter 3
inches, W/ END MOUNT to fit 1 to 2 in. O.D. mast
(requires either (1) COAX RPSMA-L for short runs or
(2) COAX NTN-L with Antenna Surge Protector Kit)
COAX RPSMA-L LMR 195 ANTENNA CABLE, REVERSE POLARITY
SMA TO TYPE N MALE
COAX NTN-L RG8 ANTENNA CABLE, TYPE N MALE TO TYPE
N MALE CONNECTORS, REQUIRES 14462
14462 ANTENNA SURGE PROTECTOR KIT
FCC OET Bulletin No. 63 (October 1993)
Changing the antenna on a transmitter can significantly increase, or decrease,
the strength of the signal that is ultimately transmitted. Except for cable
locating equipment, the standards in Part 15 are not based solely on output
power but also take into account the antenna characteristics. Thus, a low
power transmitter that complies with the technical standards in Part 15 with a
particular antenna attached can exceed the Part 15 standards if a different
antenna is attached. Should this happen it could pose a serious interference
problem to authorized radio communications such as emergency, broadcast,
and air-traffic control communications.
In order to comply with the FCC RF exposure requirements,
the AVW206 series may be used only with approved
antennas that have been tested with this radio and a
minimum separation distance of 20 cm must be maintained
from the antenna to any nearby persons.
See Appendix C.4, Part 15 FCC Compliance Warning, of this manual for
important FCC information.
ITEM # 14310 900 MHZ OMNI ¼ WAVE WHIP 0 dBd
C-2
Page 73

Appendix C. Antennas, Antenna Cables, and Surge Protectors for the AVW206, AVW211, and AVW216
ITEM # 14204 900 MHZ OMNI ½ WAVE WHIP 0 dBd
ITEM # 14201 900 MHZ YAGI 9 dBd w/MOUNTS
ITEM #14205 900 MHz YAGI 6 dBd w/MOUNTS
ITEM # 14221 900 MHZ OMNI COLLINEAR 3 dBd w/MOUNTS
C-3
Page 74

Appendix C. Antennas, Antenna Cables, and Surge Protectors for the AVW206, AVW211, and AVW216
ITEM #15970 900 MHZ Indoor OMNI 1 dBd Window/Wall Mounted
ITEM #16005 2.4 GHz OMNI HALF WAVE WHIP 0 dBd
C-4
ITEM #16755 2.4 GHz ENCLOSED YAGI, 13 dBd w/MOUNTS
FIGURE C-1. Some FCC Approved Antennas
Page 75

Appendix C. Antennas, Antenna Cables, and Surge Protectors for the AVW206, AVW211, and AVW216
FIGURE C-2. Example COAX RPSMA-L Cable for Yagi or Omni
Colinear
FIGURE C-3. Antenna Surge Protector
C.2 Antenna Cables
The 14201, 14203, 14205, 14221, and 16755 antennas require an antenna
cable; either (1) the COAX RPSMA or (2) the COAX NTN with surge
protector. Indoor omnidirectional antennas are either supplied with an
appropriate cable or connect directly to the AVW206.
C.3 Surge Protectors
C.3.1 Electrostatic Issues
Many installations are out of doors and therefore susceptible to lightning
damage, especially via the antenna system. Also, depending on climate and
location, electro-statically charged wind can damage sensitive electronics if
sufficient electric charge is allowed to accumulate on the antenna and cable.
To protect against this CSI offers the Item # 14462 Antenna Surge Protection
Kit.
The COAX NTN-L cable is a low-loss RG8 coaxial cable that requires the
14462 surge protector in order to connect to the AVW206. The RG8 / Antenna
Surge Protector are recommended in preference to the COAX RPSMA in the
following applications:
C-5
Page 76

Appendix C. Antennas, Antenna Cables, and Surge Protectors for the AVW206, AVW211, and AVW216
• When the antenna cable length exceeds 10 feet
• When use of COAX RPSMA would result in too much signal loss
• When the interface will be used in an environment susceptible to lightning
or electro-static buildup
C.3.2 Antenna Surge Protector Kit
The Surge Protector Kit for the RF401 series radios includes the following:
• Polyphaser protector
• 18 inches of COAX RPSMA to connect ‘tail end’ of surge protector to
RF401
• Ground wire lead
• Screw and grommet to secure ground wire and polyphaser to backplate of
enclosure
The surge protector has female type N connectors on both ends; one for
connection to the COAX NTN-L cable and the other for connection to the 18
inch length of COAX RPSMA cable included in the kit. The COAX RPSMA
cable is an LMR195 type that terminates in a type N Male connector on the
‘antenna end’ and a Reverse Polarity SMA (RPSMA) connector on the RF401
end.
C.4 Part 15 FCC Compliance Warning
Changes or modifications to the AVW206, AVW211, or AVW216 not
expressly approved by Campbell Scientific, Inc. could void the user’s authority
to operate this product.
Note: This equipment has been tested and found to comply with the limits for a
Class B digital device, pursuant to part 15 of the FCC Rules. These limits are
designed to provide reasonable protection against harmful interference in a
residential installation. This equipment generates, uses, and can radiate radio
frequency energy and, if not installed and used in accordance with the
instructions, may cause harmful interference to radio communications.
However, there is no guarantee that interference will not occur in a particular
installation. If this equipment does cause harmful interference to radio or
television reception, which can be determined by turning the equipment off and
on, the user is encouraged to try to correct the interference by one or more of
the following measures:
• Reorient or relocate the receiving antenna.
• Increase the separation between the equipment and receiver.
• Connect the equipment into an outlet on a circuit different from that to
which the receiver is connected.
• Consult the dealer or an experienced radio/TV technician for help.
C-6
Page 77

Appendix C. Antennas, Antenna Cables, and Surge Protectors for the AVW206, AVW211, and AVW216
This device complies with part 15 of the FCC Rules. Operation is subject to
the following two conditions:
1) This device may not cause harmful interference, and
2) This device must accept any interference received, including interference
that may cause undesired operation.
C-7
Page 78

Appendix C. Antennas, Antenna Cables, and Surge Protectors for the AVW206, AVW211, and AVW216
C-8
Page 79

TABLE D-1. Description of the Public Table
NOTE
Appendix D. The Public Table
The public table of the AVW200 displays the current sensor measurement
values as well as the current settings (see TABLE D-1).
When the DeviceConfig runs the troubleshooter, it forces a measurement by
writing to the Timeseries() array in the Public table. When the
Timeseries(1)..Timeseries(4) elements are written with the proper values a
measurement is performed and the files Timeseries.bin and Spectrum.bin are
created or over-written if previous measurements have been forced. These file
are then used by DeviceConfig to graph the time domain and frequency domain
graphs in the troubleshooter.
A Datalogger program can also force a measurement by using the
GetVariable() and/or SetVariable() instructions (see Program Example D.1).
To do this, use the CRBasic SetVariable() instruction to set the TimeSeries(2),
TimeSeries(3) and TimeSeries(4) variables. Once these variables have the
correct values for Begin, End Frequency and Excite voltage, the measurement
can be forced by writing the TimeSeries(1) with the AVW200 channel and
Mux Channel (ie 101 = AVW200 Chan1 and MuxChan1, 205 = AVW200
Chan1 and MuxChan5, or 208 = AVW200 Chan2 and MuxChan8). The
measurement is completed when the TimeSeries(1) value is zeroed by the
AVW200. Once zeroed the TimeSeries(5) through TimeSeries(11) values can
be read using the CRBasic GetVariable() instruction.
TimeSeries(5) through TimeSeries(11) were added to OS version
STD.02. Customers with OS version STD.01 can get these public
variables by downloading a new OS (refer to Section
OS).
Record No Current record number for this set of data
Time
Stamp
Control Parameters for AVW200 Instruction Communications
Result Result of the last measurement
NumReps Number of replications specified for this channel
Chan Channel this record was recorded from
MuxChan Multiplexer channel this data was recorded from
BeginFreq The begin frequency used for this measurement
EndFreq The end frequency used for this measurement
ExciteVolts The excitation voltage used for this measurement
Do_Therm Do the thermistor measurement or not
Time the record was recorded
5.4, Send
RScnt Count down to start of measurement for the RS-232
RFcnt Count down to start of measurement for the RF
communication port. -1 if no interval or not used
communication port. -1 if no interval or not used
D-1
Page 80

Appendix D. The Public Table
Values and Control Parameters for SDI-12 Communications
SDI12val(1) Frequency value obtained by SDI Recorder Instruction, if
used; unchanged if not using SDI-12.
SDI12val(2) Amplitude value obtained by SDI Recorder Instruction, if
used; unchanged if not using SDI-12.
SDI12val(3) Signal to noise ratio obtained by SDI Recorder Instruction,
if used; unchanged if not using SDI-12.
SDI12val(4) Signal to noise frequency obtained by SDI Recorder
Instruction, if used; unchanged if not using SDI-12.
SDI12val(5) Decay ratio obtained by SDI Recorder Instruction, if used;
unchanged if not using SDI-12.
SDI12val(6) Thermistor reading obtained by SDI Recorder Instruction, if
used; unchanged if not using SDI-12.
SDIChan Channel used for SDI-12 measurement
SDIBFreq Begin frequency used for SDI-12 measurement
SDIEFreq End frequency used for SDI-12 measurement
SDIExVolt Excitation voltage used for SDI-12 measurement
Value of Last Instruction That’s Running
Ch1Freq Frequency value measured on channel 1
Ch1Amp Amplitude value measured on channel 1
Ch1SNR Signal to noise ratio measured on channel 1
Ch1SNRFreq Signal to noise frequency measured on channel 1
Ch1Decay Decay ratio measured on channel 1
Ch1Therm Thermistor reading measured on channel 1
Ch2Freq Frequency value measured on channel 2
Ch2Amp Amplitude value measured on channel 2
Ch2SNR Signal to noise ratio measured on channel 2
Ch2SNRFreq Signal to noise frequency measured on channel 2
Ch2Decay Decay ratio measured on channel 2
Ch2Therm Thermistor reading measured on channel 2
D-2
Page 81

Appendix D. The Public Table
Control Parameters When Troubleshooter is Running
TimeSeries(1) Writing this variable will force a Vibrating Wire
measurement and create the TimeSeries.bin and
spectrum.bin files.
Example:
101 = measures AVW200 chan1 and Mux chan1
102 = measures AVW200 chan1 and Mux chan2
.....
201 = measures AVW200 chan2 and Mux chan1
202 = measures AVW200 chan2 and Mux chan2
....
232 = measures AVW200 chan2 and Mux chan32
Notes: TimeSeries(2)..(4) need to be filled with valid
values before making the measurement.
TimeSeries(2) Begin Frequency for force measurement (100 - 6500)
TimeSeries(3) Eng Frequency for forcing measurement (100 - 6500)
TimeSeries(4) Excite voltage for forcing measurement (1=5volts or
2=12volts)
TimeSeries(5) Copy of the Chan/MuxChan executed in TimeSeries(1)
TimeSeries(6) Measured Frequency (Hz)
TimeSeries(7) Measured Amplitude (MVolts_RMS)
TimeSeries(8) Measured Signal-to-Noise Ratio
TimeSeries(9) Measured Noise Freq (Hz)
TimeSeries(10) Measured Decay Ratio
TimeSeries(11) Measured Thermistor (ohms)
D-3
Page 82

Appendix D. The Public Table
D.1 Forced Measurement Program
SequentialMode
Public UsrForcedMsmnt
Public SVResult(2), GVResult(2), TimeSeries(11)
Dim TS_done
BeginProg
TimeSeries(1) = 101 'Measure command with XYY as described below.
'X is the AVW channel, 1 or 2, and YY is the multiplexer channel, 00-32
TimeSeries(2) = 450 'Sweep start frequency, 450 Hz minimum.
TimeSeries(3) =6500 'Sweep stop frequency, 6500 Hz maximum.
TimeSeries(4) = 1 'Excitation level code, 0=5Volt, 1=12Volt.
' TimeSeries(5) 'Echo of what was used For TimeSeries(1) measure command, XYY.
' TimeSeries(6) 'Frequency of peak, Hz.
' TimeSeries(7) 'Amplitude of peak frequency, mVrms.
' TimeSeries(8) 'SNR, Signal To Noise Ratio.
' TimeSeries(9) 'Peak noise frequency, Hz.
' TimeSeries(10) 'Decay ratio.
' TimeSeries(11) 'Thermistor measurement, Ohms.
SerialOpen (Com1,38400,0,0,0)
Scan(5,Sec,0,0)
If UsrForcedMsmnt=True Then
'Set remote measurement parameters.
SendVariables(SVResult(1),Com1,200,200,0000,100, "Public","TimeSeries(2)",TimeSeries(2),3)
'Next Force measurement on indicated channel.
SendVariables(SVResult(2),Com1,200,200,0000,100, "Public","TimeSeries(1)",TimeSeries(1),1)
Delay (1,2,Sec) 'wait for 2 second measurement
Do 'Check that measure is done
GetVariables(GVResult(1),Com1,200,200,0000,100,"Public","TimeSeries(1)",TS_done,1)
If GVResult(1)
Exit Do 'failed communications
EndIf
Loop Until TS_done 'when TS_done equals zero.. the measurement is done
'Get the data from AVW206.
GetVariables(GVResult(2),Com1,200,200,0000,100,"Public","TimeSeries(5)",TimeSeries(5),7)
UsrForcedMsmnt=False
If SVResult(1) OR SVResult(2) OR GVResult(1) OR GVResult(2) Then '
Move (TimeSeries(5),7,NAN,1) 'failed communication..so fill win NAN's
EndIf
EndIf
NextScan
EndProg
D-4
Page 83

TABLE E-1. Status Fields and Descriptions
NOTE
Appendix E. Status Table
The AVW200 status table contains system operating status information
accessible via DevConfig, terminal emulator, or another PakBus device such as
a datalogger. Status Table information is easily viewed by going to DevConfig |
AVW200| Connect | Data Monitor | Status. The status table can be viewed via a
terminal emulator and command 4.
The status information can be retrieved by the datalogger by using the CRBasic
GetVariable instruction. Following is an example of retrieving the BattVoltage
status of the AVW200 using the CRBasic GetVariables instruction:
Public RC,AVW_BV
GetVariables(RC,ComSDC7,200,200,0000,0,"Status","BattVoltage",AVW_BV,1)
DevConfig polls the status table at regular intervals, updating
status information.
TABLE E-1 is a comprehensive list of status table variables with brief
descriptions.
Status
Fieldname
Record No Record number for this set of data No
Time Stamp Time the record was generated No
OSversion Version of the Operating System No
OSdate Date OS was released No
ProgName Name of the running program No
ProgSig Signature of the running program No
StationName User defined Station Name Yes
Compileresults Compile results of the running program Yes
PakBusAddress AV200 PakBus address Yes
RfInstalled Specifies the model number of the MaxStream radio
RfNetAddr Specifies the radio network address of the built in
Description
if it is recognized by the datalogger. It will have a
value of zero if there is no radio recognized by the
AVW200.
radio. This setting should be set to match the
network address for the RF401 base used to
communicate with the datalogger.
User can change?
No
Yes
RfNetHopSeq Specifies the hopping sequence that will be used for
the built-in radio. This value should be set to match
the value of the same setting for the RF401 base
station used to communicate with this datalogger.
Yes
E-1
Page 84

Appendix E. Status Table
Status
Fieldname
Description
User can change?
Rf_ForceOn When Rf_ForceOn is set to 1 the radio is always on
ignoring the duty cycle setting.
Rf_Protocol Identifies the radio protocol that will be used. The
AVW200 is always fixed at 2 (PakBus Aware mode)
RfSignalLevel The signal level of every 5th PakBus packet received
over RF
RfRxPakBusCnt Number of PakBus packets that have been received
over RF communication
RfPwrMode Radio power modes:
NO_RF (No Radio)
RF_ON (<24ma Always On)
RF_1/2_Sec (<4ma ½ Second)
RF_1_Sec (<2ma 1 Second)
RF_8_Sec (<0.4ma 8 Second)
RF_OFF (Radio Off)
PortStatus(1) Indicates control port 1 level
0 = off (low zero volts)
-1 = on (high five volts)
Yes
Yes (changing this parameter to a
value of 1 will mess up the RF
communication). All other values will
revert to a value of 2.
Yes (clear to zero)
Yes (clear to zero)
Yes (ie to change from ½ seconds
duty cycle to 1 seconds duty cycle
mode, edit the parameter with:
RF_1_Sec
No
PortStatus(2) Indicates control port 2 level
No
0 = off (low zero volts)
-1 = on (high five volts)
PortStatus(3) Indicates control port 3 level
No
0 = off (low zero volts)
-1 = on (high five volts)
PortConfig(1) Indicates control port 1 configuration (function
Yes
disabled reserved for future use).
PortConfig(2) Indicates control port 1 configuration (function
Yes
disabled reserved for future use).
PortConfig(3) Indicates control port 1 configuration (function
Yes
disabled reserved for future use).
MSPversion(1) MSP430 CPU #1 OS version No
MSPversion(2) MSP430 CPU #2 OS version No
MSPversion(3) MSP430 CPU #3 OS version No
MSPversion(4) MSP430 CPU #4 OS version No
MSPversion(5) MSP430 CPU #5 OS version No
MSPClkFreq(1) MSP430 CPU #1 RC oscillator frequecy in Hz No
MSPClkFreq(2) MSP430 CPU #2 RC oscillator frequecy in Hz No
E-2
Page 85

NOTE
Status
Fieldname
Description
User can change?
MSPClkFreq(3) MSP430 CPU #3 RC oscillator frequecy in Hz No
MSPClkFreq(4) MSP430 CPU #4 RC oscillator frequecy in Hz No
MSPClkFreq(5) MSP430 CPU #5 RC oscillator frequecy in Hz No
CalOffset Calibration offset voltage No
Appendix E. Status Table
VarOutOfBounds Number of times an array was accessed out of
Yes (clear to zero)
bounds
SkipScan Number of skipped scans that have occurred while
Yes (clear to zero)
running the current scan. When making the vibration
wire measurement it is normal for the skipscan's to
increment
TrapCode A code number that describes the last watch dog
Yes
event that has happened (updated at power up).
WatchDogCnt Number of Watchdog errors that have occurred
Yes (clear to zero)
while running this program
ResetTables Not Used Yes (function disabled)
BattVoltage Current value of the AVW200 battery voltage (value
Yes
updated every 8 sec).
SRAMMemSize Size of the SRAM memory No
The SRAMMemSize parameter was added to OS version STD.02.
Older modules have 128 Kbytes of SRAM and newer modules
have 512 Kbytes of SRAM.
If the SRAMMemSize = 512 K, then the AVW200 will create and overwrite a
file for every measurement on each channel. The files are called TS_chan1.bin
and TS_chan2.bin. These files have the 4096 samples or TimeSeries data for
the last measurement. These files can be retrieved using LoggerNet
FileControl or the datalogger instruction GetFile(). A post-processing program
in DevConfig under device type AVW200 Series called “Off Line Analysis”
can be used to analyze the files.
E-3
Page 86

Appendix E. Status Table
E-4
Page 87

Appendix F. Time Series and Spectrum Graph Information
The AVW200 uses an audio A/D for capturing the sensor’s signal. The
number of samples acquired in this period is 4096 points. A Fast Fourier
Transform (FFT) algorithm is used to create a frequency spectrum. The
frequency spectrum is displayed in the graph labeled “Spectrum” (see FIGURE
F-1). This graph shows each of the frequencies and the voltage amplitude in
mV RMS.
The “Time Series” graph is the acquired or sampled data in the time domain.
The graph shows the combination of all the frequencies coming from the
vibrating wire sensor shortly after the sensors excitation. The dominate
frequency is the natural resonating frequency of the vibrating wire. The other
frequencies can include noise pickup (i.e., motors close to the sensor, pickup
from long wires), harmonics of the natural frequency or harmonics of the noise
(50/60 Hz harmonics) and/or mechanical obstruction (loosing of the wire or the
wire vibration is physically changed by the package movement). The
AVW200 computes a signal-to-noise diagnostic by dividing the response
amplitude by the noise amplitude.
The “Time Series” graph shows the decay from the start of the sampling to the
end of the sampling. The decay is the dampening of the wire over time. The
AVW200 computes a decay ratio diagnostic from the time series ending
amplitude divided by the beginning amplitude. Some sensors will decay very
rapidly, others not. It is a good idea to characterize the sensors decay and
amplitude when the sensor is new, so that over time the health of the sensor can
be monitored.
By changing the begin and end frequencies in the options tab, the affects of
narrowing can be of value for troubleshooting and solving problems with errant
sensors, or improving the measurement. Care should be taken to ensure that
when you change the begin and end frequency that the frequency range still
captures the sensor’s signal.
F.1 Good Sensor Examples
FIGURE F-1 and Figure FIGURE F-2 are measurement results from the same
sensor — the first measurement was taken with a swept frequency between 200
and 2200 Hz while the second measurement was taken with a swept frequency
between 200 and 6500 Hz. Using the tighter frequency range (FIGURE F-1),
the measurement recorded the greatest sensor noise at a frequency of 935 Hz
with a signal-to-noise ratio of 318. Sweeping the same sensor over the far
wider range of 200 to 6500 Hz (FIGURE F-2) uncovers noise at 4150 Hz with
a signal-to-noise ratio of 21.4, which is 15 times less than the signal-to-noise
ratio of the first measurement. This illustrates that better readings are produced
when the sensor is swept over more narrow frequency ranges. Also, with the
narrowed range (FIGURE F-1), the noise frequency that exists at 4150 Hz is
completely ignored and is not relevant because it lies outside the sampling
frequency range; excitation is limited outside the swept frequency range as
well.
F-1
Page 88

Appendix F. Time Series and Spectrum Graph Information
FIGURE F-1. Good Sensor with a Narrower Range (200 to 2200 Hz)
F-2
FIGURE F-2. Good Sensor with a Wider Range (200 to 6500 Hz)
Page 89

F.2 Good Sensors with Noise
The measurements graphed in FIGURE F-3 and FIGURE F-4 are made by the
same sensor used for FIGURE F-1 and FIGURE F-2. However, for FIGURE
F-3 and FIGURE F-4, a drill is running about ½ inch away from the sensor.
This shows the effects of narrowing the begin/end frequency to deal with noise
generated by an electric motor. The narrow frequency range in F.2-1 has
reduced the effects of the noise source and has yielded a signal-to-noise ratio of
4 times better than F.2.-2. Notice that if the begin frequency in FIGURE F-4
was much less than 450 Hz, the 60 Hz harmonic would have been the dominate
frequency.
Holding the drill ½ inch away from the sensor is an invasive noise source.
When the sensor is measured with the drill a few inches away, the harmonics
of the 60 Hz are a lot less and are not more dominate than the wire’s natural
frequency. Sensors with a frequency range that are below 450 Hz should work
fine even in the presence of a 50 or 60 Hz noise source, however they should
be characterized.
Appendix E. Status Table
FIGURE F-3. Good Sensor with Noise (600 to 1800 Hz)
F-3
Page 90

Appendix F. Time Series and Spectrum Graph Information
NOTE
FIGURE F-4. Good Sensor with Noise (450 to 6500 Hz)
Check the manufactures specification for the sensors frequency
and excitation range before picking the begin/end frequencies and
excitation voltage.
F-4
Page 91

Appendix G. CR10X Programming Example
Although this example is for the CR10X, the CR23X is programmed similarly.
;{CR10X}
;
;
;
*Table 1 Program
01: 900 Execution Interval (seconds)
1: Do (P86)
1: 42 Set Port 2 High
2: Beginning of Loop (P87)
1: 0000 Delay
2: 16 Loop Count
3: Do (P86)
1: 73 Pulse Port 3
4: Excitation with Delay (P22)
1: 1 Ex Channel
2: 0000 Delay W/Ex (0.01 sec units)
3: 10 Delay After Ex (0.01 sec units)
4: 0000 mV Excitation
5: SDI-12 Recorder (P105)
1: 0 SDI-12 Address
2: 1 Start Measurement (aM1!)
3: 1 Port
4: 91 Loc [ VW ]
5: 1.0 Multiplier
6: 0.0 Offset
6: Z=X (P31) ;Write Freq to inlocs 1-16
1: 91 X Loc [ VW ]
2: 1 -- Z Loc [ Freq_1 ]
7: Z=X (P31) ;Write Amp to inlocs 17-32
1: 92 X Loc [ Amplitude ]
2: 17 -- Z Loc [ Amp_1 ]
8: Z=X (P31) ;Write Signal to Noise ratio to inlocs 33-48
1: 93 X Loc [ Sig2Noise ]
2: 3 -- Z Loc [ S2Noise_1 ]
9: Z=X (P31) ;Write Frequency of Noise to inlocs 49-64
1: 94 X Loc [ NoiseFreq ]
2: 49 -- Z Loc [ NsFreq_1 ]
G-1
Page 92

Appendix G. CR10X Programming Example
10: Z=X (P31) ;Write Decay Ratio to inlocs 65-80
1: 95 X Loc [ DcayRatio ]
2: 65 -- Z Loc [ Decay_1 ]
11: Z=X (P31) ;Write Thermister resistance to inlocs 81-96
1: 96 X Loc [ Thrmister ]
2: 81 -- Z Loc [ Therm_1 ]
12: Z=X*F (P37)
1: 76 -- X Loc [ Therm_1 ]
2: .001 F
3: 76 -- Z Loc [ Therm_1 ]
13: End (P95)
14: Do (P86)
1: 52 Set Port 2 Low
15: Do (P86)
1: 10 Set Output Flag High (Flag 0)
16: Real Time (P77)^25459
1: 1220 Year,Day,Hour/Minute (midnight = 2400)
17: Sample (P70)^326
1: 96 Reps
2: 1 Loc [ Freq_1 ]
*Table 2 Program
02: 0.0000 Execution Interval (seconds)
*Table 3 Subroutines
End Program
G-2
Page 93

Appendix H. Additional Programming Examples
H.1 AVW200-Controlled Multiplexer
H.1.1 Direct RS-232 Connection
'This is an example of a program used by a CR1000 and AVW200 to control two AM16/32B multiplexers.
'Sixteen Geokon 4450 VW displacement sensors are attached to each multiplexer and each sensor
'provides a frequency, which is converted to displacement, and resistance, which is converted to
'temperature. Polynomial Gage Factors used in this example were taken from the calibration sheets of
'the individual 4450 sensors. The coefficients used 'to convert resistance to temperature are from the
'Steinhart-Hart equation.
Public batt_volt,Ptemp
Public Mux1(16,6)
Public Mux2(16,6)
Public VWResults(2)
Public Amp1(16),Amp2(16)
Public Temp1(16),Temp2(16)
Public Therm1(16),Therm2(16)
Public VWfreq1(16),VWfreq2(16)
Public Sig2Noise1(16),Sig2Noise2(16)
Public DecayRatio1(16),DecayRatio2(16)
Public FreqOfNoise1(16),FreqOfNoise2(16)
Public Displacement1(16),Displacement2(16)
Dim i
Dim j
Dim Digits
Dim ZeroRding(32)
Dim GageFactor(32)
Dim PolyCoef1(48) As Float
Dim PolyCoef2(48) As Float
Dim CoefString1(16) As String *30
Dim CoefString2(16) As String *30
Const A=.001403040 'Coefficients for Steinhart-Hart equation
Const B=.000237318 'used to convert resistance to Temp
Const C=.00000009
DataTable (MuxExample,1,-1)
DataInterval (0,10,Min,10)
Minimum (1,batt_volt,FP2,0,False)
Sample (16,Displacement1(),FP2)
Sample (16,VWfreq1(),FP2)
Sample (16,Temp1(),FP2)
Sample (16,Amp1(),FP2)
Sample (16,Sig2Noise1(),FP2)
Sample (16,FreqOfNoise1(),FP2)
Sample (16,DecayRatio1(),FP2)
H-1
Page 94

Appendix H. Additional Programming Examples
Sample (16,Displacement2(),FP2)
Sample (16,VWfreq2(),FP2)
Sample (16,Temp2(),FP2)
Sample (16,Amp2(),FP2)
Sample (16,Sig2Noise2(),FP2)
Sample (16,FreqOfNoise2(),FP2)
Sample (16,DecayRatio2(),FP2)
EndTable
BeginProg
SerialOpen (COMRS232,38400,0,0,10000)
'Enter the 3 Polynomial Gage Factors for each sensor as listed on each Calibration Report
CoefString1(1) = "2.49866e-10, 8.716e-5, -0.20003"
CoefString1(2) = "2.56640e-10, 8.762e-5, -0.20437"
CoefString1(3) = "2.93650e-10, 8.715e-5, -0.19679"
CoefString1(4) = "1.99647e-10, 8.868e-5, -0.19430"
CoefString1(5) = "3.41276e-10, 8.777e-5, -0.19042"
CoefString1(6) = "2.30397e-10, 8.720e-5, -0.19085"
Coefstring1(7) = "2.54131e-10, 8.743e-5, -0.19218"
CoefString1(8) = "2.21677e-10, 8.832e-5, -0.20539"
CoefString1(9) = "2.85034e-10, 8.734e-5, -0.19341"
CoefString1(10) = "2.42310e-10, 8.808e-5, -0.19576"
CoefString1(11) = "2.52871e-10, 8.804e-5, -0.19232"
CoefString1(12) = "2.27416e-10, 8.797e-5, -0.19552"
CoefString1(13) = "2.27264e-10, 8.798e-5, -0.19522"
CoefString1(14) = "2.87777e-10, 8.682e-5, -0.20353"
CoefString1(15) = "2.81051e-10, 8.767e-5, -0.19691"
CoefString1(16) = "2.41462e-10, 8.747e-5, -0.19481"
CoefString2(1) = "2.73949e-10, 8.726e-5, -0.20799"
CoefString2(2) = "2.91941e-10, 8.722e-5, -0.20443"
CoefString2(3) = "2.32081e-10, 8.789e-5, -0.20064"
CoefString2(4) = "3.17163e-10, 8.741e-5, -0.19108"
CoefString2(5) = "2.66284e-10, 8.810e-5, -0.19411"
CoefString2(6) = "2.7768e-10, 8.756e-5, -0.19630"
CoefString2(7) = "2.06552e-10, 8.866e-5, -0.20578"
CoefString2(8) = "2.22761e-10, 8.848e-5, -0.20013"
CoefString2(9) = "2.31843e-10, 8.880e-5, -0.19643"
CoefString2(10) = "2.42310e-10, 8.808e-5, -0.19576"
CoefString2(11) = "1.99647e-10, 8.868e-5, -0.19430"
CoefString2(12) = "2.56640e-10, 8.762e-5, -0.20437"
CoefString2(13) = "2.81051e-10, 8.767e-5, -0.19691"
CoefString2(14) = "2.81051e-10, 8.767e-5, -0.19691"
CoefString2(15) = "2.49866e-10, 8.716e-5, -0.20003"
CoefString2(16) = "2.27264e-10, 8.798e-5, -0.19522"
For i = 1 To 16
SplitStr (PolyCoef1(3*i-2),CoefString1(i),",",3,5) 'Assign
coeficients listed in CoefString1 to individual variables
Next i
H-2
Page 95

Appendix H. Additional Programming Examples
'Assign coeficients listed in CoefString2 to individual variables
For i = 1 To 16
SplitStr (PolyCoef2(3*i-2),CoefString2(i),",",3,5)
Next i
Scan (2,Min,0,0)
PanelTemp (PTemp,250)
Battery (Batt_volt)
AVW200(VWResults(1),ComRS232,0,15,Mux1(1,1),1,1,16,1000,2500,2,_60Hz,1,0)
For i = 1 To 16
Amp1(i) = Mux1(i,2)
Therm1(i) = Mux1(i,6)
VWFreq1(i) = Mux1(i,1)
Sig2Noise1(i) = Mux1(i,3)
DecayRatio1(i) = Mux1(i,5)
FreqOfNoise1(i) = Mux1(i,4)
Digits = (VWFreq1(i)/1000)^2 * 1000 'Convert frequency to Digits
'Convert resistance to temp F.
Temp1(i) = (1/(A + B*LN(Therm1(i)) +C*(LN(Therm1(i)))^3)-273.15)*1.8+32
'Calculate displacement (inches) from Digits and calibration polynomial
Displacement1(i)=PolyCoef1(3*i-2)*Digits^2 + PolyCoef1(3*i-1)*Digits+ PolyCoef2(3*i)
Next i
AVW200(VWResults(2),ComRS232,0,15,Mux2(1,1),2,1,8,1000,2500,2,_60Hz,1, 0)
AVW200(VWResults(2),ComRS232,0,15,Mux2(9,1),2,9,8,450,6500,2,_60Hz,1,0)
For i = 1 To 16
Amp2(i) = Mux1(i,2)
Therm2(i) = Mux1(i,6)
VWFreq2(i) = Mux1(i,1)
Sig2Noise2(i) = Mux1(i,3)
DecayRatio2(i) = Mux1(i,5)
FreqOfNoise2(i) = Mux1(i,4)
Digits = (VWFreq2(i)/1000)^2 * 1000 'Convert frequency to Digits
'Calculate displacement (inches) from Digits and calibration ploynomial
Displacement2(i)=PolyCoef2(3*i-2)*Digits^2 + PolyCoef2(3*i-1)*Digits + PolyCoef2(3*i)
'Convert resistance to temp F.
Temp2(i) = (1/(A + B*LN(Therm2(i)) + C*(LN(Therm2(i)))^3)-273.15)*1.8+32
Next i
CallTable MuxExample
NextScan
EndProg
H-3
Page 96

Appendix H. Additional Programming Examples
H.1.2 Wireless/Sensors with Different Frequencies
'
'This is an example of a program used by a CR1000 and AVW206 to control two
'AM16/32B multiplexers. Sixteen Geokon 4450 VW displacement sensors are
'attached to each multiplexer and each sensor provides a frequency, which is
'converted to displacement, and resistance, which is converted to
'temperature. Polynomial Gage Factors used in this example were taken
'from the calibration sheets of the individual 4450 sensors. The
'coefficients used to convert resistance to temperature are from the
'Steinhart-Hart equation.
'The CR1000 communicates with the remote AVW206 through a RF401 radio attached to the
logger's CS/IO port in Modem Enable mode.
'The Pakbus address of the AVW206 used in this example is 20
Public batt_volt,Ptemp
Public Mux1(16,6)
Public Mux2(16,6)
Public VWResults(2)
Public Amp1(16),Amp2(16)
Public Temp1(16),Temp2(16)
Public Therm1(16),Therm2(16)
Public VWfreq1(16),VWfreq2(16)
Public Sig2Noise1(16),Sig2Noise2(16)
Public DecayRatio1(16),DecayRatio2(16)
Public FreqOfNoise1(16),FreqOfNoise2(16)
Public Displacement1(16),Displacement2(16)
Dim i
Dim j
Dim Digits
Dim ZeroRding(32)
Dim GageFactor(32)
Dim PolyCoef1(48) As Float
Dim PolyCoef2(48) As Float
Dim CoefString1(16) As String *30
Dim CoefString2(16) As String *30
Const A=.0014051 'Coefficients for Steinhart-Hart equation
Const B=.0002369 'used to convert resistance to Temp
Const C=.0000001019
'Store Freq, amplitude, signal to noise, freq of noise, decay ratio and ‘resistance from both mux's.
DataTable (MuxExample,1,-1)
DataInterval (0,10,Min,10)
Minimum (1,batt_volt,FP2,0,False)
Sample (16,Displacement1(),FP2)
Sample (16,VWfreq1(),FP2)
Sample (16,Temp1(),FP2)
Sample (16,Amp1(),FP2)
Sample (16,Sig2Noise1(),FP2)
Sample (16,FreqOfNoise1(),FP2)
Sample (16,DecayRatio1(),FP2)
H-4
Page 97

Appendix H. Additional Programming Examples
Sample (16,Displacement2(),FP2)
Sample (16,VWfreq2(),FP2)
Sample (16,Temp2(),FP2)
Sample (16,Amp2(),FP2)
Sample (16,Sig2Noise2(),FP2)
Sample (16,FreqOfNoise2(),FP2)
Sample (16,DecayRatio2(),FP2)
EndTable
BeginProg
'Enter the 3 Polynomial Gage Factors for each sensor
'as listed on each Calibration Report
CoefString1(1) = "2.49866e-10, 8.716e-5, -0.20003"
CoefString1(2) = "2.56640e-10, 8.762e-5, -0.20437"
CoefString1(3) = "2.93650e-10, 8.715e-5, -0.19679"
CoefString1(4) = "1.99647e-10, 8.868e-5, -0.19430"
CoefString1(5) = "3.41276e-10, 8.777e-5, -0.19042"
CoefString1(6) = "2.30397e-10, 8.720e-5, -0.19085"
Coefstring1(7) = "2.54131e-10, 8.743e-5, -0.19218"
CoefString1(8) = "2.21677e-10, 8.832e-5, -0.20539"
CoefString1(9) = "2.85034e-10, 8.734e-5, -0.19341"
CoefString1(10) = "2.42310e-10, 8.808e-5, -0.19576"
CoefString1(11) = "2.52871e-10, 8.804e-5, -0.19232"
CoefString1(12) = "2.27416e-10, 8.797e-5, -0.19552"
CoefString1(13) = "2.27264e-10, 8.798e-5, -0.19522"
CoefString1(14) = "2.87777e-10, 8.682e-5, -0.20353"
CoefString1(15) = "2.81051e-10, 8.767e-5, -0.19691"
CoefString1(16) = "2.41462e-10, 8.747e-5, -0.19481"
CoefString2(1) = "2.73949e-10, 8.726e-5, -0.20799"
CoefString2(2) = "2.91941e-10, 8.722e-5, -0.20443"
CoefString2(3) = "2.32081e-10, 8.789e-5, -0.20064"
CoefString2(4) = "3.17163e-10, 8.741e-5, -0.19108"
CoefString2(5) = "2.66284e-10, 8.810e-5, -0.19411"
CoefString2(6) = "2.7768e-10, 8.756e-5, -0.19630"
CoefString2(7) = "2.06552e-10, 8.866e-5, -0.20578"
CoefString2(8) = "2.22761e-10, 8.848e-5, -0.20013"
CoefString2(9) = "2.31843e-10, 8.880e-5, -0.19643"
CoefString2(10) = "2.42310e-10, 8.808e-5, -0.19576"
CoefString2(11) = "1.99647e-10, 8.868e-5, -0.19430"
CoefString2(12) = "2.56640e-10, 8.762e-5, -0.20437"
CoefString2(13) = "2.81051e-10, 8.767e-5, -0.19691"
CoefString2(14) = "2.81051e-10, 8.767e-5, -0.19691"
CoefString2(15) = "2.49866e-10, 8.716e-5, -0.20003"
CoefString2(16) = "2.27264e-10, 8.798e-5, -0.19522"
'Assign coefficients listed in CoefString1 to individual variables
For i = 1 To 16
SplitStr (PolyCoef1(3*i-2),CoefString1(i),",",3,5)
Next i
'Assign coefficients listed in CoefString2 to individual variables
For i = 1 To 16
SplitStr (PolyCoef2(3*i-2),CoefString2(i),",",3,5)
Next i
H-5
Page 98

Appendix H. Additional Programming Examples
Scan (2,Min,0,0)
PanelTemp (PTemp,250)
Battery (Batt_volt)
AVW200(VWResults(1),ComME,0,20,Mux1(1,1),1,1,16,1000,2500,2,_60Hz,1,0)
For i = 1 To 16
Amp1(i) = Mux1(i,2)
Therm1(i) = Mux1(i,6)
VWFreq1(i) = Mux1(i,1)
Sig2Noise1(i) = Mux1(i,3)
DecayRatio1(i) = Mux1(i,5)
FreqOfNoise1(i) = Mux1(i,4)
Digits = (VWFreq1(i)/1000)^2 * 1000 'Convert frequency to Digits
'Convert resistance to temp F.
Temp1(i) = (1/(A + B*LN(Therm1(i)) + C*(LN(Therm1(i)))^3)-273.15)*1.8+32
'Calculate displacement (inches) from Digits and calibration polynomial
Displacement1(i)=PolyCoef1(3*i-2)*Digits^2 + PolyCoef1(3*i-1)*Digits + PolyCoef2(3*i)
Next i
'Sensors 1-8 are excited over the freq range of 1000 - 2500
AVW200(VWResults(2),ComME,0,20,Mux2(1,1),2,1,8,1000,2500,2,_60Hz,1,0)
'Sensors 9-16 are excited over the freq range of 450 – 6500
AVW200(VWResults(2),ComME,0,20,Mux2(9,1),2,9,8,450,6500,2,_60Hz,1,0)
For i = 1 To 16
Amp2(i) = Mux1(i,2)
Therm2(i) = Mux1(i,6)
VWFreq2(i) = Mux1(i,1)
Sig2Noise2(i) = Mux1(i,3)
DecayRatio2(i) = Mux1(i,5)
FreqOfNoise2(i) = Mux1(i,4)
Digits = (VWFreq2(i)/1000)^2 * 1000 'Convert frequency to Digits
'Calculate displacement (inches) from Digits and calibration polynomial
Displacement2(i)=PolyCoef2(3*i-2)*Digits^2 + PolyCoef2(3*i-1)*Digits + PolyCoef2(3*i)
'Convert resistance to temp F.
Temp2(i) = (1/(A + B*LN(Therm2(i)) + C*(LN(Therm2(i)))^3)-273.15)*1.8+32
Next i
CallTable MuxExample
NextScan
EndProg
H-6
Page 99

Appendix H. Additional Programming Examples
H.2 Datalogger-Controlled Multiplexer
'
'This example demonstrates how to program a CR1000 to collect measurements from sensors
'attached to four AM16/32 multiplexers. The four multiplexers are controlled directly
'by the data logger, not through the AVW200 as in other examples contained in this
'manual. Displacement is calculated from the measured frequencies by applying the
'Polynomial Gage Factors contained in each sensors' calibration report. Only the
'resistance from each thermistor is measured. Temp is calculated by applying the
'resistance to a known equation which converts resistance to temp. Temperature
'correction is not shown in this example. In this example 16
'VW displacement sensors with thermistors are attached to both the first and second
'multiplexers, while only 9 similar sensors are attached to the third multiplexer.
'32 VW displacement sensors with no thermistors are attached to the fourth multiplexer.
'
SequentialMode
Public batt_volt
Public Mux(6)
Public VWResults
Public Temp1(16),Temp2(16),Temp3(12)
Public Amp1(16),Amp2(16),Amp3(12),Amp4(32)
Public VWfreq1(16),VWfreq2(16), VWFreq3(9),VWFreq4(32)
Public Sig2Noise1(16),Sig2Noise2(16),Sig2Noise3(12),Sig2Noise4(32)
Public DecayRatio1(16),DecayRatio2(16),DecayRatio3(9),DecayRatio4(32)
Public FreqOfNoise1(16),FreqOfNoise2(16),FreqOfNoise3(12),FreqOfNoise4(32)
Public Displacement1(16),Displacement2(16), Displacement3(9),Displacement4(32)
Dim i
Dim j
Dim Digits
Dim Coef1(48)
Dim Coef2(48)
Dim Coef3(27)
Dim Coef4(96)
Const A=.0014051 'Coefficients for Steinhart-Hart equation
Const B=.0002369 'used to convert resistance to Temp
Const C=.0000001019
DataTable (MuxExample,1,-1)
DataInterval (0,15,Min,10)
Minimum (1,batt_volt,FP2,0,False)
Sample (16,Displacement1(),FP2)
Sample (16,VWfreq1(),FP2)
Sample (16,Temp1(),FP2)
Sample (16,Amp1(),FP2)
Sample (16,Sig2Noise1(),FP2)
Sample (16,FreqOfNoise1(),FP2)
Sample (16,DecayRatio1(),FP2)
Sample (16,Displacement2(),FP2)
Sample (16,VWfreq2(),FP2)
Sample (16,Temp2(),FP2)
Sample (16,Amp2(),FP2)
H-7
Page 100

Appendix H. Additional Programming Examples
Sample (16,Sig2Noise2(),FP2)
Sample (16,FreqOfNoise2(),FP2)
Sample (16,DecayRatio2(),FP2)
Sample (9,Displacement3(),FP2)
Sample (9,VWfreq3(),FP2)
Sample (9,Temp3(),FP2)
Sample (9,Amp3(),FP2)
Sample (9,Sig2Noise3(),FP2)
Sample (9,FreqOfNoise3(),FP2)
Sample (9,DecayRatio3(),FP2)
Sample (32,Displacement4(),FP2)
Sample (32,VWfreq4(),FP2)
Sample (32,Amp4(),FP2)
Sample (32,Sig2Noise4(),FP2)
Sample (32,FreqOfNoise4(),FP2)
Sample (32,DecayRatio4(),FP2)
EndTable
BeginProg
'Enter the 3 Polynomial Gage Factors for each sensor as listed on each Calibration Report
'Gage Factors for sensors attached to AM16/32 #1
Coef1(1) = 2.49866e-10: Coef1(2) = 8.716e-5: Coef1(3) = -0.20003
Coef1(4) = 2.56640e-10: Coef1(5) = 8.762e-5: Coef1(6) = -0.20437
Coef1(7) = 2.93650e-10: Coef1(8) = 8.715e-5: Coef1(9) = -0.19679
Coef1(10) = 1.99647e-10: Coef1(11) = 8.868e-5: Coef1(12) = -0.19430
Coef1(13) = 3.41276e-10: Coef1(14) = 8.777e-5: Coef1(15) = -0.19042
Coef1(16) = 2.30397e-10: Coef1(17) = 8.720e-5: Coef1(18) = -0.19085
Coef1(19) = 2.54131e-10: Coef1(20) = 8.743e-5: Coef1(21) = -0.19218
Coef1(22) = 2.21677e-10: Coef1(23) = 8.832e-5: Coef1(24) = -0.20539
Coef1(25) = 2.85034e-10: Coef1(26) = 8.734e-5: Coef1(27) = -0.19341
Coef1(28) = 2.42310e-10: Coef1(29) = 8.808e-5: Coef1(30) = -0.19576
Coef1(31) = 2.52871e-10: Coef1(32) = 8.804e-5: Coef1(33) = -0.19232
Coef1(34) = 2.27416e-10: Coef1(35) = 8.797e-5: Coef1(36) = -0.19552
Coef1(37) = 2.27264e-10: Coef1(38) = 8.798e-5: Coef1(39) = -0.19522
Coef1(40) = 2.87777e-10: Coef1(41) = 8.682e-5: Coef1(42) = -0.20353
Coef1(43) = 2.81051e-10: Coef1(44) = 8.767e-5: Coef1(45) = -0.19691
Coef1(46) = 2.41462e-10: Coef1(47) = 8.747e-5: Coef1(48) = -0.19481
'Gage Factors for sensors attached to AM16/32 #2
Coef2(1) = 2.73949e-10: Coef2(2) = 8.726e-5: Coef2(3) = -0.20799
Coef2(4) = 2.91941e-10: Coef2(5) = 8.722e-5: Coef2(6) = -0.20443
Coef2(7) = 2.32081e-10: Coef2(8) = 8.789e-5: Coef2(9) = -0.20064
Coef2(10) = 3.17163e-10: Coef2(11) = 8.741e-5: Coef2(12) = -0.19108
Coef2(13) = 2.66284e-10: Coef2(14) = 8.810e-5: Coef2(15) = -0.19411
Coef2(16) = 2.77680e-10: Coef2(17) = 8.756e-5: Coef2(18) = -0.19630
Coef2(19) = 2.06552e-10: Coef2(20) = 8.866e-5: Coef2(21) = -0.20578
Coef2(22) = 2.22761e-10: Coef2(23) = 8.848e-5: Coef2(24) = -0.20013
Coef2(25) = 2.31843e-10: Coef2(26) = 8.880e-5: Coef2(27) = -0.19643
Coef2(28) = 2.42310e-10: Coef2(29) = 8.808e-5: Coef2(30) = -0.19576
Coef2(31) = 1.99647e-10: Coef2(32) = 8.868e-5: Coef2(33) = -0.19430
Coef2(34) = 2.56640e-10: Coef2(35) = 8.762e-5: Coef2(36) = -0.20437
Coef2(37) = 2.81051e-10: Coef2(38) = 8.767e-5: Coef2(39) = -0.19691
Coef2(40) = 2.81051e-10: Coef2(41) = 8.767e-5: Coef2(42) = -0.19691
Coef2(43) = 2.49866e-10: Coef2(44) = 8.716e-5: Coef2(45) = -0.20003
Coef2(46) = 2.27264e-10: Coef2(47) = 8.798e-5: Coef2(48) = -0.19522
H-8
 Loading...