

Page 1
INSTRUCTION MANUAL
AP200 CO2/H2O
Copyright © 2012- 2014
Campbell Scientific, Inc.
Atmospheric Profile System
Revision: 4/14
Page 2

Page 3

Limited Warranty
“Products manufactured by CSI are warranted by CSI to be free from defects in
materials and workmanship under normal use and service for twelve months
from the date of shipment unless otherwise specified in the corresponding
product manual. (Product manuals are available for review online at
www.campbellsci.com.) Products not manufactured by CSI, but that are resold
by CSI, are warranted only to the limits extended by the original manufacturer.
Batteries, fine-wire thermocouples, desiccant, and other consumables have no
warranty. CSI’s obligation under this warranty is limited to repairing or
replacing (at CSI’s option) defective Products, which shall be the sole and
exclusive remedy under this warranty. The Customer assumes all costs of
removing, reinstalling, and shipping defective Products to CSI. CSI will return
such Products by surface carrier prepaid within the continental United States of
America. To all other locations, CSI will return such Products best way CIP
(port of entry) per Incoterms ® 2010. This warranty shall not apply to any
Products which have been subjected to modification, misuse, neglect, improper
service, accidents of nature, or shipping damage. This warranty is in lieu of all
other warranties, expressed or implied. The warranty for installation services
performed by CSI such as programming to customer specifications, electrical
connections to Products manufactured by CSI, and Product specific training, is
part of CSI's product warranty. CSI EXPRESSLY DISCLAIMS AND
EXCLUDES ANY IMPLIED WARRANTIES OF MERCHANTABILITY
OR FITNESS FOR A PARTICULAR PURPOSE. CSI hereby disclaims,
to the fullest extent allowed by applicable law, any and all warranties and
conditions with respect to the Products, whether express, implied or
statutory, other than those expressly provided herein.”
Page 4

Assistance
Products may not be returned without prior authorization. The following
contact information is for US and international customers residing in countries
served by Campbell Scientific, Inc. directly. Affiliate companies handle
repairs for customers within their territories. Please visit
www.campbellsci.com to determine which Campbell Scientific company serves
your country.
To obtain a Returned Materials Authorization (RMA), contact CAMPBELL
SCIENTIFIC, INC., phone (435) 227-9000. After an application engineer
determines the nature of the problem, an RMA number will be issued. Please
write this number clearly on the outside of the shipping container. Campbell
Scientific’s shipping address is:
CAMPBELL SCIENTIFIC, INC.
RMA#_____
815 West 1800 North
Logan, Utah 84321-1784
For all returns, the customer must fill out a “Statement of Product Cleanliness
and Decontamination” form and comply with the requirements specified in it.
The form is available from our web site at www.campbellsci.com/repair. A
completed form must be either emailed to repair@campbellsci.com or faxed to
(435) 227-9106. Campbell Scientific is unable to process any returns until we
receive this form. If the form is not received within three days of product
receipt or is incomplete, the product will be returned to the customer at the
customer’s expense. Campbell Scientific reserves the right to refuse service on
products that were exposed to contaminants that may cause health or safety
concerns for our employees.
Page 5

Precautions
DANGER — MANY HAZARDS ARE ASSOCIATED WITH INSTALLING, USING, MAINTAINING, AND WORKING ON OR AROUND
TRIPODS, TOWERS, AND ANY ATTACHMENTS TO TRIPODS AND TOWERS SUCH AS SENSORS, CROSSARMS, ENCLOSURES,
ANTENNAS, ETC. FAILURE TO PROPERLY AND COMPLETELY ASSEMBLE, INSTALL, OPERATE, USE, AND MAINTAIN TRIPODS,
TOWERS, AND ATTACHMENTS, AND FAILURE TO HEED WARNINGS, INCREASES THE RISK OF DEATH, ACCIDENT, SERIOUS
INJURY, PROPERTY DAMAGE, AND PRODUCT FAILURE. TAKE ALL REASONABLE PRECAUTIONS TO AVOID THESE HAZARDS.
CHECK WITH YOUR ORGANIZATION'S SAFETY COORDINATOR (OR POLICY) FOR PROCEDURES AND REQUIRED PROTECTIVE
EQUIPMENT PRIOR TO PERFORMING ANY WORK.
Use tripods, towers, and attachments to tripods and towers only for purposes for which they are designed. Do not exceed design
limits. Be familiar and comply with all instructions provided in product manuals. Manuals are available at www.campbellsci.com or
by telephoning 435-227-9000 (USA). You are responsible for conformance with governing codes and regulations, including safety
regulations, and the integrity and location of structures or land to which towers, tripods, and any attachments are attached. Installation
sites should be evaluated and approved by a qualified engineer. If questions or concerns arise regarding installation, use, or
maintenance of tripods, towers, attachments, or electrical connections, consult with a licensed and qualified engineer or electrician.
General
• Prior to performing site or installation work, obtain required approvals and permits. Comply
with all governing structure-height regulations, such as those of the FAA in the USA.
• Use only qualified personnel for installation, use, and maintenance of tripods and towers, and
any attachments to tripods and towers. The use of licensed and qualified contractors is highly
recommended.
• Read all applicable instructions carefully and understand procedures thoroughly before
beginning work.
• Wear a hardhat and eye protection, and take other appropriate safety precautions while
working on or around tripods and towers.
• Do not climb tripods or towers at any time, and prohibit climbing by other persons. Take
reasonable precautions to secure tripod and tower sites from trespassers.
• Use only manufacturer recommended parts, materials, and tools.
Utility and Electrical
• You can be killed or sustain serious bodily injury if the tripod, tower, or attachments you are
installing, constructing, using, or maintaining, or a tool, stake, or anchor, come in contact with
overhead or underground utility lines.
• Maintain a distance of at least one-and-one-half times structure height, or 20 feet, or the
distance required by applicable law, whichever is greater, between overhead utility lines and
the structure (tripod, tower, attachments, or tools).
• Prior to performing site or installation work, inform all utility companies and have all
underground utilities marked.
• Comply with all electrical codes. Electrical equipment and related grounding devices should
be installed by a licensed and qualified electrician.
Elevated Work and Weather
• Exercise extreme caution when performing elevated work.
• Use appropriate equipment and safety practices.
• During installation and maintenance, keep tower and tripod sites clear of un-trained or non-
essential personnel. Take precautions to prevent elevated tools and objects from dropping.
• Do not perform any work in inclement weather, including wind, rain, snow, lightning, etc.
Maintenance
• Periodically (at least yearly) check for wear and damage, including corrosion, stress cracks,
frayed cables, loose cable clamps, cable tightness, etc. and take necessary corrective actions.
• Periodically (at least yearly) check electrical ground connections.
WHILE EVERY ATTEMPT IS MADE TO EMBODY THE HIGHEST DEGREE OF SAFETY IN ALL CAMPBELL SCIENTIFIC PRODUCTS,
THE CUSTOMER ASSUMES ALL RISK FROM ANY INJURY RESULTING FROM IMPROPER INSTALLATION, USE, OR
MAINTENANCE OF TRIPODS, TOWERS, OR ATTACHMENTS TO TRIPODS AND TOWERS SUCH AS SENSORS, CROSSARMS,
ENCLOSURES, ANTENNAS, ETC.
Page 6

Page 7

Table of Contents
PDF viewers: These page numbers refer to the printed version of this document. Use the
PDF reader bookmarks tab for links to specific sections.
1. Introduction ................................................................. 1
2. Cautionary Statements ............................................... 1
3. Initial Inspection ......................................................... 2
4. Overview ...................................................................... 2
4.1 System Components ............................................................................. 2
4.1.1 Standard Components ................................................................... 2
4.1.2 Optional Components ................................................................... 4
4.1.3 Common Accessories .................................................................... 6
4.1.4 Other Accessories ......................................................................... 9
4.1.5 Support Software .......................................................................... 9
4.1.6 Replacement Parts ....................................................................... 10
4.2 Theory of Operation ........................................................................... 11
4.2.1 Intake Assemblies ....................................................................... 13
4.2.2 Valve Manifold ........................................................................... 15
4.2.3 Pump Module .............................................................................. 16
4.3 Specifications ..................................................................................... 18
4.3.1 CO2/H2O Analyzer ...................................................................... 18
4.3.2 System Enclosure ........................................................................ 18
4.3.3 Intake Assembly .......................................................................... 20
5. Installation ................................................................. 20
5.1 Mounting ............................................................................................ 20
5.1.1 Support Structure ........................................................................ 20
5.1.2 AP200 Enclosure ........................................................................ 21
5.1.3 Intake Assemblies ....................................................................... 21
5.2 Plumbing ............................................................................................ 23
5.2.1 Profile Sample Tubes .................................................................. 23
5.2.2 Zero and CO2 Span ..................................................................... 25
5.2.3 H2O Span .................................................................................... 26
5.3 Wiring ................................................................................................ 27
5.3.1 Ground Connection ..................................................................... 27
5.3.2 Intake Heater Cables ................................................................... 28
5.3.3 Power .......................................................................................... 32
5.4 Configure the Program ....................................................................... 34
5.4.1 System Configuration Variables ................................................. 35
5.4.2 Compile Switches ....................................................................... 37
5.5 Starting and Stopping the Sequence ................................................... 37
5.6 Verify Performance ............................................................................ 38
5.6.1 Quick Status Check Using a Keyboard Display .......................... 38
5.6.2 Checking Status Remotely .......................................................... 39
i
Page 8

Table of Contents
5.6.3 On-site System Checks ............................................................... 39
6. Infrared Gas Analyzer (IRGA) Zero and Span ......... 40
6.1 Automatic Zero and Span .................................................................. 40
6.2 Manual Zero and Span ....................................................................... 41
6.2.1 Check Zero and CO2 Span .......................................................... 41
6.2.2 Do CO2 and H2O Zero ................................................................ 42
6.2.3 Do CO2 Span .............................................................................. 43
6.2.4 Do H2O Span .............................................................................. 44
6.2.5 Restart the Sequence .................................................................. 46
6.2.6 Check the System ....................................................................... 46
7. Maintenance and Troubleshooting .......................... 46
7.1 Plumbing Leaks ................................................................................. 46
7.2 Enclosure Desiccant .......................................................................... 47
7.3 Intake Filters ...................................................................................... 47
7.4 LI-840A (IRGA) ................................................................................ 50
7.4.1 Installing and Removing the IRGA ............................................ 50
7.4.2 Configuring the IRGA ................................................................ 51
7.5 Zero/Span Flow ................................................................................. 52
8. Repair ......................................................................... 53
Appendices
A.
Keyboard Display Menu ......................................... A-1
B. AP200 Diagnostics .................................................. B-1
C. Public Variables ...................................................... C-1
D. Output Tables .......................................................... D-1
E. Temperature Profile ................................................ E-1
F. Valve Sequence Timing .......................................... F-1
G. AC/DC Adapter Kit .................................................. G-1
H. Using Swagelok® Fittings ....................................... H-1
H.1 Assembly ......................................................................................... H-1
H.2 Common Replacement Parts ........................................................... H-2
I. Useful Equations ...................................................... I-1
ii
Page 9

Table of Contents
J. AP200 Pump Replacement ...................................... J-1
J.1 Introduction ....................................................................................... J-1
J.2 Removal ............................................................................................ J-1
J.3 Installation ......................................................................................... J-4
Figures
4-1. Interior of AP200 system enclosure ..................................................... 3
4-2. Side view of AP200 intake assembly ................................................... 3
4-3. Side view of earlier generation AP200 intake assembly ...................... 4
4-4. The IRGA installed in the AP200 system enclosure ............................ 4
4-5. Campbell Scientific NL115 and CFM100 CompactFlash® storage
modules ............................................................................................ 5
4-6. CFMC2G 2GB CompactFlash® memory card ..................................... 5
4-7. AP200 keyboard display mounted in system enclosure ....................... 6
4-8. AC/DC power adapter kit installed in AP200 ...................................... 7
4-9. 17752 USB memory card reader/writer ............................................... 8
4-10. 107-L temperature probe mounted with radiation shield ..................... 8
4-11. CR1000KD handheld keyboard/display ............................................... 9
4-12. Syringe filter of current AP200 intake assembly ............................... 10
4-13. Disk filter of early AP200 intake assembly ........................................ 10
4-14. Single desiccant pack ......................................................................... 10
4-15. Humidity indicator card ..................................................................... 11
4-16. Diaphragm pump used in AP200 ....................................................... 11
4-17. Plumbing diagram of AP200 system .................................................. 12
4-18. AP200 intake assembly shown open .................................................. 13
4-19. Nominal ambient pressure as related to increasing elevation ............. 14
4-20. Nominal sample flow rate as related to increasing ambient
pressure ........................................................................................... 14
4-21. Valve module and Swagelok® feedthrough fittings on bottom
of AP200 enclosure ........................................................................ 15
4-22. Pump module of AP200 system ......................................................... 17
4-23. Average power consumption relative to temperature ......................... 19
5-1. Installation (showing mounting hardware) of AP200 system
enclosure on UT30 tower ............................................................... 21
5-2. Mounting clip orientation for pipe diameters between 1.3 and
3.8 cm ............................................................................................. 22
5-3. Mounting clip orientation for pipe diameters between 3.9 and
5.1 cm ............................................................................................. 23
5-4. Installation of AP200 assembly on a small-diameter pipe (left)
and large-diameter pipe (right) ....................................................... 23
5-5. Tubing connections on bottom of AP200 enclosure .......................... 24
5-6. Labeled inlet connections inside enclosure ........................................ 24
5-7. Tubing connections from four intake assemblies connected to
inlets 1 – 4 ...................................................................................... 25
5-8. AP200 system enclosure configured with cylinders of zero air
and CO
5-9. H2O span inlet configured for a dewpoint generator .......................... 27
5-10. AP200 earth grounded on a UT30 tower ............................................ 27
5-11. Cable feedthrough cap shown removed to admit cables into the
system enclosure ............................................................................. 28
5-12. Proper wiring of heater cable onto DIN bus of AP200 system
enclosure ......................................................................................... 29
5-13. Use AP200 system screwdriver to open contacts for wiring heater
cable ................................................................................................ 29
.......................................................................................... 26
2
iii
Page 10

Table of Contents
5-14. Tabs for opening intake assembly ..................................................... 30
5-15. Wiring of heater cable on AP200 intake assembly ............................ 30
5-16. Three intake assemblies with heater cables daisy chained to the
AP200 system enclosure ................................................................ 31
5-17. Proper wiring of power cable onto DIN bus of AP200 system
enclosure ........................................................................................ 33
5-18. Power cables secured to cable tie loop on pump module of AP200
enclosure ........................................................................................ 33
5-19. Cut-away view showing proper replacement of feedthrough cap ...... 34
7-1. Releasing rain diverter from intake assembly ................................... 48
7-2. Order of replacement for orifice, filter, and rain diverter .................. 49
7-3. Correct reassembly after filter replacement ....................................... 49
7-4. Installed IRGA in system enclosure .................................................. 50
7-5. Components and fittings of IRGA installation .................................. 51
E-1. 107-L temperature probe mounted with radiation shield .................. E-1
G-1. Installation location of power adapter ............................................. G-1
G-2. Bundled cable of power adapter ...................................................... G-1
G-3. Cable extension connected to AP200 power input terminal ............ G-2
G-4. AC power cord secured within AP200 system enclosure ................ G-3
G-5. Power adapter output cable plugged into cable extension ............... G-3
H-1. Swagelok® insert ............................................................................. H-3
H-2. Front and back Swagelok® ferrules ................................................. H-3
H-3. Swagelok® plug ............................................................................... H-4
H-4. Swagelok® cap ................................................................................. H-4
J-1. Location of pump enclosure inside AP200 system enclosure ...........J-1
J-2. Location of six screws of pump enclosure cover ...............................J-2
J-3. AP200 pump ......................................................................................J-2
J-4. Location of pump connector in AP200 pump electronics .................J-3
J-5. Self-tapping screws attaching pump to metal box .............................J-3
J-6. Location of cuts to remove pump assembly from tubing ..................J-4
J-7. Inlet and outlet tubing reconnected to pump .....................................J-4
J-8. Pump side with inlet and outlet tubing connected .............................J-5
Tables
5-1. Equivalent Resistance for Intake Heaters Connected in Parallel ....... 32
7-1. IRGA Settings ................................................................................... 52
7-2. IRGA Outputs .................................................................................... 52
B-1. Summary of Bit Numbers Indicating Conditions Outside Normal
Operating Range .......................................................................... B-1
C-1. Public Variables .............................................................................. C-1
D-1. Variables of the IntAvg Table ......................................................... D-1
D-2. Variables of the CalAvg Table ........................................................ D-4
D-3. Variables of the SiteAvg Table ....................................................... D-6
D-4. Variables of the RawDataTable ....................................................... D-8
D-5. Variables of the TimeInfo Table ................................................... D-10
D-6. Variables of the message_log Table .............................................. D-12
F-1. Profile Sequence-timing Variables ................................................... F-1
F-2. System Configuration Variables of Zero/Span ................................. F-3
F-3. Timing for Zero/Span Sequence (check only) .................................. F-4
F-4. Timing for Zero/Span Sequence (setting the IRGA) ........................ F-5
H-1. Available Plastic Tubing Sizes, Construction, and Usage
Guidelines .................................................................................... H-2
H-2. Dimensions and Part Numbers for Swagelok® Inserts .................... H-3
H-3. Dimensions and Part Numbers for Swagelok® Ferrules .................. H-3
iv
Page 11

Table of Contents
H-4. Dimensions and Part Numbers for Swagelok® Plugs ...................... H-4
H-5. Dimensions and Part Numbers for Swagelok® Caps ....................... H-5
v
Page 12

Table of Contents
vi
Page 13

AP200 CO2/H2O Atmospheric Profile
System
1. Introduction
The AP200 CO2/H2O Atmospheric Profile System (AP200) measures
atmospheric carbon dioxide and water vapor at up to eight positions. Intake
assemblies are normally spaced along the height of a tower to enable
measurement of a vertical profile. The AP200 is commonly used in
conjunction with an eddy-covariance system to measure the storage term to
give a more complete measurement of the surface exchange.
Before using the AP200, please study:
• Section 2, Cautionary Statements
• Section 3, Initial Inspection
• Section 5, Installation
Operational instructions critical to preserving accurate measurements of the
system are found throughout this manual. Before using the AP200, please
study the entire manual. Several other user manuals provide additional
information and should be consulted before using the AP200. These include:
• CR1000 Measurement and Control System Operator’s Manual
• CFM100 CompactFlash
• NL115 Ethernet and CompactFlash
• Application Note 3SM-F, CF Card Information
• ENC10/12, ENC12/14, ENC14/16, ENC16/18 Instruction Manual
• CM106 Tripod Instruction Manual
• Tripod Installation Manual Models CM110, CM115, CM120
• Model 107 Temperature Probe Instruction Manual
®
Module Instruction Manual
®
Module Instruction Manual
all available at www.campbellsci.com, and
• LI-840A CO
available at www.licor.com
2/H2
2. Cautionary Statements
• WARNING:
o The AP200 can be damaged by unfiltered air being pulled into the
sampling sub system. To avoid this, each inlet must be capped or
have a particulate filter installed before applying power to the
system. Use care when connecting and disconnecting intake
assembly tubes, and zero and span tubes (see Section 5.2,
Plumbing) to avoid introducing dust or other contaminates.
o Do not overtighten the Swagelok
or intake assemblies. See Appendix H, Using Swagelok
for information on proper connection.
O Gas Analyzer Instruction Manual
®
fittings on the sampling system
®
Fittings,
1
Page 14

AP200 CO2/H2O Atmospheric Profile System
o Careful design of the power source for the AP200 should be
o Retain all spare caps and plugs as these are required when
3. Initial Inspection
Upon receipt of the AP200, inspect the packaging and contents for damage.
File damage claims with the shipping company.
Model numbers are found on each product. On cables, the model number is
often found at the connection end of the cable. Check this information against
the enclosed shipping documents to verify the expected products and the
correct lengths of cable are included.
4. Overview
The AP200 measures atmospheric carbon dioxide and water vapor at up to
eight positions. Intake assemblies are generally spaced along the height of a
tower to enable measurement of the vertical profile. The AP200 is commonly
used in conjunction with an eddy-covariance system to measure the storage
term to give a more complete measurement of the surface exchange.
undertaken to ensure uninterrupted power. If needed, contact a
Campbell Scientific applications engineer for assistance.
shipping or storing the AP200 system.
4.1 System Components
The AP200 consists of several components, some of which are optional. Some
additional accessories are required to complete a fully functioning AP200
system and are described and illustrated in the sections that follow.
4.1.1 Standard Components
Standard with the AP200 are the AP200 system enclosure and four to eight
intake assemblies.
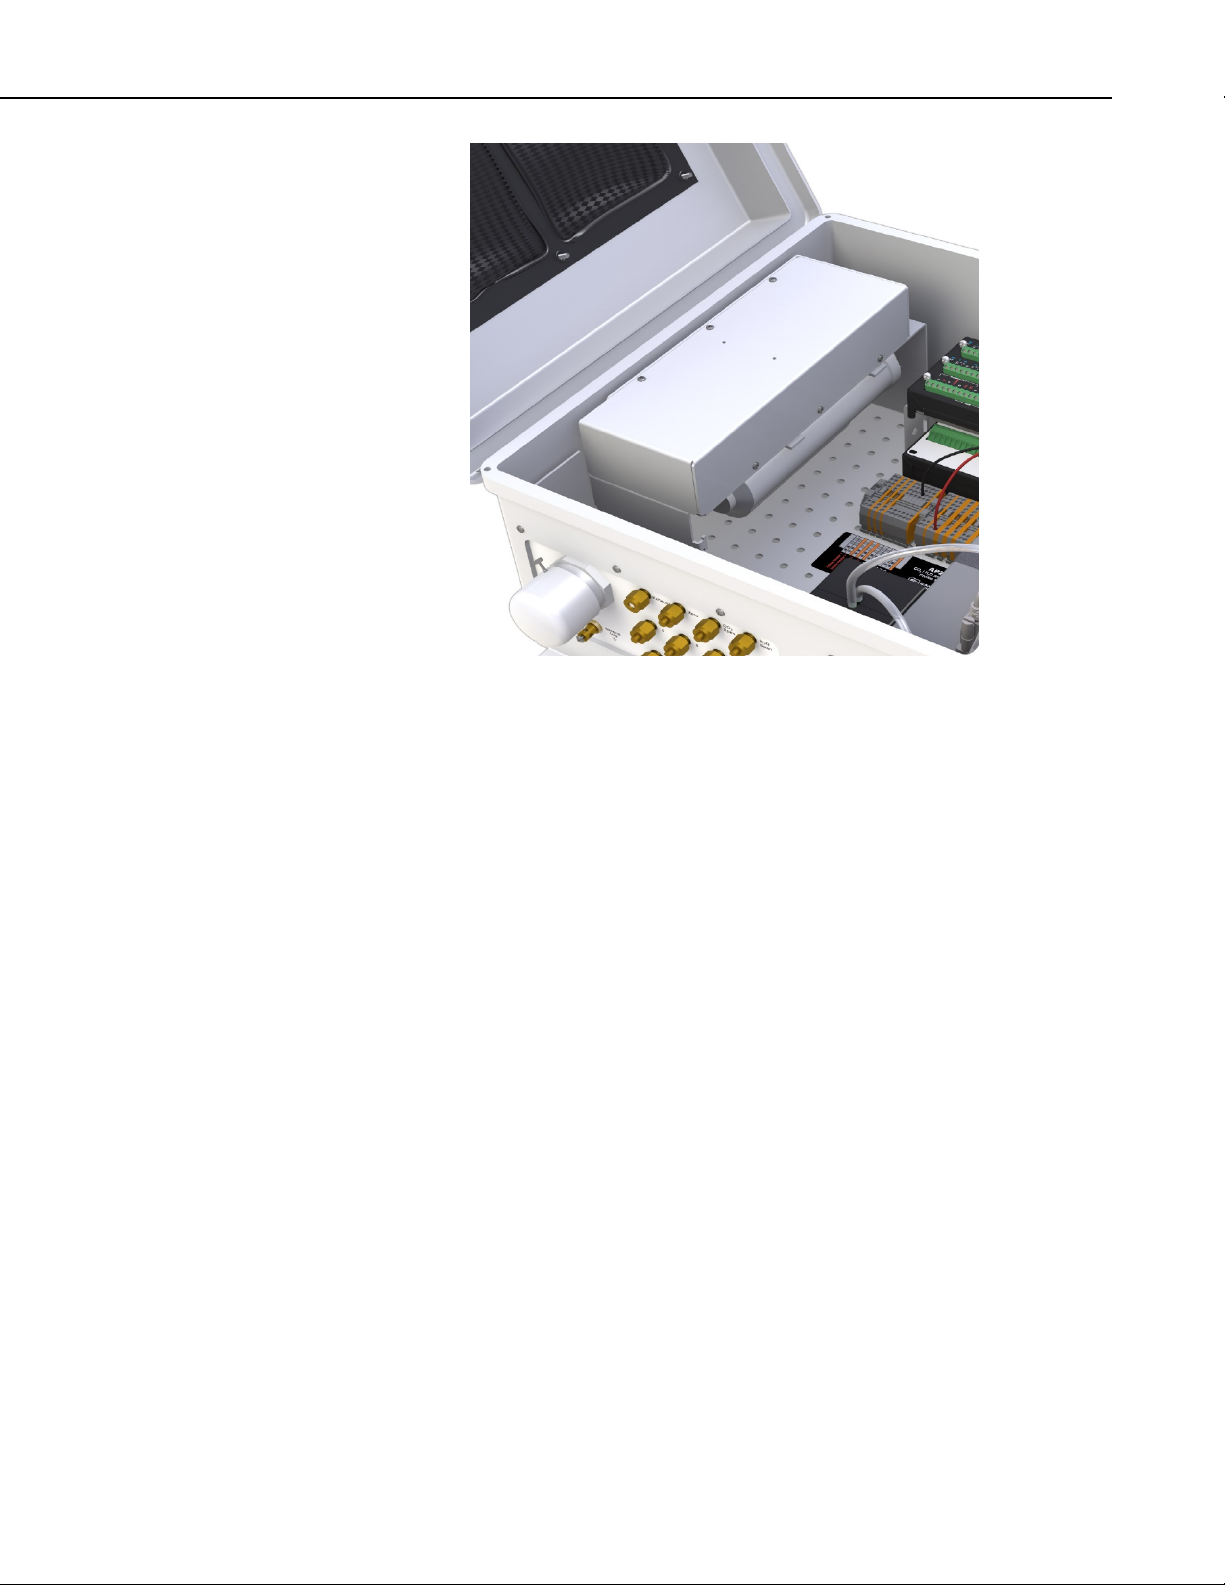
The AP200 system enclosure always includes a sample pump, valve manifold,
CR1000 datalogger, and other electronics to control and monitor the system.
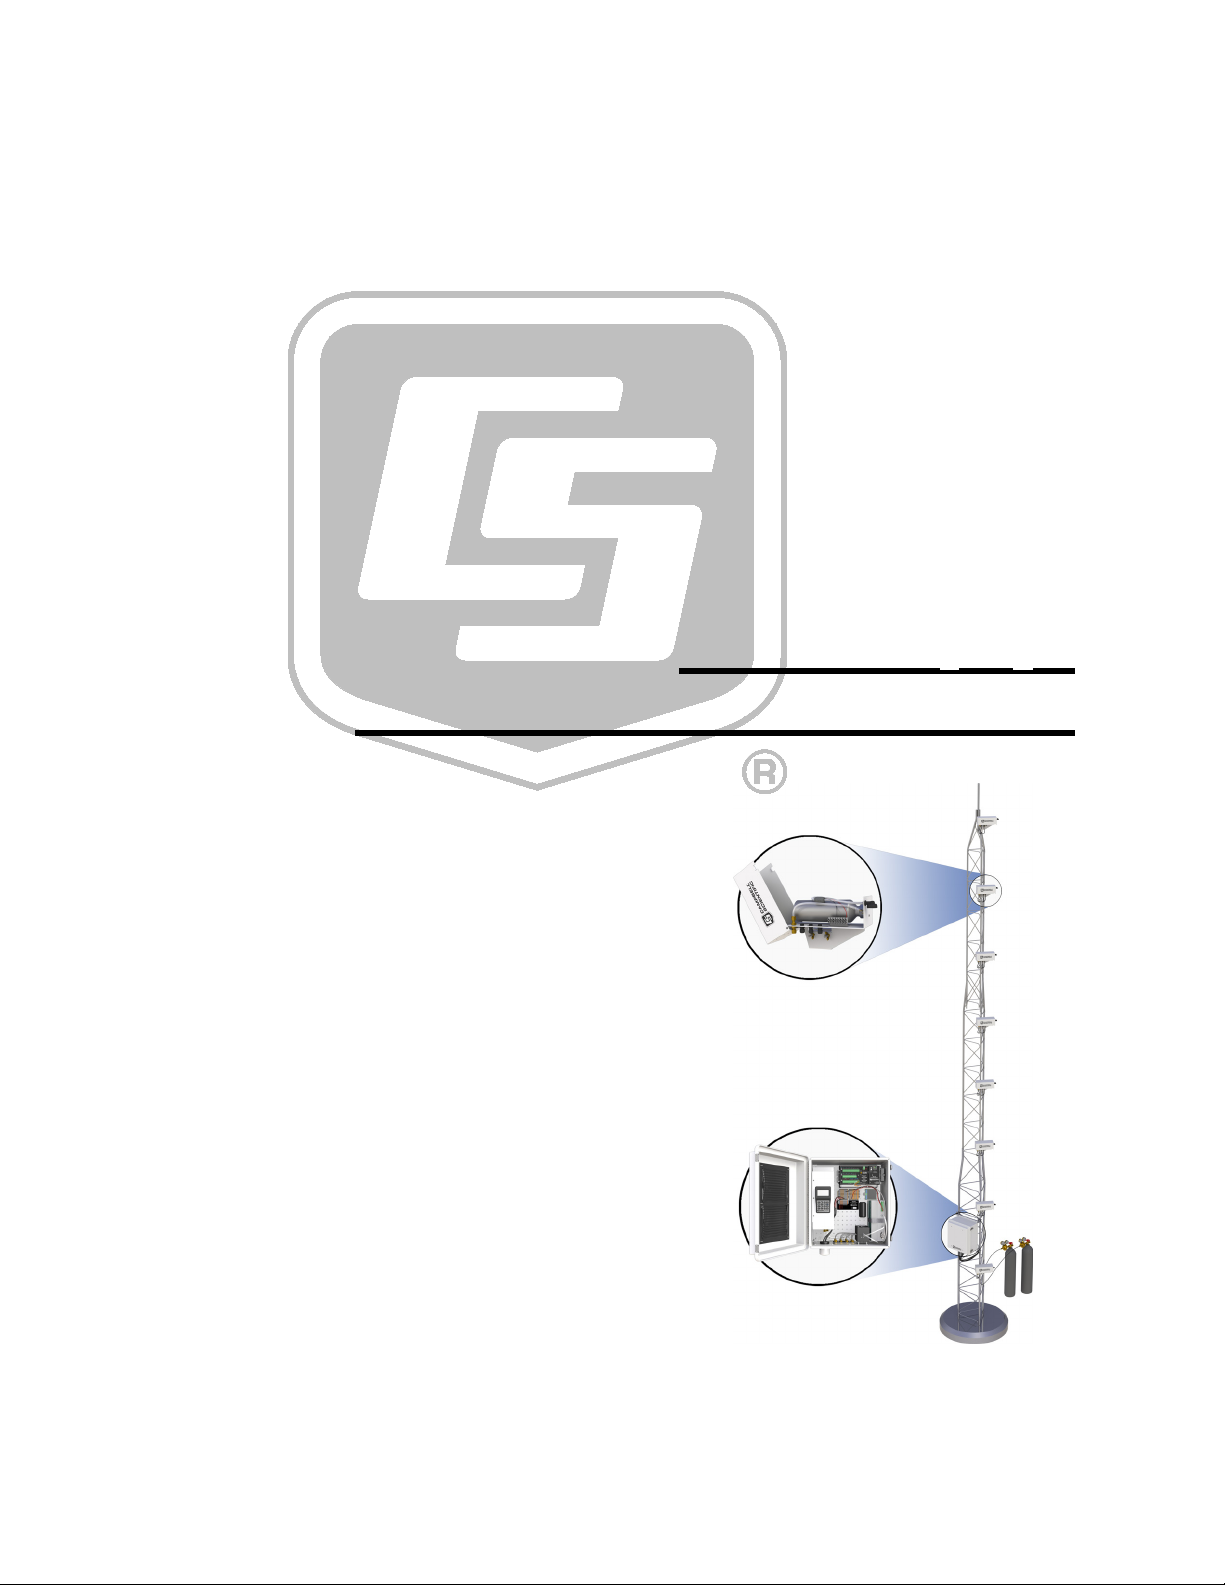
The components within the AP200 are shown in FIGURE 4-1. The CR1000
records data, selects valves, adjusts pumping speed to control system pressure,
and controls the temperatures of the pump and valve manifold.
2
Page 15
AP200 CO2/H2O Atmospheric Profile System
FIGURE 4-1. Interior of AP200 system enclosure
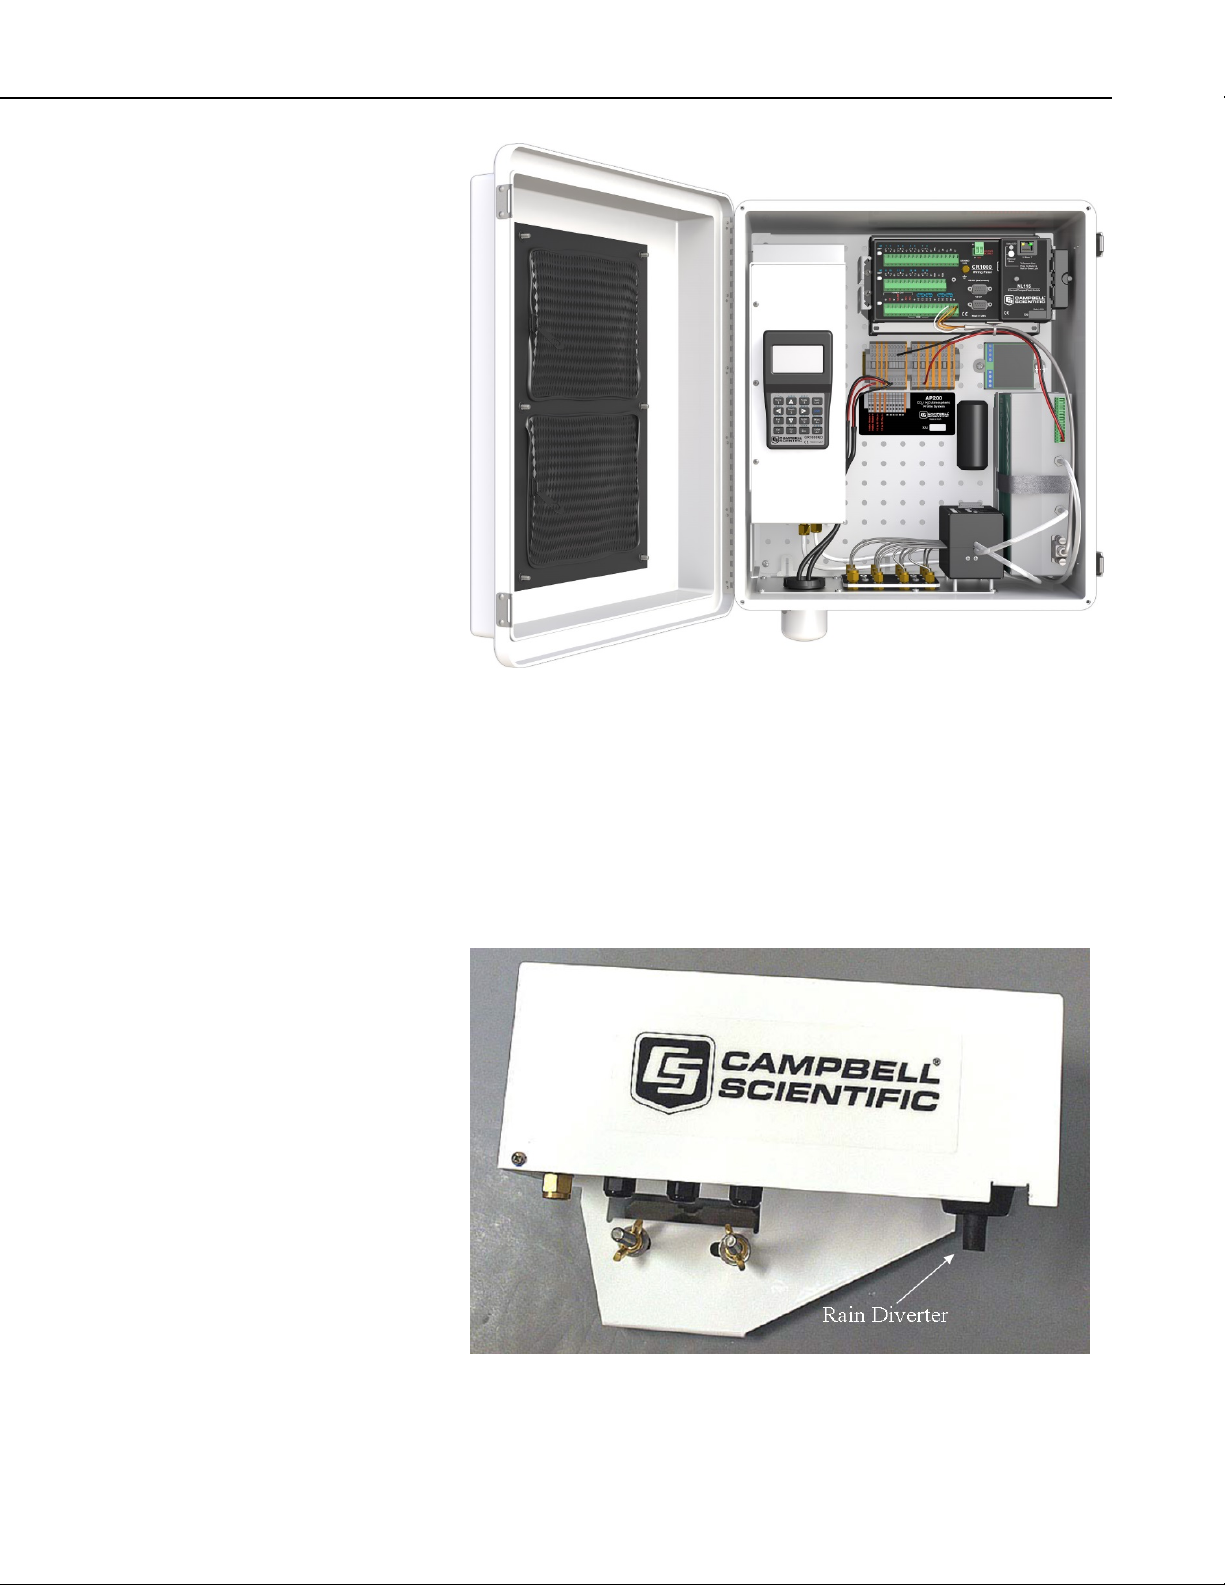
The AP200 intake assembly (pn 27693) includes an orifice to set the flow rate,
a filter that removes particulates, and a rain diverter to admit a sample of
ambient air without allowing precipitation to enter. The rain diverter is heated
to prevent condensation. The intake assembly includes a mixing volume to
dampen fluctuations in ambient concentrations of CO
and H2O. The closed
2
intake assembly is shown in FIGURE 4-2.
FIGURE 4-2. Side view of AP200 intake assembly
3
Page 16
AP200 CO2/H2O Atmospheric Profile System
NOTE
Rain Diverter
Intake assemblies shipped prior to August 2013 had the rain
diverter located at the end of the assembly rather than below, as
shown in
FIGURE 4-3. This assembly also uses a different filter,
which is shown in FIGURE 4-13
as pn 27809.
FIGURE 4-3. Side view of earlier generation AP200 intake assembly
, and available for replacement
4.1.2 Optional Components
The AP200 requires an LI-840A analyzer (manufactured by LI-COR®, Inc,
Lincoln, NE) to measure CO
analyzer (herein referred to as the IRGA) can be provided as a factory-installed
option or it can be provided by the user. The AP200 is designed for easy
installation of the LI-COR
enclosure is shown in FIGURE 4-4. For complete details, see the LI-840A
instruction manual, available at www.licor.com.
and H2O concentrations. This infrared gas
2
®
IRGA. The IRGA installed in the AP200
4
FIGURE 4-4. The IRGA installed in the AP200 system enclosure
Page 17

AP200 CO2/H2O Atmospheric Profile System
To store data on a CompactFlash® (CF) memory card, the AP200 requires
either an NL115 or a CFM100 (FIGURE 4-5) both available from Campbell
Scientific. Either storage module will provide data storage. The NL115 has the
added capabilities provided by an Ethernet interface.
FIGURE 4-5. Campbell Scientific NL115 and CFM100 CompactFlash
®
storage modules
The AP200 can be ordered with either the NL115 or the CFM100 module
factory installed or it can be ordered with neither. If the AP200 is ordered
without a storage module, the user must provide one. The CF card (FIGURE
4-6) for the storage module can be ordered separately from
www.campbellsci.com (see Section 4.1.3, Common Accessories). For details,
see the CFM100 CompactFlash Module Instruction Manual or the NL115
Ethernet and CompactFlash Module Instruction Manual, and the Application
Note 3SM-F, CF Card Information. All manuals are available at
www.campbellsci.com.
®
FIGURE 4-6. CFMC2G 2GB CompactFlash
memory card
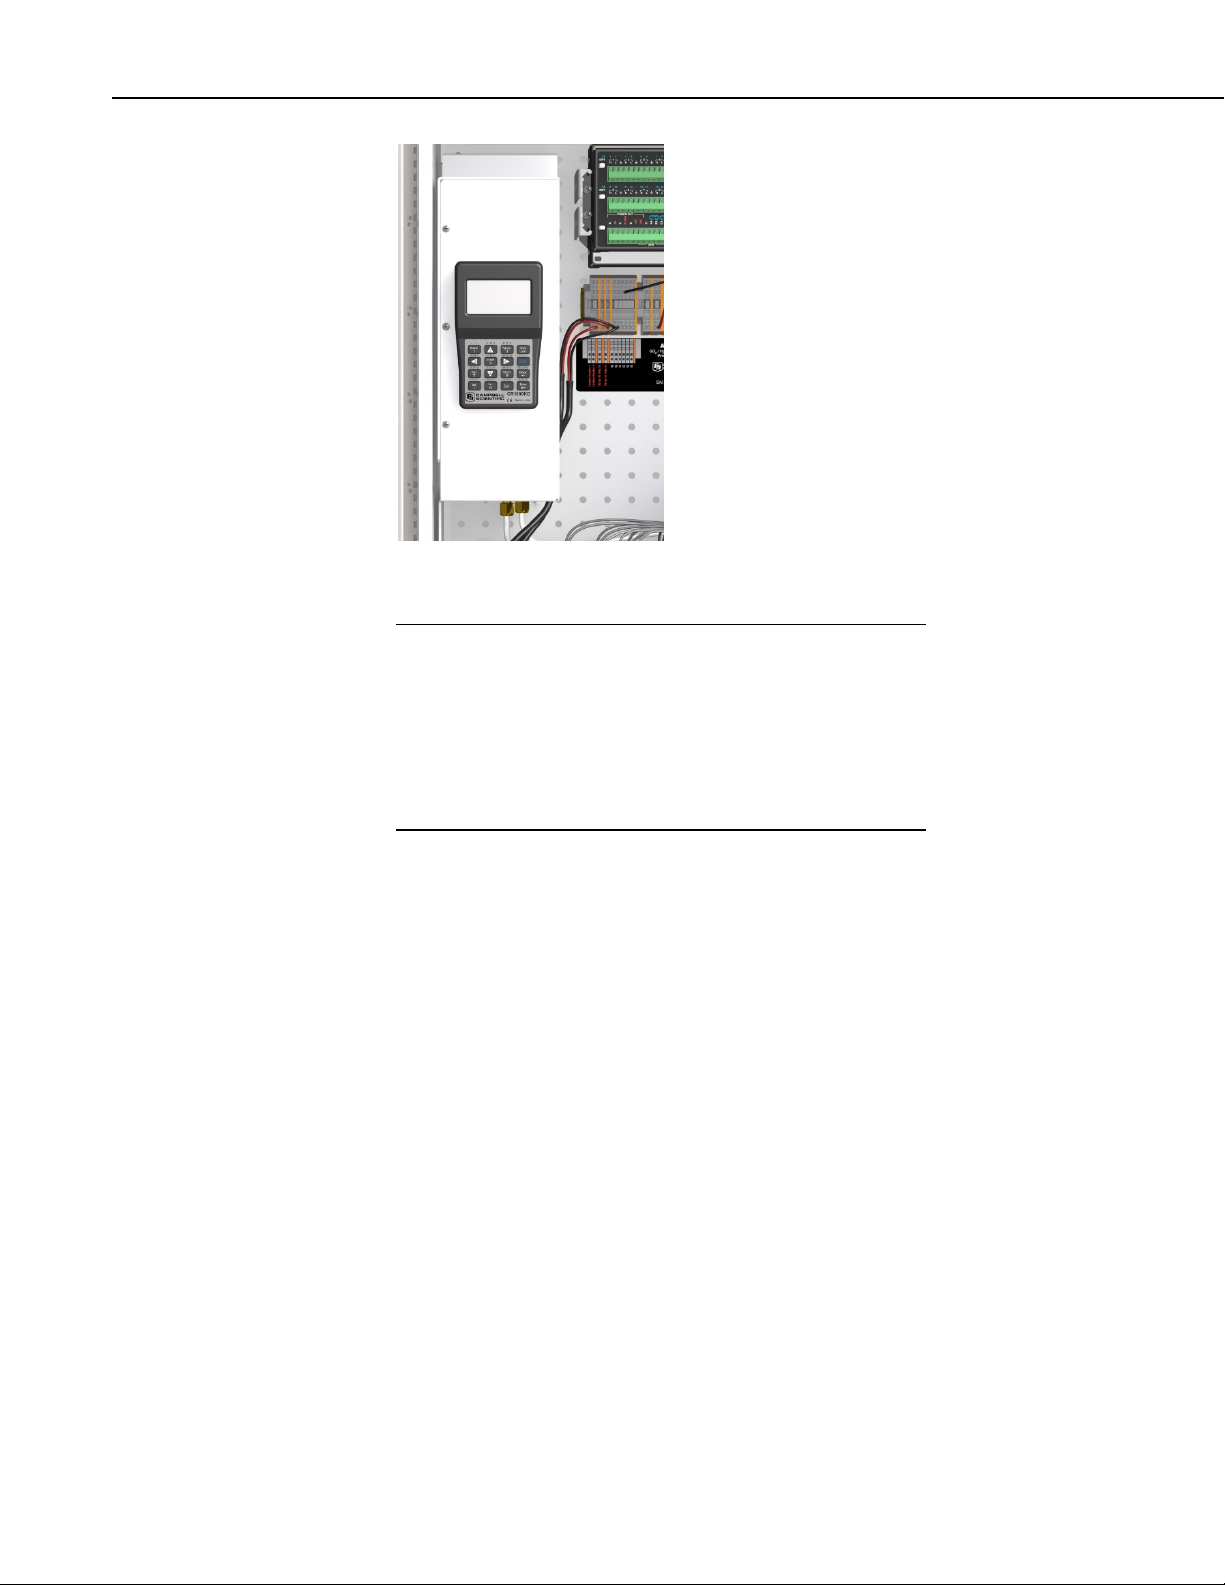
The AP200 can be ordered with an optional keyboard display factory mounted
in the system enclosure (FIGURE 4-7). This keyboard display provides a
convenient user interface to change settings or view status and data in the field.
5
Page 18
AP200 CO2/H2O Atmospheric Profile System
NOTE
FIGURE 4-7. AP200 keyboard display mounted in system enclosure
This user interface is also available using a hand-held,
detachable keyboard display, the CR1000KD, as described in
Section
4.1.4, Other Accessories. The CR1000KD may be
preferred when multiple AP200s are to be maintained. The
factory-mounted keyboard display is permanently attached, so it
cannot be forgotten or misplaced. For more detail on the
keyboard display, see the CR1000 Measurement and Control
System Operator’s Manual.
The AP200 can be configured with one of several mounting options for the
system enclosure. The AP200 system enclosure is similar to the Campbell
Scientific ENC16/18 enclosure. The same mounting options are available and
outlined below:
• Triangular tower (UT10, UT20, or UT30)
• Tripod mast (1.5 in to 1.9 in diameter)
• Tripod leg (CM106 or CM106K tripod only)
• Large pole (4.0 in to 10.0 in diameter)
• No mounting bracket
Consult the ENC10/12, ENC12/14, ENC14/16, ENC16/18 Instruction Manual,
available at www.campbellsci.com, for details on mounting bracket options.
4.1.3 Common Accessories
Additional accessories are required to conduct sampling with the AP200.
Some of the most common accessories are described here.
Tubing for Sampling: A sample tube must be used to bring the air sample
from each intake assembly to the AP200 system enclosure. Normally bulk
tubing is cut to length and installed on site. Campbell Scientific pn 15702 or
its equivalent is recommended. This tubing has a 0.25-in outer diameter to fit
the Swagelok
®
fittings on the intake assemblies and the system enclosure. The
6
Page 19
AP200 CO2/H2O Atmospheric Profile System
tubing has an aluminum core to minimize diffusion through the tubing wall and
a UV-resistant, black, high-density polyethylene jacket. Maximum tubing
length available is a 500-ft roll.
Intake Heater Cabling: The intake assemblies have a small heater in the rain
diverter to prevent condensation. For normal applications, bulk cable is cut to
length and installed on site to provide power to the intake assemblies. Heater
cables may be daisy-chained from one intake assembly to the next. Campbell
Scientific pn 9922 cable or its equivalent is recommended for this connection.
This cable consists of a twisted red/black pair of wire gauge (AWG) 20 within
a rugged Santoprene jacket.
System Power Cable: The AP200 requires a cable to connect it to the user’s
battery or other power source. The same cable may be used for the system
power as for the heaters (pn 9922) if the length is short (less than 3 m, or 10 ft).
The AP200 requires a current from 1.0 A to 3.0 A, which will cause a voltage
drop in the power cable of 0.2 V to 0.6 V for a 10-ft length of pn 9922 cable.
The corresponding power loss is 0.2 W to 1.8 W. For most applications the
preferred power cable is CABLEPCBL-L. This cable consists of a twisted
red/black pair of wire gauge (AWG) 16 within a rugged Santoprene jacket. It
is cut to the specified length and the end finished for easy installation. The
voltage and power losses will be a factor of 2.5 smaller than for the pn 9922
cable. If the power cable must be longer than 8 m (25 ft), contact Campbell
Scientific.
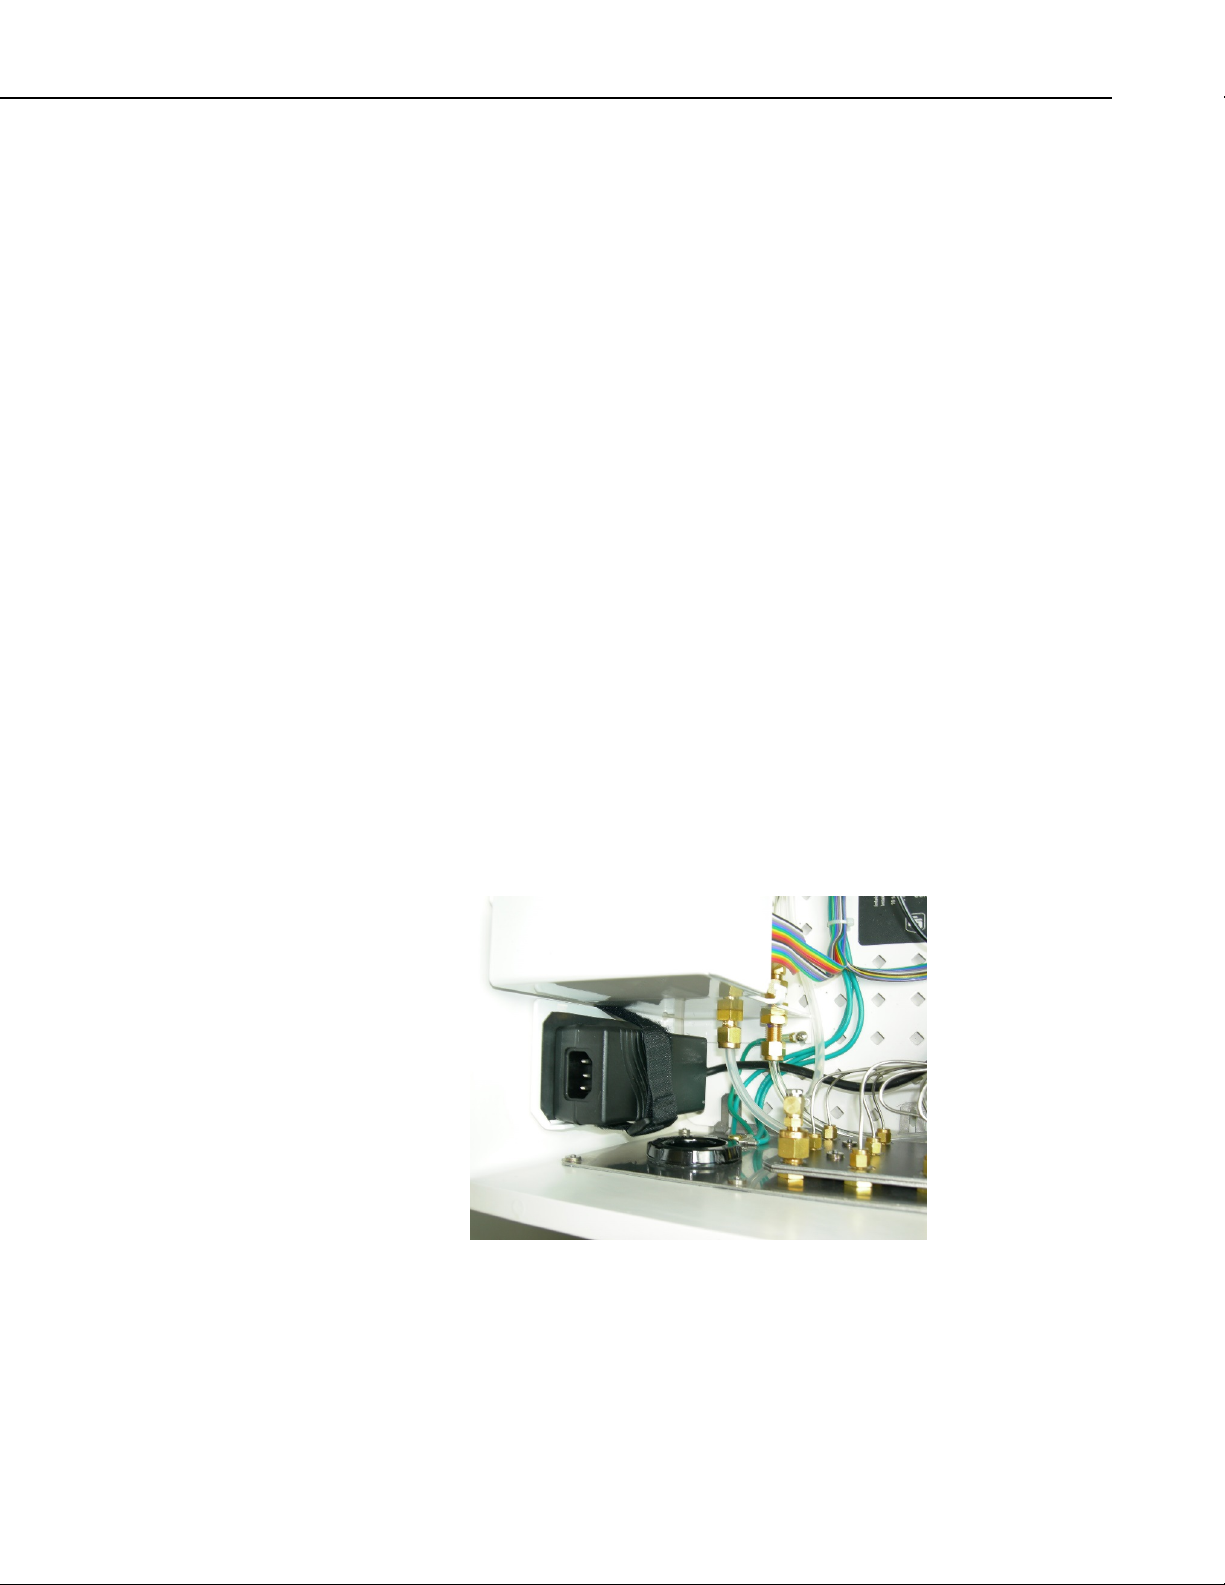
AC/DC Power Adapter Kit: A power adapter kit can be configured within
the AP200 system enclosure to allow the AP200 to be powered from AC mains
power. The AC/DC Power Adapter Kit (pn 28549) is shown in FIGURE 4-8
and instructions for installing the adapter kit are given in Appendix G, AC/DC
Power Adapter Kit.
FIGURE 4-8. AC/DC power adapter kit installed in AP200
®
CF Card: The AP200 stores data on a CompactFlash
memory card. There
are two types of CF cards available today: Industrial Grade and Standard or
Commercial Grade. Industrial Grade PC/CF cards are certified to a higher
standard in that they are designed to operate over a wider temperature range,
offer better vibration and shock resistance, and have faster read/write times
7
Page 20
AP200 CO2/H2O Atmospheric Profile System
than their commercial counterparts. Campbell Scientific recommends the use
of industrial-grade cards, such as the CFMC2G (FIGURE 4-6) available from
Campbell Scientific. For more details about this card, see Application Note
3SM-F, CF Card Information, available from www.campbellsci.com.
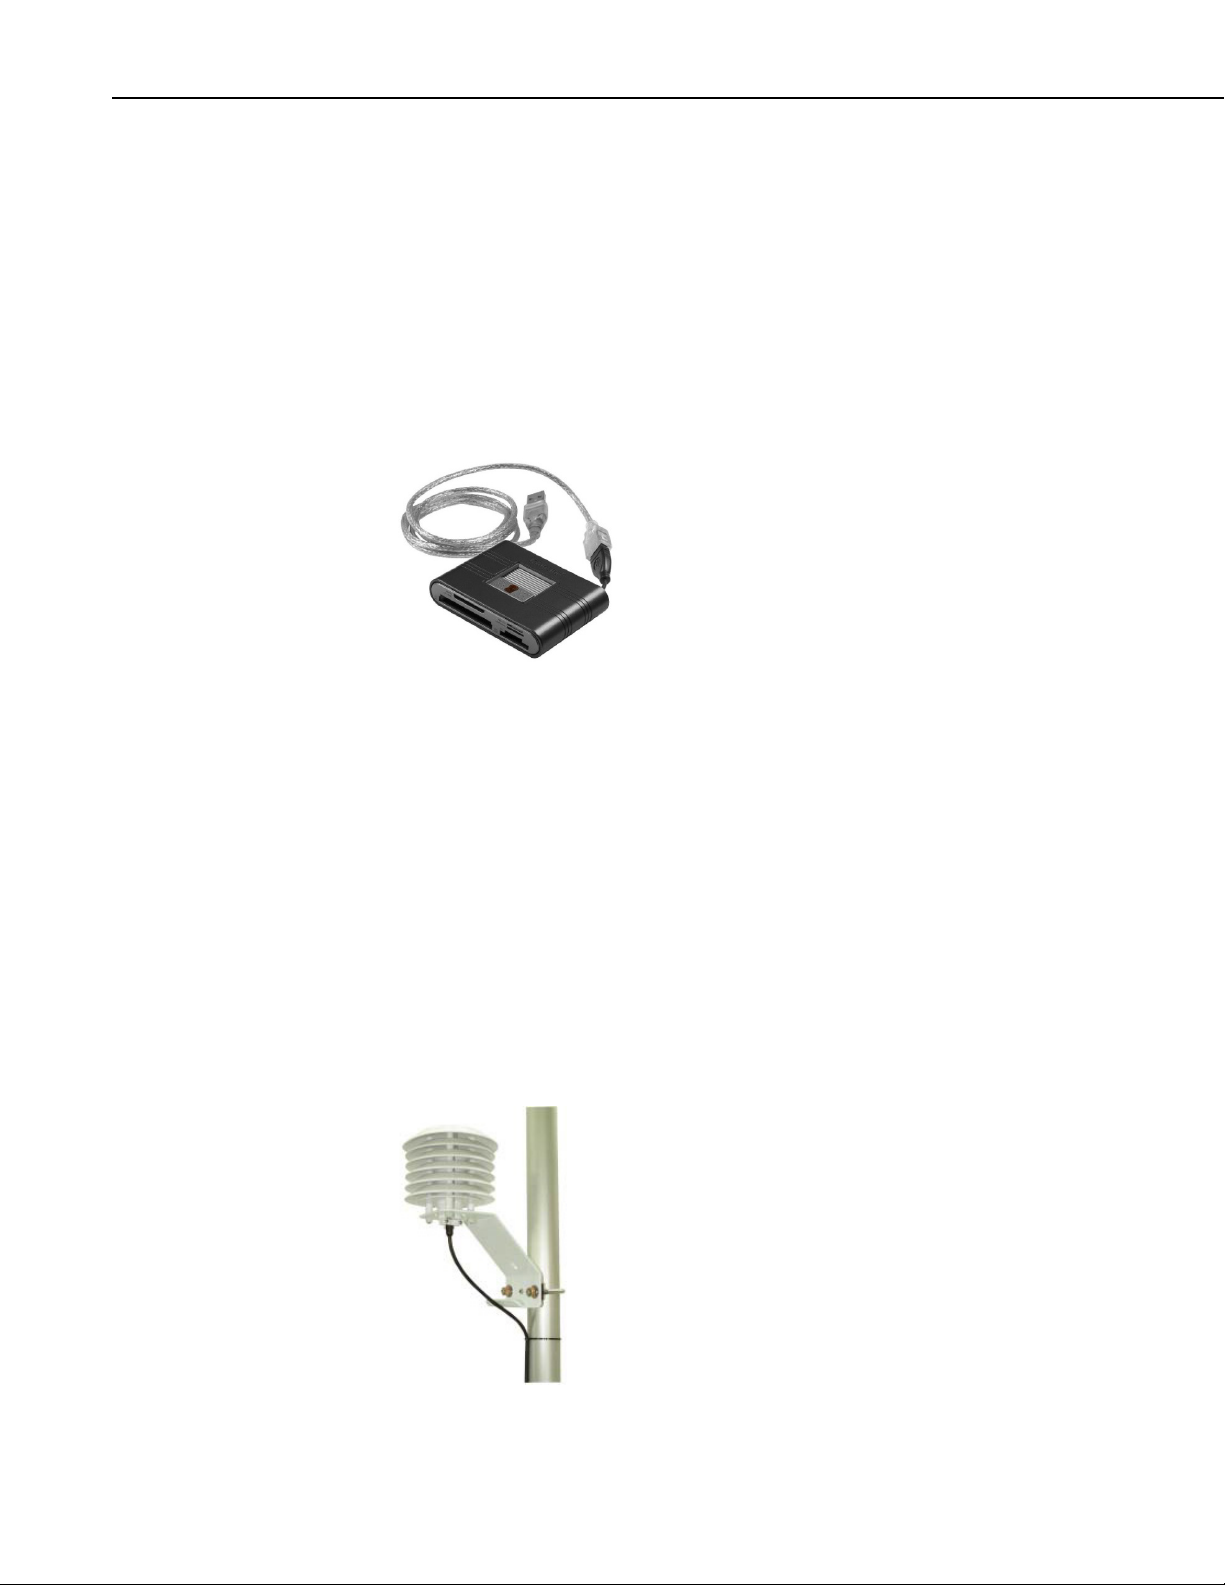
USB Memory Card Reader/Writer: The 17752 USB memory card
reader/writer, shown in FIGURE 4-9, is a single-slot, high-speed reader/writer
that allows a computer to read a memory card. When used with Campbell
Scientific equipment, the 17752 typically reads data stored on CompactFlash
cards, but it can read many different types of memory cards. The 17752
connects to the computer's USB port.
®
FIGURE 4-9. 17752 USB memory card reader/writer
Temperature Probes: The AP200 system can measure a temperature profile
at up to eight levels, using 107-L temperature probes. The 107 is a rugged,
accurate probe that measures air temperature from –35°C to +50°C. The "-L"
denotes that the cable length is specified at the time of order.
Radiation Shield: Each 107-L temperature probe is normally mounted with a
41303-5A radiation shield. The 41303-5A is a naturally aspirated, six-plate
radiation shield. Its louvered construction allows air to pass freely through the
shield, serving to keep the probe at or near ambient temperature. The shield's
white color reflects solar radiation.
The temperature probe with its accompanying radiation shield is shown in
FIGURE 4-10.
8
FIGURE 4-10. 107-L temperature probe mounted with radiation shield
Page 21
4.1.4 Other Accessories
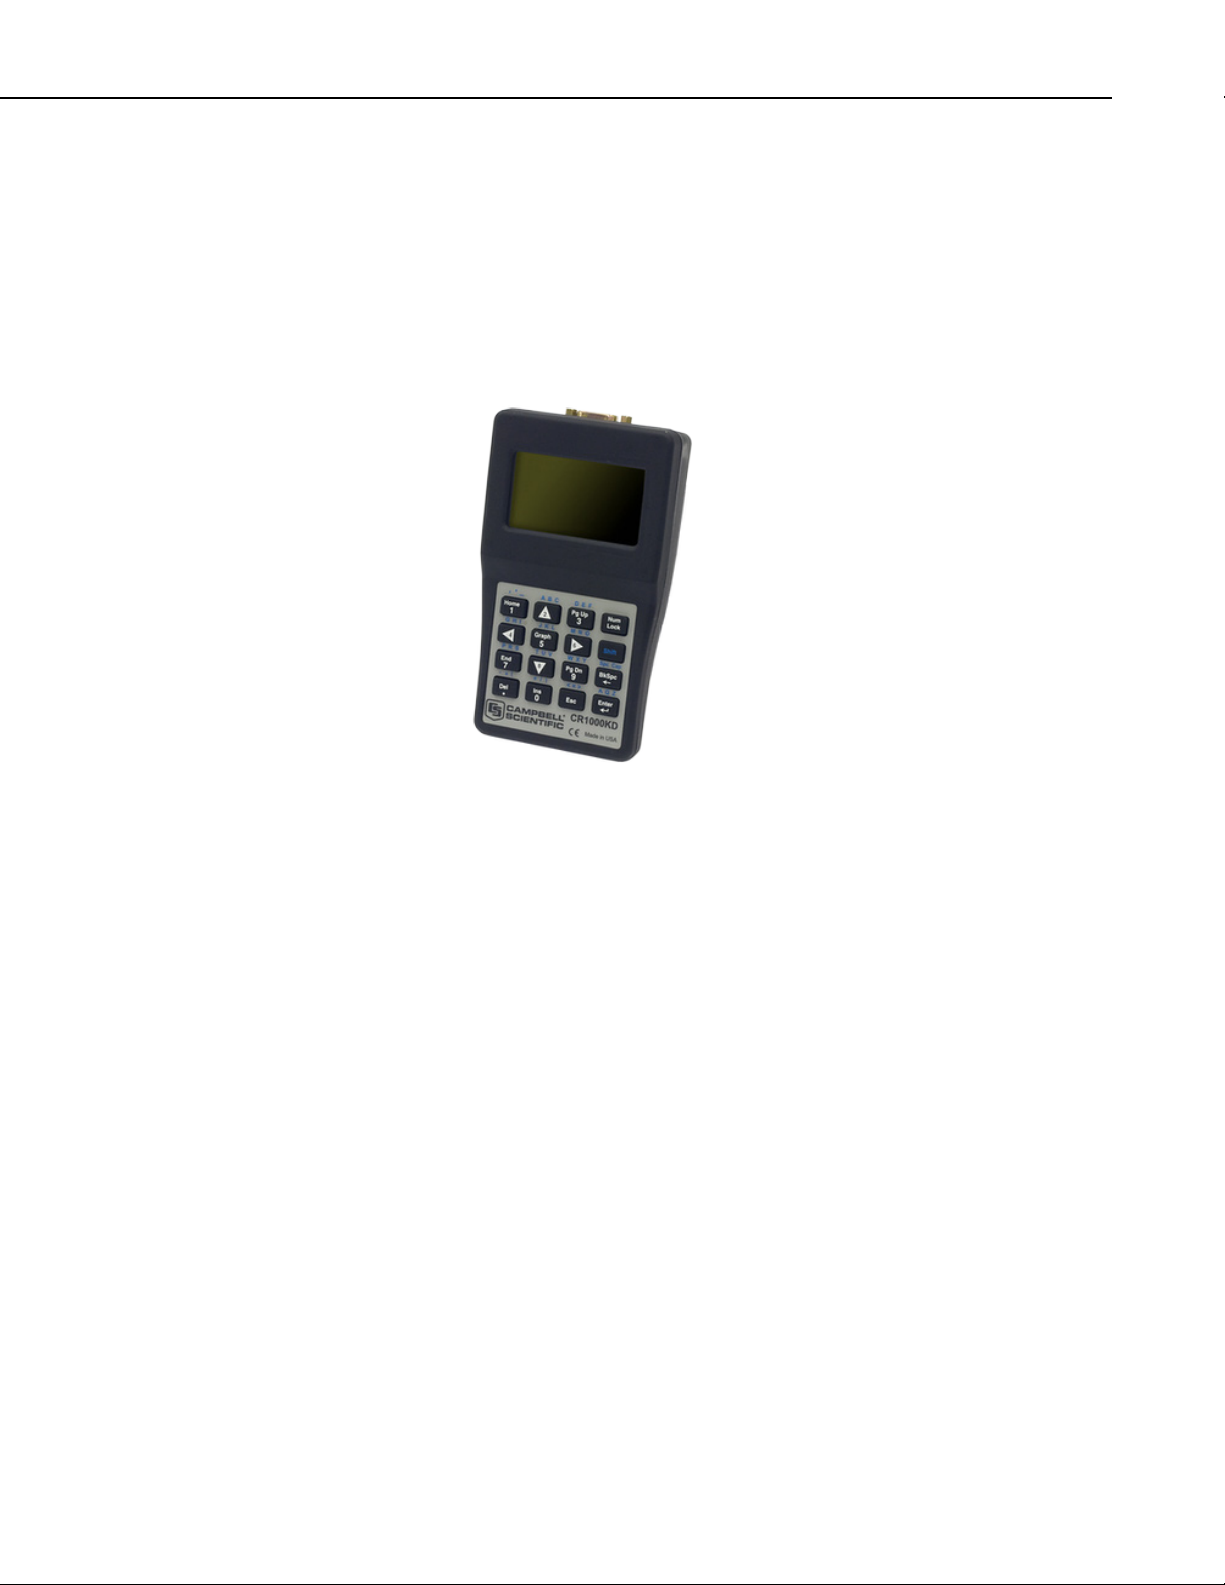
Portable Keyboard: The CR1000KD, shown in FIGURE 4-11, is a portable
keyboard and display screen for the CR1000 datalogger. The CR1000KD can
check the datalogger's status, display or plot sensor readings and stored values,
and allows the user to enter numeric data. It is similar to the hard-mounted
keyboard/display option for the AP200, but the CR1000KD may be carried
from station to station and is useful when multiple AP200s are being
maintained.
AP200 CO2/H2O Atmospheric Profile System
FIGURE 4-11. CR1000KD handheld keyboard/display
4.1.5 Support Software
There are several software products available from Campbell Scientific to
allow the user to connect a PC to the AP200’s datalogger.
PC200W: PC200W is a free, starter software package that provides basic
tools (clock set, program download, monitor data, retrieve data, etc.). The
PC200W supports direct connections between PC and datalogger but has no
telecommunications or scheduled data-collection support.
PC400: PC400 is a mid-level software package that supports a variety of
telecommunication options, manual data collection, data display, and includes
a full-featured CRBasic program editor. PC400 does not support combined
communication options (for example, phone-to-RF), PakBus® routing, or
scheduled data collection.
LoggerNet: LoggerNet is a full-featured software package that supports
programming, communication, and data collection and display. LoggerNet
consists of a server application and several client applications integrated into a
single product. This package is recommended for applications that require
telecommunications support or scheduled data retrieval, or for large datalogger
networks.
LoggerLink Mobile Apps: The LoggerLink Mobile Apps allows an iOS or
Android device to communicate with an IP-enabled datalogger such as the
9
Page 22

AP200 CO2/H2O Atmospheric Profile System
CR1000 in the AP200. The apps support field maintenance tasks such as
viewing and collecting data, setting the clock, and downloading programs.
4.1.6 Replacement Parts
Syringe Filter: Intake assemblies shipped after August 2013 use a syringe
filter with Luer lock connections. The filter is an in-line 2.5-cm (1.0-in)
diameter, PTFE membrane filter (FIGURE 4-12) of 3-micron pore size. It is
used to replace dirty filter elements in the AP200 intake assembly and is
available as pn 29998.
FIGURE 4-12. Syringe filter of current AP200 intake assembly
Disk Filter: Intake assemblies shipped prior to August 2013 used a different
filter, pn 27809. This filter is a 2.5-cm (1.0-in) diameter, sintered stainless
steel disk filter (FIGURE 4-13) of 10-micron pore size. It is used to replace
dirty filter elements in the AP200 intake assembly.
FIGURE 4-13. Disk filter of early AP200 intake assembly
Silica Desiccant Bags: The 4905 Single 4-unit Silica Desiccant Bag (FIGURE
4-14) is used to desiccate the AP200 system enclosure and should be
periodically replaced. The 4905 can be purchased in quantities of 20 as pn
6714.
10
FIGURE 4-14. Single desiccant pack
Page 23
AP200 CO2/H2O Atmospheric Profile System
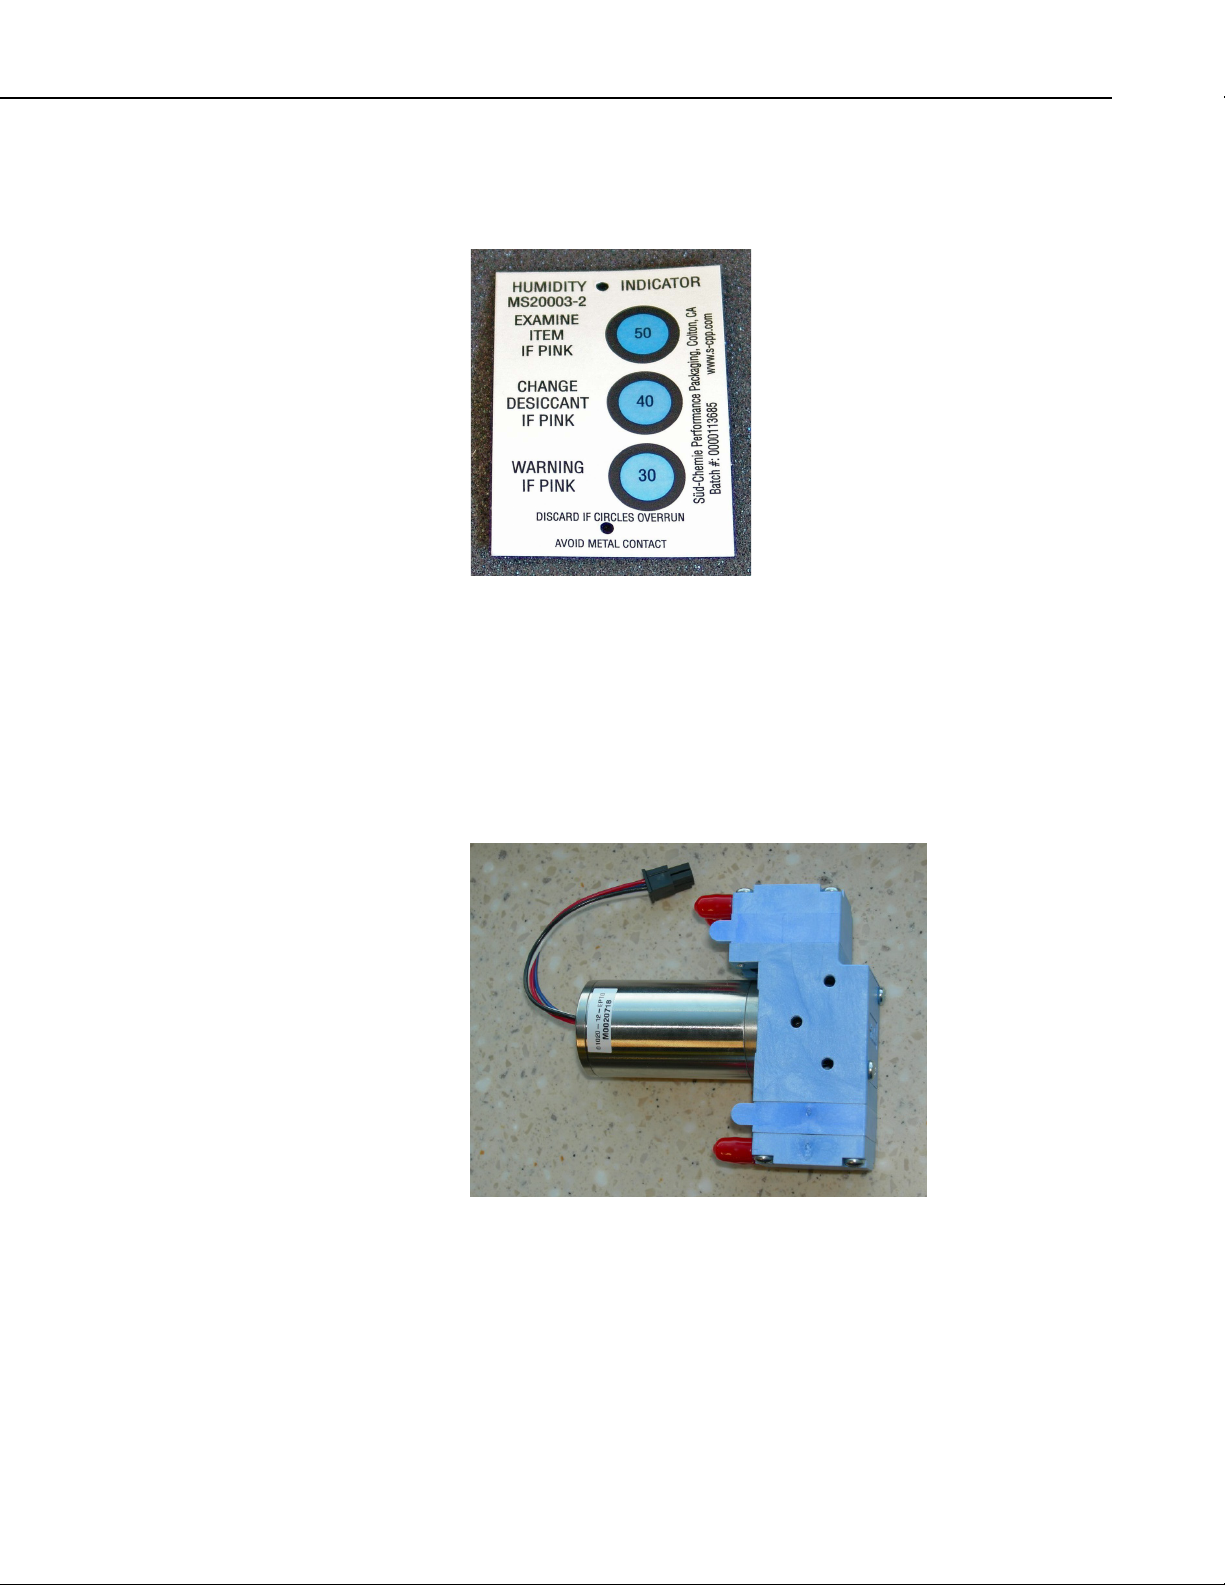
Humidity Indicator Card: The replacement humidity indicator (FIGURE
4-15) card is pn 28878.
FIGURE 4-15. Humidity indicator card
Diaphragm Pump: The pump module for the AP200 includes a small doublehead diaphragm pump with a brushless DC motor. The pump includes a speedcontrol input and a tachometer to measure actual pumping speed. It is mounted
in an insulated, temperature-controlled box inside the AP200 system enclosure.
If the pump fails, the replacement pump (FIGURE 4-16) is available as pn
26402. See Appendix J, AP200 Pump Replacement, for instructions on
replacing the pump. The part includes the connector for easy installation.
FIGURE 4-16. Diaphragm pump used in AP200
4.2 Theory of Operation
The AP200 system measures CO2 and H2O concentrations at multiple locations
by pulling a continuous sample flow from each of several (four to eight) intake
assemblies. Solenoid valves direct sample flow from one intake assembly at a
time, through a CO
O IRGA. A CR1000 datalogger records data, selects
2/H2
11
Page 24
AP200 CO2/H2O Atmospheric Profile System
valves, adjusts pumping speed to control system pressure, and controls the
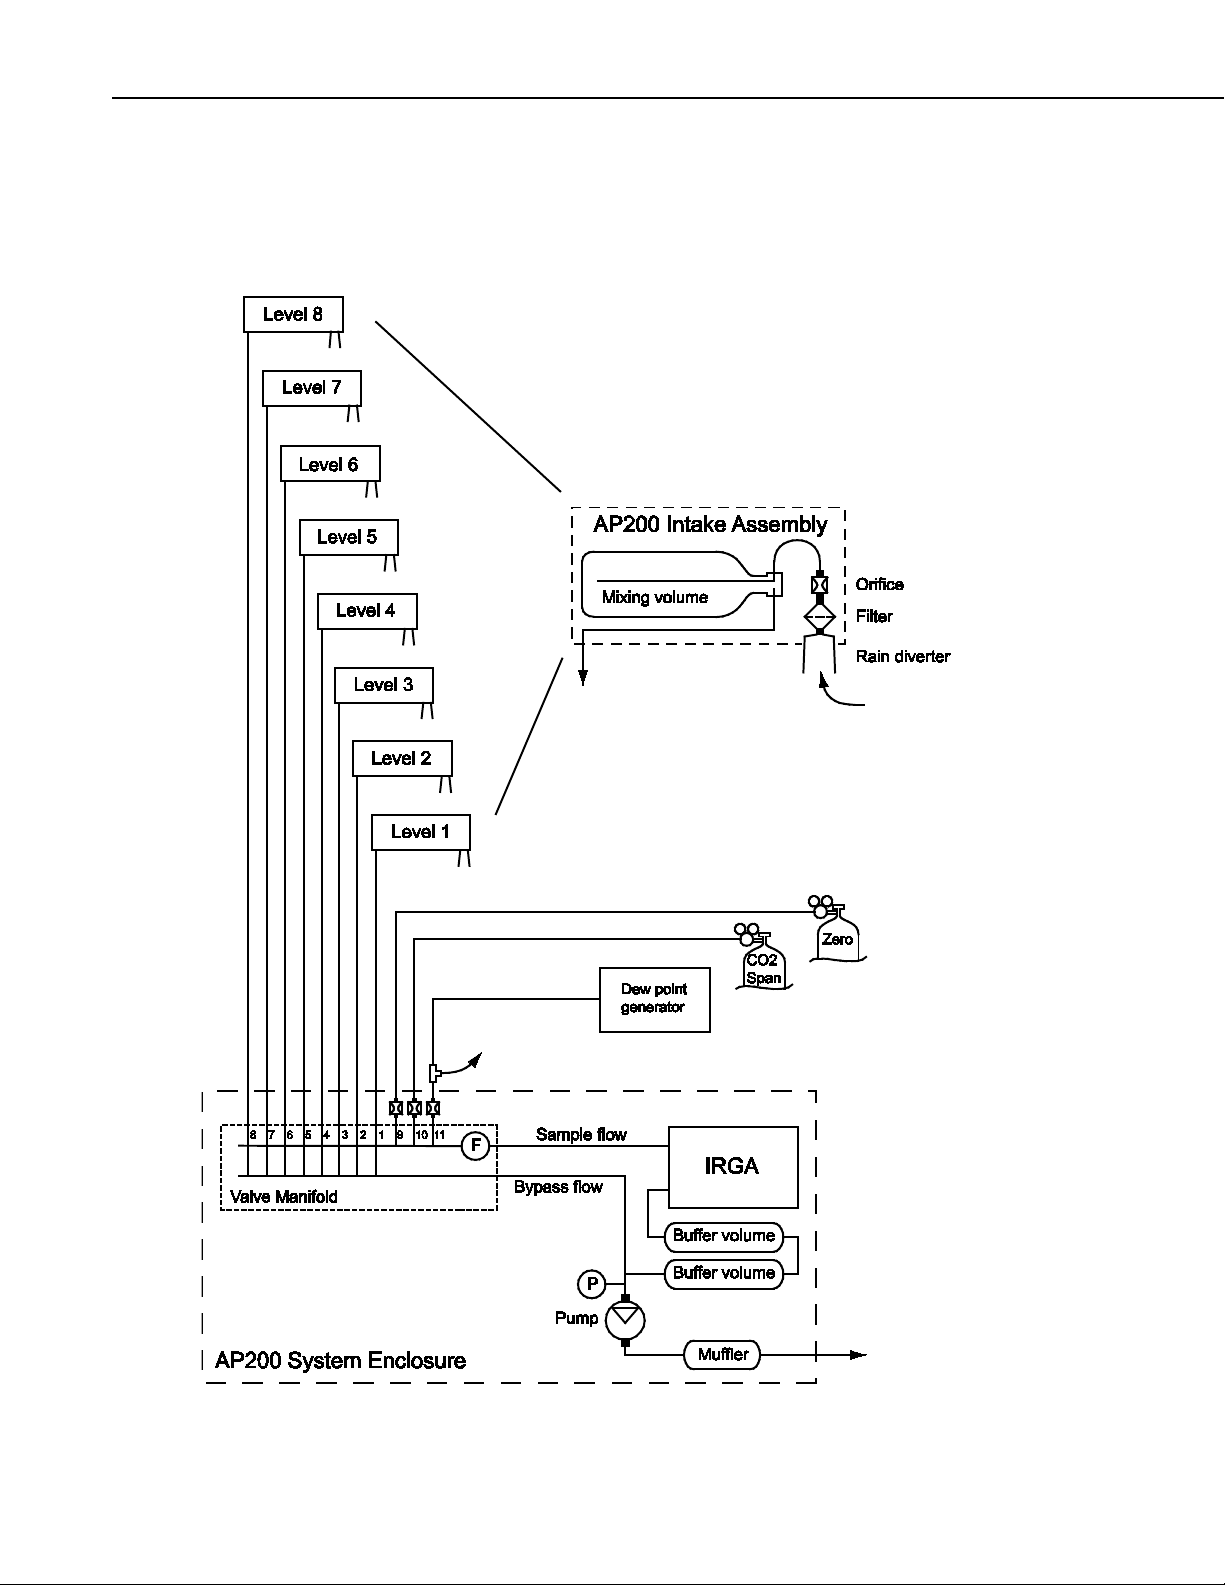
temperatures of the pump and valve manifold. FIGURE 4-17 is a plumbing
diagram showing the various parts of the AP200 system connected. Details for
each part of the system are given in this section.
12
FIGURE 4-17. Plumbing diagram of AP200 system
Page 25
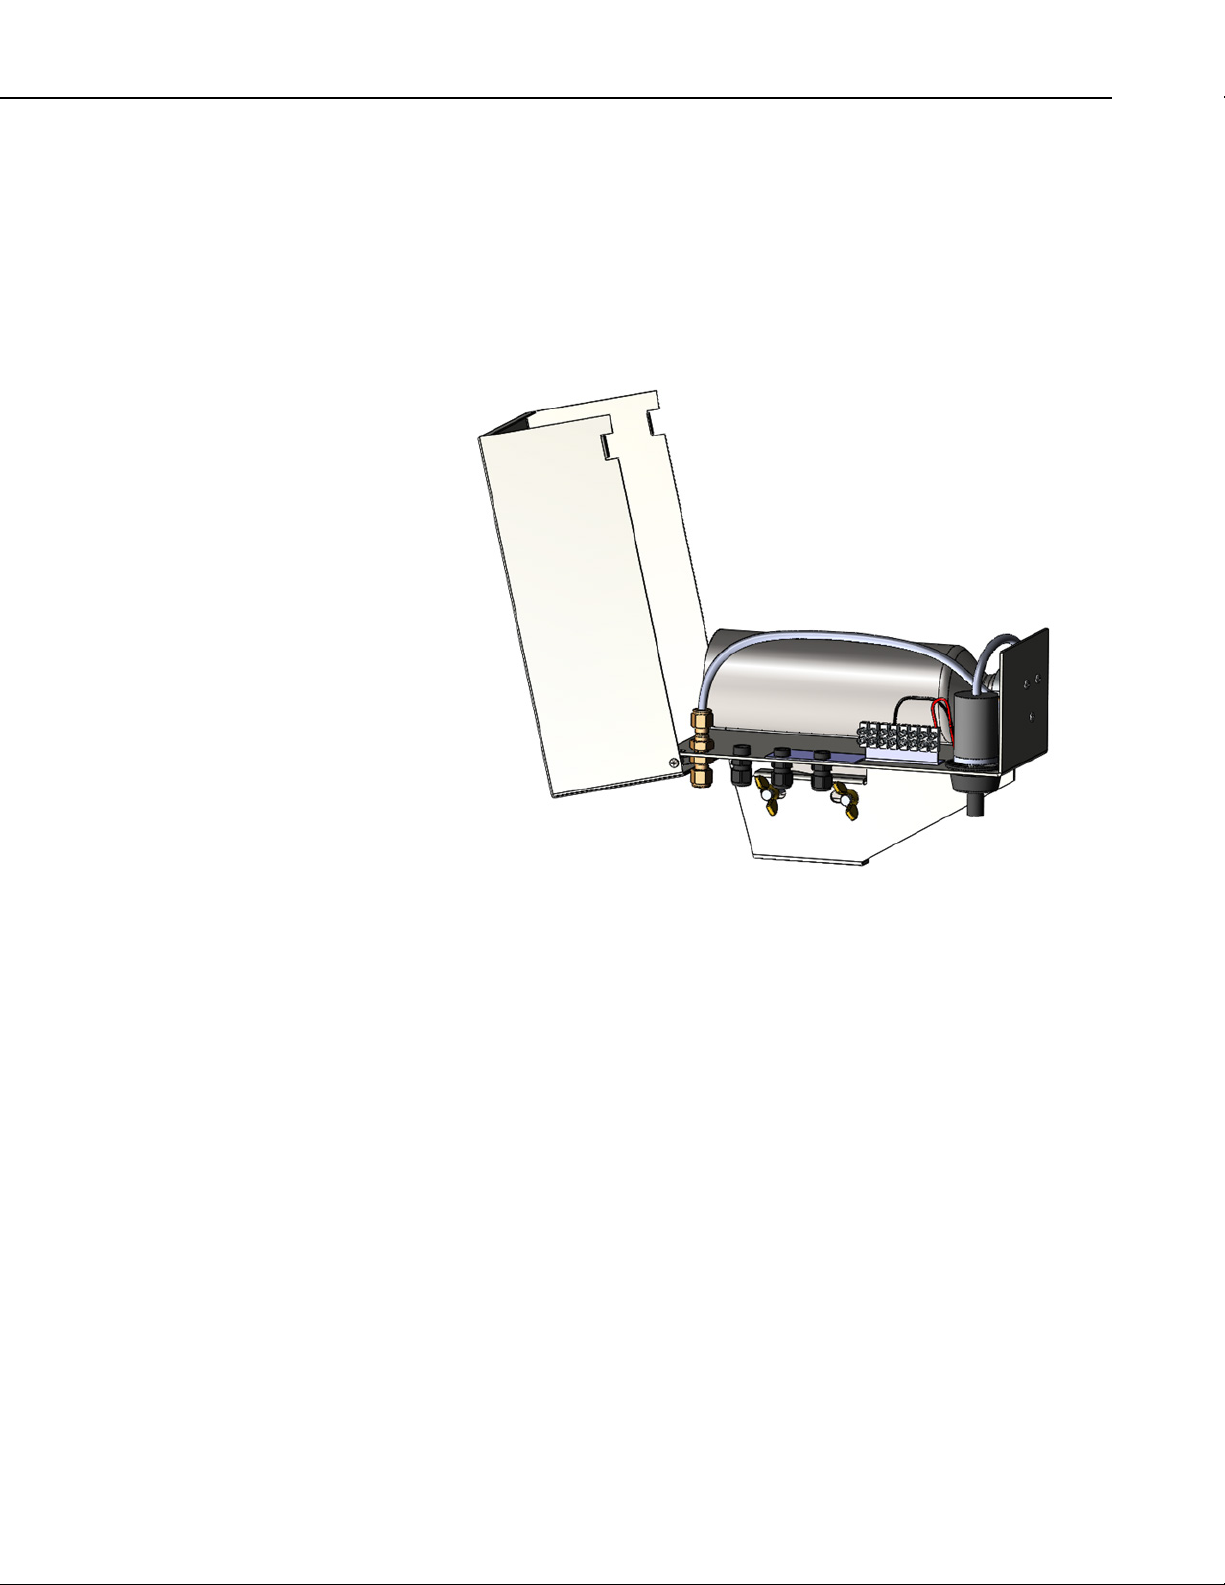
4.2.1 Intake Assemblies
The AP200 intake assembly (pn 27693) includes a heated rain diverter, an
inline filter, an orifice, and a mixing volume on a common mounting bracket
with rain cover, shown opened in FIGURE 4-18. The inline filter element, pn
29998, is a 2.5-cm (1.0-in) diameter, PTFE membrane with a 3-micron pore
size. It removes particulates from the air sample that could clog the orifice or
valve.
AP200 CO2/H2O Atmospheric Profile System
FIGURE 4-18. AP200 intake assembly shown open
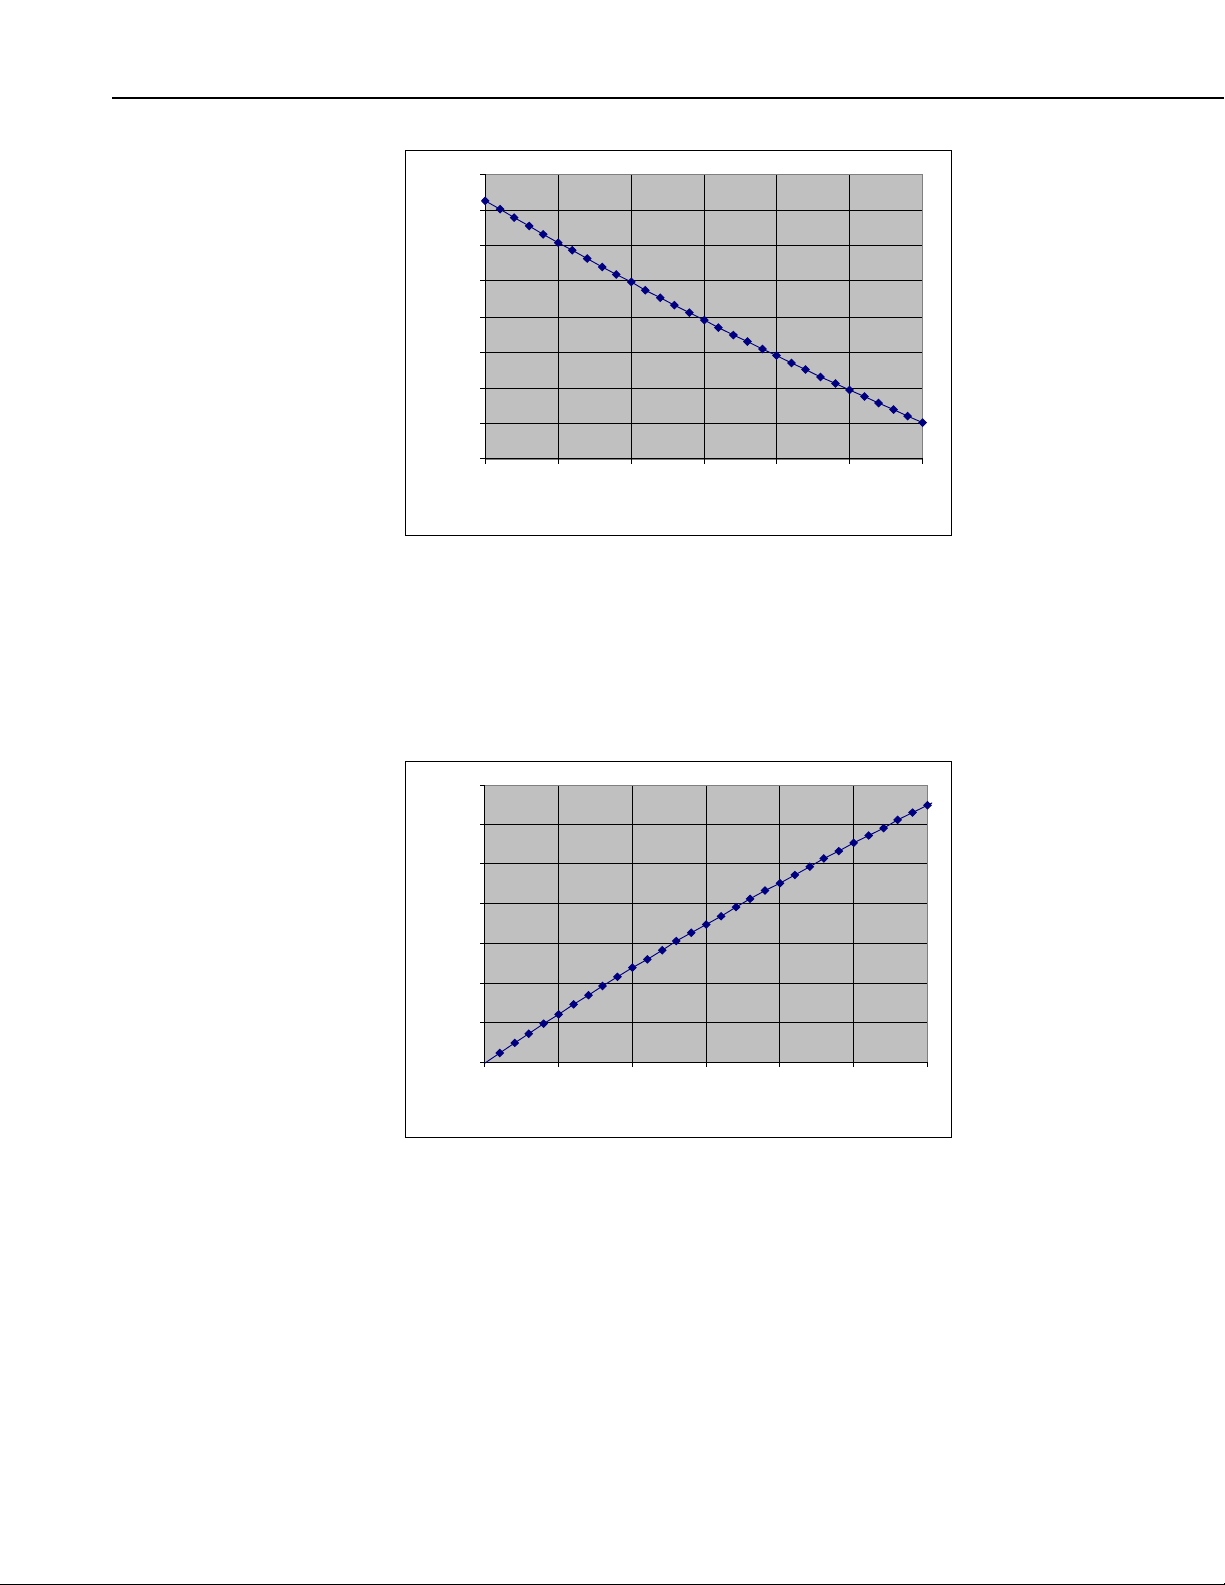
The orifice has a diameter of 0.18 mm (0.007 in) to restrict flow to a
-1
maximum of approximately 247 standard ml•min
at sea level. The flow will
be reduced at higher elevations due to the lower atmospheric pressure. The
nominal ambient pressure as a function of elevation is shown in FIGURE 4-19.
13
Page 26
AP200 CO2/H2O Atmospheric Profile System
65
70
75
80
85
90
95
100
105
0 500 1000 1500 2000 2500 3000
Elevation (m)
Ambient Pressure ( kPa)
180
190
200
210
220
230
240
250
70 75 80 85 90 95 100
Ambient Pressure (kPa)
Sample Flow (ml/min)
FIGURE 4-19. Nominal ambient pressure as related to increasing
elevation
FIGURE 4-20 shows the nominal sample flow as a function of ambient
pressure, assuming a 35-kPa pressure drop across the orifice.
14
FIGURE 4-20. Nominal sample flow rate as related to increasing
ambient pressure
Taken together, these two graphs show that the nominal flow varies from 247
ml/min at sea level to 180 ml/min at 3000 m. The flow rate is reported in
public variable sample_flow. Some variation in flow (approximately 10%) is
to be expected due to variation in the actual size of the orifices and in the
calibration of the flow sensor. For example, at an elevation of 1000 m, the
nominal ambient pressure is 90 kPa, which gives a nominal flow of 225
ml/min. The normal expected range for the flow would be from ~200 to ~250
ml/min.
Page 27

AP200 CO2/H2O Atmospheric Profile System
The flow will also vary with ambient temperature due to the corresponding
change in air density. Higher-temperature air has lower density, which will
have lower flow (approximately 2% lower flow for a 10°C temperature
change).
The sample flow will decrease over time as particulates clog the filters.
Eventually, the flow will be reduced to the extent that it will degrade the
equilibration time after an intake is selected. As a general guideline, the filters
should be replaced when the flow decreases by 25%. The filters will normally
last a few months, but will require more frequent changes in dirty conditions.
The intake assembly has been designed with two separate elements intended to
prevent condensation. First, the rain diverter has a small heater (0.25 W at 12
Vdc) to warm the air sample to approximately 10°C above ambient
temperature before reaching the filter and orifice. This prevents condensation
on surfaces upstream of the orifice. Second, the flow path downstream of the
orifice is kept at reduced pressure (typically 35 kPa below ambient pressure) to
prevent condensation.
The intake assembly includes a mixing volume to dampen fluctuations in the
and H2O concentrations. Assuming the nominal dependence of pressure
CO
2
and flow on elevation, and a 35-kPa pressure drop at the orifice, the mixing
volume residence time will vary from 2.0 min at sea level to 1.5 min at 3000
m. This residence time is similar to the time to cycle through all of the intakes
(1 to 2 min, depending on the number of intakes used). This ensures that a
transient change in atmospheric CO
or H2O concentration will be measured by
2
each of the intakes, regardless of when it occurs during the valve-switching
cycle.
4.2.2 Valve Manifold
The valve manifold is mounted on the bottom of the AP200 system enclosure.
It has LEDs to show which valve is active and the state of the heater and fan.
It has stainless steel tubes that connect the manifold to Swagelok
fittings on the bottom of the enclosure as shown in FIGURE 4-21.
FIGURE 4-21. Valve module and Swagelok
bottom of AP200 enclosure
®
feedthrough
®
feedthrough fittings on
15
Page 28

AP200 CO2/H2O Atmospheric Profile System
The valve manifold has eleven inlets (eight for air samples and three for
zero/span) and two outlets (sample and bypass). Each air sample inlet has a
three-way solenoid valve that connects it to one of the two outlets. This valve
connects its corresponding inlet to the bypass outlet when it is off and to the
sample outlet when it is energized. The sample outlet connects to the IRGA
and the bypass outlet connects directly to the pump. Therefore, the sample
inlets will have a continuous flow, regardless of which inlet is sampled by the
IRGA. This continuous flow stores an air-sample history in the intake
assembly mixing volumes, keeps the mixing volumes and sample tubes at low
pressure to prevent condensation, and minimizes flow and pressure transients
caused by valve switching.
The zero/span inlets are not bypassed, thereby allowing flow only when they
are selected. These inlets have flow restriction tubes connecting the bulkhead
fittings to the valve manifold to set the flow. These tubes have the same outer
diameter (0.062 in) as the ones for the air sample inlets, but they have a smaller
inner diameter (0.015 in, compared to 0.040 in). This provides a flow
restriction similar to the orifices in the AP200 intake assemblies. The flow for
the zero and CO
The valve manifold has a mass flow sensor on the sample outlet. This sensor’s
measurements are reported in public variable sample_flow.
span cylinders is affected by the pressure regulator setting.
2
The valve manifold temperature is reported in public variable valve_tmpr. The
operating range of the valves is 4°C to 49°C. If the valve temperature is outside
this range, the AP200 will disable the valves and pump.
The valve module has a heater (8 W) that turns on if the valve temperature falls
below 5°C. If the AP200 is started at cold temperature it may take up to 20
minutes to warm the valve module (from –30°C to +4°C). When it reaches 5°C
the heater will cycle on/off as needed to maintain this temperature. The fraction
of time the valve heater is on is reported in the output tables (IntAvg, CalAvg,
and SiteAvg) as valve_heat_Avg. This will typically increase from zero at 0°C
ambient temperature to 0.5 (4 W average power) at –30°C.
The valve module has a fan (0.7 W) that turns on if the valve temperature rises
above 45°C. The fan will stay on until the valve temperature falls below 43°C.
The fraction of time the valve fan is on is reported in the output tables (IntAvg,
CalAvg, and SiteAvg) as valve_fan_Avg. This will typically increase from
zero at 35°C ambient temperature to 1.0 (0.7 W average power) at 45°C.
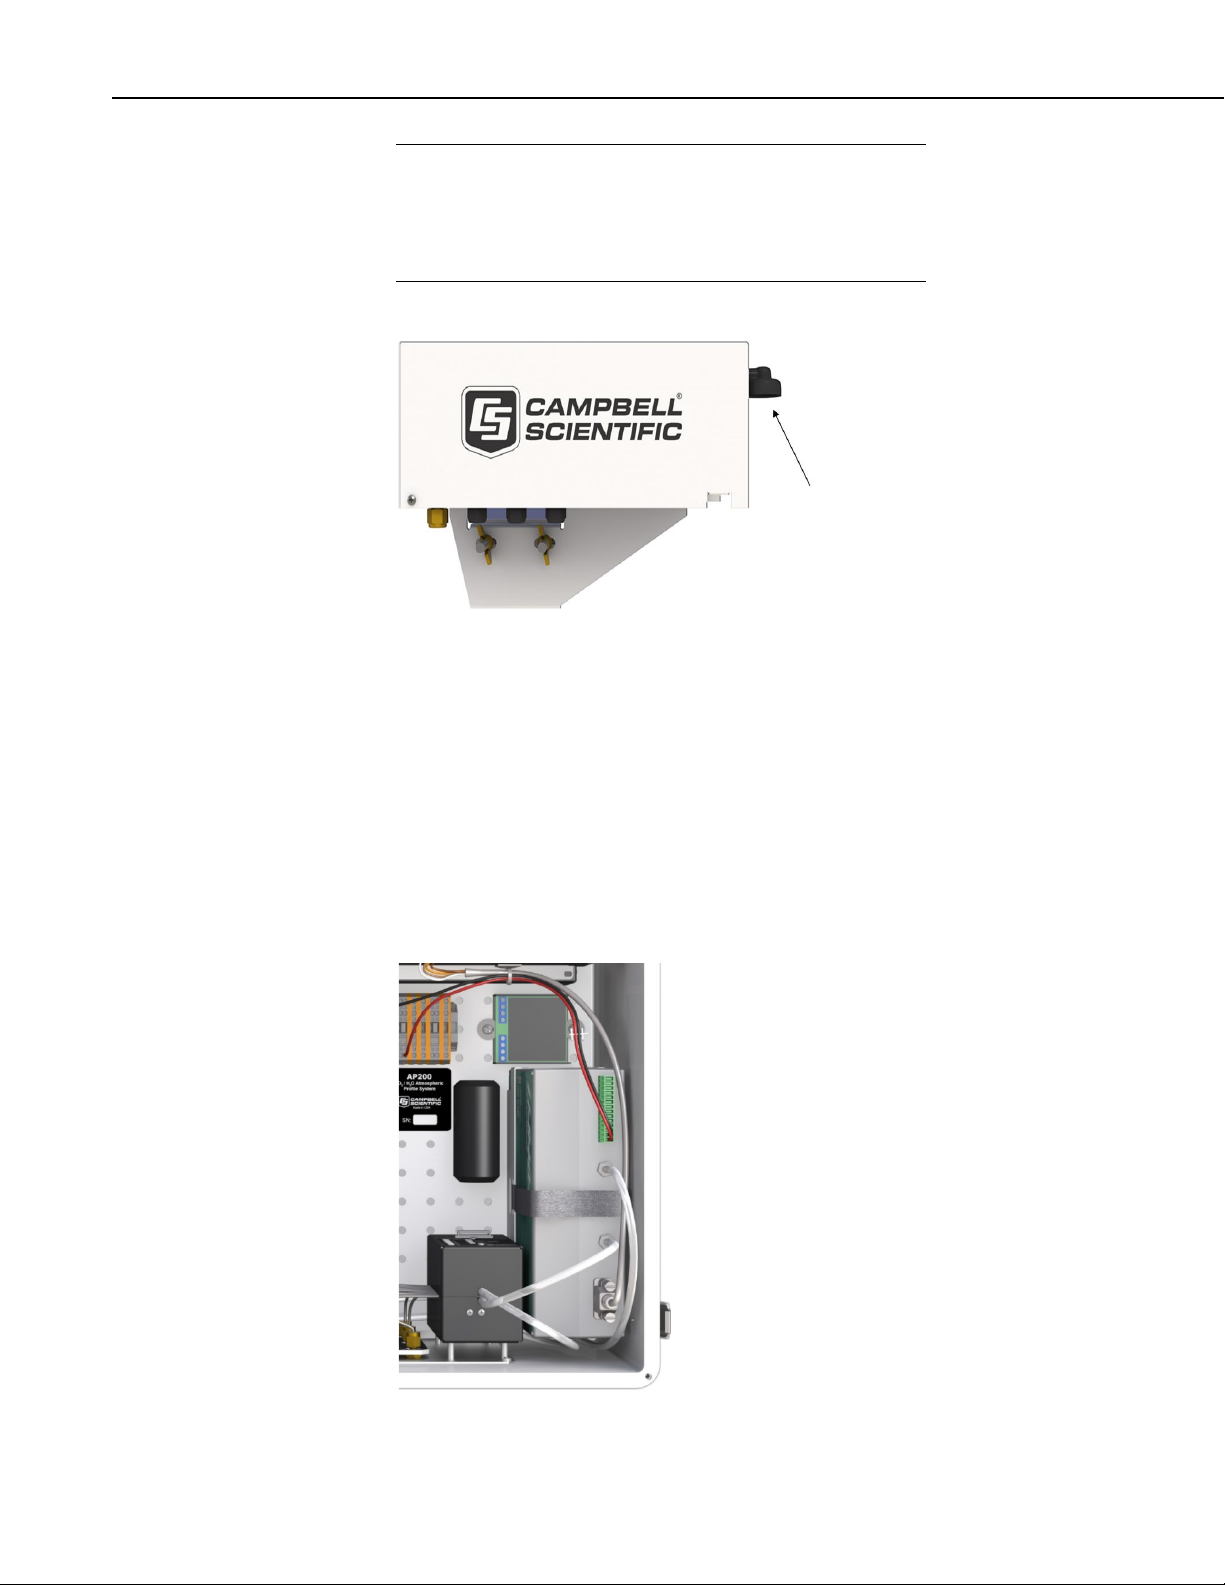
4.2.3 Pump Module
The AP200 pump module is mounted on the left side of the AP200 system
enclosure as shown in FIGURE 4-22.
16
Page 29
AP200 CO2/H2O Atmospheric Profile System
FIGURE 4-22. Pump module of AP200 system
The AP200 pump module pulls air through the system and exhausts it through
the Exhaust fitting on the bottom of the system enclosure. It uses a small
double-head diaphragm pump with a brushless DC motor. This pump includes
a speed control input and a tachometer to measure the actual pumping speed. It
is mounted in an insulated, temperature-controlled box inside the AP200
system enclosure. The following sections describe the monitored pump
operating parameters.
Pump Inlet Pressure: The measured inlet pressure of the pump is reported in
public variable pump_press. The AP200 sets the value of public variable
pump_control to a value between 0 (off) and 1 (full speed) to adjust the
pump’s speed as needed to match the measured pressure to the setpoint
pressure PUMP_P_SETPT. PUMP_P_SETPT is a system configuration
variable (see Section 5.4.1, System Configuration Variables). This pressure
setting affects the power required for the pump (lower pressure requires more
power), the possibility of water condensing in the tubing (lower pressure helps
to prevent condensation), and the flow rate (lower pressure will increase the
flow rate). The pump can achieve a maximum of approximately 60 kPa
pressure drop from ambient pressure at zero flow. The recommended setting
for the pump is 35 kPa below ambient pressure.
The pump module includes two buffer volumes to dampen the pressure
fluctuations from the pump. The sample flow from the IRGA flows through
these volumes in series on the way to the pump. The bypass flow (from nonselected inlets) connects directly to the pump.
Pump Speed: The measured pumping speed is reported in public variable
pump_speed. This is the rotational speed of the pump, given in Hz. The
pumping speed will typically be 25 Hz to 40 Hz. The actual value is not
critical, however, as long as the pressure can be maintained at the setpoint.
17
Page 30

AP200 CO2/H2O Atmospheric Profile System
Pump Temperature: The temperature of the pump module is reported in
public variable pump_tmpr. The operating range of the pump is 0°C to 55°C.
If the pump temperature is outside this range, the AP200 will disable the pump.
The pump module has a heater (8 W) that turns on if the pump temperature
falls below 2°C. If the AP200 is started at cold temperature, it may take up to
50 minutes to warm the pump module (from –30°C to 0°C). When it reaches
2°C the heater will cycle on/off as needed to maintain this temperature. The
fraction of time the pump heater is on is reported in the output tables (IntAvg,
CalAvg, and SiteAvg) as pump_heat_Avg. Once the pump is warmed up and
starts running, it will normally keep itself warm without additional heat to
approximately –30°C ambient.
The pump module has a fan (0.7 W) that turns on if the pump temperature rises
above 50°C. The fan will stay on until the pump temperature falls below 45°C.
The fraction of time the pump fan is on is reported in the output tables
(IntAvg, CalAvg, and SiteAvg) as pump_fan_Avg. This will typically
increase from zero at 20°C ambient temperature to 0.5 (0.4 W average power)
at 45°C.
The outlet of the pump connects to a small volume to reduce noise, and then to
the Exhaust fitting on the bottom of the system enclosure. This fitting has a
screen to prevent insects or debris from entering when the pump is off. If
exhausting the air samples at this location is a problem (for example, if it is
close enough to an inlet to affect its measurement), this screen may be removed
and a tube may be attached to divert the pump exhaust to another location. The
screen may be attached to the end of the tube with a Swagelok
cases the screen may simply be left in place.
®
union. In most
4.3 Specifications
4.3.1 CO2/H2O Analyzer
CO2 and H2O are measured with an LI-840A IRGA. See the LI-840A manual
(available at www.licor.com) for specifications.
4.3.2 System Enclosure
Dimensions: 52.1 cm x 44.5 cm x 29.7 cm
Weight
AP200 base model: 15.9 kg (35.0 lb)
Options
IRGA: 1.0 kg (2.3 lb)
CR1000KD: 0.3 kg (0.7 lb)
CFM100/NL115: 0.2 kg (0.4 lb)
Operating Temperature: –30°C to 45°C
Power Requirement
Voltage: 10 Vdc to 16 Vdc
Power
Maximum (cold start up): 3.75 A at 12 V dc (45.0 W)
(20.5 in x 17.5 in x 11.7 in)
18
Page 31

AP200 CO2/H2O Atmospheric Profile System
Average power varies from 14 W above 30°C to 24 W at –30°C as
shown in FIGURE 4-23. This includes 2.0 W for the intake heaters (8
intake assemblies at 0.25 W each).
FIGURE 4-23. Average power consumption relative to temperature
Pump Module
Pump type: Dual-head diaphragm pump with a
brushless DC motor
Mounting: Mounted in an insulated, temperature-
controlled box inside system enclosure
Control: Pumping speed is automatically controlled
to maintain the pump inlet pressure at the
set point
Maximum pumping speed: 9.0 liters per minute (LPM)
Pressure sensor range: 15.0 kPa to 115.0 kPa
Heater: 8.0 W, turns on/off at 2°C
Warm-up time: Approximately 50 minutes from –30°C to
2°C
Fan: 0.7 W (turns on at 50°C and off at 45°C)
Valve Manifold
Mounting: Mounted inside system enclosure
Inlets: Eight air sample inlets plus one inlet for
zero, one inlet for CO
O span
for H
2
Connections: 0.25-in Swagelok
span, and one inlet
2
®
Mass Flow Sensor: 0 to 1.0 standard liters per minute (SLPM)
Heater: 8.0 W, turns on/off at 5°C
Warm-up time: Approximately 20 minutes from –30°C to
4°C
Fan: 0.7 W; turns on at 45°C and off at 43°C
19
Page 32

AP200 CO2/H2O Atmospheric Profile System
4.3.3 Intake Assembly
Dimensions: 27.9 cm x 12.5 cm x 19.0 cm (11.0 in x 5.0
Weight: 1.4 kg (3.1 lb)
Filter: 1.0 in diameter, inline PTFE membrane
Orifice: 0.007-in inside diameter
Heater: 560 ohms (0.25 W at 12Vdc)
Mixing volume: 750 ml
Sample connection: 0.25-in Swagelok
Heater cable entry seals
Number of connections: 3 (one in, and up to two out)
Cable diameter: 2.8 mm to 6.6 mm (0.11 in to 0.26 in)
Heater cable screw terminals
Wire diameter: 26 to 12 AWG
Wire stripping length: 5.0 mm (0.2 in)
Screw tightening torque: 0.4 Newton meter (N
5. Installation
The following tools are required to install the AP200 system in the field.
Additional tools may be required for a user-supplied tripod or tower.
in x 7.5 in)
filter, 3 micron pore size, CSI pn 29998
®
•m)
• 9/16-in open-end wrench
• Adjustable wrench
• Tubing cutter (included with AP200)
• Small, flat-tip screwdriver (included with AP200)
• Wire stripping tool
5.1 Mounting
5.1.1 Support Structure
The AP200 system has two types of components that must be mounted to a
support structure: the intake assemblies and the AP200 system enclosure. The
support structure itself is not included in the AP200 so that it can be tailored to
specific needs, but several options are available. Contact a Campbell Scientific
application engineer for more information on site-specific mounting options.
The following installation notes show a typical application using a UT30
tower.
The AP200 intake assemblies are designed to mount on a vertical pipe of 1.3cm to 5.1-cm (0.5-in to 2.0-in) diameter. They should be mounted at the
positions where the air is to be sampled.
The AP200 system enclosure should be mounted where it can be accessed
easily to retrieve data from the CF cards on the datalogger. The AP200 can be
configured with one of these mounting options, similar to the standard
ENC16/18 enclosure:
20
• Triangular tower (UT10, UT20, or UT30)
• Tripod mast (1.5-in to 1.9-in diameter)
• Tripod leg (CM106 or CM106K tripod only)
Page 33

• Large pole (4.0-in to 10.0-in diameter)
• No mounting bracket
Consult the ENC10/12, ENC12/14, ENC14/16, ENC16/18 Instruction Manual,
available at www.campbellsci.com, for details on mounting bracket options.
5.1.2 AP200 Enclosure
Mount the AP200 system enclosure where it can be accessed easily to retrieve
data from the CF cards on the datalogger. The AP200 system enclosure is
similar to the ENC16/18 enclosure, and it has the same mounting options
available. Consult the ENC10/12, ENC12/14, ENC14/16, ENC16/18
Instruction Manual, available at www.campbellsci.com, for mounting details.
Typical installation of an AP200 system enclosure on a UT30 tower is shown
in FIGURE 5-1.
AP200 CO2/H2O Atmospheric Profile System
FIGURE 5-1. Installation (showing mounting hardware) of AP200
system enclosure on UT30 tower
Open the sealed bag containing the desiccant packs and humidity card. Place
two of the desiccant packs and the humidity indicator card in the mesh pocket
in the enclosure door to desiccate the inside of the enclosure. Reseal the
remaining two desiccant packs in the bag to use later.
5.1.3 Intake Assemblies
The intake assemblies are mounted at the desired air sampling positions. They
can be mounted on vertical pipes of 1.3-cm (0.5-in) to 5.1-cm (2.0-in)
diameter. The orientation of the intake assembly mounting clip must be
reversed to accommodate this range of diameters. For mounting the intake
21
Page 34

AP200 CO2/H2O Atmospheric Profile System
NOTE
assembly on smaller pipes, orient the mounting clips with their notches toward
the pipe, as shown it FIGURE 5-2. For larger pipes, orient the mounting clips
with their notches away from the pipe, as shown in FIGURE 5-3.
Orienting the mounting clip with its notch against the mounting
pipe will help to prevent rotation of the intake assembly, which
can happen for small-diameter pipes. For larger pipe diameters,
greater than approximately 3.9 cm (1.5 in), it may become
difficult to install the intake assembly because of the length of
the bolts. Reversing the clip allows it to fit on a larger-diameter
pipe.
In some mounting situations it may be easier to access the wing nuts if they are
on the other side.
Loosen the wing nuts but do not remove them completely to avoid the risk of
dropping them. Place the assembly against the vertical support, swing the
bracket around the back of the vertical support, slide the bolt into the slot and
hand tighten the wing nuts. A typical installation of an AP200 intake assembly
on pipes of differing diameters is shown in FIGURE 5-4.
22
FIGURE 5-2. Mounting clip orientation for pipe diameters between 1.3
and 3.8 cm
Page 35

AP200 CO2/H2O Atmospheric Profile System
FIGURE 5-3. Mounting clip orientation for pipe diameters between 3.9
and 5.1 cm
FIGURE 5-4. Installation of AP200 assembly on a small-diameter pipe
(left) and large-diameter pipe (right)
5.2 Plumbing
5.2.1 Profile Sample Tubes
A sample tube must be used to bring the air sample from each intake assembly
to the AP200 system enclosure. Campbell Scientific pn 15702 or equivalent is
recommended. This tubing has an aluminum layer to minimize diffusion
through the wall of the tube. See Appendix H, Using Swagelok
important information.
The AP200 has eleven inlets, labeled 1 through 8, Zero, CO
Span, and one outlet labeled Exhaust. All connections are 0.25-in Swagelok
fittings mounted on the bottom of the enclosure, as shown in FIGURE 5-5.
®
Fittings, for
Span, and H2O
2
®
23
Page 36

AP200 CO2/H2O Atmospheric Profile System
NOTE
FIGURE 5-5. Tubing connections on bottom of AP200 enclosure
If the AP200 system enclosure is mounted low to the ground, it
may be difficult to read the label on the bottom of the enclosure.
For convenience, the inlet connections are also labeled on the
inside of the enclosure as shown in
FIGURE 5-6.
24
FIGURE 5-6. Labeled inlet connections inside enclosure
Connect the lowest intake assembly to inlet 1 on the AP200 system enclosure,
the next intake assembly to inlet 2, and so forth. Connecting the tubes in this
order (shortest to longest) will minimize the time skew between intake
assemblies. If using fewer than eight intake assemblies, they must be
connected to the AP200 system enclosure inlets in order, starting with 1. Plug
unused inlets using Swagelok
®
plugs (pn 15891) that are included with the
AP200.
Page 37

AP200 CO2/H2O Atmospheric Profile System
NOTE
FIGURE 5-7 shows the tubing connections from the intake assemblies to the
system enclosure.
FIGURE 5-7. Tubing connections from four intake assemblies
connected to inlets 1 – 4
5.2.2 Zero and CO2 Span
The AP200 can perform automated zero (CO2 and H2O) and CO2 span of the
IRGA. This requires the user to supply cylinders of zero air and CO
with appropriate regulators.
Use high-quality gases for the zero and CO2 span. The zero gas
must be free of significant water vapor and CO2. The CO2 span
gas should have a well-known concentration of CO
air (not nitrogen).
Install these cylinders in close proximity to the AP200 system enclosure. Each
cylinder must have a pressure regulator to control the outlet pressure at 0 psig
and must have a 0.25-in Swagelok
to the valve module inlets using 0.25-in OD tubing, such as pn 15702.
Minimize the length of these tubes to reduce the equilibration time after the
zero or CO
configuration. Refer to Appendix H, Using Swagelok
information on installing and replacing Swagelok
Campbell Scientific can supply pre-swaged tube assemblies (pn 21823-L) for
this purpose.
balanced in
2
®
fitting on the outlet. Connect these fittings
span cylinder is selected. FIGURE 5-8 illustrates this
2
®
Fittings, for
®
fittings. For convenience,
span gas,
2
25
Page 38

AP200 CO2/H2O Atmospheric Profile System
NOTE
NOTE
FIGURE 5-8. AP200 system enclosure configured with cylinders of
zero air and CO
2
5.2.3 H2O Span
Flow meters and needle valves are not needed because the
AP200 zero and span inlets have flow restriction inside the
system enclosure to set the flow rate.
Make sure there are no leaks in the regulators or the connections
to the valve module. For automatic operation, the tank shutoff
valves are left continuously open. A plumbing leak could cause
the contents of the tank to be lost.
When inlets are not in use, replace the Swagelok® plug to keep
the system clean.
Open the shut-off valves on the cylinders and set the pressure regulators for 0psig delivery pressure.
If the pressure is inadvertently adjusted to high, the tube fitting
may need to be slightly loosened to bleed off the excess pressure.
Retighten the fitting when the proper setting is reached.
The H2O span can be performed only as a manual operation. Automated H2O
span is not feasible because it would require a dewpoint generator to provide
O span gas all the time. The H2O span inlet is not bypass equipped, so it
the H
2
will flow only when selected. This inlet can be connected to the output of a
dewpoint generator using a tee at the inlet, as shown in FIGURE 5-9, to bleed
off excess flow and avoid pressurizing the dewpoint generator.
26
Page 39

AP200 CO2/H2O Atmospheric Profile System
FIGURE 5-9. H
5.3 Wiring
5.3.1 Ground Connection
The AP200 must be earth grounded. Refer to section 7.1, ESD Protection in
the CR1000 Measurement and Control System Operator’s Manual, for
information on earth grounding and lightning protection. All component
grounds of the AP200 profile system are pre-wired at the factory to a common
ground lug located at the bottom of the enclosure. Ground this lug using
heavy-gauge copper wire. An AP200 grounded to the UT30 tower is shown in
FIGURE 5-10.
O span inlet configured for a dewpoint generator
2
FIGURE 5-10. AP200 earth grounded on a UT30 tower
27
Page 40

AP200 CO2/H2O Atmospheric Profile System
NOTE
5.3.2 Intake Heater Cables
The AP200 intake assemblies have a small heater in the rain diverter to prevent
condensation. Power for these heaters is available in the AP200 system
enclosure. Campbell Scientific pn 9922 cable or equivalent is recommended
for connecting the intake assemblies to the system enclosure. The system is
designed to daisy-chain the heater cables from one intake assembly to the next
as described below and shown in FIGURE 5-16.
Make sure power is disconnected from the AP200 before
connecting the heater cable.
To bring cables into the AP200 enclosure, remove the cap from the cable
feedthrough by loosening the thumbscrew and twisting the cap while pulling it
off. See FIGURE 5-11.
28
FIGURE 5-11. Cable feedthrough cap shown removed to admit cables
into the system enclosure
Insert the heater cable through the feedthrough, and connect it to the DIN rail
bus in the system enclosure. The red, positive wire connects to one of the
terminals labeled Intake Heater +. Connect the black, negative wire to one of
the terminals labeled G, as shown in FIGURE 5-12. Two connections are
provided for convenience if multiple cables are to be connected (for example, if
the intake assemblies are mounted on two separate towers).
Page 41

AP200 CO2/H2O Atmospheric Profile System
NOTE
FIGURE 5-12. Proper wiring of heater cable onto DIN bus of AP200
system enclosure
To connect a wire to the DIN rail terminal blocks of the AP200
enclosure, insert a small screwdriver into the square hole to open
the spring-loaded contacts as shown in
wire into the corresponding round hole and remove the
screwdriver. Gently tug the wire to confirm it is secure.
FIGURE 5-13. Insert the
FIGURE 5-13. Use AP200 system screwdriver to open contacts for
wiring heater cable
29
Page 42

AP200 CO2/H2O Atmospheric Profile System
Push at tabs to open
Route the heater cable to the first intake assembly and cut it to the needed
length. Open the intake assembly cover by gently spreading the tabs on the
lower-front corner and tilting it back. See FIGURE 5-14.
FIGURE 5-14. Tabs for opening intake assembly
Loosen the nut on one of the three cable glands (to avoid the risk of dropping
the nut, do not remove it completely). Insert the cable and tighten the nut.
Connect the red and black wires to the corresponding terminal blocks as shown
in FIGURE 5-15.
30
FIGURE 5-15. Wiring of heater cable on AP200 intake assembly
Page 43

AP200 CO2/H2O Atmospheric Profile System
NOTE
Insert and connect a second length of heater cable for the next intake assembly.
Continue this “daisy chain” from one intake assembly to the next until all of
the intake assemblies are connected as shown in FIGURE 5-16. Intake
assemblies will accommodate a third heater power cable that may be used to
branch off to another intake assembly. This may be useful if the intake
assemblies are mounted on two or more towers.
FIGURE 5-16. Three intake assemblies with heater cables daisy
chained to the AP200 system enclosure
To check the intake heater wiring, temporarily disconnect the heater cable from
the AP200 system enclosure and measure the resistance between the red and
black wires. A hand-held digital multimeter works well for this. Each heater
has a resistance of approximately 560 ohms and should be wired in parallel.
The nominal resistance will be 560 divided by the number of heaters. TABLE
5-1 shows the nominal equivalent resistance for 4 through 8 intake heater wired
in parallel. It also gives the acceptable range, which accounts for the 5%
tolerance on the resistance of each heater. If the resistance is outside this range
it is likely there is a problem with the connections or with a heater.
The resistance of the cable is small enough that it can generally
be ignored.
31
Page 44

AP200 CO2/H2O Atmospheric Profile System
TABLE 5-1. Equivalent Resistance for Intake Heaters
Number Of
Heaters
Nominal Resistance
(ohms)
Acceptable Range
(ohms)
4
140
133 to 147
5
112
106 to 118
6
93
88 to 98
7
80
76 to 84
8
70
66 to 74
CAUTION
NOTE
5.3.3 Power
The AP200 requires a 10 Vdc to 16 Vdc power source. The average power
consumption varies with ambient temperature, mostly due to the heater in the
IRGA that maintains its sample cell at 50°C. There are also heaters and fans
that will cycle on and off to maintain the temperatures of the pump and the
valve manifold. The maximum power consumption may briefly be as high as
45 W if the system is started at cold temperatures (below 0°C).
Carefully design any DC power source to ensure
uninterrupted power. Contact a Campbell Scientific
applications engineer for assistance if needed.
Connected in Parallel
The AP200 can be damaged by pulling unfiltered air into
the valve manifold. Before applying power to the AP200,
make sure each inlet has a filter (such as included in the
AP200 intake assemblies) or is capped.
To reduce the risk of shorting the power supply (this is
especially important when using batteries), connect the
power cable to the AP200 first and then connect the other
end to the power source.
Insert the power cable, CABLEPCBL-L, through the feedthrough and connect
it to the DIN rail bus in the system enclosure. The red, positive wire connects
to one of the terminals labeled 10 to 16 Vdc In. Connect the black, negative
wire to one of the terminals labeled G as shown in FIGURE 5-17. Two
connections are provided for convenience if multiple power sources are to be
connected (for example, two batteries, or a battery and an AC/DC power
adapter).
Each of these two power connections has a diode to prevent
reverse current flow. This allows two batteries to be connected
safely to the AP200 even if one is fully charged and the other is
discharged.
32
Page 45

AP200 CO2/H2O Atmospheric Profile System
FIGURE 5-17. Proper wiring of power cable onto DIN bus of AP200
system enclosure
To relieve strain on the AP200 cables, use a cable tie to secure the cables to the
cable-tie loop on the pump module as shown in FIGURE 5-18.
FIGURE 5-18. Power cables secured to cable tie loop on pump module
of AP200 enclosure
Replace the cap on the AP200 enclosure feedthrough. Gently bend the cables
back while sliding the cap on and rotating the cap to minimize the space around
the cables as shown in FIGURE 5-19. Tighten the thumbscrew to secure it.
33
Page 46

AP200 CO2/H2O Atmospheric Profile System
NOTE
This will relieve further strain on the cable and also minimize air infiltration to
extend the life of the enclosure desiccant packs.
FIGURE 5-19. Cut-away view showing proper replacement of
feedthrough cap
In very humid conditions, it may be helpful to seal the cable
feedthrough with plumber’s putty.
The AP200 stores energy in a capacitor to provide backup power
in the event power is interrupted. The capacitor will power the
datalogger for a few seconds allowing it to finish writing data to
the CF card and close the file to prevent loss of data or damage
to the CF card. Do not attach additional sensors or other devices
that are powered from the datalogger without consulting a
Campbell Scientific applications engineer.
5.4 Configure the Program
The AP200 is shipped with the program AP200_vx_x.cr1 installed on the
CR1000 datalogger. A copy of the program is found on the AP200 Support
CD (pn 28552) or can be downloaded from www.campbellsci.com. The AP200
program uses both constants and variables to customize the behavior of the
system for a particular installation. Constants are used for parameters that
must be determined when the program is compiled and variables are used
otherwise.
34
Constants are most easily modified using the CRBasic Editor, which is part of
the PC400 and LoggerNet datalogger support software packages. They may
also be edited with a simple text editor and uploaded to the datalogger using
Page 47

PC200W, which may be downloaded from www.campbellsci.com. The AP200
NOTE
uses some constants as “compile switches” to define the state of the system
during compilation.
Variables may be edited while the program is running using either a keyboard
display or a PC connected through PC200W, PC400, or LoggerNet. Variables
that define the operational configuration of the system are defined as system
configuration variables. Any changes to these variables are automatically saved in non-volatile memory.
A change to a system configuration variable that affects the
valve switching sequence will not take effect until the sequence
is started.
Other modifications to the AP200 program (for example, to
measure additional sensors) are not recommended without first
consulting a Campbell Scientific application engineer.
5.4.1 System Configuration Variables
Several special variables are used to configure the AP200. These variables are
stored in the sys_conf_var.dat file, so their values will be saved and recalled if
the program is recompiled. They are intended to be set when a new system is
installed, but they may be edited at any time. When a system configuration
variable is changed, the AP200 will write a message to the message_log table
and save the new values in sys_conf_var.dat. This section gives a brief
description of each of these variables and refers the reader to the appropriate
section of the user manual if a lengthy discussion is required.
AP200 CO2/H2O Atmospheric Profile System
PRESS_AMBIENT: This is the ambient pressure, in kPa. It depends
primarily on elevation (see FIGURE 4-19), but also varies slightly with
barometric pressure. This variable is used to convert the dewpoint temperature
measured in the IRGA sample cell Td_cell to dewpoint temperature at ambient
pressure Td_ambient. It is also used during a manual H
O span operation.
2
There are three methods to determine the appropriate value for
PRESS_AMBIENT.
• If nominal ambient pressure is known, simply enter the value.
• If elevation is known, determine ambient pressure from FIGURE
4-19.
• Ambient pressure can be measured by turning the AP200 pump off,
waiting for the pressure to stabilize at ambient pressure, and then
using the pressure measured in the IRGA (see Section 6.2.4, Do H
O
2
Span, for details).
PUMP_P_SETPT: This is the setpoint pressure (kPa) for the pump speed
control algorithm. The AP200 will adjust the pumping speed to make the
measured pump pressure, pump_press, match this value. For most applications
it should be set to approximately 35 kPa below ambient pressure (see notes on
variable PRESS_AMBIENT above). The factory default is 200, which will
prevent the AP200 from working properly until PUMP_P_SETPT is set by
the user.
35
Page 48

AP200 CO2/H2O Atmospheric Profile System
LEVELS_USED: This is the number of profile levels (air sample intakes) to
be sampled. It must be an integer from four to eight. If fewer than eight inlets
are used, they should be connected to the lowest-number inlets (starting with
one). The default is eight.
The next five variables configure the automatic calibration (zero/span)
sequence. See Section 6, Infrared Gas Analyzer (IRGA) Zero and Span, for
details.
MEASURE_TANKS: This Boolean variable determines whether the AP200
will periodically switch between the profile sequence and the calibration
(zero/span) sequence. Set this variable to True to periodically switch to the
zero and CO
2
default is MEASURE_TANKS = True.
AUTO_ZEROSPAN: This Boolean variable determines whether the AP200
will command the IRGA to perform a zero and span (True) or whether it will
merely measure the zero and span cylinders (False). It is ignored if
MEASURE_TANKS is false. The default is AUTO_ZEROSPAN = True.
CAL_INTERVAL: This variable determines how often (given as time in
minutes) the calibration (zero/span) sequence will be run. It is ignored if
MEASURE_TANKS is false. The minimum time is the output interval (30
min). The maximum time is 1,440 min (once per day).
span cylinders (tanks). Set it to False to disable this feature. The
CAL_TIMEOFFSET: This variable determines when the calibration
(zero/span) sequence is started within the CAL_INTERVAL time. If
CAL_TIMEOFFSET is set to zero, the calibration (zero/span) sequence will
start at the start of the CAL_INTERVAL. Setting this variable to a non-zero
value will delay the start of the zero/span sequence by the set number of
minutes. CAL_TIMEOFFSET may be set to any value from zero to
CAL_INTERVAL.
CO2_SPAN_PPM: This is the concentration of the CO
span tank, in ppm. If
2
MEASURE_TANKS and AUTO_ZEROSPAN are both TRUE, the system
will automatically span the IRGA to this value during the zero/span sequence.
This value is also used during a manual CO
span operation. Any value may
2
be entered for CO2_SPAN_PPM, but spanning the IRGA will be disabled
unless the value is between 100 and 20,000. The factory default is –99 to
intentionally disable setting the CO
span tank.
CO
2
span until the user enters the value for the
2
The next two variables control the AP200 automatic power shutdown function.
If the supply voltage drops too low, the AP200 automatically powers down as
much of the system as possible. The AP200 requires 10.0 Vdc to 16.0 Vdc at
the input terminals. Note that the voltage measured in the datalogger,
batt_volt, will be approximately 0.3 V lower than the input voltage due to a
reverse-polarity protection diode.
BATT_LOWLIMIT: If the supply voltage batt_volt falls below this value,
the AP200 will set the batt_volt_LOW flag and shut down as much of the
system as possible until the voltage recovers. BATT_LOWLIMIT must be
9.7 V to 15 V. The default value for BATT_LOWLIMT is 9.7 V, which
corresponds to 10.0 V at the input terminal. This power-down feature is to
protect the battery from deep discharge cycles. The user should set
36
Page 49

BATT_LOWLIMIT as appropriate to protect his battery. If AC main power
and an AC/DC adapter are used, the limit may be left at 9.7 V.
BATT_DEADBAND: This variable, along with BATT_LOWLIMIT,
determine when the AP200 will restart after an automatic power shutdown.
The AP200 will not restart until the supply voltage batt_volt reaches at least
BATT_LOWLIMIT + BATT_DEADBAND. The purpose of the deadband
(the gap between the shut-down voltage and the turn-on voltage) is to protect
the AP200 from repeated power cycles when the battery voltage is very near
the limit. BATT_DEADBAND must be zero to 10.0 V. The default is 1.0 V.
5.4.2 Compile Switches
The AP200 program defines three constants that are used as compile switches.
These constants define which optional values are to be stored in the output
tables.
MaxLevels: MaxLevels defines the maximum number of profile levels. The
default is eight, but it may be set to the actual number of levels used (four to
eight) to avoid null data for unused levels in the IntAvg output table. The
number of levels measured is determined by system configuration variable
LEVELS_USED.
AP200 CO2/H2O Atmospheric Profile System
SaveAll_diagnostics: If constant SaveAll_diagnostics is set to False (the
default), the RawData output table will contain only those values required for
normal operation. If it is set to True, the AP200 will save some additional
diagnostic values in output table RawData.
N_AirTemps: Constant N_AirTemps determines the number of 107-L
temperature sensors to measure. It may be from one to eight, or zero, which is
used to disable air-temperature measurements. The default is zero. See
Appendix E, Temperature Profile, for more details on adding a temperature
profile measurement.
5.5 Starting and Stopping the Sequence
In normal operation, the AP200 will automatically cycle through the profile
inlets. If configured for automatic zero/span, it will periodically run the
calibration (zero/span) sequence and then return to the profile sequence. The
user may stop the sequence to control the valves manually and then restart the
sequence using the public variables described below. If any of the variables
that control the valve sequence are edited, the sequence must be stopped and
restarted before changes will be in effect. The following public variables allow
the user to start and stop the sequence and to control the valves manually.
seq_ACTIVE: Reports whether the AP200 is controlling the valves (True) or
not (False). If seq_ACTIVE = False, the valves can be controlled manually.
This variable is for information only; its value cannot be directly changed by
the user.
STARTsequence: Allows the user to start the sequence. Set this variable to
True to start the automatic valve switching sequence. The AP200 will change
valve_number to 1 and wait until it can synchronize the valve sequence to the
real-time clock. This may take up to two minutes (see Appendix F, Valve
37
Page 50

AP200 CO2/H2O Atmospheric Profile System
Sequence Timing, for timing details). When the sequence is restarted, the
AP200 will set seq_ACTIVE = True and STARTsequence = False.
STOPsequence: Allows the user to stop the sequence. Set this variable to
True to stop the automatic valve switching sequence. The AP200 will
immediately set seq_ACTIVE = False and leave the valve_number in its
current state.
valve_number: Controls which valve is selected. It may be 1 through 8
(profile inlets), 9 (zero), 10 (CO
active (seq_ACTIVE = True) the AP200 controls the state of valve_number
and the user may not change it. If the sequence is stopped (seq_ACTIVE =
False), the user may change the value of valve_number to control the valves
manually.
5.6 Verify Performance
After the AP200 is installed, it is important to make sure it is operating
properly.
5.6.1 Quick Status Check Using a Keyboard Display
Span), or 11 (H2O Span). If the sequence is
2
The optional, hard-mounted keyboard display or a hand-held CR1000KD
provides an easy user interface to the AP200. See Appendix A, Keyboard
Display Menu, for a listing of the AP200 keyboard display menus. See the
CR1000KD User Manual for operating instructions. Press a key to activate the
display and select the Check Status page:
This menu page gives a quick look at the following public variables:
diag_AP200: this should be zero. If not, see Appendix B, AP200 Diagnostics.
CO2: this is the CO
concentration given in ppm. Verify that this is a
2
reasonable value.
38
H2O: this is the H
O concentration given in ppt. Verify that this is a reasonable
2
value.
seq_ACTIVE: this should be True. If not, see Section 5.5, Starting and
Stopping the Sequence.
Page 51

valve_number: this is normally an integer from 1 to 8, indicating which
profile level is being sampled. If the sequence is active, this number should
increment approximately every 15 s (see Appendix F, Valve Sequence Timing,
for details). It may be 9 (Zero) or 10 (CO
running. The corresponding LED on the valve module should be ON.
sample_flow: The expected value for the sample flow depends on the
elevation (see FIGURE 4-19 and FIGURE 4-20 for details). A significantly
higher flow indicates there may be a leak, whereas a significantly lower flow
indicates the filter or orifice may be plugged.
cell_press: This should be within ± 2 kPa of the pressure setpoint. See
Section 4.2.3, Pump Module, for details.
To access other tables in the CR1000, press <ESC> to go back to the top menu
and then select System Menu. This gives access to all of the system tables. In
particular, the status table is helpful for assessing the status of the CR1000
datalogger (see the CR1000 User Manual for details), and the public table
shows the value of each public variable as it updates in real time. See
Appendix C, Public Variables, for details on the variables in the Public Table.
5.6.2 Checking Status Remotely
AP200 CO2/H2O Atmospheric Profile System
Span) if the zero/span sequence is
2
If the system is configured with an NL115 and a network connection is
available, the AP200 can be checked remotely by connecting a PC via
LoggerNet (other software is also available that provides some of the
functionality of LoggerNet – see Section 4.1.5, Support Software). LoggerNet
may also be used on-site with a serial cable connected directly to the
datalogger. All of the variables listed in the on-site access can be checked in
the Public table. For thorough performance verification, each of the variables
in the public table can be compared to their normal values. See Appendix C,
Public Variables, for details.
5.6.3 On-site System Checks
There are several important checks that can be done on site, during initial
installation, and during routine site visits to retrieve data and maintain the
system.
NL115 or CFM100: Check that the status LED is blinking red periodically,
indicating that data are being written to the card. See the NL115 or CFM100
manual for details.
Sample pump: Listen to the sample pump which should be making a steady
hum. A slight change in pitch is normal when switching between the
calibration (zero/span) and profile sequences, but a sustained oscillation in the
pitch indicates a problem. See Appendix B, AP200 Diagnostics, Bit 4.
Enclosure humidity: Check the humidity indicator card on the door of the
AP200 system enclosure and replace the desiccant when the humidity reaches
50%. See Section 7.2, Enclosure Desiccant.
Zero and span cylinders: Check the cylinder and regulator outlet pressures.
It is recommended to log the tank pressures at each site visit and note the trend.
39
Page 52

AP200 CO2/H2O Atmospheric Profile System
NOTE
6. Infrared Gas Analyzer (IRGA) Zero and Span
The IRGA should be zeroed and spanned periodically to maintain its accuracy.
There are three ways to accomplish this:
1. The IRGA can be removed from the AP200 system and zeroed and
spanned per the manufacturer’s recommendation. See Section 7.4.1,
Installing and Removing the IRGA, for instructions on installing and
removing the IRGA, and see the LI-840A IRGA user manual for
details on performing the zero and span outside the AP200 system.
2. The IRGA zero and span may be performed manually without
removing the IRGA from the AP200. Further details for this option
are given in Section 6.2, Manual Zero and Span.
3. The IRGA zero and CO
AP200 system. This option can zero both CO
span only CO
. It is not practical to automatically span H2O because
2
of the difficulty in providing an online H
generator) in the field. Further details for this option are given in
Section 6.1, Automatic Zero and Span.
span may be performed automatically by the
2
and H2O, but it can
2
O span gas (dewpoint
2
See Sections 5.2.2, Zero and CO
plumbing connections to zero and span the IRGA while installed in the AP200.
The following sections give details on configuring the AP200 for automatic or
manual zero and span.
6.1 Automatic Zero and Span
This section describes how to configure the AP200 for periodic, automated
zero (CO
to configure the AP200 for automatic zero and span. These variables may be
edited with keyboard display, either at the Configure System menu, or through
the normal Public Table. They may also be edited using LoggerNet.
These variables are stored in the sys_conf_var.dat file, so their
values will be saved if the program is recompiled. See Section
5.4, Configure the Program, for more details.
MEASURE_TANKS: Set this variable to True to periodically switch to the
zero and CO
AUTO_ZEROSPAN: This variable can be set to either True or False. True
will command the IRGA to perform the zero and span. False will command
the IRGA to measure the cylinders but not perform the zero and span. The
recommended default is to set this variable to True.
and H2O) and CO2 span of the IRGA. Five public variables are used
2
span cylinders.
2
Span, and 5.2.3, H2O Span, for details on
2
40
CAL_INTERVAL: This variable determines how often the calibration
(zero/span) cylinders are measured. The recommended default is 1,440 min
(once per day).
CAL_TIMEOFFSET: This variable determines when the zero/span is
performed within the CAL_INTERVAL time. The recommended default is
720 min to start the calibration (zero/span) sequence at noon.
CO2_SPAN_PPM: Enter the concentration of the CO
span tank in ppm.
2
Page 53

After these variables are set, the valve sequence must be restarted to make the
changes effective. See Section 5.5, Starting and Stopping the Sequence, for
detail on starting and stopping the sequence. The program will then set its
timing variables as appropriate for the options selected (see Appendix F, Valve
Sequence Timing, for details).
6.2 Manual Zero and Span
This section describes how to perform a manual zero and span of the IRGA.
This procedure assumes the use of a keyboard display, but the process is
similar when using LoggerNet.
The AP200 keyboard menus are designed to guide the user step by step
through the manual zero/span process. Each line in a menu is either a submenu
or it displays or edits a public variable. At the top-level AP200 menu, select
Manual Zero/Span.
The Manual Zero/Span menu has four submenus that should be visited in the
order listed.
AP200 CO2/H2O Atmospheric Profile System
After the steps on the four submenus are completed, there are three lines to
restart the valve switching sequence. The following section provides details on
this procedure.
6.2.1 Check Zero and CO2 Span
At the Manual Zero/Span menu, select <Check Span, Zero>. This menu
guides the user through the steps to flow the CO
the current state of the IRGA.
span and zero gases to assess
2
41
Page 54

AP200 CO2/H2O Atmospheric Profile System
If seq_ACTIVE is True, then set STOPsequence = True to stop the sequence
and then verify that seq_ACTIVE changes to False.
Set valve_number to Zero (9). Look at the LEDs on the valve module to
confirm the selected valve is now active.
The CO2_SPAN_PPM variable displays the concentration in the CO
tank.
Check the value of diag_AP200. If it is not zero, a problem in the AP200
system should be resolved before continuing (see Appendix B, AP200
Diagnostics).
Wait for the values of CO
two minutes.
Record the value of CO
the zero cylinder is selected, the value should be close to zero. If the CO
tank is selected, it should be close to the value of CO2_SPAN_PPM.
Record the value of H
value should be close to zero for either cylinder.
Set valve_number to CO
Press <Esc> to return to the Manual Zero/Span menu.
6.2.2 Do CO2 and H2O Zero
At the Manual Zero/Span menu, select <Do Zero (CO2&H2O)>. This menu
guides the user through the steps to flow the zero gas and to send the command
to zero the IRGA.
span
2
and H2O to stabilize. Normally, this takes one or
2
. This is the measured CO2 concentration in ppm. If
2
span
2
O. This is the measured H2O concentration in ppt. The
2
span (10) and repeat the previous steps.
2
42
If seq_ACTIVE is True, then set STOPsequence = True to stop the
sequence. Then verify seq_ACTIVE changes to False.
Set valve_number to Zero (9). Look at the LEDs on the valve module to
confirm the Zero valve is now active.
Check the value of diag_AP200. If it is not zero, a problem in the AP200
system should be resolved before continuing (see Appendix B, AP200
Diagnostics).
Page 55

6.2.3 Do CO2 Span
AP200 CO2/H2O Atmospheric Profile System
Wait for the value of CO2 and H2O to stabilize. This normally takes one to two
minutes.
Set DO_zero to True. The AP200 will send the commands to the IRGA to do
zero and then an H2O zero. While the IRGA is setting to zero, the values
a CO
2
for CO
and H2O will not be available and NAN (not a number) will be
2
displayed. This will take approximately 20 s. When the process is complete,
and H2O will again be displayed. Verify that both of these values are
CO
2
close to zero.
Press <Esc> to return to the Manual Zero/Span menu.
At the Manual Zero/Span menu, select Do CO2 Span. This menu guides the
user through the steps to begin flow of the CO
command to the IRGA to set its CO
span.
2
span gas and to send the
2
If seq_ACTIVE is True, set STOPsequence = True to stop the sequence.
Then verify that seq_ACTIVE changes to False.
Check the value of CO2_SPAN_PPM. This is the span value that will be sent
to the IRGA. Ensure that the value is correct for the concentration in the CO
2
span cylinder.
Set valve_number to CO2span (10). Look at the LEDs on the valve module to
confirm the CO
span valve is now active.
2
Check the value of diag_AP200. If it is not zero, a problem in the AP200
system should be resolved before continuing (see Appendix B, AP200
Diagnostics).
Wait for the value of CO
to stabilize. This normally takes one to two minutes.
2
Set DO_CO2_span to True. The AP200 will send the command to the IRGA
to do a CO
span. While the IRGA is setting the span, the value for CO2 will
2
not be available and NAN will be displayed. This will take approximately 10
s. When the process is complete, CO
will again be displayed. Verify the value
2
is close to the value of CO2_SPAN_PPM.
Press <Esc> to return to the Manual Zero/Span menu.
43
Page 56

AP200 CO2/H2O Atmospheric Profile System
6.2.4 Do H2O Span
At the Manual Zero/Span menu, select Do H2O Span. This menu guides the
user through the steps to flow the H
the IRGA to set its H
H
O is more difficult to span than CO2 due to the difficulty of providing a
2
source of air with known humidity. Therefore, a dewpoint generator, such as
the LI-610 (LI-COR
additional complication is the need to correct the dewpoint temperature for the
difference in pressure between the dewpoint generator and the IRGA sample
cell. The AP200 is capable of making this correction, but three variables must
be set first.
H2OSpanDewPt: This variable is the dewpoint temperature setting (in °C) on
the dewpoint generator. Any value may be entered for H2OSpanDewPt.
However, the IRGA H
between 0 and 20. The default is –99 to intentionally disable setting the H
span until the user enters the value for the dewpoint generator.
PRESS_AMBIENT: This variable is the ambient pressure (kPa), which is
assumed to be the same as the pressure in the dewpoint generator.
O span gas and to send the command to
2
O span.
2
®
, Inc., Lincoln, NE), is used for many applications. An
O span setting will be disabled unless the value is
2
O
2
SpanCellP: This variable (given in kPa) is the pressure in the IRGA sample
cell during the H
pressures as part of the H
O span procedure. The steps below will measure these
2
O span procedure. PRESS_AMBIENT and
2
SpanCellP are used to calculate a pressure-corrected, span dewpoint
temperature to send to the IRGA (see Appendix I, Useful Equations, for
details).
All three of these variables must be set for the IRGA H
O span setting to be
2
enabled.
44
Page 57

AP200 CO2/H2O Atmospheric Profile System
If seq_ACTIVE is True, then set STOPsequence = True to stop the
sequence, and then verify seq_ACTIVE changes to False.
Variable cell_press is the pressure in the IRGA sample cell. Set pump_ON =
False to turn the pump off and it should be possible to hear the pump stop.
Wait for the value of cell_press to rise and stabilize to ambient pressure. This
may take several minutes as the intake tubes and mixing volumes fill with air.
Make sure the dewpoint generator is connected to the H
in Section 5.2.3, H
O Span. Consult the dewpoint generator’s user manual for
2
O Span inlet as shown
2
proper operation of the dewpoint generator.
Enter the dewpoint generator’s temperature setpoint (in °C) for
H2OSpanDewPt.
While the pump is off and the IRGA sample cell is still at ambient pressure, set
SETpressAmbient = True. The AP200 will store the value of cell_press in
PRESS_AMBIENT. Verify that the value in PRESS_AMBIENT now
matches cell_press.
The next two variables are Td_cell and Td_ambient. Td_cell is the dewpoint
temperature measured by the IRGA. Td_ambient is corrected for the
difference in pressure between the sample cell and ambient (see Appendix I,
Useful Equations). With the pump off, these two dewpoint temperatures
should match.
Step down to pump_ON and set it to True to turn the pump on. It should be
possible to hear the pump start to run at full speed and then slow down to
stabilize the pump pressure to its setpoint.
While the pump is on and the IRGA sample cell is stable at its normal
operating pressure, set SETspanCellP = True. The AP200 will store the value
of cell_press in SpanCellP. Verify that the value in SpanCellP now matches
that of cell_press.
Set valve_number to H2Ospan (11). Look at the LEDs on the valve module
to confirm the H
O span valve is now active.
2
Check the value of diag_AP200. If it is not zero, a problem in the AP200
system should be resolved before continuing (see Appendix B, AP200
Diagnostics).
Wait for the value of Td_ambient to stabilize. This normally takes one to two
minutes.
Set DO_H2O_span to True. The AP200 will send the command to the IRGA
to do an H
O span. While the IRGA is setting the span, the value for
2
Td_ambient will not be available and NAN will be displayed. This will take
approximately 10 s. When the process is complete, Td_ambient will again be
displayed. Verify that the value is close to the value of H2OSpanDewPt.
45
Page 58

AP200 CO2/H2O Atmospheric Profile System
NOTE
To avoid pulling unfiltered air into the AP200, do not shut down
or disconnect the dewpoint generator until the valve sequence
has been restarted as described in Section
Sequence.
Press <Esc> to return to the Manual Zero/Span menu.
6.2.5 Restart the Sequence
At the conclusion of the manual zero/span process, restart the automatic valve
sequence. Go to the last line of the Manual Zero/Span menu and set
STARTsequence = True. Verify valve_number changes to 1 and look at the
LEDs on the valve module to confirm that valve 1 is active. The AP200 will
stay on valve 1 until it is synchronized with the real-time clock. Then it will
set seq_ACTIVE to True and begin the valve sequence. See Section 5.5,
Starting and Stopping the Sequence, for more details on starting the sequence.
Once the valve_number changes to 1, the dewpoint generator may be shut
down and disconnected. Replace the plug on the AP200 H
Press <Esc> to return to the AP200 menu.
6.2.5, Restart the
O Span inlet.
2
6.2.6 Check the System
When the manual zero/span process is complete and the valve sequence is
restarted, select Check Status from the main AP200 menu and verify proper
operation of the system, as described in Section 5.6.1, Quick Status Check
Using a Keyboard Display.
7. Maintenance and Troubleshooting
Most of the basic diagnostic and troubleshooting issues for the AP200 are
covered in Appendix B, AP200 Diagnostics. This section provides additional
detail on some issues.
7.1 Plumbing Leaks
Most of the AP200 plumbing operates at reduced pressure. If there is a leak,
ambient air will be pulled into the air stream, mixing with the intended air
sample and changing the concentration of CO
easily identified by the higher-than-normal flow rate, but a small leak may be
difficult to detect. One technique that may be helpful to check for leaks is to
breathe on a suspect fitting while observing the measured CO
Because exhaled breath contains much higher CO
on the location of a leak will cause a rise in measured CO
inlet, take care that a user’s exhalations do not reach the inlet directly. There
may be a substantial time delay when checking for leaks at the intake
assembly. The mixing volume can cause the delay and smooth the response.
A long intake tube will also introduce a significant time delay.
2
and H2O. A large leak can be
concentration.
2
than ambient air, breathing
2
. If near the sample
2
46
Page 59

Some common causes of leaks include:
CAUTION
• Forgetting to tighten a fitting during the installation. It is good
practice to check all of the tube connections before turning the system
on. If a fitting can be loosened with fingers, it is not properly
tightened.
• Dirt or debris in the tube fitting. Use care when connecting or
disconnecting tubes, and install caps and plugs on tubes and fittings
when they are not in use.
• Excessive bending. Be careful to observe the minimum bend radius
and avoid bending the tube near the end at the connections.
7.2 Enclosure Desiccant
Check the humidity indicator card in the mesh pocket in the AP200 system
enclosure door. The humidity indicator card has three colored circles that
indicate the percentage of humidity. Desiccant packets inside the enclosure
should be replaced with fresh packets when the upper dot on the indicator
begins to turn pink. The indicator card does not need to be replaced unless the
colored circles overrun.
AP200 CO2/H2O Atmospheric Profile System
Campbell Scientific strongly suggests replacing desiccant
instead of reactivating old desiccant. Improper reactivation
can cause the desiccant packets to explode. If the user is
determined to reactivate old desiccant packets, follow the
procedure provided in the ENC16/18 User Manual.
The replacement desiccant pack is the 4905 Single 4-Unit Silica Desiccant
Bag. (The 4905 can be purchased in quantities of 20 as pn 6714.) The
replacement humidity indicator card is pn 28878.
If the desiccant packs are being replaced very frequently, make sure the
feedthrough cap is properly installed (see Section 5.3.3, Power, and FIGURE
5-19). In very humid conditions, it may be helpful to seal the cable feedthrough
with plumber’s putty.
7.3 Intake Filters
The sample flow will decrease over time as particulates clog the intake filters.
Eventually, the flow will be reduced to the extent that it will degrade the
equilibration time after an intake is selected. As a general guideline, the filters
should be replaced when the flow decreases by 25%. The filters will normally
last a few months, but will require more frequent changes in conditions with
high particulate matter in the air.
To change the intake filter, first turn the pump off to avoid pulling dirty air into
the system.
Open the cover of the intake assembly as shown in FIGURE 5-14. The rain
diverter, intake assembly with filter, and intake tubing are shown in FIGURE
5-15.
Press the rain diverter upwards and out of the bracket as shown in FIGURE
7-1.
47
Page 60

AP200 CO2/H2O Atmospheric Profile System
NOTE
FIGURE 7-1. Releasing rain diverter from intake assembly
Slide the foam insulation down the tube to expose the filter.
Unthread the rain diverter from the filter. Place the rain diverter loosely in its
mounting hole to keep it from falling.
Unthread the filter from the orifice.
To avoid the risk of dropping the orifice, keep the orifice
attached to the tube.
The orifice usually does not need to be replaced as a result of
normal usage. However, if it becomes clogged, damaged, or lost,
it may be replaced with pn 29999.
Thread a new filter (pn 29998) onto the orifice.
48
Page 61

AP200 CO2/H2O Atmospheric Profile System
NOTE
FIGURE 7-2. Order of replacement for orifice, filter, and rain diverter
Thread the rain diverter onto the filter and slide the insulation back down the
tube to the filter. Press the rain diverter back through its opening in the intake
assembly. See FIGURE 7-3.
Take care not to loosen the connections between the rain
diverter, filter, orifice, and tube when snapping the rain diverter
back into its mounting hole.
Restart the pump and check the sample flow. If replacing the filter has not
restored the flow, contact Campbell Scientific.
FIGURE 7-3. Correct reassembly after filter replacement
49
Page 62

AP200 CO2/H2O Atmospheric Profile System
7.4 LI-840A (IRGA)
Consult the LI-COR® LI-840A manual (at www.licor.com) for details on
maintaining the IRGA. The following section gives details on
installation/removal and configuration of the IRGA as it relates to its
installation in the AP200.
7.4.1 Installing and Removing the IRGA
The IRGA is easily installed or removed from the AP200 system. The installed
IRGA is shown in FIGURE 7-4.
To install the IRGA in the AP200:
1. Disconnect power from the AP200.
2. Insert the IRGA into its mounting bracket and secure it with the Velcro
strap.
3. Remove the union fitting that connects the “IN” tube to the “OUT” tube.
Remove the green, vinyl caps from the IRGA fittings, slide the caps onto
the union, and store the union in the storage pocket in the door of the
AP200 system enclosure. Connect the inlet and outlet tubes to the IRGA
(connect “IN” to “IN” and “OUT” to “OUT”). Push the tube fully onto
the fitting and tighten the knurled nut by hand. Hold the tube to prevent it
from rotating while tightening the nut.
4. Connect the serial cable.
5. Connect the power connector.
50
FIGURE 7-4. Installed IRGA in system enclosure
Page 63

AP200 CO2/H2O Atmospheric Profile System
To remove the IRGA from the AP200:
1. Disconnect power from the AP200.
2. Disconnect the power connector from the IRGA. Leave the wires
connected to the terminal block and pull the terminal block out of the
IRGA. If the IRGA is to be powered outside the AP200, use the spare
terminal block supplied with the IRGA.
3. Disconnect the serial cable from the IRGA.
4. Disconnect the inlet and outlet tubes from the IRGA. Hold the tube to
prevent it from rotating while loosening the knurled nut. Pull the tube off
the fitting.
5. To keep the AP200 and the IRGA clean, connect the “IN” tube to the
“OUT” tube using the union fitting in the storage pocket in the door of the
AP200 system enclosure. Plug the IRGA fittings with the green, vinyl
caps.
6. Undo the Velcro strap and remove the IRGA from the mounting bracket.
FIGURE 7-5. Components and fittings of IRGA installation
7.4.2 Configuring the IRGA
The IRGA is automatically configured by the AP200 program. This
configuration is sent to the IRGA when the program compiles or if the IRGA
fails to respond for five consecutive samples. Messages are written to the
51
Page 64

AP200 CO2/H2O Atmospheric Profile System
TABLE 7-1. IRGA Settings
TABLE 7-2. IRGA Outputs
message_log output table when the configuration command is sent and when
the settings are acknowledged. The IRGA settings are given in TABLE 7-1.
Setting Value Notes
OUTRATE 0.5 Output data every 0.5 s
HEATER TRUE Turn heater on
PCOMP TRUE Pressure compensation on
FILTER 0 No filter
The outputs from the IRGA are shown in TABLE 7-2 and include:
Public variable Description Units
CO2 CO2 concentration ppm
H2O H2O concentration ppt
cell_tmpr Sample cell temperature °C
cell_press Sample cell pressure kPa
Td_cell H2O dewpoint °C
7.5 Zero/Span Flow
The flow for the zero and CO2 span cylinders is affected by the pressure
regulator performance. Pressure regulators designed for a low delivery
pressure will generally perform better and should be used where possible. To
adjust these regulators, start with them set for 0-psig outlet pressure. Select the
corresponding inlet and observe the sample flow. Adjust the regulator outlet
pressure to give approximately the same sample flow as for the profile inlets
(within 10%).
Most pressure regulators will regulate the pressure only when there is flow
through them. When the flow stops (because the AP200 selects some other
valve), the pressure will rise above the setting. It will remain high until the
zero or CO
will be higher than normal (because pressure is higher than normal) until the
excess pressure is bled from the regulator and tube.
span valve is again selected, and the flow can resume. The flow
2
52
Most pressure regulators will also be affected by ambient temperature. If the
zero or CO
span sample flow varies excessively as the ambient temperature
2
changes, or if the pressure rise at shut-off is excessive, consider using a
different regulator.
The amount of zero or CO
span gas consumed depends on the details of the
2
application. The following example shows how to estimate the expected
consumption.
Page 65

AP200 CO2/H2O Atmospheric Profile System
Assume there are eight profile levels and that the AP200 is configured to set
the zero and span every four hours.
From Appendix F, Valve Sequence Timing, the zero/span sequence will select
the CO
span cylinder for 40 s, the zero cylinder for 100 s, and then the CO
2
2
span cylinder again for 70 s. The total sequence time for the CO2 span cylinder
will be 110 s (as, 40 s + 70 s = 110 s) and 100 s for the zero cylinder.
Assuming a flow of 250 ml/min, each zero/span cycle will consume:
250 ml/min * 110 s * (1 min/60 s) * (1 L/1000 ml) = 0.46 L for the
span tank, and
CO
2
250 ml/min * 100 s * (1 min/60 s) * (1 L/1000 ml) = 0.42 L for the
zero tank
Rounding this volume up to 0.5 L, and assuming the cylinders hold 200 cf (5.7
3
m
), each cylinder will last:
3
5.7 m
* (1000 L/m3)/0.5 L = 11,400 zero/span cycles
At a 4-hr interval, this is 1,900 days, or more than five years.
8. Repair
The AP200 is designed to give years of trouble-free service with reasonable
care. However, if factory repair is needed, first contact a Campbell Scientific
applications engineer to obtain an RMA (Return Materials Authorization)
number. An RMA number and product-safety documents are required prior to
any repair shipments being accepted at Campbell Scientific.
Consult with a Campbell Scientific applications engineer to determine which
parts or assemblies should be sent for repair. Do not attempt to disassemble
the system without specific instructions from Campbell Scientific. Exceptions
are the IRGA and the NL115/CFM100, which are easy to remove and install.
If the system enclosure is to be returned, plug the inlets and cap the ends of all
tubes to keep debris out. Swagelok
®
caps and plugs have been provided for
this purpose.
53
Page 66

AP200 CO2/H2O Atmospheric Profile System
54
Page 67

Appendix A. Keyboard Display Menu
The AP200 CRBasic program includes a custom menu for the keyboard
display. This menu provides a user-friendly interface for some of the more
common functions which are shown below. The custom menu can be bypassed
such that the user can interact directly with the datalogger through the
datalogger’s default menus. To bypass the custom menus, select <System
Menu>.
A-1
Page 68

Appendix A. Keyboard Display Menu
A-2
Page 69

Appendix A. Keyboard Display Menu
A-3
Page 70

Appendix A. Keyboard Display Menu
A-4
Page 71

TABLE B-1. Summary of Bit Numbers Indicating Conditions Outside Normal Operating Range
Appendix B. AP200 Diagnostics
The public variable diag_AP200 indicates conditions outside the normal
operating range for the AP200. Any value other than zero indicates a problem.
Diag_AP200 contains several error flags encoded as binary bits. To diagnose a
problem, first decode the value according to TABLE B-1 and then see the
corresponding section in this appendix.
Binary Bit (LSB = 1) Numeric Value Error Condition
1 1 Battery voltage is too low
2 2 Valve temperature is outside its operating range
3 4 Pump temperature is outside its operating range
4 8 Pump pressure is not at the setpoint
5 16 Sample flow is outside its normal range
6 32 Cell temperature is outside its operating range
7 64 Cell pressure is not at the setpoint
Example 1:
Assume diag_AP200 = 34
Because 34 = 32 + 2, this indicates bit 6 (numeric value = 32) and bit 2
(numeric value = 2) are set. This means there are two problems:
• Bit 6: Cell temperature is outside its operating range
• Bit 2: Valve temperature is outside its operating range
This could arise if the system is powered up in cold weather, and the valve
manifold and IRGA sample cell have not yet reached their operating
temperatures.
Example 2:
Assume diag_AP200 = 16
This indicates bit 5 (numeric value = 16) is set. This means the sample flow is
outside its normal range of 100 to 300 ml/min.
Output Tables
Every sample of diag_AP200 is stored in the RawData output table.
However, only an average of diag_AP200 is stored in the output tables
IntAvg, CalAvg, and SiteAvg. The interpretation of this average, given as
diag_AP200_Avg, is slightly different than the original variable, diag_AP200,
for two reasons. First, it represents only the samples that are included in the
averages (see Appendix F, Valve Sequence Timing, for timing details).
B-1
Page 72

Appendix B. AP200 Diagnostics
Second, because it is an average over time, it is impossible to tell which bits
are set. For example, an average of 4.0 could mean that bit 3 (numeric value =
4) is set all the time or it could mean that bit 4 (numeric value = 8) is set half
the time, etc. For this reason, diag_AP200_Avg can indicate only whether or
not there was a problem (nonzero value) or not. If diag_AP200_Avg is
nonzero, use the time series of diag_AP200 in the RawData table to diagnose
the problem.
The following sections give details on each of the diagnostic bits.
Bit 1: Battery voltage is too low
If bit 1 of diag_AP200 is set, this indicates the power source for the AP200 has
dropped below the acceptable voltage limit. This triggers the AP200 to power
down as much of the system as possible to protect the user’s battery from a
deep discharge that might damage the battery. The pump, valves, pump and
valve heaters and fans, and intake heaters will all be turned off. The IRGA is
powered directly, so it cannot be turned off. The AP200 will power up again
when the supply voltage reaches an acceptable level.
There are two system configuration variables, BATT_LOLIMIT and
BATT_DEADBAND, that determine the shut-down and turn-on voltage (see
Section 5.4.1, System Configuration Variables).
To confirm the problem, verify public variable batt_volt_LOW = True. This
variable is set to True if the battery voltage falls below the shutoff limit:
batt_volt < BATT_LOLIMIT
Note that batt_volt_LOW will remain True until the supply voltage reaches
the turn-on voltage:
batt_volt > BATT_LOLIMIT + BATT_DEADBAND
The purpose of the deadband (the gap between the shut-down voltage and the
turn-on voltage) is to protect the AP200 from repeated power cycles when the
battery voltage is very near the shut-down limit. Note that for troubleshooting
purposes, if batt_volt_LOW = True and batt_volt is in the deadband,
manually set batt_volt_LOW = False. This will let the AP200 power up.
If this does not work, measure the voltage at the AP200 power input terminals,
and compare this to batt_volt. Note that batt_volt is measured in the
datalogger which has a diode for reverse voltage protection. The actual voltage
at the input terminals will be approximately 0.3 volts higher than the value
reported by batt_volt.
The AP200 supply voltage must be 10.0 Vdc to 16.0 Vdc. See Section 4.3.2,
System Enclosure, for details on the power required, especially the extra power
required for a cold startup.
B-2
Page 73

Appendix B. AP200 Diagnostics
Bit 2: Valve temperature is outside its operating range
Bit 2 of diag_AP200 indicates the valve temperature is outside its operating
range. This triggers the AP200 to shut down the valves and pump to protect
the valves from possible damage.
To confirm the problem, verify that public variable valve_tmpr_OK = False.
This variable is set to True if the valve temperature is within its operating
range and is set to False if it is outside this range.
For diagnosing a problem using data saved in the output tables (IntAvg,
CalAvg, or SiteAvg), the variable valve_tmpr_OK is not available. Instead,
check the value of ValveTmprOK_Avg. This is a floating point number that
represents the fraction of time (from 0 to 1) that valve_tmpr_OK is true
during the averaging period. A value of 1 indicates no valve temperature
problem at any time during the averaging period. A value of 0 indicates a
valve temperature problem during the entire time.
Also check the measured valve temperature, valve_tmpr, and compare it to the
operating range (4°C to 49°C). The valve module has a heater that turns on if
valve_tmpr falls below 5°C. If the valve temperature is too low, check the
operation of the heater which is controlled by public variable valve_heat_ON.
This variable is saved in RawData only if saving all diagnostics. Its
corresponding variable valve_heat_Avg is saved in the averaged output tables
(IntAvg, CalAvg, and SiteAvg).
The valve module has a fan that turns on if valve_tmpr rises above 45°C. The
fan will stay on until the valve temperature falls below 43°C. If the valve
temperature is too high, check the operation of the fan which is controlled by
public variable valve_fan_ON. This variable is saved in RawData only if
saving all diagnostics. Its corresponding variable valve_fan_Avg is saved in
the averaged output tables (IntAvg, CalAvg, and SiteAvg).
If the fan is on and the valve temperature is too high, check the ambient
temperature. The AP200 is rated for ambient temperatures from –30°C to
45°C.
Bit 3: Pump temperature is outside its operating range
Bit 3 of diag_AP200 indicates the pump temperature is outside its operating
range. This triggers the AP200 to shut down the pump and valves to protect
the pump from possible damage.
To confirm the problem, verify that public variable pump_tmpr_OK = False.
This variable is set to True if the pump temperature is within its operating
range and is set to False if it is outside this range.
For diagnosing a problem using data saved in the output tables (IntAvg,
CalAvg, or SiteAvg), the variable pump_tmpr_OK is not available. Instead,
check the value of PumpTmprOK_Avg. This is a floating point number that
represents the fraction of time (from 0 to 1) that pump_tmpr_OK is true
during the averaging period. A value of 1 indicates no pump temperature
problem at any time during the averaging period. A value of 0 indicates a
pump temperature problem during the entire time.
B-3
Page 74

Appendix B. AP200 Diagnostics
Also check the measured pump temperature, pump_tmpr and compare it to
the operating range (0°C to 55°C). The pump module has a heater that turns on
if pump_tmpr falls below 2°C. If the pump temperature is too low, check the
operation of the heater which is controlled by public variable pump_heat_ON.
This variable is saved in RawData only if saving all diagnostics. Its
corresponding variable pump_heat_Avg is saved in the averaged output tables
(IntAvg, CalAvg, and SiteAvg).
The pump module has a fan that turns on if pump_tmpr rises above 50°C. The
fan will stay on until the pump temperature falls below 45°C. If the pump
temperature is too high, check the operation of the fan which is controlled by
public variable pump_fan_ON. This variable is saved in RawData only if
saving all diagnostics. Its corresponding variable, pump_fan_Avg, is saved in
the averaged output tables (IntAvg, CalAvg, and SiteAvg).
If the fan is on and the pump temperature is too high, check the ambient
temperature. The AP200 is rated for ambient temperatures from –30°C to
45°C.
Bit 4: Pump pressure is not at the setpoint
If bit 4 of diag_AP200 is set, this indicates the pump is not able to control the
pressure at the setpoint. To confirm the problem, compare the value of
pump_press to PUMP_P_SETPT. Diagnostic bit 4 indicates they differ by
more than 1.0 kPa.
Compare pump_press (pressure measured at the pump inlet) to cell_press
(pressure measured by the IRGA). These two points are physically connected
by a tube with relatively low flow such that they should be at similar pressures.
The measured pressure should agree within the combined uncertainty of the
respective pressure sensors. If they disagree by more than 4 kPa, turn the
pump off (set pump_ON = False) and allow the system to stabilize at ambient
pressure. Compare each pressure sensor to the pressure expected for the given
elevation. This test may help to diagnose a problem with the pump’s pressure
sensor. Also see the notes on bit 7.
If the pump pressure is too high, check pump_control. If pump_control = 0,
this indicates the AP200 has turned the pump off. There are several reasons
the AP200 may shut the pump off:
• Low supply voltage (see notes on bit 1)
• Valve temperature out of range (see notes on bit 2)
• Pump temperature out of range (see notes on bit 3)
• Pump has been turned off by the user; if public variable pump_ON =
False, set pump_ON = True to turn the pump on
If the pump pressure is too high and pump_control is > 0, check the value of
pump_speed to verify the pump is running. If there is physical access to the
AP200, listen for the sound of the pump to confirm it is running.
If the pump pressure is too high and the pump is running, check the system for
leaks. If no leaks are found there may be a problem with the pump. Contact
Campbell Scientific for information on replacing the pump.
B-4
Page 75

Appendix B. AP200 Diagnostics
If the pump pressure is too low, check pump_control and pump_speed.
When the pressure falls below the setpoint, the AP200 will respond by
reducing pump_control. This should reduce pump_speed and allow
pump_press to rise to the setpoint. If pump_control = 0 but the pump is still
running, contact Campbell Scientific.
If the pump speed is oscillating, check the value of BuffDepth. This variable
is found in the Status table (see the CR1000 User Manual at
www.campbellsci.com for more information). The AP200 CRBasic program
runs in Pipeline mode, which allows measurements to stay on schedule even
when processing tasks fall behind. BuffDepth indicates how far processing
has fallen behind measurements (number of scans). If processing falls too far
behind, the delay between measuring the pump pressure and adjusting the
pump speed can cause the pump speed to oscillate. Normally, BuffDepth will
be 2 or less. If the value is higher than 2, contact Campbell Scientific.
Bit 5: Sample flow is outside its normal range
If bit 5 of diag_AP200 is set, this indicates the sample flow is outside the
normal range. To confirm this error, check the value of sample_flow which is
measured by a mass-flow sensor mounted on the outlet of the valve manifold.
The sensor measures the flow to the IRGA. The normal range for the sample
flow is 100 to 350 ml/min. If the sample flow is outside this range, see the
appropriate section below.
Profile Inlets
The sample flow for profile inlets is set by an orifice in the intake assembly.
See Section 4.2.1, Intake Assemblies, for details.
If the flow goes too high at a valve switch but comes into the normal range
within a few seconds, this is normal. It is caused by a different pressure drop
through the valve manifold depending on whether the inlet is selected or
bypassed. The combined flow from the bypassed inlets causes slightly more
pressure drop than for the inlet selected to go to the IRGA. Consequently, the
pressure in the intake tubes and mixing volumes increases slightly when they
are bypassed. When a bypassed inlet is selected, the pressure equalizes by
pushing slightly higher flow than normal through the IRGA. This is acceptable
as long as the sample flow is within the normal range by the time the data are
included in the average.
If the flow for one or more of the inlets stabilizes at a high flow, this may
indicate a leak in a tube or connection. See Section 7.1, Plumbing Leaks, for
leak-checking suggestions.
If the flow is too low for one or more inlets, this is most likely caused by a
filter that is plugged with particulates. This normally happens over a span of
weeks or months. It may happen more quickly in dirty conditions. Try
replacing the filter (see Section 4.1.6, Replacement Parts). If this does not
resolve the problem, the orifice may be plugged, and Campbell Scientific
should be contacted.
B-5
Page 76

Appendix B. AP200 Diagnostics
Zero/Span Inlets
The sample flow for zero/span inlets is set by restriction in the small, stainless
steel tubes that connect the bulkhead fittings to the valve manifold. See Section
4.2.2, Valve Manifold, for details.
If the flow goes too high at a valve switch, but comes into the normal range in
a few seconds, this is normal. It is caused by the pressure regulator on the
cylinder. See notes on pressure regulators in Section 7.5, Zero/Span Flow. As
long as the sample flow is within the normal range by the time the data are
included in the average, this is acceptable.
If the flow for a zero or CO
span inlet stabilizes at a flow that is too high or
2
too low, this is most likely caused by the pressure setting on the regulator.
Adjust the pressure regulator to give the desired sample flow with the
corresponding inlet selected.
Bit 6: Cell temperature is outside its operating range
If bit 6 of diag_AP200 is set, this indicates the IRGA sample cell temperature
is outside the normal range. To confirm this error, check the value of
cell_tmpr, which is measured by the IRGA. The normal range for the sample
cell temperature is 48°C to 52°C.
The IRGA heats the sample cell to maintain its temperature at a nominal 50°C.
It may take several minutes to stabilize at this temperature when the system is
powered up (as much as 20 or 30 min if starting from –20°C). If the system
has been powered for at least 30 min and the cell temperature is still below
48°C, contact LI-COR
®
.
The IRGA does not actively cool the sample cell when the ambient temperature
is too high. If the sample cell temperature is above 52°C, make sure the
®
ambient temperature is no higher than 45°C and contact LI-COR
if the
problem persists.
Bit 7: Cell pressure is not at the setpoint
If bit 7 of diag_AP200 is set, this indicates the IRGA sample cell pressure is
not at the setpoint. Compare the value of cell_press to PUMP_P_SETPT.
Diagnostic bit 7 indicates they differ by more than 2.0 kPa.
B-6
The AP200 will control the speed of the sample pump to maintain pump_press
(measured at the inlet of the pump) at the setpoint pressure PUMP_P_SETPT.
If there is a problem with the pump, this will normally result in both bits 4 and
7 being set (see the notes above on bit 4). Having two independent diagnostics
allows some insurance that both of the pressure sensors are working properly.
Compare cell_press (pressure measured by the IRGA) to pump_press
(pressure measured at the pump inlet). These two points are physically
connected by a tube with relatively low flow, such that they should be at
similar pressures. The pressure values should agree within the combined
uncertainty of the respective pressure sensors. If they disagree by more than 4
kPa, turn the pump off (set pump_ON = False) and allow the system to
stabilize at ambient pressure. Compare each pressure sensor to the pressure
expected for the given elevation. This test may help to diagnose a problem
with the pump’s pressure sensor or the IRGA’s pressure sensor.
Page 77

TABLE C-1. Public Variables
Appendix C. Public Variables
Some of the variables in the AP200’s CRBasic program are included in the
Public table. These public variables may be displayed or edited with a
keyboard display or PC. Other program variables are hidden from the user to
reduce clutter in the Public table. Many of these public variables are saved in
the output tables. Some of the public variables allow the user to set the
operation of the system or to give diagnostic information. The intended usage
of the public variables is categorized as follows:
IRGA measured directly by the IRGA
TAIR air temperature (defined only if N_AirTemps > 0)
DIAG diagnostic
USER user setting
INFO provides information on system status
INFO/USER conditional user setting (may set if the sequence is stopped)
CONFIG system configuration parameter - saved in file
sys_conf_var.dat.
The public variables are listed in TABLE C-1.
Usage Variable Name Units Description
RecNum RN record number
TimeStamp TS date and time the record was measured
DIAG diag_AP200
INFO interval_counter
IRGA CO2 ppm CO2 concentration measured by the IRGA
IRGA H2O ppt H2O concentration measured by the IRGA
IRGA cell_tmpr °C IRGA sample cell temperature
IRGA cell_press kPa IRGA sample cell pressure
IRGA Td_cell °C dewpoint temperature measured by the IRGA
INFO Td_ambient °C Td_cell, corrected to ambient pressure
AP200 diagnostic word (nonzero value indicates a
problem detected)
number of scans since the start of this output interval (half
hour)
DIAG sample_flow ml·min-1 sample flow to the IRGA
USER STARTsequence set = to True to start the automatic valve sequence
USER STOPsequence set = to True to stop the automatic valve sequence
C-1
Page 78

Appendix C. Public Variables
TABLE C-1. Public Variables
Usage Variable Name Units Description
INFO seq_ACTIVE Boolean flag: True if the valve sequence is active
INFO/USER valve_number valve number (1 to 11); determines which inlet is selected
INFO sequence_index
index for valve switching sequence; cycles from 1 to
LEVELS_USED
INFO smpl_counter number of scans since last valve switch
INFO end_omit
Boolean flag: True when equilibration time after valve
switch is satisfied
DIAG panel_tmpr °C temperature of the datalogger wiring panel
DIAG batt_volt V
DIAG batt_volt_LOW
supply voltage; measured inside datalogger after diode
voltage drop
Boolean flag: True if batt_volt is too low (controls power
shutdown)
DIAG valve_tmpr °C temperature of the valve manifold
DIAG valve_tmpr_OK
Boolean flag: True if the valve module is within operating
limits
DIAG valve_heat_ON Boolean flag: True if the valve heater is on
DIAG valve_fan_ON Boolean flag: True if the valve fan is on
USER pump_ON set = to True to enable the sample pump
DIAG pump_press kPa pressure measured at the pump inlet
DIAG pump_control
pump speed control variable; can be from 0 (off) to 1 (full
speed)
DIAG pump_speed Hz pump speed; measured by a tachometer on the pump
DIAG pump_tmpr °C temperature of the pump
DIAG pump_tmpr_OK
Boolean flag: True if the pump temperature is within its
operating range
DIAG pump_heat_ON Boolean flag: True if the pump heater is on
DIAG pump_fan_ON Boolean flag: True if the pump fan is on
INFO intake_heat_ON Boolean flag: True if the intake heaters are on
TAIR T_air(1) °C
TAIR T_air(2) °C
TAIR T_air(3) °C
TAIR T_air(4) °C
air temperature profile (optional, defined only if
N_AirTemps > 0)
air temperature profile (optional, defined only if
N_AirTemps > 1)
air temperature profile (optional, defined only if
N_AirTemps > 2)
air temperature profile (optional, defined only if
N_AirTemps > 3)
C-2
Page 79

Appendix C. Public Variables
TABLE C-1. Public Variables
Usage Variable Name Units Description
TAIR T_air(5) °C
TAIR T_air(6) °C
TAIR T_air(7) °C
TAIR T_air(8) °C
USER H2OSpanDewPt °C
USER SETpressAmbient
USER SETspanCellP
air temperature profile (optional, defined only if
N_AirTemps > 4)
air temperature profile (optional, defined only if
N_AirTemps > 5)
air temperature profile (optional, defined only if
N_AirTemps > 6)
air temperature profile (optional, defined only if
N_AirTemps > 7)
setpoint temperature on dewpoint generator; used for H
span
set = to True for AP200 to store the value of cell_press in
PressAmbient
Set = True for AP200 to store the value of cell_press in
SpanCellP
USER SpanCellP kPa sample cell operating pressure; used for H2O span
INFO/USER DO_zero
INFO/USER DO_CO2_span
INFO/USER DO_H2O_span
set = to True for AP200 to send CO
commands to the IRGA
set = to True for AP200 to send CO
IRGA
Set = True for AP200 to send H
IRGA
& H2O zero
2
span command to the
2
O span command to the
2
O
2
CONFIG PRESS_AMBIENT kPa
ambient pressure; used to calculate Td_ambient and for
O span
H
2
CONFIG PUMP_P_SETPT kPa setpoint pressure for the pump speed control
CONFIG LEVELS_USED number of profile levels to be used
CONFIG MEASURE_TANKS
CONFIG AUTO_ZEROSPAN
set = to True to automatically measure zero and span
cylinders
set = to True to zero and span the IRGA when cylinders
are measured
CONFIG CAL_INTERVAL min time between automatic zero/span sequences
CONFIG CAL_TIMEOFFSET min time offset for starting automatic zero/span sequences
CONFIG CO2_SPAN_PPM ppm CO2 concentration in the CO2 span cylinder
CONFIG BATT_LOWLIMIT V
CONFIG BATT_DEADBAND V
AP200 will shut down if supply voltage falls below this
limit
AP200 will power up if supply voltage rises this much
above lower limit
C-3
Page 80

Appendix C. Public Variables
C-4
Page 81

TABLE D-1. Variables of the IntAvg Table
Appendix D. Output Tables
The AP200 program stores data in several output tables. Details are given for
each table.
IntAvg
The primary output table is IntAvg (Interval Average). A record is written to
this table at the end of every output interval (30 min). Space is allocated on the
memory card for 4,800 records (100 days at one record per 30 min). The CPU
has storage allocated for 480 records (10 days).
This table has a set of values for each level that includes CO2, H2O,
cell_tmpr, cell_press, NumSamples, and sample_flow. These values are
averages of all samples on that level after omitting data subsequent to the valve
switch for equilibration. For example, if all eight levels are used, the cycle
time is 2 min. In each 2-min cycle, the AP200 will spend 15 s on each level
(one to eight). For each level, the first 10 s are omitted and the remaining 5 s
are included in the averages. For this example, the number of samples in the
half-hour averaging interval will be 5 s x 2 samples/s x 15 cycles = 150
samples. This number will change if a different number of levels is used or if a
zero/span sequence is run during the averaging interval.
If fewer than eight levels are used (as determined by system configuration
variable LEVELS_USED), the unused levels will contain 0 or NAN.
Note: The columns for extra levels will be omitted if constant MaxLevels has
been set to a value less than 8.
See Section 5.4.2, Compile Switches, for details on setting program constants.
In addition to the level-specific data, several other parameters apply to all
levels. Some are similar to the level-specific data; they are averaged only
during the time end_omit = True. The rest of the parameters are averages that
include all data, regardless of end_omit.
At the end of the table are the average air temperatures for the optional
temperature profile. These data will be included only as specified by constant
N_AirTemps. See Section 5.4.2, Compile Switches, for details on setting
program constants.
The variables stored in IntAvg are listed below including notes on when
samples are included in the statistic and when the variable will be included in
the TABLE D-1.
Name Units Statistic
When Used in
Calculation
When Included in
Table
TIMESTAMP TS always
RECORD RN always
D-1
Page 82

Appendix D. Output Tables
TABLE D-1. Variables of the IntAvg Table
Name Units Statistic
When Used in
Calculation
When Included in
Table
diag_AP200_Avg Avg end_omit always
L1_NumSamples Tot end_omit always
L1_CO2 ppm Avg end_omit always
L1_H2O ppt Avg end_omit always
L1_cell_tmpr °C Avg end_omit always
L1_cell_press kPa Avg end_omit always
L1_sample_flow ml·min-1 Avg end_omit always
L2_NumSamples Tot end_omit always
L2_CO2 ppm Avg end_omit always
L2_H2O ppt Avg end_omit always
L2_cell_tmpr °C Avg end_omit always
L2_cell_press kPa Avg end_omit always
L2_sample_flow ml·min-1 Avg end_omit always
L3_NumSamples Tot end_omit always
L3_CO2 ppm Avg end_omit always
L3_H2O ppt Avg end_omit always
L3_cell_tmpr °C Avg end_omit always
L3_cell_press kPa Avg end_omit always
L3_sample_flow ml·min-1 Avg end_omit always
L4_NumSamples Tot end_omit always
L4_CO2 ppm Avg end_omit always
L4_H2O ppt Avg end_omit always
L4_cell_tmpr °C Avg end_omit always
L4_cell_press kPa Avg end_omit always
L4_sample_flow ml·min-1 Avg end_omit always
L5_NumSamples Tot end_omit MaxLevels > 4
L5_CO2 ppm Avg end_omit MaxLevels > 4
L5_H2O ppt Avg end_omit MaxLevels > 4
L5_cell_tmpr °C Avg end_omit MaxLevels > 4
L5_cell_press kPa Avg end_omit MaxLevels > 4
L5_sample_flow ml·min-1 Avg end_omit MaxLevels > 4
L6_NumSamples Tot end_omit MaxLevels > 5
D-2
L6_CO2 ppm Avg end_omit MaxLevels > 5
Page 83

Appendix D. Output Tables
TABLE D-1. Variables of the IntAvg Table
Name Units Statistic
When Used in
Calculation
When Included in
Table
L6_H2O ppt Avg end_omit MaxLevels > 5
L6_cell_tmpr °C Avg end_omit MaxLevels > 5
L6_cell_press kPa Avg end_omit MaxLevels > 5
L6_sample_flow ml·min-1 Avg end_omit MaxLevels > 5
L7_NumSamples Tot end_omit MaxLevels > 6
L7_CO2 ppm Avg end_omit MaxLevels > 6
L7_H2O ppt Avg end_omit MaxLevels > 6
L7_cell_tmpr °C Avg end_omit MaxLevels > 6
L7_cell_press kPa Avg end_omit MaxLevels > 6
L7_sample_flow ml·min-1 Avg end_omit MaxLevels > 6
L8_NumSamples Tot end_omit MaxLevels > 7
L8_CO2 ppm Avg end_omit MaxLevels > 7
L8_H2O ppt Avg end_omit MaxLevels > 7
L8_cell_tmpr °C Avg end_omit MaxLevels > 7
L8_cell_press kPa Avg end_omit MaxLevels > 7
L8_sample_flow ml·min-1 Avg end_omit MaxLevels > 7
pump_press_Avg kPa Avg end_omit always
pump_control_Avg Avg end_omit always
pump_speed_Avg Hz Avg end_omit always
PumpTmprOK_Avg Avg all always
pump_tmpr_Avg °C Avg all always
pump_heat_Avg Avg all always
pump_fan_Avg Avg all always
ValveTmprOK_Avg Avg all always
valve_tmpr_Avg °C Avg all always
valve_heat_Avg Avg all always
valve_fan_Avg Avg all always
intake_heat_Avg Avg all always
batt_volt_Avg V Avg all always
BattVoltLOW_Avg Avg all always
panel_tmpr_Avg °C Avg all always
T_air_Avg(1) °C Avg all N_AirTemps > 0
T_air_Avg(2) °C Avg all N_AirTemps > 1
D-3
Page 84

Appendix D. Output Tables
TABLE D-1. Variables of the IntAvg Table
TABLE D-2. Variables of the CalAvg Table
Name Units Statistic
When Used in
Calculation
When Included in
Table
T_air_Avg(3) °C Avg all N_AirTemps > 2
T_air_Avg(4) °C Avg all N_AirTemps > 3
T_air_Avg(5) °C Avg all N_AirTemps > 4
T_air_Avg(6) °C Avg all N_AirTemps > 5
T_air_Avg(7) °C Avg all N_AirTemps > 6
T_air_Avg(8) °C Avg all N_AirTemps > 7
CalAvg
The CalAvg table contains data from the automated zero/span sequences.
Records are written to this table when the calibration (zero/span) sequence is
run (as determined by CAL_INTERVAL). If MEASURE_TANKS = False,
the AP200 will not write to this table.
Each calibration sequence will put multiple records in the CalAvg table. If
AUTO_ZEROSPAN = False, each sequence will place two records in the
table:
• measured values for the CO2 span tank and
• zero tank
These are distinguished by valve_number (9 = Zero Tank and 10 = CO
Span
2
Tank).
D-4
If AUTO_ZEROSPAN = True, each sequence will place five records in the
table: CO
tank (before and after doing the CO
span tank, zero tank (before and after doing the zero), and CO2 span
2
span).
2
Space is allocated on the card for 24,000 records (100 days at five records per
30 min). The CPU has storage allocated for 240 records (1 day). The list of
values saved is similar to the list for the IntAvg table. Additionally, the
CalAvg table includes the valve_number and standard deviations of several
values.
Name Units Statistic
When Used in
Calculation
When Included in
Table
TIMESTAMP TS always
RECORD RN always
valve_number Smp last sample always
diag_AP200_Avg Avg end_omit always
Page 85

Appendix D. Output Tables
TABLE D-2. Variables of the CalAvg Table
Name Units Statistic
When Used in
Calculation
When Included in
Table
NumSamples Tot end_omit always
CO2_Avg ppm Avg end_omit always
H2O_Avg ppt Avg end_omit always
cell_tmpr_Avg °C Avg end_omit always
cell_press_Avg kPa Avg end_omit always
Td_cell_Avg °C Avg end_omit always
Td_ambient_Avg °C Avg end_omit always
sample_flow_Avg ml·min-1 Avg end_omit always
pump_press_Avg kPa Avg end_omit always
pump_control_Avg Avg end_omit always
pump_speed_Avg Hz Avg end_omit always
PumpTmprOK_Avg Avg all always
pump_tmpr_Avg °C Avg all always
pump_heat_Avg Avg all always
pump_fan_Avg Avg all always
ValveTmprOK_Avg Avg all always
valve_tmpr_Avg °C Avg all always
valve_heat_Avg Avg all always
valve_fan_Avg Avg all always
intake_heat_Avg Avg all always
batt_volt_Avg V Avg all always
BattVoltLOW_Avg Avg all always
panel_tmpr_Avg °C Avg all always
interval_counter Smp last sample always
CO2_Std ppm Std end_omit always
H2O_Std ppt Std end_omit always
cell_tmpr_Std °C Std end_omit always
cell_press_Std kPa Std end_omit always
sample_flow_Std ml·min-1 Std end_omit always
pump_press_Std kPa Std end_omit always
pump_control_Std Std end_omit always
pump_speed_Std Hz Std end_omit always
D-5
Page 86

Appendix D. Output Tables
TABLE D-2. Variables of the CalAvg Table
TABLE D-3. Variables of the SiteAvg Table
Name Units Statistic
When Used in
Calculation
When Included in
Table
T_air_Avg(1) °C Avg all N_AirTemps > 0
T_air_Avg(2) °C Avg all N_AirTemps > 1
T_air_Avg(3) °C Avg all N_AirTemps > 2
T_air_Avg(4) °C Avg all N_AirTemps > 3
T_air_Avg(5) °C Avg all N_AirTemps > 4
T_air_Avg(6) °C Avg all N_AirTemps > 5
T_air_Avg(7) °C Avg all N_AirTemps > 6
T_air_Avg(8) °C Avg all N_AirTemps > 7
SiteAvg
The SiteAvg table saves the same data as the CalAvg table. A record is
written to the SiteAvg table when the automatic valve sequence switches to a
new valve. Records are also written to SiteAvg any time records are written to
the CalAvg table. This includes measurement of the zero tank before and after
doing the zero, for example.
The SiteAvg table is useful if a finer time resolution is desired; either to see
how CO
and H2O concentrations changed during a 30-minute averaging
2
interval or to troubleshoot the system if a problem is detected. Space is
allocated on the card for 576,000 records (100 days at one record every 15 s).
The CPU has storage allocated for 576 records (2.4 hr at one record every 15 s).
Name Units Statistic
When used in
calculation
When included in
table
TIMESTAMP TS always
RECORD RN always
valve_number Smp last sample always
diag_AP200_Avg Avg end_omit always
NumSamples Tot end_omit always
CO2_Avg ppm Avg end_omit always
H2O_Avg ppt Avg end_omit always
cell_tmpr_Avg °C Avg end_omit always
cell_press_Avg kPa Avg end_omit always
Td_cell_Avg °C Avg end_omit always
D-6
Td_ambient_Avg °C Avg end_omit always
Page 87

Appendix D. Output Tables
TABLE D-3. Variables of the SiteAvg Table
Name Units Statistic
When used in
calculation
When included in
table
sample_flow_Avg ml·min-1 Avg end_omit always
pump_press_Avg kPa Avg end_omit always
pump_control_Avg Avg end_omit always
pump_speed_Avg Hz Avg end_omit always
PumpTmprOK_Avg Avg all always
pump_tmpr_Avg °C Avg all always
pump_heat_Avg Avg all always
pump_fan_Avg Avg all always
ValveTmprOK_Avg Avg all always
valve_tmpr_Avg °C Avg all always
valve_heat_Avg Avg all always
valve_fan_Avg Avg all always
intake_heat_Avg Avg all always
batt_volt_Avg V Avg all always
BattVoltLOW_Avg Avg all always
panel_tmpr_Avg °C Avg all always
interval_counter Smp last sample always
CO2_Std ppm Std end_omit always
H2O_Std ppt Std end_omit always
cell_tmpr_Std °C Std end_omit always
cell_press_Std kPa Std end_omit always
sample_flow_Std ml·min-1 Std end_omit always
pump_press_Std kPa Std end_omit always
pump_control_Std Std end_omit always
pump_speed_Std Hz Std end_omit always
T_air_Avg(1) °C Avg all N_AirTemps > 0
T_air_Avg(2) °C Avg all N_AirTemps > 1
T_air_Avg(3) °C Avg all N_AirTemps > 2
T_air_Avg(4) °C Avg all N_AirTemps > 3
T_air_Avg(5) °C Avg all N_AirTemps > 4
T_air_Avg(6) °C Avg all N_AirTemps > 5
T_air_Avg(7) °C Avg all N_AirTemps > 6
T_air_Avg(8) °C Avg all N_AirTemps > 7
D-7
Page 88

Appendix D. Output Tables
TABLE D-4. Variables of the RawDataTable
RawData
The RawData table stores each sample of the AP200 data (two records per
second). This table is normally used only for troubleshooting. The files on the
card and in the CPU are allocated to use remaining available space. The
number of days for which space is available on the card will depend on the
options chosen. The first set of values is always stored in RawData. The air
temperature profile data are stored as determined by constant N_AirTemps.
The remaining values are stored only if the constant SaveAll_diagnostics =
True. This constant may be set to False to reduce the amount of data stored or
set to True to allow more detailed analysis of diagnostic values for
troubleshooting. See Section 5.4.2, Compile Switches, for details on setting
program constants. A 2GB card will store over 50 days with all diagnostics, or
over 100 days if SaveAll_diagnostics = False. The actual table fill time for
the RawData table can be seen in the datalogger status table by either using
LoggerNet or with a keyboard display.
Name Units Statistic
When Used in
Calculation
When Included in Table
TIMESTAMP TS always
RECORD RN always
valve_number Smp last sample always
smpl_counter Smp last sample always
diag_AP200 Smp last sample always
CO2 ppm Smp last sample always
H2O ppt Smp last sample always
cell_tmpr °C Smp last sample always
cell_press kPa Smp last sample always
Td_cell °C Smp last sample always
Td_ambient °C Smp last sample always
sample_flow ml·min-1 Smp last sample always
pump_press kPa Smp last sample always
panel_tmpr °C Smp last sample always
batt_volt V Smp last sample always
D-8
T_air(1) °C Smp last sample N_AirTemps > 0
T_air(2) °C Smp last sample N_AirTemps > 1
T_air(3) °C Smp last sample N_AirTemps > 2
T_air(4) °C Smp last sample N_AirTemps > 3
T_air(5) °C Smp last sample N_AirTemps > 4
T_air(6) °C Smp last sample N_AirTemps > 5
T_air(7) °C Smp last sample N_AirTemps > 6
Page 89

Appendix D. Output Tables
TABLE D-4. Variables of the RawDataTable
Name Units Statistic
When Used in
Calculation
When Included in Table
T_air(8) °C Smp last sample N_AirTemps > 7
pump_control Smp last sample SaveAll_diagnostics = True
pump_speed Hz Smp last sample SaveAll_diagnostics = True
pump_tmpr °C Smp last sample SaveAll_diagnostics = True
pump_heat Smp last sample SaveAll_diagnostics = True
pump_fan Smp last sample SaveAll_diagnostics = True
valve_tmpr °C Smp last sample SaveAll_diagnostics = True
valve_heat Smp last sample SaveAll_diagnostics = True
valve_fan Smp last sample SaveAll_diagnostics = True
intake_heat Smp last sample SaveAll_diagnostics = True
STARTsequence Smp last sample SaveAll_diagnostics = True
STOPsequence Smp last sample SaveAll_diagnostics = True
seq_ACTIVE Smp last sample SaveAll_diagnostics = True
valve_mode Smp last sample SaveAll_diagnostics = True
ZeroSpanMode Smp last sample SaveAll_diagnostics = True
DO_zero Smp last sample SaveAll_diagnostics = True
DO_CO2_span Smp last sample SaveAll_diagnostics = True
DO_H2O_span Smp last sample SaveAll_diagnostics = True
interval_counter Smp last sample SaveAll_diagnostics = True
end_omit Smp last sample SaveAll_diagnostics = True
sequence_index Smp last sample SaveAll_diagnostics = True
NewSite Smp last sample SaveAll_diagnostics = True
SiteOutput Smp last sample SaveAll_diagnostics = True
SiteAvgDisable Smp last sample SaveAll_diagnostics = True
TimeInfo
The TimeInfo table stores all of the timing parameters for the automatic valve
switching sequence. A record is stored whenever the profile sequence starts
(when the program first starts up, and when the sequence is manually stopped
and restarted). This table can generally be ignored, but it provides useful
historical information about the valve sequence timing. It may be helpful for
troubleshooting sequence timing issues.
The first values stored are the system configuration variables that control the
sequence timing: LEVELS_USED, MEASURE_TANKS,
D-9
Page 90

Appendix D. Output Tables
TABLE D-5. Variables of the
AUTO_ZEROSPAN, CAL_INTERVAL, and CAL_TIMEOFFSET. The
next value, sync_interval, is calculated by the program. It is the duration of
the valve sequence in seconds. This value is used by the program to
synchronize the valve sequence to the real-time clock. For example, if
sync_interval is 90 s, the sequence will start at the top of the hour, or 1:30
later, or 3:00 later, etc.
The rest of the TimeInfo contains the arrays of timing parameters. Each array
holds eight values, where the index corresponds to the index in the sequence. If
LEVELS_USED is less than 8, zero is stored for the parameters that are not
used.
ProfileSequence: the valve number for this step in the profile sequence. This
will simply increment from 1 to LEVELS_USED.
ProfileOnCounts: the time (number of scans) to spend at this step, typically
30 counts (15 s).
ProfileOmitCounts: the time (number of scans) to wait after a valve switch
before including data in the averages, typically 20 scans (10 s).
The next arrays contain the corresponding values for the calibration (zero/span)
sequence.
TimeInfo Table
Name Units
TIMESTAMP TS
RECORD RN
LEVELS_USED
MEASURE_TANKS
AUTO_ZEROSPAN
CAL_INTERVAL min
CAL_TIMEOFFSET min
sync_interval s
ProfileSequence(1)
ProfileSequence(2)
ProfileSequence(3)
ProfileSequence(4)
ProfileSequence(5)
ProfileSequence(6)
D-10
ProfileSequence(7)
ProfileSequence(8)
ProfileOnCounts(1)
Page 91

TABLE D-5. Variables of the
TimeInfo Table
Name Units
ProfileOnCounts(2)
ProfileOnCounts(3)
ProfileOnCounts(4)
ProfileOnCounts(5)
ProfileOnCounts(6)
ProfileOnCounts(7)
ProfileOnCounts(8)
ProfileOmitCounts(1)
ProfileOmitCounts(2)
ProfileOmitCounts(3)
ProfileOmitCounts(4)
Appendix D. Output Tables
ProfileOmitCounts(5)
ProfileOmitCounts(6)
ProfileOmitCounts(7)
ProfileOmitCounts(8)
CalSequence(1)
CalSequence(2)
CalSequence(3)
CalSequence(4)
CalSequence(5)
CalSequence(6)
CalSequence(7)
CalSequence(8)
CalOnCounts(1)
CalOnCounts(2)
CalOnCounts(3)
CalOnCounts(4)
CalOnCounts(5)
CalOnCounts(6)
CalOnCounts(7)
CalOnCounts(8)
CalOmitCounts(1)
CalOmitCounts(2)
D-11
Page 92

Appendix D. Output Tables
TABLE D-5. Variables of the
TABLE D-6. Variables of
Name
Units
TIMESTAMP
TS
RECORD
RN
message_str
diag_AP200
sequence_index
smpl_counter
valve_mode
ZeroSpanMode
TimeInfo Table
Name Units
CalOmitCounts(3)
CalOmitCounts(4)
CalOmitCounts(5)
CalOmitCounts(6)
CalOmitCounts(7)
CalOmitCounts(8)
Message_log
The message_log table contains a history of events, and is intended as a
troubleshooting tool. A record is written to this table when a predefined event
occurs, including:
• Starting/stopping the valve sequence
• Sending a command to the IRGA (configuration, zero, or span)
• Error messages related to IRGA commands
• Acknowledgement from the IRGA for these commands
• Changing the value of a system configuration variable
In normal operation, each calibration sequence with AUTO_ZEROSPAN
enabled will generate six records: send and acknowledge for each of the CO
zero, H
O zero, and CO2 span commands. The memory card has space
2
allocated for 28,800 records (100 days with a calibration sequence every 30
min). The CPU has space allocated for 288 records.
The message_log table also includes several values to document the state of
the AP200 in case of trouble.
the message_log Table
2
D-12
Page 93

Appendix E. Temperature Profile
The AP200 system can measure a temperature profile at up to eight levels, with
107-L temperature probes. These temperature probes are not part of the AP200
system – they must be ordered separately. See the Model 107 Temperature
Probe Instruction Manual, available from Campbell Scientific,
www.campbellscientific.com, for details.
The following section gives brief instructions for using these temperature
probes with the AP200 system.
Mounting
See the 107 Temperature Probe Instruction Manual for more detail on
installing the temperature probes. Normally, the probes will be mounted at the
same heights as the air sample intake assemblies. See Section 4.1.4, Other
Accessories, for more detailed discussion of the 107-L temperature probe and
its associated radiation shield. The assembled probe and shield are shown in
FIGURE E-1.
FIGURE E-1. 107-L temperature probe mounted with radiation shield
Wiring
The 107 temperature probes should be wired to consecutive single-ended
channels, starting at SE1. Any number of probes from 0 to 8 may, be used.
All temperature probes should use the VX1 excitation terminal.
Configuring the CRBasic program
The AP200 program has a constant, N_AirTemps that is used as a compile
switch to tell the program how many 107-L temperature probes are used. Set
this constant to zero (the default) to disable reading temperature probes or to a
number from 1 to 8 that indicates the number of probes to be measured.
E-1
Page 94

Appendix E. Temperature Profile
Example 1: temperature probes disabled:
Const N_AirTemps = 0 'number of 107-L temperature sensors to measure
(may be 1 to 8), or zero to disable air temperature measurements
Example 2: measure eight temperature probes:
Const N_AirTemps = 8 'number of 107-L temperature sensors to measure
(may be 1 to 8), or zero to disable air temperature measurements
The value of this constant will determine how large to allocate the data array
T_air(), how many measurements to make, and how many temperatures to
record in the output tables.
Data
The real-time air temperature measurements can be found in public variable
T_air(N_AirTemps). T_air(1) will be the air temperature in °C, measured by
the probe wired to SE1. Additional probes wired to consecutive channels will
be in consecutive elements of T_air().
The air temperature profile data will be saved in output tables RawData,
SiteAvg, CalAvg, and IntAvg.
E-2
Page 95

TABLE F-1. Profile Sequence-timing Variables
Appendix F. Valve Sequence Timing
The AP200 has two valve sequences: the profile sequence and the calibration
(zero/span) sequence. The AP200 will run the majority of the time in the
profile sequence, cycling through the profile inlets in order from one to the
number of levels selected (4 to 8). If configured for automatic zero/span, then
the AP200 will periodically run the calibration sequence before returning to the
profile sequence. The timing of the valve switching depends on settings of the
following system configuration variables (see Section 5.4.1, System
Configuration Variables, for details on the system configuration variables):
LEVELS_USED
MEASURE_TANKS
AUTO_ZEROSPAN
CAL_INTERVAL
CAL_TIMEOFFSET
Profile Sequence
The profile sequence cycles through the profile inlets in order, starting at 1, and
ending at the value of LEVELS_USED. This cycle repeats until it is
interrupted for an automated calibration sequence (if this feature is enabled) or
until the sequence is stopped by the user.
The AP200 has pre-programmed parameters that determine the timing of the
profile sequence. These timing parameters allow for at least 15 s on each level,
with 10 s omitted to allow the CO
5 s included in the average. In addition to these constraints, the timing
parameters depend on the number of levels used (LEVELS_USED) to give an
integer number of complete cycles in each half-hour averaging period. As
shown in TABLE F-1, the timing for 4, 6, or 8 levels simply use these
minimum values, giving 15, 20, or 30 cycles per half hour. The times are
extended slightly for 5 or 7 levels to give integer number of cycles per half
hour.
Number
of Levels
4 15 10 5 60 30
5 18 12 6 90 20
Time on
Level (s)
Omitted
Time (s)
and H2O concentrations to equilibrate, and
2
Averaged
Time (s)
Cycle
Time (s)
Cycles/
Half Hour
6 15 10 5 90 20
7 18/17* 12/11* 6 120 15
8 15 10 5 120 15
*18 s on level 1 with 12 s omitted; 17 s with 11 s omitted for the rest of the levels
F-1
Page 96

Appendix F. Valve Sequence Timing
The profile sequence timing parameters are implemented in the AP200
CRBasic program as a set of three arrays. These arrays have eight locations to
accommodate up to eight levels. These arrays are not accessible in the Public
table, but they are output to the TimeInfo table as a record of the system
configuration. See Appendix D, Output Tables, for details on this table. As
the AP200 program steps through the profile sequence, variable
sequence_index cycles from 1 to LEVELS_USED to access the values stored
in the corresponding location in these arrays.
Array ProfileSequence() contains the valve number for each step in the
profile sequence. The values in this array increment from 1 to
LEVELS_USED. If the intake assemblies are installed according to normal
convention, the lowest intake will be designated level 1 and will connect to
inlet 1 on the AP200 system enclosure. This gives a one-to-one correspondence
between public variables valve_number and sequence_index, as well as the
terms level and step. (The intake assembly at the bottom of the tower (level 1)
connects to inlet 1 on the AP200 system enclosure, which is controlled by
valve number 1. This valve is selected during step one of the profile sequence,
defined by seq_index = 1). Array locations beyond LEVELS_USED are
filled with zero.
Array ProfileOnCounts() contains the time (number of scans) for each step in
the profile sequence. This is similar to the Time on Level given in TABLE
F-1, except it is multiplied by two to account for the datalogger scan rate (2
scans/s). For most cases, the same value is used for each step in the sequence.
However, for seven levels, one extra second is allocated for level 1 to achieve
an integer number of cycles per half hour. Array locations beyond
LEVELS_USED are filled with zero.
ProfileOmitCounts() is the time (number of scans) to wait after a valve switch
before including data in the average. This is the Omitted Time given in
TABLE F-1, multiplied by two to account for the datalogger scan rate (2
scans/s). For most cases, the same value is used for each step in the sequence.
For seven levels, an extra second is allocated for level 1 to achieve an integer
number of cycles per half hour. Array locations beyond LEVELS_USED are
filled with zero.
Synchronization to the Real-time Clock
When the AP200 program starts or when the user restarts the sequence (see
Section 5.5, Stopping and Starting the Sequence), the AP200 will delay the
actual profile sequence start by up to two minutes to synchronize the sequence
to the datalogger real-time clock. The following examples illustrate this
synchronization:
Example 1: LEVELS_USED = 8, STARTsequence set to True at 9:15:25:
As shown in TABLE F-1, the cycle time for 8 levels is 120 s (2 min). To
synchronize with the real time clock, the sequence must start at a multiple of 2
min, (for example, 9:00:00, 9:02:00, 9:04:00, etc.) Valve 1 will be selected as
soon as STARTsequence is set = True (9:15:25), but the sequence will not
actually start until 9:16:00 (the earliest multiple of 2 min). Data will be
included in the average for level 1 from 9:16:10 to 9:16:15, when the valve will
switch to level 2. Data will be included in the average for level 2 from 9:16:25
to 9:16:30, when the valve will switch to level 3, and so on.
F-2
Page 97

Appendix F. Valve Sequence Timing
TABLE F-2. System Configuration Variables of Zero/Span
Measure cylinders but do not
Example 2: LEVELS_USED = 5, STARTsequence set to True at 9:00:20.
As shown in TABLE F-1, the cycle time for 5 levels is 90 s. To synchronize
with the real-time clock, the sequence must start at multiples of 90 s, (for
example, 9:00:00, 9:01:30, 9:03:00, etc.) Valve 1 will be selected as soon as
STARTsequence is set = True (9:00:20), but the sequence will not actually
start until 9:01:30. Data will be included in the average for level 1 from
9:01:42 to 9:01:48, when the valve will switch to level 2. Data will be
included in the average for level 2 from 9:02:00 to 9:02:06, when the valve will
switch to level 3, and so on.
Calibration Sequence
The calibration (zero/span) sequence timing depends on the number of levels
used and also on whether the zero/span is merely to be checked or if the IRGA
is to set its internal zero and span coefficients. In either case the zero/span
sequence cycle time is chosen to replace an integer multiple of profile
sequences. This allows a seamless transition back and forth between the
profile sequence and the calibration sequence.
The zero/span behavior is determined by two of the system configuration
variables as shown in TABLE F-2.
MEASURE_TANKS AUTO_ZEROSPAN
False False
Do not measure cylinders. Run
profile sequence all the time
set the zero or span
True
True
False
True Measure cylinders and set the
zero and span
Without Setting Zero and Span
If the AP200 is configured with MEASURE_TANKS = True and
AUTO_ZEROSPAN = False, it will check the zero and CO
span, but it will
2
not command the IRGA to set them. This section gives timing details for this
case. The AP200 zero/span sequence will:
• Select inlet 10 (CO
Span), omit at least 20 s for equilibration, and
2
include 10 s in the average.
• Select inlet 9 (Zero), omit at least 30 s for equilibration, and include
10 s in the average.
• Select inlet 1 for at least 10 s. This allows the humidity in the tubing
and IRGA to equilibrate before restarting the profile sequence.
As shown in TABLE F-3, this minimum timing adds up to 80 s for the
zero/span sequence. The time for one or more of the steps is increased as
needed to equal the profile sequence cycle time (or a multiple of the cycle
F-3
Page 98

Appendix F. Valve Sequence Timing
TABLE F-3. Timing for Zero/Span Sequence (check only)
time). For example, if there are eight levels used, the profile cycle time is 120
s. This means 40 s must be added to the zero/span sequence. This has been
allocated as 10 s extra (each) for the span and zero, and 20 s extra for
equilibration on level 1 at the end of the sequence.
The zero/span sequence takes the place of one profile cycle for five, six, seven,
or eight levels. However, if there are four levels used, the profile cycle time is
only 60 s. This is less than the 80 s required for a zero/span check, so two
profile cycles must be replaced. This gives a total of 120 s, the same as the
scenario with eight levels.
Number
of Levels
Profile Cycle
Time (s)
Span
Time (s)
Zero
Time (s)
Equilibration
Time (s)
Total Zero/Span
Time (s)
Minimum 30 40 10 80
4 60 40 50 30 120
5 90 30 40 20 90
6 90 30 40 20 90
7 120 40 50 30 120
8 120 40 50 30 120
Similar to the profile sequence, the zero/span sequence timing parameters are
implemented as a set of three arrays: CalSequence(), CalOnCounts(), and
CalOmitCounts(). These arrays are not accessible in the Public table, but they
are output to the TimeInfo table as a record of the system configuration. See
Appendix D, Output Tables, for details on this table.
Each zero/span sequence adds two records to the SiteAvg and CalAvg output
tables: one for CO
Span and one for Zero.
2
With Zero and Span
If the AP200 is configured with MEASURE_TANKS = True and
AUTO_ZEROSPAN = True, it will check the zero and CO
span, command
2
the IRGA to set them, and then verify the new readings. This section gives
timing details for this case. The AP200 zero/span sequence will:
• Select inlet 10 (CO
include 10 s in the average
• Select inlet 9 (Zero), omit at least 30 s for equilibration, and include
10 s in the average
• Stay on inlet 9 (Zero) and set the CO
• Stay on inlet 9 (Zero) and set the H
• Stay on inlet 9 (Zero) and average for ~10 s
• Select inlet 10 (CO
• Stay on inlet 10 (CO
• Stay on inlet 10 (CO
F-4
Span), omit at least 20 s for equilibration, and
2
zero (~10 s)
2
O zero (~10 s)
2
Span), equilibrate for 30 s, and average 10 s
2
Span) and set the CO2 span (~10 s)
2
Span) and average for ~10 s
2
Page 99

Appendix F. Valve Sequence Timing
TABLE F-4. Timing for Zero/Span Sequence (setting the IRGA)
• Select inlet 1 to allow at least 10 s extra equilibration time. This
allows the humidity in the tubing and IRGA to equilibrate before
restarting the profile sequence.
As shown in TABLE F-4, this minimum timing adds up to 170 s for the
zero/span sequence. The timing parameters are adjusted as needed to equal a
multiple of the profile sequence cycle time. For example, if there are 8 levels
used, the profile cycle time is 120 s. Because this is less than the 170 s
required, it is doubled to 240 s. Extra equilibration time is added to each step to
make the zero/span sequence equal 240 s. If there are four levels used, the
profile cycle time is only 60 s. Three profile cycles times are used to give 180 s
for the zero/span sequence.
Number
of Levels
Profile
Cycle
Time (s)
Measure
Span
CO
2
Time (s)
Measure
& Set Zero
Time (s)
Measure
& Set CO
Time (s)
Span
2
Equilibration
Time (s)
Zero/Span
Time (s)
Minimum 30 70 60 10 170
8 120 40 100 70 30 240
7 120 40 100 70 30 240
6 90 30 70 60 20 180
5 90 30 70 60 20 180
4 60 30 70 60 20 180
Each time the zero/span sequence is run, five records will be added to the
SiteAvg and CalAvg tables:
• CO
Span tank before setting zero or span
2
• Zero tank before setting zero or span
• Zero tank after setting zero
• CO
• CO
Span tank after setting zero
2
Span tank after setting span
2
F-5
Page 100

Appendix F. Valve Sequence Timing
F-6
 Loading...