

Page 1

4WFBS120, 4WFBS350, 4WFBS1K
4 Wire Full Bridge Terminal
Input Modules
Revision: 3/12
Copyright © 1996-2010
Campbell Scientific, Inc.
Page 2

Page 3

Warranty
“PRODUCTS MANUFACTURED BY CAMPBELL SCIENTIFIC, INC. are
warranted by Campbell Scientific, Inc. (“Campbell”) to be free from defects in
materials and workmanship under normal use and service for twelve (12)
months from date of shipment unless otherwise specified in the corresponding
Campbell pricelist or product manual. Products not manufactured, but that are
re-sold by Campbell, are warranted only to the limits extended by the original
manufacturer. Batteries, fine-wire thermocouples, desiccant, and other
consumables have no warranty. Campbell's obligation under this warranty is
limited to repairing or replacing (at Campbell's option) defective products,
which shall be the sole and exclusive remedy under this warranty. The
customer shall assume all costs of removing, reinstalling, and shipping
defective products to Campbell. Campbell will return such products by surface
carrier prepaid within the continental United States of America. To all other
locations, Campbell will return such products best way CIP (Port of Entry)
INCOTERM® 2010, prepaid. This warranty shall not apply to any products
which have been subjected to modification, misuse, neglect, improper service,
accidents of nature, or shipping damage. This warranty is in lieu of all other
warranties, expressed or implied. The warranty for installation services
performed by Campbell such as programming to customer specifications,
electrical connections to products manufactured by Campbell, and product
specific training, is part of Campbell’s product warranty. CAMPBELL
EXPRESSLY DISCLAIMS AND EXCLUDES ANY IMPLIED
WARRANTIES OF MERCHANTABILITY OR FITNESS FOR A
PARTICULAR PURPOSE. Campbell is not liable for any special, indirect,
incidental, and/or consequential damages.”
Page 4

Assistance
Products may not be returned without prior authorization. The following
contact information is for US and international customers residing in countries
served by Campbell Scientific, Inc. directly. Affiliate companies handle
repairs for customers within their territories. Please visit
www.campbellsci.com to determine which Campbell Scientific company serves
your country.
To obtain a Returned Materials Authorization (RMA), contact CAMPBELL
SCIENTIFIC, INC., phone (435) 227-9000. After an applications engineer
determines the nature of the problem, an RMA number will be issued. Please
write this number clearly on the outside of the shipping container. Campbell
Scientific's shipping address is:
CAMPBELL SCIENTIFIC, INC.
RMA#_____
815 West 1800 North
Logan, Utah 84321-1784
For all returns, the customer must fill out a "Statement of Product Cleanliness
and Decontamination" form and comply with the requirements specified in it.
The form is available from our web site at www.campbellsci.com/repair. A
completed form must be either emailed to repair@campbellsci.com or faxed to
(435) 227-9106. Campbell Scientific is unable to process any returns until we
receive this form. If the form is not received within three days of product
receipt or is incomplete, the product will be returned to the customer at the
customer's expense. Campbell Scientific reserves the right to refuse service on
products that were exposed to contaminants that may cause health or safety
concerns for our employees.
Page 5

4WFBS120, 4WFBS350, 4WFBS1K
Table of Contents
PDF viewers: These page numbers refer to the printed version of this document. Use the
PDF reader bookmarks tab for links to specific sections.
1. Function........................................................................1
2. Specifications ..............................................................1
3. Measurement Concepts ..............................................2
4. Quarter Bridge Strain ..................................................4
4.1 Quarter Bridge Strain with 3 Wire Strain Element...................................4
4.1.1 Quarter Bridge Strain with 3 Wire Element Wiring .......................5
4.1.1.1 Quarter Bridge Strain with 3 Wire Element Wiring using
a multiplexer.......................................................................5
4.1.2 Quarter Bridge Strain with 3 Wire Element Calculations...............6
4.1.3 Quarter Bridge Strain with 3 Wire Program Examples ..................7
4.1.3.1 CRBasic Programming..........................................................7
4.1.3.2 Edlog ...................................................................................11
4.2 Quarter Bridge Strain with 2 Wire Element ...........................................17
4.2.1 Quarter Bridge Strain with 2 Wire Element Wiring .....................17
4.2.2 Two Wire ¼ Bridge use with Multiplexers and Equations...........18
4.3 Quarter Bridge Strain with Dummy Gage ..............................................18
4.3.1 Quarter Bridge Strain with Dummy Gauge Wiring Setup............20
4.3.2 Quarter Bridge Strain with Dummy Gauge Calculations..............21
4.3.3 Quarter Bridge Strain with Dummy Gauge Example Programs ...21
4.4 Quarter Bridge Strain Lead Resistance Compensation...........................21
4.4.1 Mathematical Lead Compensation for 3-Wire, ¼ Bridge Strain ..21
4.4.1.1 Mathematical Lead Compensation Circuit and Equations ..22
4.4.1.2 Mathematical Lead Compensation Programs......................23
4.4.2 Shunt Calibration Lead Compensation for 3-Wire, ¼ Bridge
Strain .........................................................................................30
4.4.2.1 Three Wire Gage Circuit with Shunt...................................30
4.4.2.2 Math for Shunt Calibration of 3-Wire, ¼ Bridge Strain
Circuits .............................................................................32
4.4.2.3 Example Programs for Shunt Calibration of 3-Wire,
¼ Bridge Strain Circuits...................................................34
4.4.3 Lead Compensation using Quarter Bridge Strain with 2 Wire
Element .....................................................................................35
4.5 Calculation of Strain for ¼ Bridge Circuits............................................37
i
Page 6

4WFBS120, 4WFBS350, 4WFBS1K Table of Contents
Figures
1-1. Terminal Input Module with CR1000 .................................................... 1
2-1. Schematic................................................................................................ 2
3-1. Strain definition ...................................................................................... 2
4.1-1. Three wire quarter bridge strain circuit ............................................... 4
4.1-2. 3-wire ¼ bridge strain wiring .............................................................. 5
4.1-3. 3-wire ¼ bridge strain with multiplexer wiring................................... 5
4.2-1. Two wire quarter bridge strain circuit ............................................... 17
4.2-2. Wiring for 2-wire gauges................................................................... 18
4.3-1. Quarter bridge strain circuit with dummy gauge............................... 19
4.3-2. ¼ bridge strain with remote dummy gauge ....................................... 20
4.3-3. ¼ bridge strain with dummy gauge at datalogger.............................. 20
4.4-1. Three wire ¼ bridge strain circuit...................................................... 22
4.4-2. Shunting remotely across active gauge.............................................. 31
4.4-3. Circuit for shunting across dummy resistor....................................... 31
4.4-4. Wiring for shunt across dummy resistor............................................ 32
4.4-5. Two wire quarter bridge strain circuit ............................................... 35
4.5-1. Strain gage in full bridge ................................................................... 37
Table
4-1. Input Locations Used in CR10(X), 21X, and CR7 Examples .............. 11
ii
Page 7
4WFBS120, 4WFBS350, 4WFBS1K 4 Wire Full Bridge Terminal Input Modules (TIM)
1. Function
The 4WFBS120, 4WFBS350, and 4WFBS1K Terminal Input Modules (TIM)
complete a full Wheatstone bridge for a single strain gage or other sensor that
acts as a single variable resistor. The difference between the three models is in
the resistor that matches the nominal resistance of a 120 ohm, 350 ohm, or
1000 ohm quarter bridge strain gage. It can also be used to complete the back
half of a Wheatstone bridge for use in a ¼ bridge strain circuit (1 active
element) using a dummy gage, or in a ½ bridge strain circuit (2 active
elements).
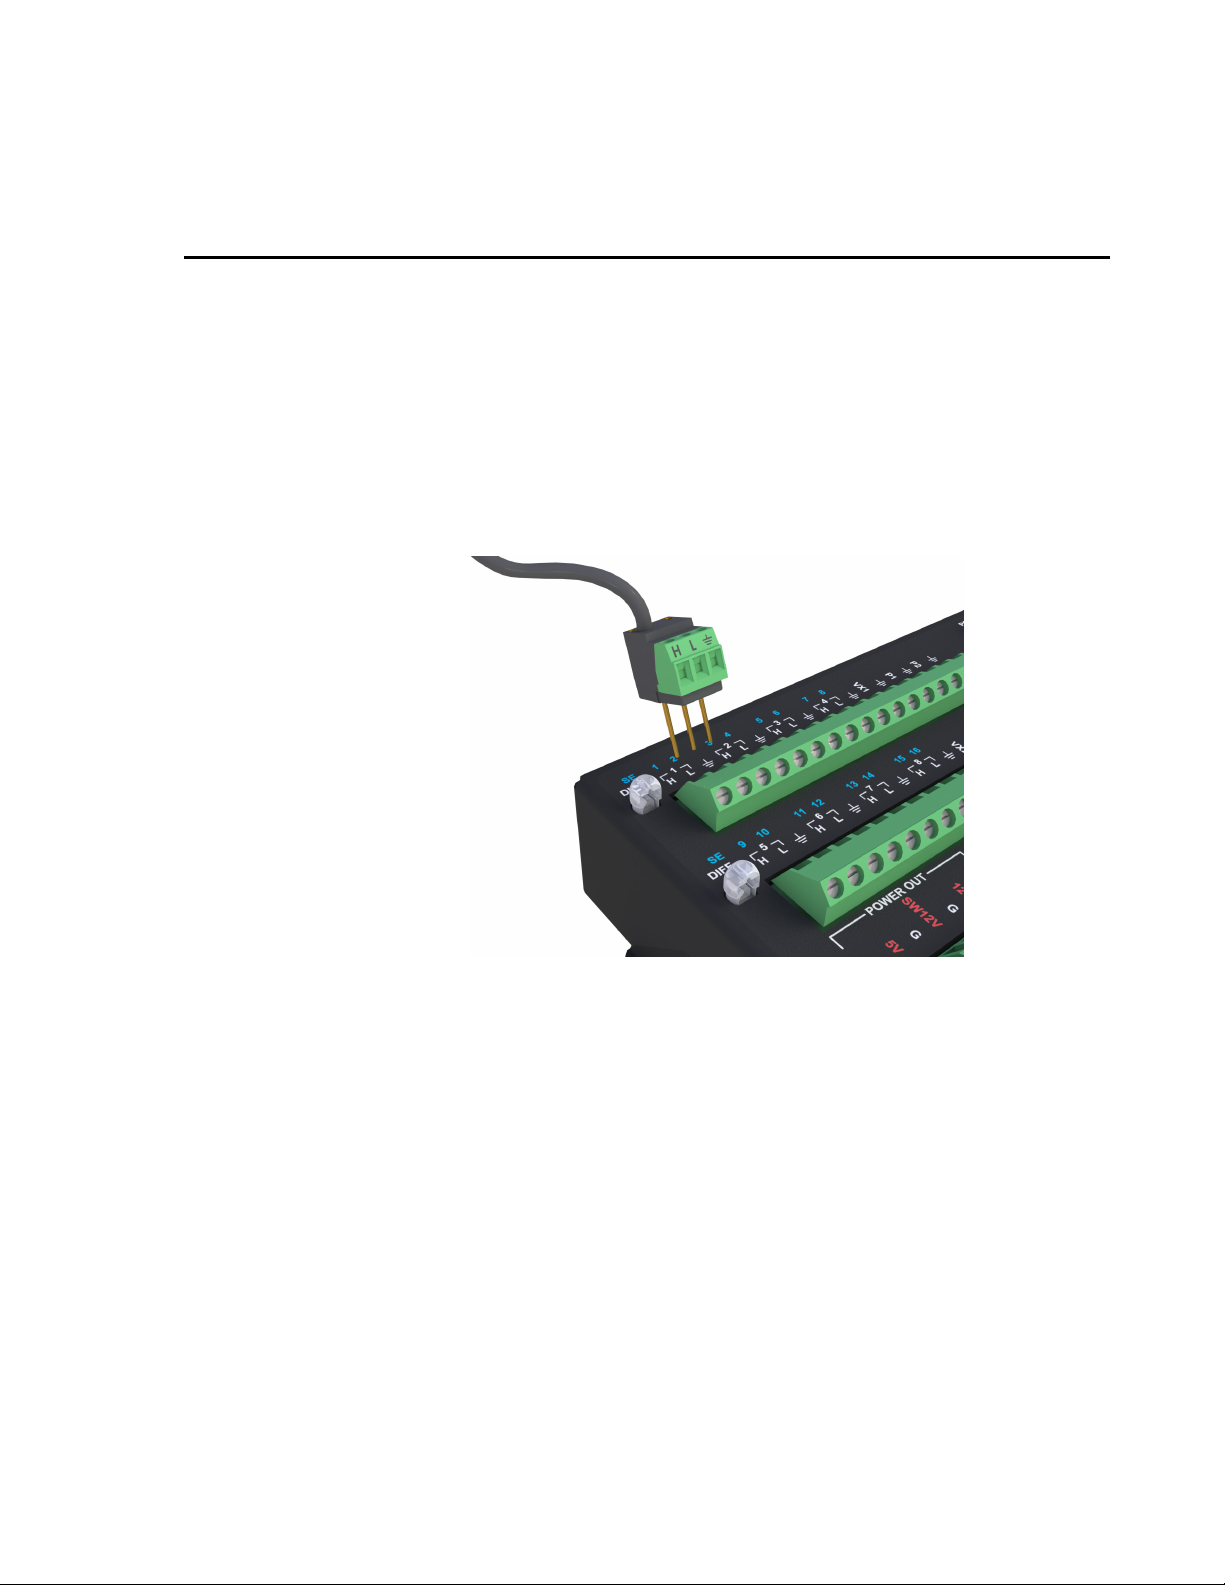
FIGURE 1-1. Terminal Input Module with CR1000
2. Specifications
2:1 Resistive Divider
Resistors:
Ratio tolerance @ 25 °C:
Ratio temperature coefficient:
Power rating per element:
Completion Resistor: 120, 350, or 1000 Ω
Tolerance @ 25 °C:
Temperature coefficient:
Power rating:
1 kΩ/1 kΩ
±0.01%
0.5 ppm/°C
(-55°C to 85°C)
0.1 W @ 70°C
±0.01%
±0.8 ppm °C
(-55°C to 85°C)
0.25 W @ 70°C
-1
1
Page 8
4WFBS120, 4WFBS350, 4WFBS1K 4 Wire Full Bridge Terminal Input Modules (TIM)
ε
(
)
ε
με
=
Δ
Δ
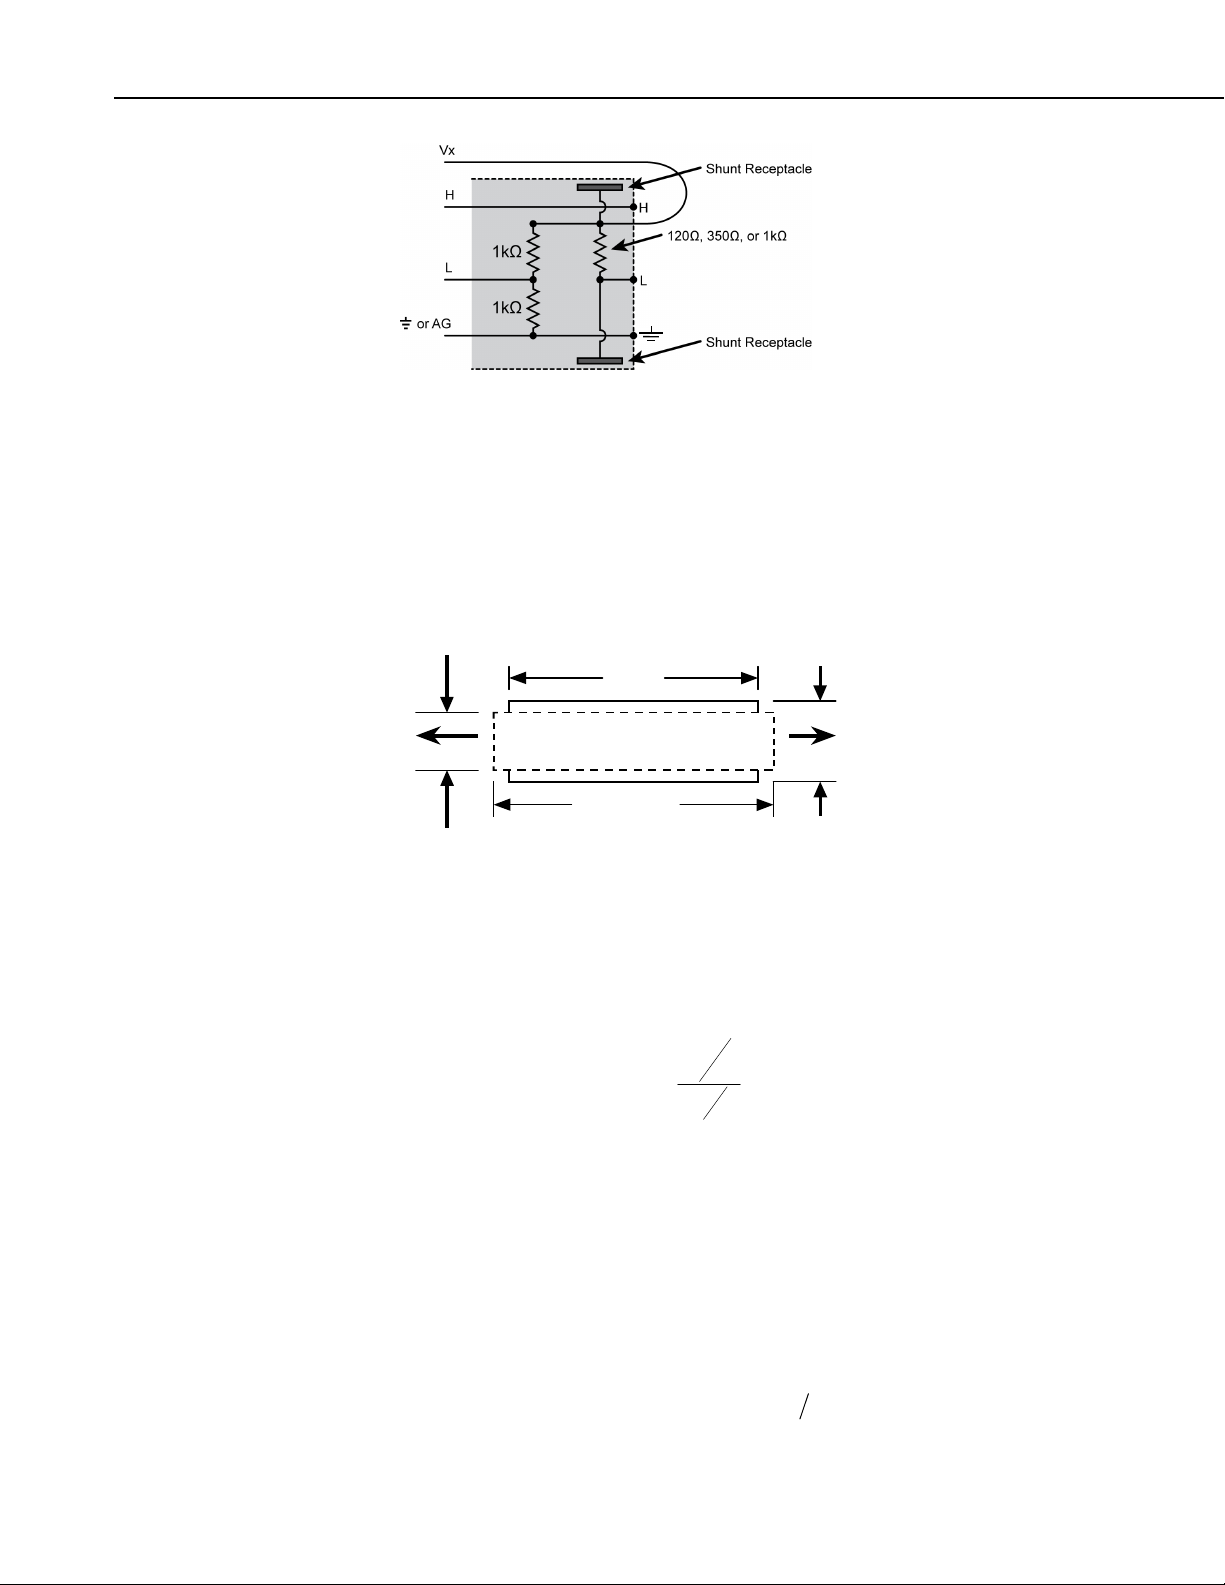
FIGURE 2-1. Schematic
3. Measurement Concepts
Measuring strain is measuring a change in length. Specifically, the unit strain
is the change in length divided by the unstrained length
()
and thus is dimensionless.
,
LL /Δ=
LT + ΔL
T
L
T
L
PP
L + ΔL
FIGURE 3-1. Strain definition
As the subject is elongated in the longitudinal direction, the material will be
narrowed or thinned down in the transverse direction. The ratio of the
transverse strain to the longitudinal strain is known as the Poisson ratio (
L
Δ
T
L
ν
=
3.1
This Poisson ratio is a known property for most materials and is used in some
half bridge strain and full bridge strain circuits.
T
L
Δ
L
ν).
2
Strain is typically reported in microstrain
expressed in parts per million, i.e.: a change in length divided by one millionth
of the length.
A metal foil strain gage is a resistive element that changes resistance as it is
stretched or compressed. The strain gage is bonded to the object in which
strain is measured. The gage factor,
resistance to the change in strain:
GF , is the ratio of the relative change in
GF R R l l
. Microstrain is strain
()
//
. For example, a
Page 9

4WFBS120, 4WFBS350, 4WFBS1K 4 Wire Full Bridge Terminal Input Modules (TIM)
μ
Δ
(
−
=
(
)
⋅
gage factor of 2 means that if the length changes by one micrometer per meter
of length
resistance. A more common method of portraying this equation is:
, the resistance will change by two micro-ohms per ohm of
()1
ε
=
ε
Or in terms of micro-strain:
με
=
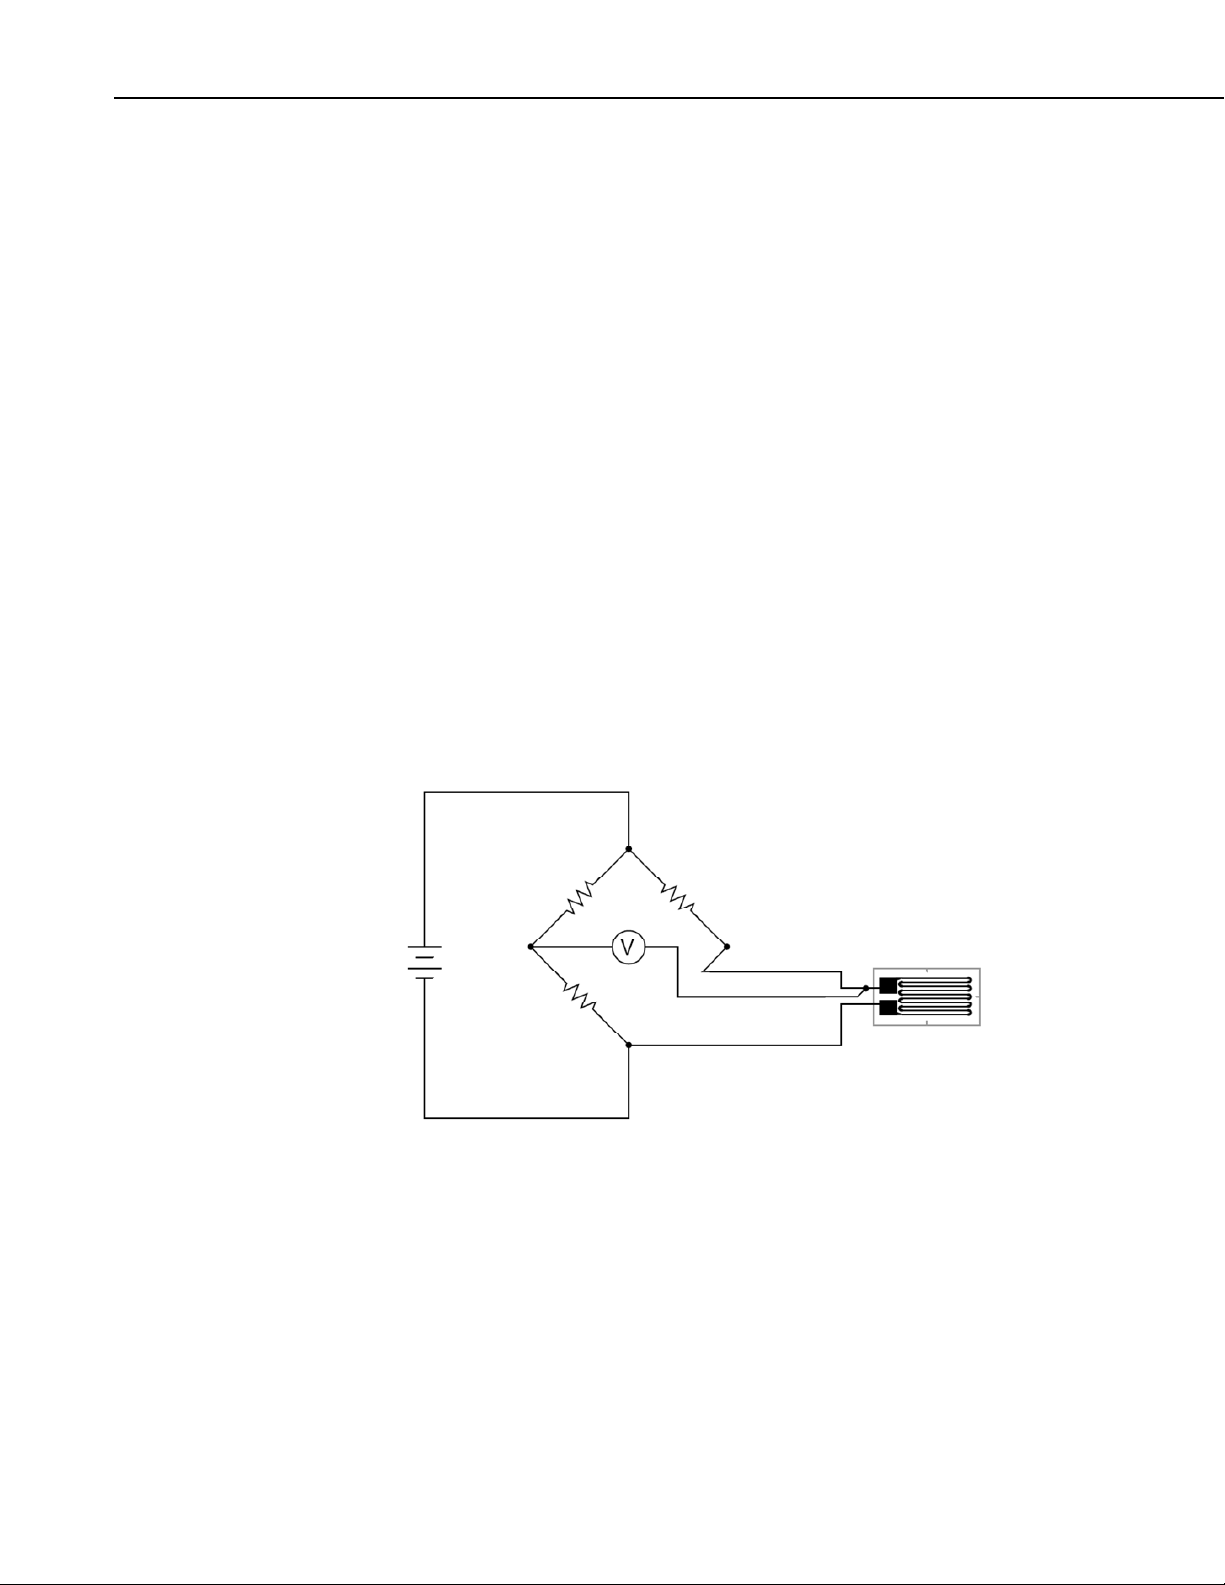
Because the actual change in resistance is small, a full Wheatstone bridge
configuration is used to give the maximum resolution. The Wheatstone bridge
can be set up with 1 active gage (Quarter bridge strain circuit), two active
gages (Half bridge strain circuit), or 4 active gages (Full bridge strain circuit).
For each of these Wheatstone bridge circuits there are multiple configurations.
The 4WFBS module provides three resistors that can be used for three of the
arms of the Wheatstone Bridge (Figure 4-1). There are two 1000 ohm
precision resistors for the back plane of the Wheatstone bridge, and a resistor
matching the strain gage's resistance for the bridge arm opposite the gage. The
inputs of the 4WFBS are configured so that this matching resistor can be
bypassed if it is desired to utilize a dummy gauge, or to use two active gauges
(Half Bridge Strain circuit).
For Full Bridge Strain circuits, as all four arms of the Wheatstone bridge are
active gages, there is no need for completion resistors, and thus a 4WFBS
module is not required.
G
RGFR•
G
3.2
6
)
101
RΔ×
G
RGF •
G
3.3
The resistance of an installed gage will differ from the nominal value. In
addition, lead resistance imbalances can result in further unbalancing of the
bridge. A zero measurement can be made with the gage installed. This zero
measurement can be incorporated into the datalogger program such that
subsequent measurements can report strain relative to this zero basis point.
This removes the apparent strain resulting from the initial bridge imbalance.
Strain is calculated in terms of the result of the full bridge measurement. This
result is the measured bridge output voltage divided by the bridge excitation
voltage:
All of the various equations that are used to calculate strain use V
in the bridge measurement from the zero state:
The result of the zero measurement,
the calculation of future strain measurements. Alternatively, the zero reading
value can be left at 0 (zero measurement is neither recorded nor used).
It should be noted the actual result of the full bridge instruction (BrFull) is the
millivolts output per volt of excitation (
V
outex
V
/
.
VVVVV )/()/(
ZeroexoutStrainedexoutr
, can be stored and used in
VV /⋅
exout
Zero
1000 VV
out ex
). The StrainCalc
/
, the change
r
3.4
3
Page 10
4WFBS120, 4WFBS350, 4WFBS1K 4 Wire Full Bridge Terminal Input Modules (TIM)
function used in CRBasic uses this raw output as its input to calculate µstrain.
See Section 4.5 Calculation of Strain for ¼ Bridge Circuits for a detailed
derivation of the equations used.
4. Quarter Bridge Strain
A "quarter bridge strain circuit" is so named because an active strain gage is
used as one of the four resistive elements that make up a full Wheatstone
bridge. The other three arms of the bridge are composed of inactive elements.
There are various circuits that use a single active element, including 2-Wire
gauges, 3-Wire gauges, as well as a few circuits that utilize a dummy gauge for
the arm opposite the arm holding the active gage instead of a resistor, R
Figure 4.1.-1 (See Figures 4.3-1, 4.3-2, and 4.3-3). The 4WFBS TIM modules
can support all types of these ¼ Bridge Strain circuits.
4.1 Quarter Bridge Strain with 3 Wire Strain Element
A 3-wire quarter bridge strain circuit is shown in figure 4.1-1. Strain gages are
available in nominal resistances of 120, 350, and 1000 ohms. The
4WFBSXXX model must match the nominal resistance of the gage when using
the 3-Wire circuit (e.g., the 4WFBS120 is used with a 120 ohm strain gage).
D
in
In Figure 4.1-1, R
the Wheatstone bridge, as is done in the TIM design. R
element, is the complementary resistor that has a nominal resistance of the unstrained gage. The 4
R2=1 KΩ
Excite V
R
and R2 are 1000 ohm resistors making up the back plane of
1
, the third resistive
D
th
resistive element is the active strain gage.
R
D
R
= Gauge
4
=1 KΩ
1
L
-
+
3
L
2
L
1
FIGURE 4.1-1. Three wire quarter bridge strain circuit
The 3-Wire gage alleviates many of the issues of the 2-Wire gage. As can be
seen in Figure 4.1-1, lead wire L
has the completion resistor while lead wire L
gage. L
is tied back to the input channel of the datalogger that has an input
2
is in the arm of the Wheatstone bridge that
3
is in the arm that has the active
1
resistance greater than 1 Gohm, thus the current flow is negligible, negating
effects of L
’s resistance. This circuit nulls temperature induced resistance
2
changes in the leads as well as reduces the sensitivity effect that the wires have
on the gauge. See Section 4.4 for more on Lead resistance effects and methods
to compensate for them.
4
Page 11
4WFBS120, 4WFBS350, 4WFBS1K 4 Wire Full Bridge Terminal Input Modules (TIM)
A
A
X
4
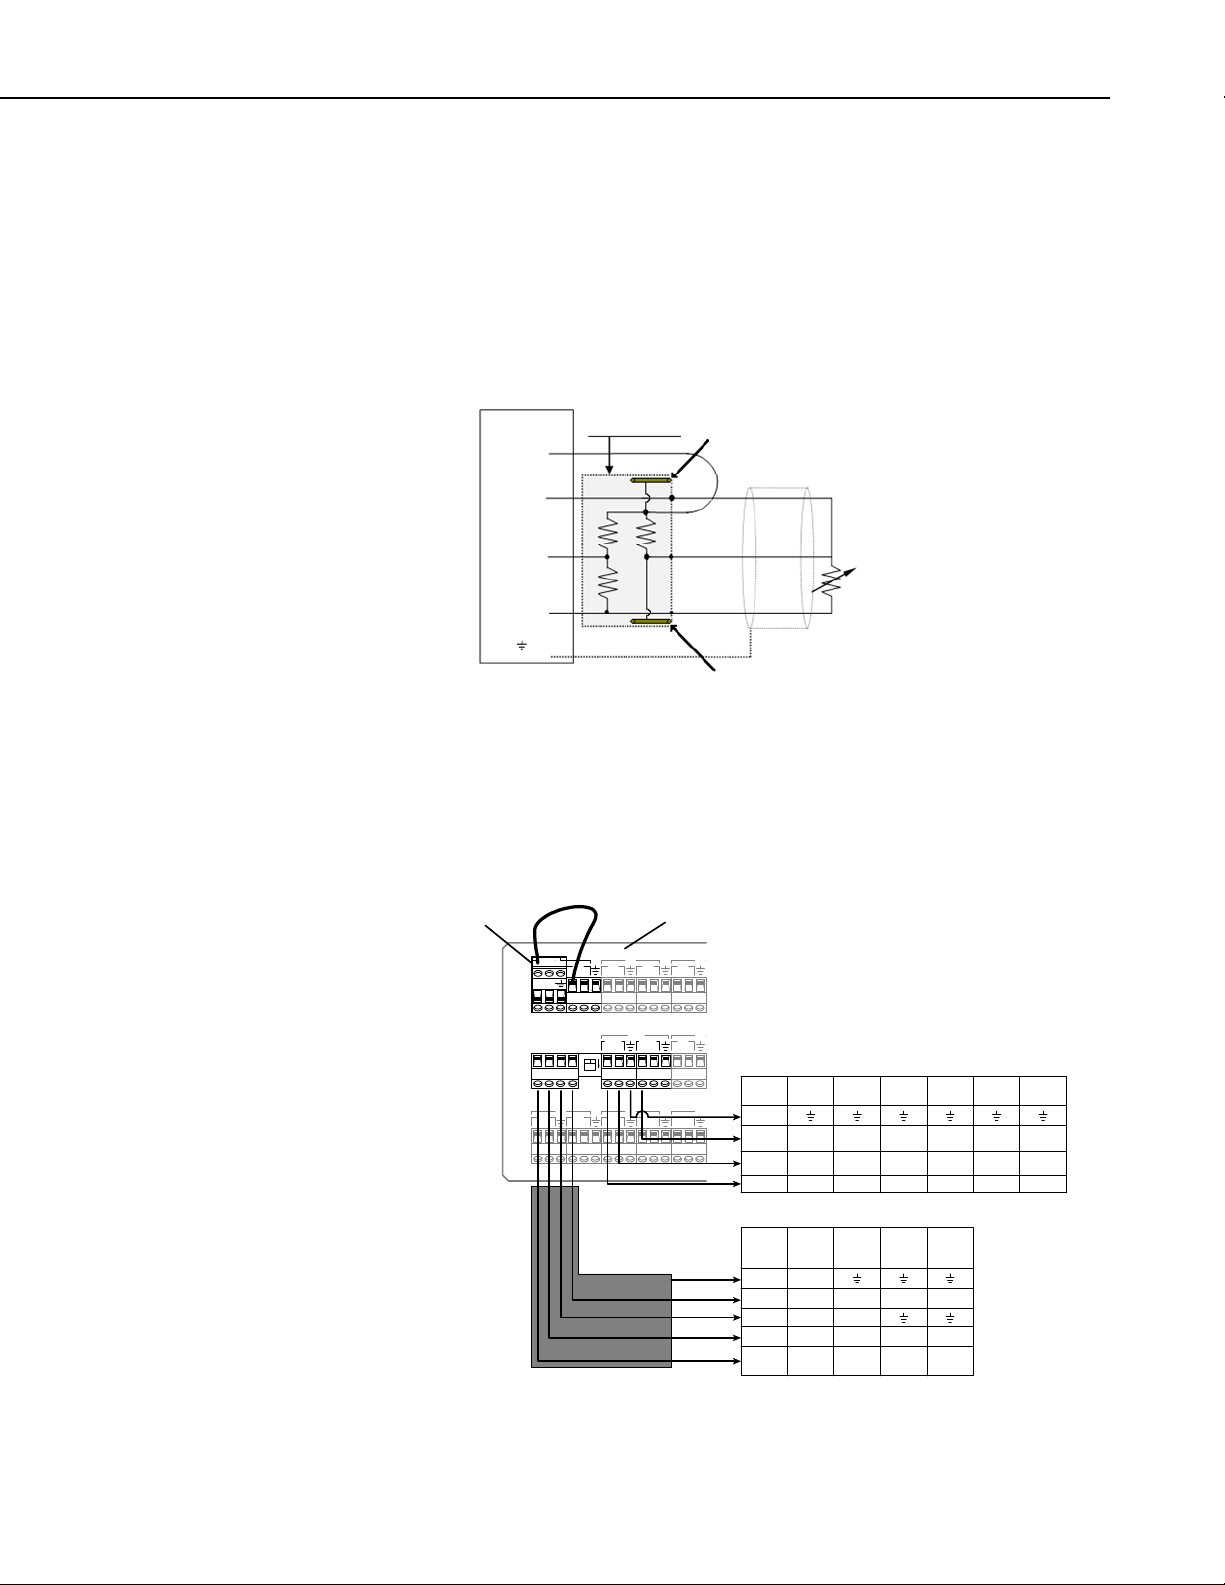
4.1.1 Quarter Bridge Strain with 3 Wire Element Wiring
Figure 4.1-2 illustrates the wiring of the strain gage to the 4WFBS module and
the wiring of the module to the datalogger. It is important that the gage be
wired as shown, and that the leads to the L and G terminals be the same length,
diameter, and wire type. It is preferable to use a twisted pair for these two
wires so that they will undergo the same temperature and electromagnetic field
variations. With this configuration, changes in wire resistance due to
temperature occur equally in both arms of the bridge with negligible effect on
the output from the bridge.
Datalogger
VX or E
4WFBSXXX TIM
Shunt Receptacl e
H
R
2
R
=1KΩ R
D
L
1
=1KΩ
ctive Gauge
G
or G
Shunt Receptacle
FIGURE 4.1-2. 3-wire ¼ bridge strain wiring
4.1.1.1 Quarter Bridge Strain with 3 Wire Element Wiring using a multiplexer
When using a mechanical relay multiplexer such as the AM16/32B, the
4WFBS module should normally be placed on the face of the multiplexer
similar as shown in Figure 4.1-3.
WFBS
2 345
H L H LH LHL
HLG
AM16/32B Relay Multiplexer
23
COM
ODD EVEN
H LHL H L
4X16
GND
CLK
RES
12V
N
1
O
2X32
11
21
LHLHLHLHL
H
12
22
23 24
7
13
13
25
Cable Shield
CR10X
AG
E1–E3
1L
1H
CR800
CR850
12 V
C1–C4
C1–C4
CR1000
EX1–EX3 or
VX1–VX3
1L
1H
CR23X
CR5000
12 V
G
C1–C8
C1–C8
CR3000
CR5000
VX1–VX4
1L
1H
21X
+12 V
EXCIT 1–4
C1–C6
21X
EXCITATION
1–4
1L
1H
CR7
12 V
EXCITATION
725 Card
Control
CR23X
EX1–EX4
1L
1H
CR10X
CR1000
CR3000
G
G
12 V
G
G
C1–C8
C1–C8
CR7
SWITCHED
ANALOG OUT
1L
1H
CR800
CR850
EX1–EX2 or
VX10VX2
1L
1H
FIGURE 4.1-3. 3-wire ¼ bridge strain with multiplexer wiring
5
Page 12

4WFBS120, 4WFBS350, 4WFBS1K 4 Wire Full Bridge Terminal Input Modules (TIM)
(
⋅
=
−
V
Although this requires a 4WFBS module for each strain gage, it is important
because placing relays internal a Wheatstone bridge strain system is
discouraged. Any change in resistance of the multiplexer’s relay contacts
would result in a corresponding change in the bridge’s output voltage.
Changes in contact resistance can be induced by temperature fluctuations,
oxidation, environmental conditions, and normal wear of contact surfaces. The
specification for the relays that are used in our multiplexers state that initial
contact resistance will be less than 100 milliohms (AM16/32B). There is not a
specification for change in contact resistance for the relays because there are so
many variables that affect contact resistance. Test reports exist for various test
conditions that show contact resistance changing over time by 10 to 20 milliOhms. These tests were performed using static test temperatures, so it is safe
to assume that real world conditions would result in larger resistance shifts.
When strain gauges are used in the Wheatstone bridge, small changes in
contact resistance result in large apparent strains. To understand the error that
can be introduced from allowing the relay contacts to be internal of the
Wheatstone bridge, let us assume that the two relays carrying the current from
the strain gage vary by 20 milliohms (40 milliohm total variance or ΔR
mΩ ). Inserting this into equation 3.3, using a 120 ohm strain gage with a gage
factor of 2 results in an apparent strain of about 167 με.
= 40
G
6
με
167
=
)
1202
Ω×× 04.0101
Ω×
4.1.2 Quarter Bridge Strain with 3 Wire Element Calculations
As noted in Section 3, in real life applications the Wheatstone bridge starts out
unbalanced. The strain gauge is never perfectly at its nominal resistance even
prior to installation. The installation process can lead to even more deviation
from this nominal state. In addition, lead resistance can cause an initial
apparent strain reading. To remove this initial offset, a zero measurement can
be made with the gauge installed. This zero measurement can be incorporated
into the datalogger program and subsequent measurements can report strain
relative to this zero basis point.
Strain is calculated in terms of the result of the full bridge measurement. This
result is the measured bridge output voltage divided by the bridge excitation
voltage
V
out ex
millivolts output per volt of excitation,
measurement,
strain measurements. The change in the full bridge measurement from the zero
state, V
, is used in the calculation of the strain.
r
. (The actual result of the full bridge instruction is the
V
/
1000⋅V
1000
VV
out ex
VVV V V
r out ex out ex
can be stored and used to calculate future
/
0
(/)( /)
out
0
) The result of the zero
/ V
ex
4.1.1
Using V
4.1.2
from equation 4.1.1, the strain is calculated using equation 4.1.2.
r
ε
=
GF V
r
()
−412
r
The calculations are covered in more detail in Section 4.5.
6
Page 13

4WFBS120, 4WFBS350, 4WFBS1K 4 Wire Full Bridge Terminal Input Modules (TIM)
4.1.3 Quarter Bridge Strain with 3 Wire Program Examples
This section is broken out into CRBasic programs and EDLOG programs.
These programs are only to be used as examples. Besides adding additional
measurement instructions, the programs will need to have the scan and data
storage intervals altered for actual applications. Refer to the datalogger’s
manuals and/or the CRBasic Editor’s help files for detailed information on the
program instructions used as well as additional program examples.
4.1.3.1 CRBasic Programming
Dataloggers that use CRBasic include our CR800, CR850, CR1000, CR3000,
CR5000, and CR9000(X). CRBasic uses the StrainCalc Instruction for
calculating strain from the output of different full bridge configurations:
StrainCalc(Dest,Reps,Source,BrZero,BrConfig,GageFactor,PoissonRatio)
Source is the variable holding the current result from the full bridge
measurement
BrZero is the zero measurement; this parameter uses the results of a previous
full bridge measurement instruction when the gage is at the zero condition
(multiplier=1, offset=0, mV/V) directly.
BRCode for the Bridge Configuration used with the 4WFBS module should be
set to -1 for a quarter bridge strain circuit.
Enter the actual gage factor in the GageFactor parameter.
Enter 0 for the Poisson ratio parameter, which is not used with ¼ Bridge strain
circuits.
Example Program 4.1. CR9000X ¼ bridge Strain with 3 reps
This example program measures the output from the Wheatstone bridge using
the BrFull instruction. The output from this instruction is input into the
StrainCalc instruction in order to calculate the raw µstrain value. This
program does not use a zero offset reading. See Example Program 4.2 for an
example that performs a zero calibration.
' Program name: STRAIN.C9X
Public StrainMvperV(3) : Units StrainMvperV = mV_per_V 'Raw Strain dimensioned source
Public Strain(3) : Units Strain = uStrain ‘uStrain dimensioned source
Public GF(3) 'Dimensioned gauge factor
DataTable(STRAIN,True,-1) 'Trigger, auto size
DataInterval(0,0,0,100) 'Synchronous, 100 lapses, autosize
CardOut(0,-1) 'PC card , size Auto
Sample (3,Strain(),IEEE4) '3 Reps, uStrain, Resolution
Sample (3,StrainMvperV(),IEEE4) ‘3Reps,Stain mVolt/Volt, Resolution
EndTable 'End of table STRAIN
BeginProg 'Program begins here
GF(1) = 2.1 : GF(2) = 2.2 : GF(3) = 2.3 'Initialize gauge factors for Strain( )
7
Page 14
4WFBS120, 4WFBS350, 4WFBS1K 4 Wire Full Bridge Terminal Input Modules (TIM)
Scan(10,mSec,100,0) 'Scan once every 10 mSecs, non-burst
BrFull(StrainMvperV(),3,mV50,4,1,5,7,1,5000,True,True,70,100,1,0)
StrainCalc(Strain(),3,StrainMvperV(),0,-1,GF(),0) 'Strain calculation
CallTable STRAIN
Next Scan 'Loop up for the next scan
SlowSequence 'Slow sequence Scan to perform temperature
Scan(1,Sec,0,0) ' compensation on DAQ
Calibrate 'Corrects ADC offset and gain
BiasComp 'Corrects ADC bias current
Next Scan
EndProg 'Program ends here
Example Program 4.2. CR9000X ¼ bridge Strain with 3 reps and zero offset
This example program starts out with Example Program 4.1 and adds
instructions (highlighted) to perform a zero calibration. As all strain circuits
have a zero or initial imbalance that is related to the circuit rather than the
member undergoing strain, a zero reading is often used to offset or remove this
apparent strain. Again, see the manual and CRBasic editor’s Help file for
more in-depth discussion on the instructions.
The FieldCalStrain instruction takes care of the underlying math for the
zeroing using equation 4.1.2.
The LoadFieldCal instruction facilitates the reloading of the calibration
factors when the logger is powered up. In addition, the programmer should
create a DataTable (we have called this DataTable Calib in the example) to
store the calibration factors each time a calibration is done.
The NewFieldCal is a Boolean flag variable that is only high during the Scan
that a calibration has been completed. It is used in the DataTable instruction’s
trigger parameter to trigger the table to record a record.
The SampleFieldCal output instruction is used to inform the logger to store all
of the calibration factors that are controlled using the FieldCalStrain
instruction.
Program name: STRAIN0.C9X
'
Public StrainMvperV(3) : Units StrainMvperV = mV_per_V 'Raw Strain dimensioned source
Public Strain(3) : Units Strain = uStrain ‘uStrain dimensioned source
Public GF(3) 'Dimensioned gauge factor
Public ZeromV_V(3), ZeroStrain(3)
Public ZReps, ZIndex, ModeVar
DataTable(STRAIN,True,-1) 'Trigger, auto size
DataInterval(0,0,0,100) 'Synchronous, 100 lapses, autosize
CardOut(0,-1) 'PC card , size Auto
Sample (3,Strain(),IEEE4) '3 Reps, uStrain, Resolution
Sample (3,StrainMvperV(),IEEE4) ‘3Reps,Stain mVolt/Volt, Resolution
EndTable 'End of table STRAIN
DataTable (Calib,NewFieldCal,10) ‘Table for calibration factors from zeroing
SampleFieldCal ‘User should collect these to his computer
EndTable ‘for future reference
8
Page 15

4WFBS120, 4WFBS350, 4WFBS1K 4 Wire Full Bridge Terminal Input Modules (TIM)
BeginProg 'Program begins here
GF(1) = 2.1 : GF(2) = 2.2 : GF(3) = 2.3 'Initialize gauge factors for Strain( )
ZReps = 3 : ZIndex = 1 ‘initialize cal reps and index pointer
LoadFieldCal(True) ‘Load prior calibration factors
Scan(10,mSec,100,0) 'Scan once every 10 mSecs, non-burst
FieldCalStrain(10,StrainMvperV(),ZReps,0,ZeromV_V(),ModeVar,0,ZIndex,1,0,Strain())
BrFull(StrainMvperV(),3,mV50,4,1,5,7,1,5000,True,True,70,100,1,0)
StrainCalc(Strain(),3,StrainMvperV(),ZeromV_V(),-1,GF(),0) 'Strain calculation
CallTable STRAIN
CallTable Calib
Next Scan 'Loop up for the next scan
SlowSequence 'Slow sequence Scan to perform
Scan(1,Sec,0,0) 'temperature compensation on the DAQ
Calibrate 'Corrects ADC offset and gain
BiasComp 'Corrects ADC bias current
Next Scan
EndProg 'Program ends here
Example Program 4.3. CR1000 ¼ Bridge Strain with 3 reps and zero offset
This example program performs the same tasks as Example Program 4.2, only
it is a CR1000 program instead of a CR9000X program. There are slight
differences such as range codes and the fact that the CR1000 does not have a
Slot parameter for its measurement instructions. This program is more similar
to what a CR800, CR3000, or a CR5000 program would look like than the
CR9000X program.
Program name: STRAIN0.CR1
'
Public StrainMvperV(3) : Units StrainMvperV = mV_per_V 'Raw Strain dimensioned source
Public Strain(3) : Units Strain = uStrain ‘uStrain dimensioned source
Public GF(3) 'Dimensioned gauge factor
Public ZeromV_V(3), ZeroStrain(3)
Public ZReps, ZIndex, ModeVar
DataTable(STRAIN,True,-1) 'Trigger, auto size
DataInterval(0,0,0,100) 'Synchronous, 100 lapses, autosize
CardOut(0,-1) 'PC card , size Auto
Sample (3,Strain(),IEEE4) '3 Reps, uStrain, Resolution
Sample (3,StrainMvperV(),IEEE4) ‘3Reps,Stain mVolt/Volt, Resolution
EndTable 'End of table STRAIN
DataTable (Calib,NewFieldCal,10) ‘Table for calibration factors from zeroing
SampleFieldCal ‘User should collect these to his computer
EndTable ‘for future reference
BeginProg 'Program begins here
GF(1) = 2.1 : GF(2) = 2.2 : GF(3) = 2.3 'Initialize gauge factors for Strain( )
ZReps = 3 : ZIndex = 1 ‘initialize cal reps and index pointer
LoadFieldCal(True) ‘Load prior calibration factors
Scan(100,mSec,100,0) 'Scan once every 10 mSecs, non-burst
FieldCalStrain(10,StrainMvperV(),ZReps,0,ZeromV_V(),ModeVar,0,ZIndex,1,0,Strain())
BrFull(StrainMvperV(),3,mV7_5,1,1,3,2500,True,True,450,500,1,0)
StrainCalc(Strain(),3,StrainMvperV(),ZeromV_V(),-1,GF(),0) 'Strain calculation
CallTable STRAIN
CallTable Calib
Next Scan 'Loop up for the next scan
9
Page 16

4WFBS120, 4WFBS350, 4WFBS1K 4 Wire Full Bridge Terminal Input Modules (TIM)
Example Program 4.3. CR1000 ¼ Bridge Strain using an AM16/32B
Multiplexer with 16 reps and zero offset
This example program has 16 strain gages multiplexed through an AM16/32
Multiplexer and uses FieldCalStrain for zeroing.
Program name: QuarterStrain with Zero and Mux.CR1
'
' This is only an example program and should be used only for help in creating a usable program
' ----------------------------------------------- WIRING ---------------------------------------------------------' CR1000 to AM16/32 Multiplexer Control
' C1 (Control Port 1) Res (Reset)
' C2 (Control Port 2) Clk (Clock)
' G GND (Ground)
' 12V 12V
' CR1000 to AM16/32 Common TIMs to AM16/32 Banks
' Diff 1H to Common Even Hi Blk Wire to Bank Odd Lo
' Diff 1L to Common Even Lo TIM H to Bank Even Hi
' EX1 to Common Odd Lo Tim L to Bank Even Lo
' AG to Common Gnd Tim AG to Bank Even AG
'\\\\\\\\\\\\\\\\\\\\\\\DECLARE VARIABLES and CONSTANTS ///////////////////////
Const REPS = 16 'Strain gage sensor count
Public MVpV(REPS) : Units MVpV = mV_V 'mV per Volt output from Bridge Measurement
Public STRAIN(REPS) : Units STRAIN = uStrain 'Variable where uS is stored,
Const BATCH_GF = 2.1 : Public GF(REPS) 'Batch Gage Factor
Public mV_VZero(REPS) : Units mV_VZero = mV_V 'Variable for Zero mV per V reading
Public CalReps, ZeroMode, ZeroStartIdx, ZeroCalAvgs 'Used by wizard for zeroing
Public CalFileLoaded As Boolean
Dim I
'\\\\IF DESIRED (NOT REQUIRED): GIVE STRAIN VARIABLES UNIQUE ALIAS NAMES ////////
Alias STRAIN(1) = Strain1 : Alias STRAIN(2) = Strain2 : Alias STRAIN(3) = Strain3
Alias STRAIN(4) = Strain4 : Alias STRAIN(5) = Strain5 : Alias STRAIN(6) = Strain6
Alias STRAIN(7) = Strain7 : Alias STRAIN(8) = Strain8 : Alias STRAIN(9) = Strain9
Alias STRAIN(10) = Strain10 : Alias STRAIN(11) = Strain11 : Alias STRAIN(12) = Strain12
Alias STRAIN(13) = Strain13 : Alias STRAIN(14) = Strain14 : Alias STRAIN(15) = Strain15
Alias STRAIN(16) = Strain16
'\\\\\\\\\\\\\\\\\\\\\\\\ OUTPUT SECTION ////////////////////////
' Table STRAIN stores uStrain and raw mV per Volt measurements to the PC Card
DataTable(STRAIN,True,-1) 'Trigger, auto size
DataInterval(0,0,0,100) 'Synchronous, 100 lapses
CardOut(0,-1) 'PC card , Autosize
Sample (REPS,STRAIN(),IEEE4) 'Sample uStrain
Sample (Reps,mVpV(),IEEE4) 'Sample raw mV per Volt values
EndTable 'End of table
' Table CalHist uses SampleFieldCal which stores all of the Calibration constants
' When a calibration function is complete, user should always collect this Table as a record
DataTable(CalHist,NewFieldCal,50)
SampleFieldCal
EndTable
'\\\\\\\\\\\\\\\\\\\\\\\\MAIN PROGRAM SECTION ////////////////////////
BeginProg 'Program begins here
For I = 1 To REPS ' For the 16 gages
GF(I) = BATCH_GF 'Assign default gauge factor (2.1) to GF array elements
Next I 'Loop back up until complete
CalFileLoaded = LoadFieldCal(1) 'Load the Cal constants if program signature matches
10
Page 17

4WFBS120, 4WFBS350, 4WFBS1K 4 Wire Full Bridge Terminal Input Modules (TIM)
Scan(1,Sec,10,0) 'Scan once a Second
PortSet (1 ,1 ) 'Turn on AM16/32 using C1
I = 1
Delay (0,150,mSec) 'required Delay for AM16/32 multiplexer
SubScan (0,0,16)
PulsePort (2,10000) 'Pulse port C2 hi and low to clock the multiplexer
BrFull(MVpV(I),1,mV7_5C,1,VX1,1,2500,True,True,250,500,1,0) 'Full Bridge measurement
StrainCalc(Strain(I),1,MVpV(I),mV_VZero(I),-1,GF(I),0) 'Strain calculation
I = I + 1 'Increment I
NextSubScan
PortSet (1 ,0 ) 'Turn on AM16/32 using C1
FieldCalStrain(10,MVpV(),CalReps,0,mV_VZero(),ZeroMode,0,ZeroStartIdx,ZeroCalAvgs,0,STRAIN())
CallTable CalHist
CallTable STRAIN
Next Scan 'Loop up for the next scan
EndProg 'Program ends here
4.1.3.2 Edlog
The following examples for the CR10(X), 21X, and CR7 all have subroutines
that measures the unstrained "zero" output of the strain gage. The examples
calculate strain using equation 4.1.2 for a strain gage with a GF=2. These are
just examples. Besides adding additional measurement instructions, the
programs will probably need to have the scan and data storage intervals altered
for actual applications. The instructions in the subroutine will also need to be
modified for the actual gage factor.
Dataloggers that use Edlog include CR510, CR10(X), 21X, and CR7. The
Edlog instruction that is used to measure strain gages is Instruction 6 – Full
Bridge.
The Input Locations assignments used in CR10(X), 21X, and CR7 Examples
are listed in Table 4-1.
TABLE 4-1. Input Locations Used in
CR10(X), 21X, and CR7 Examples
Addr Name
1 mVperV
2 mVperV_0
3 Vr
4 uStrain
5 Count
6 GF
7 _4e6
8 Mult
9 1_2Vr
10 Vr_1_2Vr
11
Page 18

4WFBS120, 4WFBS350, 4WFBS1K 4 Wire Full Bridge Terminal Input Modules (TIM)
Example Program 4.4. CR10X ¼ Bridge Strain with 1 rep and zero offset
;{CR10X}
*Table 1 Program
01: 1 Execution Interval (seconds)
1: If Flag/Port (P91) ;On the first execution (Flag 1 is low)
1: 21 Do if Flag 1 is Low ;or when user sets Flag 1 low
2: 1 Call Subroutine 1 ;call the zeroing subroutine
2: Full Bridge (P6) ;Measure the strain gage
1: 1 Reps
2: 22 ± 7.5 mV 60 Hz Rejection Range
3: 1 DIFF Channel
4: 1 Excite all reps withExchan 1
5: 2500 mV Excitation
6: 1 Loc [ mVperV ]
7: 1 Mult
8: 0 Offset
3: X-Y (P35) ;Subtract zero reading from the
1: 1 X Loc [ mVperV ] ;measurement
2: 2 Y Loc [ mVperV_0 ]
3: 3 Z Loc [ Vr ]
4: X*F (P37) ;Change Vr from mV/V to V/V
1: 3 Loc [ Vr ]
2: 0.001
3: 3 Loc [ Vr ]
;The following instructions calculate microstrain
5: Z=X*F (P37)
1: 3 X Loc [ Vr ]
2: -2 F
3: 9 Z Loc [ 1_2Vr ]
6: Z=Z+1 (P32)
1: 9 Z Loc [ 1_2Vr ]
7: Z=X/Y (P38)
1: 3 X Loc [ Vr ]
2: 9 Y Loc [ 1_2Vr ]
3: 10 Loc [ Vr_1_2Vr ]
8: Z=X*Y (P36)
1: 10 X Loc [ Vr_1_2Vr ]
2: 8 Y Loc [ Mult ]
3: 4 Z Loc [ uStrain ]
; Output Section : This example outputs an average of the 1 second readings ;once per minute.
09: If time is (P92)
1: 0 Minutes (Seconds --) into a
2: 1 Interval (same units as above)
3: 10 Set Output Flag High
10: Set Active Storage Area (P80)
1: 1 Final Storage Area 1
2: 1 Array ID ;Set Array ID = 1 for measurement data
11: Real Time (P77)
1: 1110 Year,Day,Hour/Minute
12
Page 19

4WFBS120, 4WFBS350, 4WFBS1K 4 Wire Full Bridge Terminal Input Modules (TIM)
12: Average (P71)
1: 1 Reps
2: 4 Loc [ uStrain ]
*Table 2 Program
2: 0.0000 Execution Interval (seconds)
*Table 3 Subroutines
1: Beginning of Subroutine (P85) ;Subroutine to measure "zero"
1: 1 Subroutine 1
2: Do (P86) ;This prevents calling subroutine
1: 11 Set Flag 1 High ;until user sets flag 1 low again.
3: Z=F (P30) ;Set counter use for average to 0
1: 0 F
2: 0 Exponent of 10
3: 5 Z Loc [ Count ]
4: Z=F (P30) ;load 4 million (4*uS/S) into input location
1: 4 F
2: 6 Exponent of 10
3: 7 Z Loc [ _4e6 ]
5: Z=F (P30) ;Load Gage Factor into input location
1: 2 F ;Enter the actual Gage Factor here
2: 0 Exponent of 10
3: 6 Z Loc [ GF ]
6: Z=X/Y (P38) ;calculate multiplier to use with strain
1: 7 X Loc [ _4e6 ] ;calculation
2: 6 Y Loc [ GF ]
3: 8 Z Loc [ Mult ]
7: Beginning of Loop (P87) ;Loop through 5 times to obtain average
1: 0 Delay ;zero reading
2: 5 Loop Count
8: Z=Z+1 (P32) ;Increment Counter used to determine
1: 5 Z Loc [ Count ] ;when to output
9: Full Bridge (P6) ;Measure Strain Gage
1: 1 Reps
2: 22 ± 7.5 mV 60 Hz Rejection Range
3: 1 DIFF Channel
4: 1 Excite all reps withExchan 1
5: 2500 mV Excitation
6: 1 Loc [ mVperV ]
7: 1 Mult
8: 0 Offset
10: IF (X<=>F) (P89) ;Check for last pass through loop
1: 5 X Loc [ Count ] ;to set output flag
2: 3 >=
3: 5 F
4: 10 Set Output Flag High
11: Set Active Storage Area (P80) ;Direct averaged "zero" reading
1: 3 Input Storage Area ;to input storage
2: 2 Array ID or Loc [ mVperV_0 ]
13
Page 20

4WFBS120, 4WFBS350, 4WFBS1K 4 Wire Full Bridge Terminal Input Modules (TIM)
12: Average (P71)
1: 1 Reps
2: 1 Loc [ mVperV ]
13: If Flag/Port (P91) ;When average is calculated,
1: 10 Do if Output Flag is High (Flag 0) ;also send it to Final Storage
2: 10 Set Output Flag High
14: Set Active Storage Area (P80) ;Direct Output to Final Storage
1: 1 Final Storage Area 1
2: 11 Array ID ;set Array ID = 11 for zero data
15: Real Time (P77)
1: 110 Day,Hour/Minute
16: Sample (P70)
1: 1 Reps
2: 2 Loc [ mVperV_0 ]
17: End (P95)
18: End (P95)
End Program
Example Program 4.5. 21X ¼ Bridge Strain with 1 rep and zero offset
;{21X}
*Table 1 Program
01: 1 Execution Interval (seconds)
;Other measurements could be inserted here or before the Output section
1: If Flag/Port (P91) ;On the first execution (Flag 1 is low)
1: 21 Do if Flag 1 is Low ;or when user sets Flag 1 low
2: 1 Call Subroutine 1 ;call the zeroing subroutine
2: Full Bridge (P6) ;Measure the strain gage
1: 1 Reps
2: 2 ± 15 mV Slow Range
3: 1 DIFF Channel
4: 1 Excite all reps withExchan 1
5: 5000 mV Excitation
6: 1 Loc [ mVperV ]
7: 1 Mult
8: 0 Offset
3: Z=X-Y (P35) ;Subtract zero reading from the
1: 1 X Loc [ mVperV ] ;measurement
2: 2 Y Loc [ mVperV_0 ]
3: 3 Z Loc [ Vr ]
4: Z=X*F (P37) ;Change Vr from mV/V to V/V
1: 3 X Loc [ Vr ]
2: 0.001 F
3: 3 Z Loc [ Vr ]
14
Page 21

4WFBS120, 4WFBS350, 4WFBS1K 4 Wire Full Bridge Terminal Input Modules (TIM)
;The following instructions calculate microstrain
5: Z=X*F (P37)
1: 3 X Loc [ Vr ]
2: -2 F
3: 9 Z Loc [ 1_2Vr ]
6: Z=Z+1 (P32)
1: 9 Z Loc [ 1_2Vr ]
7: Z=X/Y (P38)
1: 3 X Loc [ Vr ]
2: 9 Y Loc [ 1_2Vr ]
3: 10 Z Loc [ Vr_1_2Vr ]
8: Z=X*Y (P36)
1: 10 X Loc [ Vr_1_2Vr ]
2: 8 Y Loc [ Mult ]
3: 4 Z Loc [ uStrain ]
;Output Section
;This example outputs an average of the 1 second readings
;once per minute.
9: If time is (P92)
1: 0 Minutes (Seconds --) into a
2: 1 Interval (same units as above)
3: 10 Set Output Flag High
10: Set Active Storage Area (P80)
1: 1 Final Storage Area 1
2: 1 Array ID ;Set Array ID = 1 for measurement data
11: Real Time (P77)
1: 1110 Year,Day,Hour/Minute
12: Average (P71)
1: 1 Reps
2: 4 Loc [ uStrain ]
*Table 2 Program
01: 0.0000 Execution Interval (seconds)
*Table 3 Subroutines
1: Beginning of Subroutine (P85) ;Subroutine to measure "zero"
1: 1 Subroutine 1
2: Do (P86) ;This prevents calling subroutine
1: 11 Set Flag 1 High ;until user sets flag 1 low again.
3: Z=F (P30) ;Set counter use for average to 0
1: 0 F
2: 5 Z Loc [ count ]
4: Z=F (P30) ;load 4000 into
1: 4000 F ;input location
2: 7 Z Loc [ 4e6 ]
5: Z=X*F (P37) ;Multiply by 1000 to get (4*uS/S)
1: 7 X Loc [ 4e6 ]
2: 1000 F
3: 7 Z Loc [ 4e6 ]
15
Page 22

4WFBS120, 4WFBS350, 4WFBS1K 4 Wire Full Bridge Terminal Input Modules (TIM)
6: Z=F (P30) ;Load Gage Factor into input location
1: 2 F ;Enter the actual Gage Factor here
2: 6 Z Loc [ GF ]
7: Z=X/Y (P38) ;calculate multiplier to use with strain
1: 7 X Loc [ 4e6 ] ;calculation
2: 6 Y Loc [ GF ]
3: 8 Z Loc [ Mult ]
8: Beginning of Loop (P87) ;Loop through 5 times to obtain average
1: 0 Delay ;zero reading
2: 5 Loop Count
9: Z=Z+1 (P32) ;Increment Counter used to determine
1: 5 Z Loc [ count ] ;when to output
10: Full Bridge (P6) ;Measure Strain Gage
1: 1 Reps
2: 2 ± 15 mV Slow Range
3: 1 DIFF Channel
4: 1 Excite all reps withExchan 1
5: 5000 mV Excitation
6: 1 Loc [ mVperV ]
7: 1 Mult
8: 0 Offset
11: IF (X<=>F) (P89) ;Check for last pass through loop
1: 5 X Loc [ count ] ;to set output flag
2: 3 >=
3: 5 F
4: 10 Set Output Flag High
12: Set Active Storage Area (P80) ;Direct averaged "zero" reading
1: 3 Input Storage ;to input storage
2: 2 Array ID or Loc [ mVperV_0 ]
13: Average (P71)
1: 1 Reps
2: 1 Loc [ mVperV ]
14: If Flag/Port (P91) ;When average is calculated,
1: 10 Do if Output Flag is High (Flag 0) ;also send it to Final Storage
2: 10 Set Output Flag High
15: Set Active Storage Area (P80) ;Direct Output to Final Storage
1: 1 Final Storage
2: 11 Array ID ;set Array ID = 11 for zero data
16: Real Time (P77)
1: 110 Day,Hour/Minute
17: Sample (P70)
1: 1 Reps
2: 2 Loc [ mVperV_0 ]
18: End (P95)
19: End (P95)
End Program
16
Page 23

4WFBS120, 4WFBS350, 4WFBS1K 4 Wire Full Bridge Terminal Input Modules (TIM)
4.2 Quarter Bridge Strain with 2 Wire Element
NOTE
Although a two wire gage can be used with the 4WFBS TIM,
due to the issues outlined in Section 4.4.3, it is not
recommended. An exception may be applications with short
leads in a stable temperature environment.
A 2-wire quarter bridge strain circuit is shown in figure 4.2-1.
R
D
R
=Gauge
+
4
Excite V
R
=1KΩ
2
R1=1KΩ
-
FIGURE 4.2-1. Two wire quarter bridge strain circuit
In this circuit, R1 and R2 are 1000 ohm resistors making up the back plane of
the Wheatstone bridge, as is done in the TIM design. R
resistor, or Dummy Resistor, that has a nominal resistance of the un-strained
gage. The 4
th
resistive element is the active strain gage. Strain gages are
available in nominal resistances of 120, 350, and 1000 ohms. The 4WFBS
model must match the nominal resistance of the gage (e.g., the 4WFBS120 is
used with a 120 ohm strain gage).
As can be seen in Figure 4.2-1, both sensor leads are in the same arm of the
Wheatstone bridge. Not only does this affect the sensitivity of the gage, the
output from this circuit will include temperature induced line resistance errors.
See Section 4.4.3, Lead Compensation using ¼ Bridge Strain with 2 Wire
Element for more information on issues with using 2 wire gages.
4.2.1 Quarter Bridge Strain with 2 Wire Element Wiring
To use a two wire element strain gauge with the 4WFBS TIM requires a
jumper wire be placed between the H and L terminal of the TIM module as
shown in Figure 4.2-2.
is the complementary
D
17
Page 24

4WFBS120, 4WFBS350, 4WFBS1K 4 Wire Full Bridge Terminal Input Modules (TIM)
(
)
(
με
=
−
με
με
×
Datalogger
Vx
H
L
or AG
or G
Shield
R
R
H
H
Jumper Wire
RD
2
L
1
G
Gauge
FIGURE 4.2-2. Wiring for 2-wire gauges
4.2.2 Two Wire ¼ Bridge use with Multiplexers and Equations
The equations to resolve the strain, programming of the logger, and methods of
using with multiplexers are the same as those covered in Section 4.1 for the 3Wire Strain gauge. The only variance is the wiring of the gage to the TIM.
4.3 Quarter Bridge Strain with Dummy Gage
An undesirable property of strain gauges is that of resistance change with
changes in temperature. This is true even for the self-temperature
compensating strain gages on the market today. Supplied with each package of
strain gages are graphs and equations for the variance in the output of the strain
gage due to thermal changes (referred to as thermal output or apparent strain)
and for the variation of the gage factor with temperature. These graphs are
based on the assumption that the gages are mounted on a material with the
given thermal coefficient of expansion (TCE). The TCE value is included in
the gage type nomenclature. Following are some typical equations supplied.
µε
Equation 4.3.1 is used to calculate the thermal output variance (
) with the
TO
result in μStrain. Equation 4.3.2 is used to determine the change in the gauge
factor (GF) due to temperature changes. Both are based on temperature in
degrees Celsius (T).
−−
93.325.305.015.195.2 TETETT
με
4.3.1
TO
4
−
−+−+−=
GFTEGFGF 2440.1
−×+=
rawrawadj
4.3.2
47342
As an example, let us assume we use a gauge with a GF of 2.00 in a test that
started at 24°C and 0
1000 μStrain. The thermal output strain,
μStrain. The error in the gage factor would be 0.364% with a resultant GF
μStrain, and ended at 50°C and a recorded strain value of
µε
, at 50°C would be -29.3
TO
of
adj
2.007. The corrected strain would be 967 μStrain:
18
cor
)
007.2/000.23.291000
4.3.3
The uncorrected value had an error of approximately 3.3%. And if the ending
strain would have been 100 μStrain instead of 1000 μStrain, the error would
have been around 30%.
Page 25

4WFBS120, 4WFBS350, 4WFBS1K 4 Wire Full Bridge Terminal Input Modules (TIM)
Ω
Another temperature induced error in a quarter bridge strain circuit is due to
the Temperature Coefficient of Resistance (TCR) of the completion resistor in
the arm opposite the strain gauge. The 4WFBS TIMs use a high quality
resistor having a TCR of 0.8ppm/°C to minimize these errors. For our example
above, this could lead to an error in the reading of approximately 10 μStrain,
assuming that the datalogger experiences the same level of temperature
variation. This error could be additive or subtractive to the other errors as the
resistor manufacturer does not specify the polarity of the change in resistance,
only the absolute magnitude.
These errors, with exception to the completion resistor’s TCR, can be
mathematically compensated for to some degree. It should be remembered that
the curves and equations given are the average for the given batch of gages and
are only applicable when mounting on the specified material. An alternative
approach to eliminate the errors is to either use a dummy gage, from the same
batch mounted on identical material, or to use a half or full bridge strain
circuit.
Dummy gauges can be used to compensate for these false apparent strain
readings. A strain gauge that is mounted on a coupon that is not undergoing
mechanical stress and is used as the resistive element for the Wheatstone
bridge arm opposite the active gage is referred to as a “Dummy Gauge”. This
non-active gauge in the other arm of the Wheatstone bridge is referred to as a
“dummy gauge” because it is not subjected to “load induced” strains.
With the two opposing gauges experiencing the same temperature conditions,
the temperature effects on the active gage will be nullified by the equivalent
temperature effects on the dummy gauge. Figure 4.3.1 depicts a Quarter Bridge
Strain circuit with a Dummy gauge.
L3
L
R2=1 KΩ
R =1 K
1
3
L2
-
+
L
1
Dummy Gauge
Active Gauge
FIGURE 4.3-1. Quarter bridge strain circuit with dummy gauge
It should be noted that the coupon on which the dummy gauge is mounted can
still be subjected to temperature induced strains. This can be used to null
temperature induced strains in the monitored member if the dummy gauge is
mounted to a coupon made up of material having the same Temperature
Coefficient of Resistance (TCR) as the member that the active gauge is
mounted to. Conversely, the dummy gage could be mounted to a coupon with
a negligible TCR allowing for the monitoring of temperature induced stresses.
19
Page 26

4WFBS120, 4WFBS350, 4WFBS1K 4 Wire Full Bridge Terminal Input Modules (TIM)
The 4WFBS modules can support quarter bridge strain circuits using either the
completion resistor built into the TIM, or a user supplied “dummy” strain
gauge, for the Wheatstone Bridge arm's resistive element opposite of the active
strain gauge in the bridge. Wiring circuits using a dummy gage are covered in
Section 4.3.1.
4.3.1 Quarter Bridge Strain with Dummy Gauge Wiring Setup
Figure 4.3-2 illustrates the wiring of the strain gage with a dummy gage to the
4WFBS module, as well as the wiring of the module to the datalogger. This
shows the dummy gauge out at the remote site along with the active gage. This
is the best setup to achieve the best compensation for the apparent strain and
gauge factor variance due to temperature fluctuations, as it will be easier to
keep the temperature of the two gages equivalent.
FIGURE 4.3-2. ¼ bridge strain with remote dummy gauge
Figure 4.3-3 illustrates the wiring of the strain gage to the 4WFBS module with
the Dummy gauge at the logger location. Apparent strain errors could result
because of temperature variances between the two gauges with this setup. This
circuit is still utilized in some applications for ease of Shunt calibration (can
shunt across Dummy gage at logger location rather than at the remote gauge
location). Also an existing, standard 3-wire ¼ Bridge strain circuit can easily
be transformed into this circuit. If large temperature variances will exist
between the active gage and the dummy gage located at the datalogger, using
the 4WFBS completion resistor can result in lower temperature induced errors.
20
FIGURE 4.3-3. ¼ bridge strain with dummy gauge at datalogger
Page 27

4WFBS120, 4WFBS350, 4WFBS1K 4 Wire Full Bridge Terminal Input Modules (TIM)
With either circuit, one lead leg, L
the Wheatstone bridge. It is important that the gage be wired such, and that
these two leads be the same length, diameter and wire type. It is preferable to
use a twisted pair for these two wires so that they will undergo the same
temperature and electromagnetic field variations. With this configuration,
changes in wire resistance due to temperature occur equally in both arms of the
bridge with negligible effect on the output from the bridge.
or L3, is in one of the two opposing arms of
1
4.3.2 Quarter Bridge Strain with Dummy Gauge Calculations
The calculations for this bridge setup are the same as for the 3-Wire Quarter
Bridge circuit. See Section 4.1.2 Quarter Bridge Strain with3 Wire Element
Calculations for details.
4.3.3 Quarter Bridge Strain with Dummy Gauge Example Programs
The programming for this bridge setup is the same as for the 3-Wire Quarter
Bridge circuit. See Section 4.1.3 Quarter Bridge Strain with3 Wire Program
Examples for details.
4.4 Quarter Bridge Strain Lead Resistance Compensation
When using quarter bridge strain (full bridge with one active element) with
long lead lengths, errors can be introduced due to the resistance of the leads.
This section covers both mathematical and Shunt Calibration methods used to
rectify these errors. The techniques covered in the section can be used with
circuits using a 4WFBS’s completion resistor or a dummy gauge for the
resistive element in the third arm of the Wheatstone Bridge (arm opposite of
active gauge). The only difference is that when using a dummy gauge, the
4WFBS module’s gold shunt receptacles cannot be used. These receptacles are
connected to the dummy resistor supplied by the 4WFBS module.
One potential error with long leads is due to the leads' resistance change from
temperature fluctuations. When using a three wire strain gauge, wired as
depicted in Figure 4.1-2 3-Wire ¼ Bridge Strain Wiring, with the three leads
all the same length and laid out together (all three experience the same
temperature swings), the leads' resistance changes are self compensating. It is
preferable to use a twisted pair for the two wires (L and G) carrying the current
so that they definitely undergo the same temperature and electromagnetic field
variations. With this configuration, changes in wire resistance due to
temperature occur equally in both arms of the bridge with negligible effect on
the output from the bridge.
Another error that is introduced when using long leads, is a sensitivity
reduction of the system. There are two methods to rectify this error. The first
is mathematical. The second is to perform a shunt calibration. Sections 4.4.1
and 4.4.2 cover these methods for ¼ Bridge Strain circuits.
4.4.1 Mathematical Lead Compensation for 3-Wire, ¼ Bridge Strain
The same equations pertain whether a completion (dummy) resistor or a
dummy gauge is used to complete the third arm of the Wheatstone Bridge. So
the material in this section is relevant for wiring setups shown in Figures 4.1-2,
4.3-2, and 4.3-3. The math and the programs used would be identical for all
three of these circuits.
21
Page 28

4WFBS120, 4WFBS350, 4WFBS1K 4 Wire Full Bridge Terminal Input Modules (TIM)
4.4.1.1 Mathematical Lead Compensation Circuit and Equations
If the lead resistance is known, the sensitivity error can be mathematically
corrected for by multiplying the output by a simple factor (1+R
is the nominal resistance of one of the lead legs and R
is the resistance of the
G
strain gauge. The Gauge Factor can be multiplied by the inverse of this value,
/(RG+ RL), to derive an adjusted Gauge Factor.
R
G
) where RL
L/RG
⎞
R
g
⎟
⎟
RR
+
Lg
⎠⎝
4.4.1
The adjusted Gauge Factor, GF
derive the µ
Strain. The proof used to derive this adjusted Gauge Factor is
⎛
GFGF
⎜
×=
rawadj
⎜
, would be used in the StrainCalc function to
adj
shown below:
R2= 1K
Excite
R1= 1K
Ω
-
Ω
R
D
R
+
L
R
L
R
L
FIGURE 4.4-1. Three wire ¼ bridge strain circuit
R4=Gauge
22
Balanced Bridge Condition
⎞
⎛
E
O
⎟
⎜
⎜
E
4.4.2
⎝
=
⎟
I
⎠
BAL
RR
+
LG
RRRR
+++
DLG
R
1
−
RR
+
L
21
Strained Bridge Condition
⎞
⎛
E
O
⎟
⎜
⎜
E
⎝
=
⎟
I
⎠
STR
Change in Bridge Output (V
⎞
⎛
⎞
⎛
E
O
⎟
⎜
V
=
R
⎟
⎜
E
I
⎠
⎝
STR
E
O
⎟
⎜
−
⎟
⎜
E
I
⎠
⎝
BAL
)
R
=
RRR
Δ++
GLG
RRRRR
Δ++++
LDLG
RRR
Δ++
GLG
GLD
R
1
−
RR
+
G
RR2RR
Δ+++
G
21
4.4.3
RR
+
−
LG
2RRR
++
LGD
4.4.4
Page 29

4WFBS120, 4WFBS350, 4WFBS1K 4 Wire Full Bridge Terminal Input Modules (TIM)
Assume R
D
= R
G
RRR
Δ++
V
=
R
GLG
−
R2R2R
Δ++
GL
G
RR
+
LG
2R2R
+
LG
4.4.5
Simplify
RRRR Δ+Δ
V =
R
()()
Solve for ΔR
4.4.7
G/RG
Δ
R
4V
G
R
=
()
Use the Gauge Factor to calculate micro-strain
6
×
10
4V
=
με
4.4.8
R
()
2V-1GF
R
GLGG
2R+2RR2R+2R Δ+
L
GGLG
⎛
+
RR
⎜
⎜
⎝
LG
R2V-1R
GRG
⎛
⎜
⎜
⎝
⎛
+
⎜
⎜
R
G
⎝
⎞
⎟
⎟
⎠
με
RR
4.4.6
6
⎞
×Δ
R
10
=
G
⎞
LG
⎟
⎟
⎠
⎟
⎟
×
GFR
⎠
4.4.1.2 Mathematical Lead Compensation Programs
Example Program 4.6. CR9000X ¼ Bridge Strain with zero offset and Lead
Compensation
This program starts with Example Program 4.2 and adds instructions to
mathematically compensate for the leads resistances effects on the Gauge
Factor (sensitivity effect). Added instructions are highlighted.
Program name: StrainSH.C9X
'
Public StrainMvperV(3) : Units StrainMvperV = mV_per_V 'Raw Strain dimensioned source
Public Strain(3) : Units Strain = uStrain ‘uStrain dimensioned source
Dim GF(3) 'Dimensioned gauge factor
Public ZeromV_V(3), ZeroStrain(3)
Public ZReps, ZIndex, ModeVar
Public Leadlength(3), Lead_R(3),GF_Adjusted(3),
Public I, LeadRper100ft, Gauge_R
DataTable(STRAIN,True,-1) 'Trigger, auto size
DataInterval(0,0,0,100) 'Synchronous, 100 lapses, autosize
CardOut(0,-1) 'PC card , size Auto
Sample (3,Strain(),IEEE4) '3 Reps, uStrain, Resolution
Sample (3,StrainMvperV(),IEEE4) ‘3Reps,Stain mVolt/Volt, Resolution
EndTable 'End of table STRAIN
DataTable (Calib,NewFieldCal,10) ‘Table for calibration factors from zeroing
SampleFieldCal ‘User should collect these to his computer
EndTable ‘for future reference
23
Page 30

4WFBS120, 4WFBS350, 4WFBS1K 4 Wire Full Bridge Terminal Input Modules (TIM)
BeginProg 'Program begins here
GF(1) = 2.1 : GF(2) = 2.2 : GF(3) = 2.3 'Initialize gauge factors for Strain( )
LeadLength(1) = 1.25 ' load lead lengths (100s of feet)
LeadLength(2) = 1.50
LeadLength(3) = 2.00
LeadRper100ft = 2.5 '24 gauge copper wire lead R is 0.025 ohms/ft
Gauge_R = 350 ' Load Strain gauge Resistance
For I = 1 To 3 ' Loop through calculate the adjusted gauge factors
Lead_R(I) = LeadLength(I) * LeadRper100ft
GF_Adjusted(I) = GF(I) * (Gauge_R/(Gauge_R + Lead_R(I)))
Next I
ZReps = 3 : ZIndex = 1 ‘initialize cal reps and index pointer
LoadFieldCal(True) ‘Load prior calibration factors
Scan(10,mSec,100,0) 'Scan once every 10 mSecs, non-burst
FieldCalStrain(10,StrainMvperV(),ZReps,0,ZeromV_V(),ModeVar,0,ZIndex,1,0,Strain())
BrFull(StrainMvperV(),3,mV50,4,1,5,7,1,5000,True,True,70,100,1,0)
StrainCalc(Strain(),3,StrainMvperV(),ZeromV_V(),-1,GF(),0) 'Strain calculation
CallTable STRAIN
CallTable Calib
Next Scan 'Loop up for the next scan
SlowSequence 'Slow sequence Scan to perform temperature
Scan(1,Sec,0,0) ' compensation on DAQ
Calibrate 'Corrects ADC offset and gain
BiasComp 'Corrects ADC bias current
Next Scan
EndProg 'Program ends here
24
Page 31

4WFBS120, 4WFBS350, 4WFBS1K 4 Wire Full Bridge Terminal Input Modules (TIM)
Example Program 4.7. CR10X ¼ Bridge Strain with 16 reps, using
multiplexer with zero offset and Lead Compensation Calculations using
Lead resistance
Input Locations Used in CR10(X)Program Example X.X
Addr Name Addr Name Addr Name Addr Name
1 mVPerVG01 36 AdjGF01 70 LeadFt01 102 GF01
2 mVPerVG02 37 AdjGF02 71 LeadFt02 103 GF02
3 mVPerVG03 38 AdjGF03 72 LeadFt03 104 GF03
4 mVPerVG04 39 AdjGF04 73 LeadFt04 105 GF04
5 mVPerVG05 40 AdjGF05 74 LeadFt05 106 GF05
6 mVPerVG06 41 AdjGF06 75 LeadFt06 107 GF06
7 mVPerVG07 42 AdjGF07 76 LeadFt07 108 GF07
8 mVPerVG08 43 AdjGF08 77 LeadFt08 109 GF08
9 mVPerVG09 44 AdjGF09 78 LeadFt09 110 GF09
10 mVPerVG10 45 AdjGF10 79 LeadFt10 111 GF10
11 mVPerVG11 46 AdjGF11 80 LeadFt11 112 GF11
12 mVPerVG12 47 AdjGF12 81 LeadFt12 113 GF12
13 mVPerVG13 48 AdjGF13 82 LeadFt13 114 GF13
14 mVPerVG14 49 AdjGF14 83 LeadFt14 115 GF14
15 mVPerVG15 50 AdjGF15 84 LeadFt15 116 GF15
16 mVPerVG16 51 AdjGF16 85 LeadFt16 117 GF16
17 mVPerVZ01 52 uStrain01 86 OhmLead01 118 G01Ohms
18 mVPerVZ02 53 uStrain02 87 OhmLead02 119 G02Ohms
19 mVPerVZ03 54 uStrain03 88 OhmLead03 120 G03Ohms
20 mVPerVZ04 55 uStrain04 89 OhmLead04 121 G04Ohms
21 mVPerVZ05 56 uStrain05 90 OhmLead05 122 G05Ohms
22 mVPerVZ06 57 uStrain06 91 OhmLead06 123 G06Ohms
23 mVPerVZ07 58 uStrain07 92 OhmLead07 124 G07Ohms
24 mVPerVZ08 59 uStrain08 93 OhmLead08 125 G08Ohms
25 mVPerVZ09 60 uStrain09 94 OhmLead09 126 G09Ohms
26 mVPerVZ10 61 uStrain10 95 OhmLead10 127 G10Ohms
27 mVPerVZ11 62 uStrain11 96 OhmLead11 128 G11Ohms
28 mVPerVZ12 63 uStrain12 97 OhmLead12 129 G12Ohms
29 mVPerVZ13 64 uStrain13 98 OhmLead13 130 G13Ohms
30 mVPerVZ14 65 uStrain14 99 OhmLead14 131 G14Ohms
31 mVPerVZ15 66 uStrain15 100 OhmLead15 132 G15Ohms
32 mVPerVZ16 67 uStrain16 101 OhmLead16 133 G16Ohms
33 VR_1 68 Number4e3 134 GAndLOhms
34 One_2Vr 69 LeadOhms 135 AdjFactor
35 Vr_1_2Vr 136
25
Page 32

4WFBS120, 4WFBS350, 4WFBS1K 4 Wire Full Bridge Terminal Input Modules (TIM)
;{CR10X}
;16SGMux.CSI
;This program calculates the strain for 16 quarter strain bridges using4 wire bridge completion modules.
; It takes into account the sensitivity changes due to lead length resistance.
;(1) Sensors:
; 16 strain gauges multiplexed through an AM416
;(2) DataInfo:
; Strain gauges will be measured every 5 seconds.
; Only measurement at top of minute will be stored.
;(3) SubroutineDescrptions:
; Subroutine01: Measures the zero offset strain reading, sets the gauge factor.
; Subroutine02: Outputs processed values to FinalStorage
;(4) Wiring:
; (a) Mux01:
; 10x_12V To AM416_12V 10x_GND To AM416_GND
; 10x_C3 To AM416_ResetEnable 10x_C4 To AM416_Clock
; 10x_H4 To AM416_ComH1 10x_L4 To AM416_ComL1
; 10x_E2 To AM416_ComH2 10x_AG To AM416_ComL2
; First bank example:
; SG+ To H1 SG- To L1
; SGExcite To H2 SGGnd To L2
*Table 1 Program
01: 5 Execution Interval (seconds)
;Loop through the strain gages using the AM416:
1: Do (P86)
1: 43 Set Port 3 High ; Reset and Enable the AM416.
2: Beginning of Loop (P87)
1: 0 Delay
2: 16 Loop Count
3: Do (P86)
1: 74 Pulse Port 4 ; Clock forward to the next bank on the AM416.
4: Excitation with Delay (P22) ; Delay to allow relay connection to settle.
1: 2 Ex Channel
2: 0 Delay WITHEx (units = 0.01 sec)
3: 5 Delay After Ex (units = 0.01 sec)
4: 0 mV Excitation
5: Full Bridge (P6)
1: 1 Reps
2: 2 7.5 mV Slow Range
3: 4 DIFF Channel
4: 2 Excite all reps withExchan 2
5: 2500 mV Excitation
6: 1 -- Loc [ mVPerVG01 ]
7: 1.0 Mult
8: 0.0 Offset
6: End (P95)
7: Do (86)
1: 53 Set Port 3 Low ; Deactivate the AM416.
;..
8: If Flag/Port (P91) ; If first time through then call zero routine.
1: 21 Do if Flag 1 is Low
2: 1 Call Subroutine 1
9: Beginning of Loop (P87) ; This Loop calculates uStrain values:
1: 0 Delay
2: 16 Loop Count
10: Step Loop Index (P90)
1: 1 Step
26
Page 33

4WFBS120, 4WFBS350, 4WFBS1K 4 Wire Full Bridge Terminal Input Modules (TIM)
11: Z=X-Y (P35) ; Subtract zeroed value from measurement.
1: 1 -- X Loc [ mVPerVG01 ]
2: 17 -- Y Loc [ mVPerVZ01 ]
3: 33 Z Loc [ Vr_1 ]
12: Z=X*F (P37)
1: 33 X Loc [ Vr_1 ]
2: -2 F
3: 34 Z Loc [ One_2Vr ]
13: Z=X+F (P34)
1: 34 X Loc [ One_2Vr ]
2: 1000 F
3: 34 Z Loc [ One_2Vr ]
14: Z=X/Y (P38)
1: 33 X Loc [ Vr_1 ]
2: 34 Y Loc [ One_2Vr ]
3: 35 Z Loc [ Vr_1_2Vr ]
15: Z=X/Y (P38)
1: 35 X Loc [ Vr_1_2Vr ]
2: 36 -- Y Loc [ AdjGF01 ]
3: 52 -- Z Loc [ uStrain01 ]
16: Z=X*Y (P36)
1: 52 -- X Loc [ uStrain01 ]
2: 68 Y Loc [ Number4e3 ]
3: 52 -- Z Loc [ uStrain01 ]
17: End (P95)
18: If Flag/Port (P91)
1: 12 Do if Flag 2 is High
2: 30 Then Do
19: If time is (P92)
1: 0 Minutes (Seconds --) into a
2: 1 Interval (same units as above)
3: 2 Call Subroutine 2 ; Outputs data to FinalStorage.
20: End (P95)
*Table 2 Program
02: 0
*Table 3 Subroutines
1: Beginning of Subroutine (P85) ; Measures ZeroOffset strain reading and sets GF
1: 1 Subroutine 1
2: Do (P86) ; Setup so Subroutine does not get called again.
1: 11 Set Flag 1 High
3: Z=F (P30) ; Lead Length Resistance per 100 feet.
1: 2.5 F ; 0.025 Ohms/Foot for 24 gauge copper stranded wire.
2: 0 Exponent of 10
3: 69 Z Loc [ LeadOhms ]
4: Bulk Load (P65) ; Load lead length of the gages in 100s of feet:
1: 3.0 F ; Gage01
2: 4.4 F ; Gage02
3: 8 F ; Gage03
4: 12 F ; Gage04
5: 14 F ; Gage05
6: 19 F ; Gage06
7: 15 F ; Gage07
8: 13 F ; Gage08
9: 70 Loc [ LeadFt01 ]
27
Page 34

4WFBS120, 4WFBS350, 4WFBS1K 4 Wire Full Bridge Terminal Input Modules (TIM)
5: Bulk Load (P65)
1: 5 F ; Gage09
2: 9 F ; Gage10
3: 12 F ; Gage11
4: 4 F ; Gage12
5: 8 F ; Gage13
6: 2 F ; Gage14
7: 8 F ; Gage15
8: 9 F ; Gage16
9: 78 Loc [ LeadFt09 ]
6: Beginning of Loop (P87) ; Calculate lead length resistance:
1: 0 Delay
2: 16 Loop Count
7: Z=X*Y (P36)
1: 70 -- X Loc [ LeadFt01 ]
2: 69 Y Loc [ LeadOhms ]
3: 86 -- Z Loc [ OhmLead01 ]
8: End (P95)
9: Bulk Load (P65) ; Load strain gauge Gage Factors:
1: 2.095 F ; Gauge01
2: 2.095 F ; Gauge02
3: 2.095 F ; Gauge03
4: 2.095 F ; Gauge04
5: 2.095 F ; Gauge05
6: 2.095 F ; Gauge06
7: 2.095 F ; Gauge07
8: 2.095 F ; Gauge08
9: 102 Loc [ GF01 ]
10: Bulk Load (P65)
1: 2.095 F ; Gauge09
2: 2.095 F ; Gauge10
3: 2.095 F ; Gauge11
4: 2.095 F ; Gauge12
5: 2.095 F ; Gauge13
6: 2.095 F ; Gauge14
7: 2.095 F ; Gauge15
8: 2.095 F ; Gauge16
9: 110 Loc [ GF09 ]
; Load strain gauge resistance values:
11: Bulk Load (P65)
1: 350 F ; Gage01
2: 350 F ; Gage02
3: 350 F ; Gage03
4: 350 F ; Gage04
5: 350 F ; Gage05
6: 350 F ; Gage06
7: 350 F ; Gage07
8: 350 F ; Gage08
9: 118 Loc [ G01Ohms ]
12: Bulk Load (P65)
1: 350 F ; Gage09
2: 350 F ; Gage10
3: 350 F ; Gage11
4: 350 F ; Gage12
5: 350 F ; Gage13
6: 350 F ; Gage14
28
Page 35

4WFBS120, 4WFBS350, 4WFBS1K 4 Wire Full Bridge Terminal Input Modules (TIM)
7: 350 F ; Gage15
8: 350 F ; Gage16
9: 126 Loc [ G09Ohms ]
13: Z=F (P30) ; Load in the large number, 4000.0
1: 4 F
2: 3 Exponent of 10
3: 68 Z Loc [ Number4e3 ]
14: Beginning of Loop (P87) ; Loop through the strain gages using the AM416:
1: 0 Delay
2: 16 Loop Count
15: Z=X+Y (P33) ; Calculate GOhms+LeadOhms
1: 118 -- X Loc [ G01Ohms ]
2: 86 -- Y Loc [ OhmLead01 ]
3: 134 Z Loc [ GAndLOhms ]
16: Z=X/Y (P38) ; Calculate RG/(RG + RL)
1: 118 -- X Loc [ G01Ohms ]
2: 134 Y Loc [ GAndLOhms ]
3: 135 Z Loc [ AdjFactor ]
17: Z=X*Y (P36) ; Calculate adjusted Gauge Factor, GF*[RG/(RG + RL)]
1: 135 X Loc [ AdjFactor ]
2: 102 -- Y Loc [ GF01 ]
3: 36 -- Z Loc [ AdjGF01 ]
18: Z=X (P31) ; Load last gauge measurements.
1: 1 -- X Loc [ mVPerVG01 ]
2: 17 -- Z Loc [ mVPerVZ01 ]
19: End (P95)
;..
20: Do (P86) ; Store zero measurement values and adjusted GF.
1: 10 Set Output Flag High (Flag 0)
21: Set Active Storage Area (P80)^15754
1: 1 Final Storage Area 1
2: 311 Array ID
22: Real Time (P77)^19880
1: 1111 Year,Day,Hour/Minute,Seconds (midnight = 0000)
23: Sample (P70)^22627
1: 16 Reps
2: 17 Loc [ mVPerVZ01 ]
24: Sample (P70)^11346
1: 16 Reps
2: 36 Loc [ AdjGF01 ]
25: Do (P86)
1: 20 Set Output Flag Low (Flag 0)
26: End (P95)
;
27: Beginning of Subroutine (P85) ; Output data to FinalStorage.
1: 2 Subroutine 2
28: Do (P86)
1: 10 Set Output Flag High (Flag 0)
29: Set Active Storage Area (P80)^28949
1: 1 Final Storage Area 1
2: 321 Array ID
30: Real Time (P77)^16027
1: 1111 Year,Day,Hour/Minute,Seconds (midnight = 0000)
29
Page 36

4WFBS120, 4WFBS350, 4WFBS1K 4 Wire Full Bridge Terminal Input Modules (TIM)
31: Sample (P70)^16425
1: 16 Reps
2: 52 Loc [ uStrain01 ]
32: Do (P86)
1: 20 Set Output Flag Low (Flag 0)
33: End (P95)
End Program
4.4.2 Shunt Calibration Lead Compensation for 3-Wire, ¼ Bridge Strain
NOTE
Although the following may seem complicated, the process of
performing a Shunt calibration is simple when using the
Calibration Wizard utility found in CSI’s software packages.
Another method to compensate for sensitivity errors, and to calibrate the
system (adjust system scaling), is to do a shunt calibration. This entails
shunting a resistor across one of the arms of the bridge. The premise of a shunt
calibration is that the shunted arm undergoes a reduction in resistance creating
a simulated strain. The difference in strain reported by the system is checked
against the actual simulated strain. Variance between the reported strain and
the simulated strain can be corrected through adjusting the strain gauge’s Gage
Factor (GF).
4.4.2.1 Three Wire Gage Circuit with Shunt
There are two methods for performing a shunt calibration on a 3-Wire ¼ bridge
strain circuit. The first is to shunt across the active gage remotely, and the
second is to shunt across the Dummy resistor or Dummy Gage (dependant on
which is employed in the circuit) back at the datalogger.
For either shunt method, the Dummy resistor should be a 0.02% precision or
better resistor to insure that its resistance is the nominal resistance of the active
gauge. In addition it should have a low Temperature Coefficient of Resistance
(TCR) to limit the errors introduced by the change in its resistance due to
temperature variations. The Shunt resistor should also have a precision of
0.02% or better and a low TCR.
30
4.4.2.1.1 Three Wire Gage Circuit with Remote Shunt across the Active Gage
A 3-wire quarter bridge strain circuit with a Shunt calibration resistor ready to
shunt across the arm that holds the strain gauge is shown in figure 4.4-2.
Page 37

4WFBS120, 4WFBS350, 4WFBS1K 4 Wire Full Bridge Terminal Input Modules (TIM)
A
i
R
R2= 1K
R1= 1K
Ω
+
-
Ω
D
R
L
R
L
Gauge
R
L
R
S
FIGURE 4.4-2. Shunting remotely across active gauge
represents the line resistances. RD is the resistor in the arm next to the active
R
L
gage which has a resistance equal to the nominal resistance of the Strain gauge
and is referred to as the Dummy Resistor. R
is the Shunt resistor. This setup
s
is the classical method for shunting a 3-wire ¼ bridge strain circuit.
4.4.2.1.2 Three Wire Gage Circuit with Shunt across the Dummy Resistor
Shunting across the active gauge is frequently impractical due to inaccessibility
or protective coatings across the gage and leads, which precludes getting an
electrical contact across the gauge. For these types of applications it is more
convenient to place a shunt resistor across the Wheatstone bridge arm that
holds the dummy resistor, R
. Figure 4.4-3 shows a 3-wire ¼ Bridge strain
D
circuit for shunting across the dummy resistor.
R
S
R
R2= 1K
R2= 1K
Ω
Ω
D
R
L
R
L
R
L
Gauge
ct
ve
FIGURE 4.4-3. Circuit for shunting across dummy resistor
31
Page 38

4WFBS120, 4WFBS350, 4WFBS1K 4 Wire Full Bridge Terminal Input Modules (TIM)
A
A
X
Δ
−
NOTE
It should be noted that a shunt resistor should not be connected
across the active gauge’s leads back at the completion portion of
the Wheatstone Bridge, as this would not correctly account for
the leads resistances. If performing a shunt back at the
instrumentation location, it must be done across the Dummy
Resistor as shown in figure 4.4-3.
The 4WFBS TIM modules include 2 gold plated, shunt pin receptacles to
facilitate easy access to the internal dummy resistor. These receptacles, which
accept 0.015 to 0.025 inch diameter pins, are depicted in figure 4.4-4.
Datalogger
VX or E
or G
H
L
G
4WFBSXXX TIM
R
2
R
=1KΩ R
D
1
=1KΩ
Shunt Receptacl e
Shunt Receptacle
ctive Gauge
FIGURE 4.4-4. Wiring for shunt across dummy resistor
To shunt the dummy resistor, simply connect the resistor across the two gold
plated shunt receptacles so that it is in parallel with the dummy resistor.
4.4.2.2 Math for Shunt Calibration of 3-Wire, ¼ Bridge Strain Circuits
NOTE
The math in this section is done automatically for the user by the
Datalogger’s Operating System. It is included here mainly for
reference and for users with our older loggers that are not
supported by the Calibration Wizard and higher end instructions.
The Calibration Wizard utility which is installed with CSI’s
software packages greatly simplifies the calibration process.
The premise is the same when shunting across either arm. The shunted arm
undergoes a reduction in resistance creating a simulated strain. The change in
resistance of the shunted arm is given by Equation 4.4.9:
R
R
G
R
=
RR
+
GS
G
4.4.9
Variable definitions:
ΔR = Change in arm resistance (ohms)
R
= Nominal gauge resistance (ohms)
G
R
= Shunt resistor resistance (ohms)
S
32
Page 39

4WFBS120, 4WFBS350, 4WFBS1K 4 Wire Full Bridge Terminal Input Modules (TIM)
If shunting across the active gauge, the resistance of the active arm will
decrease, reducing the output from the Wheatstone bridge simulating a
compressive or negative strain. If shunting across the dummy resistor, the
resistance of the inactive arm will decrease, increasing the output from the
Wheatstone bridge simulating a tensile or positive strain. A precision resistor
(0.02% or better) with an adequate temperature coefficient of resistance (~4
°C) should be used for the shunt resistor.
ppm/
In order to perform a Shunt calibration, first record an initial strain reading,
next contact the leads of the Shunt Resistor to the gold plated Shunt
receptacles, and record a secondary strain reading that will include the
simulated strain. Take the difference between the two readings to get this
με
Recorded simulated strain (
) created by the Shunting process.
R
We will need to compare this recorded strain value with the calculated strain
value. Equation 4.4.10 is the standard equation for calculating the microstrain
from the change in the resistance of the gauge:
6
×
ΔR
με
=
10
×
RGF
G
4.4.10
Variable definitions:
με
= micro-strain
ΔR = change in arm resistance (ohms)
R
= Nominal gauge resistance (ohms)
G
GF = Gauge factor
Combining equations 4.4.9 and 4.4.10 results in Equation 4.4.11 that is used
for calculating the simulated strain that is induced by the shunt resistor:
R
με
4.4.11
−×
=
S
()
RR GF
+×
GS
6
10
G
Variable definitions:
με
= Simulated micro-strain created by shunt resistor
S
R
R
= Shunt resistor value (ohms)
S
= Nominal gauge resistance (ohms)
G
GF = Gauge factor
The calculated strain,
instrumentation. A multiplier is derived from the ratio,
με
, is compared to the strain readout,
S
με
με
R
/
με
R
S
, from the
. The gauge
factor is multiplied by this factor to derive an adjusted gauge factor for the
system, GF
instrumentation
Adj
= GF
.
Raw
x
με
/
με
, that is used to correct the output from the
R
S
When performing recursive shunt calibrations, the original, raw gauge factor
supplied by the gauge manufacturer should always be used for GF
Raw
.
33
Page 40

4WFBS120, 4WFBS350, 4WFBS1K 4 Wire Full Bridge Terminal Input Modules (TIM)
In some applications a Dummy or inactive gauge is used in place of the
Dummy resistor (See Section 4.3.1 Quarter Bridge Strain with Dummy Gauge
Wiring Setup). The scheme and underlying equations are the same for this type
of circuit. The only difference is that you do not use the gold plated shunt
receptacles on the 4WFBS module to access the internal matching resistor, as
this resistor is not used.
When performing a shunt calibration, it is usually preferable to use a resistor
that will simulate a strain level within the range between 500 and 1000 uStrain.
NOTE
When carrying out both a Zero and a Shunt calibration, always
do a zero calibration after the Shunt calibration is complete to
insure that the zero µstrain reading is calculated using the
adjusted gauge factor.
4.4.2.3 Example Programs for Shunt Calibration of 3-Wire, ¼ Bridge Strain Circuits
Example Program 4.8. CR9000X with Zero and Shunt Calibration
This example program starts out with Example Program 4.2 and adds
instructions to perform a Shunt calibration. Added instructions are highlighted.
A FieldCalStrain instruction takes care of the underlying math for the Shunt
Calibration. Use the Calibration Wizard utility supplied with CSI’s software to
simplify the Shunt Calibration process.
NOTE
When carrying out both a Zero and a Shunt calibration, always
do a zero calibration after the Shunt calibration is complete to
insure that the zero µstrain reading is calculated using the
adjusted gauge factor.
Example Program 4.7. CR9000X ¼ Bridge Strain with zero offset andShunt
Calibration
34
' Program name: StrainSh.C9X
Public StrainMvperV(3) : Units StrainMvperV = mV_per_V 'Raw Strain dimensioned source
Public Strain(3) : Units Strain = uStrain ‘uStrain dimensioned source
Public GF(3) 'Dimensioned gauge factor
Public ZeromV_V(3), ZeroStrain(3) ZReps, ZIndex, ModeVar
Public GF_Adjusted(3), KnownRs(3), ShuntReps, ShuntIndex,ModeShunt
Dim I
DataTable(STRAIN,True,-1) 'Trigger, auto size
DataInterval(0,0,0,100) 'Synchronous, 100 lapses, autosize
CardOut(0,-1) 'PC card , size Auto
Sample (3,Strain(),IEEE4) '3 Reps, uStrain, Resolution
Sample (3,StrainMvperV(),IEEE4) ‘3Reps,Stain mVolt/Volt, Resolution
EndTable 'End of table STRAIN
DataTable (Calib,NewFieldCal,10) ‘Table for calibration factors from zeroing
SampleFieldCal ‘User should collect these to his computer
EndTable ‘for future reference
Page 41

4WFBS120, 4WFBS350, 4WFBS1K 4 Wire Full Bridge Terminal Input Modules (TIM)
Ω
BeginProg 'Program begins here
GF(1) = 2.1 : GF(2) = 2.2 : GF(3) = 2.3 'Initialize gauge factors for Strain( )
ZReps = 3 : ZIndex = 1 ‘initialize cal reps and index pointer
For I = 1 To 3 'Initialize adjusted gage factors to raw gage factors
GF_Adjusted(I) = GF(I)
Next I
ZReps = 3 : ZIndex = 1
LoadFieldCal(True) ‘Load prior calibration factors
Scan(10,mSec,100,0) 'Scan once every 10 mSecs, non-burst
FieldCalStrain(10,StrainMvperV(),ZReps,0,ZeromV_V(),ModeVar,0,ZIndex,1,0,Strain())
FieldCalStrain (13,Strain(),ShuntReps,GF_Adjusted,0,ModeShunt,KnownRs,ShuntIndex,1,GF(),0)
BrFull(StrainMvperV(),3,mV50,4,1,5,7,1,5000,True,True,70,100,1,0)
StrainCalc(Strain(),3,StrainMvperV(),0,-1,GF(),0) 'Strain calculation
CallTable STRAIN
CallTable Calib
Next Scan 'Loop up for the next scan
SlowSequence 'Slow sequence Scan to perform temperature
Scan(1,Sec,0,0) ' compensation on DAQ
Calibrate 'Corrects ADC offset and gain
BiasComp 'Corrects ADC bias current
Next Scan
EndProg 'Program ends here
4.4.3 Lead Compensation using Quarter Bridge Strain with 2 Wire Element
NOTE
If the leads become so long that lead resistance compensation
calculations are required then a 2-wire gage should not be
utilized. It would be difficult to mathematically compensate, and
even though a Shunt Calibration is possible, false readings due to
lead wire temperature changes would in most cases inject more
error than the sensitivity change due to the leads resistances.
Instead a 3-wire gage should be utilized.
This section covers some of the errors introduced into the measurement using
this type of circuit with long leads. This is not to show how to perform lead
compensation using a 2 wire gage, but to discourage its practice.
A 2-wire quarter bridge strain circuit is shown in figure 4.4-5
R
Excite V
R2=1 K
Ω
-
+
D
R
GAUGE = R4
L
R1=1 K
R
L
FIGURE 4.4-5. Two wire quarter bridge strain circuit
35
Page 42

4WFBS120, 4WFBS350, 4WFBS1K 4 Wire Full Bridge Terminal Input Modules (TIM)
Δ
με
(
In this circuit, R1 and R2 are 1000 ohm resistors making up the back plane of
the Wheatstone bridge, as is done in the TIM design. R
resistor that has a nominal resistance of the un-strained gage. The 4
element is the active strain gage. In most applications, the gage is some
distance from the other components of the Wheatstone bridge. R
the resistance of the wire leads returning from the two sides of the gage. It is
normally assumed that the length of the two wires is equal and thus the two
lead resistances are equal; R
both included in the arm of the bridge containing the strain gage. This results
in equation 4.4.12 for solving the strain from the voltage ratio (V
equation 3.14).
. As can be seen in this circuit, the two RLs are
L.
is the complementary
D
th
resistive
represents
L
:reference
r
R
⎛
V
+
14
⎜
r
ε
=
⎛
⎜
This results in a non-linear relationship between the strain and line resistance.
In addition to this non-linear relationship in the gain, having both lines in the
same arm of the bridge results in an offset error as the line resistance (R
changes due to temperature effects. These offset errors can easily outweigh
any legitimate measurements.
Take for example a 120 ohm 2 wire gage with 100 foot leads of 20 gage copper
wire. Copper wire has a Temperature Coefficient of Resistance of about
+3930 ppm (or 0.393%) per degree C. The initial resistance for the 200 foot
combined leads is 2.000 ohms @ 24 degrees C. If the temperature were to drop
20 degrees C, the change in resistance would be 0.127 ohms:
⎝
R
⎛
V
+−
121
⎜
r
⎝
0.00393
0.127Ω ×=
Equation 3.2, from Section 3, derives strain as a function of resistance:
C20°×°
2
⎞
L
⎟
R
G
⎠
⎞
⎞
L
GF
⎟
⎟
R
G
⎠
⎠⎝
4.4.12
)
L
Ω
Ω
2Ω
C
36
R
=
ε
As mentioned before in Section 3, strain is typically reported in microstrain
. Microstrain is strain expressed in parts per million, i.e: a change in
()
length by one millionth of the length. Equation 3.3, again from Section 3,
derives microstrain as a function of resistance.
=
με
Entering 0.127 Ω
apparent or false strain reading indicated would be 529
for Δ Rg, 2 for the Gage Factor (GF), and 120 Ω for Rg , the
G
RGF •
G
6
)
Δ×
101
G
RGFR•
G
με.
Page 43

4WFBS120, 4WFBS350, 4WFBS1K 4 Wire Full Bridge Terminal Input Modules (TIM)
⎛
⎞
R
Δ
R
R
R
+
Δ
4.5 Calculation of Strain for ¼ Bridge Circuits
Vx
H
R1
L
R2
or AG
H
H
R3
L
Rg
G
FIGURE 4.5-1. Strain gage in full bridge
Figure 4.5-1 is the diagram of the strain gage in the full bridge configuration
provided by the terminal input module. The result of the datalogger's full
bridge measurement when a multiplier of 1 and an offset of 0 is used is the
measured bridge output in millivolts divided by the excitation in volts (1000
mV=1V):
1000 1000
Vout
⋅=⋅+−
Vin
R
g
⎜
RRRRR
⎝
g
3
2
+
12
⎟
⎠
4.5.1
The result is output in the units of millivolts output per volt of excitation
because the output voltage is small relative to the excitation voltage; these
units allow the result to be a larger number easier for the datalogger to display
and store (see data format discussion in the datalogger manual). The output is
a ratio because: 1) the datalogger's ratio metric measurement technique allows
this ratio to be more accurate than the measurement of the output voltage
(errors in the excitation and measured output cancel). 2) This ratio can be used
directly in the calculation of strain.
When strain is calculated, the direct ratio of the voltages (volts per volt not
millivolts per volt) will be used:
Vout
=
4.5.2
Vin
g
RRRRR
+
g
3
−
12
2
+
If the previous equation is taken as the result when the gage is unstrained, then
when the gage is strained it will change resistance by
. The equation for
g
the bridge output is:
Vout
=
Vin ++
strained
gg
RR RRRR
gg
3
−
Δ
2
+
12
4.5.3
37
Page 44

4WFBS120, 4WFBS350, 4WFBS1K 4 Wire Full Bridge Terminal Input Modules (TIM)
V
Δ
+
⋅
Δ
⋅
Δ
Δ
(
)
Δ=Δ
+
Δ=Δ
+
=Δ−24Δ
(
−Δ=
Δ
Δ
Subtracting the unstrained (zero) result from the strained result gives
Vout
Vin
⎞
⎟
⎠
⎛
=
V
⎜
r
⎝
Vout
Vin
⎞
⎟
⎠
unstrainedstrained
=
⎛
−
⎜
⎝
=
RR
gg
−
Δ++
RRR
ggD
RR
Δ×
gD
()()
The terminal input module is selected so that R
RR
V
=
r
Solving for strain:
++ ⋅ +
() 242()4
RR R
gg
gg
Δ Δ Δ
RR RR
g gg
=
24
VRV
24
rgrg
= Rg; Substituting Rg for RD:
D
RR
gg
2
+
gggggg
RVRR
grgg
RR
g
VRRVR
rggrg
=
RRRR
+
R
+
r
g
RR
+×Δ++
:
gD
4.5.4
RRRRR
gDggD
4.5.5
)
VRVR 214
rgrg
4
r
12VV
Strain is calculated by dividing equation 4.5.6 by the gage factor. The units are
converted to microstrain by multiplying by 10
με
−
⋅
410
=
GF V
−
12
()
R
g
=
R
r
g
4.5.6
6
uS/S.
6
V
r
r
10
=
GF R
6
R
g
⋅
g
4.5.7
38
Page 45

Page 46

Campbell Scientific Companies
Campbell Scientific, Inc. (CSI)
815 West 1800 North
Logan, Utah 84321
UNITED STATES
www.campbellsci.com • info@campbellsci.com
Campbell Scientific Africa Pty. Ltd. (CSAf)
PO Box 2450
Somerset West 7129
SOUTH AFRICA
www.csafrica.co.za • cleroux@csafrica.co.za
Campbell Scientific Australia Pty. Ltd. (CSA)
PO Box 444
Thuringowa Central
QLD 4812 AUSTRALIA
www.campbellsci.com.au • info@campbellsci.com.au
Campbell Scientific do Brazil Ltda. (CSB)
Rua Luisa Crapsi Orsi, 15 Butantã
CEP: 005543-000 São Paulo SP BRAZIL
www.campbellsci.com.br • suporte@campbellsci.com.br
Campbell Scientific Canada Corp. (CSC)
11564 - 149th Street NW
Edmonton, Alberta T5M 1W7
CANADA
www.campbellsci.ca • dataloggers@campbellsci.ca
Campbell Scientific Centro Caribe S.A. (CSCC)
300 N Cementerio, Edificio Breller
Santo Domingo, Heredia 40305
COSTA RICA
www.campbellsci.cc • info@campbellsci.cc
Campbell Scientific Ltd. (CSL)
Campbell Park
80 Hathern Road
Shepshed, Loughborough LE12 9GX
UNITED KINGDOM
www.campbellsci.co.uk • sales@campbellsci.co.uk
Campbell Scientific Ltd. (France)
3 Avenue de la Division Leclerc
92160 ANTONY
FRANCE
www.campbellsci.fr • info@campbellsci.fr
Campbell Scientific Spain, S. L.
Avda. Pompeu Fabra 7-9, local 1
08024 Barcelona
SPAIN
www.campbellsci.es • info@campbellsci.es
Please visit www.campbellsci.com to obtain contact information for your local US or International representative.
 Loading...