

Page 1
BUILT TO LAST
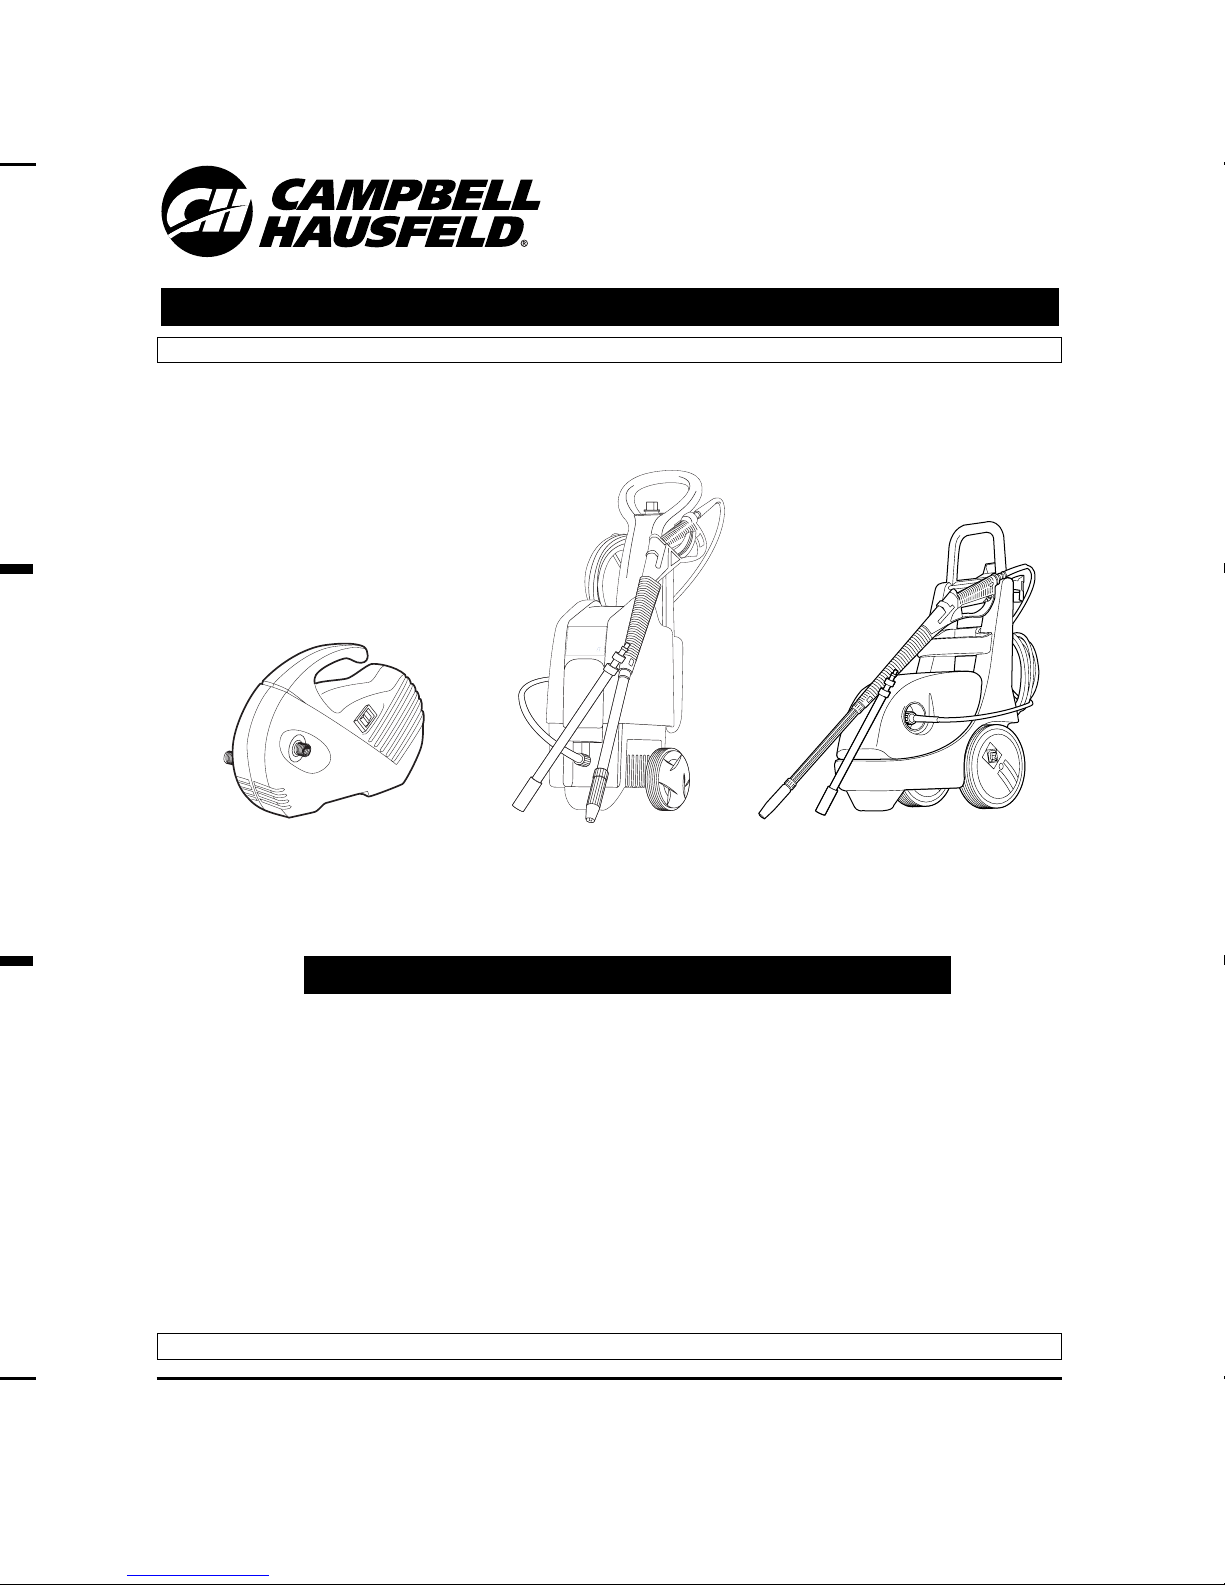
Electric Pressure
Washers
Operating Instructions
Carefully read and understand these instructions
before operating this pressure washer.
© 2003 Campbell Hausfeld
IN459000AV 10/03
1
8
5
0
P
S
I
P
r
e
s
s
u
r
e
W
a
s
h
e
r
1
.
9
G
P
M
Safety and Warning Information . . . . . . . . . . . . . . . 2 – 4
Pre-Operation . . . . . . . . . . . . . . . . . . . . . . . . . . . . . . 4 – 7
Operation, Shutdown and Storage. . . . . . . . . . . . . . 7 – 9
Troubleshooting Chart . . . . . . . . . . . . . . . . . . . . . 10 – 11
Warranty . . . . . . . . . . . . . . . . . . . . . . . . . . . . . . . . . . . . 12
Contents Page
1750 PSI
Pressure Washer
1.8 GPM
G
a
r
a
n
t
í
a
l
i
m
i
t
a
d
a
d
e
1
a
ñ
o
s
Limited
Warranty
G
a
r
a
n
t
i
e
l
i
m
i
t
é
e
d
e
1
a
n
s
E
C
P
For parts, product & service information
visit www.chpower.com
See Warranty on page 12 for important information about commercial use of this product.
REMINDER: Keep your dated proof of purchase for warranty purposes! Attach it to this manual or file it for safekeeping.
Page 2

Pressure Washers
2
Safety and Warning Information
www.chpower.com
Safety Guidelines
This manual contains information that is very
important to know and understand. This information is provided for SAFETY and to PREVENT EQUIPMENT PROBLEMS. To help recognize this information, observe the following
symbols.
Danger indicates an imminently hazardous situation which, if
not avoided, WILL result in death or
serious injury.
Warning indicates a
potentially hazardous situation which,
if not avoided, COULD result in death
or serious injury.
Caution indicates a potentially hazardous situation which, if
not avoided, MAY result in minor or
moderate injury.
NOTE:
Information that requires special atten-
tion.
Important Safety Instructions
SAVE THESE INSTRUCTIONS
When using this product, basic precautions
should always be followed, including the following:
1. Read all instructions before using the prod-
uct.
2. To reduce the risk of injury, close supervi-
sion is necessary when a product is used
near children.
3. ALWAYS disconnect power before disas-
sembling or repairing the unit.
4. Follow all safety codes as well as the
Occupational Safety and Health Act
(OSHA).
5. Ensure safety devices are operating proper-
ly before each use. DO NOT remove or
modify any part of the gun or unit.
6. Know how to stop this product and bleed
pressure quickly. Be thoroughly familiar
with the controls.
7. Stay alert – watch what you are doing.
8. Do not operate the product when fatigued
or under the influence of alcohol or drugs.
9. Keep operation area clear of all persons.
10. Do not overreach or stand on unstable
support. Keep good footing and balance
at all times.
11. Follow the maintenance instructions specified in the manual.
12. This product shall be connected to a
power supply receptacle protected by a
ground fault circuit interrupter (GFCI).
13. If product is provided with a GFCI, be sure
to inspect cord and GFCI prior to use. Any
repair or replacement of the power cord
must be performed by a qualified (licensed
or certified) electrical technician.
Risk of injection or severe
injury. Keep clear of nozzle. Do not
discharge streams at persons. This
product is to be used only by trained
operators. Always remove lance from
gun before cleaning debris from tip.
• Keep clear of nozzle. NEVER direct high
pressure spray at any person, animal or self.
• Always wear safety glasses or goggles and
protective clothing when operating or performing maintenance.
• Never put hand or fingers over the spray tip
while operating the unit.
•Never try to stop or deflect leaks with any
body part.
• Always engage the trigger safety latch in
the safe position when spraying is stopped
even if only for a few moments.
• Always follow detergent manufacturer’s
label recommendations for proper use of
detergents. Always protect eyes, skin, and
respiratory system from detergent use.
SERVICING OF A DOUBLE-INSULATED
APPLIANCE
In a double-insulated product, two systems of
insulation are provided instead of grounding.
No grounding means are provided for a dou-
!
WARNING
!
WARNING
!
WARNING
!
CAUTION
!
WARNING
!
DANGER
Garantía Limitada
1
. Duracion: De la fecha de compra por el comprador original y de acuerdo a las siguientes clasificaciones: Normas
(Standard Duty) – Un Año, Deber Serio (Serious Duty) - Dos Años, Deber Extremo (Extreme Duty) - Tres Años.
2. QUIEN OTORGA DA ÉSTA GARANTÍA (EL GARANTE): Campbell Hausfeld / Scott Fetzer Company, Harrison, Ohio,
45030, Teléfono: (800) 330-0712.
3. QUIEN RECIBE ÉSTA GARANTÍA (EL COMPRADOR): El comprador original (que no sea revendedor) de la
Lavadora de Presión Campbell Hausfeld.
4. PRODUCTOS CUBIERTOS POR ESTA GARANTÍA: Cualquier Lavadora de Presión Campbell Hausfeld fabricada o
distribuida por el garante.
5. LO QUÉ ÉSTA CUBIERTO POR ESTA GARANTÍA: Los defectos de material y/o de manufactura que ocurran dentro
del periodo de garantía con las excepciones anotadas abajo.
6. LO QUÉ NO ÉSTA CUBIERTO POR ESTA GARANTÍA:
A. Las garantías implícitas, incluyendo las garantías de comercialización y adecuación para un fin particular, son
limitadas a partir de la fecha de compra como se indica en el parrafo DURACIÓN. Si ésta lavadora de presión
es usada para trabajos comerciales, industriales o para renta, la garantía aplicada es de (90) días a partir de
la fecha de compra. En algunos estados no se permiten limitaciones a la duración de las garantías, en tal
caso esta limitacion no es aplicable.
B. CUALQUIER PERDIDA, DANO INCIDENTAL INDIRECTO O CONSECUENTE QUE PUEDE RESULTAR DE UN DEFEC-
TO, FALLA, O MALFUNCIONAMIENTO DE LA LAVADORA DE PRESIÓN CAMPBELL HAUSFELD. En algunos esta-
dos no se permiten la exclusión o limitación de daños incidentales o consecuentes y en tal caso esta limita-
cion o exclusión no es aplicable.
C. Cualquier falla que resulte por daños en la transportación, accidente, abuso, negligencia o incumplimiento
de las instrucciones de funcionamiento e instalacion indicadas en el manual suministrado con el producto.
D. El servicio al producto antes de la venta. Ejemplo ensamblaje, aceites o lubricantres, ajustes, etc.
E. Partes o ajestes requeridos normalmente en el mantenimiento de la lavadora de presión.
F. El motor de gasolina y sus componentes están expresamente excluídos de ésta garantía limitada. Estos com-
ponentes deben de ser devueltos por el comprador al fabricante original o a su taller de reparación autoriza-
do.
G. Partes adicionales no cubiertos en ésta garantía:
1. Desgaste normal en partes tales como mangueras de alta presión, sellos de agua o aceite, anillos, válvulas
y boquillas de spray.
2. Escobillas del motor (modelos eléctricos solamente).
3. Defectos esternos que no interfieren con su funcionamiento.
4. Componentes oxidados.
5. Desgaste de la bomba o daño de la válvula causado por uso de aceite inapropiado, contaminación del
aceite o por no seguir adecuadamente las recomendaciones de mantenimiento.
7. RESPONSABILIDADES DEL GARANTE BAJO ÉSTA GARANTÍA: Repare o reemplazar, como lo decida el garante, ya
sea la lavadora de presión o alguna de sus partes que se encuentre defectuoso, no funcione adecuadamente y/o
no cumpla de conformidad dentro del periodo de duración de la garantia.
8. RESPONSABILIDADES DEL COMPRADOR BAJO ESTA GARANTÍA:
A. Proporcionar prueba de la fecha de compra y registros de mantenimiento.
B. Entregar o enviar la lavadora de presión o su componente al centro de servicio autorizado Campbell
Hausfeld más cercano. Los costos de embarque, si son aplicables, serán pagados por el comprador.
C. Ser cuidadoso con el funcionamiento y mantenimiento de la lavadora de presión de acuerdo al manual(s) del
propietario.
9. CUANDO EFECTUARA EL GARANTE LA REPARACION O REEMPLAZO CUBIERTO POR ESTA GARANTÍA: La
reparación o reemplazo del equipo tomara el tiempo normal y de acuerdo a la carga de trabajo en ese momen-
to el el centro de servicio y de acuerdo a la disponibilidad de refacciones.
Esta garantía limitada es válida sólo en los EE.UU., Canadá y México y otorga derechos legales específicos. También
usted podría tener otros derechos los cuales varían de estado a estado o de país a país.
Lavadoras a Presión
Page 3
ble-insulated product, nor should grounding
means be added to the product. Servicing a
double-insulated product requires extreme
care and knowledge of the system, and should
be done only by qualified
service personnel.
Replacement parts for a
double-insulated product
must be identical to the
original parts. A doubleinsulated product is marked with the words
“Double Insulation” or “Double Insulated.”
Product may also be marked with symbol
shown in Figure 1.
Do not use pressure that
exceeds the operating pressure of any
of the parts (hoses, fittings, etc.) in
the pressurized system. Ensure all
equipment and accessories are rated
to withstand the maximum working
pressure of the unit.
Explosion hazard.
•NEVER spray flammable liquids or use pres-
sure washer in areas containing combustible
dust, liquids or vapors.
•Never operate this machine in a closed build-
ing or in or near an explosive environment
Do not spray electrical
apparatus and wiring.
•Never disconnect the high pressure discharge
hose from the machine while the system is
pressurized. To depressurize machine, turn
power and water supply off, then press gun
trigger 2-3 times.
•Never permanently engage the trigger mech-
anism on the gun.
•Never operate the machine without all com-
ponents properly connected to the machine
(handle, gun/wand assembly, nozzle, etc.).
Equipment damage.
•ALWAYS turn water supply “ON” before turn-
ing pressure washer “ON.” Running pump
dry causes serious damage.
•Do not operate the pressure washer with the
inlet water screen removed. Keep screen
clear of debris and sediment.
•NEVER operate pressure washer with broken
or missing parts. Check equipment regularly
and repair or replace worn or damaged
parts immediately.
•Use only the nozzle supplied with this
machine.
•Never leave the wand unattended while the
machine is running.
•Never attempt to alter factory settings.
Altering factory settings could damage the
unit and will void the warranty.
•Always hold gun and wand firmly when starting and operating the machine.
•NEVER allow the unit to run with the trigger
released (off) for more than one (1) minute.
Resulting heat buildup will damage pump.
•Pressure washer is not meant to pump hot
water. NEVER connect it to a hot water supply as it will significantly reduce the life of
the pump.
•NEVER store the pressure washer outdoors or
where it could freeze. The pump will be
seriously damaged.
•Release trigger when changing from high to
low pressure modes. Failure to do so could
result in damage
Keep hose away from
sharp objects. Bursting hoses may
cause injury. Examine hoses regularly
and replace if damaged. Do not
attempt to mend a damaged hose.
EXTENSION CORDS
If using an extension cord,
use only grounded, three wire extension
cords that are in good condition.
Use of an extension cord is not recommended. If
one is used, then use only wire sizes and lengths
shown in chart below.
Use only extension cords intended for outdoor
use. These are identified by the marking
“Acceptable for use with outdoor appliances;
store indoors while not in use.” Use only extension cords having an electrical rating equal to or
more than the rating of the product. Do not use
!
DANGER
!
CAUTION
!
WARNING
!
WARNING
!
WARNING
!
WARNING
3
Safety and Warning Information (Continued)
www.chpower.com
Figure 1 - Double
Insulated symbol
Page 4
Lavadoras a Presión
Guía de Diagnóstico de Averías
La lavadora a pre-
sión no se enciende.
La bomba no
alcanza la pre-
sión necesaria.
La presión
fluctúa.
El motor se
apaga inespe-
radamente.
Problema Posible(s) Causa(s) Acciones a Tomar
4
Safety and Warning Information (Continued)
www.chpower.com
damaged extension cords. Examine extension
cord before using and replace if damaged. Do
not abuse extension cord. Do not pull on the
cord to disconnect. Keep cord away from heat
and sharp edges. Always disconnect cord from
receptacle before disconnecting product from
extension cord.
Note: Do not use 16 or 18 AWG common
extension cords on this product.
Failure to follow these
instructions can result in serious
injury, including death.
To reduce the risk
of electrocution, keep all connections dry and off the
ground. Do not touch plug
with wet hands.
!
WARNING
!
DANGER
REFER TO ASSEMBLY INSTRUCTIONS FOR
ASSEMBLY, SET-UP AND
CONNECTION PROCEDURES
Pre-Operation
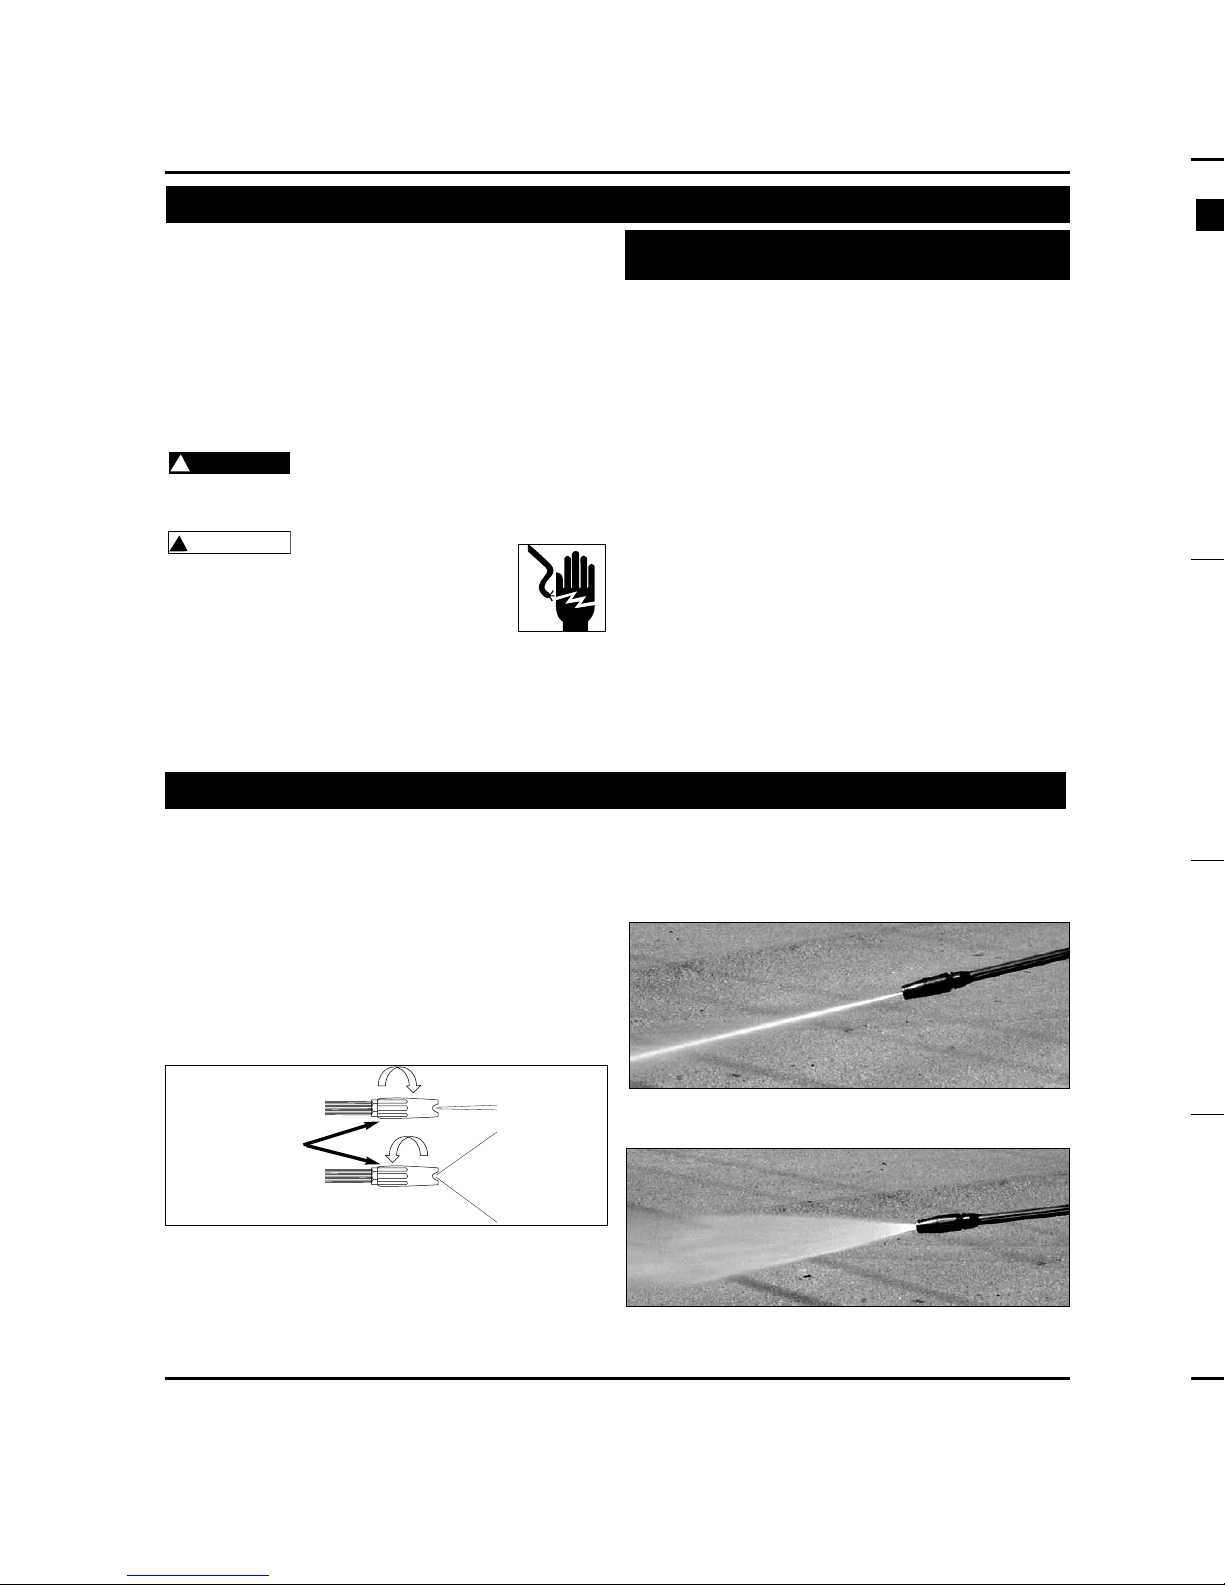
ADJUSTING FAN PATTERN
The angle of spray coming out of the lance
may be adjusted on some lances by rotating
the nozzle. This will vary the spray pattern
from approximately a 0˚ narrow high impact
stream to a 60˚ wide fan spray. (See Figure 2.)
A narrow stream has high impact force on the
cleaning surface and results in maximum deep
cleaning in a concentrated area. However, this
narrow high impact spray must be used cautiously, as it may damage some surfaces.
A wide fan pattern will distribute the impact
of the water over a larger area, resulting in
excellent cleaning action with a reduced risk
Figure 2 - Adjusting nozzle for fan pattern (not applicable on some nozzles)
Nozzle
Pressure Washers
Extension Allowable length
Cord size 25’ 50’
14 AWG Yes No
12 AWG Yes Yes
Figure 3 – Narrow high impact stream
Figure 4 – Wide fan pattern
Page 5
5
Pre-Operation (Continued)
www.chpower.com
of surface damage. Large surface areas can be
cleaned more quickly using a wide fan pattern.
ADJUSTABLE PRESSURE NOZZLE
(NOT INCLUDED WITH ALL MODELS)
The adjustable pressure nozzle allows you to
vary the pressure of your spray by turning the
blue end of the nozzle. Turning the blue end
fully clockwise will reduce the pressure to its
minimum. If the pressure washer has a detergent tank system you must use this minimum
pressure setting in order to suction detergent.
Turning the blue end fully counter-clockwise
will increase the pressure to its maximum for
greatest cleaning efficiency. Turning the blue
end changes the pressure but not the fan pattern.
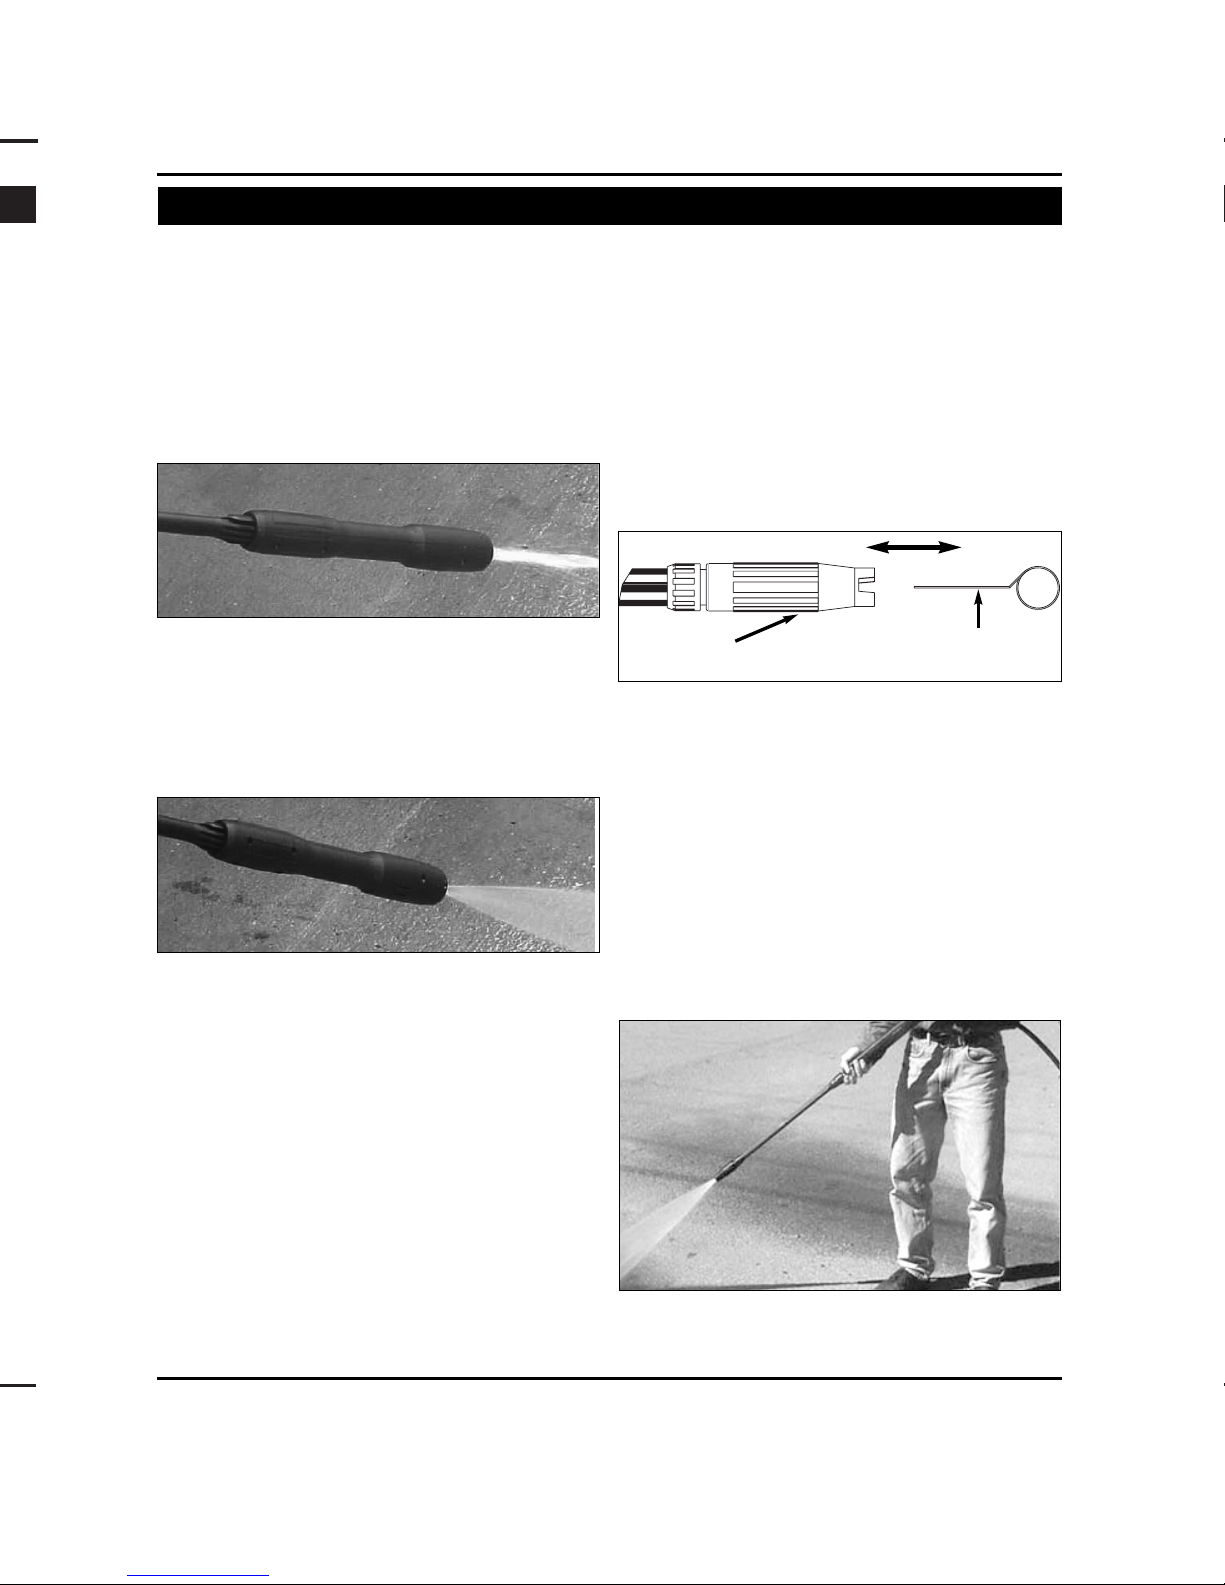
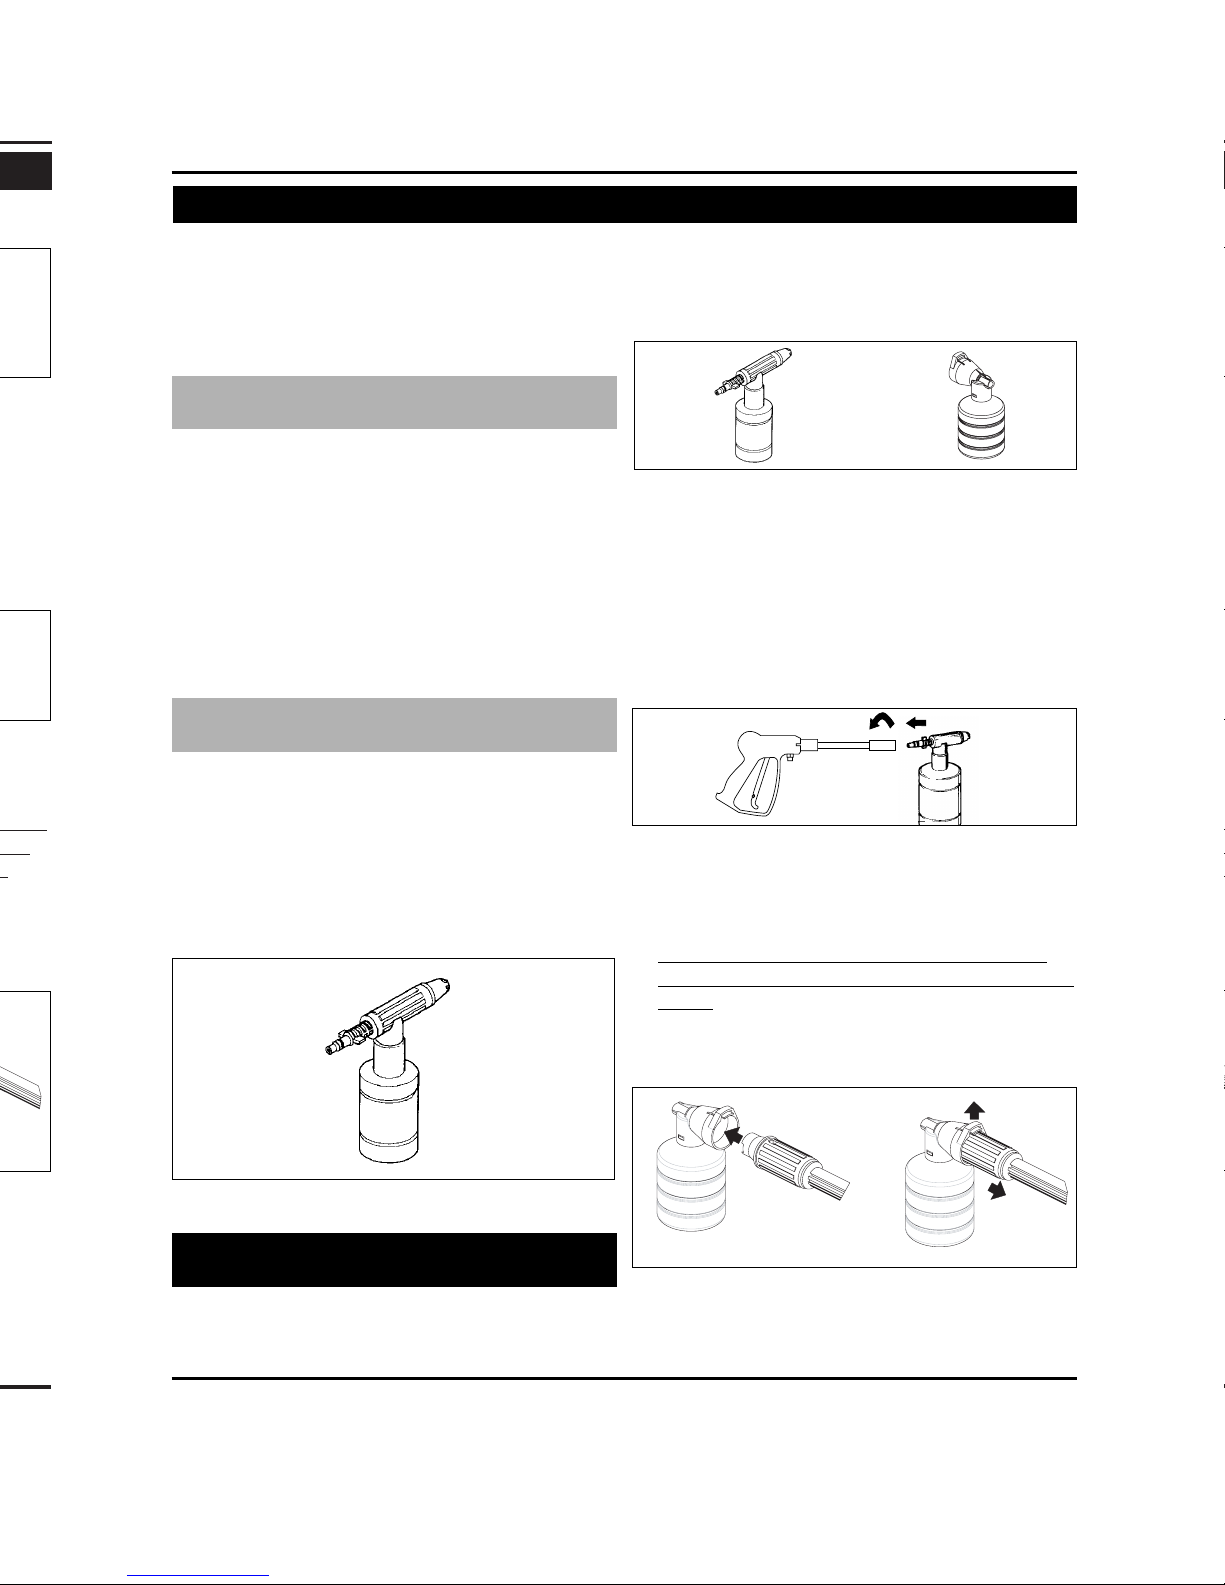
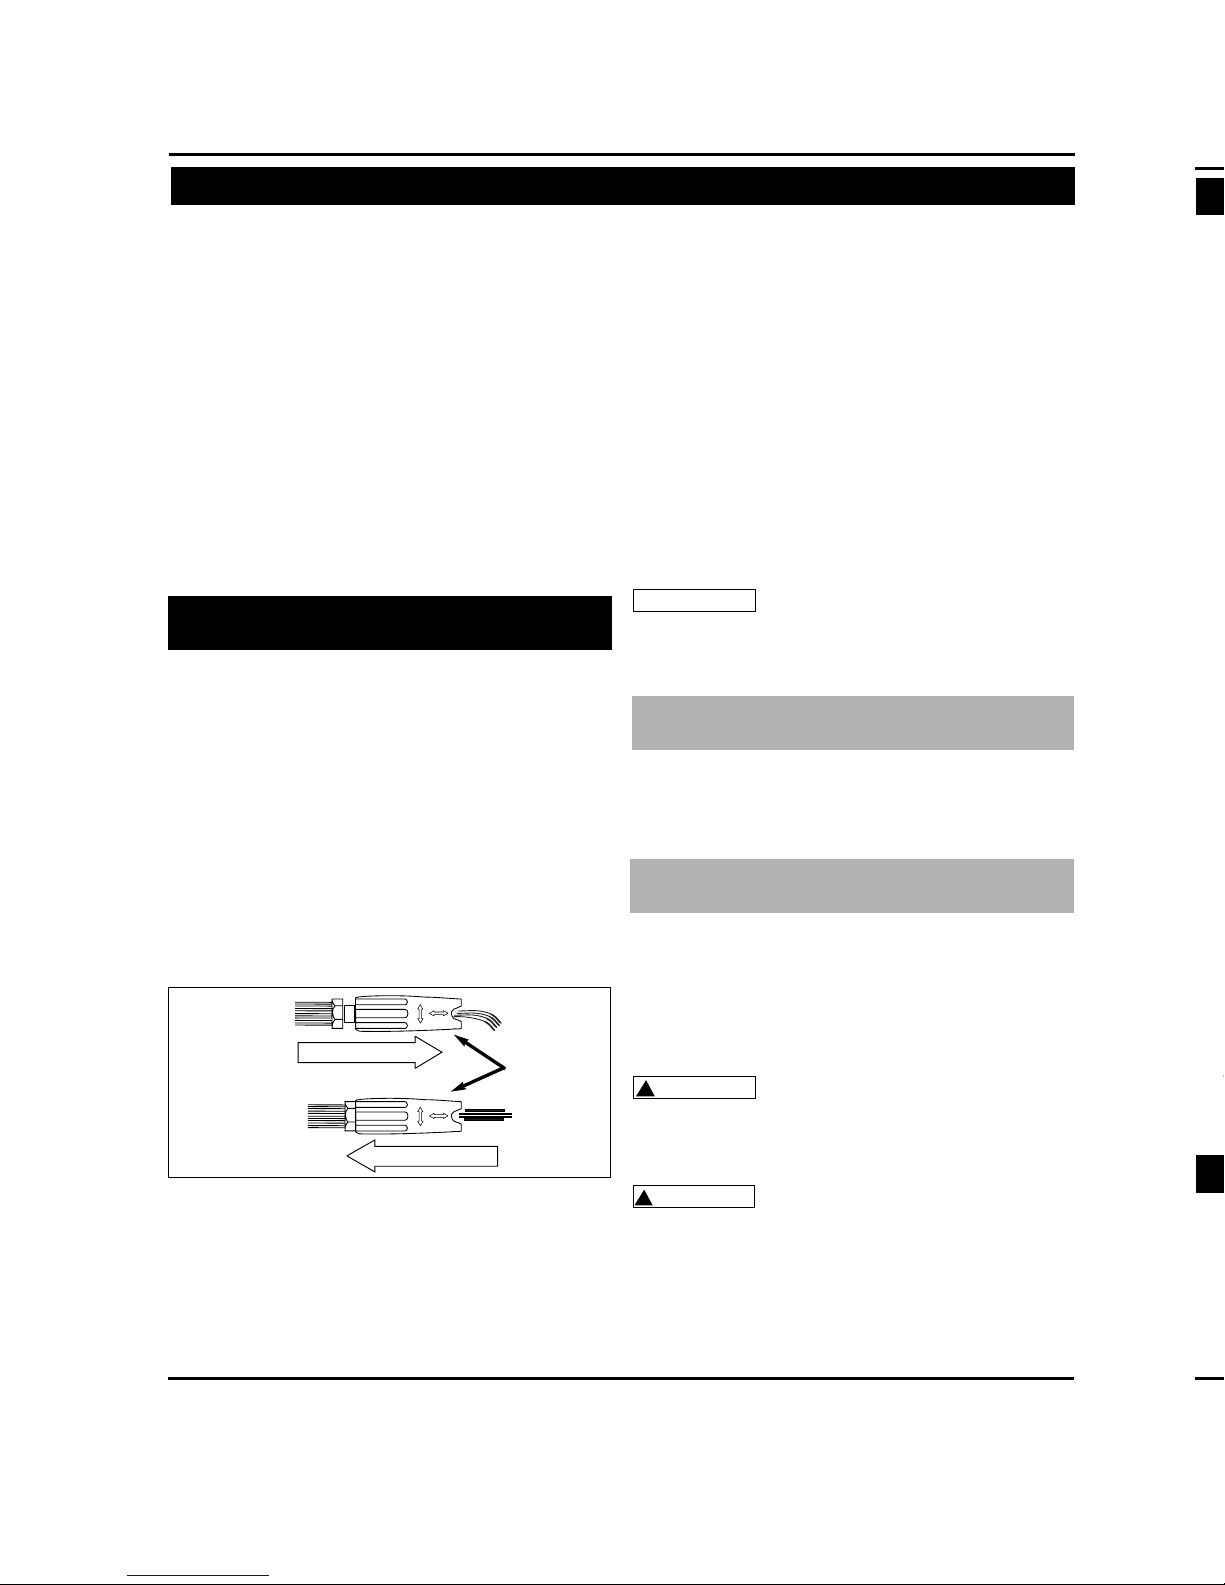
NOZZLE CLEANING INSTRUCTIONS
A clogged or partially clogged nozzle can
cause a significant reduction of water coming
out of the nozzle and cause the unit to pulsate
while spraying.
To clean out the nozzle:
•Turn off and unplug unit.
•Turn off water supply. Relieve any pressure
trapped in the hose by squeezing trigger 2-3
times.
• Separate lance from gun.
• Rotate nozzle to the narrow stream setting.
This opens up the fan blades.
• Using included tip cleaner, or an un-folded
paper clip, insert wire into the nozzle hole
and move back and forth until debris is dislodged. (See Figure 7.)
• Remove additional debris by back-flushing
water through the nozzle. To do this, place
end of a garden hose (with water running) to
end of nozzle for
30 – 60 seconds.
ANGLE TO THE CLEANING SURFACE
When spraying water against a surface, maximum impact is generated when the water
strikes the surface “head on." However, this
type of impact tends to cause dirt particles to
imbed in the surface, thereby preventing the
desired cleaning action.
The optimum angle for spraying water against
a cleaning surface is 45 degrees.
Figure 5 – Low Pressure Spray
Figure 6 – High Pressure Spray
Figure 7 – Insert tip cleaner in nozzle hole
and move back and forth until debris is dislodged.
Nozzle
Tip Cleaner
Figure 8 – Optimum Angle to Cleaning
Surface
Page 6

7. Deje que el detergente permanezca sobre la
superficie durante algunos minutos. Este es
un buen momento para usar un cepillo y cepil-
lar suavemente las áreas muy sucias. Nunca
deje que el detergente se seque sobre la
superficie de limpieza.
8.
Quite el aplicador de detergente de la pistola y
reemplácelo con la lanza, o quite el aplicador del
extremo de la lanza
9.
Enjuague el detergente de la superficie.
Nota: Lave el aplicador de detergente con un
chorro de agua limpia abundante después de
cada uso.
Siga las instrucciones del rÛtulo del fabricante
para combinar las concentraciones correctas
de jabÛn/detergente. La proporciÛn de
jabÛn/detergente y agua en la lavadora de
presiÛn debe ser cerca de 12% (1 a 8 partes).
ESTOS MODELOS NO NECESITAN UN
APLICADOR DE DETERGENTE
1. Retire la tapa del tanque de detergente y vier-
ta en su interior detergente para lavadora a
presión. Vuelva a poner la tapa.
2. Mueva el interruptor OFF/ON a la posición ON
(ENCENDIDO).
3. Corra la boquilla a la posición de baja presión
como se muestra en la figura 13, y aplique el
detergente de modo que cubra por completo
la superficie de limpieza.
Aplique el detergente de abajo hacia arriba
para evitar que el detergente se escurra para
abajo y cause vetas. Espere un par de minutos
para que el detergente afloje la mugre y la
Lavadoras a Presión
Operación (Continuación)
Unidades eléctricas con tanque de
detergente
Figura 13- Ajuste de la boquilla para presión
6
Pre-Operation (Continued)
www.chpower.com
Spraying water against a surface at this angle
provides for the most beneficial impact force
combined with efficient removal of debris from
the surface.
DISTANCE FROM CLEANING SURFACE
Another factor that determines the impact force
of the water is the distance from the spray nozzle to the cleaning surface. The impact force of
the water is increased as the nozzle is moved
closer to the surface.
HOW TO AVOID DAMAGING SURFACES
Damage to cleaning surfaces occurs because the
impact force of the water exceeds the durability
of the surface. The impact force can be varied by
controlling the three previously noted items.
Never use a narrow high impact stream or a
turbo/rotary nozzle on a surface that is susceptible to damage. Avoid spraying windows with a
narrow high impact stream or turbo nozzle as
this may cause breakage. The surest way to avoid
damaging surfaces is to follow these steps:
1.Before triggering the gun, adjust the nozzle to
a wide fan pattern.
2.Place the nozzle approximately 4-5 feet from
and 45 degrees to the cleaning surface, and
trigger the gun.
3.Vary the fan pattern spray angle and the distance to the cleaning surface until optimum
cleaning efficiency is achieved without damaging the surface.
TURBO NOZZLE (NOT INCLUDED WITH
ALL MODELS)
A turbo nozzle, sometimes referred to as a rotary
nozzle, is a very effective tool that can significantly reduce cleaning time. The turbo nozzle
combines the power of a narrow high impact
stream and the efficiency of a 25 degree fan pattern. This swirls the narrow high impact stream
into a cone shape that cleans a larger area.
Caution: Since a turbo nozzle uses a narrow
high impact stream, only use it in applications
where the cleaning surface cannot be damaged
by narrow high impact spray. Additionally, the
turbo nozzle is NOT adjustable and cannot be
used to apply detergent.
DETERGENTS
The use of detergents can dramatically reduce
cleaning time and assist in the removal of difficult stains. Some detergents have been customized for pressure washer use on specific
cleaning tasks. These detergents are approximately as thick as water. The use of thicker
detergents, such as dish soap, will clog the chemical injection system and prevent the application
of the detergent.
The cleaning power of detergents comes from
applying them to a surface and giving the chemicals time to break down the dirt and grime.
Detergents work best when applied at low pressure.
The combination of chemical action and high
pressure rinsing is very effective. On vertical surfaces, apply the detergent starting at the bottom
and work your way upward. This will prevent the
detergent from sliding down and causing
streaks. High pressure rinsing should also
progress from the bottom to top. On particularly
tough stains, it may be necessary to use a brush
in combination with detergents and high pressure rinsing.
Pressure Washers
Operation
The following cleaning procedure will help you
to organize your cleaning task, and ensure that
you achieve the most beneficial results in the
shortest amount of time. Remember to use the
spraying/ cleaning techniques previously listed.
Before starting a pressure washer cleaning job, it
is important to prepare the surface that is to be
cleaned. This is done by clearing the area of furniture, and making sure that all windows and
1. Surface Preparation
Page 7
-
7
Operation (Continued)
www.chpower.com
doors are closed tight. In addition, you should
make sure that all plants and trees adjacent to
the cleaning area are protected by a drop cloth.
This will ensure that your plants won’t be
sprayed by the detergents.
The next step is to spray the cleaning surface
with water to clear off any dirt or grime that
may have collected on the surface. This will allow
your detergent to attack the deep down dirt
that has worked its way into the cleaning surface. Before triggering the gun, adjust the nozzle to a wide fan pattern and slowly adjust to
the desired spray pattern. This will help you
avoid applying too much concentrated spray to
the surface which could cause damage.
USE THE INSTRUCTIONS APPROPRIATE
FOR MODEL PURCHASED
NOTE: Use only detergents formulated for pres-
sure washers.
NOTE: Test detergent in an inconspicuous area
before use.
Follow manufacturer's label directions for mixing
correct concentrations of soap/detergents. The
soap/detergent to water ratio through the pressure washer is approximately 5.4% (1 to 19).
MODELS WITHOUT DETERGENT TANK
1.Unscrew top of detergent applicator and fill
applicator with detergent.
2.Replace top on applicator.
3.Remove lance from gun.
4.Attach detergent applicator to gun. (See Figure
11.)
5.For detergent applicators that fit on end of
lance, turn lance to obtain wide fan pattern.
(Deter
gent suction will not work when
lance is adjusted to provide a narrow pattern.) Connect applicator to end of lance.
Make sure connection is secured correctly. (See
figure 12.)
2. Initial High Pressure Rinse
3. Detergent Application
Figure 9 – Detergent application
Units with Detergent Applicator
Included
Figure 10 – Detergent Applicators
OR
Figure 11 – Attach applicator to gun
Figure 12 – Turn lance to obtain wide fan
pattern.
Page 8
DISTANCIA DE LA SUPERFICIE DE
LIMPIEZA
Otro factor que determina la fuerza de impacto
del agua es la distancia entre la boquilla de rocia-
do y la superficie de limpieza. La fuerza de
impacto del agua aumenta a medida que se acer-
ca la boquilla a la superficie.
CÓMO EVITAR EL DAÑO A LAS
SUPERFICIES
El daño a las superficies de limpieza ocurre
debido a que la fuerza de impacto del agua
excede la durabilidad de la superficie. La fuerza
de impacto puede variarse controlando los tres
puntos ya mencionados. Nunca use un chorro
angosto de alto impacto o una boquilla
turbo/rotativa sobre una superficie susceptible al
daño. Evite rociar las ventanas con un chorro
angosto de alto impacto o con una boquilla
turbo, pues puede ocasionar roturas. La manera
más segura de evitar el daño a las superficies es
seguir estos pasos:
1. Antes de presionar el gatillo de la pistola,
ajuste la boquilla a un patrón en abanico
ancho.
2. Coloque la boquilla aproximadamente de 4 a
5 pies de la superficie de limpieza y en ángulo
de 45 grados con la misma, y presione el gatil-
lo.
3. Varíe el ángulo de rociado en abanico y la dis-
tancia a la superficie de limpieza, hasta lograr
una óptima eficiencia de limpieza sin dañar la
superficie.
BOQUILLA TURBO (NO INCLUIDA
CON TODOS LOS MODELOS)
Una boquilla turbo, a veces llamada boquilla
giratoria, puede ser una herramienta muy efi-
caz que puede disminuir el tiempo de limpieza
Lavadoras a Presión
Pre-Operación (Continuación)
Operación
El siguiente procedimiento de limpieza le ayu-
dará a organizar su trabajo de limpieza, y asegu-
rará que obtenga los resultados más beneficiosos
en el menor tiempo posible. No olvide utilizar las
técnicas de rociado/limpieza previamente indi-
cadas.
8
Operation (Continued)
www.chpower.com
Pressure Washers
6.Apply detergent so it thoroughly covers cleaning surface. Apply from bottom to top to prevent detergent from sliding down and streaking.
7.Allow detergent to remain on the surface for a
few minutes. This is a good time to use a
brush to lightly scrub heavily soiled areas.
Never allow detergent to dry on the cleaning
surface.
8.Remove detergent applicator from gun and
replace with the lance, or remove applicator
from end of lance.
9.Rinse detergent from surface.
Note: Flush detergent applicator with clear
water following each use.
Follow manufacturer's label directions for mixing
correct concentrations of soap/detergents. The
soap/detergent to water ratio through the pressure washer is approximately 12% (1 to 8).
MODELS THAT DO NOT USE A DETERGENT
APPLICATOR
1.Remove cap from detergent tank and pour in
pressure washer detergent. Replace cap.
2.Turn OFF/ON switch to the ON position.
3.Slide nozzle to low pressure position (See
Figure 13.) and apply detergent so that it
thoroughly covers the cleaning surface.
Apply detergent from bottom to top to prevent
the detergent from sliding down and streaking.
Wait a couple of minutes for the detergent to
break down dirt and grime. This is a good time
to use a brush to lightly scrub heavily soiled
areas. Never allow detergent to dry on cleaning
surface.
IMPORTANT: Unit will only apply detergent
when adjustable nozzle is used and nozzle is in
low pressure position.
•Detergent injection may not work with extension hose or replacement hoses longer than 25
feet.
4.To rinse or return to high pressure, release trigger and slide nozzle to high pressure position.
Never slide nozzle from low
to high or high to low pressure when
gun is triggered.
Start final rinse at bottom and work upward.
Make sure you thoroughly rinse the surface and
that all detergent has been removed.
1. Be sure all detergent is flushed from system.
2.Turn off motor.
3.Turn off water supply.
4.After motor and water supply are turned off,
trigger gun to depressurize system.
NEVER turn water supply
off before turning motor off. Serious
damage could occur to the pump and/or
motor.
NEVER disconnect high
pressure discharge hose from machine
while system is pressurized. To depressurize, turn motor off, turn water supply
off and squeeze gun trigger 2–3 times.
!
WARNING
!
CAUTION
NOTICE
Units with Detergent Tank
Low Pressure
High Pressure
Figure 13 – Adjusting nozzle for pressure
Nozzle
4. Final Rinse
5. Shutdown
Page 9

9
Operation (Continued)
www.chpower.com
5.After each use, wipe all surfaces of the pressure
washer with a clean, damp cloth.
• Do not store pressure washer outdoors.
• Do not store pressure washer where it might
freeze.
TIPS FOR EXTENDING THE LIFE OF YOUR
PRESSURE WASHER
1.Never operate unit without water.
2.Pressure washer is not meant to pump hot
water. Never connect to hot water supply –
this will significantly reduce life of the pump.
3.Using detergents other than Campbell
Hausfeld's brand may cause damage to pump
components (o-rings, seals, etc.). This also
applies to chemicals such as bleach, dish soap,
etc.
4.Never operate unit for more than one (1)
minute without spraying water. Resulting heat
buildup will damage pump.
5.Before adjusting nozzle for pressure (high-tolow or low-to-high) release trigger. Failure to
do so will reduce life of o-rings in lance.
6. Storage
Page 10

Lavadoras a Presión
Medidas de Seguridad y Advertencias (Continuación)
menor que los requisitos del aparato eléctrico. No
use cordones de extensión dañados. Examine el
cordón de extensión antes de usarlo y reempláce-
lo si está dañado. Tenga cuidado al manipular el
cordón de extensión y no lo hale para desconec-
tarlo. Mantenga el cordón lejos del calor y bordes
afilados. Siempre desconecte el cordón de exten-
sión del tomacorriente antes de desconectar la
hidrolavadora de la extensión. NOTA: Con este
producto no use las comunes cuerdas de exten-
siÛn 16 Û 18 AWG.
con estas instrucciones puede
ocasionar lesiones graves, incluso
la muerte.
!
PELIGRO
Pre-Operación
AJUSTE DEL PATRÓN DE ROCIADO EN
ABANICO
El ángulo de rociado que sale de la lanza se
puede graduar en algunas lanzas girando la
boquilla. Esto hará variar el patrón de rociado
desde aproximadamente un chorro angosto de
alto impacto de 0o hasta un abanico de rociado
de 600 de ancho (ver figura 2)
Un chorro angosto tiene una fuerza de alto
impacto sobre la superficie de limpieza y da
como resultado una limpieza máxima profunda
en una zona concentrada. Sin embargo, este
chorro angosto de alto impacto debe usarse con
precaución, pues puede dañar algunas superfi-
cies.
Un patrón en "abanico" ancho distribuye el
impacto del agua sobre un área mayor, lo que da
como resultado una excelente acción de limpieza
Figura 2 – Ajuste de la boquilla para el patrón de
rociado en abanico (no se aplica en algunas boquillas)
Boquilla
10
www.chpower.com
Pressure Washers
Pressure washer
does not start
up
Pump does not
reach necessary
pressure
Fluctuating
pressure
Motor stops
suddenly
1. Unit is pressurized
2. GFCI has tripped (If so
equipped)
3. Plug is not well connected
or electric socket is faulty
4. Extension cord too long or
wire size too small
5. Main voltage supply too low
6. Thermal safety switch has
tripped
1. Water inlet filter is clogged
2. Pump sucking air from hose
connections
3. Nozzle worn or not correct
size
4. Unloader clogged or worn
5. Valves clogged or worn
1. Pump sucking in air
2. Clogged nozzle
3. Valves dirty, worn or stuck
4. Water seals worn
1. Extension cord too long or
wire size too small
2. Thermal safety switch has
tripped due to overheating
1. Squeeze trigger on gun
2. Push reset button on plug
3. Check plug, socket and fuses
4. Remove extension cord (see
page 4)
5. Check that main supply voltage is adequate
6. Switch off unit and allow
motor to cool down
1. Clean water inlet filter
2. Check that connections and
locking ring are properly
tightened
3. Call 1-800-330-0712
4. Call 1-800-330-0712
5. Call 1-800-330-0712
1. Check that hoses and connections are tight
2. Clean with tip cleaner (see
page 5)
3. Call 1-800-330-0712
4. Call 1-800-330-0712
1. Remove extension cord (see
page 4)
2. Check that main supply voltage corresponds to specifications
Symptom Possible Cause(s) Corrective Action(s)
Troubleshooting Chart
Page 11

11
www.chpower.com
Pressure Washers
No detergent
suction – units
with tanks
No detergent
suction – units
with attachable
applicators
Unit begins to
smoke
1. Lance nozzle not in low pressure position
2. Using high pressure extension hose or high pressure
hose is too long
3. Injector clogged on pump
Detergent applicator clogged
Overheated, overloaded or
damaged motor
1. Slide lance nozzle into low
pressure position (see page 8)
2. Remove high pressure extension hose or use high pressure
hose shorter than 25 feet
3. Call 1-800-330-0712
1. Clean applicator with warm
water
2. Replace applicator
Turn off unit and call
1-800-330-0712
Symptom Possible Cause(s) Corrective Action(s)
Troubleshooting Chart
Page 12

Lavadoras a Presión
Medidas de Seguridad y Advertencias (Continuación)
cuando se use esta hidrolavadora, incluyendo las
siguientes:
1. Lea todas las instrucciones antes de usar la
hidrolavadora.
2. Para reducir el riesgo de lesiones, se necesita
una supervisión muy cercana cuando se use
la hidrolavadora cerca de niños.
3. SIEMPRE desconecte el suministro de fuerza
(unidades eléctricas) antes de desarmar o
reparar la unidad.
4. Siga todos los reglamentos de seguridad
locales así como la Ley de Seguridad y Salud
Ocupacional (“OSHA” en inglés).
5. Cerciórese de que los mecanismos de seguri-
dad estén funcionando debidamente antes
de cada uso. NO remueva o modifique
ninguna parte de la pistola o unidad.
6. Sepa como apagar la lavadora y liberar la
presión rápidamente. Familiarícese con
todos los controles.
7. Permanezca alerta. Esté consciente de lo que
está haciendo.
8. No opere esta hidrolavadora cuando esté
fatigado o bajo la influencia del alcohol o de
drogas.
9. Mantenga todas las personas alejadas del
área de trabajo.
10. No trate de alcanzar cosas que estén fuera
de su alcance ni se pare sobre una superficie
inestable. Manténgase siempre en buen
equilibrio, con sus pies sobre una superficie
segura.
11. Siga las instrucciones de mantenimiento
especificadas en los manuales.
12. Este producto debe conectarse a un toma-
corriente protegido por un interruptor de
circuito por fuga a tierra (sólo las lavadoras a
presión eléctricas).
13. Si el producto está provisto de un interrup-
tor de circuito por fuga a tierra, asegúrese
de inspeccionar dicho interruptor y el
cordón antes del uso. Cualquier reparación o
cambio del cordón de fuerza debe ser efec-
tuada por un técnico electricista calificado
(autorizado o certificado).
Limited Warranty
1. DURATION: From the date of purchase by the original purchaser as follows: Standard Duty - One Year, Serious
Duty - Two Years, Extreme Duty - Three Years.
2. WHO GIVES THIS WARRANTY (WARRANTOR): Campbell Hausfeld / Scott Fetzer Company, 100 Production Drive,
Harrison, Ohio, 45030, Telephone: (800) 330-0712
3. WHO RECEIVES THIS WARRANTY (PURCHASER): The original purchaser (other than for purposes of resale) of
the Campbell Hausfeld pressure washer.
4. WHAT PRODUCTS ARE COVERED UNDER THIS WARRANTY: Any Campbell Hausfeld Pressure Washer supplied or
manufactured by the Warrantor.
5. WHAT IS COVERED UNDER THIS WARRANTY: Substantial defects on material and workmanship which occur
within the duration of the warranty period with the exceptions noted below.
6. WHAT IS NOT COVERED UNDER THIS WARRANTY:
A.Implied warranties, including those of merchantability and FITNESS FOR A PARTICULAR PURPOSE ARE LIMIT-
ED FROM THE DATE OF ORIGINAL PURCHASE AS STATED IN THE DURATION. If this pressure washer is used
for commercial, industrial or rental purposes, the warranty will apply for ninety (90) days from the date of
purchase. Some States do not allow limitation on how long an implied warranty lasts, so the above limitations may not apply to you.
B. ANY INCIDENTAL, INDIRECT, OR CONSEQUENTIAL LOSS, DAMAGE, OR EXPENSE THAT MAY RESULT FROM
ANY DEFECT, FAILURE, OR MALFUNCTION OF THE CAMPBELL HAUSFELD PRESSURE WASHER. Some States do
not allow the exclusion or limitation of incidental or consequential damages, so the above limitation or
exclusion may not apply to you.
C. Any failure that results from shipping damage, accident, purchaser’s abuse, neglect or failure to install and
operate pressure washer in accordance with instructions provided in the owner’s manual(s) supplied with
product.
D.Pre-delivery service, i.e. assembly, oil or lubricants and adjustment.
E. Items or service normally required to maintain the pressure washer.
F. Gasoline engine and components are expressly excluded from coverage under this limited warranty. Such
components should be returned by the purchaser to the original manufacturer or to its authorized repair sta-
tions for service.
G. Additional items not covered under the warranty:
1. Normal wear items such as high pressure hoses, water and oil seals, o-rings, valves, lances and spray tips.
2. Motor brushes (Electric models only).
3. Cosmetic defects that do not interfere with functionality.
4. Rusted components.
5. Pump wear or valve damage caused by using improper oil, oil contamination or by failure to follow proper oil maintenance guidelines.
7. RESPONSIBILITIES OF WARRANTOR UNDER THIS WARRANTY: Repair or replace, at Warrantor’s option, pressure
washer or component which is defective, has malfunctioned and/or failed to conform within duration of the
warranty period.
8. RESPONSIBILITIES OF PURCHASER UNDER THIS WARRANTY:
A. Provide dated proof of purchase and maintenance records.
B. Deliver or ship the Campbell Hausfeld pressure washer or component to nearest Campbell Hausfeld
Authorized Service Center. Freight costs, if any, must be borne by the purchaser.
C. Use reasonable care in the operation and maintenance of the pressure washer as described in the owner’s
manual(s).
9. WHEN WARRANTOR WILL PERFORM REPAIR OR REPLACEMENT UNDER THIS WARRANTY: Repair or replacement
will be scheduled and serviced according to the normal work flow at the servicing location, and depending on
the availability of replacement parts.
This Limited Warranty applies in the U.S., Canada and Mexico only and gives you specific legal rights. You may
also have other rights which vary from state to state or country to country.
Pressure Washers
12
www.chpower.com
Page 13

BUILT TO LAST
Pulvérisateurs de
Lavage Électriques
Instructions d’Utilisation
Lire attentivement et comprendre les instructions suiv-
antes avant d’utiliser ce pulvérisateur de lavage
© 2003 Campbell Hausfeld IN459000AV 10/03
Généralités sur la Sécurité et Avertissements . . . . . . 2 – 4
Pré-Fonctionnement . . . . . . . . . . . . . . . . . . . . . . . . . 4 – 7
Fonctionnement, Arrêt et Entreposage . . . . . . . . . . 7 – 9
Guide de Dépannage . . . . . . . . . . . . . . . . . . . . . . 10 –11
Garantie . . . . . . . . . . . . . . . . . . . . . . . . . . . . . . . . . . . . 12
Table des Matières Page
1
8
5
0
P
S
I
P
r
e
s
s
u
r
e
W
a
s
h
e
r
1
.
9
G
P
M
1750 PSI
Pressure Washer
1.8 GPM
G
a
r
a
n
t
í
a
l
i
m
i
t
a
d
a
d
e
1
a
ñ
o
s
Limited
Warranty
G
a
r
a
n
t
i
e
l
i
m
i
t
é
e
d
e
1
a
n
s
E
C
P
Voir la Garantie à la page 11 Fr pour de l’information importante sur l’utilisation commercial de ce produit.
MÉMENTO: Gardez votre preuve datée d'achat à fin de la garantie!
Joignez-la à ce manuel ou classez-la dans un dossier pour plus de sécurité.
Page 14

Manque d’aspira-
tion de détergent
– modèles avec
applicateurs
amovibles
Modèle com-
mence à fumer
Symptôme Cause(s) Possible(s) Mesure(s) Corrective(s)
Guide De Dépannage
Garantie Limitée
1. DURÉE: À partir de la date d’achat par l’acheteur originel comme suit: Produits À Service Standard (Standard
Duty) - Un An, Produits À Service Sérieux (Serious Duty) - Deux Ans, Produits À Service Extrême (Extreme Duty) -
Trois Ans.
2. GARANTIE ACCORDÉE PAR (GARANT): Campbell Hausfeld / Scott Fetzer Company, 100 Production Drive,
Harrison, Ohio, 45030, Téléphone: (800) 330-0712
3. BÉNÉFICIAIRE DE CETTE GARANTIE (ACHETEUR): L’acheteur originel (sauf en cas de revente) du pulvérisateur
de lavage Campbell Hausfeld.
4. PRODUITS COUVERTS PAR CETTE GARANTIE: Tous les Pulvérisateurs de Lavage Campbell Hausfeld qui sont four-
nis ou fabriqués par le Garant.
5. COUVERTURE DE LA PRÉSENTE GARANTIE: Défauts de matière et de fabrication considérables qui se révèlent
pendant la période de validité de la garantie avec les exceptions indiquées ci-dessous.
6. LA PRÉSENTE GARANTIE NE COUVRE PAS:
A.Les garanties implicites, y compris celles de commercialisabilité et D’ADAPTION À UNE FONCTION PARTIC-
ULIÈRE SONT LIMITÉES À PARTIR DE LA DATE D’ACHAT INITIALE TELLE QU’INDIQUÉE DANS LA SECTION
DURÉE. Si le pulvérisateur de lavage est utilisé pour une fonction commerciale, industrielle ou pour la loca-
tion, la durée de la garantie sera quatre-vingt-dix (90) jours à compté de la date d’achat. Quelques Provinces
(États) n’autorisent pas de limitations de durée pour les garanties implicites. Les limitations précédentes peu-
vent donc ne pas s’appliquer.
B. TOUT DOMMAGE, PERTE OU DÉPENSE FORTUIT OU INDIRECT POUVANT RÉSULTER DE TOUT DÉFAUT, PANNE
OU MAUVAIS FONCTIONNEMENT DU PULVÉRISATEUR CAMPBELL HAUSFELD. Quelques Provinces (États) n’au-
torisent pas l’exclusion ni la limitation des dommages fortuits ou indirects. La limitation ou exclusion précé-
dente peut donc ne pas s’appliquer.
C. Toute panne résultant d’un accident, de dommage pendant l’expédition, d’une utilisation abusive, de la nég-
ligence ou d’une utilisation ne respectant pas les instructions données dans le(s) manuel(s) accompagnant le
produit.
D.Service avant livraison; montage, huile ou lubrifiants, et réglages par exemple.
E. Articles ou service normalement requis pour l’entretien du pulvérisateur de lavage.
F. Les moteurs à essence et les pièces détachées sont expressément exclus de cette garantie limitée. L’acheteur
doit retourner les pièces détachées du moteur à essence au fabricant originel ou à son centre de service
autorisé.
G. Articles additionnels qui ne sont pas couverts sous cette garantie:
1. Articles d’usure normal tels que; tuyaux haute pression, joints d’huile et hydrauliques, joints toriques,
soupapes, lances, et buses de pulvérisation.
2. Brosses de moteur (Modèles électriques seulement).
3. Les défauts esthétiques qui n’affectent pas la fonction.
4. Pièces détachées rouillées.
5. Usure de la pompe ou le dommage aux soupapes causé par l’utilisation de type d’huile incorrect, la con-
tamination de l’huile ou par le manque de suivre les directives d’entretien d’huile.
7. RESPONSABILITÉS DU GARANT AUX TERMES DE CETTE GARANTIE: Réparation ou remplacement, au choix du
Garant, du pulvérisateur de lavage ou de pièce détachée qui se sont révélés défectueux pendant la durée de la
garantie.
8. RESPONSABILITÉS DE L’ACHETEUR AUX TERMES DE CETTE GARANTIE:
A. Fournir une preuve d’achat datée et un état d’entretien.
B. La livraison ou expédition du pulvérisateur de lavage ou pièce détachée Campbell Hausfeld au Centre De
Service Autorisé Campbell Hausfeld. Taux de frais, si applicables, sont la responsabilité de l’acheteur.
C. Utilisaton et entretien du pulvérisateur de lavage avec un soin raisonable, ainsi que le décri(vent)t le(s)
manuel(s) d’utilisation.
9. RÉPARATION OU REMPLACEMENT EFFECTUÉ PAR LE GARANT AUX TERMES DE LA PRÉSENTE GARANTIE: La
réparation ou le remplacement sera prévu et exécuté en fonction de la charge de travail dans le centre de serv-
ice et dépendra de la disponabilité des pièces de rechange.
Cette Garantie Limitée s’applique aux É.-U., au Canada et au Mexique seulement et vous donne des droits juridiques
précis. L’acheteur peut également jouir d’autres droits qui varient d’une Province, d’un État ou d’un Pays à l’autre.
Généralités sur la Sécurité et Avertissements
Généralités Sur La Sécurité
Ce manuel contient de l’information qui est très
importante à connaître et à comprendre. Cette
information est fournie pour LA SÉCURITÉ et pour
ÉVITER DES PROBLÈMES D’ÉQUIPEMENT. Pour
vous aider à reconnaître cette information,
observer les symboles suivants:
Danger indique une
situation hasardeuse qui RÉSULTERA en
perte de vie ou en blessures graves.
Avertissement
indique une situation hasardeuse potentielle qui PEUT résulter en perte de vie
ou en blessures graves.
Attention indique
une
situation hasardeuse potentielle qui
PEUT résulter en blessures.
REMARQUE: Informations spéciaux.
Instructions de Sécurité Importantes
CONSERVER CES INSTRUCTIONS
Il est nécessaire de suivre des précautions
générales pendant l’utilisation de ce produit y
compris les suivantes:
1. Lire toutes les instructions avant d’utiliser le
produit.
2. Il est nécessaire de bien surveiller les enfants
si le produit est utilisé près d’eux afin de
réduire le risque de blessure.
3. TOUJOURS débrancher la source d’alimenta-
tion (modèles électriques) avant de démonter ou de réparer le modèle.
4. Respecter tous les codes locaux de sécurité
ainsi que le Occupational Safety and Health
Act (OSHA).
5. S’assurer que les appareils de sécurité fonc-
tionnent correctement avant chaque usage.
NE PAS enlever ni modifier aucune partie
du pistolet ou du modèle.
6. Savoir arrêter ce produit et purger la pres-
sion rapidement. Bien se familiariser avec
les commandes.
7. Soyez alerte - faites attention à ce que vous
faites.
8. Ne pas faire fonctionner ce produit lorsque
vous êtes fatigués ni sous l’influence de
drogues ou d’alcool.
9. Garder l’endroit de travail libre d’autres personnes.
10. Ne pas s’étendre le bras ni se tenir debout
sur un support instable. Toujours rester bien
équilibré.
11. Suivre toutes les instructions d’entretien spécifiées dans les manuels.
12. Ce produit sera branché à une prise de
courant protégée par un appareil DDFT (disjoncteur qui protège contre un dérangement dû à une mise accidentelle à la terre).
13. Si le produit est fourni d’un DDFT, s’assurer
d’inspecter le cordon et l’appareil DDFT
avant l’usage. Toutes réparations et remplacement du cordon d’alimentation doivent
être effectués par un technicien qualifié (certifié ou diplômé).
Risque d’injection
ou de blessure grave -Se tenir à l’écart
de la buse - Ne pas diriger le jet vers
une autre personne ni vers un animal Seules les personnes qualifiées doivent
se servir du produit. Toujous enlever la
lance du pistolet avant de nettoyer le
débris du bout.
• Se tenir à l’écart de la buse. NE JAMAIS diriger
un jet haute pression vers une personne, un
animal, ni vers soi-même.
•Toujours porter des lunettes de sécurité et des
vêtements protecteurs pendant l’utilisation
ou l’entretien.
• Ne jamais se mettre la main ni les doigts sur
la buse lorsque le modèle est en marche.
• Ne jamais essayer d’arrêter ni de faire dévier
les fuites avec n’importe quelle partie du
corps.
•Toujours engager le mécanisme de sécu
rité
!
AVERTISSEMENT
!
AVERTISSEMENT
!
ATTENTION
!
AVERTISSEMENT
!
DANGER
2 Fr
Page 15

Pulvérisateurs de Lavage
3 Fr
Information de Sécurité et Avertissements (Suite)
de gâchette dans la position de sécurité
lorsque la pulvérisation est arrêtée même
pour quelques moments.
•Toujours suivre les recommandations du fabricant sur l’étiquette du produit détersif pour
assurer l’usage correct. Toujours se protéger
les yeux, la peau et le système respiratoire
contre le détergent.
ENTRETIEN D’UN APPAREIL À
DOUBLE ISOLATION
Dans un appareil à double isolation, deux systèmes d’isolation sont fournis à la place d’une
mise à la terre. Aucun système de mise à la terre
n’est fourni sur un appareil à double isolation et
aucun moyen de mise à la terre ne doit y être
ajouté. Faire l’entretien d’un appareil à double
isolation demande des soins attentifs et une connaissance parfaite du système et ne sera exécuté
que par des personnes compétentes. Les pièces
de rechange pour un appareil à double isolation
doivent être identiques aux
pièces qu’elles remplacent.
Un appareil à double isolation doit porter l’inscription
“DOUBLE ISOLATION”
(Double Insulated). Le symbole peut aussi se trouver
sur l’appareil.
Ne pas utiliser une
pression qui dépasse la pression de service de n’importe quelle pièce détachée
(tuyaux, raccords, etc.) dans le système
pressurisé. S’assurer que tout
l’équipement et les accessoires soient
classifiés pour la pression de service
maximum du modèle.
Risque d’explosion.
• NE JAMAIS pulvériser des liquides inflamma-
bles, ni utiliser le pulvérisateur de lavage là où
il y a de la poussière, liquides ou vapeurs com-
bustibles.
• Ne jamais faire fonctionner cette machine
dans un bâtiment clos ni dans un environnement explosif.
Ne pas pulvériser les
appareils électriques ni le câblage
• Ne jamais débrancher le tuyau de décharge de
haute pression du modèle pendant que le système soit pressurisé. Pour dépressuriser le modèle, mettre hors circuit et couper l’eau.
Appuyer sur la gâchette du pistolet 2-3 fois.
• Ne jamais engager le mécanisme de gâchette
sur le pistolet de façon permanente.
•Ne jamais faire fonctionner la machine si
toutes les pièces détachées ne sont pas fixées
correctement au modèle. (manche, montage
de pistolet/baguette buse, etc.)
Dégâts d’équipement
•TOUJOURS alimenter la source d’eau “ON”
avant de mettre le pulvérisateur de lavage en
marche “ON.” Le fonctionnement de la
pompe à sec causera le dommage sérieux.
•Ne pas faire fonctionner le pulvérisateur de
lavage sans filtre d’arrivée d’eau. Garder le filtre libre de débris et de sédiment.
• NE JAMAIS faire fonctionner le pulvérisateur
de lavage avec des pièces manquantes ou
cassées. Inspecter l’équipement régulièrement
et remplacer les pièces usées ou endommagées immédiatement.
•Utiliser seulement la buse fournie avec cette
machine.
• Ne jamais laisser la baguette sans surveillance
pendant que la machine fonctionne.
• Ne jamais essayer de modifier les réglages de
l’usine. Modifier les réglages de l’usine pourrait endommager le modèle et niera la
garantie.
•Toujours tenir le pistolet et la baguette fermement pendant le démarrage et le fonctionnement de la machine.
• NE JAMAIS permettre que le modèle fonctionne avec la gâchette relâchée (off) pendant
!
AVERTISSEMENT
!
AVERTISSEMENT
!
AVERTISSEMENT
!
AVERTISSEMENT
!
AVERTISSEMENT
Figure 1 – Symbol
Double Isolation
Page 16

Pulvérisateurs de Lavage
fonctionnera pas avec les tuyaux prolonga-
teurs ou les tuyaux de rechange qui sont plus
longs que 25 pieds.
4. Pour rincer ou pour retourner à la position
haute pression, relâcher la gâchette et glisser
la buse à la position haute pression.
buse de bas à haut ou de haut à bas
lorsque la gâchette est actionnée.
Le rinçage final devrait commencer du bas en
haut. S’assurer de bien rinçer la surface afin
d’enlever tout le détergent.
1. S’assurer que tout le détergent soit purgé du
système.
2. Mettre le moteur hors circuit (off).
3.Couper la source d’eau.
4. Une fois que le moteur et la source d’eau
soient coupés, actionner la gâchette pour
dépressuriser le système.
source d’eau avant de mettre le moteur
hors circuit. Ceci peut endommager la
pompe et/ou le moteur.
débrancher le tuyau de décharge
haute pression de la machine pendant
que le système soit pressurisé. Pour
dépressuriser le système, mettre le
moteur hors circuit (off), couper la
source d’eau et actionner la gâchette 2-3
fois.
!
AVERTISSEMENT
!
ATTENTION
AVIS
4. Rinçage Final
5. Arrêt
4 Fr
plus qu’une minute. L’accumulation de la
chaleur endommagera la pompe.
• Le pulvérisateur de lavage n’est pas conçu
pour pomper l’eau chaude. NE JAMAIS
brancher le pulvérisateur à une source d’eau
chaude. Ceci pourrait diminuer la durée de
la pompe de façon spectaculaire.
• NE JAMAIS entreposer le pulvérisateur de
lavage dehors ni là où il peut geler. La
pompe sera endommagée de façon sérieuse.
• Relâcher la gâchette lorsque vous changez du
mode pression haute au mode pression
basse. Sinon vous risquez d’endommager
la buse.
Garder le tuyau à l’écart d’objets pointus. Les tuyaux qui
éclattent peuvent causer des blessures.
Inspecter les tuyaux régulièrement et
les remplacer si endommagés. Ne pas
essayer de réparer un tuyau endommagé.
CORDONS PROLONGATEURS
Si vous utilisez un
cordon prolongateur, utiliser seulement des cordons prolongateurs mis à
la terre, à trois broches et en bon état
de marche.
L’utilisation d’un cordon prolongateur n’est pas
recommandé. Si vous utilisez un cordon prolongateur, consultez le tableau ci-dessous et utilisez
seulement les tailles et longueurs recommandées.
Utiliser seulement les cordons prolongateurs
conçus pour l’usage à l’extérieur. Ceux-ci sont
indiqués “Acceptable pour l’usage avec appareils
à l’extérieur; ranger à l’intérieur si hors usage”.
Utiliser seulement les cordons prolongateurs avec
une classification électrique égale ou supérieure à
la classification du produit. Ne pas utiliser un cordon prolongateur endommagé. Inspecter le cordon prolongateur avant chaque usage et le remplacer si endommagé. Ne pas abuser le cordon
prolongateur. Ne pas tirer sur le cordon pour
débrancher l’appareil. Garder le cordon à l’écart
de la chaleur et des bords tranchants. Toujours
débrancher le cordon de la prise de courant
avant de débrancher le produit du cordon prolongateur.
Remarque: Ne pas utiliser des cordons prolongateurs ordinaires de 16 ou 18 AWG avec ce produit.
Manque de suivre
ces instructions peut résulter en
blessures graves, y compris la mort.
Pour
réduire le risque de secousse
électrique, garder tous les raccordements secs et au dessus
de la terre. Ne touchez pas la
fiche avec les mains trempes.
RÉGLAGE DE CONFIGURATION
!
AVERTISSEMENT
!
DANGER
!
DANGER
!
ATTENTION
Information de Sécurité et Avertissements (Suite)
Taille de Cordon Longeur permise
Prolongateur 7,7 m 15,2 m
14 AWG Oui Non
12 AWG Oui Oui
SE RÉFÉRER AUX INSTRUCTIONS DE
MONTAGE POUR LES MÉTHODES DE
MONTAGE ET DE BRANCHEMENT
Pré-Fonctionnement
L’angle du jet de pulvérisation de la lance peut
être réglé (sur quelques types de lances) en
tournant la buse. Ceci pourra régler la configuration de pulvérisation d’un jet de chute puissant étroit 0˚ à une configuration évantail
large de 60˚. (Voir Figure 2).
Un jet étroit a une force à impact élevé sur la
surface de nettoyage et peut nettoyer à font
dans un endroit concentré. Utiliser ce jet avec
précaution, il peut endommager certaines surfaces.
Une configuration large “Évantail” distribue
Page 17

Pulvérisateurs de Lavage
5 Fr
Pré-Fonctionnement (Suite)
l’impact de l’eau à travers un endroit plus large
et nettoie bien avec moins de risque de dommage à la surface. Nettoyez les surfaces larges
plus rapidement avec une configuration évantail
large.
BUSE DE PRESSION AJUSTABLE (NON
INCLUSE AVEC TOUS LES MODÈLES)
La buse de pression ajustable vous permet de
varier la pression de votre pulvérisation en
tournant l'extrémité bleue de la buse. Tourner
l'extrémité bleue entièrement dans le sens des
aiguilles d'une montre réduira la pression au
minimum. Si le pulvérisateur de lavage a un
système à réservoir de détergent, vous devez
utiliser ce réglage de pression minimum pour
aspirer le détergent.
Tourner l'extrémité bleue entièrement dans le
sens contraire des aiguilles d'une montre augmentera la pression à son niveau maximum
d'efficacité de nettoyage. Tourner l'extrémité
bleue change la pression, mais non pas le
motif en éventail.
INSTRUCTIONS DE NETTOYAGE DE LA
BUSE
Une buse obstruée pourrait diminuer le volume d’eau que sort de la buse et pourrait
causer la vibration du modèle pendant la pulvérisation.
Pour nettoyer la buse:
• Mettre le modèle hors service (off) et
débrancher le modèle.
• Couper la source d’eau. Dissiper la pression
du tuyau en serrant la gâchette 2-3 fois.
• Détacher la lance du pistolet.
•Tourner la buse au réglage de jet afin d’ouvrir les lames de l’évantail.
• Utiliser le nettoyeur de bout (compris) ou
une trombone, introduire le fil dans le trou
de la buse et le dépacer avec un mouvement
avant-arrière afin de déloger l’obstruction.
(Voir Figure 7.)
• Faire la chasse d’eau inverse en plaçant le
bout d’un tuyau d’arrosage (avec l’eau qui
coule) contre le bout de la buse pendant 30-
Figure 2 - Réglage de la buse pour configuration évantail (applicable selon le
modèle)
Buse
Figure 3 – Jet étroit à impact élevé
Figure 4 – Configuration évantail large
Figure 5 – Pulvérisation basse pression
Figure 6 – Pulvérisation haute pression
Page 18

Pulvérisateurs de Lavage
Pré-Fonctionnement (Suite)
Fonctionnement
L’utilisation des détergents tels que le savon à
vaiselle peut obstruer le système d’injection de
produit chimique et peut empêcher l’application
du détergent.
La puissance de nettoyage des détergents est
dérivée de l’application du produit à la surface et
le temps que le produit décompose la saleté.
Pour un meilleur résultat, les détergents
devraient être appliqués avec une pression basse.
Utiliser la méthode de nettoyage suivante
pour organiser votre application de nettoyage
et pour assurer un bon résultat en moins de
temps. Utiliser les techniques indiquées
précédemment.
Préparer la surface avant de commencer la pul-
vérisation. Enlever tous les meubles et s’assurer
que toutes les fenêtres et les portes soient
bien fermées. Protéger toutes les plantes et les
arbres qui sont situés près de la surface avec
une toile afin d’éviter qu’ils soient pulvérisés
de détergent.
La prochaine étape est de pulvériser la surface
avec de l’eau afin d’enlever la saleté de sur-
face. Ceci permet que le détergent nettoie la
saleté qui est sous la surface. Avant d’action-
ner le pistolet, régler la buse à une configura-
tion évantail large et régler lentement à la
configuration désirée. Ceci aide à empêcher
trop de pulvérisation concentrée sur la surface
(ce qui peut causer du dommage).
UTILISER LES INSTRUCTIONS CONVEN-
ABLES AU MODÈLE UTILISÉ
REMARQUE: Utiliser seulement les détergents
formulés pour les pulvérisateurs de lavage.
REMARQUE: Faire l’essai du détergent dans un
1. Préparation de la Surface
2. Premier Rinçage Haute Pression
3. Application de Détergent
6 Fr
Pré-Fonctionnement (Suite)
60 secondes afin d’enlever du débris additionnel.
ANGLE À LA SURFACE
Lors de la pulvérisation d’eau sur une surface,
l’impact maximum est produite lorsque l’eau
fait contact à la surface directement, mais ce
type de contact peut causer le collage de particules de saleté à la surface ce qui empêche le nettoyage à fond.
L’angle de pulvérisation optimum d’eau contre
une surface propre est 45 degrés.
La pulvérisation d’eau contre une surface à cet
angle fournit l’impact la plus efficace pour l’enlevage de débris de la surface.
DISTANCE DE LA SURFACE
Un autre facteur qui détermine la force d’impact
de l’eau est la distance de pulvérisation de la
buse à la surface. La force d’impact de l’eau est
augmentée quand la buse s’approche à la surface.
EMPÊCHER LE DOMMAGE AUX SURFACES
Les surfaces peuvent s’endommager si la force
d’impact de l’eau dépasse la durabilité de la surface. La force d’impact est variable et peut être
réglée avec le contrôle des trois articles précédents. Ne jamais utiliser un jet étroit à impact
élevé ni une buse Turbo/rotative sur une surface
sensible au dommage. Éviter la pulvérisation des
fenêtres avec un jet étroit à impact élevé car ceci
peut les casser. Suivre les étapes suivantes afin
d’éviter le dommage aux surfaces:
1. Avant d’actionner le pistolet, régler la buse à
une configuration évantail large.
2. Placer la buse approximativement 1,2-1,5 m
de/et 45 degrés à la surface, et appuyer sur la
gâchette du pistolet.
3. Régler l’angle de la configuration de pulvérisation évantail ainsi que la distance à la surface
jusqu’à ce que le degré de nettoyage désiré
soit atteint sans endommager la surface.
BUSE TURBO (PAS COMPRISE AVEC
TOUS LES MODÈLES)
Une buse turbo (rotative), peut être un outil efficace qui réduit le temps de nettoyage d’une
manière significative. La buse turbo mélange la
puissance de nettoyage d’un jet étroit à impact
élevé avec l’efficacité d’une configuration évantail de 25 degrés. La buse fait tournoyer un jet
étroit à impact élevé dans une configuration
conique qui peut nettoyer un endroit plus large.
Attention: Puisque la buse turbo utilise un jet
étroit à impact élevé, l’utiliser seulement dans les
applications où la surface ne peut être endommagée par la pulvérisation à jet étroit à impact
élevé. La Buse Turbo n’est PAS réglable et ne
peut pas être utilisée pour l’application de détergent.
DÉTERGENTS
L’usage de détergents peut réduire de façon
spectaculaire, le temps de nettoyage et peut
aider à enlever les taches difficiles. Plusieurs
détergents sont formulés pour les tâches de nettoyage spécifiques avec les pulvérisateurs de
lavage. Ces détergents ont la consistance d’eau.
Figure 8 – Angle à la Surface
Figure 7 – Introduire le nettoyeur dans le
trou de la buse et déplacer avec un mouvement avant-arrière afin de déloger l’obstruction.
Buse
Nettoyeur de buse
Page 19

Pulvérisateurs de Lavage
7 Fr
Pré-Fonctionnement (Suite)
Fonctionnement
L’utilisation des détergents tels que le savon à
vaiselle peut obstruer le système d’injection de
produit chimique et peut empêcher l’application
du détergent.
La puissance de nettoyage des détergents est
dérivée de l’application du produit à la surface et
le temps que le produit décompose la saleté.
Pour un meilleur résultat, les détergents
devraient être appliqués avec une pression basse.
La combinaison d’action chimique et de rinçage
haute pression est très efficace. Sur les surfaces
verticales, appliquer le détergent du fond en
haut, Ceci empêchera les traînées de détergent.
Le rinçage haute pression devrait aussi s’appliquer du fond en haut. Pour les taches très difficiles, il peut être nécessaire d’utiliser une brosse
avec les détergents et le rinçage haute pression.
Utiliser la méthode de nettoyage suivante
pour organiser votre application de nettoyage
et pour assurer un bon résultat en moins de
temps. Utiliser les techniques indiquées
précédemment.
Préparer la surface avant de commencer la pulvérisation. Enlever tous les meubles et s’assurer
que toutes les fenêtres et les portes soient
bien fermées. Protéger toutes les plantes et les
arbres qui sont situés près de la surface avec
une toile afin d’éviter qu’ils soient pulvérisés
de détergent.
La prochaine étape est de pulvériser la surface
avec de l’eau afin d’enlever la saleté de surface. Ceci permet que le détergent nettoie la
saleté qui est sous la surface. Avant d’actionner le pistolet, régler la buse à une configuration évantail large et régler lentement à la
configuration désirée. Ceci aide à empêcher
trop de pulvérisation concentrée sur la surface
(ce qui peut causer du dommage).
UTILISER LES INSTRUCTIONS CONVENABLES AU MODÈLE UTILISÉ
REMARQUE: Utiliser seulement les détergents
formulés pour les pulvérisateurs de lavage.
REMARQUE: Faire l’essai du détergent dans un
endroit peu voyant avant l’utilisation.
Suivre les instructions du fabricant sur l’étiquette
pour le mélange correct de savon/détergent. La
proportion de savon/détergent par rapport à
l’eau à travers le pulvérisateur de lavage est
approximativement 5.4% (1 to 19).
POUR MODÈLES SANS RÉSERVOIR DE DÉTERGENT
1. Dévisser le couvercle de l’applicateur de
détergent et remplir l’applicateur de détergent.
2. Remplacer le couvercle de l’applicateur.
3. Enlever la lance du pistolet.
1. Préparation de la Surface
2. Premier Rinçage Haute Pression
3. Application de Détergent
Figure 9 – Application de Détergent
Modèles Électriques avec Applicateur
de Détergent (Inclus)
Figure 10 – Applicateurs de détergent
– ou –
Page 20

8 Fr
4. Fixer l’applicateur de détergent au pistolet.
(Voir Figure 11.)
5. Pour les applicateurs de détergent qui s’ajustent au bout de la lance, tourner la lance au
réglage de configuration évantail large.
(L
’aspiration de dé-tergent ne fonction-
nera pas si la lance est réglée à une
configuration étroite). Brancher l’applica-
teur au bout de la lance. S’assurer que le
branchement soit sûr. (Voir figure 12.)
6. Appliquer le détergent afin de couvrir la surface de nettoyage. Appliquer de bas en haut
pour empêcher que le détergent coule et
cause du traînage.
7. Permettre que le détergent reste sur la surface pendant quelques minutes. Ce moment
est idéal pour utiliser une brosse légèrement
sur les endroits plus sales. Ne jamais permettre que le détergent sèche sur la surface de
nettoyage.
8. Enlever l’applicateur de détergent du pistolet et le remplacer avec la lance, ou enlever
l’applicateur du bout de la lance.
9. Rincer le détergent de la surface.
Remarque: Faire la chasse d’eau de l’applicateur
de détergent après chaque usage.
Suivre les instructions du fabricant sur l’étiquette
pour le mélange correct de savon/détergent. La
proportion de savon/détergent par rapport à
l’eau à travers le pulvérisateur de lavage est
approximativement 12% (1 to 8).
MODÈLES SANS APPLICATEUR DE DÉTERGENT
1. Enlever le capuchon du réservoir de détergent et verser le détergent pour pulvérisateurs à lavage. Remplacer le capuchon.
2. Tourner l’interrupteur de marche/arrêt
(OFF/ON) à la position ON (marche).
3. Glisser la buse à la position de basse pression telle qu’indiquée sur la Figure 13 et
appliquer le détergent pour couvrir la surface de nettoyage complètement.
Appliquer le détergent du bas en haut afin
d’empêcher la traînée de détergent. Laisser
le détergent pendant quelques minutes.
Brosser légèrement si nécessaire pour les
endroits très sales. Ne jamais permettre que
le détergent sèche sur la surface de nettoyage.
IMPORTANT: Le modèle peut seulement appliquer le détergent si une buse réglable est utilisée et si la buse est dans la position de basse
pression.
• Il est possible que l’injection de détergent ne
Fonctionnement
Figure 11 – Fixer l'applicateur de détergent
au pistolet
Figure 12 – Tourner la lance afin
d’obtenir une configuration évantail
large.
Modèles Électriques avec Réservoir
de Détergent
Low Pressure
High Pressure
Figure 13 – Régler la buse pour la pression
Nozzle
Pulvérisateurs de Lavage
Pré-Fonctionnement (Suite)
l’impact de l’eau à travers un endroit plus large
et nettoie bien avec moins de risque de dom-
mage à la surface. Nettoyez les surfaces larges
plus rapidement avec une configuration évantail
large.
BUSE DE PRESSION AJUSTABLE (NON
INCLUSE AVEC TOUS LES MODÈLES)
La buse de pression ajustable vous permet de
varier la pression de votre pulvérisation en
tournant l'extrémité bleue de la buse. Tourner
Figure 2 - Réglage de la buse pour config-
uration évantail (applicable selon le
modèle)
Buse
Figure 3 – Jet étroit à impact élevé
Figure 4 – Configuration évantail large
Figure 5 – Pulvérisation basse pression
Page 21

Pulvérisateurs de Lavage
9 Fr
fonctionnera pas avec les tuyaux prolongateurs ou les tuyaux de rechange qui sont plus
longs que 25 pieds.
4. Pour rincer ou pour retourner à la position
haute pression, relâcher la gâchette et glisser
la buse à la position haute pression.
Ne jamais glisser la
buse de bas à haut ou de haut à bas
lorsque la gâchette est actionnée.
Le rinçage final devrait commencer du bas en
haut. S’assurer de bien rinçer la surface afin
d’enlever tout le détergent.
1. S’assurer que tout le détergent soit purgé du
système.
2. Mettre le moteur hors circuit (off).
3.Couper la source d’eau.
4. Une fois que le moteur et la source d’eau
soient coupés, actionner la gâchette pour
dépressuriser le système.
NE JAMAIS couper la
source d’eau avant de mettre le moteur
hors circuit. Ceci peut endommager la
pompe et/ou le moteur.
NE JAMAIS
débrancher le tuyau de décharge
haute pression de la machine pendant
que le système soit pressurisé. Pour
dépressuriser le système, mettre le
moteur hors circuit (off), couper la
source d’eau et actionner la gâchette 2-3
fois.
5. Après chaque usage, essuyer toutes les surfaces du pulvérisateur de lavage avec un torchon propre et humide.
• Ne pas ranger le pulvérisateur de lavage à
l’extérieur.
• Ne pas ranger le pulvérisateur de lavage là où
il pourrait geler.
CONSEILS POUR PROLONGER LA
DURÉE DE VOTRE PULVÉRISATEUR DE
LAVAGE
1. Ne jamais faire fonctionner le modèle sans
eau.
2.Votre pulvérisateur de lavage n’est pas conçu
pour le pompage d’eau chaude. Ne jamais
brancher votre pulvérisateur de lavage à une
source d’eau chaude, car ceci pourrait réduire
la durée de la pompe de façon spectaculaire.
3. Utiliser des détergents autrement que la marque Campbell Hausfeld pourrait endommager
les pièces détachées de la pompe (joints
toriques, joints etc.). Ceci s’applique aux produits chimiques tels que les produits de blanchissement, le savon de vaisselle, etc.
4. Faire fonctionner le modèle pendant plus que
1 minute sans pulvériser de l’eau peut causer
l’accumulation de chaleur dans la pompe,
éviter ceci.
5.Lâcher la gâchette avant de régler la buse pour
la pression (haute à basse ou basse à haute).
Manque de suivre cette directive pourrait
diminuer la durée des joints toriques dans la
lance.
!
AVERTISSEMENT
!
ATTENTION
AVIS
4. Rinçage Final
6. Entreposage
5. Arrêt
Page 22

10 Fr
Le pulvérisateur
de lavage ne se
démarre pas
La pompe n’atteint pas la pression nécessaire
Pression fluctuante
Moteur s’arrête
subitement
Manque d’aspiration de détergent
– modèles avec
réservoirs
1. Le modèle est pressurisé
2. L’appareil DDFT est déclenché
(si équipé)
3. La fiche n’est pas bien
branchée ou la prise de
courant est défectueuse
4. Cordon prolongateur trop
long ou taille de fil trop petite
5. La source de tension principale
est trop basse
6. L’interrupteur de protection
thermique enclenchée
1. Le filtre d’arrivée d’eau est
obstrué
2. La pompe aspire de l’air des
raccords de tuyaux
3. Buse usée ou de mauvaise
taille
4. Déchargeur obstrué ou usé
5. Soupapes obstruées ou usées
1. Pompe aspire de l’air
2. Buse obstruée
3. Soupapes sales, usées ou grippées
4. Joints hydrauliques usés
1. Cordon prolongateur trop
long ou taille de fil trop petite
2. L’interrupteur de protection
thermique s’est enclenché à
cause du surchauffage
1. Buse de lance n’est pas dans la
position de basse pression
2. L’usage d’un tuyau prolongateur haute pression ou le
tuyau haute presson est trop
long
3. Injecteur de la pompe obstrué
1. Serrer la gâchette sur le pistolet
2. Appuyer sur le bouton de réenclenchement sur la fiche
3. Inspecter la fiche, la prise et les
fusibles
4. Enlever le cordon prolongateur
(voir page 4)
5. Vérifier que la source de tension
principale soit suffisante
6. Mettre le modèle hors circuit
(off) et le permettre de se
refroidir
1. Nettoyer le filtre d’arrivée d’eau
2. Vérifier que les raccords et la
bague d’arrêt soient bien serrés
3. Composer le 1-800-330-0712
4. Composer le 1-800-330-0712
5. Composer le 1-800-330-0712
1. Vérifier que les raccords et
tuyaux soient sûrs.
2. Nettoyer avec un nettoyeur de
buse (voir page 5)
3. Composer 1-800-330-0712
4. Composer 1-800-330-0712
1. Enlever le cordon prolongateur
(voir page 4)
2. Vérifier que la source de tension
principale corresponde aux spécifications
1. Glisser la buse de lance dans la
position de basse pression (voir
page 8)
2. Enlever le tuyau prolongateur
haute pression ou utiliser un
tuyau haute pression moins de
25 pieds de longueur
3. Composer le 1-800-330-0712
Symptôme Cause(s) Possible(s) Mesure(s) Corrective(s)
Guide De Dépannage
Pulvérisateurs de Lavage
Information de Sécurité et Avertissements (Suite)
de gâchette dans la position de sécurité
lorsque la pulvérisation est arrêtée même
pour quelques moments.
•Toujours suivre les recommandations du fabri-
cant sur l’étiquette du produit détersif pour
assurer l’usage correct. Toujours se protéger
les yeux, la peau et le système respiratoire
contre le détergent.
ENTRETIEN D’UN APPAREIL À
DOUBLE ISOLATION
Dans un appareil à double isolation, deux sys-
tèmes d’isolation sont fournis à la place d’une
mise à la terre. Aucun système de mise à la terre
n’est fourni sur un appareil à double isolation et
aucun moyen de mise à la terre ne doit y être
ajouté. Faire l’entretien d’un appareil à double
isolation demande des soins attentifs et une con-
naissance parfaite du système et ne sera exécuté
que par des personnes compétentes. Les pièces
de rechange pour un appareil à double isolation
doivent être identiques aux
pièces qu’elles remplacent.
Un appareil à double isola-
tion doit porter l’inscription
“DOUBLE ISOLATION”
(Double Insulated). Le sym-
bole peut aussi se trouver
sur l’appareil.
pression qui dépasse la pression de serv-
ice de n’importe quelle pièce détachée
(tuyaux, raccords, etc.) dans le système
pressurisé. S’assurer que tout
l’équipement et les accessoires soient
classifiés pour la pression de service
maximum du modèle.
• NE JAMAIS pulvériser des liquides inflamma-
bles, ni utiliser le pulvérisateur de lavage là où
il y a de la poussière, liquides ou vapeurs com-
!
AVERTISSEMENT
!
AVERTISSEMENT
!
Page 23

11 Fr
Manque d’aspiration de détergent
– modèles avec
applicateurs
amovibles
Modèle commence à fumer
Applicateur de détergent obstrué
Moteur surchauffé, surchargé ou
endommagé
1. Nettoyer l’applicateur avec l’eau
tiede
2. Remplacer l’applicateur
Mettre le modèle hors circuit (off)
et composer le 1-800-330-0712
Symptôme Cause(s) Possible(s) Mesure(s) Corrective(s)
Guide De Dépannage
Garantie Limitée
1. DURÉE: À partir de la date d’achat par l’acheteur originel comme suit: Produits À Service Standard (Standard
Duty) - Un An, Produits À Service Sérieux (Serious Duty) - Deux Ans, Produits À Service Extrême (Extreme Duty) Trois Ans.
2. GARANTIE ACCORDÉE PAR (GARANT): Campbell Hausfeld / Scott Fetzer Company, 100 Production Drive,
Harrison, Ohio, 45030, Téléphone: (800) 330-0712
3. BÉNÉFICIAIRE DE CETTE GARANTIE (ACHETEUR): L’acheteur originel (sauf en cas de revente) du pulvérisateur
de lavage Campbell Hausfeld.
4. PRODUITS COUVERTS PAR CETTE GARANTIE: Tous les Pulvérisateurs de Lavage Campbell Hausfeld qui sont fournis ou fabriqués par le Garant.
5. COUVERTURE DE LA PRÉSENTE GARANTIE: Défauts de matière et de fabrication considérables qui se révèlent
pendant la période de validité de la garantie avec les exceptions indiquées ci-dessous.
6. LA PRÉSENTE GARANTIE NE COUVRE PAS:
A.Les garanties implicites, y compris celles de commercialisabilité et D’ADAPTION À UNE FONCTION PARTIC-
ULIÈRE SONT LIMITÉES À PARTIR DE LA DATE D’ACHAT INITIALE TELLE QU’INDIQUÉE DANS LA SECTION
DURÉE. Si le pulvérisateur de lavage est utilisé pour une fonction commerciale, industrielle ou pour la location, la durée de la garantie sera quatre-vingt-dix (90) jours à compté de la date d’achat. Quelques Provinces
(États) n’autorisent pas de limitations de durée pour les garanties implicites. Les limitations précédentes peuvent donc ne pas s’appliquer.
B. TOUT DOMMAGE, PERTE OU DÉPENSE FORTUIT OU INDIRECT POUVANT RÉSULTER DE TOUT DÉFAUT, PANNE
OU MAUVAIS FONCTIONNEMENT DU PULVÉRISATEUR CAMPBELL HAUSFELD. Quelques Provinces (États) n’autorisent pas l’exclusion ni la limitation des dommages fortuits ou indirects. La limitation ou exclusion précédente peut donc ne pas s’appliquer.
C. Toute panne résultant d’un accident, de dommage pendant l’expédition, d’une utilisation abusive, de la nég-
ligence ou d’une utilisation ne respectant pas les instructions données dans le(s) manuel(s) accompagnant le
produit.
D.Service avant livraison; montage, huile ou lubrifiants, et réglages par exemple.
E. Articles ou service normalement requis pour l’entretien du pulvérisateur de lavage.
F. Les moteurs à essence et les pièces détachées sont expressément exclus de cette garantie limitée. L’acheteur
doit retourner les pièces détachées du moteur à essence au fabricant originel ou à son centre de service
autorisé.
G. Articles additionnels qui ne sont pas couverts sous cette garantie:
1. Articles d’usure normal tels que; tuyaux haute pression, joints d’huile et hydrauliques, joints toriques,
soupapes, lances, et buses de pulvérisation.
2. Brosses de moteur (Modèles électriques seulement).
3. Les défauts esthétiques qui n’affectent pas la fonction.
4. Pièces détachées rouillées.
5. Usure de la pompe ou le dommage aux soupapes causé par l’utilisation de type d’huile incorrect, la contamination de l’huile ou par le manque de suivre les directives d’entretien d’huile.
7. RESPONSABILITÉS DU GARANT AUX TERMES DE CETTE GARANTIE: Réparation ou remplacement, au choix du
Garant, du pulvérisateur de lavage ou de pièce détachée qui se sont révélés défectueux pendant la durée de la
garantie.
8. RESPONSABILITÉS DE L’ACHETEUR AUX TERMES DE CETTE GARANTIE:
A. Fournir une preuve d’achat datée et un état d’entretien.
B. La livraison ou expédition du pulvérisateur de lavage ou pièce détachée Campbell Hausfeld au Centre De
Service Autorisé Campbell Hausfeld. Taux de frais, si applicables, sont la responsabilité de l’acheteur.
C. Utilisaton et entretien du pulvérisateur de lavage avec un soin raisonable, ainsi que le décri(vent)t le(s)
manuel(s) d’utilisation.
9. RÉPARATION OU REMPLACEMENT EFFECTUÉ PAR LE GARANT AUX TERMES DE LA PRÉSENTE GARANTIE: La
réparation ou le remplacement sera prévu et exécuté en fonction de la charge de travail dans le centre de service et dépendra de la disponabilité des pièces de rechange.
Cette Garantie Limitée s’applique aux É.-U., au Canada et au Mexique seulement et vous donne des droits juridiques
précis. L’acheteur peut également jouir d’autres droits qui varient d’une Province, d’un État ou d’un Pays à l’autre.
Page 24

BUILT TO LAST
Instructions d’Utilisation
Lire attentivement et comprendre les instructions suiv-
© 2003 Campbell Hausfeld IN459000AV 10/03
1
8
5
0
P
S
I
P
r
e
s
s
u
r
e
W
a
s
h
e
r
1
.
9
G
P
M
1750 PSI
Pressure Washer
1.8 GPM
G
a
r
a
n
t
í
a
l
i
m
i
t
a
d
a
d
e
1
a
ñ
o
s
Limited
Warranty
G
a
r
a
n
t
i
e
l
i
m
i
t
é
e
d
e
1
a
n
s
E
C
P
Voir la Garantie à la page 11 Fr pour de l’information importante sur l’utilisation commercial de ce produit.
BUILT TO LAST
Lavadoras
eléctricas a presión
Manual del Producto
© 2003 Campbell Hausfeld IN459000AV 10/03
Lineamientos de seguridad
Este manual contiene información que es muy
importante conocer y entender. Esta información se provee con fines de SEGURIDAD y para
EVITAR PROBLEMAS DE EQUIPO. Para ayudarle a reconocer esta información, observe los
símbolos siguientes:
Peligro indica una
situación de riesgo inminente, la cual, si
no se evita, PUEDE ocasionar la muerte o
graves lesiones.
Adver-tencia indica
una situación potencialmente riesgosa,
la cual, si no se evita, PODRÍA provocar
la muerte o graves lesiones.
Precaución indica una
situación potencialmente riesgosa, la
cual, si no se evita, PUEDE provocar
lesiones menores o moderadas.
NOTA: Información que requiere atención espe-
cial.
Instrucciones Importantes de Seguridad
GUARDE EST
AS INSTRUCCIONES
Se deben tomar ciertas precauciones básicas
!
ADVERTENCIA
!
PRECAUCION
!
ADVERTENCIA
!
PELIGRO
1
8
5
0
P
S
I
P
r
e
s
s
u
r
e
W
a
s
h
e
r
1
.
9
G
P
M
1750 PSI
Pressure Washer
1.8 GPM
G
a
r
a
n
t
í
a
l
i
m
i
t
a
d
a
d
e
1
a
ñ
o
s
Limited
Warranty
G
a
r
a
n
t
i
e
l
i
m
i
t
é
e
d
e
1
a
n
s
E
C
P
Lea con cuidado y comprenda estas
instrucciones antes de operar esta hidrolavadora
Información de seguridad, advertencias y precauciones . . . . . . . . . 1 - 4
Pre-Operación. . . . . . . . . . . . . . . . . . . . . . . . . . . . . . . . . . . . . . . . . . 4 - 6
Operación, Cierre y Almacenamiento. . . . . . . . . . . . . . . . . . . . . . . . 6 - 9
Guía de Diagnóstico de Averías . . . . . . . . . . . . . . . . . . . . . . . . . . 10 - 11
Garantía . . . . . . . . . . . . . . . . . . . . . . . . . . . . . . . . . . . . . . . . . . . . . . . . 12
Contenido Página
Medidas de Seguridad y
Advertencias
Ver la Garantía en página 12 Sp para información importante sobre el uso comercial de este producto.
RECORDATORIO: ¡Guarde su comprobante de compra con fecha para fines de la garantía!
Adjúntela a este manual o archívela en lugar seguro.
Page 25

Lavadoras a Presión
2 Sp
Medidas de Seguridad y Advertencias (Continuación)
cuando se use esta hidrolavadora, incluyendo las
siguientes:
1. Lea todas las instrucciones antes de usar la
hidrolavadora.
2. Para reducir el riesgo de lesiones, se necesita
una supervisión muy cercana cuando se use
la hidrolavadora cerca de niños.
3. SIEMPRE desconecte el suministro de fuerza
(unidades eléctricas) antes de desarmar o
reparar la unidad.
4. Siga todos los reglamentos de seguridad
locales así como la Ley de Seguridad y Salud
Ocupacional (“OSHA” en inglés).
5. Cerciórese de que los mecanismos de seguridad estén funcionando debidamente antes
de cada uso. NO remueva o modifique
ninguna parte de la pistola o unidad.
6. Sepa como apagar la lavadora y liberar la
presión rápidamente. Familiarícese con
todos los controles.
7. Permanezca alerta. Esté consciente de lo que
está haciendo.
8. No opere esta hidrolavadora cuando esté
fatigado o bajo la influencia del alcohol o de
drogas.
9. Mantenga todas las personas alejadas del
área de trabajo.
10. No trate de alcanzar cosas que estén fuera
de su alcance ni se pare sobre una superficie
inestable. Manténgase siempre en buen
equilibrio, con sus pies sobre una superficie
segura.
11. Siga las instrucciones de mantenimiento
especificadas en los manuales.
12. Este producto debe conectarse a un tomacorriente protegido por un interruptor de
circuito por fuga a tierra (sólo las lavadoras a
presión eléctricas).
13. Si el producto está provisto de un interruptor de circuito por fuga a tierra, asegúrese
de inspeccionar dicho interruptor y el
cordón antes del uso. Cualquier reparación o
cambio del cordón de fuerza debe ser efectuada por un técnico electricista calificado
(autorizado o certificado).
Peligro de inyección
o lesión grave - Aléjese de la boquilla No descargue chorros sobre personas o
animales - Este producto debe ser utilizado sólo por operadores entrenados.
Siempre retire la lanza de la pistola
antes de limpiar la punta.
• Manténgase alejado de la boquilla. NUNCA
rocíe agua a alta presión hacia ninguna persona, animal o hacia Ud.
• Use siempre lentes o gafas de seguridad cuan-
do esté operando o efectuando mantenimiento.
• Nunca ponga la mano o los dedos sobre la
boquilla de rociado mientras esté operando la
máquina.
• Nunca intente parar o desviar fugas con ningu-
na parte del cuerpo.
• Siempre enganche el seguro del gatillo en la
posición de seguridad cuando deje de rociar,
así sea por un momento.
• Siga siempre las recomendaciones del fabri-
cante que aparecen en la etiqueta del detergente, para el uso adecuado de éste. Proteja
siempre los ojos, la piel y el sistema respiratorio
del uso de detergentes.
FORMA DE REPARAR UN APARATO DE
DOBLE AISLAMIENTO
Los productos de doble aislamiento contienen
dos sistemas de aislamiento en lugar de una
conexión a tierra. No hay forma de conectar a
tierra un producto con doble aislamiento, ni se le
debe instalar ninguna forma de hacerlo. La
reparación de un producto
con doble aislamiento
requiere un gran cuidado y
conocimiento del sistema y
se debe hacer solamente por
personal de servicio debidamente calificado. Las
piezas de repuesto para un producto con doble
aislamiento deben ser idénticas a las piezas que
van a substituir. Un producto con doble aislamiento, fabricado en los Estados Unidos, está marcado
con las palabras “DOUBLE INSULATION” (DOBLE
!
ADVERTENCIA
!
ADVERTENCIA
Figura 1
Page 26

3 Sp
Medidas de Seguridad y Advertencias (Continuación)
AISLAMIENTO) o “DOUBLE INSULATED” (AISLADO DOBLEMENTE). El símbolo también puede
estar marcado sobre el producto.
No aplique presiones que excedan la presiÛn de funcionamiento de ninguna de las partes
(mangueras, acoples, etc...) del sistema de presiÛn. Aseg˙rese de que
todo el equipo y los accesorios est·n
clasificados para resistir la presiÛn
m·xima de trabajo de la unidad.
Peligro de Explosión.
• NUNCA rocíe líquidos inflamables, ni use la
hidrolavadora en áreas donde haya residuos
líquidos o vapores combustibles.
• Nunca opere esta máquina en un edificio cer-
rado o en un ambiente explosivo o cerca del
mismo.
No rocíe artefactos
ni alambres eléctricos.
• Nunca desconecte la manguera de descarga de
alta presión de la máquina mientras el sistema
esté presurizado. Para despresurizar la
máquina, cierre los suministros de electricidad
y agua, y luego, presione 2-3 veces el gatillo de
la pistola.
• Nunca enganche de manera permanente el
mecanismo del gatillo de la pistola.
• Nunca opere la máquina sin que todos los
componentes estén debidamente conectados a
ella. (Mango, conjunto de pistola/vara, boquilla, etc.)
DAÑOS EN EL EQUIPO
• SIEMPRE abra el suministro de agua antes de la
hidrolavadora. La operación de la bomba en
seco causa daños muy serios.
• No opere la lavadora a presión con el filtro de
la entrada de agua removido. Mantenga el filtro libre de basura y sedimento.
• NUNCA opere la lavadora a presión con piezas
rotas o que faltan. Revise el equipo con regularidad y repare o cambie inmediatamente las
piezas gastadas o dañadas.
• Use solamente la boquilla suministrada con
esta máquina.
• Nunca deje la lanza sola mientras la máquina
está funcionando.
• Nunca intente alterar los ajustes de fábrica.
La alteración de los ajustes de fábrica podría
dañar la unidad y anulará la garantía.
• Siempre sujete firmemente la pistola y lanza
cuando inicie el funcionamiento y opere la
máquina.
• NUNCA permita que la unidad funcione por
más de un minuto con el gatillo suelto. El calor
producido durante ese tipo de funcionamiento
dañará la bomba.
• La lavadora a presión no está diseñada para
bombear agua caliente. NUNCA la conecte
a un suministro de agua caliente ya que
reduciría significativamente la vida de la
bomba.
• NUNCA guarde la hidrolavadora a la intemperie o donde se pueda congelar. La bomba se
dañaría seriamente.
• Suelte el gatillo cuando vaya a cambiar de alta
a baja presión. De no hacerlo podría dañar la
boquilla.
Mantenga la manguera
lejos de objetos filudos. Las mangueras
que se revíentan pueden ocasionar
lesiones. Examine las mangueras con
regularidad y cámbielas si están
dañadas. No intente reparar una
manguera dañada.
CORDONES DE EXTENSION
Si va a utilizar un
cordón de extensión, sólo use un cordón
para conexión a tierra que tenga tres
cables y cerciórese de que esté en buenas condiciones.
No se recomienda el uso de un cordÛn elÈctrico de extensiÛn. Si se usara, aseg˙rese de usar
sÛlo las dimensiones de alambre y largos
como se indica en la tabla a continuaciÛn. Use
sólo cordones de extensiónes aprobados para uso
a la intemperie. Estas extensiones, si son fabricadas en los EUA, pueden estar identificadas con
el siguiente letrero (Acept-able para uso con
aparatos eléctricos a la intemperie; guárdese bajo
techo cuando no esté en uso). Use sólo extensiones con una capacidad eléctrica que no sea
!
PELIGRO
!
PRECAUCION
!
ADVERTENCIA
!
ADVERTENCIA
!
ADVERTENCIA
!
ADVERTENCIA
Pressure Washers
No detergent
suction – units
with tanks
No detergent
suction – units
with attachable
applicators
Unit begins to
smoke
Symptom Possible Cause(s) Corrective Action(s)
Troubleshooting Chart
Page 27

Lavadoras a Presión
4 Sp
Medidas de Seguridad y Advertencias (Continuación)
menor que los requisitos del aparato eléctrico. No
use cordones de extensión dañados. Examine el
cordón de extensión antes de usarlo y reemplácelo si está dañado. Tenga cuidado al manipular el
cordón de extensión y no lo hale para desconectarlo. Mantenga el cordón lejos del calor y bordes
afilados. Siempre desconecte el cordón de extensión del tomacorriente antes de desconectar la
hidrolavadora de la extensión. NOTA: Con este
producto no use las comunes cuerdas de extensiÛn 16 Û 18 AWG.
El no cumplir
con estas instrucciones puede
ocasionar lesiones graves, incluso
la muerte.
Para disminuir el
riesgo de electrocución, mantenga secas
todas las conexiones y sin entrar en contacto con el piso. No toque el enchufe
con las manos mojadas.
CONSULTE LAS INSTRUCCIONES DE MONTA-
JE PARA OBTENER INFORMACIÓN SOBRE
LOS PROCEDIMIENTOS DE MONTAJE,
INSTALACIÓN Y CONEXIÓN.
!
ADVERTENCIA
!
PELIGRO
Tamaño del Longitud
cordón de recomendada
extensión 7,62M 15,24M
14 AWG Si No
12 AWG Si Si
Pre-Operación
AJUSTE DEL PATRÓN DE ROCIADO EN
ABANICO
El ángulo de rociado que sale de la lanza se
puede graduar en algunas lanzas girando la
boquilla. Esto hará variar el patrón de rociado
desde aproximadamente un chorro angosto de
alto impacto de 0o hasta un abanico de rociado
de 600 de ancho (ver figura 2)
Un chorro angosto tiene una fuerza de alto
impacto sobre la superficie de limpieza y da
como resultado una limpieza máxima profunda
en una zona concentrada. Sin embargo, este
chorro angosto de alto impacto debe usarse con
precaución, pues puede dañar algunas superficies.
Un patrón en "abanico" ancho distribuye el
impacto del agua sobre un área mayor, lo que da
como resultado una excelente acción de limpieza
con un menor riesgo de daño a la superficie. Las
áreas de superficie amplias se pueden limpiar
más rápido con el uso de un patrón en abanico
más ancho.
BOQUILLA DE PRESIÓN AJUSTABLE
(NO INCLUIDA CON TODOS LOS
MODELOS)
La boquilla de presión ajustable permite cambiar la presión de pulverización girando el
extremo azul de la boquilla. Girando comple-
Figura 2 – Ajuste de la boquilla para el patrón de
rociado en abanico (no se aplica en algunas boquillas)
Boquilla
Figura 3 - Chorro angosto de alto impacto
Figura 4 - Patrón en abanico ancho
Page 28

5 Sp
Pre-Operación (Continuación)
tamente en sentido horario se reduce la presión al mínimo. Si la lavadora a presión está
equipada con un sistema de tanque para el
detergente, es necesario usar la presión mínima para succionar el detergente
Girar el extremo azul completamente en sentido antihorario aumenta la presión al máximo
para un lavado más eficiente. Girar el extremo
azul cambia la presión pero no cambia el
patrón de rociado.
INSTRUCCIONES DE LIMPIEZA DE LA
BOQUILLA
Una boquilla obstruida o parcialmente obstruida puede causar una significativa reducción en
la cantidad de agua que sale de la misma y
puede provocar que la unidad pulse mientras
está rociando.
Para limpiar la boquilla:
• Apague la unidad y desenchúfela.
• Cierre el suministro de agua. Alivie la presión atrapada en la manguera presionando
el gatillo 2 ó 3 veces.
• Separe la lanza de la pistola.
• Gire la boquilla hasta el ajuste de chorro. Esto
abre las paletas del abanico.
• Utilizando el limpiador de punta que se
incluye, o un sujetapapeles desdoblado,
introduzca el alambre dentro del orificio de
la boquilla y muévalo hacia adelante y hacia
atrás hasta que la obstrucción desaparezca
(ver Fig. 7).
• Quite cualquier residuo adicional pasando
agua en sentido contrario a través de la
boquilla. Para hacer esto coloque el
extremo de una manguera de jardín (con
agua) en el extremo de la boquilla durante
30 a 60 segundos.
ÁNGULO A LA SUPERFICIE DE
LIMPIEZA
Cuando se rocía agua contra una superficie, el
impacto máximo se genera cuando el agua golpea la superficie "de frente". Sin embargo, este
tipo de impacto tiende a empotrar las partículas
de suciedad en la superficie, impidiendo así la
acción de limpieza deseada.
El ángulo óptimo para rociar agua contra una
superficie de limpieza es de 45 grados.
El rociar agua contra una superficie a este ángulo
proporciona la fuerza de impacto más beneficiosa combinada con una remoción eficiente de
los desechos en la superficie.
Figura 8 - Ángulo óptimo a la superficie
de limpieza
Figura 7 – Introduzca el limpiador de punta
dentro del orificio de la boquilla y muévalo
hacia adelante y hacia atrás hasta que la
obstrucción desaparezca.
Boquilla
Limpiador de punta
Figura 5 – Pulverización a baja presión
Figura 6 – Pulverización a alta presión
Operation (Continued)
5.After each use, wipe all surfaces of the pressure
washer with a clean, damp cloth.
• Do not store pressure washer outdoors.
• Do not store pressure washer where it might
freeze.
TIPS FOR EXTENDING THE LIFE OF YOUR
PRESSURE WASHER
1.Never operate unit without water.
2.Pressure washer is not meant to pump hot
water. Never connect to hot water supply –
this will significantly reduce life of the pump.
3.Using detergents other than Campbell
Hausfeld's brand may cause damage to pump
components (o-rings, seals, etc.). This also
applies to chemicals such as bleach, dish soap,
etc.
4.Never operate unit for more than one (1)
minute without spraying water. Resulting heat
buildup will damage pump.
5.Before adjusting nozzle for pressure (high-to-
low or low-to-high) release trigger. Failure to
do so will reduce life of o-rings in lance.
6. Storage
Page 29

DISTANCIA DE LA SUPERFICIE DE
LIMPIEZA
Otro factor que determina la fuerza de impacto
del agua es la distancia entre la boquilla de rociado y la superficie de limpieza. La fuerza de
impacto del agua aumenta a medida que se acerca la boquilla a la superficie.
CÓMO EVITAR EL DAÑO A LAS
SUPERFICIES
El daño a las superficies de limpieza ocurre
debido a que la fuerza de impacto del agua
excede la durabilidad de la superficie. La fuerza
de impacto puede variarse controlando los tres
puntos ya mencionados. Nunca use un chorro
angosto de alto impacto o una boquilla
turbo/rotativa sobre una superficie susceptible al
daño. Evite rociar las ventanas con un chorro
angosto de alto impacto o con una boquilla
turbo, pues puede ocasionar roturas. La manera
más segura de evitar el daño a las superficies es
seguir estos pasos:
1. Antes de presionar el gatillo de la pistola,
ajuste la boquilla a un patrón en abanico
ancho.
2. Coloque la boquilla aproximadamente de 4 a
5 pies de la superficie de limpieza y en ángulo
de 45 grados con la misma, y presione el gatillo.
3. Varíe el ángulo de rociado en abanico y la distancia a la superficie de limpieza, hasta lograr
una óptima eficiencia de limpieza sin dañar la
superficie.
BOQUILLA TURBO (NO INCLUIDA
CON TODOS LOS MODELOS)
Una boquilla turbo, a veces llamada boquilla
giratoria, puede ser una herramienta muy eficaz que puede disminuir el tiempo de limpieza
en forma significativa. La boquilla turbo combina la fuerza de limpiar con un chorro angosto de alto impacto, con la eficiencia de
limpieza que tiene un patrón en abanico de 25
grados Esto se logra arremolinando un chorro
angosto de alto impacto en una forma cónica
que limpia un área mayor. Precaución: ya que la
boquilla turbo usa un chorro angosto de alto
impacto, utilice una lanza turbo sólo en aplicaciones donde el rociado angosto de alto impacto
no pueda dañar la superficie de limpieza.
Además, la boquilla turbo NO se puede graduar
y no puede utilizarse para aplicar detergentes.
DETERGENTES
El uso de detergentes puede reducir notablemente el tiempo de limpieza y ayudar en la
remoción de manchas difíciles. Muchos detergentes han sido adaptados para utilizarlos con
lavadoras a presión en trabajos de limpieza
específicos. Estos detergentes son aproximadamente tan densos como el agua. El uso de detergentes más densos, como el jabón para vajilla,
atorará el sistema de inyección química e
impedirá la aplicación del detergente.
La fuerza limpiadora de los detergentes proviene
de aplicarlos a una superficie y darle a sus ingredientes químicos tiempo de atacar el polvo y la
suciedad. Los detergentes actúan mejor cuando
se les aplica a baja presión.
La combinación de la acción química con el
enjuague a alta presión es muy eficaz. En las
superficies verticales, aplique el detergente
comenzando desde abajo y avanzando hacia arriba. Esto evitará que el detergente se escurra y
cause vetas. El enjuague a alta presión también
debe efectuarse de abajo hacia arriba. En las
manchas especialmente difíciles, puede ser necesario utilizar un cepillo junto con los detergentes
y el enjuague a alta presión.
Lavadoras a Presión
6 Sp
Pre-Operación (Continuación)
Operación
El siguiente procedimiento de limpieza le ayudará a organizar su trabajo de limpieza, y asegurará que obtenga los resultados más beneficiosos
en el menor tiempo posible. No olvide utilizar las
técnicas de rociado/limpieza previamente indicadas.
Antes de empezar un trabajo de limpieza con
una lavadora a presión, es importante preparar la
superficie que se va a limpiar. Esto se realiza retirando los muebles del área, y cerciorándose de
1. Preparación de la superficie
Page 30

que todas las ventanas y puertas estén bien cerradas. Además, debe asegurar que todas las plantas y árboles adyacentes al área de limpieza estén
protegidos con una tela de cobertura. Esto
impedirá que sus plantas sean rociadas con detergentes.
El siguiente paso es rociar la superficie de
limpieza con agua para desprender la mugre o
suciedad acumulada en la superficie. Esto permitirá que su detergente ataque la suciedad profunda que se ha metido en la superficie de limpieza.
Antes de presionar el gatillo de la pistola, ajuste
la boquilla para un patrón en abanico ancho y
lentamente gradúe hasta obtener el patrón de
rociado deseado. Esto le ayudará a evitar la aplicación de un rociado muy concentrado a la superficie, lo cual podría ocasionar daño.
SIGA LAS INSTRUCCIONES APROPIADAS PARA EL MODELO ADQUIRIDO
NOTA: S
olamente use detergentes formula-
dos para lavadoras a presión.
NOTA: Pruebe el detergente en una zona
poco visible antes de usarlo.
Siga las instrucciones del rÛtulo del fabricante
para combinar las concentraciones correctas
de jabÛn/detergente. La proporciÛn de
jabÛn/detergente y agua en la lavadora de
presiÛn debe ser cerca de 5,4% (1 a 19
partes).
MODELOS SIN TANQUE DE DETERGENTE
1. Desenrosque la parte superior del aplicador de
detergente de detergente y llene el aplicador
con detergente."
2. Reemplace la parte superior del aplicador.
3. Quite la lanza de la pistola.
4. Una el aplicador de detergente a la pistola
(ver Fig. 11).
5. Para aplicadores de detergente que calzan en
un extremo de la lanza, gire la lanza para
obtener un patrón de abanico amplio (La suc
ción del detergente no funcionará cuando la lanza está ajustada para proporcionar un patrón angosto.) Conecte el
aplicador al extremo de la lanza.
Asegúrese de que la conexión esté sujetada correctamente (ver Fig. 12).
6. Aplique detergente para que cubra totalmente la superficie de limpieza. Aplique de
abajo hacia arriba para evitar que el detergente se escurra y marque la superficie.
7 Sp
Operación (Continuación)
2. Enjuague inicial de alta presión
3. Aplicación del detergente
Figura 9 – Aplicación del detergente
Figure 11 – Attach applicator to gun
Figura 12 – Gire la lanza para obtener un
patrón de abanico ancho.
Unidades con Aplicador de
Detergente Incluido
ó
Figura 10 – Aplicador de detergente
Operation (Continued)
doors are closed tight. In addition, you should
make sure that all plants and trees adjacent to
the cleaning area are protected by a drop cloth.
This will ensure that your plants won’t be
sprayed by the detergents.
The next step is to spray the cleaning surface
with water to clear off any dirt or grime that
may have collected on the surface. This will allow
your detergent to attack the deep down dirt
that has worked its way into the cleaning sur-
face. Before triggering the gun, adjust the noz-
zle to a wide fan pattern and slowly adjust to
the desired spray pattern. This will help you
avoid applying too much concentrated spray to
the surface which could cause damage.
USE THE INSTRUCTIONS APPROPRIATE
FOR MODEL PURCHASED
NOTE: Use only detergents formulated for pres-
sure washers.
NOTE: Test detergent in an inconspicuous area
before use.
Follow manufacturer's label directions for mixing
correct concentrations of soap/detergents. The
2. Initial High Pressure Rinse
3. Detergent Application
Figure 9 – Detergent application
Units with Detergent Applicator
Included
Page 31

7. Deje que el detergente permanezca sobre la
superficie durante algunos minutos. Este es
un buen momento para usar un cepillo y cepillar suavemente las áreas muy sucias. Nunca
deje que el detergente se seque sobre la
superficie de limpieza.
8.
Quite el aplicador de detergente de la pistola y
reemplácelo con la lanza, o quite el aplicador del
extremo de la lanza
.
9.
Enjuague el detergente de la superficie.
Nota: Lave el aplicador de detergente con un
chorro de agua limpia abundante después de
cada uso.
Siga las instrucciones del rÛtulo del fabricante
para combinar las concentraciones correctas
de jabÛn/detergente. La proporciÛn de
jabÛn/detergente y agua en la lavadora de
presiÛn debe ser cerca de 12% (1 a 8 partes).
ESTOS MODELOS NO NECESITAN UN
APLICADOR DE DETERGENTE
1. Retire la tapa del tanque de detergente y vierta en su interior detergente para lavadora a
presión. Vuelva a poner la tapa.
2. Mueva el interruptor OFF/ON a la posición ON
(ENCENDIDO).
3. Corra la boquilla a la posición de baja presión
como se muestra en la figura 13, y aplique el
detergente de modo que cubra por completo
la superficie de limpieza.
Aplique el detergente de abajo hacia arriba
para evitar que el detergente se escurra para
abajo y cause vetas. Espere un par de minutos
para que el detergente afloje la mugre y la
suciedad. Este es un buen momento para utilizar un cepillo a fin de restregar ligeramente
las zonas muy sucias. Nunca deje que el detergente se seque sobre la superficie de limpieza.
IMPORTANTE: La unidad sólo aplicará el deter-
gente cuando se utilice una boquilla regulable y
cuando la boquilla esté en la posición de baja
presión.
• La inyección de detergente puede no funcionar con una extensión de manguera o
mangueras de reemplazo de más de 25 pies
de largo.
4. Para enjuagar o volver a la alta presión, suelte
el gatillo y corra la boquilla a la posición de
alta presión.
Nunca corra la
boquilla de baja a alta presión o viceversa cuando esté presionado el gatillo
de la pistolalas unidades con.
El enjuague final debe empezar desde abajo y
avanzar hacia arriba. Asegúrese de enjuagar
totalmente la superficie y que todo el detergente
haya sido removido.
1. Cerciórese de que todo el detergente sea
enjuagado del sistema.
2. Apague el motor.
3. Cierre el suministro de agua.
4. Después de haber apagado el motor y el sum-
inistro de agua, apriete el gatillo de la pistola
para descargar la presión del sistema.
NO APAGUE nunca el
suministro de agua antes de apagar el
motor. Esto puede producir serios daños
a la bomba y al motor.
NEVER disconnect
high pressure discharge hose from
machine while system is pressurized.
Para descargar la presión, apague el
motor, corte el suministro de agua y
apriete el gatillo de la pistola 2-3 veces.
!
ADVERTENCIA
!
PRECAUCION
AVISO
Lavadoras a Presión
8 Sp
Operación (Continuación)
Unidades eléctricas con tanque de
detergente
Low Pressure
High Pressure
Figura 13- Ajuste de la boquilla para presión
Nozzle
4. Enjuague Final
5. Cierre
Page 32

9 Sp
Operación (Continuación)
5. Después de cada uso, limpie todas las superficies de la lavadora a presión con un paño
limpio y húmedo.
• No guarde la lavadora a presión al aire libre.
• No guarde la lavadora a presión donde podría
congelarse.
CONSEJOS PARA AMPLIAR LA
DURACIÓN DE SU LAVADORA A
PRESIÓN
1. Nunca opere la unidad sin agua.
2. Su lavadora a presión no está hecha para
bombear agua caliente. Nunca conecte su
lavadora a presión a un suministro de agua
caliente, ya que reducirá significativamente la
duración de la bomba.
3.El uso de detergentes que no sean de marca
Campbell Hausfeld puede causar daños a las
partes de la bomba (aros tóricos, sellos, etc.).
Esto vale también para químicos como blanqueadores, jabón de platos, etc.
4. El funcionamiento de la unidad por más de 1
minuto sin rociar agua hace que el calor se
acumule en la bomba. Esto maltrata muchos
de los componentes de la bomba, debiendo
evitarse esta práctica.
5. Suelte el gatillo antes de cambiar la presión de
la lanza de baja a alta o viceversa. El no hacerlo puede reducir la duración de los anillos en
'O' de la lanza.
6. Almacenamiento
Pre-Operation (Continued)
of surface damage. Large surface areas can be
cleaned more quickly using a wide fan pattern.
ADJUSTABLE PRESSURE NOZZLE
(NOT INCLUDED WITH ALL MODELS)
The adjustable pressure nozzle allows you to
vary the pressure of your spray by turning the
blue end of the nozzle. Turning the blue end
fully clockwise will reduce the pressure to its
minimum. If the pressure washer has a deter-
gent tank system you must use this minimum
pressure setting in order to suction detergent.
Turning the blue end fully counter-clockwise
will increase the pressure to its maximum for
greatest cleaning efficiency. Turning the blue
end changes the pressure but not the fan pat-
tern.
NOZZLE CLEANING INSTRUCTIONS
A clogged or partially clogged nozzle can
cause a significant reduction of water coming
out of the nozzle and cause the unit to pulsate
while spraying.
To clean out the nozzle:
•Turn off and unplug unit.
•Turn off water supply. Relieve any pressure
trapped in the hose by squeezing trigger 2-3
times.
• Separate lance from gun.
Figure 5 – Low Pressure Spray
Figure 6 – High Pressure Spray
Page 33

Lavadoras a Presión
10 Sp
Guía de Diagnóstico de Averías
La lavadora a presión no se enciende.
La bomba no
alcanza la presión necesaria.
La presión
fluctúa.
El motor se
apaga inesperadamente.
1. La unidad está presurizada.
2. El GFCI se ha disparado (si
está equipado así)
3. Enchufe mal conectado o
tomacorriente dañado.
4.
Cordón de extensión demasia-
do largo o tamaño del alambre demasiado pequeño.
5. El voltaje de la fuente es
demasiado bajo.
6. El interruptor térmico de
seguridad se disparó.
1. Filtro de entrada de agua
obstruido.
2. La bomba está succionando
aire de las conexiones de la
manguera.
3. Boquilla desgastada o del
tamaño incorrecto.
4. El descargador está obstruido
o desgastado.
5. Válvulas obstruidas o
desgastadas
1. La bomba absorbe aire.
2. Boquilla obstruida.
3. Válvulas sucias, desgastadas o
atascadas
4. Los sellos para agua están
desgastados.
1. El cordón de extensión es
demasiado largo o el
tamaño del alambre es
demasiado pequeño.
2. El interruptor térmico de
seguridad se disparó
porque se sobrecalentó.
1.
Presione el gatillo en la pistola.
2. Presione el botón de reposición en el enchufe.
3. Verifique el enchufe, el tomacorriente y los fusibles.
4. Quite el cordón de extensión
(ver la figura 4).
5. Cerciórese de que el voltaje de
la fuente sea el adecuado.
6. Apague la unidad y espere
hasta que el motor se enfríe.
1. Limpie el filtro de la entrada
del agua.
2. Cerciórese de que las conexiones y los anillos estén
bien apretados.
3. Llame al 1-800-330-0712
(sólo en EE.UU.)
4. Llame al 1-800-330-0712
(sólo en EE.UU.)
5. 5. Llame al 1-800-330-0712
(sólo en EE.UU.)
1. Cerciórese de que las
mangueras y las conexiones
estén bien apretadas.
2. Límpiela con el limpiador de
punta (ver la página 5).
3. Llame al 1-800-330-0712
(sólo en EE.UU.)
4. Llame al 1-800-330-0712
(sólo en EE.UU.)
1. Quite el cordón de extensión
(ver la figura 4).
2. Cerciórese de que el voltaje de
la fuente corresponda con las
especificaciones.
Problema Posible(s) Causa(s) Acciones a Tomar
Page 34

Guía de Diagnóstico de Averías
(Continuación)
No hay succión
de detergente
– unidades con
tanque.
No hay succión
de detergente
– unidades con
aplicadores
accesorios.
Comienza a
salir humo de
la unidad.
1. Boquilla de la lanza no en
posición de baja presión
2. Se está usando la
manguera de extensión de
alta presión, o la manguera
de alta presión es demasiado larga
3. Inyector de la bomba
atorado
El aplicador de detergente
está obstruido.
Motor sobrecalentado,
sobrecargado o dañado.
1.
Deslice la boquilla de la
lanza en la posición de presión baja (ver la pág. 8).
2. Quite la manguera de
extensión de alta presión o
use una manguera de alta
presión de menos de 25
pies.
3. Llame al 1-800-330-0712
(sólo en EE.UU.)
1. Limpie el aplicador con agua
tibia.
2.
Vuelva a colocar el aplicador.
Apague la unidad y llame al
1-800-330-0712 (sólo en
EE.UU.)
Problema Posible(s) Causa(s) Acciones a Tomar
11 Sp
ble-insulated product, nor should grounding
means be added to the product. Servicing a
double-insulated product requires extreme
care and knowledge of the system, and should
be done only by qualified
service personnel.
Replacement parts for a
double-insulated product
must be identical to the
original parts. A double-
insulated product is marked with the words
“Double Insulation” or “Double Insulated.”
Product may also be marked with symbol
shown in Figure 1.
exceeds the operating pressure of any
of the parts (hoses, fittings, etc.) in
the pressurized system. Ensure all
equipment and accessories are rated
to withstand the maximum working
pressure of the unit.
•NEVER spray flammable liquids or use pres-
sure washer in areas containing combustible
dust, liquids or vapors.
•Never operate this machine in a closed build-
ing or in or near an explosive environment
apparatus and wiring.
•Never disconnect the high pressure discharge
hose from the machine while the system is
pressurized. To depressurize machine, turn
power and water supply off, then press gun
trigger 2-3 times.
•Never permanently engage the trigger mech-
anism on the gun.
•Never operate the machine without all com-
ponents properly connected to the machine
(handle, gun/wand assembly, nozzle, etc.).
•ALWAYS turn water supply “ON” before turn-
ing pressure washer “ON.” Running pump
dry causes serious damage.
•Do not operate the pressure washer with the
inlet water screen removed. Keep screen
!
WARNING
!
WARNING
!
WARNING
!
WARNING
Safety and Warning Information (Continued)
Page 35

12 Sp
Garantía Limitada
1
. Duracion: De la fecha de compra por el comprador original y de acuerdo a las siguientes clasificaciones: Normas
(Standard Duty) – Un Año, Deber Serio (Serious Duty) - Dos Años, Deber Extremo (Extreme Duty) - Tres Años.
2. QUIEN OTORGA DA ÉSTA GARANTÍA (EL GARANTE): Campbell Hausfeld / Scott Fetzer Company, Harrison, Ohio,
45030, Teléfono: (800) 330-0712.
3. QUIEN RECIBE ÉSTA GARANTÍA (EL COMPRADOR): El comprador original (que no sea revendedor) de la
Lavadora de Presión Campbell Hausfeld.
4. PRODUCTOS CUBIERTOS POR ESTA GARANTÍA: Cualquier Lavadora de Presión Campbell Hausfeld fabricada o
distribuida por el garante.
5. LO QUÉ ÉSTA CUBIERTO POR ESTA GARANTÍA: Los defectos de material y/o de manufactura que ocurran dentro
del periodo de garantía con las excepciones anotadas abajo.
6. LO QUÉ NO ÉSTA CUBIERTO POR ESTA GARANTÍA:
A. Las garantías implícitas, incluyendo las garantías de comercialización y adecuación para un fin particular, son
limitadas a partir de la fecha de compra como se indica en el parrafo DURACIÓN. Si ésta lavadora de presión
es usada para trabajos comerciales, industriales o para renta, la garantía aplicada es de (90) días a partir de
la fecha de compra. En algunos estados no se permiten limitaciones a la duración de las garantías, en tal
caso esta limitacion no es aplicable.
B. CUALQUIER PERDIDA, DANO INCIDENTAL INDIRECTO O CONSECUENTE QUE PUEDE RESULTAR DE UN DEFEC-
TO, FALLA, O MALFUNCIONAMIENTO DE LA LAVADORA DE PRESIÓN CAMPBELL HAUSFELD. En algunos estados no se permiten la exclusión o limitación de daños incidentales o consecuentes y en tal caso esta limitacion o exclusión no es aplicable.
C. Cualquier falla que resulte por daños en la transportación, accidente, abuso, negligencia o incumplimiento
de las instrucciones de funcionamiento e instalacion indicadas en el manual suministrado con el producto.
D. El servicio al producto antes de la venta. Ejemplo ensamblaje, aceites o lubricantres, ajustes, etc.
E. Partes o ajestes requeridos normalmente en el mantenimiento de la lavadora de presión.
F. El motor de gasolina y sus componentes están expresamente excluídos de ésta garantía limitada. Estos com-
ponentes deben de ser devueltos por el comprador al fabricante original o a su taller de reparación autoriza-
do.
G. Partes adicionales no cubiertos en ésta garantía:
1. Desgaste normal en partes tales como mangueras de alta presión, sellos de agua o aceite, anillos, válvulas
y boquillas de spray.
2. Escobillas del motor (modelos eléctricos solamente).
3. Defectos esternos que no interfieren con su funcionamiento.
4. Componentes oxidados.
5. Desgaste de la bomba o daño de la válvula causado por uso de aceite inapropiado, contaminación del
aceite o por no seguir adecuadamente las recomendaciones de mantenimiento.
7. RESPONSABILIDADES DEL GARANTE BAJO ÉSTA GARANTÍA: Repare o reemplazar, como lo decida el garante, ya
sea la lavadora de presión o alguna de sus partes que se encuentre defectuoso, no funcione adecuadamente y/o
no cumpla de conformidad dentro del periodo de duración de la garantia.
8. RESPONSABILIDADES DEL COMPRADOR BAJO ESTA GARANTÍA:
A. Proporcionar prueba de la fecha de compra y registros de mantenimiento.
B. Entregar o enviar la lavadora de presión o su componente al centro de servicio autorizado Campbell
Hausfeld más cercano. Los costos de embarque, si son aplicables, serán pagados por el comprador.
C. Ser cuidadoso con el funcionamiento y mantenimiento de la lavadora de presión de acuerdo al manual(s) del
propietario.
9. CUANDO EFECTUARA EL GARANTE LA REPARACION O REEMPLAZO CUBIERTO POR ESTA GARANTÍA: La
reparación o reemplazo del equipo tomara el tiempo normal y de acuerdo a la carga de trabajo en ese momento el el centro de servicio y de acuerdo a la disponibilidad de refacciones.
Esta garantía limitada es válida sólo en los EE.UU., Canadá y México y otorga derechos legales específicos. También
usted podría tener otros derechos los cuales varían de estado a estado o de país a país.
Lavadoras a Presión
 Loading...