

Page 1
Instruções de Utilização e Manual de Peças
32 Pg
Garantia Limitada
1. DURAÇÃO: A partir da data de compra por parte do comprador original, da seguinte maneira: Campbell Hausfeld (Serviço Normal e
não declarados) – Um (1) ano, (Serviço intenso) – Dois (2) anos, (Serviço extremo) – Três (3) anos; IronForce pela Campbell Hausfeld –
Um (1) ano; Farmhand – Três (3) anos; Maxus – Cinco (5) anos.
2. QUEM CONCEDE ESTA GARANTIA (GARANTIDOR): Campbell Hausfeld / Scott Fetzer Company, 100 Production Drive, Harrison, Ohio,
45030, Telefone: (800) 543-6400
3. QUEM RECEBE ESTA GARANTIA (COMPRADOR): O comprador original (não para objetivo de revenda) dos produtos da Campbell
Hausfeld.
4. QUAIS SÃO OS PRODUTOS COBERTOS POR ESTA GARANTIA: Todos os pregadores, grampeadores, ferramentas pneumáticas, pistolas
de pulverização, enchedores de ar ou acessórios pneumáticos fornecidos e fabricados pelo Garantidor.
5. O QUE ESTÁ COBERTO NESTA GARANTIA: Defeitos substanciais de material e mão de obra que se apresentem durante o prazo de
garantia.
6. O QUE NÃO ESTÁ COBERTO NESTA GARANTIA:
A. Garantias implícitas, incluindo as de comerciabilidade e ADEQUAÇÃO PARA UM OBJETIVO ESPECÍFICO SÃO LIMITADAS A PARTIR
DA DATA DA COMPRA ORIGINAL, CONFORME ESTABELECIDO NO ITEM DURAÇÃO ACIMA. Se este produto for usado para
objetivos comerciais, industriais ou para aluguel, a garantia terá a duração de noventa (90) dias a partir da data de compra.
Alguns estados (nos Estados Unidos) não permitem limites referentes ao prazo de duração da garantia implícita, de forma que os
limites acima podem não se aplicar ao seu caso.
B. QUALQUER PERDA, DANO OU DESPESA INCIDENTAIS, INDIRETOS OU RESULTANTES QUE POSSAM RESULTAR DE QUALQUER
DEFEITO, FALHA OU MAU FUNCIONAMENTO DOS PRODUTOS DA CAMPBELL HAUSFELD. Alguns estados (nos Estados Unidos) não
permitem a exclusão ou limite de danos incidentais ou resultantes, de forma que o limite e exclusão acima podem não se aplicar
ao seu caso.
C. Qualquer falha resultante de acidente, abuso por parte do comprador, negligência ou da não operação do produto de acordo
com as instruções no(s) manual(ais) do proprietário que acompanha(m) este produto. Acidente, abuso por parte do comprador,
negligência, não operação dos produtos de acordo com as instruções incluirão também a retirada ou alteração de qualquer
dispositivo de segurança. Se tais dispositivos de segurança forem retirados ou alterados, esta garantia será anulada.
D. Ajustes normais que são explicados no(s) manu(ais) do proprietário fornecido com o produto.
E. Itens ou serviços normalmente exigidos para manter o produto, isto é, anéis em O, molas, amortecedores, proteções contra
detritos, lâminas acionadoras, fusíveis, baterias, gaxetas, vedações ou blindagens, bocais para líquidos, agulhas, bocais de jato de
areia, lubrificantes, mangueiras de materiais, elementos do filtro, palhetas de motor, abrasivos, lâminas, discos de cortar,
talhadoras, retentor de talhadoras, cortadores, pinças, pratos de tornos, mandíbulas de rebites, brocas para chave de fenda,
coxins de lixamento, coxins de apoio, mecanismo de impacto, ou qualquer outra parte consumível não incluída especificamente
nesta lista. Esses itens estarão cobertos apenas por noventa (90) dias a partir da data da compra original. Os itens sublinhados
possuem garantia apenas para defeitos de materiais e mão de obra.
F. Defeitos cosméticos que não interferem na função do produto.
7. RESPONSABILIDADES DO GARANTIDOR DE ACORDO COM ESTA GARANTIA: Consertar ou substituir, a critério do garantidor, produtos
ou componentes com defeitos, mau funcionamento e/ou falha durante o prazo de garantia.
8. RESPONSABILIDADES DO COMPRADOR DE ACORDO COM ESTA GARANTIA:
A. Fornecer comprovante de compra datado e registros de manutenção.
B. Ligue para 1-800-424-8936 para obter as suas opções de serviços de garantia. Os custos de frete são de responsabilidade do
comprador.
C. Usar cuidado adequado na operação e manutenção dos produtos conforme descrito no(s) manual(ais) do proprietário.
9. QUANDO O GARANTIDOR IRÁ CONSERTAR OU SUBSTITUIR DE ACORDO COM ESTA GARANTIA: Consertos ou substituições serão
programados e realizados de acordo com o fluxo de trabalho normal no local de conserto e dependendo da disponibilidade da peças
de substituição.
Esta garantia limitada é valida somente nos E.U.A., no Canadá e no México e oferece direitos legais específicos.Você pode também ter
outros direitos, que variam de um estado para outro (nos Estados Unidos), ou de um país para outro.
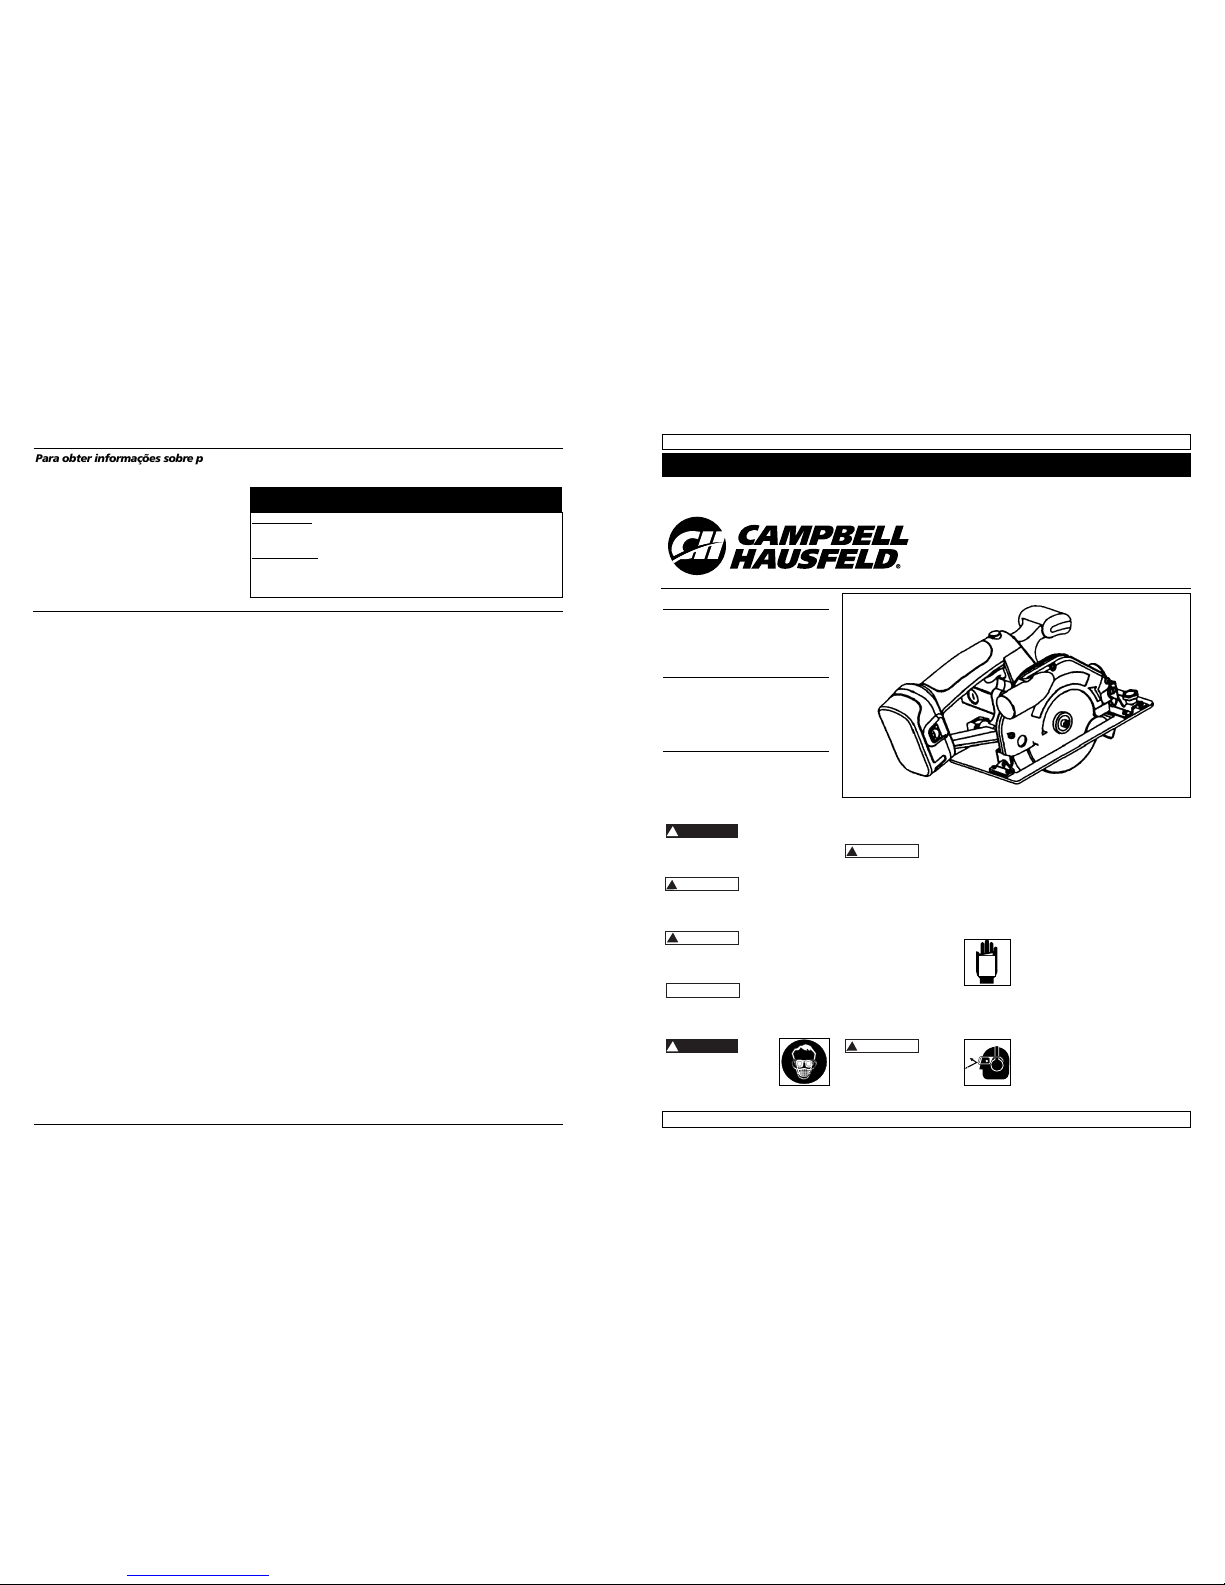
Operating Instructions and Parts Manual DG311800AV S
Cordless Circular Saw
5-1/2 in, 18.0 Volt
Please read and save these instructions. Read carefully before attempting to assemble, install, operate or maintain
the product described. Protect yourself and others by observing all safety information. Failure to comply with
instructions could result in personal injury and/or property damage! Retain instructions for future reference.
IN707601AV 4/06
For parts, product & service information
visit www.chpower.com
BUILT TO LAST
© 2006 Campbell Hausfeld/Scott Fetzer
See Warranty on page 8 for important information about commercial use of this product.
REMINDER: Keep your dated proof of purchase for warranty purposes! Attach it to this manual or file it for safekeeping.
Description
Circular saws are designed for cutting a
variety of materials. This tool is especially
useful for cutting lumber and wood
panels for various projects.
Unpacking
When unpacking this product, carefully
inspect for any damage that may have
occurred during transit.
General Safety
Information
This manual contains information that is
very important to know and understand.
This information is provided for SAFETY
and to PREVENT EQUIPMENT PROBLEMS.
To help recognize this information,
observe the following symbols.
Danger indicates
an imminently
hazardous situation which, if not
avoided, will result in death or serious
injury.
Warning indicates
a potentially
hazardous situation which, if not
avoided, could result in death or serious
injury.
Caution indicates a
potentially
hazardous situation which, if not
avoided, may result in minor or moderate
injury.
Notice indicates
important
information, that if not followed, may
cause damage to equipment.
CALIFORNIA PROPOSITION 65
You
can
create dust when you cut,
sand, drill or grind
materials such as wood,
paint, metal, concrete, cement, or other
masonry. This dust often contains
!
DANGER
NOTICE
!
CAUTION
!
WARNING
!
DANGER
chemicals known to cause cancer, birth
defects, or other reproductive harm.
Wear protective gear.
This product or its
power cord contains chemicals known
to the State of California to cause
cancer and birth defects or other
reproductive harm. Wash hands after
handling.
The following safety precautions must be
followed at all times along with any
other existing safety rules.
1. Read all manuals included
with this product
carefully. Be thoroughly
familiar with the controls
and the proper use of the equipment.
2. Only persons well acquainted with
these rules of safe operation should
be allowed to use the saw.
Safety
glasses and ear protection
must be worn during
operation.
3. Do not wear loose fitting clothing,
scarves, or neck ties in work area.
!
WARNING
!
WARNING
Loose clothing may become caught
in moving parts and result in serious
personal injury.
4. Do not wear jewelry when
operating any tool. Jewelry may
become caught in moving parts and
result in serious personal injury.
5. Always use attachments designed
for use with this tool. Do not use
damaged or worn attachments.
6. Never trigger the tool when not
applied to a work object.
Attachments must be securely
attached. Loose attachments can
cause serious injury.
7. Never point a tool at oneself or any
other person. Serious injury could
occur.
8. Use steady, even pressure when
using tool. Do not force. Too much
pressure can cause blade to break
or overheat.
9. Keep all nuts, bolts and screws tight
and ensure equipment is in safe
working condition.
10. Do not put hands near or under
moving parts.
MANUAL
;;;;;;
;;;;;;
;;;;;;
;;;;;;
Para obter informações sobre peças de reposição ou assistência técnica, ligue para 1-800-424-8936
Favor fornecer as seguintes informações:
- Número do modelo
- Número de série (se houver)
- Descrição e número da peça segundo a lista de peças
Envie correspondências para:
Campbell Hausfeld
Attn: Customer Service
100 Production Drive
Harrison, OH 45030 U.S.A.
Número
Descrição da peça
Lista de peças de reposição
CARGA RÁPIDA
Carregador – 22V (para bateria de 18V) DG024700AV
Bateria – 18V DG024900AV
CARGA NORMAL
Carregador – 22V (para bateria de 18V) DG024300AV
Bateria – 18V DG024200AV
Adaptador do carregador DG024400AV
Page 2
DG311800AV
31 Pg
Operação (Continuação)
a madeira com espessura de 1 polegada
à peça de trabalho e use a margem
interna da sapata como guia.
Corte transversal
O corte transversal consiste no corte
realizado transversalmente ao grão da
madeira. Selecione a lâmina
apropriada para o seu trabalho.
Avance a serra lentamente para evitar
o estilhaçamento da madeira.
Corte profundo
Os cortes profundos são realizados no
meio da peça de trabalho quando é
impossível realizar o corte a partir de
uma borda. Recomendamos o uso de
uma serra alternada ou uma serra
tico-tico para esse tipo de corte.
Entretanto, se você precisar usar uma
serra circular para realizar um corte
profundo, FAÇA COM EXTREMO
CUIDADO.
Para manter o controle da serra
durante o corte profundo, segure a
serra com as duas mãos.
1. Começando por um canto, alinhe a
linha de visão com a linha de corte.
Incline a serra para frente, fixando
firmemente a parte dianteira da
sapata na peça de trabalho. A
lâmina deve estar logo acima da
linha de corte, mas sem tocá-la.
Levante o guia inferior usando para
isso a sua alavanca.
2. Para iniciar o funcionamento da
serra, aperte o botão de
desbloqueio e ao mesmo tempo
puxe o gatilho. Espere que o motor
atinja a velocidade máxima antes
de iniciar o corte. Usando a parte
dianteira da sapata como um ponto
de articulação, abaixe
gradualmente a extremidade
traseira da serra contra a peça de
trabalho. Solte a alavanca do guia e
agarre o cabo frontal.
3. Quando a sapata estiver nivelada
contra a peça de trabalho, avance a
serra para o canto mais adiante.
Solte o gatilho e espere que a
lâmina pare completamente antes
de removê-la da peça de trabalho.
Repita os passos descritos acima a
partir de cada lado da abertura.
Use uma serra alternada, serra ticotico ou uma pequena serra manual
para dar acabamento aos cantos
caso os mesmos não estejam
totalmente cortados.
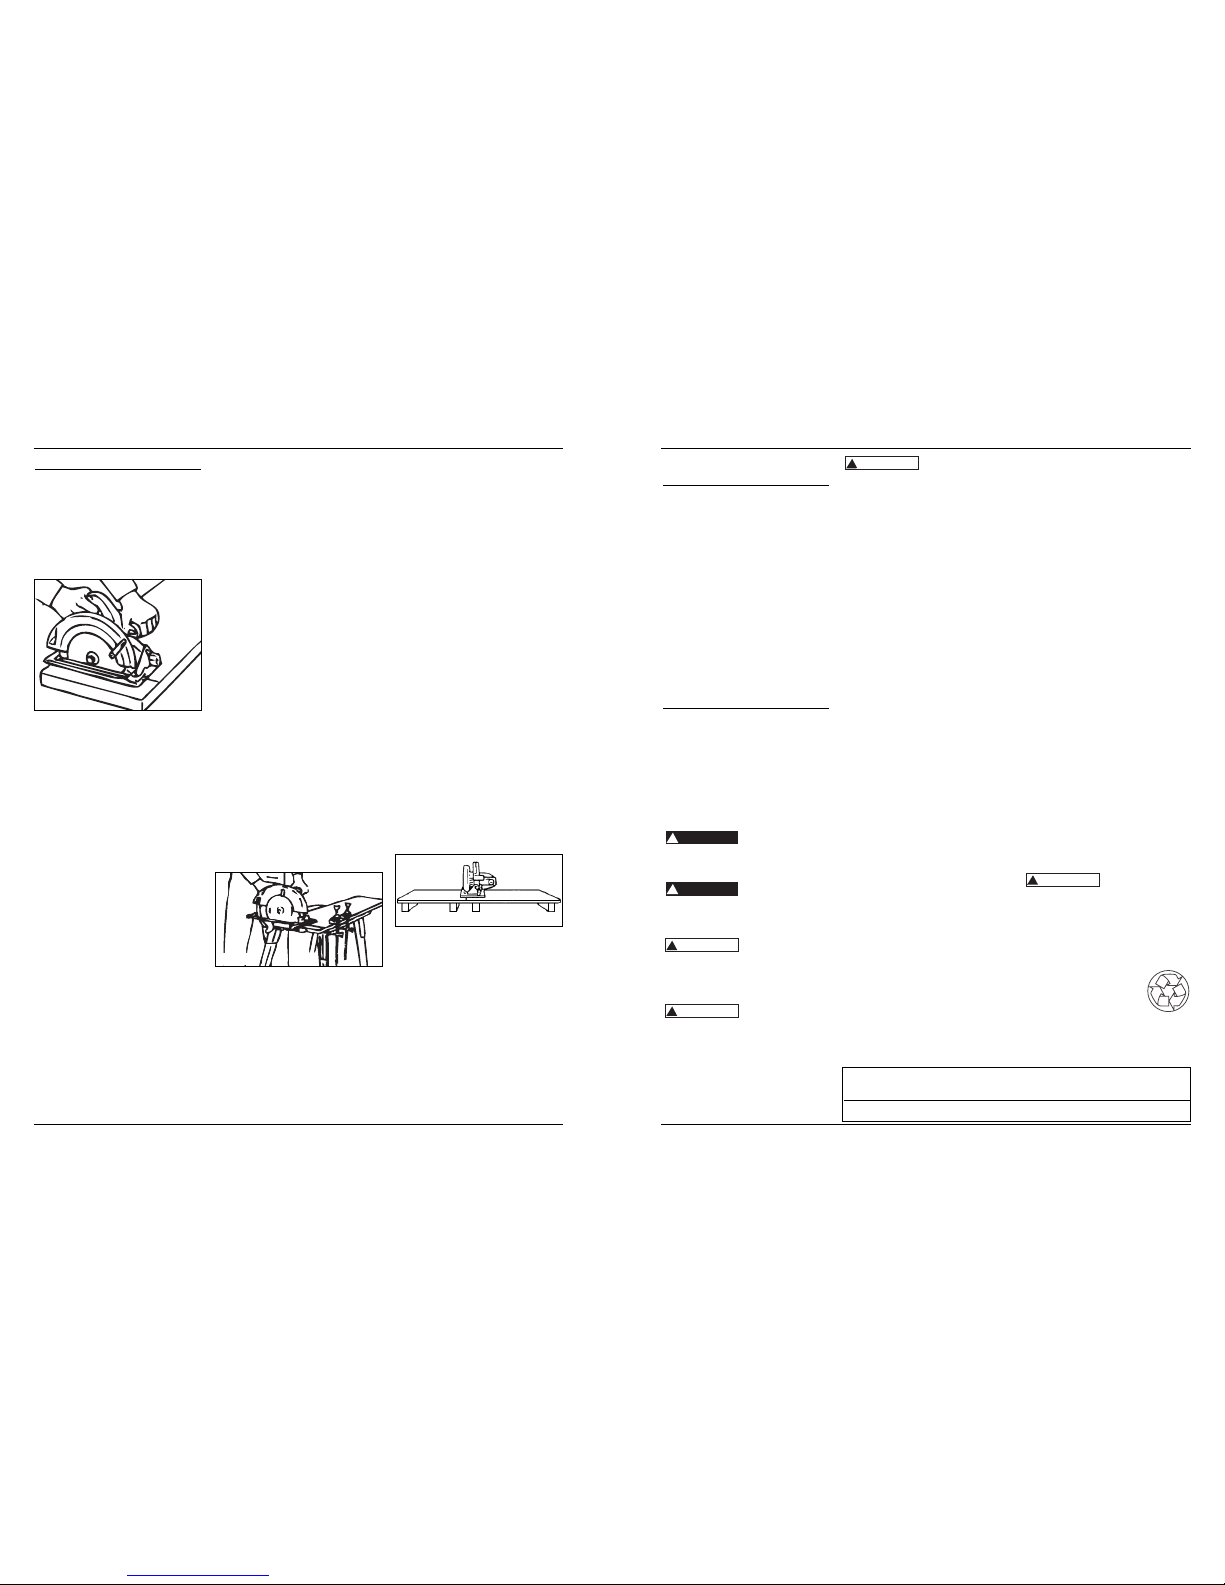
RÉGUA-GUIA
A régua-guia permite que você realize
cortes retilíneos com precisão.
Simplesmente deslize a régua-guia
ajustando-a perfeitamente contra a
parte lateral da peça de trabalho e
fixe-a com o parafuso do grampo na
parte frontal da base. A régua-guia
também pode ser usada para realizar
cortes repetidos de tamanho uniforme.
FREIO ELÉTRICO
O freio elétrico entra em ação quando
o gatilho é solto, fazendo com que a
lâmina pare e permitindo que você
prossiga com o seu trabalho. Em geral,
a lâmina da serra pára dentro de dois
segundos. Entretanto, pode ocorrer
um atraso entre a liberação do gatilho
e a funcionamento do freio.
Ocasionalmente, o freio pode deixar
de funcionar completamente. Se o
freio falhar com freqüência, a serra
necessita de serviços de reparo em uma
assistência técnica autorizada.O freio
não é um substituto para o protetor e
você sempre deve esperar que a lâmina
pare completamente antes de retirar
a serra da peça de trabalho.
AJUSTE DO ÂNGULO
Certifique-se sempre de que a
ferramenta esteja desligada.
Desconecte a bateria da ferramenta. A
base pode ser ajustada até 45°
afrouxando o botão de ajuste do
ângulo na parte frontal da serra.
Faça o alinhamento para o ângulo
desejado no quadrante calibrado.
A seguir, aperte o botão de ajuste do
ângulo. A maior quantidade de lâmina
presente dentro da peça de trabalho
e a diminuição da estabilidade da base
podem fazer com que a lâmina fique
presa.
Mantenha a serra e a base firmes na
peça de trabalho.
AJUSTE DA PROFUNDIDADE
Certifique-se sempre de que a
ferramenta esteja desligada.
Desconecte a bateria da ferramenta.
Afrouxe a alavanca no guia de
profundidade e movimente a base
para cima ou para baixo. Ao alcançar a
profundidade de corte desejada,
aperte a alavanca para fixar a base.
Manutenção
A manutenção da ferramenta deve ser
realizada somente por pessoal
qualificado em consertos. O conserto
ou manutenção realizado por pessoas
não qualificadas pode provocar risco
de lesões.
Mantenha a ferramenta, a bateria e o
carregador em boas condições
realizando a manutenção periódica.
Após 6 meses a um ano, dependendo
do uso, envie a ferramenta, a bateria e
o carregador para uma assistência
técnica da Campbell Hausfeld para:
• Lubrificação
• Inspeção da escova
• Inspeção mecânica e limpeza
• Inspeção elétrica
• Testes para garantir o
funcionamento correto
Se a ferramenta não começa a
funcionar ou não opera em sua
potência máxima com uma bateria
completamente carregada, limpe os
contatos da bateria. Se ainda assim a
ferramenta não funcionar
adequadamente, envie a ferramenta, o
carregador e a bateria para uma
assistência técnica para reparos.
Substituição das escovas de carvão
Remova e verifique as escovas de
carvão periodicamente. Estas devem
ser substituídas quando se tornam
gastas até marca limite. Mantenha as
escovas de carvão limpas e livres para
deslizarem sem problemas nos portaescovas. Ambas as escovas de carvão
devem ser substituídas ao mesmo
tempo. Use apenas escovas de carvão
idênticas.
Use uma chave de fendas para remover
as tampas do porta-escovas. Retire as
escovas de carvão gastas, insira as
escovas novas e aperte as tampas do
porta-escovas novamente.
Limpeza
Remova os pós e detritos dos respiros
e dos contatos elétricos por meio do
uso de ar comprimido. Os cabos da
ferramenta devem ser mantidos
limpos, secos e livres de óleo ou graxa.
Use apenas sabão suave e tecido
úmido para limpar a ferramenta, a
bateria e o carregador, mantendo-os
afastados de todos os contatos
elétricos.
Certos agentes de limpeza danificam
plásticos e outras peças com
isolamento. Alguns desses incluem a
gasolina, turpentina, diluente de
verniz, diluente de tintas, solventes
clorados usados para limpeza, amônia
e detergentes de uso doméstico
contendo amônia.
Nunca use solventes inflamáveis ou
combustíveis próximos às ferramentas.
A FERRAMENTA NÃO FUNCIONA
Caso a ferramenta não funcione,
certifique-se de que a bateria esteja
carregada e instalada na serra.
BATERIA
A bateria se descarrega por si só sem
sofrer danos quando guardada por
longos períodos de tempo e é possível
que seja necessário recarregá-la antes
do uso.
ASSISTÊNCIA TÉCNICA
Para obter informações a respeito
do funcionamento ou conserto desse
produto, favor ligar para
1-800-424-8936.
A
manutenção da ferramenta deve ser
realizada somente por pessoal
qualificado em consertos. O conserto
ou manutenção realizado por pessoas
não qualificadas pode provocar risco
de lesões.
!
CUIDADO
General Safety
Information (Cont’d.)
WORK AREA
Do not operate a
power tool in an explosive atmosphere,
such as in the presence of flammable
liquids, gases, or dust. Power tools
create sparks which may ignite the
fumes or dust.
Keep work area
clean and well lighted. Cluttered
benches and dark areas invite
accidents.
Keep bystanders,
children, and visitors away while
operating a power tool. Distractions
can cause you to lose control.
ELECTRICAL SAFETY
Recharge this
battery-operated tool only with the
charger specified for the battery. A
charger suitable for one type of battery
can create a risk of fire when used with
another battery.
Do not expose
power tools to rain or wet conditions.
Water entering a power tool will
increase the risk of electric shock.
Use this batteryoperated tool only with its designated
battery pack. Use of any other batteries
may create a risk of fire.
Avoid body contact
with grounded surfaces such as pipes,
radiators, ranges, and refrigerators.
There is an increased risk of electric
shock if your body is grounded.
PERSONAL SAFETY
Do not misuse this
product. Excessive exposure to
vibration, work in awkward positions,
and repetitive work motions can cause
injury to hands and arms. Stop using
any tool if discomfort, numbness,
tingling, or pain occur, and consult a
physician.
1. Stay alert, watch what you are
doing, and use common sense when
operating a power tool. Do not use
tool while tired or under the
!
WARNING
!
WARNING
!
WARNING
!
WARNING
!
WARNING
!
CAUTION
!
CAUTION
!
WARNING
influence of drugs, alcohol, or
medication. A moment of
inattention while operating power
tools may result in serious personal
injury.
Avoid accidental
starting. Be sure switch is in the locked
or off position before inserting battery
pack, making any adjustments,
changing accessories, or storing the
tool. Carrying tools with your finger on
the switch or inserting the battery pack
into a tool with the switch on invites
accidents.
2. Remove adjusting keys or wrenches
before turning on the tool. A key or
wrench attached to a rotating part
of the tool may result in personal
injury.
3. Do not overreach. Keep proper
footing and balance at all times.
Proper footing and balance enable
better control of the tool in
unexpected situations.
4. Always work in a well-ventilated
area. Wear an OSHA-approved dust
mask and safety glasses.
5. Hold tool by insulated gripping
surface when performing an
operation where the tool may
contact hidden wiring. Contacting a
“live” wire will make exposed metal
parts of the tool “live” and shock
the operator.
6. Keep hands away from rotating
parts.
7. Use clamps or another practical way
to secure the workpiece to a stable
platform. Never hold work in your
hand, lap, or against other parts of
your body when cutting.
8. Always use blades with correct size
and shape (diamond vs. round)
arbor holes. Blades that do not
match the mounting hardware of
the saw will run eccentrically,
causing great risk or injury to the
user and damage to the tool.
TOOL USE AND CARE
Do not use tool if
switch does not turn it on or off. Any
tool that cannot be controlled with the
switch is dangerous and must be
repaired.
Ensure the switch is
in the off position before inserting
battery pack. Inserting the battery pack
into the saw with the switch on invites
accidents.
!
WARNING
!
WARNING
!
CAUTION
Under abusive
conditions, liquid may be ejected from
the battery. Avoid contact. If contact
accidentally occurs, flush with water. If
liquid contacts eyes, seek medical help.
Liquid ejected from the battery may
cause irritation or burns.
1. When battery pack is not in use,
keep it away from metal objects
such as paper clips, coins, keys,
nails, or screws that can make a
connection from one terminal to
another. Shorting the battery
terminals together may cause
sparks, burns, a fire, or damage to
the battery.
2. This tool must NOT be modified or
used for any application other than
that for which it was designed.
Do not force the
tool. Use the correct tool for your
application. The correct tool will do the
job better and safer at the rate for
which it is designed.
3. Maintain tools with care. Keep
cutting tools sharp and clean.
Properly maintained tools with
sharp cutting edges are less likely
to bind and are easier to control.
4. Check for misalignment or binding
of moving parts, breakage of parts,
and any other condition that may
affect the tool’s operation. If
damaged, have the tool serviced
before using. Many accidents are
caused by poorly maintained tools.
!
CAUTION
!
WARNING
2
www.chpower.com
Operating Instructions and Parts Manual
Specifications
Tool
Model number DG311800AV
Voltage rating 18V
Charge time
Normal Charger: 3 - 6 hours
Battery pack – 18V DG024200AV
Charger – 22V DG024300AV
Fast Charger: 1 - 2 hours
Battery pack – 18V DG024900AV
Charger – 22V DG024700AV
Maximum Capabilities
Blade 5-1/2"
Blade arbor hole Round
Depth of cut at 90° 1-17/32"
Depth of cut at 45° 1-1/4"
Page 3
Instruções de Utilização e Manual de Peças
30 Pg
Operação (Continuação)
utilização incorretos, podendo ser
evitado tomando as devidas precauções
conforme indicadas a seguir:
1. Mantenha a serra firmemente segura
com ambas as mãos e posicione o seu
corpo e o braço para resistirem às
forças do RESSALTO. As forças do
RESSALTO podem ser controladas
pelo operador desde que sejam
tomadas precauções apropriadas.
2. Quando a lâmina começar a
prender, ou quando interromper
um corte por qualquer razão, solte
o gatilho e mantenha a serra
estacionária no material até a
lâmina parar completamente.
Nunca tente retirar a serra da peça
de trabalho, ou puxá-la para trás
com a lâmina em movimento; caso
contrário, poderá ocorrer um
RESSALTO. Investigue e tome as
medidas de correção necessárias
para evitar que a lâmina se prenda.
3. Quando colocar novamente a serra
na peça de trabalho, centralize a
lâmina da serra no corte e
certifique-se de que os dentes da
serra não estão enterrados no
material. Se a lâmina da serra
estiver prendendo, a serra poderá
levantar ou RESSALTAR da peça de
trabalho quando for ligada.
4. Apóie os painéis grandes para
minimizar o risco de que a lâmina se
prenda e a serra RESSALTE. Os painéis
grandes tendem a cair em razão do
seu próprio peso. Devem ser
colocados apoios sob o painel de
ambos os lados, próximos à linha de
corte e próximos à margem do painel.
5. Não use lâminas cegas ou danificadas.
As lâminas não afiadas ou
incorretamente montadas produzem
um corte estreito, provocando um
atrito excessivo, fazendo com que a
lâmina se prenda e a serra RESSALTE.
6. As alavancas de definição da
profundidade da lâmina e de ajuste
do ângulo devem estar bem fixas
antes de iniciar o corte. Se o ajuste
da lâmina se alterar durante o corte,
isso pode fazer com que a lâmina se
prenda e a serra RESSALTE.
7. Tome cuidado especial ao fazer cortes
profundos em paredes ou outras
áreas cegas. A lâmina pode cortar
objetos que provocam um RESSALTO.
8. Ajuste a profundidade de corte para
não mais que 1/8 a 1/4 polegada
maior que a espessura do material.
Quanto menor a exposição da
lâmina, menor a possibilidade de
que a mesma se prenda e ocorra um
RESSALTO. Antes de realizar o corte,
certifique-se de que os ajustes da
profundidade e do ângulo estejam
precisos.
9. Tome cuidado com as madeiras com
grande quantidade de betume, ou
que apresentam-se úmidas,
empenadas ou com nós. Essas
situações são mais prováveis de
fazerem com que a lâmina se
prenda e possivelmente causar um
RESSALTO. A madeira empenada
não deve ser serrada. Evite cortar
pregos com a ferramenta.
10. Use um guia de serra ou um guia de
borda ao serrar a madeira. Os guias
aumentam o controle e diminuem a
possibilidade de que a lâmina fique
presa.
11. Fique atento. Qualquer distração
pode fazer com que a lâmina seja
torcida ou fique presa. Os cortes
repetitivos podem levar o usuário
a realizar movimentos descuidados.
OPERAÇÃO GERAL
A peça de trabalho sempre deve ser
presa firmemente no cavalete ou na
bancada da serra.
1. Trace uma linha de corte. Posicione
a parte frontal da sapata sobre a
borda da peça de trabalho sem
fazer contato com a lâmina. Segure
o cabo com uma mão e o cabo
frontal com a outra mão.
2. Alinhe a linha de visão com a linha
de corte. Posicione os seus braços e
o seu corpo de maneira a resistirem
o RESSALTO.
3. Para iniciar o funcionamento da serra,
aperte o botão de desbloqueio e ao
mesmo tempo puxe o gatilho. Espere
que o motor atinja a velocidade
máxima antes de iniciar o corte.
4. Durante o trabalho de corte,
mantenha a sapata nivelada contra
a peça de trabalho e sempre segure
firmemente a serra. Não force a
serra contra a peça de trabalho pois
isso pode causar um RESSALTO.
5. Se estiver realizando um corte parcial,
reiniciando um corte inacabado ou
corrigindo a direção do corte, espere
que a lâmina pare completamente.
Para reiniciar o corte, centralize a
lâmina no corte da serra, retraia a
serra alguns centímetros do gume,
aperte o botão de desbloqueio e ao
mesmo tempo puxe o gatilho e
reinicie lentamente o corte.
6. Se a lâmina começar a prender e
parar, segure a serra com firmeza
e solte o gatilho imediatamente.
Mantenha a serra estacionária no
material até a lâmina parar
completamente.
7. Após terminar um corte, certifique-se
de fechar o protetor inferior e esperar
que lâmina pare completamente
antes de colocar a serra de lado.
Corte de painéis e pranchas
Os grandes painéis e pranchas podem se
curvar ou dobrar se não forem apoiados
corretamente. Se você tentar realizar o
corte sem antes nivelar e apoiar
adequadamente a peça de trabalho,
a lâmina tenderá a se prender e isso
poderá causar o RESSALTO. Apóie os
grandes painéis. Certifique-se de ajustar
a profundidade do corte de maneira
que o corte seja realizado somente na
peça de trabalho e não atinja os apoios.
Serração na direção do fio
A serração na direção do fio é o corte
no sentido do comprimento do grão da
madeira. Selecione a lâmina apropriada
para o seu trabalho. Use um guia de
abertura para as fendas com largura
igual ou menor que 4 polegadas. Para
instalar o guia de abertura, deslize a
barra através do slot do guia de
abertura em um dos lados da sapata. A
largura do corte é a distância entre o
interior da lâmina e a margem interna
do guia de abertura.
Ajuste o guia de abertura para a largura
desejada e trave esse ajuste apertando o
botão do guia de abertura.
Quando realizar aberturas de fendas
maiores que 4 polegadas, prenda ou fixe
General Safety
Information (Cont’d.)
5. Use only accessories that are
recommended by the manufacturer
for your model. Accessories suitable
for one tool may create a risk of
injury when used on another tool.
6. Some wood contains preservatives
which can be toxic. Take extra care
to prevent inhalation and skin
contact when working with these
materials. Request and follow all
safety information available from
your material supplier.
7. Store tools out of reach of children
and other untrained persons. Tools
are dangerous in the hands of
untrained users.
Safety Instructions
for Charger and
Batteries
Before using battery charger, read all
instructions on battery charger, battery
pack, and product.
1. A battery-operated tool with
integral batteries or a separate
battery pack must be recharged
only with the specified charger for
the battery. A charger that may be
suitable for one type of battery may
create a risk of fire when used with
another battery.
24 volts DC present
at charging terminals. Do not probe with
conductive objects. Danger of electrical
shock or electrocution.
If battery pack case
is cracked or damaged, do not insert into
charger. Danger of electrical shock or
electrocution.
Avoid body contact
with grounded surfaces such as pipes,
radiators, ranges, and refrigerators.
There is an increased risk of electric
shock if your body is grounded.
Charger plugs must
match the outlet. Never modify the
plug in any way. Do not use adapter
plugs with grounded chargers.
Unmodified plugs and matching
outlets will reduce the risk of
electric shock.
!
WARNING
!
WARNING
!
DANGER
!
DANGER
Do not abuse cord.
• Never carry charger by its cord.
• Never pull the cord to disconnect
from receptacle. Pull charger case
rather than cord when
disconnecting charger.
2. Do not operate charger with
damaged cord or plug.
• Have a damaged or worn power
cord and/or strain relief replaced
immediately.
• Do not attempt to repair power
cord.
3. Make sure cord is located so that it
will not be stepped on, tripped
over, or otherwise subjected to
damage or stress.
4. Do not operate charger if it has
received a sharp blow, been
dropped, or otherwise damaged.
Take it to a qualified serviceman.
5. Do not disassemble charger or
battery pack. Take it to a qualified
serviceman when service or repair is
required. Incorrect reassembly may
result in a risk of electric shock or
fire.
6. Do not use an extension cord unless
absolutely necessary. Use of
improper extension cord could
result in a risk of fire and electric
shock. If an extension cord must be
used, make sure:
• That the size of the cord is at least
as specified in chart titled
“Minimum Wire Size (AWG) of
Extension Cord for Battery
Charger.”
• That the pins on plug of extension
cord are the same number, size and
shape as those of plug on charger.
• That the extension cord is
properly wired and in good
electrical condition.
• If an extension cord is to be used
outdoors it must be marked with
the suffix “W-A” or “W” following
the cord type designation to
indicate it is acceptable for outdoor
use. For example – SJTW-A
7. Unplug charger from outlet before
attempting any maintenance or
cleaning.
8. Charge the battery pack in a wellventilated area. Do not allow any
object to cover the charger and/or
battery pack while charging.
!
WARNING
9. Do not store the charger or battery
pack in locations where the
temperature may reach or exceed
105°F (40°C), such as a metal tool
shed, or a car in the summer. This
can lead to deterioration of the
storage battery.
10. For optimal charging of the battery
pack, charge it in temperatures
between 65°-75° F (18°-24°C). Do
not charge the battery pack in an
air temperature below 40°F (4° C),
or above 105°F (40° C). Charging the
battery outside of this range can
adversely affect battery
performance.
11. Do not charge battery in damp or
wet locations.
12. Do not charge battery pack if it
feels hot to the touch. Wait for it to
cool.
13. Do not expose charger to rain, snow
or frost.
14. Do not incinerate battery pack. It
can explode in a fire.
15. Battery charger is not intended for
any other uses other than charging
the rechargeable battery. Any other
uses may result in risk of fire,
electrical shock, or electrocution.
16. The charger is ventilated through
slots in the top and the bottom of
the housing. Do not block the
ventilation slots or place in a
location where ventilation slots may
become blocked. Intense heat and
risk of fire may result.
BATTERY DISPOSAL
Do not attempt to
disassemble the battery or remove any
component projecting from the battery
terminals. Fire or injury may result.
Prior to disposal, protect exposed
terminals with heavy insulating tape to
prevent shorting.
NICKEL-CADMIUM BATTERY
• If equipped with a
nickel-cadmium battery,
the battery must be
recycled or disposed of
in an environmentally
sound manner. Check with your
county’s Public Works Department
for information on recycling
batteries.
!
WARNING
3
www.chpower.com
DG311800AV
Figure 4
Figure 5
Figure 6
Length of Cord in Feet 25 50 100 150
AWG Size of Cord 18 18 18 16
Minimum Wire Size (AWG) of Extension Cord for Battery Charger
Page 4
DG311800AV
29 Pg
Montagem
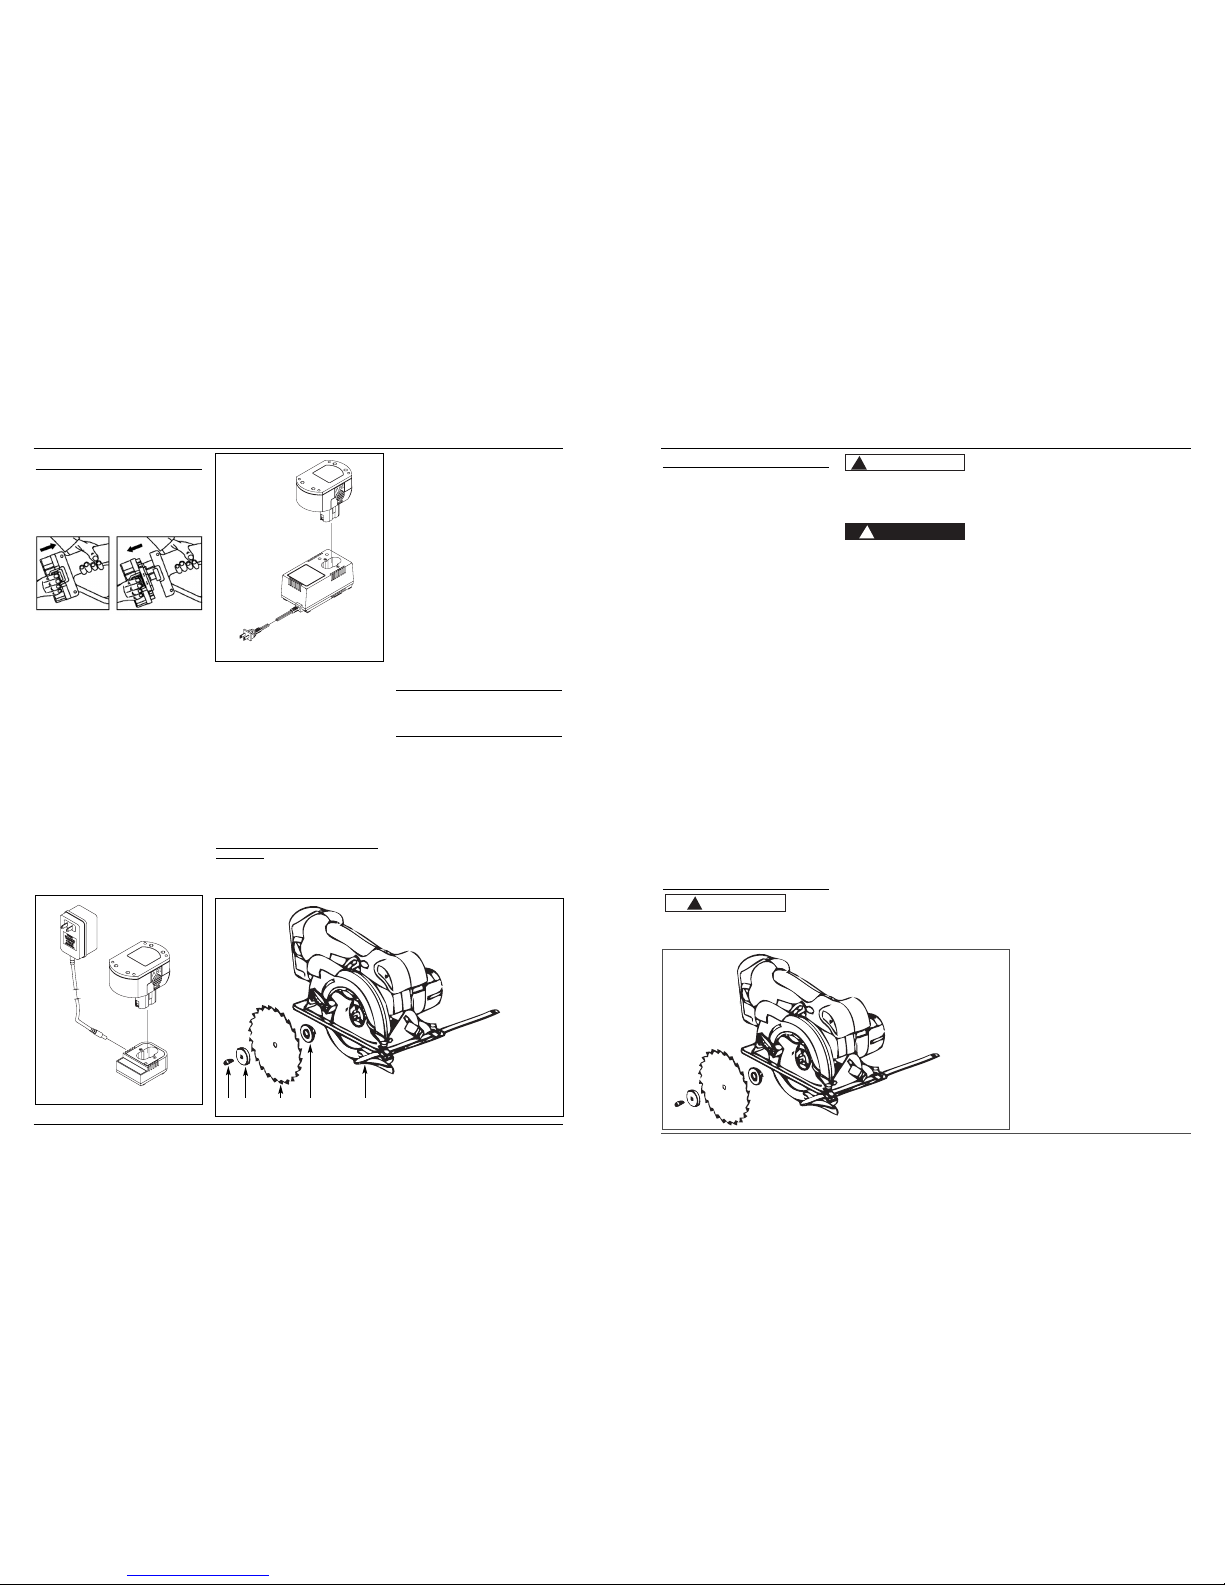
ACOPLAMENTO DA LÂMINA
Sempre desconecte a bateria da
ferramenta e coloque o interruptor na
posição travada ou desligada antes de
realizar qualquer montagem, ajustes
ou troca de acessórios. Essas medidas
preventivas de segurança reduzem o
risco de funcionamento acidental da
ferramenta.
1. Gire o parafuso do eixo em sentido
anti-horário e remova a ARRUELA
EXTERNA.
2. Recolha o protetor inferior
completamente para cima e para
dentro do protetor superior. Ao
recolher o protetor inferior,
verifique o funcionamento e as
condições da MOLA DO PROTETOR
INFERIOR. Pressione e segure o
botão de travamento do eixo na
parte posterior do protetor superior
para travar a lâmina e o eixo de
transmissão do motor.
3. Certifique-se de que os dentes da
serra e a seta existente na lâmina
apontam para a mesma direção que
a seta existente no protetor inferior.
Os dentes da lâmina devem estar
voltados na mesma direção conforme
ilustrado abaixo se a lâmina estiver
instalada corretamente.
4. Deslize a lâmina pelo slot na base
e monte-a de encontro com a
ARRUELA INTERNA no eixo.
Certifique-se de que o diâmetro
maior da arruela EXTERNA esteja
assentado rente à lâmina.
5. Reinstale a ARRUELA EXTERNA e
aperte firmemente o parafuso do
eixo.
Operação
Devem
ser usados óculos de segurança
durante a operação.
!
AVISO
Assegurese de que o trabalho esteja fixado de
maneira segura em um torno de bancada
ou preso ao local antes de iniciar a
operação de perfuração. O trabalho solto
pode girar e causar lesão corporal.
Mantenha as mãos afastadas da área de
corte e da lâmina. Mantenha a sua outra
mão no cabo auxiliar ou na carcaça do
motor.
Se as duas mãos estiverem segurando a
serra, elas não podem ser cortadas pela
lâmina. Segure firmemente a serra
para prevenir a perda de controle.
NUNCA coloque a sua mão atrás da
lâmina da serra uma vez que o ressalto
pode fazer com que a serra salte para
trás e atinja a sua mão.
Mantenha o seu corpo posicionado em
um dos lados em relação à lâmina da
serra, mas não alinhado com a mesma.
O RESSALTO pode fazer com que a
serra salte para trás. (Veja “Causas de
Ressalto e Prevenção pelo Usuário”.)
Não coloque a mão por baixo da peça
de trabalho. O protetor não é capaz de
protegê-lo da lâmina por abaixo da
peça de trabalho.
Não tente remover o material cortado
enquanto a lâmina estiver em
movimento. Verifique o protetor
inferior quanto ao fechamento correto
antes de cada uso.
Não utilize a serra caso o protetor
inferior não se movimente livremente e
se não feche instantaneamente. Nunca
prenda ou amarre o protetor inferior
na posição aberta. Se a serra for
derrubada acidentalmente, o protetor
inferior poderá ficar deformado.
Levante o protetor inferior somente
com a Alavanca para Levantar o
Protetor Inferior e certifique-se de que
o mesmo se movimenta livremente e
não toca a lâmina ou qualquer outra
peça, qualquer que seja o ângulo ou
profundidade do corte.
!
PERIGO
!
CUIDADO
Verifique a operação da mola do
protetor inferior. Se o protetor e a mola
não estiverem funcionando
corretamente, devem ser reparados
antes de serem usados. O protetor
inferior pode funcionar de maneira mais
lenta em razão de peças danificadas,
acúmulo de viscosidade ou de detritos.
Desconecte a bateria da ferramenta.
Remova periodicamente a lâmina, limpe
os protetores e área central com
querosene e seque esses locais ou utilize
ar comprimido para a limpeza.
O protetor inferior deve ser retraído
manualmente apenas para cortes
especiais como os “Cortes Profundos”
e “Cortes Compostos”. Levante o
protetor inferior utilizando a Alavanca
para Levantar o Protetor Inferior. Assim
que a lâmina penetrar no material, o
protetor inferior deve ser liberado.
Para todos os outros tipos de serração,
o protetor inferior deve funcionar
automaticamente.
Observe sempre que o guia inferior
esteja cobrindo a lâmina antes de
colocar a serra na bancada ou no chão.
Uma lâmina desprotegida em
desaceleração fará com que a serra se
movimente para trás e corte tudo que
esteja em seu caminho. Esteja ciente
sobre o tempo necessário para a
lâmina parar totalmente após ter
desligado o interruptor.
NUNCA segure a peça que está sendo
cortada com as mãos e nem a coloque
sobre as pernas. É importante apoiar
corretamente a peça de trabalho para
minimizar os perigos para o corpo, e
reduzir a possibilidade de que a lâmina
fique presa ou a perda de controle da
ferramenta.
CAUSAS DE RESSALTO E
PREVENÇÃO PELO USUÁRIO:
RESSALTO é uma reação súbita a uma
lâmina comprimida, presa ou
desalinhada, fazendo com que a serra
descontrolada saia da peça de trabalho
e recue na direção do operador.
Quando o corte se estreita e chega a
prender completamente a lâmina, esta
pára e a reação do motor faz recuar a
unidade rapidamente em direção ao
operador.
Se a lâmina torcer ou perder o
alinhamento no corte, os dentes da
parte de trás da lâmina podem penetrar
na superfície superior da madeira,
fazendo com que a lâmina saia do corte
e ressalte na direção do operador.
O RESSALTO é o resultado de uma má
utilização da ferramenta e/ou
condições ou procedimentos de
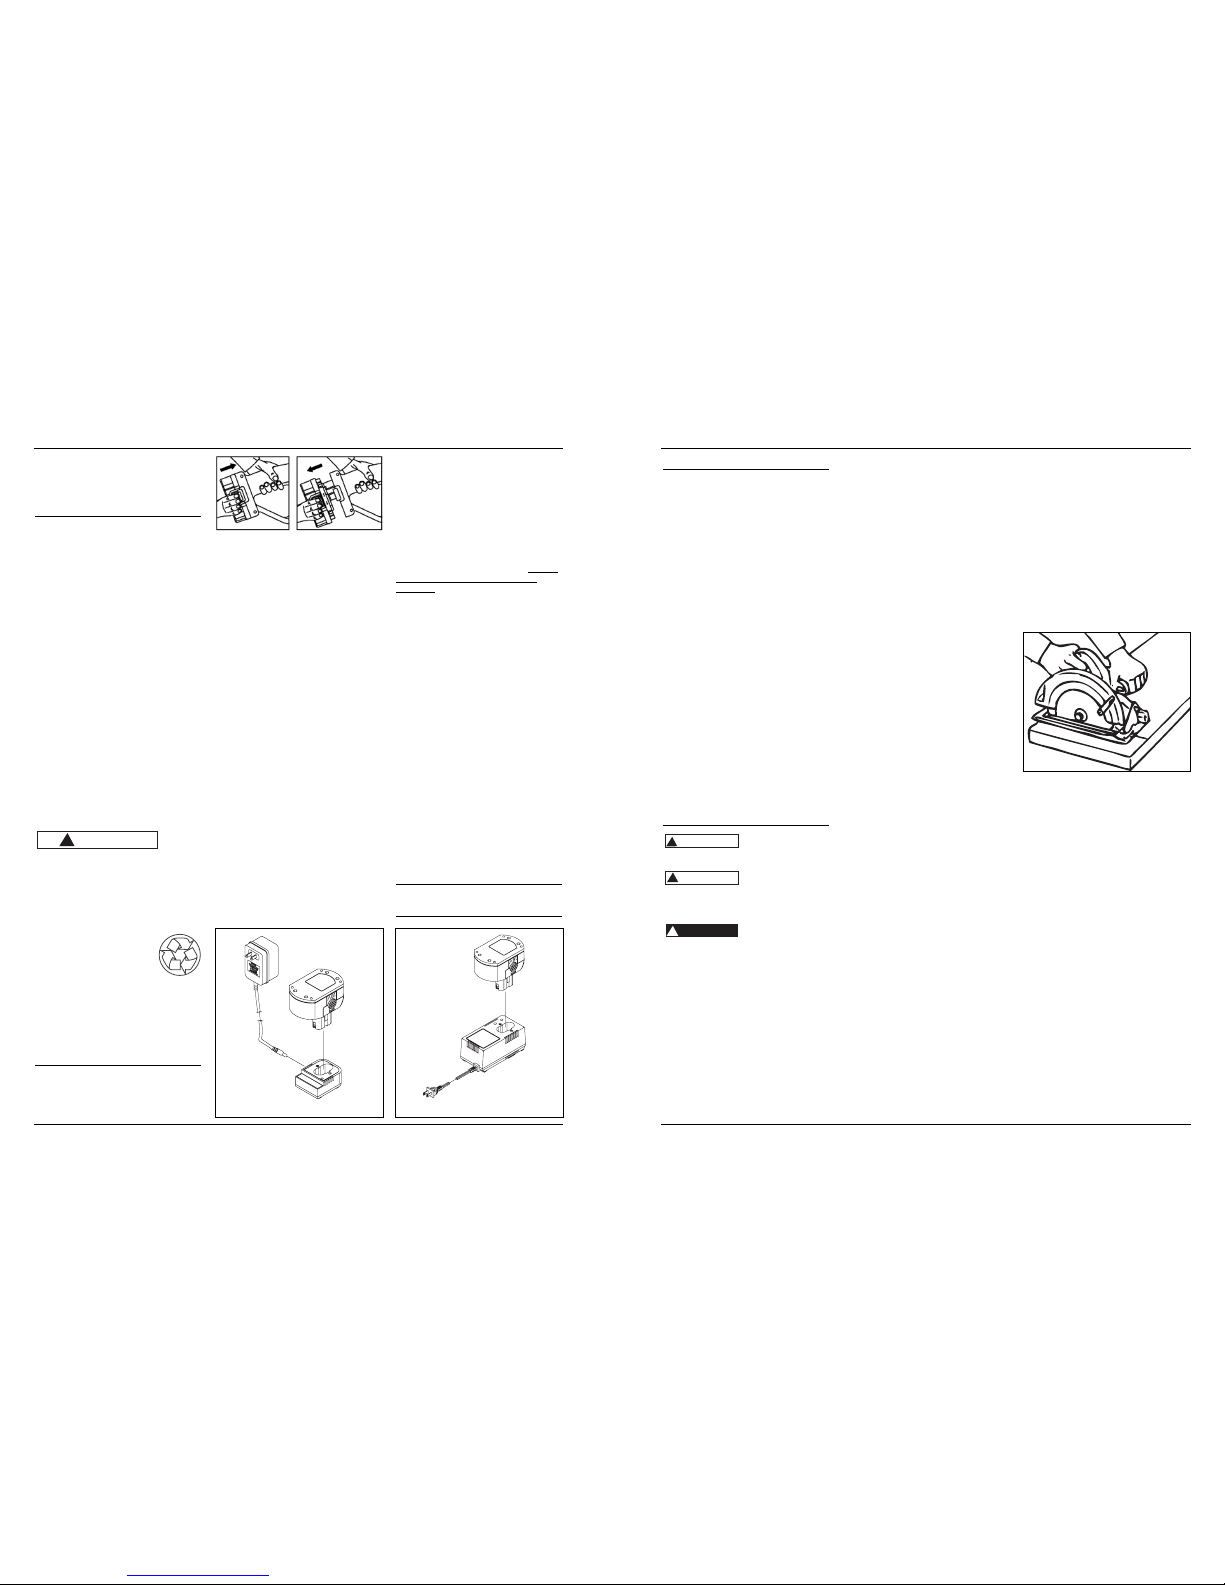
Charging Battery
REMOVING BATTERY PACK
Before charging, remove battery pack
from tool by depressing the battery
release button and pulling the battery
pack out of tool.
GENERAL INSTRUCTIONS
With normal use, as battery pack
approaches the discharged state, you
will notice a sharp drop in tool
performance. When the tool is unable
to perform the task at hand, it is time
to recharge the battery pack.
Recharging the battery pack before
this condition is reached will reduce
the total work life of the pack.
Discharging the pack beyond this point
can damage the pack.
NOTE: Battery temperature will
increase during and shortly after use.
Batteries may not accept a full charge
if they are charged immediately after
use. Do not charge battery pack if it
feels hot to the touch. Wait for it to
cool.
INITIAL CHARGING
Before using the reciprocating saw for
the first time, charge the battery fully.
Depending on room temperature and
line voltage, the normal charge battery
should be fully charged in six (6) to ten
(10) hours in charger DG024300AV and
the fast charge battery should be fully
charged in two (2) to four (4) hours in
the fast charger DG024700AV. The fast
charge is complete when the green
light is on.
CHARGING
NORMAL CHARGER & BATTERY
Connect the current carrying prongs
on the power cord to a 120V AC 60Hz
wall outlet. Connect the other end of
the power cord to the battery pack
holder. The charger is equipped with
an LED, a red light will light up as long
as the battery pack is connected to the
charger and the charger is plugged in.
There is no indication on when charge
is complete.
With normal use, the battery pack will
be fully charged after about three (3)
to six (6) hours. Remove the battery
from the holder and unplug from wall
outlet.
FAST CHARGER & BATTERY
Connect the current carrying prongs
on the power cord to a 120V AC 60Hz
wall outlet. The charger is equipped
with an LED, a red light will light up
while charging. Once the battery is
fully charged, a green light indicates
that the charging is complete.
With normal use, the battery pack will
be fully charged after about one (1) to
two (2) hours. Remove the battery
from the holder and unplug from wall
outlet.
The fast charge battery DG024900AV
will charge in either charger. The
battery DG024200AV will charge only
in charger DG024300AV. Disconnect
charger from power source when not
in use.
IMPORTANT: THE BATTERY PACK
SHOULD NOT BE LEFT ON THE
CHARGER FOR MORE THAN
FORTY-EIGHT (48) HOURS.
4
www.chpower.com
1. Screw
2. Outer washer
3. Blade
4. Inner washer
5. Gauge
12 3 4 5
Operating Instructions and Parts Manual
Figure 1 - Normal Charger and Battery
Figure 2 - Fast Charger and Battery
1. Parafuso
2. Arruela externa
3. Lâmina
4. Arruela interna
5. Medidor
123 4
5
Figure 3
Figure 3
Page 5
Instruções de Utilização e Manual de Peças
28 Pg
Instruções de
Segurança para o
Carregador e Baterias
(Continuação)
a bateria em temperatura ambiente
abaixo de 4ºC (40ºF) ou acima de 40ºC
(105ºF). O carregamento da bateria
fora dessa faixa de temperaturas
pode afetar de maneira adversa o
desempenho da bateria.
11. Não carregue a bateria em locais
molhados ou úmidos.
12. Não carregue a bateria se a mesma
estiver quente ao tocá-la. Espere até
que a mesma se esfrie.
13. Não exponha o carregador à chuva,
neve ou geada.
14. Não incinere a bateria, pois a
mesma pode explodir no fogo.
15. O carregador de bateria não se
destina a outros usos exceto para
recarregar uma bateria recarregável.
Quaisquer outros usos podem
resultar em risco de incêndio,
choque elétrico ou eletrocução.
16. O carregador é ventilado por meio
de slots nas partes superior e inferior
do corpo. Não obstrua os slots de
ventilação ou coloque o carregador
em local onde os slots de ventilação
possam ficar obstruídos. Isso poderia
resultar em aquecimento intenso e
risco de incêndio.
DESCARTE DA BATERIA
Não
tente desmontar a bateria ou remover
qualquer componente que se saia dos
terminais da bateria. Isso pode causar
incêndio ou lesões. Antes de descartar
a bateria, proteja os terminais expostos
com uma fita isolante reforçada para
evitar que se formem curtos-circuitos.
BATERIA DE NÍQUEL-CÁDMIO
• No caso de bateria de
níquel-cádmio, a bateria
deve ser reciclada ou
descartada de maneira
que não cause danos ao
meio ambiente. Verifique com o
Departamento de Obras Públicas de
sua região a respeito das
informações sobre a reciclagem de
baterias.
Como carregar
a bateria
COMO RETIRAR A BATERIA
Antes de carregar, retire a bateria
de dentro da ferramenta apertando
o botão de liberação da bateria
!
AVISO
e puxando a bateria de dentro
da ferramenta.
INSTRUÇÕES GERAIS
Com o uso normal, à medida que
a bateria vai descarregando observa-se
uma diminuição do desempenho da
ferramenta. Quando a ferramenta
estiver incapaz de realizar com
facilidade o trabalho, é o momento
de recarregar novamente a bateria.
A recarga da bateria antes de chegar
a esse ponto pode reduzir a vida útil
total da mesma. O descarregamento
da bateria além desse ponto pode
danificá-la.
NOTA: A temperatura da bateria
aumenta durante e imediatamente
após o uso. As baterias podem não
aceitar a carga total se forem
carregadas imediatamente após o uso.
Não carregue a bateria se a mesma
estiver quente. Aguarde até ela esfriar.
CARGA INICIAL
Antes de usar a lanterna pela primeira
vez, carregue totalmente a bateria.
Dependendo da temperatura ambiente
e da voltagem da linha, a bateria
normal deve estar completamente
carregada em seis (6) a dez (10) horas
no carregador DG024300AV e a bateria
de carga rápida deve estar
completamente carregada em duas (2)
a quatro (4) horas no carregador rápido
DG024700AV. A carga rápida está
completa quando a luz verde se acende.
CARGA
BATERIA E CARREGADOR NORMAL
Conecte os pinos do cabo de
alimentação a uma tomada de 120V AC
60Hz.
Conecte a outra extremidade do cabo
de alimentação à bateria. Se o
carregador possuir um LED, uma luz
vermelha irá acender desde que a
bateria esteja conectada ao carregador
e o carregador esteja plugado. Não há
indicação de quando a carga está
completa.
Com o uso normal, a bateria estará
completamente carregada após cerca
de três (3) a seis (6) horas. Remova a
bateria do suporte e desconecte da
tomada.
BATERIA E CARREGADOR RÁPIDO
Conecte os pinos do cabo de
alimentação a uma tomada de 120V
AC 60Hz.
Se o carregador possuir um LED, uma
luz vermelha irá acender durante a
recarga da bateria. Quando a bateria
estiver completamente carregada, uma
luz verde indicará que o procedimento
está concluído.
Com o uso normal, a bateria estará
completamente carregada após cerca
de uma (1) a duas (2) horas. Remova a
bateria do suporte e desconecte da
tomada.
A bateria de carga rápida DG024900AV
pode ser carregada em qualquer desses
dois carregadores. A bateria
DG024200AV pode ser carregada apenas
no carregador DG024300AV. Desconecte
o carregador da fonte de energia
quando não estiver sendo usado.
IMPORTANTE: A BATERIA NÃO DEVE SER
DEIXADA NO CARREGADOR POR MAIS
DE QUARENTA E OITO (48) HORAS.
Assembly
ATTACHING THE BLADE
Always disconnect battery pack from
tool and place the switch in the locked
or off position before making any
assembly, adjustments or changing
accessories. Such preventive safety
measures reduce the risk of starting
the tool accidentally.
1. Turn spindle screw counter-clockwise
and remove OUTER WASHER.
2. Retract the lower guard all the way
up into the upper guard. While
retracting the lower guard, check
operation and condition of the
LOWER GUARD SPRING. Press and
hold spindle lock button behind the
top guard to lock the blade and
motor shaft.
3. Make sure the saw teeth and arrow
on the blade point in the same
direction as the arrow on the lower
guard. Blade teeth should be facing
in the same direction as illustrated
below if blade is installed properly.
4. Slide blade through slot in the foot
and mount it against the INNER
WASHER on the shaft. Be sure the
large diameter of the OUTER
washer lays flush against the blade.
5. Reinstall OUTER WASHER and
tighten spindle screw snugly.
Operation
Safety glasses must
be worn during operation.
Make sure work is
held securely in vise or clamped in
place prior to starting operation. Loose
work may spin and cause bodily injury.
Keep hands away
from cutting area and blade. Keep your
second hand on auxiliary handle, or
motor housing.
If both hands are holding the saw,
they cannot be cut by the blade. Hold
the saw firmly to prevent loss of
control. NEVER place your hand behind
the saw blade since kickback could
cause the saw to jump backwards over
your hand.
Keep your body positioned to either
side of the saw blade, but not in line
with the saw blade. KICKBACK could
cause the saw to jump backwards.
(See “Causes and User Prevention of
Kickback”.)
!
DANGER
!
CAUTION
!
WARNING
Do not reach underneath the work.
The guard cannot protect you from the
blade below the work.
Do not attempt to remove cut material
when blade is moving. Check lower
guard for proper closing before each use.
Do not operate saw if lower guard
does not move freely and close
instantly. Never clamp or tie the lower
guard into the open position. If saw is
accidentally dropped, lower guard may
be bent. Raise the lower guard only
with the Lower Guard Lift Lever and
make sure it moves freely and does not
touch the blade or any other part, in
all angles and depths of cut.
Check the operation of the lower
guard spring. If the guard and the
spring are not operating properly, they
must be serviced before use. Lower
guard may operate sluggishly due to
damaged parts, gummy deposits, or a
buildup of debris. Disconnect battery
pack from tool. Periodically remove
the blade, clean the upper, lower
guards and the hub area with
kerosene and wipe it dry, or blow it
clean with compressed air.
Lower guard should be retracted
manually only for special cuts such as
“Pocket Cuts” and “Compound Cuts”.
Raise lower guard by Lower Guard Lift
Lever. As soon as blade enters the
material, lower guard must be
released. For all other sawing, the
lower guard should operate
automatically.
Always observe that the lower guard is
covering the blade before placing saw
down on bench or floor. An
unprotected, coasting blade will cause
the saw to walk backwards, cutting
whatever is in its path. Be aware of the
time it takes for the blade to stop after
switch is released.
NEVER hold piece being cut in your
hands or across your leg. It is
important to support the work
properly to minimize body exposure,
blade binding, or loss of control.
CAUSES AND USER PREVENTION
OF KICKBACK:
KICKBACK is a sudden reaction to a
pinched, bound or misaligned saw
blade, causing an uncontrolled saw to
lift up and out of the workpiece
toward the operator.
When the blade is pinched or bound
tightly by the kerf, or cutting slot,
closing down, the blade stalls and the
motor reaction drives the unit rapidly
back toward the operator.
If the blade becomes twisted or
misaligned in the cut, the teeth at the
back edge of the blade can dig into the
top surface of the wood causing the
blade to climb out of the kerf and jump
back toward operator.
KICKBACK is the result of tool misuse
and/ or incorrect operating procedures
or conditions and can be avoided by
taking proper precautions as given
below:
1. Maintain a firm grip with both
hands on the saw and position your
body and arm to allow you to resist
KICKBACK forces. KICKBACK forces
can be controlled by the operator, if
proper precautions are taken.
2. When blade is binding, or when
interrupting a cut for any reason,
release the trigger and hold the saw
motionless in the material until the
blade comes to a complete stop.
Never attempt to remove the saw
from the work or pull the saw
backward while the blade is in
motion or KICKBACK may occur.
Investigate and take corrective
actions to eliminate the cause of
blade binding.
3. When restarting a saw in the
workpiece, center the saw blade in
the kerf, or cut, and check that saw
teeth are not engaged into the
material. If saw blade is binding, it
may walk up or KICKBACK from the
workpiece as the saw is restarted.
4. Support large panels to minimize
the risk of blade pinching and
KICKBACK. Large panels tend to sag
under their own weight. Supports
must be placed under the panel on
both sides, near the line of cut and
near the edge of the panel.
5. Do not use dull or damaged blades.
Unsharpened or improperly set
blades produce narrow kerf causing
excessive friction, blade binding and
KICKBACK.
5
www.chpower.com
DG311800AV
Figure 1 - Carga Normal e Bateria Figure 2 - Carga Rápida e Bateria
Figure 4
Page 6

DG311800AV
27 Pg
Informações Gerais de
Segurança (Continuação)
1. Quando a bateria não estiver sendo
usada, mantenha-a afastada de
objetos metálicos como clipes de
papel, moedas, chaves, pregos ou
parafusos que podem fazer uma
conexão entre os terminais. A
construção de uma ponte entre os
terminais da bateria pode produzir
faíscas, queimaduras, incêndio ou
danos à bateria.
2. Essa ferramenta NÃO deve ser
modificada ou usada para qualquer
aplicação diferente daquela para a
qual foi desenhada.
Não
force a ferramenta. Use a ferramenta
correta para a sua aplicação. A
ferramenta correta fará um trabalho
melhor e mais seguro na velocidade
para a qual foi desenhada.
3. Cuide de suas ferramentas.
Mantenhas as ferramentas de corte
afiadas e limpas. As ferramentas
mantidas adequadamente e com
superfícies de corte afiadas são
menos prováveis de se prenderem
e são mais fáceis de controlar.
4. Verifique se as peças móveis não
estão desalinhadas ou aderidas, que
não há peças quebradas, ou
qualquer outro problema que possa
afetar o funcionamento da
ferramenta. Se estiver danificada,
providencie o conserto da
ferramenta antes de utilizá-la.
Muitos acidentes são causados por
ferramentas que não possuem uma
manutenção adequada.
5. Use somente acessórios
recomendados pelo fabricante de
seu modelo. Os acessórios
apropriados para uma ferramenta
podem causar risco de lesão quando
usados com outra ferramenta.
6. Algumas madeiras contêm
conservantes que podem ser
tóxicos. Tome cuidado especial para
evitar a inalação e o contato com a
pele quando estiver trabalhando
com esses materiais. Solicite e siga
todas as informações de segurança
disponíveis por parte do seu
fornecedor de materiais.
7. Guarde as ferramentas fora do
alcance de crianças e outras pessoas
não treinadas para usá-las. As
ferramentas são perigosas quando
estão em mãos de usuários
inexperientes.
!
CUIDADO
Instruções de
Segurança para o
Carregador e Baterias
Antes de usar um carregador de
baterias, leia todas as instruções sobre
o carregador de baterias, da bateria e
do produto onde a mesma será usada.
1. Uma ferramenta movida a bateria
com baterias integrais ou uma
bateria separada deve ser
recarregada apenas com o
carregador especificado para essa
bateria. Um carregador adequado
para um tipo de bateria pode
causar risco de incêndio quando
usado com outra bateria.
24 volts
DC (corrente direta) presente nos
terminais de carga. Não explore com
objetos condutores de corrente. Perigo
de choque elétrico ou eletrocução.
Se a caixa
da bateria estiver rachada ou danificada,
não a introduza no carregador. Perigo de
choque elétrico ou eletrocução.
Evite
o contato corporal com superfícies
aterradas como canos, radiadores,
estandes e refrigeradores. Há maior
risco de choque elétrico se o seu corpo
estiver aterrado.
Os
plugues do carregador devem encaixar na
tomada. De qualquer maneira, nunca
modifique o plugue. Não use plugues
adaptadores com carregadores aterrados.
O uso de plugues não modificados e
tomadas apropriadas para esses plugues
reduz o risco de choque elétrico.
Não
utilize erroneamente o cabo.
• Nunca transporte o carregador
segurando pelo cabo.
• Nunca puxe o cabo para
desconectá-lo da tomada. Puxe a
caixa do carregador em vez do cabo
ao desconectar o carregador.
2. Não utilize o carregador com cabo
ou plugue danificado.
• Substitua imediatamente o cabo
de alimentação e/ou o liberador de
tensão danificado ou gasto.
• Não tente consertar o cabo de
alimentação.
!
AVISO
!
AVISO
!
AVISO
!
PERIGO
!
PERIGO
3. Assegure-se de que o cabo esteja
localizado de maneira que não se
pise ou tropece sobre o mesmo, e
que não esteja sujeito a algum dano
ou tensão.
4. Não opere o carregador se o mesmo
tiver recebido alguma pancada forte,
tiver sido derrubado ou danificado
de outra maneira. Leve-o a um
técnico especializado em consertos.
5. Não desmonte o carregador ou a
bateria. Leve-o a um técnico
especializado em consertos quando
houver a necessidade de manutenção
ou conserto. A remontagem incorreta
pode resultar em risco de choque
elétrico ou incêndio.
6. Não use um cabo de extensão a
menos que seja absolutamente
necessário. O uso inadequado de um
cabo de extensão pode resultar no
risco de incêndio e choque elétrico. Se
for necessária a utilização de um cabo
de extensão, certifique-se de que:
• O tamanho do cabo é pelo menos o
especificado na tabela chamada
“Tamanho mínimo do cabo (AWG) de
extensão para o carregador de
bateria”
• Que os pinos no plugue do cabo de
extensão sejam em mesmo número,
tamanho e forma que os pinos do
carregador.
• Que o cabo de extensão esteja
adequadamente cabeado e em boas
condições elétricas.
• Se for utilizar um cabo de extensão
em ambiente externo, o mesmo
deve ser identificado com o sufixo
“W-A” ou “W” após a designação
do tipo de cabo para indicar que é
aceitável para o uso em ambiente
externo. Por exemplo: SJTW-A
7. Desconecte o plugue da tomada antes
de realizar qualquer procedimento de
manutenção ou limpeza.
8. Carregue a bateria em uma área bem
ventilada. Não permita que nenhum
objeto cubra o carregador e/ou a
bateria enquanto estiver carregando.
9. Não guarde o carregador ou a
bateria em locais onde a
temperatura possa alcançar ou
ultrapassar 40°C (105°F), como uma
despensa para ferramentas
construída em metal ou dentro do
carro no verão. Isso pode levar à
deterioração da bateria.
10. Para o carregamento ideal da bateria,
carregue-a em temperaturas entre
18 – 24°C (65° – 75°F). Não carregue
6
Operation (Cont’d.)
6. Blade depth and bevel adjusting
locking levers must be tight and
secure before making cut. If blade
adjustment shifts while cutting, it
may cause binding and KICKBACK.
7. Use extra caution when making a
“Pocket Cut” into existing walls or
other blind areas. The protruding
blade may cut objects that can
cause KICKBACK.
8. Set the depth of cut for no more
than 1/8" to 1/4" greater than the
thickness of the stock. The less
blade exposed, the less chance of
binding and KICKBACK. Before
cutting, be sure depth and bevel
adjustments are tight.
9. Be cautious of pitchy, knotty, wet or
warped stock. These are most likely
to create pinching conditions and
possible KICKBACK. Do not rip
warped lumber. Avoid cutting nails.
10. Use a rip fence or edge guide when
ripping. Guides improve control and
reduce blade binding.
11. Stay alert. Any distraction can cause
twisting or binding. Repetitive cuts
may lull the user into careless
movements.
GENERAL OPERATION
Always clamp the work piece securely
on a saw horse or bench.
1. Draw a cutting line. Place the front
of the shoe on the edge of the
workpiece without making blade
contact. Hold the handle with one
hand and the front handle with the
other.
2. Line up the sight line with your
cutting line. Position your arms and
body to resist KICKBACK.
3. To start the saw, push the lock-off
button down while pulling the
trigger. Allow the motor to reach
full speed before beginning cut.
4. While cutting, keep the shoe flat
against the workpiece and maintain
a firm grip. Do not force the saw
through the workpiece. Forcing a
saw can cause KICKBACK.
5. If making a partial cut, restarting in
midcut or correcting direction,
allow the blade to come to a
complete stop. To resume cutting,
center the blade in the kerf, back
the saw away from cutting edge a
few inches, push the lock-off button
down while pulling the trigger and
re-enter the cut slowly.
6. If the saw binds and stalls, maintain
a firm grip and release the trigger
immediately. Hold the saw
motionless in the workpiece until
the blade comes to a complete stop.
7. After finishing a cut, be sure the
lower guard closes and the blade
comes to a complete stop before
setting the saw down.
Cutting Panels and Boards
Large panels and long boards sag or
bend if they are not correctly
supported. If you attempt to cut
without leveling and properly
supporting the workpiece, the blade
will tend to bind, causing KICKBACK.
Support large panels. Be sure to set the
depth of the cut so that you only cut
through the workpiece, not through
the supports.
Ripping
Ripping is cutting length wise with the
grain. Select the proper blade for your
job. Use a rip fence for rips 4" wide or
less. To install the rip fence, slide the
bar through the rip fence slot in either
side of the shoe. The width of the cut
is the distance from the inside of the
blade to the inside edge of the rip
fence.
Adjust the rip fence for the desired
width, and lock the setting by
tightening the rip fence adjusting
knob.
When ripping widths greater than 4",
clamp or tack 1" lumber to workpiece
and use the inside edge of the shoe as
a guide.
Cross-Cutting
Cross-cutting is cutting across the
grain. Select the proper blade for your
job. Advance the saw slowly to avoid
splintering the wood.
Pocket Cutting
Pocket cuts are made in the middle of
the workpiece when it cannot be cut
from an edge. We recommend using a
reciprocating saw or jig saw for this
type of cut. However, if you must use a
circular saw to make a pocket cut,
USE
EXTREME CAUTION.
To maintain control of the saw during
pocket cutting, keep both hands on
the saw.
1. Beginning at a corner, line up the
sight line with your cutting line. Tilt
the saw forward, firmly fixing the
front of the shoe on the workpiece.
The blade should be just above
cutting line,but not touching it.
Raise the lower guard using the
guard lever.
2. To start the saw, push the lock-off
button down while pulling the
trigger. Allow the motor to reach
full speed before beginning cut.
Using the front of the shoe as a
hinge point, gradually lower the
back end of the saw into the
workpiece. Release the guard lever
and grasp the front handle.
3. When the shoe rests flat against
workpiece, advance the saw to the
far corner. Release the trigger and
allow the blade to come to a
complete stop before removing it
from workpiece. Repeat the above
steps for each side of the opening.
Use a reciprocating saw, jig saw or
small hand saw to finish the corners
if they are not completely cut
through.
GUIDE RULE
The guide rule allows you to do
accurate straight cuts. Simply slide the
guide rule up snugly against the side of
the work piece and secure it in position
with the clamp screw on the front of
the base. The guide rule can also be
used to make repeated cuts of uniform
size.
ELECTRIC BRAKE
The electric brake engages when the
trigger is released, causing the blade to
stop and allowing you to proceed with
your work. Generally, the saw blade
stops within two seconds. However,
there may be a delay between the time
you release the trigger and when the
brake engages. Occasionally the brake
may miss completely. If the brake
misses frequently, the saw needs
servicing by an authorized service
facility. The brake is not a substitute for
the guard, and you must always wait
for the blade to stop completely before
removing the saw from the workpiece.
www.chpower.com
Operating Instructions and Parts Manual
Comprimento do Cabo em pés 25 50 100 150
Tamanho AWG do Cabo 18 18 18 16
Tamanho Mínimo do Cabo (AWG) de Extensão para o Carregador da Bateria
Figure 5
Figure 6
Page 7

Informações Gerais de
Segurança (Continuação)
maneira segura. As braçadeiras
frouxas podem causar lesões graves.
7. Nunca direcione uma ferramenta
para si mesmo ou para outra pessoa.
Isso pode causar lesões graves.
8. Ao usar a ferramenta, use pressão
constante e uniforme. Não force a
ferramenta. O excesso de pressão
pode fazer com que a lâmina se
quebre ou se aqueça excessivamente.
9. Mantenha todos os parafusos, porcas
e roscas apertados e assegure-se de
que o equipamento esteja em
condições seguras de trabalho.
10. Não coloque as mãos próximas ou
debaixo das partes em movimento.
ÁREA DE TRABALHO
Não
opere uma ferramenta elétrica em
ambiente explosivo, como na presença
de líquidos, gases ou poeiras
inflamáveis. As ferramentas elétricas
produzem faíscas que podem causar
a combustão de gases ou poeiras.
Mantenha a área de trabalho limpa e bem
iluminada. As bancadas desorganizadas e
os locais escuros propiciam os acidentes.
Mantenha afastados os espectadores,
crianças e visitantes enquanto estiver
utilizando uma ferramenta elétrica. As
distrações podem fazer com que você
perca o controle.
SEGURANÇA ELÉTRICA
Recarregue essa ferramenta movida
a pilha somente com o carregador
especificado para a pilha. Um
carregador adequado para um tipo de
pilha pode provocar risco de incêndio
quando usada com outra pilha.
Não
exponha ferramentas elétricas à chuva
ou condições com umidade. A entrada
de água em uma ferramenta elétrica
aumenta o risco de choque elétrico.
Use essa
ferramenta movida a bateria somente
com a embalagem da bateria indicada.
O uso de qualquer outra bateria pode
provocar o risco de incêndio.
!
AVISO
!
AVISO
!
AVISO
!
CUIDADO
!
CUIDADO
!
AVISO
Evite
o contato corporal com superfícies
aterradas como canos, radiadores,
estandes e refrigeradores. Há maior
risco de choque elétrico se o seu corpo
estiver aterrado.
SEGURANÇA PESSOAL
Não use
esse produto de maneira inadequada.
A exposição excessiva à vibração, o
trabalho em posições incômodas e os
movimentos de trabalho repetitivos
podem causar lesões às mãos e aos
braços. Pare de usar qualquer
ferramenta se ocorrer desconforto,
dormência, formigamento ou dor e
consulte o médico.
1. Fique alerta, preste atenção no que
está fazendo e use o bom senso ao
utilizar uma ferramenta mecânica.
Não use a ferramenta se estiver
cansado ou sob o efeito de drogas,
álcool ou medicação. Um momento
de distração enquanto estiver
utilizando ferramentas mecânicas
pode resultar em graves lesões
pessoais.
Evite o
funcionamento acidental. Certifique-se
de que o interruptor esteja na posição
travada antes de introduzir a bateria,
fazer quaisquer ajustes, trocar os
acessórios ou guardar a ferramenta. O
transporte da ferramenta com o seu dedo
no interruptor ou a inserção da bateria
em uma ferramenta com o interruptor
ligado favorece a ocorrência de acidentes.
2. Remova qualquer ferramenta ou
chave de ajuste antes de ligar a
ferramenta elétrica. Uma chave de
ajuste deixada conectada a uma
parte giratória da ferramenta
elétrica pode causar lesão pessoal.
3. Não tente alcançar locais que estejam
fora do seu alcance. Mantenha um
bom suporte e equilíbrio durante
todo o tempo de utilização da
ferramenta. Um suporte e equilíbrio
adequados permitem o melhor
controle da ferramenta nas situações
inesperadas.
4. Trabalhe sempre em local bem
ventilado. Use uma máscara contra
poeira aprovada pela OSHA e
óculos de segurança.
5. Segure a ferramenta pela superfície
de pega isolada ao realizar um
trabalho em que a ferramenta pode
entrar em contato com fiação
oculta. Ao entrar em contato com
um fio de corrente elétrica, as peças
metálicas da ferramenta conduzirão
a eletricidade e poderão causar um
choque elétrico no usuário.
!
CUIDADO
!
AVISO
!
AVISO
6. Mantenha as mãos afastadas das
peças giratórias.
7. Use grampos ou outros meios
práticos para fixar a peça de trabalho
em uma plataforma estável. Nunca
segure a peça de trabalho com a
mão, no colo ou contra alguma parte
do corpo ao realizar o corte.
8. Use sempre lâminas com orifícios de
eixo de tamanho e forma corretas
(diamante versus esférica). As
lâminas que não correspondem às
peças de montagem da serra
funcionarão de maneira excêntrica,
causando grande risco ou lesão ao
usuário e dano à ferramenta.
CUIDADOS E USO DA
FERRAMENTA
Não use
a ferramenta se o interruptor não ligar
e nem desligar. Qualquer ferramenta
que não possa ser controlada com o
interruptor é perigosa e deve ser
consertada.
Certifique-se de que o interruptor esteja
desligado antes de introduzir a bateria.
A inserção da bateria em uma serra com
o interruptor ligado favorece a
ocorrência de acidentes.
Em
condições abusivas, pode ocorrer a
ejeção de líquido da bateria. Evite o
contato. Se ocorrer o contato acidental,
lave com água. Se o líquido entrar em
contato com os olhos, procure o
médico. O líquido ejetado da bateria
pode causar irritação ou queimaduras.
!
AVISO
!
AVISO
!
AVISO
Instruções de Utilização e Manual de Peças
26 Pg
7
DG311800AV
Operation (Cont’d.)
BEVEL ADJUSTMENT
Always be sure that the tool is switched
off. Disconnect battery pack from tool.
The foot can be adjusted up to 45° by
loosening the bevel adjustment knob
at the front of the saw.
Align to desired angle on calibrated
quadrant. Then tighten bevel
adjustment knob. Because of the
increased amount of blade
engagement in the work and
decreased stability of the foot, blade
binding may occur.
Keep the saw steady and the foot
firmly on the workpiece.
DEPTH ADJUSTMENT
Always be sure that the tool is switched
off. Disconnect battery pack from tool.
Loosen the lever on the depth guide
and move the base up or down. At the
desired depth of cut, secure the base by
tightening the lever.
Maintenance
Tool service must be performed only
by qualified repair personnel. Service
or maintenance performed by
unqualified personnel could result in
a risk of injury.
Keep your tool, battery pack and
charger in good repair by doing
regular maintenance. After six months
to one year, depending on use, return
the tool, battery pack and charger to a
Campbell Hausfeld service facility for:
• Lubrication
• Brush inspection
• Mechanical inspection and cleaning
• Electrical inspection
• Testing to assure proper operation
If the tool does not start or operate at
full power with a fully charged battery
pack, clean the contacts on the battery
pack. If the tool still does not work
properly, return the tool, charger and
battery pack to a service facility for
repairs.
Replacing Carbon Brushes
Remove and check the carbon brushes
regularly. replace when they wear
down to the limit mark. Keep the
carbon brushes clean and free to slip
in the holders. Both carbon brushes
should be replaced at the same time.
Use only identical carbon brushes.
Use a screwdriver to remove the brush
holder caps. Take out the worn carbon
brushes, insert the new ones and
secure the brush holder caps.
Cleaning
Clean out dust and debris from vents
and electrical contacts by blowing with
compressed air. Keep tool handles
clean, dry and free of oil or grease.
Use only mild soap and a damp cloth
to clean the tool,battery pack and
charger, keeping away from all
electrical contacts.
Certain cleaning agents and solvents
are harmful to plastics and other
insulated parts. Some of these include
gasoline, turpentine, lacquer thinner,
paint thinner, chlorinated cleaning
solvents, ammonia and household
detergents containing ammonia.
Never use flammable or combustible
solvents around tools.
FAILURE TO START
Should your tool fail to start, make
sure battery pack is charged and
installed in saw.
BATTERY
The battery pack will discharge by
itself without damage if stored for
long periods of time, and may require
recharging before use.
TECHNICAL SERVICE
For information regarding the
operation or repair of this product,
please call 1-800-424-8936.
Tool service must
be performed only by qualified repair
personnel. Service or maintenance
performed by unqualified personnel
could result in a risk of injury.
!
CAUTION
For Replacement Parts or Technical Assistance, call 1-800-424-8936
or visit our website: www.chpower.com
Please provide following information:
- Model number
- Serial number (if any)
- Part description and number as shown in parts list
Address any correspondence to:
Campbell Hausfeld
Attn: Customer Service
100 Production Drive
Harrison, OH 45030 U.S.A.
Part
Description Number
FAST
CHARGE
Charger – 22V (for 18V Battery) DG024700AV
Battery Pack – 18V DG024900AV
NORMAL
CHARGE
Charger – 22V (for 18V Battery) DG024300AV
Battery Pack – 18V DG024200AV
Charger Adapter DG024400AV
Replacement Parts List
Especificações
Ferramenta
Número do modelo DG311800AV
Regime de tensão 18V
Tempo de carga
Carga Normal: 3 - 6 horas
Bateria – 18V DG024200AV
Carregador – 22V DG024300AV
Fast Charger: 1 - 2 horas
Bateria – 18V DG024900AV
Carregador – 22V DG024700AV
Capacidades máximas
Lâmina 5-1/2
polegadas
Orifício do eixo
da lâmina Circular
Profundidade de corte 1-17/32
a 90° polegadas
Profundidade de corte 1-1/4
a 45° polegadas
Page 8

Instruções de Utilização e Manual de Peças DG311800AV S
Serra Circular Sem Fio
5-1/2 polegadas, 18.0 Volts
Por favor, leia e guarde essas instruções. Leia com atenção antes de tentar montar, instalar, utilizar ou fazer
manutenção no produto descrito. Proteja a si mesmo e outras pessoas observando todas as informações de segurança,
caso contrário podem ocorrer lesões pessoais e/ou danos materiais! Guarde essas instruções para futuras consultas.
IN707601AV 4/06
BUILT TO LAST
© 2006 Campbell Hausfeld/Scott Fetzer
Veja a Garantia na página 32 para informações importantes sobre o uso comercial deste produto.
Descrição
As serras circulares são projetadas para
cortar vários tipos de materiais. Essa
ferramenta é especialmente útil para
cortar madeira de construção e painéis
de madeira para vários projetos.
Remoção da
Embalagem
Ao desembalar este produto,
inspecione-o com cuidado procurando
qualquer dano que possa ter ocorrido
durante o transporte.
Informações Gerais
de Segurança
Esse manual contém informações muito
importantes de serem conhecidas e
compreendidas. Essas informações são
fornecidas para SEGURANÇA e para
EVITAR PROBLEMAS COM O
EQUIPAMENTO. Para ajudar a
reconhecer essas informações, observe
os seguintes símbolos.
Perigo
indica uma situação de perigo iminente
que, se não evitada, resulta em morte ou
lesão grave.
Advertência indica uma situação
potencialmente perigosa que, se não
evitada, pode resultar em morte ou lesão
grave.
Atenção
indica uma situação potencialmente
perigosa que, se não evitada, pode
resultar em lesão menor ou moderada.
Aviso
indica informação importante que, se não
for seguida, pode causar dano ao
equipamento.
PROPOSIÇÃO 65 DA CALIFÓRNIA
NOTA
!
CUIDADO
!
AVISO
!
PERIGO
Você
pode produzir poeira ao cortar, lixar,
furar ou triturar materiais
como madeira, tinta, metal,
concreto, cimento ou outro
tipo de alvenaria. Essa
poeira freqüentemente
contém substâncias
químicas conhecidas por causarem
câncer, defeitos congênitos ou outras
lesões ao sistema reprodutor. Use
equipamentos de proteção.
Esse
produto ou o seu cabo de alimentação
contém chumbo, um produto químico
conhecido no Estado da Califórnia por
causar câncer e defeitos congênitos ou
outras lesões ao sistema reprodutor.
Lave as mãos após o manuseio.
As seguintes precauções de segurança
devem ser seguidas em todos os
momentos juntamente com
quaisquer outras normas de
segurança existentes.
1. Leia com atenção todos
os manuais incluídos com
esse produto. Familiarize-
!
AVISO
!
PERIGO
se com os controles e o uso
apropriado do equipamento.
2. Somente pessoas bem familiarizadas
com essas normas de utilização segura
devem ter permissão para usar a serra.
Use óculos de segurança e
protetor auditivo durante a
operação.
3. Não use roupas largas,
cachecóis ou gravatas na
área de trabalho. As
roupas largas podem ficar presas
nas partes em movimento e resultar
em graves lesões pessoais.
4. Não use jóias ao utilizar qualquer
ferramenta. As jóias podem ficar
presas nas partes em movimento e
resultar em graves lesões pessoais.
5. Use sempre braçadeiras projetadas
para o uso com essa ferramenta.
Não use braçadeiras danificadas ou
gastas.
6. Nunca opere a ferramenta se a
mesma não estiver em contato com
um objeto de trabalho. As
braçadeiras devem estar presas de
!
AVISO
MANUAL
;;;;;;
;;;;;;
;;;;;;
;;;;;;
25 Pg
LEMBRETE: Guarde o seu comprovante de compra datado para fins de garantia do produto!
Anexe-o junto desse manual ou arquivo para melhor proteção.
Limited Warranty
1. DURATION: From the date of purchase by the original purchaser as follows: Campbell Hausfeld (Standard
Duty and Unannounced) – One (1) Year, (Serious Duty) – Two (2) Years, (Extreme Duty) – Three (3) Years;
IronForce by Campbell Hausfeld – One (1) Year; Farmhand – Three (3) Years; Maxus – Five (5) Years.
2. WHO GIVES THIS WARRANTY (WARRANTOR): Campbell Hausfeld / Scott Fetzer Company, 100 Production
Drive, Harrison, Ohio, 45030, Telephone: (800) 543-6400
3. WHO RECEIVES THIS WARRANTY (PURCHASER): The original purchaser (other than for purposes of resale)
of the Campbell Hausfeld product.
4. WHAT PRODUCTS ARE COVERED BY THIS WARRANTY: Any Campbell Hausfeld nailer, stapler, air tool, spray
gun, inflator or air accessory supplied or manufactured by Warrantor.
5. WHAT IS COVERED UNDER THIS WARRANTY: Substantial defects in material and workmanship which occur
within the duration of the warranty period.
6. WHAT IS NOT COVERED UNDER THIS WARRANTY:
A. Implied warranties, including those of merchantability and FITNESS FOR A PARTICULAR PURPOSE ARE
LIMITED FROM THE DATE OF ORIGINAL PURCHASE AS STATED IN THE DURATION. If this product is used
for commercial, industrial or rental purposes, the warranty will apply for ninety (90) days from the date
of purchase. Some States do not allow limitation on how long an implied warranty lasts, so the above
limitations may not apply to you.
B. ANY INCIDENTAL, INDIRECT, OR CONSEQUENTIAL LOSS, DAMAGE, OR EXPENSE THAT MAY RESULT
FROM ANY DEFECT, FAILURE, OR MALFUNCTION OF THE CAMPBELL HAUSFELD PRODUCT. Some States
do not allow the exclusion or limitation of incidental or consequential damages, so the above limitation
or exclusion may not apply to you.
C. Any failure that results from an accident, purchaser’s abuse, neglect or failure to operate products in
accordance with instructions provided in the owner’s manual(s) supplied with product. Accident,
purchaser's abuse, neglect or failure to operate products in accordance with instructions shall also
include the removal or alteration of any safety devices. If such safety devices are removed or altered,
this warranty is void.
D. Normal adjustments which are explained in the owner’s manual(s) provided with the product.
E. Items or service that are normally required to maintain the product, i.e. o-rings, springs, bumpers,
debris shields, driver blades
, fuses, batteries, gaskets, packings or seals, fluid nozzles, needles, sandblast
nozzles, lubricants, material hoses, filter elements, motor vanes, abrasives, blades, cut-off wheels,
chisels, chisel retainers, cutters, collets, chucks, rivet jaws, screw driver bits, sanding pads, back-up pads,
impact mechanism, or any other expendable part not specifically listed. These items will only be
covered for ninety (90) days from date of original purchase. Underlined items are warranted for defects
in material and workmanship only.
F. Cosmetic defects that do not interfere with the product’s function.
7. RESPONSIBILITIES OF WARRANTOR UNDER THIS WARRANTY: Repair or replace, at Warrantor’s option,
products or components which are defective, have malfunctioned and/or failed to conform within duration
of the warranty period.
8. RESPONSIBILITIES OF PURCHASER UNDER THIS WARRANTY:
A. Provide dated proof of purchase and maintenance records.
B. Call 1-800-424-8936 to obtain your warranty service options. Freight costs must be borne by the
purchaser.
C. Use reasonable care in the operation and maintenance of the products as described in the owner’s
manual(s).
9. WHEN WARRANTOR WILL PERFORM REPAIR OR REPLACEMENT UNDER THIS WARRANTY: Repair or
replacement will be scheduled and serviced according to the normal work flow at the servicing location,
and depending on the availability of replacement parts.
This Limited Warranty applies in the United States, Canada and Mexico only and gives you specific legal rights.
You may also have other rights which vary from state to state or country to country.
8
Operating Instructions and Parts Manual
Page 9

Garantía Limitada
1. DURACIÓN: Desde la fecha de compra por parte del comprador original, según se detalla: Campbell Hausfeld (Trabajo estándar y sin
especificar) – 1 (un) año, (Trabajo pesado) – 2 (dos) años, (Trabajo extremo) – 3 (tres) años; IronForce de Campbell Hausfeld – 1 (un)
año; Farmhand – 3 (tres) años; Maxus – 5 (cinco) años.
2. QUIEN OTORGA ESTA GARANTIA (EL GARANTE: Campbell Hausfeld / The Scott Fetzer Company 100 Production Drive, Harrison, Ohio
45030 Teléfono: (800) 543-6400
3. QUIEN RECIBE ESTA GARANTIA (EL COMPRADOR): El comprador original (que no sea un revendedor) del producto Campbell Hausfeld.
4. PRODUCTOS CUBIERTOS POR ESTA GARANTIA: Cualquier clavadora, grapadora, herramienta neumática, pistola pulverizadora,
inflador o accesorio neumático suministrado o fabricado por el Garante.
5. COBERTURA DE LA GARANTIA: Los defectos substanciales de material y fabricación que ocurran dentro del período de validez de la
garantía.
6. LO QUE NO ESTA CUBIERTO POR ESTA GARANTIA:
A. Las garantías implícitas, incluyendo aquellas de comercialidad E IDONEIDAD PARA FINES PARTICULARES, ESTAN LIMITADOS A LO
ESPECIFICADO EN EL PARRAFO DE DURACION. Si este producto es empleado para uso comercial, industrial o para renta, la
garantía será aplicable por noventa (90) días a partir de la fecha de compra. En algunos estados no se permiten limitaciones a la
duración de las garantías implícitas, por lo tanto, en tales casos esta limitación no es aplicable.
B. CUALQUIER PERDIDA DAÑO INCIDENTAL, INDIRECTO O CONSECUENTE QUE PUEDA RESULTAR DE UN DEFECTO, FALLA O
MALFUNCIONAMIENTO DEL PRODUCTO CAMPBELL HAUSFELD. En algunos estados no se permite la exclusión o limitación de
daños incidentales o consecuentes, por lo tanto, en tales casos esta limitación o exclusión no es aplicable
C. Cualquier falla que resulte de un accidente, abuso, negligencia o incumplimiento de las instrucciones de funcionamiento y uso
indicadas en el (los) manual(es) que se adjunta(n) al producto. Dichos accidentes, abusos por parte del comprador, o falta de
operar el producto siguiendo las instrucciones del manual de instrucciones suministrado también debe incluir la desconexión o
modificación de los instrumentos de seguridad. Si dichos instrumentos de seguridad son desconectados, la garantía quedaría
cancelada.
D. Los ajustes normales explicados en el(los) manual(es) suministrado(s) con el producto.
E. Artículos o servicios normalmente requeridos para el mantenimiento del producto, tales como: anillos en O, resortes,
amortiguadores, defensas, hojas de impulsor, fusibles, baterías, empaques, almohadillas o sellos, boquillas de fluído, agujas,
boquillas para rociar arena, lubricantes, mangueras de material, elementos filtrantes, álabes de motores, abrasivos, hojillas, discos
para cortar, cinceles, retenes para cinceles, cortadores, collarines, mandriles, mordazas para remachadoras, brocas para
desarmadores, almohadillas para lijar, soportes de almohadillas, mecanismo de impacto o cualquier otro artículo desgastable que
no se haya enumerado específicamente . Estos artículos sólo estarán cubiertos bajo esta garantía por noventa (90) días a partir de
la fecha de compra original. Los artículos subrayados sólo están garantizados por defectos de material o fabricación.
F. Defectos estéticos que no interfieran con la función del producto
7. RESPONSABILIDADES DEL GARANTE BAJO ESTA GARANTIA: Reparar o reemplazar, como lo decida el Garante, los productos o
componentes que estén defectuosos, se hayan dañado o hayan dejado de funcionar adecuadamente, durante el período de validez de
la garantía
8. RESPONSABILIDADES DEL COMPRADOR BAJO ESTA GARANTIA:
A. Suministrar prueba fechada de compra y la historia de mantenimiento del producto.
B. Llame a Campbell Hausfeld (800-424-8936) por sus opciones de servicio incluidas en la garantía. Los costos de flete correrán por
cuenta del comprador.
C. Seguir las instrucciones sobre operación y mantenimiento del producto, tal como se indica(n) en el (los) manual(es) del
propietario
9. CUANDO EFECTUARA EL GARANTE LA REPARACION O REEMPLAZO CUBIERTO BAJO ESTA GARANTIA: La reparación o reemplazo
dependerá del flujo normal de trabajo del centro de servicio y de la disponibilidad de repuestos.
Esta garantía limitada es válida sólo en los EE.UU., Canadá y México y otorga derechos legales específicos. Usted también puede tener otros
derechos que varían de un Estado a otro. o de un país a otro.
24 Sp
Manual de Instrucciones y Lista de Piezas
9Fr
Instructions d’Utilisation et Manual de Pièces DG311800AV S
Scie circulaire sans fil
de 5 1/2 po, 18 volts
S’il vous plaît lire et conserver ces instructions. Lire attentivement avant de monter, installer, utiliser ou de
procéder à l’entretien du produit décrit. Se protéger ainsi que les autres en observant toutes les instructions de
sécurité, sinon, il y a risque de blessure et/ou dégâts matériels! Conserver ces instructions comme référence.
IN707601AV 4/06
BUILT TO LAST
© 2006 Campbell Hausfeld/Scott Fetzer
Voir la Garantie à la page 16 pour de l’information importante sur l’utilisation commercial de ce produit.
MÉMENTO: Gardez votre preuve datée d’achat à fin de la garantie!
Joignez-la à ce manuel ou classez-la dans un dossier pour plus de sécurité.
Description
Les scies circulaires sont conçues pour
couper une variété de matériaux. Cet
outil est particulièrement utile pour
couper le bois d’oeuvre et les panneaux
de bois pour divers projets.
Déballage
En déballant ce produit, inspecter
attentivement pour tout signe de
dommage en transit.
Directives De Sécurité
Ce manuel contient de l’information très
importante qui est fournie pour la
SÉCURITÉ et pour ÉVITER LES PROBLÈMES
D’ÉQUIPEMENT. Rechercher les symboles
suivants pour cette information.
Danger indique une situation hasardeuse
imminente qui RÉSULTERA en perte de vie
ou blessures graves.
Avertissement indique une situation
hasardeuse potentielle qui PEUT résulter
en perte de vie ou blessures graves.
Attention indique une situation
hasardeuse potentielle qui PEUT résulter
en blessures.
Avis indique l’information importante
pour éviter le dommage de l’équipement.
PROPOSITION 65 CALIFORNIE
Vous
pouvez
créer de la poussière en
coupant, ponçant, perçant
ou meulant les matériaux
tels que le bois, la peinture,
le métal, le béton, le ciment
ou autre maçonnerie. Cette
AVIS
!
ATTENTION
!
AVERTISSEMENT
!
DANGER
poussière contient souvent des
produits chimiques reconnus pour
causer le cancer, les déformations
congénitales ou autres problèmes de la
reproduction. Portez de l’équipement
de protection.
Ce
produit ou son cordon contient des
produits chimiques qui de l’avis de l’État
de Californie peut causer le cancer et des
anomalies congénitales ou autres
problèmes de reproduction. Lavez-vous
les mains après la manipulation.
Les précautions de sécurité suivantes
doivent être respectées en tout temps
en plus de toute autre règle de
sécurité actuelle.
1. Lire attentivement tous
les manuels, y compris
celui de ce produit. Bien
se familiariser avec les
commandes et l’utilisation
correcte de l’équipement.
2. Seules les personnes familières avec
ces règles d’utilisation sans danger
devraient utiliser la scie.
!
AVERTISSEMENT
Porter des lunettes de
sécurité et une protection
des oreilles pendant son
fonctionnement.
3. Ne pas porter de
vêtements amples, de foulards ou
de cravates dans l’aire de travail.
Les vêtements amples pourraient
se prendre dans les pièces mobiles
de l’appareil et mener à de graves
blessures.
4. Ne pas porter de bijoux en utilisant
tout outil. Les bijoux peuvent se
prendre dans les pièces mobiles et
mener à de graves blessures.
5. Toujours utiliser les accessoires
conçus pour cet outil. Ne pas utiliser
d’accessoires endommagés ou usés.
6. Ne jamais déclencher l’outil n’est
pas appliqué à un travail. Les
accessoires doivent être bien
attachés. Tout accessoire desserré
peut provoquer de graves blessures.
7. Ne jamais pointer un outil vers
soi-même ou vers toute autre
!
AVERTISSEMENT
MANUAL
;;;;;;
;;;;;;
;;;;;;
;;;;;;
!
DANGER
Mantenimiento
(Continuación)
LA HERRAMIENTA NO
FUNCIONA
En caso de que la herramienta no
funcione, asegúrese de que la batería
esté cargada e instalada en la sierra.
BATERÍA
La batería se descargará por si sola sin
dañarse si se guarda por largos
períodos de tiempo y es posible que
necesite recargarla antes de usarla.
SERVICIO TÉCNICO
Para obtener información con relación
al funcionamiento o reparación de
este producto, sírvase llamar al
1-800-424-8936.
El
servicio
de la herramienta debe ser realizado
sólo por personal de reparaciones
calificado. El servicio o mantenimiento
realizado por personas no calificadas
puede provocar riesgo de lesiones.
!
PRECAUCION
Sirvase darnos la siguiente información:
- Número del modelo
- Código impreso
- Descripción y número del repuesto según la lista de repuestos
Número del
Descripción Repuesto
Dirija toda la correspondencia a:
Campbell Hausfeld
Attn: Customer Service
100 Production Drive
Harrison, OH 45030 U.S.A.
Lista de Repuestos
CARGA RÁPIDA
Cargador – 22V (para baterías de 18V) DG024700AV
Batería – 18V DG024900AV
CARGA NORMAL
Cargador – 22V (para baterías de 18V) DG024300AV
Batería – 18V DG024200AV
Adaptador del cargador DG024400AV
Para Ordenar Repuestos o Asistencia Técnica, Llame al Teléfono 1-800-424-8936
Page 10

Funcionamiento
(Continuación)
Sujete los paneles grandes. Asegúrese de
definir la profundidad del corte para que
solamente pueda cortar a través de la
pieza de trabajo, no a través de los
soportes.
Serrado
Serrar es cortar a lo largo siguiendo la
veta. Seleccione la hoja adecuada para su
trabajo. Use una guía de corte para
cortes a lo largo de 4" de ancho o menos.
Para instalar la guía de corte, deslice la
barra a través de la ranura de la guía de
corte a cualquiera de los lados de la
zapata. El ancho del corte es la distancia
desde el interior de la hoja hasta el borde
interior de la guía de corte.
Ajuste la guía de corte en el ancho
deseado, y bloquee la definición
ajustando la perilla de ajuste de la guía
de corte.
Cuando sierre anchos mayores a 4",
sujete o clave 1" de madera a la pieza
de trabajo y utilice el borde interior de
la zapata como guía.
Cortes cruzados
Cortar cruzado es cortar transversalmente
a la veta. Seleccione la hoja adecuada
para su trabajo. Avance con la sierra
lentamente para evitar astillar la madera.
Corte de bolsillo
Los cortes de bolsillo se hacen en el
medio de la pieza de trabajo cuando no
pueden cortarse desde un borde.
Recomendamos utilizar una sierra de
vaivén o sierra vertical para este tipo de
cortes. Sin embargo, si debe usar una
sierra circular para hacer un corte de
bolsillo, TENGA EXTREMO CUIDADO
.
Para mantener el control de la sierra
durante el corte de bolsillo, mantenga
ambas manos sobre la sierra.
1. Comenzando en una esquina,
alinee la línea de la vista con
su línea de corte. Incline la sierra
hacia adelante, fijando con firmeza
la parte delantera de la zapata
sobre la pieza de trabajo. La hoja
debería estar apenas encima de la
línea de corte, pero sin tocarla.
Levante la protección inferior
utilizando la palanca de la
protección.
2. Para encender la sierra, presione el
botón de bloqueo hacia abajo
mientras tira del gatillo. Permita
que el motor alcance la velocidad
máxima antes de empezar a cortar.
Con la parte delantera de la zapata
como punto de articulación, baje
gradualmente el extremo trasero
de la sierra hacia la pieza del
trabajo. Libere la palanca de la
protección y tome el mango
delantero.
3. Cuando la zapata esté plana contra
la pieza de trabajo, avance con la
sierra hacia la esquina más alejada.
Libere el gatillo y permita que la
hoja se detenga por completo antes
de retirarla de la pieza de trabajo.
Repita los pasos anteriores para
cada lado de la abertura. Use una
sierra de vaivén, sierra vertical o
sierra de mano pequeña para
terminar las esquinas si no están
completamente cortadas.
REGLA GUÍA
La regla guía le permite hacer cortes
rectos precisos. Simplemente deslice la
regla guía hacia arriba bien ajustada
contra el lado de la pieza de trabajo y
asegúrela en la posición con el tornillo
de fijación sobre la parte delantera de
la base. La regla guía también puede
usarse para hacer cortes repetidos del
mismo tamaño.
FRENO ELÉCTRICO
El freno eléctrico se acciona cuando se
suelta el gatillo, provocando que la
hoja se detenga y permitiéndole
continuar con su trabajo. Por lo
general, la hoja de la sierra se detiene
en dos segundos. Sin embargo, puede
haber una demora entre el momento
en que suelta el gatillo hasta que se
acciona el freno. En ocasiones el freno
puede fallar por completo. Si el freno
falla con frecuencia, la sierra necesita
servicio en una instalación de servicio
autorizada. El freno no es un sustituto
de la protección, y siempre debe
esperar que la hoja se detenga por
completo antes de retirar la sierra de la
pieza de trabajo.
AJUSTE DEL CORTE DIAGONAL
Siempre asegúrese de que la
herramienta esté apagada. Desconecte
la batería de la herramienta. El pie
puede ajustarse hasta 45º, soltando la
perilla de ajuste de corte diagonal, en
la parte delantera de la sierra.
Alinee en el ángulo deseado en el
cuadrante calibrado. Luego ajuste la
perilla de ajuste del corte diagonal.
Debido a la cantidad aumentada de
accionamientos de la hoja en el trabajo
y la estabilidad disminuida del pie, la
hoja puede atascarse.
Mantenga la sierra pareja y el pie
firmemente sobre la pieza de trabajo.
AJUSTE DE PROFUNDIDAD
Siempre asegúrese de que la
herramienta esté apagada. Desconecte
la batería de la herramienta. Suelte la
palanca sobre la guía de profundidad y
mueva la base hacia arriba o hacia
abajo. Cuando llegue a la profundidad
deseada para el corte, asegure la base
ajustando la palanca.
Mantenimiento
El servicio de la herramienta debe ser
realizado sólo por personal de
reparaciones calificado. El servicio o
mantenimiento realizado por personas
no calificadas puede provocar riesgo
de lesiones.
Mantenga su herramienta, baterías
y cargador en buenas condiciones,
realizándoles mantenimientos
periódicos. Después de seis meses a un
año, dependiendo del uso, devuelva la
herramienta, las baterías y el cargador
a la instalación de servicio de Campbell
Hausfeld para:
• Lubricación
• Inspección de los cepillos
• Inspección mecánica y limpieza
• Inspección eléctrica
• Pruebas para asegurar el
funcionamiento adecuado
Si la herramienta no se enciende ni
funciona a la máxima potencia con una
batería totalmente cargada, limpie los
contactos de la batería. Si la
herramienta sigue sin funcionar
correctamente, devuelva la
herramienta, el cargador y la batería a
una instalación de servicios para
repararla.
Cambio de escobillas de carbón
Retire y verifique las escobillas de
carbón regularmente. Cámbielas
cuando se desgasten hasta la marca
límite. Mantenga las escobillas de
carbón limpias y libres para que se
deslicen en los soportes. Ambas
escobillas de carbón deben cambiarse
al mismo tiempo. Use únicamente
escobillas de carbón idénticas.
Use un destornillador para retirar las
tapas de los soportes de las escobillas.
Quite las escobillas de carbón
desgastadas, introduzca las nuevas y
asegure las tapas de los soportes de las
escobillas.
Limpieza
Limpie el polvo y los desechos de los
orificios y contactos eléctricos,
soplando con aire comprimido.
Mantenga los mangos de las
herramientas limpios, secos y libres de
aceite o grasa. Use únicamente un
jabón suave y un paño húmedo para
limpiar la herramienta, la batería y el
cargador, evitando todos los contactos
eléctricos.
Ciertos agentes de limpieza y solventes
son nocivos para los plásticos y otras
piezas aisladas. Algunos de éstos
incluyen gasolina, aguarrás, solvente
para laca, solvente de pintura,
solventes de limpieza con cloro,
amoníaco y detergentes de uso
doméstico que contengan amoníaco.
Nunca use solventes inflamables ni
combustibles cerca de las
herramientas.
23 Sp
DG311800AV
Directives De Sécurité
(Suite)
personne. Des blessures graves
pourraient en résulter.
8. Utiliser une pression constante et
uniforme en utilisant l’outil. Ne pas
forcer. Trop de pression pourrait
mener au bris ou à la surchauffe de
la lame.
9. Garder tous les écrous, boulons et
vis serrés et faire en sorte que
l’équipement soit en bon état de
marche.
10. Ne pas mettre les mains près ou
sous les pièces mobiles.
AIRE DE TRAVAIL
Ne pas
faire fonctionner un outil électrique
dans une atmosphère explosive comme
en présence de liquides, gaz ou
poussières inflammables. Les outils
électriques créent des étincelles qui
peuvent enflammer la fumée ou la
poussière.
Garder
l’aire de travail propre et bien éclairée.
Les établis encombrés et les coins
sombres attirent les accidents.
Garder
les spectateurs, les enfants et les
visiteurs loin en utilisant un outil
électrique. Les distractions peuvent
faire perdre le contrôle.
SÉCURITÉ ÉLECTRIQUE
Recharger cet outil à batterie
seulement avec le chargeur spécifié sur
la batterie. Un chargeur convenant pour
un certain type de batterie peut créer
un risque d’incendie lorsqu’on l’utilise
avec une autre batterie.
Ne pas
exposer les outils électriques à la pluie
ou à des conditions humides. Toute eau
pénétrant dans l’outil électrique
augmente le risque de choc électrique.
Utiliser
cet outil à batterie seulement avec le
bloc-batteries spécifié. Utiliser un autre
type de batterie peut créer un risque
d’incendie.
!
AVERTISSEMENT
!
AVERTISSEMENT
!
AVERTISSEMENT
!
ATTENTION
!
ATTENTION
!
AVERTISSEMENT
Éviter
tout contact avec les surfaces mises à la
terre telles que les tuyaux, les
radiateurs, les cuisinières et les
réfrigérateurs. Il y a un risque accru de
choc électrique si votre corps est mis à
la terre.
SÉCURITÉ PERSONNELLE
Ne pas
abuser de ce produit. Toute exposition
excessive à la vibration, tout travail
dans les positions encombrantes et les
motions de travail à répétition peuvent
provoquer des blessures aux mains et
aux bras. Cesser d’utiliser tout outil si
l’on ressent un malaise, un
engourdissement, un fourmillement ou
une douleur et consulter un médecin.
1. Il faut rester vigilant, savoir ce
qu’on fait et utiliser son sens
commun en faisant fonctionner un
outil électrique. Ne pas faire
fonctionner l’appareil fatigué ou
sous l’influence de drogues,
d’alcool ou de médicaments. Un
moment d’inattention en faisant
fonctionner les outils électriques
peut mener à des blessures graves.
Éviter
tout démarrage accidentel. S’assurer
que l’interrupteur soit verrouillé ou en
position d’arrêt (off) avant d’insérer le
bloc-batteries, avant tout ajustement,
avant de changer les accessoires ou
ranger l’outil. Transporter les outils
avec le doigt sur l’interrupteur ou
insérer le bloc-batteries dans un outil
avec l’interrupteur en marche invite les
accidents.
2. Retirer les clés à ouverture fixe ou
les clés d’ajustement avant de
mettre l’outil en marche. Une clé ou
une clé à ouverture fixe installée sur
une pièce mobile de l’outil pourrait
mener à une blessure.
3. Ne pas trop se pencher. Garder bon
pied et bon équilibre en tout temps.
Ceci permet d’avoir un meilleur
contrôle de l’outil dans les
situations imprévues.
4. Toujours travailler dans un
endroit bien ventilé. Porter des
lunettes de sécurité et un masque
anti-poussières homologué OSHA.
5. Tenir l’outil par une surface de prise
isolée en effectuant le travail
lorsque l’outil pourrait entrer en
contact avec un câblage caché. Un
contact avec un fil « sous tension »
rendra les pièces de métal exposées
!
ATTENTION
!
AVERTISSEMENT
!
AVERTISSEMENT
de l’outil « sous tension » et
produira un choc pour l’opérateur.
6. Garder les mains loin des pièces
mobiles.
7. Utiliser des pinces ou tout autre
moyen pratique pour fixer le travail
à une plate-forme stable. Ne jamais
tenir le travail dans les mains, sur les
genoux ou contre toutes parties du
corps en coupant.
8. Toujours utiliser les lames avec la
bonne taille et la bonne forme
(losange par rapport à rond) des
alésages centraux. Les lames qui ne
sont pas associées à la quincaillerie
de montage de la scie fonctionneront
de manière excentrique et
provoqueront ainsi un risque
important de blessure à l’utilisateur
et de dommages à l’outil.
UTILISATION ET ENTRETIEN
DE L’OUTIL
Ne pas
utiliser l’outil si l’interrupteur ne se
met pas en marche ou ne s’éteint pas.
Tout outil qui ne peut pas être contrôlé
par l’interrupteur est dangereux et doit
être réparé.
!
AVERTISSEMENT
Instructions d’Utilisation et Manual de Pièces
10 Fr
Spécifications
Outil
Numéro de modèle DG311800AV
Tension nominale 18V
Temps de charge
Charge Normale: 3 à 6 heures
Bloc-piles – 18V DG 024200AV
Chargeur – 22V DG 024300AV
Charge Rapide
Bloc-piles – 18V DG024900AV
Chargeur – 22V DG024700AV
Capacités maximum
Lame 13,97 cm
(5 1/2 po)
Alésage central de
la lame Rond
Profondeur de coupe 3,89 cm
à 90° (1 17/32 po)
Profondeur de coupe 3,17 cm
à 45° (1 1/4 po)
Page 11

Funcionamiento
(Continuación)
CAUSAS Y PREVENCIÓN DEL
CONTRAGOLPE POR PARTE DEL
USUARIO:
El CONTRAGOLPE es una reacción
repentina de una hoja de sierra
mordida, atascada o mal alineada,
provocando que una sierra fuera de
control se levante y salga de la pieza de
trabajo hacia el operador.
Cuando la hoja esté mordida o atascada
firmemente por la entalla o ranura de
corte, cerrándose, la hoja se parará y la
reacción del motor impulsará la unidad
rápidamente hacia el operador.
Si la hoja se tuerce o se desaliña en el
corte, los dientes del borde posterior
de la hoja pueden perforar la superficie
superior de la madera provocando que
la hoja se zafe de la entalla y salte
hacia el operador.
El CONTRAGOLPE es el resultado de un
mal uso de la herramienta y/o de
procedimientos o condiciones de
operación incorrectos y puede evitarse
tomando las precauciones necesarias
que se proporcionan a continuación:
1. Sostenga la sierra con firmeza con
las dos manos y posicione su cuerpo
y brazo para permitirle resistir las
fuerzas de CONTRAGOLPE. El
operador puede controlar las
fuerzas de CONTRAGOLPE si toma
las precauciones necesarias.
2. Cuando la hoja se atasque, o cuando
se interrumpa el corte por algún
motivo, libere el gatillo y sostenga la
sierra sin moverla sobre el material
hasta que la hoja se detenga por
completo. Nunca intente retirar la
sierra del trabajo ni tirar la sierra
hacia atrás mientras la hoja esté en
movimiento o puede haber un
CONTRAGOLPE. Investigue y tome
acciones correctivas para eliminar la
causa del atascamiento de la hoja.
3. Cuando reinicie una sierra en la
pieza de trabajo, centre la hoja de
la sierra en la entalla, o corte, y
verifique que los dientes de la sierra
no queden enganchados en el
material. Si la hoja de la sierra está
atascada, puede salir o provocar un
CONTRAGOLPE desde la pieza de
trabajo mientras se reinicia la sierra.
4. Sostenga los paneles grandes para
minimizar el riesgo de morder la
hoja y de CONTRAGOLPE. Los
paneles grandes tienden a curvarse
por su propio peso. Se deben
colocar apoyos a ambos lados
debajo del panel, junto a la línea de
corte y cerca del borde del panel.
5. No utilice hojas desafiladas ni
dañadas. Las hojas desafiladas o en
mal estado producen que la entalla
se angoste causando fricción
excesiva, atascamiento de la hoja
y CONTRAGOLPE.
6. La profundidad de la hoja y las
palancas que bloquean el ajuste del
corte en diagonal deben estar
ajustadas y seguras antes de hacer el
corte. Si el ajuste de la hoja se mueve
durante el corte, puede provocar
atascamiento y CONTRAGOLPE.
7. Tenga extremo cuidado al hacer
un “Corte en bolsillo” en paredes
existentes u otras áreas ciegas. La
hoja que sobresale puede cortar
objetos que pueden causar
CONTRAGOLPE.
8. Fije la profundidad de corte para no
más de 1/8" a 1/4" más del grosor
del material. Cuanta menos hoja
quede expuesta, habrá menos
probabilidades de atascamiento
y CONTRAGOLPE. Antes de cortar,
asegúrese de que los ajustes de
profundidad y de corte en diagonal
estén firmes.
9. Tenga cuidado con los materiales
inclinados, enredados, húmedos o
deformados. Es muy probable que
estos materiales creen condiciones
de mordida y posiblemente
CONTRAGOLPE. No rasgue madera
deformada. Evite cortar clavos.
10. Use una guía de corte o guía para
borde al cortar. Las guías mejoran el
control y reducen el atascamiento
de las hojas.
11. Manténgase alerta. Cualquier
distracción puede provocar que la
hoja se tuerza o se atasque. Los cortes
repetitivos pueden llevar al usuario a
tener movimientos descuidados.
FUNCIONAMIENTO GENERAL
Siempre sujete la pieza de trabajo en
forma segura en un caballete de
aserrar o banco.
1. Dibuje una línea de corte. Coloque
la parte delantera de la zapata
sobre el borde de la pieza de trabajo
sin hacer contacto con la hoja.
Sostenga el mango con una mano y
el mango delantero con la otra.
2. Alinee la línea de la vista con su línea
de corte. Coloque los brazos y el
cuerpo para resistir el CONTRAGOLPE.
3. Para encender la sierra, presione el
botón de bloqueo hacia abajo
mientras tira del gatillo. Permita
que el motor alcance la velocidad
máxima antes de empezar a cortar.
4. Mientras esté cortando, mantenga
la zapata plana contra la pieza de
trabajo y sostenga con firmeza. No
fuerce la sierra a través de la pieza
de trabajo. Forzar una sierra puede
causar un CONTRAGOLPE.
5. Si está haciendo un corte parcial,
reiniciando en la mitad del corte o
corrigiendo la dirección, permita que
la hoja se detenga por completo.
Para volver a cortar, centre la hoja en
la entalla, retire la sierra del borde de
corte unas pulgadas, y presione el
botón de bloqueo hacia abajo
mientras tira del gatillo y vuelve a
retomar el corte lentamente.
6. Si la sierra se atasca y se detiene,
manténgala agarrada con firmeza
y libere el gatillo de inmediato.
Sostenga la sierra sin moverla en la
pieza hasta que la hoja se detenga
por completo.
7. Después de terminar un corte,
asegúrese de que la protección
inferior se cierre y la hoja se detenga
por completo antes de bajar la sierra.
Corte de paneles y tablas
Los paneles grandes y las tablas largas se
curvan o doblan si no están sujetados
correctamente. Si intenta cortar sin
nivelar ni sujetar la pieza de trabajo
correctamente, la hoja tenderá a
atascarse, provocando un CONTRAGOLPE.
22 Sp
Manual de Instrucciones y Lista de Piezas
Directives De Sécurité
(Suite)
S’assurer que l’interrupteur soit en
position d’arrêt avant d’insérer le
bloc-batterie. Insérer le bloc-batteries
dans la scie avec l’interrupteur en
marche invite les accidents.
Sous des
conditions d’abus, le liquide peut être
éjecté de la batterie. Éviter tout contact.
S’il y a un contact accidentel, rincer à
l’eau. Si le liquide entre en contact avec
les yeux, consulter un médecin. Le
liquide expulsé de la batterie pourrait
causer une irritation ou des brûlures.
1. Lorsque le bloc-batteries n’est pas
utilisé, garder loin de tous les objets
métalliques comme les trombones,
la monnaie, les clés, les clous ou les
vis qui peuvent établir une connexion
d’une borne à l’autre. Provoquer un
court-circuit des bornes de batterie
ensemble peut provoquer des
étincelles, des brûlures, un incendie
ou des dommages à la batterie.
2. Cet outil NE peut PAS être modifié ou
utilisé pour toute application autre
que celle pour laquelle il a été conçu.
Ne pas
forcer l’outil. Utiliser le bon outil pour
votre application. Le bon outil
effectuera le meilleur travail sécuritaire
au rythme pour lequel il a été conçu.
3. Il faut entretenir les outils avec soin.
Il faut garder les outils tranchants et
propres. Des outils bien entretenus
aux bords tranchants sont moins
susceptibles de bloquer et sont plus
faciles à contrôler.
4. Vérifier tout mauvais alignement ou
blocage de pièces mobiles, bris de
pièces et toute autre condition qui
pourrait affecter le fonctionnement
de l’outil. Si l’outil est endommagé,
le réparer avant de l’utiliser. De
nombreux accidents sont causés par
des outils mal entretenus.
5. Utiliser seulement des accessoires
recommandés par le fabricant par
votre modèle. Les accessoires
convenables pour un outil peuvent
créer un risque de blessure lorsqu’ils
sont utilisés pour un autre.
6. Certains bois contiennent des agents
de conservation qui pourraient être
toxiques. Attention d’éviter toute
inhalation et contact avec la peau
en travaillant avec ces matériaux.
Demander et suivre toute
!
ATTENTION
!
AVERTISSEMENT
!
AVERTISSEMENT
information de sécurité disponible
du fournisseur de matériaux.
7. Ranger les outils hors de portée des
enfants et autres personnes non
formées. Les outils sont dangereux
dans les mains d’utilisateurs non
formés.
Instructions de
sécurité pour le
chargeur et les
batteries
Avant d’utiliser le chargeur de batterie,
lire toutes les instructions sur le
chargeur, le bloc-batteries et le produit
utilisant la batterie.
1. Un outil à batterie avec des batteries
intégrales ou un bloc-batteries
distinct doit être rechargé seulement
avec le chargeur spécifié pour la
batterie. Un chargeur convenant pour
un certain type de batterie peut créer
un risque d’incendie lorsqu’on l’utilise
avec une autre batterie.
24 volts
c.c. présent aux bornes de charge. Ne pas
sonder avec des objets conducteurs.
Risque de choc électrique ou
d’électrocution.
Si le
boîtier du bloc-batteries est fissuré ou
endommagé, ne pas insérer dans le
chargeur. Risque de choc électrique ou
d’électrocution.
Éviter
tout contact avec les surfaces mises à la
terre telles que les tuyaux, les radiateurs,
les cuisinières et les réfrigérateurs. Il y a
un risque accru de choc électrique si
votre corps est mis à la terre.
Les fiches
du chargeur doivent s’agencer à la prise.
Ne jamais modifier la fiche de quelque
façon que ce soit. Ne pas utiliser de
fiches d’adaptation avec les chargeurs
mis à la terre. Les fiches non modifiées et
prises assorties réduiront le risque de
choc électrique.
Ne pas
mal utiliser le cordon.
• Ne jamais porter le chargeur par
son cordon.
!
AVERTISSEMENT
!
AVERTISSEMENT
!
AVERTISSEMENT
!
DANGER
!
DANGER
• Ne jamais débrancher le cordon en
le tirant de la prise. Tirez la ficher
plutôt que le cordon en débranchant
le chargeur.
2. Ne pas faire fonctionner le chargeur
avec un cordon ou une prise
endommagé(e).
• Faire remplacer immédiatement
tout cordon et/ou collier de serrage
endommagé ou usé.
• Ne pas essayer de réparer le
cordon d’alimentation.
3. S’assurer que le cordon soit placé de
telle manière que l’on ne puisse pas
marcher dessus, trébucher ou subir
des dommages ou un stress
quelconque.
4. Ne pas faire fonctionner le chargeur
s’il a été frappé, a été échappé ou
endommagé de quelque autre façon.
L’apporter à un réparateur qualifié.
5. Ne pas démonter le chargeur ou le
bloc-batteries. L’apporter à un
réparateur qualifié lorsqu’il doit être
réparé ou entretenu. Un mauvais
assemblage peut mener à un risque
de choc électrique ou d’incendie.
6. Ne pas utiliser de rallonges à moins
que cela ne soit absolument
nécessaire. Une mauvaise utilisation
de rallonge pourrait mener à un
risque d’incendie ou de choc
électrique. S’il faut utiliser une
rallonge, s’assurer que :
• La taille du cordon est au moins
celle spécifiée sur le tableau intitulé
« Taille de fil minimum (AWG) de
rallonge pour le chargeur de
batterie. »
• Les broches de la fiche de la
rallonge sont du même nombre,
de même taille et forme que celles
de la fiche du chargeur.
• La rallonge est bien câblée et en
bon état.
• Si vous utilisez une rallonge à
l’extérieur, elle doit porter le suffixe
« W-A » ou « W » selon la
désignation du type de cordon pour
indiquer s’il peut servir à l’extérieur.
Par exemple - SJTW-A
7. Débrancher le chargeur de la prise
avant tout entretien ou nettoyage.
8. Charger le bloc-batteries dans un
endroit bien ventilé. Ne pas laisser
d’objet couvrir le chargeur et/ou le
bloc-batteries en chargeant.
9. Ne pas ranger le chargeur ou le
bloc-batteries dans des endroits où
la température pourrait atteindre
DG311800AV
11 Fr
Figure 4
Figure 6
Figure 5
Longueur de cordon en pieds 25 50 100 150
Taille AWG de cordon 18 18 18 16
Taille minimum de fil (AWG) de rallonge pour le chargeur de batterie
Page 12

Cómo cargar la
batería (Continuación)
horas. Retire la batería del soporte y
desenchufe del tomacorriente de pared.
La batería de carga rápida DG024900AV
se cargará con cualquiera de los
cargadores. La batería DG024200AV se
cargará únicamente con el cargador
DG024300AV. Desconecte el cargador
de la fuente de energía mientras no lo
esté usando.
IMPORTANTE: LA BATERÍA NO DEBERÁ
DEJARSE EN EL CARGADOR DURANTE
MÁS DE 48 (CUARENTA Y OCHO)
HORAS.
Ensamblaje
CÓMO COLOCAR LA HOJA
Siempre desconecte la batería de la
herramienta y coloque el interruptor en
la posición de bloqueo o de apagado
antes de hacer cualquier armado, ajuste
o de cambiar accesorios. Dichas medidas
de seguridad preventivas reducen el
riesgo de que la herramienta se active
por accidente.
1. Gire el tornillo del vástago hacia la
izquierda y retire la ARANDELA
EXTERIOR.
2. Retire la protección inferior por
completo hasta colocarla dentro de
la protección superior. Mientras
retira la protección inferior,
verifique el funcionamiento y las
condiciones del RESORTE DE LA
PROTECCIÓN INFERIOR. Presione sin
soltar el botón de bloqueo del
vástago que está detrás de la
protección superior para bloquear
la hoja y el eje del motor.
3. Asegúrese de que los dientes de la
sierra y la flecha de la hoja apunten
hacia la misma dirección que la
flecha que está en la protección
inferior. Los dientes de la hoja
deben apuntar en la dirección que
se ilustra a continuación si la hoja
queda debidamente instalada.
4. Deslice la hoja a través de la ranura
del pie y colóquela contra la
ARANDELA INTERIOR sobre el eje.
Asegúrese de que el diámetro
grande de la arandela EXTERIOR
quede al ras de la hoja.
5. Vuelva a instalar la ARANDELA
EXTERIOR y ajuste bien el tornillo
del vástago.
Funcionamiento
Se
deberán usar gafas de seguridad
durante la operación.
Asegúrese de que el trabajo esté sujeto
en forma segura en una prensa de
tornillo o mordaza antes de comenzar la
operación de perforado. El trabajo que
está flojo puede girar y causar lesiones
corporales.
Mantenga
las manos alejadas del área de corte y de
la hoja. Mantenga su otra mano sobre la
palanca auxiliar o caja del motor.
Si está sosteniendo la sierra con ambas
manos, no correrá riesgo de cortárselas
con la hoja. Sostenga la sierra con
firmeza para evitar perder el control.
NUNCA coloque las manos detrás de la
hoja de la sierra ya que el contragolpe
puede hacer que la sierra salte hacia
atrás sobre su mano.
Colóquese con el cuerpo hacia
cualquiera de los lados de la hoja de la
sierra, pero no alineado con la hoja de
la sierra. El CONTRAGOLPE podría
provocar que la sierra saltara hacia
!
PELIGRO
!
PRECAUCION
!
ADVERTENCIA
atrás. (Vea “Causas y prevención del
contragolpe por parte del usuario”.)
No intente alcanzar nada debajo del
trabajo. La protección no puede
protegerlo de la hoja debajo del trabajo.
No intente retirar el material de corte
cuando la hoja se esté moviendo.
Verifique que la protección inferior se
cierre bien antes de cada uso.
No ponga la sierra en funcionamiento
si la protección inferior no se mueve
libremente y se cierra instantáneamente.
Nunca sujete ni ate la protección inferior
en la posición abierta. Si la sierra se cae
por accidente, la protección inferior
puede doblarse. Levante la protección
inferior solamente con la Palanca para
levantar la protección inferior y asegúrese
de que se mueva libremente y no toque la
hoja ni ninguna otra pieza, en todos los
ángulos y profundidades de corte.
Verifique el funcionamiento del resorte
de la protección inferior. Si la protección
y el resorte no están funcionando
correctamente, se les debe realizar un
servicio antes de usarlos. Puede que la
protección inferior funcione con lentitud
debido a piezas dañadas, depósitos de
goma o una acumulación de desechos.
Desconecte la batería de la herramienta.
Retire la hoja periódicamente, limpie las
protecciones superior e inferior y el área
del núcleo con keroseno y séquela con
un paño, o límpiela con aire comprimido.
La protección inferior deberá retirarse
manualmente solamente para cortes
especiales como “Cortes de bolsillo”
y “Cortes compuestos”. Levante la
protección inferior con la Palanca para
levantar la protección inferior. Tan
pronto como la hoja se introduzca en el
material, se debe liberar la protección
inferior. Para todas las demás
operaciones de corte, la protección
inferior debe funcionar
automáticamente.
Asegúrese de que la protección
inferior cubra la hoja antes de colocar
la sierra en la mesa de trabajo o en el
piso. Una hoja sin protección y todavía
en movimiento hará que la sierra se
desplace hacia atrás cortando todo lo
que encuentra en su camino. Entérese
del tiempo necesario para que la hoja
deje de girar después de haber
apagado el interruptor.
NUNCA sostenga una pieza que está
cortando en sus manos ni sobre sus
piernas. Es importante apoyar el
trabajo correctamente para minimizar
la exposición corporal, el atascamiento
de la hoja o la pérdida de control.
21 Sp
DG311800AV
Instructions de
sécurité pour le
chargeur et les
batteries (Suite)
ou dépasser 105 °F (40 °C), comme
une remise à outils de métal ou une
voiture en été. Ceci peut mener à
une détérioration de la batterie
entreposée.
10. Pour une charge optimale du
bloc-batterie, le charger dans des
températures entre 18° – 24 °C
(67 – 75 °F). Ne pas charger le
bloc-batteries dans une température
de l’air inférieure à 4 °C (40 °F) ou
supérieure à 105 °C (40 °F). Changer
la batterie à l’extérieur de cette
plage peut avoir un effet négatif sur
la performance de la batterie.
11. Ne pas charger la batterie dans des
endroits humides ou mouillés.
12. Ne pas charger le bloc-batteries s’il
est chaud au toucher. Attendre que
l’appareil refroidisse.
13. Ne pas exposer le chargeur à la
pluie, à la neige ou au gel.
14. Ne pas incinérer le bloc-batteries.
Il peut exploser.
15. Le chargeur de batterie n’est pas
pour des utilisations autres que la
charge de batterie rechargeable.
Toute autre utilisation peut mener
à un risque d’incendie, de choc
électrique ou d’électrocution.
16. Le chargeur est ventilé par des
fentes sur le dessus et le bas de
l’enceinte. Ne pas bloquer les fentes
de ventilation ou placer à un
endroit où les fentes de ventilation
pourraient être bloquées. Une
chaleur intense et un risque
d’incendie pourraient en résulter.
ÉLIMINATION DE BATTERIE
Ne pas
essayer d’ouvrir la batterie ni retirer
tout composant sortant des bornes de
la batterie. Cela pourrait mener à des
incendies ou des blessures. Avant
l’élimination, protéger les bornes
exposées avec un ruban isolant lourd
pour éviter les court-circuits.
BATTERIE DE NICKEL-CADMIUM
• Si l’appareil est doté
d’une batterie nickelcadmium, la batterie
doit être recyclée ou
éliminée d’une manière
respectueuse de l’environnement.
Vérifier auprès de votre service des
travaux publics pour obtenir
l’information du recyclage de
batteries.
!
AVERTISSEMENT
Charger la batterie
RETIRER LE BLOC-BATTERIES
Avant de charger, retirer le blocbatteries de l’outil en enfonçant le
bouton de dégagement de la batterie
et en sortant le bloc de l’outil.
INSTRUCTIONS GÉNÉRALES
Avec une utilisation normale, lorsque
le bloc-batteries approche une
décharge on remarque une chute
rapide de performance de l’outil.
Lorsque l’outil ne peut pas effectuer
la tâche en cours, le moment est venu
de recharger le bloc-batteries.
Recharger le bloc-batteries avant ce
point réduit la durée de vie totale
du bloc-batteries. Décharger le
bloc-batteries au-delà de ce point
peut endommager le bloc-batteries.
REMARQUE : La température de
batterie augmente pendant et un peu
après l’utilisation. Les batteries
pourraient ne pas accepter une charge
complète si elles sont chargées
immédiatement après leur utilisation.
Ne pas charger le bloc-batteries s’il est
chaud au toucher. Attendre que
l’appareil se refroidisse.
CHARGE INITIALE
Avant d’utiliser la scie alternative pour
la première fois, charger entièrement
la batterie. Selon la température
ambiante et la tension de ligne,
la batterie à charge normale devrait
être chargée entièrement en six (6)
à dix (10) heures dans le chargeur
DG024300AV et celle à charge rapide
devrait être charge en deux (2) à
quatre (4) heures dans le chargeur
rapide DG024700AV. La charge rapide
est terminée lorsque le voyant
s’allume.
CHARGE
CHARGEUR NORMAL ET BATTERIE
Connecter les broches transportant le
courant sur le cordon d’alimentation
à une prise murale de 120 V c.a. 60 Hz.
Connecter l’autre extrémité du cordon
au support de bloc-batteries.
Le chargeur est doté d’une DEL,
un voyant rouge qui s’allumera en
autant que le bloc-batteries est
connecté au chargeur et que le
chargeur est branché. Il n’y a aucune
indication de fin de charge.
Avec une utilisation normale,
le bloc-batteries sera entièrement
chargé après environ trois (3) à six (6)
heures. Retirer la batterie du support
et débrancher de la prise murale.
CHARGEUR RAPIDE ET BATTERIE
Connecter les broches transportant le
courant sur le cordon d’alimentation
à une prise murale de 120 V c.a. 60 Hz.
Le chargeur est doté d’une DEL, un
voyant rouge s’allumera pendant la
charge. Lorsque la batterie est
entièrement chargée, un voyant vert
indique la fin de la charge.
Avec une utilisation normale,
le bloc-batteries sera entièrement
chargé après environ une (1) à deux
(2) heures. Retirer la batterie du
support et débrancher de la prise
murale.
La batterie à charge rapide
DG024900AV se chargera dans l’un ou
l’autre chargeur. La batterie
DG024200AV ne se charge que dans le
chargeur DG024300AV. Débrancher le
chargeur de la source de courant
lorsqu’il n’est pas utilisé.
Instructions d’Utilisation et Manual de Pièces
12 Fr
1. Tornillo
2. Arandela externa
3. Hoja
4. Arandela interna
5. Indicador
123 4
5
Figure 1 -
Chargeur Normale et Bloc-piles
Figure 2 -
Chargeur Rapide et Bloc-piles
Figure 3
Page 13

Instrucciones de
seguridad para el
cargador y las
baterías (Continuación)
para indicar que es apto para usarse
en exteriores. Por ejemplo: SJTW-A
7. Desenchufe el cargador del
tomacorriente antes de intentar
cualquier mantenimiento o limpieza.
8. Cargue la batería en un área bien
ventilada. No permita que ningún
objeto cubra el cargador ni la
batería mientras está cargando.
9. No guarde el cargador ni la batería
en lugares donde la temperatura
pueda alcanzar o exceder los 105ºF
(40ºC), como un cobertizo para
herramientas de metal o un auto en
verano. Esto puede provocar que la
batería guardada se deteriore.
10. Para un cargado óptimo de la
batería, cargue a temperaturas entre
65º y 75ºF (18º y 24ºC). No cargue la
batería en temperaturas ambiente
por debajo de los 40ºF (4ºC) ni por
encima de los 105ºF (40ºC). El cargar
la batería fuera de este rango puede
afectar el rendimiento de la batería
de manera adversa.
11. No cargue la batería en lugares
mojados o húmedos.
12. No cargue la batería si se siente
caliente al tacto. Espere a que
se enfríe.
13. No exponga el cargador a la lluvia,
nieve o heladas.
14. No incinere la batería. Puede
explotar en el fuego.
15. El cargador de la batería no está
concebido para otros usos que no
sean cargar la batería recargable.
Cualquier otro uso puede dar lugar
a riesgo de incendio, choque
eléctrico o electrocución.
16. El cargador se ventila a través de las
ranuras de las partes superior e
inferior de la caja. No bloquee las
ranuras de ventilación ni coloque la
caja en un lugar donde las ranuras
de ventilación puedan quedar
bloqueadas. Esto puede dar lugar a
calor intenso y riesgo de incendio.
CÓMO DESECHAR LA BATERÍA
No
intente desarmar la batería ni quitar
ningún componente que sobresalga de
las terminales de la batería. Puede
provocar un incendio o lesiones. Antes
de desechar la batería, proteja las
terminales expuestas con cinta
!
ADVERTENCIA
aisladora gruesa para evitar que se
produzcan cortocircuitos.
BATERÍA DE NÍQUEL-CADMIO
• Si está equipada con una
batería de níquelcadmio, la batería debe
reciclarse o desecharse
de manera que no dañe
el medio ambiente. Verifique con el
Departamento de Obras Públicas de
su condado la información sobre
cómo reciclar baterías.
Cómo cargar la
batería
CÓMO RETIRAR LA BATERÍA
Antes de cargar, retire la batería de la
herramienta presionando el botón de
liberación de la batería y tirando de la
batería hacia afuera de la herramienta.
INSTRUCCIONES GENERALES
Con el uso normal, a medida que la
batería se va descargando, observará
una importante disminución en el
rendimiento de la herramienta.
Cuando la herramienta no es capaz de
realizar la tarea, es hora de recargar la
batería. El recargar la batería antes de
llegar a esta condición reducirá la vida
útil total de la misma. Descargar la
batería más allá de este punto puede
dañarla.
NOTA: la temperatura de la batería
aumentará durante el uso y enseguida
después de usarla. Es posible que las
baterías no acepten una carga total si
se cargan inmediatamente después de
usarlas. No cargue la batería si se
siente caliente al tacto. Espere a que se
enfríe.
CARGA INICIAL
Antes de usar la sierra alternativa por
primera vez, cargue la batería por
completo. Dependiendo de la
temperatura ambiente y del voltaje de
línea, la batería debería cargarse por
completo en 6 (seis) a 10 (diez) horas
con el cargador DG024300AV y la
batería de carga rápida debería
cargarse por completo en 2 (dos) a 4
(cuatro) horas con el cargador rápido
DG024700AV. La carga rápida estará
completa cuando se encienda la luz
verde.
CARGA
CARGADOR Y BATERÍA NORMALES
Conecte las clavijas de conducción de
corriente en el cable de corriente a un
tomacorriente de pared de 120V CA,
60Hz. Conecte el otro extremo del
cable de corriente al soporte de la
batería. Si el cargador tiene un LED,
se encenderá una luz roja siempre que
la batería esté conectada al cargador
y el cargador esté enchufado. No hay
indicador de que la carga se ha
completado.
Con el uso normal, la batería estará
totalmente cargada después de
aproximadamente 3 (tres) a 6 (seis)
horas. Retire la batería del soporte
y desenchufe del tomacorriente de
pared.
CARGADOR Y BATERÍA RÁPIDOS
Conecte las clavijas de conducción de
corriente en el cable de corriente a un
tomacorriente de pared de 120V CA,
60Hz. El cargador viene con un LED; se
encenderá una luz roja mientras esté
cargando. Una vez que la batería esté
completamente cargada, una luz verde
indicará que la carga está completa.
Con el uso normal, la batería estará
totalmente cargada después de
aproximadamente 1 (una) a 2 (dos)
20 Sp
Manual de Instrucciones y Lista de Piezas
Charger la batterie
(Suite)
IMPORTANT : LE BLOC-BATTERIES NE
DOIT PAS RESTER SUR LE CHARGEUR
PENDANT PLUS DE QUARANTE-HUIT
(48) HEURES.
Montage
INSTALLER LA LAME
Toujours débrancher le bloc-batteries de
l’outil et placer l’interrupteur en position
verrouillée ou d’arrêt (off) avant tout
assemblage, ajustement ou changement
d’accessoires. De telles mesures de
sécurité préventives réduisent le risque
de démarrage accidentel de l’outil.
1. Tourner la vis de mandrin dans le
sens anti-horaire et retirer la
RONDELLE EXTÉRIEURE.
2. Rentrer le dispositif de protection
inférieur jusqu’au bout dans le
dispositif de protection supérieur.
En rentrant le dispositif de protection
inférieur, vérifier le fonctionnement
et l’état du RESSORT DE DISPOSITIF
DE PROTECTION INFÉRIEUR. Appuyer
et tenir le bouton de verrouillage de
mandrin derrière le dispositif de
protection supérieur pour verrouiller
la lame et l’arbre du moteur.
3. S’assurer que les dents de scie et que
la flèche de la lame pointent dans la
même direction que la flèche sur le
dispositif de protection inférieur. Les
dents de lame doivent faire face à la
même direction qu’illustré plus bas si
la lame est installée correctement.
4. Glisser la lame par la fente du pied
et la monter contre la RONDELLE
INTÉRIEURE sur l’arbre. S’assurer que
le large diamètre de la rondelle
EXTÉRIEURE affleure contre la lame.
5. Réinstaller la RONDELLE EXTÉRIEURE
et bien resserrer la vis du mandrin.
Fonctionnement
Porter
des lunettes de sécurité quand
l’appareil est en marche.
S’assurer
que le travail est bien en place dans
l’étau ou pincé en place avant de
commencer à percer. Le travail mal
installé pourrait tourner et provoquer
des blessures.
Garder
les mains loin de l’aire de coupe et de
la lame. Garder votre autre main sur la
poignée auxiliaire ou sur le bâti du
moteur.
Si les deux mains tiennent la scie, elles
ne peuvent pas être coupées par la
lame. Tenir fermement la scie pour
éviter la perte de contrôle. NE jamais
PLACER la main derrière la lame de scie
puisque le recul pourrait faire sauter la
scie vers l’arrière sur votre main.
Garder le corps en position d’un côté
ou l’autre de la lame de scie, mais non
en ligne avec la lame de scie. Le RECUL
pourrait faire sauter la scie vers
l’arrière. (Voir “Causes et prévention de
l'utilisateur du recul”.)
Ne pas se pencher sous le travail. Le
dispositif de protection ne peut pas
protéger la personne de la lame sous le
travail.
Ne pas essayer de retirer le matériel
coupé lorsque la lame est en
mouvement. Vérifier le dispositif de
protection inférieur pour bien fermer
!
DANGER
!
ATTENTION
!
AVERTISSEMENT
après chaque utilisation.
Ne pas utiliser la scie si le dispositif de
protection inférieur ne se déplace pas
librement et ne se ferme pas
instantanément. Ne jamais pincer ou
attacher le dispositif de protection
inférieur en position ouverte. Si la scie
est échappée accidentellement, le
dispositif de protection inférieur
pourrait être plié. Soulever seulement
le dispositif de protection inférieur
avec le levier de levage du dispositif de
protection inférieur et s’assurer qu’il se
déplace librement et ne touche pas la
lame ou toute autre pièce, dans les
angles et profondeurs de coupe.
Vérifier le fonctionnement du ressort du
dispositif de protection inférieur. Si le
dispositif de protection et le ressort ne
fonctionnent pas correctement, ils
doivent être réparés avant l’utilisation.
Le dispositif de protection inférieur peut
fonctionner de manière erratique à
cause de pièces endommagées, dépôts
gommeux ou accumulation de débris.
Débrancher le bloc-batteries de l’outil.
Retirer régulièrement la lame, nettoyer
les dispositifs de protection inférieur et
supérieur ainsi que le moyeu avec du
kérosène et essuyer pour assécher, ou
souffler avec de l’air comprimé.
Le dispositif de protection inférieur
doit être rentré manuellement
seulement pour les coupes spéciales
telles que « coupes en poche » et «
coupes composées », Soulever le
dispositif de protection inférieur par le
levier de levage du dispositif de
protection inférieur. Dès que la lame
entre dans le matériau, il faut dégager
le dispositif de protection inférieur.
Pour toute autre coupe à la scie, le
dispositif de protection inférieur
devrait fonctionner automatiquement.
S’assurer toujours que le protecteur
inférieur couvre la lame avant de
déposer la scie sur la table de travail
ou sur le plancher. Une lame sans
protection qui n’a pas encore cessé de
tourner causera que la scie se déplace
vers l’arrière, en tranchant tous ce qui
rencontre sur sa voie. Faites attention
au temps nécessaire parce que la lame
quitte de tourner après avoir dégagé
l’interrupteur.
NE JAMAIS tenir la pièce à couper dans
les mains ou sur votre jambe. Il est
important de supporter correctement
le travail pour réduire l’exposition du
corps, le grippage de la lame ou la
perte de contrôle.
DG311800AV
13 Fr
Figure 1 - Carga Normal y Batería
Figure 2 - Carga Rápida y Batería
1. Vis
2. Rondelle extérieure
3. Lame
4. Rondelle intérieure
5. Jauge
12
3
45
Figure 3
Page 14

Informaciones
Generales de
Seguridad (Continuación)
Asegúrese de que el interruptor esté en
la posición de apagado antes de
introducir la batería. Introducir la
batería en la sierra con el interruptor en
la posición de encendido lo deja
expuesto a más accidentes.
Bajo
condiciones de abuso, puede salir
líquido expulsado de la batería. Evite el
contacto. Si ocurre un contacto
accidental, enjuague con agua. Si le
entra líquido en los lentes de contacto,
procure ayuda médica. El líquido
expulsado de la batería puede causar
irritación o quemaduras.
1. Cuando la batería no está en uso,
manténgalo alejado de otros
objetos de metal como sujetadores,
llaves, clavos o tornillos que puedan
hacer una conexión entre las
terminales. Hacer un puente entre
las terminales de la batería puede
provocar chispas, quemaduras,
incendios o daños a la batería.
2. Esta herramienta NO debe
modificarse ni usarse para cualquier
aplicación que no sea la aplicación
para la cual fue diseñada.
No
fuerce la
herramienta. Use la herramienta
correcta para su aplicación. La
herramienta correcta hará el trabajo
mejor y en forma más segura a la
velocidad para la cual fue diseñada.
3. Cuide sus herramientas. Mantenga
sus herramientas para cortar afiladas
y limpias. Es menos probable que las
herramientas con un mantenimiento
adecuado y con bordes de corte
afilados se atasquen y además son
más fáciles de controlar.
4. Cuide sus herramientas. Mantenga
sus herramientas para cortar
afiladas y limpias. Es menos
probable que las herramientas con
un mantenimiento adecuado y con
bordes de corte afilados se
atasquen y además son más fáciles
de controlar.
5. Use solamente accesorios
recomendados por el fabricante de
su modelo. Los accesorios
apropiados para una herramienta
pueden causar un riesgo de lesión
cuando se usan con otra
herramienta.
6. Algunas maderas contienen
!
PRECAUCION
!
ADVERTENCIA
!
ADVERTENCIA
conservadores que pueden ser
tóxicos. Tenga especial cuidado
para evitar la inhalación y el
contacto con la piel con estos
materiales. Solicite y cumpla con
toda la información de seguridad
disponible por parte de su
proveedor de materiales.
7. Guarde las herramientas fuera del
alcance de los niños y de otras
personas no capacitadas para
usarlas. Las herramientas son
peligrosas cuando están en manos
de usuarios inexpertos.
Instrucciones de
seguridad para el
cargador y las
baterías
Antes de usar el cargador de la batería,
lea todas las instrucciones del cargador
de la batería, la batería y del producto
donde se usará la batería.
1. Una herramienta a batería con
baterías integrales o baterías
independientes deben recargarse
únicamente con el cargador
especificado para la batería. Un
cargador apto para un tipo de batería
puede provocar un riesgo de incendio
cuando se usa con otra batería.
240 voltios de CC en los terminales de
carga. No introduzca objetos
conductores. Peligro de choque eléctrico
o electrocución.
Si la caja
de la batería está rajada o dañada, no la
introduzca en el cargador. Peligro de
choque eléctrico o electrocución.
Evite el
contacto corporal con las superficies
conectadas a tierra, tales como
tuberías, radiadores, cocinas eléctricas
o refrigeradores. Existe un mayor
riesgo de choque eléctrico si su cuerpo
está conectado a tierra.
Los
enchufes del cargador deben coincidir
con el tomacorriente. Nunca modifique
el enchufe de ninguna manera. No
utilice enchufes adaptadores con
!
ADVERTENCIA
!
ADVERTENCIA
!
PELIGRO
!
PELIGRO
cargadores conectados a tierra. Los
enchufes no modificados y los
tomacorrientes correspondientes
reducirán el riesgo de choque eléctrico.
Trate el
cable con cuidado.
• Nunca tome el cargador por el
cable para transportarlo.
• Nunca tire del cable para
desenchufarlo del receptáculo. Tire
del enchufe en vez del cable cuando
desenchufe el cargador.
2. No utilice el cargador con un cable
o un enchufe dañado.
• Haga cambiar el cable de
corriente dañado o desgastado
y/o el liberador de tensión
inmediatamente.
• No intente reparar el cable de
corriente.
3. Asegúrese de que el cable esté
ubicado de tal manera que nadie lo
pise ni se tropiece con él, y que no
esté sujeto de alguna otra manera a
algún daño o tensión.
4. No opere el cargador si ha recibido
un golpe fuerte, si se ha caído o ha
sido dañado de otra manera. Llévelo
a un técnico de reparación calificado.
5. No desarme el cargador ni la batería.
Llévelo a un técnico de reparación
calificado cuando necesite servicio
o reparación. El rearmado incorrecto
puede dar como resultado un riesgo
de choque eléctrico.
6. No use un cable de extensión a
menos que sea absolutamente
necesario. El uso de un cable de
extensión inadecuado puede resultar
en un riesgo de incendio y choque
eléctrico. Si se debe usar un cable de
extensión, asegúrese de que:
• El tamaño del cable sea al menos
el especificado en la tabla llamada
“Tamaño mínimo del cable (AWG)
de extensión para el cargador de
batería.”
• Que las clavijas del enchufe del
cable de extensión tengan el mismo
número, tamaño y forma que las
del enchufe del cargador.
• Que el cable de extensión esté
correctamente cableado y en
buenas condiciones eléctricas.
• Si el cable de extensión va a usarse
en exteriores debe estar marcado
con el sufijo “W-A” o “W” después
de la designación del tipo de cable
!
ADVERTENCIA
19 Sp
DG311800AV
Fonctionnement
(Suite)
CAUSE DU RECUL ET PRÉVENTION
PAR L’UTILISATEUR :
Le RECUL est une réaction soudaine à
une lame de scie pincée, accrochée ou
mal alignée provoquant le soulèvement
de la scie incontrôlée puis la sortie hors
de la pièce vers l’opérateur.
Lorsque la lame est pincée ou accrochée
par le trait de scie ou la fente de coupe,
la fermeture, la lame grippe et la
réaction du moteur entraîne rapidement
l’appareil vers l’arrière et vers l’opérateur.
Si la lame se coince ou se désaligne
dans la coupe, les dents du bord arrière
de la lame peuvent pénétrer dans la
surface supérieure du bois et alors la
lame sort du trait et saute vers l’arrière
et vers l’opérateur.
Le RECUL est le résultat de la mauvaise
utilisation de l’outil et / ou de mauvaises
procédures ou conditions d’opération et
peut être évité en suivant les précautions
appropriées indiquées plus bas :
1. Maintenir une prise ferme des deux
main de la scie et positionner le
corps et le bras pour permettre de
résister aux forces de RECUL. Ces
forces se contrôlent par l’opérateur
en suivant les bonnes précautions.
2. Lorsque la lame grippe ou en
interrompant une coupe pour toute
raison, dégager la gâchette et tenir
la scie immobile dans le matériau
jusqu’à ce que la lame s’arrête
complètement. Ne jamais essayer de
retirer la scie du travail ni reculer la
scie tandis que la lame est en
marche sinon il pourrait y avoir un
RECUL. Vérifier et prendre les
mesures correctrices voulues pour
éliminer le grippage de la lame.
3. En redémarrant une scie sur la pièce,
centrer la lame de scie dans le trait
ou la coupe et vérifier que les dents
de scie ne sont pas engagées dans le
matériau. Si la lame de scie grippe,
elle peut marcher ou RECULER de la
pièce si la scie est redémarrée.
4. Supporter les larges panneaux pour
réduire le risque de pincement de la
lame et de RECUL. Les larges
panneaux tendent à s’affaisser sous
leurs propres poids. Des supports
doivent être placés sous le panneau
des deux côtés, près de la ligne de
coupe et près du bord du panneau.
5. Ne pas utiliser de lames émoussées
ou endommagées. Les lames mal
placées ou affûtées produisent un
trait de coupe étroit provoquant
une friction excessive, un grippage
de lame et un RECUL.
6. Les leviers de verrouillage
d’ajustement en biseau et la
profondeur de la lame doivent être
serrés et bien installés avant la
coupe. Si l’ajustement de lame se
déplace pendant la coupe, il
pourrait y avoir grippage et RECUL.
7. Attention pendant une « coupe en
poche » dans les murs actuels ou
autres endroits borgnes. La lame
qui ressort peut couper des objets
qui peuvent provoquer le RECUL.
8. Régler la profondeur de coupe d’au
plus 0,31 à 0,63 cm (1/8 à 1/4 po) de
plus que l’épaisseur du matériel.
Moins il y a de lame exposée et moins
il y aura de chance de grippage et de
RECUL. Avant la coupe, s’assurer que
les ajustements de profondeur et de
biseau sont serrés.
9. Attention au matériau dense,
noueux, humide ou déformé. Ils
sont les plus susceptibles de créer
des conditions de pincement et des
RECULS possibles. Ne pas refendre
le bois d’oeuvre gauchi. Éviter de
couper les clous.
10. Utiliser un guide longitudinal ou un
guide de bord pour les coupes en
long. Les guides améliorent le
contrôle et réduisent le grippage de
lame.
11. Rester vigilant. Toute distraction
peut provoquer une torsion ou un
grippage. Les coupes à répétition
peuvent créer chaque l’utilisateur
des mouvements imprudents.
FONCTIONNEMENT GÉNÉRAL
Toujours bien pincer la pièce sur un
établi ou un chevalet de sciage.
1. Tracer une ligne de coupe. Placer
l’avant de la semelle sur le bord de
la pièce sans contact avec la lame.
Tenir la poignée d’une main et la
poignée avant de l’autre.
2. Aligner l’angle de vision avec votre
ligne de coupe. Positionner vos bras
et votre corps pour résister au RECUL.
3. Pour commencer à scier, pousser le
bouton de verrouillage vers le bas
tout en tirant la gâchette. Laisser le
moteur atteindre pleine vitesse
avant de commencer la coupe.
4. En coupant, garder la semelle à plat
contre le travail et maintenir une
prise ferme. Ne pas forcer la scie à
travers la pièce. Forcer une scie peut
provoquer un RECUL.
5. Pour une coupe partielle, reprendre
à mi-coupe ou corriger la direction,
laisser la lame s’arrêter
complètement. Pour reprendre la
coupe, centrer la lame dans le trait
de coupe, reculer la scie du bord de
coupe de quelques pouces, pousser
le bouton de verrouillage vers le bas
en tirant la gâchette et en rentrant
lentement la coupe.
6. Si la scie grippe et s’arrête, maintenir
une prise ferme et dégager
immédiatement la gâchette. Tenir la
scie immobile dans la pièce jusqu’à ce
que la lame s’arrête complètement.
7. Après avoir fini une coupe, s’assurer
que le dispositif de protection se
ferme et que la lame s’arrête
complètement avant de déposer la
scie.
Coupe de panneaux et de planches
Les larges panneaux et les longues
planches s’affaissent ou plient si elles ne
sont pas supportés correctement. Si l’on
essaie de couper sans niveler et sans
supporter correctement la pièce, la lame
aura tendance à gripper, provoquant un
RECUL. Supporter les larges panneaux.
S’assurer de régler la profondeur de
coupe pour ne couper qu’à travers la
pièce, non pas les supports.
Coupe en long
Le délignage est une coupe en long selon
le grain. Choisir la bonne lame pour
l’emploi. Utiliser un guide longitudinal
pour le délignage de 10,16 cm (4 po) de
largeur ou moins. Pour installer le guide
longitudinal, glisser la barre à travers la
fente du guide longitudinal d’un côté ou
l’autre de la semelle. La largeur de coupe
Instructions d’Utilisation et Manual de Pièces
14 Fr
Tamaño mínimo del cable (AWG) de extensión para el cargador de batería
Largo del cable en pies
25 50 100 150
Tamaño AWG del cable 18 18 18 16
Figure 4
Figure 5
Figure 6
Page 15

Informaciones
Generales de
Seguridad (Continuación)
6. Nunca accione la herramienta si
no está aplicada a un objeto de
trabajo. Los accesorios deben
colocarse en forma segura. Los
accesorios sueltos pueden causar
lesiones graves.
7. Nunca apunte una herramienta
hacia usted ni hacia otra persona.
Pueden ocurrir lesiones graves.
8. Utilice presión firme y pareja al usar
la herramienta. No la fuerce.
Demasiada presión puede provocar
que la hoja se quiebre o se recaliente.
9. Mantenga todas las tuercas, pernos
y tornillos ajustados y asegúrese de
que el equipo esté en condiciones
de trabajo seguras.
10. No acerque las manos a las piezas
móviles ni las coloque debajo de
ellas.
ÁREA DE TRABAJO
No haga
funcionar una herramienta a motor en
un entorno explosivo, como por ejemplo
cuando haya líquidos, gases o polvo
inflamable. Las herramientas a motor
hacen chispas que pueden encender los
gases o el polvo.
Mantenga el área de trabajo limpia y
bien iluminada. Los bancos
desordenados y las áreas oscuras
propician accidentes.
Mantenga alejados a los observadores,
niños y visitantes mientras hace
funcionar una herramienta a motor. Las
distracciones pueden hacerle perder el
control.
SEGURIDAD ELÉCTRICA
Recargue
esta
herramienta a batería únicamente con
el cargador que se especifica para la
batería. Un cargador apto para un solo
tipo de batería puede provocar un
riesgo de incendio cuando se usa con
otra batería.
No
exponga
las herramientas a motor a la lluvia ni a
superficies mojadas. Si entra agua
dentro de una herramienta a motor,
aumentará el riesgo de choque
eléctrico.
!
ADVERTENCIA
!
ADVERTENCIA
!
PRECAUCION
!
PRECAUCION
!
ADVERTENCIA
Use esta
herramienta a batería únicamente con su
paquete de batería indicado. El uso de
cualquier otra batería puede provocar un
riesgo de incendio.
Evite el
contacto
corporal con las superficies conectadas
a tierra, tales como tuberías,
radiadores, cocinas eléctricas o
refrigeradores. Existe un mayor riesgo
de choque eléctrico si su cuerpo está
conectado a tierra.
SEGURIDAD PERSONAL
No use
este
producto en forma inadecuada. La
exposición excesiva a la vibración,
trabajar en posiciones incómodas y los
movimientos de trabajo repetitivos
pueden causar lesiones a las manos y
brazos. Deje de usar cualquier
herramienta si aparece incomodidad
cosquilleo o dolor y consulte a un
médico.
1. Manténgase alerta, preste atención
a lo que hace y use su sentido
común cuando maneje cualquier
herramienta a motor. No use la
herramienta si está cansado o bajo
la influencia de drogas, alcohol o
medicamentos. Un momento de
distracción mientras maneja
cualquier herramienta a motor
puede dar como resultado graves
lesiones personales.
Evite
que se
encienda accidentalmente. Asegúrese de
que el interruptor esté en la posición de
trabado o de apagado antes de introducir
la batería, al hacer cualquier ajuste,
cambiar los accesorios o almacenar la
herramienta. El transportar herramientas
con su dedo en el interruptor o el
introducir la batería en una herramienta
encendida favorece la ocurrencia de
accidentes.
2. Quite las llaves de ajuste o antes de
encender la herramienta. Una
conectada a una pieza giratoria de
la herramienta puede provocar
lesiones personales.
3. No intente alcanzar lugares
alejados. Mantenga un buen
soporte y equilibrio en todo
momento. Un soporte y equilibrio
adecuados permiten un mejor
control de la herramienta en
situaciones inesperadas.
4. Trabaje siempre en un área bien
ventilada. Use gafas de seguridad
y una máscara para polvo aprobada
por OSHA.
!
PRECAUCION
!
ADVERTENCIA
!
ADVERTENCIA
!
ADVERTENCIA
5. Sostenga la herramienta por la
superficie de sujeción aislada
cuando realice una operación en la
que la herramienta pueda entrar en
contacto con un cableado oculto. Al
entrar en contacto con un cable de
corriente las piezas metálicas de la
herramienta conducirán la
electricidad y el usuario recibirá un
choque eléctrico.
6. Mantenga las manos alejadas de las
piezas giratorias.
7. Use sujetadores u otra manera
práctica de asegurar la pieza de
trabajo a una plataforma estable.
Nunca sostenga el trabajo en sus
manos, su regazo o contra otras
partes de su cuerpo cuando corte.
8. Siempre utilice hojas con orificios
del mandril del tamaño y forma
correctos (diamante contra
redondas). Las hojas que no
coincidan con la ferretería de
montaje de la sierra funcionarán
excéntricamente, causando un gran
riesgo o lesión al usuario y daño a
la herramienta.
CUIDADO Y USO DE LA
HERRAMIENTA
No use la
herramienta si el interruptor no la
enciende ni apaga. Cualquier
herramienta que no pueda ser
controlada con el interruptor es
peligrosa y debe repararse.
!
ADVERTENCIA
18 Sp
Manual de Instrucciones y Lista de Piezas
Fonctionnement
(Suite)
est la distance de l’intérieur de la lame au
bord intérieur du guide longitudinal.
Ajuster le guide longitudinal pour la
largeur désirée et verrouiller le réglage
en resserrant le bouton d’ajustement
du guide longitudinal.
En coupant en long des largeurs de
plus de 10,16 cm (4 po), pincer ou fixer
un bois d’oeuvre de 2,54 cm (1 po) à la
pièce et utiliser le bord intérieur de la
semelle comme guide.
Sciage en travers
Le sciage en travers est une coupe en
travers du grain. Choisir la bonne lame
pour votre application. Faire avancer la
scie lentement pour éviter l’écaillage
du bois.
Coupe en poche
Les coupes en poche se font au milieu
de la pièce lorsqu’elle ne peut pas être
coupée d’un bord. Nous recommandons
d’utiliser une scie alternative ou une
sauteuse pour ce type de coupe. Par
contre, si l’on utilise une scie circulaire
pour une coupe en poche, il faut être
EXTRÊMEMENT PRUDENT
.
Pour maintenir le contrôle de la scie
durant la coupe, garder les deux mains
sur la scie.
1. Commencer dans un coin, aligner
l’angle de vision avec la ligne de
coupe. Pencher la scie vers l’avant
en fixant fermement l’avant de la
semelle sur le travail. La lame
devrait être juste au-dessus de la
ligne de coupe, sans la toucher.
Soulever le dispositif de protection
inférieur par son levier.
2. Pour commencer à scier, pousser le
bouton de verrouillage vers le bas
tout en tirant la gâchette. Laisser le
moteur atteindre pleine vitesse
avant de commencer la coupe.
Utiliser l’avant de la semelle comme
point charnière et abaisser
graduellement l’extrémité arrière
de la scie sur la pièce. Dégager le
levier du dispositif de protection et
agripper la poignée avant.
3. Lorsque la semelle repose à plat
contre la pièce, faire avancer la scie
au coin le plus éloigné. Dégager la
gâchette et laisser la lame s’arrêter
complètement avant de la retirer de
la pièce. Répéter les étapes
précédentes pour chaque côté de
l’ouverture. Utiliser une scie
alternative, une scie sauteur ou une
petite scie manuelle pour finir les
coins s’ils ne sont pas entièrement
découpés.
RÈGLE DU GUIDE
La règle du guide vous permet de faire
des coupes droites et exactes. Glisser
tout simplement la règle du guide bien
ajustée contre le côté de la pièce et la
fixer en position avec la vis de blocage
à l’avant de la base. La règle sert aussi
pour répéter les coupes de taille
uniforme.
FREIN ÉLECTRIQUE
Le frein électrique s’engage lorsque la
gâchette est dégagée et ainsi la lame
s’arrête permettant à l’opérateur de
faire le travail. Normalement, la lame
de la scie s’arrête après deux secondes.
Il pourrait par contre y avoir un délai
entre le moment où l’on dégage la
gâchette et lorsque le frein s’engage.
À l’occasion, le frein peut manquer
complètement. Si le frein manque
fréquemment, la scie doit être réparée
par un centre de service autorisé. Le
frein ne remplace pas le dispositif de
protection et il faut toujours attendre
que la lame s’arrête complètement
avant de retirer la scie du travail.
AJUSTEMENT DU BISEAU
Toujours s’assurer que l’outil est éteint.
Débrancher le bloc-batteries de l’outil. Le
pied s’ajuste jusqu’à 45° en desserrant le
bouton d’ajustement en biseau à l’avant
de la scie.
Aligner l’angle voulu sur le secteur
corrigé. Resserrer ensuite le bouton
d’ajustement en biseau. À cause de
l’engagement de lame accru sur le
travail et la stabilité réduite du pied,
la lame pourrait gripper.
Garder la scie fixe et le pied fermement
sur la pièce de travail.
AJUSTEMENT DE PROFONDEUR
Toujours s’assurer que l’outil est éteint.
Débrancher le bloc-batteries de l’outil.
Desserrer le levier du guide de
profondeur et déplacer la base vers le
haut ou vers le bas. À la profondeur de
coupe voulue, fixer la base en
resserrant le levier.
Entretien
Tout le travail d’entretien et de
réparation doit être effectué seulement
par un personnel de réparation qualifié.
L’entretien ou les réparations non
effectués par un personnel qualifié
pourraient mener à des blessures.
Garder l’outil, le bloc-batteries et le
chargeur en bon état par un entretien
régulier. Après six mois à un an, selon
l’utilisation, retourner l’outil, le blocbatteries et le chargeur à une installation
de service Campbell Hausfeld pour :
• La lubrification
• L’inspection des brosses
• L’inspection et le nettoyage
mécaniques
• L’inspection électrique
• Le test pour assurer un bon
fonctionnement.
Si l’outil ne démarre pas ou ne
fonctionne pas à pleine puissance avec
un bloc-batteries entièrement chargé,
nettoyer les contacts du bloc-batterie.
Si l’outil continue à ne pas fonctionner
correctement, retourner l’outil, le
chargeur et le bloc-batteries à une
installation de service pour leur
réparation.
Remplacer les brosses de carbone
Retirer et vérifier régulièrement les
brosses de carbone, les remplacer
lorsqu’elles sont usées au-delà de la
marque de limite. Garder les brosses de
carbone propres et libres de glisser
dans les supports. Les deux brosses de
carbone doivent être remplacées en
même temps. Utiliser seulement des
brosses de carbone identiques.
Utiliser un tournevis pour retirer les
bouchons du support de brosses.
Retirer les brosses de carbone usées,
insérer les nouvelles et remettre les
bouchons du support.
Nettoyage
Nettoyer la saleté et les débris des évents
et des contacts électriques en soufflant
de l’air comprimé. Garder les poignées
des outils propres, sèches et libres d’huile
ou de graisse. Utiliser seulement un
savon doux et un chiffon humide pour
nettoyer l’outil, le bloc-batteries et le
chargeur en restant loin de tous les
contacts électriques.
Certains agents de nettoyage et solvants
sont dangereux pour les plastiques et
autres pièces isolées. Certains de ces
articles incluent : essence, térébenthine,
diluant de laque, diluant de peinture,
solvants de nettoyage au chlore,
ammoniaque et détergents résidentiels
contenant de l’ammoniaque.
Ne jamais utiliser de solvants
inflammables ou combustibles autour
des outils.
NE DÉMARRE PAS
Si votre outil ne démarre pas, s’assurer
que le bloc-batteries est chargé et
installé sur la scie.
BATTERIE
Le bloc-batteries se déchargera lui-même
sans dommage s’il est rangé longtemps
et peut exiger un rechargement avant
utilisation.
SERVICE TECHNIQUE
Pour obtenir de l’information sur le
fonctionnement ou la réparation de
ce produit, veuillez appeler le
1-800-424-8936.
Tout le travail d’entretien et de
réparation doit être effectué seulement
par un personnel de réparation qualifié.
L’entretien ou les réparations non
effectués par un personnel qualifié
pourraient mener à des blessures.
!
ATTENTION
DG311800AV
15 Fr
Especificaciones
Herramienta
Número de modelo DG311800AV
Clasificación de voltaje 18V
Tiempo de carga
Carga Normal: 3 - 6 horas
Batería – 18V DG024200AV
Cargador – 22V DG024300AV
Carga Rápida: 1 - 2 horas
Batería – 18V DG024900AV
Cargador – 22V DG024700AV
Capacidades máximas
Hoja 5-1/2"
Orificio del mandril
de la hoja Redondo
Profundidad de corte
a 90º 1-17/32"
Profundidad de corte
a 45º 1-1/4"
Page 16

Manual de Instrucciones y Lista de Piezas DG311800AV S
Sierra circular inalámbrica
de 5-1/2 pulg., 18.0 voltios
Sírvase leer y guardar estas instrucciones. Lea con cuidado antes de tratar de armar, instalar, manejar o darle
servicio al producto descrito en este manual. Protéjase Ud. y a los demás observando todas las reglas de
seguridad. El no seguir las instrucciones podría resultar en heridas y/o daños a su propiedad. Guarde este
manual como referencia.
IN707601AV 4/06
BUILT TO LAST
© 2006 Campbell Hausfeld/Scott Fetzer
Ver la Garantía en página 24 para información importante sobre el uso comercial de este producto.
Descripción
Las sierras circulares están diseñadas para
cortar una variedad de materiales. Esta
herramienta es especialmente útil para
cortar madera y paneles de madera para
varios proyectos.
Para desempacar
Cuando desempaque este producto,
inspecciónelo cuidadosamente para
detectar cualquier daño que pueda
haber ocurrido durante el envío.
Informaciones
Generales de
Seguridad
Este manual contiene información que
es muy importante que sepa y
comprenda. Esta información se la
suministramos como medida de
SEGURIDAD y para EVITAR PROBLEMAS
CON EL EQUIPO. Debe reconocer los
siguientes símbolos.
Ésto le
indica
que hay una situación inmediata que LE
OCASIONARIA la muerte o heridas de
gravedad.
Ésto le
indica
que hay una situación que PODRIA
ocasionarle la muerte o heridas de
gravedad.
Ésto le
indica
que hay una situación que PODRIA
ocasionarle heridas no muy graves.
Ésto le
indica
una información importante, que de no
seguirla, le podría ocasionar daños al
equipo.
AVISO
!
PRECAUCION
!
ADVERTENCIA
!
PELIGRO
PROPOSICIÓN DE CALIFORNIA 65
Cuando corta lija, taladra o
pule materiales como por
ejemplo madera, pintura,
metal, hormigón, cemento,
u otro tipo de mampostería
se puede producir polvo.
Con frecuencia este polvo contiene
productos químicos que se conocen
como causantes de cáncer, defectos
congénitos u otros daños
reproductivos. Use equipo de
protección.
Este
producto, o su cordón eléctrico,
contiene productos químicos conocidos
por el estado de California como
causantes de cáncer y defectos de
nacimiento u otros daños
reproductivos. Lave sus manos
minuciosamente después de usar.
Las siguientes precauciones de seguridad
se deben seguir en todo momento junto
con cualquier otra norma de seguridad.
1. Lea con cuidado los manuales incluidos
con este producto. Familiarícese con los
!
ADVERTENCIA
!
PELIGRO
controles y el uso adecuado
del equipo.
2. Sólo se les debe permitir
usar la sierra a aquellas
personas bien
familiarizadas con estas reglas de
manejo seguro.
Se deberán usar gafas de
seguridad durante la
operación.
3. No use vestimenta suelta, bufandas o
corbatas en el área de trabajo. Las
prendas sueltas pueden quedar
atrapadas en las partes móviles y
provocar graves lesiones personales.
4. No use alhajas al manejar
herramientas. Las alhajas pueden
quedar atrapadas en las partes
móviles y provocar graves lesiones
personales.
5. Utilice siempre los accesorios
diseñados para usar con esta
herramienta. No utilice accesorios
dañados ni desgastados.
!
ADVERTENCIA
MANUAL
;;;;;;
;;;;;;
;;;;;;
;;;;;;
17 Sp
Garantie Limitée
1. DURÉE : De la date d’achat par l’acheteur original comme suit : Campbell Hausfeld (service standard et non annoncé) un (1) an ; (service sérieux) - deux (2) ans, (service extrême) - trois (3) ans, IronForce de Campbell Hausfeld - un (1) an;
Farmhand - trois (3) ans; Maxus - cinq (5) ans.
2. GARANTIE ACCORDÉE PAR (GARANT): Campbell Hausfeld/Scott Fetzer Company, 100 Production Drive, Harrison, Ohio,
45030, Téléphone: (800) 543-6400
3. BÉNÉFICIAIRE DE CETTE GARANTIE (ACHETEUR): L’acheteur original (sauf en cas de revente) du produit Campbell
Hausfeld.
4. PRODUITS COUVERTS PAR CETTE GARANTIE: Tous les outils de fixation (cloueuses et agrafeuses), outils pneumatiques,
pistolets vaporisateurs, gonfleurs ou accessoires pneumatiques Campbell Hausfeld qui sont fournis par ou fabriqués par
le Garant.
5. COUVERTURE DE LA PRÉSENTE GARANTIE: Défauts de matière et de fabrication considérables qui se révèlent pendant la
période de validité de la garantie.
6. LA PRÉSENTE GARANTIE NE COUVRE PAS:
A. Les garanties implicites, y compris celles de commercialisabilité et D’ADAPTION À UNE FONCTION PARTICULIÈRE
SONT LIMITÉES À PARTIR DE LA DATE D’ACHAT INITIALE TELLE QU’INDIQUÉE DANS LA SECTION DURÉE. Si ce
produit est utilisé pour une fonction commerciale, industrielle ou pour la location, la durée de la garantie sera
quatre-vingt-dix (90) jours à compté de la date d’achat. Quelques Provinces (États) n’autorisent pas de limitations de
durée pour les garanties implicites. Les limitations précédentes peuvent donc ne pas s’appliquer.
B. TOUT DOMMAGE, PERTE OU DÉPENSE FORTUIT OU INDIRECT POUVANT RÉSULTER DE TOUT DÉFAUT, PANNE OU
MAUVAIS FONCTIONNEMENT DU PRODUIT CAMPBELL HAUSFELD. Quelques Provinces (États) n’autorisent pas
l’exclusion ni la limitation des dommages fortuits ou indirects. La limitation ou exclusion précédente peut donc ne
pas s’appliquer.
C. Toute panne résultant d’un accident, d’une utilisation abusive, de la négligence ou d’une utilisation ne respectant
pas les instructions données dans le(s) manuel(s) accompagnant le produit. Un accident, l’utilisation abusive par
l’acheteur, la négligence ou le manque de faire fonctionner les produits selon les instructions comprend aussi
l’enlevage ou la modification de n’importe quel appareil de sûreté. Si ces appareils de sûreté sont enlevés ou
modifiés, la garantie sera annulée.
D. Réglages normaux qui sont expliqués dans le(s) manuel(s) d’utilisation accompagnant le produit.
E. Articles ou services qui sont exigés pour l’entretien du produit; Joints torique, ressorts, amortisseurs, écrans de
débris, lames d’entraînement, fusibles, batteries
, joints d’étanchéité, garnitures ou joints, buses de fluide, aiguilles,
buses de sablage, graisses
, tuyaux de matériaux, cartouches filtrantes, pales de moteur, abrasifs, lames, meules de
coupage, burins, fixe-burins, coupeuses, douilles de serrage, mandrins. mâchoires de rivet, lames de tournevis,
tampons de sablage, tampons de sauvegarde, mécanisme de percussion ou toute pièce qui n’est pas indispensable
et qui n’est pas indiquée. Ces articles seront couverts pour quatre-vingt-dix (90) jours à partir de la date d’achat
original. Les articles soulignés sont garanties pour défauts de matière et de fabrication seulement
.
F. Les défauts cosmétiques qui n’ont pas d’effet sur le fonctionnement de l’appareil.
7. RESPONSABILITÉS DU GARANT AUX TERMES DE CETTE GARANTIE: Réparation ou remplacement, au choix du Garant, des
produits ou pièces qui se sont révélés défectueux pendant la durée de validité de la garantie.
8. RESPONSABILITÉS DE L’ACHETEUR AUX TERMES DE CETTE GARANTIE:
A. Fournir une preuve d’achat datée et un état d’entretien.
B. Appelez Campbell Hausfeld (800-424-8936) pour obtenir vos options de service sous garantie. Les frais de transport
sont la responsabilité de l’acheteur.
C. Utilisation et entretien du produit avec un soin raisonable, ainsi que le décri(vent)t le(s) manuel(s) d’utilisation.
9. RÉPARATION OU REMPLACEMENT EFFECTUÉ PAR LE GARANT AUX TERMES DE LA PRÉSENTE GARANTIE: La réparation
ou le remplacement sera prévu et exécuté en fonction de la charge de travail dans le centre de service et dépendra de la
disponabilité des pièces de rechange.
Cette Garantie Limitée s’applique aux É.-U., au Canada et au Mexique seulement et vous donne des droits juridiques précis.
L’acheteur peut également jouir d’autres droits qui varient d’une Province, d’un État ou d’un Pays à l’autre.
Instructions d’Utilisation et Manual de Pièces
16 Fr
CHARGE RAPIDE
Chargeur – 22V (for 18V Battery) DG024700AV
Bloc-piles – 18V DG024900AV
CHARGE NORMALE
Chargeur – 22V (for 18V Battery) DG024300AV
Bloc-piles – 18V DG024200AV
Adaptateur de chargeur DG024400AV
Pour Pièces de Rechange ou assistance technique, appeler 1-800-424-8936
S’il vous plaît fournir l’information suivante:
- Numéro de Modèle
- Numéro de série (si présent)
- Description et numéro de la pièce
Adresser toute correspondance à
Campbell Hausfeld
Attn: Customer Service
100 Production Drive
Harrison, OH 45030 U.S.A.
Node
Description Pièce
Liste de Pièces de Rechange
RECORDATORIO: ¡Guarde su comprobante de compra con fecha para fines de la garantía!
Adjúntela a este manual o archívela en lugar seguro.
 Loading...