

Page 1

SDM-IO16
16 Channel Input/Output
Expansion Module
Issued: 13.8.18
Copyright © 1998-2018 Campbell Scientific, Inc.
Printed under licence by Campbell Scientific Ltd.
CSL 479
USER GUIDE
Page 2

Page 3

Guarantee
This equipment is guaranteed against defects in materials and workmanship.
We will repair or replace products which prove to be defective during the
guarantee period as detailed on your invoice, provided they are returned to us
prepaid. The guarantee will not apply to:
Equipment which has been modified or altered in any way without the
written permission of Campbell Scientific
Batteries
Any product which has been subjected to misuse, neglect, acts of God or
damage in transit.
Campbell Scientific will return guaranteed equipment by surface carrier
prepaid. Campbell Scientific will not reimburse the claimant for costs incurred
in removing and/or reinstalling equipment. This guarantee and the Company’s
obligation thereunder is in lieu of all other guarantees, expressed or implied,
including those of suitability and fitness for a particular purpose. Campbell
Scientific is not liable for consequential damage.
Please inform us before returning equipment and obtain a Repair Reference
Number whether the repair is under guarantee or not. Please state the faults as
clearly as possible, and if the product is out of the guarantee period it should
be accompanied by a purchase order. Quotations for repairs can be given on
request. It is the policy of Campbell Scientific to protect the health of its
employees and provide a safe working environment, in support of this policy a
“Declaration of Hazardous Material and Decontamination” form will be
issued for completion.
When returning equipment, the Repair Reference Number must be clearly
marked on the outside of the package. Complete the “Declaration of
Hazardous Material and Decontamination” form and ensure a completed copy
is returned with your goods. Please note your Repair may not be processed if
you do not include a copy of this form and Campbell Scientific Ltd reserves
the right to return goods at the customers’ expense.
Note that goods sent air freight are subject to Customs clearance fees which
Campbell Scientific will charge to customers. In many cases, these charges are
greater than the cost of the repair.
Campbell Scientific Ltd,
80 Hathern Road,
Shepshed, Loughborough, LE12 9GX, UK
Tel: +44 (0) 1509 601141
Fax: +44 (0) 1509 270924
Email: support@campbellsci.co.uk
www.campbellsci.co.uk
Page 4

Page 5

PLEASE READ FIRST
About this manual
Please note that this manual was originally produced by Campbell Scientific Inc. primarily for the North
American market. Some spellings, weights and measures may reflect this origin.
Some useful conversion factors:
Area: 1 in2 (square inch) = 645 mm2
Length: 1 in. (inch) = 25.4 mm
1 ft (foot) = 304.8 mm
1 yard = 0.914 m
1 mile = 1.609 km
Mass: 1 oz. (ounce) = 28.35 g
1 lb (pound weight) = 0.454 kg
Pressure: 1 psi (lb/in2) = 68.95 mb
Volume: 1 UK pint = 568.3 ml
1 UK gallon = 4.546 litres
1 US gallon = 3.785 litres
In addition, while most of the information in the manual is correct for all countries, certain information
is specific to the North American market and so may not be applicable to European users.
Differences include the U.S standard external power supply details where some information (for
example the AC transformer input voltage) will not be applicable for British/European use. Please note,
however, that when a power supply adapter is ordered it will be suitable for use in your country.
Reference to some radio transmitters, digital cell phones and aerials may also not be applicable
according to your locality.
Some brackets, shields and enclosure options, including wiring, are not sold as standard items in the
European market; in some cases alternatives are offered. Details of the alternatives will be covered in
separate manuals.
Part numbers prefixed with a “#” symbol are special order parts for use with non-EU variants or for
special installations. Please quote the full part number with the # when ordering.
Recycling information
At the end of this product’s life it should not be put in commercial or domestic refuse but
sent for recycling. Any batteries contained within the product or used during the
products life should be removed from the product and also be sent to an appropriate
recycling facility.
Campbell Scientific Ltd can advise on the recycling of the equipment and in some cases
arrange collection and the correct disposal of it, although charges may apply for some
items or territories.
For further advice or support, please contact Campbell Scientific Ltd, or your local agent.
Campbell Scientific Ltd, 80 Hathern Road, Shepshed, Loughborough, LE12 9GX,
UK Tel: +44 (0) 1509 601141 Fax: +44 (0) 1509 270924
Email: support@campbellsci.co.uk
www.campbellsci.co.uk
Page 6

Page 7

Safety
DANGER — MANY HAZARDS ARE ASSOCIATED WITH INSTALLING, USING, MAINTAIN ING, AND WORKING ON
OR AROUND TRIPODS, TOWERS, AND ANY ATTACHMENTS T O TRIP ODS AND T OWERS SUCH AS SENSORS,
CROSSARMS, ENCLOSURES, ANTENNAS, ETC. FAILURE TO PROPERLY AND COM P LE TE LY AS S E MB LE ,
INSTALL, OPERATE, USE, AND MAINTAIN TRIPODS, TOWERS, AND ATTACHMENTS, AND F AI LURE TO HEED
WARNINGS, INCREASES THE RISK OF DEATH, ACCIDENT, SERIOUS INJURY, PROPERTY DAMAGE, AND
PRODUCT FAILURE. TAKE ALL REASONABLE PRECAUTIONS TO AVOID THESE HAZARDS. CHECK WITH YOUR
ORGANIZATION'S SAFETY COORDINATOR (OR POLICY) FOR PROCE DURES AND REQUIRED PROTECTIVE
EQUIPMENT PRIOR TO PERFORMING ANY WORK.
Use tripods, towers, and attachments to tripods and towers only for purposes for which they are designed. Do not
exceed design limits. Be familiar and comply with all instructions provided in product manuals. Manuals are
available at www.campbellsci.eu or by telephoning +44(0) 1509 828 888 (UK). You are responsible for conformance
with govern i ng codes and regulations, including safety regulations, and the integrity and location of str uctures or l and
to which towers, tripods, and any attachments are attached. Installation sites should be evaluated and approved by a
qualified engineer. If questions or concerns arise regarding installation, use, or maintenance of tripods, towers,
attachments, or electrical connections, consult with a licensed and qualified engineer or electrician.
General
• Prior to performing site or installation work, obtain required approvals and permits. Comply with all
governing structure-height regulations, such as those of the FAA in the USA.
• Use only qualified personnel for installation, use, and maintenance of tripods and towers, and any
attachments to tripods and towers. The use of licensed and qualified contractors is highly recommended.
• Read all applicable instructions carefully and understand procedures thoroughly before beginning work.
• Wear a hardhat and eye protection, and take other appropriate safety precautions while working on or
around tripods and towers.
• Do not climb tripods or towers at any time, and prohibit climbing by other persons. Take reasonable
precautions to secure tripod and tower sites from trespassers.
• Use only manufacturer recommended parts, materials, and tools.
Utility and Electrical
• You can be killed or sustain serious bodily injury if the tripod, tower, or attachments you are installing,
constructing, using, or maintaining, or a tool, stake, or anchor, come in contact with overhead o
r
u
nderground utility lines.
• Maintain a distance of at least one-and-one-half times structure height, or 20 feet, or the distance
r
equired by applicable law, whichever is greater, between overhead utility lines and the structure (tripod,
tower, attachments, or tools).
• Prior to performing site or installation work, inform all utility companies and have all underground utilities
marked.
• Comply with all electrical codes. Electrical equipment and related grounding devices should be installed
by a licensed and qualified electrician.
Elevated Work and Weather
• Exercise extreme caution when performing elevated work.
• Use appropriate equipment and safety practices.
• During installation and maintenance, keep tower and tripod sites clear of un-trained or non-essential
personnel. Take precautions to prevent elevated tools and objects from dropping.
• Do not perform any work in inclement weather, including wind, rain, snow, lightning, etc.
Maintenance
• Periodically (at least yearly) check for wear and damage, including corrosion, stress cracks, frayed cables,
loose cable clamps, cable tightness, etc. and take necessary corrective actions.
• Periodically (at least yearly) check electrical ground connections.
WHILE EVERY ATTEMPT IS MADE TO EMBODY THE HIGHEST DEGREE OF SAFETY IN ALL CAMPBELL
SCIENTIFIC PRODUCTS, THE CUSTOMER ASSUMES ALL RISK FROM ANY INJURY RESULTING FROM IMPROPER
INSTALLATION, USE, OR MAINTENANCE OF TRIPODS, TOWERS, OR ATTACHMENTS TO TRIPODS AND TOWERS
SUCH AS SENSORS, CROSSARMS, ENCLOSURES, ANTENNAS, ETC.
Page 8

Page 9

i
Contents
PDF viewers note: These page numbers refer to the printed version of this document. Use
the Adobe Acrobat® bookmarks tab for links to specific sections.
1. Introduction................................................................. 1
2. Specifications ............................................................. 2
2.1 General ...................................................................................................... 2
2.2 Port Specifications (Output Mode) ........................................................... 3
2.3 Port Specifications (Input Mode) .............................................................. 3
2.4 Pulse Counting Specifications................................................................... 3
3. Power Considerations ................................................ 4
4. Installation .................................................................. 5
4.1 Terminal Connections ............................................................................... 6
5. Address Selection Switches ...................................... 7
6. Programming the Datalogger .................................... 8
6.1 General Principles ..................................................................................... 8
6.2 Programming the CR800, CR850, CR1000, CR3000, and CR5000 ......... 9
6.2.1 SDMIO16 Instruction...................................................................... 9
6.2.2 SDMCD16AC Instruction ............................................................. 10
6.2.3 SDMSpeed Instruction .................................................................. 10
6.3 Instruction P188 (CR10X and CR23X) .................................................. 11
6.4 Command Codes ..................................................................................... 12
6.5 Datalogger Instructions 104 and 29 (CR10, CR7, 21X) ......................... 14
Page 10

ii
Appendices
A. Program Examples ................................................. A-1
A.1 SDMIO16 Example ............................................................................. A-1
A.2 A CR10X Program Using the Outputs for Control of a
Greenhouse Heating and Cooling System ..................................... A-1
A.3 A CR10X Program which Measures Four Frequency Inputs
(Anemometers) and Four Switch Closure Inputs (Rain Gauges) .. A-6
A.4 A CR10X Program that uses the Interrupt Subroutine in the
Datalogger to Record the Time of Change of any one of the
Ports on an SDM-IO16 ................................................................. A-8
B. General Principles of Pulse and Frequency
Measurements ................................................... B-1
B.1 Introduction .......................................................................................... B-1
B.2 Frequency and Duty Cycle Measurement Range .................................. B-1
B.3 Resolution of Frequency Measurements .............................................. B-2
B.4 Resolution of Duty Cycle Measurements ............................................. B-2
B.5 Debounce Filtering ............................................................................... B-3
C. Command Code Listing ......................................... C-1
D. Details of use with PC208W and older
dataloggers ........................................................ D-1
Figures
1. SDM-IO16 (with mounting brackets) ......................................................... 1
2. Simplified Equivalent Port Circuits ............................................................ 4
3. Connection Block Diagrams ....................................................................... 5
4. Use of Terminal Blocks .............................................................................. 6
5. Address Selection Switch............................................................................ 7
Tables
1. Datalogger to SDM-IO16 Connections ....................................................... 5
2. Bit Period Values ...................................................................................... 10
3. Summary of the Common Command Codes relative to Port Number
and Function .......................................................................................... 14
Page 11
1
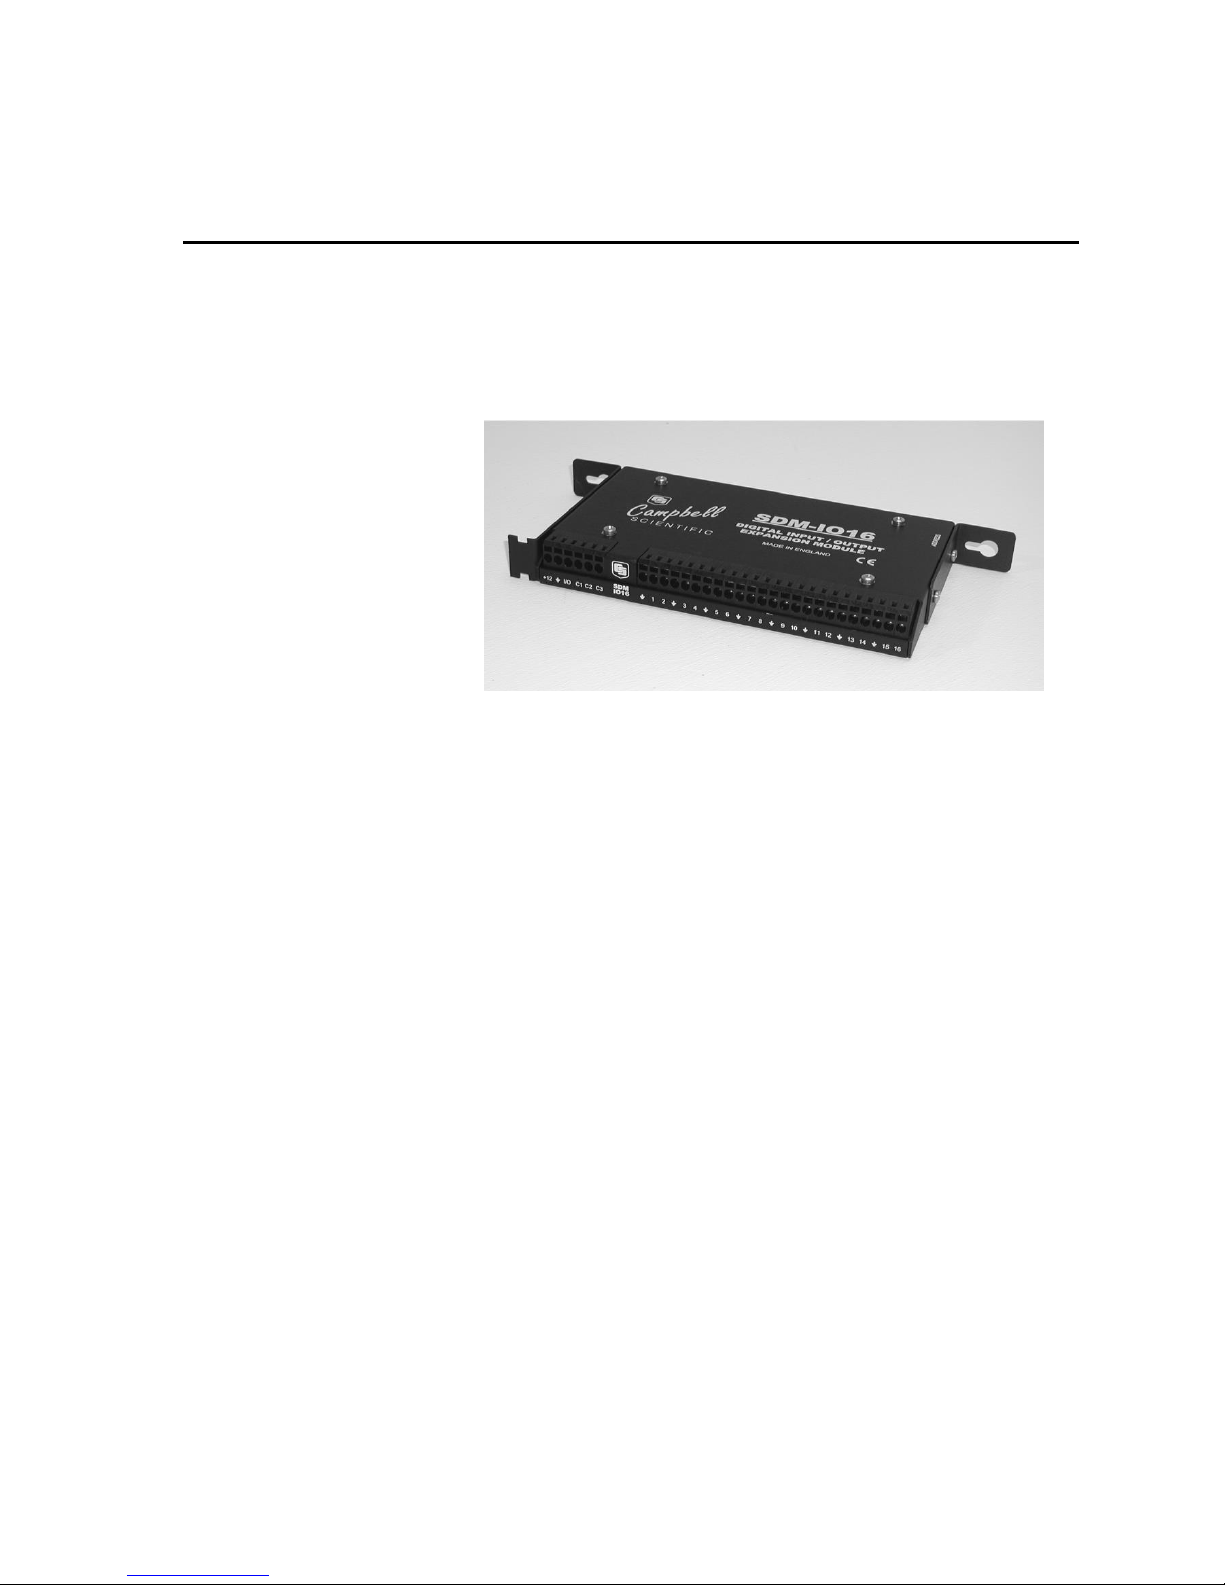
SDM-IO16 16 Channel Input/Output
Expansion Module
The SDM-IO16 (see Figure 1) is a synchronously addressed peripheral. It has 16 ports that
can be configured for input or output which expand the number of control ports of the
datalogger. It is fully compatible with Campbell Scientific’s CR6, CR800, CR850, CR1000,
CR1000X, CR3000, CR5000 and CR23X dataloggers.
Figure 1. SDM-IO16 (with mounting brackets)
1. Introduction
The SDM-IO16 expands the digital input and/or output capability of Campbell
Scientific dataloggers. It offers similar functionality to the control ports of the
majority of Campbell Scientific dataloggers.
When a port is configured as an input it can measure the logical state of the port,
count pulses, measure the frequency of and determine the duty cycle of signals
applied to the port. In pulse counting mode there is also an option to enable switch
debounce filtering so the unit can accurately count switch closure events. The
SDM-IO16 measures the frequency of signals by measuring the time between
pulses, thereby giving relatively high-resolution measurements even for low
frequency signals.
The module can also be programmed to generate an interrupt signal to the
datalogger when one or more input signals change state.
When configured as an output, each port can be set to 0 or 5 V by the datalogger.
In addition to being able to drive normal logic level inputs, when an output is set
HI a ‘boost’ circuit allows it to source a current of up to 100 mA, allowing direct
control of low voltage valves, relays etc.
The SDM-IO16 is a synchronously addressed datalogger peripheral. Datalogger
control ports 1, 2 and 3 are used to address the SDM-IO16 and exchange digital
data with it. This module utilizes advanced error checking techniques to ensure
correct transmission of data to and from the module. Up to sixteen SDM-IO16s
may be addressed, making it possible to control a maximum of 256 ports from the
first three datalogger control ports.
Page 12

SDM-IO16 16 Channel Input/Output Expansion Module
2
The SDM-IO16 is supplied with two removable mounting brackets that attach to
the ends of the unit, as shown in Figure 1.
The full functions and support for the error checked communications
protocol require an operating system for the datalogger and Edlog
template files that post-dates March 2002. The CR10X and CR23X
with older operating systems and the CR10, CR7 and 21X
dataloggers can use I/O Instruction 104 to set and use the ports for
output only.
2. Specifications
2.1 General
Compatible dataloggers: CR6, CR800, CR850, CR1000, CR1000X,
CR3000, CR5000, CR10X, and CR23X. (CR10,
21X, and CR7 output modes only.)
Operating voltage: 12 VDC nominal (9 to 18 V).
Current drain at 12V DC: 600 µA typical standby (All ports HI, no load, not
pulse counting).
Maximum (no output load): 3 mA active with all
16 ports counting pulses at 2 KHz. Above the
quiescent level, power consumption is roughly
proportional to input signal frequency and number
of ports used.
Current drawn from any output must be added to
the quiescent level to give the total current drain.
SDM and I/O port: 0/5 V logic level ports compliant with the
requirements of the CS SDM protocol — these are
designed for connection to the datalogger's
control/SDM ports.
Operating temperature: -25C to +50C standard
Size: 235 mm over mounting brackets x 100 mm x
24 mm
Mounting: Mounting brackets have two holes at 225 mm
nominal spacing. Mounting screws and plastic
inserts suitable for use with Campbell Scientific
enclosures are also supplied.
Weight: 350 g (including brackets)
EMC status: Complies with EN61326:1997
Total SDM cable length: 6 m maximum recommended
NOTE
Page 13

User Guide
3
2.2 Port Specifications (Output Mode)
Output voltage (no load): Output ON/HI, Nominal 5 V (Minimum 4.5 V)
Output OFF/LO, Nominal 0 V (Maximum 0.1 V)
Output sink current: Output will sink 8.6 mA from a 5 V source1
Output source current: Output will source 42 mA @ 3 V, 133 mA short-
circuited to ground1
Max. output current: Limited by the 12 V supply.
(total for all outputs)
2.3 Port Specifications (Input Mode)
Input voltage: Input high, 4.0 V minimum threshold
Input low, 1.0 V maximum threshold
All inputs feature Schmitt triggered detectors.
Input protection: The input is clamped at -0.6 V and +5.6 V relative
to ground via a 33 resistor1. This will withstand
a continuous current flow of 200 mA (including
that which might be caused by accidentally
connecting directly to a 12 V supply). To limit
power dissipation and damage at higher voltages
than 12 V, an external series current limiting
resistor is recommended.
Input impedance: The input is biased to +5 V relative to ground by a
100 kohm resistor.
2.4 Pulse Counting Specifications
Maximum frequency: 2.048 KHz on all channels simultaneously with
switch debounce-mode set off, with a 50/50 duty
cycle.
150 Hz on all channels with default switch
debounce timing enabled and a 50/50 duty cycle2.
Minimum frequency: a frequency of 0 Hz is measured if there are less
than two high-to-low signal transitions in the
measurement interval.
Minimum pulse width: a pulse must stay high or low for a minimum of
244 sec for a change of state or pulse to be
counted.
Switch debounce timing: with the default settings a switch between the input
and G must remain closed for 3.17 msec and then
remain open for 3.17 msec, to be counted as a
closure2. The debounce time can be changed from
the user program.
Page 14

SDM-IO16 16 Channel Input/Output Expansion Module
4
Accuracy: internal clock accuracy 0.01% (worst case) over
the standard temperature range of -25 to +50C.
See also Appendix B for a discussion on
frequency resolution.
Duty cycle resolution: this depends on frequency and measurement
interval - See Appendix B. The average duty cycle
can be measured for signals up to 4 kHz.
Max measurement interval: for frequency or duty cycle measurements the
datalogger must request a measurement at an
interval no longer than 15.9375 seconds. Each
channel can be measured at different intervals,
both for frequency and duty cycle.
1
If more detailed input/output characteristics are required, experienced users
should consult the equivalent circuit diagrams shown in Figure 2.
2
See Appendix B for a more detailed discussion of switch debounce, resolution
and accuracy.
OV
.From sensor
5 V
100 K
5.6 V
0 V
To internal logic
a) Input biasing and protection
0.6 V Drop
.Output
.Output
.550
b) Output set ON
c) Output set OFF
V
5 V, 0
33
Figure 2. Simplified Equivalent Port Circuits
3. Power Considerations
For most applications, especially for pulse counting or status inputs, it is more
normal to use the datalogger supply to power the SDM-IO16, as shown in Figure
3(a).
When being used for control and outputting current the SDM-IO16 power
requirements can be large compared to most Campbell Scientific products when
driving significant loads. For this type of application an external power supply, as
shown in Figure 3(b), is recommended to power the SDM-IO16.
Page 15

User Guide
5
SDM-IO16
DATALOGGER
GND
12 V
SDM-C1 or C1
SDM-C2 or C2
SDM-C3 or C3
a) Connection with Datalogger Supply
EXTERNAL
9 TO 18 VDC
SDM-IO16
DATALOGGER
12 V
GND
+ -
SDM-C1 or C1
SDM-C2 or C2
SDM-C3 or C3
(b) Connection with External Supply
Figure 3. Connection Block Diagrams
4. Installation
For correct operation the SDM-IO16 must be installed where there is no risk of
water ingress or condensation.
The order in which connections are made is critical. Always
connect 12 V first, followed by ground, then the control ports.
The CABLE5CBL-L or a similar cable connects the datalogger to the SDM-IO16.
For datalogger connections, see Table 1, below. Please refer to Figure 4 for details
of how to use the spring-loaded terminals.
Table 1. Datalogger to SDM-IO16 Connections
Datalogger
Connection Order
SDM-IO16
CR800, CR850, CR1000,
CR6, CR1000X
CR10(X), 21X, CR7
CR3000, CR5000
First
12 V
12 V on datalogger or
external supply
12 V on datalogger or
external supply
Second
C1
C2
C3
or G
C1
C2
C3
G
SDM-C1
SDM-C2
SDM-C3
CAUTION
Page 16

SDM-IO16 16 Channel Input/Output Expansion Module
6
Multiple SDM-IO16s can be wired in parallel by connecting the datalogger
connections of one SDM-IO16 to the next.
The transient protection of the SDM-IO16 relies on a low resistance path to earth.
Ensure that the ground return wire has as low a resistance as possible. Where very
long cable runs are likely, or where lightning damage is a possibility, the SDMIO16 can be fitted with optional gas discharge tubes. Please contact Campbell
Scientific for details.
The total cable length connecting SDM-IO16s to SDM-IO16s and
the datalogger should not exceed 6 m. Total cable lengths in excess
of 6 m will adversely affect communication performance between
the module and datalogger.
4.1 Terminal Connections
The SDM-IO16 uses spring-loaded terminal blocks, which provide quick,
vibration resistant, connections. The output terminals are labelled 1 to 16. A
common ground connector is provided between each pair of terminals
Use a screwdriver in either the top or front slot, as appropriate, to open the
terminal spring. Strip any insulation from the wire to give 7 to 9 mm bare wire.
Push the wire into the opening, and, while holding it in position, withdraw the
screwdriver to release the spring. The wire will now be firmly held in place. See
Figure 4, below.
You cannot reliably insert more than one solid-core wire into one
terminal connector unless the wires are soldered or clamped
together. When inserting more than one stranded wire, twist the bare
ends together before insertion.
Figure 4. Use of Terminal Blocks
NOTE
NOTE
Strip insulation
and insert wire
Address switch
location
Page 17

User Guide
7
5. Address Selection Switches
Each SDM-IO16 can have 1 of 16 addresses. The factory-set address is 00. Table 2
shows switch position and the corresponding address. Figures 4 and 5 show the
position of the switch. Note that you will have to remove the mounting bracket to
gain access to this switch.
Switch Setting
Decimal Address
Base 4 Address
0 0 00 1 1
01 2 2
02 3 3
03 4 4
10 5 5
11 6 6
12 7 7
13 8 8
20 9 9
21 A 10
22 B 11
23 C 12
30 D 13
31 E 14
32 F 15
33
Figure 5. Address Selection Switch
Each SDM-IO16 needs to be set to a unique address on the SDM bus, so that no
two SDM peripherals share the same address.
Page 18

SDM-IO16 16 Channel Input/Output Expansion Module
8
6. Programming the Datalogger
6.1 General Principles
For recent dataloggers, there is a specific program instruction that is used to
control operation of the SDM-IO16. The different variants of this command are
described in Sections 6.1 to 6.3 below. Older dataloggers can use different
commands to control the output functions only; if you have such a datalogger
please go to Section 6.5 now as the remainder of this section will not be relevant.
The general form of the command specific to the SDM-IO16 includes:
parameters to specify which module to address,
a command code to specify what the module is to do, and
a number of control parameters and pointers to input locations /variables
which can hold data (either read by the module or which are used to control
the outputs of the module).
The instruction differs from many others in that, rather than addressing a variable
number of ports (using a 'reps' parameter), ports are dealt with in blocks of 1, 4, 8
or 16 ports at a time. The specific port(s) and number to be controlled is implicit in
the command code used. This approach has been taken to improve the efficiency
of programming and also to reduce the amount of data transferred between the
module and datalogger via the SDM port.
The module can be reconfigured quite extensively from the controlling program to
allow for more demanding applications. In most cases, though, operation is quite
simple as on power-up the input/output ports of the SDM-IO16 default to input
mode, with no switch debounce filtering and measurement of frequency and dutycycle automatically starts for all ports.
For many input measurements, the controlling program in the datalogger can then
simply be written to ask the SDM-IO16 for measurements of status, duty-cycle or
frequency from any channel. The only constraint is that it must ask for duty-cycle
or frequency measurements more frequently than once every 15.9375 seconds (see
Appendix B).
Where one or more channels will be used for output, one call of the instruction can
be within the normal program structure to set those ports to either a fixed state, or
a state dependent upon a variable in an input location.
Where ports will be used as switch closure inputs, where a change of state of a port
will be used to toggle the I/O line (normally to generate an interrupt to the
datalogger) or where the port is to be used as a fixed output, then it would be usual
to include code that sends a command to the SDM-IO16 to configure the ports
before they are used. See the program examples in Appendix B.
The configuration of individual ports can also be changed during normal program
operation, if required.
Page 19

User Guide
9
6.2 Programming the CR800, CR850, CR1000, CR1000X, CR3000,
and CR5000
6.2.1 SDMIO16 Instruction
The SDMIO16 instruction in CRBasic supports all of the functions of the SDMIO16. The SDMIO16 instruction is described below; refer to Section 7 for an
example.
Syntax
SDMIO16 ( Dest, Status, Address, Command, Mode Ports 16-13, Mode Ports
12-9, Mode Ports 8-5, Mode Ports 4-1, Mult, Offset )
Remarks
The ports on the SDM-IO16 can be configured for either input or output. When
configured as input, the SDM-IO16 can measure the logical state of each port,
count pulses, and measure the frequency of and determine the duty cycle of
applied signals. The module can also be programmed to generate an interrupt
signal to the datalogger when one or more input signals change state. When
configured as an output, each port can be set to 0 or 5 V by the datalogger. In
addition to being able to drive normal logic level inputs, when an output is set high
a ‘boost’ circuit allows it to source a current of up to 100 mA, allowing direct
control of low voltage valves, relays, etc.
Dest The Dest parameter is a variable or variable array in which to
store the results of the measurement (Command codes 1 - 69, 91,
92, 99) or the Source value for the Command Codes (70 - 85,
93 - 98). The variable array for this parameter must be
dimensioned to accommodate the number of values returned (or
sent) by the instruction.
Status The Status parameter is used to hold the result of the command
issued by the instruction. If the command is successful a 0 is
returned; otherwise, the value is incremented by 1 with each
failure.
SDMAddress The SDMAddress parameter defines the address of the SDM-
IO16 with which to communicate. Valid SDM addresses are 0
through 14. Address 15 is reserved for the SDMTrigger
instruction. If the Reps parameter is greater than 1, the datalogger
will increment the SDM address for each subsequent SDM-IO16
that it communicates with.
Command The Command parameter is used to set up the SDM-IO16. Please
read Section 6.4 for detailed description of the controlling
command codes.
Mode Each Mode parameter is used to configure a bank of four ports
when a Command code 86 through 90 is used (if any other
Command Code is used, enter 0 for the Mode parameters). Mode
is entered as a four digit parameter, where each parameter
indicates the setting for a port. Ports are represented from the
highest port number to the lowest, from left to right (e.g., 16 15 14
13; 12 11 10 9; 8 7 6 5; 4 3 2 1). There is a Mode for Ports 16 13, 12 - 9, 8 - 5, and 4 - 1. The valid codes are:
Page 20

SDM-IO16 16 Channel Input/Output Expansion Module
10
Code Description
0 Output logic low
1 Output logic high
2 Input digital, no debounce filter
3 Input switch closure 3.17 msec debounce filter
4 Input digital interrupt enabled, no debounce filter
5 Input switch closure interrupt enabled 3.17 msec,
debounce filter
6 Undefined
7 Undefined
8 Undefined
9 No change
Mult, Offset The Mult and Offset parameters are each a constant, variable,
array, or expression by which to scale the results of the
measurement.
6.2.2 SDMCD16AC Instruction
All but the oldest versions of the CR5000 operating system also support the
SDMCD16AC instruction that can be used to control the SDM-IO16 for output
mode only. This instruction should only be used if backward compatibility is
required, as only the IO16 instruction supports error detection on communication
between the peripheral and the datalogger.
6.2.3 SDMSpeed Instruction
The SDMSpeed instruction is used to change the bit period that the datalogger
uses to clock the SDM data. Slowing down the clock rate may be necessary when
long cable lengths are used to connect the datalogger and SDM devices.
The syntax of this instruction is as follows:
SDMSpeed (BitPeriod)
The BitPeriod argument can be an integer or a variable. If the SDMSpeed
instruction is not in the program, a default bit period is used. If 0 is used for the
argument, the minimum allowable bit period is used. Table 2 shows the default,
minimum allowable, and maximum bit period for each of our CRBasic
dataloggers.
Table 2. Bit Period Values
Datalogger
Default
Bit Period
Minimum Allowable
Bit Period
Maximum
Bit Period
CR800, CR850
26.04 sec
8.68 sec
2.2 msec
CR1000, CR1000X
26.04 sec
8.68 sec
2.2 msec
CR3000
26.04 sec
8.68 sec
2.2 msec
CR5000
30 sec
8 sec
3 msec
The equation used to calculate the bit rate depends on the datalogger used. The
datalogger will round down to the next faster bit rate.
Page 21

User Guide
11
Equation for CR800, CR850, and CR1000:
bit_rate=INT((k*72)/625)*Resolution
Where:
k= the value entered in BitPeriod
Resolution=8.68 microseconds
Equation for CR3000:
bit_rate=INT((k*144)/625)*Resolution
Where:
k= the value entered in BitPeriod
Resolution= 4.34 sec.
Equation for CR5000:
bit_rate=INT(k*20)*Resolution
Where:
k= the value entered in BitPeriod
Resolution=50 nsec.
6.3 Instruction P188 (CR10X and CR23X)
Datalogger instruction number 188, ‘SDM-IO16’, supports control of the
SDM-IO16. This instruction is included in recent versions of the operating systems
for the CR10X and CR23X dataloggers. This is an instruction that is specifically
designed to control the SDM-IO16, and takes the form:
P188 SDM-IO16 instruction
01:99 SDM address 0-15.
02:9999 Command number 0-255.
03:FP Ports 16-13 Mode 0-9999.
04:FP Ports 12-9 Mode 0-9999.
05:FP Ports 8-5 Mode 0-9999.
06:FP Ports 4-1 Mode 0-9999.
07:9999 Location number for return code.
08:9999 Start location number for values.
09:FP Multiplier.
10:FP Offset.
The codes after the parameter number indicate the entry type, where 99 and 9999
signify two or four digit integer entries and FP indicates a floating point number
entry, e.g. 1.234. The range of values you would enter with the
SDM-IO16 is shown after the description of some parameters. A detailed
description of the individual parameters follows.
Parameter 01 sets the SDM address number (see Figure 5). This instruction
accepts the address in decimal form. The factory setting is 0.
Parameter 02 specifies the command number, which is the main way of
controlling what the SDM-IO16 does in response to a specific call of P188. The
range of commands is described in Section 6.4 below.
Parameters 03…06 allows the entry of four digit numbers which allow a simple
method of setting up the state or method of operation of each I/O port on the
module. These parameters are only functional with commands 86...90, otherwise
they can be left at zero. Each digit relates to one I/O port on the module in the
order shown above; for example 03 relates to Ports 16-13, 06 relates to Ports 4-1
etc. Ports are read in descending numerical order from left to right.
Page 22

SDM-IO16 16 Channel Input/Output Expansion Module
12
Available modes are:
0 = Output logic low
1 = Output logic high
2 = Input digital, no debounce filter
3 = Input switch closure 3.17 msec debounce filter
4 = Input digital interrupt enabled, no debounce filter
5 = Input switch closure interrupt enabled 3.17 msec, debounce filter
6 = Undefined
7 = Undefined
8 = Undefined
9 = No change.
For example parameter 3 for ports 16-13 could be 9213 which from the list below
would set port 16 = no change in operation, port 15 = digital input,
port 14 = output logic 1 and port 13 = switch closure input.
Parameter 07 specifies the input location number to hold a counter to indicate
errors in communicating with the SDM-IO16. All communication between the
SDM-IO16 and the datalogger is error checked. If, for any reason, there is an error
then the datalogger will retry the instruction 3 times before continuing with the
next instruction. If, after 3 retries, the communication was not successful, then the
number in this location will increment. If later communication is successful then
this location will be reset to zero. This counter is used normally only to diagnose
problems with SDM communications which may require more careful wiring of
the SDM bus or reduction of the SDM-bus speed if the cables are long (see details
of P115 in the datalogger manual).
Parameter 08 specifies the number of the input location where data is either read
from or written to, depending on the command being used. This may be the first
location in a series of locations.
Parameter 09 is a multiplier that is applied to data read to and from input
locations. Normally you would set this to 1.000, unless applying a calibration
factor to data being read from the SDM-IO16.
Parameter 10 is an offset that is applied to data read to and from input locations.
Normally you would set this to 0.000, unless applying a calibration factor to data
being read from the SDM-IO16.
See programming examples in Appendix A.
6.4 Command Codes
The same command codes are used for all datalogger types that support the SDMIO16 instruction, therefore this section applies to both forms of instruction.
There are approximately 100 command codes; the full list is tabulated in
Appendix C. The reason there are so many codes is that each type of action is
generally possible for either a single or block of ports of various sizes, as
discussed in Section 6.1 above. A summary table of common command codes is
shown in Table 2, below. There are only a relatively small number of different
types of action that allows the commands to be grouped, as follows:
Pulse counting (1..23): these read the counts accumulated on the specified ports
since they were last read. The maximum number of counts possible is 65535. If the
count has not been read before this maximum is reached, this figure will roll over
(from 65535 back to 0) at this point. The count is incremented when there is a low
to high transition on the port.
Page 23

User Guide
13
Frequency measurement (24..46): these read the average frequency on specified
ports since the last time a frequency command was called. See Appendix B for a
full discussion of the effects of sample rate on frequency of measurement.
Generally, the longer the sample rate the higher the resolution. However, the
interval between frequency commands for any one port must be less than 15.9375
seconds.
Duty cycle measurement (47..69): Read the average duty cycle on the specified
ports since the last duty cycle command for that port. See Appendix A for a full
discussion of the effects of sample rate on duty cycle measurement. Generally, the
longer the sample rate the higher the resolution. However, the interval between
duty cycle commands for any one port must be less than 15.9375 seconds. The
value output is a number between 0 and 100 that indicates the percentage of time
the port was high.
Set the port debounce time (70..85): sets the debounce filtering time in multiples
of 244 sec from 0 to 255 on the specified port. On power-up, the default time
parameter is set to 0, i.e. no debounce filtering. If debounce filtering is enabled
using one of the command codes 86..90, this parameter is set to 12, equivalent to a
filter time of 3.17 msec. See Appendix B for full details of the operation of this
filter and the timing.
Configure the ports (86..90): these let you set the configuration of each port
using parameters (3..6) that form part of the instruction. The options allow setting
of output state or input filtering and whether a port will cause the I/O line to
generate an interrupt pulse to the datalogger.
Read the port states (91..92): reads the state of all the ports into either one or 16
sequential input locations. For normal logic input a value of 0 is returned for the
low state and a value of 1 is returned for the high state, while for switch closures
0 and 1 relate to closed and open. The current state of all ports is read, even if
some are being used for outputs or frequency inputs.
Set the port states (93..94): sets the pattern of the state of the port outputs either
from a single location or 16 sequential locations. These commands will only
change the state of ports already set to output (using one of the command codes
86..90, 95 or 96). The pattern is stored internally, and so if a port is subsequently
changed from input to output (using command code 95 or 96) the port will then
change to match that set by an earlier call with command code 93 or 94.
Set the direction (input or output) of the ports (95..96): sets the direction of the
ports either from a single location or 16 sequential locations. A value of 1 for a
port sets it to input and a value of 0 sets it to output. On power-up, ports default to
being inputs. If the direction is set to be an output immediately after power-up the
state will be low.
Set the interrupt mask (97..98): these commands set a binary mask across the
ports to define whether a change of state on the port (which must also be
configured as an input) will generate an interrupt signal to the datalogger. When
the appropriate mask bit representing the port is set to 1 an interrupt will be
generated whenever the port changes state. The interrupt is generated by pulsing
the I/O line on the SDM-IO16 until the datalogger responds by reading the port
states of the SDM-IO16 in question using the SDM-IO16 command. The I/O line
would normally be connected to a control port on the datalogger that activates an
interrupt subroutine. When the I/O line is not pulsing, it switches to a high
impedance state, which means that several similar I/O lines can be connected in
parallel to the same control port on the datalogger.
Page 24

SDM-IO16 16 Channel Input/Output Expansion Module
14
Read module status (99): reads back the module operating system signature
(which is calculated once at power-up), a number which identifies the operating
system version plus two counters. These are a watchdog error counter which is
incremented if the module crashes because of a software or hardware failure that
required the SDM-IO16 to be reset and a communication error counter which
represents the number of times SDM communication between the datalogger and
SDM-IO16 failed. Both counters have a maximum limit of 255 counts and are
reset to zero when this command code is used to read them. This command is only
normally used when trying to diagnose problems with the datalogging system.
Table 3. Summary of the Common Command Codes (in italics) relative to port number and function.
Port Number
Action
Port
Blocksize
1 2 3 4 5 6 7 8 9
10
11
12
13
14
15
16
Read
Counts
1 Port
1 2 3 4 5 6 7 8 9
10
11
12
13
14
15
16
4 Ports
17
18
19
20
8 Ports
21
22
16 Ports
23
Read
Frequency
1 Port
24
25
26
27
28
29
30
31
32
33
34
35
36
37
38
39
4 Ports
40
41
42
43
8 Ports
44
45
16 Ports
46
Read
Duty Cycle
1 Port
47
48
49
50
51
52
53
54
55
56
57
58
59
60
61
62
4 Ports
63
64
65
66
8 Ports
67
68
16 Ports
69
Set Debounce
1 Port
70
71
72
73
74
75
76
77
78
79
80
81
82
83
84
85
Set-up
ports
4 Ports
89
88
87
86
16 Ports
90
Read State
16 ports
91 or 92
Set state
16 ports
93 or 94
Set Direct.
16 ports
95 or 96
Set Int Mask
16 ports
97 or 98
6.5 Datalogger Instructions 104 and 29 (CR10, CR7, 21X)
Instruction 104 is normally used by the CR10/10X, CR23X, CR7 and 21X to
control the SDM-CD16(AC/D) digital output interfaces. Older CR7s used a
similar instruction (P29). These instructions can be used to control the output
status only of the SDM-IO16, as it emulates a SDM-CD16 if it receives commands
from the datalogger sent by this instruction and if the SDM address of the module
also matches that sent by the datalogger.
This can be useful if you need to use the SDM-IO16 in place of an SDM-CD16 or
any of its later variants, or if you need to use one for output expansion only, using
a datalogger that has an old operating system that does not support instruction
P188 mentioned above.
Page 25

User Guide
15
If your datalogger does support P188 though, it is best to use that instruction as
commands sent to the SDM-IO16 are checked for corruption and resent if a
corruption is detected. This technique ensures more reliable operation, especially
in electronically noisy environments.
The Instruction descriptions are shown below.
Instruction 104 – SDM-CD16 used with CR10/10X, CR23X, CR7
and 21X Dataloggers
Parameter Type Description
1 2 Reps (No. of modules sequentially addressed)
2 2 Starting Address (base 4: 00..33)
3 4 Starting Input Location
Execution Time = 2 ms per Rep for the CR10/10X and CR23X
3.5 ms per Rep for the 21X and CR7
Instruction 29 –used with older CR7s
Parameter Type Description
1 2 Reps (No. of modules sequentially addressed)
2 2 Device (2 = SDM-CD16/SDM-IO16)
3 2 Starting Address (base 4: 00..33)
4 2 Card (Excitation card No.)
5 4 Starting Input Location
Execution Time = 150 ms to 190 ms per Rep
Please note that these instructions use base 4 addressing. See the table with Figure
5 to see the matching setting of the address switch on the SDM-IO16 that equates
to any base 4 address.
The number of SDM-IO16s to be addressed is defined by the Reps (repetitions)
parameter. Each Rep sequentially addresses (00, 01, 02,...32, 33) SDM-IO16s,
starting with the address specified in parameter 2 (parameter 3 for Instruction 29).
For each repetition, the 16 ports of the addressed SDM-IO16 are set according to
16 sequential input locations starting at the input location specified in parameter 3
(parameter 5 for Instruction 29). Any non-zero value stored in an input location
activates (sets HI 5V) the associated SDM-IO16 port. A value of zero (0) deactivates the port (sets LO 0V). For example, assuming two repetitions and a
starting input location of 33, outputs 1 to 16 of the first SDM-IO16 are set
according to input locations 33 to 48, and outputs 1 to 16 of the second SDMIO16 are set according to input locations 49 to 64.
For older CR7s with Instruction 29, the Device (parameter 2) specifies what type
of synchronously addressed peripheral is to be addressed. The Device code for an
SDM-CD16/IO16 is 2.
For Instruction 29 only (older CR7s), the Card parameter (parameter 4) specifies
which 725 Excitation Card is being used for the control port signals. The Reps
parameter does not advance beyond the specified Card, requiring another
Instruction 29 for each 725 Excitation Card used.
Page 26

SDM-IO16 16 Channel Input/Output Expansion Module
16
Page 27

A-1
Appendix A. Program Examples
A.1 SDM-IO16 Example
The following program sets up and measures an SDM-IO16.
Public Version(4)
Public ComsStat(3)
Public Freq(16)
Public Setup(1)
Alias version(1)=OS_Ver
Alias version(2)=OS_Sig
Alias version(3)=WatchDog
Alias version(4)=ComErr
BeginProg
'Set up the SDM-IO16.
Scan(1,sec,0,2)
'Set IO ports 1-16 to input switch closure.
SDMIO16(Setup,ComsStat(1),0,90,3333,3333,3333,3333,1,0)
NextScan
'Measure.
Scan(1,sec,0,0)
'get signature from io16
SDMIO16(Version,ComsStat(2),0,99,0,0,0,0,1,0)
'read frequency of all 16 channels
SDMIO16(Freq(),ComsStat(3),0,46,0,0,0,0,1,0)
NextScan
EndProg
A.2 A CR10X Program Using the Outputs for Control
of a Greenhouse Heating and Cooling System
The example is written for the CR10X Measurement and Control Module. The
program concepts presented are the same for the CR23X, 21X and CR7
dataloggers with minor changes in the program code or use of different
instructions as indicated.
In this example, the SDM-IO16 is used to control the temperature between 23°C
and 28°C in each of five greenhouses. In each greenhouse the SDM-IO16 controls a
heating unit, a refrigerating unit and an air mixing fan. Solid state relays might be
used as the interface to these units. The rules for control are:
Heating unit:
Activate when temperature <23.5°C.
Deactivate when temperature >25.5°C.
Page 28

SDM-IO16 16 Channel Input/Output Expansion Module
A-2
Cooling unit:
Activate when temperature >27.5°C.
Deactivate when temperature <24.5°C.
Mixing fan:
Activate whenever the heating or cooling units are activated.
Activate for 5 minutes out of every 15 minutes.
The program assumes that the temperature measurements have been made, and
that the average temperature for each greenhouse is computed and stored in input
locations 1 to 5. For further information on loops and input location indexing,
please refer to your datalogger manual.
Input location assignments are as follows:
Input
Location
Input
Location Label
Description
1..5
Temp #1..#5
Avg. temp. greenhouse 1..5
10..14
Heat #1..#5
Heater control, greenhouse 1..5
SDM-IO16 Port 1..5
15..19
Cool #1..#5
Cooler control, greenhouse 1..5
SDM-IO16 Port 6..10
20..24
Fan #1..#5
Fan control, greenhouse 1..5
SDM-IO16 Port 11..15
;{CR10X}
;
*Table 1 Program
01: 5 Execution Interval (seconds)
;First configure the IO16 if not already done
;If flag 1 is not set, i.e. the program has just
;been compiled or datalogger powered up.
;Omit the following four instructions if using
;an older datalogger with P104 instead of P188
1: If Flag/Port (P91)
1: 21 Do if Flag 1 is Low
2: 30 Then Do
;Call instruction 188 to set the ports as outputs
;with the outputs set low.
2: SDM-IO16 (P188)
1: 00 SDM Address
2: 90 Command Code Option ;configure the ports
3: 0000 Ports 16-13 ;Set all ports as output and low
4: 0000 Ports 12-9
5: 0000 Ports 8-5
6: 0000 Ports 4-1
7: 27 Return Code Loc [ ErrCount ] ;for return code
8: 10 First Loc [ Heat_1 ] ;for control values
9: 1.0 Mult
10: 0.0 Offset
Page 29

Appendix A. Program Examples
A-3
;Set flag 1 high to indicate we have run the setup code
3: Do (P86)
1: 11 Set Flag 1 High
4: End (P95) ;of IF block
;Measure the five temperatures, with 5 107 probes in this example
5: Temp (107) (P11)
1: 5 Reps
2: 1 SE Channel
3: 1 Excite all reps w/E1
4: 1 Loc [ Temp_1 ]
5: 1.0 Mult
6: 0.0 Offset
6: Beginning of Loop (P87) ;Master loop: end
1: 0 Delay ;loop at step 30
2: 5 Loop Count
;Start heater control logic
7: If (X<=>F) (P89) ;if temperature is below
1: 1 -- X Loc [ Temp_1 ] ;heater threshold
2: 4 <
3: 23.5 F
4: 30 Then Do ;then
8: Z=F (P30) ;put a '1' into heater control
1: 1 F ;location
2: 0 Exponent of 10
3: 10 -- Z Loc [ Heat_1 ]
9: End (P95) ;end 'then do'
10: If (X<=>F) (P89) ;if the heater is on (heater
1: 10 -- X Loc [ Heat_1 ] ;control location <>0)
2: 2 <>
3: 0 F
4: 30 Then Do ;then
11: If (X<=>F) (P89) ;check upper threshold
1: 1 -- X Loc [ Temp_1 ] ;to see if heater should
2: 3 >= ;be turned off
3: 25.5 F
4: 30 Then Do
12: Z=F (P30) ;if heater should be turned
1: 0 F ;off, enter a '0' into
2: 0 Exponent of 10 ;heater control location
3: 10 -- Z Loc [ Heat_1 ]
13: End (P95) ;end 'then do'
14: Else (P94) ;else, if the heater is off
15: Z=F (P30) ;enter a '0' into heater
1: 0 F ;control location
2: 0 Exponent of 10
3: 10 -- Z Loc [ Heat_1 ]
16: End (P95) ;end 'then do/else'
Page 30

SDM-IO16 16 Channel Input/Output Expansion Module
A-4
;End heater control logic
;Start cooler control logic
17: If (X<=>F) (P89) ;if 'cooler on' threshold
1: 1 -- X Loc [ Temp_1 ] ;is exceeded
2: 3 >=
3: 27.5 F
4: 30 Then Do ;then
18: Z=F (P30) ;put a '1' into cooler
1: 1 F ;control location
2: 0 Exponent of 10
3: 15 -- Z Loc [ Cool_1 ]
19: End (P95) ;end 'then do'
20: If (X<=>F) (P89) ;if cooler is on (cooler
1: 15 -- X Loc [ Cool_1 ] ;control location <>0)
2: 2 <>
3: 0 F
4: 30 Then Do ;then
21: If (X<=>F) (P89) ;check lower threshold to
1: 1 -- X Loc [ Temp_1 ] ;see if cooler should be
2: 4 < ;turned off
3: 24.5 F
4: 30 Then Do
22: Z=F (P30) ;if cooler should be turned off
1: 0 F ;put a '0' into cooler control
2: 0 Exponent of 10 ;location
3: 15 -- Z Loc [ Cool_1 ]
23: End (P95) ;end 'then do'
24: Else (P94) ;else, if cooler is off
25: Z=F (P30) ;put a '0' into cooler
1: 0 F ;control location
2: 0 Exponent of 10
3: 15 -- Z Loc [ Cool_1 ]
26: End (P95) ;end 'then do/else'
;End cooler control logic
;Start fan control logic based on heater/cooler
27: If (X<=>F) (P89) ;if heater is on
1: 10 -- X Loc [ Heat_1 ]
2: 2 <>
3: 0 F
4: 11 Set Flag 1 High ;set flag 1
28: If (X<=>F) (P89) ;if cooler is on
1: 15 -- X Loc [ Cool_1 ]
2: 2 <>
3: 0 F
4: 11 Set Flag 1 High ;set flag 1
29: If Flag/Port (P91) ;if flag 1 is set
Page 31

Appendix A. Program Examples
A-5
1: 11 Do if Flag 1 is High
2: 30 Then Do ;then
30: Z=F (P30) ;put a '1' into fan control
1: 1 F ;location
2: 0 Exponent of 10
3: 20 -- Z Loc [ Fan_1 ]
31: Else (P94) ;else, if flag 1 is reset
32: Z=F (P30) ;put a '0' into fan control
1: 0 F ;location
2: 0 Exponent of 10
3: 20 -- Z Loc [ Fan_1 ]
33: End (P95) ;end 'then do/else'
34: Do (P86) ;reset flag 1
1: 21 Set Flag 1 Low
35: End (P95) ;end master loop
;End fan control logic based on heater/cooler
;Start fan control logic based on time
36: If time is (P92) ;if 5 minutes remain
1: 10 Minutes (Seconds --) into a ;out of 15 minute
2: 15 Interval (same units as above) ;interval
3: 12 Set Flag 2 High ;set flag 2
37: If Flag/Port (P91) ;if flag 2 is set
1: 12 Do if Flag 2 is High
2: 30 Then Do ;then
38: Beginning of Loop (P87) ;start fan loop
1: 0 Delay
2: 5 Loop Count
39: Z=F (P30) ;put a '1' into fan control
1: 1 F ;location
2: 0 Exponent of 10
3: 20 -- Z Loc [ Fan_1 ]
40: End (P95) ;end fan loop
41: End (P95) ;end 'then do'
42: If time is (P92) ;reset flag 2 at the
1: 0 Minutes (Seconds --) into a ;end of the 15 minutes
2: 15 Interval (same units as above)
3: 22 Set Flag 2 Low
;End fan control logic based on time
;Input locations 10 to 24 are now loaded
;with a '1' or '0' to set ports on the SDM-IO16
;Omit this instruction if using an older datalogger
;see below
43: SDM-IO16 (P188)
1: 00 SDM Address
Page 32

SDM-IO16 16 Channel Input/Output Expansion Module
A-6
2: 94 Command Code Option ;set the ports from locations
3: 0000 Ports 16-13 ;port settings not used for 94
4: 0000 Ports 12-9
5: 0000 Ports 8-5
6: 0000 Ports 4-1
7: 27 Return Code Loc [ ErrCount ] ;for return code
8: 10 First Loc [ Heat_1 ] ;for control values
9: 1.0 Mult
10: 0.0 Offset
;Alternatively for older dataloggers P104 could be used
;Remove the above and uncomment this instruction
;43: SDM-CD16 (P104) ;send instructions to the
;1: 1 Reps ;SDM-IO16 with address 00
;2: 00 Address
;3: 10 Loc [ Heat_1 ]
*Table 2 Program
02: 0.0000 Execution Interval (seconds)
*Table 3 Subroutines
End Program
A.3 A CR10X Program which Measures Four
Frequency Inputs (Anemometers) and Four Switch
Closure Inputs (Rain Gauges)
This program can also be used with a CR23X datalogger.
;{CR10X}
;An example that shows initial setup with frequency measurement
;on four ports and pulse counting, with switch closure, on the next
;four. In this example the four frequencies are anemometers and
;the switch closures are raingauges that need to be totalised
;
*Table 1 Program
01: 5 Execution Interval (seconds)
;First configure the IO16 if not already done
;If flag 1 is not set, i.e. the program has just
;been compiled or datalogger powered up.
;This code is needed primarily to enable switch debounce filtering
;on channels 4..8
1: If Flag/Port (P91)
1: 21 Do if Flag 1 is Low
2: 30 Then Do
; Call instruction 188 to set the ports up
2: SDM-IO16 (P188)
1: 0 SDM Address
2: 90 Command Code Option ;configure the ports
3: 9999 Ports 16-13 ;Leave the last 8 ports as they are
4: 9999 Ports 12-9
5: 3333 Ports 8-5 ;Set ports 5..8 as switch closure
Page 33

Appendix A. Program Examples
A-7
6: 2222 Ports 4-1 ;Set ports 1..4 as normal inputs
7: 1 Return Code Loc [ ErrCount ]
8: 2 First Loc [ Windspd_1 ]
9: 1.0 Mult
10: 0.0 Offset
;Set flag 1 high to indicate we have run the setup code
3: Do (P86)
1: 11 Set Flag 1 High
4: End (P95) ; of IF block
;Measure the four frequencies and write to four input locations
;applying a scaling to m/s
5: SDM-IO16 (P188)
1: 00 SDM Address
2: 40 Command Code Option ;read the freq of the signals on ports 1..4
3: 0 Ports 16-13 ;port settings not used for 40
4: 0 Ports 12-9
5: 0 Ports 8-5
6: 0 Ports 4-1
7: 1 Return Code Loc [ ErrCount ] ;for return code
8: 2 First Loc [ Windspd_1 ] ;for first windspeed data
9: .05148 Mult ;Calibration to give m/s for A100L2
10: 0.0 Offset
;Measure the four pulses counts and write to four locations
;as equivalent rainfall in mm
6: SDM-IO16 (P188)
1: 00 SDM Address
2: 18 Command Code Option ;Count the pulses on ports 5..8
3: 0 Ports 16-13 ;port settings not used for 18
4: 0 Ports 12-9
5: 0 Ports 8-5
6: 0 Ports 4-1
7: 1 Return Code Loc [ ErrCount ] ;for return code
8: 6 First Loc [ Rain_1 ] ;for rain values
9: 0.2 Mult ;Typical calib for mm per tip
10: 0.0 Offset
;Example of output instructions
;Every hour
7: If time is (P92)
1: 0 Minutes (Seconds --) into a
2: 60 Interval (same units as above)
3: 10 Set Output Flag High (Flag 0)
;Fix the array ID to 100
8: Set Active Storage Area (P80)
1: 1 Final Storage Area 1
2: 100 Array ID
;Store a time stamp first
9: Real Time (P77)
1: 1110 Year,Day,Hour/Minute (midnight = 0000)
;Store average windspeeds
10: Average (P71)
1: 4 Reps
2: 2 Loc [ Windspd_1 ]
Page 34

SDM-IO16 16 Channel Input/Output Expansion Module
A-8
;Maximum windspeeds with time of maximum
11: Maximum (P73)
1: 4 Reps
2: 10 Value with Hr-Min
3: 2 Loc [ Windspd_1 ]
;Totalize the rainfall over the previous hour
12: Totalize (P72)
1: 4 Reps
2: 6 Loc [ Rain_1 ]
*Table 2 Program
02: 0.0000 Execution Interval (seconds)
*Table 3 Subroutines
End Program
A.4 A CR10X Program that uses the Interrupt
Subroutine in the Datalogger to Record the Time of
Change of any one of the Ports on an SDM-IO16
This program can also be used with a CR23X datalogger.
;{CR10X}
;An example that shows the use of the IO16 to detect the change
;of state of one of the 16 ports and indicate this to the
;datalogger using the I/O line (which should be connected to C8).
;The datalogger in turn reads the status and captures the
;current port status and writes this with a time stamp to memory
;
*Table 1 Program
01: 5 Execution Interval (seconds)
;First configure the IO16 if not already done
;If flag 1 is not set, i.e. the program has just
;been compiled or datalogger powered up.
;This code is needed to set the IO16 to pulse its I/O line
;if any port changes state.
1: If Flag/Port (P91)
1: 21 Do if Flag 1 is Low
2: 30 Then Do
; Call instruction 188 to set the ports up
2: SDM-IO16 (P188)
1: 00 SDM Address
2: 90 Command Code Option
3: 4444 Ports 16-13 ;configure the ports
4: 4444 Ports 12-9 ;Set so all ports will cause an interrupt
5: 4444 Ports 8-5
6: 4444 Ports 4-1
7: 1 Return Code Loc [ Errcount ] ;for return code
8: 2 First Loc [ Portstat_]
9: 1.0 Mult
10: 0.0 Offset
Page 35

Appendix A. Program Examples
A-9
;Set flag 1 high to indicate we have run the setup code
3: Do (P86)
1: 11 Set Flag 1 High
4: End (P95) ; of IF block
;Now the rest of the other normal measurements would follow
*Table 2 Program
02: 0.0000 Execution Interval (seconds)
*Table 3 Subroutines
;Subroutine 98 will be run when a signal is generated by the I/O line
;from the IO16 connected to C8 on the datalogger.
1: Beginning of Subroutine (P85)
1: 98 Subroutine 98
;First read the port status from the IO16 as quickly as possible
;The speed at which the datalogger can respond to the I/O signal will
;determine the minimum pulse width that you can guarantee to capture
;as a change of state of a port. Typically this will be 10 ms but will
;vary with the datalogger and other activity.
;Reading the port status will cancel further polling
;until the next change of state.
2: SDM-IO16 (P188)
1: 00 SDM Address
2: 91 Command Code Option ;read the port status into one location
3: 0 Ports 16-13 ;port settings not used for code 91
4: 0 Ports 12-9
5: 0 Ports 8-5
6: 0 Ports 4-1
7: 1 Return Code Loc [Errcount ] ;for return code
8: 2 First Loc [Portstat ]
9: 1.0 Mult
10: 0.0 Offset
;Set the output flag to force immediate storage of data
3: Do (P86)
1: 10 Set Output Flag High (Flag 0)
;Fix the array ID at 2000
4: Set Active Storage Area (P80)
1: 1 Final Storage Area 1
2: 200 Array ID
;Store the time now
5: Real Time (P77)
1: 1111 Year,Day,Hour/Minute,Seconds (midnight = 0000)
;Switch to high resolution to ensure we can store the maximum value with
;full resolution, i.e. 5 digits for 65536
6: Resolution (P78)
1: 1 High Resolution
;Sample the port status as a single binary value
7: Sample (P70)
1: 1 Reps
Page 36

SDM-IO16 16 Channel Input/Output Expansion Module
A-10
2: 2 Loc [ Portstat_ ]
8: End (P95)
End Program
This is a blank page.
Page 37

B-1
Appendix B. General Principles of Pulse
and Frequency Measurements
B.1 Introduction
It is necessary to understand the general method of input measurements of the
SDM-IO16 to be able to easily comprehend the limits of frequency and duty cycle
resolution.
The microprocessor in the module runs an internal task that reads the status of all
16 ports at a fixed frequency of 4096 Hz. Changes of state of each port from one
sample to the next are used to determine the start and end of pulses. This sampling
frequency determines the resolution and range of the pulse measurements.
B.2 Frequency and Duty Cycle Measurement Range
To guarantee that a pulse is detected it must last longer than the time between
samples which is 244 s. This sets the upper limit of signal frequency for which
pulses can be counted or frequencies measured. By implication, the maximum
frequency that can be measured is with a 50/50 duty cycle signal. If the duty cycle
is different from this, the maximum frequency measurable is lower. This
maximum frequency, measurable for a signal with a range of duty cycles, can be
expressed as the minimum of two functions:
f
max
= %min * 4096 / 100 (1)
f
max
= (100 - %max) * 4096 / 100 (2)
Where:
f
max
= maximum frequency at a specific duty cycle (Hz)
%min = minimum duty cycle in %
%max = maximum duty cycle in %
It also follows that for any given frequency (f) there will be a limit to the
maximum and minimum duty cycle that can be measured due to the restriction of
the minimum detectable pulse width. Using the same variables defined above,
%min = f * 100 / 4096
%max = 100 - %min
It can be seen that the lower the frequency, the larger the measurable range of duty
cycle.
Page 38

SDM-IO16 16 Channel Input/Output Expansion Module
B-2
B.3 Resolution of Frequency Measurements
The module measures frequency by counting the number of full signal cycles
between requests for measurements by the datalogger and measuring the time
between the start of the first and end of the last of these cycles. The resolution of a
frequency measurement will be dependent on the number of pulses and the
resolution of the internal timer (244 s). The resultant resolution can be calculated
with the following equation:
f
res
= f2 / (4096 * Int (t * f) )
Where:
f
res
= resolution in (Hz).
f = actual frequency measured in (Hz).
t = time between frequency measurement commands in (seconds).
Int = a function which returns the truncated integer value.
For example, reading 1000 Hz at a 0.25 sec frequency measurement interval will
give a resolution of 0.97 Hz, whilst at 1 sec between measurements the resolution
would be 0.25 Hz.
The resolution improves with longer times between frequency measurement
commands. However, the maximum time between measurements is 15.9375
seconds which is limited by the range of internal counters.
B.4 Resolution of Duty Cycle Measurements
Duty cycle measurements are made by calculating the proportion of time that a
signal is high for all full signal cycles that occur in between two measurement
requests by the datalogger. The resolution can be calculated using the following
equation:
%r = 100 * f / (4096*Int(t*f))
Where:
%r = duty cycle resolution in (%)
f = frequency of the signal in (Hz)
t = time between duty cycle measurement commands in (seconds)
Int = a function which returns the truncated integer value.
For example reading the duty cycle of a 1000 Hz signal at 0.25 sec intervals will
give a resolution of 0.097%, whilst at 1 second intervals the resolution would be
0.025%.
It can be seen that duty cycle resolution improves with longer times between duty
cycle measurement commands. However, the maximum time between
measurements is 15.9375 seconds which is limited by the range of internal
counters.
Although the duty cycle measurement uses the same sampling frequency as the
frequency measurement technique, it is not dependent on counting or timing a
known number of cycles. For this reason, it is capable of sampling and giving
accurate duty cycle readings for higher frequency signals. Signals up to 4.000 kHz
can be measured without error. Signals of higher frequency will also appear to
give accurate measurements. Care should be taken as signals that are exact
multiples of the sampler frequency, e.g. 4096, 8192 Hz will give completely
spurious readings.
Page 39

Appendix B. General Principles of Pulse and Frequency Measurements
B-3
B.5 Debounce Filtering
The module is able to digitally filter input signals to prevent false counting of
pulses or inaccurate measurement of frequency for signals sources that do not
have "clean" digital signals. Such signals are often generated by mechanical
switch closures where the contacts often bounce on changeover resulting in a
signal that, for instance, goes low as the switch closes but then goes high for an
instant as the contact bounces, before finally going low again when the switch
finally closes properly.
The method of filtering switch bounce is also based on the 4096 Hz sampler. The
principle of operation is that when the debounce time parameter is non-zero an
integrator function is enabled for that port. Then when the signal is sampled, a
counter is either increased or decreased depending on whether the signal is high or
low. The counter value can range between two limits that represent the high or
low input states. Only when the counter reaches the opposite extreme limit will a
change of state be recognized. This action emulates a traditional ‘RC’ type of
filter, except that the integrator changes in a linear fashion. The amount by which
the counter is changed decreases with increasing size of the debounce timer
parameter; i.e. the larger the parameter the slower the integration counter will
change and the longer it will take for a change of state to be recognized.
This debounce time is the time a signal must stay in the new state before it will be
recognized as having changed state. This is the minimum time it takes the internal
counter to ramp from one limit to the other, providing the input signal switches
cleanly from one state to the other. As with a traditional ‘RC’ filter, if the signal
‘bounces’ back to its old state, the integrator will ramp in the opposite direction
during the bounce. This means that a new change of state will not be recognized
until the filter time has passed plus twice the time period that the signal ‘bounces’
back to its original state.
As an example, a switch that changes state but bounces to its original state for a
total of 0.5 ms whilst changing will, with the default debounce time of 3.17 ms,
not be recognized as changing state until 4.17 ms after the initial change. Only one
pulse will be counted, though, even if the switch opened and closed several times
within that 4.17 ms period.
One consequence of this method of filtering is that the maximum frequency that
can be measured is affected by the amount of switch bounce. In the example
above, it takes 4.17 ms to detect the initial changeover. The next change back to
the original state cannot start until the end of this period otherwise the original
changeover may not be counted. Assuming the same amount of bounce for all
changeovers, the maximum frequency in this example would be 1/(0.00417*2),
which equates to 120 Hz, rather than 158 Hz if there is no bounce.
The relationship between the minimum debounce time in milliseconds (td) and the
debounce parameter (n) is:
td = 0.244 + n * 0.244
The relationship between maximum frequency (f
max
), debounce time and total
switch bounce time (tb) in milliseconds is:
f
max
= 1000 / (2 * (td + 2 * tb))
Page 40

Page 41

C-1
Appendix C. Command Code Listing
Command
Action
1
Read port 1 accumulated counts into 1 location
2
Read port 2 accumulated counts into 1 location
3
Read port 3 accumulated counts into 1 location
4
Read port 4 accumulated counts into 1 location
5
Read port 5 accumulated counts into 1 location
6
Read port 6 accumulated counts into 1 location
7
Read port 7 accumulated counts into 1 location
8
Read port 8 accumulated counts into 1 location
9
Read port 9 accumulated counts into 1 location
10
Read port 10 accumulated counts into 1 location
11
Read port 11 accumulated counts into 1 location
12
Read port 12 accumulated counts into 1 location
13
Read port 13 accumulated counts into 1 location
14
Read port 14 accumulated counts into 1 location
15
Read port 15 accumulated counts into 1 location
16
Read port 16 accumulated counts into 1 location
17
Read ports 1-4 accumulated counts into 4 locations
18
Read ports 5-8 accumulated counts into 4 locations
19
Read ports 9-12 accumulated counts into 4 locations
20
Read ports 13-16 accumulated counts into 4 locations
21
Read ports 1-8 accumulated counts into 8 locations
22
Read ports 9-16 accumulated counts into 8 locations
23
Read ports 1-16 accumulated counts into 16 locations
24
Read port 1 frequency into 1 location
25
Read port 2 frequency into 1 location
26
Read port 3 frequency into 1 location
27
Read port 4 frequency into 1 location
28
Read port 5 frequency into 1 location
29
Read port 6 frequency into 1 location
30
Read port 7 frequency into 1 location
31
Read port 8 frequency into 1 location
32
Read port 9 frequency into 1 location
33
Read port 10 frequency into 1 location
34
Read port 11 frequency into 1 location
35
Read port 12 frequency into 1 location
36
Read port 13 frequency into 1 location
37
Read port 14 frequency into 1 location
38
Read port 15 frequency into 1 location
39
Read port 16 frequency into 1 location
40
Read ports 1-4 frequency into 4 locations
41
Read ports 5-8 frequency into 4 locations
42
Read ports 9-12 frequency into 4 locations
43
Read ports 13-16 frequency into 4 locations
44
Read ports 1-8 frequency into 8 locations
45
Read ports 9-16 frequency into 8 locations
46
Read ports 1-16 frequency into 16 locations
47
Read port 1 duty cycle into 1 location
48
Read port 2 duty cycle into 1 location
49
Read port 3 duty cycle into 1 location
50
Read port 4 duty cycle into 1 location
51
Read port 5 duty cycle into 1 location
52
Read port 6 duty cycle into 1 location
53
Read port 7 duty cycle into 1 location
Page 42

SDM-IO16 16 Channel Input/Output Expansion Module
C-2
Command
Action
54
Read port 8 duty cycle into 1 location
55
Read port 9 duty cycle into 1 location
56
Read port 10 duty cycle into 1 location
57
Read port 11 duty cycle into 1 location
58
Read port 12 duty cycle into 1 location
59
Read port 13 duty cycle into 1 location
60
Read port 14 duty cycle into 1 location
61
Read port 15 duty cycle into 1 location
62
Read port 16 duty cycle into 1 location
63
Read ports 1-4 duty cycle into 4 locations
64
Read ports 5-8 duty cycle into 4 locations
65
Read ports 9-12 duty cycle into 4 locations
66
Read ports 13-16 duty cycle into 4 locations
67
Read ports 1-8 duty cycle into 8 locations
68
Read ports 9-16 duty cycle into 8 locations
69
Read ports 1-16 duty cycle into 16 locations
70
Set port 1 debounce time from 1 location
71
Set port 2 debounce time from 1 location
72
Set port 3 debounce time from 1 location
73
Set port 4 debounce time from 1 location
74
Set port 5 debounce time from 1 location
75
Set port 6 debounce time from 1 location
76
Set port 7 debounce time from 1 location
77
Set port 8 debounce time from 1 location
78
Set port 9 debounce time from 1 location
79
Set port 10 debounce time from 1 location
80
Set port 11 debounce time from 1 location
81
Set port 12 debounce time from 1 location
82
Set port 13 debounce time from 1 location
83
Set port 14 debounce time from 1 location
84
Set port 15 debounce time from 1 location
85
Set port 16 debounce time from 1 location
86
Set port 16-13 from parameter 4
87
Set port 12-9 from parameter 5
88
Set port 8-5 from parameter 6
89
Set port 4-1 from parameter 7
90
Set port 16-1 from parameters 4-7
91
Read state of ports 1-16 into 1 location. The location is a 16 bit decimal
representation from 0-65535
92
Read state of ports 1-16 into 16 locations. The first location is port 1 and the
state is represented by 0 or 1
93
Set state of ports 1-16 from 1 location. The location is a 16 bit decimal
representation from 0-65535
94
Set state of ports 1-16 from 16 locations. The first location is port 1 and the
state is represented by 0 or 1
95
Set direction of ports 1-16 from 1 location. The location is a 16 bit decimal
representation from 0-65535
96
Set direction of ports 1-16 from 16 locations. The first location is port 1 and
the direction is represented by 0 or 1.
97
Set interrupt mask of ports 1-16 from 1 location. The location is a 16 bit
decimal representation from 0-65535
98
Set interrupt mask of ports 1-16 from 16 locations. The first location is port 1
and the mask is represented by 0 or 1
99
Read the OS signature, OS version and counters for watchdog resets and
communication errors into 4 locations. Using this command also resets the
counters.
Page 43

D-1
Appendix D. Details of use with PC208W
and older dataloggers
D1. Datalogger Instruction 188 – Software
Requirements
D1.1 PC208W Datalogger Support Software
PC208W support of SDM-IO16 Instruction 188 requires
replacement of some PC208W files
Datalogger Instruction 188 for the SDM-IO16 was developed after the release of
PC208W version 3.3. Campbell Scientific will not release another version of
PC208W but instead will offer the next generation datalogger support software
which is LoggerNet. Instruction 188 is supported in LoggerNet version 2.1 and
later.
A special patch to PC208W version 3.3 is available from our website to give
support for Instruction P188. If you do not already have version 3.3, follow steps 1
to 3 below, otherwise start at step 4. You must have PC208W version 3.0 or later
to complete this upgrade.
1. Go to Campbell Scientific website www.campbellsci.com/resource.html.
2. In section “Product Upgrades”, click on link 3.3 to link to the patch for
PC208W/P.
3. Follow instructions for On-line Upgrades. An email will be sent to you with a
link to the required files for the patch. The patch will upgrade PC208W to
version 3.3.
4. Next, download file ed16update.exe from our ftp site,
ftp://ftp.campbellsci.com/pub/csl/outgoing/ to a location of your choice. Open
the self-extracting file. The default directory is C:\PC208W\BIN which will
be correct for almost all PC208W installations. (If your original installation
was to some different disk or directory, amend the path as required, and
install to the appropriate \BIN directory.) Select other options using the radio
buttons.
This upgrade also includes support for Campbell Scientific’s CS616
sensor.
5. Follow the instructions below to upgrade your Datalogger Operating System.
NOTE
NOTE
Page 44

Appendix D. Details of use with PC208W and older dataloggers
D-2
D2. CR23X and CR10X Operating System
Requirements
Use of SDM-IO16 Instruction 188 requires newer datalogger
operating systems for the CR23X and CR10X.
The following table lists the datalogger operating systems required for support of
Instruction 188. To determine which operating system is presently installed in a
datalogger, use the *B mode. See your datalogger manual for a detailed
description.
Campbell Scientific
Datalogger
Required Operating System Version
--Listed version or later--
CR10X
1.17
CR23X
1.14
Campbell Scientific datalogger operating systems are easily downloaded from our
website page, www.campbellsci.com/resource.html. Go to section Product
Upgrades and click on the link for the appropriate datalogger.
NOTE
Page 45

Page 46

CAMPBELL SCIENTIFIC COMPANIES
Campbell Scientific, Inc. (CSI)
815 West 1800 North
Logan, Utah 84321
UNITED STATES
www.campbellsci.com info@campbellsci.com
Campbell Scientific Africa Pty. Ltd. (CSAf)
PO Box 2450
Somerset West 7129
SOUTH AFRICA
www.csafrica.co.za sales@csafrica.co.za
Campbell Scientific Southeast Asia Co., Ltd.
877/22 Nirvana@Work, Rama 9 Road
Suan Luang Subdistrict, Suan Luang District
Bangkok 10250
THAILAND
www.campbellsci.asia info@campbellsci.asia
Campbell Scientific Australia Pty. Ltd. (CSA)
PO Box 8108
Garbutt Post Shop
QLD 4814 AUSTRALIA
www.campbellsci.com.au info@campbellsci.com.au
Campbell Scientific do Brazil Ltda. (CSB)
Rua Apinagés, nbr. 2018 - Perdizes
CEP: 01258-00 São Paulo SP BRAZIL
www.campbellsci.com.br
vendas@campbellsci.com.br
Campbell Scientific Canada Corp. (CSC)
14532 – 131 Avenue NW
Edmonton, Alberta T5L 4X4
CANADA
www.campbellsci.ca dataloggers@campbellsci.ca
Campbell Scientific Centro Caribe S.A. (CSCC)
300N Cementerio, Edificio Breller
Santo Domingo, Heredia 40305
COSTA RICA
www.campbellsci.cc info@campbellsci.cc
Campbell Scientific Ltd. (CSL)
80 Hathern Road, Shepshed, Loughborough LE12 9GX
UNITED KINGDOM
www.campbellsci.co.uk sales@campbellsci.co.uk
Campbell Scientific Ltd. (France)
3 Avenue de la Division Leclerc
92160 ANTONY
FRANCE
www.campbellsci.fr info@campbellsci.fr
Campbell Scientific Spain, S. L.
Avda. Pompeu Fabra 7-9
Local 1 - 08024 BARCELONA
SPAIN
www.campbellsci.es info@campbellsci.es
Campbell Scientific Ltd. (Germany)
Fahrenheitstrasse13, D-28359 Bremen
GERMANY
www.campbellsci.de info@campbellsci.de
Campbell Scientific (Beijing) Co., Ltd.
8B16, Floor 8 Tower B, Hanwei Plaza
7 Guanghua Road, Chaoyang, Beijing 100004
P.R. CHINA
www.campbellsci.com info@campbellsci.com.cn
Please visit www.campbellsci.eu to obtain contact information for your local EU or International representative .
 Loading...