

Page 1
NS
UC
ON
NU
I
TR
TI
MA
RF401A-Series Spread
Spectrum Radios
Revision: 4/15
AL
Copyright © 2001-2015
Campbell Scientific, Inc.
Page 2

Page 3
Page 4

Assistance
Products may not be returned without prior authorization. The following
contact information is for Canadian and international clients residing in
countries served by Campbell Scientific (Canada) Corp. directly. Affiliate
companies handle repairs for clients within their territories. Please visit
www.campbellsci.ca to determine which Campbell Scientific company serves
your country.
To obtain a Returned Materials Authorization (RMA), contact CAMPBELL
SCIENTIFIC (CANADA) CORP., phone (780) 454-2505. After a
measurement consultant determines the nature of the problem, an RMA
number will be issued. Please write this number clearly on the outside of the
shipping container. Campbell Scientific’s shipping address is:
CAMPBELL SCIENTIFIC (CANADA) CORP.
RMA#_____
14532 131 Avenue NW
Edmonton, Alberta T5L 4X4
Canada
For all returns, the client must fill out a “Statement of Product Cleanliness and
Decontamination” form and comply with the requirements specified in it. The
form is available from our web site at www.campbellsci.ca/repair. A
completed form must be either emailed to repair@campbellsci.ca or faxed to
(780) 454-2655. Campbell Scientific (Canada) Corp. is unable to process any
returns until we receive this form. If the form is not received within three days
of product receipt or is incomplete, the product will be returned to the client at
the client’s expense. Campbell Scientific (Canada) Corp.f reserves the right to
refuse service on products that were exposed to contaminants that may cause
health or safety concerns for our employees.
Page 5

Precautions
DANGER — MANY HAZARDS ARE ASSOCIATED WITH INSTALLING, USING, MAINTAINING, AND WORKING ON OR AROUND
TRIPODS, TOWERS, AND ANY ATTACHMENTS TO TRIPODS AND TOWERS SUCH AS SENSORS, CROSSARMS, ENCLOSURES,
ANTENNAS, ETC. FAILURE TO PROPERLY AND COMPLETELY ASSEMBLE, INSTALL, OPERATE, USE, AND MAINTAIN TRIPODS,
TOWERS, AND ATTACHMENTS, AND FAILURE TO HEED WARNINGS, INCREASES THE RISK OF DEATH, ACCIDENT, SERIOUS
INJURY, PROPERTY DAMAGE, AND PRODUCT FAILURE. TAKE ALL REASONABLE PRECAUTIONS TO AVOID THESE HAZARDS.
CHECK WITH YOUR ORGANIZATION'S SAFETY COORDINATOR (OR POLICY) FOR PROCEDURES AND REQUIRED PROTECTIVE
EQUIPMENT PRIOR TO PERFORMING ANY WORK.
Use tripods, towers, and attachments to tripods and towers only for purposes for which they are designed. Do not exceed design
limits. Be familiar and comply with all instructions provided in product manuals. Manuals are available at www.campbellsci.ca or by
telephoning (780) 454-2505 (Canada). You are responsible for conformance with governing codes and regulations, including safety
regulations, and the integrity and location of structures or land to which towers, tripods, and any attachments are attached. Installation
sites should be evaluated and approved by a qualified personnel (e.g. engineer). If questions or concerns arise regarding installation,
use, or maintenance of tripods, towers, attachments, or electrical connections, consult with a licensed and qualified engineer or
electrician.
General
x Prior to performing site or installation work, obtain required approvals and permits.
x Use only qualified personnel for installation, use, and maintenance of tripods and towers, and
any attachments to tripods and towers. The use of licensed and qualified contractors is
highly recommended.
x Read all applicable instructions carefully and understand procedures thoroughly before
beginning work.
x Wear a hardhat and eye protection, and take other appropriate safety precautions while
working on or around tripods and towers.
x Do not climb tripods or towers at any time, and prohibit climbing by other persons. Take
reasonable precautions to secure tripod and tower sites from trespassers.
x Use only manufacturer recommended parts, materials, and tools.
Utility and Electrical
x You can be killed or sustain serious bodily injury if the tripod, tower, or attachments you are
installing, constructing, using, or maintaining, or a tool, stake, or anchor, come in contact
with overhead or underground utility lines.
x Maintain a distance of at least one-and-one-half times structure height, 6 meters (20 feet), or
the distance required by applicable law, whichever is greater, between overhead utility lines
and the structure (tripod, tower, attachments, or tools).
x Prior to performing site or installation work, inform all utility companies and have all
underground utilities marked.
x Comply with all electrical codes. Electrical equipment and related grounding devices should
be installed by a licensed and qualified electrician.
Elevated Work and Weather
x Exercise extreme caution when performing elevated work.
x Use appropriate equipment and safety practices.
x During installation and maintenance, keep tower and tripod sites clear of un-trained or non-
essential personnel. Take precautions to prevent elevated tools and objects from dropping.
x Do not perform any work in inclement weather, including wind, rain, snow, lightning, etc.
Maintenance
x Periodically (at least yearly) check for wear and damage, including corrosion, stress cracks,
frayed cables, loose cable clamps, cable tightness, etc. and take necessary corrective actions.
x Periodically (at least yearly) check electrical ground connections.
WHILE EVERY ATTEMPT IS MADE TO EMBODY THE HIGHEST DEGREE OF SAFETY IN ALL CAMPBELL SCIENTIFIC PRODUCTS,
THE CLIENT ASSUMES ALL RISK FROM ANY INJURY RESULTING FROM IMPROPER INSTALLATION, USE, OR MAINTENANCE OF
TRIPODS, TOWERS, OR ATTACHMENTS TO TRIPODS AND TOWERS SUCH AS SENSORS, CROSSARMS, ENCLOSURES, ANTENNAS,
ETC.
Page 6

PLEASE READ FIRST
About this manual
Please note that this manual was originally produced by Campbell Scientific Inc. (CSI) primarily
for the US market. Some spellings, weights and measures may reflect this origin.
Some useful conversion factors:
Area: 1 in
2
(square inch) = 645 mm
2
Length: 1 in. (inch) = 25.4 mm
1 ft (foot) = 304.8 mm
1 yard = 0.914 m
1 mile = 1.609 km
Mass: 1 oz. (ounce) = 28.35 g
1 lb (pound weight) = 0.454 kg
Pressure: 1 psi (lb/in2) = 68.95 mb
Volume: 1 US gallon = 3.785 litres
In addition, part ordering numbers may vary. For example, the CABLE5CBL is a CSI part
number and known as a FIN5COND at Campbell Scientific Canada (CSC). CSC Technical
Support will be pleased to assist with any questions.
About sensor wiring
Please note that certain sensor configurations may require a user supplied jumper wire. It is
recommended to review the sensor configuration requirements for your application and supply the jumper
wire is necessary.
Page 7

Page 8

Table of Contents
PDF viewers: These page numbers refer to the printed version of this document. Use the
PDF reader bookmarks tab for links to specific sections.
1. Introduction ................................................................. 1
2. Cautionary Statements ............................................... 1
3. Initial Inspection ......................................................... 1
4. Quickstart .................................................................... 2
4.1 Remote Station Radio .......................................................................... 2
4.2 Base Station Radio ............................................................................... 2
4.3 LoggerNet Setup .................................................................................. 2
5. Overview ...................................................................... 3
5.1 Retired Radios ...................................................................................... 3
5.1.1 RF401-Series and RF430-Series Radios ....................................... 3
5.1.2 RF400-Series Radios .................................................................... 3
6. Specifications ............................................................. 3
7. Product Description .................................................... 6
7.1 Mounting .............................................................................................. 6
7.2 Power ................................................................................................... 6
7.3 USB ...................................................................................................... 6
7.4 CS I/O .................................................................................................. 7
7.5 RS-232 ................................................................................................. 8
7.6 LEDs .................................................................................................... 9
7.7 Antenna ................................................................................................ 9
7.7.1 Compatible Antennas .................................................................... 9
7.7.2 Electrostatic Issues and Surge Protection ................................... 10
7.7.3 Antenna Cables ........................................................................... 10
8. Configuring the RF401A Series ............................... 11
8.1 Device Configuration Utility.............................................................. 11
9. LoggerNet Setup ....................................................... 11
10. Installation Best Practices ....................................... 16
9.1 Basic Setup......................................................................................... 11
9.2 Using a Repeater ................................................................................ 16
10.1 Avoiding Interference ........................................................................ 16
10.2 Antenna Selection, Placement, and Mounting ................................... 17
10.3 Antenna Cables .................................................................................. 17
i
Page 9

Table of Contents
11. Operation ................................................................... 17
11.1 Main .................................................................................................. 18
11.1.1 Active Interface .......................................................................... 18
11.1.2 SDC Address .............................................................................. 19
11.1.3 RS-232 Baud Rate ...................................................................... 19
11.1.4 Protocol ...................................................................................... 19
11.1.5 RF Hop Sequence ....................................................................... 20
11.1.6 RF Network ................................................................................ 20
11.1.7 RF Radio Address ...................................................................... 20
11.1.8 Power Mode ............................................................................... 20
11.1.9 Retry Level ................................................................................. 21
11.1.10 Radio TX Power Level ............................................................... 22
11.2 PakBus®............................................................................................ 22
11.2.1 PakBus Address ......................................................................... 22
11.2.2 PakBus Beacon Interval ............................................................. 22
11.2.3 PakBus Verify Interval ............................................................... 23
11.2.4 Central Router ............................................................................ 23
11.2.5 Neighbors Allowed .................................................................... 23
11.3 Advanced ........................................................................................... 23
11.3.1 Serial Number ............................................................................ 23
11.3.2 Operating System Version ......................................................... 23
11.3.3 Radio Firmware Version ............................................................ 24
11.3.4 Received Signal Strength ........................................................... 24
11.3.5 Retransmit Failures .................................................................... 24
11.3.6 ME Baud Rate ............................................................................ 24
11.3.7 RS-232 Parity ............................................................................. 25
11.3.8 RS-232 Stop Bits ........................................................................ 25
11.3.9 RS-232 Character Length ........................................................... 25
11.3.10 RS-232 Auto Power Down ......................................................... 25
11.3.11 AT Sequence Character .............................................................. 25
11.3.12 Silence Time Before Command Sequence ................................. 25
11.3.13 Silence Time After Command Sequence ................................... 25
11.3.14 AT Command Mode Timeout .................................................... 25
11.3.15 Net Address Mask ...................................................................... 25
11.3.16 Radio Address Mask .................................................................. 25
12. Attribution .................................................................. 25
Appendices
Part 15 FCC Compliance Warning ......................... A-1
A.
B. Distance vs. Antenna Gain, Terrain, and Other
Factors ................................................................... B-1
B.1 Introduction ..................................................................................... B-1
B.2 How Far Can You Go? .................................................................... B-2
B.2.1 Overview .................................................................................. B-2
B.2.2 Link Analysis ........................................................................... B-2
B.2.3 Transmitter Power .................................................................... B-3
B.2.4 Cable Loss ................................................................................ B-3
B.2.5 Antenna Gain ........................................................................... B-4
B.2.6 Receiver Sensitivity ................................................................. B-4
ii
Page 10

Figure
Tables
Table of Contents
B.2.7 Path Loss ................................................................................... B-5
B.3 Real World Distance Estimates ........................................................ B-6
B.4 Examples .......................................................................................... B-7
6-1. RF401A-series dimensions .................................................................. 5
7-1. USB Pinout (USB Type B Jack) .......................................................... 7
7-2. CS I/O Pinout ( 9-PIN D-SUB MALE) ............................................... 7
7-3. RS-232 Pinout (9-PIN D-SUB FEMALE) ........................................... 8
B-1. RF Path Examples ............................................................................ B-1
B-2. Transmitter Power ............................................................................ B-3
B-3. Cable Loss ........................................................................................ B-4
B-4. LMR-195 Cable Loss vs. Length @ 900 MHz ................................ B-4
B-5. Antenna Gain of Recommended Antennas ...................................... B-4
B-6. Free Space Path Loss ....................................................................... B-5
B-7. 900 MHz Distance vs. Path Loss (Lp in dB) per Three Path
Types ............................................................................................ B-6
B-8. Path Type vs. Path Characteristics Selector ..................................... B-7
iii
Page 11

Table of Contents
iv
Page 12

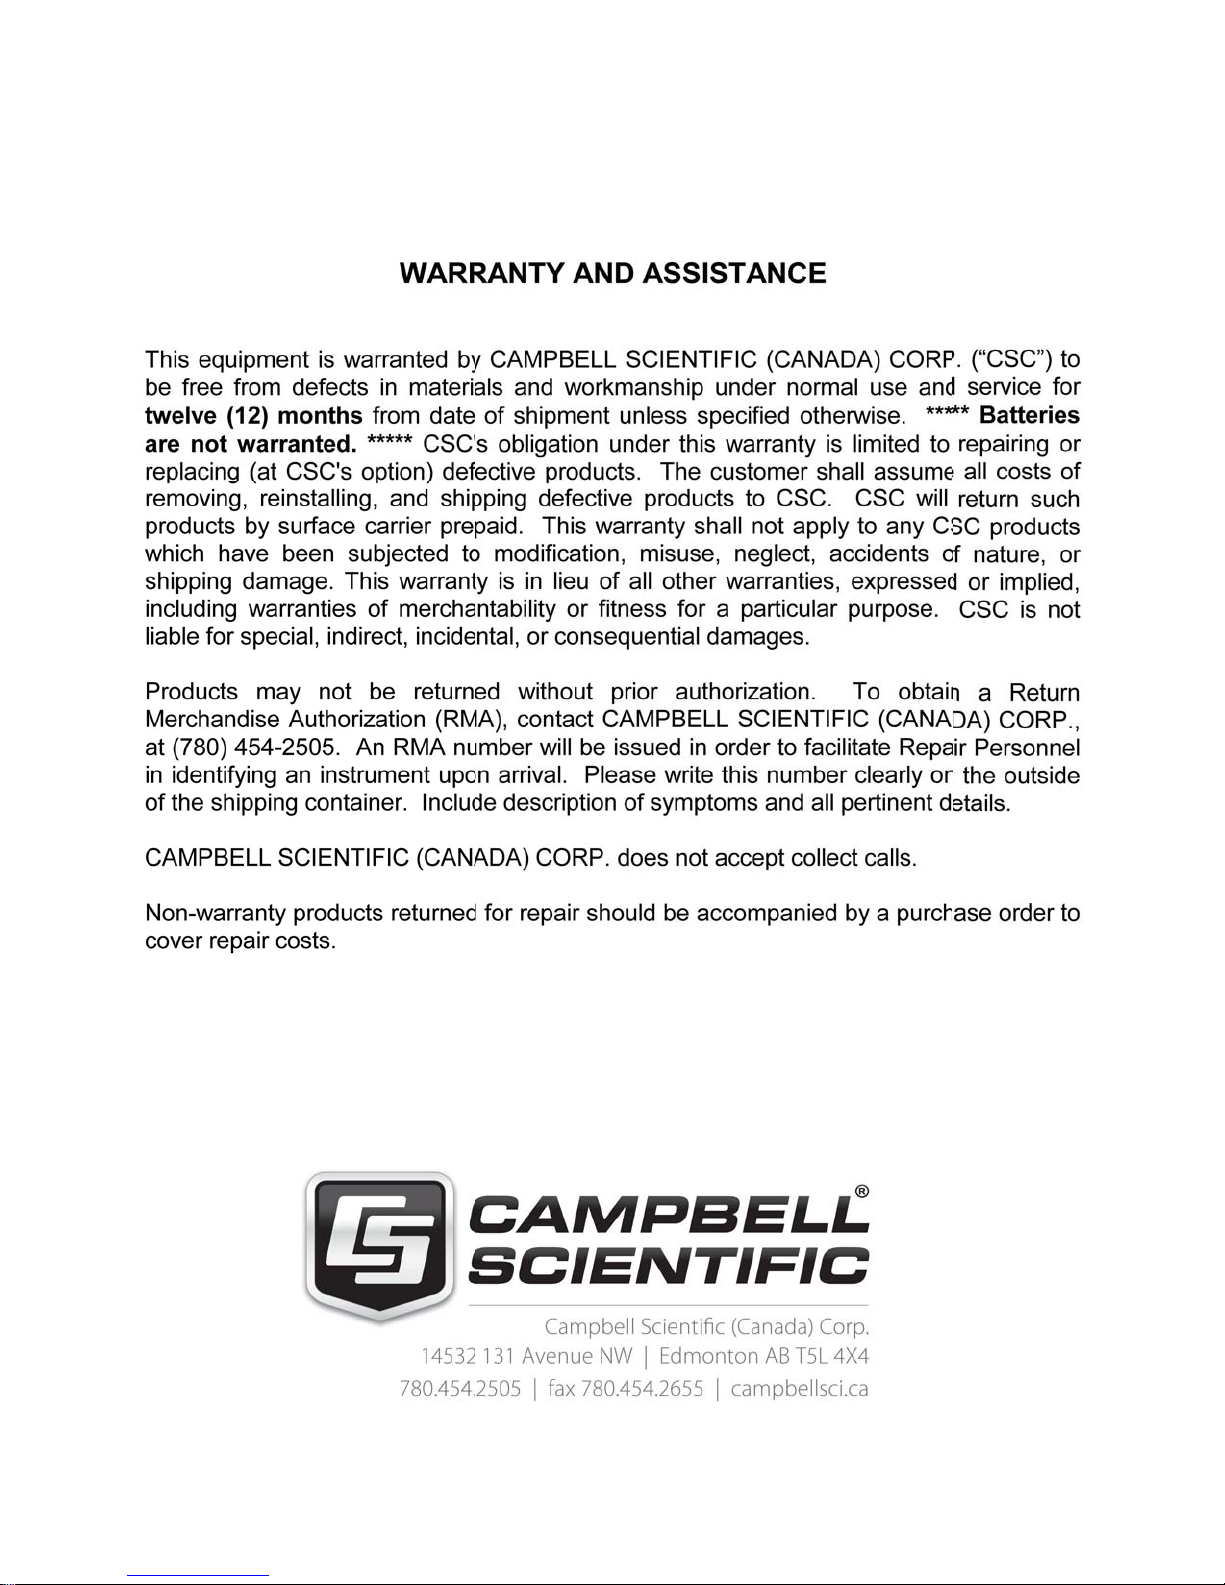
RF401A-Series Spread Spectrum Radio
1. Introduction
This manual discusses the configuration, operation, and maintenance of the
Campbell Scientific RF401A and RF411A frequency-hopping spread spectrum
(FHSS) radios. This manual will refer to these devices collectively as either
“radio,” “RF401A series,” or “RF401A-series radio” unless otherwise noted.
The RF401A-series radios are designed for license-free use in several
countries. The RF401A has a 910 to 918 MHz operating-frequency range
appropriate for use in the United States and Canada. The RF411A has a 920 to
928 MHz operating-frequency range appropriate for use in Australia and New
Zealand.
The RF401A-series radios provide a high level of RF compatibility with
previous products. The RF401A is compatible with the RF400, RF401,
RF430, CR205, CR206, CR206X, and AVW206. The RF411A is compatible
with the RF410, RF411, RF431, CR210, CR211, CR211X, and AVW211.
2. Cautionary Statements
x This equipment generates, uses, and can radiate radio frequency energy
and, if not installed and used in accordance with the instructions, may
cause harmful interference to radio communications. See Appendix A,
Part 15 FCC Compliance Warning
x Ensure maximum protection against surges. Use coaxial (antenna) surge
protection. Keep RS-232, CS I/O, and USB connections short or use
protective isolation and surge protection when appropriate.
x Where an AC adapter is used, Campbell Scientific recommends pn 15966.
Any other AC adapter used must have a DC output not exceeding 16.5
volts measured without a load to avoid damage to the radio. Over-voltage
damage is not covered by factory warranty.
x Campbell Scientific does not recommend using RF401A-series, RF401-
series, or RF430-series radios in networks containing RF450 radios. The
RF450 radios will interfere with the transmission of the RF401A-series,
RF401-series, and RF430-series radios.
x Line-of-sight obstructions and RF interference will affect the transmission
distance. See Appendix B, Distance vs. Antenna Gain, Terrain, and Other
Factors
distance.
(p. B-1), for a discussion of antenna gain and other factors affecting
(p. A-1), for more information.
3. Initial Inspection
x The RF401A-series radios ship with an SC12 serial cable, a USB A to
USB B Cable, 2 grommets, and 2 screws.
x Upon receipt of the RF401A-series radio, inspect the packaging and
contents for damage. File damage claims with the shipping company.
Contact Campbell Scientific to facilitate repair or replacement.
1
Page 13

RF401A-Series Spread Spectrum Radio
x Immediately check package contents against shipping documentation.
Thoroughly check all packaging material for product that may be trapped
inside it. Contact Campbell Scientific immediately about any
discrepancies. Model numbers are found on each product. On cables, the
model number is often found at the connection end of the cable.
4. Quickstart
Out of the box, the radio is configured for use with a datalogger connecting via
CS I/O and using CS I/O SDC address 7.
4.1 Remote Station Radio
Using the supplied SC12 serial cable, connect the radio’s CS I/O port to the CS
I/O port of the datalogger.
4.2 Base Station Radio
You will need to connect the radio to your PC and use Device Configuration
Utility to change the radio’s Active Interface to USB. To learn more about
connecting with Device Configuration Utility see Section 8.1, Device
Configuration Utility
Active Interface setting to USB. If using the base radio to connect to a CR200
series, you will also need to change the Power Mode setting to 1 Sec. The
Power Mode setting should match that of the device you are connecting to.
Apply the change(s), close Device Configuration Utility, and leave the radio
connected to the PC via USB.
(p. 11). Using Device Configuration Util i t y, set the radio’s
4.3 LoggerNet Setup
The next step is to run LoggerNet and configure it to connect to the datalogger
via the radio link.
x From the EZ View of the LoggerNet Setup screen, press Add, select
your datalogger type, enter a name for your datalogger, and press
Next.
x Under Connection Type, select Direct Connect. Press Next.
x Under COM Port Selection, select the port designated as RF401A-
Series.
x Under Datalogger Settings, select a Baud Rate of 115200, enter the
PakBus Address of the datalogger, and set Extra Response Time to
1 second. Press Next.
x Under Datalogger Settings – Security, enter any security codes that
have been previously configured in the datalogger, if any. Press Next.
x Review the Communication Setup Summary and verify that all
settings are correct. Press Next.
x On the Communication Test screen, select Yes and press Next to
verify that you are able to communicate with your datalogger. If you
are unable to communicate, press the Previous button and review
your settings. Once you have successfully communicated with your
datalogger, press the Finish button.
x You are now ready to connect to your datalogger using the LoggerNet
Connect screen.
2
Page 14

5. Overview
5.1 Retired Radios
5.1.1 RF401-Series and RF430-Series Radios
RF401A-Series Spread Spectrum Radio
Spread spectrum radios spread the normally narrowband information signal
over a relatively wide band of frequencies. This allows the communications to
be more immune to noise and interference from RF sources such as pagers,
cellular phones and multipath. The RF401A-series radios reduce susceptibility
to RF interference from other spread spectrum devices by providing userselectable frequency hopping patterns.
The RF401A-series radios can provide up to one mile transmission range when
using an inexpensive whip antenna. The radios can provide up to 10 mile
transmission range when using a higher gain directional antenna at ideal
conditions. Compatible antennas are described in Section 7.7.1, Compatible
Antennas
In June 2014, the RF401A and RF411A replaced the RF401 and RF430, and
RF411 and RF431, respectively. It should be noted that the RF401-series and
RF430-series radios have a maximum transmit power of 100 mW. The
RF401A-series radio has a maximum transmit power of 250 mW, configurable
via software. Please ensure that when replacing an existing RF401-series or
RF430-series radio with an RF401A-series radio that the legal transmit power
limits are not exceeded with existing cabling and antenna configuration.
(p. 9).
5.1.2 RF400-Series Radios
The RF401A series have a choice of three communication protocol settings:
Transparent, PakBus Aware, and PakBus Node. Transparent is the protocol
used by the RF400, RF410, and CR205. RF401-series radios in networks that
also have RF400-series radios must use the Transparent protocol setting.
CAUTION
Do not mix the Transparent protocol with any of the
PakBus® protocols. This will produce RF traffic without any
RF communications.
6. Specifications
General
Dimensions: 11.1 x 6.9 x 2.7 cm (4.4 x 2.7 x 1.1 in)
Weight: 136 g (4.8 oz)
Two-piece aluminum case, black anodized
Radio
Frequency Hopping Spread Spectrum (FHSS) Radio Transceiver
Frequency
RF401A: 910 to 918 MHz
RF411A: 920 to 928 MHz
Transmit Power Output: 5 to 250 mW, software selectable
Receiver Sensitivity: –109 dBm
Channel Capacity: 7 hop sequences share 25 frequencies
RF Data Rate: 10 kbps
RF Connector: Reverse Polarity SMA (RPSMA) jack, 50 Ohm unbalanced
3
Page 15

RF401A-Series Spread Spectrum Radio
Power
Powered over CS I/O or 2.5 mm DC power jack
Input Voltage: 9 to 16 Vdc
Average Current Drain
Transmit: < 80 mA (250 mW TX Power)
Receive: 15 mA
Stand-by: < 0.5 mA (depending on power saving mode)
Connections
USB
USB Type B Jack
Can draw enough power for normal operation from standard USB host
RS-232
DB9, Female
1200, 4800, 9600, 19200, 38400, 57600, and 115200 baud rate supported
CS I/O
DB9, Male
Provides power connection from datalogger for normal operation
Supports SDC (7|8|10|11) and Modem Enable Master communication modes
Does not support Modem Enable Peripheral mode
Diagnostics
LEDs: Power/Tx, Rx
Received Signal Strength Indicator for Last Packet (PakBus® mode)
Retransmit Failure Counter (PakBus® mode)
Operating Temperature
Standard: –25 to +50 °C
Extended: –40 to +85 °C
Configuration
Device Configuration Utility via USB
Compliance
United States FCC Part 15.247: MCQ-XB900HP
Industry Canada (IC): 1846A-XB900HP
(RF411A Only) Australia C-Tick: N3013
RoHS
4
Page 16

RF401A-Series Spread Spectrum Radio
FIGURE 6-1. RF401A-series dimensions
5
Page 17

RF401A-Series Spread Spectrum Radio
7. Product Description
7.1 Mounting
The mounting holes are designed to align with a one-inch-on-center hole
pattern and provide for ridged mounting of the radio in either a vertical or
horizontal orientation. #6-32 x 0.375 inch stainless steel Phillips head screws
(pn 505) and nylon grommets (pn 6044) are supplied for securing the radio to
the backplate of a Campbell Scientific enclosure.
7.2 Power
There are three ways the radio may be powered for operation. The radio may
be powered via CS I/O, USB, or the 2.5 mm DC power jack labeled as Power.
The power connector is most commonly used to supply power to the radio
when the radio is used as a standalone PakBus® Router / RF repeater or when
the RS-232 port is used for interconnect with another device. The Field Power
Cable (pn 14291) or AC to DC power adapter (pn 15966) are used for
supplying 12 Vdc to the power connector.
The power connector of the radio uses the inner conductor for positive (+)
voltage and the outer / sleeve conductor for ground (–).
CAUTION
7.3 USB
NOTE
There are many AC adapters available with barrel
connectors that will fit the RF401A series. Damage that
occurs from the use of an AC adapter that is not the 15966
AC to DC power adapter will not be covered by warranty. If
using a different AC adapter, be sure that the adapter’s “no
load” voltage is below the 16.5 Vdc; measure the output with
a DC voltmeter while the AC adapter is plugged into the
outlet but not powering anything.
The radio has a USB Type B jack that can be connected to your PC using the
supplied 17648 USB cable. The connection is used for power, configuration,
and data.
INSTALL the DEVICE DRIVER BEFORE connecting the radio
to your PC via USB for the first time. You will need the device
driver properly installed before you can connect to the radio via
USB. To install the device driver, download the latest version of
Device Configuration Utility from our website. Under Device
Type, select Radio | RF401A Series. Click the Install the USB
device driver link and follow the prompts.
Most host USB ports will supply a sufficient amount of voltage and current for
all normal operations. When used as a base radio, an external power supply is
generally not required. When sourcing operational power from the PC’s USB
port, connect the radio directly to the PC or to an externally powered USB hub.
6
Page 18

RF401A-Series Spread Spectrum Radio
When the radio is connected to the PC, a virtual COM port will be added to the
list of available Ports (COM and LPT) devices. It will be descriptively labeled,
for example “RF401A Series (COM10)”, where COM10 denotes the COM
port enumerated by the Windows operating system.
The USB port is always available for configuration purposes. Independent of
the Active Interface radio setting, USB can always be used for connecting with
Device Configuration Utility for radio configuration.
The USB interface is only available for operational, network communication
when the radio’s Active Interface setting is set as USB.
TABLE 7-1. USB Pinout (USB Type B Jack)
PIN FUNCTION
1 5V
2 Data–
3 Data+
4 GND
7.4 CS I/O
The CS I/O port is a 9-pin male D-Sub connector that is typically connected to
a Campbell Scientific datalogger using the supplied SC12 cable. This
connection is used for power and data.
The CS I/O port is not a typical RS-232 connection and is specific to Campbell
Scientific products. CS I/O cannot be used for radio configuration using the
Device Configuration Utility.
For a typical remote radio site, the radio need only be connected to the
datalogger CS I/O port using the supplied SC12 cable. This connection will
supply operational power to the radio and serve as the data connection between
the radio the datalogger. The Active Interface setting must be set to CS I/O
SDC.
An alternative, but much less common, use of CS I/O is connection to another
communication peripheral through an A100 CS I/O null modem adapter. This
is typically only used when creating a “phone to RF base” configuration. The
radio’s Active Interface setting must be set to CS I/O ME Master and the
other device (for example COM220) must be capable of being configured as a
modem enabled (ME) peripheral.
TABLE 7-2. CS I/O Pinout ( 9-PIN D-SUB MALE)
PIN FUNCTION I/O DESCRIPTION
1 5V I Sources 5 Vdc to power peripherals
2 GND
3 Ring O Raised by modem to put datalogger
GND for pin 1 and signals
into telecommunications mode
7
Page 19

RF401A-Series Spread Spectrum Radio
4 RX O Serial data receive line
5 Modem Enable I Raised when datalogger determines
that associated modem raised the ring
line
7.5 RS-232
6 Synchronous
Device Enable
7 CLK/Handshake I/O Used by datalogger with SDE and TX
8 12V supplied by
datalogger
9 TX I Serial data transmit line
I = Signal into the RF401A series, O = Signal out of the RF401A series
The RS-232 port is a DCE, 9-pin female D-Sub connector used to for
connecting the radio to the RS-232 port of a datalogger, computer, or another
RS-232 device. This connection is most commonly used when connecting the
radio to a device without a CS I/O port or when linking two communication
peripherals, for example directly connecting the radio to an Ethernet serial
server.
The RS-232 port can be connected to a DTE device, like a computer or NL201,
using the pn 10873, 9-Pin female to 9-Pin male serial cable. The RS-232 port
can be connected to another DCE device, like a datalogger RS-232 or MD485
or cellular modem, using the 18663 9-pin male-to-male null modem serial
cable.
I Used by datalogger to address
synchronous devices; can be used as a
printer enable
lines to transfer data to synchronous
devices
PWR Sources 12 Vdc to power peripherals
8
When using RS-232, 12 Vdc power should be supplied to the power connector
using a field power connector or AC power adapter. The Active Interface
setting must be set to RS-232, and the RS-232 port configuration, like baud
rate, should match the device the radio is connected to.
RS-232 cannot be used for radio configuration using Device Configuration
Utility.
TABLE 7-3. RS-232 Pinout (9-PIN D-SUB FEMALE)
PIN I/O DESCRIPTION
1
2 O TX
3 I RX
4
5 GND
6
Page 20

7.6 LEDs
RF401A-Series Spread Spectrum Radio
7
8 O CTS
9
I = Signal into the RF401A series, 0 = Signal out of the RF401A series
The radios have a red LED labeled Pwr/TX and a green LED labeled RX.
When 12V power is applied, the red LED lights for ten seconds. About three
seconds after power-up, the green LED lights for a second. Ten seconds after
power-up, the selected standby mode begins to control the red LED.
The red LED lights to indicate when the receiver is actively listening. When
the receiver detects RF traffic (header or data with the same hopping
sequence), the red LED will light steadily. When radio is transmitting, the red
LED will pulse OFF as the RF packets are transmitted (it will not be on solid).
Green LED activity indicates that there is an RF signal being received whose
hopping sequence corresponds to the configured hopping sequence of the
RF401A series. This does not necessarily mean that the network/radio address
of the received packet corresponds with that of the RF401A series. (Where a
neighboring network exists it is a good idea to choose a unique hopping
sequence.)
7.7 Antenna
The radio has a reverse polarity SMA (RPSMA) jack antenna connection. It is
important to note the distinction between RPSMA and SMA connectors when
selecting a mating antenna or antenna cable.
7.7.1 Compatible Antennas
Campbell Scientific offers antennas to satisfy the needs for various base station
and remote station requirements. All antennas (or antenna cables) that attach
directly to the radio have an RPSMA plug connector. The use of an
unauthorized antenna could cause transmitted field strengths in excess of FCC
rules, interfere with licensed services, and result in FCC sanctions against the
user. One of the following antennas listed below must be used.
CAUTION
CAUTION
An FCC authorized antenna is a required component. You
must pick one of the antennas below.
In order to comply with the FCC RF exposure requirements,
the RF401A series may be used only with approved
antennas that have been tested with these radios and a
minimum separation distance of 20 cm must be maintained
from the antenna to any nearby persons.
9
Page 21

RF401A-Series Spread Spectrum Radio
Campbell Scientific
Part Number Description
14201 900 MHz 9 dBd Yagi Antenna with Type N Female
14204 900 MHz 0 dBd Omnidirectional 1/2 Wave Whip
14205 900 MHz 6 dBd Yagi Antenna with Type N Female
14221 900 MHz 3 dBd Omnidirectional Antenna with
14310 900 MHz 0 dBd Omnidirectional 1/4 Wave Whip
15730 900 MHz 0 dBd Omnidirectional 1/4 Wave Whip
15731 900 MHz 0 dBd Omnidirectional 1/4 Wave Whip
Approved Antennas
and Mounting Hardware
Antenna with Right Angle and RPSMA Male
and Mounting Hardware
Type N Female and Mounting Hardware
Antenna, Straight 3 inches Tall with RPSMA Male
Antenna with Right Angle and RPSMA Male
Antenna, Straight 2 inches Tall with RPSMA Male
15970 900 MHz 1 dBd Dipole Antenna with Adhesive
Mount and RPSMA Female 10ft Cable
7.7.2 Electrostatic Issues and Surge Protection
Many radio installations are out of doors and therefore susceptible to lightning
damage, especially via the antenna system. Also, depending on climate and
location, electrostatically-charged wind can damage sensitive electronics, if
sufficient electric charge is allowed to accumulate on the antenna and cable.
To protect against electrostatic damage, the antenna connector of the radio is
connected to the radio case which can be tied to a good earth ground for
discharge of electrostatic build up.
Also to protect against electrostatic damage, Campbell Scientific offers pn
14462, Antenna Surge Protection Kit. The surge protection kit includes a
Polyphaser surge protector, a coax jumper for connecting the RF401A-series
radio to the Polyphaser, ground wire lead, and mounting hardware. The
Polyphaser has Type N jack connectors on both ends; one for connection to a
COAXNTN-L cable and the other for connection to the 18-inch length of
COAXRPSMA cable included in the kit.
7.7.3 Antenna Cables
Some antennas require an additional antenna cable to connect to the radio
directly or to an interconnected surge protector.
COAXRPSMA-L is a LMR195 coaxial cable terminated with a Type N plug
on one end and a RPSMA plug on the other. The COAXRPSMA-L can be
used to connect antennas with a Type N jack connector directly to the
RF401A-series radios. Such antennas include the 14201, 14204, 14205, and
14221.
10
Page 22

RF401A-Series Spread Spectrum Radio
COAXNTN-L is a RG8/U coax cable terminated with a Type N plug on both
ends. The COAXNTN-L is typically used to connect antennas with a Type N
jack connector to an inline surge protector, or to a bulk head Type N jack.
8. Configuring the RF401A Series
8.1 Device Configuration Utility
Device Configuration Utility is the primary tool for configuring the radio.
Device Configuration Utility version 2.08 or later is required. Device
Configuration Utility can be downloaded free of charge from
www.campbellsci.com/downloads.
NOTE
INSTALL the DEVICE DRIVER BEFORE plugging the radio
into your PC for the first time. You will need the device driver
properly installed before you can connect to the radio via USB.
To install the device driver using the Device Configuration Utility,
select Radio | RF401A Series under Device Type. Click the
Install the USB device driver link and follow the prompts.
x Open Device Configuration Utility.
x Under Device Type, select Radio | RF401A Series.
x Carefully review the Connect Instructions text provided on the right.
x With the USB device driver installation complete, connect the
supplied USB cable between the USB port on your computer and the
USB port on the radio.
x Click the browse button next to Communication Port.
x Select the port labeled RF401A-Series.
x Click OK.
x Click Connect.
x Configure the radio as needed for your application. See Section 11,
Operation
x Click Apply to save your changes.
You will be prompted to save your configuration. Doing so will allow you to
easily recall the configuration later or apply this same configuration to other
devices.
(p. 17).
9. LoggerNet Setup
9.1 Basic Setup
Start LoggerNet and open the Setup screen from the Main category of the
toolbar. Start the configuration by clicking on the Add Root button. From the
Add submenu make the following selections:
x ComPort
x PakBusPort
x Your datalogger
11
Page 23

RF401A-Series Spread Spectrum Radio
Finally, click the Close button on the Add submenu. Your setup tree should
appear as shown below:
12
Page 24

RF401A-Series Spread Spectrum Radio
With the setup tree entered, you will now need to complete the configuration of
each element. Start with selecting the ComPort element at the root of the tree.
Under ComPort Connection, select port labeled RF401A-Series.
Set the Extra Response Time to match the Power Mode of the RF401A
series. The image below is for a radio with Power Mode set to 1 sec.
13
Page 25

RF401A-Series Spread Spectrum Radio
Select the PakBusPort element in the tree, and select the PakBus Port
Always Open checkbox. Set the Maximum Baud Rate to 115200.
14
Page 26

RF401A-Series Spread Spectrum Radio
Finally, select your datalogger in the tree. Set the PakBus Address field to the
PakBus® address of your datalogger. Enter the Security Code, if security has
been set up in your datalogger.
Press the Apply button to save your changes. You are now ready to connect to
your datalogger using the LoggerNet Connect screen.
15
Page 27

RF401A-Series Spread Spectrum Radio
9.2 Using a Repeater
When using an RF401A-series radio as a repeater in your network, it can be
entered into the LoggerNet Setup screen using the pbRouter device and
entering the PakBus® address of the RF401A series in the PakBus Address
field. If the repeater is the first hop from LoggerNet, it should always be
shown in the network map. This will force routes to go through the repeater.
If the repeater is further down the network, it may still be helpful to display it
in the network map. However, it does not force routes to go through the
repeater.
10. Installation Best Practices
10.1 Avoiding Interference
In-band interference within “view” of either radio in a link can significantly
degrade communications. Attempt to avoid locating radios and antennas near
other transmitters or transmitting through commercial communication tower
locations. Additionally, a powerful signal of almost any frequency at very
close range can simply overwhelm a receiver. Test such a site with a
representative setup before committing to it. Relocating an antenna by a few
feet vertically or horizontally or constraining the radiation pattern with a
16
Page 28

RF401A-Series Spread Spectrum Radio
directional antenna may make a significant difference. Keep in mind that
commercial tower sites and urban areas tend to evolve over time meaning that
sources of interference may develop over time.
10.2 Antenna Selection, Placement, and Mounting
Antenna selection and placement can play a large role in system performance.
Often directional antennas are preferred over omnidirectional antennas when
possible as RF energy can be more selectively directed and received and higher
gains can be realized without the consumption of additional power.
Additionally, a good rule of thumb is to place antennas as high as possible.
Giving an antenna a higher elevation often increases the amount of area and
distance it can “see” and cover with “line of sight”. Sometimes performance
can be improved by even slightly changing the horizontal or vertical position of
the antenna.
10.3 Antenna Cables
x Routing
o Route all conductors and cables in a neat, orderly fashion. Avoid
routing directly over or across system components.
o Avoid routing conductors carrying low level analog signals in close
proximity and parallel to conductors carrying digital signals or
switched voltage levels.
x Bend Radius
o The RF cable used to interconnect the radio and antenna has a
specified minimum bend radius. Exceeding it will lead to a
degradation of system performance: extra losses, high VSWR, etc.
x Strain Relief
o Avoid cable chaffing and connector fatigue by strain relieving all
conductors and cables that span a distance of more than 12 inches or
have a potential for relative motion due to vibration or wind.
x Connectors
o All exposed RF connectors should be weatherproofed. A good
method is to apply overlapping wraps of a good quality mastic tape,
extending several inches beyond either side of the connection, then
cover the mastic tape with tight, overlapping wraps of a good quality
vinyl tape.
o Maintain electrical connectors in a clean, corrosion-free condition by
means of a periodic application of a good quality aerosol-based
contact cleaner.
11. Operation
The following settings are available for the RF401A-series radios. Configure
them as appropriate for your application.
17
Page 29

RF401A-Series Spread Spectrum Radio
11.1 Main
11.1.1 Active Interface
The radio provides three physical ports for interfacing to a computer,
datalogger, or other device. They are USB, RS-232, and CS I/O. The CS I/O
port has two operational modes, SDC and ME Master. Additionally, there is
PakBus Router which is a software defined interface that disables normal
operation of all of the physical ports. Only one interface can be selected as
active at any given time. Note that despite the value of this setting, the USB
port will always be available for configuration.
Interface Description
CS I/O SDC Use this setting when the CS I/O port is connected to a
RS-232 Use this setting when the RS-232 port is connected to
Campbell Scientific datalogger CS I/O port. The
devices will use the concurrent synchronous device for
communication protocol. Also, see the setting SDC
Address and make sure that multiple SDC devices
connected to a single CS I/O port use unique SDC
addresses.
the RS-232 port of a datalogger, computer, or another
RS-232 device. This setting is most commonly used
when connecting the radio to a device without a CS I/O
port or when linking two communication peripherals,
for example directly connecting the radio to an Ethernet
serial server. Also, see RS-232 Baud Rate and the
advanced settings RS-232 Parity, Stop Bits, Character
Length, and Auto Power Down.
USB Use this setting when connecting the radio to a
computer. This setting is the most common when the
device is used as a “base radio” for a network. A
computer’s USB port can simultaneously be used for
powering and communicating with the device.
PakBus Router Use this setting when a stand-alone PakBus® router is
required to repeat messages through a network. In this
mode, the CS I/O, RS-232, and USB ports are NOT
available for connecting other devices for normal
network operations. Note that despite the value of this
setting, the USB port will always be available for
configuration. The Protocol setting must be set as
PakBus Node. Also ensure that PakBus Address is
unique within the PakBus network.
CS I/O ME
Master
Use this setting only under special circumstances where
the CSI/O port is connected to another Campbell
Scientific peripheral configured for Modem Enable
(ME) through an A100 Null Modem Adapter. The
A100 will swap TX / RX and ME / RING and supply
power to the devices. The ME Baud Rate of both
devices must match. An example includes connecting
this device to a COM2xx phone modem. Also see ME
Baud Rate.
18
Page 30

11.1.2 SDC Address
Specifies the CS I/O port SDC address when Active Interface is set as CS I/O
SDC.
11.1.3 RS-232 Baud Rate
Specifies the baud rate that will be used on the RS-232 port when Active
Interface is set as RS-232. Other related advanced settings include RS-232
Parity, Stop Bits, Character Length, and Auto Power Down.
11.1.4 Protocol
Protocol Description
Transparent Provides a transparent link with no interpretation of the
PakBus Aware This is the most commonly used protocol setting for
RF401A-Series Spread Spectrum Radio
data packet. This mode is most commonly used with
array based dataloggers, and it must be used when
communicating with other transparent devices such as
the RF400/410/415 and CR205/210/215. This mode is
also used for non PakBus® protocols like Modbus.
When used this way, Retry Level must be set to None.
PakBus® networks. The radio will automatically
inherit an RF identifier equal to the PakBus address of
the device it is serially attached to. In this mode, the
radio will be capable of performing RF level retries and
acknowledgements and provide a more reliable link
than Transparent mode used for broadcast messaging.
You do not need to manually set a unique RF Radio
Address or a unique PakBus Address. This device will
not appear in PakBus Graph.
PakBus Node This mode is similar to PakBus Aware, but it requires
the device to have a unique PakBus Address specified.
Because the radio is PakBus® addressable, status
information, such as RSSI, can be queried through a get
variables transaction. Additionally, if the radio is
connected to a PakBus router, it will also be viewable
in PakBus Graph and accessible by other remote
PakBus devices. If attached to a PakBus router,
network overhead will increase due the increase in
number of PakBus nodes in the network. If Active
Interface is also set to PakBus Router, this mode will
allow the device to function as a standalone RF
repeater. This setting must be used if Active Interface
is set as PakBus Router. This setting is most
commonly used when a user wants to a) use the device
as a standalone PakBus repeater, b) make the device
available remotely for viewing and editing settings, or
c) attach more than one radio to a single datalogger.
19
Page 31

RF401A-Series Spread Spectrum Radio
11.1.5 RF Hop Sequence
Specifies the radio channel hop sequence. This setting must match in all radios
in the same RF network. This setting can also be used to prevent radios in one
RF network from listening to transmissions of another.
11.1.6 RF Network
Specifies the RF network. This setting must match in all radios in the same RF
network. Valid entries are 0 to 3 for radios with Protocol set to PakBus Aware
or PakBus Node. Valid entries are 0 to 63 for radios with Protocol set to
Transparent.
11.1.7 RF Radio Address
Specifies the radio address. The radio address is only used when Protocol is
set as Transparent. Radios must have matching radio addresses in order to
communicate. Valid addresses are 0 to 1023.
11.1.8 Power Mode
Power Mode governs the duty cycle that the radio will use for powering its
receiver. As such, it governs the amortized current drain for the radio. Note
that choosing a low power mode that requires a long transmission header for a
network with frequent communications can actually cause a higher average
power draw; a large percentage of the communication interval is spent in high
power transmission.
Power
Mode
Always
on, No
Header
Always
on, 1 Sec
Header
Typical
Avg.
Current
Draw
< 15 mA The radio receiver is always on. Additional
wakeup header is never transmitted. Use this
setting in a network with very frequent
communications or when network latency needs to
be minimized.
< 15 mA The radio receiver is always on. A wakeup header
of 1.2 seconds is transmitted at the beginning of
the first transmission occurring after a period of RF
inactivity to ensure that other radios in the network
set to a 1 second mode are awake and ready to
communicate. Using this setting is uncommon,
generally only used in a base radio that
communicates with a CR200-series datalogger
configured with a power mode of “1 second” (no
header).
Description
20
Page 32

RF401A-Series Spread Spectrum Radio
Always
on, 8 Sec
Header
< 15 mA The radio receiver is always on. A wakeup header
of 8.2 seconds is transmitted at the beginning of
the first transmission occurring after a period of RF
inactivity to ensure that other radios in the network
set to an 8 second mode are awake and ready to
communicate. Using this setting is uncommon,
generally only used in a base radio that
communicates with a CR200-series datalogger
configured with a power mode of “8 second” (no
header).
0.5
Second
< 2 mA The radio receiver is turned on every 0.5 seconds
for 100 milliseconds to look for RF activity. The
radio transmits a 700 millisecond wakeup header
with the first transmission occurring after a period
of RF inactivity. This is the most common setting
in networks that do not contain CR200(X)-series
dataloggers.
1 Second < 1 mA The radio receiver is turned on every 1 second for
100 milliseconds to look for RF activity. The radio
transmits a 1.2 second wakeup header with the first
transmission occurring after a period of RF
inactivity. This is the most common setting in
networks that contain CR200(X)-series
dataloggers.
11.1.9 Retry Level
8 Second < 0.3 mA The radio receiver is turned on every 8 seconds for
100 milliseconds to look for RF activity. The radio
transmits an 8.2 second wakeup header with the
first transmission occurring after a period of RF
inactivity. Only use this setting in networks where
time between communications is long (hours) and
saving an average an additional 1 to 1.5 mA is
essential.
An advantage of using one of the PakBus® protocol modes is that the radios
will retry packet delivery at the RF level. This setting specifies the level to
which the radio should retry to deliver an unacknowledged RF packet
transmission. When an RF packet fails to be acknowledged by the destination,
the radio will delay a random amount of time before resending the packet
again. A receiving radio responds to the sending radio with an ACK packet for
every radio packet it receives addressed to it with a valid CRC.
Retry Level Retry Count Random Delay Slots Transmit Timer
None 0 0 65535
Low 3 1 400
Medium 5 2 400
High 7 3 400
21
Page 33

RF401A-Series Spread Spectrum Radio
NOTE
NOTE
Set Retry Level to None when Protocol is set to Transparent for
the purpose of communicating with RF400/RF410 radios,
CR205/CR210 dataloggers, or RF401/RF411 radios and
CR206/CR211 dataloggers with Protocol also set to Transparent.
If the Retry Level is increased in a network with poor reception
and many nodes, latency will greatly increase, sometimes to the
point of non-operation if inundated with traffic.
11.1.10 Radio TX Power Level
This setting specifies the power level at which the RF module transmits.
Levels are approximate.
TX Power Level, dBm TX Power Level, mW
7 5
15 32
18 63
21 125
24 250
It is very important that the TX power level selected and the gain of the
attached antenna do not exceed the maximum allowed ERP permitted by local
laws. These rules vary from region to region. For example, in much of the
United States, FCC part 15 rules limit the 900 MHz, ISM band transmission
from this radio to a maximum effective radiated power of +36 dBm. If the
radio is set to transmit at +24 dBm (250 mW), the maximum gain antenna that
may be attached is 11 dBi (~8.5 dBd).
22
11.2 PakBus®
11.2.1 PakBus Address
This setting specifies the PakBus® address for this device. The value for this
setting must be chosen such that the address of the device will be unique in the
scope of the PakBus® network. Duplication of PakBus® addresses in two or
more devices can lead to failures and unpredictable behavior in the PakBus®
network. Valid range is 1 to 4094. However, values greater than 3999 are
generally reserved for software products.
11.2.2 PakBus Beacon Interval
This setting, in units of seconds, governs the rate at which beacons will be
broadcast over the Active Interface for the purpose of discovering PakBus®
neighbors. When Active Interface is PakBus Router, beacons will be sent
over RF; otherwise, beacons will be sent over the serial port selected as the
Active Interface. Set to zero to disable beaconing.
If PakBus Verify Interval is set to zero, a verify interval of 2.5 times the
PakBus Beacon Interval will be assumed by the device.
Page 34

11.2.3 PakBus Verify Interval
This setting specifies the interval, in units of seconds, which will be reported as
the link verification interval in the PakBus® hello transaction message. It will
indirectly govern the rate at which the device will attempt to start a hello
transaction with a neighbor if no other communication has taken place within
the negotiated PakBus® link verification interval. When Active Interface is
PakBus Router, hello transactions will occur over RF; otherwise, they will be
sent over the serial port selected as the Active Interface.
If PakBus Verify Interval is set to zero, a verify interval of 2.5 times the
PakBus Beacon Interval will be reported by the device.
RF401A-Series Spread Spectrum Radio
NOTE
It is advised that PakBus Verify Interval be set to an interval
several times larger than your expected general communication
interval, for example, data collection interval.
11.2.4 Central Router
Specifies the PakBus® address of another device that the RF401A series will
use as a Central Router. A valid setting is a single address between 1 and
4094. When set, the RF401A series will act as a branch router. Specifying a
central router address can reduce the amount of PakBus® RF traffic by
eliminating the exchange of neighbor lists with routers beyond the central
router. This is especially true when the network contains many transient or
intermittent PakBus® routers. If the RF401A series does not know how to
explicitly route a packet, it will be handed off to the Central Router specified
by this setting.
11.2.5 Neighbors Allowed
This setting specifies an explicit list of nodes the RF401A series will accept as
neighbors when acting in the capacity of a PakBus® RF repeater / router. If
the list is empty (default), any node will be accepted as a neighbor. This
setting will not affect the acceptance of a neighbor if that node’s address is
greater than 3999. The formal syntax for this setting is:
neighbor := { "(" range-begin "," range-end ")" }.
range-begin := pakbus-address. ;
range-end := pakbus-address.
pakbus-address := number. ; 0 < number < 4000
11.3 Advanced
11.3.1 Serial Number
11.3.2 Operating System Version
Example: (129,129) (1084, 1084)
In the example above, nodes 129 and 1084 are assigned as neighbors to the
RF401A series.
Stores the serial number of the device.
Device operating system version
23
Page 35

RF401A-Series Spread Spectrum Radio
11.3.3 Radio Firmware Version
Radio firmware version
11.3.4 Received Signal Strength
Indicates the signal strength of the last packet received addressed to this radio
and with a valid CRC. The range of values reported, generally between 6 and
54, represent the approximate range from –35 dBm to –110 dBm with each
value representing a little less than 2 dB. The table below displays signal
strength values and the corresponding dBm level. Because the received signal
strength can vary due to multipath, interference or other environmental effects,
it may not give a true indication of communication performance or range.
However, received signal strength can be useful for activities such as:
x determining the optimal direction to aim a Yagi antenna
x determining the effects of antenna height and location
x trying alternate (reflective) paths
x seeing the effect of vegetation and weather over time
Appox. Signal Level (dBm) Indicator Value
–35 50
–40 49
–45 48
–50 47
–55 46
–60 45
–65 44
–70 42
–75 41
–80 39
–85 37
–90 34
–95 30
–100 24
–105 17
–108 11
11.3.5 Retransmit Failures
Records the number of retransmit failure.
11.3.6 ME Baud Rate
Specifies the baud rate that will be used on the CSI/O port when configured for
ME Master.
24
Page 36

RF401A-Series Spread Spectrum Radio
11.3.7 RS-232 Parity
Specifies the parity that will be used on the RS-232 port.
11.3.8 RS-232 Stop Bits
Specifies the number of stop bits used on the RS-232 port.
11.3.9 RS-232 Character Length
Specifies the length in bits of character frames on the RS-232 port.
11.3.10 RS-232 Auto Power Down
Specifies whether to always power the RS-232 device or that the RS-232 TX
automatically powers down when there is no activity for 30 seconds.
11.3.11 AT Sequence Character
Specifies the character that should be sent three times sequentially in order to
put the modem in “local” mode.
11.3.12 Silence Time Before Command Sequence
11.3.13 Silence Time After Command Sequence
11.3.14 AT Command Mode Timeout
11.3.15 Net Address Mask
11.3.16 Radio Address Mask
12. Attribution
Specifies the amount of time (in tenths of seconds) that the RS-232 interface
must be silent after accepting the AT command sequence before the RF401A
series will enter command mode.
Specifies the amount of time (in tenths of seconds) that the RS-232 interface
must be silent after accepting the AT command sequence before the RF401A
series will enter command mode.
Specifies the amount of time (in tenths of seconds) that must elapse with no
activity on the RS-232 interface before the RF401A series exits command
mode automatically.
Specifies the network portion of the address mask.
Specifies the radio address portion of the address mask.
PakBus is a registered trademark of Campbell Scientific, Inc.
25
Page 37

RF401A-Series Spread Spectrum Radio
26
Page 38

Appendix A. Part 15 FCC Compliance
Warning
Changes or modifications to the RF401A-series radio systems not expressly
approved by Campbell Scientific, Inc. could void the user’s authority to
operate this product.
Note: This equipment has been tested and found to comply with the limits for a
Class B digital device, pursuant to part 15 of the FCC Rules. These limits are
designed to provide reasonable protection against harmful interference in a
residential installation. This equipment generates, uses, and can radiate radio
frequency energy and, if not installed and used in accordance with the
instructions, may cause harmful interference to radio communications.
However, there is no guarantee that interference will not occur in a particular
installation. If this equipment does cause harmful interference to radio or
television reception, which can be determined by turning the equipment off and
on, the user is encouraged to try to correct the interference by one or more of
the following measures:
x Reorient or relocate the receiving antenna.
x Increase the separation between the equipment and receiver.
x Connect the equipment into an outlet on a circuit different from that to
which the receiver is connected.
x Consult the dealer or an experienced radio/TV technician for help.
This device complies with part 15 of the FCC Rules. Operation is subject to
the following two conditions:
1) This device may not cause harmful interference, and
2) This device must accept any interference received, including
interference that may cause undesired operation.
A-1
Page 39

Appendix A. Part 15 FCC Compliance Warning
A-2
Page 40

Appendix B. Distance vs. Antenna
Gain, Terrain, and Other Factors
B.1 Introduction
The communication distance you can expect to obtain using the RF401A series
depends on many factors including line of sight, antenna height, and antenna
gain. Examples of distance achieved using different antennas and line of sight
are shown in TABLE B-1.
TABLE B-1. RF Path Examples
Distance
Achieved
(miles)
2
10
35
* dBd = decibel level compared to a simple dipole antenna
14204 Omnidirectional ½ Wave 0 dBd* Whip
to
14204 Omnidirectional ½ Wave 0 dBd Whip
14204 Omnidirectional ½ Wave 0 dBd Whip
to
14204 Omnidirectional ½ Wave 0 dBd Whip
14204 Omnidirectional ½ Wave 0 dBd Whip
to
14201 9 dBd Yagi
Antennas
LINE OF SIGHT
You should arrange for a line-of-sight signal path between radios. At 900
MHz, there is little signal bending, however, there is reflection from hills,
water, and conductive objects. Sometimes reflections provide a helpful path
around an obstacle. There can be some trees and bushes in the signal path
(with reduction in signal strength), but a hill will block the signal effectively.
Thick trees can limit range to as little as 800 feet. Where possible, avoid
buildings and other man-made structures in the signal path as they absorb or
reflect some of the direct wave, possibly below the level needed for
communications.
Path Between Radios
Virtual line of sight on valley floor with wetland
foliage.
Line of sight across a valley (on foothills
approximately 300 feet above the valley floor on
each end).
Line of sight across a valley (on foothills
approximately 300 feet above the valley floor on
each end).
ANTENNA HEIGHT
In situations where the radio antennas are situated virtually line of sight, the
elevation of antennas (by choice of site or by installing a tower or mast) can
substantially increase signal strengths. The amount of increase depends on
factors in the propagation path between the radios including terrain, foliage,
and man-made structures. Elevating one or both of the antennas essentially
raises the signal path allowing the direct wave to better avoid absorption or
reflection which can sometimes be more helpful than adding higher gain
antennas.
B-1
Page 41

Appendix B. Distance vs. Antenna Gain, Terrain, and Other Factors
GAIN ANTENNAS
Increasing antenna gains improves signal strength and distance. For example,
the substitution of a 9 dBd Yagi antenna where a 0 dBd omnidirectional existed
theoretically extends the attainable distance by a factor of 2.8. Adding 9 dBd
Yagi antennas on both ends in place of 0 dBd whip antennas theoretically
extends the distance by a factor of 7.9. The higher the Yagi’s gain, the
narrower the beam width and the more critical it is that it be aimed right on
target.
B.2 How Far Can You Go?
Estimating Distance for Spread Spectrum Radios
B.2.1 Overview
There is a great deal of interest in estimating the distance you can expect to
achieve with the RF401A-series radios. Also of interest are the effects of cable
length, antenna gain, and terrain. Some of these items are easy to quantify
(cable loss, for instance); others are difficult to quantify (such as the effect of
ground reflections). They are all important, though, and affect how well the
RF system performs.
Probably the best approach to take in making range estimates is to do a site
survey that considers the topography, location of antennas and radios, and
cable lengths, make some assumptions about the path losses, and see if there is
still some net gain. If there is, or if it is close, the next course is to actually try
it out.
B.2.2 Link Analysis
In an RF system, there are gains (transmitter power, antenna gains, and
receiver sensitivity “gain”) and losses (cable loss and path loss). If the gains
exceed the losses, you have a connection; any excess is the “link margin”.
Here is a block diagram of the various components of gain/loss:
EXAMPLE GAINS EXAMPLE LOSSES
Transmitter Power 24 Transmitter Cable 3
Transmitter Antenna 6 Free Space 120
Receiver Antenna 6 Receiver Cable 3
Receiver Sensitivity “gain” 109
TOTAL GAINS = 145 dB TOTAL LOSSES = 126 dB
Link Margin = (Total Gains) – (Total Losses) = 145 – 126 = 19 dB
A minimum of 6 dB of link margin is recommended.
Radio
Transmitter
Cable
Loss
Pt - Lt + Gt - Lp + Gr - Lr = Pr
B-2
Antenna
Gain
Free Space
Loss
Antenna
Gain
Cable
Loss
Radio
Receiver
Page 42

Appendix B. Distance vs. Antenna Gain, Terrain, and Other Factors
Where:
Pt => transmitter output power, in dBm (24 dBm in the case of the RF401A
series at maximum transmitter power)
Lt => cable loss between transmitter and antenna in dB (see Cable Loss section)
Gt => transmit antenna gain in dBi (dBi = dBd + 2.15)
Lp => path loss between isotropic antennas in dB (see TABLE B-7, TABLE
B-8)
Gr => receive antenna gain in dBi
Lr => cable loss between antenna and receiver in dB
Pr => signal power at the radio receiver in dBm
The signal power at the receiver (Pr) must exceed the receiver sensitivity
(109 dBm) by a minimum of 6 dB for an effective link. The amount that Pr
exceeds –109 dBm is the link margin.
All of these elements are known, or are easily determined, with the exception
of Lp. Unfortunately, signal path loss can make the difference between a
marginal link 1/2 mile apart, and a reliable link 10 miles apart!
B.2.3 Transmitter Power
Transmitter output power is often expressed in dBm, which is a decibel power
rating relative to 1 milliWatt. The formula is: dBm = 10 log (Pt) with Pt
expressed in milliWatts.
250 (RF401A series maximum) 24
B.2.4 Cable Loss
Cable loss is a function of cable type, length, and frequency and is usually
specified as attenuation (dB) per 100 ft. of cable. Using a low loss cable
becomes very important as the cable run distances increase. Here are some
typical cable types and their properties:
TABLE B-2. Transmitter Power
Transmitter Power (Pt)
(milliWatts)
1 0
5 (RF401A series minimum) 7
10 10
50 17
100 20
1000 30
5000 37
dBm
B-3
Page 43

Appendix B. Distance vs. Antenna Gain, Terrain, and Other Factors
TABLE B-3. Cable Loss
Cable Type Outside Diameter Loss (dB/100 ft) @ 900 MHz
RG-58A/U 0.195” 21.1
COAX RPSMA-L 0.195” 11.1
RG-8 0.405” 6.9
COAX NTN-L 0.405” 4.5
LMR-400 0.405” 3.9
*CSI stocked antenna cables are shaded.
CSI’s “COAX RPSMA-L” uses LMR-195 antenna cable. Cable loss is
proportional to length as the following table illustrates.
TABLE B-4. LMR-195 Cable Loss vs. Length @ 900 MHz
LENGTH (ft.) LOSS (dB)
100 11.1
50 5.6
25 2.8
10 1.1
6 0.7
B.2.5 Antenna Gain
Antenna gain is specified either in dBi (decibels of gain relative to an isotropic
radiator) or in dBd (decibels of gain relative to a dipole). The relationship is:
dBi = dBd + 2.15
Some antennas that are FCC approved for use with the RF401A series are:
TABLE B-5. Antenna Gain of Recommended Antennas
Mfg.
Astron Omni (1/2 wave) 900 MHz AXH900 RP SMA R 14204 0 2.15 6.75 in
Antenex Collinear 900 MHz FG9023 14221 3 5.15 24 in
MaxRad Yagi 900 MHz BMOY8905 14201 9 11.15 21.4 in
Antenna Type
Band
Model
CSI Part
Number
dBd
Gain
dBi
Gain Size
B.2.6 Receiver Sensitivity
Receiver sensitivity is usually specified in dBm for a specific bit error rate
(BER). The transceiver module used in the RF401A series is specified at –109
dBm at ~10
B-4
–4
raw BER.
Page 44

If the received signal strength is greater than the receiver sensitivity, a link can
be established. Any excess signal strength above the receiver sensitivity is
“link margin”, and is a very good thing; a minimum of 6 dB of link margin
should be sought.
B.2.7 Path Loss
We have combined in this section the normal “free space” path loss (only seen
in mountaintop to mountaintop scenarios) with loss due to ground reflections,
diffraction, leaf/forest absorption, etc. It is all loss!
A starting point is the “free space” path loss. Here are two equations for this:
Lp (dB) = 32.4 + 20 x log( f ) + 20 x log ( d ) dB (f in MHz, d in km)
Lp (dB) = 36.6 + 20 x log( f ) + 20 x log ( d ) dB (f in MHz, d in miles)
Here is a table showing the free space path loss (in dB). Note the effect of
frequency.
Frequency Distance
Appendix B. Distance vs. Antenna Gain, Terrain, and Other Factors
TABLE B-6. Free Space Path Loss
1 mi. 2 mi. 4 mi. 8 mi. 10 mi. 16 mi. 22 mi. 26 mi. 30 mi.
400 MHz 89 95 101 107 109 113 115 117 118
915 MHz 96 102 108 114 116 120 123 124 125
2.4 GHz 104 110 116 122 124 128 131 133 134
Notice the relationship between path loss and distance: each time you double
the distance, you lose 6 dB of signal under free space conditions. Or, put
another way, if you add 6 dB of gain (for example with 6 dB of additional
antenna gain, or 6 dB less cable loss), you can double the distance for free
space conditions.
As mentioned before, free space conditions are the ideal, but seldom actually
seen. The higher the antenna height relative to the terrain in the line-of-sight
path, the closer to free space conditions. Antenna height is everything!
Here are some additional propagation effects that increase the path losses:
Diffraction
This is caused by objects close to the line-of-sight path. Real world examples
of this would be hills, buildings, or trees. The object may not be in the direct
line of sight, but if it is close enough, it will cause the RF to diffract around the
object, giving additional path loss. “Close enough” is a function of frequency,
path length, and position of the obstacle along the path.
An example at 900 MHz: a 10 mile path length with an obstacle halfway along
the path will see diffraction “losses” from an obstacle within ~70 ft. of line-of
sight. The amount of loss would be from 6 dB to 20 dB, depending on the
obstacle surface. A sharp edge (like a rock cliff) would give the minimum loss
(6 dB), while a rounded hill would give the maximum loss (20 dB).
B-5
Page 45

Appendix B. Distance vs. Antenna Gain, Terrain, and Other Factors
Ground Reflections
These are caused by the RF signal being reflected from the ground (or water),
and undergoing a phase shift so that it destructively interferes with the line-ofsight signal. The conditions that cause this the most are propagation over
water, or over a low-lying fogbank. The reflected signal suffers little
attenuation, gets out of phase, and interferes with the main signal. If antennas
need to be sited near water, they should be positioned away from the water’s
edge so that the ground vegetation attenuates the reflected RF.
The result of the reflection and interference (worst case) is that the path loss
th
increases as the 4
power of the distance, instead of the 2nd power. This
changes the distance term in the path loss equation to: 40 x log ( d ) dB. Then,
with each doubling of distance, the path loss increases by 12 dB, instead of 6
dB.
Vegetation
Losses due to vegetation (trees, bushes, etc.) cause the path loss to increase by
rd
to 4th power of the distance, instead of the 2nd power. This is just like in
the 3
the severe ground reflection case above.
Rain, Snow, and Fog
Below 10 GHz, these don’t have much effect on path loss (see Ground
Reflections).
B.3 Real World Distance Estimates
From the above discussion of departures from the ideal “free space” path loss,
it is clear that we should usually use something other than the 2
distance table.
TABLE B-7 gives calculated path loss (Lp) values at 900 MHz for the 2
th
powers of distance; the equations (for 915 MHz) are:
and 4
nd
power
nd
, 3rd,
nd
Lp (2
power) = 95.8 + 20 u log ( d ) dB (d in miles)
rd
power) = 95.8 + 30 u log ( d ) dB (d in miles)
Lp (3
th
power) = 95.8 + 40 u log ( d ) dB (d in miles)
Lp (4
TABLE B-7. 900 MHz Distance vs. Path Loss (Lp in dB) per Three Path Types
Path Type 2 mi. 4 mi. 6 mi. 8 mi. 10 mi. 14 mi. 18 mi. 22 mi. 26 mi. 30 mi.
2nd power 102 108 111 114 116 119 121 123 124 125
3rd power 105 114 119 123 126 130 133 136 138 140
4th power 108 120 127 132 136 142 146 149 152 155
B-6
Page 46

Appendix B. Distance vs. Antenna Gain, Terrain, and Other Factors
The following table helps select a Path Type in the above “Distance vs. Path
Loss” table to best fit your situation.
TABLE B-8. Path Type vs. Path
Characteristics Selector
Path Type Path Characteristics
2nd power Mountaintop to mountaintop
or Tall antenna towers
Line of sight
3rd power Dominantly line of sight
Low antenna heights
Some trees
4th power At water’s edge (very reflective)
Across field of grain (reflective)
Lots of Trees (absorptive)
B.4 Examples
Some examples will help illustrate the trade-offs in a link analysis. These
examples will all use the RF401A-series 900 MHz radio at maximum
transmitter power, and will use –106 dBm as the required power level at the
radio receiver. This is 3 dB higher than the quoted sensitivity of –109 dBm,
which will give us a 3 dB margin.
Here’s the equation we will use, from the first page:
Pt – Lt + Gt – Lp + Gr – Lr = Pr
Solved for Lp:
Lp = Pt – Lt + Gt + Gr – Lr – Pr
Example #1
Antenex FG9023 antennas on each end, 20 ft of LMR195 cable on one end,
10 ft of LMR195 on the other end, antennas at 10 ft height, fairly open terrain
with a few trees. How far can I go?
Pt = 24 dBm
Lt = 20 ft (11.1 dB/100 ft) = 2.22 dB
Gt = Gr = 3 dBd = 5.15 dBi
Lr = 10 ft (11.1 dB/100 ft) = 1.11 dB
Use –106 dBm for Pr
Lp = 24 – 2.22+ 5.15 + 5.15 – 1.11– (–106) = 137 dB
rd
Use the 3
miles
to 4th power tables: Range from ~10 (4th power) to ~24 (3rd power)
B-7
Page 47

Appendix B. Distance vs. Antenna Gain, Terrain, and Other Factors
Example #2
Base has MaxRad BMOY8905 Yagi, with 50 ft of LMR195 cable on a 30 ft
tower, also a lightening protection device with a VSWR of 1:1.75; remote also
has a MaxRad BMOY8905 Yagi with 5 ft of LMR195 cable on a 4 ft pole.
Terrain is mostly flat, with sagebrush. How far can I go?
Pt = 24 dBm
Lt = 50 ft (11.1 dB/100 ft) = 5.55 dB
Gt = 9 dBd = 11.15 dBi
Lr = 5 ft (11.1 dB/100 ft) = 0.55 dB
Gr = 9 dBd = 11.15 dBi
Need to include the loss from the surge arrestor: VSWR of 1:1.75 = 0.34 dB
loss
Use –106 dBm for Pr
Lp = 24 – 5.55+ 11.15 + 11.15 – 0.55 – (–106) –0.34 = 146 dB
rd
Use the 3
to 4th power tables: Range from ~18 (4th power) to 30+ (3rd power)
miles
Example #3
You need to run 125 ft of cable for the transmitter:
How much loss if I use LMR195 cable? 125 ft (11.1 dB/100 ft) = 13.9 dB
How much loss if I use LMR400 cable? 125 ft (3.9 dB/100 ft) = 4.9 dB
nd
If I am using path loss from the 2
power table, and operating fine at 8 miles
with LMR195 cable, how much more range could I expect if I use LMR400
cable (assuming similar terrain)?
13.9 dB – 4.9 dB => 9 dB more link margin
Loss at 8 miles: 114 dB; could tolerate 114 + 9 dB = 123 dB loss =>>> 22
miles (14 miles more)
B-8
Page 48

Page 49

Campbell Scientific Companies
Campbell Scientific, Inc. (CSI)
815 West 1800 North
Logan, Utah 84321
UNITED STATES
www.campbellsci.com info@campbellsci.com
Campbell Scientific Africa Pty. Ltd. (CSAf)
PO Box 2450
Somerset West 7129
SOUTH AFRICA
www.csafrica.co.za cleroux@csafrica.co.za
Campbell Scientific Australia Pty. Ltd. (CSA)
PO Box 8108
Garbutt Post Shop QLD 4814
AUSTRALIA
www.campbellsci.com.au info@campbellsci.com.au
Campbell Scientific (Beijing) Co., Ltd.
8B16, Floor 8 Tower B, Hanwei Plaza
7 Guanghua Road
Chaoyang, Beijing 100004
P.R. CHINA
www.campbellsci.com LQIR#FDPSEHOOVFLFRPFQ
Campbell Scientific do Brasil Ltda. (CSB)
Rua ApinagéVQEUņ3HUGL]HV
CEP: 01258-ņSão Paulo ņ63
BRASIL
www.campbellsci.com.br vendas@campbellsci.com.br
Campbell Scientific Canada Corp. (CSC)
14532 – 131 Avenue NW
Edmonton AB T5L 4X4
CANADA
www.campbellsci.ca dataloggers@campbellsci.ca
Please visit www.campbellsci.com to obtain contact information for your local US or international representative.
Campbell Scientific Centro Caribe S.A. (CSCC)
300 N Cementerio, Edificio Breller
Santo Domingo, Heredia 40305
COSTA RICA
www.campbellsci.cc LQIR#FDPSEHOOVFLFF
Campbell Scientific Ltd. (CSL)
Campbell Park
80 Hathern Road
Shepshed, Loughborough LE12 9GX
UNITED KINGDOM
www.campbellsci.co.uk sales@campbellsci.co.uk
Campbell Scientific Ltd. (CSL France)
3 Avenue de la Division Leclerc
92160 ANTONY
FRANCE
www.campbellsci.fr info@campbellsci.fr
Campbell Scientific Ltd. (CSL Germany)
Fahrenheitstraße 13
28359 Bremen
GERMANY
www.campbellsci.de LQIR#FDPSEHOOVFLGH
Campbell Scientific Spain, S. L. (CSL Spain)
Avda. Pompeu Fabra 7-9, local 1
08024 Barcelona
SPAIN
www.campbellsci.es info@campbellsci.es
 Loading...