

Page 1

PCONNECTCE FOR JUNIPER SYSTEM’S ALLEGRO FIELD PC
SOFTWARE SUPPORT FOR CAMPBELL SCIENTIFIC DATALOGGERS
VERSION 1.1
INSTRUCTION MANUAL
REVISION: 8/03
COPYRIGHT © 2001-2003 CAMPBELL SCIENTIFIC, INC.
Software Copyright © MeasureTek, Inc.
Page 2

This is a blank page.
Page 3

LIMITED WARRANTY
CAMPBELL SCIENTIFIC (CANADA) CORPORATION warrants that the installation compact disk (CD) on which the accompanying
computer software is recorded and the documentation provided with it are free from physical defects in materials and workmanship under normal use.
CAMPBELL SCIENTIFIC (CANADA) CORPORATION warrants that the computer software itself will perform substantially in accordance with the
specifications set forth in the Instruction Manual published by CAMPBELL SCIENTIFIC (CANADA) CORPORATION. CAMPBELL
SCIENTIFIC (CANADA) CORPORATION warrants that the software is compatible only with the Allegro CE Field PC. CAMPBELL SCIENTIFIC
(CANADA) CORPORATION is not responsible for incompatibility of this software running under any operating system other than those specified in
accompanying data sheets or Instruction Manuals.
The above warranties are made for ninety (90) days from the date of original shipment.
CAMPBELL SCIENTIFIC (CANADA) CORPORATION will replace any CD or documentation that proves defective in materials or
workmanship without charge.
CAMPBELL SCIENTIFIC (CANADA) CORPORATION will either replace or correct any software that does not perform substantially
according to the specifications set forth in the Instruction Manual with a corrected copy of the software or corrective code. In the case of significant
error in the documentation, CAMPBELL SCIENTIFIC (CANADA) CORPORATION will correct errors in the documentation without charge by
providing addenda or substitute pages.
If CAMPBELL SCIENTIFIC (CANADA) CORPORATION is unable to replace defective documentation or a defective CD, or if CAMPBELL
SCIENTIFIC (CANADA) CORPORATION is unable to provide corrected software or corrected documentation within a reasonable time,
CAMPBELL SCIENTIFIC (CANADA) CORPORATION will either replace the software with a functionally similar program or refund the purchase
price paid for the software.
CAMPBELL SCIENTIFIC (CANADA) CORPORATION does not warrant that the software will meet licensee’s requirements or that the
software or documentation are error free or that the operation of the software will be uninterrupted. The warranty does not cover any CD or
documentation that has been damaged or abused. The software warranty does not cover any software that has been altered or changed in any way by
anyone other than CAMPBELL SCIENTIFIC (CANADA) CORPORATION. CAMPBELL SCIENTIFIC (CANADA) CORPORATION is not
responsible for problems caused by computer hardware, computer operating systems or the use of CAMPBELL SCIENTIFIC (CANADA)
CORPORATION’s soft ware with non-CAMPBELL SCIENTIFIC (CANADA) CORPORATION hardware.
ALL WARRANTIES OF MERCHANTABILITY AND FITNESS FOR A PARTICULAR PURPOSE ARE DISCLAIMED AND
EXCLUDED. CAMPBELL SCIENTIFIC (CANADA) CORPORATION SHALL NOT IN ANY CASE BE LIABLE FOR SPECIAL,
INCIDENTAL, CONSEQUENTIAL, INDIRECT, OR OTHER SIMILAR DAMAGES EVEN IF CAMPBELL SCIENTIFIC (CANADA)
CORPORATION HAS BEEN ADVISED OF THE POSSIBILITY OF SUCH DAMAGES.
CAMPBELL SCIENTIFIC (CANADA) CORPORATION is not responsible for any costs incurred as result of lost profits or revenue, loss of
use of the software, loss of data, cost of re-creating lost data, the cost of any substitute program, claims by any party other than licensee, or for other
similar costs.
LICENSEE’S SOLE AND EXCLUSIVE REMEDY IS SET FORTH IN THIS LIMITED WARRANTY. CAMPBELL SCIENTIFIC
(CANADA) CORPORATION’S AGGREGATE LIABILITY ARISING FROM OR RELATING TO THIS AGREEMENT OR THE SOFTWARE
OR DOCUMENTATION (REGARDLESS OF THE FORM OF ACTION; E.G., CONTRACT, TORT, COMPUTER MALPRACTICE, FRAUD
AND/OR OTHERWISE) IS LIMITED TO THE PURCHASE PRICE PAID BY THE LICENSEE.
LICENSE FOR USE
This software is protected by both the United States copyright law and international copyright treaty provisions. You may copy it onto a single
Allegro Field PC to be used and you may make archival copies of the software for the sole purpose of backing-up CAMPBELL SCIENTIFIC
(CANADA) CORPORATION software and protecting your investment from loss. All copyright notices and labelling must be left intact.
This software may be used by any number of people, and may be freely moved from one Allegro Field PC to another, so long as there is not a
possibility of it being used at one location while it’s being used at another. The software, under the terms of this license, cannot be used by two
different people in two different places at the same time. For example, if you want to install it on two Allegro Field PCs at the same time, you must
have two licenses.
Page 4

Page 5

PConnectCE for the Allegro CE
Table of Contents
1. Introduction.................................................................1
1.1 New Features in this Version....................................................................2
2. Software Installation...................................................2
2.1 Initial Installation......................................................................................2
2.2 Installing the PConnectCE Upgrade .........................................................3
3. Connecting Your Allegro CE to the Datalogger........3
3.1 Direct Serial Connection...........................................................................3
3.2 RF400 Radio Communication ..................................................................4
4. Using the PConnect Software....................................5
4.1 Configuring Stations.................................................................................5
4.2 Connecting to the Station..........................................................................8
4.3 Viewing Data on the Allegro CE............................................................12
4.4 Viewing Datalogger Programs................................................................13
4.5 Transferring Data to Your Desktop Computer........................................14
i
Page 6

This is a blank page.
Page 7

PConnectCE for the Allegro CE
1. Introduction
Welcome to PConnectCE for the Allegro CE Field PC support software for
Campbell Scientific's CR10(X), CR500/510, CR23X, 21X, and CR7
dataloggers.
PConnectCE software allows you to connect your Allegro CE (a rugged
handheld field computer by Juniper Systems, Inc.) to a Campbell Scientific
datalogger to perform all of the standard datalogger support functions,
including:
x check and set the datalogger clock
x send and receive datalogger programs
x view and edit input locations and labels
x set flags and ports
x collect data
x access the datalogger’s remote keyboard mode through a terminal interface
x view collected data in a tabular display
1
PConnectCE stores collected datalogger data in the Allegro’s internal memory.
(Expansion memory cards are not supported in this version.) Using the data
display feature, you can view this data while at the site. When the Allegro is
synchronized with the desktop computer, this data is moved to a folder,
specified during software installation, on the PC. New data from each station is
appended to any existing data file on the PC.
The synchronization process also synchronizes datalogger program files
between the PC and Allegro CE. Files copied to the Allegro CE’s PConnectCE
folder will automatically be transferred to the Allegro CE during the next
synchronization process. Using this process, you can store DLD files on the
Allegro CE, and subsequently send them to the datalogger or use them for
labels when viewing measurements (input locations). You can also retrieve
programs from dataloggers to the Allegro CE, and use the synchronization
process to copy them to the PC. If two different programs—one on the Allegro
CE and another in PConnectCE’s programs folder on the PC—have the same
name when you synchronize, the DLD on the PC will overwrite the DLD on the
Allegro CE.
(Note: PConnectCE does not support data collection from Campbell
Scientific’s Storage Modules or Card Storage Modules.)
1
PConnectCE is a trademark of MeasureTek, Inc.
Allegro CE is a registered trademark of Juniper Systems, Inc.
Juniper Systems is a Campbell Scientific, Inc. company
1
Page 8

PConnectCE for the Allegro CE
1.1 New Features in this Version
Several new features have been added to PConnectCE version 1.1. These are:
x Graphing of collected data on the Allegro
x Support for RF400 radio communication
x Support for COM2
2. Software Installation
2.1 Initial Installation
PConnectCE requires an Allegro CE running Windows CE£ version 3.0 or
higher. Computer requirements include a PC running a Windows-based, 32-bit
operating system (Windows 95, 98, ME, NT, 2000, or XP) with Microsoft
ActiveSync
Make sure ActiveSync is installed on your PC and that a partnership has been
established with ActiveSync for the Allegro CE. The “New Partnership
Wizard” that sets up this partnership is automatically launched in ActiveSync
the first time you connect the Allegro CE to your PC. For additional
information, refer to the ActiveSync section of your Allegro CE Owner’s
Manual or the ActiveSync on-line help.
£ version 3.7 or later.
2
Insert the PConnectCE compact disk into your CD-ROM drive and run the
setup.exe program from the disk. Follow the instructions on the screen to install
the software. During the installation, you will be prompted to “Choose Working
Folder” for the software (default is C:\CampbellSci\PConnectCE). The first
time you synchronize with the Allegro CE to download the PConnectCE
software, a subdirectory for the Allegro will be created in this Working Folder
directory (e.g., C:\CampbellSci\PConnectCE\Allegro_####). This subdirectory
is where the data files retrieved using PConnectCE will be saved when you
synchronize your Allegro CE with the PC after data has been collected from a
datalogger. This will also be the directory into which you will copy any files
that should be transferred to the Allegro CE for use with the datalogger, such as
a new program file (*.DLD).
After you have installed the software on your PC, synchronize with your
Allegro CE using ActiveSync. This will install PConnectCE on the Allegro CE.
After PConnectCE is installed, you will be asked to ensure that no further steps
are required on the Allegro CE to complete the installation. During the
installation process an item will be placed on the Allegro’s Start | Programs |
PConnectCE menu. Select this menu option to start the program.
2
Microsoft and ActiveSync are registered trademarks of Microsoft Corporation in the United States and/or other
countries.
2
Page 9

PConnectCE for the Allegro CE
NOTE
PConnectCE must be selected under ActiveSync’s Tools |
Options, Sync Options tab for data to be transferred to/from the
Allegro CE when it is synchronized with the computer. It is
selected when a check mark appears beside the application name
in the Sync Options list. In most instances, PConnectCE is
selected automatically, but with some devices the user must do
this manually.
If PConnectCE appears in the Sync Options list but its status is
reflected as “Not Installed”, close ActiveSync and disconnect the
Allegro CE. When you reopen ActiveSync’s Options list,
PConnectCE should be available for selection.
After installation, you may change the folders for the data and DLD files by
opening ActiveSync, choosing Tools | Options from the menu, selecting
PConnectCE from the list of programs on the Sync Options tab, and pressing
the Settings button. A window will be displayed where you can specify a new
directory to which the *.DAT files will be saved and where the files to be sent
to the Allegro CE are placed.
You are now ready to use the PConnectCE software.
2.2 Installing the PConnectCE Upgrade
1. Disconnect the Allegro from the computer.
2. From the ActiveSync menu, select Tools | Options.
3. On the Sync Options tab, clear the check box for the PConnectCE conduit.
Press OK to close the Options dialog box.
3
Page 10

PConnectCE for the Allegro CE
4. Synchronize with the Allegro. This will unload the ActiveSync provider
for PConnectCE.
NOTE
This step is crucial. If it is not followed, the software will not
install properly on the Allegro device.
5. Install the PConnectCE 1.1 upgrade on your computer. The installation
will ask if you want to upgrade the application; select Yes.
6. Open Tools | Options again from the ActiveSync menu. Re-enable the
PConnectCE conduit by selecting the check box beside the text
PConnectCE and close the dialog by selecting OK.
7. Synchronize again with the Allegro; the software installation will be
complete.
3. Connecting Your Allegro CE to the Datalogger
3.1 Direct Serial Connection
The most common method of connecting the Allegro to the datalogger is using
a direct serial connection.
The Allegro CE connects to the datalogger via the serial port on the top of the
Allegro. If you do not have a “Connection Serial Cable” for your Allegro CE,
you will need to purchase one. Since this cable is specific to the Allegro CE it
is not included with the PConnectCE software, but can be purchased separately
from your Allegro CE seller.
After connecting the “Connection Cable” to the top of the Allegro CE, use the
supplied “PDA to CS I/O” adaptor to connect to the datalogger:
4
Page 11

Connection Serial Cable
(purchased separately)
“PDA to CS I/O” Adaptor
(supplied with PConnectCE)
PConnectCE for the Allegro CE
Datalogger
Note that one side of the connector is labeled Datalogger, and the other side is
labeled PDA. If the connections are reversed, communication with the
datalogger will fail.
3.2 RF400 Radio Communication
Two RF400 radios can be used to communicate with the datalogger using the
Allegro. With this setup, the PDA to CS I/O connector is not used.
At the datalogger site, the CS I/O ports of the RF400 radio and the datalogger
are connected using an SC12 or similar cable. Power for the RF400 is supplied
by the datalogger’s CS I/O port pin 8, which supplies 12 V.
The Allegro is connected to the base RF400 radio by using an RS-232 null
modem cable between the Allegro’s serial connection and the RF400’s RS-232
port. Typically, this is accomplished by using the Allegro’s standard
communication cable, with a null modem connector at the end, connecting to
the RF400’s RS-232 port. Depending upon the type of null modem cable used,
a gender changer may be necessary. An external power source will be needed
for the RF400 base radio, since it cannot be powered by the handheld device.
Allegro CE
Cables, gender changers, and power supplies can be purchased from local
suppliers or from Juniper Systems. Campbell Scientific offers a Null Modem
Cable Kit (DB9 Male to DB9 Male, P/N 14392) for connecting a handheld
device to the RF400 base. Two gender changers (P/N 14393) may be required
for use with a customer-supplied null modem cable. The RF400 Base Station
Kit (P/N 14220) provides an AC to 12V DC transformer for the RF400. The
Field Power Cable (P/N 14291) provides a 12V DC barrel plug on one end for
5
Page 12
PConnectCE for the Allegro CE
connection to the RF400 and two pigtails on the other end for use with other
power supplies such as a vehicle's 12 V cigarette lighter accessory.
4. Using the PConnect Software
PConnectCE is started by selecting Start | Programs | PConnectCE on the
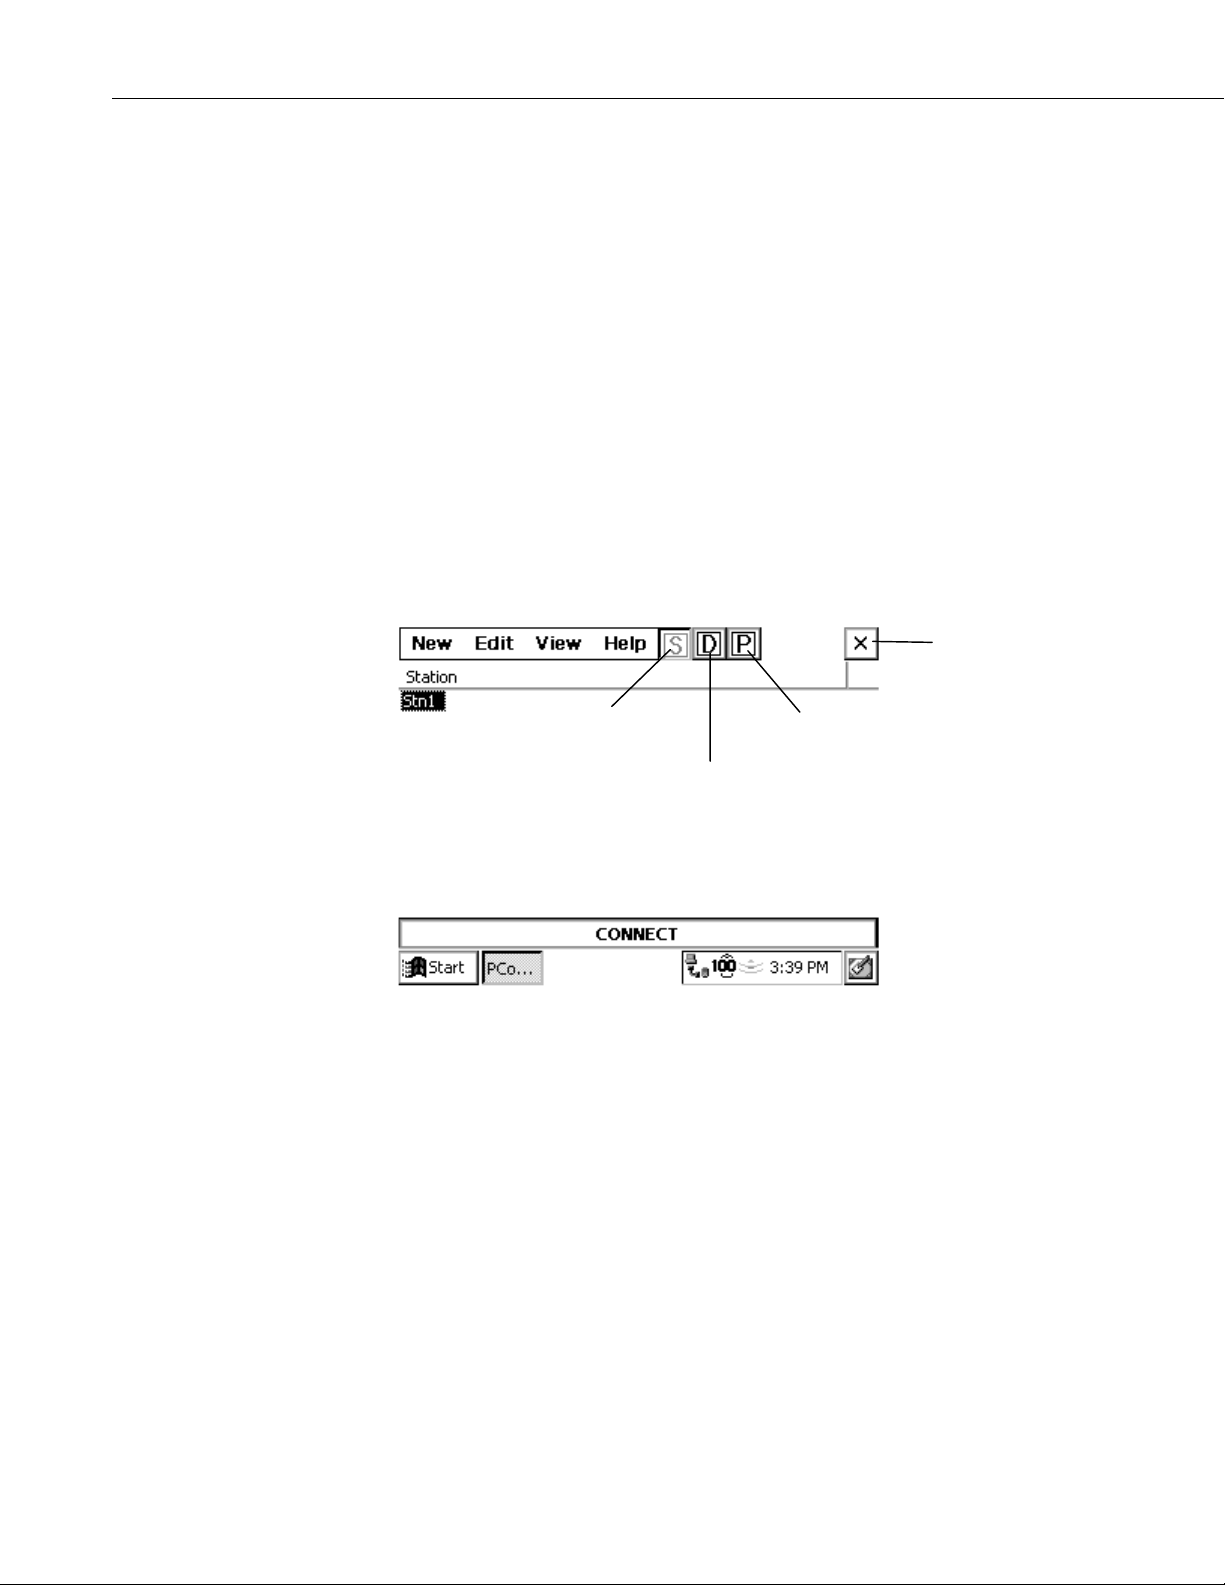
Allegro CE. The software has three main windows, the Station window, the
Data window, and the Program window. You can navigate between these
windows by pressing the letter box for each window (S for Station, D for Data,
and P for Program). The Station window is used to set up and communicate
with the datalogger. The Data window is used to view a data file that has been
collected from the datalogger. The Program window is used to view the DLD
files that have been copied to the Allegro CE.
When PConnectCE is first installed, the Station window will appear. The first
step is to configure the station for communication.
4.1 Configuring Stations
Station Window
Your first datalogger will appear by default with the name, “Stn1”. You must
provide a unique identity for each individual datalogger. To change the station
setup, including the datalogger name, touch the station name, then touch the
Edit | Properties to bring up the Edit Station Parameters screen:
Close
Window
Program Window
Data Window
6
Page 13

PConnectCE for the Allegro CE
Close Edit Station
Parameters
Window
Click to
Browse DLD
Files
On this screen you can change the station Name, select the Datalogger model,
enter any Security Code, select which Allegro CE Communication port you
are using to connect to the datalogger, and associate a Program. When you are
finished editing the station parameters, touch OK.
The Station name can be any name up to 8 characters. It must contain alpha
and/or numeric characters and cannot contain any spaces.
The datalogger model of the station is chosen by pressing the arrow to the right
of the Logger field and selecting the desired datalogger type.
Dataloggers may have up to three levels of Security. Security is set when
creating the datalogger program or in the datalogger’s *C mode. If security is
enabled in the datalogger, you may need to enter the four-digit security code to
collect data, set the datalogger’s clock, and depending upon the level of
security, even to connect to the datalogger. Refer to the datalogger’s user
manual for complete information on security codes.
A Program File can be associated with the datalogger to provide labels for the
input locations when viewing them on the Measurements tab. (Note that only
DLD files created with Edlog version 2.0 and greater will have these labels
stored in the DLD.) If a program is already running in the datalogger and you
have a copy of the DLD on the Allegro CE, you can associate the program with
the station. When you download a new program to the datalogger using
PConnectCE, you will be asked if you want the label descriptions to be
changed to reflect the new program.
The communication mode can be specified by selecting it from the
Communication field. PConnectCE for the Allegro supports direct serial
communication and point-to-multipoint RF400 radio communication (see
Section 3).
When the RF400 is selected, an RF Net Address and an RF Radio Address
must be entered. These two settings must reflect the settings in the remote
RF400 radio. PConnectCE for the Allegro will temporarily set the RF base
modem's addresses to the addresses specified, and then return them to the
previous values after you disconnect.
7
Page 14
PConnectCE for the Allegro CE
4.2 Connecting to the Station
If you will be using the Allegro CE to collect data from more than one
datalogger, you will need to create additional stations. To do this, select New
from the menu. The New Stations window will be displayed. The fields on this
window are identical to the fields for the Edit Station Parameters window.
Once the fields are completed, touch OK to save the new station. You will be
returned to the Station window.
A station can be deleted by highlighting it and pressing the Delete button. You
will be prompted to confirm the deletion.
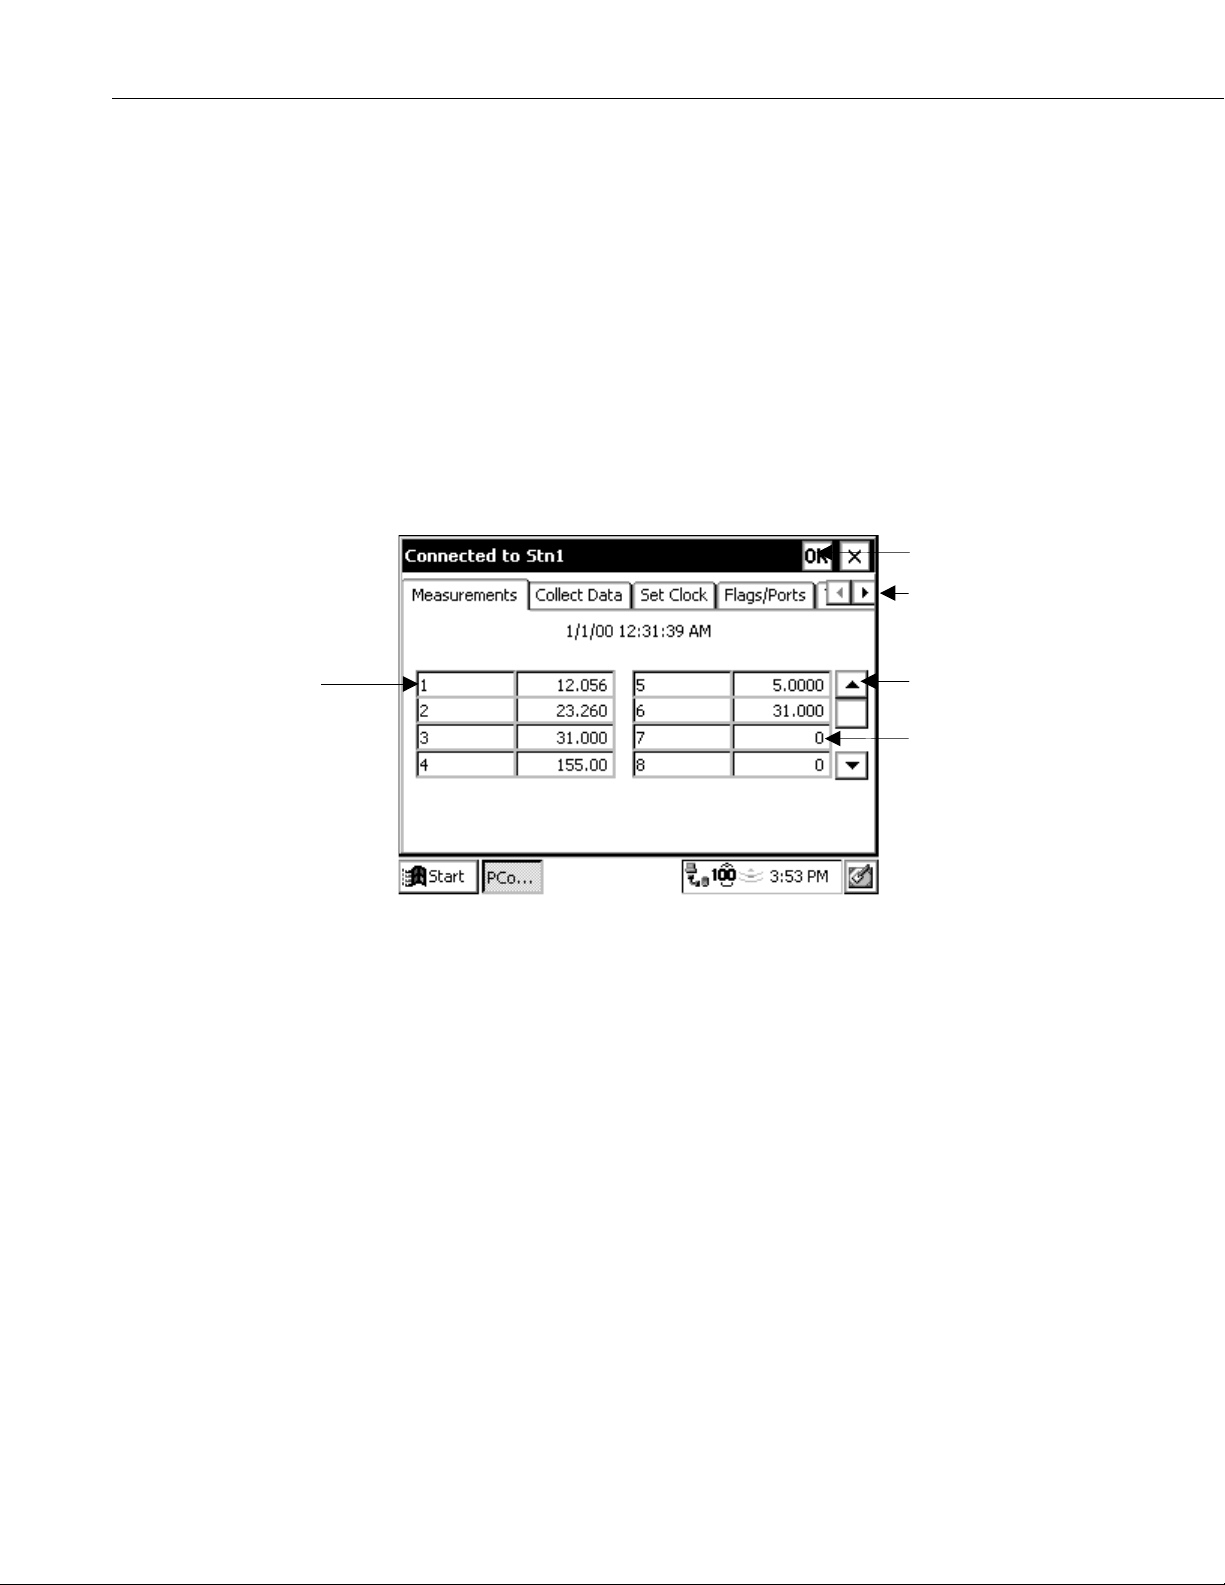
From the Station window, choose a station to connect to and touch Connect.
The Measurements tab will appear, displaying the current input locations in the
datalogger.
Return to Station
Window
Datalogger Options
(Click to Scroll
Through Tabs)
Click in Left Side
Box to Edit
Description
Click To See More
Values
Click in Right Side
Box to Edit Value
Because of the small screen size, you may see only a portion of the input
locations in the datalogger. Touch the up or down arrows to the right of the
measurement cells to scroll through the values.
The value of an input location can be changed from the Measurements tab.
Highlight the cell, enter a new value, and press Enter. You can change the
descriptive labels for measurements similarly.
There are five other tabs you can switch to, to accomplish other tasks with the
datalogger. They are the Collect Data tab, the Set Clock tab, the Port/Flags tab,
the Terminal tab, and the Transfer Program tab.
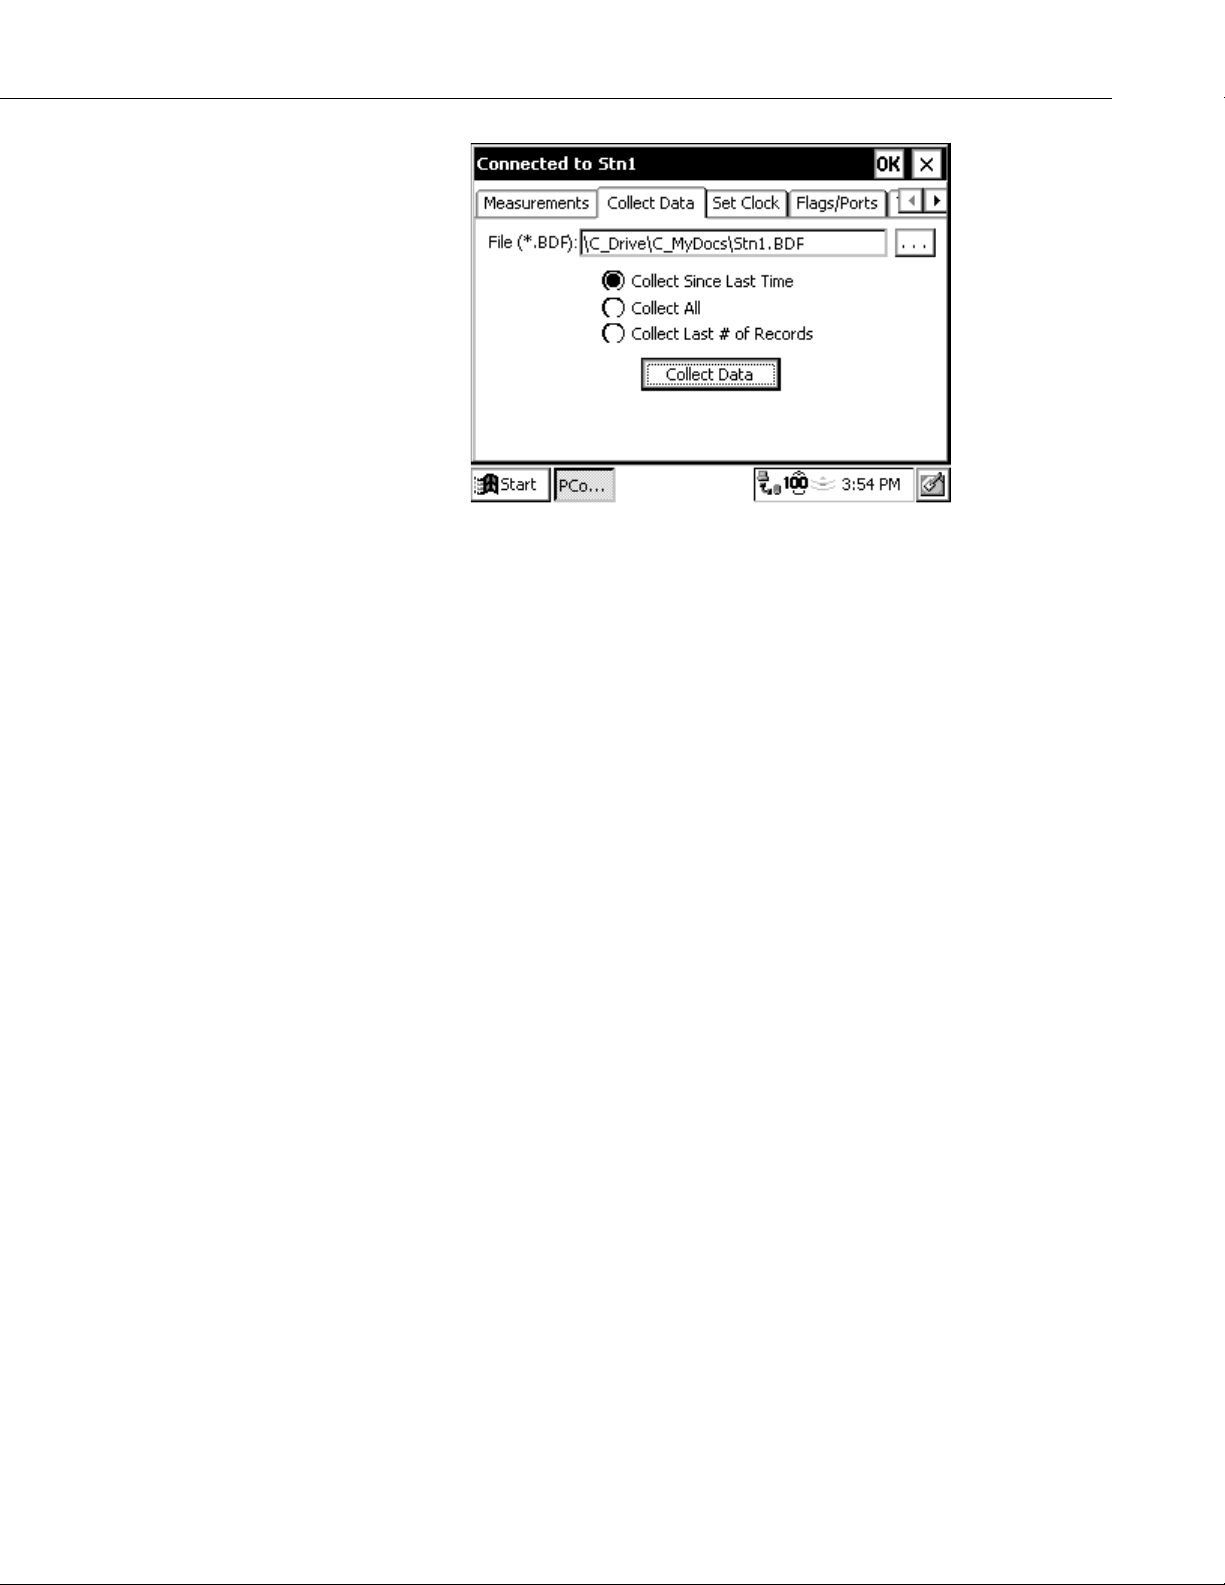
Collect Data
The Collect Data tab is used to collect data from the datalogger and store it to a
file on the Allegro CE. The name of the file is the station_name.bdf. Note that
the data is stored in binary format on the Allegro CE and then converted to a
comma-separated ASCII format when the file is transferred to the PC during
the synchronization process.
8
Page 15
PConnectCE for the Allegro CE
There are three data collection options:
x Collect Since Last Time – This will collect only the new data that has been
stored since the last time data was collected using the Allegro CE. If this is
a first data collection attempt, all data will be collected.
x Collect All – This will collect all data currently in datalogger memory,
regardless of whether the data has been collected previously.
x Collect Last # of Records – This will collect only the number of records
entered into the adjacent field.
When the Allegro CE is synchronized with the PC and the data file is
transferred, the data will be appended to any data file that exists with the same
name. During the transfer, the data is converted to comma-separated ASCII
format. After the file is transferred, the binary file is deleted from the Allegro
CE.
Set Clock
The datalogger’s clock can be set to that of the Allegro CE by switching to the
Set Clock tab and touching the Set Clock button. Note that the two clocks may
not match exactly, since there will always be some time lag between when the
command is sent and when it is received by the datalogger.
9
Page 16

PConnectCE for the Allegro CE
Campbell Scientific typically advises against frequent routine setting of the
datalogger’s clock. Setting the clock could result in data with duplicate or
missing timestamps, especially if data is being saved in final storage fairly
quickly. For instance, assume you are storing 1-minute data. If the datalogger’s
clock reaches 11:45 and it stores data for that period, and then you set the clock
using an Allegro CE whose internal clock reads 11:44, you will end up with
two different arrays of data with a timestamp of 11:45.
Flags/Ports
The datalogger’s ports and flags can be viewed and toggled from the
Flags/Ports tab. All of the flags and ports in the datalogger are displayed on the
screen. If a flag or port is High, a check mark will appear in the box beside the
port or flag. If a flag or port is low, the box will be empty.
To change the state of a port or flag, touch the box for that port or flag. There
may be a small time lag between when the box is touched and when the state of
the port or flag appears to change.
10
Page 17

PConnectCE for the Allegro CE
Terminal
When the Terminal tab is selected, the remote communications command is
sent to the datalogger and it is put into a remote communications state. This
state allows the user to send telecommunications commands directly to the
datalogger and is typically used for trouble-shooting.
To return the datalogger to its program execution state, enter *0. LOG1, LOG2,
or LOG12 should be displayed indicating that the code in program table 1,
and/or program table 2, is running.
This option should be used with caution since it is possible to delete
instructions in the datalogger’s program or delete data from the datalogger
while in this mode. Refer to the datalogger’s user manual for complete
information on the remote communications mode.
Transfer Program
Switch to the Transfer Program tab to send a new program file (DLD) to the
datalogger, or receive the program file that is currently running in the
datalogger.
Browse DLD Files
11
Page 18

PConnectCE for the Allegro CE
4.3 Viewing Data on the Allegro CE
First, select the desired option, and then touch the Browse button to the right of
the File field to choose the file to be sent or to enter a name for the retrieved
file. After the File field is completed, press the Send (or Retrieve) button.
If you want to copy a DLD file to the Allegro CE so it can be transferred to the
datalogger, make sure the DLD is stored in the Allegro CE’s Working
Directory folder on the PC. The next time you synchronize with the Allegro
CE, the file will be copied.
If you retrieve a DLD file from the datalogger, the next time you synchronize
with the Allegro CE, the file will be uploaded to the Working Directory for the
device.
Once data is collected onto your Allegro CE, you can view it in a commaseparated or tabular format. You can also graph the values for one data point at
a time.
From the Station window, press the letter D to open a window that displays all
of the data files on the Allegro CE. To view a data file, simply highlight the
filename. The data files are given a BDF extension on the Allegro CE, since
they are stored in binary format to conserve memory. They will be converted to
comma-separated ASCII format during the synchronization process.
12
When the data file is opened, it will be displayed in a tabular format. To view
the data in a comma-separated format, touch the button as indicated in the
graphic below. If there are multiple output arrays stored in the data file, you can
view the data from a single array by touching the arrow beside the word All and
selecting the array ID from the drop down list.
Page 19

PConnectCE for the Allegro CE
Comma-Separated
View Button
Select Only
One Array
As you scroll through the data, note that all of the collected arrays are displayed
intermixed as they were retrieved from the datalogger. To graph a column of
data, you must limit the display to only one array type. Tap the Array ID dropdown arrow and select the ID of the array from which you want to graph data.
Double tap the column of interest to graph it. You can scroll back and forth
within the data. To see the value and the time stamp of a particular point, just
tap that point.
If an FSL file with the same name as the DLD file name exists on the handheld,
PConnectCE for the Allegro will use the FSL to derive column labels, graph
labels, and time stamps when viewing the data. If an FSL with the same
program name does not exist, PConnectCE for the Allegro will prompt you to
select a file. To transfer an FSL file to the handheld, place the file in the
PConnectCE/devicename directory and the file will be copied during the next
synchronization operation.
A data file can be deleted from the handheld device by pressing the Delete
button. You will be asked to confirm the deletion. A data file that has been
deleted will not be transferred when the handheld device is synchronized with
the computer, and it cannot be restored once deleted.
4.4 Viewing Datalogger Programs
If there were any program files (CSI or DLD) in the Allegro CE’s working
directory when you synchronized it with the PC, they will be transferred to the
Allegro CE. To see a list of the datalogger program files that are stored on the
Allegro CE, touch the letter P to display the Program window.
A list of available programs will be displayed on the left side of the window.
On the right side of the window, the date of the last time the program was
downloaded to the Allegro CE will be displayed. To view a program, simply
highlight the program name. The DLD code will be displayed; however, it
cannot be edited. To close the program, touch the OK.
13
Page 20

PConnectCE for the Allegro CE
4.5 Transferring Data to Your Desktop Computer
Once data is collected onto your Allegro CE, you can synchronize with your
desktop computer and the data will automatically transfer to the folder you
specified during the initial setup. Data is stored on the Allegro CE in the same
binary format as in the datalogger to conserve memory. It is converted to
comma-separated ASCII during the synchronization process and appended to
the data file on the PC named after the station from which it was retrieved.
14
 Loading...