

Page 1

PC208W DATALOGGER SUPPORT SOFTWARE
INSTRUCTION MANUAL
REVISION: 4/01
COPYRIGHT (c) 1996-2001 CAMPBELL SCIENTIFIC, INC.
Page 2

This is a blank page.
Page 3

License for Use
This software is protected by both United States copyright law and
international copyright treaty provisions. The installation and use of this
software constitutes an agreement to abide by the provisions of this license
agreement.
You may copy this software onto a computer to be used and you may make
archival copies of the software for the sole purpose of backing-up CAMPBELL
SCIENTIFIC, INC. software and protecting your investment from loss. This
software may not be sold, included or redistributed in any other software, or
altered in any way without prior written permission from Campbell Scientific.
All copyright notices and labeling must be left intact.
This software may be used by any number of people, and may be freely moved
from one computer location to another, so long as there is not a possibility of it
being used at one location while it's being used at another. The software, under
the terms of this license, cannot be used by two different people in two
different places at the same time.
Page 4

Page 5

Limited Warranty
CAMPBELL SCIENTIFIC, INC. warrants that the installation media on which
the accompanying computer software is recorded and the documentation
provided with it are free from physical defects in materials and workmanship
under normal use. CAMPBELL SCIENTIFIC, INC. warrants that the
computer software itself will perform substantially in accordance with the
specifications set forth in the instruction manual published by CAMPBELL
SCIENTIFIC, INC. CAMPBELL SCIENTIFIC, INC. warrants that the
software is compatible with computers running Microsoft Windows 3.1, 95, 98,
NT and 2000.
CAMPBELL SCIENTIFIC, INC. will either replace or correct any software
that does not perform substantially according to the specifications set forth in
the instruction manual with a corrected copy of the software or corrective code.
In the case of significant error in the installation media or documentation,
CAMPBELL SCIENTIFIC, INC. will correct errors without charge by
providing new media, addenda or substitute pages.
If CAMPBELL SCIENTIFIC, INC. is unable to replace defective media or
documentation, or if CAMPBELL SCIENTIFIC, INC. is unable to provide
corrected software or corrected documentation within a reasonable time,
CAMPBELL SCIENTIFIC, INC. will either replace the software with a
functionally similar program or refund the purchase price paid for the software.
The above warranties are made for ninety (90) days from the date of original
shipment.
CAMPBELL SCIENTIFIC, INC. does not warrant that the software will meet
licensee’s requirements or that the software or documentation are error free or
that the operation of the software will be uninterrupted. The warranty does not
cover any diskette or documentation that has been damaged or abused. The
software warranty does not cover any software that has been altered or changed
in any way by anyone other than CAMPBELL SCIENTIFIC, INC.
CAMPBELL SCIENTIFIC, INC. is not responsible for problems caused by
computer hardware, computer operating systems or the use of CAMPBELL
SCIENTIFIC, INC.’s software with non-CAMPBELL SCIENTIFIC, INC.
software.
ALL WARRANTIES OF MERCHANTABILITY AND FITNESS FOR A
PARTICULAR PURPOSE ARE DISCLAIMED AND EXCLUDED.
CAMPBELL SCIENTIFIC, INC. SHALL NOT IN ANY CASE BE LIABLE
FOR SPECIAL, INCIDENTAL, CONSEQUENTIAL, INDIRECT, OR
OTHER SIMILAR DAMAGES EVEN IF CAMPBELL SCIENTIFIC HAS
BEEN ADVISED OF THE POSSIBILITY OF SUCH DAMAGES.
CAMPBELL SCIENTIFIC, INC. IS NOT RESPONSIBLE FOR ANY COSTS
INCURRED AS A RESULT OF LOST PROFITS OR REVENUE, LOSS OF
USE OF THE SOFTWARE, LOSS OF DATA, COST OF RE-CREATING
LOST DATA, THE COST OF ANY SUBSTITUTE PROGRAM, CLAIMS
BY ANY PARTY OTHER THAN LICENSEE, OR FOR OTHER SIMILAR
COSTS.
Page 6

LICENSEE’S SOLE AND EXCLUSIVE REMEDY IS SET FORTH IN THIS
LIMITED WARRANTY. CAMPBELL SCIENTIFIC, INC.’S AGGREGATE
LIABILITY ARISING FROM OR RELATING TO THIS AGREEMENT OR
THE SOFTWARE OR DOCUMENTATION (REGARDLESS OF THE
FORM OF ACTION; E.G., CONTRACT, TORT, COMPUTER
MALPRACTICE, FRAUD AND/OR OTHERWISE) IS LIMITED TO THE
PURCHASE PRICE PAID BY THE LICENSEE.
815 W. 1800 N.
Logan, UT 84321-1784
USA
Phone (435) 753-2342
FAX (435) 750-9540
www.campbellsci.com
Campbell Scientific Canada Corp.
11564 -149th Street
Edmonton, Alberta T5M 1W7
CANADA
Phone (780) 454-2505
FAX (780) 454-2655
Campbell Scientific Ltd.
Campbell Park
80 Hathern Road
Shepshed, Loughborough
LE12 9GX, U.K.
Phone +44 (0) 1509 601141
FAX +44 (0) 1509 601091
Page 7

What's New!
PC208W 3.3 is being released to enhance Edlogw's programming capabilities
by adding new instructions:
• Instruction 126, Data Transfer to HDR GOES (CR510, CR10X, CR23X) -
Communication and control for our SAT HDR GOES transmitter.
• Instruction 127, HDR GOES Status (CR510, CR10X, CR23X) -
Diagnostic tool for SAT HDR GOES transmitter communication.
• Instruction 137, Pulse Width Modulation (CR23X) - Instruction to
generate a continuous pulse width on a control port.
In addition to these new instructions, an issue has been resolved that was seen
when using call-back over telephone modems. Some modems require a longer
power-down period after a call-back attempt to reset and return to a callwaiting state. An improvement has been made in PC208W 3.3 to increase this
power-down period to help ensure that most modems will be reset properly
after call-back.
Note for Windows ME Users: Microsoft has confirmed a problem with its
Windows ME Internet Protocol Helper API component (Iphlpapi.dll) that can
result in an error message when a 16-bit program makes a call to the Winsock
connect() function. This problem affects PC208W. Refer to Microsoft's web
site at http://support.microsoft.com/support/kb/articles/Q279/8/66.ASP to
download a fix for this problem prior to running PC208W.
For Users Upgrading from PC208W 2.3 or earlier
If you are upgrading from PC208W 2.3 or earlier, you may also be interested
in some of the new features and improvements which were implemented in
PC208W 3.0, 3.1, and 3.2.
Changes in PC208W 3.2
PC208W 3.2 implements the ability to use TCP/IP communication protocol to
communicate with Campbell Scientific dataloggers. This version of software is
required to communicate with a datalogger over an Ethernet network (Internet
or Intranet) using Campbell Scientific's NL100/105 Network Link Interface.
Changes in PC208W 3.1
Setup
Scheduled data collection has been improved to better handle instances of
failed calls. Retry attempts are now synch r onized with the original Calling
Interval to help prevent drif t wh en in retry mode. This new feature is impor tant
to those who have a critical time window during which calls should be made,
Page 8

Connect
Edlog
such as cell phone users who power their communication equipment only
during certain times of the day.
PC208W has been updated to include the improved telecommunications
commands supported by newer datalogger operating systems (see Note below).
These commands help to prevent ports or flags from being inadvertently
toggled to another state because of noisy communication links.
When PC208W connects to a datalogger, a command is sent to determine the
operating system in the datalogger. PC208W then sends the appropriate
commands for the datalogger's communications protocol. Integrity measures
with this newer protocol include error-checking of input locations and setting
ports and flags high or low (rather than toggling the ports or flags between
states as in older operating systems).
Instructions have been added in support of some of the newer devices available
from Campbell Scientific: TDR100 Time Domain Reflectometer, SDM-CAN
CAN-bus interface, and the LI-COR 7500 Gas Analyzer.
Support has been added to the measurement instructions for the newer
datalogger operating systems which take advantage of Autoranging (see Note
below). With Autoranging, the datalogger tests and determines the correct
voltage range for the sensor being measured. Note that Autoranging can
significantly increase program execution time; therefore, it should be used with
caution. Refer to the Edlog help file or the datalogger User's Manual for
additional information .
Report
The runtime version of Split (Splitr) can now be run minimized from a
command line using the /H switch.
Storage Module Communication
Support has been added to SMS for the new 4M (SM4M) and 16M (SM16M)
storage modules. These modules store 2 million and 8 million data points,
respectively, and take advantage of Flash memory technology.
SMS now uses View to take a quick look at data stored on the module. Using
View, the user can print quick reports and select up to two elements for
graphing.
Page 9

NOTE
The features are available only in the following operating
systems:
CR10X Default OS Revision 10 and greater
CR10X Modbus OS Revision 06 and greater
CR10X Alert OS Revision 03 and greater
CR10X Toro OS Revision 03 and greater
CR510X OS (all options) Revision 03 and greater
CR23X OS (all options) Revision 07 and greater
Refer to the datalogger operator's manual for information on
accessing the *B mode to determine the datalogger's OS version
and revision number. Contact Campbell Scientific for upgrade
information if your datalogger does not support the required
features.
Changes in PC208W 3.0
Setup
Improved Modem Communication - Setting up remote communications is
easier with PC208W's new modem configurations. PC208W uses hardware
flow control, verbose result codes (looking for “CONNECT” back from the
modem rather than a number), and error correction which is consistent with the
newer, faster modems. Just pick your modem from a list, and you should be
ready to communicate. If your modem is not in the list, the default modem
will work in most instances.
Connect
NOTE
If you used a custom modem string in a previous version of
PC208W, please refer to the special upgrade information
provided in Section 1.4, Installation.
User-determined FSA 2 Data File Names - PC208W now lets you specify
different names for data files from Final Storage Areas 1 and 2.
New Clock Offset - A clock offset feature has been added to make it easier to
set the datalogger time for different time zones or daylight savings.
Updated Scheduling Capability - Datalogger schedules can now be copied to
one or more datalogger stations. When you have one station's schedule set up,
simply click a button to apply those settings to other stations. This helps you
set up your data collection schedules in less time and with less effort.
Datalogger Call-back - If you use call-back with your dataloggers, you’ll
notice that PC208W automatically tries to initialize the COM port. Check the
Help on “Call-back” for details on properly setting up the network.
New Numeric Monitor - The Numeric Monitor is now a stand-alone window
that is opened separately from the other Connect screen views. This 17-column
Page 10

View
by 15-cell display has room for assigning 254 input locations. It can be sized to
view one to four columns (up to 60 input locations) at one time. This new
design allows you to monitor your real-time data with a small screen while
minimizing the rest of PC208W so you can work on other tasks.
Enhanced Graphing Capability - You can now save any of the three realtime graphs to disk in a WMF (Windows metafile) format for printing or
importing into other programs.
New Graphing Capability - View now plots up to two array elements on one
graph. This is especially useful to quickly identify potential problems in your
data (or sensors) either in the field or office. Use the zoom feature for a closer
look at the graph, or click on a data point to display its numeric value.
Enhanced Ease of Use - Graphical icons have been added to the user interface
for easier and more efficient use of the program. For instance, you can view
your data in comma separated, columnar, or hexadecimal format just by
clicking a button.
Enhanced Printing Capability - You can now preview your data or graph
before printing. Headings have been added to the printed page for quicker
identification of printed data. Margins can be adjusted by entering numerical
values or by simply "dragging" them in Print Preview mode.
Report
Start Offsets - A negative value can now be entered as an offset on the Input
File tab. This directs Split to begin reading X bytes from the end of the file
(positive values begin reading f r om the beginning of the file). This makes
using the time sync functions to process the tail end of a data file much faster
when that data file is very large.
SplitR - Multiple copies of SplitR, the comma n d-line version of Split, can be
run at once using the /M switch.
New Start-up Feature!
Command Line Capabilities - Command line arguments can be entered from
a Windows command prompt or Windows short cut to open PC208W and
perform a specific task automatically. Collecting data, setting the clock,
invoking the Numeric Monitor or graphs, and toggling ports or flags can all be
accomplished using command line arguments. Administrators can set up
complex tasks for associates to run without training them on the entire
package.
You can find a comprehensive list of these command line entries in the Help
(search for “command line” ) and in Section 1.5 of this manual.
Page 11

PC208W Datalogger Support Software
Table of Contents
PC208W 3.3 Introduction................................................ 1
I.1 Please Read This....................................................................................... 1
I.2 Overview................................................................................................... 1
I.3 Other Software of Interest......................................................................... 2
I.4 Installation ................................................................................................ 3
I.4.1 Floppy Disk Installation.................................................................. 4
I.4.2 For Users Upgrading from PC208W Versions 2.3 and Earlier....... 4
I.5 Uninstall.................................................................................................... 6
I.6 Some Notes on System Resources ............................................................ 6
I.7 Getting Help.............................................................................................. 7
1. Setting Up the Network and Communicating
with the Datalogger ............................................. 1-1
1.1 Getting Started ......................................................................................1-1
1.2 Setup .....................................................................................................1-1
1.2.1 General Information....................................................................1-1
1.2.2 Setup Procedures.........................................................................1-1
1.2.3 Device Map Notes.......................................................................1-3
1.2.4 Example Device Maps.................................................................1-5
1.2.5 Notes on Data Collection and Formats........................................1-9
1.2.6 Setup Safety Tips.......................................................................1-10
1.3 Connect...............................................................................................1-11
1.3.1 Handy Things That May Not Be Obvious.................................1-11
1.3.2 Connect Safety Tips ..................................................................1-13
1.4 Status...................................................................................................1-13
1.4.1 Device Map and Station Map....................................................1-13
1.4.2 Low Level I/O...........................................................................1-14
1.4.3 COMM SWF Messages.............................................................1-15
1.4.4 Pause..........................................................................................1-15
1.5 Command Line Parameters.................................................................1-16
2. Program: EDLOG................................................... 2-1
2.1 Introduction...........................................................................................2-1
2.2 Getting Started ......................................................................................2-4
2.2.1 Creating a New EDLOG Program...............................................2-4
2.2.2 Editing an Existing Program .......................................................2-4
2.2.3 Documenting a DLD File............................................................2-4
2.2.4 The Program Development Template .........................................2-4
2.3 Comments .............................................................................................2-5
2.4 Instructions............................................................................................2-6
2.4.1 Entering Parameters ....................................................................2-6
2.4.2 Data Entry Warning.....................................................................2-7
i
Page 12

PC208W Datalogger Support Software Table of Contents
2.5 Expressions............................................................................................2-7
2.5.1 Rules for Creating Expressions....................................................2-7
2.5.2 Examples .....................................................................................2-9
2.6 Editing EDLOG Programs ..................................................................2-10
2.6.1 Editing Comments, Instructions, and Expressions....................2-10
2.6.2 Cut, Copy, Paste, and Clipboard Options..................................2-11
2.6.3 Library Files ..............................................................................2-11
2.6.4 Renumbering the Instructions.................................................... 2-11
2.6.5 Compress View..........................................................................2-11
2.7 Input Locations....................................................................................2-12
2.7.1 Entering Input Locations...........................................................2-12
2.7.2 REPS..........................................................................................2-12
2.7.3 Input Location Editor.................................................................2-13
2.7.4 Input Location Anomalies.........................................................2-15
2.8 Indention..............................................................................................2-15
2.9 File Types............................................................................................2-16
2.9.1 Program Documentation, *.CSI.................................................2-16
2.9.2 Download Files, *.DLD.............................................................2-16
2.9.3 Final Storage Label Files, *.FSL...............................................2-16
2.9.4 Program Trace Information Files, *.PTI....................................2-16
2.9.5 Printer Output Files, *.TXT.......................................................2-17
2.9.6 Library Files, *.LBR..................................................................2-17
3. Report: SPLIT......................................................... 3-1
3.1 Overview...............................................................................................3-1
3.2 Getting Started.......................................................................................3-1
3.3 SPLIT Parameter File Entries................................................................3-7
3.3.1 Input Files....................................................................................3-7
3.3.2 Start Condition........................................................................... 3-10
3.3.3 Stop Condition...........................................................................3-14
3.3.4 Copy ..........................................................................................3-17
3.3.5 Select .........................................................................................3-18
3.3.6 Output Files ...............................................................................3-33
3.4 Help Option.........................................................................................3-37
3.5 Editing Commands..............................................................................3-37
3.6 Running SPLIT From a Command Line.............................................3-37
3.6.1 Processing Alternate Files .........................................................3-37
3.6.2 Processing Multiple Files with One Command Line.................3-38
3.6.3 Using SPLITR.EXE in Batch Files............................................3-38
3.6.4 Command Line Switches...........................................................3-39
4. View.......................................................................... 4-1
4.1 Introduction...........................................................................................4-1
4.2 Menu Items............................................................................................4-1
4.3 Icon Items..............................................................................................4-1
4.4 Running View as a Stand-Alone Program.............................................4-4
4.5 Assigning Data Files to View................................................................4-4
ii
Page 13

PC208W Datalogger Support Software Table of Contents
5. Stg Module: SMS - Storage Module Software...... 5-1
5.1 Introduction...........................................................................................5-1
5.2 Getting Started ......................................................................................5-2
5.2.1 The Setup Screen.........................................................................5-3
5.2.2 Establishing Communications.....................................................5-4
5.3 Status Information .................................................................................5-7
5.3.1 Status Box/Update Status............................................................5-7
5.3.2 Advanced Status Information......................................................5-7
5.4 Programs .............................................................................................5-10
5.4.1 Program Location......................................................................5-11
5.4.2 Clear..........................................................................................5-11
5.4.3 Store ..........................................................................................5-12
5.4.4 Read...........................................................................................5-12
5.5 Data.....................................................................................................5-12
5.5.1 File Format................................................................................5-13
5.5.2 File Naming Options.................................................................5-14
5.5.3 Show Card/Module Directory and Viewing Data.....................5-15
5.5.4 Get All.......................................................................................5-15
5.5.5 Get New.....................................................................................5-15
5.5.6 Get One .....................................................................................5-16
5.6 Erase....................................................................................................5-16
5.6.1 Erase Data .................................................................................5-16
5.6.2 Erase Data and Programs ..........................................................5-16
5.6.3 Erase and Test Card/Module.....................................................5-16
5.7 The Menu Bar .....................................................................................5-16
5.7.1 File.............................................................................................5-17
5.7.2 Options......................................................................................5-17
5.7.3 Data ...........................................................................................5-18
5.7.4 Tools..........................................................................................5-18
5.7.5 Help...........................................................................................5-18
5.8 Abort...................................................................................................5-19
6. Program Conversion............................................... 6-1
6.1 CR10 Programs to CR10X....................................................................6-1
6.2 Xlate......................................................................................................6-1
6.2.1 File Menu ....................................................................................6-1
6.2.2 Options Menu..............................................................................6-2
6.2.3 Using Translated Files.................................................................6-3
A. Frequently Asked Questions.................................A-1
A.1 Setup, Connect, and Status..................................................................A-1
A.2 EDLOG.EXE.......................................................................................A-3
iii
Page 14

PC208W Datalogger Support Software Table of Contents
B. Modems...................................................................B-1
B.1 Phone Modems ....................................................................................B-1
B.2 Generic Modem Dialing Strings..........................................................B-2
B.3 MD9 Multidrop Interface.....................................................................B-3
B.4 Short Haul Modems.............................................................................B-3
B.5 NL100/105 (Network Link Interface)..................................................B-3
B.6 Datalogger Initiated Communications (Call-back)..............................B-4
C. PC208W Error Messages .......................................C-1
C.1 SPLIT Error Messages.........................................................................C-1
C.2 EDLOG Expression Errors..................................................................C-3
C.2.1 Causes........................................................................................C-3
D. Card Services Driver Software Notes ...................D-1
D.1 General ................................................................................................D-1
D.2 Driver Version Numbers .....................................................................D-1
D.2.1 Microsoft Windows...................................................................D-2
D.2.2 CSL_CS.DLL ............................................................................D-2
D.3 Setting Up Card Services.....................................................................D-2
D.3.1 How to Choose Which Area of Memory to Allocate to
Card Services ........................................................................D-4
E. Glossary of Common Windows Terminology.......E-1
Glossary
iv
Page 15
PC208W 3.3 Introduction
I.1 Please Read This
Welcome to PC208W 3.3, Campbell Scientific’s Windows compatible
support software for the CR10X, CR10, CR500, CR510, 21X, CR7, and
CR23X dataloggers. Please take time to read the Introduction and Frequently
Asked Questions (Appendix A) sections of this manualwe’ve tried hard to
keep them short and direct. We have designed the PC208W windows and help
screens to make learning the sof twar e as intuitive as possible, and have
intentionally kept these sections short.
We hope that the use of most controls and features will be obvious, but for
those that are not, there are several ways to get help. First check the
hint lines
which are displayed on the bottom of most screens. These provide a one line
summary of the control under the mouse cursor. For more help, select a
control with the mouse pointer or <Tab> key and press the <F1> key. In some
instances clicking the right mouse b utton will bring up options that will he lp.
I.2 Overview
This manual assumes that the user is familiar with the Microsoft Windows
interface. If you need help with some of Windows' features (double-clicking,
cutting and pasting, etc.) refer to Appendix E.
There are eight buttons on the PC208W toolbar. Here is what they are used
for:
Setup: Configure the devices (including modems, dataloggers, COM
•
ports, and tasks) that you use, with separate tabs for hardware, data
collection, and collection schedules.
Connect: Go on-line with a datalogger to set the clock, send programs,
•
collect data, view and graph measurements, etc.
Status: Check the communication and data collection status of all devices
•
you work with, and trigger manual data collection.
Program: Create and edit datalogger programs with EDLOG.
•
Report: Process the data files and create reports using SPLIT.
•
View: View ASCII files in comma separated, columnar, or hexadecimal
•
format. Quickly graph up to two elements in your data file.
Stg Module: Retrieve files from (and reset, program, etc.) Storage
•
Modules either directly using an SC532 or via a CR10(X), CR500, CR510,
or CR23X, and from PCMCIA (PC) Cards via the CSM1/MCR1 interface
or directly from a PCMCIA slot in the PC.
PC208W, Version 3.3, Instruction Manual 1
Page 16
PC208W 3.3 Introduction
Help: Enter the PC208W help system.
•
Each of these buttons launches its own window which gives you access to all
of PC208W’s functions all the time. The details of each screen are described
further in the rest of this man ual and in the Help.
NOTE
Reading Card Storage Module cards directly in a PCMCIA slot
requires compliant drivers. Some computers may require the
purchase of drivers from a software vendor. Windows NT and
Windows 2000 do not support 16-bit card services; therefore,
accessing CSI formatted PC cards via a PCMCIA card slot in a
computer is not available.
I.3 Other Software of Interest
There are other programs available from Campbell Scientific that you may find
useful. These packages are free and are available from our Internet site
(www.campbellsci.com) or on disk (call 435-753-2342 and ask for an
Applications Engineer):
Short Cut Program Generato r ( SCWI N): An alternative to EDLOG for
•
creating simple programs. Short Cut guides the user through the selection
and setup of sensors (including wiring) and data storage for many
meteorological, hydrological, and industrial applications. Short Cut
supports the CR10(X) , CR500, CR510, CR23X, and 21X dataloggers.
(You can then download the program to the datalogger and retrieve data
with PC208W.)
PC TOUR: A computer-based tutorial that introduces a new user to basic
•
datalogger and datalogger support software use. It provides an overview
of a CR10X datalogger wiring panel, discusses the concepts behind a data
acquisition system, and presents an overview of PC208W.
PC200W: PC200W is Campbell Scientific's starter software for datalogger
•
communication. You can connect to a datalogger over a direct link and
collect data, set the clock, and send programs, as well as generate simple
reports and view collected data files.
2 PC208W, Version 3.3, Instruction Manual
Page 17
I.4 Installation
PC208W 3.3 Introduction
SMS: SMS Storage Module Software is shipped with PC208W, but the
•
latest version can also be downloaded from our web site. The SMS install
utility is included in the PC200W installation.
CAUTION
As with all software, Campbell Scientific strongly
recommends that a back-up of critical files be performed
before software installation. In addition, periodic back-ups
should be performed on files in the PC208W directory.
These files include: PC208W.DND (datalogger network
map), WMODEM3.INI (modem setup information), Edlog
program files (*.DLD, *.CSI), Split Parameter files (*.PAR),
and collected data files (*.DAT).
PC208W requires Windows 3.1, Windows 95, Windows 98, Windows
, or Windows 2000. We recommend at least a 486 computer with 16 M
NT
RAM. Though PC208W may run on slower systems, better performance will
be seen with faster systems. A mouse is also required. A minimum of 16 M of
hard disk space is required for software installation . Additional disk space
may be required for I/O log files if you choose to log these files to disk (refer
to Section 1.4.2 and Appendix A for more information on log files).
Insert the PC208W disk into your computer's CD-ROM drive. If your system is
configured for Autorun, the installation procedure will begin automatically. If
it does not begin automatically, go into Windows Explorer and double-click on
the file named Setup.exe that is in th e Disk1 folder. Follow the instructions
given on the screen. PC208W lets you choose a working directory name and
installs most of the software into a subdirectory named BIN.
In the example below, PC208W was installed to the C:\PC208W directory.
Working Directory:
Programs
•
Data files
•
etc.
•
PC208W Software
and templates:
pc208w.exe
•
edlogw.exe
•
etc.
•
PC208W, Version 3.3, Instruction Manual 3
“ini” files for the main PC208W
screens and Connect screen setting
for each datalogger.
Page 18

PC208W 3.3 Introduction
I.4.1 Floppy Disk Installation
I.4.2 For Users Upgrading from PC208W Versions 2.3 and
Earlier
PC208W is shipped only on CD-ROM. However, the CD-ROM includes
folders that can be used to create a set of disks for floppy disk installation. To
create a set of disks, copy the contents of each folder named Disk1, Disk2, etc.,
to a 1.44 MB 3.5" floppy.
To install the program from floppy disk, insert the floppy disk with the
contents of Disk1 into your computer's drive. In Windows 95, 98, NT, or 2000,
select RUN from the Start button. Type in SETUP and press OK. (In Windows
3.1, select FILE and then RUN from the Program Manager menu. Enter
A:SETUP and select the OK button.) The installation process should begin;
follow the instructions given o n the screen to complete software installation.
Modem Configurations
PC208W 3.0 and greater use a newer configuration for modem setups, which
should provide for more reliable communication and fewer problems in
establishing remote communication links. If your station setup uses a modem
that is included in PC208W's modem list, you won't need to make any changes
after installing PC208W.
NOTE
However, if you previously set up a custom modem instead of using an
existing modem configuration, PC208W will leave the modem pick list field
blank. Choose the default modem; in most instances, this setup should work.
If the default settings will not work with your modem, you will need to refer to
your modem's user's manual to enter valid strings (refer to Appendix B). Some
items to look for when developing a custom modem string are: hardware flow
control enabled, verbose result codes (looking for “CONNECT” back from the
modem rather than a number), and error correction enabled.
PC208W won’t find your custom modem on its WMODEM3.INI
list so it will display a blank field for the Modem Pick List field
and a warning in the SWF log until you actually pick "default
modem".
Directory Structures
In version 2.1 and greater, the main PC208W directory is PC208W (unless you
manually change the default directory during software installation). Two
subdirectories exist under PC208W: BIN and INIFILES. The BIN directory is
used to store nearly all of the files essential to the operation of the PC208W
program (executable files, help files, etc.). The INIFILES directory is used to
store all of the *.INI files associated with datalogger setups and PC208W
software execution.
Datalogger *.INI files are created/updated each time a communication session
with a datalogger is closed, and PC208W's INI file is updated each time it is
closed. The files provide the PC208W program with specific information so
4 PC208W, Version 3.3, Instruction Manual
Page 19

PC208W 3.3 Introduction
your devices or program defaults do not have to be configured before each
PC208W session.
Versions of software prior to 2.3 stored the PC208W.INI file in the working
directory. This INI file included information on all of the dataloggers in the
device map and setup information on PC208W. If you are upgrading from
Version 2.2 or earlier, when the program is installed, your existing
PC208W.INI file will be moved into the INIFILES directory. Then, the first
time a connection is made to each datalogger that was set up in your original
INI file, the program accesses the INI file and creates a new file from the
information in the old INI. This change in directory structure was made to
accommodate an INI file size limitation inherent to the Windows operating
system.
Datalogger Network Configuration Files (*.DND files)
PC208W keeps the setup information in the working directory in a DND file.
(In PC208W 1.x and earlier, this file was named TCOM.DND. In versions later
than 1.x, it was named PC208W.DND.) If an existing DND file is found during
an upgrade installation, this file will be renamed, if necessary, and updated to
the current DND format.
During the upgrade installation, you may choose to install the new PC208W in
a different directory. If so, you can copy the old DND file into the new
directory. If the old file is named TCOM.DND, rename it to PC208W.DND.
By copying this DND file, you will not have to set up new network
configurations (the device map) for your existing datalogger stations.
Existing Data, Edlog, and Split Files
Your existing PC208W files can be used without modification in PC208W 3.3
These file types include: *.DAT, *.PAR, *.CSI, *.FSL, *.DLD. (Refer to
Section 2.9 for more information on Edlog file types.)
For users upgrading from DOS PC208
You will have to recreate the setup information and batch routines. Edlog .CSI
and .DLD files and Split .PAR files will work without modification. However,
if your previous version of Edlog used .DOC files, they will need to be
converted using DOC2CSI (see Section 6).
If you are connecting to one or more dataloggers via an MD9 network, and have
been using PC208 for DOS, you will have to change the ID switch settings on
your base MD9. The DOS software uses an address between 1 and 254;
PC208W uses address 255.
If the base MD9 ID is set to 255, you can still use PC208 DOS software, if
needed, without changing the setting back to a number between 1 and 254.
Simply add a pound sign (#) to the end of the MD9 dialing path in the station
file.
PC208W, Version 3.3, Instruction Manual 5
Page 20

PC208W 3.3 Introduction
I.5 Uninstall
Should you need to remove PC208W from a computer, an uninstall program is
provided. With Windows 95, 98, NT, or 2000, select SETTINGS from the
Start button then select CONTROL PANEL. Double click on
ADD/REMOVE programs. Select PC208W from the list and select the
Add/Remove button.
With Windows 3.1, double click on the UNINSTALL PC208W icon in the
PC208W program group.
I.6 Some Notes on System Resources
COM Ports and Interrupts
PC208W is capable of running in the background while you are doing other
work with other programs. To do this, it uses the system’s idle time for some
of its serial communications. Some other applications may be so resource
intensive that PC208W does not receive sufficient time for its communications.
PC208W will not run reliably with these applications loaded.
NOTE
The Windows environment provides access to the COM ports via a COM port
driver. Many computers have COM ports which share interrupts with other
COM ports. (Typically COM1 and COM3 share IRQ 4 and COM2 and COM4
share IRQ 3.) This can be checked by examining the ‘Ports’
(Settings/Advanced) setting in the Windows Control Panel. A COM port
sharing an interrupt with another device can prevent Windows from reliably
performing communications using that port, particularly if the COM port and
device are used concurrently. This shared interrupt problem would also affect
operation of PC208W.
If you appear to be experiencing communication problems when
using external modules, always check the COM ports setting in
the Windows Control Panel, using the ‘Ports’
(Settings/Advanced) option, and check for any shared interrupts.
Other programs may also try to use the COM ports, and some may leave the
COM ports “open” even when not active. This is especially true of DOS
based communications programs. If PC208W has trouble connecting to a
datalogger when you believe the setup and connections are correct, check to
make sure other programs that use the same COM ports are closed.
For Windows 3.1 and 95 Users
A problem which is inherent to Windows 3.1 and 95 may surface when
scheduling Tasks which call DOS programs. When a DOS command is
executed, a certain amount of system resources are allocated to this command.
Windows 95 does not free up this resource when the command has been
executed and control is returned to Windows. This memory is freed, however,
once your computer system is rebooted.
6 PC208W, Version 3.3, Instruction Manual
Page 21

I.7 Getting Help
PC208W 3.3 Introduction
If your Windows 3.1/95 system remains on-line for long periods of time (such
as a week or more without being powered down), it is suggested that the
system be rebooted every few days if DOS commands are being executed. If
not, your system may run out of system resources and fail to respond. The
only solution to this system “lock-up” is to reboot the computer. Any files
which have not been saved to disk will be lost.
We’ve tried hard to make PC208W 3.3 as intuitive as possible and follow
common Windows conventions. There are several sources of help for you
including:
This manual.
•
Hint lines which appear at the bottom of each screen.
•
Context-sensitive Help in each program available when you press <F1>.
•
General help from the Help pull down menu.
•
The datalogger manuals. These are thick and more for reference than to
•
be read cover-to-cover. The Overview chapter, however, is a good one,
and you should be sure to read it carefully.
From Anywhere:
Campbell Scientific, Inc.
815 West 1800 North
Logan, UT 84321-1784
Tel: (435) 753-2342
Fax: (435) 750-9540
E-mail: support@campbellsci.com
WWW: http://www.campbellsci.com
From Australia, Fiji, Indonesia, Malaysia, Papua New Guinea, Philippines,
Singapore, and Thailand:
Campbell Scientific Australia Pty Ltd
PO Box 444 Thuringowa Central
Townsville QLD 4817 AUSTRALIA
Phone: 61-7-4772-0444
Fax: 61-7-4772-0555
E-mail: info@campbellsci.com.au
WWW: http://www.campbellsci.com.au
From Canada:
Campbell Scientific Canada
11564 - 149th Street
Edmonton, Alberta T5M 1W7
Phone: 780-454-2505
Fax: 780-454-2655
E-mail: dataloggers@campbellsci.ca
PC208W, Version 3.3, Instruction Manual 7
Page 22

PC208W 3.3 Introduction
From Austria, Belgium, Denmark, Finland, France, Germany, Greece, Ireland,
Italy, Luxembourg, Netherlands, Northern Ireland, Norway, Poland, Portugal,
Spain, Sweden, Switzerland, and United Kingdom:
Campbell Scientific Ltd.
Campbell Park
80 Hathern Road
Shepshed, Loughborough LE12 9GX
UNITED KINGDOM
Phone: 44-(0)1509-601141
Fax: 44-(0)1509-601091
E-mail: sales@campbellsci.co.uk
Technical Support: support@campbellsci.co.uk
WWW: http://www.campbellsci.com/europe /
From South Africa:
Campbell Scientific Africa
Box 2450
Somerset West 7129
Republic of South Africa
Phone: 2721-880-1252
Fax: 2721-880-0240
E-mail: jvisagie@mbv.co.za
From Brazil:
Campbell Scientific do Brazil Ltda
Rua Mateus Grou n°152 - Pinheiros
05417-010
Sao Paulo SP
Brazil
Phone: 011-55-11-306-10916
Fax: 011-55-11-306-89945
E-mail: ghfamb@sti.com.br
8 PC208W, Version 3.3, Instruction Manual
Page 23
Section 1. Setting Up the Network and Communicating with the Datalogger
1.1 Getting Started
With the software installed, you are probably anxious to start using the
datalogger. If at all possible, prior to deploying the equipment in the field,
make sure you can establish a telecommunication link with your datalogger
even if you have to create a temporary setup in your office. Getting familiar
with datalogger programming and the support software in the comfort of your
office will be a lot less frustrating than trying to resolve problems in the field.
If your datalogger is already deployed and working, then establishing
communications with the datalogger is the place to start.
The first step in interfacing your PC and the PC208W software with your
equipment is to set up your datalogger and other devices. SETUP is used to
accomplish this. Once your network is configured, direct connection can be
made to the logger through the CONNECT screens. After telecommunication
has been established you can use the other features of PC208W to create and
download programs, collect data, view raw data or prepare more sophisticated
reports, monitor equipment status, and interact with storage devices.
1.2 Setup
1.2.1 General Information
1.2.2 Setup Procedures
opens a window in which you edit the Device Map, a
diagram of all the various dataloggers, modems and
other communications devices which you are using.
Three different pages on this screen show up as tabs to
let you configure Hardware, Data Collection, and
Scheduled Communications settings. Whether you work with one
datalogger (or “station”) on your desk or hundreds of dataloggers over
elaborate telecommunications networks, PC208W’s Device Map keeps track of
the type of devices, addresses and phone numbers, data collection pointers, and
collection schedules. You can also add “Tasks” to the Device Map to execute
other programs, such as DOS batch files, SPLIT (PC208W’s data processing
utility), or any other executable pr o gram.
The first step in setting up telecommunications is to add the necessary
component to the Device Map by choosing one of the Add... options from the
toolbar. Some of the necessary entries include which serial communication
port (e.g., COM1 or Socket 1) you will use, modems (if any), type of
datalogger, etc.
PC208W, Version 3.3, Instruction Manual 1-1
Page 24

Section 1. Setting Up the Network and Communicating with the Datalogger
The Setup window consists of three tabs: HARDWARE, DATA
COLLECTION, and SCHEDULE. Each device will have these three tabs
but only parameters relevant to that type of device will be shown on the tabs.
1.2.2.1 Hardware Setting
PC208W inserts default values for most parameters, but some it can’t know.
Therefore, once you add devices to the Device Map, click on the
HARDWARE tab for each device to enter settings unique for that device, such
as baud rates for COM ports, brand of telephone modem (for initialization
strings), telephone numbers, radio IDs or paths for dataloggers, etc.
1.2.2.2 Data Collection Settings
You will also need to set up what data you want to collect and how you want to
collect and store it. This information goes on the DATA COLLECTION tab
for the datalogger. Note that PC208W will suggest a filename for the data, but
you can Browse to choose a different name, directory, or even a different
computer if you’re on a network.
1.2.2.3 Schedule Settings
PC208W can be configured to call one or more dataloggers and collect data on
a predefined schedule. Once all data has been collected from a datalogger, the
call is automatically terminated. This function is set up on the Schedule tab for
the datalogger.
The first field to set up is the Calling Interv al. The Calling Interval is how
often PC208W should call the datalogger to collect data. When the schedule is
first set up, the initial starting time for scheduled data collection should be
entered into the Next Time to Call field. Once th e schedule is implemented,
this field will be updated each time the scheduled call is successful to reflect
the next time that PC208W will attempt to make a scheduled call.
The Next Time to Call will be determined based upon entries in the Primary
Retry Interval, the Retries Using Primary Interval, and the Secondary Retry
Interval fields. The Primary Retry Interval is an interval at which calls will be
made if a scheduled call fails. The Retries Using Primary Interval field is the
number of times calls will be attempted using this interval. The Secondary
Retry Interval is an interval that will be used if all of the Primary Retries fail.
Following are some of the rules PC208W will follow for scheduled data
collection.
• If a scheduled call for a device is successful, the "Next Time to Call" will
be incremented one "Calling Inter val". For instance, if the Calling Interval
is set at 1 hour and a successful call occurs at 8:00 a.m., the "Next Time to
Call" will be set to 9:00 a.m.
• If a scheduled call fails and the "Retries Using Primary Interval" is set to
something other than 0, and this number of Primary Retries has not been
exhausted, the "Next Time to Call" will be incremen ted by the Primary
Retry Interval value, plus the time that the call actually took to fail (this
allows time for a hardware reset). For in stance, if the original time for a
1-2 PC208W, Version 3.3, Instruction Manual
Page 25

Section 1. Setting Up the Network and Communicating with the Datalogger
failed call was 9:00 a.m. and the Primar y Retry Interval was set to 5
minutes, on the first retry the "Next Time to Call" will be set to 9:05 a.m.,
plus the few seconds it took for PC208W to determine the call failed.
• If a scheduled call fails and the "Retries Using Primary Interval" is set to 0
or the number of Primary Retries has been exhausted, the "Next Time to
Call" will be some multiple of the "Secondary Retry Interval" added to the
regularly scheduled "Next Time to Call", such that the "Next Time to Call"
is in the future.
• If the "Primary Retry Interval" is 0 and "Retries Using Primary Interval"
have not been exhausted, the "Next Tim e to Call" is set for the time the
last call failed (i.e., zero seconds after the failure, and the next primary
retry may begin immediately).
• If the "Retries Using Primary Interval" is set to 0, no primary retries will
be attempted and the next time to call is determined by the "Secondary
Retry Interval."
• If the "Secondary Retry Interval" is set to 0, once the Primary Retries are
exhausted, the "Next Time to Call" is set by add ing some multiple of the
"Calling Interval" to the last time a regularly scheduled call was to begin,
such that the “Next Time to Call” is in the future.
PC208W also allows you to set up other DOS or Windows programs to be run
at scheduled times. These programs are referred to as TASKS. To set up a task
to be run, press the Add Task button. On the HARDWARE tab, you can enter
a unique name for the task to be run in the "Task Name" field. In the "Name of
Program to Start" field, enter the command line for the program, batch file, or
DOS command you want to execute. On the SCHEDULE tab, enter the
"Calling Interval" for the task and ensure the "Schedule On" box is checked.
You will notice a list-box on all of the SCHEDULE tabs called “After Call Do”.
If you select the name of a device or Task from the Device Map, that device will
be called or Task executed after the first Device is called (only for Scheduled
Calls). In this way, you can set up a sequence of calls to dataloggers, or run
other programs after that call (such as data processing applications like SPLITR).
Note that the After Call Do function is executed regardless of whether the first
call is “su ccessful”.
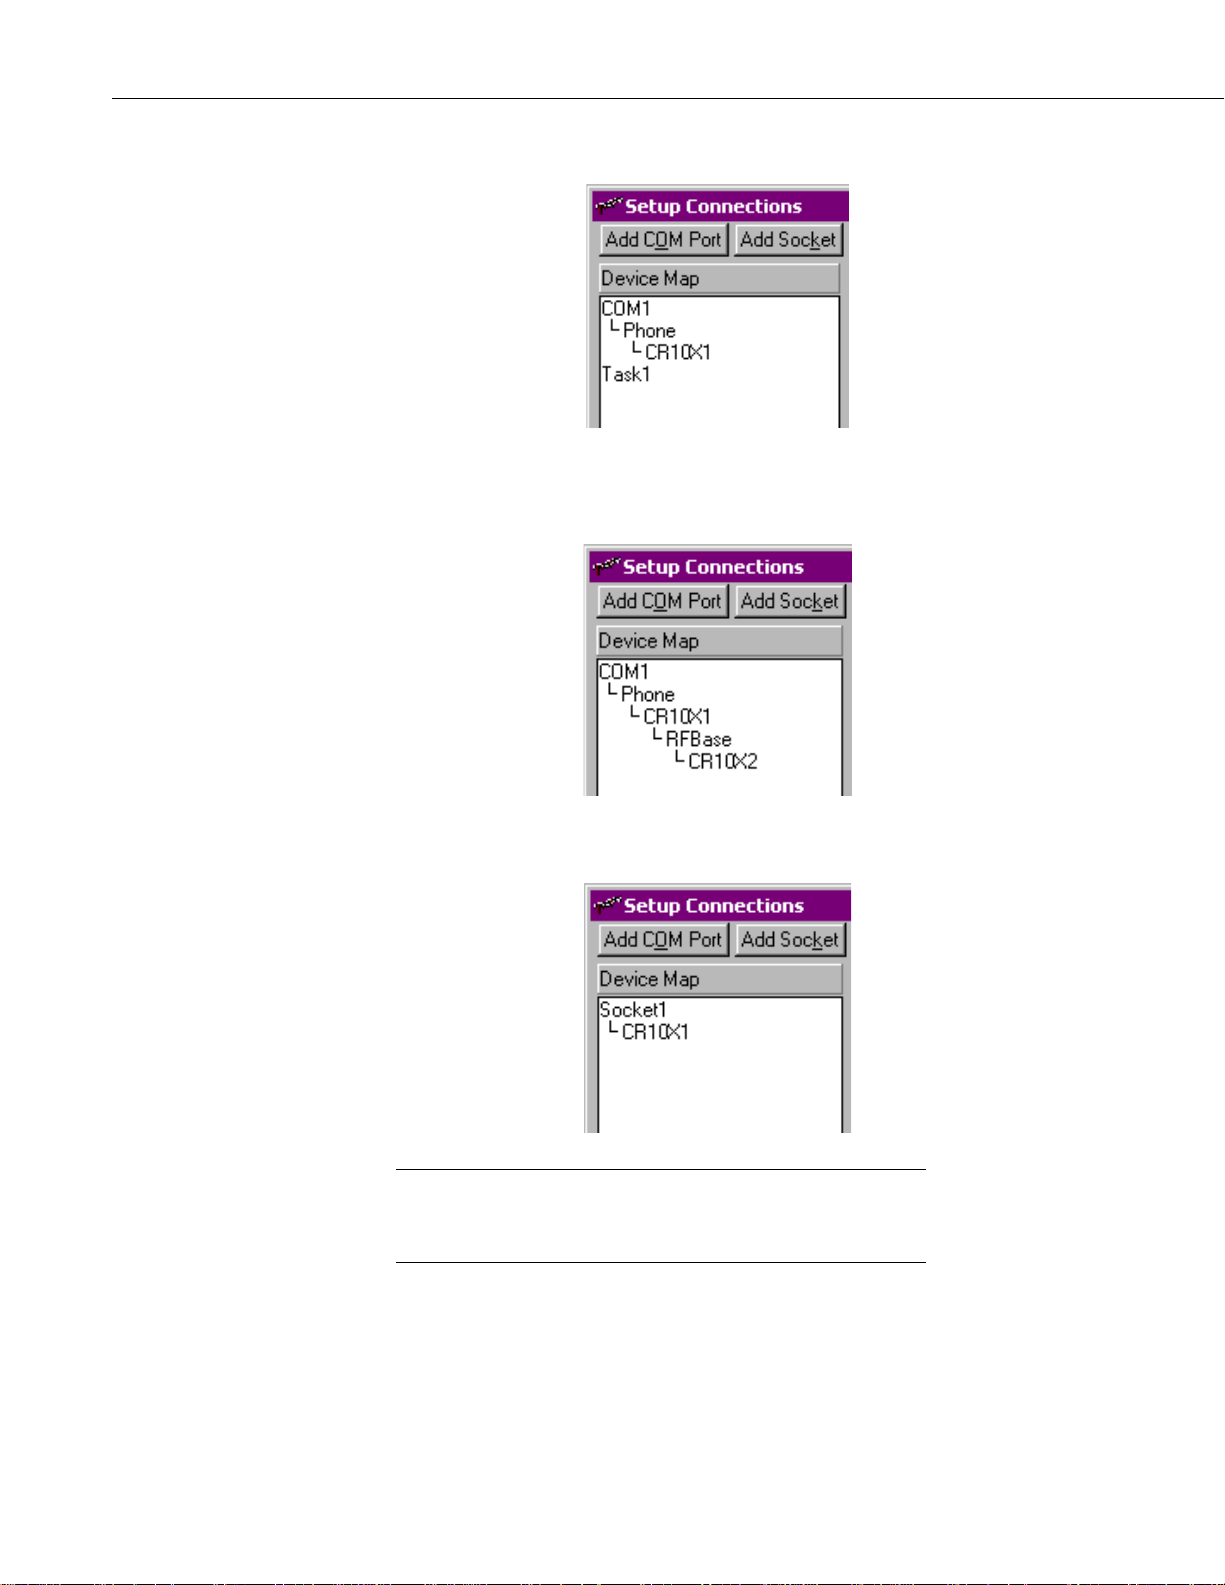
1.2.3 Device Map Notes
The Device Map provides a pictorial representation of how each device is
connected in your communications link. "Parent" and "child" connections are
shown by right angle lines which connect the components, and the child
components are indented beneath the parent component to help depict the
logical order of the connection.
PC208W, Version 3.3, Instruction Manual 1-3
Page 26
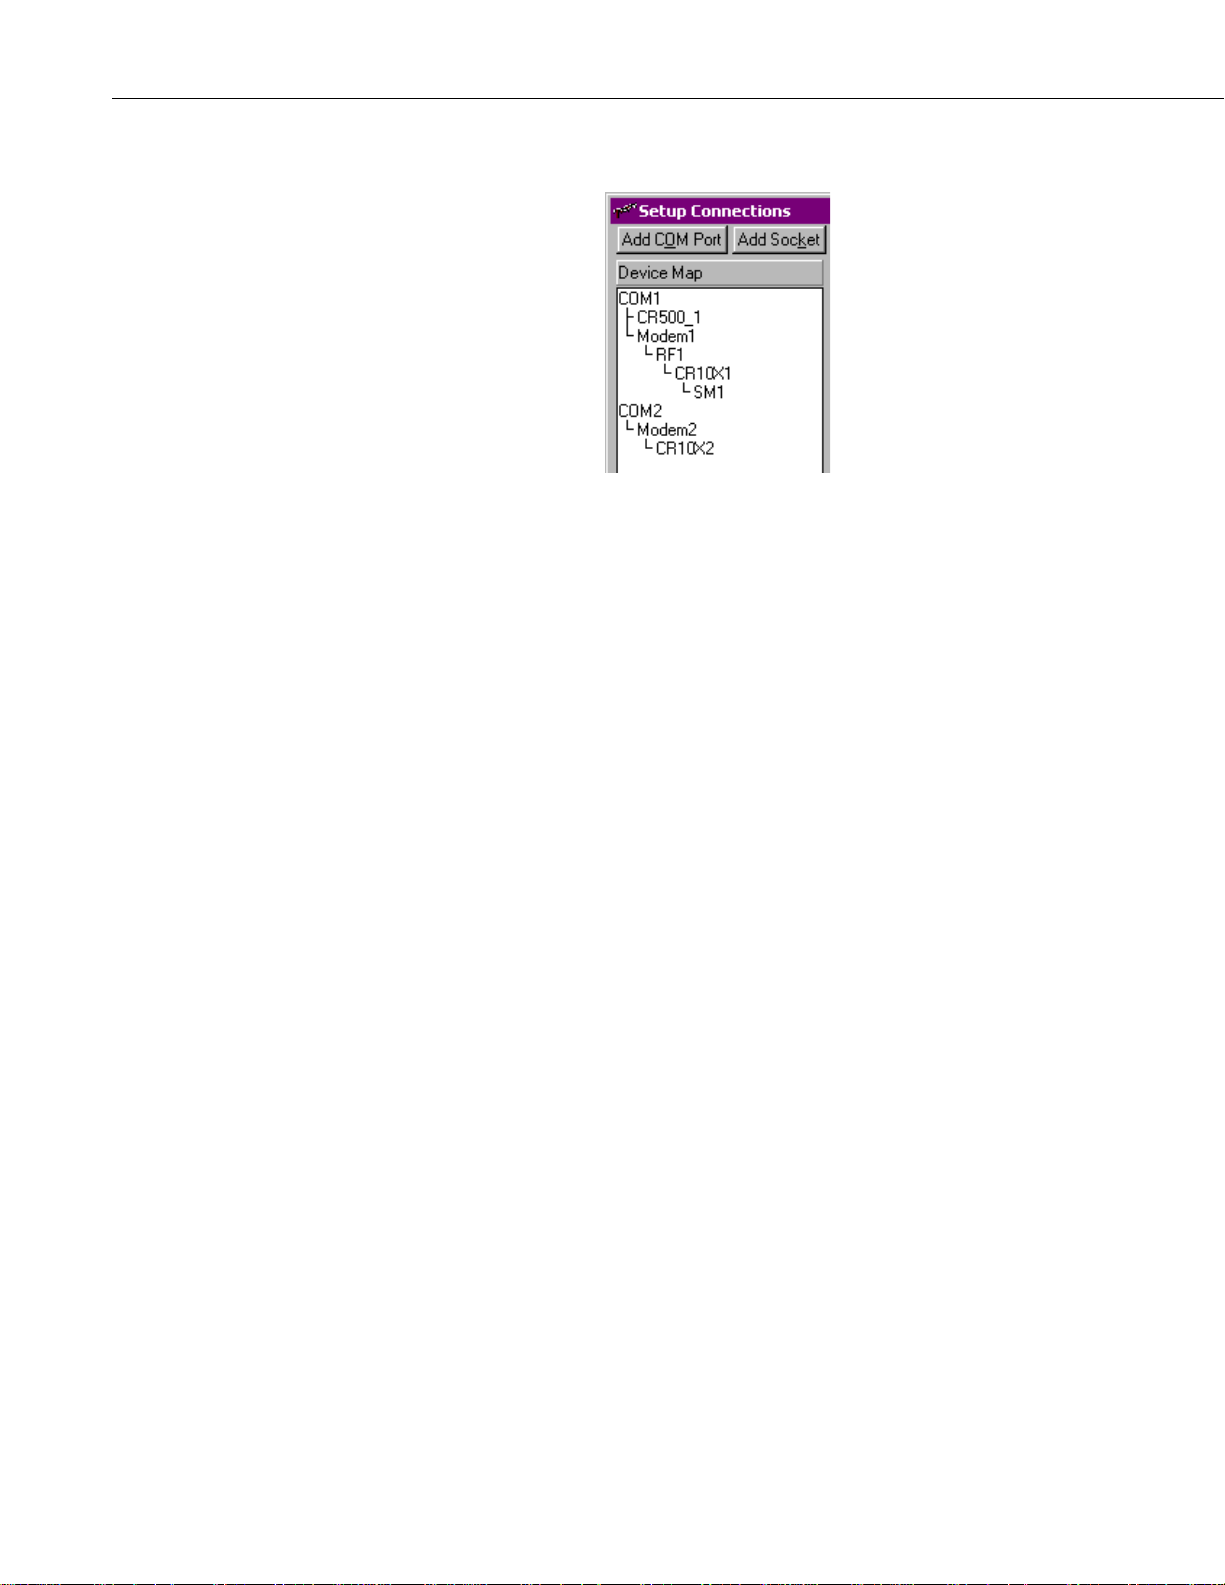
Section 1. Setting Up the Network and Communicating with the Datalogger
Review the example below:
The first item shown on the Device Map above is COM1it is considered a
parent component. The CR500 under it is a child. This communications link
could be for direct connection from a desktop PC's COM1 port to the CR500.
The Modem1 connection is a link from the PC's COM1 port that has a phone
modem connected to it, an RF modem connected to the phone modem, and a
CR10X at the other end (remote RF modem is assumed) and a storage module
connected to the CR10X. COM2 is a similar example, with a CR10X
connected to COM2 through a phone modem (remote phone modem is
assumed).
Following are some hints which may help when setting up your Device Map.
• When you choose Add Device, a two column popup screen appears. The
device which you want to add should be chosen from the left-hand
column; the component which you want for the parent device should be
chosen from the right hand column. PC208W will only allow you to
choose valid parent components for each device; other devices are grayed
out.
• Add your COM port first, and then attach each component in the order that
it physically appears in your communications link.
• PC208W recognizes that modems are used in pairsone at the computer
and one at the datalogger. Therefore, once you attach a modem to the
COM port, you do not have to add another modem for the datalogger site.
• Each device can be given a unique name. This can be helpful if you have a
large network of datalogger sites and you want to remember which
connections are for which sites. Device names can be edited by typing in a
new entry directly in the device’s Name field on the Hardware, Data
Collection, or Schedule tab.
• If you need to change the logical order of a site's communication link, you
can select a component with the mouse pointer and drag it to a new
location. If PC208W is unclear of the connection to be made it will ask
you to select whether the device should be connected as a child component
or on the same level. If the device you are moving has child components,
these will be moved along with their parent device.
1-4 PC208W, Version 3.3, Instruction Manual
Page 27
Section 1. Setting Up the Network and Communicating with the Datalogger
• If you delete a component with child components attached, the child
components also will be deleted.
• If you inadvertently delete a communications link, it can be refreshed by
choosing Cancel Edits (as long as you have not chosen Save Edits since
the deletion).
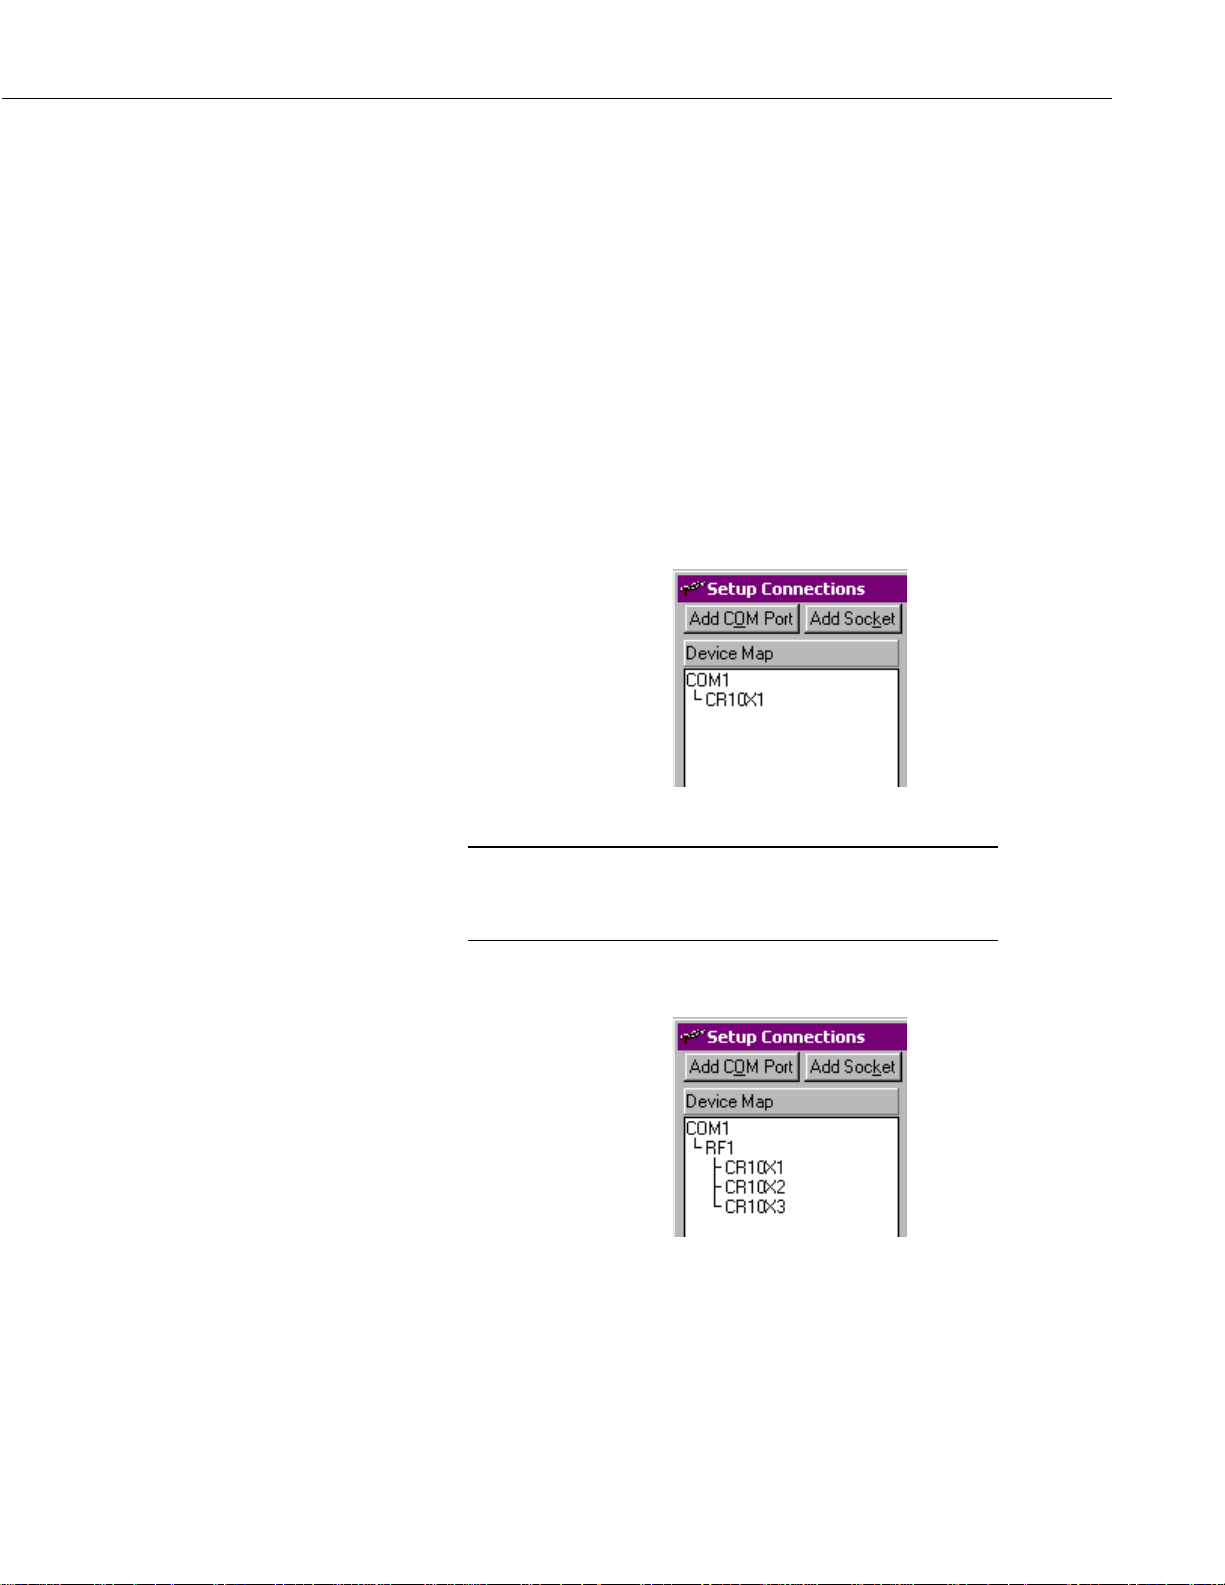
1.2.4 Example Device Maps
Refer to the examples below for help in setting up your own Device Map.
Step-by-step examples are provided in the PC208W help file. These can be
accessed from the content page, by a right click on the device map in the Setup
screen, or by searching for Cue Cards in the help file index.
Direct Connect via an SC32A or RAD Short Haul Modem Pairs to a CR1 0X:
NOTE
Older short haul modems (SC95) are set up as generic modems
with the datalogger attached. Refer to Appendix B for more
information.
RF (Radiotelemetry) Connection to Three CR10Xs:
PC208W, Version 3.3, Instruction Manual 1-5
Page 28
Section 1. Setting Up the Network and Communicating with the Datalogger
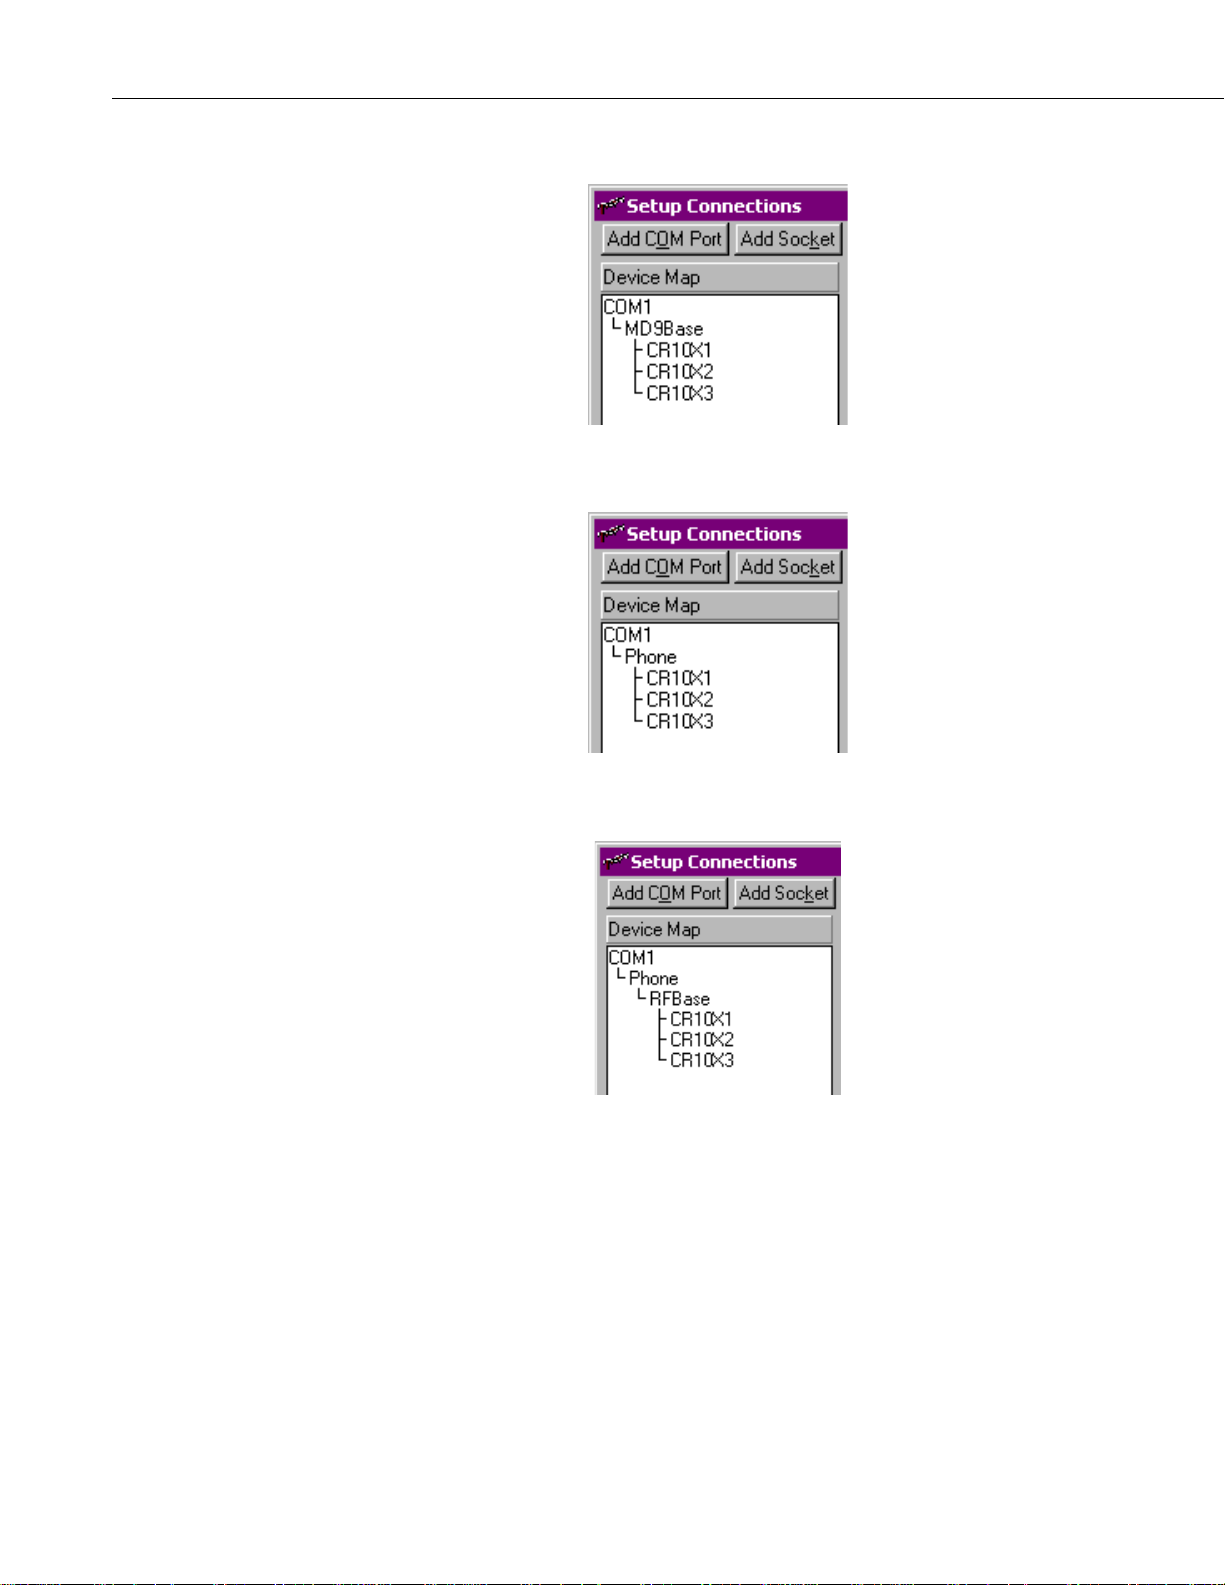
MD9 (Coax Multi-drop) Connection to Three CR10Xs:
Phone Modem Connection to Three CR10Xs:
Phone to RF (or MD9) Connection to Three CR10Xs:
1-6 PC208W, Version 3.3, Instruction Manual
Page 29
Section 1. Setting Up the Network and Communicating with the Datalogger
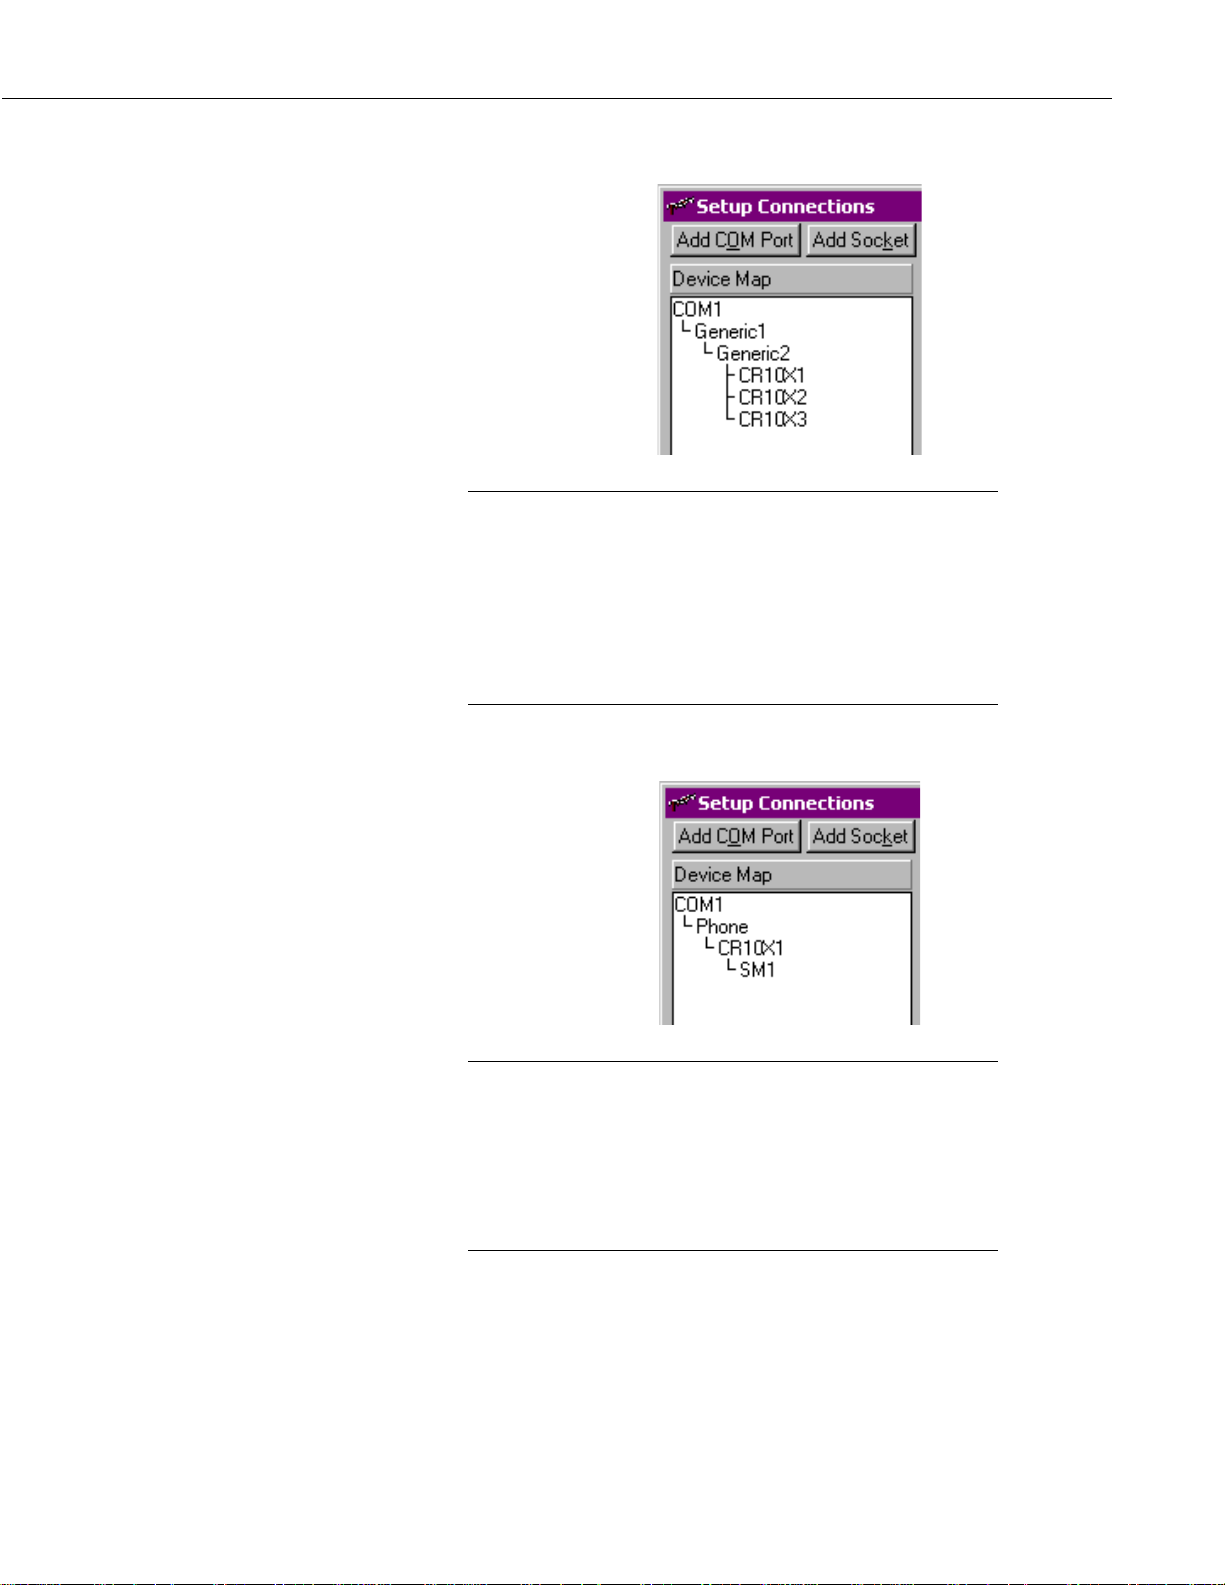
Generic Modem Connection to Three CR10Xs:
NOTE
Generic modems are used for connections or modems otherwise
not supported by PC208W (such half-duplex modems from other
vendors or SC95 short haul modems). Generic modems require
that the users specify the dialing and response strings needed to
dial the modem. The user must also specify the delays and
resolve timing issues. (See Appendix B.) It is possible to chain
several generic modems if multiple strings and responses are
required.
Modem Connection to CR10X with Storage Device:
NOTE
In reality, you can connect Campbell Scientific storage modules
or PC card drives to most dataloggers. However, PC208W only
allows valid connections in the Device Map where data can be
retrieved from a storage module through a datalogger over
telecommunications. PC208W allows remote data collection
from SM192, SM716, SM4M and SM16M storage modules
connected to CR10(X), CR500, CR510, or CR23X dataloggers.
PC208W, Version 3.3, Instruction Manual 1-7
Page 30
Section 1. Setting Up the Network and Communicating with the Datalogger
Tasks (Scheduled Execution of DOS or Windows Programs):
Phone Modem to RF Connection to a Remote CR10X, with a CR10X at the
Phone-to-RF Base:
TCP/IP Connection - NL100/105 to Datalogger:
NOTE
Extra response time (3000 to 4000 ms) may need to be added to
the Socket and/or the datalogger to account for network traffic
delays over a TCP/IP connection.
1-8 PC208W, Version 3.3, Instruction Manual
Page 31

Section 1. Setting Up the Network and Communicating with the Datalogger
TCP/IP Connection - NL100/105 to Phone (or RF or MD9) to Datalogger:
NOTE
The modem peripheral should be connected to the RS232 port of
the NL100/105. When an RF modem is used, the pin that carries
the RTS signal should be disabled in the cable (pin 7 on a 9-pin
connector or pin 4 on a 25-pin connector).
1.2.5 Notes on Data Collection and Formats
As noted in Section 1.2.2, you must define how the datalogger should collect
data and what file format to store the d ata. This information is entered on the
Data Collection tab of the Setup window.
There are two basic options for specifying what data is collected: collect all
the new data since the last collection or collect a fixed number of arrays on
each call. Use the Data Logged Since Last Call option to build a complete
archive. Use the Most Recently Logged Arrays option to collect a fixed
number of the most recent arrays for each call.
When the Most Recently Logged Arrays option is chosen, the number of
arrays to be collected is entered in the Arrays to Collect on each call field.
Enter 0 if you want to collect all data on each call.
Data File Names for Areas 1 and 2
All dataloggers have a Final Storage area 1. The CR10, CR10X, and CR23X
can be configured with two final storage areas. The default filenames for a
device's Final Storage areas are taken from the device name. If a CR10X is
named LOG1, the default files names are LOG1.DAT and LOG12.DAT.
These default names can be changed by selecting the Browse button and
entering a new name.
NOTE
PC208W, Version 3.3, Instruction Manual 1-9
By default, only Final Storage area 1 is set up for CR10s,
CR510s, CR10Xs, and CR23Xs. For data to be stored in Final
Storage area 2, memory must be allocated in the datalogger, and
the program must write data to this area.
Page 32

Section 1. Setting Up the Network and Communicating with the Datalogger
File Format
PC208W supports three formats for the collected data:
• ASCII, Comma Separated - This is the best choice for most applications.
Data values are separated by commas with no leading zeros and with each
array on a new line. This is the easiest format for importing into other
software; it’s reasonably compact and can be viewed directly.
• ASCII, Printable - Numbers are aligned in columns and preceded by a 2-
digit ID indicating the array position. The column IDs repeat after 100
columns. Each row in the data file has up to eight columns before a new
line is started. This format is easiest to read manually (i.e., printed copy)
but is difficult to import into spreadsheets and other application s. SPLIT
can be used to convert to other formats. This format is ambiguous for data
arrays of 100 or more and should be avoided for purposes other than
printing.
• Binary - This format is the most compact on the PC but must be converted
before it can be used. SPLIT can be used to convert to other formats.
1.2.6 Setup Safety Tips
You can freely move between the different PC208W windows. This means
you can open the SETUP screen while you are communicating with a
datalogger or using one of the other PC208W programs. However, if you
change the setup, PC208W may hang up calls in process and not call again
until the changes are saved. It does this to prevent data storage pointer s f r om
being corrupted. Therefore, it is better to avoid changing the setup while
communicating with a datalogger that will be affected by the change.
You must click on Save Edits for the device settings to take effect and continue
any scheduled communications. You will also be prompted to Save Edits if
you close the Setup window or PC208W if you have not yet saved the new
device settings. If you find you have made a mistake while changing device
settings but have not yet saved the edits, you can return to the previous
configuration by clicking Cancel Edits. This only works for one previous
setup because otherwise, PC208W may have called a datalogger and changed
data storage pointers, making a return to previous settings unreliable.
You may drag and drop devices from one connection to another. If the place
where you drop a device is ambiguous, PC208W will ask whether to place the
moved device as a child or at the same level.
PC208W uses the computer clock to control some of its timing. Changing the
PC clock while connected to a datalogger may cause unexpected results in
PC208W.
1-10 PC208W, Version 3.3, Instruction Manual
Page 33

1.3 Connect
Section 1. Setting Up the Network and Communicating with the Datalogger
brings up a window which gives you real time access to
any of the dataloggers in your Device Map.
You can transfer programs to a datalogger, set the datalogger clock, collect
data from the datalogger, collect data from the storage module, and display or
graph datalogger measurements. From the CONNECT window you may
connect to only one datalogger or storage module at any given time.
Only dataloggers and storage modules are shown on the CONNECT screen.
You can switch to a different device by clicking on it with the mouse pointer.
If you are connected to a device, PC208W will warn you and ask if it should
close the current connection.
PC208W assumes a double click on a different datalogger means you want to
switch regardless of the current connection. It will close the connection in an
orderly fashion and switch to the new CONNECT screen. Note that PC208W
saves the location and appearance of the screen for each datalogger, so
switching to a new one may appear to make the screen “jump” from one
position to another.
1.3.1 Handy Things That May Not Be Obvious
TOOLS Tab
• Check the Pause Clk Update to stop the clock display. This can speed up
manual data collection on a slow communication link. Be careful; if you
pause the clock display AND the numeric d isplay, there will be no visual
clues as to when you are connected. In fact, PC208W may not stay
connected as there is nothing to do. If you pause everything for more than
about 40 seconds, the datalogger may time out and hang up the link from
its end to conserve power.
• If you associate a datalogger program (.DLD file) in which you labeled
your Input Locations, then you will have labels in the Numeric Display
and Graphs.
• The Pause Both checkbox stops updating the numeric displays and
graphs. This can speed up manual data collection on a slow
communication link.
Ports/Flags
• A port or flag can be given a unique label. Right click on the port or flag
and type in a new label. Labels are saved individually in an *.ILL file in
the Inifiles subdirectory for each datalogger in the Device Map.
PC208W, Version 3.3, Instruction Manual 1-11
Page 34

Section 1. Setting Up the Network and Communicating with the Datalogger
Numeric Display
• Right click on any cell in the Numeric Display to invoke a pop-up box.
From this box you can choose to Add locations to the display; Delete
locations from the display; Setup the Numeric Display's update interval,
delete options, or decimal place settings.
• Double click on value labels to edit them. Changing the labels only
affects the Numeric display and will not change the datalogger program.
• Double click on a value, then edit it and press <Enter> to send the new
value to the datalogger’s Input Location.
• You can drag and drop individual Input Locations to different locations on
the display.
• Press and hold the <Ctrl> key before starting to drag an Input Location
cell, and the cell will be inserted when you drop it. If <Ctrl> is not held,
the dragged cell will replace the destination cell.
• You can drag an Input Location from the ADD Inloc List and drop it on
the numeric display instead of using the Paste button. You can drag and
drop multiple locations at once by first highlighting labels using
conventional <Ctrl>-click and <Shift>-click keystrokes.
Graphs
TERMINAL Tab
• A cell must be highlighted on the numeric display in order to paste new
input locations.
• <Ctrl>-click and <Shift>-click allow you to highlight multiple Input
Locations for a subsequent DELETE.
• If you are using the “power of 10 autoscaling” and a trace goes off scale,
select the Rescale button to scale the value back to the Y-axis again.
• You can leave one or more graphs up with all other PC208W windows
minimized, but if you close the CONNECT screen or the main PC208W
toolbar, the connections are dropped and the graphs are also closed.
• Use the Capture button to save a graph to a WMF (Windows Metafile)
format. This file can be printed or imported into other programs.
• If you are not connected to a datalogger, the Open Port button will allow
you to manually dial and work with the communication devices. If you
are connected, selecting the TERMINAL tab will stop all other
communication with the datalogger until you return to the TOOLS tab.
To enter the Remote Keyboard Mode on the datalogger press <Enter> to
get an “*” and then press “7H <Enter>” (CR10(X), CR500, or CR23X)
or “2718H <Enter>” (any datalogger). BE CAREFUL! This mode
1-12 PC208W, Version 3.3, Instruction Manual
Page 35

Section 1. Setting Up the Network and Communicating with the Datalogger
allows you to delete program instructions and may result in erasing the
datalogger’s memory!
• If you enter the Remote Keyboard Mode, be sure to press the ‘ *0 ’ keys
sequence to get a LOG1 message from the datalogger before you leave the
TERMINAL screen so the datalogger is left in a known state.
1.3.2 Connect Safety Tips
• Leaving PC208W connected to a datalogger keeps the communication link
to the datalogger open and may prevent scheduled collection or callback
from other dataloggers which use the same COM port.
• If you pause the clock display and the numeric display, there will be no
visual clues as to when you are connected. In fact, PC208W may not stay
connected as there is nothing to do. If you pause communication for more
than 40 seconds, the datalogger may time out and hang up the link.
• If you are connected, selecting the TERMINAL tab will stop all other
communication with the datalogger until you return to the TOOLS tab. If
communication between the computer and datalogger remains idle for
more than 40 seconds, the datalogger may time out and hang up the link.
When the datalogger times out, you may get odd characters on the screen.
1.4 Status
1.4.1 Device Map and Station Map
• During data collection if the disk or other storage devices become full, an
error will be written to the SWF log and the data collection attempt will be
halted. Once space is freed up on the disk or a new storage device is
attached, data collection will be resumed, though some duplicate data may
be written to the file.
displays information for all the dataloggers on the
Device Map at one glance. You can check the status of
data collection including scheduled calls, errors, retries,
and how much data was collected. You can also
launch windows displaying SWF (Status, Warning, and
Fault) messages or Low Level I/O (input/output) to monitor the binary traffic
between the PC and datalogger. Buttons are also provided to conveniently
collect data, stop data collection, turn on scheduled calls or reset retries.
The top portion of the Status window shows a summary for all the devices you
have set up. Information is displayed on data collection attempts and the next
scheduled call. A checkbox in the lower left portion of the screen allows you to
choose between viewing all the devices or just the stations (dataloggers). You
can also highlight one or more dataloggers to manually collect data or manually
terminate a collection in progress.
When a device is highlighted, you can press the right mouse button to bring up
a list of data collection related options. You can Toggle On/Off the device's
schedule; Collect Data from the device; Collect Data and Do Task (that is,
PC208W, Version 3.3, Instruction Manual 1-13
Page 36

Section 1. Setting Up the Network and Communicating with the Datalogger
perform any "After Call Do" items); Reset Retries to 0, or Discontinue the
current data collection process.
This display gives a variety of diagnostic information summarized below.
On-line
O - the device is currently on-line or being dialed.
T - the device, usually a modem, has been dialed and is currently transparent
(active but not the end of the link).
M - the COM port is being monitored for datalogger initiated communication
(call-back).
Error Rate
This is a running average of the errors in the last 20 communication attempts.
(n) will appear following the error nu m ber if the last attempt to communicate
failed. “n” is the number of successive failures. Typically the higher the error
rate number, the worse the communication link.
Last Call
Indicates when the last call or attempt to call finished (even if it failed).
Collected
Indicates the last area collected, how many Final Storage locations were
collected, and how many Final Storage locations should have been collected.
(The CR10, CR10X, CR510, and CR23X are the only supported dataloggers with
a Final Storage area 2.) For example, Area1 7/7 indicates that seven Final
Storage locations were collected from Area 1 on the last call. Area1 0/0
indicates that no locations where collected on the last call, probably because
there was no new data. Area1 0/10 would indicate that 10 locations were
attempted but none were collected, possibly due to a link failure.
Next Call
Indicates the next time to call. This is based on the scheduling and retry
parameters entered on the SCHEDULE tab for the datalogger in the SETUP
window. If no date and time are displayed, scheduling is not enabled. If a date
and time are displayed, but are grayed out, the schedule has been paused by
checking the Pause Schedule check box at the bottom of the Status screen. A
device's schedule can be toggled on or off by selecting the device, pressing the
right mouse button, and choosing Toggle On/Off or by pressing the Toggle
On/Off button.
1.4.2 Low Level I/O
Logging low level I/O is typically used to troubleshoot a communication
problem.
Select the View I/O button to display the actual serial communications for all
the serial ports. The columns on th e lef t co ntain the characters transmitted by
PC208W and those on the right indicate characters received. Binary
(unprintable) characters are displayed as a period “.” character. Since
1-14 PC208W, Version 3.3, Instruction Manual
Page 37

Section 1. Setting Up the Network and Communicating with the Datalogger
communication for all serial ports is displayed and can occur concurrently, it
may be helpful to turn scheduling off for all other sites when troubleshooting a
particular site.
The Log I/O to Disk checkbox is used to enable logging to a file in PC208W's
working directory. The files are named IO$COM1.LOG for COM1,
IO$COM2.LOG for COM2, and so on for COM ports, and IO$SOCKE.LOG
for socket connections. A separate file is used for each COM port, but all
socket activity is contained in one log. These files use a hexadecimal format so
binary characters can be viewed.
Information is saved to the IO$COMX.log file until it reaches 1 . 2 M . Once it
reaches 1.2M it is named IO1COMX.log and new information is saved in the
file IO$COMX.log. Up to ten log files are created (IO$COMX.log,
IO1COM1.log, IO2COM1.log…IO9COMX.log), and then the oldest file is
overwritten with the next new log file. This method of overwriting older log
files prevents disk space from being consumed by the files. Because log files
are saved for each communications port, if multiple COM ports are used lo g
files can consume a substantial amount of disk space.
1.4.3 COMM SWF Messages
1.4.4 Pause
Messages pertaining to datalogger communications can be displayed by
selecting the View Messages button. Warning and Fault messages are always
displayed and logged to disk in a file named SWF$.LOG. Status messages are
also displayed if you enable the Show Status Messages checkbox and are
logged if you enable the Log Status Msgs box
Information is saved to the SWF$.log file un til it reach es 1.2M. Once it reaches
1.2M it is named SWF1.log and new information is saved in the file SWF$.log.
Up to three log files are created (SWF$.log, SWF1.log and SWF2.log), and
then the oldest file is overwritten with the next new log file. This method of
overwriting older log files prevents disk space from being consumed by the
files.
The first character of the message indicates the type of messageStatus,
Warning, or Fault. The time the message occurred is given next. The format is
DD HH:MM:SS, where DD is the day of the month, HH is the hour, MM the
minutes, and SS the seconds. The name of the relevant device and actual
message follow the time.
When PC208W is first started, all scheduled data collection is paused for 15
seconds. The text for the box in the lower right corner of the status window
reads Startup Pause. After 15 seconds, the Pause Schedule box will be either
checked or unchecked, depending on its state when you last closed PC208W.
When Pause Schedule is enabled, the Next Call information for any devices
with scheduled data collection will be gray ed out.
PC208W, Version 3.3, Instruction Manual 1-15
Page 38

Section 1. Setting Up the Network and Communicating with the Datalogger
1.5 Command Line Functions
Command lines can be used to auto m a te data collection. Using command line
parameters, you can start PC208W and automatically connect to stations,
collect data, and exit the program.
Command lines are entered from the command prompt, from the Start | Run
menu, or specified on the executable line of a shortcut. Up to 150 characters
(including spaces) can be specified on a command line. Each command begins
with a forward slash, /. A dash, -, should separate the command and any
parameters it may have. If multiple comm an ds are used on one command line,
they should be separated by a space. Following are a list of command line
parameters that can be used with PC208W.
Parameter Description
/A-filename The /A switch is used to specify an alternate file name
for data collected from the active station's Final Storage
Area 1. Filename is the user-specified alternate file
name. Syntax: /S-station /A-filename /C
/A2-filename The /A2 switch is used to specify an alternate file name
for data collected from the active station's Final Storage
Area 2. Filename is the user-specified alternate file
name. Syntax: /S-station /A2-filename /C
/C The /C switch is used to collect data from the active
station.
/D-seconds The /D switch is used to insert a delay, in seconds,
before the next command is executed. Seconds is the
number of seconds to delay.
/F-Flag# The /F switch is used to toggle the specified flag of the
active station. To specify an extended flag for the
CR23X, precede the Flag# with an X.
/G-graph# The /G-graph# (where graph# is 1, 2, or 3) is used to
invoke Graph number 1, 2, or 3 for the active station.
/I-InLoc#:Value The /I switch is used to insert a value into the specified
input location of the active station.
/K The /K switch is used to set the clock for the active
station.
/M The /M switch is used to invoke the Numeric Monitor
for the active station.
/N The /N switch is used to open PC208W and run it in a
minimized mode.
/P-Port# The /P switch is used to toggle the specified port of the
active station.
/Q The /Q switch is used to quit PC208W.
1-16 PC208W, Version 3.3, Instruction Manual
Page 39

Examples:
Section 1. Setting Up the Network and Communicating with the Datalogger
Parameter Description
/S-Station The /S switch is used to open a session with th e
specified station. This command must precede all other
commands.
/T-Taskname The /T switch is used to execute a Task that has been set
up in the device map. The /T command can also be
used to collect data from a datalogger (see discussion
below).
The following is a typical command line that might be used in a desktop short
cut. The command line is typed into the Target Directory field.
PC208W.exe /S-CR10X1 /D-5 /K /A-newdata /C /Q
will
1. Open PC208W
2. Connect to the station named CR10X1
3. Delay for 5 seconds
4. Set the datalogger clock
5. Set the name for data collected from final storage area 1 to "newdata"
6. Collect data
7. Close PC208W
Below is an example of a DOS batch file. When double-clicked in the
Windows Explorer, it will perform the same function as the short cut above.
cd pc208W
bin\PC208W.exe /S-CR10X1 /D-5 /K /A-newdata /C /Q
This example assumes that PC208W was installed using the default directories.
\bin specifies the subdirectory in which the PC208W executable resides.
See section below on Directories.
NOTE
Because commands are separated by a space, the commands will
not work if there are other spaces in the command line.
Data Collection Using /C versus /T
The /C command is used to collect data from the datalogger specified by the
preceding /S command. Once data collection is completed, PC208W remains
connected to the datalogger until it is closed or until another /S command is
executed. Though a datalogger may have an After Call Do item associated
with it, the After Call Do is not executed.
The /T command is used to execute a task from the command line. However,
it can also be used to collect data from a datalogger. When the /T command is
PC208W, Version 3.3, Instruction Manual 1-17
Page 40

Section 1. Setting Up the Network and Communicating with the Datalogger
executed, PC208W connects to the datalogger, collects data, and then
terminates the connection. If the datalogger has an associated After Call Do
item, that item, and any subsequent After Call Do items, are executed.
If a resource intensive task is executed after collecting data from a datalogger,
it may be advantageous to use the /T optio n to collect the data. If the /S-station
/C combination is used, PC208W could return telecommunication errors if
system resources are not available to maintain uninterrupted communication
with the datalogger.
A Note About Directories and Command Line Entrie s
PC208W's default installation creates the PC208W directory and two
subdirectories, Bin and Inifiles. PC208W stores most of the files it needs for
program execution, including the PC208W.EXE file, in the Bin directory. The
PC208W directory is set up as the working directory; most of the files created
by the user are stored in this directory.
One file that is integral to the operation of PC208W is the PC208W.DND file.
This DND file contains the datalogger network description for your Device
Map. When you add a datalogger or other device to the Device Map, or make
changes to an existing device, the in f ormation is stored in the PC208W.DND
file in the working directory by choosing the Save Edits button.
When PC208W is started it reads the DND file from the working directory. If
you are running command line entries from a command prompt, PC208W
considers the working directory to be the directory from which the commands
were invoked. Therefore, if you type the following command at the C:\
prompt:
C:\PC208W\bin\pc208w.exe /S-CR10X1 /C /Q
PC208W will look for the DND file on the root of the C:\ drive. When it
doesn't find a DND file, it will create a new one that contains on ly COM1
(none of your devices will exist on the new device map).
One way to resolve this is to run the above command from a batch file that
directs your computer to the appropriate directories. For example:
cd pc208w
bin\pc208w.exe /S-CR10X1 /C /Q
This batch file, which would be run from the C:\ prompt, would set the active
(working) directory as PC208W and run PC208W.exe, which is stored in the
Bin directory, using the specified command line parameters.
1-18 PC208W, Version 3.3, Instruction Manual
Page 41

Section 2. Program: EDLOG
This section is intended to explain the use of the Edlog program generator. For
information on writing datalogger programs, refer to your datalogger User’s Manual.
2.1 Introduction
Choosing PROGRAM from the main PC208W toolbar invokes the program
EDLOG. EDLOG is a tool for creating, editing, and documenting programs
for the CR7, CR10, CR10X, CR500, CR510, CR23X, and 21X dataloggers.
EDLOG annotates the numeric instructions and parameters that are sent to the
datalogger. Instructions and parameters can be picked from lists or entered
manually, and are easily edited, moved, or deleted.
Some highlights of EDLOG’s features are listed below.
Context-Sensitive Help
If you need help with an instruction or parameter,
The right mouse button brings up editor options, pick lists or pop-up help for
where you’re pointing. Detailed help is available for the cursor location by
pressing <F1> or from a button on the pick list. Help, pick lists, and edit
functions are also available from the menus or toolbar.
Cut and Paste
Several programs can be open simultaneously, simplifying cutting and pasting
between programs for the same datalogger.
Input Location Labels
Measurement results and calculations are stored in datalogger Input Locations.
EDLOG allows labeling these locations. For many applications, EDLOG will
manage the use of Input Locations. A new Input Location label is
automatically assigned the next available Input Location number (address).
That Input Location can be picked from a list for further calculations or output.
The Input Location Editor (Section 2.7.3) allows the Input Locations to be
edited (moved, inserted, deleted); the Input Location numbers are
automatically changed wherever the labels appear in the program.
When a section of code is pasted into a program, EDLOG will automatically
use existing locations for matching labels and assign locations to new labels.
All location numbers in the pasted code are updated accordingly.
press the right mouse button
.
The programmer that wants to assign labels to specific Input Locations may
find it easiest to enter the labels in the Input Location Editor first and then pick
them from a list as the program is wr itten .
PC208W, Version 3.3, Instruction Manual 2-1
Page 42

Section 2. Program: EDLOG
Expression Interpreter
Mathematical calculations can be written algebraically using Input Location
labels as variables. For example, the following expression could be used to
create a new location that holds the temperature in Fahrenheit (TempF) which
is calculated from the temperature in Celsius (TempC):
TempF=TempC*1.8+32
EDLOG will compile the expression into datalogger instructions, creating
locations for intermediate steps if necessar y (Section 2.5).
Compiler
EDLOG compiles the program to check for errors and create the file that is
downloaded to the datalogger. The download file (*.DLD) excludes all
comments and incorporates the instructions required to calculate the
expressions. During the compile step, a Final Storage Label file (*.FSL) that
lists the labels used by the program and a Program Trace Information file
(*.PTI) are also created (Section 2.9).
2-2 PC208W, Version 3.3 Instruction Manual
Page 43

File Edit Search Compile Display Options Window Help
Section 2. Program: EDLOG
Compile Program
Contents
How to Use Help
About
Tile
Cascade
Editor
Show Toolbar
Font
Program Security
Final Storage Area 2 (C R1 0, CR10X)
Datalogger ID (CR10X, CR500)
Power-Up Settings (CR10X)
Compile Sett ings (CR23X)
RS-232 Initial Bau d/Power Settings (CR23X)
Renumber
Rebuild Indention
Compress (<F7>)
Uncompress (<F7>)
Checks program syntax and creates a .DLD File.
Renumbers instruct i ons.
Resets indenti ons to parameters specified in automatic indentions
Displays only the first li ne of each instruction.
Displays all lines of each in struction.
Displays windows on an equal port ion of the screen.
Only the tit le bars of the inactive windows are shown.
Allows a topic to be selected
from a list.
Lists version number and
copyright date.
Enables/disables automatic re-numbering,
data entry warni ng, and automatic
indentions.
Displays a "Speed bar" for certain EDLOG
functions.
Selects font for EDLOG display.
Sets datalogger security codes.
Sets the amount of final storage area 2
memory.
Assigns an identification label to a
datalogger.
Clears or retains settings for ports, flags,
and storage.
Clears or retains settings for ports, flags,
and storage.
Sets initial baud rate and RS-232 power.
Search (<Ctrl>F)
Search Again (<F3>)
Cut (<Ctrl>X)
Copy (<Ctrl>C)
Paste (<Ctrl>V)
Delete (<Ctrl>Del)
Comment (<Ctrl><N>)
Uncomment (<Ctrl><N>)
Show Clipboard
Save to Library File
Insert Library File
Insert Instruction (<Shift><Ins>)
Delete Instruction (<Shift><Del>)
Input Labels (<F5>)
Final Storage Labels
View Mode 4 Table (CR10, CR10X, CR500, CR23X)
New
Open
Save (<Ctrl>S)
Save As
View File
Close (<Ctrl><F4>)
Close All
Print (<Ctrl>P)
Print to File
Print Setup
Document DLD File
Exit (<Alt><F4>)
(Filename)
Creates a new datalogger program
Edits an existing program
Saves the current datalogger program
Saves the current datalogger program under a new name.
Opens file in view only mode (file cannot be edited).
Closes only the active window.
Closes all of the windows.
Sends current program to printer.
Sends current program to a printable file.
Changes print settings.
Documents a file that was create d w ith the keyboard/display or an earlier version of EDLOG.
Exits EDLOG and returns to PC208W.
Name of last program edit ed.
Searches for a string of text.
Performs search again.
Pastes EDLOG text to Windows clipboard (see Section 2.6.2).
Copies EDLOG text (see Section 2.6.2).
Copies text at cursor location (see Section 2.6.2).
Deletes highlighted text.
Formats the selected text or instruction as a comment.
Changes the commented text or instruc tion to uncommented.
Displays t he text that will be inserted if the Paste option is used.
Creates a library f i le (see Section 2. 6.3).
Inserts a library file (see Section 2.6.3).
Allows an instruction to be selected from a list (see Section 2.4).
Deletes an instruction.
Accesses the Input Locati on editor (see Sectio n 2.7.3).
Lists the final storage locations affected by the selected output processing instruction.
Displays a table listing of Mode 4 parameters.
FIGURE 2.1-1. EDLOG Menu
PC208W, Version 3.3, Instruction Manual 2-3
Page 44

Section 2. Program: EDLOG
2.2 Getting Started
2.2.1 Creating a New EDLOG Program
The steps for creating a new datalogger program are:
1. Start EDLOG from PC208W by clicking on the toolbar icon labeled
2. Select FILE | NEW.
3. When prompted, select the datalogger type.
4. Develop and edit your datalogger program (Sections 2.3 and 2.4).
5. Select FILE | SAVE to save and name the program.
6. When prompted, select YES to compile the program.
7. Exit EDLOG by selecting FILE | EXIT.
PROGRAM.
2.2.2 Editing an Existing Program
Instead of using FILE | NEW, load an existing program by selecting FILE |
OPEN.
2.2.3 Documenting a DLD File
FILE | DOCUMENT DLD FILE is for creating a documented (.CSI) file from
the instructions in a .DLD file. This might be used if a program was keyed
directly into the datalogger (or modified with the keyboard) and then retrieved
with PC208W. After creating a documented file, make sure to save it using
FILE | SAVE.
Programs created with versions of EDLOG earlier than 6.0 were stored with
the instruction description and comments in a *.DOC file and the download
code in the .DLD file. These programs,
can be imported into this version o f EDLOG with FILE | DOCUMENT DLD
FILE. To convert these programs and retain the programmer’s comments, use
DOC2CSI (Section 6).
without the programmer’s comments,
2.2.4 The Program Development TEMPLATE
When FILE | NEW is selected, the template shown in Figure 2.2-1 appears in
the PROGRAM DEVELOPMENT screen. A program consists of
instructions, comments, and expressions inserted into Program Tables 1 and 2
and the Subroutine Table 3.
The Table Headers and Execution Intervals are protected text which cannot be
deleted or commented out. When the cursor is moved to the Execution
Interval line, the value for the execu tion interval is highlighted. A numeric
2-4 PC208W, Version 3.3 Instruction Manual
Page 45

Section 2. Program: EDLOG
value must be entered or the instr uctions in the table will not be performed.
On the blank lines in each of the program tables, instructions can be inserted or
comments and equations can be freely typed in.
Like the execution interval, instructions consist of protected text and fields
where parameters are entered. With data entry warnings enabled (default),
EDLOG prevents leaving a field with an incorrect value.
Datalogger type entered as comment
Protected Text
2.3 Comments
Enter Instructions
and Comments
FIGURE 2.2-1. Program Development Template
Comments are entered to describe the program for the programmer or future
users. Comments are ignored by the compiler; they can be entered anywhere
in the EDLOG program. A semicolon (;) is used to mark comments. When
the compiler finds a semicolon in a line, it ignores the rest of the line.
Instructions can be commented out to test various versions of a program or to
delete a measurement.
In addition to typing a semicolon at the beginning of each line while entering
comments, there are several ways to comment and uncomment lines,
instructions, or blocks of code:
• Select “comment” or “uncomment” from the right button menu
(highlighted block only).
• Select FILE | COMMENT or FILE | UNCOMMENT from the EDLOG
toolbar.
• Press <ctrl> n. The line, instructio n or highlighted block will become a
comment.
PC208W, Version 3.3, Instruction Manual 2-5
Page 46

Section 2. Program: EDLOG
2.4 Instructions
• Press <shift><ctrl> n. The line, in str uction or highlighted block will be
uncommented.
• Press <End> to move to the right of the protected text of an instruction
and enter a comment.
EDLOG will not allow a portion of an instru ctio n or protected text (such as the
table execution intervals) to be commented out.
Instructions must be entered in one of the program tables. Instructions are
added to a program with the Insert Instruction dialog box. (Programmers with
a great memory can type the instruction number on a blank line and press
<enter>.) To get the Insert Instruction box, either:
• Point the mouse cursor at the blank line where you want the instruction
and press the right button.
• Select EDIT | INSERT INSTRUCTION from the main menu.
• Press <shift> <Insert>.
Select the instruction with the mouse or by moving the cursor keys and click
OK. If you need more information on an instruction, highlight the instruction
and press the Help button.
FIGURE 2.4-1. Insert Instruction Dialog Box
2.4.1 Entering Parameters
When an instruction is inserted, the cu rsor moves to the first parameter. Type
the parameter's value and press <enter> to move to the next parameter. For
help with the parameter:
• Point the mouse cursor at the parameter and press the right button. This
brings up a Dialog box for selecting the parameter or a pop-up description
of what needs to be entered.
2-6 PC208W, Version 3.3 Instruction Manual
Page 47

Section 2. Program: EDLOG
• Press <F1>. This opens the help system to the detailed description of the
instruction and parameters.
Repeat the process until all of the param eters have been entered.
NOTE
2.4.2 Data Entry Warning
2.5 Expressions
The instructions and their parameters are datalogger specific; to
find a detailed description of an instruction, refer to the specific
datalogger manual.
When the Data Entry Warning is active, a warn ing is displayed immediately
after an invalid input has been entered for an instruction's parameter. The
warning lists the valid inputs. A valid input must be entered before advancing
to the next parameter.
By default, the Data Entry Warning is enab led. To disable the Data Entry
Warning, select OPTION | EDITOR. Use the <tab> key to place the cursor on
the brackets and press the <space> bar or select the brackets with the computer's
mouse. A space instead of an 'X' between the brackets indicates this option is
disabled.
Expressions are a shortcut for processing numbers and input data. They can be
entered into any of the program tables. When a datalogger program that
contains an expression is compiled, the appropriate instructions are
automatically incorporated into the .DLD file.
2.5.1 Rules for Creating Expressions
• Expressions must be set equal to the label of the Input Location that will
store the result. The label must be to the lef t of the expression. See
Section 2.7 for more information about Input Location labels.
• Expressions can have both fixed numbers and Input Location labels. Input
Locations can ONLY be referenced by their label; each number is always
assumed to be a constant.
• Floating point numbers are limited to five (or six for the CR10X) digits
plus the decimal point and sign.
• The operator(s) and/or function(s) used in the expression must be on the
operator or function list (Table 2.5-1).
• Numbers and labels that are immediately after a function must be enclosed
in parentheses.
• Several operators and/or functions can be used in one expression.
Operations and functions that are enclosed in parentheses are calculated
first; the inner most parentheses are evaluated first.
• To continue an expression to th e next line, end the first line with an
underscore (_).
PC208W, Version 3.3, Instruction Manual 2-7
Page 48

Section 2. Program: EDLOG
TABLE 2.5-1. Operators and Functions
Operators
* (multiply)
/ (divide)
+ (add)
- (subtract)
^ (raise to the power of; enclose negative values in parentheses)
@ (modulo divide)
e (for CR10(X) only, scientific notation; 6e-1=0.6)
Functions
COS (cosine; angle in degrees)
SIN (sine; angle in degrees)
TAN (tangent; angle in degrees)
COTAN (cotangent; angle in degrees)
ARCTAN (arctangent; angle in degrees)
ARCSIN (arcsine; angle in degrees)
ARCCOS (arccosine; angle in degrees)
ARCCOT (arccotangent; angle in degrees)
SQRT (square root)
LN (natural logarithm)
EXP (exponent of e; EXP(2) = e2)
RCP (reciprocal; RCP(4) = 1/4 = 0.25)
ABS (absolute value)
FRAC (takes the fraction portion; FRAC(2.78)=.78)
INT (takes the integer portion; INT(2.78)=2)
2-8 PC208W, Version 3.3 Instruction Manual
Page 49

2.5.2 Examples
Below are examples of valid expressions:
Zee = Vee+Ex
es = tee^(-2)
Root = SQRT(ABS(data))
avg = (data1+data2+data3+data4+data5)/5
length = SQRT((adj^2)+(opp^2))
TempF = (TempC*1.8)+32
The following section of an EDLOG program for the CR10X uses an
expression to convert Temperature from Celsius to Fahrenheit:
Execution Interval = 10 sec
1: Temperature (107) (P11)
01: 1 REPS
02: 2 Channel
03: 1 Excitation Channel
04: 2 Loc [TempC]
05: 1 Mult
06: 0 Offset
Section 2. Program: EDLOG
TempF = (TempC*1.8)+32
When this program is compiled, the .DLD file contains the following
instructions. The last 5 instructions calculate th e ex pression.
1: Temperature, 107 (P11)
1: 1
2: 2
3: 1
4: 2
5: 1.0
6: 0.0
2: Z=X (P31)
1: 2
2: 5
3: Z=F (P30)
1: 1.8
2: 0
3: 3
4: Z=X*Y (P36)
1: 3
2: 5
3: 5
5: Z=F (P30)
1: 32
2: 0
3: 3
6: Z=X+Y (P33)
1: 3
2: 5
3: 6
PC208W, Version 3.3, Instruction Manual 2-9
Page 50

Section 2. Program: EDLOG
2.6 Editing EDLOG Programs
Table 2.6-1 provides a list of keystrokes which can be used in editing programs
and moving around in the PROGRAM DEVELOPMENT screen.
TABLE 2.6-1. Editor Keystrokes
PgUp Page Up
PgDn Page Down
Up Arrow Move Up One Line
Down Arrow Move Down One Line
Right Arrow Move One Character Right
Left Arrow Move One Character Left
<ctrl> Home Move Cursor to Beginning of File
<ctrl> End Move Cursor to End of File
<ctrl> PgUp Move Cursor to Top of Screen
<ctrl> PgDn Move Cursor to Bottom of Screen
<Enter> Move to Next Field or Create New Line
<shift> Ins Select an Instruction from a Dialog Box
<ctrl> Right Arrow Move Instruction 1 Tab Right (Cursor on Parameter)
<ctrl> Left Arrow Move Instruction 1 Tab left (Cursor on Parameter)
or Move from Input Location label to Input Location
number.
<ctrl> n Comment out a Line or Instruction
<shift> <ctrl> n Uncomment a Line or Instruction
<end> Move to end of line, Add a comment if on an
Instruction
<ctrl>C Copy highlighted text
<ctrl> X Cut highlighted text
<ctrl>V Paste clipboard
Del Delete character to right or highlighted text
<shift> Del Delete the Instruction or Line Under the Cursor
<Esc> Close Dialog Box
2.6.1 Editing Comments, Instructions, and Expressions
To edit Comments, Expressions, and Instruction parameters, move the cursor
to the appropriate text and retype it. To delete an instruction when the cursor
is somewhere within the instruction, select EDIT | DELETE INSTRUCTION
or press <shift> Del. An instruction or block of instructions can also be
highlighted and deleted with the delete key or right mouse click.
2-10 PC208W, Version 3.3 Instruction Manual
Page 51

Section 2. Program: EDLOG
2.6.2 Cut, Copy, Paste, and Clipboar d Opti ons
EDIT | CUT, EDIT | COPY, and EDIT | PASTE allow sections of the program
to be moved or copied to another area of the program or between programs.
EDIT | SHOW CLIPBOARD shows the contents of the clipboard.
NOTE
You cannot move, copy, delete or comment out protected text
(Tables, Execution Intervals). To move, copy or delete an
Instruction, the entire instru ction, inclu ding all of th e par ameters,
must be selected.
Cutting and pasting between datalogger programs should be between programs
for the same datalogger type only. Instructions and parameters may differ
between dataloggers. The compiler will catch many of these errors; however,
this may be at the expense of much time and confusion.
2.6.3 Library Files
Library files can be created to store portions of programs. The library file can
be inserted into a program at a later time. To create a library file, select the text
to be stored and then EDIT | SAVE TO LIBRARY FILE. When the window
appears, type in the library filenam e .
To insert a library file in a program, m o ve the cursor where the file is to go and
select EDIT | INSERT LIBRARY FILE. Library files created for one type of
datalogger type should not be used in programs for a different type; i.e., a file
for a CR10X should not be used in a program for a 21X.
2.6.4 Renumbering the Instructions
When Automatic Renumbering is enabled, the instructions are automatically
renumbered whenever instructions are inserted or deleted. By default,
Automatic Renumbering is enabled.
To improve performance on slow computers, the Automatic Renumbering can
be disabled by selecting OPTIONS | EDITOR. When Automatic Renumbering
is disabled, the user can manually renumber the instructions by selecting
DISPLAY | RENUMBER.
2.6.5 Compress View
When DISPLAY | COMPRESS VIEW is selected, the first line of each
instruction is displayed. The co mpressed view makes it easier to see the
program structure and to move around in the program, but instructions cannot
be edited in the Compress View window. Use DISPLAY | UNCOMPRESS to
switch back to the full view or use the <F7> function key to toggle between the
compressed and full views.
PC208W, Version 3.3, Instruction Manual 2-11
Page 52

Section 2. Program: EDLOG
2.7 Input Locations
Each Input Location has an Input Location number and a label that appear
whenever the Input Location is referenced in the program. EDLOG
automatically assigns Input Location numbers as labels are entered.
2.7.1 Entering Input Locations
When a parameter requires an Input Location, the cursor automatically
advances to where the label is keyed-in. When a new label is entered, the next
available Input Location number is automatically assigned to that label. To
select an existing label from a list, press the right mouse button or <F6>.
Labels can have up to nine characters. The first character must be a letter. The
allowed characters are letters, numbers, and underscore (_). The following
labels are reserved for expressions and should not be entered by the user:
CSI_R, CSI_2, CSI_3, . . . CSI_95.
To move the cursor to type the Input Location number instead of the label, use
the mouse or press <ctrl> left arrow.
2.7.2 REPS
Many input/output and o utput processing instructions have a r epetitions
parameter. Repetitions (REPS) allow one programming instruction to m easure
several identical sensors or to process data from several Input Locations.
When REPS are greater than 1, the Input Locations are assigned consecutive
numbers (e.g., with REPS of 2 and LOC of 5, the Input Locations are 5 and 6).
Each rep label is the initial label with a “ _” and the next consecutive numb er .
For example: With 3 REPS and a label of “data” the labels for each REP are:
data_1, data_2, and data_3.
Only the first location of an output processing instruction is linked to the label.
Reps of input/output instructions and output processing instructions are not
linked.
For example:
In the following section of an EDLOG program, the TempC and BatteryV
Input Locations are sampled with one sample (P70) instruction, with the REPS
parameter of 2.
2-12 PC208W, Version 3.3 Instruction Manual
Page 53

10: Temperature (107) (P11)
01: 1 REPS
02: 2 Channel
03: 1 Excitation Channel
04: 1 Loc [TempC]
05: 1 Mult
06: 0 Offset
11: Battery, Volt (P10)
01: 2 Loc [BatteryV]
12: If time is (P92)
01: 0 minutes into interval
02: 60 minute interval
03: 10 Set high Flag 0 (output)
13: Sample (P70)
01: 2 Reps
02: 1 Loc [TempC]
Section 2. Program: EDLOG
NOTE
If an Input Location is inserted between the TempC and
BatteryV location, the inserted location will be sampled instead
of BatteryV.
2.7.3 Input Location Editor
Input Location labels can be entered and edited by using the Input Location
Editor (Figure 2.7-1). To access the Input Location Editor, select
EDIT | INPUT LABELS.
The following commands are available from the Input Location Editor Edit
menu:
INSERT (<F2>) — inserts blank Input Locations. This is used to provide
space for new input labels between existing labels. This automatically changes
the Input Location numbers for all of the labels that are after the inserted
location.
DELETE (<F3>) — deletes the Input Location label, flags, number of reads
and writes, and block information for a designated location number. Whenever
the datalogger program references a deleted location label, the Input Location's
number automatically becomes 0.
MOVE (<F4>) — moves the Input Location to a different number. This might
change several Input Location numbers.
TOGGLE MANUAL (<F5>) — allows the programmer to manually mark a
location as in use, or to remove this manual designation. This is used for burst
mode, indexed loops, or other situations where it's not clear to EDLOG that the
locations are being written to. Input Locations not marked as read, write, or
manual are deleted by the optimize command. (See Section 2.7.4 Input
Location Anomalies.)
PC208W, Version 3.3, Instruction Manual 2-13
Page 54

Section 2. Program: EDLOG
OPTIMIZE (<F6>) — deletes Input Locations that aren't read, written to, or
marked manually. Optimize tries to r educe the total number of locations used
by moving Input Location labels down (in location number) to fill in unused
locations. This might change several Input Location numbers. Any changes in
location number made by the optimize command are reflected in the EDLOG
program.
INSERT BLOCK (<F7>) – inserts a block of Input Locations with the manual
flag set. The label for the locations is entered in the Base Name input area.
The locations are labeled in the same manner as r eps.
Location number
Number of Instructions
in the program that
read the location
Number of Instructions
in the program that write
to the location
Label
Program Use:
R Read
W Written to
M Manually marked
Reps or Manual Block
Start First of Rep.
End Last of Rep.
FIGURE 2.7-1. INPUT LOCATION EDITOR Screen
2-14 PC208W, Version 3.3 Instruction Manual
Page 55

2.7.4 Input Location Anomalies
In most instances, EDLOG will automatically assign Input Locations for
locations which are generated by the datalogger program. An example of this
is EDLOG’s handling of Input Locations for the REPS parameter. Though
only one Input Location is specified, if REPS is greater than 1, additional Input
Locations are created by EDLOG (refer to 2.7.2 above).
However, there are certain instructions which generate multiple Input
Locations for which EDLOG does not automatically allocate Input Locations.
These are:
• Instruction 15, Serial I/O with Control Port
• Instruction 23, Burst Measurement
• Instruction 49, Spatial Maximum
• Instruction 50, Spatial Minimum
• Instruction 54, Block Move
• Instruction 75, Histogram
• Instruction 80, Set Active Storage Area
• Instruction 81, Rainflow Histogram
• Instruction 100, TDR Measurement
• Instruction 101, SDM-INT8
• Instruction 105, SDI-12 Recorder
• Instruction 106, SDI-12 Sensor
• Instruction 113, SDM-SIO4
• Instruction 118, SDM CAN
• Instruction 119, TDR100
• Instruction 120, DATA TRANSFER TO TGT
• Instruction 189, SDM-LI7500
• Indexed input locations in a loop
Section 2. Program: EDLOG
2.8 Indention
Details on how EDLOG handles each of these instructions is given in
Appendix A.
When these instructions are used in a program, the Toggle Manual feature (see
2.7.3 above) can be used to manually mark Input Locations for use by the
program.
Indention is typically used with If Then/Else sequences and loops to provide a
visual key to the program execution. Indention is to assist the person looking
at the program; it has no meaning to the datalogger. If the programmer
chooses to use indention, it can be done automatically or manually.
The settings for indention are found under OPTIONS | EDITOR. Turn on
Automatic Indention by checking the box next to it. The distance for each
indention (in spaces) is set on the same Dialog box.
To manually indent an instruction, place the cursor on one of the instruction’s
parameters and press either <ctrl> right arro w or <ctrl> left arrow; the
instruction is indented the direction the arrow is pointing.
PC208W, Version 3.3, Instruction Manual 2-15
Page 56

Section 2. Program: EDLOG
2.9 File Types
2.9.1 Program Documentation, *.CSI
2.9.2 Download Files, *.DLD
DISPLAY | REBUILD INDENTION resets all existing indentions and rebuilds
automatic indentions. Automatic inde n tions may need to be rebuilt when
editing instructions cause the indentions to get misaligned.
*.CSI files are the EDLOG program files that the user edits. When an EDLOG
program is saved, EDLOG automatically adds a .CSI extension to the
program's name. Existing .CSI files can be loaded into EDLOG by selecting
FILE | OPEN. Although .CSI files are ASCII files, editing the files with a text
editor can affect the EDLOG files so that they no longer compile.
*.DLD files are files which can be downloaded to a datalogger. They are
produced by compiling an EDLOG program or by retrieving a program from
the datalogger. Whenever an EDLOG program is compiled, any existing .DLD
files with the same name are overwritten. .DLD files that were created with an
older version of EDLOG or created with the keyboard/display can be
documented by selecting FILE | DOCUMENT DLD.
2.9.3 Final Storage Label Files, *.FSL
*.FSL files list the final storage labels. The .FSL files are u sed b y SPLIT to
help select output values. These files can be viewed with FILE | VIEW.
These files are produced by EDLOG when the program is compiled.
Whenever an EDLOG program is comp iled, any existing .FSL files with the
same name are overwritten.
2.9.4 Program Trace Information Files, *.PTI
*.PTI files show the execution times for each instruction, block (e.g.,
subroutine), and table as well as the number of final storage locations used per
day. The execution times are estimates. .PTI files do not account for If
commands, Else commands, or repetitions of loops. For some instructions, the
execution times are listed as 0. This occurs when the execution time is difficult
to calculate (e.g., Burst Mode).
*.PTI files can be viewed with FILE | VIEW.
These files are produced by EDLOG when the program is compiled.
Whenever an EDLOG program is comp iled , any existing .PTI files with the
same name are overwritten.
2-16 PC208W, Version 3.3 Instruction Manual
Page 57

2.9.5 Printer Output Files, *.TXT
*.TXT files are EDLOG programs that can be printed or used with a text
editor. They are produced by selecting FILE | PRINT TO FILE.
2.9.6 Library Files, *.LBR
Library files allow a section of a program to be inserted into any EDLOG
program. To avoid programming errors, the library file and the EDLOG file
should be for the same type of datalogger.
Section 2. Program: EDLOG
PC208W, Version 3.3, Instruction Manual 2-17
Page 58

Section 2. Program: EDLOG
This is a blank page.
2-18 PC208W, Version 3.3 Instruction Manual
Page 59

Section 3. Report: SPLIT
3.1 Overview
SPLIT is a tool to aid the use and analysis of data collected with Campbell
Scientific dataloggers. Its name comes from its function of splitting specific
data from a larger data file. The most common application, as shown in
Section 3.2, Getting Started, is to separate data collected on a particular
interval from a data file containing data output at several different intervals.
In addition to simply splitting a data array collected at one interval from all the
data collected by a datalogger, SPLIT applications include: data selection
based on time or condition s, statistics, calculations, file reformatting, data
quality checking (limit testing), table generation with report and co lumn
headings, and time synchronizing and merging of up to eight files.
Input Files (maximum of eight) are read by SPLIT, specific operations are
performed on the data, and the results are output to a single Output File or print
out. SPLIT creates a parameter file (filename.PAR) that defines which data
files are read, what operations are performed on the data set, and where the
final results will be saved. The parameter file may be saved and used again.
Input Files (Section 3.3.1) must be formatted in Printable ASCII, Comma
Separated ASCII, Field Formatted ASCII, Final Storage (Binary) Format, or
Raw A/D data.
Output files generated by SPLIT are Field Formatted (default), Comma
Separated ASCII, or Printable ASCII.
SPLIT lends itself to experimentation. The processed data are displayed on the
screen, giving immediate feedback as to the effect of changes or new entries to
the parameter file. The Input File is not modified by SPLIT.
3.2 Getting Started
The most common use of SPLIT is to separate data collected on a particular
interval from a data file containing data output at several different intervals.
In the following example, hourly data are split from a data set that contains
both hourly and daily data. The data were collected from Weather Station 1, a
CR10X. The station was named WS1 when telecommunications were set up
so the data are stored in the file WS1.dat. The CR10X was loaded with a
program created by EDLOG named WS1.dld.
The hourly data, array 10, and the daily data, array 20, are intermixed in the
data file (Figure 3.2-1)
PC208W, Version 3.3, Instruction Manual 3-1
Page 60

Section 3. Report: SPLIT
FIGURE 3.2-1. Data File
When EDLOG compiled WS1.dld, it also created the Final Storage Label file,
WS1.FSL which lists the final storage locations for each data element (Figure
3.2-2).
FIGURE 3.2-2. FSL file
3-2 PC208W, Version 3.3, Instruction Manual
Page 61

Section 3. Report: SPLIT
FIGURE 3.2-3. Input File Template
Start SPLIT from the PC208W toolbar by clicking on the Report
icon. Figure 3.2-3 shows the blank SPLIT template. Information entered into
this template can be saved as a parameter file (*.PAR) and reused for other
data.
On the INPUT FILE tab we only need to specify the input filename, copy
condition, and the data to select. SPLIT allows specific start and stop
conditions to be specified but if they ar e lef t b lank, the entire file will be read.
The name of the Input Data File can be typed in or the Browse button can be
used to select from available files. In this example: C:\PC208W\WS1.dat is
selected as the input data file.
Selecting the data to copy is simplified by the use of the WS1.fsl file. From
the toolbar menu, click on LABELS | USE FINAL STORAGE LABELS.
From the Data File Labels pop-up, Select File is used to find WS1.fsl. When
one of the Output Arrays is highlighted, the Field Names of the data in that
array are displayed (Figure 3.2-4).
PC208W, Version 3.3, Instruction Manual 3-3
Page 62

Section 3. Report: SPLIT
FIGURE 3.2-4. DATA FILE LABELS Screen
FIGURE 3.2-5. Pasting Values into SPLIT
In this example we want the hourly data (note the Output Interval at the bottom
of the Data File Label window) so we click on array 10. To paste all the values
in this array into the Select box, we put the SPLIT cursor in the Select box by
clicking the mouse in that box, select all the field names (click on the first one
3-4 PC208W, Version 3.3, Instruction Manual
Page 63

Section 3. Report: SPLIT
and holding the mouse button down, drag to the end), then click on Paste
(Figure 3.2.5).
Note that the cursor in the INPUT FILE(S) screen must be in valid paste area
(Copy or Select). If the cursor is in the Filename box or in Start/Stop
condition, you will get the error message “Cannot Paste There”.
The Paste operation put the numbers of each of the fields into the Select box.
Notice also that it pasted the Array ID into the copy condition: 1[10] tells
SPLIT that in order to copy a line of data, the first value in that line must be
10. SPLIT uses the Array ID to discriminate between the hourly and daily
data.
Now we must specify the Output File. (Without one specified, SPLIT will run
and display results but no output file will be created.) Click on the OUTPUT
FILE tab. We type in “hourly” for the name of the output file. By default,
SPLIT will use the file extension “PRN”, creating the output file: hourly.prn.
The Labels option from the toolbar can also assist in labeling the output values.
Once again, choose LABELS | USE FINAL STORAGE LABELS and select
array 10 and all the field names. This time move the cursor to Line 1 of the
first column of labels on the OUTPUT FILE tab and press Paste (Figure
3.2-6).
FIGURE 3.2-6. Pasting Labels Into SPLIT
PC208W, Version 3.3, Instruction Manual 3-5
Page 64

Section 3. Report: SPLIT
FIGURE 3.2-7. Edited Headings
Maximum column heading width is one less than the number entered in the
column width field. Any FSL labels which are too long for SPLIT column
headings will be shown in red. They should be edited before running SPLIT.
To edit one of the labels, press the <Enter> key or use a mouse to copy, cut,
and paste. A Report Heading can also be entered (Figure 3.3-7) using the same
editing technique.
Now we are ready to run SPLIT. Select RUN | GO and the hourly data will be
split out and stored in hourly.prn. The results are displayed on the screen as
shown in Figure 3.2-8.
Close the Run window. If you wish to save this parameter file for future
reports, choose FILE | SAVE. The file will be saved with a .PAR extension.
3-6 PC208W, Version 3.3, Instruction Manual
Page 65

Section 3. Report: SPLIT
FIGURE 3.2-8. SPLIT Run Showing Hourly Data
3.3 SPLIT Parameter File Entries
3.3.1 Input Files
The name of the Input File is entered in the space to the right of the Browse
button. The default directory is defined by the properties of the shortcut that
started PC208W. If the input file is not in the default directory, use the
Browse button to find the input file.
Input Files must be formatted in Comma Separated ASCII, Final Storage
(Binary) Format, Field Formatted ASCII (SPLIT default output format),
Printable ASCII, or Raw A/D data (refer to special Burst Mode Instruction in
Campbell Scientific datalogger manual).
Table 3.3-1 provides an example of Printable ASCII, Comma Separated, and
Field Formatted input file types. The data in the various formats are identical.
Each line of data represents an "Output Array", starting with an Output Array
ID (in this case 115). Each data point in the Output Array is referred to as an
"element". The element number is given in the Printable ASCII format, and
implied in the other formats. Data presented in Table 3.3-1 is used for
example purposes in the following sections.
PC208W, Version 3.3, Instruction Manual 3-7
Page 66

Section 3. Report: SPLIT
TABLE 3.3-1. Comma Separated, Field F ormatted, and Printable ASCII
Input File Format Types
COMMA SEPARATED
115,189,1200,89.6,55.3,25.36,270
115,189,1300,91.3,61.5,27.25,255.4
115,189,1400,92.7,67.7,15.15,220.1
115,189,1500,94.1,69,20.35,260.6
FIELD FORMATTED
115 189 1200 89.6 55.3 25.36 270
115 189 1300 91.3 61.5 27.25 255.4
115 189 1400 92.7 67.7 15.15 220.1
115 189 1500 94.1 69 20.35 260.6
PRINTABLE ASCII
01+0115 02+0189 03+1200 04+089.6 05+055.3 06+25.36 07+270.0
01+0115 02+0189 03+1300 04+091.3 05+061.5 06+27.25 07+255.4
01+0115 02+0189 03+1400 04+092.7 05+067.7 06+15.15 07+220.1
01+0115 02+0189 03+1500 04+094.1 05+069.0 06+20.35 07+260.6
Element 1 = Output Array ID# (115)
Element 2 = Julian day (189)
Element 3 = hour, minute
Element 4 = average temperature in deg. F
Element 5 = average soil temperature in deg. F
Element 6 = average wind speed in mph
Element 7 = wind direction in degrees
A maximum of eight input files may be opened by SPLIT. Additional input
files are opened with the EDIT | ADD DATA FILE menu option. SPLIT
defaults to a file extension of .DAT if no extension is specified. If the Input
File does not exist, an error message is displayed when RUN | GO is selected
from the menu options.
For instance, to process two files named TEST.DAT and TEST_1.DAT the
user would select TEST.DAT and TEST_1.DAT as Input Files. Two blank
templates will be generated. To change fr om one template to the other, click
on the appropriate tab on the bottom of the screen. Both templates mu st be
completed before SPLIT will process the data. To merge different output
arrays from the same input file into one array, open the data file once for each
different array.
3-8 PC208W, Version 3.3, Instruction Manual
Page 67

Section 3. Report: SPLIT
Example 1
Each time SPLIT runs a parameter file, it keeps track of the number of bytes it
read from the input file and saves this information in the parameter file.
SPLIT can then start where it last left off. This is done by clicking on the
Offsets button and selecting the Last Count option (see Example 1). This
feature may be used to process only the new data from a file in which new data
are being appended periodically to the data file using the scheduled data
collection option of PC208W.
CAUTION
When using the Last Count option, if the Start and Stop
Conditions (Sections 3.3.2, 3.3.3) are specified, they mus t
exist in the newly appended data or SPLIT will never begin
execution.
By selecting the Specific option and en tering a number, SPLIT will "seek" that
position in the file. This option saves time by starting part way through a large
data file. The number specifies the number of characters into the file to seek
before processing data. A positive or negative number can be entered. If the
number is positive, SPLIT will start readin g from the beginning of a file; if the
number is negative, SPLIT will start readin g from the end of a file. All
characters, including spaces, carriage returns, and line feeds, are counted.
Beginning and ending points may be specified.
Example 2
PC208W, Version 3.3, Instruction Manual 3-9
Page 68

Section 3. Report: SPLIT
Example 3
In Example 2, SPLIT will skip the first 256 characters before it begins
processing the data in Input File. In Example 3, SPLIT will skip the first 256
characters before beginning and stop execution on character 1024.
In most instances, SPLIT automatically recognizes the type of data file it is
reading by using Auto Select in the File Info field. However, there are two
exceptions:
• Reading Raw A/D Data from Burst Measurements
To read this type of data and convert it to ASCII, select Burst in the File Info
box. Once Burst is selected, the Number of Values in Each Burst window
in the Offset Menu will become accessible. Enter the number of elements
in each Burst. This number does not include the array ID number or
calibration data.
• Reading Data in Final Storage (Binary) Format
If Start and Stop Offsets are used in parsing the data, Final Storage (Binary)
Format must be selected in the File Info f ield. This tells SPLIT that the
file must be decoded as Final Storage before counting the bytes. If Offsets
are not used, Auto Detect may be chosen and th e f ile will be processed
correctly.
This option works with all subsequent commands except with the Transpose
option (Section 3.3.1) or the Select elements option (Section 3.3.5).
3.3.2 Start Condition
A starting point may be specified to begin processing data. If the Start
Condition field is left blank, SPLIT will start processing data at the beginning
of the data file. The starting point can be any element within the array or a
combination of elements within an array.
For example, the data in Table 3.3-1 contains seven elements per Output
Array, representing hourly data. Assume that this data file contains one month
of hourly data. To start processing data at 1500 hours on the first day, the Start
Condition is expressed as 3[1500], where 3 means the third element within the
array and 1500 is the value of that third element.
3-10 PC208W, Version 3.3, Instruction Manual
Page 69

The syntax can be expressed as:
e
i
Section 3. Report: SPLIT
[vali]
where e
val
= the position number of the elem ent within the array
i
= the value of that element.
i
Logical “and” and “or” statements can be used when specifying the Start
Condition. A logical “and” statement means that all conditions must be true
for the statement to be true. Up to three conditions can be connected with
“and” statements. If too many “and” statements are used, an error message
will be displayed when you run SPLIT.
The logical “or” statement means that if any of the conditions are true, then
the statement is true. SPLIT allows up to six co nditions to be connected with
“or” statements. Additionally, each “or” statement can contain up to three
“and” conditions. As with the “and” statements, if the maximum number of
valid statements is exceeded, an error message will be displayed.
These rules for logical statements also apply to the Stop and Copy Conditions.
An example of a simple logical “and” statement follows:
2[189]and3[1200]
Element two (the Julian day) must equal 189, and element three (the time in
hours/minutes) must equal 1200.
If the following “and” statement was used:
an error would be returned because the maximum number of allowable “and”
statements has been exceeded.
A range can be specified for val
limit. For example:
In this example two conditions must be satisfied to start processing data. First,
the day of year must be 189, and second, the wind direction must be between
200 to 275 degrees, inclusive.
3.3.2.1 Time Synchronization
The time synchronize function is useful when data are missing from files or
several files of data need to be merged together. The files are synchronized
according to time. This function synchronizes according to day, hrmn (hourminute), and/or seconds. The syntax used to identify the time elements is:
2[189]and3[1200]and4[92]and5[67]
by putting ".." between the lower and upper
i
2[189]and7[200..275]
e
[day]:ei[hrmn]:ei[seconds]
i
PC208W, Version 3.3, Instruction Manual 3-11
Page 70

Section 3. Report: SPLIT
Referring to Table 3.3-1, to identify the day of year, type:
2[189]::
for hrmn type:
:3[1200]:
and seconds are expressed as:
::4[5]
A single colon is assumed to be between day and hrmn (e.g., 2[189]: means
day, :3[1200] means hours, and 2[189]:3[1200] means day and hour-minute).
When the time synchronize function is used, a time interval must be specified
in the Copy line. If no time interval is specified in the Copy line then the time
specified in the Start Condition b ecomes simply a starting time with no time
synchronization. The starting time specified must actually be found in the
input file before the Start Condition is satisfied (e.g., if the input file starts at
1100 hrs and 1000 hrs is entered for the starting time, with no day specified,
SPLIT will skip over arrays until it reaches 1000 hrs the next day).
Time elements can be identified without specifying a starting time (e.g., 2:3).
When no starting time is specified, SPLIT assumes the starting time to be 0 and
inserts carriage return line feeds (CRLF) at the start of the Output File. The
number of CRLFs equals the time between 0 and the time of the first array
selected, divided by the interval specified in the Copy condition.
When time synchronizing, if multiple input files are given starting times,
SPLIT starts the Output at the earliest specified starting time. Blanks or the
comment entered in the “Replace bad data with” field are inserted for values
from other input files until their starting times are reached.
3.3.2.2 Starting Relative to PC Time
Included in the time synchr onize function is the ability to start relative to the
current PC TIME (computer time). This feature allows a .PAR file to be run
on different data without changing the Start Conditions, provided the Input
Data File is collected at a fixed frequency and SPLIT is run at a fixed
frequency. For example, assume that PC208W is used in scheduled data
collection mode which automatically appends data to an archive file. SPLITR
is executed using the “After Call do” option in PC208W. In this case the
frequency of data collection and data reduction is the same. Time values in the
data file (day, hrmn, sec.) are different each time the data are collected, but by
telling SPLIT where to Start reading relativ e to the PC clock, the Start
Conditions do not need to be changed. To accommodate variations in the data
collection and reduction frequencies, an interval in minutes or seconds may be
specified as shown in the examples below.
2[-0]:3[-60,5] tells SPLIT to start at the closest 5 minute interval of the current
day that is less than the PC time minus 60 minutes. If the PC time is 1404,
SPLIT calculates 1304 and looks for hour 1300 to start reading.
3-12 PC208W, Version 3.3, Instruction Manual
Page 71

Section 3. Report: SPLIT
2[-3]:3[-120,60] tells SPLIT to find the closest 60 minute in ter val that is less
than the PC time minus 3 days and 2 hours. If the PC time is the day of year
159, hour 0017, SPLIT will start reading on data output at 2200 hours on day
155.
2[-3]:3[-120]:4[20,5] tells SPLIT to find the closest 5 second interval that is
less than the PC time minus 3 days, 2 hours and 20 seconds. If the PC time is
27 seconds after noon on day 30, SPLIT will begin reading on data output at
1000 hours and 05 seconds on day 27.
CAUTION
NOTE
SPLIT will not start reading if the exact specified starting
time cannot be found. The interval (5 minutes, 60 minutes,
and 5 seconds in the examples above) must be evenly
divisible into 60 minutes.
• If the start time is a certain nu mber of days prior to the PC
time, the file will be processed beginning at midnight of the
day specified.
• To specify a start time in minutes from the current PC time,
you must also specify a day parameter of [-0]. Otherwise,
processing will begin at the first instan ce in the data file that
the minutes parameter equals the current minutes.
• If you are specifying a start time in minutes from the current
PC time, the time you specify cannot be a value that would
push the start time past midnight (e.g., at 9 a.m., specifying
a start condition of 2[-0]:3[-600], which would be a start
time of hour/minutes equals 2300). If you do, the start
condition is never found and the file is not processed.
3.3.2.3 Using Time Synchronization While Starting Relative to PC Time
Split tries to time-sync files to the top of the hour when starting relative to PC
time. If you are synchronizing files where the data output interval is not at the
top of the hour, you will need to specify an interval in the Copy Condition that
represents a window of time in which Split should look for the hour/minute.
For instance, if your data is output 50 minutes into a 60 minute interval (and
therefore, your time stamps are 50, 150, 250, 350...2350) your Start Condition
and Copy Conditions for the first file might look like the following:
Start Condition
2[-1]:3[50]:
Copy Condition
1[106]and3[60,10]
Where:
element 1 is the array ID
element 2 is the Julian day
element 3 is the hour/minute
PC208W, Version 3.3, Instruction Manual 3-13
Page 72

Section 3. Report: SPLIT
3.3.3 Stop Condition
The Start Condition directs Split to b egin processing data when the time is on e
day prior to the current PC time and when the hour/minute value is equal to 50.
The 1[106] in the Copy Condition specifies the array from which the data
should be copied. The 3[60,10] indicates that the interval for the time stamp is
60 minutes and designates a 10 minute time window on each side of the top of
the hour in which Split should look for the hour/minute data (10 minutes
before the hour, 10 minutes after the hour).
The second file's Copy Condition should include only the array from which to
copy the data. No interval is necessary.
The Stop Condition is expressed with the same syntax as the Start Condition,
with the exception that there is no tim e sy nchronization. If the Stop Condition
parameter is left blank, SPLIT will execute until th e end of the file. Logical
"and" and "or" statements can be used when specifying the Stop Condition
(Section 3.3.2).
The Stop Condition specifies when to stop processing data. This feature allows
segments of data to be removed f r om large data files. For instance, if a data
file contains one month of data and just one day is desired, the start and stop
values allow the user to get just that day’s data. The array containing the Stop
Condition is not included in the output file. If the stop value is not found,
SPLIT will display a dialog box that gives the option to select a new file and
continue processing the data. This feature is useful when data are contained on
several diskettes.
The C and F commands alter the meaning of the Stop Condition.
3.3.3.1 "C" Option: Formatting Event Tests Containing Conditional Output Arrays
The C option is used to combine data from two or more conditional arrays onto
one Split output line. A conditional array is one that is only output when a
defined event occurs.
Assume that two or more conditional Output Arrays with unique Output Array
IDs compose a test period, followed by an unconditional Output Array that
defines the end of a test. The unconditional "end of test" Output Array is at the
end of each test, but the conditional Output Arrays may or may not be present.
The data file is comprised of several of these tests.
As an example, let's look at a vehicle test application. The start of the test is
when the vehicle is turned on, and the end of the test is when the vehicle is
turned off. The conditional output arrays could be:
• monitoring the engine temperature and outputting data to a unique array
when the temperature exceeds a limit
• outputting data to a unique array when the brakes are applied
• outputting data when engine RPM exceeds a limit
3-14 PC208W, Version 3.3, Instruction Manual
Page 73

Section 3. Report: SPLIT
The unconditional array data (the stop condition) would be output to a unique
array when the engine is turned off. By processing the data with Split using the
C option, the data collected during each test could be merged on to one line,
with blanks inserted if a set of data didn't exist (e.g., if the engine temperature
never exceeded the defined limit).
To use the C option, the Parameter file should be set up as follows:
• An Input File must be set up for each array ID in the test. The first Input
File is configured on the Input File tab that appears when you open Split.
Additional Input Files are added by choosing Edit | Add Data File from the
Split menu. The same data file will be used as the Input File for each
array.
• Type in the array ID in the Copy field of the Input File tab for each array.
The array ID is the first element of a data file, so the line should read
1[123], where 123 is the actual array ID you want to process.
• In the Select field, type in the number for each element (data value) you
want to be output in the report.
• In the Stop Condition field, type in a "C," followed by the ID of your stop
condition array. If your "end of test" array was array ID 200, the Stop
Condition field would read: C,1[200]. This should be typed into the Stop
Condition fields of each array, including the "end of test" array.
Set up the Output File as you would for any Split process. If you are including
column headings, the arrays and elements will appear in the order they are
listed on the Input File tabs. That is, the first column will be Input File number
1, element number 1; the next column is Input File number 1, element number
2… Input File number 2, element number 1 follows in the column immediately
after the last element of Input File number 1.
Consider Table 3.3-2 below:
TABLE 3.3-2. Example of Event Driven Te st Data Set
100,12.1,10.,32.6
101,92.7,67.7
102,56.1,48.7,98.,220.1
200
100,12.5,9.89,30.1
102,56.2,50.,100.5,210.6
200
100,13.1,10.1,33.1
101,94.1,69
200
This table contains four different output arrays: 100, 101, 102, and 200. During
the first test, data was output from all three conditional arrays (100, 101, and
102), with 200 signaling the end of the test. During the second test, data was
Data from arrays
output during t he
first test.
Second test.
Third test.
PC208W, Version 3.3, Instruction Manual 3-15
Page 74

Section 3. Report: SPLIT
output from arrays 100 and 102. During the third test, data was output from
arrays 100 and 101.
To process these files using the C option, the parameter file would be set up as
follows (assuming the name of our data file is Data_1.DAT):
First Input File = Data_1.DAT:1
Stop condition = C,1[200]
Copy = 1[100]
Select = 1,2,3,4
Second Input File = Data_1.DAT:2
Stop condition = C,1[200]
Copy = 1[101]
Select = 1,2,3
Third Input File = Data_1.DAT:3
Stop condition = C,1[200]
Copy = 1[102]
Select = 1,2,3,4,5
Fourth ("end of test") Input File = Data_1.DAT:4
Stop condition = C,1[200]
Copy = 1[200]
Select = (leave blank)
NOTE
100 12.1 10 32.6 101 92.7 67.7 102 56.1 48.7 98 220.1
100 12.5 9.89 30.1 102 56.2 50 100.5 210.6
100 13.1 10.1 33.1 101 94.1 69
The :(number) after the data file name is inserted automatically
by Split.
TABLE 3.3-3. Processed Data File Using Option C
When Split is run, the resulting data file will look similar to Table 3.3-3. Each
line of data represents one test. Notice that b lan ks were inserted if the data set
(conditional array) did not exist.
3.3.3.2 Trigger on Stop Condition (F Option) Output of Time Series
The Trigger on Stop Condition, or F option, changes the function of the Stop
Condition when one or more Time Series functions (Section 3.3.5.2) are
contained in the Select field. When a Stop Condition is met, the time series
data is calculated and written to the output file. However, instead of stopping at
this point, processing resumes and time series data is output the next time the
Stop Condition is met. This continues until the end of file or until th e user
stops Split manually.
3-16 PC208W, Version 3.3, Instruction Manual
Page 75

Section 3. Report: SPLIT
The Trigger on Stop Condition is enabled by clicking Other… on the Output
Tab and checking the box next to the Trigger on Stop Condition field. When
the Trigger on Stop Condition is enabled, the function affects all files being
processed that have a Stop Con dition specified. If multiple files are being
processed but it is desired that the function affect one or morebut not allof
the files, the F option is used in the Stop Condition field of the files that yo u
want processed using the function. The syntax for the F option is: F,e
[vali].
i
A typical application for the Trigger on Stop Condition is to reduce days of
hourly data into daily summaries. A logical element to use for the Stop
Condition is time (hrmn). Assuming the third element of the hourly Output
Array is hrmn, and midnight is output as 0, the Stop Condition is entered as
3[0] (or F,3[0] if the F option is used). The Time Series processing is
performed over a day defined by midnight to midnight.
If only hourly Output Arrays were contained in the Input File, the Copy line
could be left blank. If other Output Arrays are present which need not be
included in the Time Series processing, a logical Copy condition would be the
Output Array ID of the hourly output.
The Trigger on Stop Condition functions the same for multiple Input files as it
does for a single Input File. If the option is enabled on several Input Files, and
the Stop Conditions do not occur at the same point in each file, when a file's
Stop Condition is met, its time series data are output and blanks are output for
data selected from the other Input Files.
3.3.4 Copy
Say, for example, that you were interested in the average value of the first data
point (element 2) for each test, in the data set listed in Table 3.3-2. The Input
File template would look like that shown in Table 3.3-4.
TABLE 3.3-4. Input File Entries to P r ocess the
First Data Point for each Test
First Input File = DATA_1.DAT:1
Stop Condition = F,1[200]
Select = AVG(2)
After the Start Condition is satisfied, and before the Stop Condition is m e t, the
Copy condition must be satisfied before any data will be processed according
to Select line instructions (Section 3.3.1.4). If the Copy condition is left blank,
all arrays are processed between the Start and Stop values. Syntax for the
Copy condition is similar to the Start and Stop values mentioned above.
Logical "and" and "or" statements (see Section 3.3.2) can be used when
specifying the Copy condition.
PC208W, Version 3.3, Instruction Manual 3-17
Page 76

Section 3. Report: SPLIT
For example, referring to Table 3.3-1, if only those hours during day 189 when
the temperature was above 90 and the soil temperature was below 62 is
desired, or, during day 189 when the average wind speed was below 21 while
the wind direction was between 255 to 265 is desired, the Copy condition
would be:
1[189]and4[90..150]and5[0..61.99]or1[189]and6[0..20.99]and7[255..265]
Only Output Arrays with hours 1300 and 1500, Table 3.3-1, conform to the
above Copy conditions.
To use the time synchronize function, time element(s) must be specified in the
Start Condition (Section 3.3.1.1). The user specifies a time interval in the
Copy condition. For instance, if the original data had 15 minute outputs and
you only want hourly outputs, then an interval of 60 minutes must be specified
following the element number. This is entered as (assuming hrmn is element
number 3) “3[60]” . If time synchronization is specified in the Start Condition,
SPLIT looks for the interval in a time element in the Copy condition. Only
one time interval is specified. This interv al is th e unit of time to synchronize
each file.
The interval can be given tolerance lim its by following the interval with a
comma and the tolerance. For example, if 3 is the hrmn element, and the time
interval is 60 minutes +2 minutes, the syntax is 3[60,2].
3.3.5 Select
If the time synchronize function is enabled, and data are missing at one or
more of the time intervals specified, then a blank (or the comment entered in
the “Replace bad data with” field) is output to the Output File.
The Select line specifies which elements of an Output Array are selected for
processing and/or output to the specified Output File. The Select line becomes
operable only after the Start Condition and Copy condition are met, and before
the Stop Condition is satisfied. If th e Select line is left blank, all elements in
output arrays meeting the Start Condition and Copy conditions are output to
the Output File. Up to 255 characters can be entered on one Select line. If this
is a limitation, open the Input Data file twice (use the EDIT | ADD DATA
FILE menu) and use the Select line in the second Input File template to define
the additional operations.
3-18 PC208W, Version 3.3, Instruction Manual
Page 77

Section 3. Report: SPLIT
Element numbers may be entered individually (e.g., 2,3,4,5,6,7), or, in groups
(e.g., 2..7) if sequential. Range limits (lower to upper boundary conditions)
may be placed on elements or groups of elements specified in the Select or
Copy lines. For example, 3[3.7..5],4..7[5..10] implies that element 3 is
selected only if it is between 3.7 and 5, inclusive, and elements 4,5,6, and 7
must be between 5 and 10, inclusive.
If range limits are used in the Select condition, when SPLIT is run, any data
which are outside of the specified range will be h ig hlighted according to the
options chosen for the output file. Table 3.3-5 summarizes what each option
produces on the screen and in the output file if out of range data are
encountered. This type of range testing is a quick way to identify data
problems.
TABLE 3.3-5. Effects of Out of Range Values for Given Output Options
Output Option Screen Display* PRN File
Report = None; No
other options defined
(default)
Report = File or Printer;
no other options defined
Report = None;
comment in "Replace
bad data with" field
Report = File or Printer;
comment in "Replace
bad data with" field
Report = None;
"Display only bad data"
option enabled
bad values displayed in red and
preceded by asterisk; the text "bad
data" highlighted in a red box at
bottom right of screen
bad values displayed in red and
preceded by asterisk; the text "bad
data" highlighted in a red box at
bottom right of screen
bad values displayed in red and
preceded by asterisk; the text "bad
data" highlighted in a red box at
bottom right of screen
bad values displayed in red and
preceded by asterisk; the text "bad
data" highlighted in a red box at
bottom right of screen
only lines with bad data are displayed;
bad values displayed in red and
preceded by asterisk; the text "bad
data" highlighted in a red box at
bottom right of screen
blanks inserted for
bad values
blanks inserted for
bad values
comment inserted
in place of bad
values
comment inserted
in place of bad
values
only lines with
bad data output;
blanks inserted for
bad values
RPT File or
Printer Output
N/A
bad values
preceded by
asterisk
N/A
bad values
preceded by
asterisk
N/A
Report = File or Printer;
"Display only bad data"
option enabled
*The Screen Display box must be checked; if not, no data will be displayed on the Split Run screen.
PC208W, Version 3.3, Instruction Manual 3-19
only lines with bad data are displayed;
bad values displayed in red and
preceded by asterisk; the text "bad
data" highlighted in a red box at
bottom right of screen
only lines with
bad data output;
blanks inserted for
bad values
only lines with
bad data output;
bad values
preceded by
asterisk
Page 78

Section 3. Report: SPLIT
NOTE
TABLE 3.3-7. SPLIT Operators, Ma t h Functions, and Time Series Functions
In this instance, out of range data refers to data outside of the
specified output range. It is not to be confused with out of range
data generated by the logger.
Variables can be assigned names in the Select line. For example, x = 45∗(6∗3.0) means that x is equal to element 6, times the number 3, times
element 5, subtracted from element 4. A numeric value is distinguished from
an array element by the inclusion of a decimal point. Variables must be
declared before they can be used in the Select line. A variable name must start
with an alpha character, can include numbers and must not exceed eight
characters. Variable names can start with the same character but they must not
start with another complete variable name ( e.g., the variable XY is not valid if
there is also the variable X). A comma must follow each variable statement, as
with all parameters in the Select line. Once the variables have been declared
they can be used later in the Select line (i.e., x=4-5∗(6∗3.0),
y=6/3,2,3,6,7,7∗x,6+y). Variables can be defined in the first four Input File’s
Select lines only, but may be used in subsequent Input File’s Select lines.
Processing is accomplished through arithmetic operators, math functions,
spatial functions, and time series func tions. The following is a list of
operators, math functions, and Time Series functions supported by SPLIT.
OPERATORS OPERATOR PRECEDENCE ORDER
(3 = high, 1 = low)
^ = raise to the power 3
x Mod y = Modulo divide of x by y 2
∗ / = multiplication, division 2
+ - = addition, subtraction 1
EXAMPLES OF SYNTAX FOR MATHEMATICAL OPERATORS
3∗5 multiply element 3 by element 5
3/5 divide element 3 by element 5
(3..5)/(8..10) same as 3/8, 4/9, 5/10
3+5 add element 3 to element 5
3-5 subtract element 5 from element 3
(3,9,5)-(8,7,10) same as 3-8, 9-7, 5-10
3∗2.0 multiply element 3 by a fixed n umber 2
2^3.0 raise element 2 to the third power
MATH FUNCTIONS
Abs(x) = Absolute value of x
Arctan(x) = Arc tangent of x (in degrees)
Cos(x) = Cosine of x (in degrees)
Exp(x) = Natural Exponent function (ex)
Frac(x) = Fractional portion of x
Int(x) = Integer portion of x
Ln(x) = Natural logarithm of x
Sin(x) = Sine of x (in degrees)
SpaAvg(x..y) = Spatial average of elements x through y
SpaMax(x..y) = Spatial maximum of elements x through y
SpaMin(x..y) = Spatial minimum of elements x through y
SpaSd(x..y) = Spatial standard deviation of elements x through y
Sqrt(x) = Square root of x
3-20 PC208W, Version 3.3, Instruction Manual
Page 79

Section 3. Report: SPLIT
TIME SERIES FUNCTIONS
Avg(x;n) = Average
Blanks(x;n) = Number of blanks in element
Count(x;n) = Number of data points in element
Max(x;n) = Maximum
Min(x;n) = Minimum
RunTotal(x;n) = Running total
Sd(x;n) = Standard deviation
Smpl(x;n) = Sample raw value
SmplMax(x;y;n) = Sample (y) on a maximum (x)
SmplMin(x;y;n) = Sample (y) on a minimum (x)
Total(x;n) = Totalize
WAvg(x;n) = Unit vector mean wind direction (in degrees)
NOTE: x can be an element or a valid expression. n is optional and is the number of arrays to include in the
function. Date and Edate can be used for the “n” in the Time Series functions (see Table 3.3-8 Special Functions,
this Section)
Illegal operations (e.g., logarithm of a negative number) will cause SPLIT to
store blanks for the Output. It is possible to get a run time error (error 0/1) if
the floating point math exceeds the limits of the PC.
The greatest number that can be output is determined by the field width (Table
3.3-3, “Column Widths” option). If the width is eight or greater, the maximum
number is 99999; for widths less than eight the maximum is 9999. Larger
numbers will be stored as 99999 or 9999.
TABLE 3.3-8. SPLIT SPECIAL FUNCTIONS
Crlf = Insert carriage return line feed in Output File.
Date(doy;y) = Convert day of year to calendar date, where doy=day of
year and y=year. Format is MM DD. When used as the
interval, n, with Time Series Functions (see example, this
Section), Date triggers monthly time series summaries.
Edate(doy;y) = Convert day of year to European date, where doy=day of
year and y=year. Format is DD MM. When used as the
interval, n, with Time Series Functions (see example, this
Section), Edate triggers monthly time series summaries.
"Label" = Insert Comment in Output file. (Label is anything within
the quote marks.)
Line = Number of lines written to Outpu t f ile.
.PA = Page br eak to printer or to the .RPT file.
PC208W, Version 3.3, Instruction Manual 3-21
Page 80

Section 3. Report: SPLIT
3.3.5.1 Mathematical Functions, Details, and Examples
The following array of PRINTABLE ASCII data will be used for all
Mathematical function examples.
0105 0176 1200 -07.89 55.10 12.45 270.5
Abs(x) returns the absolute, or positive value of element x.
Examples:
Abs(4) = 7.89
Abs(4∗5) = 434.74
Arctan(x) returns the arc tangent of element x in degrees.
Examples:
Arctan(7) = 89.788
Arctan(7/6) = 87.365
Cos(x) returns the cosine of element x in degrees.
Examples:
Cos(5) = .57215
Cos(5-6) = .73551
Exp(x) returns the exponential base e to the power of element x.
Example:
Exp(4) = .00037
Frac(x) returns the fractional value of the element x.
Examples:
Frac(4) = -.89
Frac(6+7) = .95
Int(x) returns the integer p ortion of the element x.
Examples:
Int(7) = 270
Int(5∗6) = 685
Ln(x) returns the natural log of element x.
Examples:
Ln(6) = 2.5217
Ln(7/6∗5/1) = 2.4337
Sin(x) returns the sine of element x in degrees.
Examples:
Sin(7) = -.99996
Sin(7-2+5) = .50603
Spatial functions, included under Mathematical functions, operate on a per
Output Array basis. The average, maximum, minimum, and standard deviation
of a specified group of elements within an array are calculated.
3-22 PC208W, Version 3.3, Instruction Manual
Page 81

Section 3. Report: SPLIT
SpaAvg(x..y) returns the spatial average of elements x through y.
Examples:
SpaAvg(1..7) = 258.74
SpaAvg(1,4,7) = 122.54
SpaMax(x..y) returns the maximum value of elements x
through y.
Examples:
SpaMax(1..7) = 1200
SpaMax(1,2,5) = 176
SpaMin(x..y) returns the minimum value of elements x through y.
Examples:
SpaMin(1..7) = -7.89
SpaMin(1,2,5) = 55.1
SpaSd(x..y) returns the standard deviation of elements x through y.
Examples:
SpaSd(1..7) = 394.57
SpaSd(5,2,1) = 49.607
Sqrt(x) returns the square root of element x.
Examples:
Sqrt(3) = 34.641
Sqrt(3^ 2.0) = 1200
3.3.5.2 Time Series Functions, Details, and Examples
Time Series functions are used to perform vertical processing on selected
elements, such as calculating the average of an element over a specified range
of data. Time Series results are output in three instances:
1. when a Trigger on Stop Condition (F option) is met
2. at the end of a data file (or within a range specified by Start and Stop
Conditions)
3. when an interval count is met
When the Trigger on Stop Condition (or F option) is used, any time series data
defined in the Select line is output each time the Stop Condition is met. Refer
to Section 3.3.3.2 for more information on the Trigger on Stop Condition.
Results which are output at the end of a file or a range of data are referred to as
Final Summaries. A typical select line that would produce a Final Summary is:
1,2,3,4,Avg(4)
This line would output values for elements 1 through 4 each time an array was
output. Additionally, an average value for element 4 would be calculated for
the entire file and output as the last line of data in the output file.
PC208W, Version 3.3, Instruction Manual 3-23
Page 82

Section 3. Report: SPLIT
Results which are output at the end of a specified Interval are Interval
Summaries. A typical select line that would produce an Interval Summary is:
1,2,3,4,Avg(4;24)
This line would output values for elements 1 through 4 each time an array was
output, and an average value for element 4 would be calculated every 24
th
array
and output as an additional column in the file. An additional summary would
occur for an Interval Count if the count was not evenly divisible into the
number of output arrays present in the Input File. The summary, in this case, is
calculated from an incomplete interval count.
The interval count in a Time Series Function is optional and does not require a
decimal point. To determine the interval, SPLIT counts the number of arrays
which meet the specified conditions (Stop, Start, and Copy). If the time
synchronize function is enabled, the Time Series functions remain
synchronized to the starting time even if a complete array is missing from the
input data. When elements are missing, the Time Series calculations are based
on the actual number of elements found.
Semicolons are used in Time Series functions to separate the elements or
expressions from the count which determines the interval. SmplMax and
SmplMin require two elements separated by a semicolon. The first is checked
for a maximum or minimum, while the second is sampled on the maximum or
minimum.
The following set of weather data from Mt. Logan in Cache Valley, Utah gives
a total of seven elements each hour. This Field Formatted output, with title and
column headers, was generated by SPLIT. These data are used in the
following examples of Time Series functions.
3-24 PC208W, Version 3.3, Instruction Manual
Page 83

Mt. Logan Weather Data
Day Time Air RH Mean Mean Std
178 100 58.56 17.42 5.855 338.3 6.562
178 200 57.48 17.65 8.27 344.8 7.51
178 300 56.85 17.76 7.75 330.8 5.065
178 400 56.55 18.89 7.6 319.7 10.93
178 500 56.57 19.6 10.41 307.3 4.23
178 600 55.33 23.32 8.99 317.7 6.258
178 700 55.95 24.79 9.52 322.3 4.609
178 800 58.12 23.98 6.588 315.6 9.43
178 900 59.79 23.46 5.458 312 15.32
178 1000 61.09 24.12 4.622 299.3 18.3
178 1100 61.34 25.03 5.926 303 17.26
178 1200 60.61 27.46 6.815 309.7 18.71
178 1300 61.01 25.44 8.35 310.2 18.37
178 1400 60.93 25.48 10.92 317.5 12.68
178 1500 62.3 23.79 8.43 310.6 19.21
178 1600 63.75 24.31 8.88 321.4 15.22
178 1700 66.15 22.45 7.97 341 17.77
178 1800 67.33 23.06 6.758 344.1 20.74
178 1900 66.59 24.75 7.08 341.8 16.09
178 2000 64.52 26.03 8.76 337.2 14.91
178 2100 59.84 27.45 11.81 305.4 12.36
178 2200 56.19 35.46 15.62 316.7 19.01
178 2300 55.48 38.8 17.12 338.7 11.41
179 0 55.22 37.13 11.86 351.6 8.22
Section 3. Report: SPLIT
temp Wind Wind Dev
deg Speed Vec of
FmphDirDir
Avg(x;n) returns the average of element x over a full data set or every
th
value.
n
Examples:
Avg(3) = 59.898 (average daily temp)
Avg(3;4) = 57.36 (average 4 hour temp)
56.493 (average 4 hour temp)
60.708 (average 4 hour temp)
61.998 (average 4 hour temp)
66.148 (average 4 hour temp)
56.683 (average 4 hour temp)
Blanks(x;n) returns the number of blanks or bad data in element x over a
full data set or every nth value. Refer to Table 3.3-9 for
definition of blank or bad data. Example:
Blanks(3) = 0 (no holes in data set).
Count(x;n) returns the number of data points (non blanks) in element x
over a full data set or every n
th
value.
Example:
Count(1) = 24 (24 data points in data set).
PC208W, Version 3.3, Instruction Manual 3-25
Page 84

Section 3. Report: SPLIT
NOTE
Blanks and Count are functions designed for checking the
integrity of the data file. A commo n use for these two functions
is “100.*BLANK(x;n)/BLANK(x;n)+COUNT(x;n)” which
gives the percentage of holes (bad data) in the file.
Max(x;n) returns the maximum value of element x over a full data set
or every n
th
value.
Examples:
Max(5) = 17.12 (max WS for day)
Max(5;12) = 10.41 (max WS for 12 hours)
17.12 (max WS for 12 hours)
Min(x;n) returns the minimum value of element x over a full data set
or every n
th
value.
Examples:
Min(7) = 4.23 (min std. dev. of WS for day)
Min(3;8) = 55.33 (min temp for 8 hours)
59.79 (min temp for 8 hours)
55.22 (min temp for 8 hours)
RunTotal(x;n) returns a running total of element x for every line in the data
set. If an n
every n
th
value is specified, a running total will be output
th
value.
Example: RunTotal(5) =
5.85
14.12
21.87
29.47
39.88
48.87
:
:
:
166.76
182.38
199.50
211.36
211.36
Running total of hourly average wind speed provides up-to-the-hour wind run
for that day. Because an n
th
value was not specified, the Final Summary
output, which is daily wind, is the same as the "total" output.
Sd(x;n) returns the standard deviation of element x over a full data
set or every n
th
value.
Examples:
Sd(3) = 3.6593 (std. dev. temp for day)
Sd(3;8)= 1.011 (Sd temp for 8 hours)
1.1182 (Sd temp for 8 hours)
4.965 (Sd temp for 8 hours)
3-26 PC208W, Version 3.3, Instruction Manual
Page 85

Section 3. Report: SPLIT
Smpl(x;n) returns a sample of element x every n
function must always have an interval specified.
Examples:
Smpl(4;8) = 23.98 (RH every 8 hours)
24.31 (RH every 8 hours)
37.13 (RH every 8 hours)
th
value. The Sample
SmplMax(x;(y);n) looks for a maximum value in element x and samples
element y when the maximum is found. If an n
th
value is
specified then it outputs the sample on a maximum every n
value, otherwise it outputs the sample on a maximum at the
EOF.
Examples:
SmplMax(5;(3)) = 55.48 (on max wind speed sample
temperature)
SmplMax(5;(3,6);8) = 56.57 307.3
60.93 317.5
55.48 338.7
(on max wind speed sample temperature and wind direction
every 8 hours)
SmplMin(x;(y);n) looks for a minimum value in element x and samples
element y when the minimum is found. If an n
th
value is
specified then it outputs the sample on a minimum every n
value, otherwise it outputs the sample on a minimum at the
EOF. Examples:
SmplMin(3;5) = 11.86 (on min temp sample wind speed)
SmplMin(3; (5,6);8) = 8.99 317.7
5.458 312
11.86 351.6
(on min temperature sample wind speed and wind direction
every 8 hours)
th
th
Total(x;n) returns the total of element x over a data set or every n
th
value.
Examples: Total(5) = 211.36 (daily wind run)
WAvg(x;n) Returns the unit vector mean wind direction in degrees of
element x (wind direction in degrees) over a full data set or
every nth value.
Example:
WAvg(6) =
323.14 (mean wind direction for the day)
WAvg(6;4) =
333.41 (mean wind direction for 4 hours)
315.73 (mean wind direction for 4 hours)
306 (mean wind direction for 4 hours)
314.92 (mean wind direction for 4 hours)
341.03 (mean wind direction for 4 hours)
328.09 (mean wind direction for 4 hours)
PC208W, Version 3.3, Instruction Manual 3-27
Page 86

Section 3. Report: SPLIT
3.3.5.3 Special Functions, Details, and Examples
The Mt. Logan data set is used for the Special Function examples. These
functions are helpful in converting day of year to months and days of month
and formatting the output.
Crlf returns a carriage return and line feed where the Crlf is
placed in the parameter file.
Examples:
Smpl("Max Temp";24),Max(3;24),
Smpl(Crlf;24),Smpl("Max RH";24),Max(4;24)
= Max Temp 67.33
Max RH 38.8
The Crlf is placed after the maximum temperature 67.33 so
that the maximum RH is on the nex t lin e.
Date(doy;y) converts the day of year into a calendar date in the form MM
DD; where doy = element with the day of year and y =
containing year. If the year is not contained in the data set, a
year can be specified in the “y” year location (i.e., 1987.).
A decimal must be included with the year. Date can be used
as the interval in a Time Series function to tr igger a Time
Series output on the first day of each month. For example,
Avg(3;Date(1;1987.)) outputs the average temperature for
each month. This option is useful when the data set contains
several months of data and monthly information is needed.
Note that a decimal was used after the year to designate it as
a constant instead of an element number.
Examples:
Date(1;1987.) =
6 27 (June 27 repeated
6 27 23 times)
6 27
6 28
Smpl(Date(1;1987.);8) =
6 27 (June 27)
6 27 (June 27)
6 28 (June 28)
Edate(doy;y) same as Date(doy;y), except form is DD MM.
3-28 PC208W, Version 3.3, Instruction Manual
Page 87

Section 3. Report: SPLIT
"Label" returns a comment in the output file. This is a useful
formatting function when labels are desired on the same line
as the data. The label includes anything within the quote
marks, the quote marks are not output but must be in the
parameter file. The label cannot exceed the width of the
output column (default is eight characters). A maximum of
thirty (30) labels are allowed per Select lin e.
Examples:
"Max Temp" =
Max Temp (outputs Max Temp
Max Temp 24 times)
.
.
.
Max Temp
Smpl("8 hour ";8),Smpl("Max Temp";8), Max(3;8) = 8 hour
Max Temp 58.56
8 hour Max Temp 63.75
8 hour Max Temp 67.33
This example samples the labels called "8 hour" and "Max
Temp" and looks for a Maximum temp for every 8 hour
interval.
Line returns the number of lin es wr itten to the output file created
by SPLIT. This differs from the Count function in that
Count looks at how many lines were read.
Examples:
Line, 4, 5 =
1 17.42 5.855
2 17.65 8.27
3 17.76 7.75
4 18.89 7.6
5 19.6 10.41
6 23.32 8.99
7 24.79 9.52
..
..
..
19 24.75 7.08
20 26.03 8.76
21 27.45 11.81
22 35.46 15.62
23 38.8 17.12
24 37.13 11.86
Smpl (Line;8), Smpl (4;8),
Smpl (5;8)
1 23.98 6.588
2 24.31 8.88
3 37.13 11.86
PC208W, Version 3.3, Instruction Manual 3-29
Page 88

Section 3. Report: SPLIT
.PA Sends a page break to the printer or .RPT file.
Examples:
2, 3, Smpl (.PA;12) =
100 58.56
200 57.48
..
..
..
1100 61.34
1200 60.61
Page 2 ---------------------------
1300 61.01
1400 60.93
..
..
..
2300 55.48
0 55.22
The following is a parameter file that operates on the Mt. Logan data with
several of the SPLIT features being utilized.
3-30 PC208W, Version 3.3, Instruction Manual
Page 89

Section 3. Report: SPLIT
This .PAR file produces a wind chill summar y of the Mt. Logan Peak data set.
The formula for calculating wind chill is given as follows:
Te = 33-(h/22.066)
where
Te = Wind Chill equivalent temperature, degrees C
h = ((100V)
where
h = Kcal m
0.5
+ 10.45-V)(33-T)
-2
hr-1 wind chill index
v = wind speed in meters/second
T = temperature in degrees C
Note that at wind speeds between 0 to 4 mph (0 to 1.8 m/s), the wind chill
should be ignored because this formula results in wind chill temperatures that
are greater than the ambient temperature. The National Weather Service
includes wind chill in reports o nly when temperatures drop below 35°F
(1.7°C).
1
The formula is for example purposes and is not endorsed by
Campbell Scientific as a standard.
When this .PAR file is executed, the following output is displayed on the
screen.
PC208W, Version 3.3, Instruction Manual 3-31
Page 90

Section 3. Report: SPLIT
Wind Chill Report from Mt. Logan
Temp Wind H Wind Wind
deg C Speed Chill Chill
m/s deg C deg F
14.756 2.6172 438.06 13.148 55.666
14.156 3.6967 489.58 10.813 51.463
13.806 3.4643 491.34 10.733 51.319
13.639 3.3972 493.4 10.64 51.151
13.65 4.6533 529.57 9.0005 48.201
12.961 4.0185 530.58 8.9547 48.118
13.306 4.2554 528.27 9.0596 48.307
14.511 2.9448 456.04 12.333 54.199
15.439 2.4397 414.97 14.194 57.55
16.161 2.066 383.21 15.633 60.14
16.3 2.6489 402.08 14.778 58.601
15.894 3.0463 425.2 13.731 56.715
16.117 3.7325 439.59 13.078 55.541
16.072 4.8812 468.26 11.779 53.202
16.833 3.7682 421.85 13.882 56.988
17.639 3.9694 405.59 14.619 58.314
18.972 3.5626 361.39 16.622 61.92
19.628 3.0208 331.76 17.965 64.337
19.217 3.1648 345.62 17.337 63.207
18.067 3.9157 393.08 15.186 59.335
15.467 5.2791 493.51 10.635 51.142
13.439 6.9821 584.71 6.5016 43.703
13.044 7.6526 607.86 5.4526 41.815
12.9 5.3014 566.29 7.3368 45.206
Reference
1
“Wind Chill Errors”, Edwin Kessler, Bulletin of the American Meteorology
Society, Vol. 74, No. 9, September 1993, pp 1743-1744.
3.3.5.4 Summary of Select Line Syntax Rules
• A fixed numeric value must include a decimal point "." or be in scientific
notation. There are some exceptions to this as noted below.
• Scientific notation has the format "mantissa E power of ten” (e.g., 3E5 =
• Element numbers are entered without a decimal point.
• Commas separate Select line parameters (e.g., 2,3,(3+4)/3.2,6).
• Two decimal points are used to select consecutive elements between
5
3 x 10
).
starting and ending elements (e.g., 3..6, refers to the elements 3,4,5, and
6).
3-32 PC208W, Version 3.3, Instruction Manual
Page 91

Section 3. Report: SPLIT
• A set is a group of two or more elements and/or expressions separated by
commas and enclosed by parentheses. No member of a set can include
parentheses. Therefore, a set cannot include a set or a function as one of
its members. For example:
VALID EXPRESSION INVALID EXPRESSION
Arctan (2/3) Arctan ((2/3))
Arctan (2/3, 3/4, 4/5) Arctan ((2/3, 3/4), 4/5)
Arctan (COS(2)) Arctan (COS(2), COS(3))
• A single expression can operate on a set of elements. For example, the
expression (3..6,8)/2.0 is the same as 3/2.0, 4/2.0, 5/2.0, 6/2.0, 8/2.0;
(3..6)/(2..5) is the same as 3/2, 4/3, 5/4, 6/5.
• The element or expression which is the argument of a math or Time Series
function, must be enclosed in parentheses. A range of elements can be
specified, resulting in as many outputs as elements (e.g., Avg(3..5,7) will
output 4 averages).
• Square brackets are used to enclose an allowable range for a value (e.g.,
3[3.6..12] indicates that the allowable range for element 3 is from 3.6 to 12).
Whole numbers within brackets do not require a decimal point. Table 3.3-6
explains how values outside the specified range are treated.
• The count in a Time Series function is optional and does not require a
• Semicolons are used in Time Series functions to separate the elements or
3.3.6 Output Files
To create an Output File, click on the OUTPUT FILE tab. The file is created on
the default drive or directory unless the filename is preceded with an alternative
drive or directory. Use the Browse button to change directories.
SPLIT will assign this file an extension of .PRN if an extension is not specified
by the user. Whenever an Output Filename is entered, regardless of extension,
an Output file is created only when the RUN | GO menu option is selected.
If this line is left blank, SPLIT does not write data to an Output File on disk;
rather, it will display the processed values on the screen if the Screen Display
box is checked. If Screen Display is not enabled, no data will be displayed on
the SPLIT RUN screen.
CAUTION
The Output Filename cannot be the same as the Input
Filename. SPLIT will display an error message if this
condition occurs.
decimal point.
expressions from the count which determines the interval. Sample on
maximum and sample on minimum require two elements or expressions
also separated by a semicolon.
PC208W, Version 3.3, Instruction Manual 3-33
Page 92

Section 3. Report: SPLIT
Several output options may be specified to alter the default output to the file.
Some are located on the main OUTPUT FILE screen and some are made
available by pressing the Other button.
FIGURE 3.3-1. Output File Template
3.3.6.1 Description of Output Option Commands
File Format
There are four File Format options to choose from: No File, Field, Comma, and
Printable. If No File is chosen, then no output file is saved to disk. The Field,
Comma, and Printable options produce files formatted as Field Formatted,
Comma Separated, and Printable ASCII, respectively. An example of each of
these file types is given in Table 3.3-1 in the Input Files section.
Column Widths
The Column Widths field is used to set the width of the columns. Valid entries
are 6,7,8, and 9. The default width is 8. High Resolution Final Storage data
requires a minimum column width of 8.
Screen Display
The Screen Display field controls writing the processed data to the screen. To
write to the screen, check the box. To omit writing to screen, for faster
execution, uncheck the box. The data will then be written to the file only.
3-34 PC208W, Version 3.3, Instruction Manual
Page 93

Section 3. Report: SPLIT
Report
A report, with page and column headings, can be sent to a file or printer.
Select the appropriate option in the Report field. A report sent to a file has the
extension of .RPT. If the report is sent to a printer, the printer must be on-lin e.
The default Output File is also created.
FIGURE 3.3-2. Other Output File Options
Other
The Other button allows the settings below to be modified:
Replace bad data with - The text in the field, to th e r ight of this option,
is entered into the data set if data are blank, bad, or out of range. See
Table 3.3-9 for definition of blank or bad data. Whatever the user enters
in the field will be entered if a blank or question mark is in the data or if
data are out of range. This option is useful when the Output file is
imported into a spreadsheet program, such as Excel.
TABLE 3.3-9. Definition of Blank or Bad Data for each Data File Format
File Format Definition of Blank or Bad Data
Printable ASCII ????
Comma Separated ASCII blank or any character except numeral or space
Field Formatted blank or "" (double quotation marks)
Only display lines with bad data - Outputs only those arrays containing
one or more Out of Range elements. If a report is generated, an asterisk
precedes the Out of Range value in the .RPT file.
PC208W, Version 3.3, Instruction Manual 3-35
Page 94

Section 3. Report: SPLIT
Trigger and Stop condition - Changes the meaning of Stop Condition to
trigger Time Series processing output. The Stop Condition is included in
the Time Series processing if it satisfies the Copy line.
If the Trigger and Stop Condition is selected, a Time Series output will
occur each time the Stop Condition is met. See Select line elements
(Section 3.3.3.2).
Match files - This option compares two files of the same data. If good
data exists in one and not the other (question marks), then SPLIT will f ill
the OUTPUT file with the good data. This is used to get a more complete
record from an error ridden file (e.g., one recorded at freezing
temperatures by reading a tape twice and running both files through
SPLIT).
CAUTION
For the Match files option to produce a c orrect O utput File,
the differences between the two Input Files can only be
question marks. Both files must have the same Start
Condition or the beginning of both files must be the same.
Transpose file - Transposes the rows and columns of the input file. Only
one Input File can be transposed at a time and no Select options can be
specified. A maximum of 26 arrays are transposed per pass of SPLIT.
To transpose a file containing more than 26 arrays, several passes are
required. Change the Output Filename and Start Condition for each pass.
SPLIT may then be used to merge th e multiple files.
No FF - Suppresses form feed and page breaks to printer or .RPT file
when a report is generated.
Break arrays - This option breaks up the Output Array into new arrays
that are #+1 elements in each new array. SPLIT automatically assigns an
array ID number equal to the f ir st element in the first array. Only one
Input File may be specified. Start, Stop, and Copy Conditions may be
specified, but the Select line must be left blank.
3.3.6.2 Report Headings
A report is output to a printer or file with the extension .RPT. Headings are not
included in the standard output to disk (.PRN or user named extension output
file). However, a report can be labeled with a header by entering text into the
Report Heading field. A report heading can have several lines, but it is limited
to a total of 255 characters including backslashes and carriage returns. “\”
denotes a new heading line for the report.
When Time Series functions are used in the Select field, they appear as a final
summary at the end of the repor t. They can be labeled by entering a title into
the Time Series Heading field at the bottom of the Output File page. Time
Series interval summaries cannot be assigned individual titles.
3-36 PC208W, Version 3.3, Instruction Manual
Page 95

3.3.6.3 Column Headings
3.4 Help Option
Section 3. Report: SPLIT
“PCDATE” within the Report Heading inserts the computer's current date
(Month-Day-Year). For the European format (Day-Month-Year), enter
“PCEDATE” .
Up to three lines per column can be entered as column headings. These
headings are limited to a length of one less than the Output field width.
Column headings associated with Time Series outputs are repeated for Final
Summaries if a title for the Final Summ ar y is requested on the headings for
report line.
The number of digits to report to the right of the decimal point is entered in the
Decimal field and is unique for each column. The value o u tp ut will be
rounded to the specified number of digits. Leave this field blank if you do not
want to round the data to a specific number of digits.
On-line Help is available from any locatio n in SPLIT. Simply select the area
of SPLIT in question and press <F1>. SPLIT also offers a brief on-the-fly
Help. Place the cursor on the area of SPLIT in question; after a moment a brief
description pops up.
3.5 Editing Commands
SPLIT supports the Windows Cut, Copy, and Paste commands. Text from any
field in SPLIT or other Windows applications can be Cut, Copied, or Pasted.
3.6 Running SPLIT From a Command Line
Existing parameter files can be executed using SPLITR.EXE which is a "runtime" version of the Split Report Gen erator. When SPLITR.EXE is run, the file
is processed as if the user chose Run | Go f r om the Split menu. SPLITR.EXE
can be executed from a Task in PC208W, from a batch file, or from a
Windows 95/98/NT command line prompt.
NOTE
3.6.1 Processing Alternate Files
SPLITR.EXE is a Windows program and cannot be executed
from a Standard MS-DOS command line prompt. Therefore, it
cannot be run from the Windows 3.1 MS-DOS prompt.
SPLITR allows the user to select different input and/or output files for an
existing parameter file by entering them on the command line after the
parameter filename. For example:
“SPLITR LOGAN/R TEST.DAT TEST.PRN”
PC208W, Version 3.3, Instruction Manual 3-37
Page 96

Section 3. Report: SPLIT
3.6.2 Processing Multiple Parameter Files with One Command Line
Replaces the Input and Output filenames in LOGAN.PAR, with TEST.DAT
and TEST.PRN, respectively.
A space must be used to separate parameters. SPLITR uses as many entries as
exist on the command line. However, the command line is limited to 255
characters for Windows 95 and 127 characters for Windows NT. The
parameters must be in the following sequence: Input Filename, Output
Filename, Start Condition, Stop Condition, Copy Condition, and Select. A
comma space comma should be inserted for any parameter not specified.
If a parameter is to be left as it is in the parameter file, space comma space ( , )
may be entered in the command line. For instance, if the parameter file
LOGAN.PAR contained TEST1.DAT as an input filename, the following
command line would leave the input file TEST1.DAT and change the output
file to TEST.PRN.
“SPLITR LOGAN/R , TEST.PRN”
More than one .PAR file can be executed with a single SPLITR command line.
Each .PAR file and its associated parameters are separated from the next .PAR
file by a semicolon with one space on each side ( ; ). For example:
“SPLITR LOGAN/R TEST.DAT TEST.PRN ; SINKS/R TEST1.DAT
TEST2.DAT 1[189]”
executes the LOGAN.PAR file on TEST.DAT and outputs the results to
TEST.PRN, then executes the SINKS.PAR file on TEST1.DAT and outputs
the results to TEST2.DAT. Execution of SINKS.PAR starts wh en the first
element in TEST1.DAT is 189.
3.6.3 Using SPLITR.EXE in Batch Files
Batch files containing one or more SPLITR command lines can be useful for
automating data processing. Batch files can be executed manually or by setting
them up as a Task in PC208W's Setup window.
Batch files process each command in succession, without waiting for execution
of a command to be completed before proceeding to the next unless they are
configured to do so. If multiple parameter files are being pro cessed using
SPLITR in a batch file, there are no conflicts because only one copy of
SPLITR can be active at any one time (unless the /M switch is used. Refer to
the information below on this option.). However, if other commands are used
along with SPLITR (such as opening the file in a spreadsheet, copying it to an
archive directory, or appending it to an existing file) these commands might be
executed before SPLITR finishes processing data.
The Windows 95/NT Start /w (wait) parameter is added to a batch file
command line to delay execution of the next command until the first com mand
has finished. The syntax for this type of command line is:
Start /w SPLITR LOGAN/R
3-38 PC208W, Version 3.3, Instruction Manual
Page 97

Section 3. Report: SPLIT
By adding the Start /w parameter to the command line that initiates SPLITR,
no further commands will be processed until the LOGAN.PAR file has
finished execution.
3.6.4 Command Line Switches
SPLITR has three switches that can be used to control how files are processed.
3.6.4.1 Closing the SPLITR.EXE Program After Execution (/R Switch)
Typically when SPLIT is run, after the file is processed the user must close the
Screen Display window. When SPLITR.EXE is run from a command line, the
user must also close the Screen Display window unless the /R switch is used.
The syntax for this switch is:
SPLITR LOGAN/R
The /R switch should follow immediately after the parameter file name with no
space between the two. If a space is used, the following message will be
displayed "There was a problem opening the input file. File could not be found
or may be in use."
3.6.4.2 Running SPLITR in a Minimized State (/H Switch)
SPLITR can be run in a minimized state, so that the Screen Display window
does not interrupt other processes on the computer. The syntax for running
SPLITR minimized is:
SPLITR /H LOGAN
The /H switch must be positioned after SPLITR but before the parameter file
name, and a space is required between the executable name and the switch.
3.6.4.3 Running Multiple Copies of SPLITR (/M Switch)
Multiple copies of SPLITR can be run at o ne time by using the /M switch.
This switch must appear immediately after SPLITR. For instance, a batch file
or PC208W task containing the lines:
SPLITR /M Logan/R
SPLITR /M Sinks/R
will open two copies of SPLITR an d process the two files simultaneously.
NOTE
When using the /M switch in a batch file under Windows NT,
you must begin each line of the batch file that runs an instance of
SPLITR with the "start" command. Other wise, NT will wait until
the first SPLITR command has finished before proceeding to the
next.
PC208W, Version 3.3, Instruction Manual 3-39
Page 98

Section 3. Report: SPLIT
This is a blank page.
3-40 PC208W, Version 3.3, Instruction Manual
Page 99

Section 4. View
4.1 Introduction
Pressing the View button on the main tool bar invokes PC208W’s file viewing
program. This program can be used to look at any data file collected by
PC208W from dataloggers and storage devices, regardless of the format in
which it was saved (comma separated, binary, or printable).
Once a file is opened, data can be printed, graphed, or displayed in ASCII,
tabular, or hexadecimal format. However, since View is primarily a file
viewing utility, a file cannot be edited or saved using this program.
4.2 Menu Items
All of the tools available in the pull-down menus can be accessed using the
graphical icons. Each of these icons is explained below.
4.3 Icon Items
Following is a description of the icons that appear below the menu items. If
you move and hold the mouse pointer over an icon for a few seconds, a brief
text message will pop up that describes the function that will be performed if
the button is pressed.
File Open Options
Select the icon (f ir st icon) to open a data file. The default file extension is
DAT, but PRN and CSV files can also be opened in this mode. (Opening files
of types other than these may cause unexpected results in View.)
When a data file is opened in this mode View will automatically associate an
FSL file with a matching name if one exists in the active directory (see Final
Storage Label below). If a matching FSL file does not exist, a box will appear
asking whether or not you want to select one. When an FSL file is associated
with a data file, View will use column headers and tim e stamps from this file
when viewing or graphing an array.
NOTE
View will try to assign a time/date stamp automatically when
opening a data file. Therefore, it may take a few minutes to
completely open a large file.
Select the icon (second icon) to open a file in Quick Open mode. In this
mode files are not processed for time stamping. A file opened in this mode can
be viewed only in its original format or in hex mode. The Array Selection,
Array Definitions, Tab options, and Graph View options do not work. This
mode is most often used to open files other than data files (or to quickly open
data files, but without any of View's graphing or time stamping capabilities).
PC208W, Version 3.3, Instruction Manual 4-1
Page 100

Section 4. View
p
p
In Quick Open mode, data can be copied to the Windows clipboard and pasted
into other applications.
Array Selection
File Open
tions
O
Printing Options
Printing
Options
Text View
tions
O
Array
Definitions
Graph View Options
Select the icon to immediately print the current data file. (If you prefer to
set the margins of a page or perform a print preview before printing, this can
be done through the File menu.) Press the
icon to bring up a dialog box to
change the font used for the printer and the display.
Array Selection
When a data file is first opened, all array s in that file will be displayed. Use
the Array Selection list to pick a single array to be displayed, graphed, or
printed.
Text View Options
There are three icons that can be used to change the way data is displayed in
View. When the
format. This is a toggle button, so if it is pressed again data will return to
ASCII format.
Pressing the
icon also acts as a toggle. The tab size can be changed by typing a number
directly into the combo box or by using the up and down arrows to change the
value. The tab size can be varied from 8 to 20 spaces.
Graph View Options
To view data graphically, you must first select an array and then select up to
two columns of data (elements) to be graphed. After the first column is
highlighted, hold the control key and click on the second column to select it.
icon is pressed, the data will be display ed in hexadecimal
icon will change the data display fro m ASCII to tabular. This
4-2 PC208W, Version 3.3, Instruction Manual
 Loading...