

Page 1
COMPONENTS
PROCEDURE
MILEAGE IN KM
(MAX)
check screws are tightened to the cor-
rect torque
Torque
wrench
PROCEDURE
MILEAGE IN KM
(MAX)
check screws are tightened to the cor-
rect torque
Torque
wrench
MAINTENANCE
WARNING!
THIS TECHNICAL MANUAL IS INTENDED FOR USE BY PROFESSIONAL MECHANICS.
Anyone who is not professionally qualied to assemble bicycles should not attempt to install and operate on the components because of the risk of carrying out incorrect operations that could cause the components to malfunction with the consequent risk of accidents, physical injury or even death.
The actual product may dier from what is illustrated, as the specic purpose of these instructions is to explain the procedures for using the component.
IMPORTANT!
If maintenance has to be performed on the electrical components, the EPS drivetrain must be switched off:
- by inserting the magnet in the special seat on the underside of the Power Unit (version V1)
- by placing the special power off magnet in the "sensitive area" on the Power Unit (version V2 / V3 / V4)
CAUTION
The time indications shown here are purely approximate and may vary significantly in relation to the conditions of use and the
intensity of the cyclist's activity (for example, the following are significant factors: sport use, rain, salty roads during the winter,
weight of the cyclist, etc.).
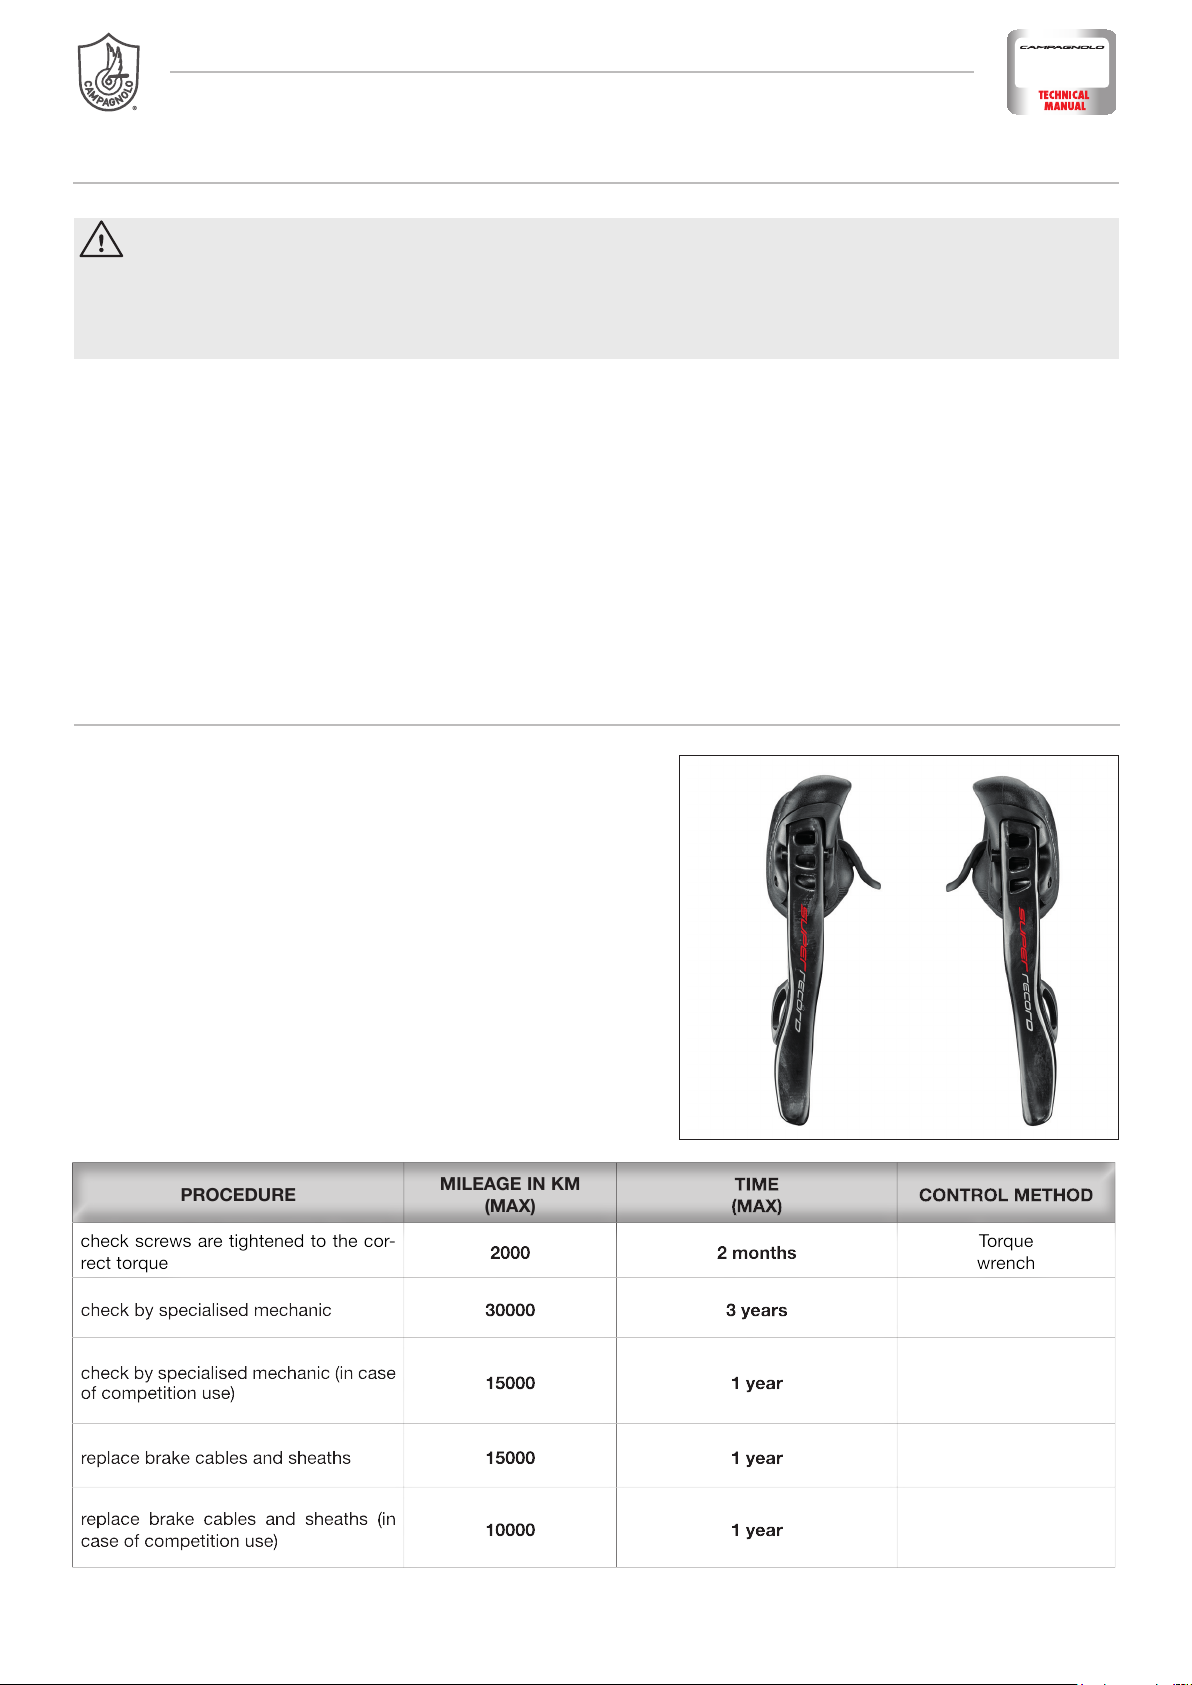
1 - ERGOPOWER EPS CONTROL LEVERS
Before each use and after a fall or collision, check that the component does not exhibit any of the following problems:
• Ergopower EPS control levers that are loose or not correctly positioned on the handlebar.
• Ergopower EPS control levers, cables and sheaths that are damaged and no longer operating the front derailleur, rear derailleur and
brakes correctly.
• levers jammed and failing to return to the original position, or
damaged levers.
• damaged control covers, which could cause the hands to slip.
• Lever 1 can be replaced as with mechanical controls.
MAINTENANCE - Rev. 01/ 06-2019 1
Page 2
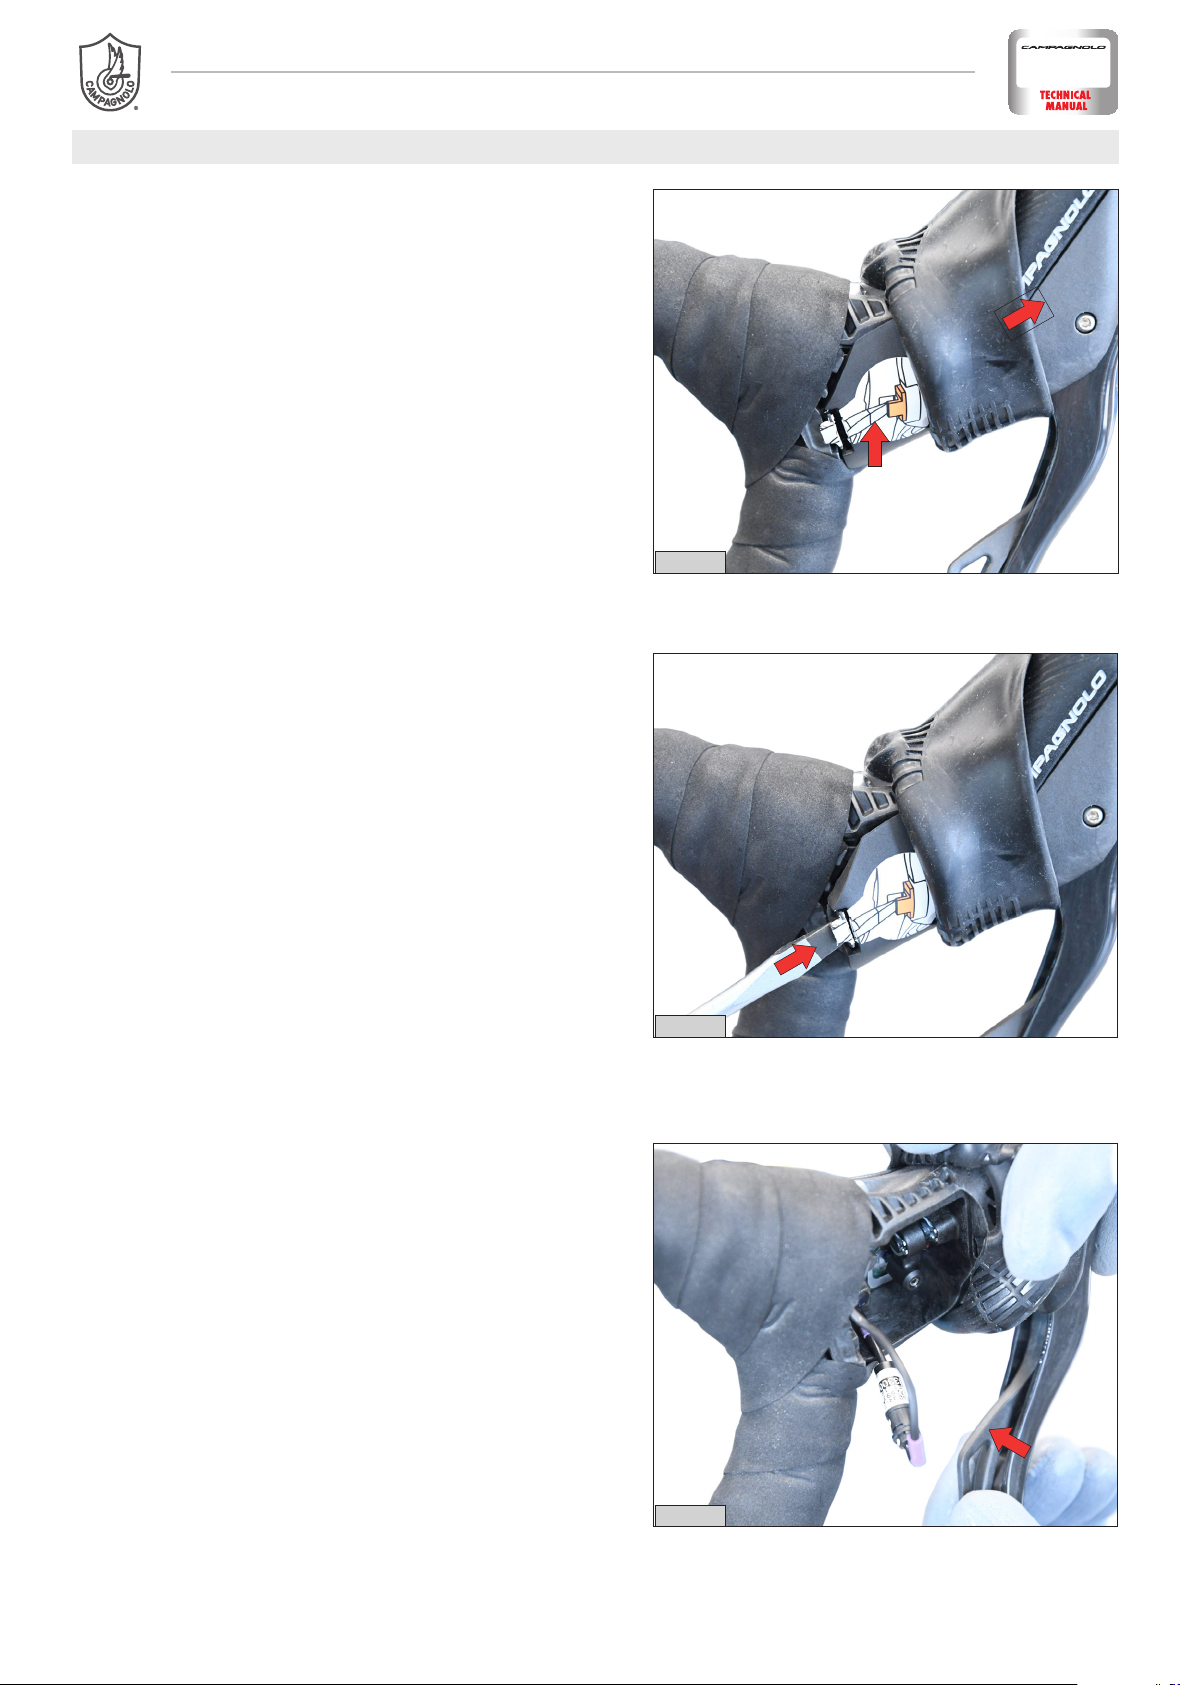
1.1 - ADJUSTING OPERATION OF OUTER LEVER
If you do not hear a click when the outer lever is operated or it
clicks when in a position that requires excessive rotation of the
lever, you can check and modify the operation of the lever hammer
as follows.
1) Move the hood to access the cover in the control lever (Fig.1).
COMPONENTS
1
2) Open the cover by using a flathead screwdriver to release the
cover clip (Fig. 2).
3) Press the outer lever to check that the hammer is operating correctly (Fig. 3).
2
3
MAINTENANCE - Rev. 01/ 06-20192
Page 3
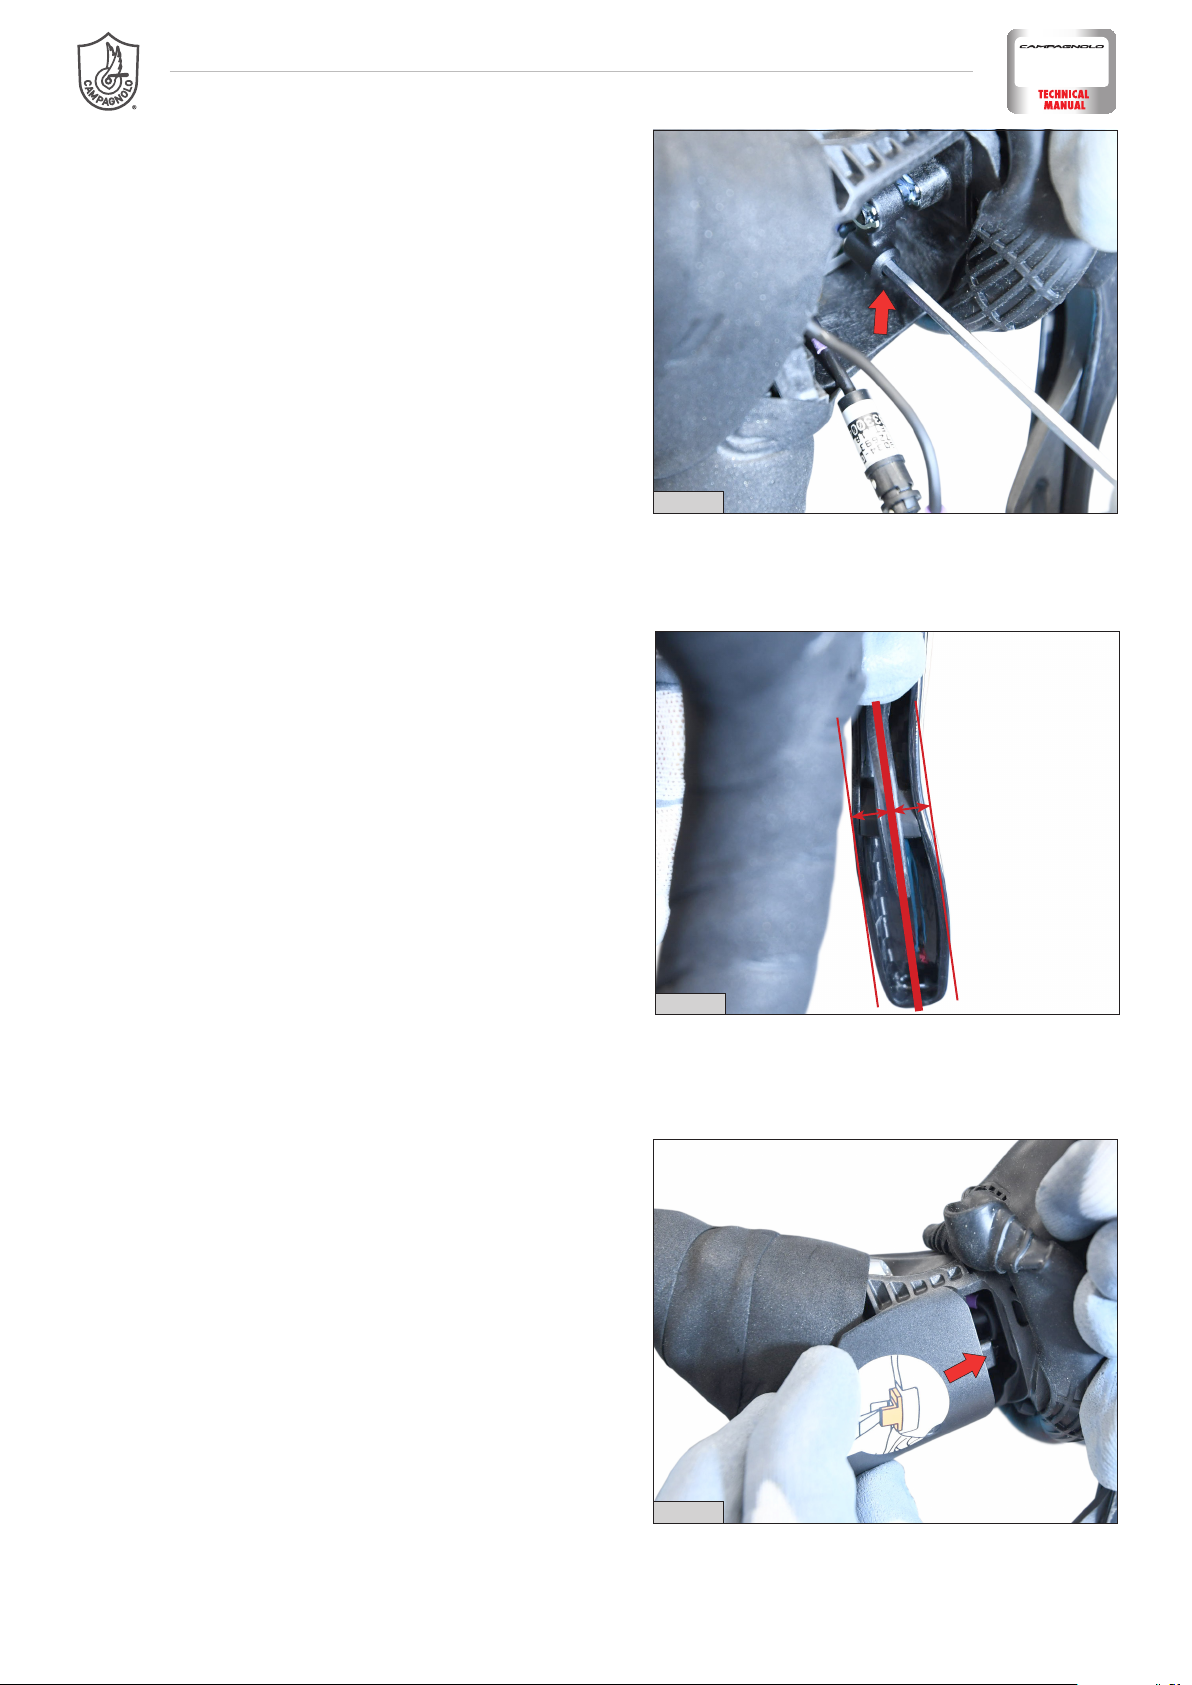
4) Using a 1.5 mm Allen wrench (Fig. 4), turn the pivot in the hammer by lowering or lifting the pusher head on the underside of the
hammer.
5) The lever must be adjusted so that the click is heard when the
outer lever is pushed approximately halfway down (Fig. 5).
COMPONENTS
4
6) Refit the cover on the control lever by placing the tooth at the
front and pressing the clip at the rear (Fig. 6).
7) Refit the hood and make sure it is positioned correctly on the
control lever.
=
=
5
6
MAINTENANCE - Rev. 01/ 06-2019 3
Page 4
2 - EPS FRONT DERAILLEUR
PROCEDURE
MILEAGE IN KM
(MAX)
check screws are tightened to the cor-
rect torque
Torque
wrench
PROCEDURE
MILEAGE IN KM
(MAX)
check screws are tightened to the cor-
rect torque
Torque
wrench
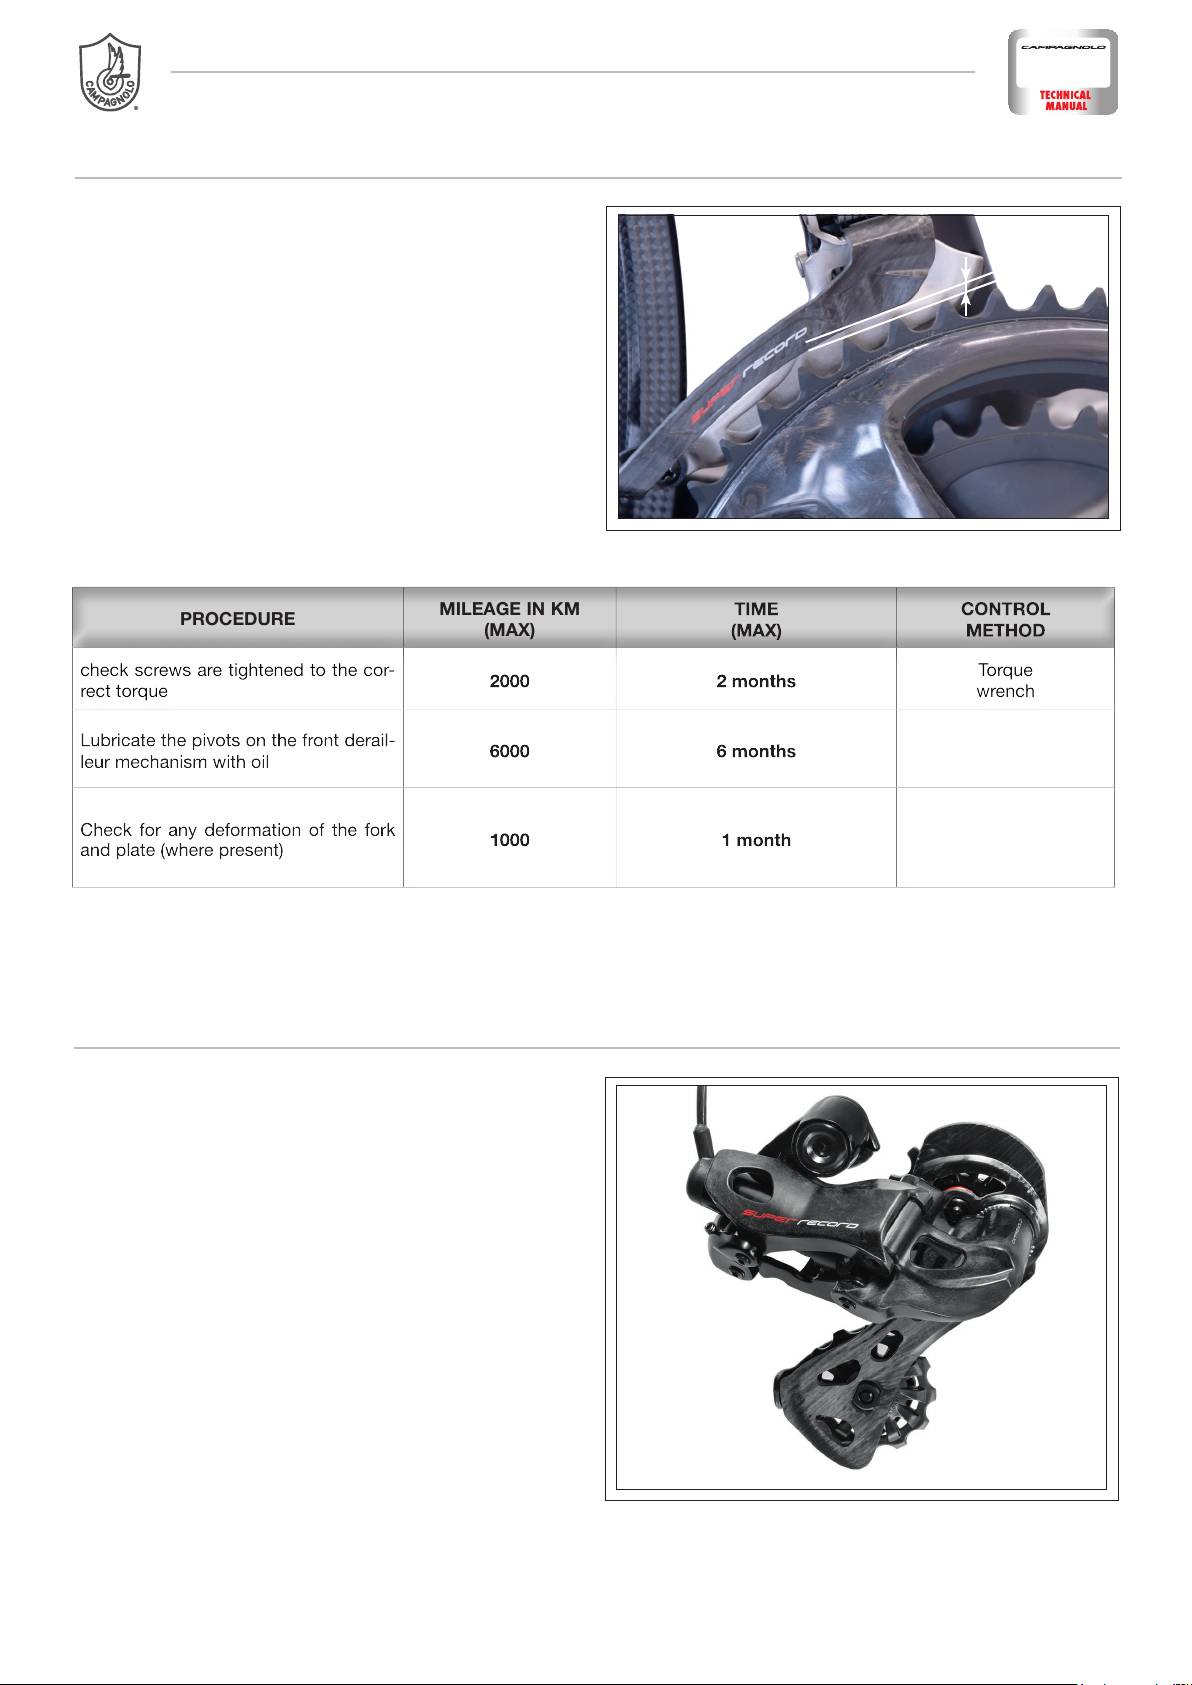
• Check that the front derailleur is oriented correctly:
- the derailleur cage must be 1.5÷3 mm from the largest
chainring.
- the external side of the derailleur cage must be parallel to
the largest chainring.
Periodically clean and lubricate the pivots of the front and
rear derailleurs with non-aggressive oil for thermoplastic
components.
• Make sure you do not damage the component because the
three pivots are press fitted using knurls (one on the short
pivots and two on the long pivot).
• The derailleur cage can be replaced (as with mechanical
systems) by contacting a Campagnolo Service Centre.
COMPONENTS
1.5 – 3 mm
3 - EPS REAR DERAILLEUR
• Periodically lubricate all the joints with non-aggressive oil for
thermoplastic components.
• If the wheels do not rotate smoothly, thoroughly clean them
or replace if necessary.
• To remove the wheels, unfasten the screws using the 3 mm
Allen wrench.
Caution!
The wheel marked “UPPER” must be fitted on the topside
and the wheel marked “LOWER” on the underside.
Caution!
When replacing the wheels, comply with the following:
TIGHTENING TORQUE: 2.7 Nm (24 in.lbs)
MAINTENANCE - Rev. 01/ 06-20194
Page 5
COMPONENTS
Check screws are tightened to
the correct torque
Torque
wrench
Check screws are tightened to
the correct torque
Torque
wrench
4 - EPS POWER UNIT
Before carrying out maintenance work on the electrical
components, the EPS drivetrain must be switched off:
- by inserting the magnet in the special seat on the underside of the Power Unit (version V1)
- by placing the special power off magnet in the "sensitive
area" on the Power Unit (version V2 / V3 / V4)
Since the EPS Power Unit contains the battery pack:
• Only use the battery charger supplied with the EPS driv-
etrain.
• do not dismantle or make any modifications to the EPS
Power Unit.
• do not use the EPS Power Unit if there is any visible
external damage to the unit itself.
• do no use the EPS Power Unit if damaged or malfunctioning.
• keep the EPS Power Unit in a safe place, out of reach of
children and animals.
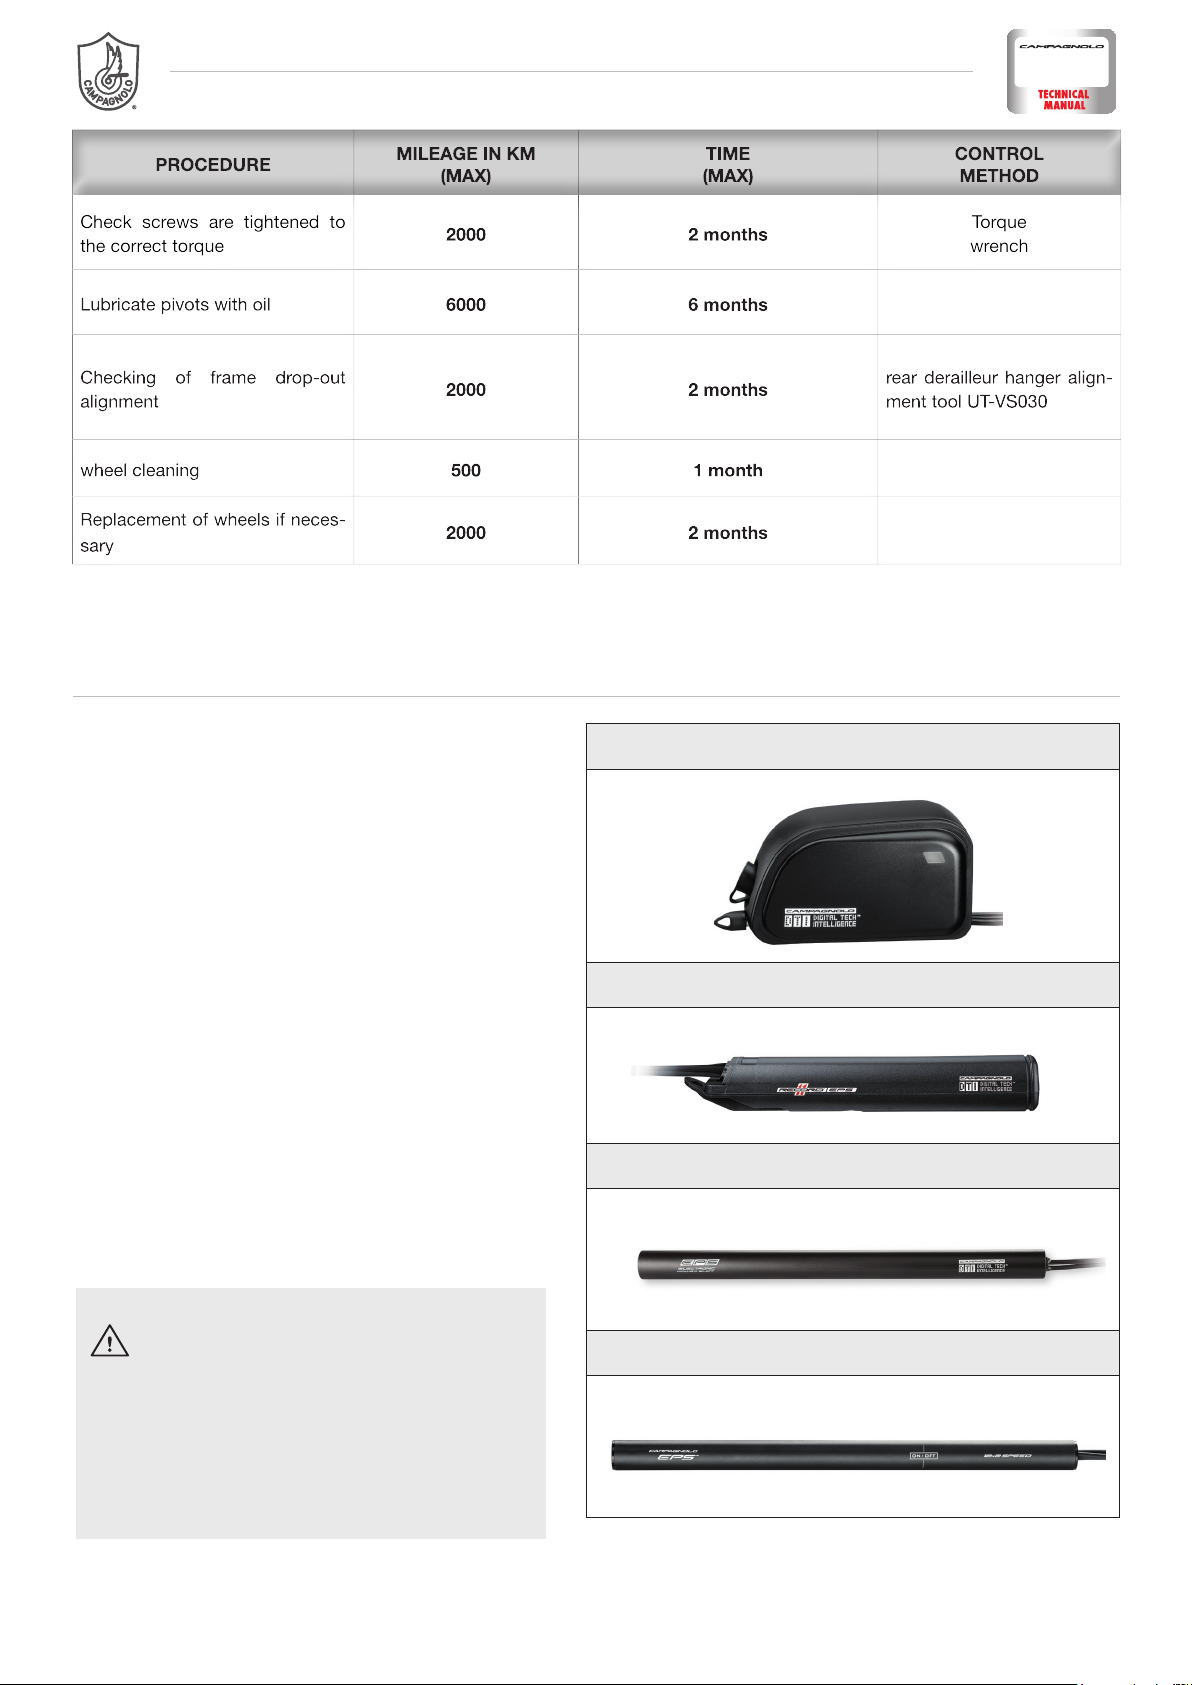
V1 POWER UNIT (11s)
V2 POWER UNIT (11s)
V3 INTERFACE UNIT (11s)
MAINTENANCE - Rev. 01/ 06-2019 5
DANGER!
Do not heat or burn the power unit. Do not leave the
power unit in a place where the temperature may
exceed 60°C (e.g. in a car on a hot day or near fireplaces or heaters). Failure to observe these instructions may cause overheating, fire or explosion and
result in severe injury or death.
V4 INTERFACE UNIT (12s)
Page 6
COMPONENTS
IMPORTANT!
If you do not intend to use the EPS Power Unit for a prolonged period of time, it must be switched off and kept in a safe place. We
also recommend checking the battery charge level and fully charging the battery approximately once every six months.
• Battery lifetime depends on a number of different factors, such as usage and storage conditions. Note that if the EPS Power Unit
is stored in excessively cold or hot conditions, battery performance and lifespan may be reduced.
• The battery is a perishable product and charge capacity will reduce gradually with repeated use and over time. If charge duration
reduces significantly, the battery may be depleted, requiring the purchase of a new EPS Power Unit.
IMPORTANT!
Use only water and neutral detergent to clean the EPS Power Unit. Do not use alcohol, acetone or solvents. In
order to dispose of the EPS Power Unit correctly, comply with the applicable legislation in the country of use.
5 - EPS INTERFACE UNIT
IMPORTANT!
Use only water and neutral detergent to clean the
EPS Interface Unit. Do not use alcohol, acetone or
solvents. In order to dispose of the EPS Interface
Unit correctly, comply with the applicable legislation in the
country of use.
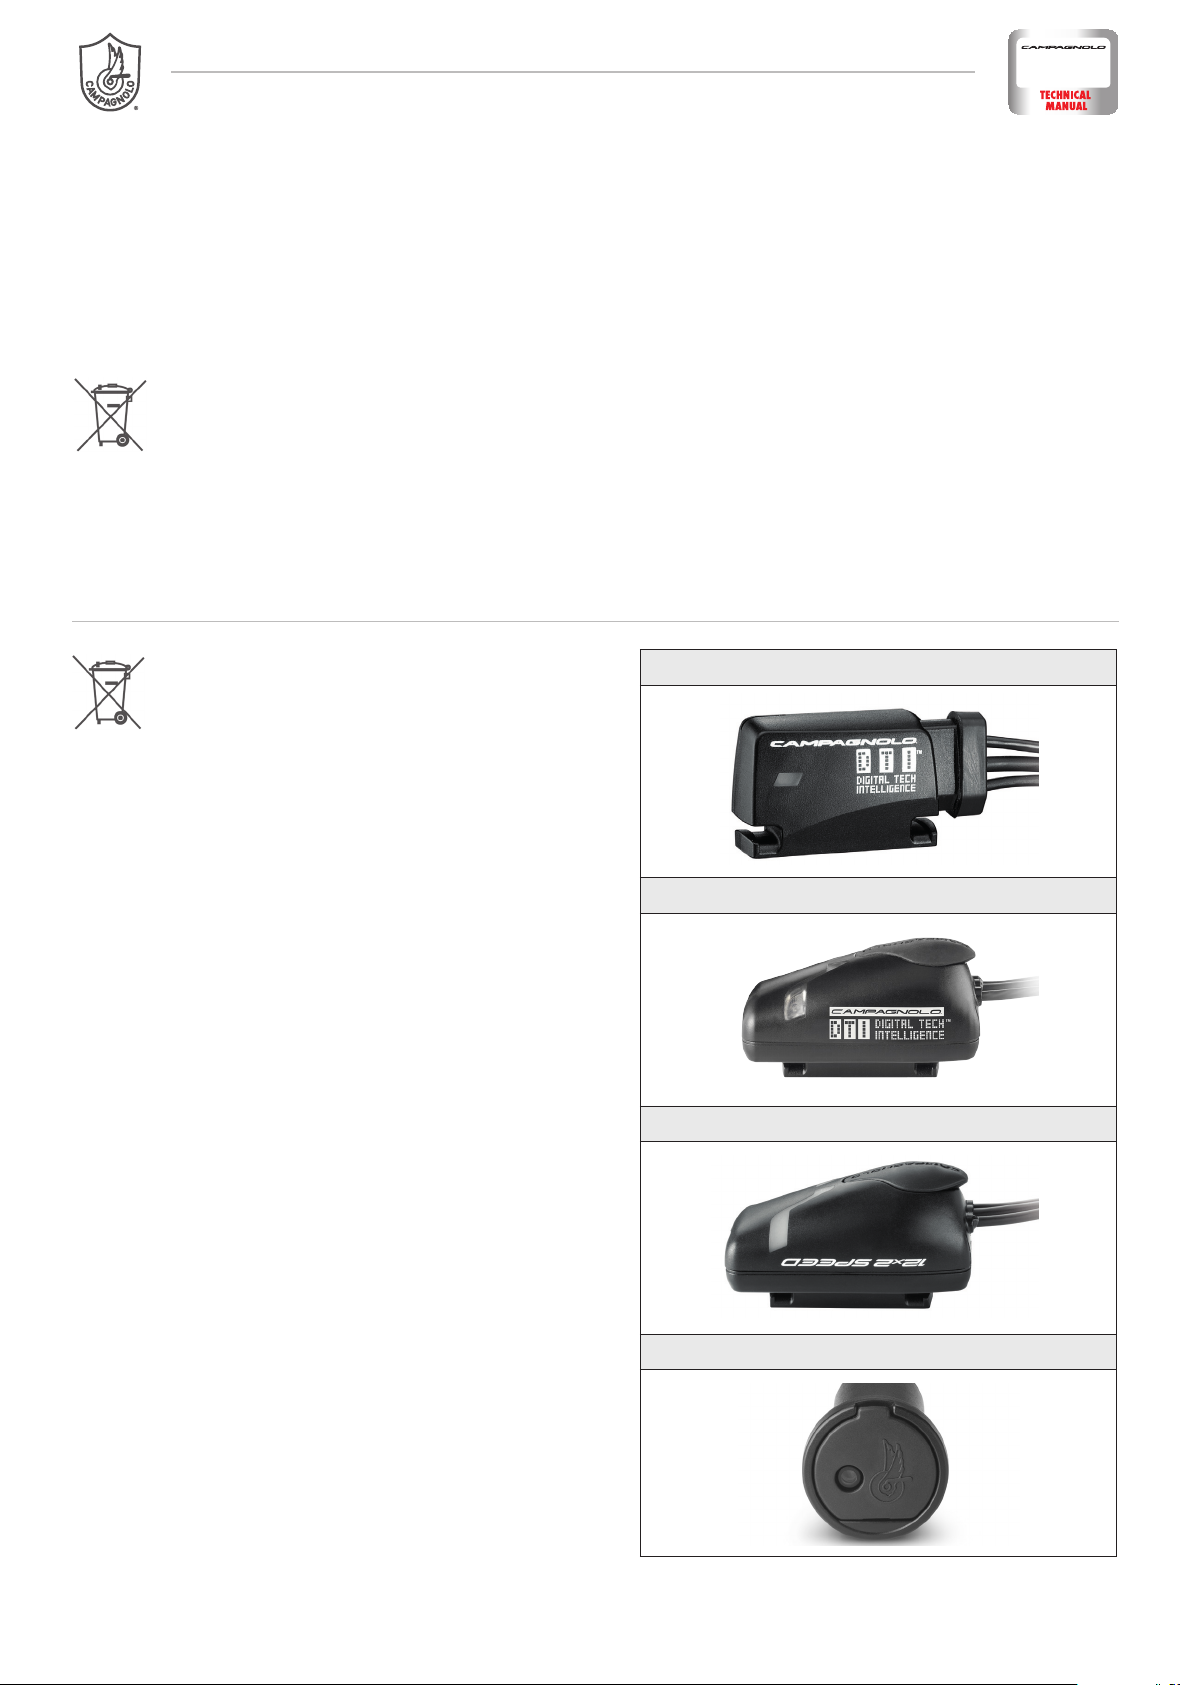
V1 / V2 INTERFACE UNIT (11s)
V3 INTERFACE UNIT (11s)
V4 INTERFACE UNIT (12s)
V4 INTERFACE UNIT (12s)
MAINTENANCE - Rev. 01/ 06-20196
Page 7
COMPONENTS
6 - BATTERY CHARGER
• Since it does not contain any user-serviceable parts, do not open the EPS battery charger for any reason.
• The EPS battery charger may only be used indoors and must not be exposed to rain or humidity.
• The EPS battery charger should only be used to charge the battery pack for the Campagnolo EPS Power Unit.
WARNING!
Only use the power cable supplied with the battery charger for use with mains power or one for use with a 12 VDC vehicle
power supply. The use of cables other than those specified by Campagnolo s.r.l. may cause electric shock, explosion, fire,
injury or death.
• Always disconnect the EPS battery charger from the mains socket when not in use.
• If the unit is malfunctioning, do not attempt to open or repair it in any way and contact a Campagnolo Service Centre or Pro-
shop.
• Keep the EPS battery charger out of the reach of children and animals.
IMPORTANT!
Never use denatured alcohol to clean your EPS battery charger.
Please contact a Campagnolo Service Centre or Campagnolo Pro-Shop for information on how to correctly dispose of
your EPS battery charger.
7 - HOW TO CLEAN THE EPS COMPONENTS
•
Although the system has an IP67 water resistance rating, washing the bicycle with pressurised water or with harsh detergents
is not recommended.
•
Dirt seriously damages the bicycle and its components. Rinse, clean and dry your bicycle carefully after use.
IMPORTANT: for cleaning the bicycle only use environmentally-friendly and neutral products without caustic substances
and safe to use for you and for the environment.
• Dry the drivetrain with a soft cloth: never use abrasive sponges or metal scouring pads.
Never wash your bicycle with pressurised water. Pressurised water - even from a normal garden hose - may infiltrate through the
seals and into your Campagnolo®, components, causing irreparable damage to them. Wash your bicycle and the Campagnolo®
components by delicately cleaning with soap and water and drying thoroughly.
WARNING!
Saline conditions (such as roads in winter and in coastal areas) may cause galvanic corrosion in the majority of the
exposed bicycle components. To prevent damage, malfunction and the consequent risk of accident, rinse, clean, dry and
re-lubricate all components subject to corrosion.
MAINTENANCE - Rev. 01/ 06-2019 7
 Loading...