

Campa ConvectAir, ConvectAir 7716 Installation & Operating Instructions Manual
EXCEPTIONALLY RADIANT
INSTALLATION &
OPERATING INSTRUCTIONS
(READ CAREFULLY BEFORE ANY OPERATION - DOCUMENT TO BE KEPT BY END USER)
IMPRESARIO – LIVING SPACES
MODEL NUMBER : 7716
421AA2558-2 109339/12
Page 2
Dear owner,
- Congratulations on the purchase of this premium electric heater. CONVECTAIR
develops and produces the highest quality heating products in the electrical
industry.
- To obtain the best results and the ultimate in performance and comfort,
please take a moment to read the installation, operation and maintenance
instructions detailed in this manual.
1. - QUICKSTART GUIDE page 3
2. - SPECIFICATIONS page 4
3. - RECOMMENDED SET-UP page 4
4. - INSTALLATION AND MOUNTING page 6
5. - ELECTRICAL CONNECTION page 7
6. - OPERATING INSTRUCTIONS page 8
7. - MAINTENANCE AND ADVICE page 15
8. - TROUBLESHOOTING page 16
9. - IDENTIFICATION OF YOUR HEATER page 17
WARRANTY AND REGISTRATION Back Cover
TABLE OF CONTENTS
INTRODUCTION
Page 3
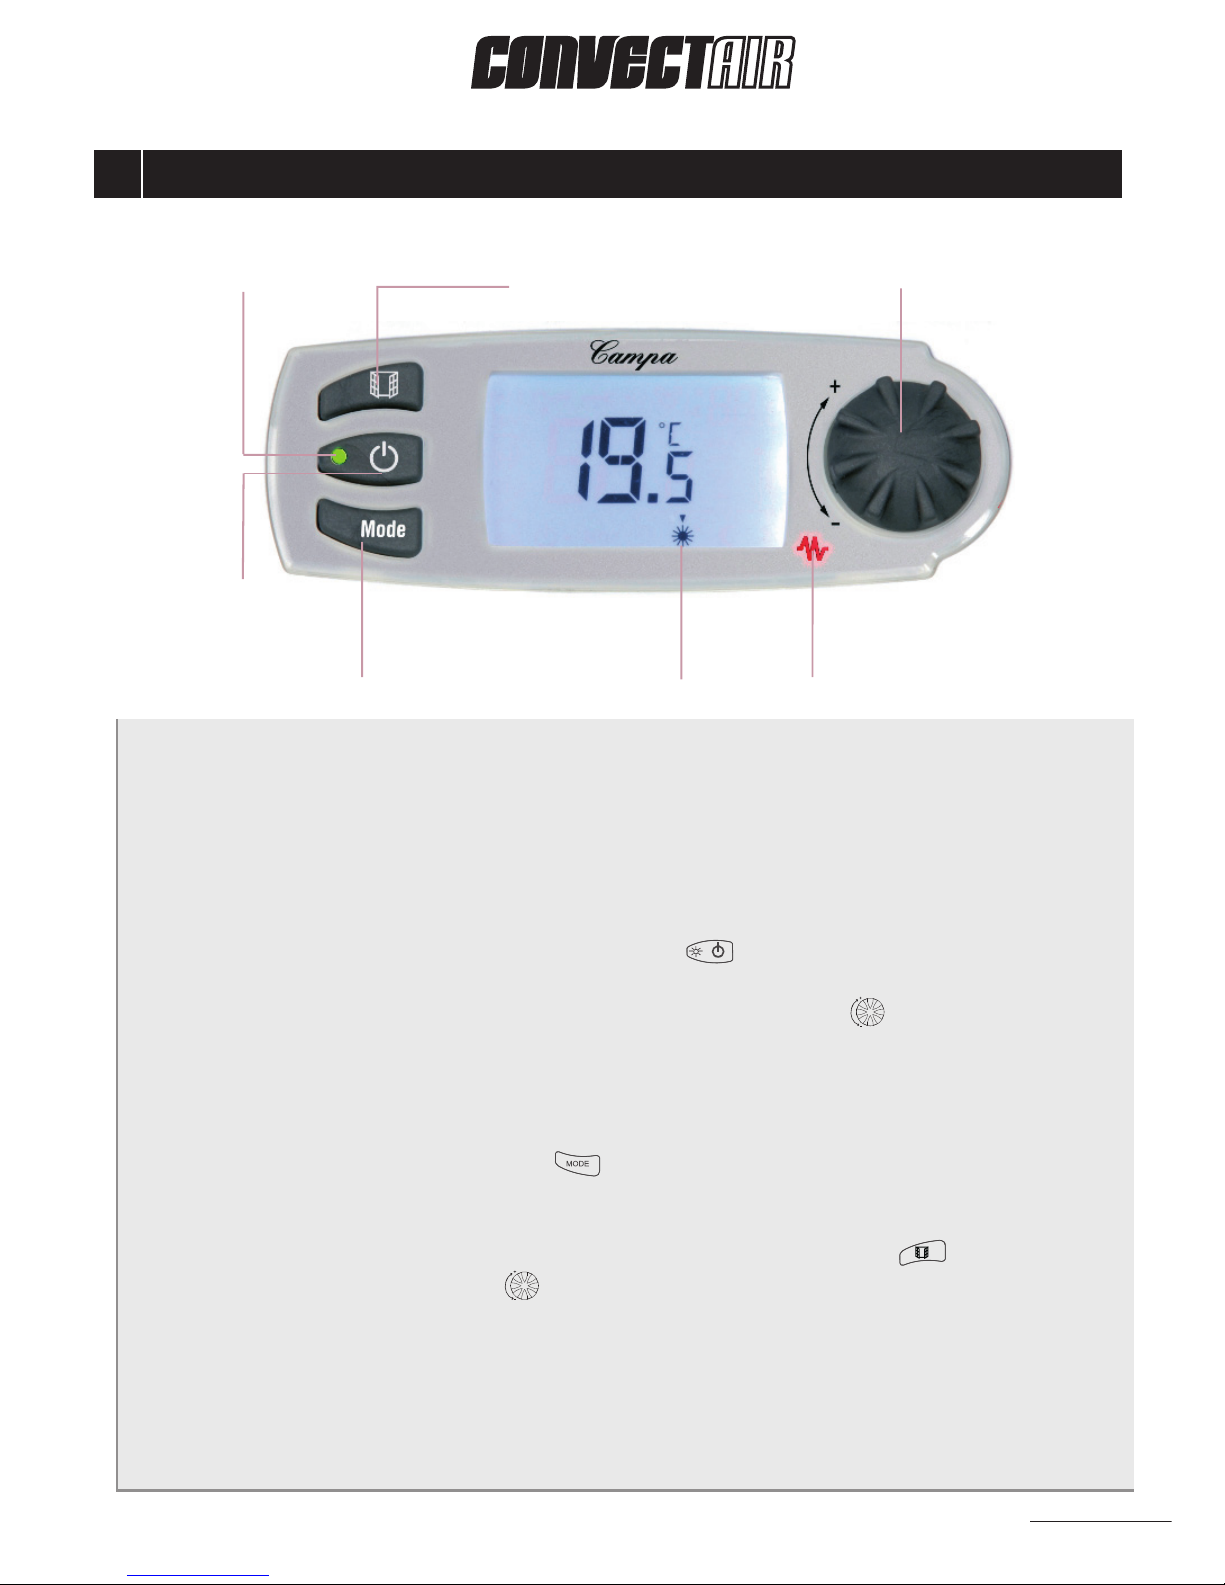
QUICKSTART GUIDE
1
Electrical requirements : 208 V / 220-240 V
Install a 2 in. x 3 in. wall junction box, positioned within the space defined by the
wall bracket. Lowest fixing hole of wall bracket should be at 32 cm (12 1/2”) from
the floor (page 6 Fig. B).
Installing and connecting the heater : (pages 4-7).
To turn the heater ON : Press the ON/Standby key (page 8).
To set the temperature : Turn the Temperature adjustment knob to raise or to
lower the temperature setting (page 8).
To change from °C to °F : (page 9)
To change Mode : Press the Mode key (Comfort > Economy > Frost protection
> Program > Comfort >... (pages 9-10).
To lock or unlock the control panel : Press and hold the Window key and the
Temperature adjustment knob at the same time (page 11).
Troubleshooting : (page 16).
To contact CONVECTAIR : (Back Cover).
“ON” indicator light
“Open Window” Activate/Deactivate key Temperature adjustment knob
Heating indicator light
Operating mode displayOperating mode selection key
“ON/Stanby” key
Page 4
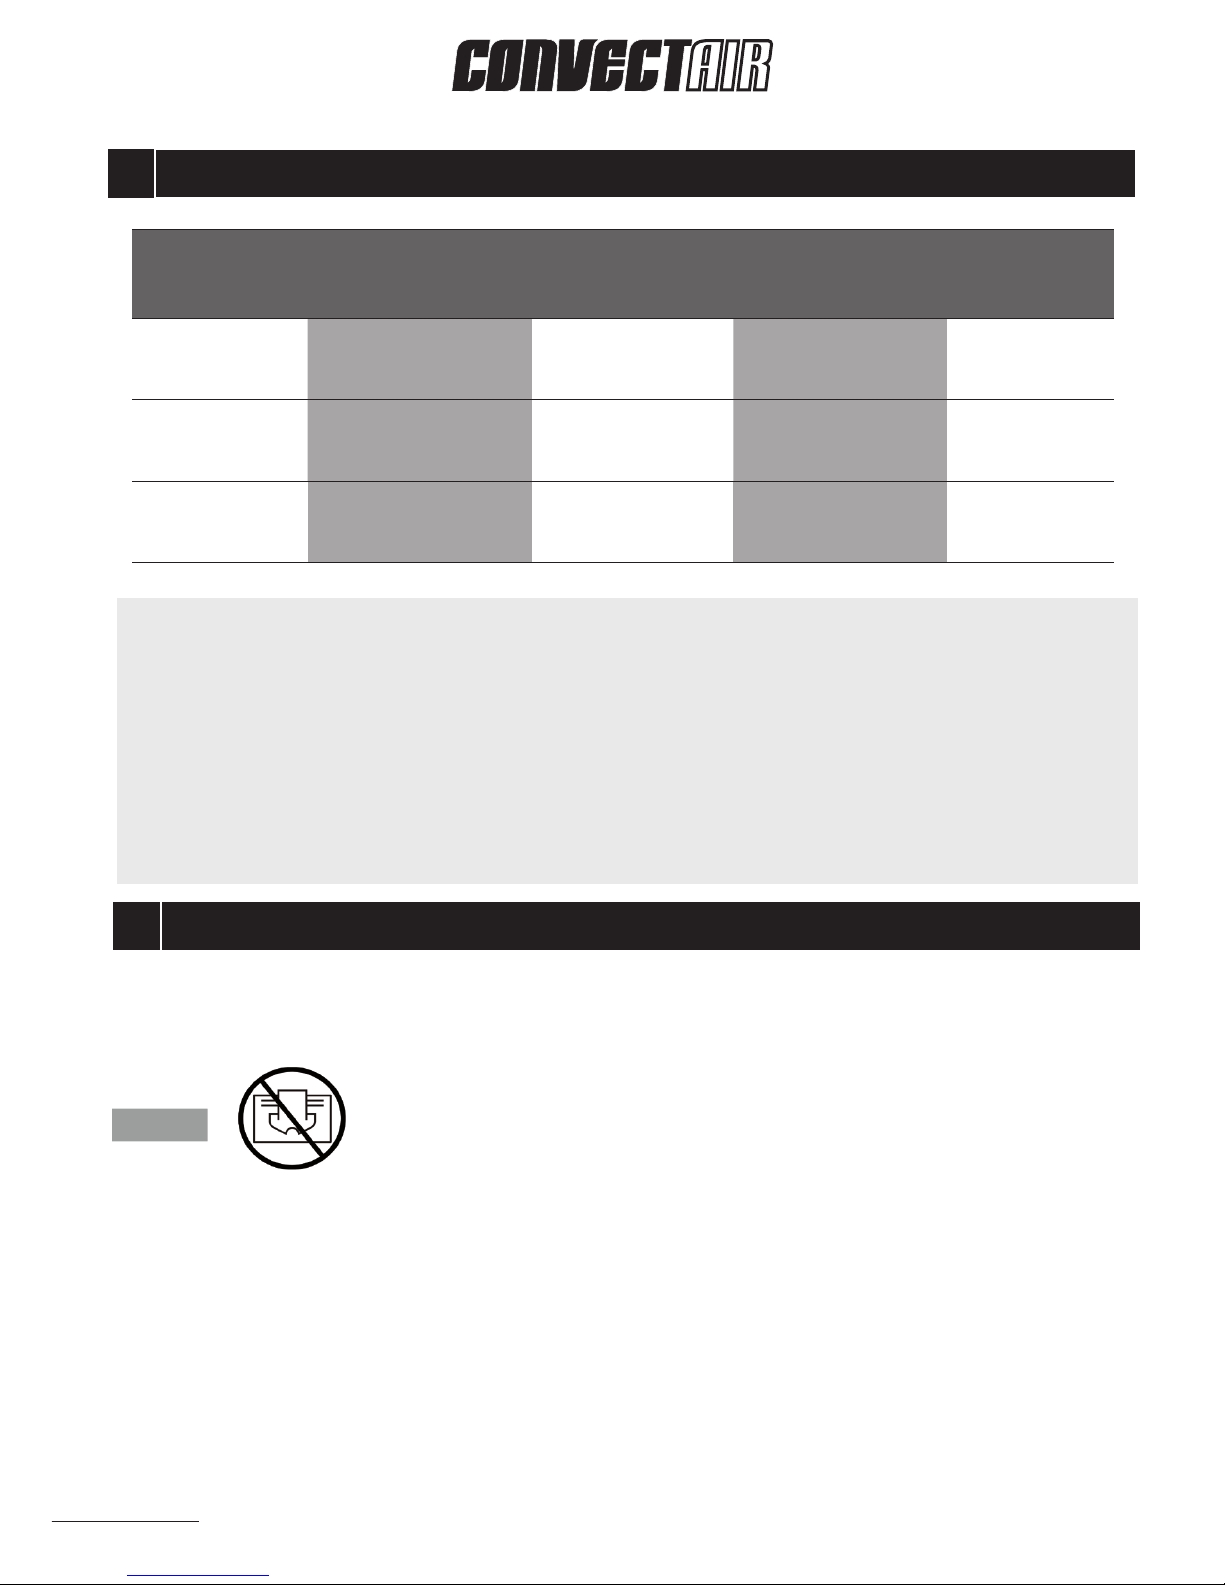
SPECIFICATIONS
RECOMMENDED SET-UP
2
3
Optional setback system (sold separately) :
Your IMPRESARIO can be fitted with the optional CONVECTAIR Programmer Modules
to program temperature setbacks in periods of prolonged absence, providing the
same comfort and more savings. For more information, contact your electrical
contractor or dealer, or call CONVECTAIR (see Back Cover).
PLEASE NOTE : Your heater must be installed in accordance with national and local codes and
CONVECTAIR recommends an installation by a qualified electrician.
CAUTION DO NOT COVER THE FRONT PANEL OR TOP OF THE HEATER
• Do not position the heater below an electrical receptacle.
• Your heater must be installed so that the control panel is out of reach from anyone in the
bath-tub or in the shower. Do not install over a bath-tub or spa.
• Do not install the heater behind a door, furniture or other obstacles, or in front of an air
exhaust vent.
• Keep combustible materials such as curtains, away from the heater.
• Your heater is equipped with a heating element that may reach high temperatures. Do not
install or operate in the presence of gasoline, paint solvents or other flammable products.
• Maintain the minimum required clearances (height from floor, distances from side walls or
furniture, drapes, etc).
Model
number
Description Capacity Voltage Current
draw
7716-C10
Impresario,
Radiant electric heater.
800W / 1000W
208 / 220-240V,
60Hz
4A / 5A
7716-C15
Impresario,
Radiant electric heater.
1250W / 1500W
208 / 220-240V,
60Hz
6A / 7A
7716-C20
Impresario,
Radiant electric heater.
1600W / 2000W
208 / 220-240V,
60Hz
7A / 8A
Page 5
RECOMMENDED SET-UP (continued)
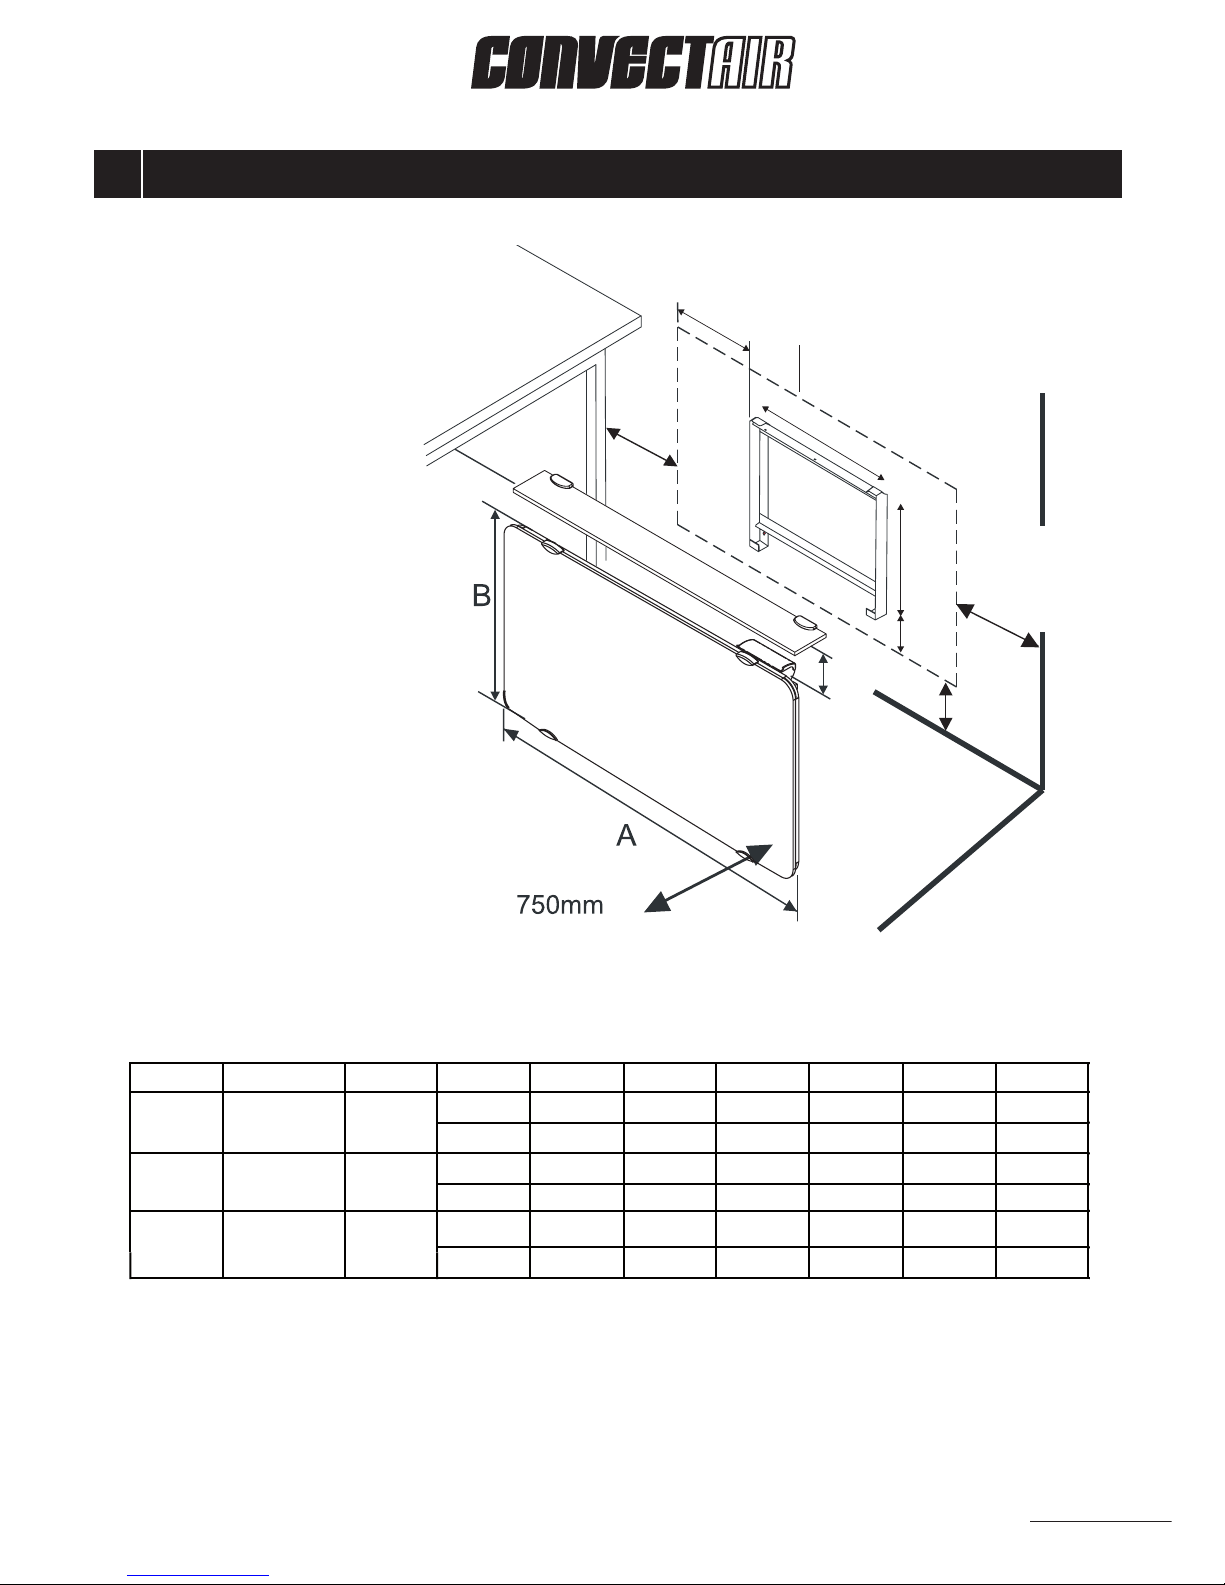
Fig. A:
Minimum clearances:
INSTALLATION HEIGHT :
20 cm (8 in.).
MINIMUM CLEARANCE IN
FRONT OF HEATER :
75 cm (30 in.).
3
Heater outline
Wall
Shelf or curtains
(30”)
200mm
(8”)
250mm
(10”)
C
D
E
150mm (6”)
*300mm (12”)
*for Programmer
150mm
(6”)
F
Surround
(30”)
Référence Puissance Courant Poids A B C D E
17 Kg 820 mm 565 mm 384 mm 294 mm 115 mm
7716-C10
7716-C15
7716-C20
800 / 1000W
1250 / 1500W
1600 / 2000W
4A / 5A
37.4 lbs
32 1/4 po.
22 1/4 po.
22.6 Kg 1098 mm 565 mm 662 mm 294 mm 115 mm
6A / 7A
49.7 lbs
61.6 lbs
43 1/4 po.
22 1/4 po.
26 po.
28 Kg 1098 mm 690 mm 662 mm 419 mm 115 mm
8A / 9A
43 1/4 po.
27 1/8 po.
26 po.
200mm
(8”)
250mm
(10”)
11 1/2 po.
11 1/2 po.
16 1/2 po.
Contour de l’appareil
Mur
Tablette et voilage
Meuble de face
(30”)
200mm
(8”)
250mm
(10”)
C
D
E
150mm (6”)
*300mm (12”)
*pour Programmeur
150mm
(6”)
F
4 1/2 po.
4 1/2 po.
F
181 mm
181 mm
181 mm
7 1/8 po.
7 1/8 po.
7 1/8 po.
4 1/2 po.
15 1/8 po.
Reference Capacity Current Weight A B C D E
7716-C10
7716-C15
7716-C20
800 / 1000W
1250 / 1500W
1600 / 2000W
4A / 5A
6A / 7A
8A / 9A
F
17 Kg 820 mm 565 mm 384 mm 294 mm 115 mm
37.4 lbs
32 1/4 in.
22 1/4 in.
22.6 Kg 1098 mm 565 mm 662 mm 294 mm 115 mm
49.7 lbs
61.6 lbs
43 1/4 in.
22 1/4 in.
26 in.
28 Kg 1098 mm 690 mm 662 mm 419 mm 115 mm
43 1/4 in.
27 1/8 in.
26 in.
11 1/2 in.
11 1/2 in.
16 1/2 in.
4 1/2 in.
4 1/2 in.
181 mm
181 mm
181 mm
7 1/8 in.
7 1/8 in.
7 1/8 in.
4 1/2 in.
15 1/8 in.
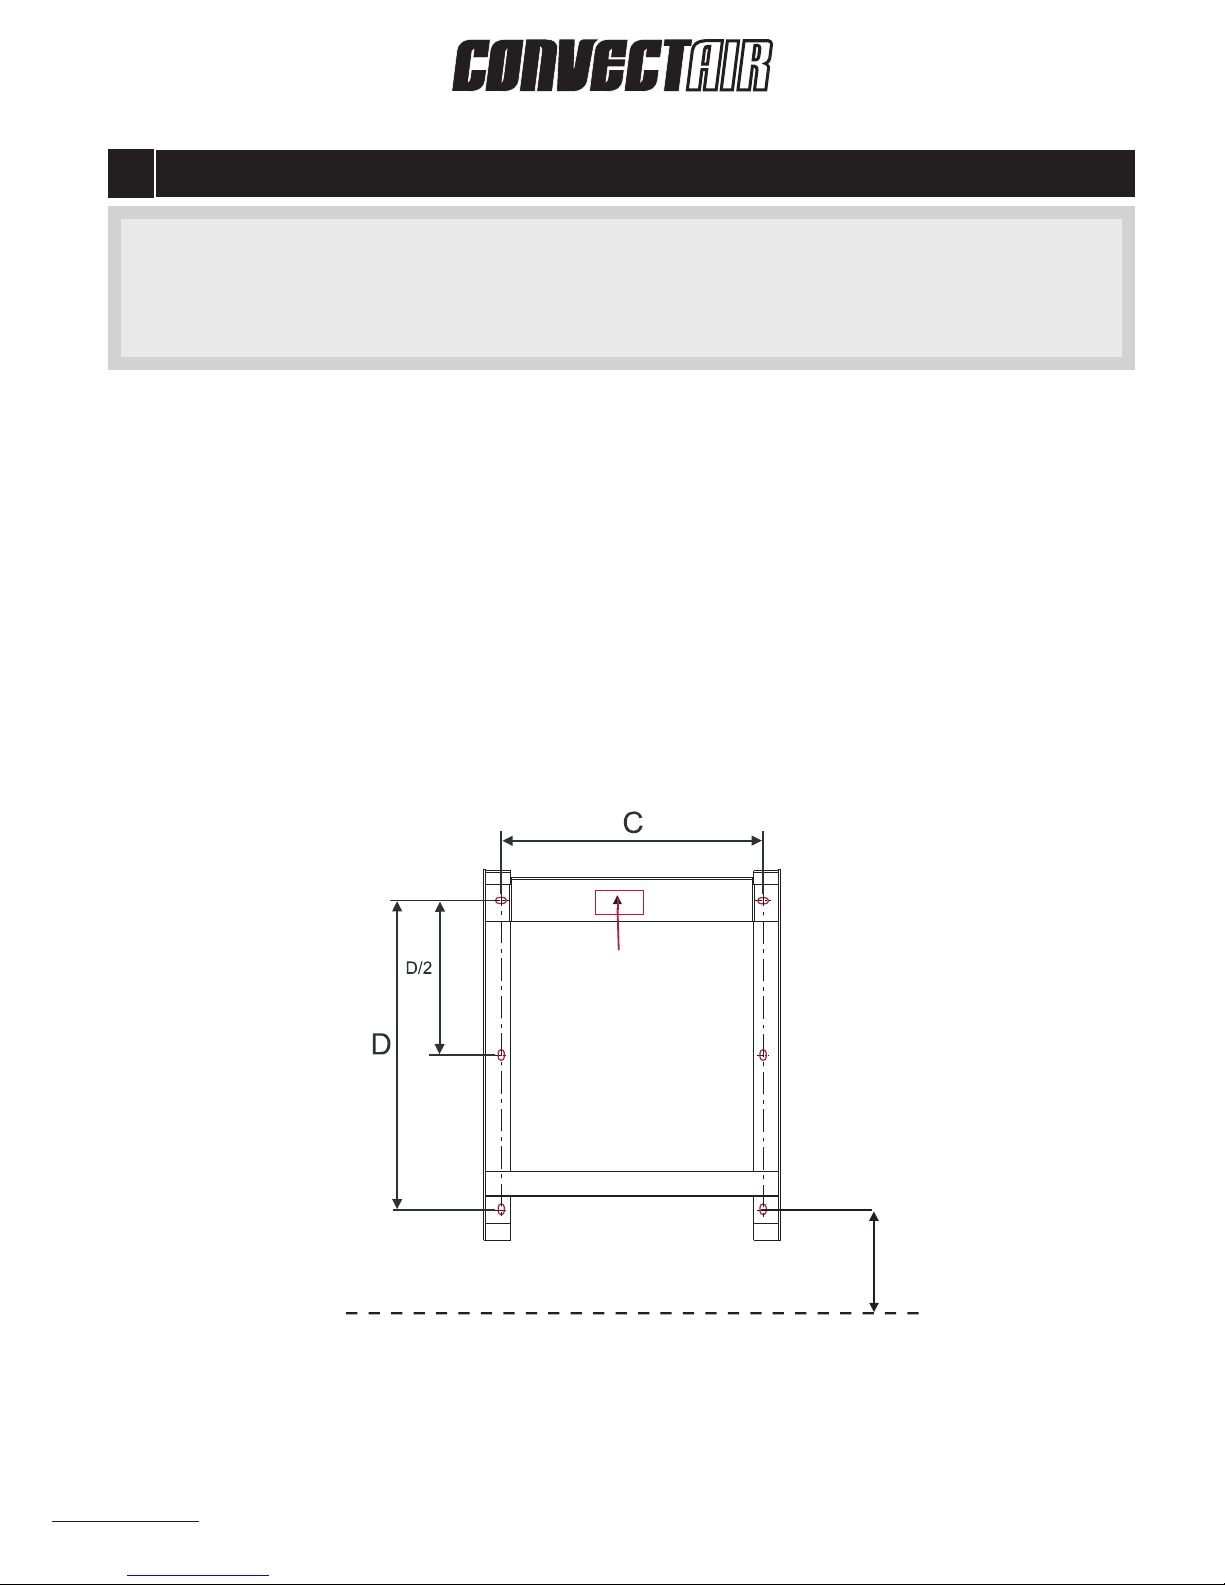
Page 6
INSTALLATION AND MOUNTING
4
- Remove the mounting bracket from the heater – loosen the locking screw if necessary.
- Respect all minimum clearances (page 5 Fig. A).
- Position the bracket on the wall, making sure it is properly oriented and that the bottom
fastening holes are at a height of 32 cm (12 1/2 in.) from the floor.
- On some models, the bracket may not be centered on the heater. Use the center reference mark on the bracket to position it.
- Check that the bracket is leveled and mark the 6 fixing holes.
- Install the appropriate wall anchors and fasten the mounting bracket with 6 screws.
Maximum screw size : 5,5mm (7/32 in.).
22 1/4 po.
22 1/4 po.
26 po.
27 1/8 po.
26 po.
11 1/2 po.
11 1/2 po.
16 1/2 po.
4 1/2 po.
4 1/2 po.
F
181 mm
181 mm
181 mm
7 1/8 po.
7 1/8 po.
7 1/8 po.
4 1/2 po.
15 1/8 po.
Floor level
When inserting the programming module or interface
(optional), we recommend leaving a 300 mm(12 in.) gap
between the corner of the wall and the heater to take the
receiver cover.
F
Center Label
32 cm (12 1/2”)
22 1/4 in.
22 1/4 in.
26 in.
27 1/8 in.
26 in.
11 1/2 in.
11 1/2 in.
16 1/2 in.
4 1/2 in.
4 1/2 in.
181 mm
181 mm
181 mm
7 1/8 in.
7 1/8 in.
7 1/8 in.
4 1/2 in.
15 1/8 in.
Fig. B
CAUTION
Because of the heavy weight of this heater, particular care must be taken when handling and installing it. Use
screws and anchors adapted to the wall type and weight of the heater.
 Loading...