

Page 1
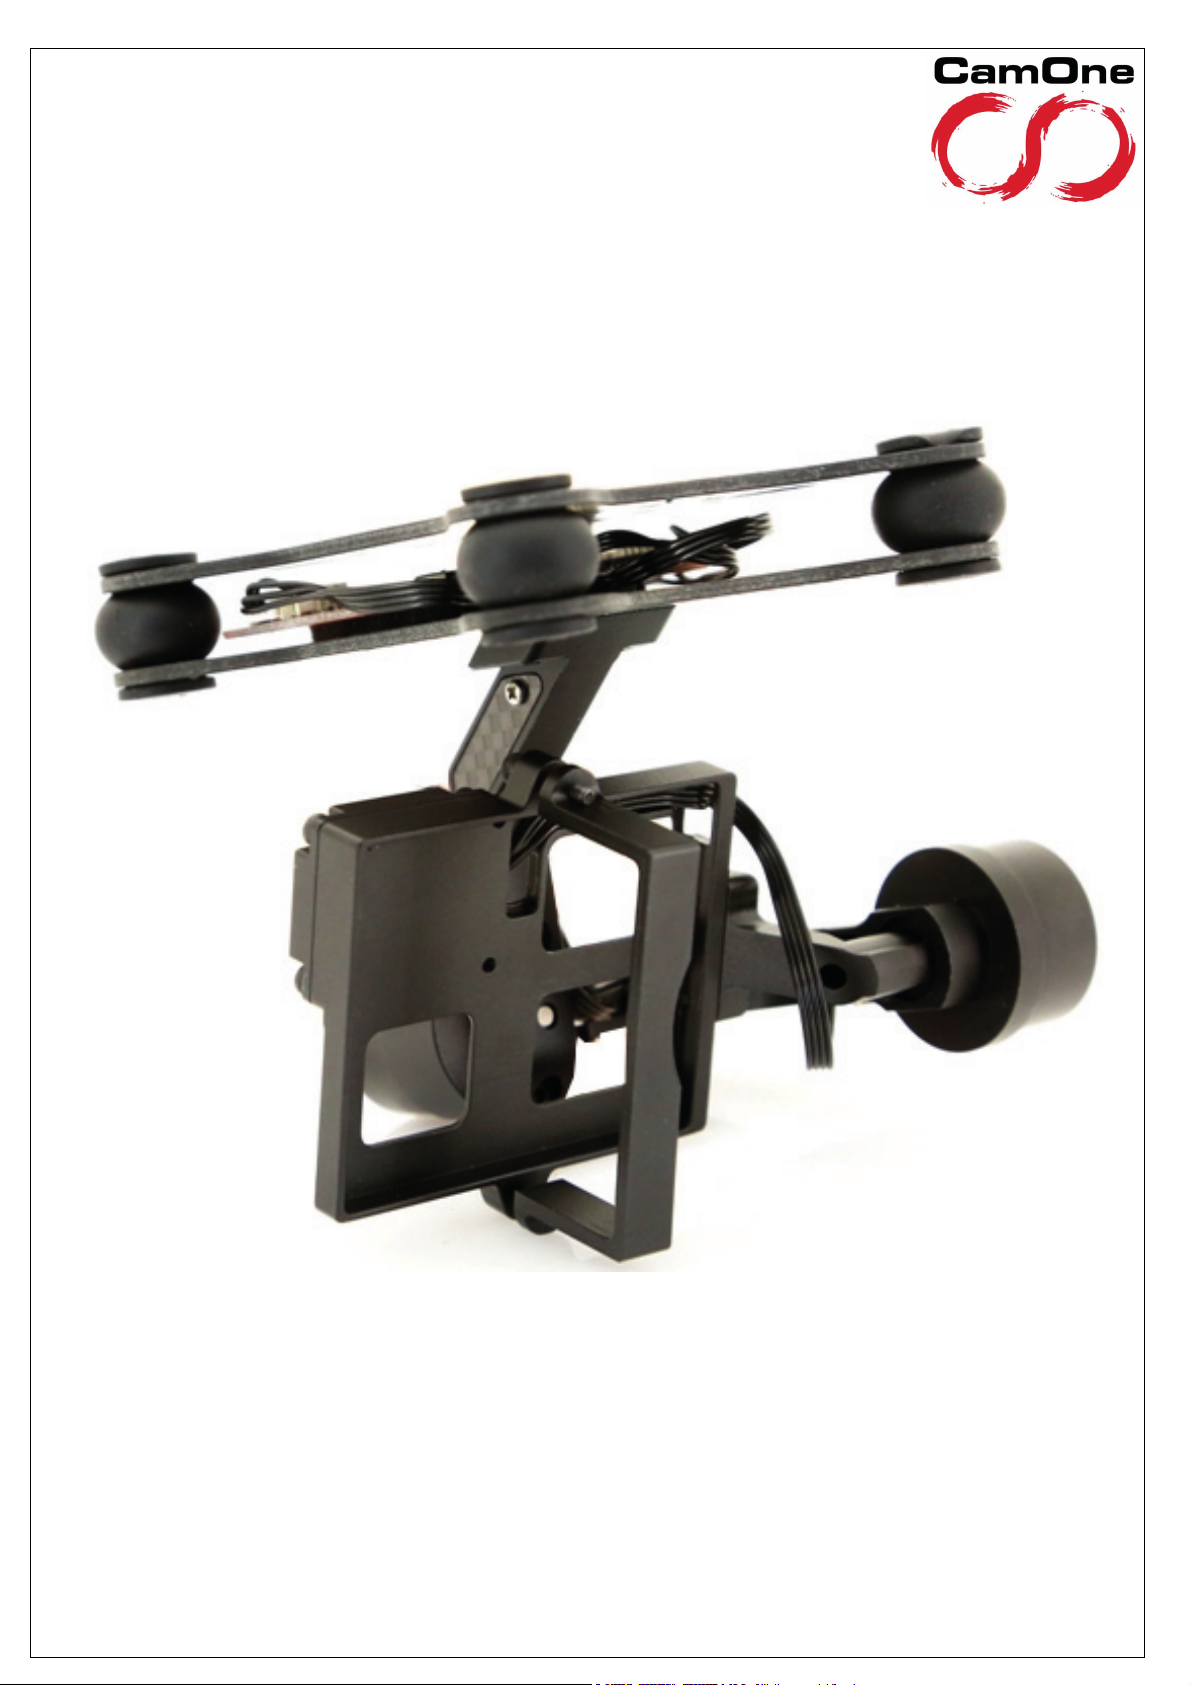
CamOne Gravity Air 2D
Flightgimbal
Benutzerhandbuch
Vers. 1.0
"FlyCamOne" und „CamOne” sind registrierte Marken von ACME the game company GmbH, Deutschland
© copyright 2015 von ACME the game company GmbH
Dieses Benutzerhandbuch ist durch internationale Urheberrechtsgesetze geschützt.
Kein Teil dieses Benutzerhandbuchs darf ohne die vorherige schriftliche Genehmigung von ACME the game company GmbH
in irgendeiner Form oder durch irgendwelche Mittel, elektronisch oder mechanisch, einschließlich von
Fotokopieren, Aufzeichnen oder Speichern in einem Informationsspeicher- und -abrufsystem, reproduziert,
verteilt, übersetzt oder übertragen werden
Page 2
Sicherheitshinweise
WARNUNG:
BEACHTEN SIE FOLGENDE HINWEISE,
UM STROMSCHLÄGE ODER SCHÄDEN
AM PRODUKT AUSZUSCHLIESSEN:
‐ SETZEN SIE DAS GERÄT NICHT REGEN,
FEUCHTIGKEIT, TROPF- ODER
SPRITZWASSER AUS
‐ HALTEN SIE DAS GERÄT UND ALLE BESTANDTEILE
VON WASSER FERN
‐ VERWENDEN SIE AUSSCHLIESSLICH
EMPFOHLENE ZUBEHÖRTEILE
‐ DEMONTIEREN SIE NICHT DAS GERÄT
‐ IM INNERN BEFINDEN SICH KEINE TEILE,
DIE VOM BENUTZER GEWARTET
WERDEN KÖNNEN.
LASSEN SIE WARTUNGSARBEITEN VON
QUALIFIZIERTEN KUNDENDIENST-MITARBEITERN
DURCHFÜHREN
SERVICE & SUPPORT
ACME the game company GmbH
Boikweg 24
33129 Delbrück
Germany
Tel: +49 2944 9738 30
service@CamOneTec.com
oder
http://www.CamOneTec.com
Informationen zur Verwendung von LiPo-Akkus
ACHTUNG
Wenn ein Akku nicht ordnungsgemäß
ausgetauscht wird, besteht Explosionsgefahr.
Tauschen Sie den Akku stets durch einen vom Hersteller
empfohlenen Akku desselben oder eines entsprechenden
Typs aus. Entsorgen Sie alte Akkus entsprechend den
Anweisungen durch den Hersteller.
CE Deklaration
Hiermit erklären wir, dass dieser Artikel den grundlegenden
Anforderungen und den anderen relevanten Vorschriften
der Richtlinie 2004/108/EG entspricht. Eine Kopie der
Konformitätserklärung kann unter der oben genannten
Adresse angefordert werden.
Bringen Sie verbrauchte Akkus zu einer dafür
vorgesehenen Sammelstelle.
Es besteht Brand-, Explosions- und
Verbrennungsgefahr. Zerlegen Sie
nicht den Akku.
Vermeiden Sie die Erhitzung des
Akkus über die unten genannte
Temperatur und verbrennen Sie
diesen nicht.
LiPo-Akku <50°C
WEEE Reg. Nr.: DE64989527
Benutzerinformation zur
Entsorgung von elektrischen und
elektronischen Geräten
Entsprechend der Firmengrundsätze
der ACME the game company GmbH
wurden hochwertige
wiederverwertbare Komponenten in
diesem Produkt verbaut. Dieses
Symbol auf Produkten und/oder
Begleitdokumenten besagt, dass das
Produkt am Ende der Lebensdauer
getrennt vom Hausmüll entsorgt
werden muss.
Bringen Sie diese Produkte, auch den
Akku, zur ordnungsgemäßen und
umweltfreundlichen Entsorgung zu
Ihrer nächsten Sammelstelle (bzw.
Recyclinghof).
2
Page 3
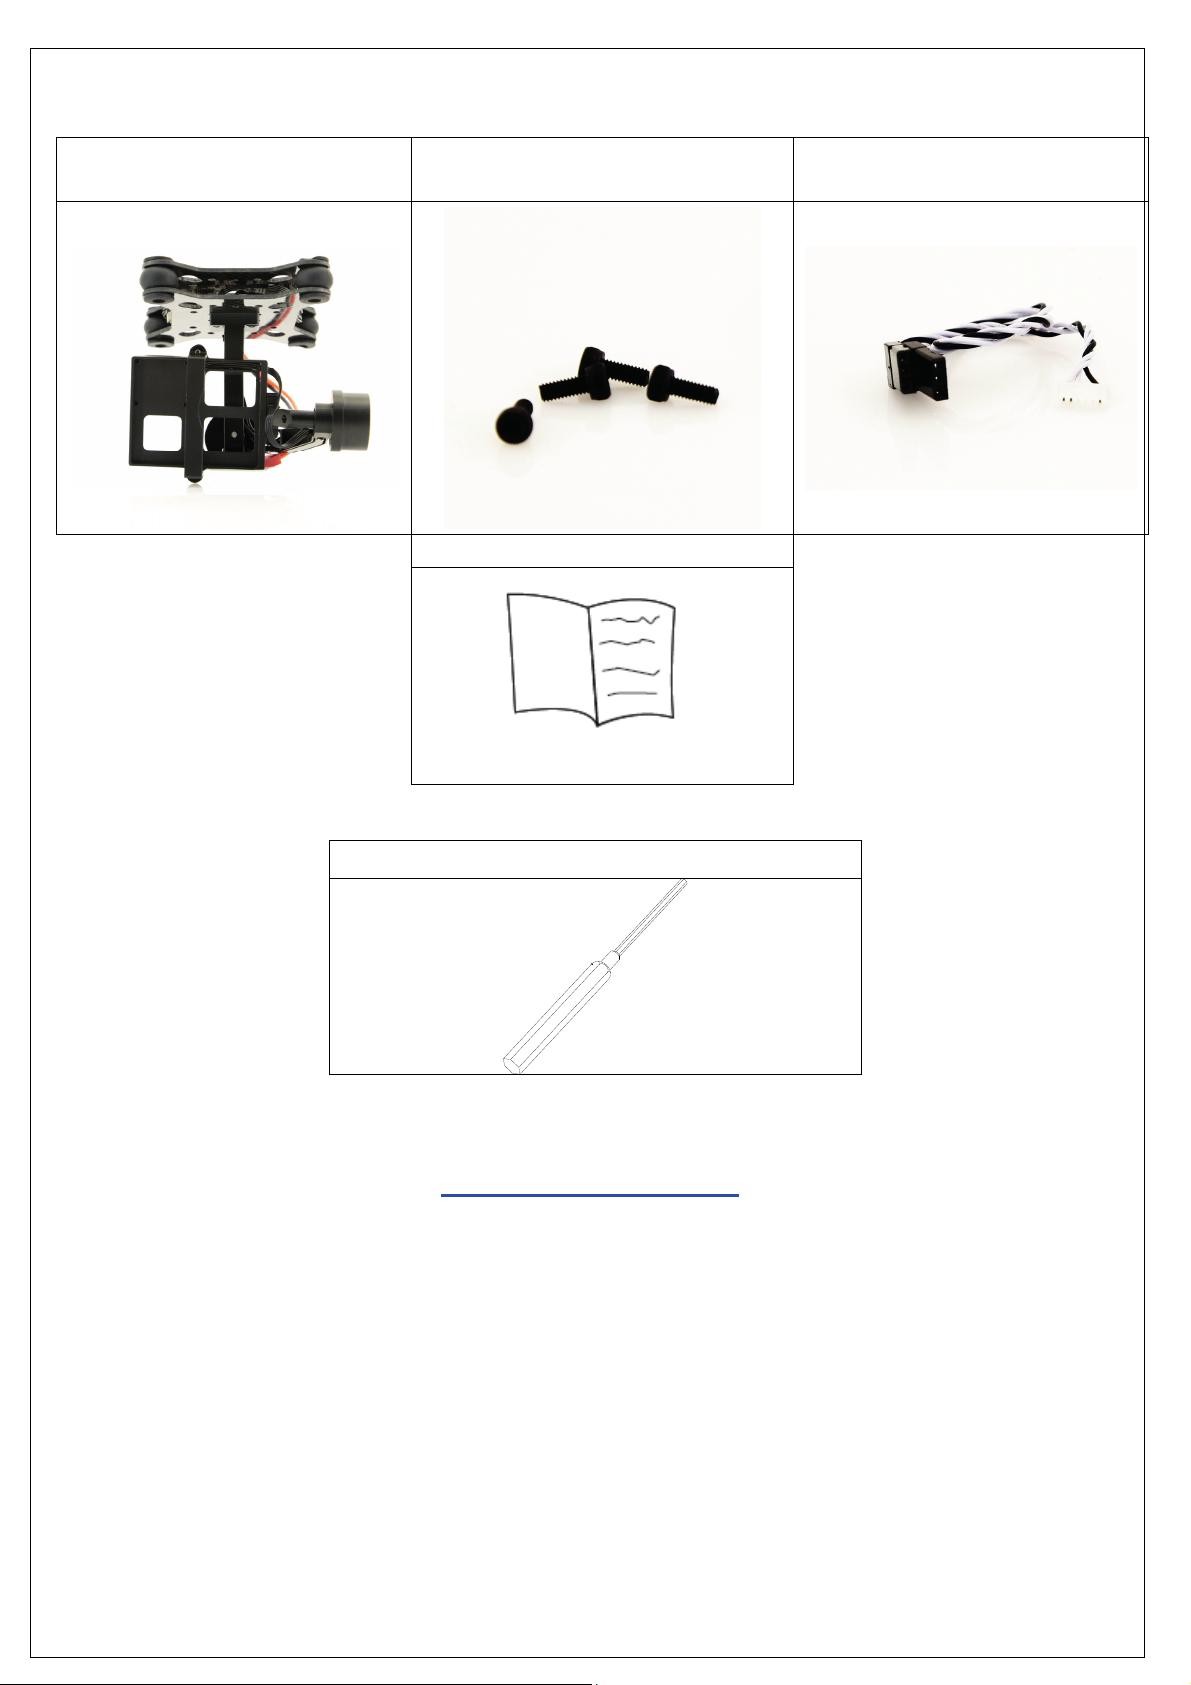
Lieferumfang
Überprüfen Sie die Vollständigkeit bevor Sie das Gerät in Betrieb nehmen
Gimbal Montageschrauben 4x Verbindungskabel
Bedienungsanleitung
Benötigtes Zubehör
Inbus 1,5 + 2,0mm Schraubendreher
Wichtige Hinweise!
Auf der Internetseite von CamOneTec (http://www.CamOneTec.com) finden Sie weitere Hinweise,
Informationen und Anpassungen zu dieser Anleitung.
Halten Sie sich unbedingt bei der Montage an diese Anleitung!
3
Page 4

Haftungsausschluss und Warnhinweise
Lesen Sie diese Hinweise vor der Inbetriebnahme und Verwendung des Artikels und seiner Komponenten!
Mit der Inbetriebnahme des Artikels erklären Sie sich mit den Bedingungen zum Haftungsausschluss und den
Hinweisen einverstanden.
Bauen Sie den Artikel gemäß der Anleitung auf. Jegliche Veränderungen an diesem oder Verwendungen von
Fremdprodukten/Ersatzteilen kann zu Schäden führen.
Dieses schließt die Übernahme von Gewährleistungsansprüchen aus!
Der Artikel befindet sich bereits im Lieferzustand in einem funktionsfähigen Zustand. Nehmen Sie sich für die
erste Inbetriebnahme Zeit.
Es wird keine Verantwortung für Schäden oder Verletzungen vom Hersteller, Importeur oder Händler
übernommen, die bei der Nutzung des Produktes entstehen.
Achten Sie bereits vor dem Anbau an Ihrem Flugmodell das ggf. Vorgaben und Empfehlungen von deren
Hersteller für die Verwendung von Gimbal-System bestehen.
Betriebsspannung 11,1V (3S LiPo)
Inbetriebnahme nur mit eingelegter Kamera!
Äußerliche Krafteinflüsse beschädigen im Betrieb den Gimbal!
Beachten Sie, dass durch die Montage des Gimbals und weiteren FPVArtikeln, sich die Flugzeit des Modell verringert!
Achten Sie bei der Verwendung von Videosendern darauf, dass das
Videoausgangkabel welches aus der Kamera geführt wird, den
Bewegungsraum des Gimbals nicht einschränkt.
4
Page 5
Anschluss / Montage Erklärung
5
Page 6
Montage
Verwenden Sie die beiliegenden Schrauben zur Befestigung.
Wenn keine Montagelöcher im Flugmodell vorhanden sind, erkundigen Sie sich in der Anleitung des
Flugmodells oder beim jeweiligen Hersteller.
Achten Sie auf den festen Sitz der Schrauben und kontrollieren Sie regelmäßig vor den Flügen diese
Verschraubung. Der Gimbal wird grundsätzlich nach unten ausgerichtet verbaut.
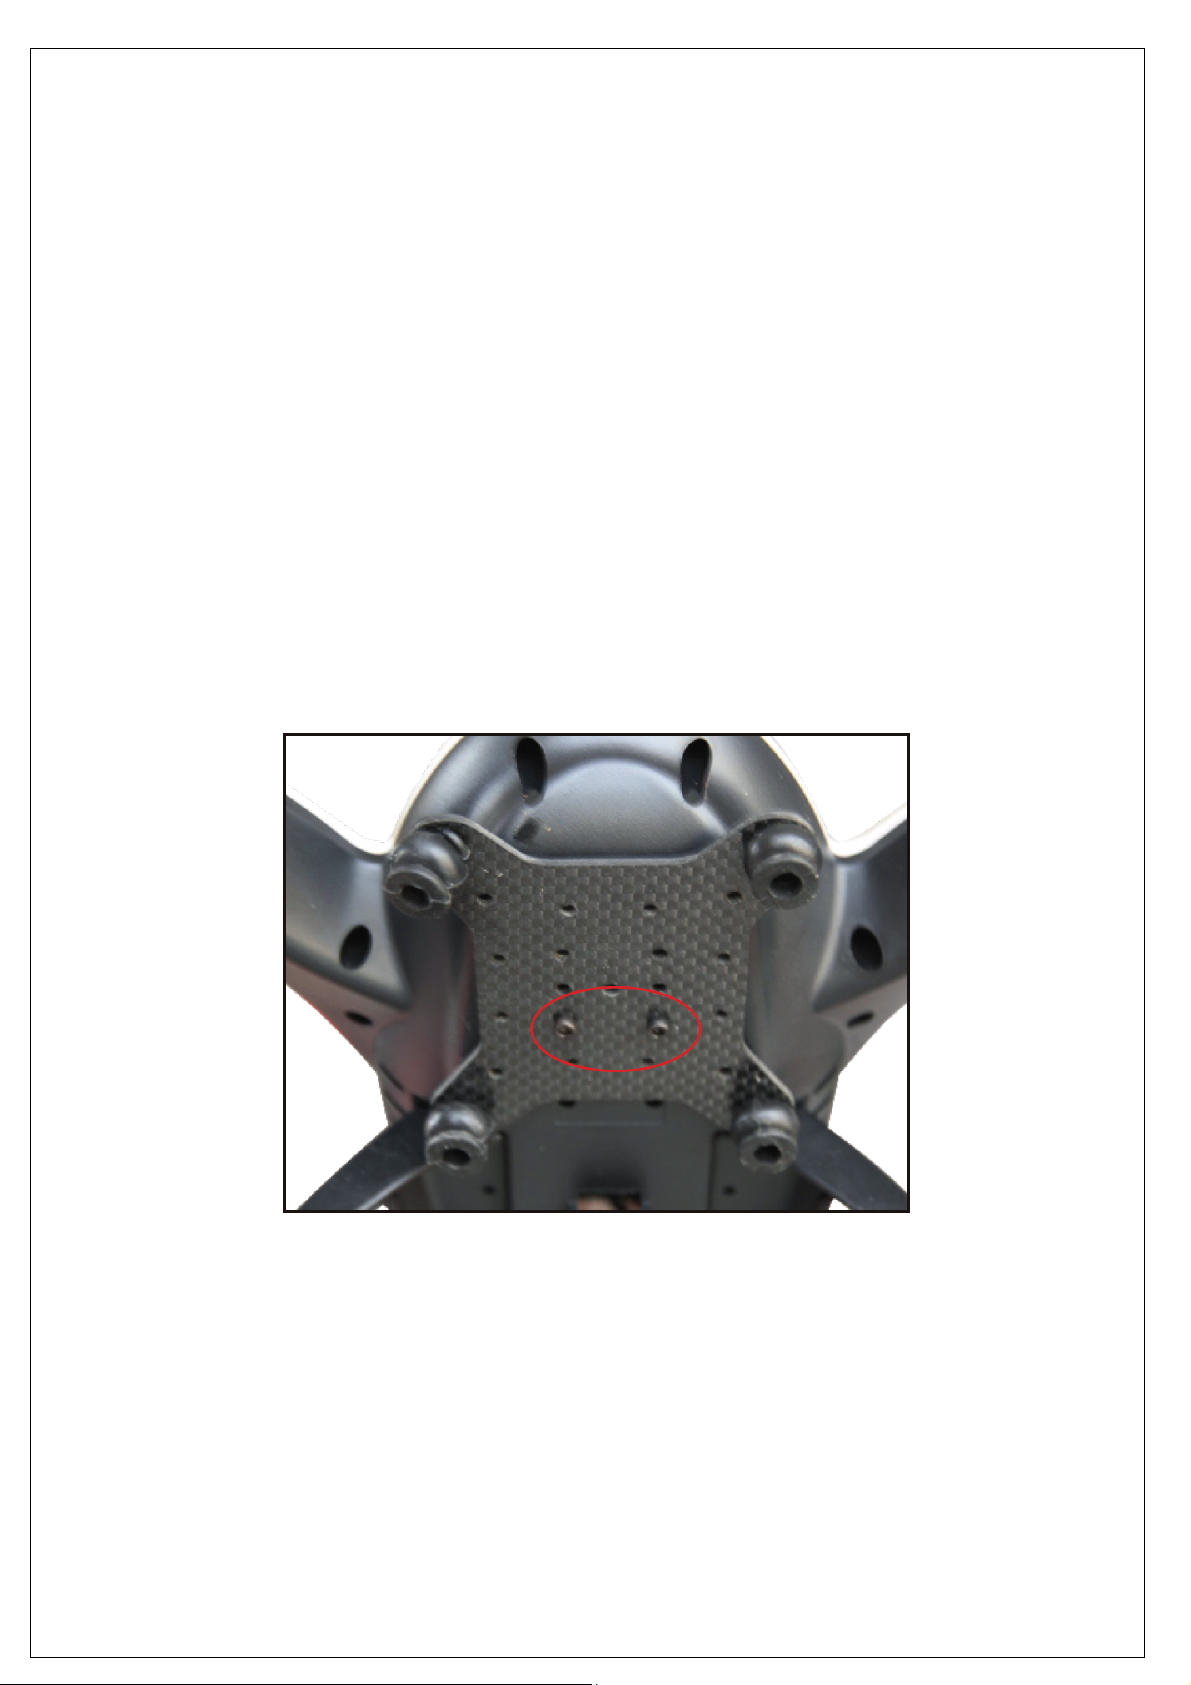
Der Gimbal ist bereits vormontiert. Um diesen an Ihr Modell anzubringen, folgen Sie bitte die folgenden
Schritte.
1. Montieren Sie die obere Platte des Gimbals an den passenden Vorrichtungen an Ihrem
Flugmodell
In der Montageplatte des Gimbals für das Flugmodell sind bereits verschiedene Montagelöcher vorhanden um
dieses passend am jeweiligen Modell zu montieren.
Montieren Sie zunächst die obere Montageplatte des bereits aufgebauten Gimbals ab. Halten Sie hierzu das
Gummibalg fest und ziehen vorsichtig an der unteren Platte, damit die Gummibälger weiterhin an der oberen
Platte montiert sind. Dieses wird Ihnen die spätere Montage des gesamten Gimbals am Flugmodell
erleichtern.
Verschrauben Sie die Montageplatte unter Verwendung der mitgelieferten Schrauben am Flugmodell.
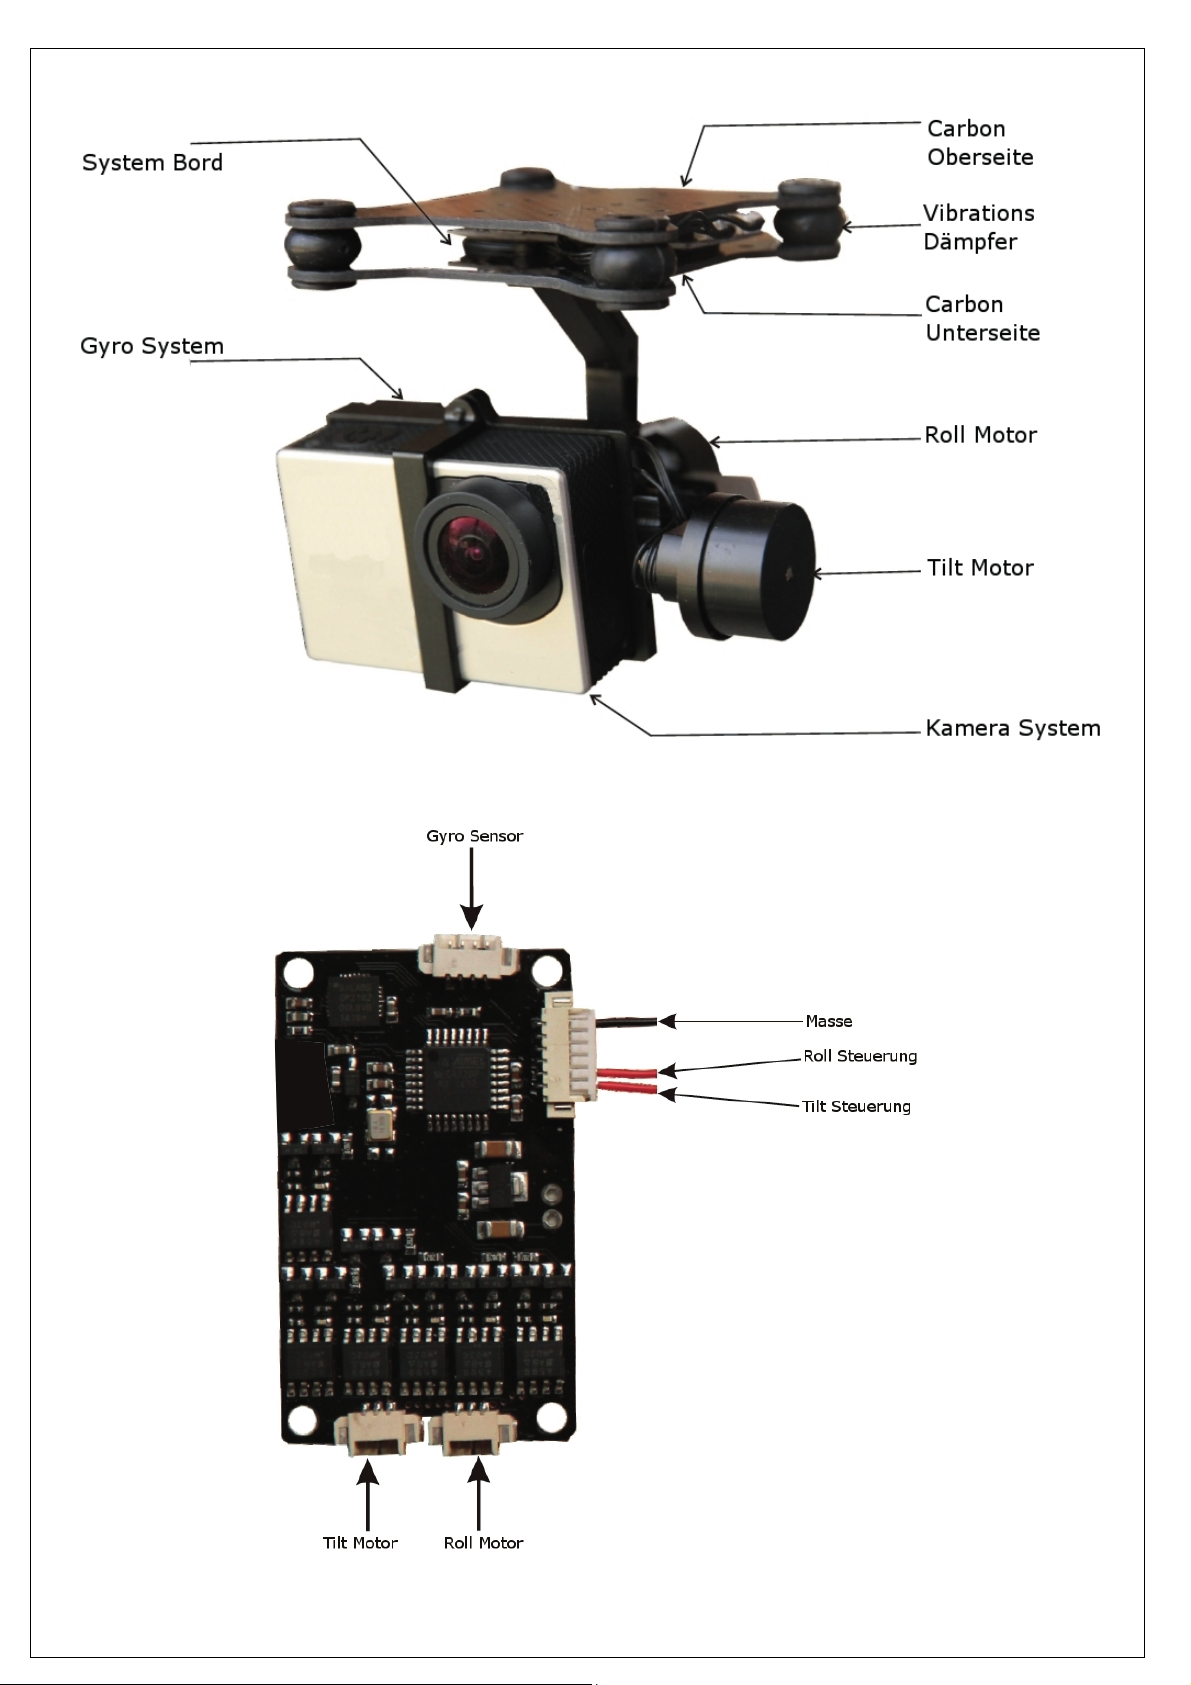
Schließen Sie jetzt schon das mitgelieferte Steuerkabel an den freien, breiten Steckplatz auf der Platine des
Gimbals an.
6
Page 7
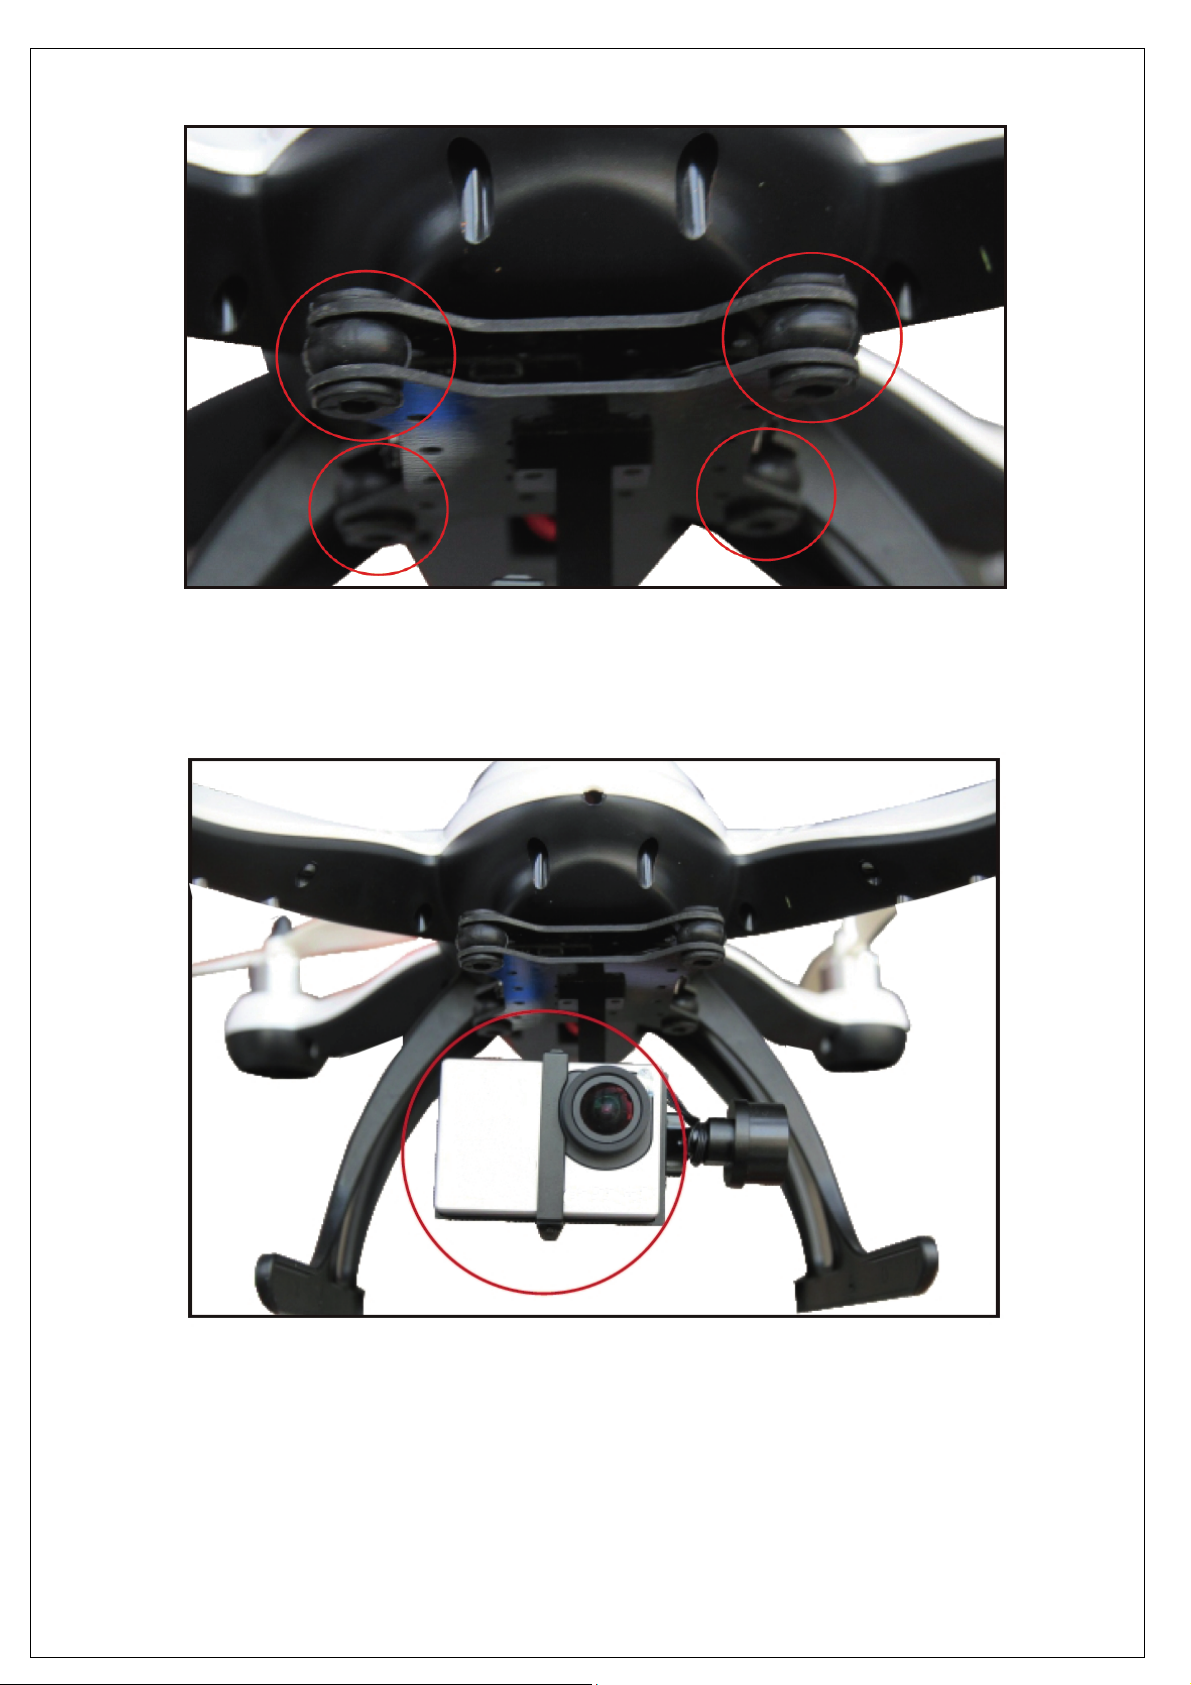
2.Verbinden Sie die Vibrationsdämpfer mit der unteren Platte des Gimbals
Legen Sie anschließend die vormontierte, untere Platte mit dem Gimbal auf die Platte und die Gummibälger.
Drücken Sie die Gummibälger nun in die Platte ein. Dieses erfordert etwas Geduld.
Wenn dieses erfolgreich war, können Sie Ihre Kamera einlegen. Lösen Sie die beiden Schrauben des
Kamerabügels und sichern Sie diesen wieder, sobald die Kamera montiert ist. Achten Sie bei der Montage des
Bügels darauf, dass dieser nicht verkantet bzw. verklemmt.
Wichtig: Schalten Sie den Gimbal niemals ohne eingelegter Kamera ein!
Die Halterung ist mit folgenden Actionkameras kompatibel:
- CamOne infinity
- GoPro Hero 3 | 3+ | 4 Serie
7
Page 8
Kabelanschluss
Die Betriebsspannung ist 11,1V.
Die Versorgung des Gimbals erfolgt über das installierte Kabel (roter Stecker).
Dieses können Sie an einen 2S oder 3S LiPo- Akku anschließen. Der Gimbal geht in Betrieb, sobald der Akku
verbunden ist. Nehmen Sie den Gimbal erst in Betrieb wenn eine Kamera eingelegt ist und die
Steuerkabel (s. unten) am Empfänger angeschlossen sind!
Die Steuerung der beiden Achsen erfolgt in der Regel über die freien Kanäle 7 und 8 am RCEmpfänger. Achten Sie darauf, dass diese über ein Drehpoti verfügen. Schließen Sie das Steuerkabel
an den Empfänger Ihres Flugmodells an, bevor Sie den Gimbal in Betrieb nehmen.
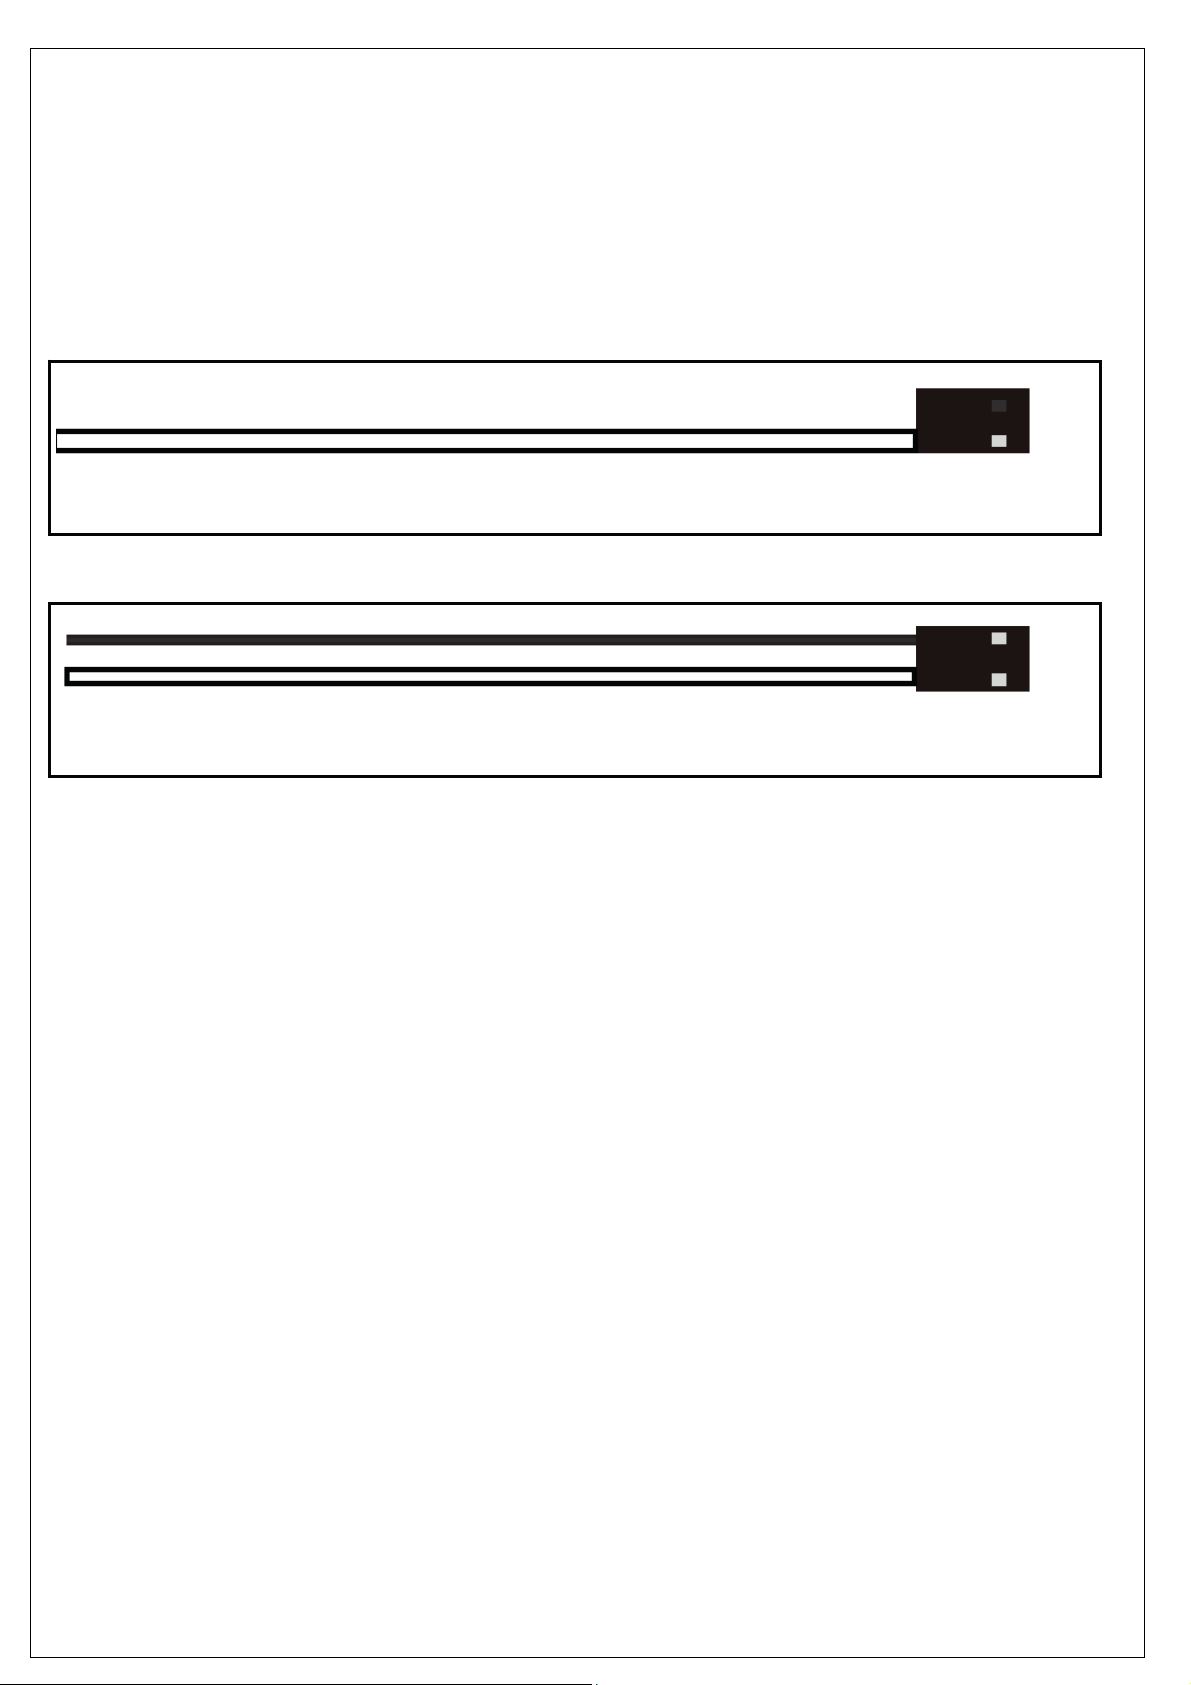
Steuerkabel für die Tilt-Position
Steuerkabel für die Roll-Position
Erste Inbetriebnahme
Alle Bauteile wurden von Ihnen gemäß den vorangegangenen Punkten beachtet und montiert. Der Gimbal
darf keinen Kontakt zum Boden haben, die Landekufen vom Flugmodell müssen immer länger sein!
Verbinden Sie erst das Flugmodell mit der Stromquelle und danach den Gimbal.
Stellen Sie dazu das Flugmodell auf eine gerade Unterfläche und bewegen Sie dieses nicht bis sich der
Gimbal ausgerichtet hat.
Nach dem Anschluss der Stromquelle stellt sich der Gimbal automatisch innerhalb von wenigen Sekunden ein.
BEWEGEN SIE DEN GIMBAL IN DIESER SITUATION NICHT PER HAND!
Nehmen Sie den Gimbal immer erst dann in Betrieb, wenn eine Kamera eingelegt ist!
Testen Sie die Funktion des Gimbals über manuelle Bewegungen des Flugmodells. Schwenken Sie z.B. das
Flugmodell per Hand von rechts nach links und beobachten dabei die stets gerade Ausrichtung des Gimbals.
Technische Details:
- Betriebstemperatur 0°C ~ 50°C
- Gewicht 121g (ohne Kamera)
- Abmessung 100x84x94mm
- Schwenkbereich -45° bis +45° Roll Achse
-135° bis 90° Tilt Achse
- Steuer Frequenz 1000Hz
- Betriebsspannung 11,1 Volt
- Motoren Brushless Motoren 2208 KV80
- Akkustecker JST
8
Page 9

Gewährleistung & Garantie
Dem Verbraucher wird unbeschadet seiner Mängelansprüche gegenüber dem Verkäufer eine
Haltbarkeitsgarantie zu den nachstehenden Bedingungen eingeräumt:
»Neugeräte und deren Komponenten, die aufgrund von Fabrikations- und / oder
Materialfehlern innerhalb von 24 Monate, ab Kauf einen Defekt aufweisen, werden von
ACME the game company GmbH nach eigener Wahl gegen ein dem Stand der Technik entsprechendes Gerät
dem Erstkäufer kostenlos ausgetauscht oder repariert.
Für Verschleißteile gilt diese Haltbarkeitsgarantie für 3 Monate ab Kauf.
»Diese Garantie gilt nicht, soweit der Defekt der Geräte auf unsachgemäßer Behandlung
und/oder Nichtbeachtung der Anleitung beruht.
»Diese Garantie erstreckt sich nicht auf vom Kunden selbsterbrachte Leistungen
(z. B. Umbauten)
»Garantieansprüche sind sofort nach Kenntnis des Garantiefalles geltend zu machen.
»Ersetzte Geräte bzw. deren Komponenten, die im Rahmen des Austauschs an ACME the game company
GmbH zurückgeliefert werden, gehen in das Eigentum
von ACME the game company GmbH über.
»Durch eine erbrachte Garantieleistung verlängert sich der Garantiezeitraum nicht
»Soweit kein Garantiefall vorliegt, behält sich ACME the game company GmbH vor, dem Kunden den
Austausch, die Reparatur oder die Versandkosten in Rechnung zu stellen. Der Kunde wird hierüber vorab
informiert.
Service & Support
ACME the game company GmbH
Westwood
Boikweg 24
33129 Delbrück
Germany
Telefon: +49 2944 9738 30
E-Mail: service@CamOneTec.com
9
Page 10

CamOne Gravity Air 2D
Flightgimbal
Manual
Vers. 1.0
"FlyCamOne" and „CamOne” are registered trademarks of ACME the game company GmbH, Germany
© copyright 2015 ACME the game company GmbH
This user manual is protected by international copyright laws.
No part of this manual may be reproduced without the prior written permission of ACME the game company GmbH
in any form or by any means, electronic or mechanical, including Photocopying, recording or storing in any information storage and retrieval system,
reproduced, distributed, translated, or transmitted.
10
Page 11

Safety advice
WARNING:
PLEASE NOTE THE FOLLOWING ADVICES
TO AVOID SHOCKS OR DAMAGES
ON THE PRODUCT:
- DON’T USE THE PRODUCT WHEN RAINING, OR AT
WET PLACES
‐ KEEP THE DEVICE AWAY FROM WATER
‐ ONLY USE ORIGINAL SPARE PARTS
DO NOT DISMANTLE THE DEVICE. INSIDE ARE NO
PARTS THAT CAN BE REPAIRED BY THE USER. THE
SERVICE SHALL BE PERFORMED BY THE SUPPLIER
OR PRODUCER.
Information on LiPo- batteries
Attention
If a battery is incorrectly replaced, there is danger of
explosion.
Replace the battery only with the same manufacturer's
recommended battery or an equivalent type. Dispose of
used batteries according to the manufacturer's instructions.
CE Declaration
We hereby declare that this model meets the essential
requirements and other relevant provisions of Directive
2004/108/EC. A copy of the Declaration of Conformity can
be obtained at the above address.
Dispose LiPo- batteries at proper collection points.
SERVICE & SUPPORT
ACME the game company GmbH
Boikweg 24
33129 Delbrück
Germany
Tel: +49 2944 9738 30
service@CamOneTec.com
or
http://www.CamOneTec.com
Risk of fire, explosions and
burns. Do not dismantle the battery.
Do not exceed the below quoted
temperature and do not burn the
battery.
LiPo-Battery <50°C
WEEE Reg. Nr.: DE64989527
Information for Users on Disposal
of electrical and electronic
equipment
According to the company principles
of ACME the game company GmbH
high-quality reusable components
have been installed in this product.
This symbol on the products and / or
accompanying documents means that
the product must be disposed of
separately at the end of life from
household waste.
Bring these products, even the battery
for proper and environmentally
friendly disposal of your nearest
collection (or recycling).
11
Page 12

Content of the box
Überprüfen Sie die Vollständigkeit bevor Sie das Gerät in Betrieb nehmen
Gimbal Screws 4x Connection cable
Manual
Required accessories
Inbus 1,5 + 2,0mm screw driver
Important!
The CamOneTec website (http://www.CamOneTec.com) offers further advice, information and updates for
this manual.
Please strictly follow this manual to mount this device!
12
Page 13

Disclaimer and warnings
Read these instructions before commissioning and use of the article and its components!
With the start of the article, you agree to the terms of the disclaimer and agree to the instructions.
Assemble the items according to the instructions. Any changes to this or uses of third-party products / spare
parts can cause damage.
This excludes the acquisition of warranty claims!
The article is already in a functional state after delivery. Take your time before you start.
There is no responsibility for damage or injury from the manufacturer, importer or distributor acquired, resulting
from the use of the product.
Make sure prior to attachment to your flight model which can optionally consist requirements and
recommendations of the manufacturer for the use of gimbal system.
Operating voltage 11.1V (3S LiPo)
Use only with inserted camera!
Outer influences while operation may damage the Gimbal!
Please note that the flight time of your model decreases as soon as
you connect a Gimbal and further FPV- equipment!
When using video transmitters, make sure that its connection cables
do not interfer the Gimbal.
13
Page 14

Connection / Mounting advice
14
Page 15

Montage
Use the supplied screws to mount the unit.
If there are no matching holes inside your RC models fuselage, please contact your supplier for further advice.
Make sure that the screws are tightened before every flight. The Gimbal needs to be mounted downwards.
The gimbal is already mounted out of the box. To attach it to your model, please proceed as described below.
1. Mount the upper plate to your model
The mounting plate of the gimbal already features various holes to attach it to your model.
At first, unmount the top plate of the gimbal. To perform this, hold the bellow and pull carefully pull the bottom
plate in order to keep the bellows on the top plate. We recommend to keep the bellows on the top plate, as this
will ease the later attachment of the complete gimbal on your model.
Tighten the plate by using the supplied screws..
Now connect the supplied cable to the free port on the main board of the gimbal.
15
Page 16

2.Connect the bellows to the bottom plate.
Now place the pre-mounted plate with the gimbal on the mounted plate with the bellows.
Push the bellows into the plate. Take your time when performing this work.
When finished successfully, you can insert your camera. Release the 2 screws on the camera bail and mount
it again once the camera is inserted. Make sure that the bail and the camera don’t get damaged.
Important: Never activate the gimbal without camera!
The mount is compatible to the following cameras:
- CamOne infinity
- GoPro Hero 3 | 3+ | 4 Series
16
Page 17

Cable connection
The operating voltage is 11.1V.
The supply follows through the installed cable (red plug).
You can connect it to a 2S or 3S LiPo- battery. As soon as the battery is connected, the gimbal is activated.
Do not activate before the camera is inserted and the cables are connected as shown below!
Generally, the axis control is performed by the free channels 7 and 8 on the RC receiver. Make sure
that these feature a rotary switch. Connect the cables before you activate the gimbal.
Tilt- position cable
Roll-position cable
First use
All parts have been mounted by you according to the instructions of this manual. The gimbal shall absolutely
not have any contact to the ground, the landing gears of your model shall always be longer!
Power up your model before you power the gimbal.
Place the model on an even surface and do not move it until the Gimbal has been adjusted.
After connecting to a power source, the gimbal will adjust itself within a few seconds.
DO NOT MOVE THE GIMBAL BY HAND DURING THIS PERFORMANCE!
Take the gimbal into service only when a camera is inserted!
Test the function of the gimbal via manual movements of the flight model. Pan the model for example by hand
from right to left and check the always straight alignment of the gimbal.
Technical details:
- Working voltage 0°C ~ 50°C
- Weight 121g (without camera)
- Size 100x84x94mm
- Pan range -45° till +45° Roll axis
-135° till 90° Tilt axis
- Control frequency 1000Hz
- Operating voltage 11.1 Volt
- Motors Brushless Motors 2208 KV80
- Battery plug JST
17
Page 18

Warranty
The consumer is without prejudice to any claim against the seller a
Manufacturer's Guarantee under the conditions set out below :
»New devices and their components , or arising from manufacturing and /
Material faults within 24 months of purchase develop a fault , are of
ACME the game company GmbH exchanged at its option against a prior -art device to the original purchaser
or repaired free of charge .
For wear parts, this warranty is valid for 3 months from purchase.
"This warranty does not apply if the device defect is attributable to improper treatment
and / or non-observance of the information presented is based.
"This warranty does not extend to self- paid by the customer services
(eg conversions)
»Warranty claims are to be claimed at once , to the knowledge of the warranty claim .
"Ownership of devices or components that are returned to ACME the game company GmbH in the framework
of exchange, become the property
ACME the game company GmbH.
»By services rendered under warranty, the warranty period is not extended
"Insofar as no Guarantee default exists, ACME the game company GmbH reserves the right to charge the
customer for replacement, repair , or shipping costs. The customer will be informed in advance.
Service & Support
ACME the game company GmbH
Westwood
Boikweg 24
33129 Delbrück
Germany
Phone: +49 2944 9738 30
E-Mail: service@CamOneTec.com
18
Page 19

CamOne Gravity Air 2D
Flightgimbal
Manuel
Vers. 1.0
"FlyCamOne", CamOne Infinity et le logo FlyCamOne HD” sont des marques déposées par la société ACME the game company GmbH, en Allemagne
© copyright 2014 de ACME the game company GmbH.
Ce manuel est protégé par un copyright international.
Aucune partie de ce manuel ne peut être copiée sans l’autorisation préalable de la société ACME the game company GmbH.
19
Page 20

Conseils de sécurité
Avertissements:
Il est indispensable de suivre les instructions ci-après afin
ACME the game company GmbH
d’éviter d’endommager votre caméra:
-NE PAS UTILISER LA CAMERA EN CONDITIONS
PLUVIEUSES SI CELLE-CI N’EST PAS PROTEGEE
-MAINTENIR A L’ECART DE L’HUMIDITE
-N’UTILISER QUE LES ACCESSOIRES COMPATIBLES
-NE PAS TENTER DE DEMONTER
-AUCUN COMPOSANT INTERNE NE NECESSITE
D’ENTRETIEN PARTICULIER
-LES REPARATIONS NE DOIVENT ETRE FAITES QUE
PAR LE PERSONNEL QUALIFIE.
Informations relatives à la batterie Li-Po
Avertissements sur les batteries Li-Po
Une mauvaise utilisation de la batterie peut être à l’origine
d’explosion ou de fumées qui peuvent être nuisibles pour
les biens et personnes.
Ne jamais charger une batterie Li-Po endommagée.
Arrêter immédiatement la charge si la batterie Li-Po
devenait chaude ou se déformait.
Ne pas mettre en court-circuit, risque d’incendie ou
d’explosion
La charge et le stockage de la
batterie doivent se faire dans des
pièces dont la température est
comprise entre 10°C et 50°C. Ne
jamais entreposer dans un endroit où
la température est supérieure à
50°C.
Batterie LiPo <50°C
SERVICE & SUPPORT
Boikweg 24
33129 Delbrück
Germany
Phone: +49 2944 9738 30
service@CamOneTec.com
ou
http://www.CamOneTec.com
Déclaration CE
Nous déclarons par la présente que ce produit est en règle
avec les directives relatives aux normes 2004/108/EC.
Une copie de l’original de la déclaration de conformité est
disponible sur simple demande à notre adresse.
Les batteries en fin de vie doivent être collectées en vue
d’être recyclées.
Vous devez pour cela vous rapprocher du centre de collecte
le plus proche de chez vous.
WEEE Reg. Nr.: DE64989527
Informations relatives aux produits
recyclables.
Le symbole ici présent sur le produit
que vous venez d’acheter signifie que
celui-ci contient des composants
susceptibles d’être recyclés. Pour
cette raison vous ne pouvez pas jeter
ce produit avec vos déchets
ménagers. Il est indispensable que
vous preniez contact avec un centre
de recyclages des déchets sensibles
afin d’assurer le recyclage de ce
produit.
20
Page 21

Contenu de la boite
Merci de vérifier que le produit est complet avant de commencer à l‘utiliser
Gimbal Vis 4x Câble de connexion
Manuel
Accessoires nécessaires
Tournevis 1,5 + 2,0mm
Remarque importante!
Plus d’informations et de mise à jour sont disponibles sur notre site CamOneTec
(http://www.CamOneTec.com).
Suivez scrupuleusement ce manuel avant de commencer à utiliser le produit !
21
Page 22

Limite de responsabilité et avertissement
Merci de lire ces instructions avant de mettre en œuvre le produit ou l’un de ses composants!
En mettant en marche le produit, vous validez les éléments de la limite de responsabilité ainsi que les instructions
d’utilisation.
Assembler le produit en suivant les instructions de ce manuel. Si vous tentez de modifier le produit ou la mise en œuvre
de celui-ci, vous pourriez nuire à son bon fonctionnement.
La garantie ne pourrait alors s’appliquer!
Le produit est livré neuf en état de fonctionnement et ne nécessite aucun réglages particulier. Prenez votre temps lors de
la mise en marche.
La responsabilité du fabricant ne pourrait être engagée en cas de blessures ou de dommages qui résulteraient de
l’utilisation de ce matériel.
Voltage d‘utilisation 11.1V (3S LiPo)
Ne mettre en marche qu’une fois la caméra fixée à la nacelle!
En cas d’action manuelle sur la nacelle, vous pourriez l’endommager!
Le temps de vol de votre modèle va être diminué une fois la nacelle et
les accessoires FPV positionnés en dessous de votre modèle!
Si vous utilisez un système de retransmission vidéo, assurez-vous
qu’il n’interfère pas avec la nacelle.
22
Page 23

Connexion / Conseils de montage
23
Page 24

Montage
Utiliser les vis livrées avec le produit.
Si votre modèle ne possède pas les trous pour fixer la platine, nous vous demandons de contacter votre
revendeur pour plus de renseignements.
Vérifier le serrage des vis avant chaque vol. La nacelle doit être fixée la tête en bas.
La nacelle est montée d’origine. Pour la fixer à votre modèle, veuillez suivre les indications suivantes.
1. Fixer la platine haute à votre modèle
La platine de montage de la nacelle est équipée de différents trous pour pouvoir être montée à votre modèle.
Commencer par dévisser la platine haute de votre nacelle. Pour cela, maintenir les amortisseurs et séparer la
partie haute de la partie basse en gardant ceux-ci sur la platine basse.
Nous vous recommandons de conserver les amortisseurs sur la partie basse de la nacelle afin de faciliter le
remontage sur votre modèle.
Fixer la platine à l’aide des vis livrées.
Connecter à présent le câble livré avec le port du circuit imprimé de la nacelle.
24
Page 25

2. Connexion des amortisseurs sur la platine basse.
A présent, positionner la platine avec la nacelle pré montée sur la platine déjà fixée au modèle.
Veiller à ce que les amortisseurs se positionnent correctement entre les deux platines. Prenez votre temps
pour effectuer cette opération.
Une fois le montage correctement effectué, vous pourrez positionner la caméra dans la nacelle.
Pour cela enlever les deux vis du bracelet de fixation de la caméra et positionnez-la en lieux et place.
Remonter le bracelet et visser les vis comme à l’origine.
Important: Ne jamais activer la nacelle sans caméra!
La nacelle est compatible avec les caméras :
- CamOne infinity
- GoPro Hero 3 | 3+ | 4
25
Page 26

Câble de connexion
L’alimentation de la nacelle s’effectue en 11.1V.
Celle-ci s’effectue via le fil rouge déjà installé.
Vous pouvez le connecter à une batterie LiPo 2S ou 3S. Une fois la batterie connectée, la nacelle sera active.
Ne pas connecter la batterie si aucune caméra n’est positionnée dans la nacelle!
En général, le contrôle des axes de la nacelle s’effectue via les voies 7 et 8 de votre récepteur. Veillez à
ce que votre équipement propose bien un potentiomètre sur ces deux voies.
Câble de position du tilt
Câble de position du roulis
Première utilisation
Toutes les pièces de cet accessoire ont été montées par vos soins en suivant ce manuel.
La nacelle ne doit en aucun cas être en contact avec le sol, le train d’atterrissage de votre modèle assurant
une surélévation!
Mettre en marche votre modèle avant de mettre en marche la nacelle.
Positionner votre modèle sur une surface dégagée et ne pas le toucher jusqu’à ce que la nacelle soit ajustée.
Une fois sous tension, la nacelle va s’ajuster en quelques secondes.
NE PAS MANIPULER LA NACELLE A LA MAIN UNE FOIS SOUS TENSION!
N’utiliser la nacelle que lorsqu’une caméra est positionnée dessus!
Tester les fonctions de la nacelle en faisant bouger votre modèle au sol. Par exemple, faites bouger votre
modèle vers l’avant afin de visualiser la correction apportée par la nacelle.
Caractéristiques techniques:
-Température d‘utilisation 0°C ~ 50°C
-Poids 121g (sans caméra)
-Taille 100x84x94mm
-Angle d‘inclinaison Roulis de -45° à +45°
Tilt -135° à 90°
-Fréquence de contrôle 1000Hz
- Alimentation 11.1 Volt
-Moteurs Moteurs brushless 2208 KV80
-Prise batterie JST
26
Page 27

Garantie
Le consommateur accepte les conditions de prise en charge par le fabricant du matériel sous garante dans les
conditions qui suivent :
» Un matériel défectueux ou présentant des défauts dans une période de 24 mois devrait être renvoyé à la
charge du client au fabricant ACME the game company GmbH pour expertise et si besoin réparation ou
échange. Cette garantie se limite à 3 mois pour les pièces d’usure.
" En cas d’utilisation impropre su matériel, la garantie ne pourra s’appliquer.
" Le matériel retourné en garantie restera la propriété de la société ACME the game company GmbH dans le
cas d’un échange de matériel.
" ACME the game company GmbH se réserve le droit de facturer les réparations éventuelles ainsi que les frais
d’expédition retour du matériel. Le client sera informé préalablement.
Service & Support
ACME the game company GmbH
Westwood
Boikweg 24
33129 Delbrück
Germany
Téléphone: +49 2944 9738 30
E-Mail: service@camone.de
27
 Loading...