

Page 1

LA20 AERATOR
Operating Instructions
Before commissioning the machine, read operating instructions and
observe warning and safety instructions.
Page 2

CAMON LA20 Lawn Aera tor Tracmaster Ltd
Manufacturer Details
Tracmaster Ltd
Sovereign Centre
Victoria Road
Burgess Hill
West Sussex
RH15 9LR
UNITED KINGDOM
Tel: +44 1444 247689
Fax: +44 1444 871612
www.tracmaster.co.uk
[email protected]
Machine Details
Model: CAMON LA20 Lawn Aerator
Serial Number: ..................................................
Engine Serial No: ..................................................
Date of Purchase: ..................................................
Supplier: ..................................................
_______________________________________________________________________________
2 For parts diagrams v i sit www.tracmaster.co.uk
Page 3

Tracmaster Ltd CAMON LA20 Lawn Aera tor
Table of Contents
1.0 Designation of Machine............................................................................................................ 2
1.1 Applications........................................................................................................................ 2
2.0 Specifications........................................................................................................................... 3
3.0 Unpacking and Assembly.........................................................................................................4
3.1 Major Components Diagram............................................................................................ 4
3.2 Unpacking Instructions.................................................................................................... 4
4.0 Safety Instructions – Pre-Operation......................................................................................... 5
4.1 Basic Safety Instructions................................................................................................. 5
4.2 Main Components and Operating Elements.................................................................... 5
4.3 Engine and Drive............................................................................................................. 5
4.4 Operating Lever............................................................................................................... 5
4.5 Height Adjustment ........................................................................................................... 5
4.6 Tines ............................................................................................................................ 6
4.7 Solid Spiking Tines & Hollow Coring T i nes......................................................................6
4.8 Commissioning................................................................................................................ 6
4.9 General Safety Instructions ............................................................................................. 6
4.10 Engine Specific Safety Instructions.................................................................................. 7
5.0 Safety Instructions Starting and Operating............................................................................... 8
5.1 To Start the Engine .......................................................................................................... 8
5.2 To Stop the Engine .......................................................................................................... 9
5.3 Safety Equipment............................................................................................................ 9
5.4 Operation ......................................................................................................................... 9
5.5 Procedure for Unexpected Shut Down .......................................................................... 10
5.6 Residual Risks of the LA20 Aerator............................................................................... 10
6.0 Maintenance ...........................................................................................................................11
6.1 Schedule.........................................................................................................................11
6.2 Basic Maintenance.........................................................................................................11
6.3 Engine ...........................................................................................................................11
6.3.1 Check Engine Oil Level......................................................................................11
6.3.2 Change Engine Oil............................................................................................ 12
6.3.3 Air Filter ............................................................................................................ 12
6.3.4 Spark Plug......................................................................................................... 12
6.4 Cleaning ........................................................................................................................13
6.5 Troubleshooting............................................................................................................. 13
6.5.1 Machine............................................................................................................ 13
6.5.2 Engine............................................................................................................... 13
6.5.3 Lubricants......................................................................................................... 13
7.0 Transportation, Storage and Handling.................................................................................... 14
7.1 Transportation................................................................................................................ 14
7.2 Storage .......................................................................................................................... 14
7.3 Handling ........................................................................................................................14
8.0 Service Record ...................................................................................................................... 15
EC Declaration of Conformity......................................................................................................... 16
_______________________________________________________________________________________________
For parts diagrams v i sit www.tracmaster .co.uk
1
Page 4
CAMON LA20 Lawn Aera tor Tracmaster Ltd
1.0 What the Machine is Designed For
1.1 Applications
The CAMON LA20 Lawn Aerator has been designed by Tracmaster for aerating lawns and
grass areas.
The benefit of aerating a lawn is that it allows air, water and nutrients to reach the roots of
the grass, relieves soil compaction and removes unwanted thatch and foreign material.
! IMPORTANT – READ CAREFULLY
The tines of the CAMON LA20 Aerator are designed to be used only on
grassed areas where the surface soil is more than 10cm in depth.
Prior to operation of the LA20, the operator MUST test the depth of the
soil. This can be done simply with a garden fork.
DO NOT use the CAMON LA20 A erator for any alternative use other than
aerating grass areas.
Operating the machine on non-grass surfaces such as concrete or tarmac
will cause damage to the LA20 Aerator.
After aerating DO NOT expose the lawn to high temperatures or drought.
Irrigate the lawn if necessary to ensure that the grass can recover from its
treatment.
_______________________________________________________________________________
2 For parts diagrams v i sit www.tracmaster.co.uk
Page 5

Tracmaster Ltd CAMON LA20 Lawn Aera tor
2.0 Specifications
ENGINE
Engine Manufacturer Honda
Engine Model GX160
Engine Type 4-Stroke overhead valve, single cylinder
Engine Output 4kw
Engine Shaft Size 3/4” Straight
Spark Plug BPR6ES(NGK) / W20EPR-U (DENSO)
Spark Plug Gap 0.70-0.80mm
Engine Ignition Type Recoil
Cold Start System Choke
Fuel Tank Capacity 3.6 litres
Fuel Type Unleaded
Fuel Consumption 313g/kwhr
Air Filter Paper
Rated Engine Speed 3600 rpm
Engine Oil 10w/30
Oil Filling Quantity 0.5 litres
Dry Weight 15kg
MACHINE
Model LA20
Working Width 40cm
Tine Types Solid & Hollow
Solid Tine Dimensions 10mm diameter & 100mm length
Hollow Tines Dimensions 19mm diameter & 100mm length
No of Tines Fitted in Operation. 4
Clutch T ype Centrifugal
Tine Depth Adjustment From 9cm to 11cm
Core Discharge To the rear
Wheel T ypes Pneumatic
Steering Handle Foldable
Noise Level 86db
Vibration Acceleration Value 5.4ms
2
Max gradient for operation on slope 20 degrees
Weight 90kg
Dimensions (l x w x h) 100 x 70 x 68cm
_______________________________________________________________________________________________
For parts diagrams v i sit www.tracmaster .co.uk
3
Page 6
CAMON LA20 Lawn Aera tor Tracmaster Ltd
3.0 Unpacking and Assembly
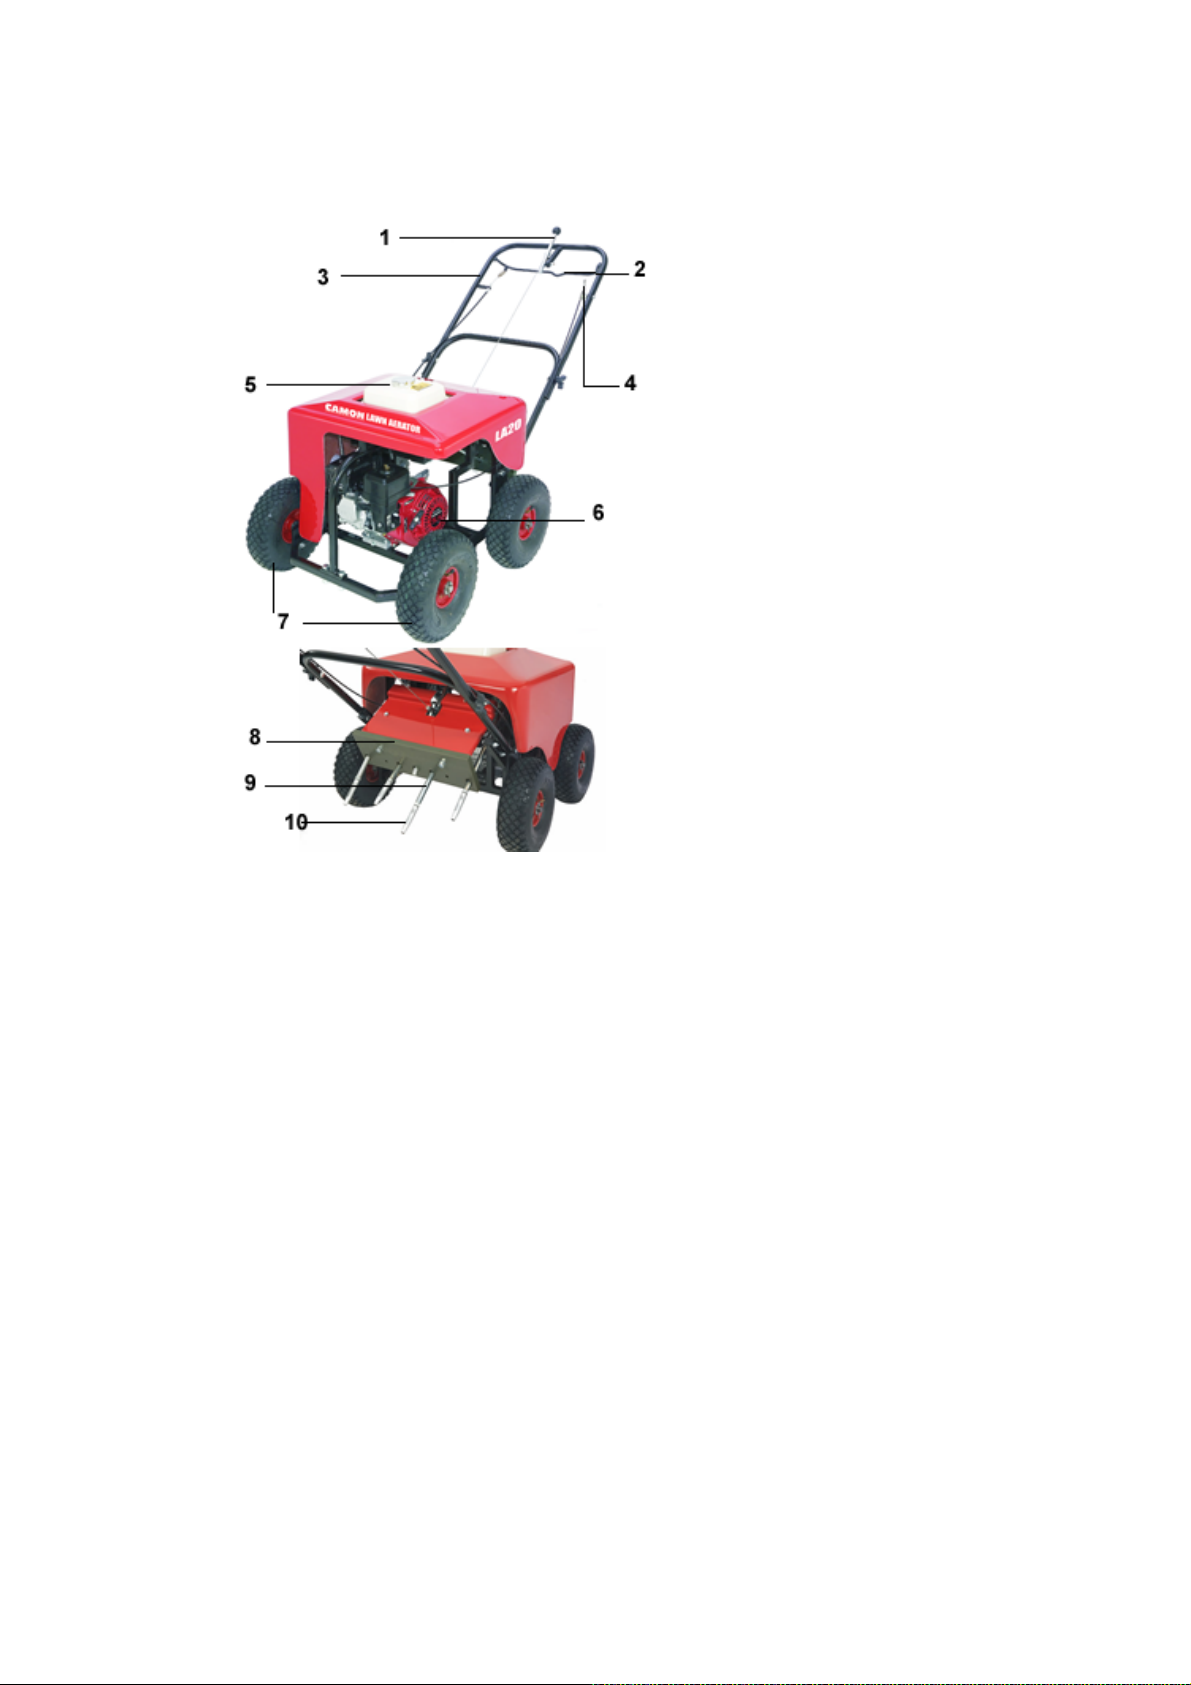
3.1 Major Components Diagram
1 Tine Control Lever
2 Operating Lever
3 Top Handlebar
4 Throttle
5 Fuel Tank
6 Engine
7 Wheels
8 Tine Lifting Board
9 Tine Holding Rod
10 Tine
3.2 Unpacking Instructions
Open the top of cardboard box.
Cut the box open by using a sharp knife to cut down through the four corners of the box.
Swivel the folded top part of the handlebar until it locates into position extending from the
lower handlebar arms.
Tighten the top handlebar into position using the locking knobs provided.
Push the four wheels onto the axles of the Aerator and fasten in place using the split pin and
washer provided.
Push the machine forward safely and gently out of the box.
Dispose of the cardboard box and other padding material.
_______________________________________________________________________________
4 For parts diagrams v i sit www.tracmaster.co.uk
Page 7
Tracmaster Ltd CAMON LA20 Lawn Aera tor
4.0 Safety Instructions – Pre-Operation
4.1 Basic Safety Instructions
Before starting the machine, read and understand these operating instructions.
4.2 Main Components and Operating Elements
Below is a description of the main components of the LA20 Aerator and how they operate.
4.3 Engine and Drive
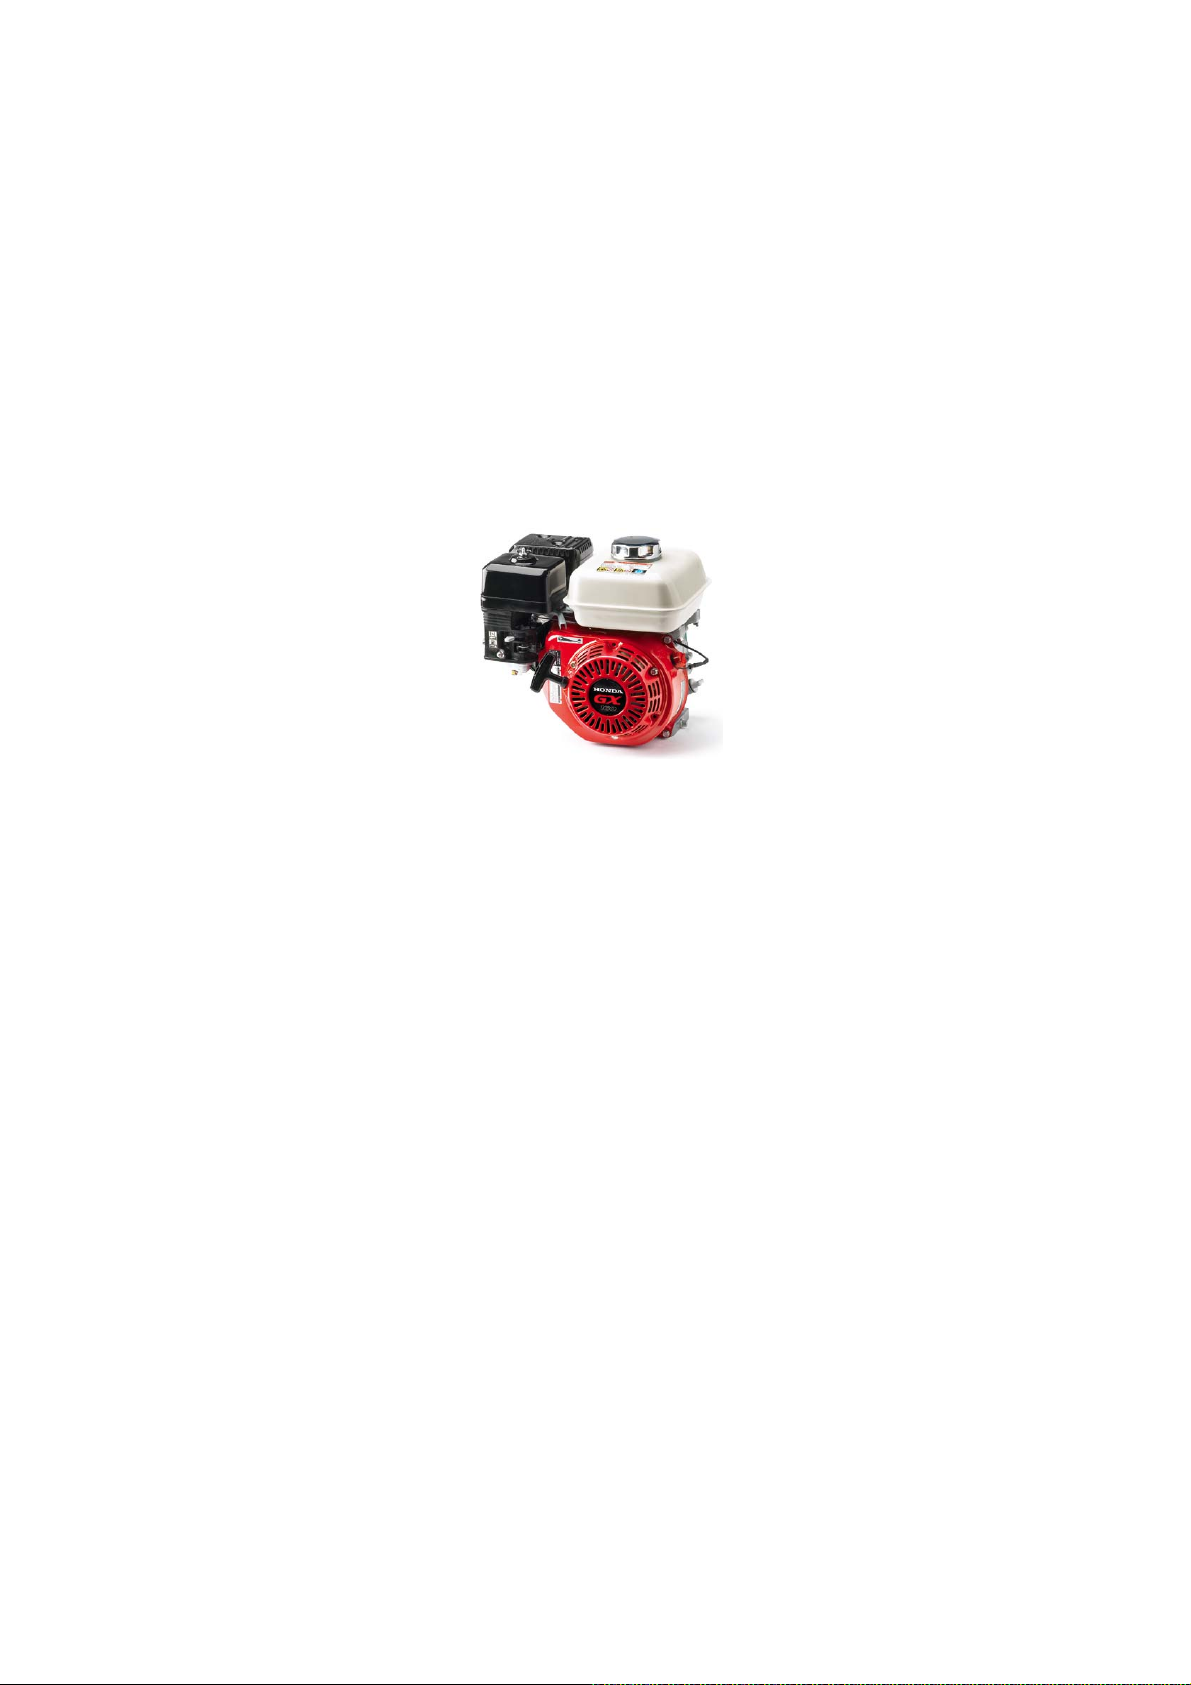
The Honda GX160 is a four stroke engine that runs on standard unleaded fuel.
The engine is air cooled and therefore it is important that the grille covering the recoil rope is
kept clear from debris.
The engine air filter cleans the air sucked in by the engine. A clogged air filter will reduce
performance.
The engine is fitted with a fuel on/off lever and a choke lever. Read the engine operating
instructions to understand the operation of these levers.
4.4 Operating Lever
The LA20 Aerator tines are operated by lifting the free swinging lever located underneath the
top of the handlebar.
Once the drive has been engaged it will transfer the engine power through a gearbox, to the
tine rods that will rotate. The surface penetrating tines are held at the end of each tine rod
and will be pushed into the ground before being withdrawn as the tine rods rotate.
4.5 Height Adjustment
The depth of the tine penetration of LA20 Aerator is altered by changing the position of the
back axles. Each back axle has three holes by which it can be attached to the main chassis
frame. Attaching the axles using the lowest position holes has the effect of moving the tines
closer to the ground and increasing the depth the aerator will penetrate. The two alternative
_______________________________________________________________________________________________
For parts diagrams v i sit www.tracmaster .co.uk
5
Page 8

CAMON LA20 Lawn Aera tor Tracmaster Ltd
positioning holes raise the height of the tines away from the ground and decrease the depth
the tines will penetrate. Moving from the lowest hole to the middle hole and to the highest
will decrease the depth of the tines by 10mm each step.
4.6 Tines
Four tines of a similar type must be fitted at all times for the LA20 operator to function
correctly. Each tine must be threaded and secured tightly into the tine holder rods. Each
tine must be fitted with a washer and spring washer to ensure the tine can be tightened
sufficiently into the tine rod. A 17mm spanner must be used to tighten the tines in place.
4.7 Solid Spiking Tines & Hollow Coring Tines
The LA20 Aerator is supplied with both solid spike and hollow corer tines. You must always
use a consistent tine type when setting up and operating the Aerator.
Solid tines help nutrients to reach soil roots and improve drainage.
Hollow tines, in addition to the benefits listed for solid tines, reduce surface compaction by
removing a section of the soil each time a tine is punched into the soil.
4.8 Commissioning
Prior to operation it is necessary to check the engine oil level and add engine oil level to the
levels indicated in the specification table on page 4.
The engine fuel tank will not contain fuel so will need filling to the recommended level before
use.
4.9 General Safety Instructions
Be aware of all the safety requirements for the machine.
Visually check the machine for operational safety, complete components and fixed guarding
prior to each use.
Read and be aware of the warning and instruction signs located on the machinery.
Cordon off the work area to access from the general public.
Before starting work clear the area of any objects that may cause damage to the machine.
Do not operate the machine if you are under the influence of alcohol or drugs. This
equipment must only be operated by persons who are medically fit both physically and
mentally.
Only work in good light and visibility.
Wear the correct personal protection equipment as instructed by this manual.
_______________________________________________________________________________
6 For parts diagrams v i sit www.tracmaster.co.uk
Page 9

Tracmaster Ltd CAMON LA20 Lawn Aera tor
Operator clothing should not be loose and footwear should offer good grip.
Know how to stop the machine in an emergency.
4.10 Engine Specific Safety Instructions
Always ensure the engine is turned off and fuel tap is turned off when transporting the
machinery, cleaning the machinery and making adjustments.
Always start the engine in the open air. Starting an engine within a confined space can lead
to the inhalation of toxic substances.
Do not smoke or use a naked flame when refueling.
Use only unleaded petrol from fuel containers designed for this purpose. Refuel outdoors
only and replace the fuel tank cap securely.
Do not mix oil with the fuel.
Leave one inch of space in the fuel tank during refilling.
Clear up any petrol spillages immediately.
Avoid contact with the engine during operation as it will become hot. Leave the engine to
cool prior to contact.
Never interfere with the control settings of the engine.
_______________________________________________________________________________________________
For parts diagrams v i sit www.tracmaster .co.uk
7
Page 10
CAMON LA20 Lawn Aera tor Tracmaster Ltd
5.0 Safety Instructions Starting and Operating
5.1 To Start the Engine
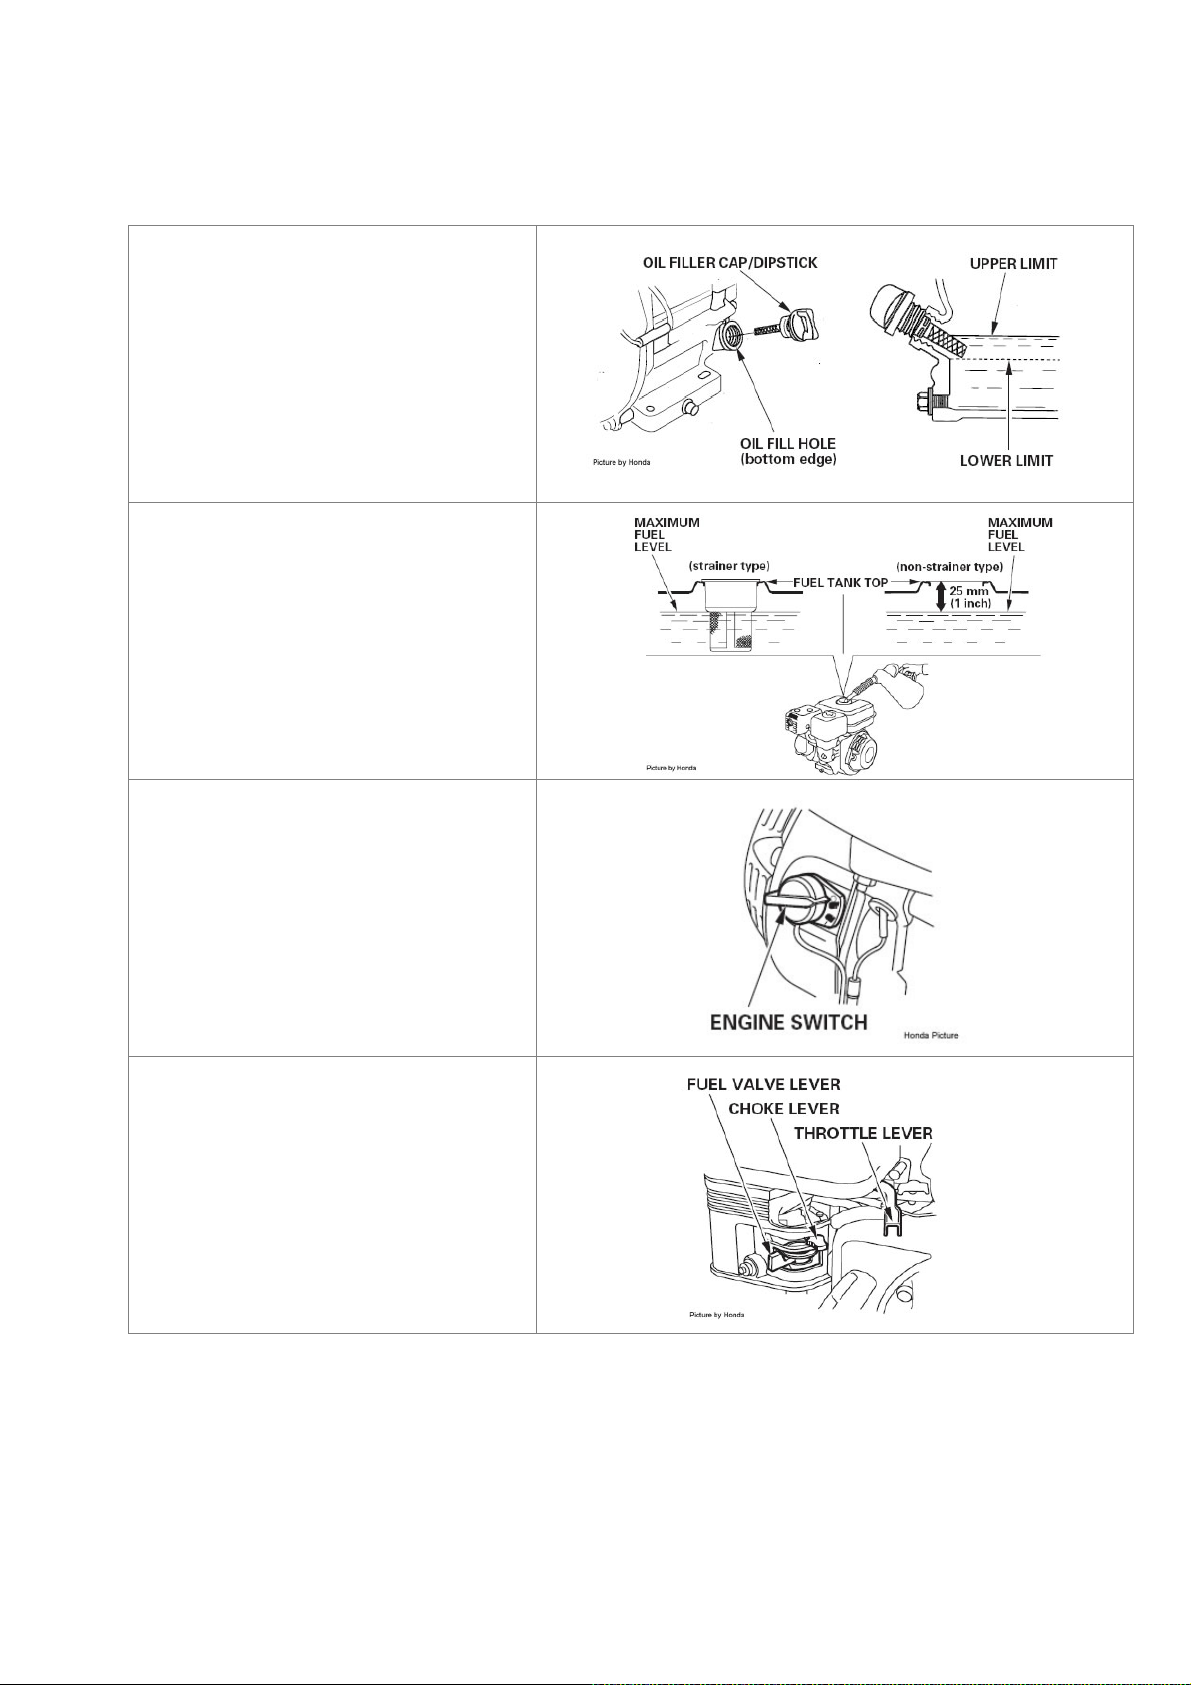
Using the dipstick provided,
check the engine oil level. Top
up with 10w/30 oil if the dipstick
is clear of oil.
Check the fuel level. Refill as
necessary and as determined by
the fuel tank type – see diagram.
Switch the engine ignition switch
to the ON position.
Turn the fuel tap located on the
engine carburetor to the ON
position. If the engine is cold or
has not been operated recently
set the choke lever on the
carburetor to the ON position.
Pull the engine recoil handle slowly until it engages then pull hard and fast to start the
engine.
After the start, guide the cord back into its position. Do not let it snap back.
Once the engine has started, if the choke lever has been used, return this to its OFF position
after the engine has run for a few seconds.
_______________________________________________________________________________
8 For parts diagrams v i sit www.tracmaster.co.uk
Page 11

Tracmaster Ltd CAMON LA20 Lawn Aera tor
5.2 To Stop the Engine
Release the operating lever.
Switch the engine ON/OFF switch to the “O” OFF position.
Turn the fuel tap lever to the OFF position.
Ensure the tines have stopped prior to moving the machine.
WARNING: THE EXHAUST COVER MAY BE HOT – DO NOT TOUCH.
5.3 Safety Equipment
The LA20 operator must be wearing:
• Ear Defenders
• Gloves
• Protective Footwear
• Safety Glasses
5.4 Operation
Before aerating can be carried out, the grass must be cut short and be cleared of any
objects such as stones or sticks that would damage the Aerator.
WARNING: AERATING LONG GRASS WILL QUICKLY CAUSE DAMAGE TO
COMPONENTS OF THE MACHINE. WE RECOMMEND GRASS IS CUT PRIOR TO
AERATING.
Do not operate the Aerator on wet lawns or in wet weather.
Hollow tines should only be used on moist ground conditions.
Hardcore or rubble located under the surface of the turf will cause damage to the machine.
Use a garden fork to test the depth of the turf. The fork must enter the ground up to 100mm
in depth to avoid damage to the tines or corers.
When safety checks have been completed, start the engine following the correct procedure.
Position the throttle lever in its midway position.
Lift the operating lever to engage the drive and start the tines rotating in their lifted position.
Using the central tine control lever, lower the tine lifting board, allowing the rotating tine rods
to fall to a vertical position where the tines will be penetrating the ground.
As the tines begin to penetrate the ground they will start to also propel the LA20 Aerator
forwards.
_______________________________________________________________________________________________
For parts diagrams v i sit www.tracmaster .co.uk
9
Page 12

CAMON LA20 Lawn Aera tor Tracmaster Ltd
DURING OPERATION OF THE LA20 AERATOR APPLY A SMALL PULLING PRESSURE
ON THE HANDLEBAR AS THIS WILL ENSURE THA T THE TINES AND TINE RODS
REMAIN IN A VERTICAL POSITION. THE TINES MUST BE VERTICAL FOR MAXIMUM
AERATING DEPTHS AND EFFICIENT PROPULSION TO BE ACHIEVED.
Do not work the Aerator on slopes of more than 20 degrees and always work across the
slope, not up and down it.
5.5 Procedure for Unexpected Shut Down
Release the operating lever
Turn the engine operating switch located on the handlebars to the OFF position.
Ensure the tines have stopped prior to moving the machine.
5.6 Residual Risks of the LA20 Aerator
The LA20 Aerator is designed to be pushed by the operator during transportation and whilst
it propels itself during operation it does not have a driven axle. It has no brake system and
therefore the operator must hold firmly onto the machine at all times when the machine is on
sloped areas.
_______________________________________________________________________________
10 For parts diagrams v i sit www.tracmaster.co.uk
Page 13
Tracmaster Ltd CAMON LA20 Lawn Aera tor
6.0 Maintenance
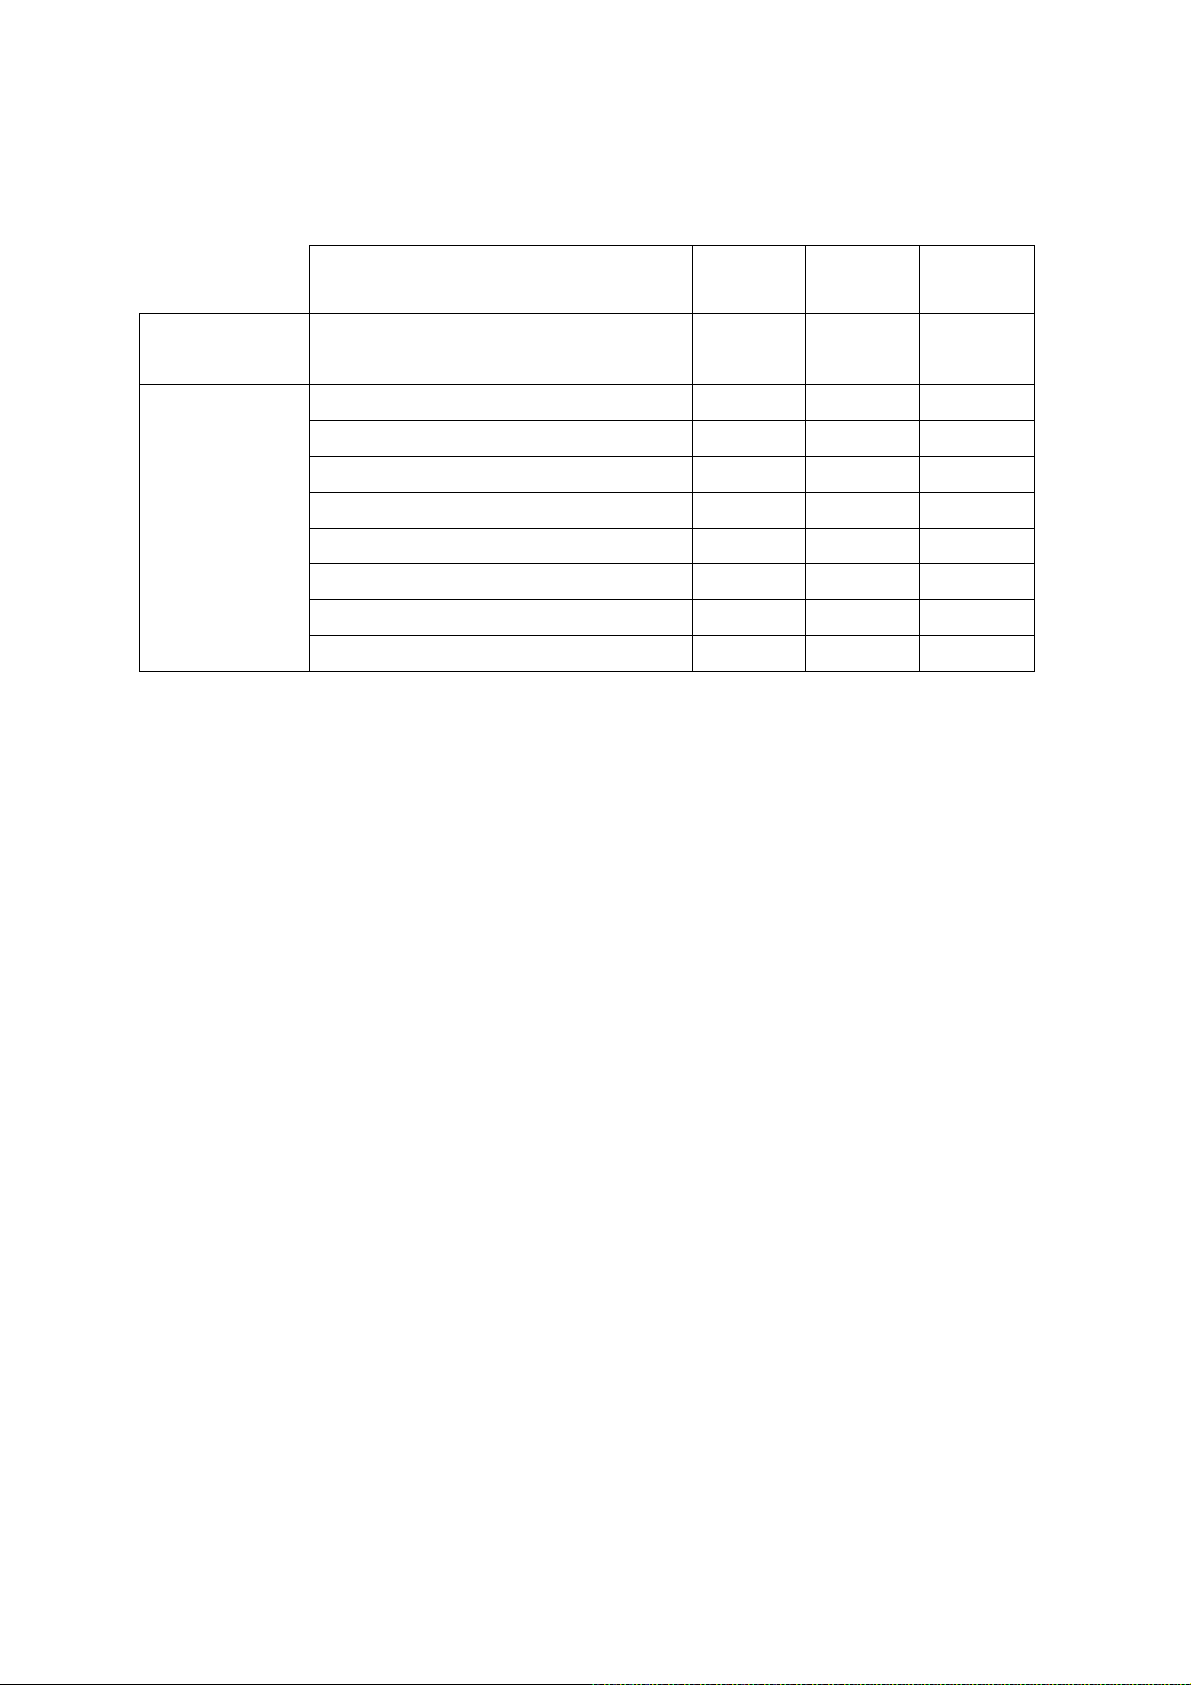
6.1 Schedule
Operation Daily Every
Week
Every
Month
Engine Check engine oil level 10W/30
X X
See separate engine manual
Machine
Check condition of tines
Check condition of tines rods
Check belt condition
Check operating lever and cable
Check protection cover condition
Check bearings
Lubricate wheel bearings
Tighten all nuts and bolts
X
X
X
X
X
X
X
X
6.2 Basic Maintenance
Check that all guards are fitted securely.
Ensure the cable connecting the operating lever to the engine is securely fastened at both
ends and shows no sign of wear.
Check the pressure of pnuematic tyres and ensure that they do not show any indentations or
significant wear and tear.
Ensure the wheels are held securely and the fixed pin that holds the wheels onto the axles is
in place.
6.3 Engine
6.3.1 Check En gine Oil Level
This is to be checked prior to each use and every 8 hours during operation.
Check only when the engine is off and in a horizontal position.
Clean the oil filler plug and its surrounding parts.
Remove the oil filler plug. Clean the dipstick with a clean cloth and put the oil filler
plug all the way back into the engine. Remove the oil filler plug and check the oil
level.
Re fill the oil if indicator shows more is required. For the Honda GX160 the
recommended oil is SAE 10w/30.
_______________________________________________________________________________________________
For parts diagrams v i sit www.tracmaster .co.uk
11
Page 14
CAMON LA20 Lawn Aera tor Tracmaster Ltd
6.3.2 Change Engine Oil
Refer to the engine manufacturer's manual for location of components and more
detailed assistance.
Do not change the oil if the engine is hot.
The first oil change is after 50 hours of work.
Subsequent oil changes should be made after each 100 hours of work.
At extreme temperatures or conditions change the oil after every 50 hours.
Open the drain plug on the engine and the filling plug and drain the oil into a suitable
container or use a suction pump to remove oil through filler neck.
Ensure the waste oil is disposed of properly.
Re-fit the drain plug and tighten.
Fill fresh engine oil through the oil filling opening. Use a funnel or similar device for
ease of filling.
Replace the oil filler plug and tighten.
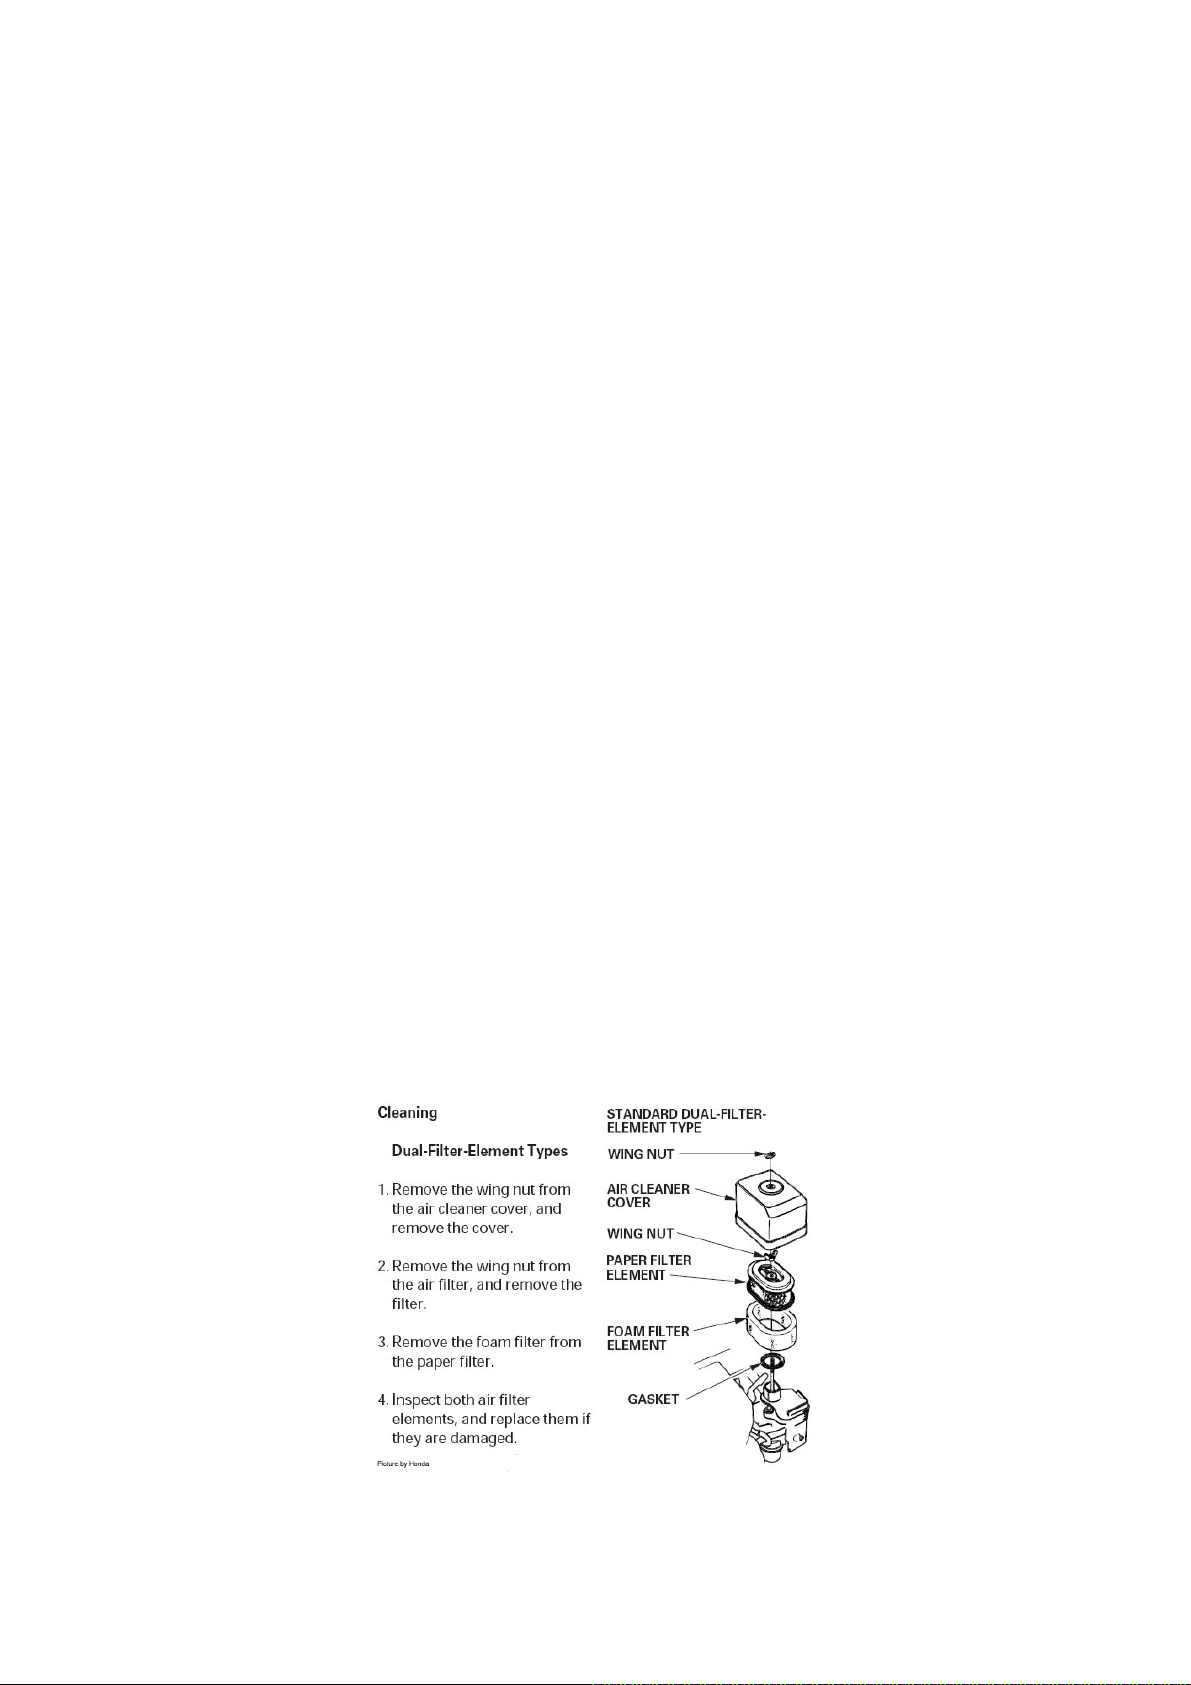
6.3.3 Air Filter
Inspection Check:
Remove the air cleaner cover and inspect the filter elements.
Cleaning:
See diagram below containing information provided by Honda
6.3.4 Spark Plug
Clean and replace.
_______________________________________________________________________________
12 For parts diagrams v i sit www.tracmaster.co.uk
Page 15

Tracmaster Ltd CAMON LA20 Lawn Aera tor
6.4 Cleaning
After cleaning, particularly if a pressure washer has been used, ensure any lubrication points
are re-lubricated.
Clean the engine with a cloth only. Avoid spraying the engine with jets of water as this may
leak into the fuel and ignition systems.
6.5 Troubleshooting
6.5.1 Machine
Have all serious malfunctions on the machine and engine repaired by an authorised
Tracmaster or Honda agent.
Problem Possible Cause Remedy
No drive to blades Broken belt Replace belt
Poor depth and
propulsion
Operator is pushing the
machine
Pull back on handlebar
during operation to ensure
tines are vertical
6.5.2 Engine
Problem Possible Cause Remedy
Spark plug connector not connected Connect spark plug connector
Choke lever is not actuated Actuate choke lever
Engine
does not
start
Fuel tank empty Fill fuel tank
Fuel line clogged Clean fuel line
Defective spark plug Clean or replace spark plug
Dry and adjust spark plug and
start engine on full throttle
Engine
overheats
Engine has too much fuel
Low engine oil Refill immediately
Impaired cooling Clean cooling fan grille
Air filter clogged Clean air filter
6.5.3 Lubricants
Use the specified 10w/30 oil specified by Honda for the engine oil.
To lubricate the roller bearings in the wheels we recommend using bio-lubricating
grease.
_______________________________________________________________________________________________
For parts diagrams v i sit www.tracmaster .co.uk
13
Page 16

CAMON LA20 Lawn Aera tor Tracmaster Ltd
7.0 Transport a tion, Storage and Handling
7.1 Transportation
Use ramps where possible to manoeuvre the Aerator into a transportation vehicle.
The LA20 Aerator must be fixed securely using straps and by placing chocks behind the
wheels.
Always transport the LA20 Aerator horizontally and not tilted at an angle.
Ensure that the fuel control lever on the engine is moved into the OFF position so fuel does
not leak into the carburetor during transportation.
7.2 Storage
Always clean the machine and dry thoroughly prior to storage and ensure all lubrication
points have been re-greased.
For periods of long storage, change the engine oil.
Either drain the fuel completely or fill the fuel tank and add fuel stabilizer.
Do not store the Aerator in wet rooms, where fertiliser is stored, or in stables as heavy
corrosion may occur.
Always store the machine in a horizontal position.
7.3 Handling
Do not attempt to lift the machine alone. At least two people is the minimum required.
Gloves must be worn when lifting the LA20 Aerator.
Do not tilt the machine so that fuel can leak into the air filter of the engine.
When performing maintenance on the Aerator when it is situated on a work bench, ensure
that the machine is firmly held in position at all times.
Do not lift the machine solely by the engine at any point.
_______________________________________________________________________________
14 For parts diagrams v i sit www.tracmaster.co.uk
Page 17

Tracmaster Ltd CAMON LA20 Lawn Aera tor
8.0 Service Record
To ensure your machine is kept in peak condition we recommend that your Aerator is serviced
regularly.
Contact Tracmaster on 01444 247689 to find out who your local Authorised Agent is.
Company:__________________________
Date:______________________________
Company:__________________________
Date:______________________________
Company:__________________________
Date:______________________________
Company:__________________________
Date:______________________________
Company:__________________________
Date:______________________________
Company:__________________________
Date:______________________________
_______________________________________________________________________________________________
For parts diagrams v i sit www.tracmaster .co.uk
15
Page 18

CAMON LA20 Lawn Aera tor Tracmaster Ltd
EC Declaration of Conformity
Tracmaster Ltd declares that the machinery stipulated below complies with all the relevant
provisions of:
Machinery Directive 2006/42/EC
EMC Directive 89/336/EEC
and the National Laws and Regulations adopting these directives and other relevant directive.
Manufacturer: Tracmaster Ltd
Sovereign Centre
Victoria Road
Burgess Hill
RH15 9LR
UNITED KINGDOM
Machine Description: Lawn Aerator
Type: CAMON LA20
Serial No: …....................................
Harmonised Standards applied: (including parts of):
EN 12100-1:2003 Safety of Machinery: Basic Principles. Terminology. Methodology.
EN 12100-2:2003 Safety of Machinery: Basic Principles. Technical Principles.
EN 13684:2004+A2:2009 Garden equipment. Pedestrian controlled lawn aerators and scarifiers.
EN 13857:2008 Safety distances to prevent hazard zones being reached by upper and lower
limbs.
Responsible Person: Stephen Pitt
Position in Company: Managing Director
Address: Tracmaster Ltd, Sovereign Centre, Victoria Road, Burgess Hill, RH15 9LR
Date: August 2010
Signature: …........................................................................................
_______________________________________________________________________________
16 For parts diagrams v i sit www.tracmaster.co.uk
Page 19

Tracmaster Ltd CAMON LA20 Lawn Aera tor
Warranty Registration
To validate your warranty please complete the form below and return it to:
Tracmaster Ltd, Sovereign Centre, Victoria Road, Burgess Hill, RH15 9LR
Alternatively visit www.tracmaster.co.uk and complete the online form.
CUSTOMER DETAILS
Name: ...............................................................................................................
Company (if applicable):...............................................................................................................
Address: ...............................................................................................................
...............................................................................................................
............................................... Postcode: .........................................
Email: ...............................................................................................................
Phone: ...............................................................................................................
MACHINE DETAILS
Machine: CAMON Lawn Aerator
Model: LA20
Serial Number: ...............................................................................................................
Engine Serial Number: ...............................................................................................................
Purchase Date: ...............................................................................................................
SUPPLIER DETAILS (if not supplied directly by Tracmaster)
Dealer Name: ...............................................................................................................
Dealer Address: ...............................................................................................................
...............................................................................................................
............................................... Postcode: .........................................
We will never pass your details to any third party, however, we may occasionally send you
emails with offers and promotions, if you do not want us to do this please tick this box.
_______________________________________________________________________________________________
For parts diagrams v i sit www.tracmaster .co.uk
17
Page 20

© 2011 Tracmaster Ltd
Sovereign Centre, Victoria Road, Burgess Hill RH15 9LR
Tel: +44 (0) 1444 247689 Fax: +44 (0) 1444 871612
 Loading...