

Page 1

CAMOAT RoadSafe1 D
ash
Cam Recorder
Thank you for purchasing CAMOAT RoadSafe (RS1) – an advanced vehicle dash cam
recorder with a separate display hub system that is specifically designed to capture
real-time video of events happening outside your vehicle while driving.
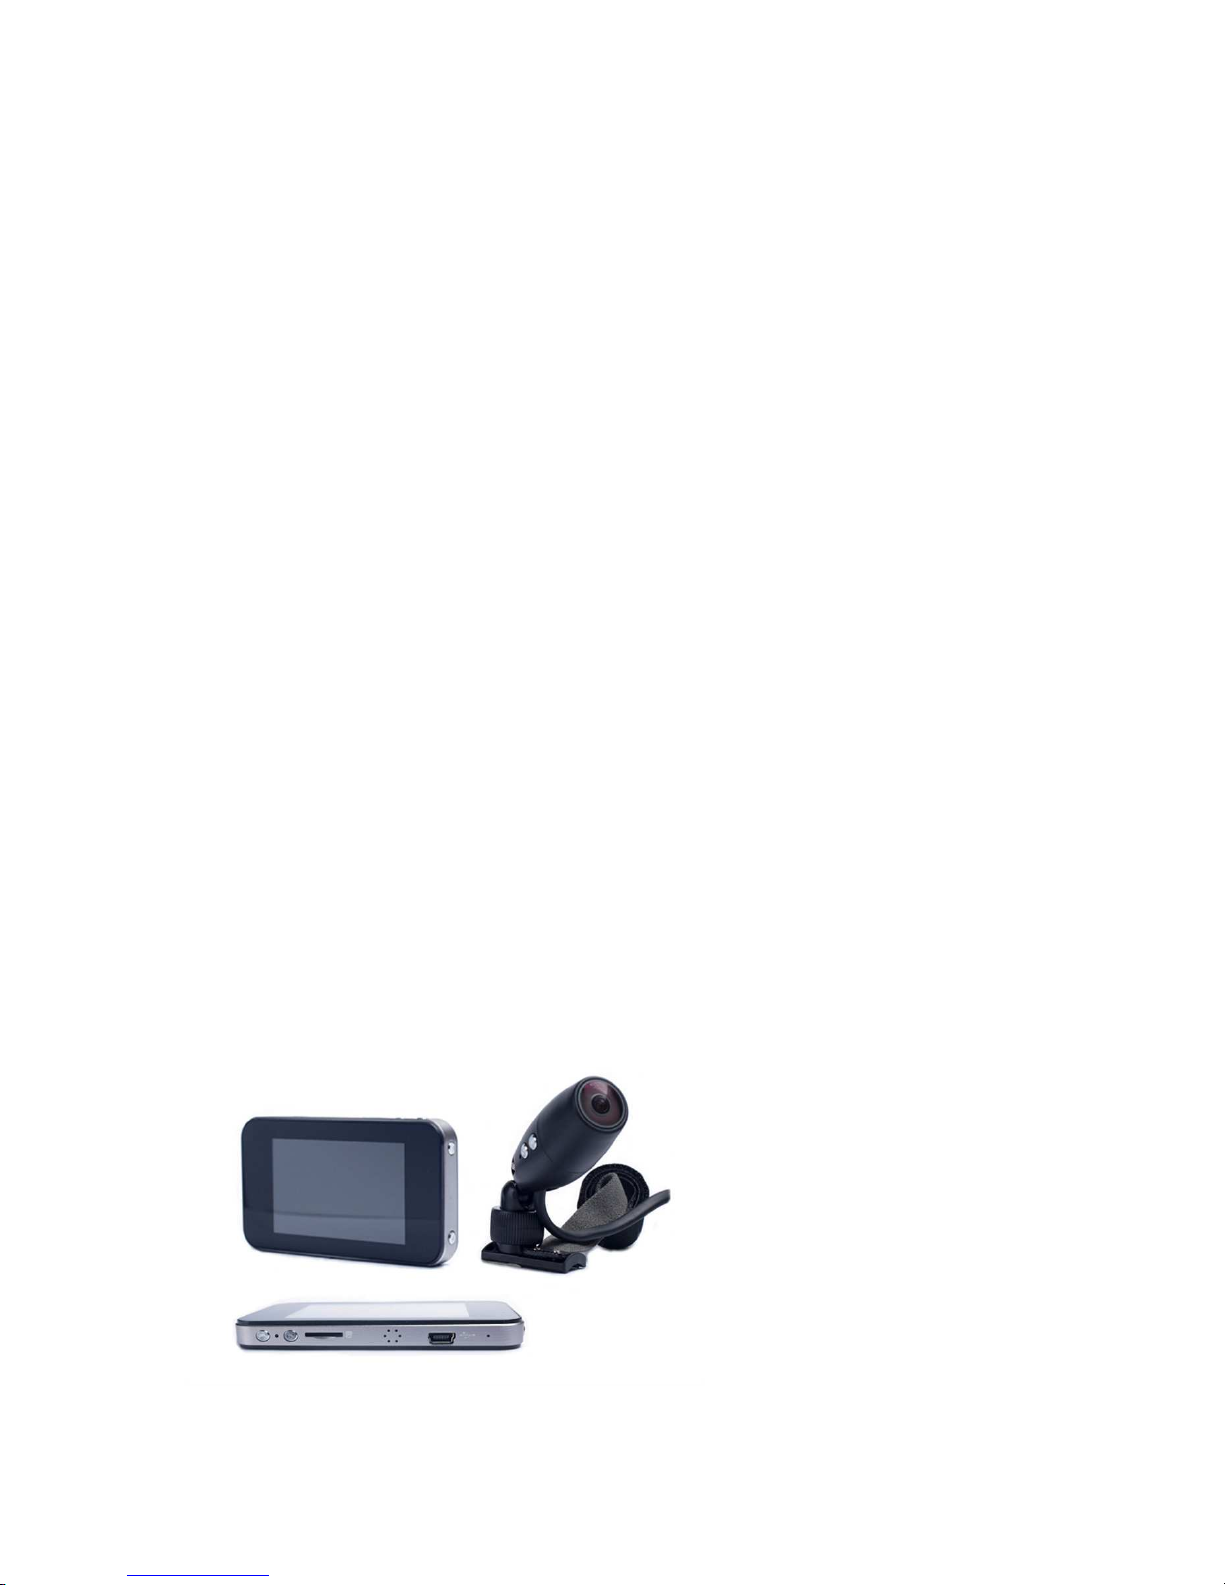
The camera is separate from the main display hub and mounted on your car’s
windshield or rear-view mirror. The separation makes the camera unit smaller and more
discreet which allows the display hub unit to be stored safely out-of-sight. The RS1 uses a
170° Wide Angle Lens for the best field of view and records video in crystal clear Full HD
1080P to ensure all the important details of your trip are recorded. This User Manual
gives you step-by-step instructions and advice to help you get the best experience from
your new device. Please read carefully before using the RS1.
SAFETY PRECAUTIONS
These usage and safety guidelines are important. Please follow them carefully to ensure
safe conditions and help protect your RS1 from potential damage.
General Use
• For in-vehicle use only.
• Do not operate the RS1 while driving.
• Never allow the RS1 to come in contact with water or any other liquids.
•
Do not use the RS1 in environments with strong magnetic fields or excessive
vibration.
Page 2
Mounting Location
• Never place the RS1 where the driver’s view or deployment of airbags can be
obstructed.
•
Mount the RS1 within the range of the windshield wipers to ensure clear visibility in
rain.
Package Contents
RS1 HD Camera Lens, Display Hub, Rear-view Mirror & Windshield Mounting System,
16GB Class-10 microSD Card, Car Charger, Display Pouch, and Instruction Manual
Features
• Smooth, detailed FULL HD 1080P recording @ 30fps resolution
• Bright 2.7” color TFT screen
• Super wide 170° and 6 glass wide angle lens
• WDR (Wide Dynamic Range) video system
• Endless looping mode
• Auto ON/OFF. Works automatically without any human touch
• Motion Detection
• Accident Auto Detection, G-Sensor with customizable sensitivity
• Built-in microphone
• Built-in speaker
• Supports 10 languages
• Safety First: NO Li-polymer battery inside
• Bundled 16GB microSD memory card
Page 3
GETTING STARTED
Installing the Memory Card
Before you can use or turn on the device, you must install a memory card.
1. Press the provided memory card into the slot on the display hub.
2. When you hear a click, the memory card is secure in the display hub slot.
Connecting the Device to Vehicle Power
1. Turn off the vehicle.
2. Mount camera lens on the rear-view mirror or windshield.
3. Route the HDMI cable around the interior of the vehicle.
4. Plug the camera lens in the HDMI port on the display hub.
5. Plug the power cable into a power outlet in your vehicle.
6. Plug the other end of the power cable into a USB port on the display hub.
7.
Turn on the vehicle.
Auto Start
When the device connects to a 12-volt power outlet, the RS1 turns on automatically
when you turn on your vehicle and powers down when the vehicle turns off.
Page 4

HDMI Cord Management
The RS1 comes with an 11 inch HDMI cord. Route the HDMI cord to the display hub.
Place the display hub in a discreet area such as the glove box or the bottom/inner side
of driver/passenger seat.
The RS1 is pre-configured with the most optimal resolution setting. Install the camera lens
onto your windshield or rear-view mirror so the lens is not blocking your view. Once the
above is done, and you start your vehicle, the unit starts to record automatically. Using
the TFT screen, point the camera to where you would like to record.
The TFT screen automatically powers down, but the RS1 continues to record, and a
green LED light flashes to indicate that the unit is recording. To view the display briefly
press the UP or DOWN button and the display turns on and then turns off again after a
brief period.
When you power down the vehicle, the RS1 automatically powers down after 3 sec. The
recording length per file is adjustable from 1, 2, or 3 minute segment lengths in the loop
setting.
Video Recording
The RS1 immediately begins recording video when it turns on, and it continues
recording, overwriting the oldest, non-protected videos until it turns off (looping).
Protecting a Video File
The RS1's sensor automatically detects accidental collisions. The sensor also called a
Gravity Sensor (G-Sensor) has sensitivity adjustments in Settings. By default, the G-Sensor
is on and is set to Low Sensitivity. When the sensor detects a collision, the RS1
automatically locks the clip to prevents any overwriting. You can also manually protect
videos at any time by pressing the Menu button while recording. A key icon indicates
that clip is locked and prevents overwriting, the only way to delete the file is manually.
Taking a Picture
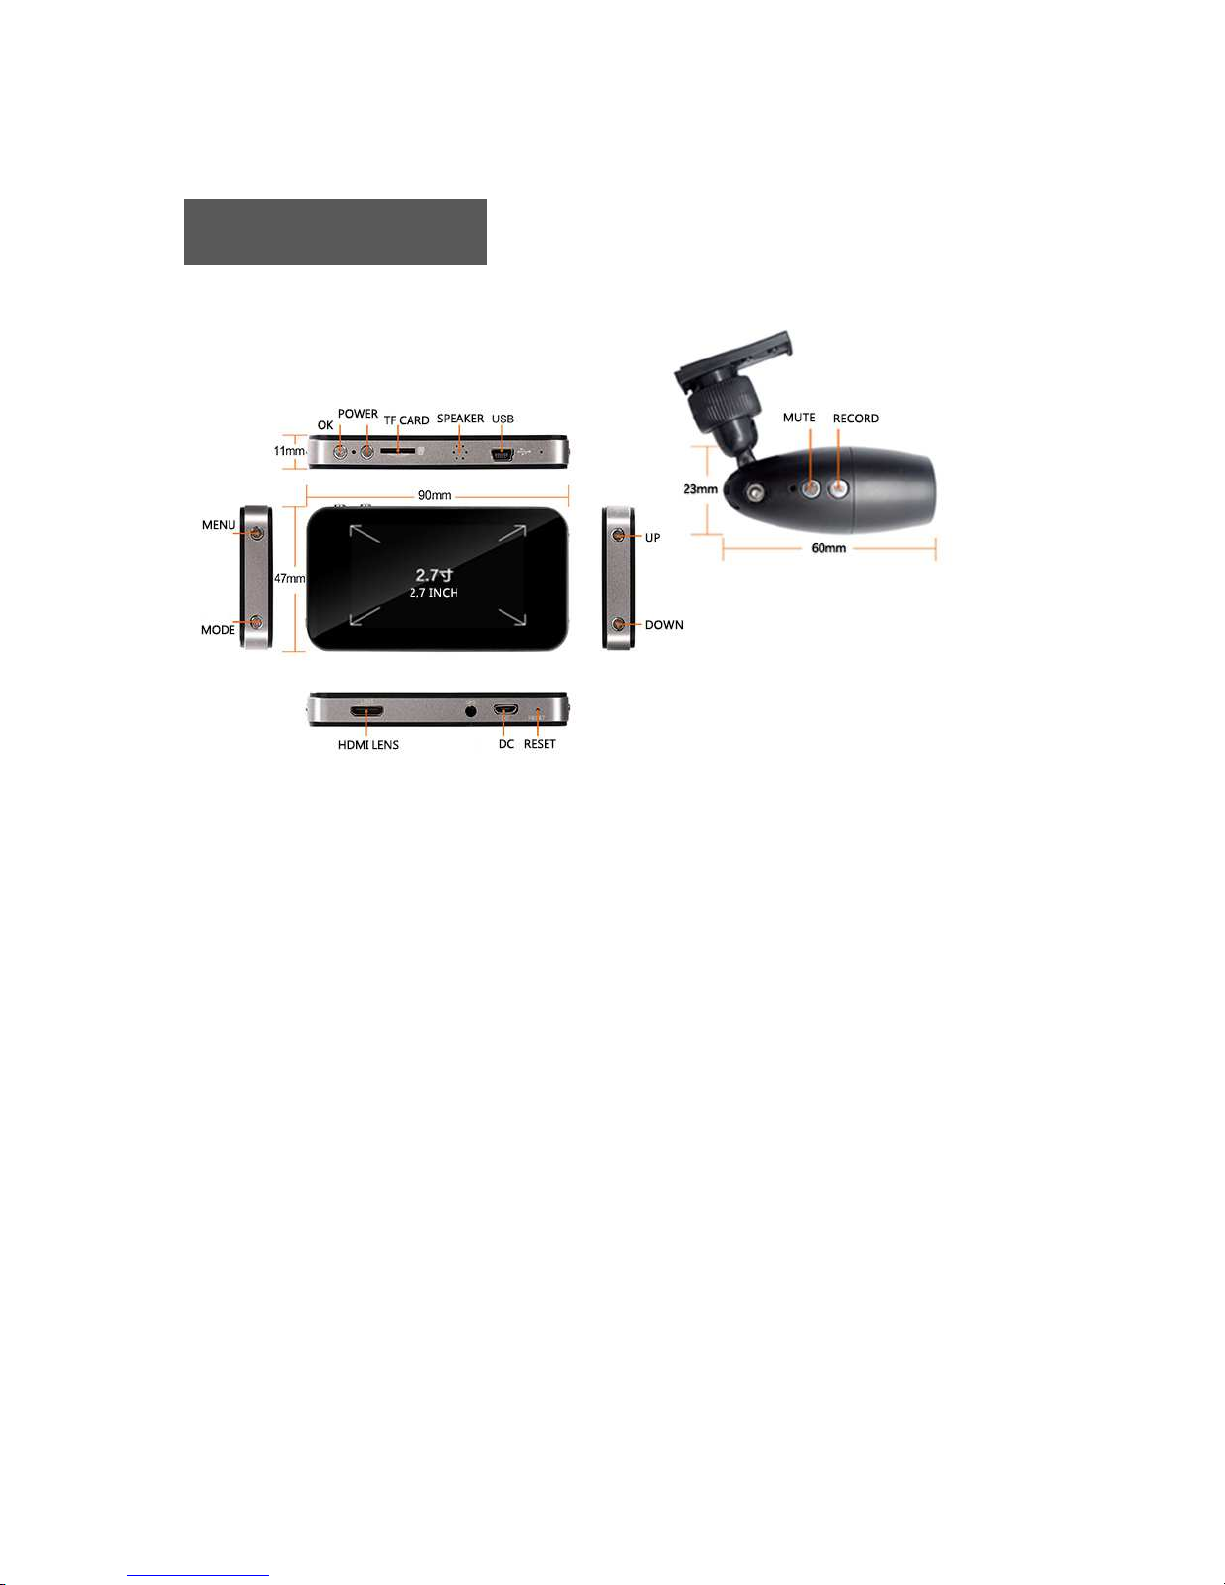
Press the OK button to stop the RS1 from recording and the on-screen recording icon
stops flashing. Press the MODE button to switch to Picture Mode. In this mode press the
OK button to take a picture, and push the UP and DOWN buttons to zoom in and out.
Page 5

Viewing Videos and Photos
The RS1 has a 2.7” TFT screen to calibrate the cameras viewing angle as well as playing
back video with sound or viewing pictures. The screen allows the user to be able to
change settings without having to plug the RS1 to a computer. There are 3 modes:
Video, Photo, and Video/Photo playback. Press the Mode button when the RS1 is not
recording to allow the user to select between modes.
1. To stop the RS1 from recording, press the OK button.
2. Press the MODE button until the Video/Photo Playback selection appears.
3. Select between the videos and photos by using the UP and DOWN buttons.
4. Play and pause a video using the OK button, and to exit the video, press the MODE
button.
VIDEO SETTINGS / DEVICE SETTINGS
Enter the Video Settings by pressing the MENU button while the RS1 is idle and not
recording. Enter Device Settings by quickly pressing the MENU button again. Below is a
list of settings and options.
** Important - Saving Settings
To save settings, after the desired settings are selected, press the POWER button
to turn the device off and save your most recent settings.
1 VIDEO SETTINGS
Resolution:
Set the resolution/quality of recording videos, available options are
1080FHD, 720HD.
Loop Recording:
Select 1, 2 or 3 minute loop clips, or select OFF for one continuous
file. When the memory card fills up with clips, the oldest files are overwritten. If Loop
Recording is set to OFF, the RS1 records until the microSD card is filled, and then stops
Page 6

recording. Format the card to use the device again. Loop Mode is recommended.
Motion Detection:
This is OFF by default and should not be ON when driving, it is strictly
for a parked vehicle situation.
Record Audio:
ON or OFF; on default audio recording is OFF, turn ON to record audio
while recording video.
G-sensor:
OFF, LOW, MEDIUM, or HIGH Sensitivity. Also known as the G-Sensor, this
mechanism detects sudden collisions and automatically locks the recording to prevent
overwriting. (NOTE: Adjust the sensitivity if the sensor does not detect events or
incorrectly detects events during normal driving.)
2 DEVICE SETTINGS
Date/Time:
Sets Date and Time. Use the OK button to switch between values and the
UP and DOWN button to change numbers.
Key Audio:
ON or OFF
Language:
English, French, Spanish, Portuguese, German, Italian, Simplified Chinese,
Traditional Chinese, Russian and Japanese.
Frequency:
50Hz or 60Hz. Depending on the region of the world being used, 60Hz is
generally for the America’s and parts of China.
Screen Display:
Set duration for display to automatically turn off after recording
begins.
Format:
Format the microSD card right on the RS1 instead of formatting the memory
card via computer. Formatting right on the device is useful for continuous recording
when the microSD card fills out. (NOTE: Check and format microSD card once per
month is recommended.)
Page 7

Default Setting:
Restores the RS1 back to factory settings.
Version:
Current operation version.
FEATURE SHORTCUTS
Helpful one button press shortcuts for key features are below.
• Microphone: To toggle between ON and OFF press the mute button on the camera
lens while recording.
• Recording: Press the recording button on the camera lens to force START or STOP
record.
TROUBLESHOOTING
If a problem occurs with your RS1 please first check the information listed below before
send your device for repair.
I was using my RS1, and now no buttons are responding.
Try unplugging the car adapter from your RS1, and then reconnecting it to your RS1
again.
Why my RS1 cannot read videos on my memory card?
• Edited and deformed videos may not display properly on your RS1
• RS1 only play files generated by RS1.
SUPPORT
At CAMOAT we believe customer support is paramount. Should the troubleshooting tips
above be of no use? Please contact us immediately.
Page 8

WARRANTY
1 Year Manufacturer Limited Warranty
CAMOAT warrants to you, the original retail purchaser (“Consumer”), that this product
(“Product”) will under normal use operate substantially in accordance with the
accompanying documentation for a period of one (1) year from date of original
purchase. Consumer’s sole and exclusive remedy and CAMOAT’s sole and exclusive
responsibility under this warranty will be, at CAMOAT’s option, either to repair or replace
the defective Product during the one (1) year limited warranty period so that it performs
substantially in accordance with the accompanying documentation on the date of
your initial purchase. Any replacement may be, at the option of CAMOAT, a new or re-
manufactured Product. If CAMOAT, in its sole discretion, determines it is no reasonable
to replace the defective Product, CAMOAT may refund to Consumer the purchase
price paid for the Product.
www.camoat.com
 Loading...