

Cameo Communications WLN2002 Users Manual


Table of Contents
CHAPTER 1: PRODUCT OVERVIEW
1.1 Features ..............................................................................................................5
1.2 Package Contents ............................................................................................... 6
1.3 Hardware Overview .............................................................................................7
1.3.1 LED Indicators ..........................................................................................7
1.3.2 Connectors ................................................................................................8
1.4 Travel Router Modes ...........................................................................................9
1.4.1 Switching Modes ....................................................................................... 10
1.5 Making Connections ............................................................................................11
1.5.1 Connecting the Power Adapter .................................................................11
1.5.2 Connecting the Dual Head USB Cable .....................................................11
1.5.3 Connecting the Ethernet Cable ................................................................. 12
1.6 System Requirements ......................................................................................... 12
1.6.1 Conguring Connections ...........................................................................12
CHAPTER 2: AP MODE
2.1 Installation ...........................................................................................................14
2.2 Web-Based Conguration ...................................................................................15
2.2.1 Wizard .......................................................................................................16
2.2.2 Setup .........................................................................................................18
Wireless Network Settings ........................................................................18
Local Area Network (LAN) Settings ..........................................................21
Dynamic IP (DHCP) .................................................................................21
Static IP ....................................................................................................21
Wi-Fi Protected Setup (WPS) Settings .....................................................22
2.2.3 Advanced ..................................................................................................23
Advanced Wireless Network Settings .......................................................23
Access Control ..........................................................................................24
2.2.4 System ......................................................................................................25
Admin ........................................................................................................25
Settings .....................................................................................................25
Firmware ...................................................................................................26
Time ..........................................................................................................26
Wireless Travel Router2 Wireless Travel Router2

2.2.5 Status ........................................................................................................ 27
Device Info ................................................................................................27
Logs ..........................................................................................................27
Statistics ....................................................................................................27
Wireless ....................................................................................................27
CHAPTER 3: CLIENT MODE
3.1 Installation ...........................................................................................................29
3.1.1 Infrastructure Mode ................................................................................... 29
3.1.2 Ad-Hoc Mode ............................................................................................30
3.2 Web-Based Conguration ...................................................................................31
3.2.1 Wizard .......................................................................................................32
3.2.2 Setup .........................................................................................................34
Wireless AP/ AP Client Settings ................................................................34
Local Area Network (LAN) Settings ..........................................................39
Dynamic IP (DHCP) ..................................................................................39
Static IP .....................................................................................................39
Wi-Fi Protected Setup (WPS) Settings .....................................................40
3.2.3 Advanced ..................................................................................................40
Advanced Wireless Network Settings .......................................................40
3.2.4 System ......................................................................................................41
Admin ........................................................................................................41
Settings .....................................................................................................41
Firmware ...................................................................................................42
Time ..........................................................................................................42
3.2.5 Status ........................................................................................................ 43
Device Info ................................................................................................43
Logs ..........................................................................................................43
Statistics ....................................................................................................43
CHAPTER 4: ROUTER MODE
4.1 Installation ...........................................................................................................45
4.2 Web-Based Conguration ...................................................................................46
4.2.1 Wizard .......................................................................................................47
4.2.2 Setup .........................................................................................................50
Wireless Network Settings ........................................................................50
Wireless Travel Router 3Wireless Travel Router 3

Local Area Network (LAN) Settings ..........................................................53
Wide Area Network (WAN) Settings ..........................................................54
Dynamic IP (DHCP) ..................................................................................54
Static IP .....................................................................................................54
PPPoE ......................................................................................................55
PPTP .........................................................................................................56
L2TP .........................................................................................................57
Wi-Fi Protected Setup (WPS) Settings .....................................................58
Dynamic DNS Settings .............................................................................59
4.2.3 Advanced ..................................................................................................60
Access Control ..........................................................................................60
IP Filter ......................................................................................................61
Parental Control ........................................................................................62
Virtual Server ............................................................................................63
Special AP .................................................................................................64
DMZ ..........................................................................................................65
Firewall Settings ........................................................................................66
Advanced Network Settings ...................................................................... 67
Advanced Wireless Network Settings .......................................................68
4.2.4 System ......................................................................................................69
Admin ........................................................................................................69
Settings .....................................................................................................69
Firmware ...................................................................................................70
Time ..........................................................................................................70
Ping Test ...................................................................................................71
4.2.5 Status ........................................................................................................ 71
Device Info ................................................................................................71
Statistics ....................................................................................................72
Wireless ....................................................................................................72
Logs ..........................................................................................................72
Appendix A: Regulatory & Safety Information ........................................................... 73
Appendix B: Specications .......................................................................................77
Appendix C: Limited Warranty .................................................................................. 78
Wireless Travel Router4 Wireless Travel Router4

1
Product
Overview
Congratulations on your purchase of the 3-in-1 Travel Router. The Travel Router
functions as an Access Point for wireless connections, an Access Point Client for
wired devices to have wireless connections, and a Router to share resources such as
computers, printers, les and other devices.
This User Manual will guide you on how to install and set up the Travel Router. Read
it carefully and keep it for future reference.
1.1 Features
3-in-1 Operation Mode: Supports AP, Router, and AP Client modes
•
Smallest Networking Device
•
Fast Wireless Networking: Provides fast data rate connection up to 300Mbps for
•
802.11n devices
Full range compatibility: Compatible with IEEE 802.11n, 802.11g, 802.11b and
•
802.3u devices
Low Power Consumption: Consumes less than 2.5 watts
•
USB Bus Powered: Provides better mobility.
•
Quick and Easy Setup with Web-based Management Utility
•
Strong Network Security - Supports the following features:
•
WPA, WPA-PSK, WPA2, and WPA2-PSK security standars
→
WPS button for Wi-Fi WPS conguration
→
PPPoE/PPTP/L2TP protocol for DSL connections
→
Firewall protection
→
Wireless Travel Router 5
Wireless Travel Router6 Wireless Travel Router6
1. PRODUCT OVERVIEW
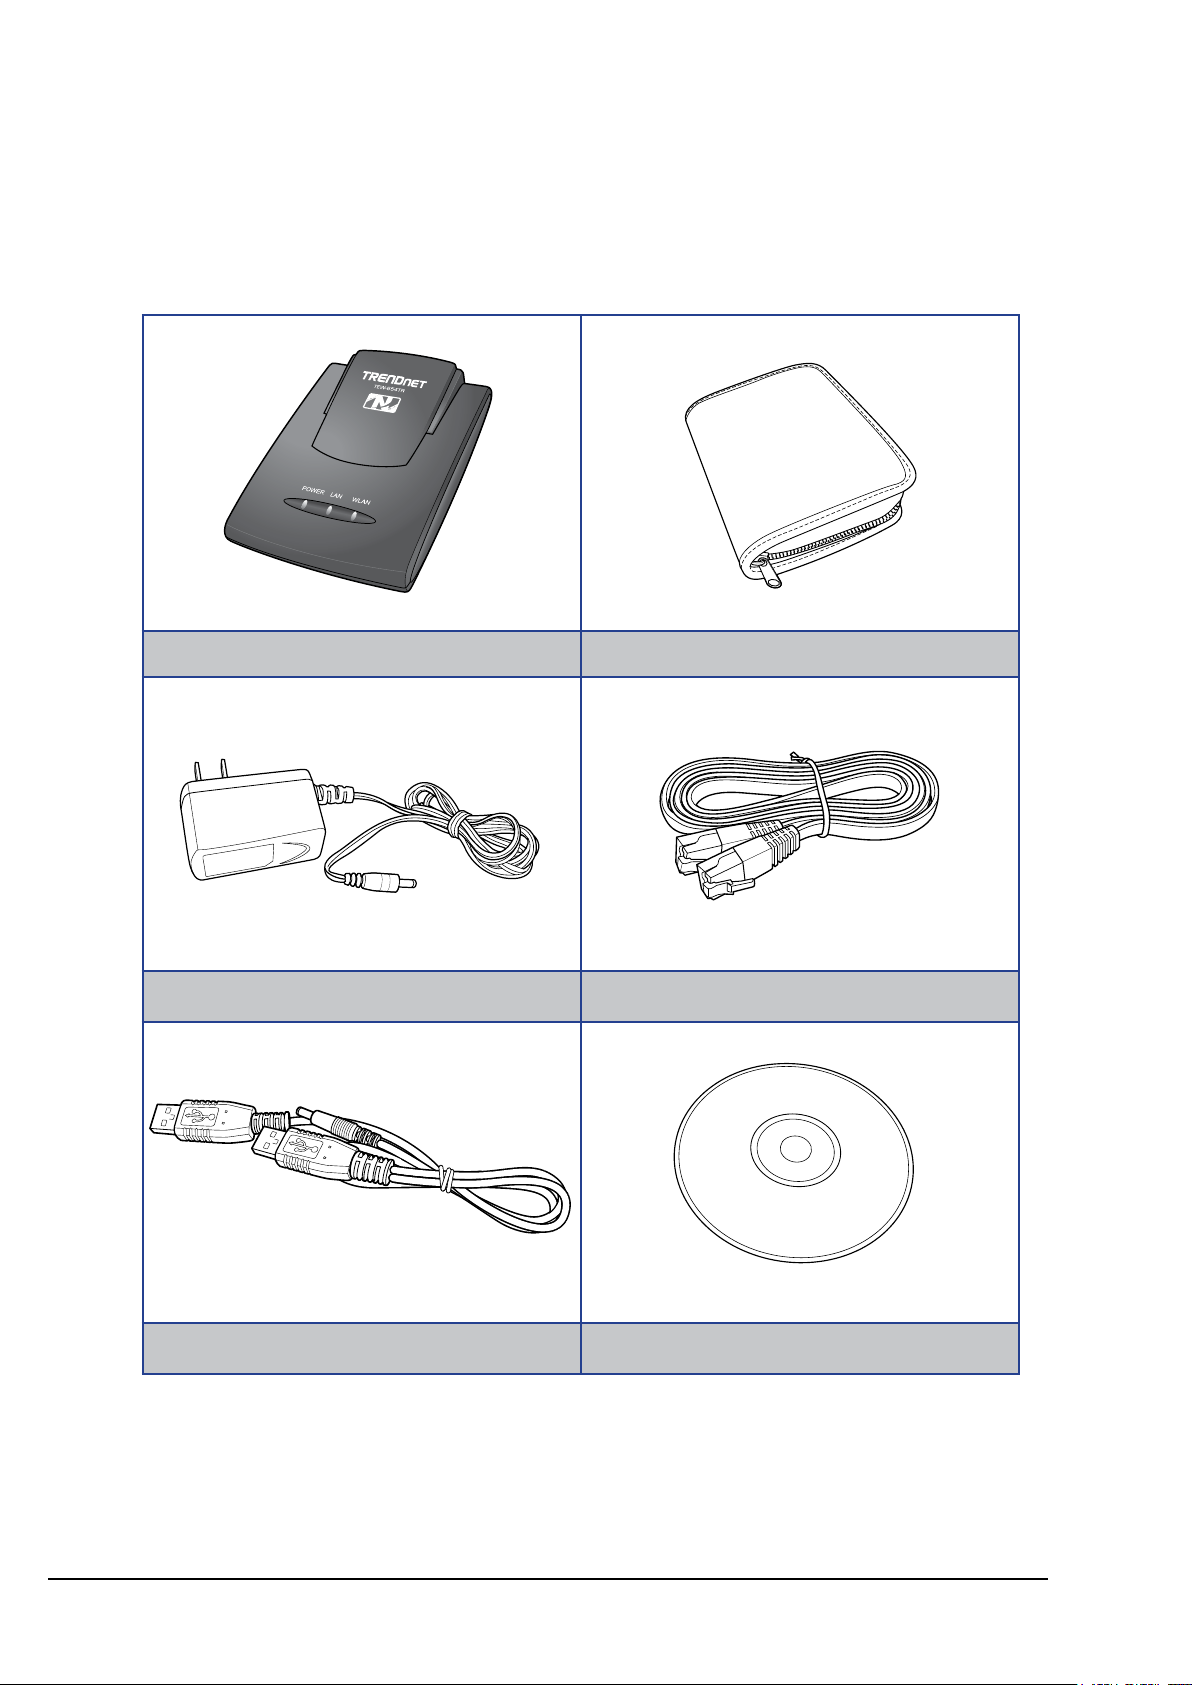
1.2 Package Contents
Check if your package comes with the following items. If any of them is missing or
appears damaged, please contact your retailer.
Travel Router Pouch
Power Adapter Ethernet Cable
Dual Head USB Cable CD-ROM
POWER WLANLAN
1.3 Hardware Overview
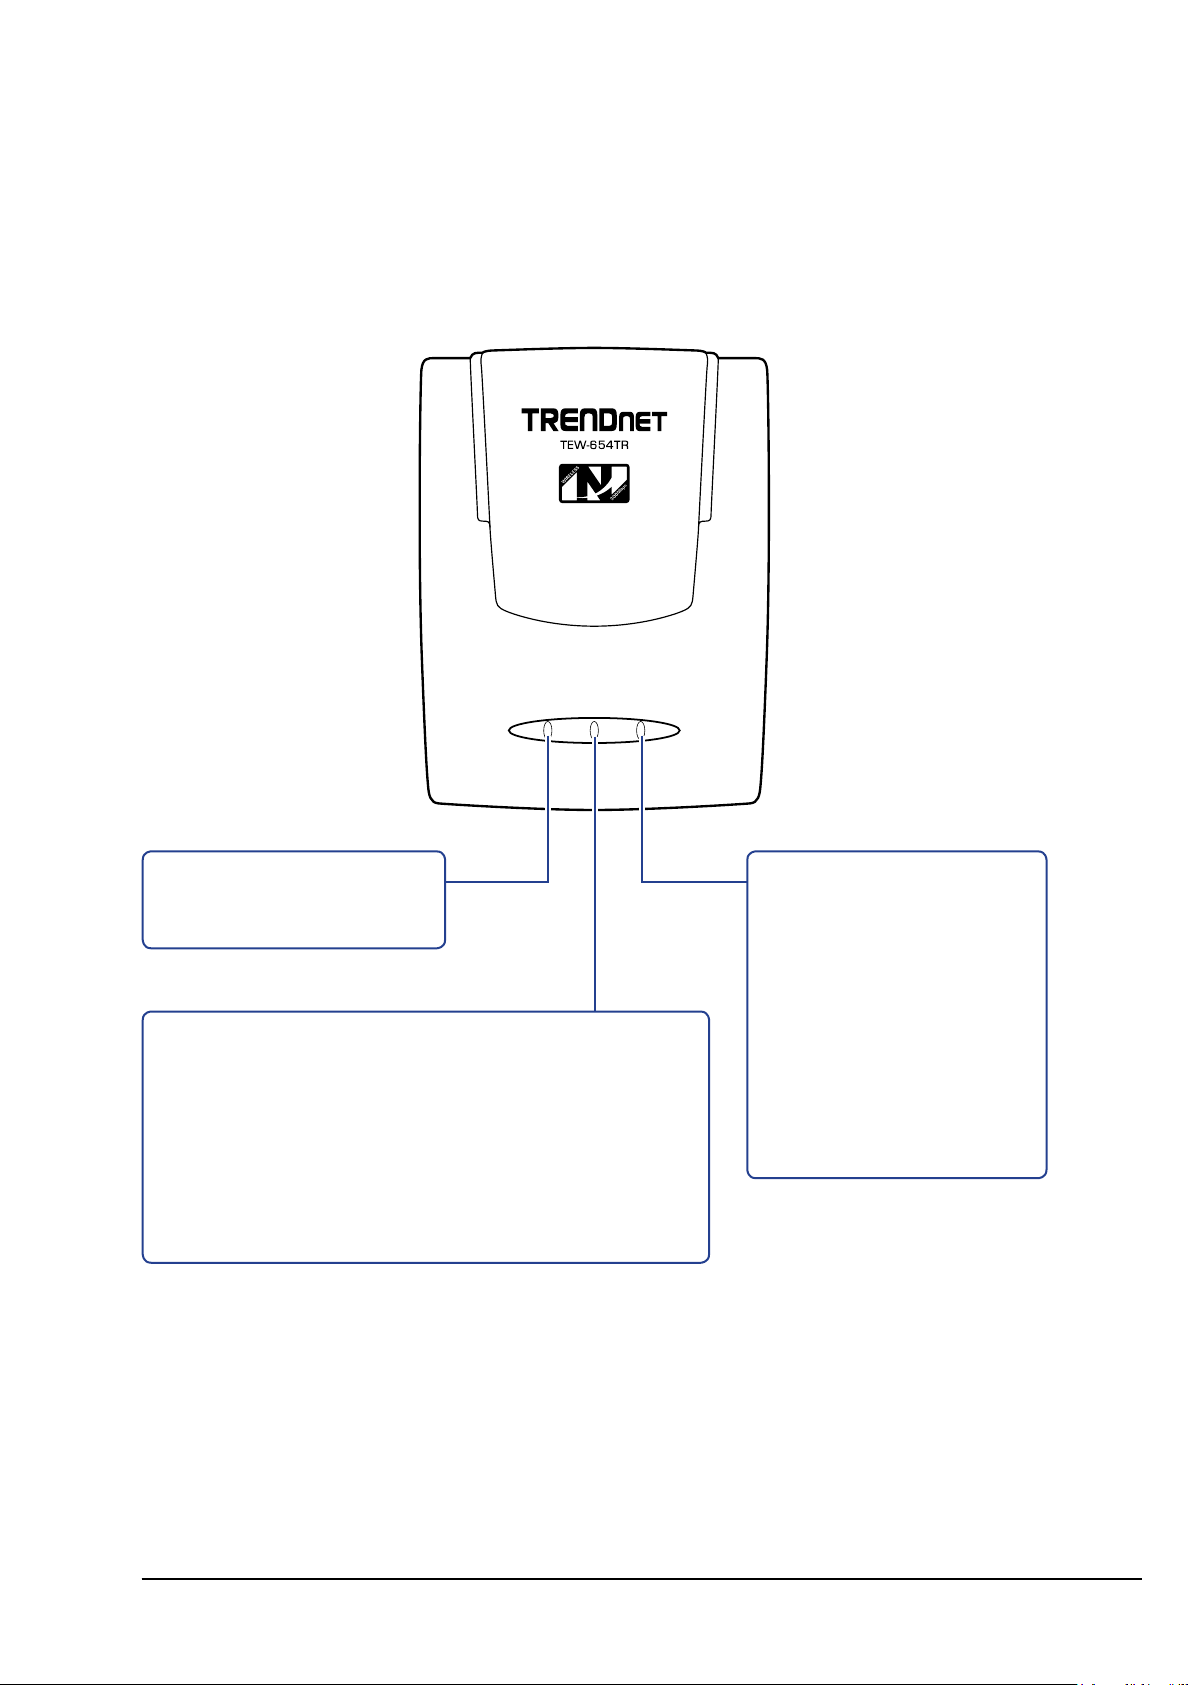
1.3.1 LED Indicators
1. PRODUCT OVERVIEW
Power LED
Lights when the power is
connected.
LAN / WAN LED
GREEN (solid)
Lights when LAN/WAN port is connected to a DSL
•
or cable modem successfully.
GREEN (blinks)
Blinks when transmitting or receiving data through
•
the LAN / WAN connection.
WLAN / WPS LED
Flashes to indicate activity.
GREEN
Blinks when a wireless
•
device is connected.
•
Blinks when data
transfer is in progress.
AMBER
Blinks when WPS is
•
enabled.
Wireless Travel Router 7Wireless Travel Router 7
Wireless Travel Router8 Wireless Travel Router8
1. PRODUCT OVERVIEW
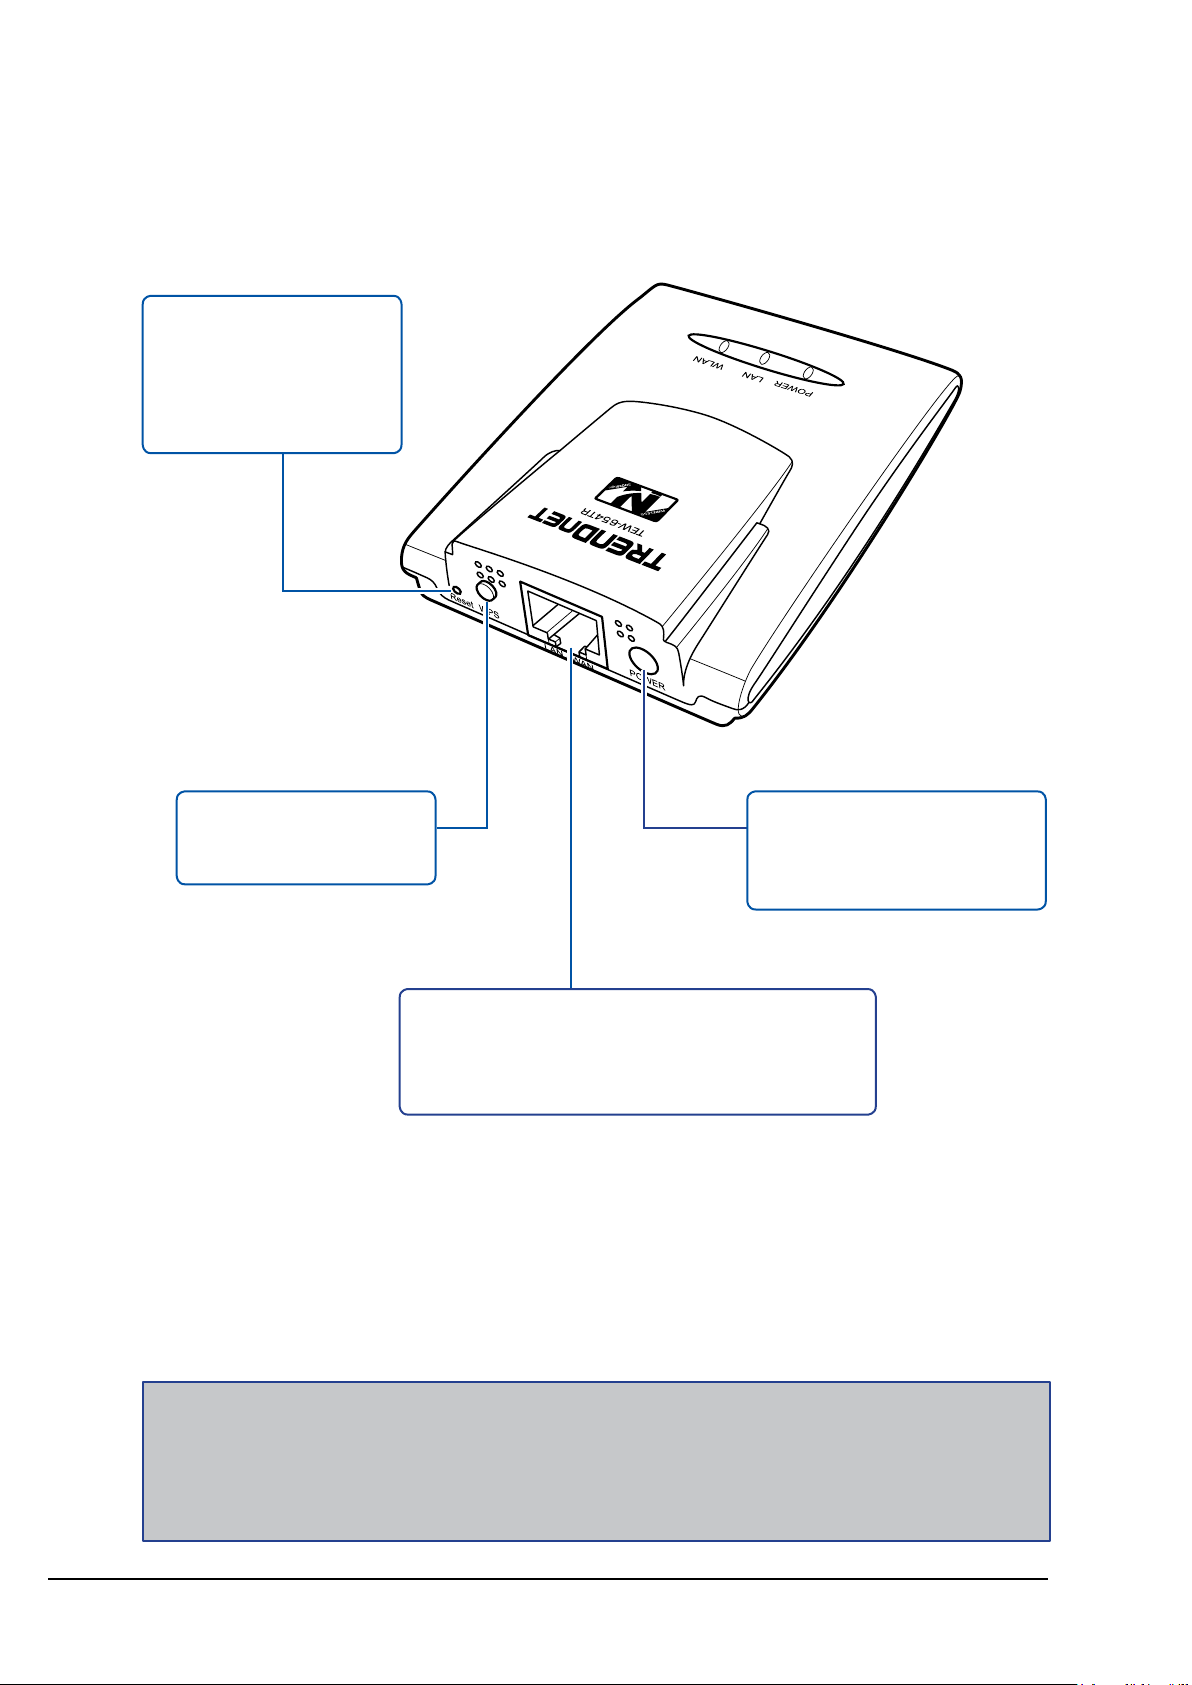
1.3.2 Connectors
Reset Button
Press and hold for 5
seconds to reboot the
device and restore the
factory default settings.
WPS Button
Press to enable Wi-Fi
Protected Setup.
Power Port
Connect the power adapter
or the USB cable to this
port.
LAN / WAN Port
Connect to a wired network or a DSL modem,
a computer, or other device such as a switch
or a hub using the Ethernet cable.
Note:
A wireless network normally requires a network name (SSID) and WPA security key to prevent
unwanted access to the network. This process requires users to have knowledge of WiFi devices
and their congurations. But with WPS enabled, the network name (SSID) and WPA security key of
the devices are automatically congured.
1. PRODUCT OVERVIEW
Internet
ADSL /
Cable Modem
WLAN AP /
Router
Wireless Station
Printer
Game Console
Internet
DSL /
Cable Modem
Wireless Station
Mobile PDA
Wireless Station
Broadband
Router
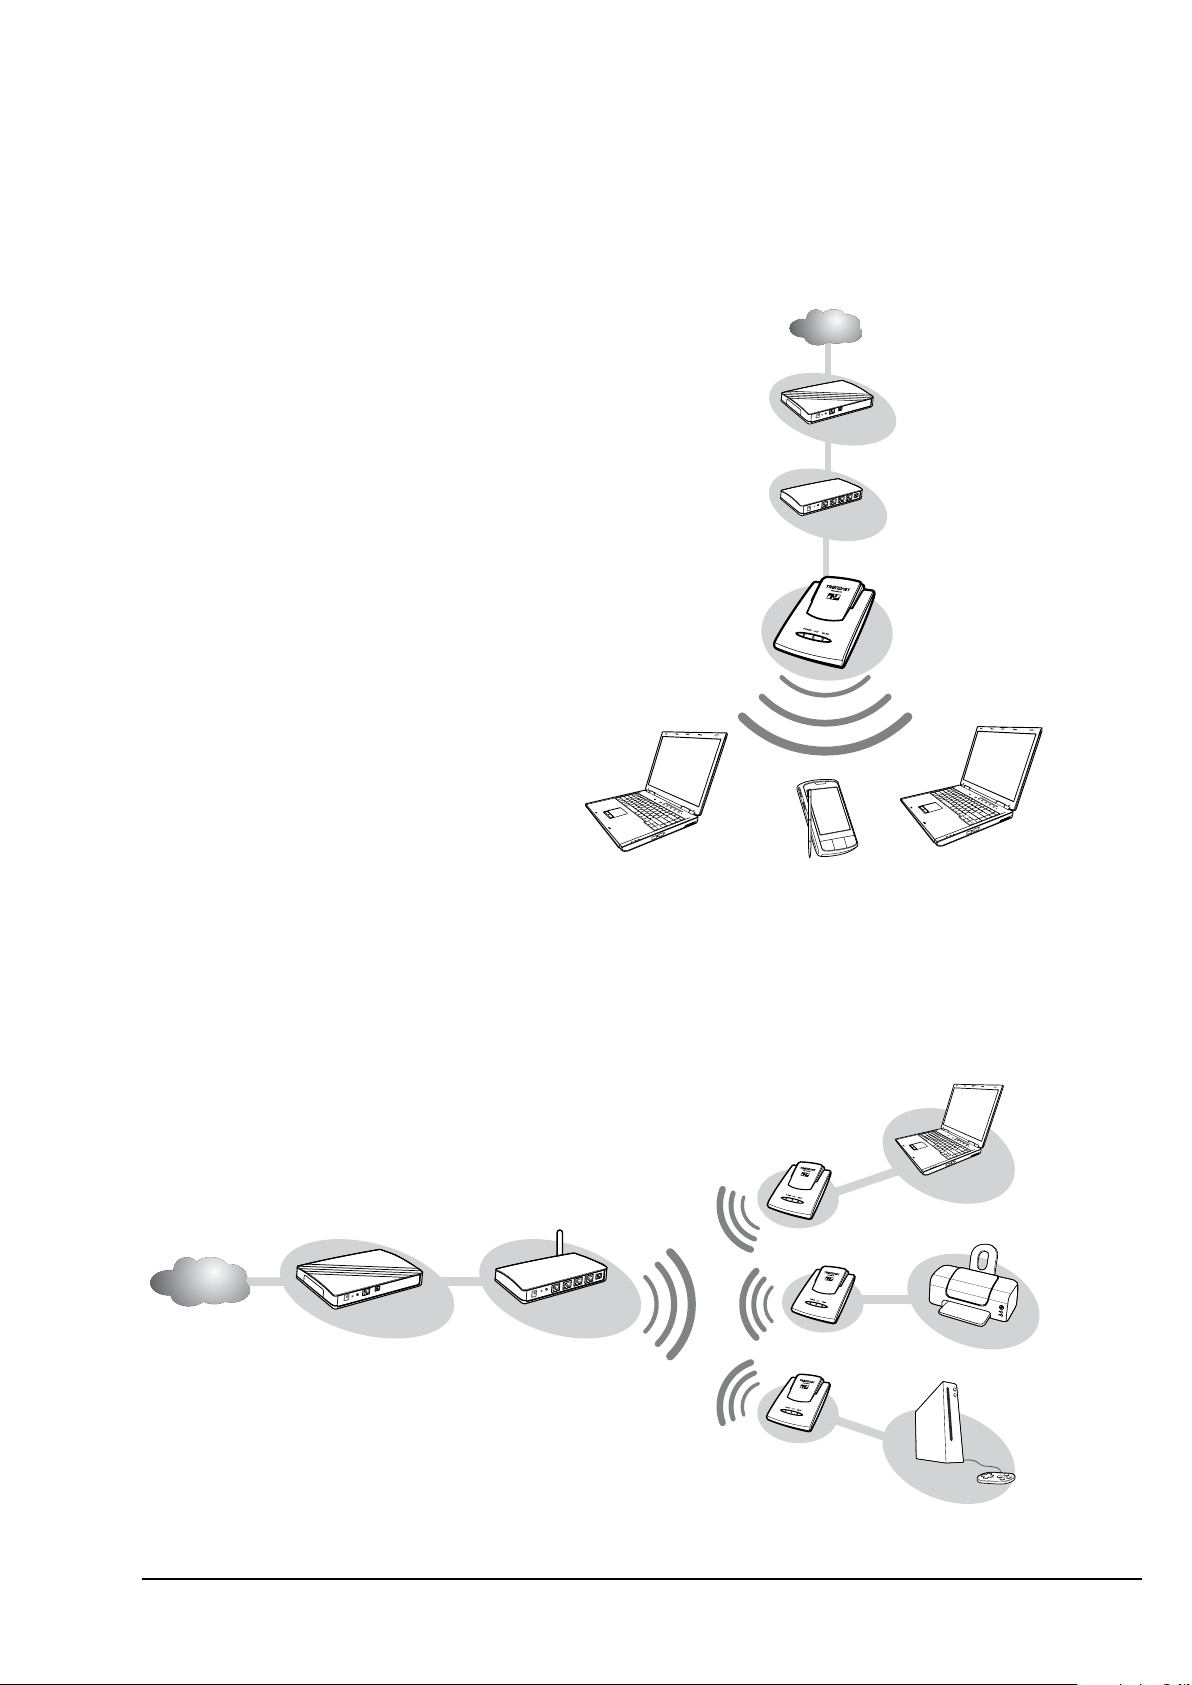
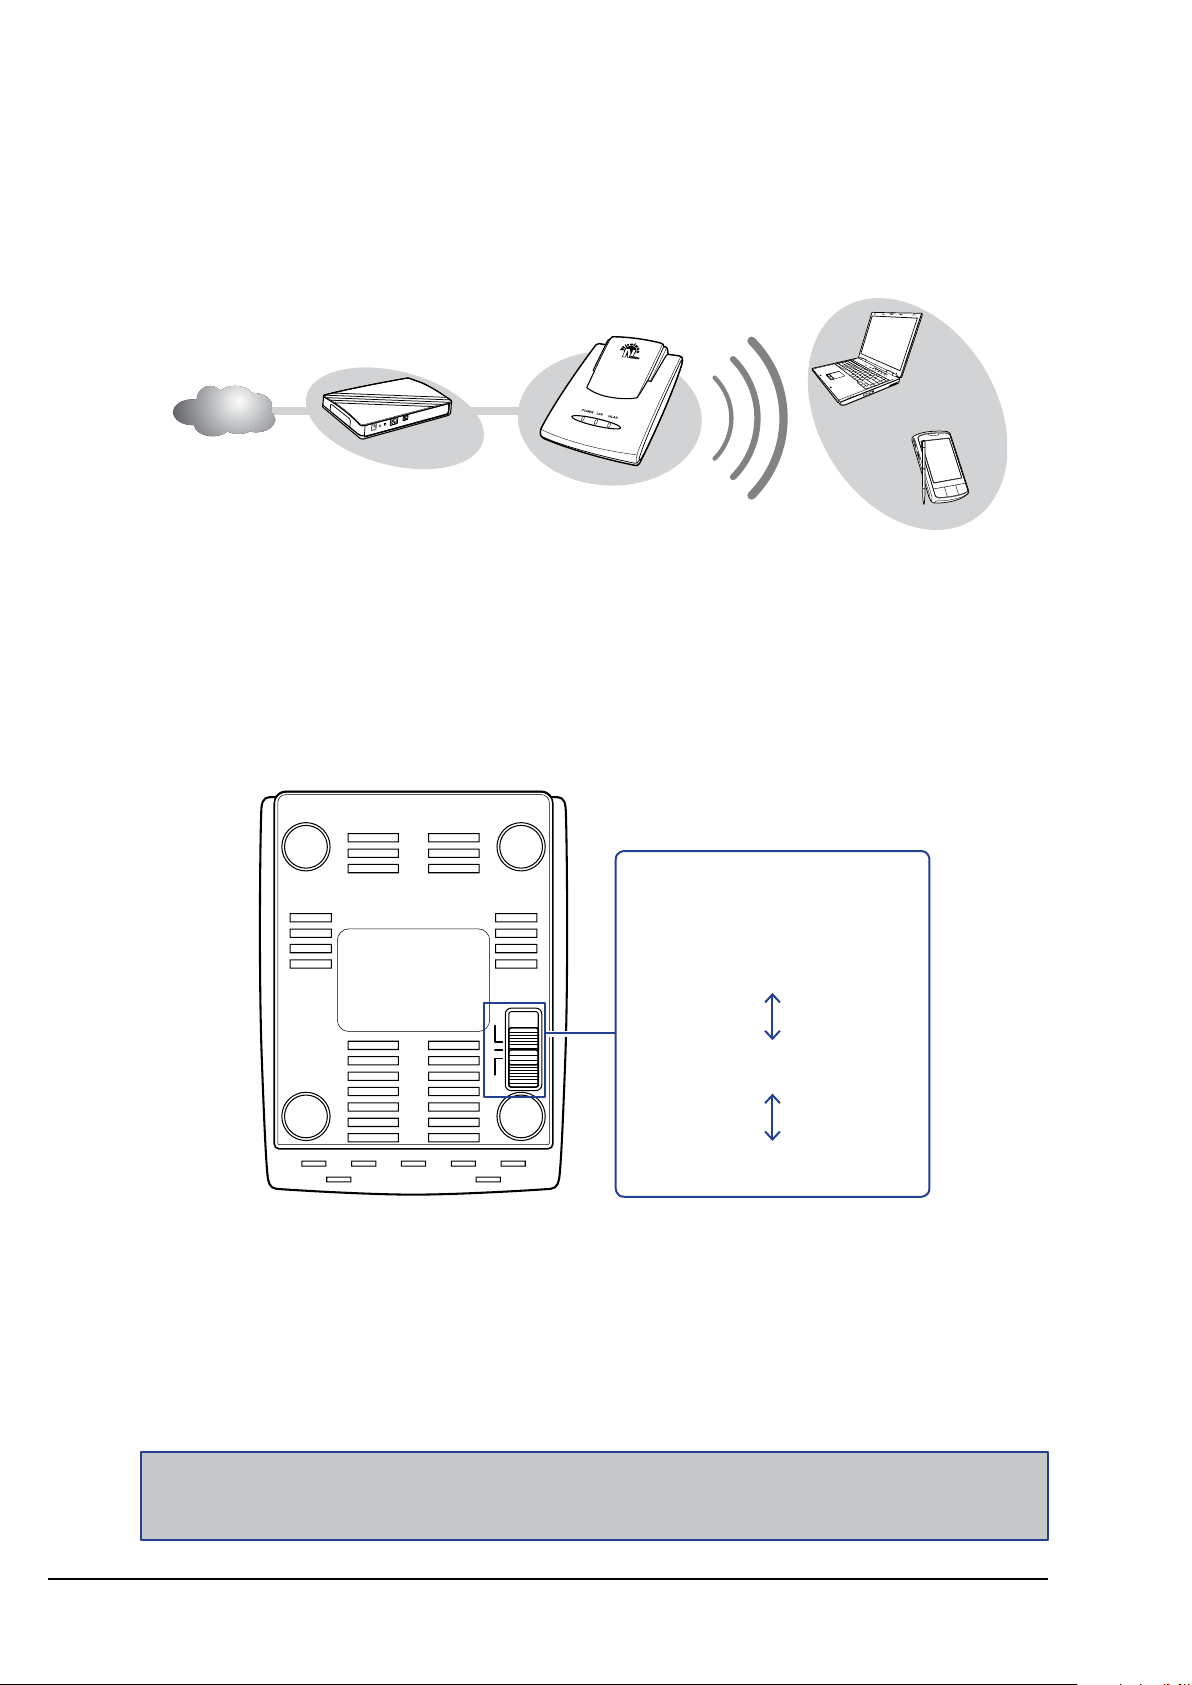
1.4 Travel Router Modes
Before using the travel router, determine the type of mode you want to use:
Access Point (AP) Mode
•
With AP mode, you can use the
travel router as an access point for
wireless clients to connect to the
local area network (LAN) and to
other wireless clients.
Client Mode
•
Switch to this AP-Client mode to connect a device to the travel router using an RJ45 cable and use the travel router as a wireless adapter. This mode enables the
Ethernet-connected device to have wireless function over a network.
Wireless Travel Router 9Wireless Travel Router 9
Wireless Travel Router10 Wireless Travel Router10
1. PRODUCT OVERVIEW
AP RT
Client
Internet
ADSL /
Cable Modem
Wireless Station
Mobile PDA
Router Mode
•
Use this mode to connect the travel router to a DSL or cable modem. With this
mode, wireless clients connect to the Internet through the travel router using one
account and one IP address.
1.4.1 Switching Modes
Use the mode switch at the bottom of the travel router to change modes.
Mode Switch
Adjust the switch to change
modes:
AP
Client
Router
1 Unplug the power source (power adapter or USB cable) if it is connected.
2 Adjust the switch to desired mode.
3 Re-connect the power source to the power port.
Note:
Make sure to unplug the power source from the power port rst before switching modes.
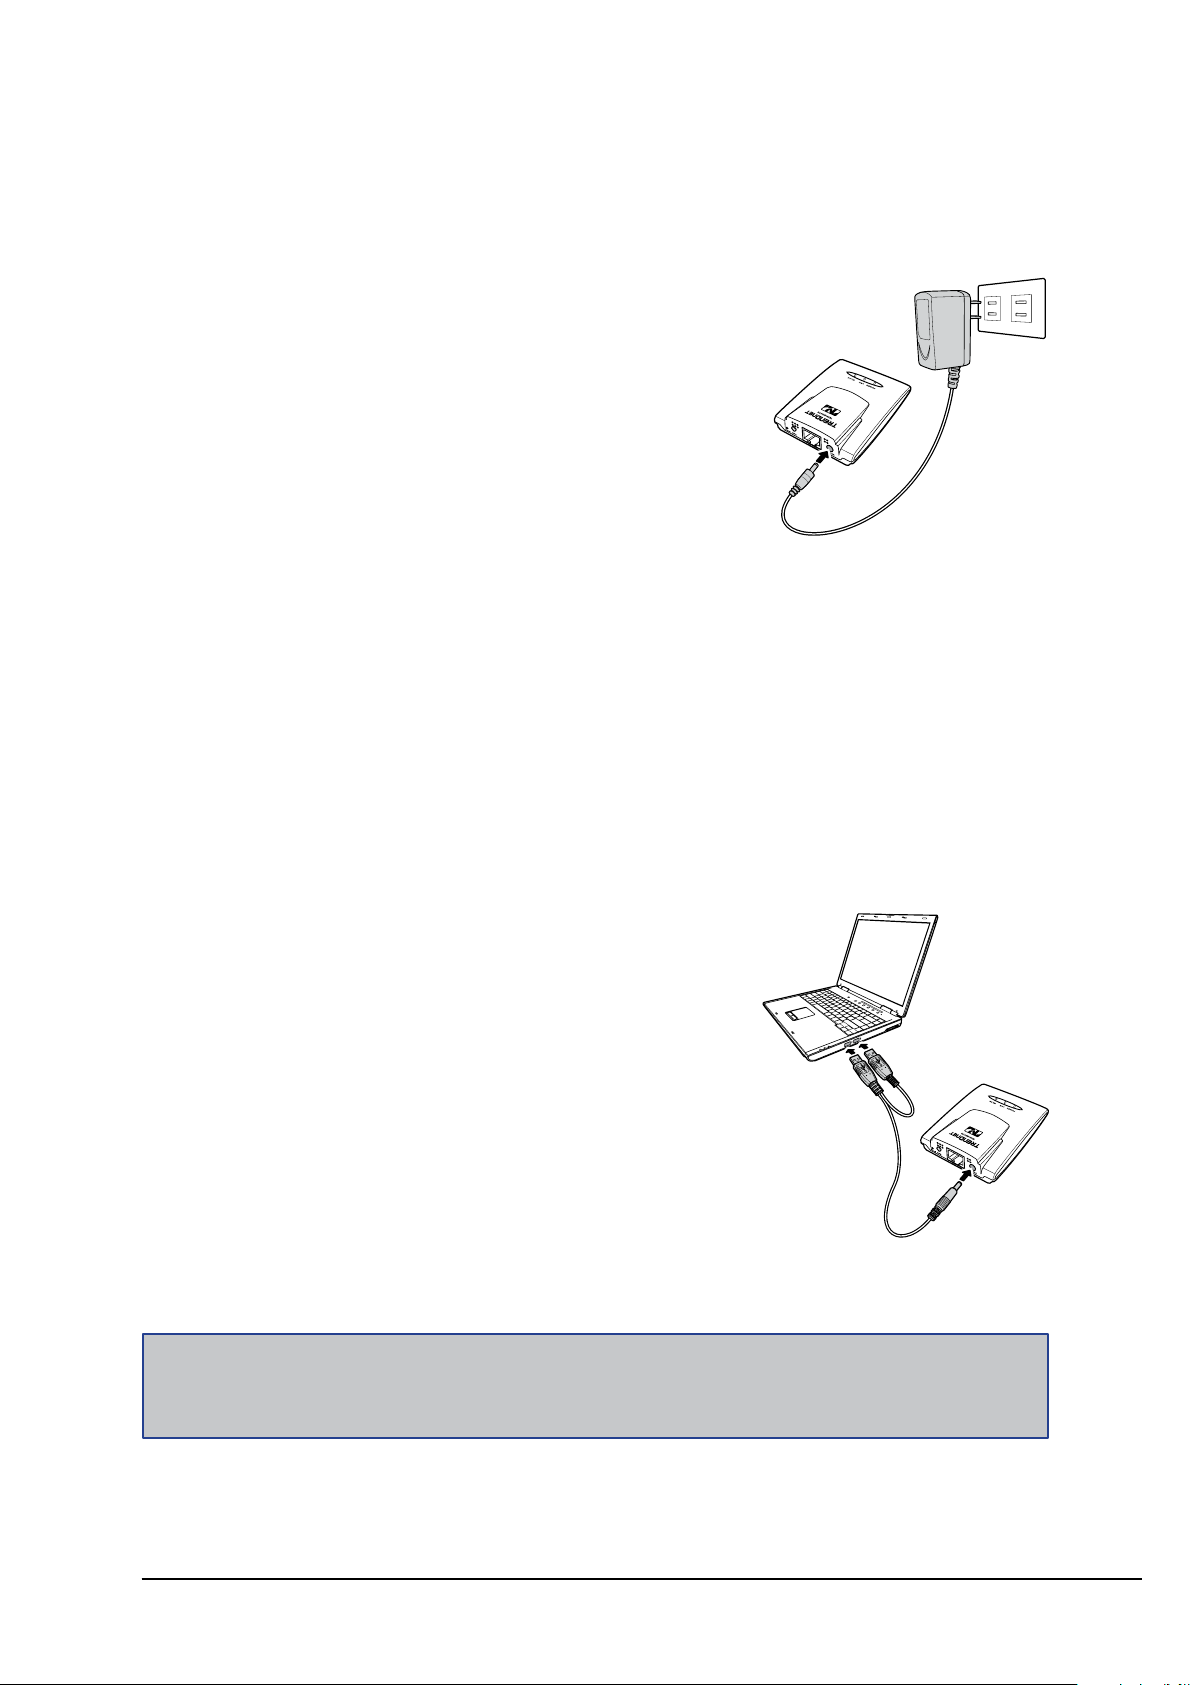
1.5 Making Connections
1.5.1 Connecting the Power Adapter
Use the power adapter to directly connect to a
power outlet.
1 Connect the power adapter to the power
port of the travel router.
2 Plug the power adapter to an outlet or power
strip.
1. PRODUCT OVERVIEW
1.5.2 Connecting the Dual Head USB Cable
Some computers have over-current protection capability. This means that when the
current of a USB port goes over 500mA, the connected device will not be accessed
by the computer. To avoid this risk, use the dual head USB cable supplied with your
travel router.
To connect, follow the steps below:
1 Connect the two heads of the USB cable to
your computer.
2 Plug the other end to the power port of the
travel router.
Note:
Make sure you connect the dual head USB cable to the computer rst before connecting the travel
router.
Wireless Travel Router 11Wireless Travel Router 11
Wireless Travel Router12
1. PRODUCT OVERVIEW
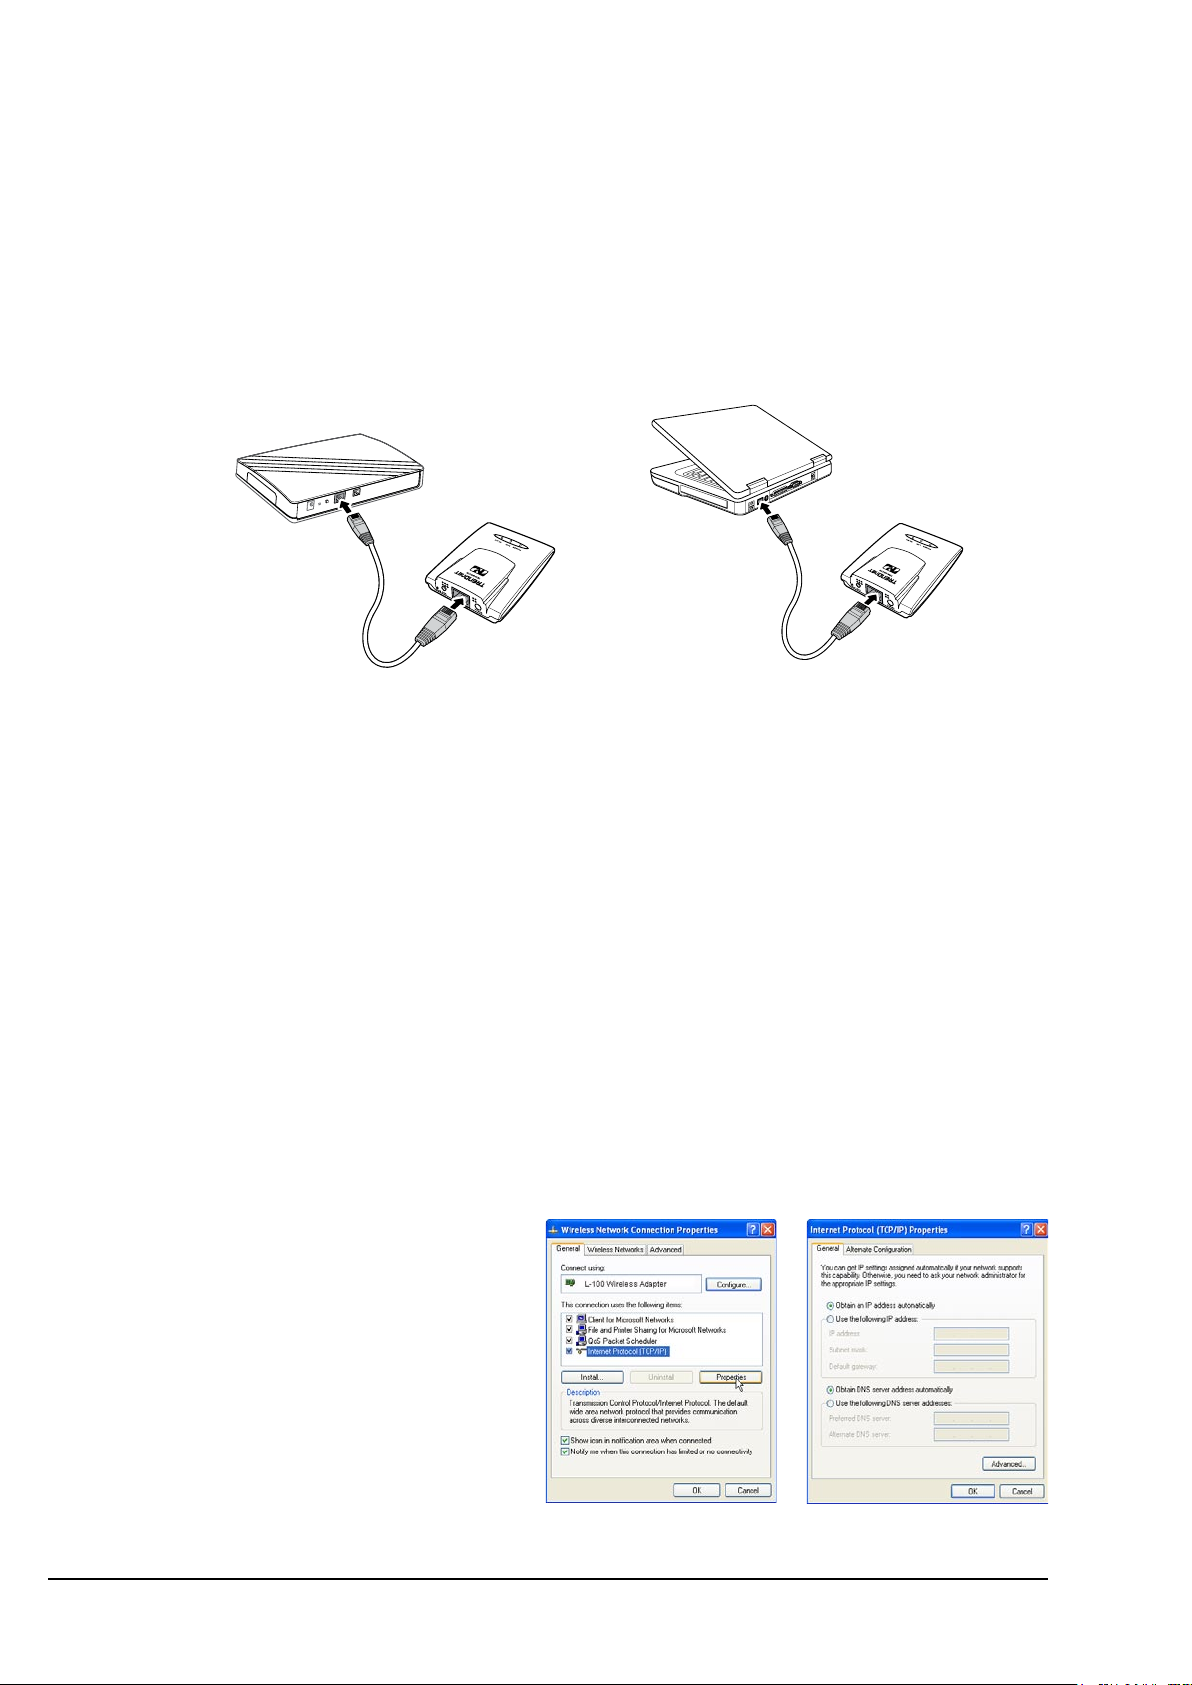
1.5.3 Connecting the Ethernet Cable
Use the Ethernet (RJ-45) cable to connect to a computer for wired connection or
connect to a DSL or cable modem for internet connection.
1 Connect one end of the Ethernet cable to your computer or a DSL or cable
modem.
2 Plug the other end to the LAN port of the travel router.
Cable modem connection Wired computer connection
1.6 System Requirements
Operating systems: Windows XP, Vista
•
Microsoft Internet Explorer 5.5 or higher
•
At least one RJ-45 Ethernet network
•
1.6.1 Conguring Connections
To properly detect the connections, congure your computer’s network settings rst.
The following instructions are based on Windows XP. Non-Windows XP users will
see similar screens.
1 For Windows XP, click Start > Control Panel > Network Connections. Right
click on a connection, then select Properties.
2 Highlight Internet Protocol
(TCP/IP), then click
Properties.
3 Click Obtain an IP address
automatically and Obtain
DNS server address
automatically.
4 Click OK and OK again.
Wireless Travel Router12

AP Mode
With AP mode, you can use the travel router as an access point of your wireless
device.
Before You Begin
Checklist
A valid network or Internet connection.
√
A DSL / cable modem provided by the ISP as part of the broadband connection
√
installation.
2
A broadband router that connects to the DSL / cable modem for internet
√
connection sharing.
You need to connect...
Connect the travel router to your router or network that has a DHCP server. The
•
travel router will obtain an IP address from the network automatically.
Connect the LAN port of the travel router to the LAN port on your network then
•
plug in the power adapter.
Use wireless adapters to connect to the ravel router (default SSID TRENDnet654).
•
Wireless Travel Router 13
Wireless Travel Router14 Wireless Travel Router14
2. AP MODE
Internet
DSL /
Cable Modem
Wireless Station
Mobile PDA
Wireless Station
Broadband
Router
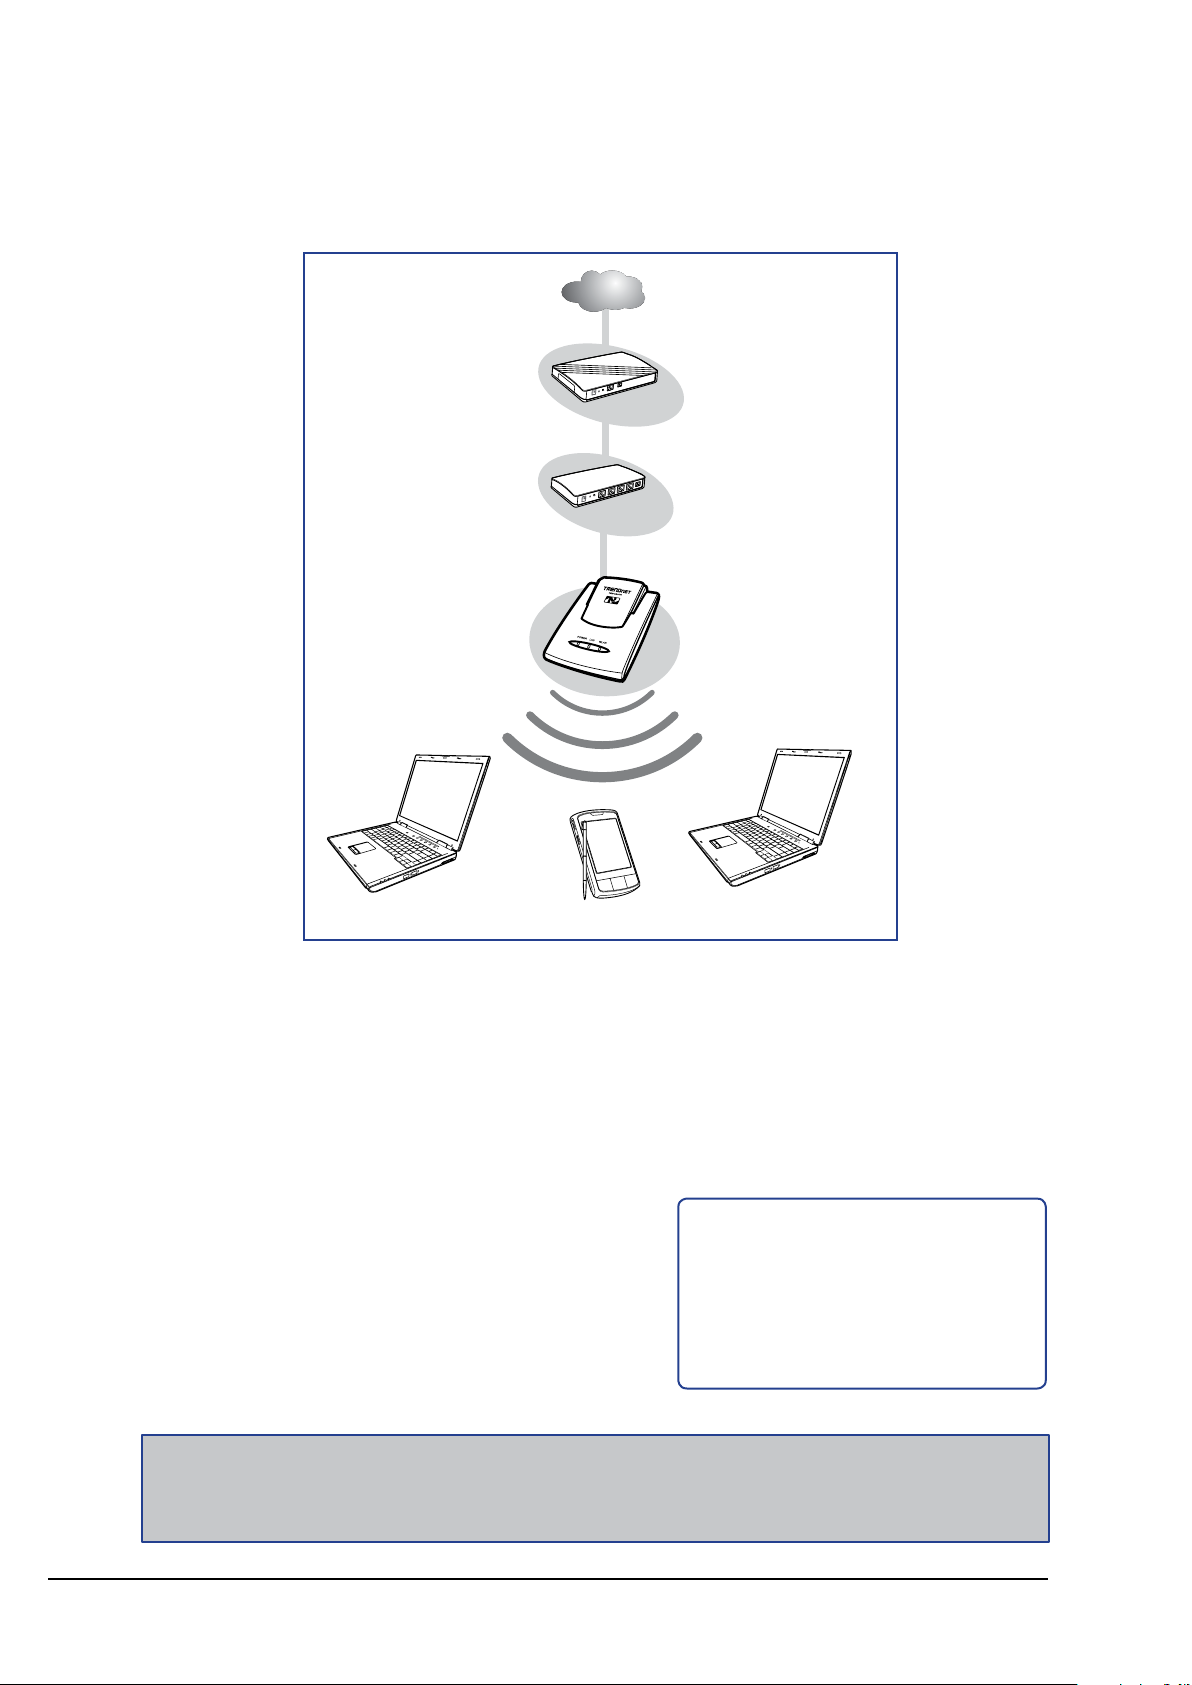
2.1 Installation
Network Diagram
1 Adjust the switch to AP mode.
2 Connect one end of the RJ-45 cable to the travel router and the other end to
the DSL or cable modem.
3 Turn on or plug in the DSL / cable modem and the broadband router.
4 Connect the power adapter to the travel router and plug to an outlet or power
strip. Wait for the travel router to boot.
5 Check the LED indicators to verify
connection.
6 Enable the wireless function of the
wireless clients or devices.
Note:
Make sure you remove the power source from the travel router rst before adjusting the mode
switch.
The following LED
indicators should be lit...
Power LED (solid)
√
LAN LED (solid)
√
 Loading...