

Camec RV Media 043169 Instruction Manual

Instruction Manual
12/24/240V Full HD LED TV/DVD/USB Combo
043169 (22")
Contents
1
Wha t’s in th e Box
TV Co ntrol s
TV In puts an d Outpu ts
Rem ote Con trol
SYS TEM CON NECTI ONS
AV Inp ut
PC In put
HDM I Input
YPb Pr Comp onent I nput
USB I nput
5
6
7
12- 14
8
8
9
9
10
COA XIAL Ou tpu t
10
OSD M ENU OPE RATION
Pic ture
Sou nd
Cha nnel
Fea ture
Set up
EPG
MED IA OPER ATION
Pho to
Mus ic
Moc ie
E-B ook
Bui lt-in D VD Play er Oper ation
16- 17
18- 19
20- 24
25- 27
28- 29
30- 33
38- 39
40- 42
43
43
44- 49
PVR
33
Cle aning a nd Main tenan ce
Trou blesh ootin g
50
51- 52
53
Spe cific ation s
Ant enna Co nnect ion
11
Imp ortan t Safet y Instr uctio ns
Sou rce Sel ectio n
15
Aut o Insta llati on
34- 37
Stand mount guide
7

Important Safety Instructions
Important Safety Instructions (cont)
reference, along with the warranty card, purchase receipt and carton. The safety
correctly adhered to.
• Before installing this TV set, make sure your outlet voltage corresponds to the
voltage stated on the appliance rating label of the power adaptor being used..
• Do not overload the power outlet.
• CAUTION
the power supply cord, plug and antenna cable to rain or moisture; do not use it
anywhere near water; do not touch the power plug with wet hands.
• Do not let the cord hang over the edge of a table or counter, or touch hot surfaces.
• Do not allow anything to rest on or roll over the power cord and antenna cable.
Protect the cord and run all cables so that no one steps on or trips over them.
• Do not run the cord near heat-producing appliances such as radiators, stoves or
irons. The excessive heat could melt the insulation and expose live wires.
• Only use this TV with the power adaptors supplied. If either plug does not
fit into your outlets, consult your dealer or an RV service center for
• When not in use, disconnect the power cord from the outlet. Hold the plug, not
the cord, when disconnecting the unit. Pulling the cord can damage the internal
wires and may cause a fire.
• Never touch the TV screen, antenna or cord during thunderstorms. Stop use
during thunderstorms; unplug the unit when a thunderstorm is approaching.
Position
• If a television is not positioned in a sufficiently stable location, when stand
mounted, it can potentially be hazardous if it falls. Many injuries, particularly to
children, can be avoided by taking simple precautions such as:
• Using cabinets, shelves or stands that provide a sturdy support for the TV and are
not in areas where the TV can be accidently knocked or bumped .
• Only using furniture that can safely support the television.
• Ensuring the TV is not overhanging the edge of the supporting furniture.
• Not placing the TV on tall furniture (for example, cupboards or bookcases)
without anchoring both the furniture and the TV to a suitable support.
• Educating children about the dangers of climbing up to reach the TV controls.
• Not standing the TV on cloth or other materials placed between the TV and
supporting furniture.
Usage conditions and restrictions
• Follow the instructions in this manual when installing and adjusting the TV set.
Only adjust those controls that are covered in this instruction manual; improper
adjustment of other controls may result in damage. If this happens, unplug the TV
and have it serviced by appropriately qualified personnel.
• Do not change or modify the TV set in any way. Only use the attachments/
accessories specified.
• Do not cover the ventilation openings with items such as newspapers, tablecloths,
curtains etc., as this could impede ventilation.
• Do not insert any objects of any kind into this unit through the ventilation slots or
DVD slot, as they could touch the current-carrying parts or short-circuit parts,
resulting in fire, electric shock or damage to the unit.
• Do not touch the screen with fingers, as this may scratch or smudge the TV screen.
• Do not expose the batteries to excessive heat such as sunshine, fire or the like.
• Unplug the TV set in all of the following circumstances:
• If it has been subject to impact or has been dropped and is damaged.
• If its voltage adaptor plugs, or the wall socket, are damaged.
• The appliance is not intended for use by persons (including children) with reduced
physical, sensory or mental capabilities, or lack of experience and knowledge,
unless they have been given supervision or instruction concerning use of the
appliance by a person responsible for their safety.
• Young children should be supervised to ensure they do not play with the TV.
2 3
56cm (22")
Full H D LED TV
Part N umber : 04316 9
INPU T DC 12V Ma x 3A 36W
June 2 015
4 5
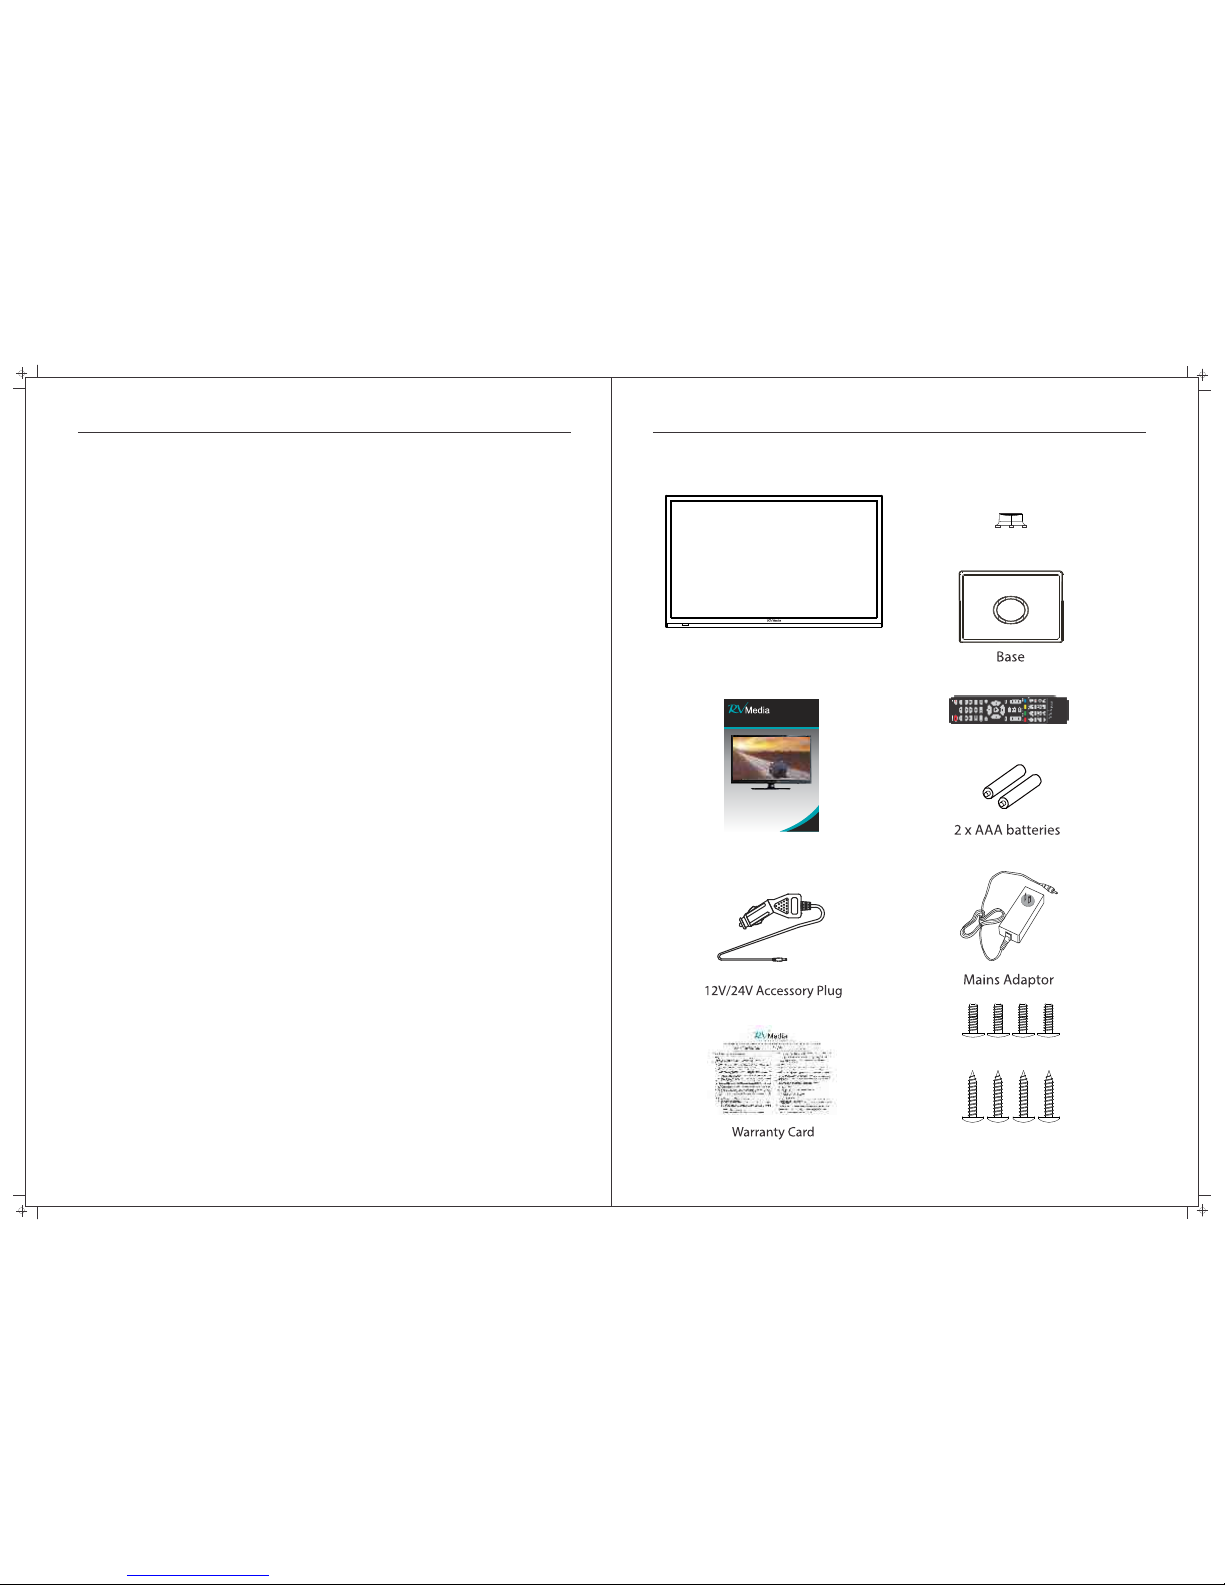
What’s in the Box
22" TV wi th in built D VD Pl ay er
Manua l
• When deciding where to put the TV set, make sure the location is:
• Well ventilated. Leave at least a 20cm space all around the TV set for good
ventilation.
• Protected from overheating and away from direct sunlight.
• Away from damp and cold.
• Away from areas with extremes of temperature (below 0°C or exceeding 40°C)
or moisture.
• Away from moisture drips or splashes.
• Protected from excessive dust.
• Do not install this equipment in a confined space such as a bookcase or similar.
• Do not put any objects filled with liquids, such as vases, on top of the TV set.
• Do not place any naked flame sources, such as lighted candles, on top of the TV.
Important Safety Instructions (cont)
Instr uctio n Manua l
12/24/240V FHD LED TV/DVD/USB Combo
043169(22 ")
Colum n bra cket
4 Screw s
Remot e Contr ol
4 Screw s

TV Controls
TV Controls
76
100 100
1. VO L(+) - Th is butt on incr eases t he TV’s vo lume. I f the OSD m enu is ac tive, p ressi ng this b utton w ill
mov e the sel ectio n to the ri ght.
2. VO L(-) - Th is butt on decr eases t he TV’s vo lume. I f the On Sc reen Di splay (OSD) m enu is ac tive,
pre ssing t his but ton wil l move th e selec tion to t he left .
3. CH (+) - Thi s butto n perfo rms the c hanne l up func tion. I f the OSD m enu is ac tive, t his but ton fun ction s
as up c ontro l for the m enu.
4. CH (-) - Thi s butto n perfo rms the c hanne l down fu nctio n. If the O SD menu i s activ e, this b utton
fun ction s as down c ontro l for the m enu.
6. ME NU - This b utton a ctiva tes the O SD menu . If a sub- menu is a ctive , press ing thi s butto n will re turn
the s elect ion to th e previ ous men u level .
5. SO URCE - Th is butt on swit ches be tween a ll the di fferen t sourc es of the T V. Whe n the OSD i s activ e,
thi s butto n acts as t he ente r butto n and con firms t he menu s elect ion.
7. Aft er you lo ad a disc , press t o play th e disc, a nd pres s twice t o pause .
8. Pr ess the b utton w hen the p ower is o n the dis c will ej ect, Pr ess the b utton a gain to l oad the
dis c autom atica lly.
9. PO WER( ) - Tur n on the TV b y press ing the b utton o nce. Pr ess the b utton a gain to t urn off th e TV.
Stand mount guide
1. PO WER: (D C 12V) in put
2. Earph one out: Output for headphones or head units such as RV Media Head Units with TV input.
3. AV In put s: Co mpo sit e Vid eo & Aud io (A /V) i n.
4. PC A udi o Inp ut: C onn ect t o the a udi o out put j ack o n a com put er.
5. VG A Inp ut: C onn ect t o a com put er ’s VG A outp ut ja ck.
6. HD MI Inpu t: HDMI i n.
7. CO AXIAL O ut: D igi tal Au dio o utp ut fo r Sur rou nd So und a mpl ifi ers a nd ot her d evi ces .
8. RF I nput: C onnec t to an ext ernal a ntenn a to rece ive ATV/D TV TV s ign als
in ATV /DTV mo des.
9. US B: USB/ Multi media i nput.
10. Y /Pb /Pr I npu t: Co mpo nen t Vid eo in .
Rear Bottom
Rear Side
1 2 3 5 64
DC 12V
EARPH ONE
OUT
VIDEO RL
VGA
HDMI
PC
AUDIO
IN
RF
IN
USB
9
COAXI AL
OUT
Y PrPb
8 107
IN
IN
TV Inputs & Outputs
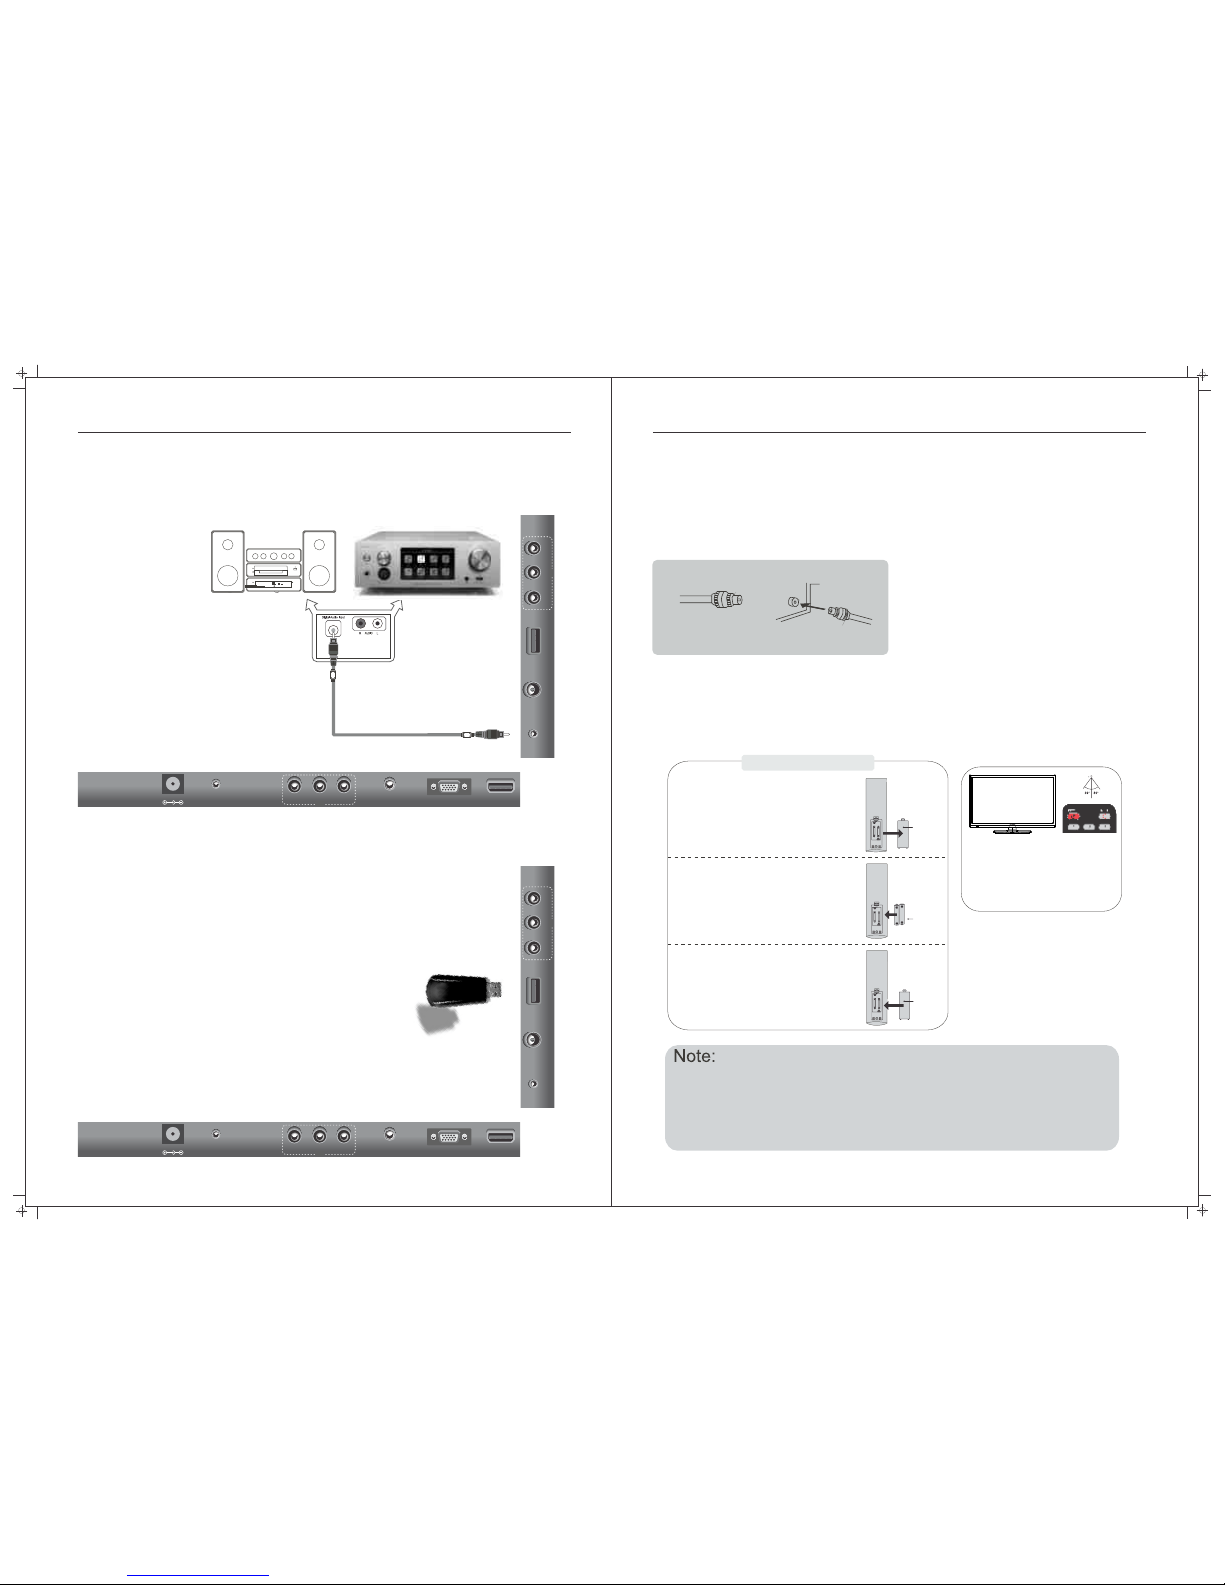
Screws
Screw hole A
Screw hole B
Instructions:
1. Place the TV unit on a flat and clean surface.
2. Attach stand mount using 4 screws through holes B into A.
3. Place the base on to the mount with the supplied screws
through holes D into C.
Screws
Screw hole C
Screw hole D
four
8 9
System Connection
System Connection
NOTE: Ple ase, make sure the inp uts and output s have firm connec tions be fore
con necti ng powe r.
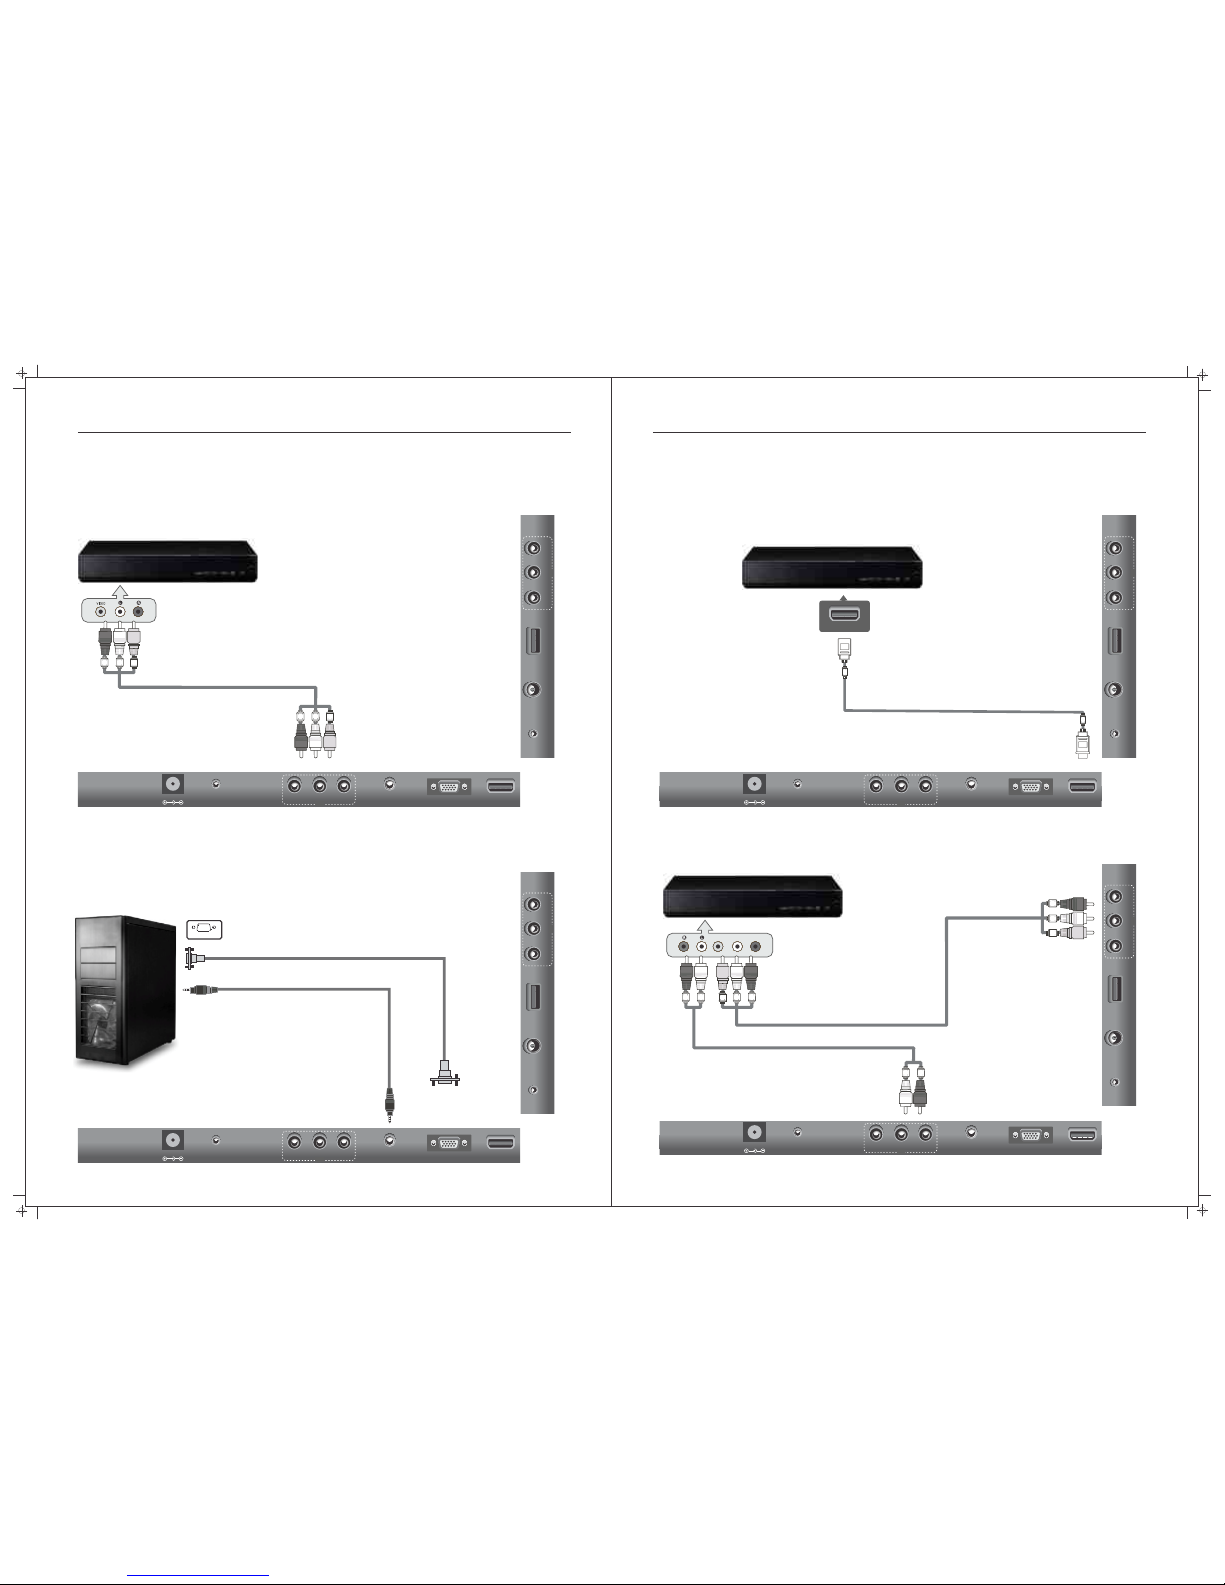
1. COMP OSI TE A/ V INP UT
Aud io/vi deo inp ut: Use t he SOUR CE butt on to sel ect AV on the r emo te co ntr ol.
VGA OUTPUT
PC AUDI O
OUT PUT
VGA OU TPUT
2. PC INP UT
PC in put: Us e the SOU RCE but ton on th e remot e contr ol to sel ect PC.
Video Cable Red/White/Yellow (Not supplied)
3. HDMI I NPU T
HDM I input : Use the S OURCE b utton o n the rem ote con trol to s elect H DMI.
Source eg. Blu-ray, DVD, Satellite, camcorder etc
HDMI 1
4. YPbP r COM PON ENT I NPU T
Vid eo co mpo nen t inp ut: U se th e SOU RCE b utt on on t he re mot e con tro l to se lec t YPb Pr.
Thi s input c onsis ts of bot h Video ( Gre en/ Blu e/R ed) a nd Aud io (R ed/ Whi te)
Y
Pb
Pr
RF
IN
USB
COAXI AL
OUT
Y PrPb
IN
DC 12V
EARPH ONE
OUT
VIDEO RL
VGA
HDMI
PC
AUDIO
IN
IN
RF
IN
USB
COAXI AL
OUT
Y PrPb
IN
DC 12V
EARPH ONE
OUT
VIDEO RL
VGA
HDMI
PC
AUDIO
IN
IN
RF
IN
USB
COAXI AL
OUT
Y PrPb
IN
DC 12V
EARPH ONE
OUT
VIDEO RL
VGA
HDMI
PC
AUDIO
IN
IN
RF
IN
USB
COAXI AL
OUT
Y PrPb
IN
DC 12V
EARPH ONE
OUT
VIDEO RL
VGA
HDMI
PC
AUDIO
IN
IN
11
System Connection
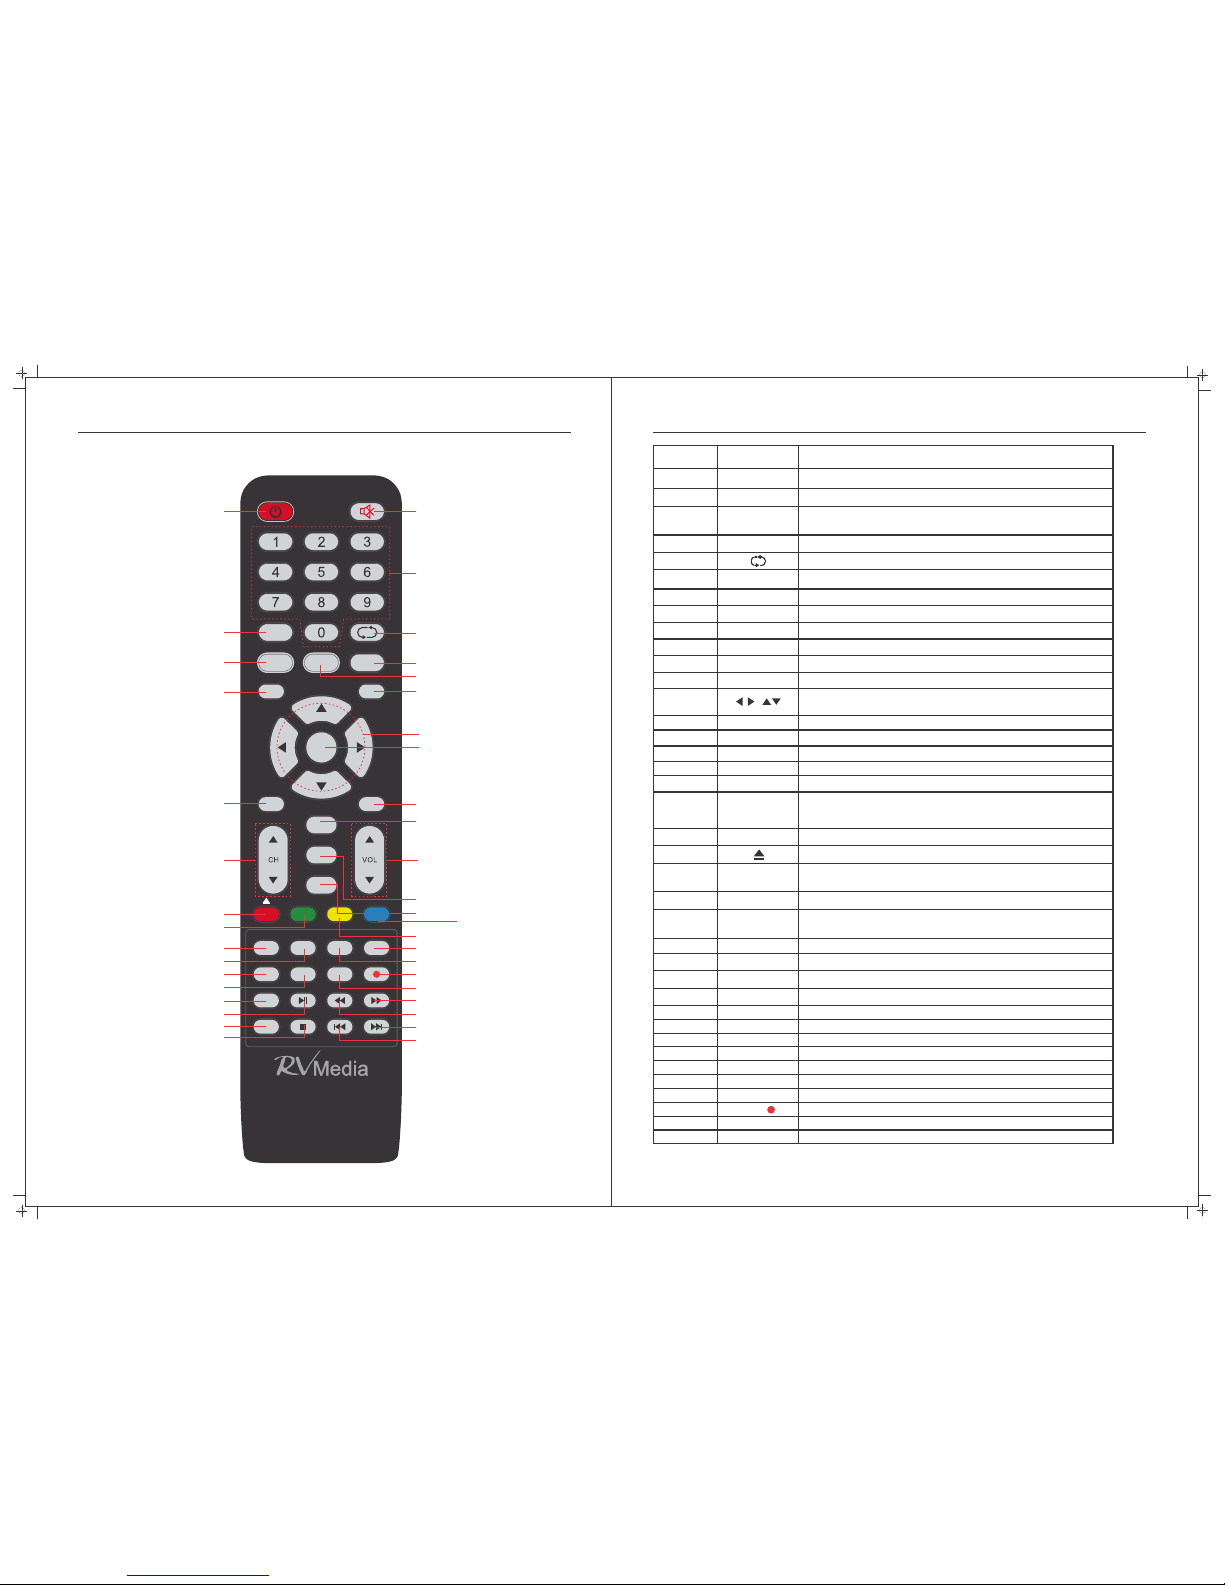
Remote Control
7. Antenna connection
Antenna input impedance of this unit is 75ohm. VHF/UHF 75ohm coaxial cable can be
connected to the antenna jack directly.
75ohm coaxial cable
Antenna cable
Antenna lead with 75 ohm male PAL Connector
- Batte rie s shoul d not b e expos ed to e xcess ive h ea t suc h as di re ct
sunli ght , fire or t he li ke.
- If not be ing u sed for a p eri od of tim e, pl ease re mov e the bat ter ie s
from th e rem ote in ca se of l eakag e.
- Do not mi x old & n ew batt eri es toge the r.
Installing Batteries
1
Open the battery compartment
cover on the back of the remote.
2
Insert two 1.5V AAA size batteries
using the correct polarity as shown.
Don’t mix old or used batteries with.
3
Replace the cover.
Battery
Cover
2 x size AAA 1.5V
Battery
Cover
System Connection
new ones..
To use th e remot e contr ol, poi nt
it to wards t he remo te sens or at
the f ront of t he tele visio n. The
rem ote con trol ha s a range o f up
to ap proxi matel y seven m eters
fro m the TV at an a ngle of u p to
60 de grees .
5. CO AXIAL O UTP UT
All ows c onn ect ion o f Digi tal aud io sy ste ms an d Surr ound So und .
6. US B INPUT
Use t he SO URC E but ton o n the re mote co ntr oll er to s elec t Media .
USB m emory
COAXIAL Cable (Not supplied)
COAXIAL
10
RF
IN
USB
COAXI AL
OUT
Y PrPb
IN
DC 12V
EARPH ONE
OUT
VIDEO RL
VGA
HDMI
PC
AUDIO
IN
IN
RF
IN
USB
COAXI AL
OUT
Y PrPb
IN
DC 12V
EARPH ONE
OUT
VIDEO RL
VGA
HDMI
PC
AUDIO
IN
IN
12 13
Remote-Control Unit
P.MODE
S.MO DE
AUTO
DIS PLAY
SOU RCE
EXIT
MENU
AUDI O
REC. MENU
POWE R MUTE
FAV EPG
HOLD
SUBT ITLE
INDE X
REVE AL TEXT
SUBPA GE
SIZE
REC
OK
QT
TIME S HIFT
ASPE CT
TV/R ADIO
CANC EL
MIX
D.ME NU SETU P D.DISP
A-B
REPE AT
I/I I
SLEE P
1
4
6
11
15
9
21/25
22/26
29
30
33
37
41
34
38/45
42/48
16
2
3
5
8
7
10
13
14
12
17
18/19
20
24/28
23/27
32
31
36
35
40/47
39/46
44/50
43/49
All ows you to n avigat e the on‐ scree n menus a nd adju st the
syst em setti ngs to yo ur prefe rence.
Pre ss thes e two butt ons to in crease /decr ease th e volum e.
Pre ss to chan ge the DT V or DVD au dio lan guage.
No. B utt on Des cript ion
POW ER
Turns t he TV on o r off to sta ndby mod e.
1
2
MUT E
Pre ss to mute t he soun d. Pres s again to r egain so und.
0‐9
Pre ss 0‐9 to se lect a TV c hanne l direc tly. The ca nnel wi ll
cha nge afte r 2 secon ds.
3
4
5
Return to the previously viewed program.
6
7
AUTO
8
9
P.MODE
10
S.M ODE
11
12
Sel ect the p icture m ode.
Sel ect the s ound mo de.
EXI T
MEN U
Exi t from the c urren t menu or s ub‐me nu.
All ows you to n avigat e the on sc reen me nus (OS D).
13
14
OK
Sel ect the o ption .
15
16
VOL +/‐
CH+ /‐
Pre ss thes e two butt ons to ch ange cha nnels u p/dow n.
AUD IO
17
18
ASP ECT
Pre ss this b utton to s elect t he aspe ct ratio o f the scr een.
20
DIS PLAY
Pre ss to disp lay the s ource a nd chan nel info .
25
26
27
28
Use fo r adjus tment s in PC mod e.
Del ete func tion bu tton.
Rena me func tion bu tton.
Mov e funct ion butt on.
Ski p funct ion but ton.
R (D ELETE )
G (R ENAME )
Y (M OVE)
B (S KIP)
29
FAV
Sel ects fav orite c hanne l(s).
30
TEX T
Swi tch on/o ff of Telete xt wind ow.
31
32
33
34
35
36
SUB TITLE
Press to select the subtitle language.
IND EX
Retu rns to In dex pag e by Teletex t.
REV EAL
Sho ws hidd en words o r pages b y Tele text.
EPG
Pre ss to disp lay EPG ( Elect ronic P rogram G uide) .
SOU RCE
Pre ss to sele ct sign al the so urce for t he TV.
QT
Eje ct/in sert di sc.
D.ME NU
Qui ck Teletex t naviga tion or s etup se tting s / DVD: Vid eo
DVD M enu but ton.
SET UP
DVD s ystem se tup.
D.DI SP
Qui ck navig ation d uring Tel etext or s etup se tting s / DVD: DVD
Info rmati on butt on.
TIM E SHIFT
Pre ss to swit ch to TIM E SHIFT m ode.
SLE EP
Set t he delay t ime for t he TV to tu rn off aut omati cally.
Pre ss to reco rd the pro gram im mediat ely.
REC /
37
38
TV/R ADIO
Press to switch between DTV and radio programs
21
22
23
24
Qui ck Tune. Qu ick TV Ch annel A utotu ne Butt on.
I/I I
19
Sel ect NIC AM audi o mode.
Onl y be avail able fo r TV progr ammers w ith NIC AM tran smiss ion,
and d efault m ode is mo no.
REC .MENU
Pre ss to swit ch to REC. MENU im media tely (D TV only ).

14 15
OSD Menu Operation
Pre ss SOUR CE butt on to dis play th e input s ource l ist.
Pre ss the ▼/ ▲ butto ns to sel ect the i nput so urce yo u want
to wa tch,
Pre ss the OK b utton t o selec t the inp ut sour ce.
Sourc e Se lecti on
No. B utt on Des cript ion
42
45
46
47
48
49
50
SIZ E
Zoo m In or Out o f the Telete xt wind ow.
Play a nd Paus e Media ‐Playe r / DVD.
Sto ps playb ack Med ia‐Pl ayer and D VD.
Fast R ewind Me dia‐P layer a nd DVD.
Fast F orward M edia‐ Playe r and DVD.
Play s the pre vious M edia Pl ayer or DV D file/c hapte r.
Play s the nex t Media P layer or D VD file /chapt er..
Hol ds on the c urrent Tel etext p age.
HOL D
Dis plays a su p‐pag e of uppe r Tele text opt ions.
SUB PAGE
MIX
Set s the tran spare ncy of Tele text win dow.
DVD : Repeat m ode sel ectio n.
REP EAT
40
41
43
44
39 CAN CEL
Swi tches th e Teletex t windo w to the bac kgrou nd; onl y the
cur rent pag e no is vis ible.
Pre ss MENU b utton t o displ ay the MA IN OSD ME NU.
Pre ss ▼/▲ butt ons to se lect th e sub MEN U that yo u want.
Pre ss ENTE R butto n or but ton to en ter the s ub menu , and pre ss but ton to re turn ba ck ► ◄
to th e previ ous men u.
Pre ss ▼/▲ butt ons to se lect an o ption i n the sub menu an d then pr ess ENT ER butt on or ►
but ton to se lect th e opt ion. Pr ess but tons to ad just t he valu e or pres s ▼/▲ but tons to ◄ / ►
sel ect dro p down op tion s.
You ca n pre ss ME NU bu tto n to sa ve an d ret urn b ack t o the p rev iou s men u, an d pre ss
EXI T but ton to ex it the en tire me nu.s
Input
DTV
ATV
AV
YPbPr
HDMI
PC
Media
DVD
Main Me nu
 Loading...