

Cambro CAMSHELVING CSFLEXMERCH Owner's Manual

OWNER’S
MANUAL
CAMSHELVING® FLEX STATION MERCHANDISER
PRODUCT CODE: CSFLEXMERCH
DIMENSIONS:
Side Panel: W 23" x H 56"
Header : L 48" x H 8"
Overall unit height when installed: 75 3/4"
B
A
Premium Series Flex Station shown
with Optional Food S torage Boxe s.
IMPORTAN T! BEFORE INSTALLING SIDE PA NEL S:
Ensure your Flex Station is completely set up with all divider bars installed in place for service with food pans/food boxes.
Once panels are attached, there is VERY limited access to be able to properly install or move divider bars on each side/end.
C
D
Parts Checklist:
❏ A Fully Assembled Flex Station
❏ B Header with Aluminum Base Frame
❏ C Side Panel with Menu/Info Holder
❏ D Side Panel
❏ E Zip Ties (2) for Header Base Frame
Needed: Scissors or Cutting Pliers
E
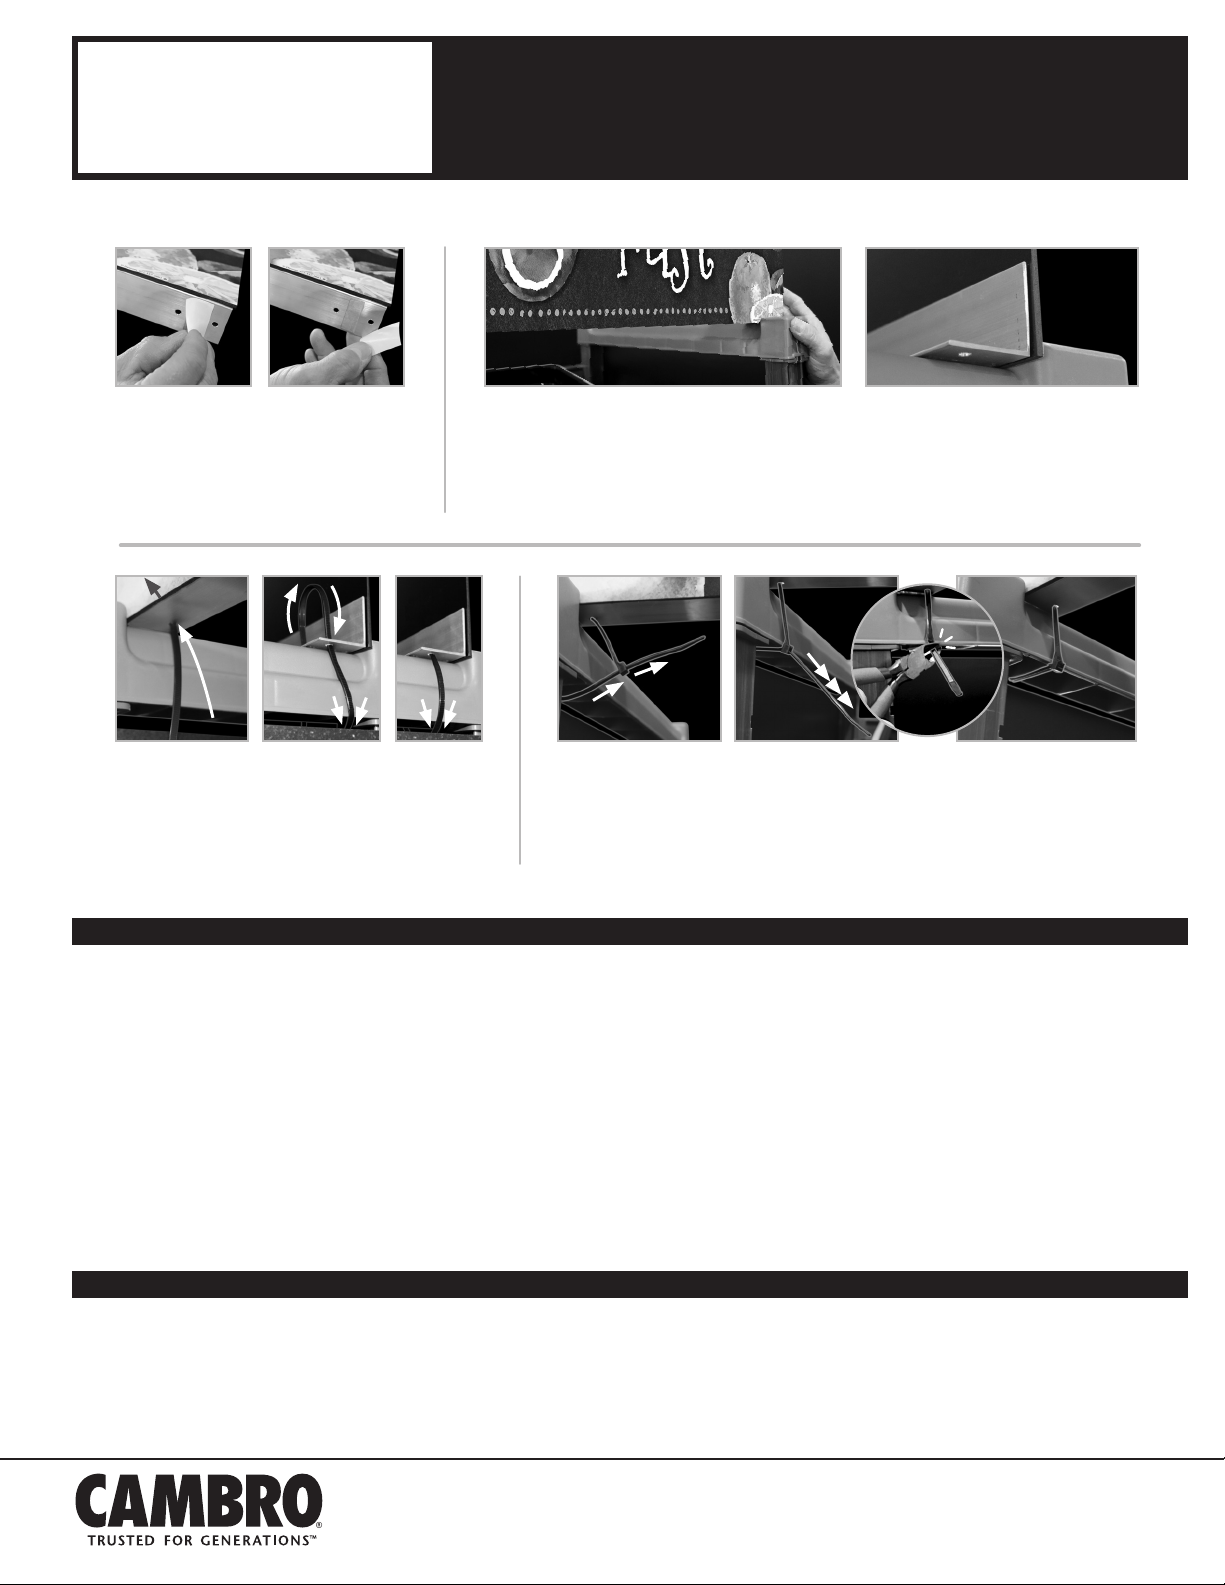
A. SIDE PANEL INSTALLATION
STEP 1
Remove the backIng paper from the
adhesive strip at each of the top
corners of the side panel (C/D).
Telephone 714 848 1555 Toll Free 800 854 7631 Customer Service 800 833 3003
© Cambro Manufacturing Company 5801 Skylab Road, Huntington Beach, California 92647-2056
Printed in USA 08 /18
STEP 2
Carefully set top corners into a straight
position directly under the post
connectors and in a straight line down
each post then press firmly in place.
STEP 3
Remove the rest
of the backing papers and firmly press
both sides, from top to bottom.
Repeat 1-3 for the other side panel.
Page 1
UMCSFLEX
D0718123
OWNER’S
MANUAL
B. HEADER PANEL INSTALLATION
CAMSHELVING® FLEX STATION MERCHANDISER
STEP 1
Remove all adhesive backing paper
from the Header Metal Base.
STEP 3
Thread 1 zip tie up through the inside hole, out
over the post connector, down into the outer hole
and tuck it back in above the side panel.
Care and Cleaning
The Flex Station Merchandiser Panels are designed to withstand normal wear and tear from regular use. Each
panel has a protective, clear laminate top layer to protect graphics from dust, food debris, and also incidental
marks from regular use. It will not withstand damage from ex treme contact with hard or sharp surfaces. It is
possible that ink marks, including Sharpie, may be removed with a standard commercial cleaner. The panels
will tolerate moisture and rain exposure but on a limited basis. Fading due to sunlight is possible over time. It
is not recommended to store Flex Station with Merchandiser in coolers or freezers.
STEP 2
Position Header Metal Base on top front of the Flex Station, moving it all the way forward
to rest firmly against the back of the post connector tops. IMPORTANT! Before pressing
down into place, there are 2 holes on each end of the Metal Base - 1 should be on the
outside of the post connector and one should be on the inside.
STEP 4
Thread the zip tie into the open end and pull tight. Repeat 1-4 for the other end
of the Header Metal Base. Check the Header position for any movement and
tighten the zip ties if necessary. Once secured into place, snip off excess zip tie
ends with scissors or cutting pliers.
To clean, use a sof t, dry cloth for dusting, or a soft damp cloth and soapy water for more extensive cleaning.
Commercial products can be used for heavy dut y cleaning but do not use solvent based products like acetone.
Panels should never be pressure washed. Panels can be removed for complete cleaning but it is not advised.
Remove adhesive on unit with standard glue removal cleaner. Re-installation of panels requires operator to
supply adhesive strips and zip ties to re-at tach panels and header to the unit.
Warranty
Cambro Manufacturing warrants its new products(s) to be free from defects in material and workmanship for
a period of one (1) year from the date of shipment from authorized CAMBRO distribution locations.
Telephone 714 848 1555 Toll Free 800 854 7631 Customer Service 800 833 3003
© Cambro Manufacturing Company 5801 Skylab Road, Huntington Beach, California 92647-2056
Printed in USA 08/18
Page 2
UMCSFLEX
D0718123
 Loading...