

Page 1

Instructions for:
®
MicroWorks
by Henry Kloss
Contents
Safety Precautions ................................................................................. i, ii
Thank You ................................................................................................ 1
Inspecting For Damage ............................................................................. 2
Getting Started ......................................................................................... 2
Satellite Cube Connections ....................................................................... 3
Program Source Connections .................................................................... 4
Connecting Music Sources ........................................................................ 5
Mounting The Volume Control ................................................................. 5
Power Connections ................................................................................... 6
Connecting Two Program Sources ............................................................ 7
Attaching The Stands ............................................................................... 7
Important – Please Read Before Operating Your MicroWorks .................. 8
MicroWorks With A Computer .................................................................. 9
MicroWorks As A Music System .............................................................. 10
MicroWorks With A TV Set ...................................................................... 11
Mounting The Cubes ................................................................................12
Wiring Diagram ...................................................................................... 13
1-Year Limited Warranty .........................................................................14
MicroWorks Specifications ...................................................................... 14
Technical Support ................................................................................... 15
iii
Page 2
IMPORTANT
The lightning flash with arrowhead, within
an equilateral triangle, is intended to alert
the user of the presence of uninsulated
“dangerous voltage” within a product’s enclosure that may be of sufficient magnitude
to constitute the risk of electric shock to
persons.
READ AND HEED IMPORTANT SAFETY WARNING
WARNING
SHOCK HAZARD
DO NOT OPEN
TO PREVENT THE RISK OF ELECTRIC
SHOCK, DO NOT REMOVE SUBWOOFER’S COVER. NO USER-SERVICEABLE
PARTS INSIDE. REFER SERVICING TO
QUALIFIED SERVICE PERSONNEL.
POUR EVITER TOUT RISQUE DE CHOC
ELECTRIQUE, NE PAS DEMONTER LE
COUVERCLE DU HAUT PARLEUR.
AUCUN ENTRETIEN DES PIECES
INTERIEURES N’EST REQUIS.TOUT
SERVICE D’ENTRETIEN NE DOIT ETRE
EFFECTUE QUE PAR DU PERSONNEL
D’ENTRETIEN QUALIFIE.
AVIS
RISQUE DE CHOC ELECTRIQUE
NE PAS OUVRIR
ON BOTTOM OF SUBWOOFER ENCLOSURE
The exclamation point within an equilateral
triangle is intended to alert the user of the
presence of important operating and maintenance (servicing) instructions in the literature accompanying this product.
CAUTION: TO PREVENT ELECTRIC
SHOCK, MATCH WIDE BLADE OF PLUG
TO WIDE SLOT, INSERT FULLY.
ATTENTION: POUR EVITER LES CHOCS
ELECTRIQUES, INTRODUIRE LA LAME LA PLUS
LARGE DE LA FICHE DANS LA BORNE
CORRESPONDANTE DE LA PRISE ET POUSSER
JUSQU’AU FOND.
TO PREVENT FIRE OR
WARNING:
SHOCK HAZARD, DO NOT
EXPOSE THIS APPLIANCE
TO RAIN OR MOISTURE.
The serial number for the
on the subwoofer’s control panel. Please write
this number down and keep it in a secure area.
This is for your security.
IMPORTANT NOTICE
MicroWorks
is located
i
Page 3

IMPORTANT SAFETY INSTRUCTIONS
READ INSTRUCTIONS - All safety and op-
erating instructions should be read before
MicroWorks
the
ellite system is operated.
RETAIN INSTRUCTIONS - The safety and
operating instructions should be retained
for future reference.
HEED WARNINGS - All warnings on the
subwoofer and in the operating instructions should be adhered to.
FOLLOW INSTRUCTIONS - All operating
and use instructions should be followed.
CLEANING - Unplug the subwoofer from the
wall outlet or other power source before
cleaning. Do not use liquid cleaners or
aerosol cleaners. Use a damp cloth for
cleaning.
ATTACHMENTS - Do not use attachments
not recommended by Cambridge
SoundWorks as they may cause hazards.
WATER AND MOISTURE - Do not use the
subwoofer near water—for example, near
a bath tub, wash bowl, kitchen sink, or
laundry tub; in a wet basement; or near a
swimming pool; and the like.
ACCESSORIES - Do not place the
MicroWorks
stand, tripod, bracket, or table. The subwoofer or satellites may fall, causing serious injury to a child or adult, and serious
damage to the product. Use only with a
cart, stand, tripod, bracket, or table recommended by Cambridge SoundWorks,
or sold with the product. Any mounting of
the satellites or subwoofer should follow
the manufacturer’s instructions, and
should use a mounting accessory recommended by Cambridge SoundWorks.
amplified subwoofer/sat-
system on an unstable cart,
VENTILATION - Slots and openings in the
cabinet are provided for ventilation and to
ensure reliable operation of the subwoofer
and to prevent it from overheating, and
these openings must not be blocked or
covered. The openings should never be
blocked by placing the product on a bed,
sofa, rug, or other similar surface. The
subwoofer should not be placed in a builtin installation such as a bookcase or rack
unless proper ventilation is provided or
Cambridge SoundWorks’ instructions
have been adhered to.
HEAT - The subwoofer should be situated
away from heat sources such as radiators, heat registers, stoves, and other
products (including amplifiers) that produce heat.
POWER SOURCES - The subwoofer should
be operated only from the type of power
source indicated on the marking label. If
you are not sure of the type of power
supply to your home, consult your product
dealer or local power company. For products intended to operate from battery
power, or other sources, refer to the operating instructions.
POLARIZATION - The subwoofer may be
equipped with a polarized alternating-current line plug (a plug having one blade
wider than the other). This plug will fit into
the power outlet only one way. This is a
safety feature. If you are unable to insert
the plug fully into the outlet, try reversing
the plug. If the plug should still fail to fit,
contact your electrician to replace your
obsolete outlet. Do not defeat the safety
purpose of the polarized plug.
POWER-CORD PROTECTION - Power-sup-
ply cords should be routed so that they are
not likely to be walked on or pinched by
items placed upon or against them, paying particular attention to cords at plugs,
convenience receptacles, and the point
where they exit from the subwoofer.
LIGHTNING - For added protection for the
MicroWorks
storm, or when it is left unattended and
unused for long periods of time, unplug it
from the wall outlet. This will prevent damage to the subwoofer due to lightning and
power-line surges.
OVERLOADING - Do not overload wall out-
lets, extension cords, or integral convenience receptacles as this can result in a
risk of fire or electric shock.
OBJECT AND LIQUID ENTRY - Never push
objects of any kind into the subwoofer
through openings as they may touch dangerous voltage points or short out parts
that could result in a fire or electric shock.
Never spill liquid of any kind on the subwoofer.
SERVICING - Do not attempt to service the
subwoofer yourself as opening or removing covers may expose you to dangerous
voltage or other hazards. Refer all servicing to qualified service personnel.
DAMAGE REQUIRING SERVICE - Unplug
the subwoofer from the wall outlet or other
power source and refer servicing to qualified service personnel under the following
conditions:
a) When the power-supply cord or plug is
damaged.
b) If liquid has been spilled, or objects
system during a lightning
have fallen into the subwoofer.
c) If the subwoofer has been exposed to
rain or water.
d) If the subwoofer does not operate normally by following the operating instructions; or exhibits a distinct change in performance.
e) If the product has been dropped or
damaged in any way.
REPLACEMENT PARTS - When replace-
ment parts are required, be sure the service technician has used replacement
parts specified by Cambridge SoundWorks
or have the same characteristics as the
original part. Unauthorized substitutions
may result in fire, electric shock, or other
hazards.
SAFETY CHECK - Upon completion of any
service or repairs to the
tem, ask the service technician to perform
safety checks to determine that the
MicroWorks
condition.
WALL OR CEILING MOUNTING - The
MicroWorks
to a wall or ceiling only as recommended
by Cambridge SoundWorks.
system is in proper operating
satellites should be mounted
MicroWorks
sys-
ii
Page 4

Introduction
hank you for choosing
MicroWorks by Henry Kloss
We think you’ll find its
T
sound quality astonishing,
whether you connect it to
your computer or use it as a
stand-alone music system.
To create a so-called
“multimedia” speaker, many
manufacturers just add some
magnetic shielding and a new
nameplate to an existing model.
At Cambridge SoundWorks, we
®
started with the assumption that
.
computer users care no less about
sound quality than music lovers.
We have developed a totally
new system, lavishing as much
effort on its design as on that
of our critically-acclaimed
Ensemble
MicroWorks far outstrips many
home stereo systems, let alone the
typical “multimedia” speaker.
®
speakers. Thus
Cambridge SoundWorks
1-877-YES-HIFI
(1-877-937-4434)
24 hours a day,
every day
In Canada: 1-800-987-9104
Outside US or Canada:
Tel: 617-332-5936
Fax: 617-527-3194
www.cambridgesoundworks.com
E-mail:
info@cambridgesoundworks.com
1
Page 5
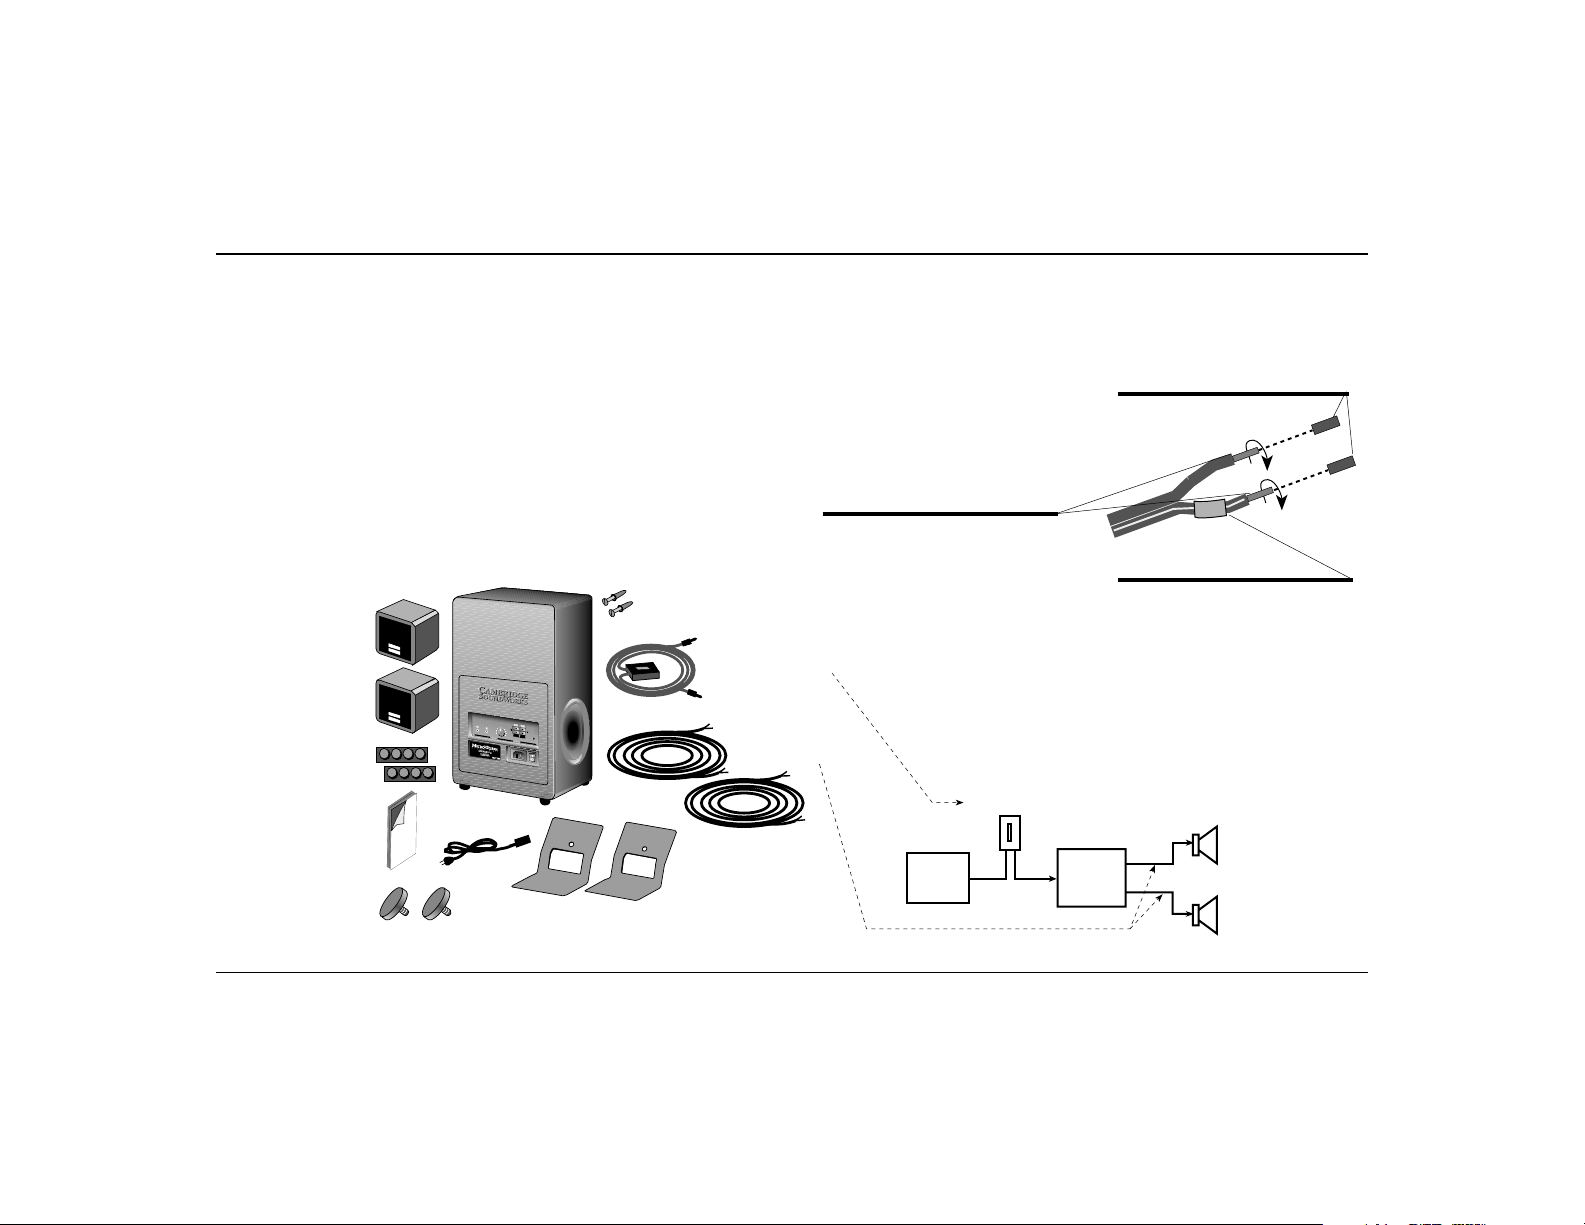
Subwoofer/
amplifier
Satellite
Speaker
Cubes (2)
Stick-on feet
for cubes or
stands (2 sets)
Stands for cubes (2)
Volume Control with 12 ft.
audio connecting cable
and stereo mini-plugs*
12 ft. speaker wires for
connecting cubes (2)*
*Extensions available; visit your
store or call a Cambridge
SoundWorks Audio/Video
Consultant at 1-877-YES-HIFI
Power cord
Wall-mounting
hardware for cubes (2 sets)
Program
Source
Subwoofer/
Amplifier
Left Cube
Speaker
Right Cube
Speaker
Semipermanent
mounting strip
(1) for attaching
volume control
Volume Control
Threaded knobs
for stands (2)
R
–
R
+
L
+
L
–
A
U
D
I
O
I
N
P
U
T
2
B
A
S
S
L
E
V
E
L
A
U
D
I
O
I
N
P
U
T
1
Inspecting For Damage Getting Started
Examine each speaker unit carefully
for shipping damage. If there is any,
do not install or use the system. For
Advice, call the store where you made
your purchase.
All the items shown in the
illustration below should be included
with your system. If anything is
missing, notify your retailer.
Save the carton and its inserts in
case you need to ship or move your
MicroWorks system later.
Notes: The satellite amplifiers inside
the MicroWorks subwoofer are specifically designed to drive the MicroWorks
cube satellites. Do not connect these left
and right amplifier outputs to any other
speakers or any kind of signal processing device.
To lengthen the satellite speaker
wires, you can add additional speaker
wire using wire nuts or substitute
longer lengths of 18 gauge speaker wire.
For your convenience, an overall
wiring diagram appears on page 13.
One of the first steps in setting up
MicroWorks is connecting the small
“cube” satellite speakers to the
subwoofer (see next page). Therefore,
before anything else, prepare their
connecting wires as shown.
Twist the individual strands of bared wire
2
tightly together so there are no free
strands that could short across the
speaker or amplifier terminals.
Playback System Diagram
From both ends of each speaker cable,
1
pull off and discard the precut strips of
insulation, revealing the bare wires.
Silver wire
Copper wire
Red
band
Note the red band around the lead with the
3
copper wire at each end of each speaker
cable. This will help you connect speakers
“in phase” as described on the next page.
2
Page 6
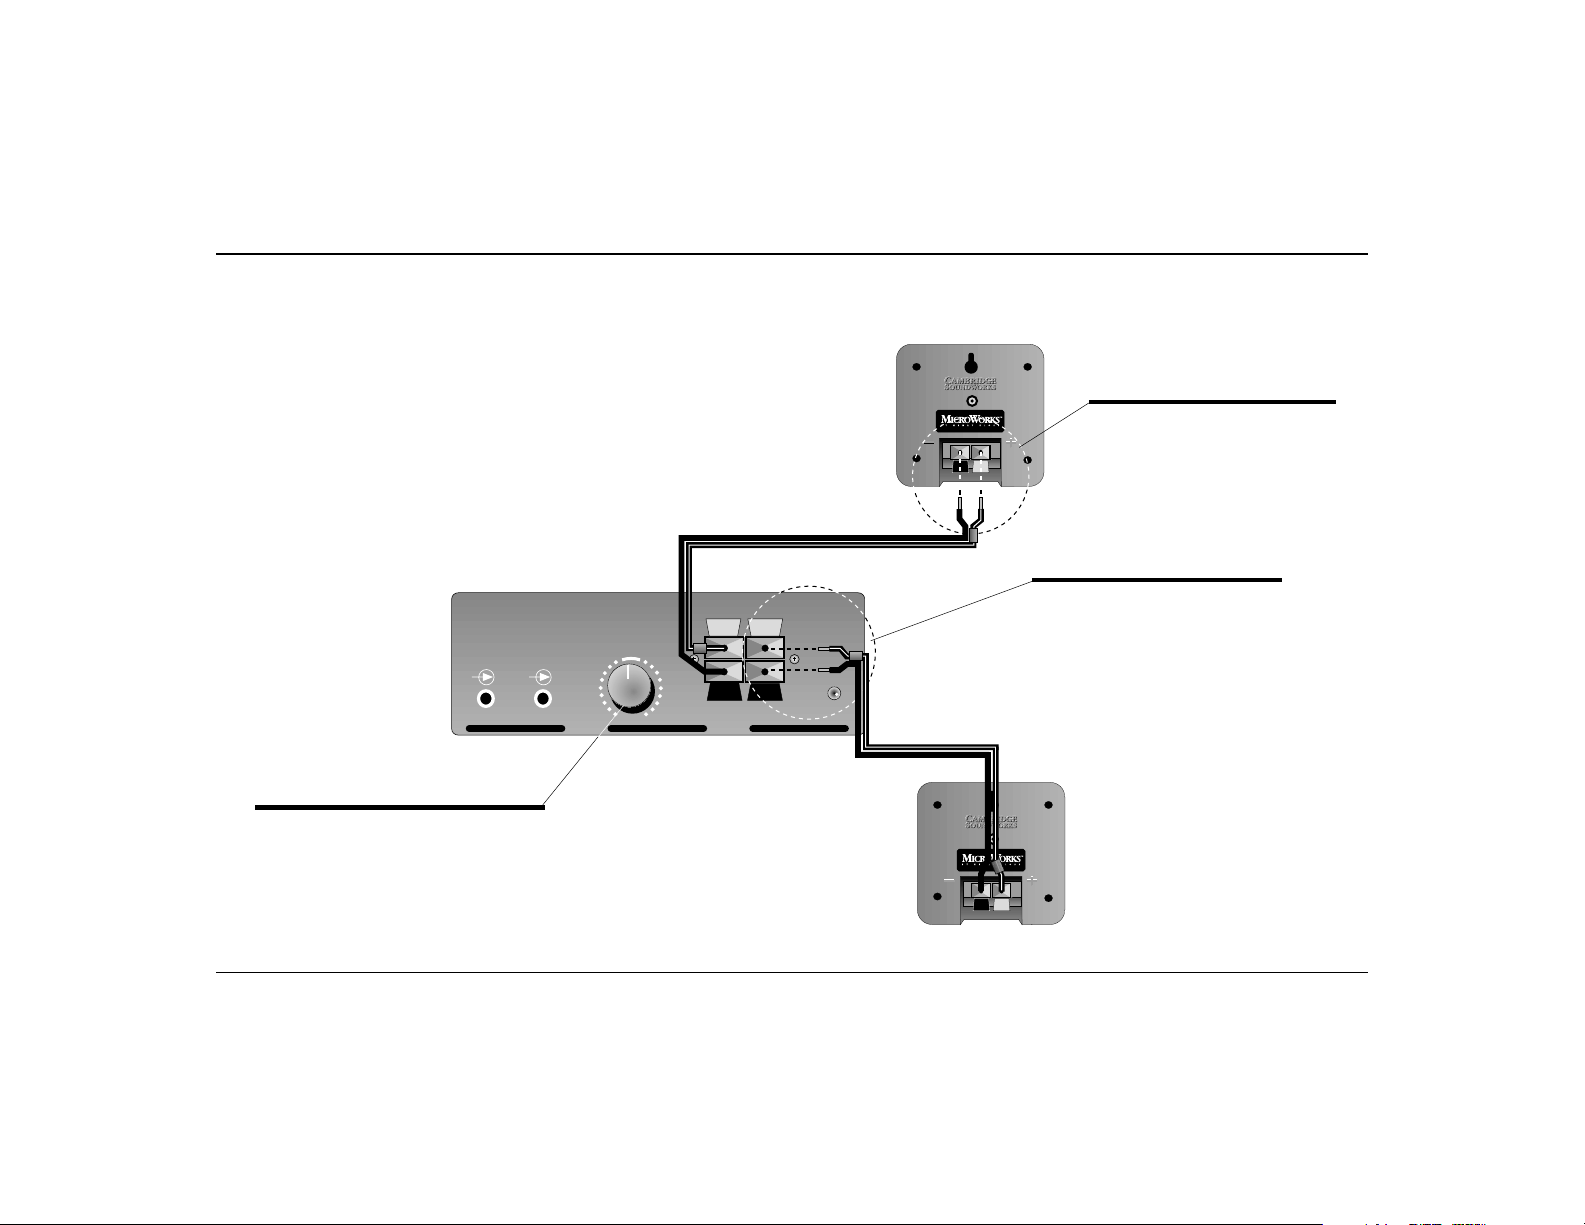
Satellite Cube Connections
Connect the red (+) and black
(–) terminals on the subwoofer to
their red and black counterparts on
the cube speakers. Use the leads
with the red bands for interconnecting the red terminals, and the
unmarked leads for the black
terminals.
Connecting the two cubes identically assures that they operate “inphase” (their cones move in and
out together). “Out-of-phase”
connections can muddy the stereo
effect. Solo voices, which should
appear to come from a point between the two cubes, will sound
“split” between them.
Left
Satellite
Cube
To connect speaker wires to cubes, push down
on the tab beneath connector, insert bared end
of wire, then release the tab.
Subwoofer
Control
Panel
Use of the Bass Level control is described in each of
the applications sections that follow; for now simply
set it at the set midway (12 o’clock) position.
AUDIO
INPUT 1
AUDIO
INPUT 2
BASS
LEVEL
Speaker wire
+
L
–
L
+
R
–
R
Red band
Right
Satellite
Cube
Red band
To connect speaker wires to subwoofer,
push on the spring-loaded tab above or
beneath each connector, insert bared end of
wire, then release tab to lock wire in place.
Notes
The satellite amplifiers inside the
subwoofer are specifically designed to drive
the
MicroWorks
connect these left and right amplifier outputs to
any other speakers or any kind of signal
processing device.
You can splice more standard speaker wire or
regular 18-gauge lamp cord onto the 12-ft.
speaker wires supplied using wire nuts; visit
your store or call a Cambridge SoundWorks
Audio/Video Consultant at 1-877-YES-HIFI to
purchase additional wire.
cube satellites. Do not
MicroWorks
3
Page 7

Program Source Connections
Connect the Volume Control’s short
lead (FROM SOURCE) to the
audio output of your computer or
other program source. Connect the
long lead (TO SUB) to either audio
input of MicroWorks’ subwoofer
as shown. The control can be
mounted on the side of your
computer monitor or other surface
using the adhesive strip provided
(see opposite page).
Your program source may have
separate left and right “RCA style”
outputs instead of a stereo minijack. If so, you will need a “Y”
conversion adapter.
If the program source has its
own level control, set it at least
half-way up, and then use the
Volume Control to achieve your
preferred playback level. If there’s
audible hum or hiss, or if the
Volume Control adjustment range
is unsatisfactory, readjust the
program source’s level control up
or down (and the Volume Control
accordingly).
It is possible to connect two
program sources to MicroWorks
since it has two stereo mini jack
inputs
(see page 7).
AUDIO
Computer CPU/
program source
AUDIO
AUDIO
INPUT 2
INPUT 1
OUTPUT
BASS
LEVEL
Subwoofer
+
L
–
L
Volume Control
Short lead
(FROM SOURCE)
+
R
–
R
Long lead
(TO SUB)
M
E
O
C
R
R
F
U
O
S
S
K
O
T
R
B
U
O
S
W
D
IN
N
M
U
O
S
X
A
M
Computer monitor
4
Page 8

Connecting Music Sources
BASS
LEVEL
MAX
OFF 1 2
BASS BOOST
Some portable players have “bass boost”
circuits designed for their small
headphones. Switch these circuits OFF
when playing through
MicroWorks
When connecting tape and CD players, it is
generally preferable to use the headphone
output; fixed “line out” outputs will work, but
any noise present in the player may be
more audible at high levels.
+
L
–
L
+
R
–
R
PHONES
LINE
OUT
Program Source
AUDIO
INPUT 1
AUDIO
INPUT 2
FROM
TO
SOURCE
SUB
DCIN
ORKS
W
OUND
S
MIN
Mounting The Volume Control
The enclosed mounting strip is
semipermanent—it holds well but
can be peeled off gently. Be sure that
the mounting surface, such as the
computer monitor or your desktop,
is smooth and clean.
M
O
R
F
E
C
R
U
O
TO
S
B
U
S
S
K
R
O
W
D
N
U
O
S
IN
M
X
A
.
Remove protective paper from one
1
side to reveal adhesive.
Press exposed adhesive side
2
firmly against back of volume
control.
M
E
O
C
R
R
F
U
O
S
S
K
TO
B
R
U
O
S
W
D
N
I
N
M
U
O
S
X
A
M
M
Subwoofer Control Panel
Remove remaining paper strip.
3
5
Press control firmly against
4
mounting surface
(desktop, keyboard or monitor).
Page 9

Power Connections
Connect the removable AC power cord to the
MicroWorks power socket. The internal power
supply for the amplifiers stays on all the time
the subwoofer is plugged in. For this reason,
the panel area may remain warm to the
touch. This is normal, but it’s a good idea to
unplug the unit when you are away for a
week or more.
MicroWorks
Subwoofer Control Panel
CAUTION:
TO PREVENT ELECTRIC SHOCK DO NOT USE THIS
POLARIZED PLUG WITH AN EXTENSION CORD, RECEPTACLE, OR OTHER OUTLET UNLESS THE BLADES CAN BE
FULLY INSERTED TO PREVENT BLADE EXPOSURE.
ATTENTION:
POUR PREVENIR LES CHOCS ELECTRIQUES NE PAS
UTILISER CETTE FICHE POLARISEE AVEC UN
PROLONGATEUR, UNE PRISE DE COURANT, OU UNE
AUTRE SORTIE DE COURANT, SAUF SI LES LAMES
PEUVENT ETRE INSEREES A FOND SANS EN LESSER
AUCUNE PARTIE A DECOUVERT.
Your set of
for the power supply cord specific to your country. Please
check that you have the correct power supply cord before
using the speakers. In the event of a mismatched power
supply cord, please contact the dealer from which your unit
was purchased.
MicroWorks
contains the appropriate plug type
AUDIO
INPUT 1
AUDIO
INPUT 2
BASS
LEVEL
+
L
–
L
+
R
–
R
ON
OFF
6
Page 10

Connecting Two Program Sources Attaching The Stands
Because MicroWorks has two stereo
minijack inputs, it’s possible to
blend the sound output of a computer and a second program source,
such as a CD player.
To connect a second program
source to MicroWorks, you need an
additional connecting cable. It
should have a 3.5mm stereo mini
plug at one end (for the MicroWorks
input) and an appropriate stereo
signal connector on the other end.
For the majority of portable CD
players, an additional Volume
Control will work perfectly. Call
1-877-YES-HIFI (1-877-937-4434)
to purchase one.
For most applications, the cube
speakers should be attached to their
desktop stands. Install each stand
using a threaded knob. Attach the
stick-on feet to the base of
the stand.
BASS
AUDIO
AUDIO
INPUT 2
INPUT 1
FROM PROGRAM SOURCE 1 FROM PROGRAM SOURCE 2
LEVEL
+
L
–
L
+
R
–
R
7
Page 11

Important – Please Read Before Operating Your MicroWorks
Playback Levels
MicroWorks is intended for individual or small group listening
and will achieve surprizingly high
output levels. However, playing
the system continuously at overly
loud, distorted levels on heavybass program material may cause
its internal fuse to blow.
The fuse can be replaced only by
a qualified representative. To
avoid this inconvenience and a
possible non-warranty repair
charge, reduce the playback volume when the system shows
obvious signs of stress, i.e. it
sounds “raspy,” “fuzzy,”
and/or “muddy.”
Controlling Background Noise and Distortion
Due to MicroWorks’ high input
sensitivity (only .18 V RMS for
rated output), some signal sources
will send audible levels of background hum and hiss through
to MicroWorks.
If hiss or hum is heard from
MicroWorks and if the signal
source has its own volume control
capability (on-screen control for a
computer or variable audio output
for a TV or CD/tape player), use
one of the following
two approaches:
1. Reduce the setting of the
Volume Control until hum or
hiss is reduced to an unnoticeable level. Use the signal
source to control the
output level.
2. Set the signal source’s volume
control to a high setting (70%
or higher) and use the Volume
Control to vary output.
Some PC sound boards have an
output control on the card. Trial
and error may be necessary to
achieve the right setting of this
control. Too low a setting could
cause background noise. Too high
a setting may cause distortion.
Keep in mind, MicroWorks has
sonic fidelity sufficient to reveal
noise and distortion inherent in
many digital sound processors.
You may not have noticed these
imperfections before, even with socalled “CD-equivalent” cards.
Background noise present in a
few, fixed-level signal sources may
be audible when the Volume
Control is set to a high level and
program material is silent or
playing at a low level. This behavior is intrinsic to the fixed-level
signal source and is not the fault
of MicroWorks.
8
Page 12

MicroWorks With A Computer
Place the magnetically shielded cubes aimed
straight ahead on the small stands to either side
of the monitor.
Place the subwoofer on the floor under your
desk or workstation, back against the wall. Do
not
place it up on the work surface or a shelf,
which could result in disappointing bass
performance (see text to the right). The
subwoofer is not magnetically shielded, and
must be at least 18 inches from the monitor to
prevent distorting its picture.
• Have a clear line of sight from
your listening position to
the cubes.
• The ear cannot locate the source
of low-bass, which is why the
subwoofer can go on the floor,
out of sight. The bass port (the
hole above the control panel)
must be at least 2 inches from the
nearest surface, however.
• If you just can’t place the woofer
on the floor against a wall as
shown, use the Bass Level control
to compensate. Try turning it up
if you place the subwoofer up on
a shelf, away from the acoustic
support that the floor and wall
give low-bass.
• On the other hand, if the subwoofer sits in a corner on the
floor, it may sound bass-heavy, in
which case try turning the Bass
Level control down.
• Set the Bass Level control for best
bass balance, then forget it. It is
not intended to be adjusted
regularly to compensate for
differences in recordings.
9
Page 13

MicroWorks As A Music System
For recorded performers to
appear “on stage” in front of
you, place the cubes to form a
MOZART
S
y
m
p
h
N
o
n
o
i
.
e
3
s
9
&
4
1
Place the subwoofer on the floor against a
wall (surfaces that acoustically support the
bass). Placing it out from the wall and/or up
on a shelf could result in disappointing bass
performance (see text).
roughly equal-sided triangle
with your favorite listening
position. But by all means,
take advantage of their tiny
size and experiment liberally
with their placement (see text
for suggestions).
• Have a clear line of sight from your
listening position to the cubes.
• The further away the cubes, the
less critical their height. Try them
down on the floor, up near the
ceiling, or anywhere in between. If
they are close to you, however, it’s
best to have them at ear level.
• Use your imagination, and try
different locations for the cubes—
on window sills, for example, or on
a bookshelf as shown. They can
also easily be wall mounted
(see page 12).
• The ear cannot locate the source of
low-bass, so the subwoofer does
not have to be very close to the
cubes. It can be hidden by furniture. The bass port (the hole above
the control panel) must be at least
2 inches from the nearest
surface, however.
• If you just can’t place the subwoofer on the floor against a wall,
use the Bass Level control to
compensate. Try turning it up if
you place the subwoofer up on a
shelf, and/or out from the wall.
• On the other hand, if the subwoofer
sits in a corner on the floor, it may
sound bass-heavy, in which case
try turning the Bass Level
control down.
• Set the Bass Level control for best
bass balance, then forget it. It is not
intended to be adjusted regularly to
compensate for differences
in recordings.
10
Page 14

MicroWorks With A TV Set
The cubes are magnetically shielded, and so
can be placed close to your TV if necessary.
Placing them too far apart can keep dialogue
from sounding like it’s coming from the screen.
(Wall-mounting instructions are on the next page).
Place the subwoofer on the floor against a wall
(surfaces that acoustically support the bass).
Placing it out from the wall and/or up on a
shelf could result in disappointing bass
performance (see text to the right).
subwoofer is not magnetically shielded,
and must be at least 18 inches from the TV
to prevent picture distortion.
The
• To use MicroWorks with a stereo
TV set, the set should have a
volume-controlled audio signal
output. This kind of output retains
the TV remote’s ability to control
the overall sound level. This
output could a headphone jack.
• If your sets’ stereo audio outputs
are a pair of separate left and right
jacks rather than a single stereo
headphone jack, contact the
retailer where your Microworks
was purchased for the adapters
you’ll need to add to the cable
supplied with your MicroWorks
system Volume Control.
• Switch off the TV’s internal speakers (some sets do so automatically
when you connect an external
audio system).
• The ear cannot locate the source of
low-bass, so the subwoofer does
not have to be close to the cubes,
and can be hidden by furniture.
The bass port (the hole above the
control panel) must be at least 2
inches from the nearest
surface, however.
• If you can’t place the subwoofer
on the floor against a wall, use the
Bass Level control to compensate.
Try turning it up if you place the
subwoofer up on a shelf, and/or
out from the wall.
• On the other hand, if the subwoofer sits in a corner on the
floor, it may sound bass-heavy, in
which case try turning the Bass
Level control down.
• Set the Bass Level control for best
bass balance, then forget it. It is
not intended to be adjusted regularly to compensate for differences
in recordings and broadcasts.
• If what MicroWorks does for your
TV starts you thinking about a
full-blown “home theater” with
®
Dolby
Surround sound, call
a Cambridge SoundWorks
Audio/Video Consultant at
1-877-YES-HIFI for more
information.
11
Page 15

Mounting The Cubes
To a wall:
To wall-mount the cubes on
structurally strong surfaces
(a wall stud or wood panelling),
screw the No. 10 screws into the
material. Allow their heads to
protrude about
keyhole slots on the back of
each cube (as shown below).
The plastic anchors supplied
will be needed to secure the
screws in most wall surfaces. If
so, drill
then tap the anchors into the
holes until they are flush with
the wall. Then screw the screws
into the anchors until they
protrude about
Be sure to apply the stick-on
rubber feet to the back of the
satellite cubes. This assures an
acoustically secure installation.
1
/4" to fit into the
1
/4" holes in the wall,
1
/4."
12
Page 16

Wiring Diagram
Subwoofer/Amplifier
C
AMBRIDGE
C
AMBRIDGE
C
AMBRIDGE
S
OUNDWORKS
S
OUNDWORKS
S
OUNDWORKS
BASS
+
LEVEL
AUDIO
AUDIO
INPUT 2
INPUT 1
TO
FROM
TO
FROM
SUB
SOURCE
SUB
SOURCE
S
OUNDWORKS
S
OUNDWORKS
MIN
MIN
MAX
MAX
Volume Control Program Source
–
L
Cube Speaker
Desktop
Stands
Threaded Knobs
R+L
–
R
Speaker
Wire
AC Power Cord
13
Page 17

1-Year Limited Warranty
o the original purchaser,
Cambridge SoundWorks,
Inc. will warrant the
T
MicroWorks system to be
free of defects in material and
workmanship for a period of
one (1) year from date of
purchase. With respect to
defects, Cambridge SoundWorks
will, at its option, replace the
product or repair the defect in
the product with no charge to
the original purchaser for parts
or labor.
This warranty does not
extend to any defect, malfunction or failure caused by
misuse, abuse, accident, faulty
hookup, defective associated
equipment or use of the speaker
with equipment for which it is
not intended.
This warranty is valid only
when the speaker is returned to
the retailer who sold the Micro-
Works to the original purchaser.
This is the sole and express
warranty. This warranty is in lieu
of all other warranties, expressed
or implied, of merchantability,
fitness for purpose or otherwise.
In no event shall Cambridge
SoundWorks be liable for
incidental or consequential
damages or have any liability
with respect to defects other than
the obligations set forth above.
To ensure warranty coverage it
is incumbent upon the original
purchaser of MicroWorks to
inform the retailer of the defect
within the warranty period. The
only acceptable method of
establishing warranty status is a
copy of the original proof of
purchase indicating customers
name and purchase date.
MicroWorks’
Three-channel
Amplifier Specification
Satellite amplifier: One channel
driven into a 4 ohm load at less than
1% total harmonic distortion, at 1KHz:
13 watts RMS.
Subwoofer amplifier: With a
4 ohm load at less than 1% total
harmonic distortion, at 100Hz:
42 watts RMS.
Note: in advertising, the term “peak
power”—double an amplifier’s music
power—is often used
.
s
® Cambridge SoundWorks, MicroWorks, MicroWorks by Henry Kloss and Ensemble are registered trademarks of Cambridge SoundWorks, Inc.
14
Page 18

Holland Tel: +3115578244
Italy Tel: +39 2 982 4 4100
Norway Tel: 800 11663 (Freephone)
BBS: +45 4824 4351 (HST V.34)
+45 4824 4361 (ZyTEL 19,200)
Scandinavia Tel: +45 4824 4322
Fax: +45 4824 4323
Spain Tel: 900 953536 (Freephone)
Sweden Tel: 020 791088 (Freephone)
BBS: +45 4824 4351 (HST V.34)
+45 4824 4361 (ZyTEL 19,200)
UK Tel: +44 01734 344 744
Fax: +44 01734 320 271
BBS: +44 01743 360 287
Operating hours
Mon-Fri: Business Hours
Sat-Sun: Closed
FaxBack is a facility that allows you to obtain product and technical information
through facsimile services. In Europe, use the following number: +353 1 820 3667.
Inside Asia
Creative Technology Ltd. Technical Support
31 International Business Park,
Creative Resource, Singapore 609921
Tel: +65 8954100
Fax: +65 8954999
BBS: +65 776 2423
Operating hours (Singapore Time)
Mon-Thu: 9am-6:30pm
Fri: 9am-6pm
Sat-Sun & Public Holidays: Closed
16
Page 19

Technical Support
Inside U.S.A., Canada and Latin America
Creative Labs Inc. Technical Support
If you need technical assistance, call 405-742-6622. Technical support is
available seven days a week from 8:00 am to midnight, Central time.
You can get the latest program and driver updates from Creative Labs’ bulletin
board, 24 hours a day. Call 405-742-6660; use modem settings:
Baud rate: 300 to 14400
(V.32/V.42 bis)
Data bits: 8
Parity: none
Stop bits: 1
You can also send a FAX at 405-742-6633 or write us at:
Technical Support
Creative Labs, Inc.
1523 Cimarron Plaza
Stillwater, OK 74075
To reach Creative Technical support via the Internet, visit our technical support
web site at http://www.creativehelp.com, for troubleshooting help.
For information about this product and other Creative Labs products, visit
Creative Zone at http://www.soundblaster.com. Or, call customer Service at
800-998-1000
Faxback information is available by calling 405-372-5227
Inside Europe
Creative Labs (Ireland) Ltd. Technical Support
Ballycoolin Business Park, Blanchardstown Dublin, 15 Ireland
Ireland Tel: +353 1 820 7555
Fax: +353 1 820 5052
BBS: +353 1 820 3784 (HST)
+353 1 820 3818 (ZyXEL)
Belgium Tel: +32 32300997 (French)
(for Benelux) Fax: +32 32300998 (Dutch)
BBS: +32 3281 4631 (HST V.34)
+32 3281 4632 (V.34)
Denmark Tel: 8001 7177 (Freephone)
BBS: +45 4824 4351 (HST V.34)
+45 4824 4361 (V.34)
Finland Tel: 08001 18052 (Freephone)
BBS: +45 4824 4351 (HST V.34)
+45 4824 4361 (ZyXEL 19,200)
France Tel: +33 1 39 20 04 21
Fax: +33 1 39 20 90 10
BBS: +33 1 39 20 90 43 (HST)
+33 1 39 20 90 47 (V.32bis)
Minitel: 3615 CREATIVE and 3617 CREATIVE
Germany Tel: +49 089 9579081
(for central and Fax: +49 089 9577453
Eastern Europe) BBS: +49 089 9577274
15
Page 20

311 Needham Street, Newton MA 02464
1-877-937-4434 Fax: 617-527-3194
www.cambridgesoundworks.com
Email: info@cambridgesoundworks.com
P81-0920 0400
A Company
 Loading...