

Page 1
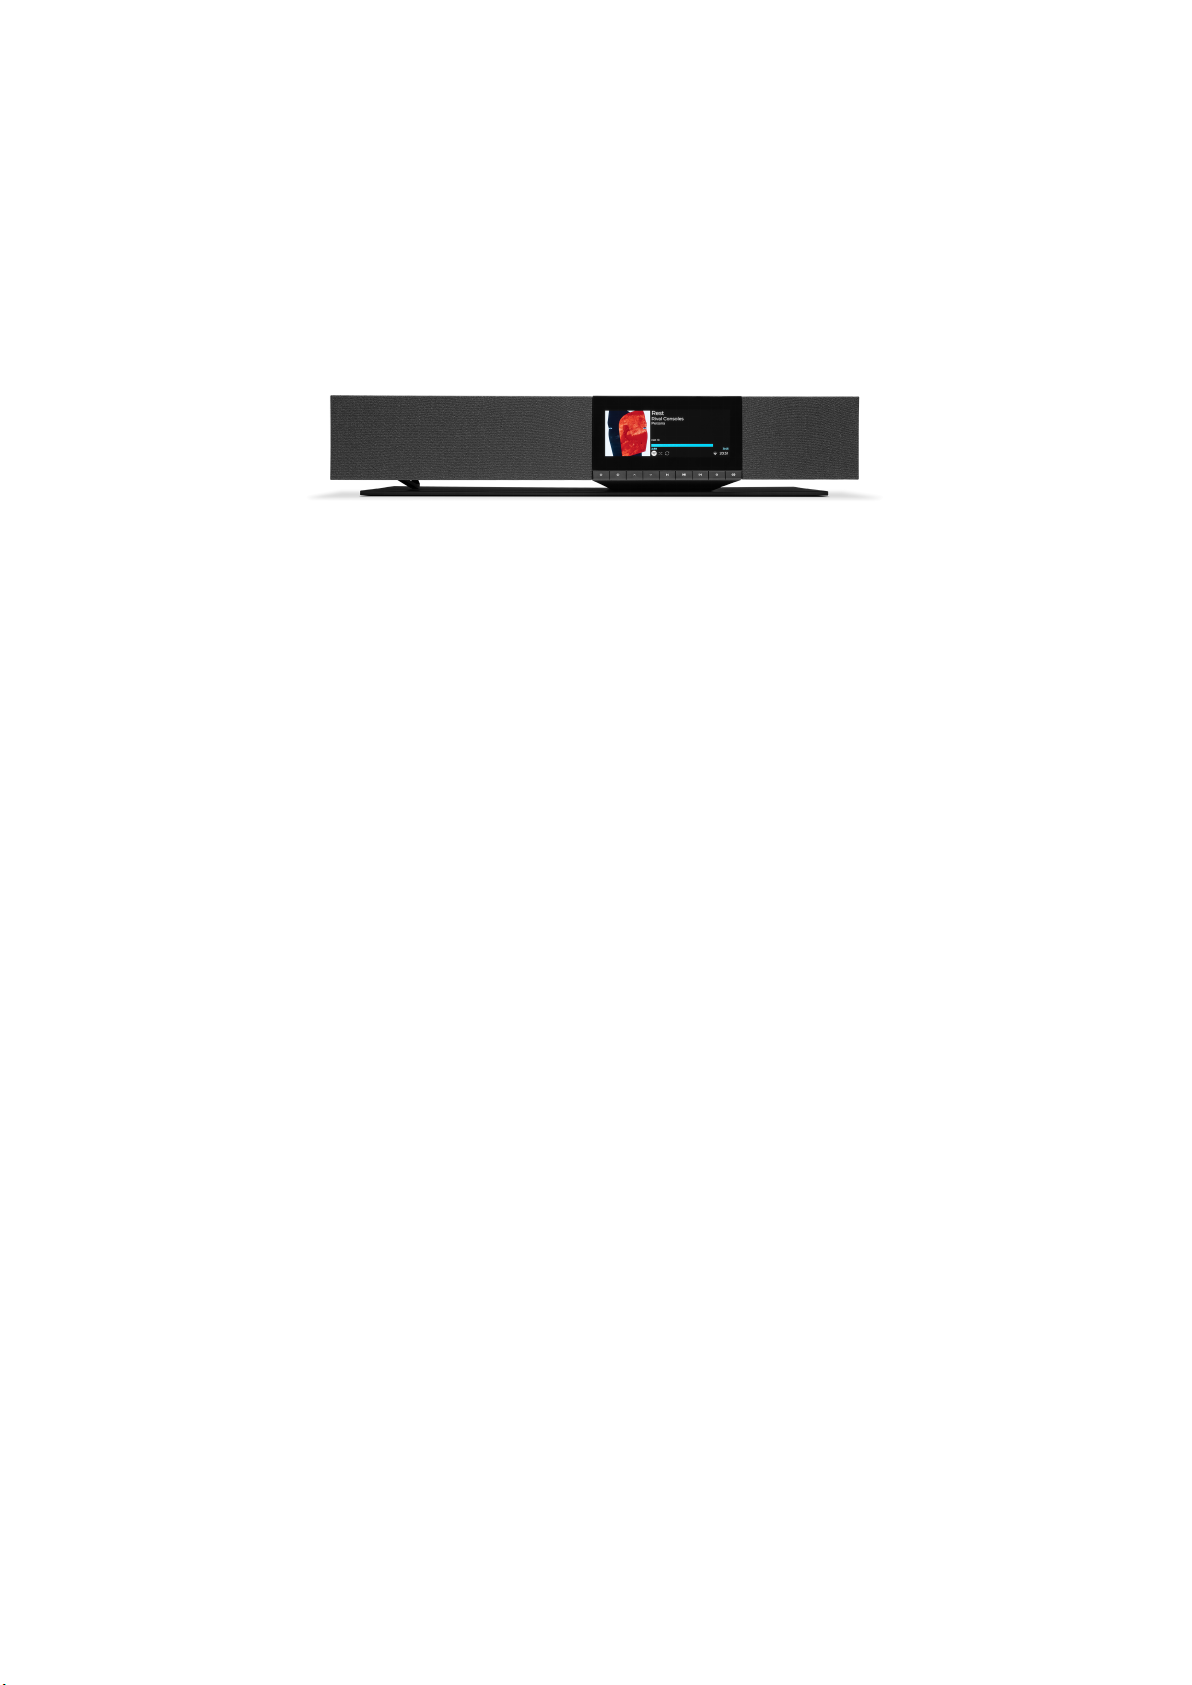
Evo One
Manual Generated: 09/10/2024 - 11:54
1
Page 2

Table of Contents
Evo One 3 ...........................................................................................................................................................................................................
Introduction 3 ....................................................................................................................................................................................................
What's included with the Evo One? 4 ............................................................................................................................................................
Front panel controls 5 .....................................................................................................................................................................................
Display 6 ............................................................................................................................................................................................................
Rear panel connections 8 ................................................................................................................................................................................
Remote control 9 ..............................................................................................................................................................................................
Getting connected 10 .......................................................................................................................................................................................
Connecting to a network 12 ............................................................................................................................................................................
StreamMagic app - Setup 13 ...........................................................................................................................................................................
Google Home / Google Cast 14 .......................................................................................................................................................................
AirPlay 15 ...........................................................................................................................................................................................................
Built-in streaming services 16 ........................................................................................................................................................................
Internet radio 18 ...............................................................................................................................................................................................
Streaming your local digital music collection 19 ........................................................................................................................................
Bluetooth 20 ......................................................................................................................................................................................................
TV - eARC input 21 ............................................................................................................................................................................................
USB Media 22 ....................................................................................................................................................................................................
Settings 23 .........................................................................................................................................................................................................
Audio Settings 25 .............................................................................................................................................................................................
Technical specifications 26 .............................................................................................................................................................................
Source quality matrix 28 .................................................................................................................................................................................
Troubleshooting 29 ..........................................................................................................................................................................................
Frequently asked questions 31 ......................................................................................................................................................................
2
Page 3

Evo One
Last updated: October 9, 2024 11:39. Revision #13705
Users Manual
Introduction
Last updated: August 1, 2024 04:04. Revision #13565
This guide is designed to make installing and using this product as easy as possible. Information in this document has been carefully
checked for accuracy at the time of publishing; however, Cambridge Audio’s policy is one of continuous improvement, therefore design and
specifications are subject to change without prior notice.
This document contains proprietary information protected by copyright. All rights are reserved. No part of this manual may be reproduced
by any mechanical, electronic or other means, in any form, without prior written permission of the manufacturer. All trademarks and
registered trademarks are the property of their respective owners.
3
The Bluetooth® word mark and logos are registered trademarks owned by the Bluetooth SIG, Inc. and any use of such marks by Audio
Partnership Plc is under license. Other trademarks and trade names are those of their respective owners.
StreamMagic is a trademark of Audio Partnership Plc and is registered in the European Community and other countries.
This product contains software licensed under version 2 of the GNU Public License and version 2.1 of the GNU Lesser Public License. The
source code for this software is available from: http://gpl.stream-magic.com/
This product includes technology owned by Microsoft Corporation and under a licence from Microsoft Licensing GP. Use or distribution of
such technology outside of this product is prohibited without a license from Microsoft Corporation and/or Microsoft Licensing, GP as
applicable.
The Spotify Software is subject to third party licenses found here: https://www.spotify.com/connect/third-party-licenses.
This product support AirPlay 2 and requires iOS 11.4 or later.
Apple and AirPlay are trademarks of Apple Inc., registered in the U.S. and other countries.
Use of the Works with Apple badge means that an accessory has been designed to work specifically with the technology identified in the
badge and has been certified by the developer to meet Apple performance standards.
Android, Google Play and the Google Cast-enabled logo are trademarks of Google Inc.
TIDAL and TIDAL logo are registered trademark of Aspiro AB in the European Union and other countries.
© Copyright Cambridge Audio Ltd
For upcoming news on future products, software updates and exclusive offers, make sure you register your product
at https://www.cambridgeaudio.com/register
Page 4

What's included with the Evo One?
Last updated: August 9, 2024 09:04. Revision #13550
Inside the box of your Evo One you will receive:
1. Evo One Player
4
2. Quick Start Guide
3. Remote control
4. AAA batteries x 2
5. Registration Card
6. Welcome letter
7. Safety Guide
8. Regional Power Cable
Page 5
Front panel controls
Last updated: August 9, 2024 09:04. Revision #13549
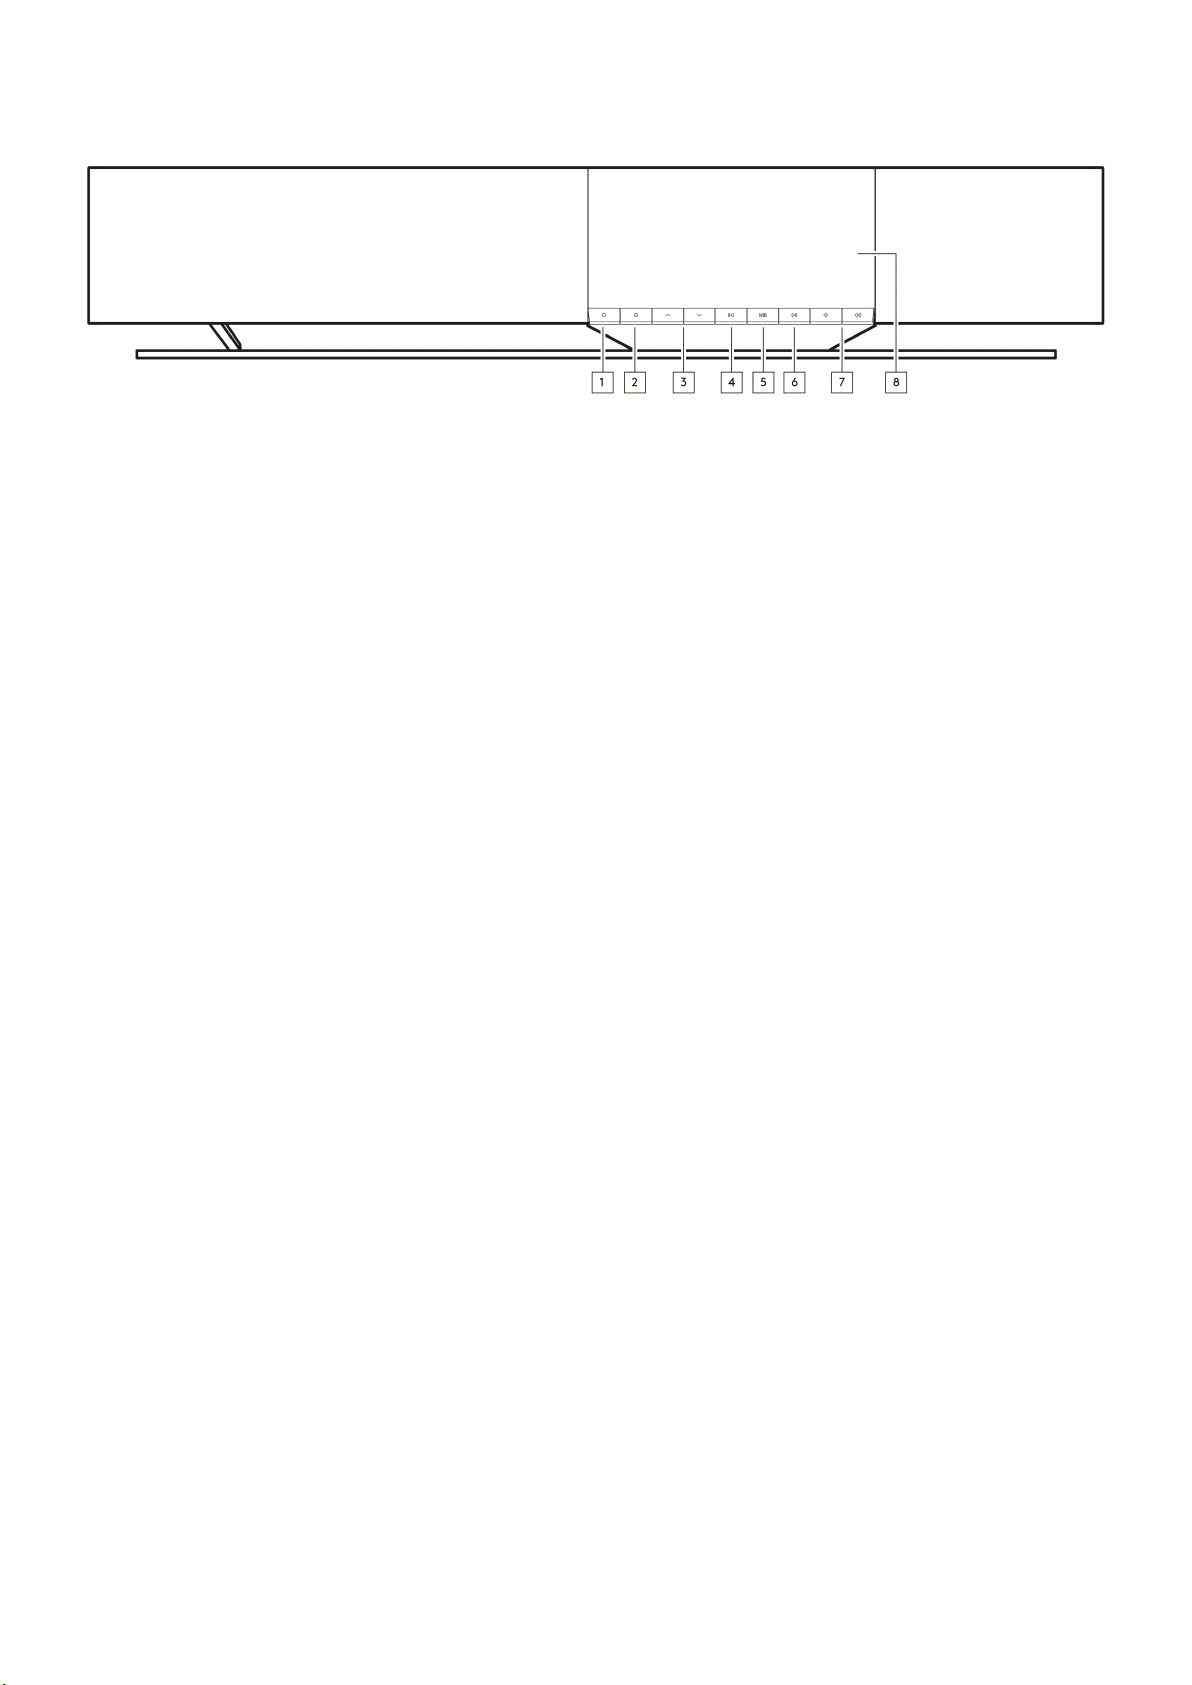
1. Standby/On
Switches the unit between Standby mode (indicated by a dimly lit standby button) and On mode.
2. Info
During playback, pressing this button will cycle through the different ‘Now Playing’ screens. Press and hold to display the product info, as
well as options for updating the firmware, network setup mode and factory reset.
3. Source Selector
5
Scroll through sources enabled in the StreamMagic app.
4. Skip Previous
Skip to previous track during playback.
5. Play/Pause
Play or Pause current track.
6. Skip Next
Skip to next track during playback.
7. Volume Control
Increase or decrease volume.
8. Display
Page 6
Display
Last updated: October 3, 2024 09:29. Revision #13681
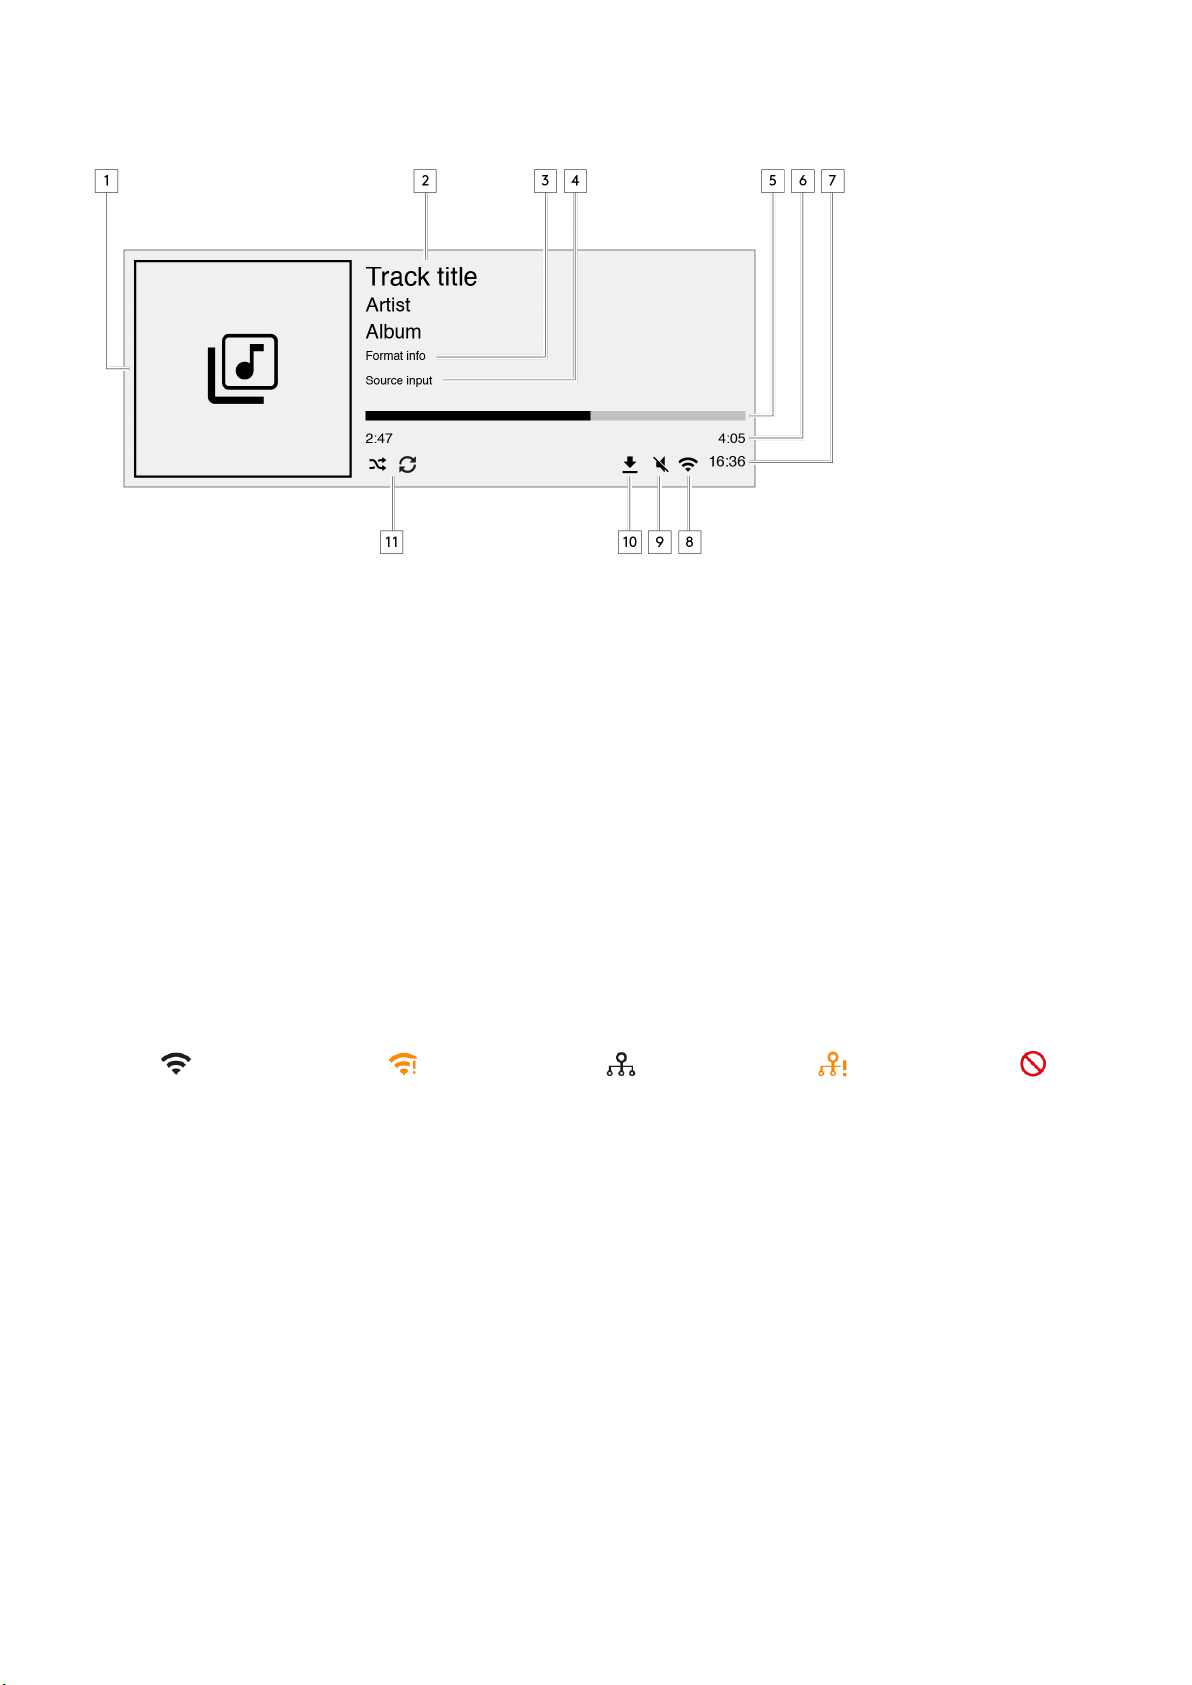
1. Album/Source artwork
Displays the album artwork. Alternatively, if no artwork is available this will display the source input icon.
6
2. Track title, artist and album
For Internet Radio, this will display the radio station name and the current playback.
3. Format info
Displays the streaming sample rate. For Internet Radio, this will display the bitrate the station is streaming.
4. Source input
Displays the currently selected source input.
5. Progress bar
When available, this will display the current track progression during playback.
6. Track time
When available, this will display the elapsed track time during playback.
7. Clock
8. Network connection
Displays the current network connection.
Wireless network connection
Wireless connection with no internet access
Wired network connection
Wired connection with no internet access No network connection
Page 7

9. Mute volume
Displays when the speaker is muted.
10. Firmware update
This indicates when new firmware is available. Press the 'Info' button on the front panel or use the StreamMagic app to update the network
streamer's firmware.
11. Shuffle, Repeat and Repeat +1
7
Page 8
Rear panel connections
Last updated: August 9, 2024 09:05. Revision #13547
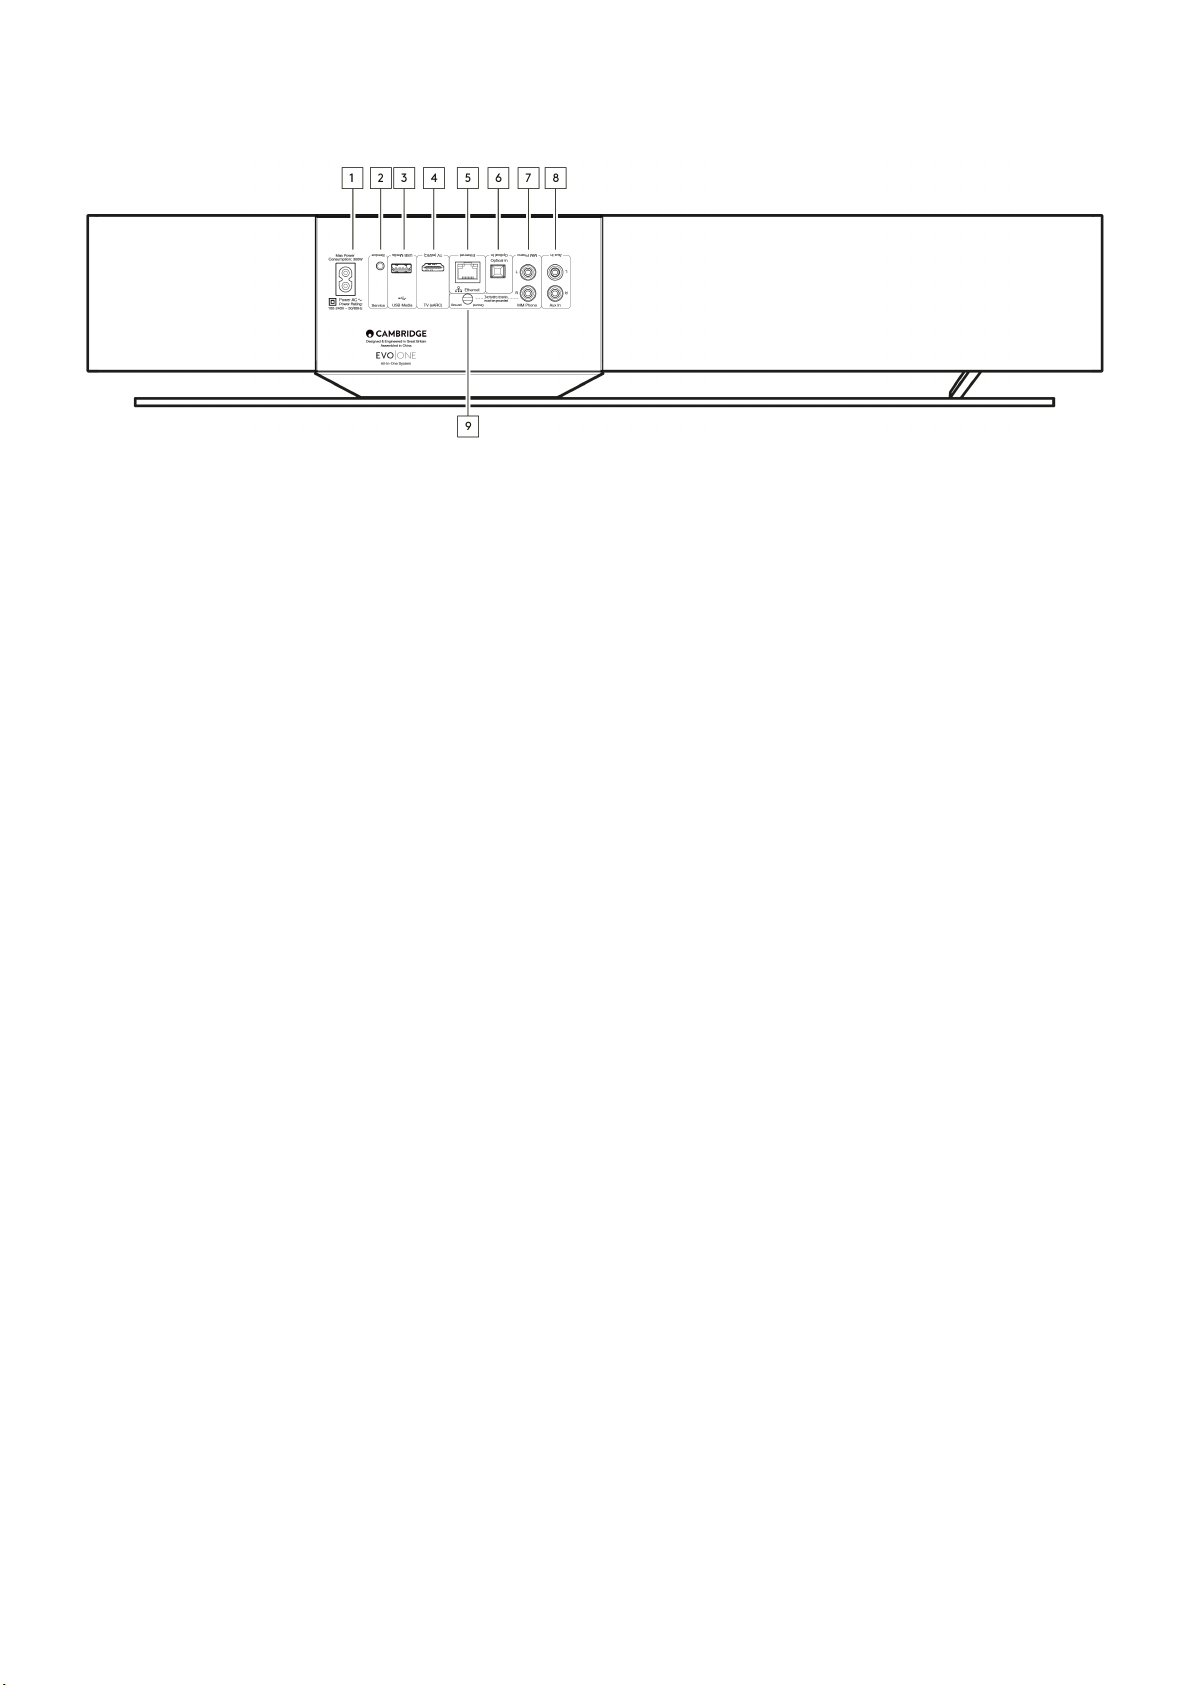
1. AC Power socket
Once you have completed all connections to the player, plug the AC power cable into an appropriate mains socket.
2. Service Port
For servicing use only.
8
Note: Connecting any other device here may result in damage.
3. USB Media
For connecting local media storage. Note that the USB ports are not intended for connection to mobile devices; no functionality, charging or
otherwise is supported.
Note: Connecting any other device here may result in damage.
4. TV (eARC)
Use to connect your speaker to your ARC or eARC enabled TV.
5. Ethernet
Use to connect your speaker directly to a network router. Use a wired connection for seamless playback of high-resolution 352.8kHz,
384kHz, and DSD up to 256x.
6. Digital Input (Optical)
Use a high quality TOSLINK fibre optic interconnect cable designed specifically for audio use. This input is suitable for 16-24 bit content up to
96kHz (TOSLINK is not recommended at 192kHz sampling rates).
7. & 9. MM Phono input
For connecting a turntable without an integrated phono stage that uses a moving magnet cartridge. If connecting your turntable to the
phono input, please make sure you connect the ground of your turntable to the Ground tab of the Evo One.
8. Auxiliary input
Use this line-level input to connect any analogue sources, like a CD player, tuner or turntable with an integrated phono stage.
Page 9
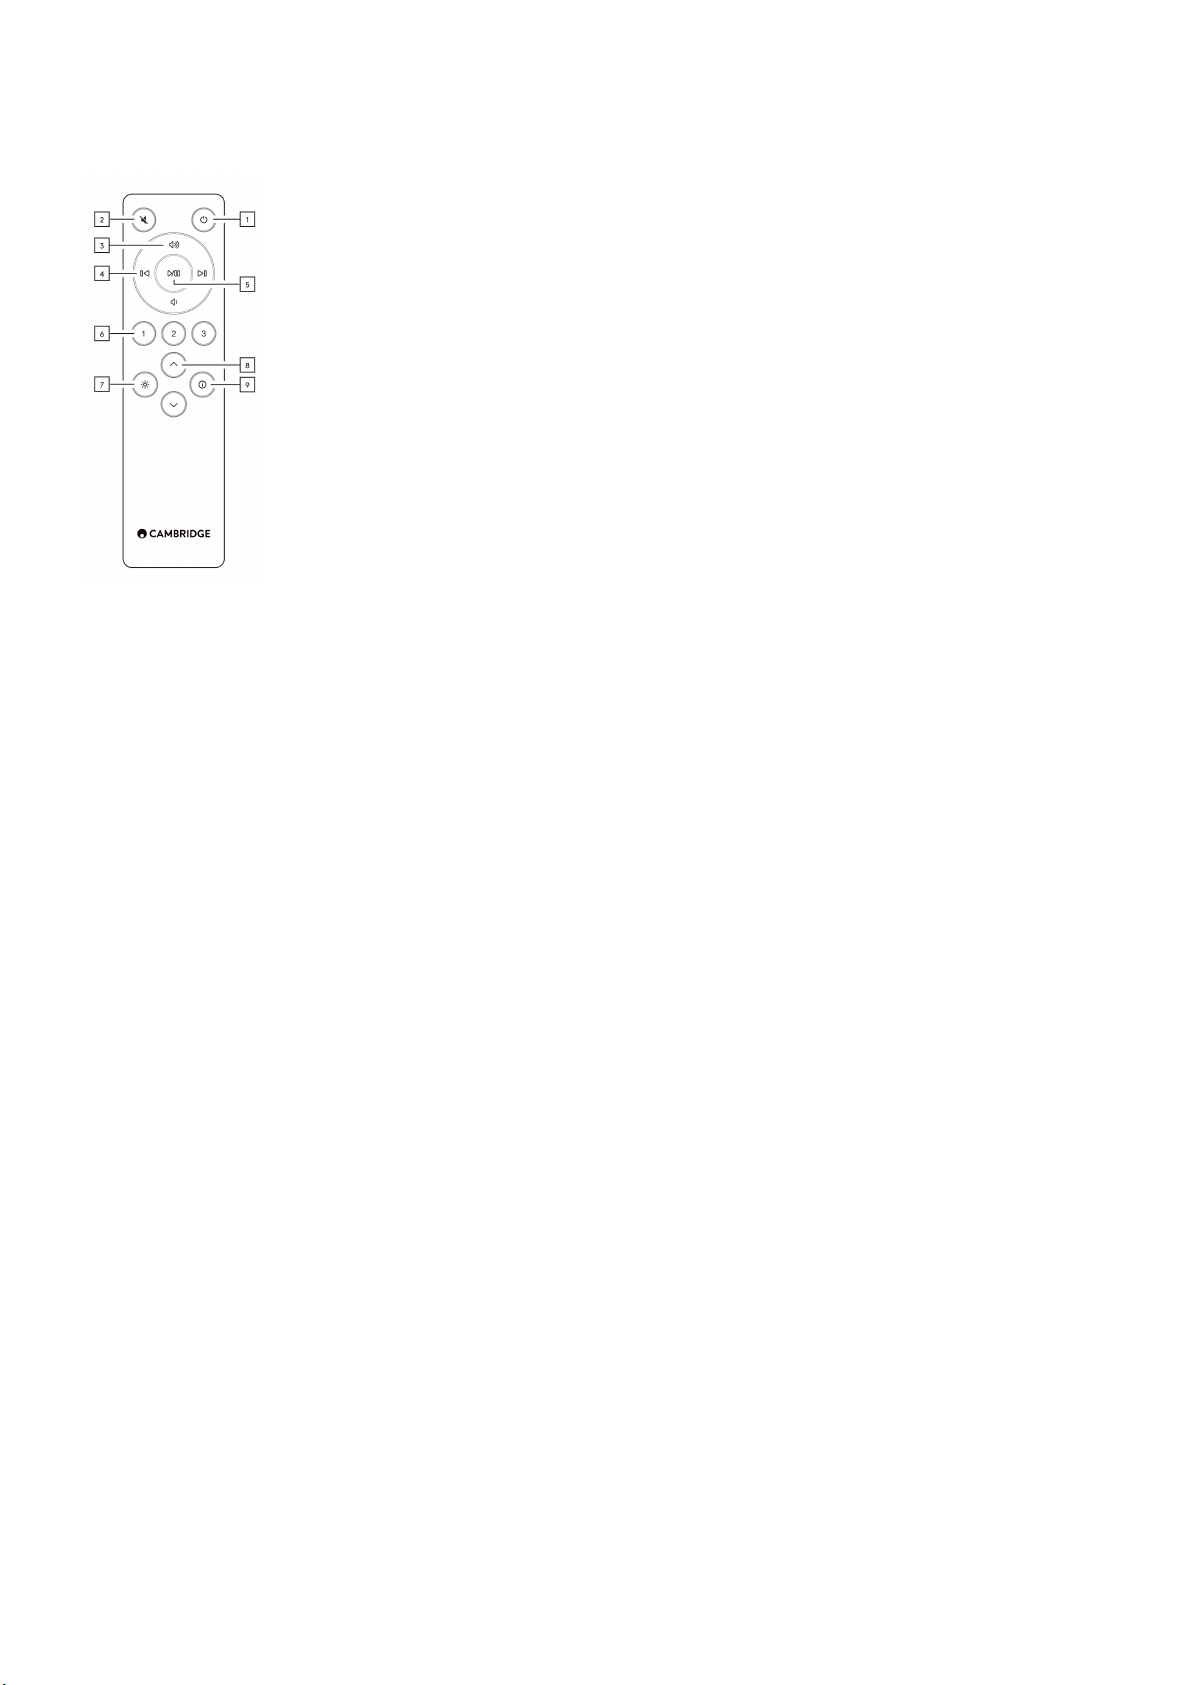
Remote control
Last updated: August 9, 2024 09:05. Revision #13546
1. Standby/On
9
Switches the Player between On and Standby mode.
2. Mute
Press to mute or un-mute the audio.
3. Volume up/down
Volume level adjust.
4. Skip previous/next
Skips between previous and next tracks.
5. Play/Pause
Play or Pause current track.
6. Preset buttons
Press to recall stored 1 – 3 presets. Press and hold to store the current source as a preset.
Note: Not available for media player queue, AirPlay or Chromecast sources.
7. Brightness
Pressing this button will alter the brightness of the display backlight between bright, dim and an option to switch off the backlight.
8. Source selection
Scroll through sources enabled in the StreamMagic app.
9. Info
During playback, pressing this button will cycle through ‘Now Playing’ screens. Press and hold to display the product info.
If the remote control will not function, please check that the batteries have not expired, and that there is nothing blocking the front panel IR
sensor.
Page 10
Getting connected
Last updated: August 9, 2024 09:06. Revision #13545
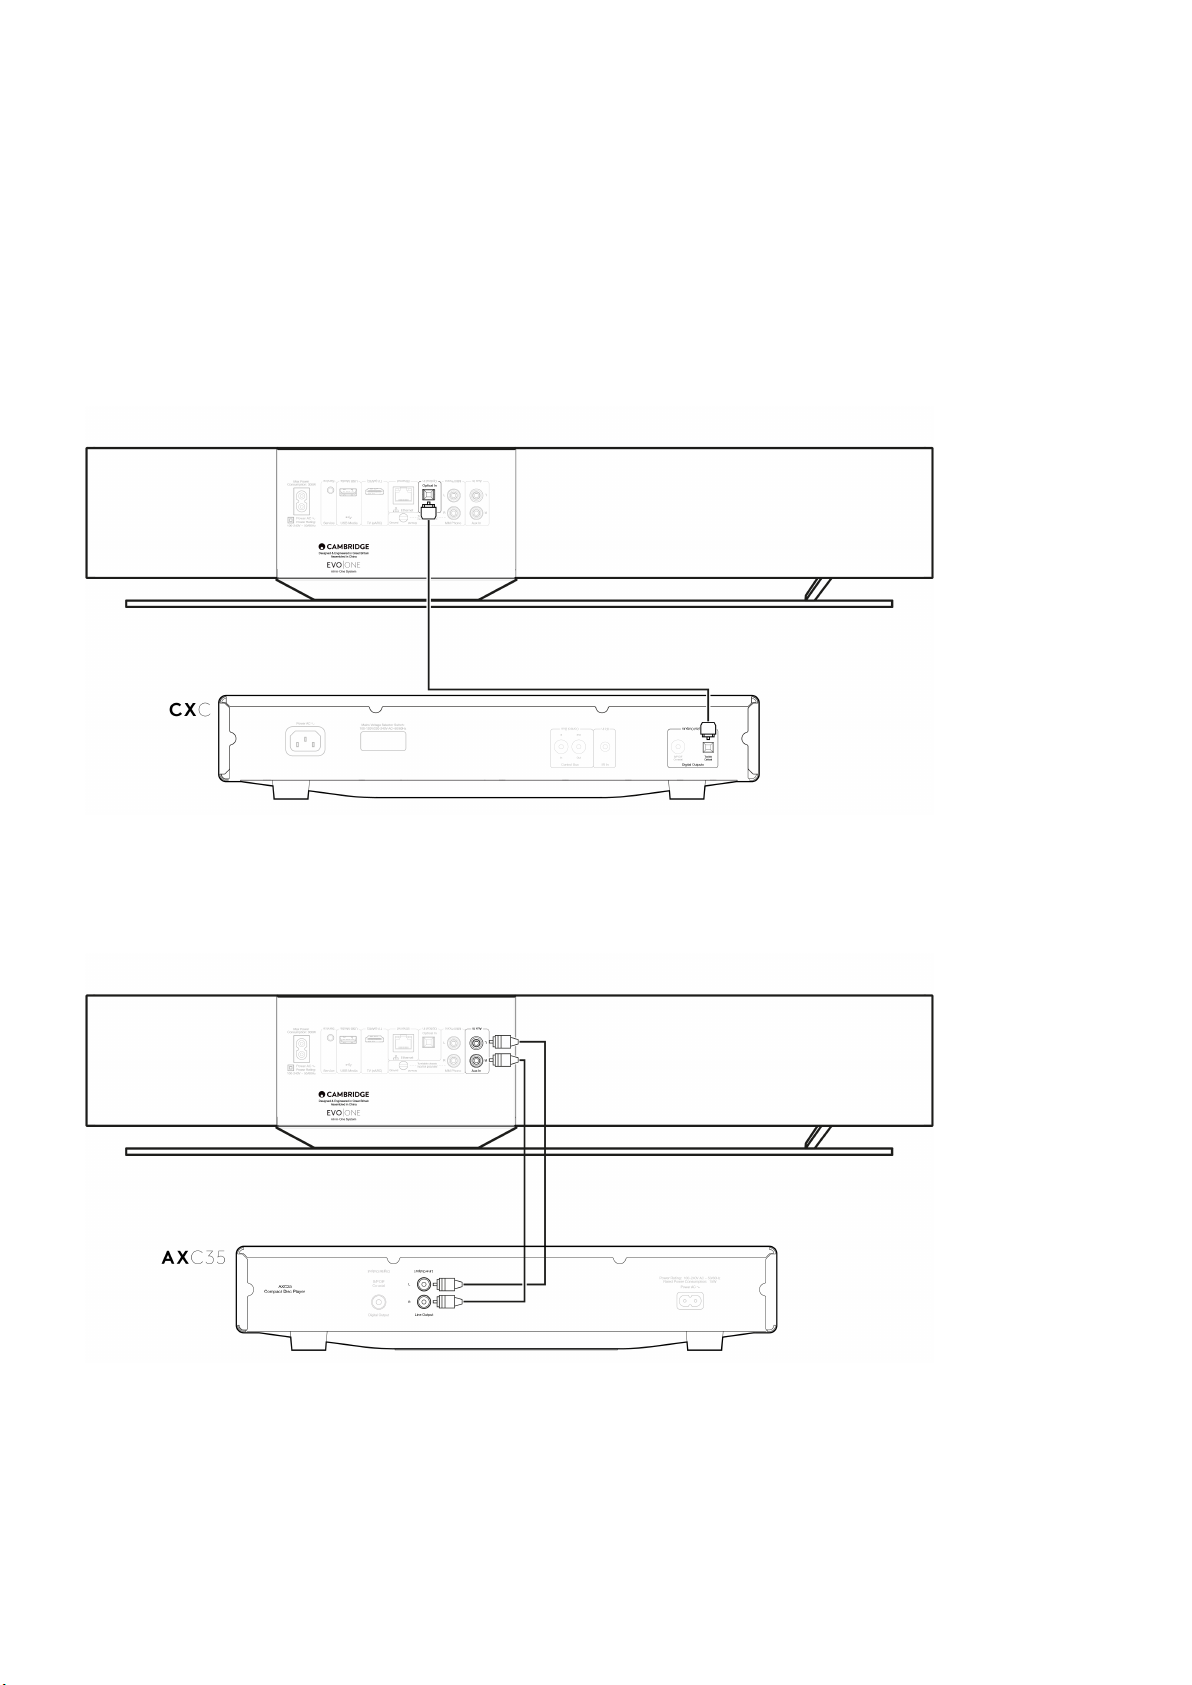
Basic Connections
Important Note: Switch the power off before making any connections.
Digital Optical Input
A digital device such as a TV or CD player can be connected to the Optical input. This input is suitable for 16-24 bit content up to 96kHz
(TOSLINK is not recommended at 192kHz sampling rates).
10
Analogue Auxiliary Input
An analogue device such as a CD player, tuner or turntable with an integrated phono stage can be connected to this line level input.
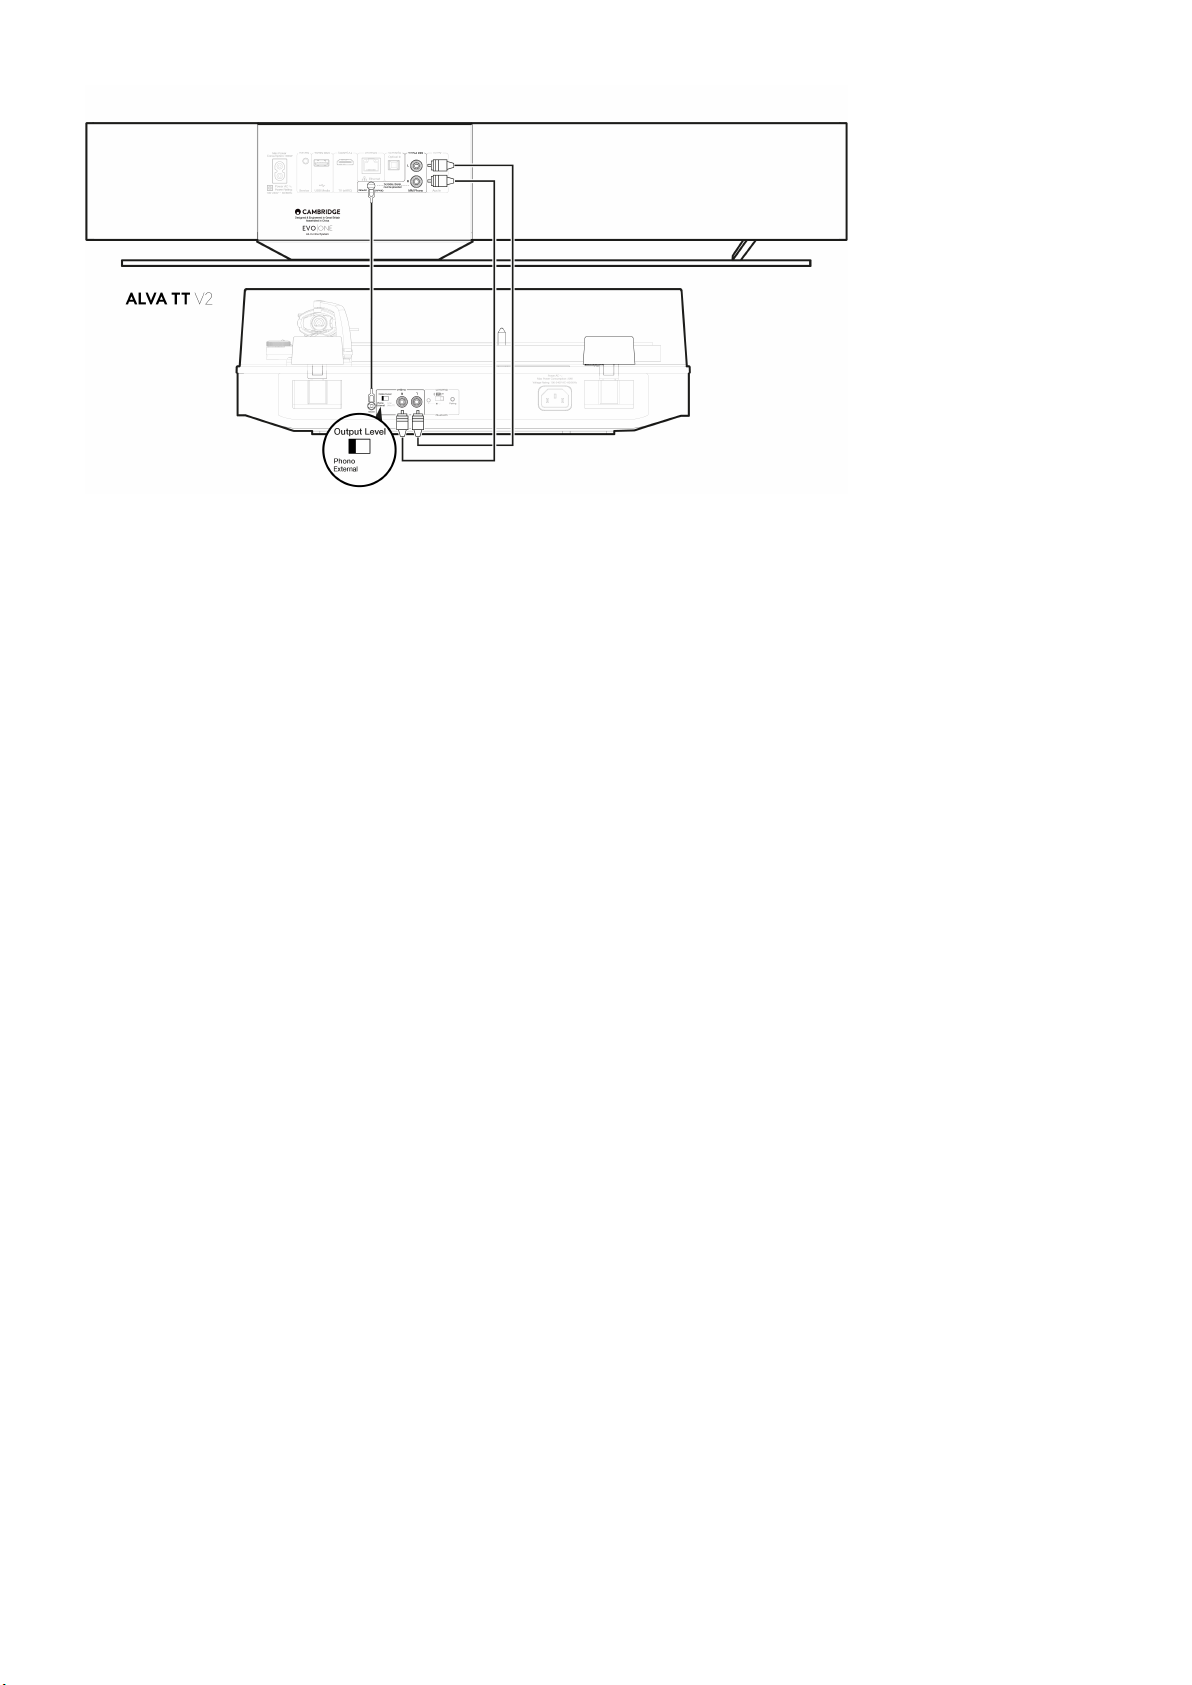
MM Phono Input
A turntable without an integrated phono stage that uses a moving magnet cartridge can be connected to the MM Phono input.
When connecting a turntable to the Phono input, you will need to ensure that the turntable ground is connected to the ground tab of the
EVO One, as shown below.
Page 11
11 12
Page 12
Connecting to a network
Last updated: August 9, 2024 09:07. Revision #13544
Important Note: It is vitally important that your EVO remains connected to the internet as often as possible. This will ensure that the unit
is regularly updated to meet essential security protocols, third party compatibility and the latest software requirements.
Failure to maintain your device with regular firmware updates as provided by Cambridge Audio will void the product warranty and is likely to
cause major issues to the unit in time. Please ensure that your unit is updated to the most current firmware version. Information on the
latest firmware version for the Evo One can be found here.
Note: The Evo One is not compatible with captive portal networks. Where possible, avoid the use of powerline adapters, Wi-Fi signal
boosters/extenders as these can disrupt the reliability of the network connection.
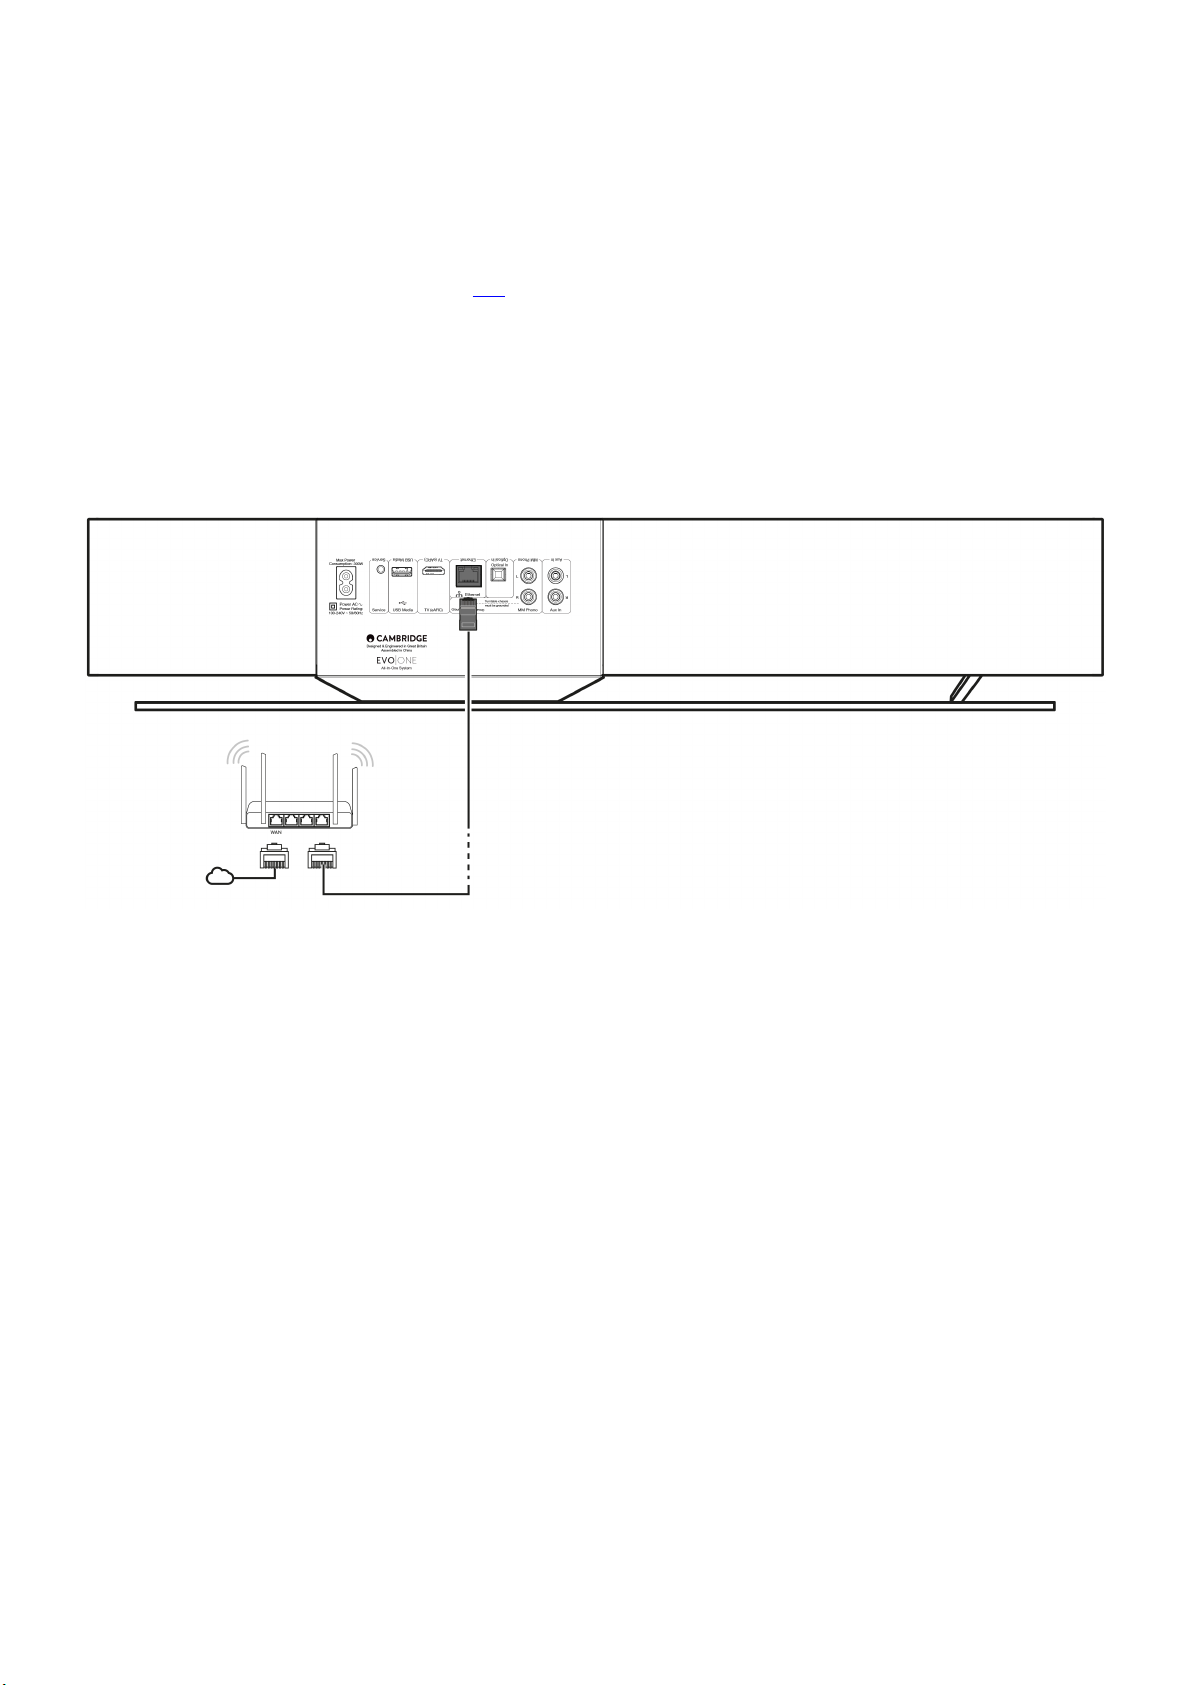
Connecting to a wired network
Connect a network cable (Category 5/5E straight-through Ethernet cable) between your player and your router.1.
Your player will now automatically connect to the network.2.
Connecting to a wireless network
Ensure the player is in range of your wireless router and then power on the player.1.
Note: If you are setting up your device for the first time or after a factory reset, you will first need to follow the on screen
instructions to select your preferred language after powering on your unit.
Please download and launch the StreamMagic app and follow the 'setting up a new product' steps within the app.2.
Follow the 'Setting up a new product' steps in the StreamMagic app. You will be guided through the wireless setup process within3.
the app, which will explain what to expect to ensure the product is in the correct state for set up. You will also be offered links for
support in case you have any questions regarding the set up process.
Page 13

13
StreamMagic app - Setup
Last updated: August 9, 2024 09:07. Revision #13626
Your player is network connected, not only can you listen to devices connected to the inputs on the product but you can also stream music
from many different sources both on your home network and from the internet.
To set up your player, please first download the StreamMagic app from the Apple app store or Google Play store.
Set up
Switch on your player and follow the on screen instructions to select your preferred language.1.
Open the StreamMagic app and follow the instructions provided to complete setting up your player on your network. This process2.
will also apply any new updates that may be pending.
Note: During the set up process you will be asked to give your player a name, please make sure this is unique to your player. This will make
it easier to find when using streaming and smart home services.
Once your player is connected to your home network you'll have full control of your sources, including internet radio, streaming services,
network and USB drives and more.
For more information on our StreamMagic app, please visit: https://www.cambridgeaudio.com/gbr/en/products/streammagic
Page 14

14
Google Home / Google Cast
Last updated: June 27, 2024 11:47. Revision #13560
Your player features Google Cast and can be incorporated in to your Google Home. To set up your player, download the Google Home app
on your smart phone or tablet.
With Google Cast built in to your player, your phone becomes your remote. Simply tap the Cast button from apps you already know and love
to stream music, podcasts and playlists from your phone, tablet or laptop to your player.
Google Cast
Your phone is your remote
Simply tap the Cast button from apps you already know and love. No new logins or downloads required.
Use your phone to search, play, pause and turn up the volume from anywhere in the home.
While you’re streaming, you can keep using your phone for other things – scroll through social media, send a text, and even accept
calls.
Enjoy music throughout your house when you use multi-room casting with Google Cast-enabled speakers.
Just say “Hey Google” to cast to your player
Unlimited entertainment, all on your schedule
Works with hundreds of apps and new apps are being added all the time.
Choose from millions of songs from popular music services like Pandora, Spotify, and Youtube Music.
Note: When first setting up your Player via the StreamMagic app or after a factory reset, please ensure that you accept Google's terms and
conditions when prompted to enable Google Cast functionality.
Android, Google Play and the Google Cast-enabled logo are trademarks of Google Inc.
Full Google Cast-enabled features may not be available in some territories.
Page 15

15
AirPlay
Last updated: October 3, 2024 09:38. Revision #13688
AirPlay is an Apple technology designed to control home audio systems and speakers in any room — with a tap or by just asking Siri — right
from iPhone, iPad, HomePod, or Apple TV. Play a song in the living room and kitchen at the same time or adjust the volume in any room, all
in sync.
After installing your player, add it to the Apple Home app with a few simple steps using your iPhone or iPad
How to use AirPlay from iPhone or iPad
1. Ensure your player is connected to your network.
2. Open the app that you want to AirPlay from.
3. Tap or .
4. Select your player as your AirPlay device.
How to use AirPlay from Control Center
To switch the audio on your device from Control Center:
Swipe down from the top right side of the screen on your device to open Control Center.
Touch and hold in the upper-right corner, then select your player.
This product supports AirPlay 2 and requires iOS 11.4 or later.
Apple and AirPlay are trademarks of Apple Inc., registered in the U.S. and other countries.
Use of the Works with Apple badge means that an accessory has been designed to work specifically with the technology identified in the
badge and has been certified by the developer to meet Apple performance standards.
Page 16

Built-in streaming services
Last updated: October 3, 2024 09:34. Revision #13685
Your player has the following built-in streaming services:
Spotify Connect
TIDAL
Qobuz
Deezer
Note: It is essential that the device you are streaming from (smartphone, tablet, computer, etc.) is on the same Wi-Fi network as your
player, to ensure that the units can communicate with each other.
Spotify Connect
Use your phone, tablet or computer as a remote control for Spotify.
Go to spotify.com/connect to learn more.
TIDAL (Connect)
1. Open the TIDAL app and choose the playlist, album, song, etc. that you wish to stream to your player.
2. Select the Sound Output devices icon within TIDAL and select your player from the list.
3. TIDAL Connect should now be streaming your chosen content to your player.
16
Go to tidal.com/connect to learn more
TIDAL (via StreamMagic)
1. Open the StreamMagic app and navigate to the Library tab, and then select TIDAL.
Note: Please ensure that you sign into your TIDAL account when prompted to do so. This will only be required on the first instance of use to
link the account to the StreamMagic app.
2. Choose the playlist, album, song, etc. that you wish to stream to your player.
3. TIDAL should now be streaming your chosen content to your player.
Qobuz (via Google Cast)
1. Open the Qobuz app and choose the playlist, album, song, etc. that you wish to stream to your player.
2. Select the Google Cast icon within Qobuz and select your player from the Qobuz Connect list.
3. Qobuz should now be casting your chosen content to your player.
Qobuz (via StreamMagic)
1. Open the StreamMagic app and navigate to the Library tab, and then select Qobuz.
Note: Please ensure that you sign into your Qobuz account when prompted to do so. This will only be required on the first instance of use to
link the account to the StreamMagic app.
2. Choose the playlist, album, song, etc. that you wish to stream to your player.
3. Qobuz should now be streaming your chosen content to your player.
Deezer (via Google Cast)
1. Open the Deezer app and choose the playlist, album, song, etc. that you wish to stream to your player.
2. Select the speaker icon within Deezer, then select 'Google Cast'. Select your player from the list.
3. Deezer should now be casting your chosen content to your player.
Deezer (via StreamMagic)*
1. Open the StreamMagic app and navigate to the Library tab, and then select Deezer.
Note: Please ensure that you sign into your Deezer account when prompted to do so. This will only be required on the first instance of use
to link the account to the StreamMagic app.
Page 17

17
2. Choose the playlist, album, song, etc. that you wish to stream to your player.
3. Deezer should now be streaming your chosen content to your player.
*Deezer is only available within the StreamMagic app when running firmware version 129-b-004 or later and StreamMagic app version 2.9.0
or later.
Page 18

Internet radio
Last updated: October 3, 2024 09:36. Revision #13686
You can browse and play a wide variety of Internet Radio stations in the StreamMagic app Radio tab. You can also assign up to 99 of your
favourite Internet Radio stations and other media as presets on your player, which can then be recalled using the StreamMagic app. A
limited amount of presets can be recalled via the remote control if your player includes one.
You can search and assign a preset via the StreamMagic app:
Within the StreamMagic app navigate to the Radio tab.1.
Use the Search for Radio search tab at the top of the page or enter a Custom URL link by selecting URL.2.
Once you have located the station you wish to store, select and you will be prompted with the option to Play now or Add to3.
presets.
Add station to the desired preset for your player between 1-99.4.
You will then receive confirmation that the station is saved to the chosen preset.5.
Note: Please ensure that the custom URL stream is one of the following supported file types: ALAC, WAV, FLAC, AIFF, DSD (x256), WMA,
MP3, AAC, HE AAC AAC+, OGG Vorbis.
To remove a preset (iOS):
Within the StreamMagic app navigate to the Home tab.1.
Scroll to the bottom of the page where you find your player's Presets, and select EDIT.2.
To remove a station from preset, tap the red circle icon and then press Delete.3.
18
To remove a preset (Android):
Within the StreamMagic app navigate to the Home tab.1.
Scroll to the bottom of the page where you find your players Presets, and select EDIT.2.
Tap on the station you wish to remove.3.
Note: You may also assign a preset using a remote control if your player includes one, by pressing and holding a number on the remote
whilst a station is playing.
Page 19

19
Streaming your local digital music collection
Last updated: June 21, 2024 04:47. Revision #13556
Your player can play content from many different physical sources and this section will explain what you need to do to access and play your
locally stored digital music collection. ‘Locally Stored’ means the digital music files you have on your PC, Mac or Network Attached
Storage devices (NAS).
To stream local content, you will need the following hardware and software running in your network:
1. Your Cambridge Audio Player.
2. A mobile device such as a smartphone or tablet on which you can run the StreamMagic app, or by accessing your collection via the front
panel controls.
3. A hard drive, computer or NAS containing your compatible digital music files.
4. An active UPnP music or media server.
5. A router which is configured to allow the UPnP service.
Note: The above items must be correctly connected and configured, and it is important to note that depending on the server, NAS,
computer, etc. you’re using, this will differ from setup to setup. To help you with this we have created best practice guide which should get
you up and running with minimal fuss and effort. This can be found here.
Page 20

Bluetooth
Last updated: October 3, 2024 09:37. Revision #13687
The Bluetooth source allows your player to receive wireless Bluetooth audio from most phones, tablets and laptops.
Pairing
To begin streaming high-quality music from your chosen media source it will first need to be paired with your player.
Within the StreamMagic App navigate to the Home tab.1.
Use the “Edit” option of the source to add the Bluetooth source.2.
Return to the Home tab and select the Bluetooth source.3.
Open your mobile device or laptop's Bluetooth settings.4.
Select your player from the list of available devices.5.
Your device should now connect to your player.6.
Once paired you should be able to connect to your player at any time by selecting the Bluetooth source on your player and then choosing
your player from the list of previously connected devices.
Note:
Your Bluetooth device can only be connected to your player while the Bluetooth source is selected.
20
Page 21

TV - eARC input
Last updated: June 19, 2024 03:34. Revision #13554
The ARC or eARC function on a TV allows it to send audio and control commands to a connected audio product. This allows the TV to switch
on the audio product when needed, and also to control the volume from the TV remote.
In addition to allowing connection and control, eARC compatible TVs should also automatically set their output to an appropriate format
compatible with the connected device.
Troubleshooting
No signal shown on the front panel or no audio output from your connected product
Make sure the HDMI input on your TV supports ARC or eARC
Make sure the TV is set to use a connected audio system rather than its internal speakers
Make sure your HDMI cable is compatible with HDMI 1.4 or above
For non eARC enabled TVs, make sure that the audio output of your TV is set to 'Stereo PCM (Uncompressed)'
TV will not switch on or control your connected product
Make sure that 'TV Power Control' is enabled in the StreamMagic app on the TV ARC source settings page
Reporting an issue
If after following the above troubleshooting steps you still have a problem getting eARC to work with your product, please let our customer
support team know.
21
Page 22

USB Media
Last updated: October 3, 2024 09:39. Revision #13689
You may connect a USB SSD, USB HDD or flash drive to your player via the USB Media input located on the rear of the unit for playback.
Once connected, the following formats are supported: ALAC, WAV, FLAC, AIFF, DSD, WMA, MP3, AAC, HE AAC, AAC+, OGG Vorbis
Note: your player will read large capacity hard drives connected to the USB input. However, some larger capacity drives will require you to
use their own power supply.
Your player only supports USB hard drives which are formatted to FAT32, exFAT, NTFS and Ext4.
The primary function of your player is as a network music player. The USB ports are intended for convenient connection of USB thumb
drives. As such, we cannot guarantee compatibility with all USB HDD’s.
USB Media Playback (via StreamMagic app)
1.Connect a USB SSD, HDD or flash drive to rear panel USB Input.
2.Navigate to the Library tab of the StreamMagic app.
3.Under USB Drives, locate your USB Media device and open.
4.Upon selecting a track you will have the option to ‘PLAY FROM HERE’, ‘PLAY TRACK NOW’, ‘PLAY TRACK NEXT’ or ‘QUEUE TRACK’.
22
Playback Options:
PLAY FROM HERE – Playback of album/folder will begin from this point onwards.
PLAY TRACK NOW – Selected track will playback immediately.
PLAY TRACK NEXT – Selected track will be added to queue and playback next.
QUEUE TRACK – Selected track will be added to playback queue.
Page 23

23
Settings
Last updated: August 9, 2024 09:09. Revision #13551
Device Name
This is how your player will appear in your StreamMagic app and on your home network when using services like Spotify, Google Cast and
TIDAL Connect.
Giving your player a unique name makes it easier to distinguish when using streaming and smart home services.
AirPlay Name
This is how your player will appear when using AirPlay or the Apple Home app.
Standby Mode
This selects what type of standby mode your player will use.
Network Standby means your player will still be controllable by the StreamMagic app and other network services.
If Eco mode is chosen your player will use even less power in standby but will need to be switched on either by the front panel or the remote
control.
Automatic Power Down
This sets how long your player will wait while inactive before switching in to standby.
Display Brightness
This sets the brightness of your player’s display and buttons. If set to ‘Off’ the display will show for a few seconds after any change and then
switch off.
Volume Limit
This sets the maximum volume that other streaming services like AirPlay, Spotify, TIDAL Connect and Google Cast can set. The front panel,
remote control and StreamMagic app volume controls can override this setting.
Early Update
Setting this to ‘On’ will let you try out the latest firmware ahead of general release.
For more information and to find out what's new visit our FAQ.
Firmware
This will check for and apply any new firmware available for your player.
You can also check for new updates on the info screen and manually update the unit’s firmware by following the steps below:
Hold down the ‘i’ (Info) button on the front panel1.
As instructed on the display, press the ‘play/pause’ button to check for new firmware. The new firmware version will now update if2.
there is one available.
When left in network standby overnight your player will check and apply any new updates.
Note: Your network player must be connected to the internet to carry out firmware updates. It is recommended that you keep your network
player connected to ensure optimal performance.
Page 24
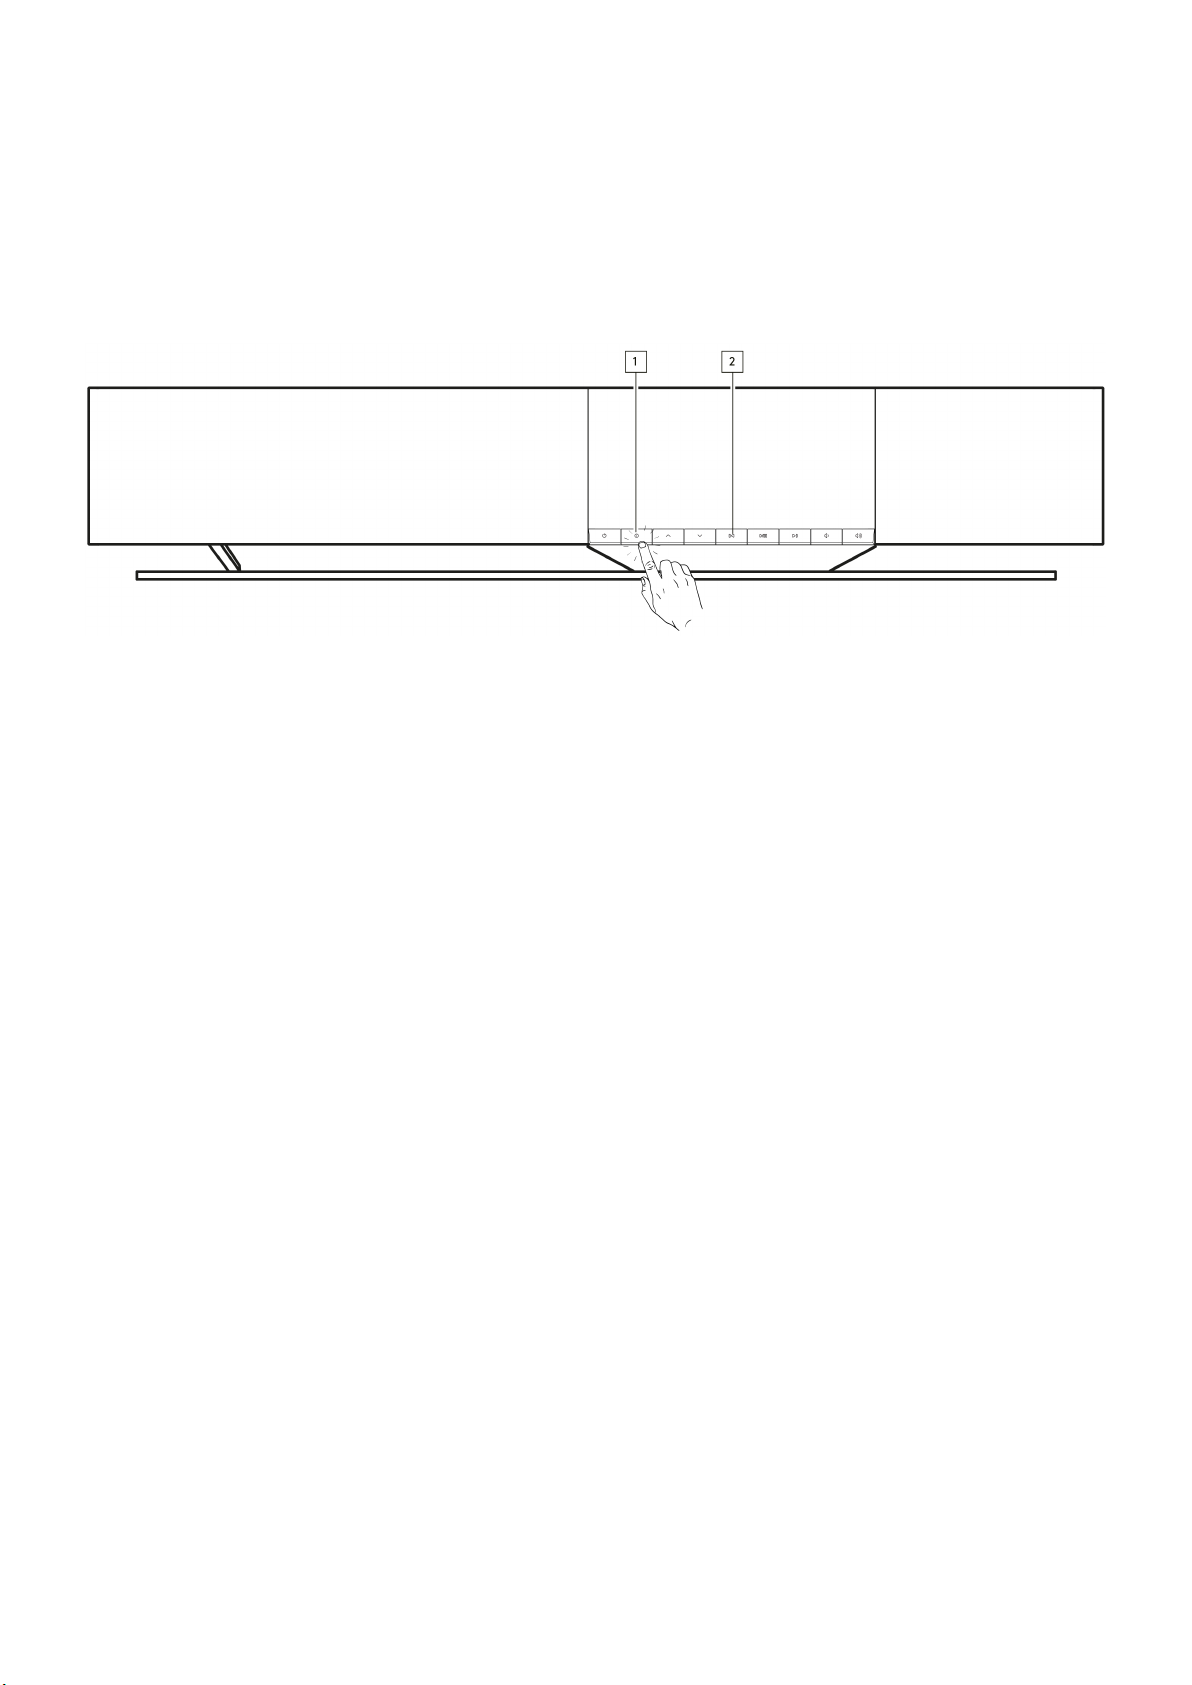
Restart
This will restart your player.
Factory Reset
This will return your player to its factory settings.
You can also do this from the info screen by following the steps below:
Hold down the ‘i’ (Info) button on the front panel.1.
As instructed on the display, hold down the ‘reverse skip’ button to perform the factory reset.2.
24
Page 25

Audio Settings
Last updated: August 9, 2024 09:10. Revision #13552
Your player offers a lot of flexibility for customizing the sound to your personal preferences and room acoustics.
Speaker Placement
This function can be found under 'Room Settings' in the StreamMagic app home page.
Adjusts for placing the player near walls. Move the slider to match the distance to the closest wall behind the speaker.
Room Compensation
This function can be found under 'Room Settings' in the StreamMagic app home page.
Adjusts for the type of room you're in. Move the slider based on how reflective the surfaces are (hard surfaces like wood or tile will be more
reflective than soft surfaces like carpet or curtains).
User EQ
25
This function can be found under 'EQ' in the StreamMagic app home page.
Provides precise control over the sound. Adjust individual frequency bands or choose presets for specific effects.
Loudness
This function can be turned on and off from the StreamMagic app volume setting page. Access this by selecting the volume icon on the 'Now
Playing' bar in the app.
It ensures a balanced sound at any volume level, by compensating for hearing sensitivity at lower volume.
Page 26

Technical specifications
Last updated: September 27, 2024 10:05. Revision #13579
POWER OUTPUT
14 x 50W into 4 Ohms
AMPLIFICATION
Class-D
SNR - 110dB
THD + N (at 1W, 1 kHz) - 0.03%
DRIVERS
14 channels:
4 x 1" silk dome tweeters
4 x 2.25" aluminium cone mid-range
6 x 2.75" long-throw woofers
FREQUENCY RESPONSE
38Hz to 20kHz +/-3dB
ANALOGUE AUDIO INPUTS
1 x Line level, 1 x MM phono
26
DIGITAL AUDIO INPUTS
1 x TOSLINK optical, 1 x TV eARC
CONNECTIVITY
UPnP, Local USB media, Airplay 2, Google Cast, Internet Radio, Spotify Connect, TIDAL, Qobuz, Deezer, RoonReady.
COMPATIBILITY
Audio Formats: WAV, FLAC, ALAC, AIFF, DSD (DSF and DFF), WMA, MP3 (CBR and VBR), AAC, HE AAC and AAC+ (CBR and VBR), OGG
Vorbis
TOSLINK Optical: 16/24bit 32-192kHz PCM only
eARC/ARC: 16/24bit 32-192kHz PCM only
Bluetooth: 5.1 A2DP / AVRCP supporting SBC and AAC
Local USB Media: 1 x USB 2.0 current limited to 1A. PCM up to 32bit/384kHz, DSD up to 128x
UPnP: PCM up to 32bit/384kHz, DSD up to 128x
File Systems: FAT32, NTFS, Ext2/3/4, ExFAT
ETHERNET
IEEE 802.3, 10 Base-T or 100 Base-T
WI-FI
IEEE 802.11 a/b/g/n/ac (2.4GHz / 5GHz)
MAX POWER CONSUMPTION
300W
STANDBY POWER CONSUMPTION
<0.5W (ECO), <2W (Network Standby)
DIMENSIONS (W x H x D)
675 x 129 x 290mm (26.6 x 5.1 x 11.4")
WEIGHT
Page 27

14.5kg (32lbs)
27
Page 28

Source quality matrix
Last updated: August 9, 2024 09:10. Revision #13562
SOURCE DELIVERY METHOD MAXIMUM RESOLUTION
Spotify Connect Mobile/Desktop App 320kbps
Spotify AirPlay Mobile/Desktop App 320kbps
Spotify Chromecast Mobile/Desktop App 320kbps
Spotify Bluetooth Mobile/Desktop App AAC
TIDAL Connect Mobile/Desktop App 24bit / 192 kHz
TIDAL (via StreamMagic app) StreamMagic App 24bit / 192 kHz
TIDAL AirPlay AirPlay 2 16bit / 44.1 kHz
TIDAL Chromecast Chromecast 24bit / 48 kHz
TIDAL Bluetooth Bluetooth AAC
TIDAL Roon Roon Endpoint 24bit / 192 kHz
Qobuz (via StreamMagic app) StreamMagic App 24bit / 192 kHz
Qobuz AirPlay AirPlay 2 16bit / 44.1 kHz
Qobuz Chromecast Chromecast 24bit / 48 kHz
Qobuz Bluetooth Bluetooth AAC
Qobuz Roon Roon Endpoint 24bit / 192 kHz
Third Party App (via AirPlay) AirPlay 2 16bit / 44.1 kHz
Third Party App (via Chromecast) Chromecast 24bit / 48 kHz
Third Party App (via Bluetooth) Bluetooth AAC
28
Page 29

29
Troubleshooting
Last updated: August 9, 2024 09:12. Revision #13563
If you have trouble connecting the Player to your network or the StreamMagic app to your Player, these steps may help to
resolve the problem:
Ensure that you have followed the 'Connecting to WiFi' steps in the manual here.
Ensure your mobile device is connected to the same network you wish to connect your Player to.
Remove any VPN or Anti Virus app you may have downloaded on your mobile device, as they can sometimes prevent the app from
'seeing' other devices on the network.
Remove any network switches/extenders etc. that are part of your network set up
Connect the unit directly to your router via an Ethernet cable.
Perform a factory reset on your unit, and then attempt the network set up steps again.
Check that a DHCP server is available, or that you have configured a static IP address on your Player. You can configure a static IP
address on the unit via the 'Network' settings in the StreamMagic app.
Reboot and/or factory reset your router.
If your Player is experiencing audio dropouts during playback from a network source, these steps may help to resolve the
problem:
Remove any network switches, extenders, boosters etc. that may be part of your network set up
Connect the unit directly to your router via an Ethernet cable.
Reset your network router.
Perform a factory reset on your Player by following the steps in the manual here.
If your Player can connect to the network successfully but is unable to play particular Internet Radio stations, it may be due
to one of the following causes:
The station is not broadcasting at this time of the day (remember it may be in a different time zone).
The link in our database is simply out of date. (You can request that a radio station is added or updated by following the steps in the
following FAQ.)
The Internet connection between the server (often located in a different country) and you is slow.
Try deleting and then re-installing the StreamMagic app on your device.
If the station is set as a preset, delete and then re-install the station as a preset in the StreamMagic app.
Perform a factory reset on your Speaker by following the steps in the manual here.
If you have problems with UPnP playback check the following:
Ensure your chosen UPnP server software can serve the file type you are trying to access. Some servers do not serve FLAC for
instance.
This Player can only play non-DRM files. Files that have DRM controls cannot be played.
If attempting to play 24-bit WAV or FLAC content, note a wired Ethernet connection is normally preferred for reliable operation due
to bandwidth considerations.
Check the Player can play back the file type you are trying to access. ALAC, WAV, FLAC, AIFF, DSD (x256), WMA, MP3, AAC, HE AAC
AAC+, OGG Vorbis can currently be played.
Ensure your PC/NAS drive are connected to the same network as your Player.
Ensure you have followed the required steps for PC/NAS drive configuration. You can find out more about this in the following FAQ.
If you have problems with USB Media playback check the following:
Check the Player can play back the file type you are trying to access. ALAC, WAV, FLAC, AIFF, DSD (x256), WMA, MP3, AAC, HE AAC
AAC+, OGG Vorbis can currently be played.
This Player can only play non-DRM files. Files that have DRM controls cannot be played.
Check that your device does not require more than 1A if it is powered from the USB socket itself.
Check your device is formatted in FAT32/NTFS/exFAT/Ext4 format.
The way you organise your USB media affects the size of the internal database the Player needs to build dynamically as you browse
content. It is good practice to create folders for Artists, within which should be a sub folder for each album containing the tracks for
that album. Libraries with thousands of tracks in one folder will progressively slow down the Player's media browsing.
If you have problems connecting a Bluetooth device to the Player check the following:
Ensure the Bluetooth source has been selected via the remote control, app or front panel source selector. You will be unable to pair
a Bluetooth device to the Player unless the Bluetooth source has been selected.
Ensure the Player is not already connected to another Bluetooth device.
There is no sound:
Ensure the Player is not in Standby mode.
Ensure the Player is not muted.
Ensure the correct source has been selected via the remote control, app or front panel source selector.
Check that any connected device is not in mute mode.
Page 30

There is a buzz or hum when connecting a turntable to the Phono input:
Check that the ground lead is securely connected to both the turntable and the Player's ground tab.
Ensure all cable connections are secure.
30
Page 31
31
Frequently asked questions
Last updated: August 9, 2024 09:12. Revision #13542
Can I play from a connected source, such as a turntable or USB HD, when the Evo One is not connected to
a network?
As the Evo One is a Network Player, it requires a network connection to function properly. This means you cannot play from connected
sources like a turntable or USB HD when the Evo One is not connected to a network. The network connection is necessary for setting up the
unit, selecting sources, and using the StreamMagic app.
Please note that it is strongly recommended that the Evo One is connected to a network at all times.
Can I access features such as Internet Radio and streaming services via the front panel?
It is not possible to access services and features via the front panel of the Evo One. You will be able to access many features via the
StreamMagic app, as well as integrated services such as TIDAL, Spotify etc. via their respective apps.
You will be able to select specific sources via the front panel source selector.
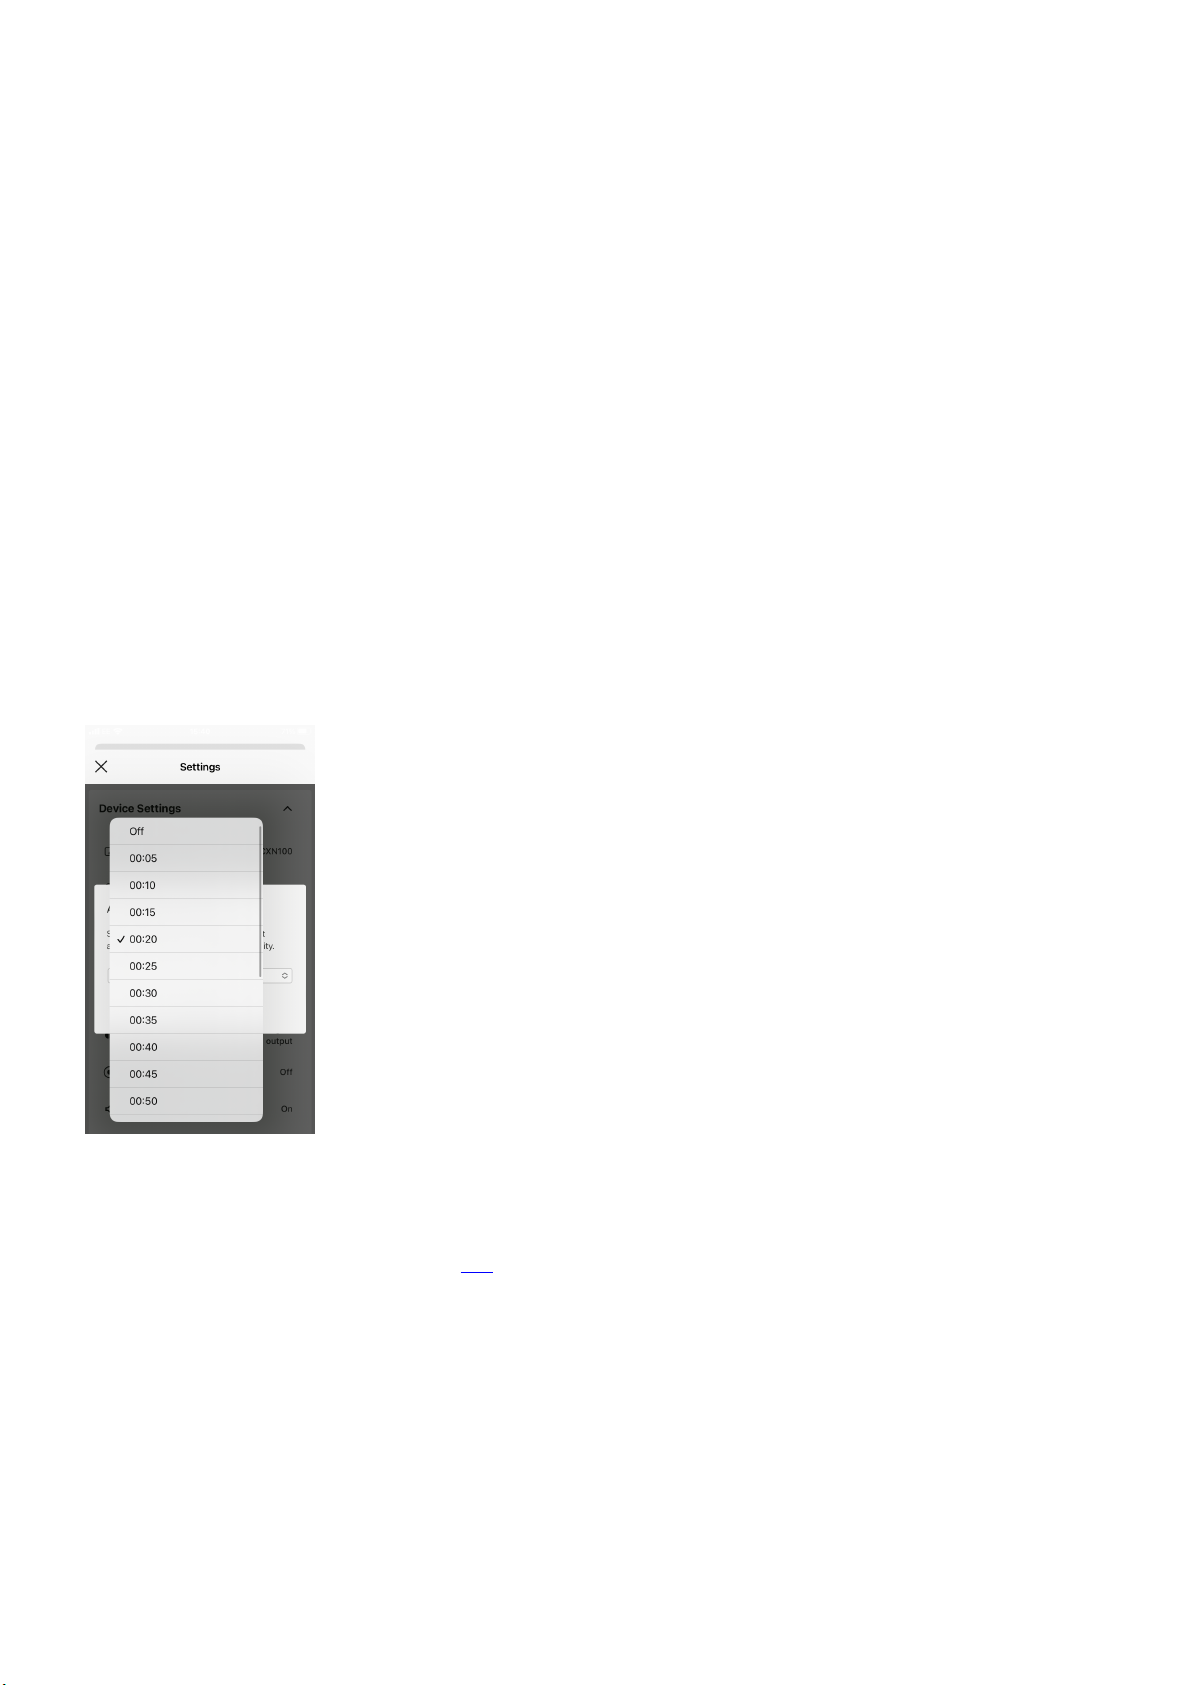
How do I stop the Evo One from powering down when not in use?
The Evo One will automatically switch to standby mode after 20 minutes of inactivity. This Automatic Power-Down (APD) feature can be
disabled, by navigating to the device settings within the StreamMagic app.
You can either disable this feature, or edit the length of time it takes for APD to be triggered, by selecting ‘Automatic Power-Down’.
How do I use the different EQ settings for the Evo One?
The Evo One has different EQ and audio customization settings that can be accessed via the StreamMagic app. An explanation of these
different audio settings can be found in the manual here.
 Loading...