

Page 1
CXA61/81
1
CXA61/81
INTEGRATED AMPLIFIER
Page 2

Contents
IMPORTANT SAFETY INSTRUCTIONS 3
LIMITED WARRANTY 5
REAR PANEL CONNECTIONS 6
FRONT PANEL CONTROLS 7
REMOTE CONTROL 8
CONNECTIONS 9
BASIC CONNECTIONS 9
SPEAKER B CONNECTIONS 9
PREAMP OUT CONNECTIONS 9
BALANCED AUDIO CONNECTIONS (CXA81 ONLY) 9
USB AUDIO CONNECTION 9
SETUP MENU 10
AUTO POWER DOWN (APD) 10
CLIPPING FUNCTION 10
USB MODE 10
ADVANCED USB AUDIO 10
USE WITH PCS/MACS/ LINUX 10
BLUETOOTH AUDIO STREAMING 10
PAIRING 10
CONTROL BUS 11
STREAMMAGIC APP (VIA CXN) 11
CAP5 - FIVE WAY PROTECTION SYSTEM 12
TROUBLESHOOTING 12
TECHNICAL SPECIFICATIONS 13
This guide is designed to make installing and using this product as easy
as possible. Information in this document has been carefully checked for
accuracy at the time of printing; however, Cambridge Audio’s policy is
one of continuous improvement, therefore design and specications are
subject to change without prior notice.
This document contains proprietary information protected by copyright.
All rights are reserved. No part of this manual may be reproduced by
any mechanical, electronic or other means, in any form, without prior
written permission of the manufacturer. All trademarks and registered
trademarks are the property of their respective owners.
© Copyright Cambridge Audio Ltd 2019.
Make sure you register your CA product:
WWW.CAMBRIDGEAUDIO.COM/REGISTER
For upcoming news on future products, software updates and exclusive
oers.
Support
FAQS AND SUPPORT
Please visit https://techsupport.cambridgeaudio.com
GET IN CONTACT WITH OUR
DEDICATED TECHNICAL SUPPORT TEAM:
support@cambridgeaudio.com
UK
US: +1 877 357-8204
HK: +852 2882 4000
Page 3

Important safety instructions
For your own safety please read the following important safety instructions
carefully before attempting to connect this unit to the mains power supply.
They will also enable you to get the best performance from and prolong the
life of the unit:
1. Read these instructions.
2. Keep these instructions.
3. Heed all warnings.
4. Follow all instructions.
5. Do not use this apparatus near water.
6. Clean only with a dry cloth.
7. Do not block any ventilation openings. Install in accordance with the
manufacturer’s instructions.
8. Do not install near any heat sources such as radiators, heat registers,
stoves, or other apparatus (including ampliers) that produce heat.
9. Do not defeat the safety purpose of the polarized or grounding-type
plug. A polarized plug has two blades with one wider than the other.
A grounding-type plug has two blades and a third grounding prong.
The wide blade or the third prong are provided for your safety. If the
provided plug does not t into your outlet, consult an electrician for
replacement of the obsolete outlet.
10. Protect the power cord from being walked on or pinched, particularly
at plugs, convenience receptacles and the point where they exit from
the apparatus.
11. Only use attachments/accessories specied by the manufacturer.
12. Use with only the cart, stand, tripod, bracket, or table
specied by the manufacturer, or sold with the apparatus.
When a cart is used, use caution when moving the cart/
apparatus combination to avoid injury from tip-over.
13. Unplug this apparatus during lightning storms or when unused for
long periods of time.
14. Refer all servicing to qualied service personnel. Servicing is required
when the apparatus has been damaged in any way, such as the powersupply cord or plug having been damaged, liquid has been spilled or
objects have fallen into the apparatus, the apparatus has been exposed
to rain or moisture, does not operate normally, or has been dropped.
WARNING:
- Do not place the unit in an enclosed space; if you wish to place the
unit on a shelf, use the top shelf to allow maximum ventilation. Do not
put any objects on top of this unit. Do not situate it on a rug or other
soft surface and do not obstruct any air inlets or outlet grilles. Do not
cover the ventilation grilles with items such as newspapers, tablecloths,
curtains, etc.
- To reduce the risk of re or electric shock, do not expose this apparatus
to rain or moisture . This unit must not be used near water or exposed
to dripping or splashing water or other liquids. No objects lled with
liquid, such as vases, shall be placed on the unit.
- Danger of explosion if battery is incorrectly replaced. Replace only with
the same or equivalent type.
- The battery (battery pack or batteries installed) shall not be exposed to
excessive heat such as sunshine, re or the like.
- The unit must be installed in a manner that makes disconnection of
the mains plug from the mains socket outlet (or appliance connector
from the rear of the unit) possible. Where the mains plug is used as the
disconnect device, the disconnect device shall remain readily operable.
- Please refer to the information on the exterior rear panel for electrical
and safety information before installing or operating the apparatus.
- Only use the mains cord supplied with this unit.
Use of the apparatus in tropical climates - The equipment shall be used at
a maximum 45 degree C ambient temperature.
The unit is of Class 1 construction and must be connected to a mains socket
outlet with a protective earthing connection.
The lightning ash with the arrowhead symbol within an equilateral
triangle is intended to alert the user to the presence of un-insulated
'dangerous voltage' within the product’s enclosure that may be of sucient
magnitude to constitute a risk of electric shock to persons.
Warning: To reduce the risk of electric shock, do not remove cover (or
back) as there are no user-serviceable parts inside. Refer servicing to
qualied personnel.
The exclamation point within an equilateral triangle is intended to
alert the user to the presence of important operating and maintenance
instructions in the service literature relevant to this appliance.
VENTILATION
Important! The unit will become hot when in use. Do not stack multiple
units on top of each other.
Ensure that small objects do not fall through any ventilation grille. If this
happens, switch o immediately, disconnect from the mains supply and
contact your dealer for advice.
POSITIONING
Choose the installation location carefully. Avoid placing it in direct
sunlight or close to a source of heat. No naked ame sources, such as
lighted candles, should be placed on the unit. Also avoid locations subject
to vibration and excessive dust, cold or moisture. The unit can be used in
a moderate climate.
This unit must be installed on a sturdy, level surface. Do not place in a
sealed area such as a bookcase or in a cabinet. Do not place the unit on
an unstable surface or shelf. The unit may fall, causing serious injury to a
child or adult as well as serious damage to the product. Do not place other
equipment on top of the unit.
Due to stray magnetic elds, turntables or CRT TVs should not be located
nearby due to possible interference.
Electronic audio components have a running in period of around a week (if
used several hours per day). This will allow the new components to settle
down and the sonic properties will improve over this time.
POWER SOURCES
The unit should be operated only from the type of power source indicated
on the marking label. If you are not sure of the type of power-supply to your
home, consult your product dealer or local power company.
If you do not intend to use this unit for a long period of time, unplug it from
the mains socket.
OVERLOADING
Do not overload wall outlets or extension cords as this can result in a risk
of re or electric shock. Overloaded AC outlets, extension cords, frayed
power cords, damaged or cracked wire insulation and broken plugs are
dangerous. They may result in a shock or re hazard.
Be sure to insert each power cord securely. To prevent hum and noise, do
not bundle the interconnect leads with the power cord or speaker leads.
CLEANING
To clean the unit, wipe its case with a dry, lint-free cloth. Do not use any
cleaning uids containing alcohol, ammonia or abrasives. Do not spray an
aerosol at or near the unit.
BATTERY DISPOSAL
Batteries may contain substances harmful to the environment. Please
dispose of any discharged batteries with due consideration and in
accordance with local environmental/electronic recycling guidelines.
SERVICING
These units are not user serviceable. Never attempt to repair, disassemble
or reconstruct the unit if there seems to be a problem. A serious electric
shock could result if this precautionary measure is ignored. In the event of
a problem or failure, please contact your dealer.
CXA61/81
3
Page 4
WEEE SYMBOL
The crossed-out wheeled bin is the European Union symbol
for indicating separate collection for electrical and electronic
equipment. This product contains electrical and electronic
and should not be disposed of with unsorted regular waste. Please return
-
the unit or contact the authorised dealer from whom you purchased this
product for more information.
Environmentally-friendly design of Energy-related Products (2009/125/
EC) Directives when used and installed according to this instruction
manual. For continued compliance only Cambridge Audio accessories
should be used with this product and servicing must be referred to
qualied service personnel.
Due to the surface of both heat sinks being unsuitable to attach a label,
there is no sticker on the product.
FEDERAL COMMUNICATIONS COMMISSION
Supplier’s declaration of conformity (SDoC)
Equipment: Integrated Amplier
Model: CXA61 / CXA81
Trademark: Cambridge Audio
This device complies with Part 15 of the FCC Rules. Operation is subject
to the following two conditions: (1) this device may not cause harmful
interference, and (2) this device must accept any interference received,
including interference that may cause undesired operation.
The responsible party in US:
Company name: Audio Partnership LLC
Address:
1913 N Milwaukee Ave. Chicago, IL 60647
Phone: (312) 636-4817
Legal Representative Person:
Gregg Chopper
Signature:
FEDERAL COMMUNICATIONS COMMISSION NOTICE:
This equipment has been tested and found to comply with the limits for a
Class B digital device, pursuant to Part 15 of the FCC Rules. These limits are
designed to provide reasonable protection against harmful interference in
a residential installation.
This equipment generates, uses, and can radiate radio frequency energy,
and if not installed and used in accordance with the instructions, may
cause harmful interference to radio communications. However, there is
no guarantee that interference will not occur in a particular installation.
If this equipment does cause harmful interference to radio or television
reception, which can be determined by turning the equipment o and on,
the user is encouraged to try and correct the interference by one or more
of the following measures:
equipment which should be reused, recycled or recovered
CE MARK
This product complies with European Low Voltage (2014/35/
EU), Electromagnetic Compatibility (2014/30/EU) and
RCM (REGULATORY COMPLIANCE MARK)
This product meets Australia, New Zealand Safety, EMC and
Radio Communications requirements of the ERAC and ACMA.
CU-TR MARK
This product meets Russia, Byelorussia and Kazakhstan
electronic safety approvals.
CAUTION: HOT SURFACE. DO NOT TOUCH
Both side heat sinks of the product may become hot when
operating this product continuously.
• Reorient or relocate the receiving antenna.
• Increase the distance between the equipment and the receiver.
• Connect the equipment to an outlet on a circuit dierent from that to
which the receiver is connected.
• Consult the dealer or an experienced radio/TV technician for help.
FCC Caution: Any changes or modications not expressly approved by the
party responsible for compliance could void the user’s authority to operate
this equipment.
RF Exposure Statement:
To maintain compliance with FCC’s RF Exposure guidelines. This
equipment should be installed and operated with a minimum distance of
20cm between the radiator and your body. Use only the supplied antenna.
Modications:
The FCC requires the user to be notied that any changes or modications
to this device that are not expressly approved by Cambridge Audio, may
void the user’s authority to operate the equipment.
CANADA-INDUSTRY CANADA (IC)
This radio transmitter has been approved by Industry Canada.
This device complies with Industry Canada’s license-exempt RSSs.
Operation is subject to the following two conditions.
(1) this device may not cause interference and (2) this device must accept
any interference, including interference that may cause undesired
operation of the device.
This equipment should be installed and operated with a minimum
distance of 20cm between the radiator and your body.
The transmitter must not be co-located or operating in conjunction with
any other antenna or transmitter.
The device meets the exemption from the routine evaluation limits in
section 2.5 of RSS 102 and compliance with RSS-102 RF exposure, users can
obtain Canadian information on RF exposure and compliance.
INDUSTRIE CANADA (IC)
Le présent appareil est conforme aux CNR d’Industrie Canada applicables
aux appareils radio exempts de licence. L’exploitation est autorisée aux
deux conditions suivantes :
(1) l’appareil ne doit pas produire de brouillage, et (2) l’utilisateur de
l’appareil doit accepter tout brouillage radioélectrique subi, même si le
brouillage est susceptible d’en compromettre le fonctionnement.
Cet équipement doit être installé et utilisé à une distance minimale de 20
cm entre le radiateur et votre corps.
L’émetteur ne doit pas être co-placé ni fonctionner en conjonction avec
une autre antenne ou transmetteur.
Le dispositif rencontre l’exemption des limites courantes d’évaluation
dans la section 2.5 de RSS 102 et la conformité à l’exposition de RSS-102
rf, utilisateurs peut obtenir l’information canadienne sur l’exposition et la
conformité de rf.
EUROPE-EUROPEAN UNION NOTICE
Hereby, Audio Partnership PLC declares that this product is in compliance
with Directive 2014/53/EU, the full text of the EU declaration of conformity
is available at the following internet address:
https://ww w.cambridgeaudio.com/DoC
Bluetooth Radio Frequency:
2.402GHz-2.48 GHz The Max. transmit power: 10dBm.
Page 5

Limited warranty
Cambridge Audio warrants this product to be free from defects in materials
and workmanship (subject to the terms set forth below). Cambridge Audio
will repair or replace (at Cambridge Audio’s option) this product or any
defective parts in this product. Warranty periods may vary from country
to country. If in doubt consult your dealer and ensure that you retain proof
of purchase.
To obtain warranty service, please contact the Cambridge Audio authorised
dealer from which you purchased this product. If your dealer is not
equipped to perform the repair of your Cambridge Audio product, it can be
returned by your dealer to Cambridge Audio or an authorised Cambridge
Audio service agent. You will need to ship this product in either its original
packaging or packaging aording an equal degree of protection.
Proof of purchase in the form of a bill of sale or receipted invoice, which
is evidence that this product is within the warranty period, must be
presented to obtain warranty service.
This Warranty is invalid if (a) the factory-applied serial number has been
altered or removed from this product or (b) this product was not purchased
from a Cambridge Audio authorised dealer. You may call Cambridge
Audio or your local country Cambridge Audio distributor to conrm that
you have an unaltered serial number and/or you made a purchase from a
Cambridge Audio authorised dealer.
This Warranty does not cover cosmetic damage or damage due to acts of
God, accident, misuse, abuse, negligence, commercial use, or modication
of, or to any part of, the product. This Warranty does not cover damage due
to improper operation, maintenance or installation, or attempted repair
by anyone other than Cambridge Audio or a Cambridge Audio dealer,
or authorised service agent which is authorised to do Cambridge Audio
warranty work. Any unauthorised repairs will void this Warranty. This
Warranty does not cover products sold AS IS or WI TH ALL FAULTS.
REPAIRS OR REPLACEMENTS AS PROVIDED UNDER THIS WARRANTY
ARE THE EXCLUSIVE REMEDY OF THE CONSUMER. CAMBRIDGE AUDIO
SHALL NOT BE LIABLE FOR ANY INCIDENTAL OR CONSEQUENTIAL
DAMAGES FOR BREACH OF ANY EXPRESS OR IMPLIED WARRANTY IN
THIS PRODUCT. EXCEPT TO THE EXTENT PROHIBITED BY LAW, THIS
WARRANTY IS EXCLUSIVE AND IN LIEU OF ALL OTHER EXPRESS AND
IMPLIED WARRANTIES WHATSOEVER INCLUDING, BUT NOT LIMITED
TO, THE WARRANTY OF MERCHANTABILITY AND FITNESS FOR A
PRACTICAL PURPOSE.
Some countries and US states do not allow the exclusion or limitation of
incidental or consequential damages or implied warranties so the above
exclusions may not apply to you. This Warranty gives you specic legal
rights, and you may have other statutory rights, which vary from state to
state or country to country.
For any service, in or out of warranty, please contact your dealer.
CXA61/81
5
Page 6
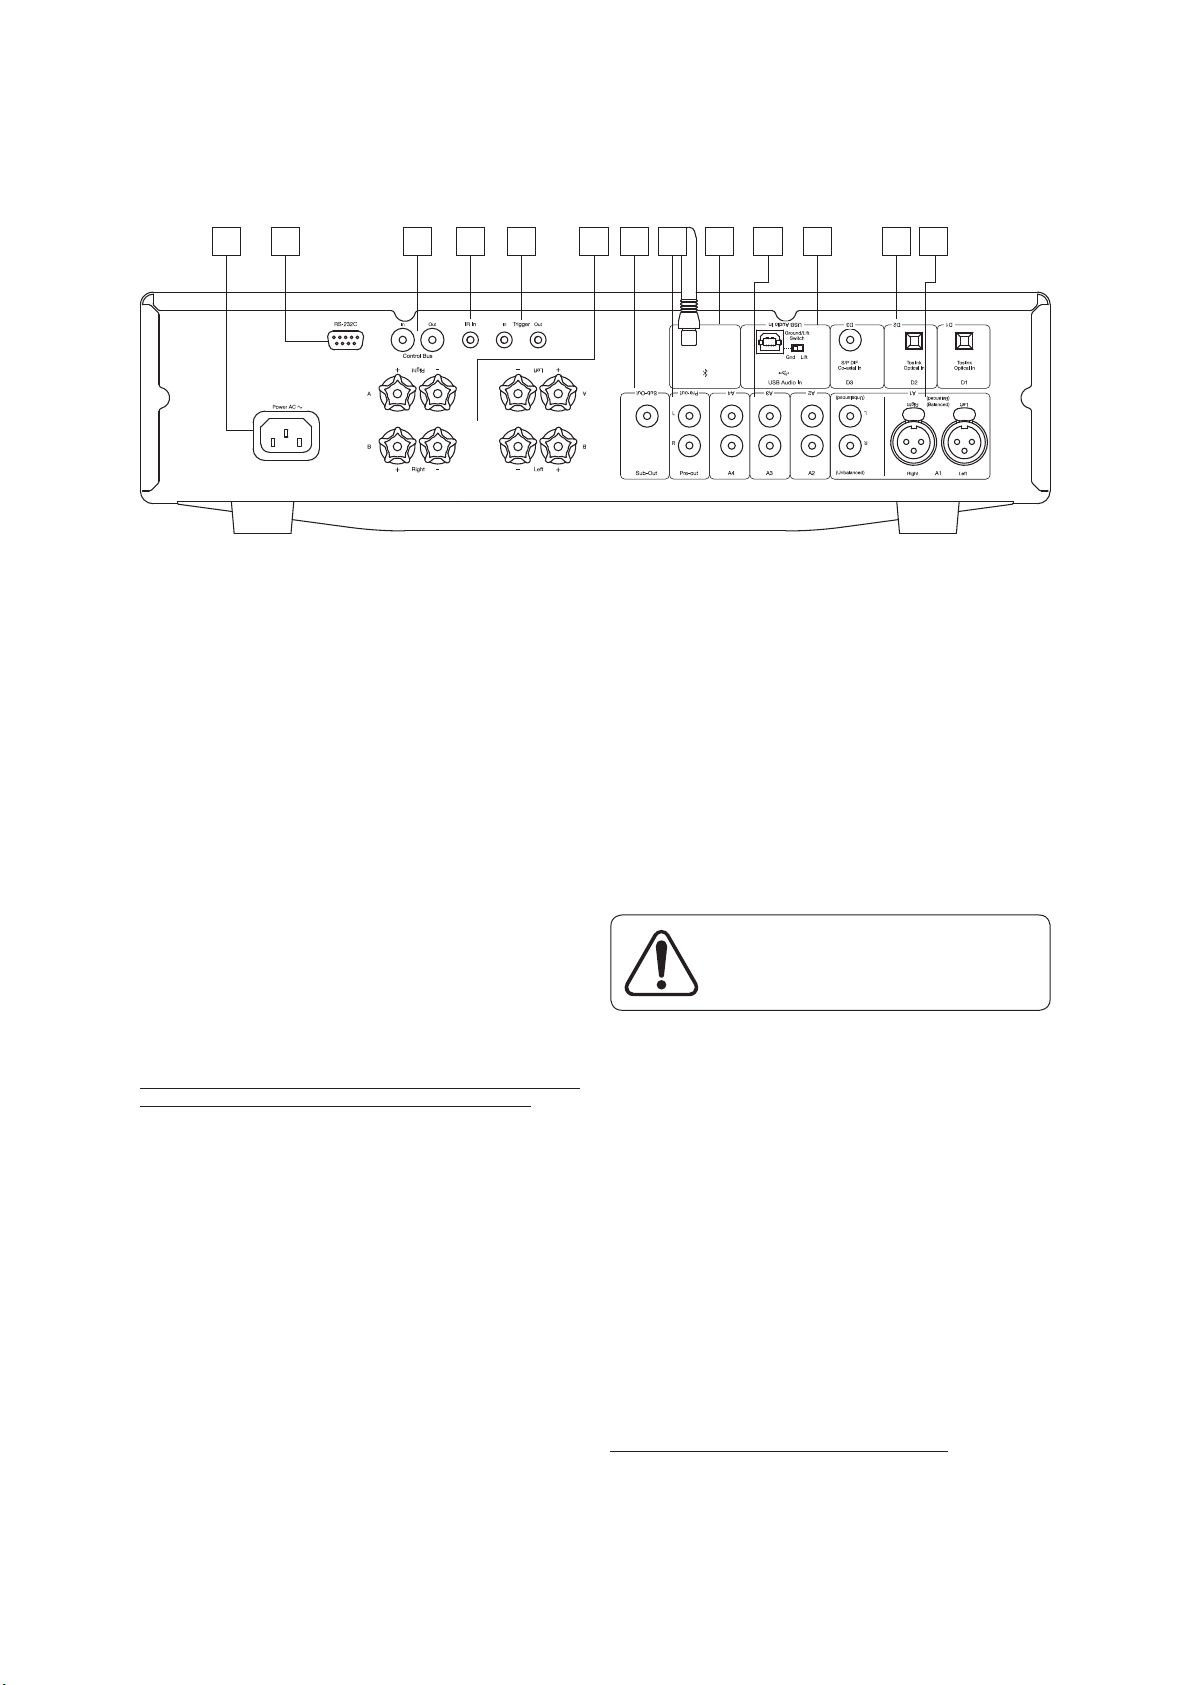
Rear panel connections
1 2 3 4 5 6 7 9 11 128 10 13
1. AC POWER SOCKET
Once you have completed all connections to the amplier, plug the
AC power cable into an appropriate mains socket then switch on. Your
amplier is now ready for use.
2. RS232C
Custom install control - a full protocol is available for the CXA on our
website.
3. CONTROL BUS
RCA sockets used to send and receive power and volume commands from
other connected CX Series products. For more information on the Control
Bus, see Control Bus section.
4. IR IN
Allows modulated IR commands from an IR repeater or custom install
systems to be received by the amplier.
5. TRIGGER IN/OUT
The CXA can be connected to the trigger control output of home
automation equipment to control the power state of the CXA. The input
level should be 12V.
The trigger out will go high while the CXA is powered on. This can be used
to turn on other equipment that has a trigger in.
6. LOUDSPEAKER TERMINALS
Important Note: When using a banana plug, make sure the speaker
terminals are completely tightened before inserting the plug.
Two sets of loudspeaker terminals are available, A (main loudspeaker
terminals) and B (secondary loudspeaker terminals). Both sets of speakers
can be turned on and o independently. Connect the wires from your left
channel loudspeaker to the Left + & - terminals, and the wires from the
right channel loudspeaker to the Right + & - terminals. In each case, the
red terminal is the positive output and the black terminal is the negative
output.
Care should be taken to ensure no stray strands of wire short the speaker
outputs together. Please ensure that the loudspeaker terminals have been
tightened completely to provide a good electrical connection. It is possible
for the sound quality to be aected if the screw terminals are loose.
7. SUB OUT
Connect to the input on an active subwoofer if required.
8. PRE-OUT
For connection to the unbalanced inputs of a power amplier or active
subwoofer.
9. BLUETOOTH ANTENNA
Used for bluetooth audio streaming. See Bluetooth section for details
10. ANALOGUE INPUTS (A1 UNBALANCED, A2, A3 AND A4)
These inputs are suitable for any 'line level' source equipment such as CD
players, DAB or FM/AM tuners etc.
Note: These inputs are for analogue audio signals only. They should not be
connected to the digital output of a CD player or any other digital device.
11. USB AUDIO IN
A USB B type socket is tted to the CXA to enable the playback of audio
from a personal computer running either Microsoft Windows or Apple
Mac OS X operating systems. Some builds of Linux are also suitable.
Note: Always use a high quality USB connection cable certied as USB
Hi-Speed. USB cable connections longer than 3m may result in
inconsistent audio performance.
Always turn the volume to minimum, switch to
another input or turn the CXA o before plugging/
unplugging cables to the USB input or whilst booting
up/shutting down your PC/Mac.
GROUND/LIFT SWITCH
The Ground/Lift switch enables the USB interface earth to be disconnected
from the CXA chassis earth. Disconnecting (lifting) the earth can be useful
if electronic hum is heard through the speakers when the USB input is
selected. The switch should otherwise be left in the Ground position.
12. DIGITAL INPUTS (D1, D2 AND D3)
TOSLINK and S/P DIF co-axial digital inputs.
Coaxial – Use a high quality 75 ohm digital RCA Phono interconnect cable
(not one designed for normal audio use). This input is suitable for 16-24 bit
content up to 192kHz.
TOSLINK Optical – Use a high quality TOSLINK bre optic interconnect
cable designed specically for audio use. This input is suitable for 16-24 bit
content up to 96kHz (TOSLINK is not recommended at 192kHz sampling
rates).
Note: To obtain the best results from your system we recommend using
only high quality Cambridge Audio interconnects. This will ensure that
you hear your system as we designed it. Please ask you dealer for details.
13. A1 INPUTS
Note: Balanced (XLR) is available on the CXA81 only.
A1 inputs feature either unbalanced (phono/RCA) or balanced (XLR)
connections. The balanced connection is the higher quality option and can
reject noise and interference in the cable when used with other equipment
that supports this function. An XLR connector is wired Pin 1 - Ground; Pin
2 - Hot (in-phase); Pin 3 - Cold (phase-inverted).
Page 7
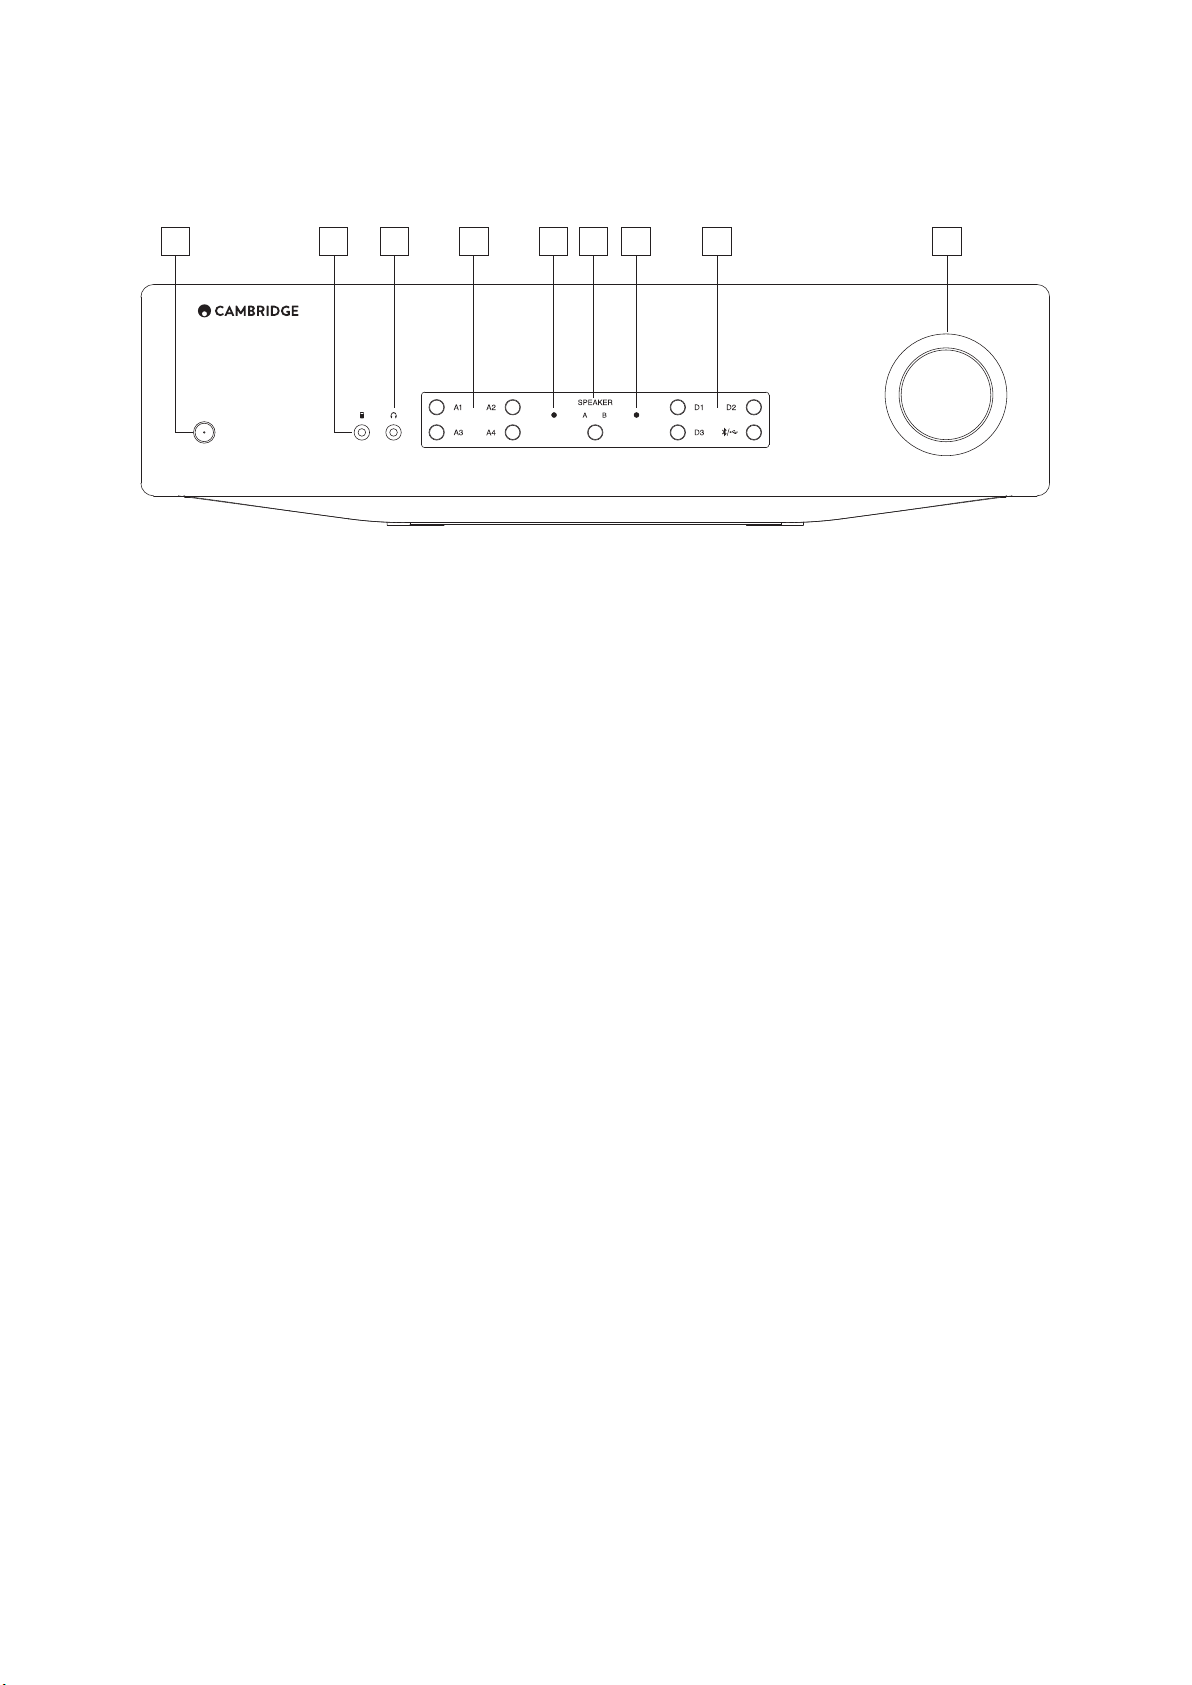
Front panel controls
1 2 3 4 5 76 98
8CAMBRIDGE
SPEAKER
e A B e
0
0
• 0
@@
CXA61/81
7
0
1. STANDBY/ON
Switches the unit between Standby mode (indicated by dim power LED)
and On (indicated by bright power LED). Standby mode is a low power
mode where the power consumption is less than 0.5 Watts. The unit
should be left in Standby mode when not in use.
This product has APD (Auto Power Down) enabled as default. After
inactivity of 20 minutes, the product will automatically switch to Standby.
See the 'Setup menu' section for further details.
2. MP3 INPUT (CXA61 ONLY)
This source input allows you to connect a portable audio device such as an
MP3 player directly into the front of the unit using the 3.5mm stereo-jack.
Note: The MP3 input can only be selected when a jack is inserted. Plugging
in a device into the jack socket automatically selects the MP3 input. With
the jack inserted pressing the A4 button will toggle between A4 and MP3
inputs. The MP3 input is shown by A4 being lit orange.
3. HEADPHONES
Allows for the connection of stereo headphones with a 3.5mm jack
plug. Headphones with an impedance of between 8 and 600 ohms are
recommended.
Note: Plugging in headphones will automatically mute the loudspeaker,
pre-out, and sub outputs.
4. ANALOGUE SOURCE SELECT BUTTONS
Push the appropriate input selection button to select the source that you
wish to listen to.
Note: On the CXA81, pressing the A1 input selection button will toggle
between balanced and unbalanced. The balanced input is shown by A1
being lit orange.
5. PROTECTION INDICATOR
See the 'CAP5' section for further details.
7. MUTE INDICATOR
The light will ash to show the outputs are muted.
8. DIGITAL SOURCE SELECT BUTTONS
Push the appropriate input selection button to select the source that you
wish to listen to.
Note: Pressing the Bluetooth/USB button will toggle between the two
inputs. The USB audio is shown by the symbol being lit orange.
9. VOLUME
Use to increase/decrease the level of the sound from the outputs of the
amplier. This control aects the level of all outputs.
6. SPEAKER A/B
Press to scroll through the speaker sets connected to the loudspeaker
terminals on the back panel (speaker sets A, B or A and B). This can be
used for listening to an extra set of loudspeakers in another room. See the
'Connections' section for further details.
Page 8

Remote control
The CXA is supplied with a remote control handset that duplicates the
front panel control functions and is also able to control other CX series
products. The supplied AAA batteries must be tted before the remote
control can be used.
The handset buttons function as described below:
1. BRIGHTNESS
Alters the brightness of the CXA display lights. There are two brightness
levels and an option to switch o the backlight.
Note: When the CXA display lights are selected to be o, selecting any of
the functions will briey switch on the lights to show the change.
2. MUTE
Press to mute or unmute the loudspeakers, pre-out, sub, and the
headphone outputs. The light will ash on the front of the unit to show
the outputs are muted.
3. STANDBY/ON
Switches the CXA between On and Standby mode.
4. SOURCES
Used to select the source inputs.
Note: For the CXA81, the A1 button has the double function of selecting
the balanced or unbalanced A1 input, and will toggle between the two
inputs when double pressing. The MP3 source can only be selected when
there is a jack connected to the input.
5. VOLUME UP/DOWN
Volume level adjustment.
1
2
>----------+-l+---
4
...--CXA--.
0000
000
re~
CXN
000©
-
0000
0000
3
®
8
5
5
~cxc~
0000
8008
Page 9

Connections
In Out
InOut
Mains Voltage Selector Switch:
100-120V/220-240V AC~50/60Hz
S/P DIF
Co-axial
Toslink
Optical
Digital Outputs
Digital Outputs
IR In Control Bus
IR InControl Bus
Power AC
D1
Toslink OpticalD2S/P DIF Co-axial
Ethernet
Toslink OpticalS/P DIF Co-axial
Ground/Lift
Switch
Right Left
LiftGnd
Digital OutputsUSB Audio In Digital Inputs USB
Ethernet Digital Outputs USB Audio InDigital InputsUSB
In
Out
Control Bus
Balanced Audio Output
Balanced Audio Output
Line Output
Line Output
IR In
For local mediaWi-Fi Dongle
IR In
Power AC
CXA61/81
9
When designing our ampliers we include features that allow you to
connect your system in various ways. The inclusion of features such as
Pre-Out and Speaker B connections mean that you can exibly congure
your system depending on your requirements.
Important Note: When using a banana plug, make sure the speaker
terminals are completely tightened before inserting the plug.
BASIC CONNECTIONS
The diagram below shows the basic connection of your amplier to a CD
player using the D3 coaxial digital input source and a pair of loudspeakers.
Digital Outputs
l8J
CJ
S/P DIF
Co-axial
Digital Outputs
SPEAKER B CONNECTIONS
The Speaker B connections on the back of the amplier allow for a second
set of speakers to be used (i.e. speakers located in another room). The
Speaker A/B button on the front panel scrolls through the selection of
speaker A only, speaker B only, and speaker A and B together.
BALANCED AUDIO CONNECTIONS (CXA81 ONLY)
The diagram below shows how to connect the CXA81 to the CXN Network
player using the Balanced Audio inputs via three pin XLR connectors.
The CXA81 can also be connected to non-Cambridge Audio sources with
balanced outputs.
Balanced Audio Output
Line Output
Right Left
Balanced Audio Output
Balanced connections in an audio system are designed to reject electrical
noise, from power wiring etc, and also the eects of noise currents
owing through ground connections. The basic principle of balanced
interconnection is to get the signal you want by subtraction, using a threewire connection. One signal wire (the hot or in-phase) carries the normal
signal, while other (the cold or phase-inverted) carries an inverted version.
The balanced input senses the dierence between the two lines to give the
wanted signal. Any noise voltages that appear identically on both lines
(these are called common-mode signals) are cancelled by the subtraction.
The CXA81 is designed to work at its highest performance when a balanced
interconnect is used.
Note: To select the balanced input on the CXA81, press the A1 button twice
on the front panel or on the remote control so that the A1 light on the front
panel display lights up Orange. Repeatedly pressing the A1 button will
toggle between balanced and unbalanced inputs.
- '
..
:•'
....
',
.'~
...
: +
'·'·,·····.··.·
,··.,
~.
.. • ..
·1
PREAMP OUT CONNECTIONS
The Preamp Out sockets are for connecting to the input sockets of a
power amplier or active subwoofer. The diagram below shows how to
connect the amplier to an active subwoofer via the Line In inputs on the
subwoofer.
Line
In
USB AUDIO CONNECTION
The CXA USB input enables the playback of audio les or streamed
programme from Microsoft Windows or Apple Mac OS X personal
computers (and some Linux builds). When connected via USB the personal
computer will identify the CXA as an audio device. Specifying the CXA in
the computer’s audio control panel will enable it to play audio data either
stored locally on the computer or streamed to the computer via a network
or the internet.
Always turn the volume to minimum, switch to another
input or turn the CXA o before plugging/unplugging
cables to the USB input or whilst booting up/shutting
down your PC/Mac.
Note: Always use a high quality USB connection cable certied as USB
Hi- Speed. USB cable connections longer than 3m may result in
inconsistent audio performance.
Page 10

Setup menu
ADVANCED USB AUDIO
The CXA is both USB 2.0 (Hi-Speed) and USB 1.1 (Full-speed) USB port
compatible.
It should also work with the new USB 3.0 ports where the PC will simply
treat the CXA as if it were a USB 2.0 or 1.1 device.
The CXA supports two USB Audio protocols (not the same as the port
types themselves) USB Audio Class 1 (which works over USB 1.1 ports and
supports up to 24-bit/96kHz) or USB Audio Class 2 (which requires a USB
2.0 port and can support up to 32-bit/384kHz).
The default conguration is USB Audio Class 2.
See our online guide at www.cambridgeaudio.com/USB-Audio on
USB Audio for more details. With careful choice of playback software and
settings many pitfalls can be avoided.
Windows based PC’s required a Cambridge Audio USB driver to be installed
before connection.
USB mode can be selected in the Setup menu. See 'Setup' section.
A brief explanation of your choices are below:
USE WITH PCS
With the CXA switched to USB Audio Class 1 the CXA will work with the
native Windows XP, Vista, 7, or 8 Audio 1.0 driver (no need to load any new
driver) and accept audio up to 24-bit/96kHz.
With the CXA switched to USB Audio Class 2 the CXA needs the Cambridge
Audio USB Audio 2.0 Driver to be loaded and can then accept up to
32-bit/384kHz.
The driver is available from www.cambridgeaudio.com/USB-Audio.
USE WITH MACS
No extra drivers are required. With the CXA switched to USB Audio 1.0 the
CXA will work with the native Mac OS-X 10.5 (Leopard) or above Audio 1.0
driver and accept audio up to 24-bit/96kHz.
With the CXA switched to USB Audio Class 2 the CXA works with the
native Mac OS-X 10.5 (Leopard) or above Audio 2.0 driver and can accept
audio up to 32-bit/384kHz.
USE WITH LINUX
For most builds of Linux with the CXA switched to USB Audio Class 1 the
CXA will work with the native Audio 1.0 driver and accept audio up to
24-bit/96kHz.
Some very new builds of Linux are now supporting USB Audio Class 2
for which the CXA should be switched to Audio 2.0 to accept audio up to
32-bit/384kHz.
For both cases because Linux builds vary according to their creators choice
of software components including drivers it is not possible to guarantee
operation and Audio drivers may need to be loaded.
'Class drivers' as they are called for generic support of Audio Class 1.0 or
Audio Class 2.0 devices may be available from the Linux community, we
do not supply these.
To enter the Setup menu, put the CXA in standby mode, whilst on Standby
mode, press and hold the Speaker A/B button until the A/B lights ash
alternatively and the sources A1-A4 light up. See below source buttons for
setup conguration:
Note: Button selected is represented by Blue light.
AUTO POWER DOWN (APD)
A1 o – Disables the APD (Auto power down) function.
A1 on – Sets the APD time to 20 minutes.
Note: Auto power down is a power down function that automatically
switches the CXA into standby mode if there is no audio. The APD time
represents the amount of time required for there to be no audio before the
CXA is automatically put into the standby mode.
CLIPPING FUNCTION
A3 on – Clipping function enabled. The volume nudges down if signal
clipping is detected.
A3 o – Clipping function is disabled.
USB MODE
A4 on – Puts the CXA in USB Audio Class 2 mode.
A4 o – Puts the CXA in USB Audio Class 1 mode.
Notes:
– To save the setup settings and exit the setup menu, press the Speaker
A/B button.
– Pressing the Standby/On button while in the setup menu will exit this
setup menu and will not save the setup settings.
Bluetooth
BLUETOOTH AUDIO STREAMING
Selecting this allows the CXA to receive Bluetooth audio from most
phones, tablets and laptops.
PAIRING
To begin streaming high quality music from your device it will rst need
to be paired with the CXA.Select the Bluetooth input on the CXA to enter
discovery mode.
Notes:
– Your device can only be paired and connected to the CXA while the
Bluetooth source is selected.
– The CXA is always in discoverable mode when there is no Bluetooth
connection.
Page 11

D1
Toslink OpticalD2S/P DIF Co-axial
Ethernet
Toslink OpticalS/P DIF Co-axial
Ground/Lift
Switch
Right Left
LiftGnd
Digital OutputsUSB Audio In Digital Inputs USB
Ethernet Digital Outputs USB Audio InDigital InputsUSB
In
Out
Control Bus
Balanced Audio Output
Balanced Audio Output
Line Output
Line Output
IR In
For local mediaWi-Fi Dongle
IR In
Power AC
In Out
InOut
Mains Voltage Selector Switch:
100-120V/220-240V AC~50/60Hz
S/P DIF
Co-axial
Toslink
Optical
Digital Outputs
Digital Outputs
IR In Control Bus
IR InControl Bus
Power AC
D1
Toslink OpticalD2S/P DIF Co-axial
Ethernet
Toslink OpticalS/P DIF Co-axial
Ground/Lift
Switch
Right Left
LiftGnd
Digital OutputsUSB Audio In Digital Inputs USB
Ethernet Digital Outputs USB Audio InDigital InputsUSB
In
Out
Control Bus
Balanced Audio Output
Balanced Audio Output
Line Output
Line Output
IR In
For local mediaWi-Fi Dongle
IR In
Power AC
Control Bus
CXA61/81
11
The Control Bus allows any compatible Cambridge products to synchronise
when powering up the units. See the following diagrams when connecting
the CXA using the provided Control Bus cable.
Another added feature with this Control Bus is the use of the StreamMagic
app. You can use the StreamMagic app to control the CXA via the CXN.
STREAMMAGIC APP (VIA CXN)
When using the app to turn the CXN on/o, this will also turn the CXA on/
o. The app can also be used to control the volume of the CXA. Connect
the CXN control bus out to CXA in. For more information, see the CXN
manual.
Control Bus
CXA WITH CXC
When turning the CXA on/o, this will also turn the CXC on/o. Connect
the CXA control bus out to CXC in.
CXA WITH CXN AND CXC
Using the CXA as the primary power controller, see the diagram below.
When turning the CXA on/o, this will also turn the CXN and CXC on/o.
Control Bus
In
Control Bus
InOut
In Out
Control Bus
Adding an additional connection from CXN to CXA will enable the use of
the StreamMagic app function.
§ ~0 ®
~
®~~.
J ::
I ,
~!-
~
]";
-~
~lt~f~lIT~
CXA WITH CXN
Note: Without using the StreamMagic app to control the CXA.
When turning the CXA on/o, this will also turn the CXN on/o. Connect
the CXA control bus out to CXN in.
Control Bus
In
In Out
Control Bus
Control Bus
In
InOut
Out
Control Bus
Page 12

CAP5 - Five way protection system
Cambridge Audio has developed a proprietary protection system to ensure
reliability and a long life for its ampliers and the speakers they are
connected to. This protection system comprises of ve main protection
methods:
1. DC DETECTION
Indication - Unit has switched o during operation. The front panel LED
light ashes together in the following sequence, one ash with long pause
between ashes. Read below for more information.
Description - CAP5 oers loudspeaker protection if the output of the
amplier goes to a high constant voltage (DC) because of some internal
fault. This is a rare fault although detecting it could just save those
expensive loudspeakers.
Remedy - Due to the necessary sensitivity of the DC protection circuit,
extremely hard clipping of the amplier may cause DC protection to be
triggered. If this fault occurs, please contact your dealer for service.
2. OVER TEMPERATURE DETECTION
Indication - Unit has switched o during operation. The front panel LED
light ashes together in the following sequence, two quick ashes with
long pause between ashes. Read below for more information.
Description - Over temperature is caused by a combination of high
listening levels and low impedance speakers. CAP5 includes temperature
detection which constantly monitors the heat generated by the output
transistors. If the monitored temperature reaches a high level (suitably
within the limits of the output devices) the amplier will automatically
switch into a fault mode. The unit should ideally be left for 15 minutes in
this state to cool down adequately. If the unit has not fully cooled down
then the temperature may reach the limit soon after the amplier is
powered up. If the loudspeaker impedance is low the temperature of the
amplier may rise faster as the amplier is working harder. If the amplier
is mounted in a cabinet or the ventilation slots are obstructed the over
temperature detection may activate/reactivate after a short listening time.
Remedy - The internal temperature of the output transistors has reached
the over temperature limit. Leave the unit for 15 minutes to cool down
before pressing the Standby button to resume normal operation.
3. OVERVOLTAGE/OVERCURRENT DETECTION
Indication - Unit has switched o during operation. The front panel LED
light ashes together in the following sequence, three quick ashes with
long pause between ashes. Read below for more information.
Description - CAP5 oers V/I (voltage/current) protection by constantly
monitoring the output transistors to keep them working inside their
Safe Operating Area (SOA). The SOA is a set of limits given by the output
transistor manufacturer to ensure reliability. The V/I protection has been
incorporated within the amplier circuitry to provide a fast response to
temporary overload conditions. When the V/I protection is triggered
the unit will continue to operate but distortion may be heard as the unit
protects the output transistors.
Remedy - Reduce the volume. If distortion is still present, check the
speaker connections and ratings.
4. SHORT CIRCUIT DETECTION
Indication - Unit has switched o during power up. The front panel LED
light ashes together in the following sequence, four quick ashes with
long pause between ashes. Read below for more information.
Description - During power up from Standby CAP5 performs a check on
the loudspeaker terminals to see if a short across the terminals has been
accidentally introduced. If the resistance measured across the loudspeaker
terminals is too low the unit will stay in Standby mode until the fault has
been removed and Power up is re-attempted.
Remedy - There may be a short circuit between the loudspeaker terminals.
Check all loudspeaker connections before attempting to switch the unit
out of Standby.
5. INTELLIGENT CLIPPING DETECTION
Indication - Volume is reduced automatically.
Description - CAP5 has the ability to detect when the amplier starts
to clip or overdrive at its output, which can damage loudspeakers, and
degrade the sound. Clipping distortion is caused at high volume levels
when the output signal attempts to go outside the maximum voltage that
the amplier can provide, causing the tops of the signal to atten o.
When CAP5 detects clipping the volume will be automatically reduced
down until CAP5 detects an undistorted output.
Note: The clipping detection is disabled by default. The clipping detection
can be enabled in the Setup menu (see 'Setup menu' section).
Troubleshooting
THERE IS NO POWER
Ensure the AC power cord is connected securely.
Ensure the plug is fully inserted into the wall socket and is switched on.
Check fuse in the mains plug or adaptor.
THERE IS NO SOUND
Make sure the unit is not in Standby mode.
Check that source component is properly connected.
Check that your speakers are properly connected.
Make sure the selected speaker A/B light corresponds to the speaker
terminals that the loudspeakers are connected to.
Make sure unit is not in mute mode.
THERE IS NO SOUND ON ONE CHANNEL
Ensure that balance control is in the correct position.
Check speaker connections.
Check interconnects.
THERE IS A LOUD BUZZ OR HUM
Check turntable or tone arm for ground and connection lead fault.
Ensure no interconnects are loose or defective.
Ensure that your turntable is not too close to the amplier.
THERE IS WEAK BASS OR DIFFUSED STEREO IMAGING
Ensure that speakers are not wired out of phase.
SPEAKER A/B AND MUTE LIGHT FLASHING
See section on CAP5 protection system.
THE REMOTE HANDSET DOES NOT FUNCTION
Check that the batteries have not expired.
Ensure that nothing is blocking the remote sensor.
For more frequently asked questions (FAQ’s), technical advice and
information on getting the most out of your CXA, please visit the Support
section on Cambridge Audio’s website:
www.cambridgeaudio.com/support
For all servicing, in or out of warranty, please contact your dealer.
Page 13

Technical specications
CXA61/81
13
CONTINUOUS POWER OUTPUT
THD (UNWEIGHTED)
FREQUENCY RESPONSE
S/N RATIO (REF 1W INTO 8 OHM)
S/N RATIO (REF FULL POWER)
INPUT SENSITIVITY
INPUT IMPEDANCES
INPUTS
OUTPUTS
POWER AMP DAMPING FACTOR
USB AUDIO INPUT
BLUETOOTH
COMPATIBILITY
MAX POWER CONSUMPTION
STANDBY POWER CONSUMPTION
DIMENSIONS
WEIGHT
CXA81: 80W RMS into 8 Ohms, 120W RMS into 4 Ohms
CXA61: 60W RMS into 8 Ohms, 90W RMS into 4 Ohms
<0.002% 1kHz at 80% of rated power
<0.02% 20Hz – 20kHz at 80% of rated power
<5Hz – 60kHz +/-1dB
>93 dB
>105 dB
Input A1-A4 (unbalanced) 370mV RMS
CXA81: Input A1 (balanced) 50 kOhm
Input A1-A4 (unbalanced) 43 kOhm
CXA81: Balanced and Unbalanced
MP3 jack (CXA61), Coax SPDIF, TOSLINK, Bluetooth, USB Audio
Speakers, Headphone, Preamplier Output, Sub Output
>110 at 1kHz
USB Type B conforming to USB Audio Class 1 or USB Audio Class 2 (user selectable)
4.2 A2DP/AVRCP supporting SBC, aptX and aptX HD codecs
USB Audio Class 1: Up to 24-bit 96kHz (asynchronous)
USB Audio Class 2: Up to 32 bit 384kHz (asynchronous) and up to DSD-256
TOSLINK: 16/24-bit 32-96kHz
Coax SPDIF: 16/24-bit 32-192kHz
CXA81: 750W
CXA61: 600W
<0.5W
115 x 430 x 341mm (4.5 x 16.9 x 13.4”)
8.7kg (19.1Lbs)
Page 14

WW W.CAMBRIDG EAUD IO.COM
Gallery Cou rt, Hankey Place
London
1 4
United K ingdom
Cambr idge Audio is a bra nd of Audio Partnership Plc.
Registered in England No. 2953313
AP 36766/1
Page 15

CAMBRIDGE
CXC
AUDIO
QUICK
How to configure a basic system
INBETRIEBNAHME FUR
Konfigurieren eines einfachen Systems
DEMARRAGE RAPIDE
Comment
, ,
GUIA
Como configurar
AVVIO
START
configurer
un
RAPIDA
un
sistema basico
RAPIDO
••
systeme simple
CXA81
CXA6
CXN
UNGEDULDIGE
1
V2
Come configurare il sistema di base
KOM
Sadan konfigureres
6blCTPMI
Ka
K CKOHcp111ryp111posaTb OCHO
HURTIGT I GANG
et
almindeligt system
YCTAHOBKA
BHYIO
KaHanbHYIO
·t~~Ar~ifffl
SlDioJ~cti-@¥7.Js:*~Jt
C,
0
Ii
ii
0
CI/ICTe
My
0 o I
0
olg
0 0
0 0 0
gl
I
0
000
0
GREAT
BRITISH
SOUND
SINCE
1968
Page 16

CAMBRIDGE
AUDIO
Please
check
the
ex
support
http://techsupport.cambridgeaudio.com for details
advice on compatibility with
copy
of this manual.
page
other
at
products
, audio formats and the
of
any
new
features,
most
CXA*
*
recent
Besuchen Sie die
http://techsupport.cambridgeaudio.com , um Details zu neuen Funktionen,
Tipps zur Kompatibilitat
Version dieses
De
meme, pour
sur
la compatibilite avec d'autres produits
le plus recent
du
ex
sur le site http://techsupport.cambridgeaudio.com
Visite
tamb
http://techsupport.cambridgeaudio.com para obtener informaci6n sobre
nuevas funciones, compatibilidad con otros
version
mas
eonsigliamo
ex
su http://techsupport.cambridgeaudio.com
informazioni dettagliate su qualsiasi
con altri prodotti e formati audio e la
Las aven supportsidan for
information
ljudformat
KpoMe
TOro, CBeAeHHH O HOBblX
AaHHOro
nocneAHIOIO
rexH1-1YecKo~
http:/ /techsupport.cambridgeaudio.com
i\!ii1i
a
g,i;111 eXsilH~W http://techsupport.cambridgeaudio.com
~
ycrpo~CTBa C
1oJeXJtti¥
u•~-~
OOft
ffiW~•WR@~~*•~m-Bmm~ffl~~~- ~~ffi~~-
Support
Handbuchs
en savoir plus sur
de
ce manuel, nous vous invitons a consulter la page
ien la pagina
reciente
inoltre di consultare la pagina dedicata all 'assistenza del dispositivo
om
nya funktioner, rad
samt
den senaste utgavan av
peAaKL.11-1IO
nOAAep>t<Kl-1
mW
http:/ /techsupport.cambridgeaudio.com
~
~-~~~a•••~~••tt~~-
-Seite
fur
den
ex
unter
mit
anderen Produkten, Audioformaten und
zu erhalten.
de
nouvelles fonctions, obtenir
et
formats audio ainsi
de
soporte para el
de
este manual.
ex
pa
cpyHKL.11-1HX, peKOMeHAa1..11-11-1
APYrlllMl-1
Hacro,11.1-1ero
1113AenHHMl/1
npo1-1rpb10arem1
http:/ /techsupport.cambridgeaudio.com
om
ex
en
productos y formatos
dove
nuova
funzione, consigli sulla compatibilita
copia
piu aggiornata del presente manuale .
kompatibilitet med andra
denna
bruksanvisning.
111
3ByKOBblMl-1
PYKOBOACTBa
ex
no aApecy
MO>KHO
~&••~~ft•••·
que
sono
disponibili
produkter
no
COBMeCrnMOCrn
cpopMaTaMl/1
nony4111Tb
die
neueste
des
conseils
l'exemplaire
de
support
de
audio, y la
, a
TaK>Ke
Ha
crpaHl/llle
och
for
0000
0000
0000
0000
0000
~@)
c::>
0000
0000
0000
0000
~
Safety
Guide
WWW
~CAMBRIDGE
0
Quick
Start
Page 17

BASIC
SETUP
Einrichtung
Installation
lnstalaci6n
lmpostazioni
Opsa:!tning
CXSERIES
2
1
((<>))
LANJl]Ort=
~-----
The
Wi+fi
dongle is pre-fitted.
connected.
Your
Ethernet connection
Der
Wi-Fl
Dongle
in
Verbindung Das Geriit verwendet automatisch eine
Ethemet-
Vert>
indung, wenn eine hergestellt wird.
le
dongle
WHi
est
coonect8
. l 'appareil passera automatiquernent
en connexion
Ethernet
E!tablie.
El
accesorio
de
favor
deje1o
conectado.
utilizara
la
conexi6n
si
8Sta
se
encuemra
II
ricevitore Wi•
Fi
II
sistema
usera
automaticamente
=====================
~~
Please
unit will automatically default to
if
isl vorinstalliert Bitte lassen
prnmonte.
Wi-Fi
Ethernet
disponible
e preinstall
la
connesione via cavo
se
presente
leave
one
is
made
.
Veuillez
si
une connexioo filaire est
se encuentra pre-instalado.
La
unidad autOffiaticarnente
como
predetem,inada
.
ato.
Non
disconnettere.
.
c:::::J
CXC
CXN
Wrfi-dongeln
inkopplad.
an
LAN-nl:itver1c
ansluta v
Sie
es
Wi-Fi
na)l(SJ'¥1CTS,
le
npoeo,qHOrO C0eAHH8HVIR
laissef
W,-Rlc!l!i!Ji!l2l'i'I€, ill'll<l~i!Ji,
Ml
l'll>tlil:lHJ!l<llcll!i!Jill<Jl>t!it
i!\!JUl!
POf
W.-F;J!IUH!l!il!2!11%!<ll, ~ -
al!!JBl!!l!.tlllll!l!!!llilli!
ll'JBH!.
'lilHtl!.
CXA81
V2
.lir
ansluten
pA
Om
iadet
M0AY11b
1!!'1ll!iHill!l'I!!.
llilli~Eilbl!I:!"'
forhand och
du ansluter ett Ethemet-kabel till ett
kommer
enheten
.
y>K8
ycT8.HOl3fleH 8
He
OTKI1!048Vlre
annapaT
autornatiskt
USB
era.
n~
nepet<J'IIO'laeTCSI
b6r
pa3beM.
Hanl-T'l~
lamnas
att
(o
□
OJ
~
Important note:
Wheri
using
plug. make sura the speaker termi
are completely tightened before inserting
the plug.
Wichtiger Hinweis:
4mm Banar'l8f'l-Steckern bitte die Tem,inal-
Schrauben
vor
(!)
anziellen.
Si VOUS utili
sez
la borne
de
l'enceinte
fiche
banane
Neta
importante: Cuando use un conector
de
tipo banana, compruebe
terminales
del
comp!etamente antes
COOneciOf.
a banana
Bei
Verwendung von
dem
Einstecken handfest
des fiches bananes, serrez
avant d'inseref
.
qua
esten
de
insertar
los
apretados
attavoz
nals
la
el
Awiso
importante: quando si usa u
a
banana
4mm
, assicurarsi
cha
degli al
topar1anti
prima di inserire la spina
Viktig
infom,ation:
av banankontakter, se till
hogtalarterrninaJema
Atskrwadei1nanduansluterkontakten.
npl'I
~rlO/lb308aH\.1M
He
336yAbTe
~
3aTilt-ryn,
K/leMMbl
!l'l!llii\,
(lllll'liH!Hli!ii;U
lw;lcZJ!1J,
illlililH>/liiiii-l'sECF:l'i'l\l.
U!ilm'
(!□ll'liii!B<lliiilll
li!il!ZJ!1J
.IO!lli!ll!l>lll-l''/ECF:lf\l.
i terminali
siano fissati cooettamente
Vici
anvandning
att
ar
ordent1igt
pa3beM08
"i5a-laH"
nonHOCTblO
Ha.AC
1£\liAi'Hli
ttlliAlHi
- "
. -
.
-·
-7
- T "
® @)®
t~
&
~,~
~~~
®l~
na
spina
,;-=;:
l~
=~
""'3
J='.:=
=.,-,.-====;
g~
~~
~
Page 18

2
A CAMBRIDGE
U A
UDIO
3
ecAMBRIDGE
4
To
get the best periormance from your
manual. For more information, visit our website http://www.cambridgeaudio.com/
Um die beste Leistung aus lhren
Online-Handbuch lesen. Fur weitere lnformationen, besuchen Sie unsere Website
http://www.cambridgeaudio.com/
Pour obtenir les meilleures performances de vos produits
manuel online. Pour plus d'informations, visitez notre site Web
http://www.cambridgeaudio.com/
ex
products, please read the online
ex
Produkten zu erhalten, benutzen Sie bitte das
ex,
s'il vous plait lire
le
CXNV
2
5
twliMliilM
To setup the
Cambridge Connect app from the Apple app store
or
setting
Um den CXN
zunachst die Cambridge Connect
dem
herunter. Die App wird Ihnen helfen,
V2
Pour configurer le CXN V2, veuillez d'abord
telecharger !'application Cambridge Connect
sur I' Apple
CXN
V2,
please first download the
Google Play store. The
up
the CXN
V2.
V2
einzurichten, laden Sie bitte
Apple
App
Store oder Google Play Store
einrichten.
App
store ou Google Play Store.
app
will assist you in
App
aus
in
die
CXN
L:application vous aidera a mettre en place la
CXNV2.
Para configurar
aplicaci6n Cambridge Connect
de
Apple o
le ayudara en
Per configurare l'CXN
la
app
da Google Play. L:applicazione
creazione del CXN
lnstallera CXN
Cambridge Connect-appen
eller Google Play-butiken. Appen hjalper dig att
stalla
el
CXN
V2,
descargue primero
App
del
el
Play store
de
la
Cambridge Connect dall'Apple store o
V2
in
CXN
V2.
Google. La aplicaci6n
creaci6n
de
V2,
innanzitutto scaricare
V2.
genom att forst hamta
la CXN
vi
aiutera nella
frAn
Apple
App
V2.
App
Store
AnR
HaCTJX)i<K•
np11111o>t<eH111e
Apple
la
nOMO>K8T B8M B H8CTpO~Ke
store
il!.CXNV2,
Google Play
~li'1/ll~i~llffllD/J!.2:il!.
a211
CXN
Google Play Ni167''2 Cambridge Connect
Mt9/ll~ii\:$11tD/J1,2:~- CXN
CXN
Cambridge
app
•n•
Google
jf)\tjt;>).Appleli'1/lliffii,siilt
iffil6"Fe
V2,
ffl!/1\tjt;!Jt Apple 9/lliffif,s;;Jt
V2
CHaYana
aarpya•re
Connect
1113
Play.
Cambridge Connect Ji'1/ll,
CXN V2.
Mara3111Ha
np•nmKeH•e
Cxn
V2.
V2
,
9/ll,
Para obtener
online. Para obtener mas informaci6n, visite nuestro sitio
http://www.cambridgeaudio.com/
Per ottenere
ii
manuale online. Per ulteriori informazioni, visitate ii nostro sito httpJ/www.
cambridgeaudio.com/
For att
information, besok vAr hemsida http://www.cambridgeaudio.com/
/J,nR
ex
,
AOno11H~TeJ1bHO~
~-~~F~~~Gtt~.
http://www.cambridgeaudio.com/
~ll~
http://www.cambridgeaudio.com/
el
mayor rendimiento de los productos
le
migliori prestazioni dai vostri prodotti
fA
basta prestanda
roro,
YT06bl
no>Kany~cra,
nO/lyYITTb
npoY~Ta~Te
~HcjlopMa4~~
frAn
dina
ex
M8KC~Ma/lbHYIO
~HTepaKrnBHOO
noce™Te
~~-~--~~, ~•■
ex
iffi&l85Jftiitttlll , Blllll!IJ!PJ!"l~ll§W.
ex,
por
favor lea
web
ex,
si
prega di leggere
produkter, lasa online-manualen. For mer
npoo3BOAITTe/lbHOCTb
pyKOBOACTBO.
Haw
ee6-coo httpJ
OT
/J,nR
nO/lyYeH~R
/www
.cambridgeaudio.com/
a,
~~~~.
eaw~x
npoAYKTOB
~~~-m~~
BJ!aBrcmff'185J~iio
el
manual
Page 19

For
further information
about
Cambridge
Audio,
our
support, please visit: WWW.CAMBRIDGEAUDIO.COM
products, news, reviews and
Weitere Infos zu
und
Kundendienst finden Sie unter: WWW.CAMBRIDGEAUDIO.COM
Pour
obtenir
produits
WWW.CAMBRIDGEAUDIO.COM
Para
, nouveautes, actualites
obtener
noticias, resenas y
Per
maggiori informazioni su
Cambridge
des
informations supplementaires
mas
informaci6n acerca
soporte
Audio, unsere Produkte, Neuigkeiten, Testberichte
et
assistance, veuillez
, visite: WWW.CAMBRIDGEAUDIO.COM
Cambridge
sur
Cambridge
vous
de
Cambridge
Audio
Audio e i nostri prodotti,
articoli e assistenza, visitare: WWW.CAMBRIDGEAUDIO.COM
Du kan finde flere oplysninger
og
support
6onee
HOBOCTs:!X
WWW.CAMBRIDGEAUDIO.COM
~0~7
i~ifjfa]~ff]
N'l~IJffifiDfaJB{JJ!~f~,@
pa: WWW.CAMBRIDGEAUDIO.COM
n0Apo6Hyt0
, o63opax
a{]
fxx]
1t1HcpopMaL11t1t0 o KOMnaH111111
111
TeXHlt14eCKOIII
"!l!i:
WWW.CAMBRIDGEAUDIO.COM
om
Cambridge Audio, vores
noAD,ep>KKe
,, fi{fla{J.F~,
iJrllll
Cambridge
CM.
Ha
,
i5¥i~~3z:M',
se6-ca111Te:
Audio, nos
rendre
sur
, nuestros
per
produkter
Audio, ee
notre site:
productos
notizie,
, nyheder
npOAYKTax,
,
~~~M~mfi•a{J~~fflA,ft~a{JB~,ffi~,
!~!nr□~ttir,a{J~iUi
OUR
support@cambridgeaudio.com
UK:
US:
HK:
© 2019 Cambridge Audio Ltd.
Cambridge Audio is a
Registered office: Gallery Court, Hankey Place, London
CAM
FRIENDLY
+44
203
+1877
357
+852
2499
BR I DGEAUDIO.COM
: WWW.CAMBRIDGEAUDIO.COM
514 1521
8204
6018
brand
SUPPORT
of
Audio
TEAM
Partnership
I)
"JI
flD
ARE
Pie.
/CAMBRIDGEAUDIO
~-W3z:M:,
HERE
Sfa
TO
HELP:
4BB. Reg. No. 2953313. All rights reserved.
Page 20

CAMBRIDGE
AUDIO
IM
PORT
For
your
the
mains
1. Read
2. Keep these Instructions.
3.
Heed
4. Follow all Instructions.
5.
Do
not
6.
Clean
7.
Do not
8.
Do
not
that
produce
9.
Do
not
than
the
provided
obsolete
1
O.
Protect
where
11.
Only
use
12.
Use
with
When a cart
13.
Unplug
14. Refer all servicing
In
any
Into
the
WARNING:
-
Do
not
ventilation.
any
air
inlets
-
To
reduce the risk
near water
placed
on
- Danger
-
The
battery (battery
-
The
unit
connector
shall remain readily operable.
- Please refer
the
apparatus.
-
Only
use
Use
of
the
::.:•ai:at
ANT
own
safety please read the following Important safety instructions carefully before
power
supply.
these
Instructions.
all warnings.
use
this
apparatus
only
with
a
dry
block
any
ventilation
install near any
heat.
defeat
the
safety
other. A
grounding-type
for
your
safety. If the provided
outlet.
the
power
they
exit
from
attachments/accessories
only
the
cart, stand, tripod, bracket. or
is
used,
this
apparatus
to
way,
such
as
apparatus,
place
the
unit
Do
not
put
or
outlet grilles. Do
of
or
exposed
the
unit.
of
explosion
pack
must
be
installed In a manner that
from
the
rear
to
the
informati
the
mains
cord
apparatus In tropical climates - The
SAFETY INSTRUCTIONS
They
will
also
enable
near
water.
cloth.
openings.
heat
purpose
cord
from being walked
the apparatus.
use
caution when
during
qualified s8fVice personnel. Servicing
the
power~supply
the
apparatus
in
an
any
objects
fire
or
to
dripping
if
battery
or
of
the
supplied
Install
sources
such
of
the
plug
has
specified
moving
lightning
storms
cord
has
been
enck>sed space;
on
top
not
cover
electric
shock.
or
splashing water
is incorrectly replaced. Replace onty
batteries installed) shall
unit) possible. Where
on
on
the
exterior rear panel
with
this
you
to
get
the
best
per1ormance
in
accordance
as
polarized
two
plug
on
by
or
or
exposed
if
you
of
this unit.
the
ventilation grilles
do
not
makes
unit.
equipment
.A.
with
radiators,
heat
registers, stoves,
or
grounding-type
blades
and
a third grounding prong. The
does
not
fit
into
or
pinched, particularty
the manufacturer.
table
specified
cart/
when
having
to
wish
expose
or
not
the
apparatus
unused
Is
been
rain
or
to
place
Do
not
this
other
be
exposed
mains
for
electrical
shall
be
to a mains
by
for
required
moisture,
situate
with
apparatus
liquids.
of
plug
used
the
plug
disconnection
acted
from
and
the
manufacturer's
or
plug, A polartzed
your
outlet,
consult
at
plugs, convenience receptacles
the
manufacturer,
combination
long
damaged,
the unit
items
with
to
the
is
socket
to
periods
of
time.
when
the
apparatus
liquid
does
not
operate
on
a shelf,
it
on
a rug
or
such
as newspapers. tablecloths. curtains,
to
rain
or
No
objects filled
the
same
or
excessive heat
mains
plug
from
used
as
the
disconnect
and
safety
Information
at a maximum
outlet
with
attempting
to
prolong
Instructions.
other
plug
wide
an
electrician
or
sold
avoid injury
has
been
use
other
soft
moisture . This
with
equivalent type.
such
the
mains
45
degree C ambient temperature.
a protective earthing connecilon.
connect this unit
the
life
of
the
unit:
apparatus Qncludlng amplifiers)
has
two
blades
the
from
been
shelf
socket
or
the
for
replacement
apparatus.
tip-over.
damaged
or
objects
or
has
to
and
unit
must
such
as
outlet
the
disconnect
installlng
with
third
and
been
allow
do
not
not
vases. shall
or
the
(or
or
blade
with
has
spilled
normally,
the
top
surface
liquid,
as
sunshine, fire
device,
before
one
wider
prong
are
of
the
the
point
I)
have fallen
dropped.
maximum
obstruct
etc.
be
used
be
lik
e.
appliance
device
operating
to
The lightning flash
un-lnsulated 'dangerous
electric
The exclamation
maintenance instructions in
- recovered and
C
E:
with
this
A RCM (REGULATORY COMPLIANCE
~
VENTILATION
IMPORTANT
enclosed area
Ensure that small objects
mains
Please
unit.
Do
grilles
POSITIONING
Choose the Installation location carefully.
such as lighted candles,
moisture.
This untt
place the
damage
Due
to
Electronic
components
POWER SOURCES
The
unit
of
power-supply
This
unit
a long
OVERLOADING
Do
not
extension
In a
shock
Be sure
cord
or
CLEANING
To
clean
abrasives.
BATTERY
Batteries
consideration
SERVICING
These units are
problem. A serious electric
please
SUPPLIER'S DECLARATION OF CONFORMITY
Equipment: Integrated Amplifier
Model{s):
Trademark: Cambndge Audio
This device complies with
may not cause harmful interference,
may cause undesired operation.
The
responsible party in
Company
Address: 1913 N Milwaukee
Phone:
Legal
Represernatrve
Signature
with
the
arrowhead symbol
voltage'
shock
to
persons.
point
WEEE
SYMBOL .
The
crossed-out
electronic equipment. This
dealer
from
CEMARK
This
product
Environmentally-friendly design
according
to
product
and servicing
ThfS
product
- The unit will
such
as a
supply
and
contact
ensure
there
Is
not
situate
it
with
stray
penod
over1oad wall outlets
contact
on a rug
items
such
The
unft
can
must
be
Installed on a sturdy. level surface.
unit
on
an unstable surface
to
the
product.
magnetic
audlo
components
to
settle
should
be
operated
to
your home, consult
can
be
left
in
of
time, unplug
cords,
frayed
or
fire hazard.
to
insert
each
speaker leads.
the
unit,
wipe
Do
not
spray
DISPOSAL
may
contain substances harmful
and
in
accordance
not
user
your dealer.
within
within
an equilateral triangle
the
service literature relevant
wheeled
should
not
whom
you purchased this
complies
with European
this Instruction manual.
must
meets
the
Safety, EMC and Radio
become
bookcase
do
not fall
your
dealer for advice.
ample
ventilation {at least
or
other
as newspapers,
should
be
be
used
In a moderate
Do
not
place
fields, turntables
have
down
and
the
only
from
Standby
mode
it
from
or
extension
power
cords,
power
cord
Its
case
with
an aerosol
with
servlceable. Never
shock
within
the
product's
bin
is
the
European
product
contains electrlcat
be
disposed
of
product
Low
of
Energy-related
For
be
referred
to
hot
when
In use.
or
in a cabinet
through
placed
a running In
sonic
the
securely. To prevent
at
could
without
any ventilation grille.
20cm
soft
surface
and
tablec
loths, curtains,
Avoid
placing
on
the
climate.
or
shelf. The unit
other
equipment
or
CAT
lVs
period
properties wilt
the
type
of
power
your
product
when
not
in
use
mains socket.
cords
as
damaged
or
a dry, lint-free
or
near
the
unit.
to
the environment. Please
local environmental/electronic recycling guidelines.
attempt
result
if
this precautionary measure
CXA61,CXA81
Part
15
of
the
FCC
Rules.
and
(2)
this device must accept any interference recehled, including interference that
Audio Partnership
636-4817
US:
Ave.
U.C
Chicago, IL60647
name:
(312)
Person: Gregg Chopper
~
/0[
an equilateral triangle
enclosure
ls
Intended
to
Union
with
unsorted
for
Voltage (2014/35/EU), Electromagnetic
continued
qualified service personnel.
MARK)
Communications
Do
sufficient
clearance
do
not
It
In
urnt.
Nso
Do
not
may
on
top
should
of
around a week
improve
source
dealer
and
will
this
can
cracked
hum
cloth.
to
repair. disassemble
Operation is subject
is
that
may
be
of
to
alert
the
this appliance.
more
Products
compllance
not
stack
obstruct
etc.
direct
avoid
place
fall, causing serious inJury
of
not
be
or
local
draw
result In a risk
wire
and
Do
user
symbol
for
and
on
indicating separate collection
electronic
regular waste. Please return
sunllght
the
indicated
insulation and
not
equipment
information.
(2009/125/EC) Directives when
only
Cambridge
requirements
multiple
units
ventilation.
If
this
happens.
the
top,
side
any
air
inlets or outlet grilles.
or
close
locations
subject
In
a sealed area
unit.
located
nearby
Qf
used
over
this time.
on
the
power
company.
<0.SW in
this
of
fire
noise,
do
not
use
any
cleaning fluids containing alcohol,
dispose
or
is
(SDOC)
to
the following
intended
to
alert
sufficient
to
the
on
switch
and
rear,.
to
a
such
due
several hours
marking
state.
or
broken
bundle
reconstruct
ignored. In the event
the
magnitude
presence
of
which
should
the
unit
Compatibility
Audio
accessories
of
the
ERAC end" ACMA.
top
of
each
off
Immediately,
Do
not
put
Do
source
of
heat.
to
vibration
and
as a bookcase
to
a child
or
to
possible
interference.
per
day). This will
label.
If
you
If
you
do
not
electric shock. Overloaded
ptugs are dangerous. They
the
interconnect leads with
of
any discharged batteries wtth
the
unit
two
conditions:
user to
the
to
constitute
important
operating
for
electrical and
be
reused, recycled or
or
contact
the authorised
(2014/30/EU)
used
and
should
other. Do
not
disconnect
any
objects
on
not
cover
the
No
naked flame sources,
excessive
dust,
or
ln
a cabinet.
adult
as
well as serious
allow
are
not
sure
Intend
to
use
11
there
seems
of
a problem
(1)
this device
presence
a risk
Installed
be
place
from
top
of
ventilation
cold
Do
the
of
the
this
unit
AC
outlets,
may
the
power
ammonia
to
or
fallure,
and
and
used
In
the
this
not
new
type
for
result
due
be
of
of
an
or
or
a
Page 21

FEDERAL
This equipment
FCC Rules. These limits are designed
This equipment generates, uses, and
instructions,
not
occur
can
be
more
of
• Reorient
•
Inc
rease
• Connect
• Consult
FCC Caution: Any changes
user's authority
CO
MM
UNICATION S CO
has
been tested and found
may
cause harmful interference
1n
a particular installation.
determined
the following measures:
or
relocate the receiving antenna.
the
the
the
dealer
by
turning
distance between
equipment
or
an experienced radio/TV technician
to
operate this equipment.
the
to
an outlet
or
modifications
equipment
the
MMISSION
to
comply
to
provide reasonable protection against harmful interference In a residential installation.
can
radiate radio frequency energy, and
to
radio communications. However, there Is
If
this equipment
off
and on,
equipment and
on
a circuit different from that
not
expressly approved
with
does
the
NOTICE
the
limits
cause harmful interference
the
user
receiver.
for
help.
for
a Class B digital device, pursuant
is encouraged
to
which the receive r is connected.
by
the
party
if
not
installed and used in a
no
to
radio or television reception,
to
try
and
correct
responsible
to
Part
ccordance
guarantee t
the interference
for
compliance could void the
hat
interference will
by
15
with
of
the
the
which
one
or
RF EXPOSURE
To
maintain compliance with FCC's RF Exposure guidelines. This equipment should be installed and operated with a minimum
distance
MODIFIC
The FCC requires the
Cambndge
of
20cm
ATI
Audio, may
CANADA-INDUSTRY
This Class B digital apparatus complies
This device
conditions.
(1)
this
cause undesired operation
This equipment complies with RSS-102 limits set fourth
and operated with a minimum distance
The transmitter
complies
device
INDUSTRIE
Cet appareil numerique
Cat appareil
deux
conditions suivantes :
(1)
cet appareil ne
les interferences pouvant provoquer un fonctionnement indesirable.
Cet equipement est conforme aux limites RSS-102 preconisees
install&
L'emetteur ne
et
utilise a
est
STATEMENT:
between
ONS
user
void the user's authority
with Industry Canada License
may
not
cause Interference and
must
not
CANADA
de
conforme
doit
pas
une
distance minlmale
do1t
pas etre
the
radiator and
to
be
notified that any changes
CANADA
of
the
device.
be
co-located
your
body. Use only
to
(IC)
with
Canadian standard ICES-003.
(2)
of
20cm
or
operating in conjunction wrth
between
(IC)
Classe B est
aux normes ASS exemptes
provoquer
co-place
conforme
d'interference nuisible
de
20
cm
nl fonctionner en conjonction
the
supplied antenna.
or
operate
exempt
this
device
for
the
modifications
the
equipment.
ASS standard(s). Operation is subject
must
accept
an uncontrolled environment. This equip
radiator and
to
this device that are
any interference, includ
your
body.
any
other antenna
a la norme canadienne ICES-003.
de
licence d'lndustrie Canada. Son fonctionnement est soumis
et
(2)
cet
pour
entre le radiateur
avec
appareil
un envlronnement
et
votre
dolt
accepter
corps
.
une autre antenna
not
expressly approved
to
the
ing
interference that
ment
should be installed
or transmitter.
toute interference reoue, y
non
con
trole.
Cet
equipement
ou
transmetteur.
following
compns
doit
by
two
may
aux
etre
EU
ROPE
Hereby. Audio Partnership PLC declares
declarati
Bluetooth Radio Frequency:2.402GHz-2.48 GHz The Max. transmit power:
-EUROPEAN
on
of
conformity
UNI
1s
available
ON NOTICE
that
this product
at
the
following internet address: https://www.cambridgeaudio.com/DoC
1s
,n
compliance with Directive 2014/53/EU ,
10d8m
the
full text
.
of
the
EU
Page 22

©
2019
Cambridge Audio Ltd.
Cambridge
Audio is a
brand
of
Aud.io
Partnership
Registered uffi.ce: Gallery Court, Hankey Place,
Londo.
www.CAMBRiDGEAUDI0
AP3647.
Di
SE.14B8.
a/1
Reg.
No.
2953313,
1
1
•
C:OM
All rights reserved.
P'lc.
IG,
REAT
BRITI.SH
SOUND
SINCE
196B
 Loading...