

Page 1

CXN V2
NETWORK PLAYER
Page 2

Contents
IMPORTANT SAFET Y INSTRUCTIONS 3
LIMITED WARRANTY 5
REAR PANEL CONNECTIONS 6
FRONT PANEL CONNECTIONS 7
REMOTE CONTROL 8
OVERVIEW 9
GETTING CONNECTED 9
OPERATING INSTRUCTIONS 10
PRESETS 10
RADIO 10
MUSIC LIBRARY 11
INPUTS 12
USB AUDIO 12
BT100 AND BLUETOOTH AUDIO STREAMING 12
SPOTIFY 13
AIRPLAY 13
CHROMECAST BUILT-IN 13
SETTINGS 14
NETWORK 14
WIRED/WIRELESS CONNECTION 15
DISPLAY BRIGHTNESS 15
DEVICE NAME 15
AUDIO 15
USB AUDIO CLASS 15
INSTANT ON 16
AUTOMATIC POWER DOWN 16
EDIT DIGITAL INPUT NAMES 16
FACTORY RESET 16
TECHNICAL SPECIFICATIONS 17
TROUBLESHOOTING 17
IMORTANT!
The CXN v2 is largely a software based product and new features and
updates will be made available from time to time. See the Upgrade
Firmware section at the end of this manual for how to check for and then
automatically update your unit via the internet. The process takes only
a few minutes.
We would encourage you to check for any updates before using your
CXN v2 for the rst time and then from time to time afterwards.
Also please do check the support page for the CXN v2 at
https://techsupport.cambridgeaudio.com for details of any new
features, advice on compatibility with other products and audio formats
and the most recent copy of this manual.
Make sure you register your purchase.
Visit: www.cambridgeaudio.com/register
By registering, you’ll be the rst to know about:
● Future product releases
● Software upgrades
● News, events and exclusive oers plus competitions!
This guide is designed to make installing and using this product as easy
as possible. Information in this document has been carefully checked
for accuracy at the time of printing; however, Cambridge Audio’s policy
is one of continuous improvement, therefore design and specications
are subject to change without prior notice.
This document contains proprietary information protected by copyright.
All rights are reserved. No part of this manual may be reproduced by
any mechanical, electronic or other means, in any form, without prior
written permission of the manufacturer. All trademarks and registered
trademarks are the property of their respective owners.
© Copyright Cambridge Audio Ltd 2019.
Cambridge Audio and the Cambridge Audio logo are trademarks of
Cambridge Audio.
Stream Magic is a trademark of Audio Partnership Plc and is registered
in the European Community and other countries.
This product contains software licensed under version 2 of the GNU
Public License and version 2.1 of the GNU Lesser Public License. The
source code for this software is available from:
http://gpl.stream-magic.com/
This product includes technology owned by Microsoft Corporation and
under a licence from Microsoft Licensing GP. Use or distribution of such
technology outside of this product is prohibited without a license from
Microsoft Corporation and/or Microsoft Licensing, GP as applicable.
The Spotify software is subject to third party licenses found here:
www.spotify.com/connect/third-party-licenses.
Support
FAQS AND SUPPORT
Please visit https://techsupport.cambridgeaudio.com
GET IN CONTACT WITH OUR
DEDICATED TECHNICAL SUPPORT TEAM:
support@cambridgeaudio.com
UK: +44 20 7551 5422
US: +1 877 357-8204
HK: +852 2499 6018
2
Page 3
Important safety instructions
For your own safety please read the following important safety instructions
carefully before attempting to connect this unit to the mains
power supply. They will also enable you to get the best performance from
and prolong the life of the unit:
1. Read these instructions.
2. Keep these instructions.
3. Heed all warnings.
4. Follow all instructions.
5. Do not use this apparatus near water.
6. Clean only with a dry cloth.
7. Do not block any ventilation openings. Install in accordance with the
manufacturer’s instructions.
8. Do not install near any heat sources such as radiators, heat registers,
stoves, or other apparatus (including ampliers) that produce heat.
9. Do not defeat the safety purpose of the polarized or grounding-type
plug. A polarized plug has two blades with one wider than the other.
A grounding-type plug has two blades and a third grounding prong.
The wide blade or the third prong are provided for your safety. If the
provided plug does not t into your outlet, consult an electrician for
replacement of the obsolete outlet.
10. Protect the power cord from being walked on or pinched, particularly
at plugs, convenience receptacles and the point where they exit from
the apparatus.
11. Only use attachments/accessories specied by the manufacturer.
12. Use with only the cart, stand, tripod, bracket, or table
specied by the manufacturer, or sold with the apparatus.
When a cart is used, use caution when moving the cart/
apparatus combination to avoid injury from tip-over.
13. Unplug this apparatus during lightning storms or when unused for
long periods of time.
14. Refer all servicing to qualied service personnel. Servicing is required
when the apparatus has been damaged in any way, such as the powersupply cord or plug having been damaged, liquid has been spilled or
objects have fallen into the apparatus, the apparatus has been exposed
to rain or moisture, does not operate normally, or has been dropped.
WARNING
– To reduce the risk of re or electric shock, do not expose this unit
to rain or moisture.
– Batteries (battery pack or batteries installed) shall not be exposed to
excessive heat such as sunshine, re or the like.
The unit is of Class 1 construction and must be connected to a mains
socket outlet with a protective earthing connection.
The unit must be installed in a manner that makes disconnection of the
mains plug from the mains socket outlet (or appliance connector from the
rear of the unit) possible. Where the mains plug is used as the disconnect
device, the disconnect device shall remain readily operable. Only use the
mains cord supplied with this unit.
Please ensure there is ample ventilation (at least 10cm clearance all
round). Do not put any objects on top of this unit. Do not situate it on
a rug or other soft surface and do not obstruct any air inlets or outlet
grilles. Do not cover the ventilation grilles with items such as newspapers,
tablecloths, curtains, etc.
This unit must not be used near water or exposed to dripping or splashing
water or other liquids. No objects lled with liquid, such as vases, shall be
placed on the unit.
The lightning ash with the arrowhead symbol within an equilateral
triangle is intended to alert the user to the presence of un-insulated
‘dangerous voltage’ within the product’s enclosure that may be of sucient
magnitude to constitute a risk of electric shock to persons.
The exclamation point within an equilateral triangle is intended to alert the
user to the presence of important operating and maintenance instructions
in the service literature relevant to this appliance.
you purchased this product for more information.
Environmentally-friendly design of Energy-related Products (2009/125/EC)
Directives when used and installed according to this instruction manual.
For continued compliance only Cambridge Audio accessories should be
used with this product and servicing must be referred to qualied service
personnel.
VENTILATION
IMPORTANT – The unit will become hot when in use. Do not stack
multiple units on top of each other. Do not place in an enclosed area such
as a bookcase or in a cabinet without sucient ventilation.
Ensure that small objects do not fall through any ventilation grille. If this
happens, switch o immediately, disconnect from the mains supply and
contact your dealer for advice.
POSITIONING
Choose the installation location carefully. Avoid placing it in direct
sunlight or close to a source of heat. No naked ame sources, such as
lighted candles, should be placed on the unit. Also avoid locations subject
to vibration and excessive dust, cold or moisture. The unit can be used in
a moderate climate.
This unit must be installed on a sturdy, level surface. Do not place in a
sealed area such as a bookcase or in a cabinet. Do not place the unit on
an unstable surface or shelf. The unit may fall, causing serious injury to a
child or adult as well as serious damage to the product. Do not place other
equipment on top of the unit.
Due to stray magnetic elds, turntables or CRT TVs should not be located
nearby due to possible interference.
Electronic audio components have a running in period of around a week (if
used several hours per day). This will allow the new components to settle
down and the sonic properties will improve over this time.
WEEE SYMBOL
The crossed-out wheeled bin is the European Union symbol
for indicating separate collection for electrical and electronic
equipment. This product contains electrical and electronic
equipment which should be reused, recycled or recovered and
should not be disposed of with unsorted regular waste. Please
return the unit or contact the authorised dealer from whom
CE MARK
This product complies with European Low Voltage (2014/35/
EU), Electromagnetic Compatibility (2014/30/EU) and
RCM (REGULATORY COMPLIANCE MARK)
This product meets the Safety, EMC and Radio
Communications requirements of the ERAC and ACMA.
CU-TR MARK
This product meets Russia, Byelorussia and Kazakhstan
electronic safety approvals.
CXN V2
3
POWER SOURCES
the marking label. If you are not sure of the type of power-supply to your
home, consult your product dealer or local power company.
This unit can be left in Standby mode when not in use and will draw <0.5W
in this state. To turn the unit o, unplug it from the mains socket.
3
Page 4

Wi-Fi information
OVERLOADING
Do not overload wall outlets or extension cords as this can result in a risk
of re or electric shock. Overloaded AC outlets, extension cords, frayed
power cords, damaged or cracked wire insulation and broken plugs are
dangerous. They may result in a shock or re hazard.
Be sure to insert each power cord securely. To prevent hum and noise, do
not bundle the interconnect leads with the power cord or speaker leads.
CLEANING
To clean the unit, wipe its case with a dry, lint-free cloth. Do not use any
cleaning uids containing alcohol, ammonia or abrasives. Do not spray an
aerosol at or near the unit.
BATTERY DISPOSAL
Batteries may contain substances harmful to the environment. Please
dispose of any discharged batteries with due consideration and in
accordance with local environmental/electronic recycling guidelines.
LOUDSPEAKERS
Before making any connections to loudspeakers, make sure all power is
turned o and only use suitable interconnects.
SERVICING
These units are not user serviceable. Never attempt to repair, disassemble
or reconstruct the unit if there seems to be a problem. A serious electric
shock could result if this precautionary measure is ignored. In the event of
a problem or failure, please contact your dealer.
This unit is intended to be used in conjunction with the EW-7611ULB
WiFi Dongle please observe the statements below when using with
WIFI.
FCC STATEMENT
Caution: Exposure to Radio Frequency Radiation.
The device shall be used in such a manner that the potential for human
contact during normal operation is minimized.
When connecting an external antenna to the device, the antenna shall
be placed in such a manner to minimize the potential for human contact
during normal operation. This transmitter must not be co-located or
operating in conjunction with any other antenna or transmitter.
Supplier’s declaration of conformity (SDoC)
Equipment: Network Player
Model: CXN V2
Trademark: Cambridge Audio
This device complies with Part 15 of the FCC Rules. Operation is subject
to the following two conditions: (1) this device may not cause harmful
interference, and (2) this device must accept any interference received,
including interference that may cause undesired operation.
The responsible party in US:
Company name: Audio Partnership LLC
Address: 1913 N Milwaukee Ave. Chicago, IL 60647
Phone: (312) 636-4817
Legal Representative Person: Gregg Chopper
Signature:
FEDERAL COMMUNICATIONS COMMISSION NOTICE
This equipment has been tested and found to comply with the limits for a
Class B digital device, pursuant to Part 15 of the FCC Rules. These limits are
designed to provide reasonable protection against harmful interference in
a residential installation.
This equipment generates, uses, and can radiate radio frequency energy,
and if not installed and used in accordance with the instructions, may
cause harmful interference to radio communications. However, there is
no guarantee that interference will not occur in a particular installation.
If this equipment does cause harmful interference to radio or television
reception, which can be determined by turning the equipment o and on,
the user is encouraged to try and correct the interference by one or more
of the following measures:
• Reorient or relocate the receiving antenna.
• Increase the distance between the equipment and the receiver.
• Connect the equipment to an outlet on a circuit dierent from that to
which the receiver is connected.
• Consult the dealer or an experienced radio/TV technician for help.
FCC Caution: Any changes or modications not expressly approved by the
party responsible for compliance could void the user’s authority to operate
this equipment.
IMPORTANT NOTE:
FCC RADIATION EXPOSURE STATEMENT:
This equipment complies with FCC radiation exposure limits set forth for
an uncontrolled environment. This equipment should be installed and
operated with a minimum distance of 20cm between the radiator and
your body.
This transmitter must not be co-located or operating in conjunction with
any other antenna or transmitter.
2 .4GHz operation of this product in the USA is rmware-limited to
channels 1 through 11.
MODIFICATIONS
The FCC requires the user to be notied that any changes or modications
to this device that are not expressly approved by Cambridge Audio, may
void the user’s authority to operate the equipment.
4
Page 5

6
201-180239
Limited warranty
CXN V2
5
CANADA-INDUSTRY CANADA (IC)
This radio transmitter has been approved by Industry Canada.
This Class B digital apparatus complies with Canadian standard ICES-
003. This device complies with Industry Canada License exempt RSS
standard(s). Operation is subject to the following two conditions.
(1) this device may not cause interference and (2) this device must accept
any interference, including interference that may cause undesired
operation of the device.
The transmitter must not be co-located or operating in conjunction with
any other antenna or transmitter.
INDUSTRIE CANADA (IC)
Cet émetteur radiophonique a été approuvé par Industrie Canada.
Cet appareil numérique de Classe B est conforme à la norme canadienne
ICES-003. Cet appareil est conforme aux normes RSS exemptes de licence
d’Industrie Canada. Son fonctionnement est soumis aux deux conditions
suivantes :
(1) cet appareil ne doit pas provoquer d’interférence nuisible et (2) cet
appareil doit accepter toute interférence reçue, y compris les interférences
pouvant provoquer un fonctionnement indésirable.
L’émetteur ne doit pas être co-placé ni fonctionner en conjonction avec
une autre antenne ou transmetteur.
EUROPE-EUROPEAN UNION NOTICE
Hereby, Audio Partnership PLC declares that this product is in compliance
with Directive 2014/53/EU, the full text of the EU declaration of
conformity is available at the following internet address: https://www.
cambridgeaudio.com/DoC
WARNING: To reduce exposure to electromagnetic radiation, it is advised
that user is situated at least 20cm from the Wi-Fi Antenna during normal
operation.
This product with an external USB WIFI dongle EW-7611ULB, WIFI Radio
Frequency 2.412 GHz-2.472 GHz, the Max. transmit power is 21dBm.
For Wi-Fi dongle EW-7611ULB, its trading name is EDIMAX, the
manufacturer is Audio Partnership Plc, Registered oce: Gallery Court,
Hankey Place, London SE1 4BB.
EW-7611ULB with European, Australia & New Zealand, Canada, US, Japan,
Taiwan, China certicates, Because of size limit, the CE, RCM, Canada IC
ID, US FCC ID marked on its body only.
FCC ID: NDD9576111602 IC:4701A-76111701
CAN ICES-3 (B)/NMB-3 (B)
CMIIT ID: 2018DJ2827
Cambridge Audio warrants this product to be free from defects in materials
and workmanship (subject to the terms set forth below). Cambridge Audio
will repair or replace (at Cambridge Audio’s option) this product or any
defective parts in this product. Warranty periods may vary from country
to country. If in doubt consult your dealer and ensure that you retain proof
of purchase.
To obtain warranty service, please contact the Cambridge Audio authorised
dealer from which you purchased this product. If your dealer is not
equipped to perform the repair of your Cambridge Audio product, it can be
returned by your dealer to Cambridge Audio or an authorised Cambridge
Audio service agent. You will need to ship this product in either its original
packaging or packaging aording an equal degree of protection.
Proof of purchase in the form of a bill of sale or receipted invoice, which
is evidence that this product is within the warranty period, must be
presented to obtain warranty service.
This Warranty is invalid if (a) the factory-applied serial number has been
altered or removed from this product or (b) this product was not purchased
from a Cambridge Audio authorised dealer. You may call Cambridge
Audio or your local country Cambridge Audio distributor to conrm that
you have an unaltered serial number and/or you made a purchase from a
Cambridge Audio authorised dealer.
This Warranty does not cover cosmetic damage or damage due to acts of
God, accident, misuse, abuse, negligence, commercial use, or modication
of, or to any part of, the product. This Warranty does not cover damage due
to improper operation, maintenance or installation, or attempted repair
by anyone other than Cambridge Audio or a Cambridge Audio dealer,
or authorised service agent which is authorised to do Cambridge Audio
warranty work. Any unauthorised repairs will void this Warranty. This
Warranty does not cover products sold AS IS or WITH ALL FAULTS.
REPAIRS OR REPLACEMENTS AS PROVIDED UNDER THIS WARRANTY
ARE THE EXCLUSIVE REMEDY OF THE CONSUMER. CAMBRIDGE AUDIO
SHALL NOT BE LIABLE FOR ANY INCIDENTAL OR CONSEQUENTIAL
DAMAGES FOR BREACH OF ANY EXPRESS OR IMPLIED WARRANTY IN
THIS PRODUCT. EXCEPT TO THE EXTENT PROHIBITED BY LAW, THIS
WARRANTY IS EXCLUSIVE AND IN LIEU OF ALL OTHER EXPRESS AND
IMPLIED WARRANTIES WHATSOEVER INCLUDING, BUT NOT LIMITED
TO, THE WARRANTY OF MERCHANTABILITY AND FITNESS FOR A
PRACTICAL PURPOSE.
Some countries and US states do not allow the exclusion or limitation of
incidental or consequential damages or implied warranties so the above
exclusions may not apply to you. This Warranty gives you specic legal
rights, and you may have other statutory rights, which vary from state to
state or country to country.
For any service, in or out of warranty, please contact your dealer.
CCAF18LP2280T
5
Page 6
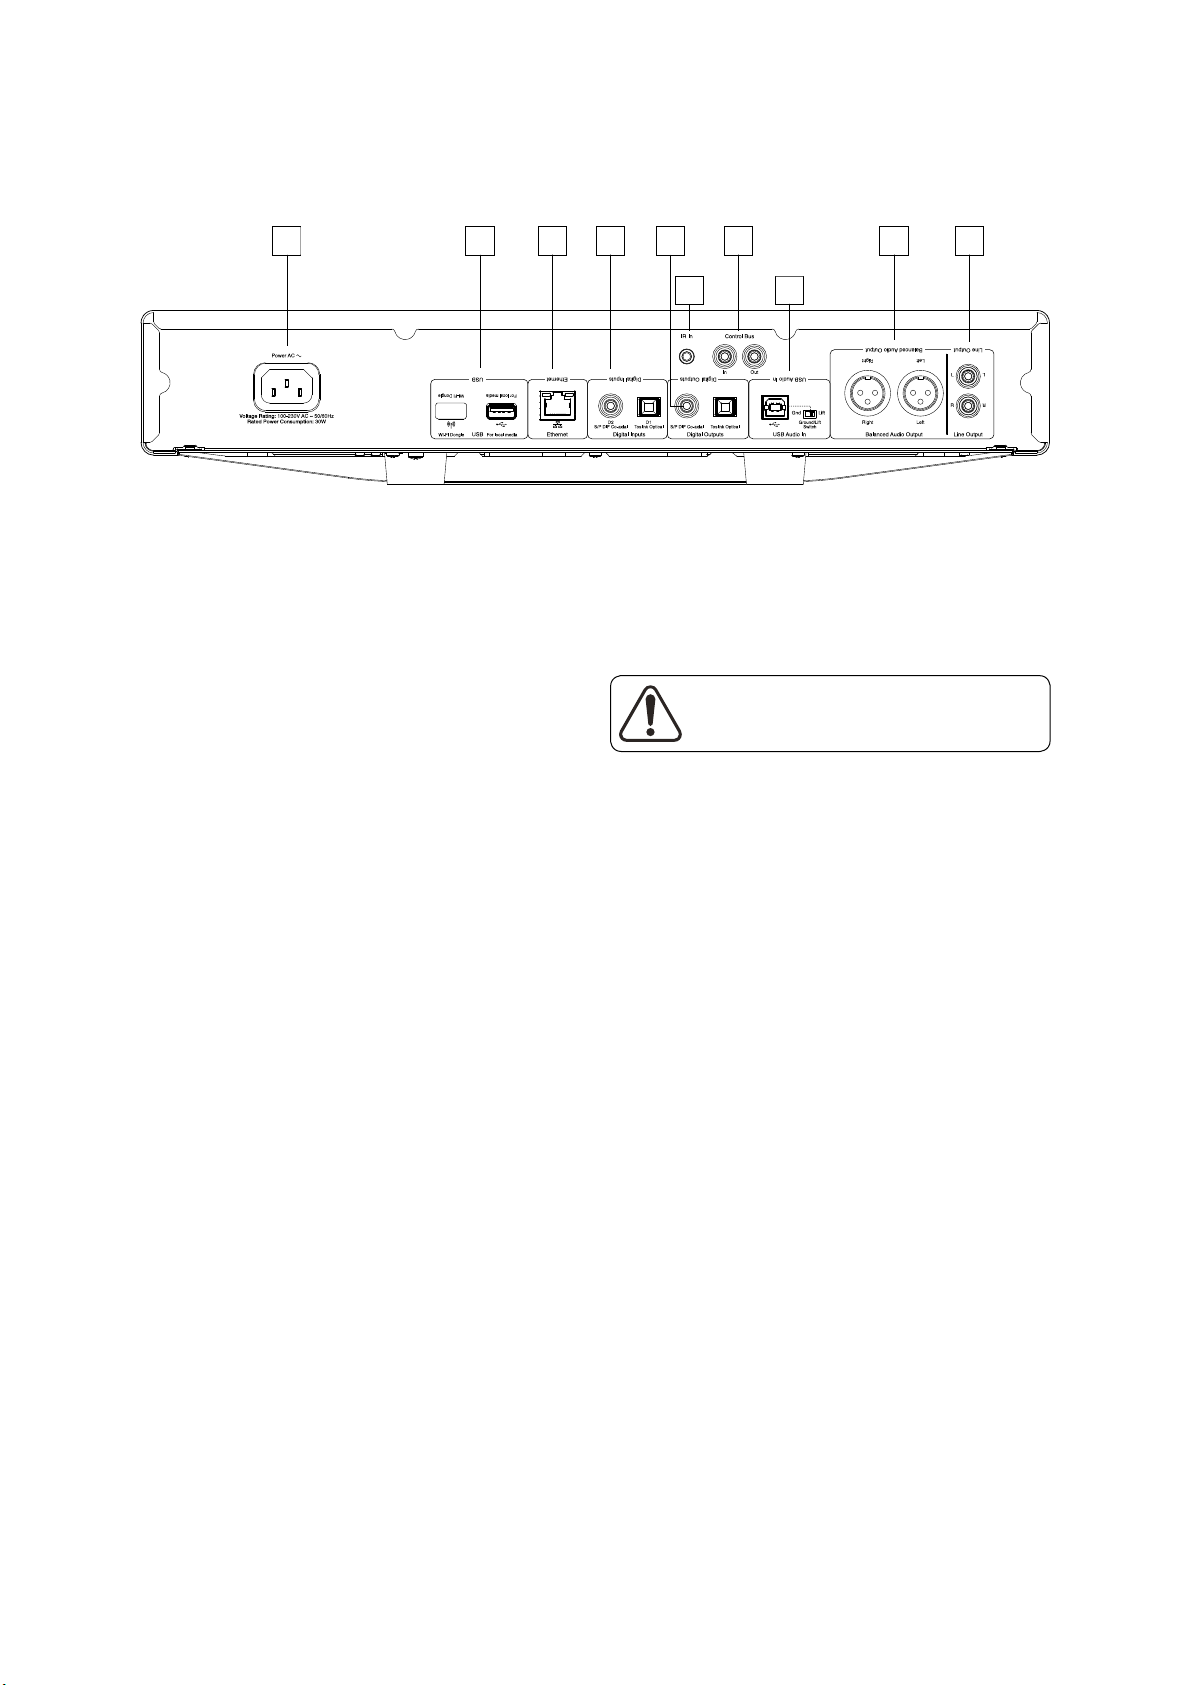
Rear panel connections
1 2 4 53 8
1. POWER SOCKET
Once all other connections are made, connect the supplied power cable to
the CXN v2 power socket and to an appropriate mains socket. The CXN v2
is now ready for use.
2. USB SOCKETS
Wi-Fi Dongle – The Wi- dongle is pre-tted. Please leave connected.
Allows connection to 802.11b/g or n networks (2.4 GHz will only be used
for n networks). If you are using this CXN v2 with Wi-Fi please make sure
your unit is positioned within range of your wireless router.
Important note:
Do not connect/disconnect the Wi-Fi dongle when the unit is on.
Local Media – Use to connect a USB storage device or another portable
device that is USB HD/ashdisk compatible containing music les.
Alternatively an optional Cambridge Audio BT100 Bluetooth Adaptor can
be plugged in here adding wireless streaming audio capability directly
from most phones, tablets and laptops. See later section for details.
Note: The USB ports are not intended for connection to Apple mobile
devices, no functionality, charging or otherwise is supported.
3. ETHERNET
Ethernet port for connecting to a 10/100BASE-T local area network (LAN).
Your unit will automatically default to an Ethernet connection if one is
made.
4. DIGITAL INPUTS
The CXN v2 has two digital inputs in total featuring both S/PDIF co-axial
and TOSLINK optical sockets.
D1 TOSLINK Optical – Use a high quality TOSLINK bre optic interconnect
cable designed specically for audio use. This input is suitable for 16-24 bit
content up to 192kHz (using high quality TOSLINK optical cable).
Note: Although TOSLINK connections on the CXN v2 work up to 192kHz
with high quality cables, TOSLINK is not usually recommended with
sampling rates above 96kHz.
D2 Coaxial – Use a high quality 75 ohm digital RCA Phono interconnect
cable. This input is suitable for 16-24 bit content up to 192kHz.
5. DIGITAL OUTPUTS
The CXN v2 digital outputs enable a separate DAC (digital to analogue
converter) or digital recording device to be connected. Refer to the
‘Operating instructions’ section for more information.
Two concurrent digital outputs are available. Note that these outputs pass
through the currently selected audio source unprocessed, i.e. no volume
control or up-sampling is performed on the digital outputs.
Coaxial – To obtain best results, use a high quality 75 ohm digital RCA
interconnect cable.
TOSLINK Optical – Use a high quality TOSLINK bre optic interconnect
cable designed specically for audio use.
9 10
7
6
6. USB AUDIO IN
A USB B type socket is tted to the CXN v2 to enable the playback of audio
from a personal computer running either Microsoft Windows or Apple
Mac OS X operating systems, most Linux distributions are also suitable.
Note: Always use a high quality USB connection cable certied as USB HiSpeed. USB cable connections longer than 3m may result in inconsistent
audio performance.
Always turn the Volume to minimum, switch to another
input or turn the CXN v2 o before plugging/unplugging
cables to the USB input or whilst booting up/shutting
down your PC/Mac.
Ground Lift Switch
The Ground Lift Switch enables the USB interface earth to be disconnected
from the CXN v2 chassis earth. Disconnecting (lifting) the earth can be
useful if electronic hum is heard through the speakers. The switch should
otherwise be left in the Ground position.
7. IR (INFRA RED) EMITTER IN
A 3.5mm mini-jack socket that enables modulated IR commands from
multi-room or IR repeater systems to be received by the CXN v2.
Note: Commands received by the IR Emitter In socket are not looped out
of the Control Bus. Refer to the ‘Custom Installation’ section for more
information.
8. CONTROL BUS
In – An RCA phono socket that enables un-modulated commands from
multi-rooms systems or other components to be received by the CXN v2.
Out – An RCA phono socket that provides control bus output commands
for further downstream units. This can be useful if using the iPhone/
Android app to control the volume on a CXA-60/CXA-80 ampliers and
Azur ampliers.
9. BALANCED AUDIO OUTPUT
The CXN v2 features balanced outputs on two XLR sockets. Balanced
outputs provide slightly better audio performance and can reject cableborne noise and interference when used with equipment with balanced
inputs.
Note: XLR connectors should be wired as follows:
Pin 1: Ground
Pin 2: Hot (in-phase)
Pin 3: Cold (phase-inverted)
10. LINE OUTPUT
A conventional RCA phono stereo output for connection to the line-level
inputs of an amplier. Use a high quality stereo RCA phono interconnect
cable intended for analogue audio signals.
6
Page 7

Front panel controls
CXN V2
7
1 2 4 108 117 126
3
5
1. STANDBY/ON
Switches the unit between Standby mode (indicated by a dim power LED)
and On (indicated by a bright power LED). Standby is a low power mode
where the power consumption is <0.5W. The unit should be left in Standby
mode when not in use.
Note that the full startup sequence can take approximately 30 seconds to
complete.
ECO mode
If ECO mode is enabled, then the CXN v2 is in its default 0.5W standby
mode and the CXN v2 can be switched on from:
– Front panel power button,
– IR remote control power button with IR received on either the front panel
IR receiver.
NETWORK STANDBY
This is a higher power standby mode which allows the StreamMagic
module and wired or wireless network to remain powered. If this mode is
enabled then the CXN v2 can be switched on from the Cambridge Connect
app.
2. USB
Use to connect a USB storage device or another portable device containing
music les. 1A maximum current consumption.
Note: This USB port is not intended for connection to Apple mobile
devices, no functionality, charging or otherwise is supported.
3. SKIP
Press once to skip forwards or backwards one track.
4. PLAY/PAUSE
Plays and pauses playback.
5. STOP/DELETE
Press during playback to stop or press during playback to stop or delete
items in various menus.
9
CXN
6. DISPLAY
Displays the status of the unit.
7. (i) INFO
Pressing this button toggles between 'Now Playing' screen and the
dierent 'Now Playing' views.
8. HOME
Press takes you to Home screen.
9. INFRARED SENSOR
Receive IR commands from the supplied remote control. A clear
unobstructed line of sight between the remote control and the sensor is
required.
10. RETURN
Press to return to the previous menu.
11. (MORE)
When playing media over UPnP or USB drive, more will show the queue.
12. NAVIGATION/SELECT (ROTARY DIAL)
Rotate to scroll and navigate around the menus. Pressing the rotary dial
in performs the 'Select' function to accept the item/function shown on the
display.
FAST SCROLL FEATURE
When scrolling through lists of tracks or stations, normally rotating the
rotary encoder or press of the remote control navigator button steps to the
next item in the list. For long lists this can become tiresome.
The Fast Scroll feature, which is always enabled, detects how fast the front
panel rotary encoder is being rotated or how long the remote control
navigator buttons have been pressed. The faster the encoder rotation or
the longer the button press, the bigger the jump up or down the list with
each step.
If navigating using the front panel rotary encoder, reducing the speed of
rotation then decreases the step size again.
If navigating using the remote control, you need to release the button to
stop the scroll and press-and-hold the button again to begin the scroll
speed ramp-up, or single-press the button to step one item in the list at
a time.
7
Page 8

Remote control
Important!
The default mode for the remote allows combined control of
the CXN v2 and other CX range products.
1. STANDBY/ON
Switches the CXN v2 between On and low power eco-friendly
Standby mode. If enabled, you can also switch the unit into
Idle mode.
Note: The CXN v2 takes approximately 30 seconds to
come out of Standby, during this time the front panel
Standby/On LED will ash but nothing will be shown on
the display.
2. BRIGHTNESS
Alters the brightness of the CXN v2 display backlight. There
are three brightness levels; o, dim, bright and an option to
switch-o the backlight.
When the display is set to OFF, nothing will be displayed
onscreen until a selection is made via the front panel or
remote control. The display will then re-activate allowing you
to browse the menu and make your selection. The display will
then automatically switch back o after a few seconds if no
further selections are made.
3. MUTE
4. (MORE)
This is the reply/interactive button. Press when listening to
an Internet Radio station or Streaming Service that has some
form of interaction with the user. This function will bring
up an interactive menu (where available). This feature is
commonly used to allow indication that you like or don’t like
the current stream so the service can tailor the music served
to your personal taste.
For Media Play back (UPnP or Local) this button will toggle
between the 'Now Playing' display and the 'Queue' display.
2
3
Pressing this button toggles between Menu position and Now
Playing screen.
1
11. SKIP
10. (INFO)
Press once to skip forwards or backwards one track.
12. ENTER
Press to accept the item/function highlighted in the display
menu. In tuner mode, press and hold to store the current
station in the preset bank.
4
6
9
11
12
14
5
13. NAVIGATION
7
Press to navigate around the main menus.
8
14. RETURN
10
Press to return to the previous menu.
11
13
15. PLAY/PAUSE
15
Press once to start media playback. Press and hold to pause
media playback.
8
16. PRESETS
Press to directly access stored presets.
16
5. DIGITAL INPUTS
Press to select the digital input source.
6. RANDOM
Press to turn the random/shue playback function on and
o.
7. REPEAT
Press to turn repeat playback function (media play back only)
on and o.
8. VOLUME
Increases or decreases the volume of the Amplier/Receiver.
9. HOME
Go directly to the top Home Menu.
8
Page 9

CXN V2
9
Overview
The CXN v2 is able to receive and play back media from several distinct types of
source. Here we have attempted to give an overview of the various types of service
available and the terminology you may encounter.
INTERNET RADIO
These are ‘radio’ stations broadcast over the internet. Currently the StreamMagic
range can access about 20,000 internet radio stations all sorted by us into Location,
Language and Genre. The list of available stations is constantly maintained and
automatically updated to your unit via the internet. You can set your own presets
via the Cambridge Connect app or the front panel of the player.
You can also add stations to your units that are currently not in the Stream Magic's
Radio database, suggest new stations to us and more. There are also links and help
for setting up third-party Streaming Services from a wide variety of other suppliers.
Other Stream Magic features will be launched in the future, check the website from
time to time to see the latest developments.
STREAMING SERVICES
Streaming Services are similar to Internet Radio but come from other suppliers and
often have an element of interaction with the user. Because Streaming Services
generally allow the user some choice over the content they listen to, they are also
licensed dierently to Internet Radio by the music companies and often each service
only has arrangements in certain countries and may also charge a subscription for
membership.
Examples of such services are Spotify, Pandora, TIDAL and others. All allow some
control of the content from the ability to select and play whole albums of your
choice, playlists or an artists back catalogue. Some also oer the ability to download
content for use o-line as well.
These services come from third parties and although we support connections to
them via our Connect app or the units' webmin page; we do not create their content
and are not responsible for their service in any way. Your streaming account is with
the streaming service only. We are merely acting as an intermediary to make the
connection simpler and more convenient. We will support the correct software on
our unit to allow playback and browsing of their content.
NETWORK MEDIA
The CXN v2 supports a wide range of compressed formats; MP3, AAC, WMA and
Ogg Vorbis CODEC types are all supported, plus for true audiophile use it also
supports either uncompressed PCM (in a WAV container) or losslessly compressed
FLAC, both can contain from 16-bits/44.1kHz from CDs right up to 24-bit/192kHz for
better than CD quality from suitable download sites.
Note: For this to work your server will also need to support the CODEC you wish to
play as some have limitations and may not serve FLAC for instance. Always check
that the server you wish to use also supports your favoured CODECs.
Also for lossless/uncompressed formats both the server and network connection
will need to sustain the high bitrate necessary.
Note: It is not recommended to use Wi-Fi connections for content above 24bits,
96kHz if lossless/uncompressed.
Getting connected
BASIC CONNECTIONS
CXN V2/CXA
NETWORK CONNECTIONS
Before you can use your CXN v2 for Radio/Streaming you must have the following:
• A broadband internet connection (such as ADSL) to a suitable internet service
provider (ISP).
• A network connection either wirelessly via 802.11b/g or n Wi-Fi or wired Ethernet
connection (10 or 100 M bits/sec via an RJ45 connection).
Note: For playback of high sample rate les (24-bits/176.4kHz & 24-bits/192kHz)
streamed from your home network, we recommend using an Ethernet connection
to avoid unwanted disruption as the high data rate of these les is beyond most WiFi networks capability.
In many cases the broadband modem, router and wireless access point will be a
single combined unit supplied by your Internet Service Provider or bought from a
computer store.
If your wireless network is congured to use Wired Equivalent Privacy (WEP) or WiFi Protected Access (WPA) data encryption then you will need to know your WEP or
WPA key so you can get the CXN v2 to communicate with the network.
IMPORTANT:
Before you continue, make sure that your wireless access point or router is
powered up and working with your broadband internet service (use your
computer to verify this). To get this part of the system working you must read
the instructions supplied with the wireless access point or router.
The CXN v2 can be congured to connect to a Wired or Wireless network or has
an (default) Auto setting. In Auto the CXN v2 looks for a each connection type
and selects whichever is present. You can also force the unit to one or the other
connection type, see later Settings section.
CONNECTING TO A WIRED NETWORK
USB MEDIA
The CXN v2 also supports USB Media from USB Flash-disks or USB hard-drives and
has 3 USB 2.0 ports for this purpose. Here the CXN v2 simply browses the folders
present on the media attached and displays them. Only content that the CXN v2
can play will be shown. This feature is provided for convenient access to temporary
storage devices.
It is however highly recommended that UPnP is used for continued use of stored
media as the UPnP system is able to support album art, sophisticated content
browsing and ltering and other features not possible with simple folder browsing.
Note: Supports NTFS and FAT32 le system.
PODCASTS
Podcasts are archived audio recordings downloadable over the internet. Often
podcasts are recordings of previous live broadcasts or episodic content.
The CXN v2 supports various third party podcast services, navigate to Podcasts on
the unit for the list available in your area. In addition the CXN v2 supports your own
personal choice of podcasts where you know its URL (weblink) via the Webmin page.
INTERNET
BROADBAND ROUTER/MODEM
Plug one end of a network cable (Category 5/5E straight through Ethernet cable) into
the LAN port on the back of the unit.
Note: Only connect the LAN port of the player to an Ethernet port that supports
10BASE-T or 100BASE-TX. Connecting to any other ports or jacks, such as a phone
jack, can damage the unit
The CXN v2 should automatically connect to your network as below via DHCP; this
means it will be given an IP address by your router automatically.
ETHERNET
CABLE
9
Page 10

Operating instructions
Connecting to a wireless network
10-30M DISTANCE
INTERNET
WIRELESS BROADBAND
ROUTER/MODEM
Place the CXN v2 in range of your wireless network (usually 10-30m of a suitable
wireless transmitter, although this is aected by walls and the construction of your
building) and turn it on, via the back panel switch and then on the front panel.
The CXN v2 will automatically connect and obtain an IP address from your wireless
network. For advanced users, if you would like to give your CXN v2 a static IP
address, then see the 'Network cong' section of the manual.
Note: If you make a mistake at any point, you can always press the
back to the previous screen.
The unit will now scan for all available wireless networks and will display "Scanning".
If it can’t nd one then the display will say: "No Wireless Networks Found". If this
happens then you need to either move the CXN v2 nearer your wireless access point
or investigate any issues with your wireless network.
When the CXN v2 nds your wireless network, it displays the broadcast name
(ESSID) for the access point – this is a name allocated to the access point by whoever
set up the network, it may either be a default name for your router/wireless or may
be a more familiar name such as "Johns Wi-Fi" etc. If your CXN v2 nds more than
one wireless network you can simply choose which one you want to connect to.
Turn the rotary dial to see the ESSID for each wireless network.
When the ESSID for the wireless network you want to connect to is displayed on
the screen, press the SELECT button. If your network is not congured with an
encryption code, the screen should say "Connecting to network" then "Network OK".
If the screen displays either "Enter WEP key" or "Enter WPA key", then the network
is using one of the supported encryption systems: Wired Equivalent Privacy (WEP)
or Wi-Fi Protected Access (WPA). You now need to enter your correct WEP or WPA
code. The person who set up the wireless network in the rst place will know what
this code is (or be able to reset it to a new known code); if that person is not you, then
you need to nd out what it is.
After 3 seconds, the display goes into the code entry mode. To enter the code, use the
rotary dial to select each character of the code in turn, pressing the SELECT button
after entering each character.
Note: The WEP and WPA codes are case sensitive, so you must enter them exactly.
After entering the nal character, use the rotary dial to select the
press the SELECT button. It’s a little ddly but you will only need to do this once. The
CXN v2 will remember this code and use it automatically from now on.
The unit should now be able to connect to the network.
Note: We recommend rebooting your CXN v2 to search for any rmware
updates, as new rmware may have been released since your unit was
manufactured.
button to go
character and
The CXN v2 home menu consists of 5 items:
Presets
Radio
Music Library
Inputs
Settings
These allow access to the four basic types of media choice plus a Settings menu for
the unit.
You can return to this menu at any time by pressing the
Simply scroll through the items with the scroll wheel or navigator buttons
on the remote control and press in the scroll wheel or use the Enter button on the
remote to select the item you want.
button.
Presets
The CXN v2 supports presets. These can be Internet Radio stations or streams from
most Streaming Services. UPnP/USB Media cannot be set as a preset. To add a
station/stream to a preset, rst select that stream for playback in the normal way.
Now press the 'Home' button on the remote and navigate to the Presets menu.
Note: Empty presets are not displayed. To save a presets to an empty location, select
'Set Preset' and all slots will be displayed.
Select the preset location you require and press the Navigation/Select dial or the
Enter button on the remote to save the current station/stream to that preset.
Recalling presets is done simply by selecting the Presets button on the remote or
via the Home menu.
Note:
– The CXN v2 loads the presets for display from our Stream Magic servers over the
internet, thus they can take a few seconds to appear.
– All saved Presets will be deleted when a unit is registered/re-registered online.
Radio
The Stream Magic Internet Radio service brings thousands of internet radio stations
to you. The sheer choice available on the internet allows you to nd new music,
listen to stations in your native language (or perhaps if you are learning another
one), from your home town or by your Genre of choice.
It has to be said that the audio quality of internet radio varies greatly dependant
on the bitrate and compression technology used by the broadcaster, but the choice
more than makes up for this. Internet Radio allows you to explore and nd new
music from all over the world.
Note: As an 'aggregator' service we are simply organising the browsing and
connection process for these stations so that you don’t have to manually search
for them or type in any URLs (web links) etc to access them. Whilst we regularly
check the stations to make sure they are still transmitting reliably and in reasonable
quality, we are not responsible for their content in any way.
If there is a station you would like added to the list that isn't currently available,
please email us at support@cambridgeaudio.com and we will be more than happy
to look into the availability of this.
HOW TO USE RADIO
Press the button to return to the top-level menu.
Select Radio from the list using the rotary dial then press the rotary dial to select it.
The CXN v2 displays the following submenus.
RADIO
» Location
» Genre
» Search Radio Stations
» Streaming Services
» Podcasts
You can now turn the rotary dial to choose from Location, Genre, Search Radio
Stations, Streaming Services or Podcasts.
Location – Enables you to choose from the stations in any of the countries which
you choose from a list.
Genre – Enables you to choose radio stations according to their declared content,
for example Classic Rock, Sport, News, etc.
Search Radio Stations – Enables you to search for a station you know the name of.
10
Page 11

CXN V2
11
Enter the full name or rst part of the name for your desired station. The CXN v2 will
bring up a list of all stations that contain a word that starts with your search term.
Note: Although we check the stations for continuity of service, some radio stations
do not broadcast 24 hours per day, and some stations may not always be on-line.
Streaming Services – The services available vary depending on your geographical
location. This is because Streaming Services generally allow the user some choice
over the content they listen to and are licensed dierently to Internet Radio.
Podcasts – The podcast services in your area will be shown. These typically display
dierent types of podcast by Subject, Radio Station or DJ etc. It is important to
understand that the menu structure and the availability of podcasts is dictated from
that particular provider and is controlled by them. The availability may therefore
change as the service updates its features etc.
Note: To use the Personal Podcasts feature, please navigate to the webmin page of
your unit by entering the IP address of the CXN v2 into an internet browser on the
same network. Your IP address can be identied by briey pressing and holding
the 'i' icon on front panel of the the unit. This feature allows you to access podcasts
on the CXN v2 that are not available from the other Podcast services we currently
support.
Music Library
The CXN v2 can access media from UPnP/DNLA Servers or USB Media connected
via USB. The CXN v2 displays the following submenus:
UPnP is by far the preferred method as it allows for browsing by artist, album and
other methods, has support for control from Wi-Fi controller and the media can be
shared amongst several devices.
UPNP SERVERS
Your CXN v2 can connect with Computers or Network Attached Storage devices that
feature a Universal Plug and Play (UPnP) AV Server.
When using a UPnP server to share your media, the search and selection criteria are
determined by the server and not the CXN v2, but typically include Album, Artist
and additional options such as Genre.
As long as the CXN v2 is correctly congured for your Network, it will automatically
discover and connect to UPnP servers it nds. It will then allow navigation of the
menu structure coming from that server.
There are many suitable UPnP server software packages available for PC and Mac.
Stand-alone servers and Network Attached Storage (NAS) devices with built in UPnP
server capabilities are also available. Please see the set-up guides on our website at
https://techsupport.cambridgeaudio.com/.
Once you have setup a suitable server, navigate to the My Library menu and press
Select.
The CXN v2 will perform a scan of your network and report any UPnP Servers it
nds. If none are found it will display "No Servers Found" on the display. If a server
or servers are found, UPnP server names will be displayed and you can select which
one you’d like to get the contents from.
Select the server you want and the CXN v2 will then load the appropriate menu
structure from that sever. These typically allows you to browse the content by
Album, Artist, Genre etc. It is important to understand that the menu structure here
is coming from the Server and not the CXN v2.
You can now browse and select any music content in a format the CXN v2 supports
(currently AAC, MP3, WMA, AIFF, FLAC, WAV and Ogg Vorbis).
Note: Not all servers support serving of all these formats. Always make sure the
server you choose also supports your formats of choice. For example, Windows
Media Server does not currently serve FLAC format.
Where available you can select Alphanumeric search and then enter the name or
partial name of an album or track you wish to nd.
Simply select each character in order using the Navigation/Select dial or the
navigational buttons on the remote, using the dial, rotate to each character and
then press in to select or press the Enter button on the remote. You can also use the
button to enter a character and the button to delete a character.
Once nished either press the
Enter button on the remote or press the Navigation/Select dial.
The CXN v2 then displays all Album names or Track names it can nd that matches
your chosen text.
You can then simply select your chosen item and press the Enter or
the remote to start it playing.
button or navigate to the symbol and press the
button on
THE 'NOW PLAYING' SCREEN
Selecting a new Station, Stream or Media item will start playback and display the
'Now Playing' screen.
The current Artist/Album and Track or Station name will be shown with the
relevant CODEC details (i.e. audio le type and bitrate/sample rate.)
For Media les, the CXN v2 also shows the incremental track playback time.
You can also display the now playing screen at any time by pressing the
the remote control or front panel.
i button on
RANDOM
Accessed via the remote or the Cambridge Connect app only. Press the Random
button to toggle Random On or O.
The CXN v2 displays a
If the currently selected media item/folder contains fewer than 1000 tracks the CXN
v2 generates a true random shue of those tracks and starts playback such that all
are played once in a random order and then playback stops.
If more than 1000 tracks are contained the CXN v2 will instead pick a track at
random for playback then pick another one randomly (and without reference to
what has gone before) once the current one has nished.
This continues until Random is turned O. Thus for >1000 tracks the playback of
any track may be repeated randomly.
in the 'Now Playing' screen when Random is On.
REPEAT
Accessed via the remote or the Cambridge Connect app only. Press the Repeat
button to toggle Repeat On or O.
If the currently selected media item is a track the CXN v2 will repeat that track, if it is
an album or artist etc. the CXN v2 will repeat all tracks in that item.
The CXN v2 displays a
in the 'Now Playing' screen when Repeat is On.
USB MEDIA
The CXN v2 can also playback audio content from standard USB hard-drives and
thumb drives. Simply copy your media les onto your USB drive and then connect it
to the front or back USB sockets of the unit.
Press the Home button to get to the top menu. Select the 'Music Library' menu.
The CXN v2 will now scan the thumb drive for media les. Once the scan is
completed, you will then be able to browse the les by selecting 'By Album' or 'By
Artist'.
ALPHANUMERIC SEARCH
This is a search function menu inserted by the CXN v2 into the browse tree of UPnP
servers that support an external search function.
11
Page 12

QUEUE
Viewing the queue
To view the queue at any time press the '•••' (more) button. You can jump playback
to any point in the queue by navigating up/down the list and pressing the Enter
button.
Editing the queue
Tracks can be removed from the queue by highlighting them with the navigator and
pressing the Stop button.
To clear an entire queue, navigate to the bottom of the queue to highlight [Clear
Queue] and press the Enter button.
Note: Switching the CXN v2 into standby will delete the queue.
PLAYLIST
The CXN v2 also supports various playlist formats. For permanent storage of
favourite media selections it is recommended to use suitable software to create
playlist.
These can then be accessed by the CXN v2 from USB Media or UPnP servers that
support Playlist serving.
Inputs
» USB
» D1-D2 (S/PDIF Coax/TOSLINK Optical)
» Bluetooth
» Spotify
The CXN v2 has 3 digital inputs, USB Audio, S/P DIF co-axial and TOSLINK optical.
The digital inputs allow you to play audio sent from a separate digital audio source
such as a PC or CD player with digital outputs. This can optimise sound quality, for
example where the CXN v2 USB Audio is used instead of the PC soundcard or the
upsampled and re-clocked low jitter DACs of the CXN v2 are used instead of a CD
player DACs.
The USB Audio input directly connects to a PC or Mac computer. The CXN v2 can be
setup to stream via the simple setup USB1.1 or the high sample rate 24-bit/192kHz
via USB2.0. Also note that the SP DIF co-axial and TOSLINK inputs are capable of
high sample rates up to 24-bit/192kHz, but your source equipment and interconnect
cables must be capable of this sample rate to achieve this.
ADVANCED USB AUDIO
The CXN v2 is both USB 2.0 (Hi-Speed) and USB 1.1 (Full-speed) USB port compatible.
It should also work with the new USB 3.0 ports where the PC will simply treat the
CXN v2 as if it were a USB 2.0 or 1.1 device.
The CXN v2 also supports two USB Audio protocols (not the same as the port types
themselves) USB Audio 1.0 (which works over USB 1.1 ports and supports up to
24-bit/96kHz) or USB Audio 2.0 (which requires a USB 2.0 port and can support up
to 24-bit/192kHz).
The default conguration is USB 1.1 and USB Audio 1.0 which works with nearly all
common operating systems and computer types without drivers and supports up to
24-bit/96kHz audio, simply plug in and play.
In this conguration the CXN v2 is able to work at up to 24-bit/96kHz by declaring to
your computer that it can handle any sample rate from 32kHz to 96kHz.
However in some Windows/Mac operating system variants the operating system
itself may restrict or x the output sample rate or re-sample the audio.
See our online guide at https://techsupport.cambridgeaudio.com on USB Audio
for more details on this. With careful choice of playback software and settings many
pitfalls can be avoided.
In particular our free Windows USB Audio 2.0 driver (available from our website)
supports up to 24-bit/192kHz audio and WASAPI Exclusive or ASIO modes that can
give enhanced performance.
A brief explanation of your choices are below:
USE WITH PCS
With the CXN v2 switched to USB Audio 1.0 (this is the default setting) the CXN v2
will work with the native Windows XP, Vista, Windows 7 or 8 Audio 1.0 driver (no
need to load any new driver) and accept audio up to 24-bit/96kHz.
With the CXN v2 switched to USB Audio 2.0 the CXN v2 needs the Cambridge Audio
USB Audio 2.0 Driver to be loaded and can then accept up to 24-bit/192kHz (and
support ASIO and WASAPI Exclusive if required).
The driver is available from https://techsupport.cambridgeaudio.com.
(Only available when a BT100 is plugged into the rear USB)
USE WITH MACS
No extra drivers are required. With the CXN v2 switched to USB Audio 1.0 the CXN
v2 will work with the native Mac OS-X 10.5 (Leopard) or above Audio 1.0 driver and
accept audio up to 24-bit/96kHz.
With the CXN v2 switched to USB Audio 2.0 the CXN v2 works with the native
Mac OS-X 10.5 (Leopard) or above Audio 2.0 driver and can accept audio up to
24-bit/192kHz.
USE WITH LINUX
In USB Audio 1.0 mode the CXN v2 will work with most Linux distributions,
allowing the playback of audio up to 24-bit/96kHz.
Newer Linux distributions (e.g. Ubuntu 10.04) support USB Audio 2.0 for which the
CXN v2 should be switched to USB Audio 2.0 to accept audio up to 24-bit/192kHz.
For both cases because Linux distributions vary according to their creators' choice
of software components, including drivers, it is not possible to guarantee operation
and Audio drivers may need to be loaded.
‘Class drivers’ for generic support of USB Audio Class 1.0 or USB Audio Class 2.0
devices may be available from the Linux community, we do not supply these.
BT100 AND BLUETOOTH AUDIO STREAMING
The CXN v2 is compatible with the optional BT100 Bluetooth adaptor from
Cambridge Audio.
When a BT100 is plugged into the rear USB socket an extra menu item called
Bluetooth appears in the Digital Inputs menu.
Selecting this allows the CXN v2 to receive wireless Bluetooth audio from most
phones/tablets and laptops.
Both the standard SBC CODEC and newer high quality aptX CODEC are supported (if
the sending device supports it). Contact your dealer for details.
BT100 BLUETOOTH ADAPTOR
When connected to your CXN v2 this adaptor allows the CXN v2 to receive Bluetooth
Audio (known as Bluetooth Advanced Audio Distribution Prole or A2DP). Contact
your dealer for details.
The BT100 supports Bluetooth A2DP using either the original SBC encoded form or
the latest higher quality aptX encoded form.
SBC and aptX refer to the encoding used over the wireless Bluetooth interface only
and not the format your music may be in, which can be any type that your phone/
laptop or other playing device supports.
Your playing device plays your les then re-encodes the playback before streaming
it to the BT100 in one of these two formats.
Many phones and laptops now feature Bluetooth with A2DP. SBC should be
supported by all such devices (it is the mandatory format for A2DP).
aptX is optional, so check if your sending device supports it, if you wish to achieve
the highest quality audio transfer.
Note: The BT100 declares that it can handle both SBC and aptX to the sending
device which will then use whichever version it supports.
What is aptX?
aptX is a high quality CODEC (CODer/DECoder) i.e. a way of compressing audio data
so it can be sent over a link such as Bluetooth then decompressed on the other side
(if both devices support it).
If your Bluetooth audio source does not support aptX, the BT100 will fall back to
using the standard SBC CODEC that is supported by all Bluetooth audio devices.
12
Page 13

CXN V2
13
BT100 CONTROLS AND CONNECTIONS
C
B
A
A. PAIRING BUTTON/STATUS LED
Button performs pairing and related functionality. Integrated LED indicates BT100
status.
B. USB PLUG
Streams high quality USB audio into your CXN v2 USB socket.
C. EXTENSION CABLE
Allows the BT100 to be positioned for accessibility or optimal wireless reception.
Pairing
To begin streaming high quality music from your chosen media source it will rst
need to be paired with the BT100.
A. Insert the BT100 into the USB port at the back of your CXN v2.
B. Wait a moment for the BT100 to be detected. Then double click the button to enter
pairing mode, the BT100 indicates it is in the pairing state by ashing rapidly.
C. Put your Bluetooth compliant audio source into pairing mode. Please consult
your manufacturer’s user manual on how to do this.
Pairing your BT100 and source establishes an authorised audio link that can then be
used again in the future without having to go through this stage again.
After pairing you can just select the BT100 and play at any time as long as your
Bluetooth A2DP compatible source (phone/laptop etc.) is within approx. 10m of the
BT100.
Normally on your source you will need to select Bluetooth Pairing and then the
BT100 should appear as ‘Cambridge Audio BT100’ in a list of locally found Bluetooth
devices.
Select that item in the list to nish pairing.
D. On successful pairing, the BT100s LED goes o for a second or two, then triple
ashes quickly. The LED then goes o and only lights up in the future when you
are playing audio via Bluetooth.
E. To play back via a paired Bluetooth device, simply select the BT100 on that device
and start playing. The BT100 LED lights up constantly when streaming SBC or on
and icks o every 2 seconds when streaming aptX.
Notes:
– You can pair to more than one source up to a maximum of 8 sources at any time.
Pairing to a 9th device will cause the rst one to be forgotten and so on. However
as you would expect the BT100 can only play back from one of these sources at a
time.
– When you have nished playback many sources keep the Bluetooth link active for
a time unless you actively tell them to stop by deselecting playback via the BT100
(do not unpair as this is not necessary).
This can prevent another source to be able to access the BT100.
To immediately use another source, simply deselect the BT100 for playback on
your rst source device before starting up on a second.
– Some devices stream empty data all the time even when paused or stopped. These
devices will cause the BT100s LED to be on even if playback is currently stopped
or paused.
SPOTIFY
Spotify lets you listen to millions of songs – the artists you love, the latest hits and
discoveries just for you. If you are a Spotify Premium user, you can control your CXN
v2 using the Spotify app.
1. Connect your CXN v2 to the same Wi-Fi network as your phone or tablet running
the Spotify app.
2. Open the Spotify app, and play any song.
3. Tap the song image in the bottom left of the screen.
4. Tap the Connect icon
5. Pick your CXN v2 from the list.
For information on how to set up and use Spotify Connect please visit
www.spotify.com/connect.
The Spotify Software is subject to third party licenses found here:
www.spotify.com/connect/third-party-licenses.
.
AIRPLAY
1. Connect your CXN v2 to your network.
2. Open the app that you want to AirPlay from.
or .
3. Tap
4. Select CXN v2 as your AirPlay device.
From Control Center
To switch the audio on your device from Control Center: Swipe up from the bottom
edge of any screen on your device to open Control Center.
Touch and hold
in the upper-right corner, then select your CXN v2.
CHROMECAST BUILT-IN
CXN v2 comes with Chromecast built-in. It lets you stream your favorite music from
your phone, tablet or laptop to your speaker.*
*Works with compatible iPhone®, iPad®, Android phone and tablet, Mac® and
Windows® laptop, and Chromebookdevices.
Your phone is your remote
By using your phone, there’s nothing new to learn — stream your apps, your
playlists, your favorite artists — without new log-ins or downloads. It’s simple to
browse, queue, and control from anywhere in the home.
Tap the Cast button
Simply tap the Cast button from your own mobile device to start streaming music to
your speaker. Search, play, pause, and more right from your phone.*
*Device should be on the same Wi-Fi network.
100+ Chromecast enabled apps
Choose from millions of songs from popular music services like Google
Play Music, Spotify, Deezer, TuneIn and 100+ more. Discover more apps at...
google.com/cast/apps
Set up your speaker on your phone or tablet
google.com/cast/setup
13
Page 14

This menu contains various setup/conguration menus as shown below.
SETTINGS
» Network
» Firmware
» Display Brightness
» Device Name
» Audio
» Remote Code
» Language
» Power
» Edit Input Names
» Factory Reset
NETWORK
This menu enables you to set your CXN v2’s network settings, scan again for a
connection to another wireless network, or to manually congure the network
parameters. This is useful if you move your CXN v2 to a new location for instance.
By default the CXN v2 will be set for Automatic wired/wireless detection
and automatic IP addressing (DHCP) which will work without setup in most
circumstances (for Wi-Fi you will need to enter your WEP/WPA key if you have one).
In Auto mode the CXN v2 will look for a wired connection rst and then scan for
wireless connections if it doesn’t nd one. It will also try to obtain an IP address
automatically from your router/DHCP server.
If you wish to make changes to your setup the CXN v2 displays the following
submenus.
» Scan for networks
» Enter network name
» Current Cong
» Edit Cong
» Wi-Fi Strength
» Signal Warning
» Wi-Fi Region
» Wired/Wireless
Note: All wireless related menu are only available if the wireless dongle is
connected to the unit.
(only available if connected wirelessly)
SCAN FOR NETWORKS
This option scans all available Wi-Fi frequencies for wireless networks and allows
you to connect to them.
The CXN v2 can connect to 802.11b/g or n networks (2.4GHz frequency range only
for n networks).
A list of available networks will be presented. If a particular network requires an
encryption key, a
Select your local network using the Navigation/Select dial and press it in for enter.
The CXN v2 will then connect to the network using a saved key (if you have
previously set one) or present you with an alphanumeric entry menu. Here you can
enter the network key you set up when setting up your wireless network.
Select each character in turn using the Navigation/Select dial and then press
navigate to the
make a mistake, press
The CXN v2 can handle keys in WEP, WPA and WPA2 formats (the choice of format
is made by appropriate settings on your router) and automatically generates the
right format from your text according to the router request.
symbol will be seen at the end of the network name.
symbol and press Navigation/Select dial to enter that key. If you
to go back one character.
or
ENTER THE NETWORK NAME
This option allows the CXN v2 to search for and connect to a particular network
name only.
Type your network name in using the alphanumeric entry screen.
If no matching network is found 'Network not found' will be displayed.
CURRENT CONFIG
This menu rstly displays the IP mode (static or dynamic). This will be Auto/DHCP
(i.e. dynamic, this is the default) or alternatively Static IP.
For either mode by turning the Navigation/Select dial the CXN v2 will scroll through
the various current IP parameters, for instance the ESSID of the current wireless
network, Wired and Wireless MAC addresses, current IP address, (Sub)Netmask,
Gateway address etc.
EDIT CONFIG
This menu allows the selection of IP mode between static or dynamic (Auto/DHCP).
Auto/DHCP is recommended for most people in most circumstances. Static IP
requires quite a bit of knowledge about IP networks, and is for advanced users only.
The default setting is thus Auto/DHCP, here the CXN v2 obtains its IP address each
time you switch in on by a process called DHCP which means it is dierent each
time it is acquired. This process is completely automatic and much simpler than
implementing Static IP.
However sometimes it is useful (especially in large networks) to know the exact IP
address of each device, this can only be done by using static IP.
When using Static IP you will also need to enter the network mask you wish to
use and the addresses of your gateway and DNS service, note there is no way for
Cambridge Audio to know what these are in your network. Only select static IP if
you know exactly what you are doing!
To set static IP, select the 'Settings > Network > Edit Cong' menu.
The CXN v2 will now display 'Auto (DHCP)? YES/NO'. Turn the CXN v2’s rotary dial to
select 'NO' and then press SELECT.
You will now be able to enter the xed IP address you wish to give your CXN v2 by
using the rotary dial to select the desired numbers followed by pressing Navigation/
Select dial to end inputting the address.
The CXN v2 will now prompt you to enter the required network mask for the
network. You will be able to enter this in the same way as before for entering the
IP address.
You will now need to enter the default gateway’s IP address used by the CXN v2 on
the network.
Finally, you will need to enter the DNS IP address for the CXN v2. On some networks,
you may need to enter your ISP’s DNS IP address, which should be available on your
ISP’s support page on their website.
After entering the above information, the CXN v2 will now try to connect to your
network. If you wish to use DHCP again simply select 'Settings > Network > Edit
Cong' and then set the 'Auto (DHCP)? YES/NO' to 'YES'.
14
WI-FI STRENGTH
Displays the strength of the received Wi-Fi Signal.
Note: If Wi-Fi has been turned o (Ethernet mode only) the signal strength will
show as 0%.
Page 15

CXN V2
15
SIGNAL WARNING
The CXN v2 can display a warning if the Wi-Fi signal strength is low enough to be
causing reduced throughput. The options for the Signal Warning are simply Yes or
No.
WI-FI REGION
Dierent parts of the world use slightly dierent frequencies for Wi-Fi. For best
performance you should set the CXN v2 to the region you live in, the current options
are US, Spain, Europe (i.e. other than Spain), Japan.
WIRED/WIRELESS CONNECTION
It is possible to connect your CXN v2 to your network via an available Ethernet
connection (RJ45) or via a Wi-Fi router. By default the unit is in AUTO mode, each
time you turn the unit it looks for the presence of a wired connection, and tries
to use this, if none is present or it cannot connect it then tries to use the wireless
connection and so on. In Auto mode once the CXN v2 has established a certain type
of connection to the network, then this type of connection will remain in use while
the CXN v2 is on.
You can alternatively congure the CXN v2 to permanently only use the wired or
wireless connection from the CXN v2’s 'Network' menu, select 'Wired/Wireless'.
This menu will present you with three options: 'Auto', 'Wired Only' and 'Wireless
Only'.
Selecting 'Wired Only' will cause the CXN v2 to reboot and then only use its Ethernet
connection to communicate with the network. Selecting the 'Wireless Only' will
cause the CXN v2 to reboot and only use its Wi-Fi connection. Selecting the 'Auto'
option means the CXN v2 will try both and settle on the one it can make work as
described above.
FIRMWARE
This menu item displays some hardware/software version numbers for your CXN
v2. Turn the rotary dial to scroll through the various items.
The Service Pack is the currently loaded rmware software. It’s a good idea to note
this down if you need to contact our technical support people as they may request it.
The Serial Number and Product Code are not normally required by the technical
support team.
Note: This Serial Number is not the same as the physical serial number on the back
of the product itself.
» Check for updates
» Version
CHECK FOR UPDATES
Use this option to download new rmware for the CXN v2 from Cambridge Audio
over the Internet.
If you select this item the CXN v2 will contact our server and see if a newer version of
software is available (‘Checking for updates’ will be shown in the display).
If new software is found the CXN v2 will prompt you and ask if you want to download
it or not. It is a good idea to update the rmware from time to time to take advantage
of any bug xes or new features. At this stage, you can press the CXN v2’s
to cancel the rmware upgrade. A Firmware upgrade may take several minutes.
Note:
– It is very important that once the Firmware upgrade has started you do not switch
o the power to the CXN v2 until the operation is complete otherwise the CXN v2
may become permanently damaged.
– Also do not interrupt the network or internet connection by removing the
Ethernet lead or switching o your router etc.
button
VERSION
This menu item displays some hardware/software version numbers for your CXN
v2. Turn the rotary dial to scroll through the various items.
The Service Pack is the currently loaded rmware software. It’s a good idea to note
this down if you need to contact our technical support people as they may request it.
DISPLAY BRIGHTNESS
Alters the brightness of the CXN v2 display backlight. There are three brightness
levels; o, dim, bright and an option to switch-o the backlight.
When the display is set to OFF, nothing will be displayed onscreen until a selection
is made via the front panel or remote control. The display will then re-activate
allowing you to browse the menu and make your selection. The display will then
automatically switch back o after a few seconds if no further selections are made.
DEVICE NAME
This menu allows the setting of the declared UPnP Client name for your CXN v2.
This is the name other UPnP devices (such as control points and remote apps etc.)
will display when they see the CXN v2.
The default name will be ‘CXN v2’ but can be changed to any name you can easily
recall such as ‘Dads CXN v2’ or ‘Kitchen’ etc.
AUDIO
This menu contains a setup conguration as shown below.
» Digital Pre-amp Mode
» Balance (only available when digital pre-amp mode is enabled)
» USB Audio Class
Digital Pre-amp mode, when enabled, allows volume adjustment to be performed
within the up-sampling Digital Signal Processor (DSP) before being converted to an
analogue audio signal for connection to a power amp.
Normally, the output of CXN v2 (and most other source components) is output at
"full-scale" (i.e. maximum volume). This signal is then fed into a pre-amp which is
used to control the volume of all audio sources connected to it.
To enable Digital Pre-Amp mode it must rst be activated within the setup menus.
Go to "Settings -> Audio -> Digital Pre-amp Mode" and set to "On". CXN v2 will then
respond to the vol+ and vol- buttons on the remote control at any time.
It is also possible to adjust the volume using the rotary controller knob on the front
of the unit.
Whenever the CXN v2 is showing its ‘Now playing’ screen turning the rotary
controller knob will adjust the volume. Pressing back or home etc. to access the
menu system allows the use of the rotary controller for menu browsing. If you are in
a menu and need to adjust the volume immediately simply press the ‘
straight to ‘Now playing’ and then use the rotary controller.
Maximum volume is shown as "0dB" on the display. Reductions in volume away
from maximum are shown in the form of negative numbers i.e. "-12dB". The larger
the negative number, the larger the signal reduction so the quieter it will be. A
muted or silent output is shown as "MUTE". The volume screen is shown briey
when the volume is changed, after which it times-out to the previously displayed
screen.
The last used volume setting is memorised when the unit powered o.
i’ button to go
USB AUDIO CLASS
USB Class options enable CXN v2 compatibility with both USB Audio 1.0 and USB
Audio 2.0 interface formats. The default setting is USB Audio 1.0 which will work
driverlessly with most operating systems for 16-24 bit content at 32-96kHz. Note
USB Audio 2.0 requires a driver to be loaded for Windows. Without this selecting
USB Audio 2.0 will normally give no output. See earlier section on USB Audio for
advanced users.
REMOTE CODE
There are three Options:
Option 1 – is the default and works with the CXN v2 remote control when also in
its default mode.
Option 2 – gives a secondary code set in cases where the remote codes are found to
clash with another remote handset.
If Option 2 is selected on the CXN v2 then the remote handset must also be set to
Option 2 remote codes as well as follows:
Press and hold down the '•••' (more) button whilst inserting the batteries to switch
to Option 2.
By inserting the batteries without the '•••' (more) button held down will default
to Option1.
Option 3 – No remote used.
Language
Allows you to change the display language used.
A list of the currently supported languages will be shown. Select your preferred one
and press enter.
Note: The CXN v2 will then restart in order to start again in the new language, this
will take approximately 30 seconds.
15
Page 16

Power Cambridge Connect app
INSTANT ON
Idle mode, when enabled, allows CXN v2 to enter a lower power suspended state
using the Standby/On button. The display is turned o and many of the internal
processes and circuits are disabled to reduce power consumption. However the
dierence between Idle and Standby is that in Idle mode, power remains connected
to the main controller, Ethernet and Wi-Fi sections.
In Idle mode, networking functionality remains alive in the background. This means
that CXN v2 can be quickly woken up out of the suspended state into an operational
state using not only the front panel, the infra-red remote and the control bus, but
also the iOS app running on the iPhone or iPad. This is not possible when the unit
is in full Standby mode.
To enable Idle mode using the Standby/On button, it must rst be activated within
the setup menus. Go to "Settings -> Power -> Instant On" and set to "On".
Short presses of the Standby/On button then toggle between On and Idle modes.
Note: after putting the unit into Idle mode, you will not be able to wake the unit into
full On mode until 5 seconds have elapsed.
Full low power standby can still be activated by keeping the Standby/On button
pressed for more than two seconds. A subsequent press of Standby/On turns the
unit fully on, but remember that this can’t be done over the network (i.e. from the
iOS app) and that it takes longer to reach the full operational state.
AUTOMATIC POWER DOWN
The CXN v2 will switch itself o after 15 minutes if it is not playing anything and
there has been no user interaction with it during this time. As a default this is set
to 15 minutes, but you can increase or decrease this time, or turn this feature o
altogether if desired.
The Auto Power Down setting can be found in Settings > Power > Automatic Powerdown. There, using the rotary dial you can adjust APD from OFF to 1hr, in 5 minute
increments. Press the rotary dial to accept the new APD setting.
EDIT DIGITAL INPUT NAMES
This allows you to customise the names associated with each digital input so that
they correspond to the actual device names connected to them.
There are six digital inputs:
• USB Audio
• D1 – D5
Each input is named as default by its input type. To rename an input, go to "Settings
-> Edit Digital Input Names", highlight the desired input and select it to rename.
The screen changes to a list of letters, with the current name displayed at the top. To
delete existing letters press the "Stop/Delete" button at the bottom left of the display.
Navigate through the letters and select each letter in turn to rename the input.
When nished, select the "Return" symbol at the end of the letter list (you can press
the "Home" button on the right hand side of the display to jump to it). The name is
then saved and the display returns to the Edit Digital Input Names menu screen.
The Cambridge Connect app is a free Apple or Android application that allows
wireless control of the CXN v2 or other Stream Magic powered Cambridge Audio
products.
The application allows full control of the CXN v2 including Internet Radio,
Streaming Services, UPnP Media, Presets, Queuing and more.
It also supports display of Album artwork and Station logos (where available).
To use the Cambridge Connect app you will need a Wi-Fi network or Access point
for the application to connect to; the connection from your router to the CXN v2 can
then be either Wi-Fi or Etherne.
Search for 'Cambridge Audio' on the App Store/Play Store to download the latest
version.
The CXN v2 allows the user to control playback volume via the Cambridge Connect
app by either:
• Using the digital pre-amp inside the CXN v2, or
• Using a Cambridge Audio Azur amplier or AV Receiver connected to the CXN v2
via the Control Bus.
DIGITAL PRE-AMP
When the digital pre-amp mode is enabled on the CXN v2, the mobile application
allows direct manipulation of playback volume via a slider located on the Now
Playing screen.
CONNECTED AZUR AMPLIFIER/AV RECEIVER
Users can enable Azur Mode in the Settings screen on the application when using
the CXN v2 in conjunction with a Cambridge Audio Azur amplier/AV Receiver.
Users should then select whether they are using a Cambridge Audio Azur amplier
or an AV Receiver. If the CXN v2 and the Amp/AV Receiver are connected using the
supplied orange Conrol Bus cable as shown below.
Volume control is now possible via the 'Now Playing' screen volume-up and volume
down buttons.
FACTORY RESET
Puts all the settings back to their defaults as they were when they left the factory.
The CXN v2 will ask you if you are sure you want to proceed before performing a
reset.
Note: If you perform a factory reset, you will lose any saved WEP/WPA keys for your
wireless network connection.
16
Page 17

Technical specications Troubleshooting
CXN V2
17
D/A Converters Dual Wolfson WM8740 24-bit DACs
Analogue lter 2-Pole Dual Dierential Bessel Double Virtual
THD @ 1kHz 0dBFs <0.001% 24-bit (at volume set to full)
THD @ 1kHz -10dBFs <0.001% (at volume set to full)
THD @ 20kHz 0dBFs <0.002% (at volume set to full)
Frequency Response 20Hz-20kHz +/- 0.1dB *
Signal to Noise ratio -112dBr (at volume set to full)
Total correlated jitter < 130pS
Crosstalk @ 1kHz < -100dB
Crosstalk @ 20kHz < -90dB
Digital outputs S/PDIF Co-axial:
Audio Formats WAV containing uncompressed
Streaming Protocols RTSP (Real Time Streaming Protocol)
Connectivity AirPlay, Spotif y Connect,
Playlist ASX (Microsoft® playlist format) M3U, PLS
Wi-Fi IEEE 802.11 b/g or n
Wi-Fi Encryption WEP, WPA, WPA2
Ethernet IEEE 802.3, 10 Base-T or 100 Base-T
USB 3 x USB 1.1 current limited to 1A each
File systems FAT32, NTFS
Mains inlet voltage 100-240 VAC (switch mode)
Standby consumption <0.5W
Max power consumption 30W
Dimensions 85 x 430 x 305mm
(3.4 x 16.9 x 12.2")
Weight 4 Kg (8.8lbs)
* Steep lter disabled
* iRadio/Streaming Services are output as 16-bit data at the appropriate sample
rate for the decompressed data. The sample rate will be 32kHz, 44.1kHz or 48kHz
depending on the streams sample rate.
Incoming streams of less than 32kHz sample rate cannot be output over S/P DIF /
TOSLINK.
For compressed streams the true resolution of the audio is of course limited by the
encoding.
For Media content from local drives or UPnP this outputs in its native resolution of
16/24-bit, 32kHz 44.1kHz 48kHz or 96kHz with bit for bit transfer.
Earth Balanced
16/24-bit, 32-192kHz
TOSLINK Optical:
16/24-bit, 32-96kHz
PCM 16-24 bit 32-192kHz
FLAC containing losslessly compressed
PCM 16-24 bit 32-192kHz
Apple Lossless (ALAC) containing losslessly
compressed PCM 16-24 bit 32-192kHz
AIFF containing uncompressed
PCM 16-24 bit 32-192kHz
®
Microsoft
(WMA 9 Standard) 32-320kbps
MP3 (CBR or VBR) 16-320kbps
AAC, HE AAC and AAC+
(CBR or VBR) 16-320kbps
OGG Vorbis 32-320kbps
MMS (Microsoft Media Server Protocol)
HTTP (Hyper Text Transfer Protocol)
Google Chromecast
(2.4GHz connection used only)
Windows Media TM Audio
If you experience any trouble with your CXN v2, then you may nd it useful to visit
the help section on our webpage at:
https://techsupport.cambridgeaudio.com/
General Help guidelines:
If you have trouble connecting the CXN v2 to your network, these steps may help to
resolve the problem:
• Conrm that a connected computer can access the Internet (i.e. can browse the
web) using the same network.
• Check that a DHCP server is available, or that you have congured a static IP
address on the CXN v2. You can congure a static IP address on the CXN v2 using
the menu item ‘Settings -> Network Cong -> Edit Cong’, and then select ‘No’ for
‘Auto (DHCP)’. DHCP is however the recommended method.
• Check that your network’s rewall is not blocking any outgoing ports. As a
minimum, the radio needs access to UDP and TCP ports 80, 5 54, 1755, 5000, 6000
and 7070.
• Check your access point does not restrict connections to a particular MAC
addresses. You can view the radio’s MAC address using the menu item ‘Settings ->
Network Cong -> View Cong -> MAC address’.
• If you have an encrypted Wi-Fi network, check that you have entered the correct
key or passphrase into the CXN v2. Remember that text-format keys are case
sensitive. If, when attempting to connect to an encrypted network, your CXN v2
displays: ‘Wireless error’ followed by a 5-digit number, then please ensure that
you enter the correct passphrase for the network. If the problem persists, then you
may need to consult your network conguration.
If your CXN v2 can connect to the network successfully, but is unable to play
particular Stream Magic stations, it may be due to one of the following causes:
• The station is not broadcasting at this time of the day (remember it may be located
in a dierent time zone).
• The station has reached the ma ximum allowed number of simultaneous listeners.
• The station is not broadcasting anymore.
• The link in our database is simply out of date.
• The Internet connection between the server (often located in a dierent country)
and you is slow.
• Try using a computer to play back the stream via the broadcaster’s web site.
If you have problems with UPnP playback always check the following:
• Ensure your chosen UPnP server software is capable of serving the le type you are
trying to access. Some servers do not serve FLAC for instance.
• The CXN v2 can only play non DRM les. Files that have DRM controls cannot
be played by the CXN v2. Some servers may be able to authorise and de-crypt
Microsoft Playsforsure before then serving the content to the CXN v2 but this
operation is not guaranteed as it is purely a function of the server.
• If attempting to play 24-bit WAV or FLAC content note a wired Ethernet connection
is normally required for reliable operation due to bandwidth considerations.
• Check the CXN v2 is capable of playing back the le type you are trying to access.
WMA, AAC, MP3, Vorbis, FLAC and WAV can currently be played. The CXN v2
does not support ALAC, WMA Pro, WMA lossless, RAW, AU or other le types not
mentioned.
If you have problems with USB Media playback always check the following:
• Check the CXN v2 is capable of playing back the le type you are trying to access.
WMA, AAC, MP3, Vorbis, FLAC and WAV can currently be played.
• The CXN v2 does not support ALAC, WMA Pro, WMA lossless, RAW, AU or other
le types not mentioned.
• For USB Media the CXN v2 can only play non DRM les. Files that have DRM
controls cannot be played.
• Check that your device does not require more than 1A if it is powered from the
USB socket itself.
• Check your device is formatted in FAT32/N TFS format.
• The way you organise your USB media aects the size of internal database the CXN
v2 needs to build dynamically as you browse content. Good practice is to create
folders for Artists within which you should have a sub folders for each Album
which then containing the tracks for that Album. Libraries with thousands of
tracks in one folder will progressively slow down the CXN v2s media browsing.
For all servicing, in or out of warranty, please contact your dealer.
17
Page 18

WW W.CAMB RIDG EAUD IO.COM
Gallery Cou rt, Han key Place
London
1 4
United K ingdom
Cambr idge Audio is a bra nd of Audio Partnership Plc.
Registered i n England No. 2953313
 Loading...