

Page 1
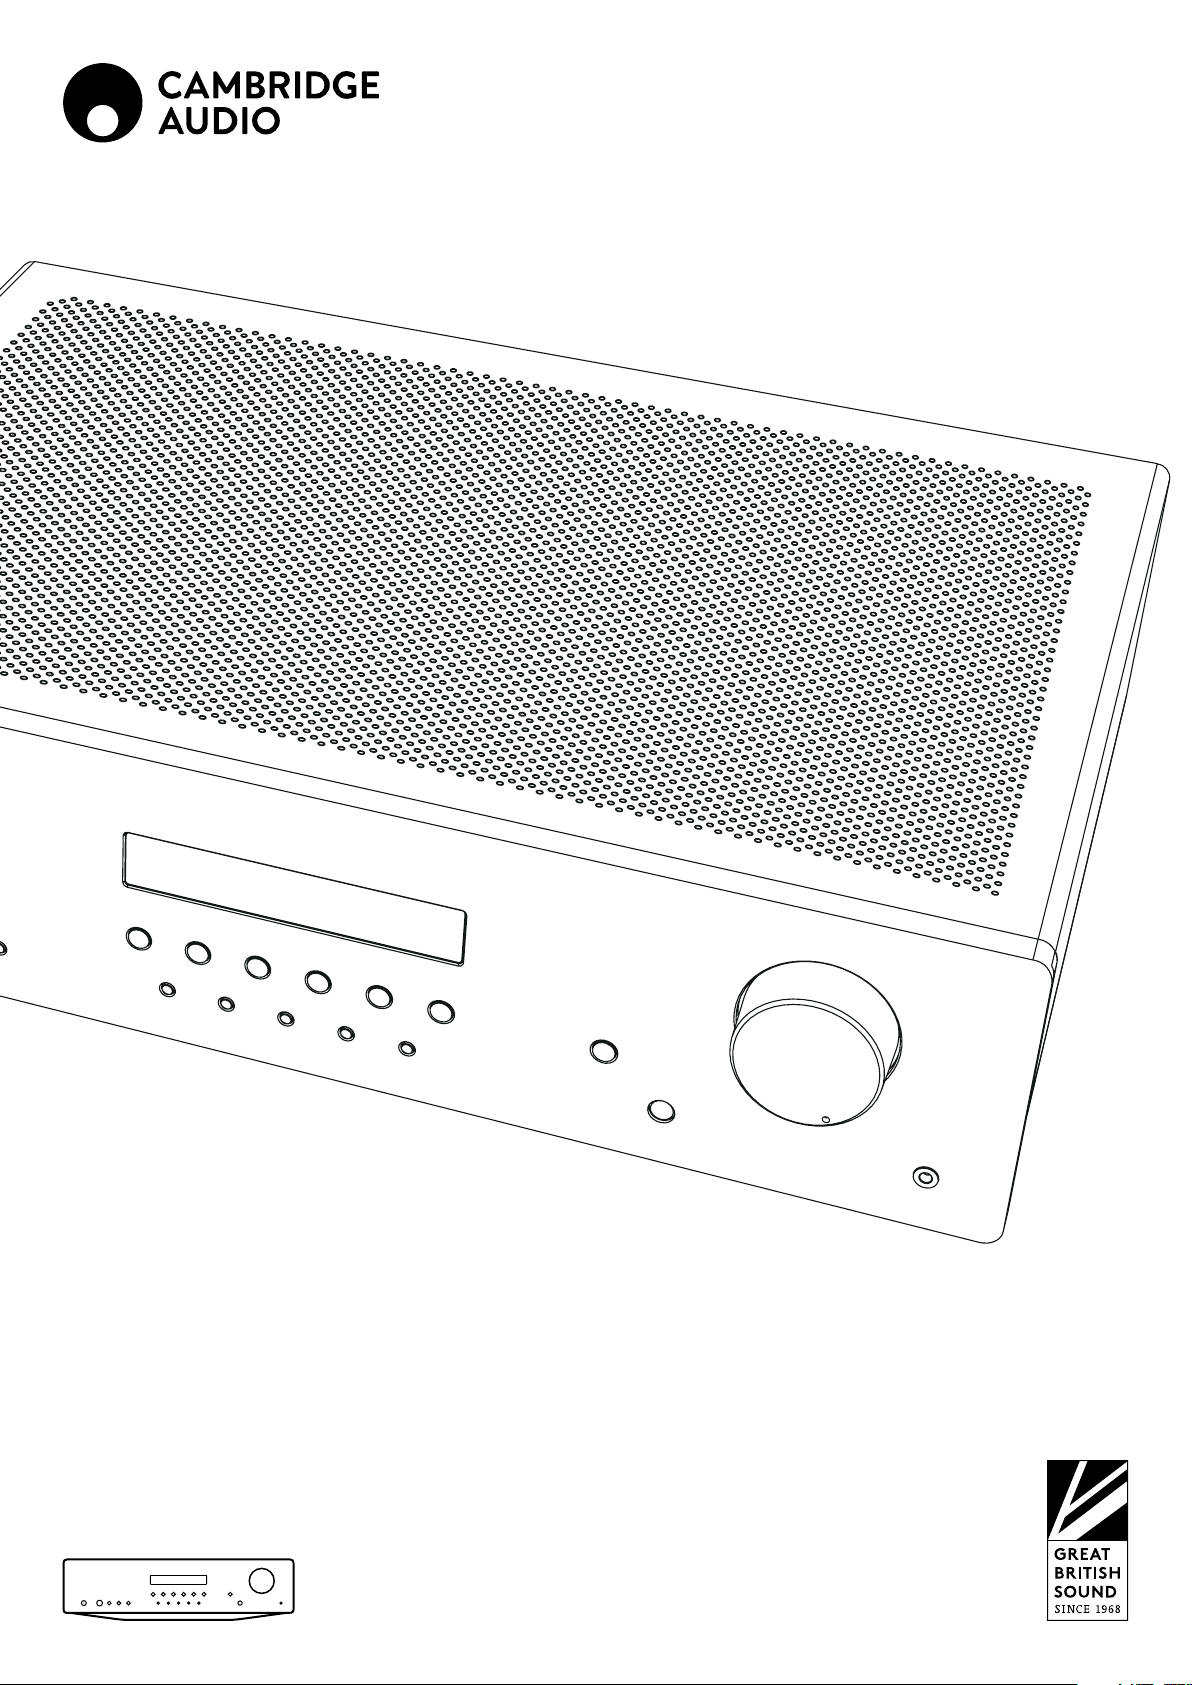
AXR100D
STEREO RECEIVER
Page 2

Contents
IMPORTANT SAFETY INSTRUCTIONS 3
REAR PANEL CONNECTIONS 5
FRONT PANEL CONTROLS 6
REMOTE CONTROL 7
CONNECTIONS 8
AERIALS 10
OPERATING INSTRUCTIONS 10
SETTING 11
TECHNICAL SPECIFICATIONS 12
TROUBLESHOOTING 13
This guide is designed to make installing and using this product as easy as possible. Information in this document has been carefully checked for accuracy at the time of printing; however,
Cambridge Audio’s policy is one of continuous improvement, therefore design and specications
are subject to change without prior notice.
This document contains proprietary information protected by copyright. All rights are reserved.
No part of this manual may be reproduced by any mechanical, electronic or other means, in any
form, without prior written permission of the manufacturer. All trademarks and registered trademarks are the property of their respective owners.
© Copyright Cambridge Audio Ltd 2020.
Make sure you register your product at:
WWW.CAMBRIDGEAUDIO.COM/REGISTER
For upcoming news on future products, software updates and exclusive oers.
Support
If you have questions about your Cambridge Audio product visit
https://support.cambridgeaudio.com where you will nd FAQs and guides to
assist you.
2
Page 3
Important safety instructions
For your own safety please read the following important safety instructions carefully
before attempting to connect this unit to the mains power supply. They will also
enable you to get the best performance from and prolong the life of the unit:
1. Read these instructions.
2. Keep these instructions.
3. Heed all warnings.
4. Follow all instructions.
5. Do not use this apparatus near water.
6. Clean only with a dry cloth.
7. Do not block any ventilation openings. Install in accordance with the
manufacturer’s instructions.
8. Do not install near any heat sources such as radiators, heat registers, stoves, or
other apparatus (including amplifiers) that produce heat.
9. Do not defeat the safety purpose of the polarized or grounding-type plug. A
polarized plug has two blades with one wider than the other. A grounding-type
plug has two blades and a third grounding prong. The wide blade or the third
prong are provided for your safety. If the provided plug does not fit into your
outlet, consult an electrician for replacement of the obsolete outlet.
10. Protect the power cord from being walked on or pinched, particularly at plugs,
convenience receptacles and the point where they exit from the apparatus.
11. Only use attachments/accessories specified by the manufacturer.
12. Use with only the cart, stand, tripod, bracket, or table specified by the
manufacturer, or sold with the apparatus. When a cart is used, use
caution when moving the cart/ apparatus combination to avoid injury
from tip-over.
13. Unplug this apparatus during lightning storms or when unused for long periods
of time.
14. Refer all servicing to qualified service personnel. Servicing is required when the
apparatus has been damaged in any way, such as the power-supply cord or plug
having been damaged, liquid has been spilled or objects have fallen into the
apparatus, the apparatus has been exposed to rain or moisture, does not operate
normally, or has been dropped.
WARNING
– To reduce the risk of fire or electric shock, do not expose this unit to rain or
moisture.
– Batteries (battery pack or batteries installed) shall not be exposed to excessive
heat such as sunshine, fire or the like.
The unit must be installed in a manner that makes disconnection of the mains plug
from the mains socket outlet (or appliance connector from the rear of the unit)
possible. Where the mains plug is used as the disconnect device, the disconnect
device shall remain readily operable. Only use the mains cord supplied with this unit.
Please ensure there is ample ventilation (at least 10cm clearance all round). Do not
put any objects on top of this unit. Do not situate it on a rug or other soft surface and
do not obstruct any air inlets or outlet grilles. Do not cover the ventilation grilles with
items such as newspapers, tablecloths, curtains, etc.
This unit must not be used near water or exposed to dripping or splashing water or
other liquids. No objects filled with liquid, such as vases, shall be placed on the unit.
Use of the a pparatu s in tropica l clima tes - The equ ipment shal l be used at a m aximu m
45 degree C a mbient tempe rature.
The un it is of Cla ss 1 const ructi on and must b e connecte d to a main s socket ou tlet wit h
a protec tive ear thing con nection.
The lightning flash with the arrowhead symbol within an equilateral triangle is
intended to alert the user to the presence of un-insulated ‘dangerous voltage’ within
the product’s enclosure that may be of sufficient magnitude to constitute a risk of
electric shock to persons.
The exclamation point within an equilateral triangle is intended to alert the user to
the presence of important operating and maintenance instructions in the service
literature relevant to this appliance.
WEEE SYMBOL
The crossed-out wheeled bin is the European Union symbol for
indicating separate collection for electrical and electronic equipment.
This product contains electrical and electronic equipment which should
unsorted regular waste. Please return the unit or contact the authorised dealer from
whom you purchased this product for more information.
friendly design of Energy-related Products (2009/125/EC) Directives when used
and installed according to this instruction manual. For continued compliance only
Cambridge Audio accessories should be used with this product and servicing must be
referred to qualified service personnel.
VENTILATION
IMPORTANT - The unit will become hot when in use. Do not stack multiple units on
top of each other. Do not place in an enclosed area such as a bookcase or in a cabinet
without sufficient ventilation.
Ensure that small objects do not fall through any ventilation grille. If this happens,
switch off immediately, disconnect from the mains supply and contact your dealer
for advice.
POSITIONING
Choose the installation location carefully. Avoid placing it in direct sunlight or close
to a source of heat. No naked flame sources, such as lighted candles, should be placed
on the unit. Also avoid locations subject to vibration and excessive dust, cold or
moisture. The unit can be used in a moderate climate.
This unit must be installed on a sturdy, level surface. Do not place in a sealed area
such as a bookcase or in a cabinet. Do not place the unit on an unstable surface or
shelf. The unit may fall, causing serious injury to a child or adult as well as serious
damage to the product. Do not place other equipment on top of the unit.
Due to stray magnetic fields turntables or CRT TVs should not be located nearby due
to possible interference.
Electronic audio components have a running in period of around a week (if used
several hours per day). This will allow the new components to settle down, the sonic
properties will improve over this time.
POWER SOURCES
The unit should be operated only from the type of power source indicated on the
marking label. If you are not sure of the type of power-supply to your home, consult
your product dealer or local power company.
This unit can be left in Standby mode when not in use and will draw <0.5W in this
state. If you do not intend to use this unit for a long period of time, unplug it from
the mains socket.
be reused, recycled or recovered and should not be disposed of with
CE MARK
This product complies with European Low Voltage (2014/35/EU),
Electromagnetic Compatibility (2014/30/EU) and Environmentally-
RCM (REGULATORY COMPLIANCE MARK)
This product meets Australia, New Zealand Safety, EMC and Radio
Communications requirements of the ERAC and ACMA.
AXR100D
3
Page 4

OVERLOADING
Do not overload wall outlets or extension cord as this can result in a risk of fire or
electric shock. Overloaded AC outlets, extension cords, frayed power cords, damaged
or cracked wire insulation, and broken plugs are dangerous. They may result in a
shock or fire hazard.
Be sure to insert each power cord securely. To prevent hum and noise, do not bundle
the interconnect leads with the power cord or speaker leads.
CLEANING
To clean the unit, wipe its case with a dry, lint-free cloth. Do not use any cleaning
fluids containing alcohol, ammonia or abrasives. Do not spray an aerosol at or near
the unit.
BATTERY DISPOSAL
Please dispose of any discharged batteries according to local environmental/
electronic waste disposal guidelines.
LOUDSPEAKERS
Before making any connections to loudspeakers, make sure all power is turned off
and only use suitable interconnects.
SERVICING
These units are not user serviceable, never attempt to repair, disassemble or
reconstruct the unit if there seems to be a problem. A serious electric shock could
result if this precautionary measure is ignored. In the event of a problem or failure,
please contact your dealer.
EUROPEEUROPEAN UNION NOTICE
Hereby, Aud io Partn ership PLC d eclares t hat th is product is i n complia nce with
Dire ctive 2014/53/ EU, the fu ll text of t he EU decl aration of con formit y is avai lable at
the fol lowing i nternet a ddress:
https://ww w.cambridgeaudio.com/DoC
Bluetoo th Radio F requency:
2.402 GHz- 2.48 GHz The Ma x. tra nsmit pow er: 10dBm
PLUG FITTING INSTRUCTIONS (UK ONLY)
The cord supplied with this appliance is factory fitted with a UK mains plug fitted
with a 5 amp fuse inside. If it is necessary to change the fuse, it is important that
a 5 amp one is used. If the plug needs to be changed because it is not suitable for
your socket, or becomes damaged, it should be cut off and an appropriate plug fitted
following the wiring instructions below. The plug must then be disposed of safely,
as insertion into a mains socket is likely to cause an electrical hazard. Should it be
necessary to fit a 3-pin BS mains plug to the power cord the wires should be fitted as
shown in this diagram. The colours of the wires in the mains lead of this appliance
may not correspond with the coloured markings identifying the terminals in your
plug. Connect them as follows:
The wire which is coloured BLUE must be
connected to the terminal which is marked
with the letter ‘N’ or coloured BLACK.
The wire which is coloured BROWN must be
connected to the terminal which is marked
with the letter ‘L’ or coloured RED.
The wire which is coloured GREEN/YELLOW
must be connected to the terminal which is
marked with the letter ‘E’ or coloured GREEN.
If a 13 amp (BS 1363) plug is used, a 5 amp fuse
must be fitted, or if any other type of plug is
used a 5 amp fuse must be fitted, either in the
plug or adaptor, or on the distribution board.
4
Page 5
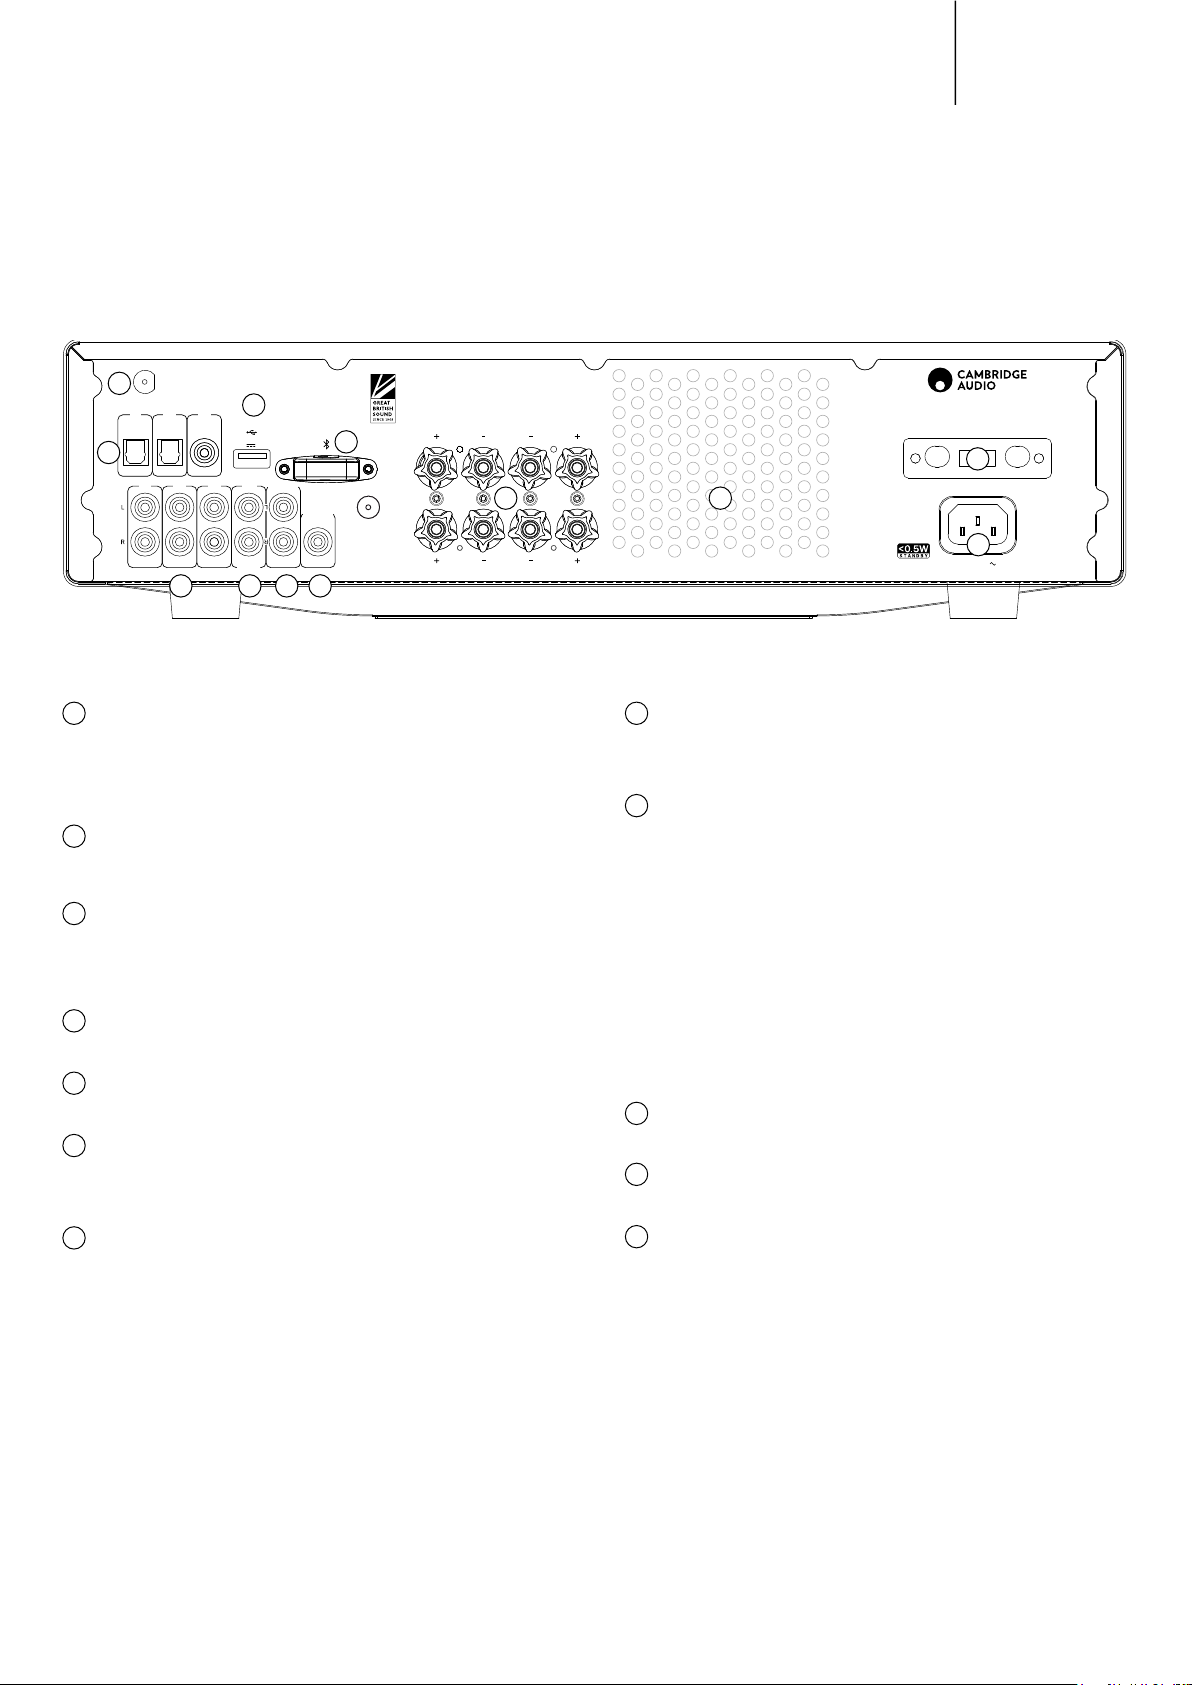
Rear panel connections
DAB / FM
6
Antenna
A3 A1
7
Service Port
Service Port
5V 400mA
5V 400mA
MM
Phono
3 4
MM
Phono
Rec Out
Loudspeaker Terminals
Sub Out
Impedance 4–8 ohms
8
A
Ground
B
Ground
Left Right
A
9
B
LeftRight
5
1
D1
D1D2D3
D2 D3
A2
A2 A3 Rec Out Sub Out
A1
2
10
AXR100D
Designed & Engineered in Great Britain
Assembled in China
AXR100D
Stereo Receiver
11
Mains Voltage Selector Switch
115V/220-240V~ 50/60Hz
12
Power AC
Max Power Consumption:550W
1
DIGITAL INPUTS
Toslink and S/P DIF co-axial digital inputs.
Note: To obtain the best results from your system we recommend using only high
quality Cambridge Audio interconnects. This will ensure that you hear your system
as we designed it. Please ask you dealer for details.
2
AUDIO INPUTS
These inputs are suitable for any ‘line level’ source equipment such as the audio
outputs of CD players, BD/DVD players, etc.
3
PHONO INPUT
This input has a built in phono stage. Record players fitted with Phono Cartridges
of the Moving Magnet (MM) tPlease consult your dealer for details. The ‘ground’
terminals on both the record player and the AXR100D should be connected (where
possible) with a ground wire for lowest noise/hum pickup.
4
REC OUT
Connect to the recording input of a tape deck, CD recorder input, etc.
5
SUB-OUT
Connection to the input socket of an active subwoofer.
6
DAB/FM ANTENNA
Tuner aerial connections for picking up radio signals. Refer to the ‘Connections’
section of this manual. For permanent use, outdoor DAB/FM aerials are highly
recommended.
7
SERVICE PORT
For servicing use only. Do not connect anything here as it may result in damage.
8
BLUETOOTH ANTENNA
Used for wireless streaming bluetooth (A2DP/AVRCP) audio capability directly from
most phones, tablests and laptops. Refer to the operating instructions section of this
manual
9
LOUDSPEAKER TERMINALS
Two sets of loudspeaker terminals are available, A (main loudspeaker terminals,
top row) and B (secondary switchable loudspeaker terminals, bottom row).
Connect the wires from your left channel loudspeaker to the Left positive and
negative terminals, and the wires from the right channel loudspeaker to the Right
positive and negative terminals.
In each case, the red terminal is the positive output and the black terminal is the
negative output.
Care should be taken to ensure no stray strands of wire are shorting speaker
outputs together. Please ensure that the loudspeaker terminals have been tightened
adequately to provide a good electrical connection. It is possible for the sound quality
to be affected if the screw terminals are loose.
The use of A and B speakers affords you an easy and inexpensive way to create a
simple multi-room system.
Note: When using two pairs of speakers, use speakers with a nominal impedance of
8 ohms.
10
HEAT TUNNEL VENT GRILLE
Allows cooling of internal circuitry via the heat tunnel. DO NOT OBSTRUCT!
11
VOLTAGE SELECT SWITCH
For servicing use only.
12
AC POWER SOCKET
Once all connections are complete, plug the AC power cable into an appropriate
mains socket and turn the unit on.
5
Page 6

Front panel controls
R100DAX
1 2 3 4
MODE / STORE
1
POWER BUTTON
Switches the unit between Standby mode (indicated by dim power LED) and On
(indicated by bright power LED). Standby is a low power mode where the power
consumption is less than 0.5 Watts. The unit can be left in Standby mode when not
in use.
DAB / FM A1 / D1 A2 / D2 A3 / D3
5
1 / 6 2 / 7 3 / 8 4 / 9 5 / 10
Auto Power Down (APD)
You can enable and disable the units APD setting. Using the rotary dial then press
the rotary dial to select it. Go to "APD Settings -> set to "On"
The product will automatically switch to standby mode after inactivity of 20 minutes.
2
HEADPHONES SOCKET
Allows for the connection of stereo headphones with a ¼ inch jack plug. Headphones
with an impedance of between 32 and 600 ohms are recommended.
Note: Plugging in headphones will automatically mute the loudspeaker outputs.
3
SKIP/SCAN BUTTONS
The skip scan buttons are used when the DAB/FM tuner is selected. These buttons
have different uses depending on the mode selected. See operation section for
details.
4
MODE/STORE BUTTON
Used for DAB/FM mode.
In FM: Press to cycle the tuning mode between Preset, Auto and Manual modes.
In DAB: Press to cycle between Auto scan, Preset and Service list modes.
Press and hold the Mode/Store button to store the current selected station then use
the or Preset buttons to select the preset location for the station to be stored.
5
INPUT SOURCE BUTTONS
(DIGITAL INPUTS D1,D2,D3)
Press the relevant source button to select the desired input source.
6
PRESET BUTTONS
Used for DAB/FM modes. The preset buttons are used to select user-stored station
presets. Pressing a preset button once will select one of the first 5 preset, pressing
and holding will select the later 5 presets These presets are stored separately for each
waveband i.e. there are 10 for FM and 10 for DAB press the DAB/FM button to switch
between bands and sets of 10 presets.
Note: As well as these 10 per band available directly from the front panel buttons a
further 5 presets (11-40) per band can also be accessed by using the Skip/Scan buttons
to cycle through all 40 presets.
7
11
9
/ PHONO SPEAKER A / B
8
MENU
10
VOLUME
AUX IN
6
7
DISPLAY
Used to display information such as the selected input source, volume and
tone/balance levels. When the FM or DAB tuner input is selected, the radio
frequency or RDS station name will be displayed.
Note: When first purchased, the display will have a protective film over the
top. Peel this off for a clear display.
8
SPEAKER A/B BUTTON
The Speaker A/B button toggles between the two sets of loudspeaker
terminals. The options are speaker A only, speaker B only, speaker A and B
together, and both sets of speakers off.
Note: ‘Speaker off’ is different to the mute function, as the Rec Out and
Headphones outputs are still enabled.
9
MENU BUTTON
Pressing this once will display the menu item. Pressing a second time will return to
the previous menu. There is the system info, Tone Setting, APD setting, Factory reset
and Upgrade in the Menu. the Treble,Base and balance options can be found in Tone
setting, When one of these options is selected, the volume control will adjust the
level. If nothing is pressed for a while, the source will be displayed and the volume
control will go back to controlling the volume level.
10
INFRARED SENSOR
Receives IR commands from the supplied remote control. An unobstructed line of
sight between the remote control and the sensor is required.
11
VOLUME CONTROL
Use to increase or decrease the level of the sound from the outputs of the unit. This
controls the volume level of the loudspeakers, Sub-out and headphones. It does not
affect the level of the ‘Rec Out’ output. The volume control will also change the level
of bass, treble and balance in the menu options.
12
AUX INPUT SOCKET
This source input allows you to connect a portable audio device such as an MP3
player directly into the front of the unit using a 3.5mm stereo-jack. Once plugged in,
this input is automatically selected.
12
6
Page 7

Remote control
The AXR100D is supplied with a remote control that operates this unit and its builtin tuner. In addition, the buttons with Blue coloured icons can operate a matching
AX CD player.
Always use Alkaline batteries.
POWER BUTTON
Switches the unit between Standby mode and On.
AXR100D
CD
MUTE
Mutes audio on the unit. Press again to cancel mute.
CD (BLUE COLOURED ICONS)
To operate the AXC players only. For more information refer to the AX CD user’s
manual.
SPEAKER A/B
Toggles between the selected loudspeaker terminals: speaker A only, speaker B only,
speaker A and B together, or all speakers off.
STEREO/MONO
Used only when FM is selected. Toggles between FM stereo output and FM mono
output. For low quality stereo FM signals, selecting mono can usually reduce the
noise. Note: Some FM stations are mono only, and selecting Stereo will have no
affect on these.
MODE
Used for DAB/FM mode. Press to cycle the tuning mode between Preset, Auto, and
Manual modes.
VOLUME
Increases or decreases the volume of the unit. Also used to change the bass, treble
and balance settings when these are selected.
SKIP/SCAN
The skip scan buttons are used when the DAB/FM tuner is selected. These buttons
have different uses depending on the mode selected. See operation section for
details.
MENU
This menu displays some system info, Tone Setting, APD setting, Factory reset and
Upgrade items, Pressing a second time will return to the previous menu. Use the
volume buttons to change the level of the selected option.
PRESET BUTTONS (1/5, 2/6, 3/7, 4/8)
Used when FM or DAB is selected. These select user-stored station presets. Pressing
a preset button once will select one of the first 4 presets, pressing and holding will
select the later 4 presets. 8 presets are available directly from the remote, further
presets can be selected in Preset mode, by using the Skip/Scan
buttons.
1 2 3
4
7 8 9
0
Speaker
A/B
1/5 2/6 3/7 4/8
Random
A1 A2
Phono
5 6
Prog
Stereo
/ Mono
Vol
Menu
Vol
Presets
D2D1
Prog
Clear
Mode
RemainRepeat
D3
A3/Aux
DAB/FM
SOURCE BUTTONS
(D1, D2, D3, A1, A2, A3/Aux, Phono, ,DAB/FM)
Press the relevant button to select the desired music source.
7
Page 8

Connections
DAB / FM
Antenna
Digital Output
Power AC
Digital Output
S/P DIF
Co-axial
Designed & Engineered in Great Britain
Assembled in China
Power Rating: 100–240V AC ~ 50/60Hz
Rated Power Consumption: 15W
AXC35
Compact Disc Player
LOUDSPEAKERS
Check the impedance of your speakers. You can use types with an impedance of 8
Ohms.
The red coloured speaker terminals are positive (+) and the black speaker terminals
are negative (-). Make sure correct polarity is maintained at each speaker connector
or the sound can become weak and “phasey” with little bass.
USING BARE WIRE CONNECTIONS
Prepare the speaker cords for connection by stripping o approximately 10mm (3/8”)
or less of the outer insulation. More than 10mm could cause a short circuit. Twist
the wires tightly together so there are no loose ends. Unscrew the speaker terminal,
insert the speaker cable, tighten the terminal and secure the cable.
Note: All connections are made using standard loudspeaker cable.
BASIC CONNECTION
The diagram below shows the basic connection of your unit to a CD player, turntable
and a pair of loudspeakers.
USING BANANA PLUGS
We recommend using Banana plugs with our units to establish a secure connection
and ensure there are no loose strands of wire that may cause unwanted noise or
interference.
Once you have stripped the outer insulation of the cable and twisted the wires as
indicated above, securely connect these to your banana plugs, remove the dust cap
from the end of the speaker terminal and push the plug in as far as possible without
applying excessive force.
8
L
R
Line Output
Line Output
L
R
Page 9

DAB / FM
Antenna
SPEAKER B CONNECTIONS
The Speaker B connections on the back of the amplifier allow for a second set of
speakers to be used (i.e. speakers located in another room).
The Speaker A/B button on the front panel and remote control allows the two sets
of speakers to be toggled on and off. Refer to the Front Panel or Remote Control
section of this manual for more information on the Speaker A/B operation.
Speaker A
Main Room
AXR100D
Either A or B, or both A and B may be selected for use.
Note: When using two pairs of speakers, use speakers with a nominal
impedance of 8 ohms each.
AXR100D
Speaker B
Room Two
BI-WIRE CONNECTIONS
If your loudspeakers are equipped with two sets of terminals, then it is possible
to connect them in the bi-wire configuration. Bi-wiring sends the bass and treble
frequencies down separate speaker cables, resulting in a clearer, more focussed
sound.
Note:
– Speaker A and B must both be selected for this type of connection to
work.
– Remove the bi-wire link on the speaker terminals before connecting.
Refer to your speakers’ manual for more information.
Right
speaker
HF
Left
HF
LF
LF
HF
LF
speaker
HF
LF
9
Page 10

Operating instructionsAerials
Ground
Ground
LeftRight
A
B
A
B
Left Right
Max Power Consumption: 550W
Mains Voltage Selector Switch
115/220-230V~ 50/60Hz
Power AC
A1
D1
D2 D3
A2 A3 Rec Out Sub Out
Rec Out
Sub Out
A3 A1
D1D2D3
MM
Phono
MM
Phono
A2
Loudspeaker Terminals
Impedance 4–8 ohms
5V 400mA
Service Port
DAB / FM
Antenna
After making any connections to your unit, activate the AXR100D by pressing the
Power On button on the front of the unit.
SELECTING THE SOURCE
Press the Source button on the front of the unit corresponding to your desired
source. Alternatively, you may use the appropriate button on the remote control.
BLUETOOTH
To.connect a Bluetooth device to AXR100D.
PAIRING
SPEAKER A / B
/ PHONO
A3 / D3A2 / D2A1 / D1DAB / FM
Note: The AXR100D is supplied with a temporary aerial for initial use. For
permanent use, outdoor aerials are highly recommended.
DAB/FM AERIAL
Extend and move the aerial until you get the best reception.
AXR100D has an F-type screw connection and the attached aerial can be removed
and replaced with an optional outdoor DAB & FM aerial if required.
To remove the aerial, feed the supplied aerial key through the aerial and turn the key
counter-clockwise.
1. Press the /Phono button or the remote. "PAIRING" will show on the display.
2. Consult the instructions of the Bluetooth device to connect to AXR100D.When
successfully connected the display will show your device name.
To add another Bluetooth device, Press and hold the
the current connection and repeat step 2. AXR100D will store up to 8 paired devices
/Phono button to disconnect
in memory.
ADJUSTING THE VOLUME
Use either the Volume Up/Down buttons on the remote control, or the Volume
control on the front of your unit system to change the volume level. The newly
selected level will be indicated briefly on the front display.
The volume is displayed in minus dB where 0dB is the highest level.
A progressively larger negative number indicates the volume is being reduced.
VOLUME -40dB
ADJUSTING THE TONE SETTINGS
Adjustments to the bass, treble and balance can be made as follows:
1. To enter the Tone setting menu. Press either the Menu button on the front of the
unit or on the remote control.
BASS 0dB
2. Step through the available settings by pressing the Menu button. The settings
available are in order Bass, Treble and Balance.
3. When you wish to make an adjustment for bass, treble or balance, simply rotate the
Volume control or use the Volume control buttons on the remote control.
10
BASS + 4dB
4. To exit, wait for five seconds, until the unit returns to normal mode.
TUNING AND LISTENING TO THE BUILT IN TUNER
Select the Tuner source using the DAB/FM button on the front of the unit, or directly
by pressing the DAB/FM button on the remote.
FM 87.50MHz
SPEAKER A / B
/ PHONO
A3 / D3A2 / D2A1 / D1DAB / FM
Page 11

Presets
AXR100D
DAB MODE
When selecting DAB mode for the very first time, the unit will initiate a 'Auto Scan',
Repeatedly pressing the DAB/FM button on the front of the unit switches between
DAB and FM modes. or use the DAB/FM button on the remote.
Pressing the Mode/Store button will cycle through:
•DAB/DAB+
Auto Scan
Preset
Service List
AUTO SCAN
Press the Mode/Store button switch to "Auto Scan" , use the or buttons to
perform a full station scan. A scanning percentag appears on the display while
scanning for stations. when scanning is completed, AXR100D will automatically play
and display the station information, if a signal is found.
DAB/DAB+
Auto Scan
MODE / STORE
SERVICE LIST
Once a scan has been performed, use Mode/Store button switch to "Service list" and
use the or buttons to browse through available station.
PRESET
(SETTING PRESETS) Simply press and hold the Mode/Store button to enter store
mode then select any preset number you require with the and keys then press
the Mode/Store button again to actually save the preset.
To recall a stored preset, simply press the Mode/Store to enter Preset mode, use the
or buttons to listen to your chosen station.
BBC Radio 2
Memor 2
MODE / STORE
SETTING PRESETS
Radio stations can be stored into the memory presets for easy access. You can store
up to 40 presets for each band (i.e. 40 presets for the DAB band plus 40 presets for
the FM band).
Tune to the station you wish to store and hold down the Mode/Store button on the
front of the unit. The display on the unit will flash the next available preset.
FM M1 87.50MHz
MODE / STORE
Press the Mode/Store button again to store the preset. The available preset will stop
flashing to indicate that the station has been stored.
To change the preset number, simply press and hold the Mode/Store button to enter
store mode then select any preset number you require with the and keys then
press the Mode/Store button again to actually save the preset.
To recall a stored preset, simply press the number on the remote control that
corresponds with the preset. Each of the preset buttons can select two presets. To
select the second preset on the button, press the button again and this will toggle to
the second preset.
1/5 2/6 3/7 4/8
To load a stored preset from the front of the unit, simply press the number on the
front the unit or remote that corresponds with the preset. To access the second
preset represented by the button, you must press and hold the button.
Note: You can only access stored presets 1-8 on the remote preset buttons. You can
access stored presets 1-10 on the front panel preset buttons. To access all presets, set
the mode to ‘Preset’ mode with the ‘Mode’ button on the remote control or ‘Mode/
Store’ button on the front panel, and use the or buttons. This will allow access
to the full 40 DAB stored presets or 40 FM stored presets.
FM MODE
Note: For ease of tuning on first time use, we recommend that you set the AXR100D
to ‘Auto’ mode. Press the Mode/Store button on the front of the unit. This button
cycles through Preset, Auto and Manual, modes.
AUTO
MODE / STORE
When Auto mode has been selected, press the button to scroll down through
the station frequencies or press the button to scroll up through the station
frequencies.
The tuner will stop at the first strong signal it finds. To move to another station
simply press the or button again.
Setting
There is the system info, Tone Setting, APD setting, Factory reset and Upgrade in the
Menu. the Treble,Base and balance options can be found in Tone setting, When one
of these options is selected, the volume control will adjust the level. If nothing is
pressed for a while, the source will be displayed and the volume control will go back
to controlling the volume level.
SYSTEM INFO
This menu item displays some version numbers for your AXR100D.
Device Nmae.
Mcu version
BT version
FACTORY RESET
Puts all setting back to their deaults as they were when they left the factory.
UPGRADE
This menu item contanis a setup configuration as show below.
MCU Upgrade.
BT Upgrade.
Connecte USB dongle to the service port of AXR100D when you've got the new
firmware from our webpage. It is very important that once the Firmware upgrade
has started you do not switch off the power to the AXR100D + until the operation is
complete otherwise the AXR100D may become permanently damaged.
Important note:
Do not connect/disconnect the USB dongle when the unit is still under upgrading.
11
Page 12

Technical specifications
Power output 100 watts (into 8Ω)
THD (unweighted) <0.01% @ 1kHz, 80% of rated
power
<0.15% 20Hz - 20kHz, 80% of
rated power
Frequency response (-1dB) 5Hz - 50kHz
S/N ratio (ref 1W) >82dB (unweighted)
Input impedances 47k ohms
Power Amp damping factor >50
Standby power consumption <0.5W
Max. power consumption 550W
Bass/Treble controls Shelving, ultimate boost/cut
+/- 10dB @ 100Hz and
20kHz
Subwoofer output 200Hz 2nd order L+R
Level follows volume setting
Digital inputs PCM 16-24-bit
S/P DIF Co-axial 32-192kHz
TOSlink Optical 32-192kHz
Dimensions 110 x 430 x 340mm
(4.3 x 16.9 x 13.4”)
Weight 8.1kg (17.8lbs)
Bluetooth 5.0 A2DP/AVRCP supporting
SBC
TUNERS
Bands European
DAB/DAB+
(174.928 -239.20MHz )Band III,
FM (87.5-108MHz)
Aerial inputs 75 ohms
Signal to noise 60dB typical (FM)
90dB typical (DAB)
Distortion (TUNER) <0.4% @ 1kHz 50kHz
deviation (FM mono)
<0.05% @ 1kHz (DAB)
12
Page 13

Troubleshooting
THERE IS NO POWER
Ensure the AC power cord is connected securely.
Ensure the plug is fully inserted into the wall socket and is switched on.
Check fuse in the mains plug or adaptor.
Check the power is on at the front of the unit.
THERE IS NO SOUND
Check the correct input is selected.
Check that the speakers are connected correctly.
If using the tuner, check aerial connections and an available station is selected.
Check the unit is not in mute mode.
Check the Speaker A/B configuration matches your speakers.
AXR100D
THE SOUND IS DISTORTED
Check aerial connections and placements.
Check speaker connections.
THERE IS A HUM COMING FROM THE SPEAKER
Ensure that all cable connections are secure, particularly ground/shield connections
for turntables.
THERE IS UNWANTED BACKGROUND NOISE AND
INTERFERENCE
Move the unit away from other electrical equipment that is likely to cause
interference.
Re-orientate the aerial.
Ensure that all cable connections are secure, particularly ground/shield connections
for turntables.
THE REMOTE HANDSET WILL NOT FUNCTION
Check that the batteries have not expired.
Ensure that nothing is blocking the remote sensor.
OVER TEMPERATURE PROTECTION
The unit has an over temperature and shutdown protection. If the unit is continuously
used for a long period and over heats, the unit will shut down. Leave the unit ‘OFF’ for
10 minutes to cool down, then turn the unit on to continue listening.
If the problem persists, then the unit is being over driven. Reduce the volume level,
and ensure the unit is in an open ventilated area to resolve the problem.
Use of two pairs of speakers which are less than 8 Ohms can cause overloading and
is not recommended.
If you have questions about your Cambridge Audio product visit
https://support.cambridgeaudio.com where you will nd FAQs and guides to
assist you..
13
Page 14

Gallery Court, Han key Place
London SE1 4BB
United K ingdom
Cambr idge Audio is a bra nd of Audio Partnership Plc.
Registered i n England No. 2953313
AP 375 14/A
 Loading...