

Calypso Modena Vanity, Modena WC, Modena High Rise, Modena 300 Wall Fitting Instructions Manual

1. Mark the position of your Calypso Modena Vanity Unit on the
wall and run your fi rst fi x plumbing.
NB. Wherever the carcass is cut to accommodate pipework the
exposed carcass material must be re-sealed.
2. Secure the Vanity Unit to the wall through the fi xing blocks at
the rear of the carcass using appropriate fi xings to suit the wall.
Brown plugs and 60mm screws are supplied for use where wall
substrate is suitable.
3. Secure the basin to the top of the vanity unit with a bead of
silicone, make your fi nal plumbing connections and test.
4. Install hinge plates to carcass sides.
5. Install soft close hinges to door fascias with screws provided.
6. Finally drill doors for handles, clip doors onto hinge plates and
adjust as necessary for perfect alignment.
1. Mark the position of your Calypso Modena WC Unit on
the wall and run your fi rst fi x plumbing.
NB. Wherever the carcass is cut to accommodate pipework
the exposed carcass material must be re-sealed.
2. Secure the WC Unit to the wall through the fi xing blocks
at the rear of the carcass using appropriate fi xings to suit the
wall. Brown plugs and 60mm screws are supplied for use
where wall substrate is suitable.
3. Fit brackets for cistern to rear upper brace and install
cistern in accordance with the installation instructions
supplied with the cistern.
4. Drill/cut upper and lower WC panels for cistern push
button, soil pipe and fl ush pipe.
5. Install the suspension clips for the lower WC panel to the
Lower Panel using the pin pricks and screws provided.
6. Remove Upper Panel fascia clip from carcass fi tting and
fi t to Upper Panel using the pin pricks and screws provided.
7. Install lower panel by dropping onto the Keku clips you
have installed. Fit cistern push button to upper panel and
connect to cistern. Push fi t the upper panel to the carcass.
Finally install your WC Pan.
8. If you have a Modena WC Worktop, fi x your remaining
Keku Clips to the ‘Inside Top’ of the carcass and to the rear
of the Modena WC Worktop using the pin pricks and screws
provided and push fi t your worktop.
1. Mark position of your Calypso unit at height required.
NB. The standard fi xing height is 2030mm from fl oor to top of
carcass.
2. Firmly fi x wall plate to wall using suitable and appropriate
fi xings. As shown in ‘FIG1’. Secure the Wall Unit to the wall
through the fi xing blocks at the rear of the carcass using
appropriate fi xings to suit the wall. Brown plugs and 60mm
screws are supplied for use where wall substrate is suitable.
3. Determine which way up the carcass is to hang
considering the hand required and insert wall hanging
brackets into the relevant holes on inside rear edge of carcass
and then rotate lock arms 180° to fi rmly secure bracket to
carcass.
4. Hang unit on wall hangers and adjust for height and
level then pull tight to wall ‘FIG2’. Finally secure with a further
screw into the wall through the rear base of the unit to prevent
unit movement.
5. Install hinge plates to carcass sides.
6. Install soft close hinges to door fascias with screws
provided.
7. Finally drill doors for handles, clip doors onto hinge plates
and adjust as necessary for perfect alignment.
N.B If fi tting a double sided mirror wall door use instructions and hinges supplied with the Double Sided Mirror Door and not the hinges supplied with the carcass.
Calypso Modena WC Unit
Calypso Modena High Rise Unit/300 Wall Unit
1. Any carcass, bath panel, door panel or other foil-wrapped item
must be sealed to prevent moisture ingress. (e.g. cutout for basin,
wc, cistern push button etc).
2. All installations must be in well ventilated areas via extraction fans
or other means to ensure humidity and moisture content is at an
acceptable level for our furniture products.
3. Water spillage or excess water must be removed. Cleaning of the
furniture must only take place with the use of a damp cloth or mild
soap cleaning solution and removed or polished via a dry cloth.
Keku upper panel clips
carcass
carcass
fascia
fascia
Keku lower panel clips
Note that failure to adhere to these instructions may invalidate your guarantee
IMPORTANT NOTES
Calypso Modena Vanity Unit
Lock Screw
Up/Down
35mm
Carcass Top
Carcass Side
30mm
ModenaFittingInstructions_MFI V180503 | page1
FITTING INSTRUCTIONS • MFI
CALYPSO MODENA BATHROOM FURNITURE
Woodco Group T/A Woodstock Trading Company | 01432 367 367 | sales@woodstockco.com | www.woodstockco.com
Straight Mile House | Beacon Road | Rotherwas Industrial Estate | Hereford | HR2 6JF
FIG2.
FIG1.
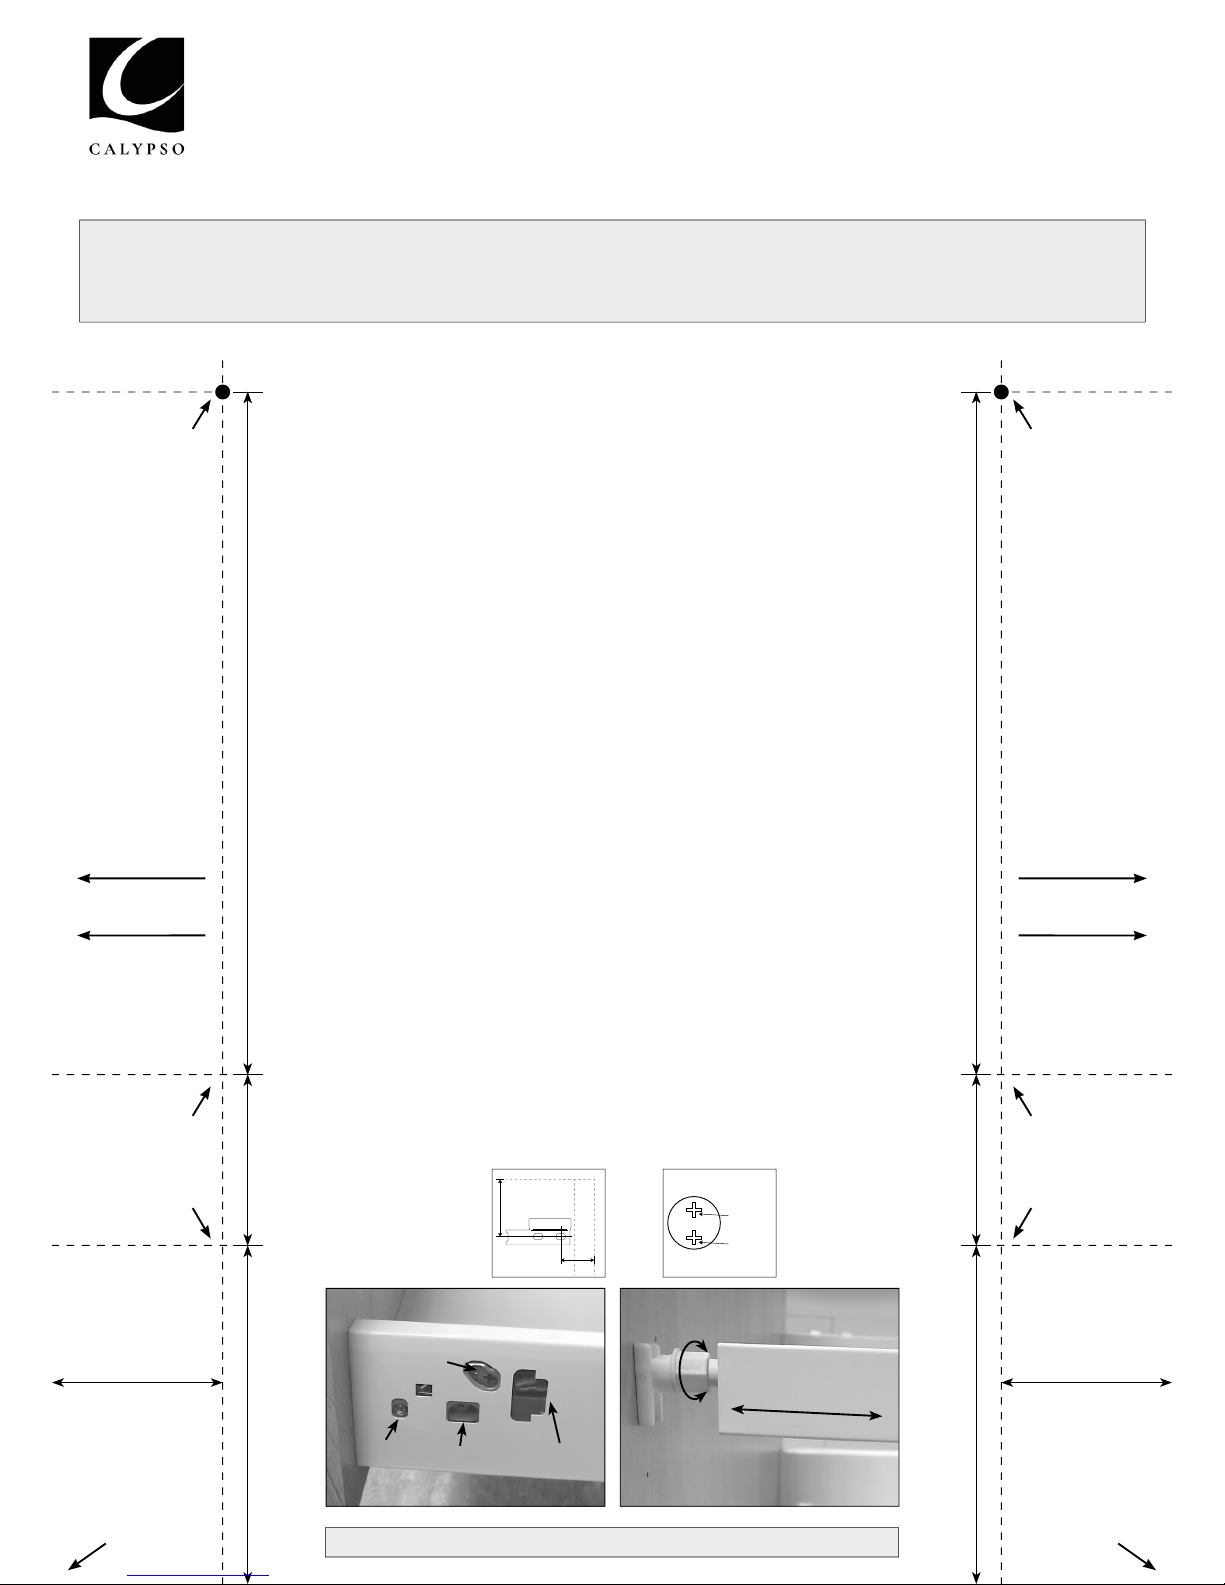
1. Remove drawer from unit by removing ‘CALYPSO’ badge from drawer box sides, lift the
release lever ‘E’ and slide drawer forward to remove.
2. Mark desired position of unit on the wall and mark top of carcass position (NB - The
standard fi xing height is 811mm from fl oor to top of carcass.
3. Fit wall plate to wall using fi xings suitable for wall substrate. FIG1. Brown plugs and 60mm
screws are supplied for use where wall substrate is suitable.
4. Hang unit on wall hangers and adjust for height and level then pull tight to wall - FIG2.
5. Fix basin to carcass side walls with silicone and plumb in tap and waste.
6. Mark and Drill rear of fascia using drill guide provided on these instructions.
NB. DO NOT USE THE PIN PRICK POSITIONS ALREADY ON THE FASCIA.
Place this paper template this side up onto the bottom rear corners of the fascia and drill small
pilot holes through the paper over the ‘x’ marks and a 10mm diameter by 12mm
deep hole at the ‘
•
’ marks.
7. Remove template paper and attach Alloy fascia brackets and Gallery Rail attachment from
drawer system to fascia.
8. Check runners are clear from dust and push drawer back onto the runners.
9. The fascia is adjustable:
• Left/Right - via adjustment ‘A’ (found on the right hand side only)
• Up/Down - via adjustment ‘B’
• In/Out - slide the sleeve ‘C’ back and rotate the adjuster ‘D’ to tilt the fascia.
10. Ensure basin and unit are adequately sealed with silicone to prevent water ingress to carcass material.
NB. To remove drawer fascia from drawer box, unclip the Gallery Rail and turn ‘F’ on both sides.
x
x
Bottom
left rear corner
of fascia
Bottom Right
rear corner of
fascia
Rear left side
of fascia
Rear Right side
of fascia
Drawer fascia
attachment
Drawer fascia
attachment
Gallery Rail
attachment to
fascia 10mm ø x
12mm deep
Gallery Rail
attachment to
fascia 10mm ø x
12mm deep
32mm 32mm
63.5mm
63.5mm
32mm
32mm
128mm
128mm
PLEASE NOTE:
Only use the drilling guide on this fi tting instruction. The pilot holes on the reverse of the fascia are for alternative units.
Do Not Scale
C.
E.
F.
D.
A.
B.
How to fi t
x
x
FIG2.FIG1.
Lock Screw
Up/Down
35mm
Carcass Top
Carcass Side
30mm
FITTING INSTRUCTIONS • MFI
CALYPSO MODENA BATHROOM FURNITURE
 Loading...