

Page 1
Manual: CB-1000
Rev 1.0
PROGRAMMABLE
IR 8
BUTTON PANEL
Main Office
944 O Keefe Road
Hudson, WI 54016
(Tel) 715-381-9646
(Fax) 715-381
-
9647
www.calypsocontrol.com
sales@calypsocontrol.com
support@calypsocontrol.com
Manual: CB
-
1000 Rev 1.0
Page 2
Page
2
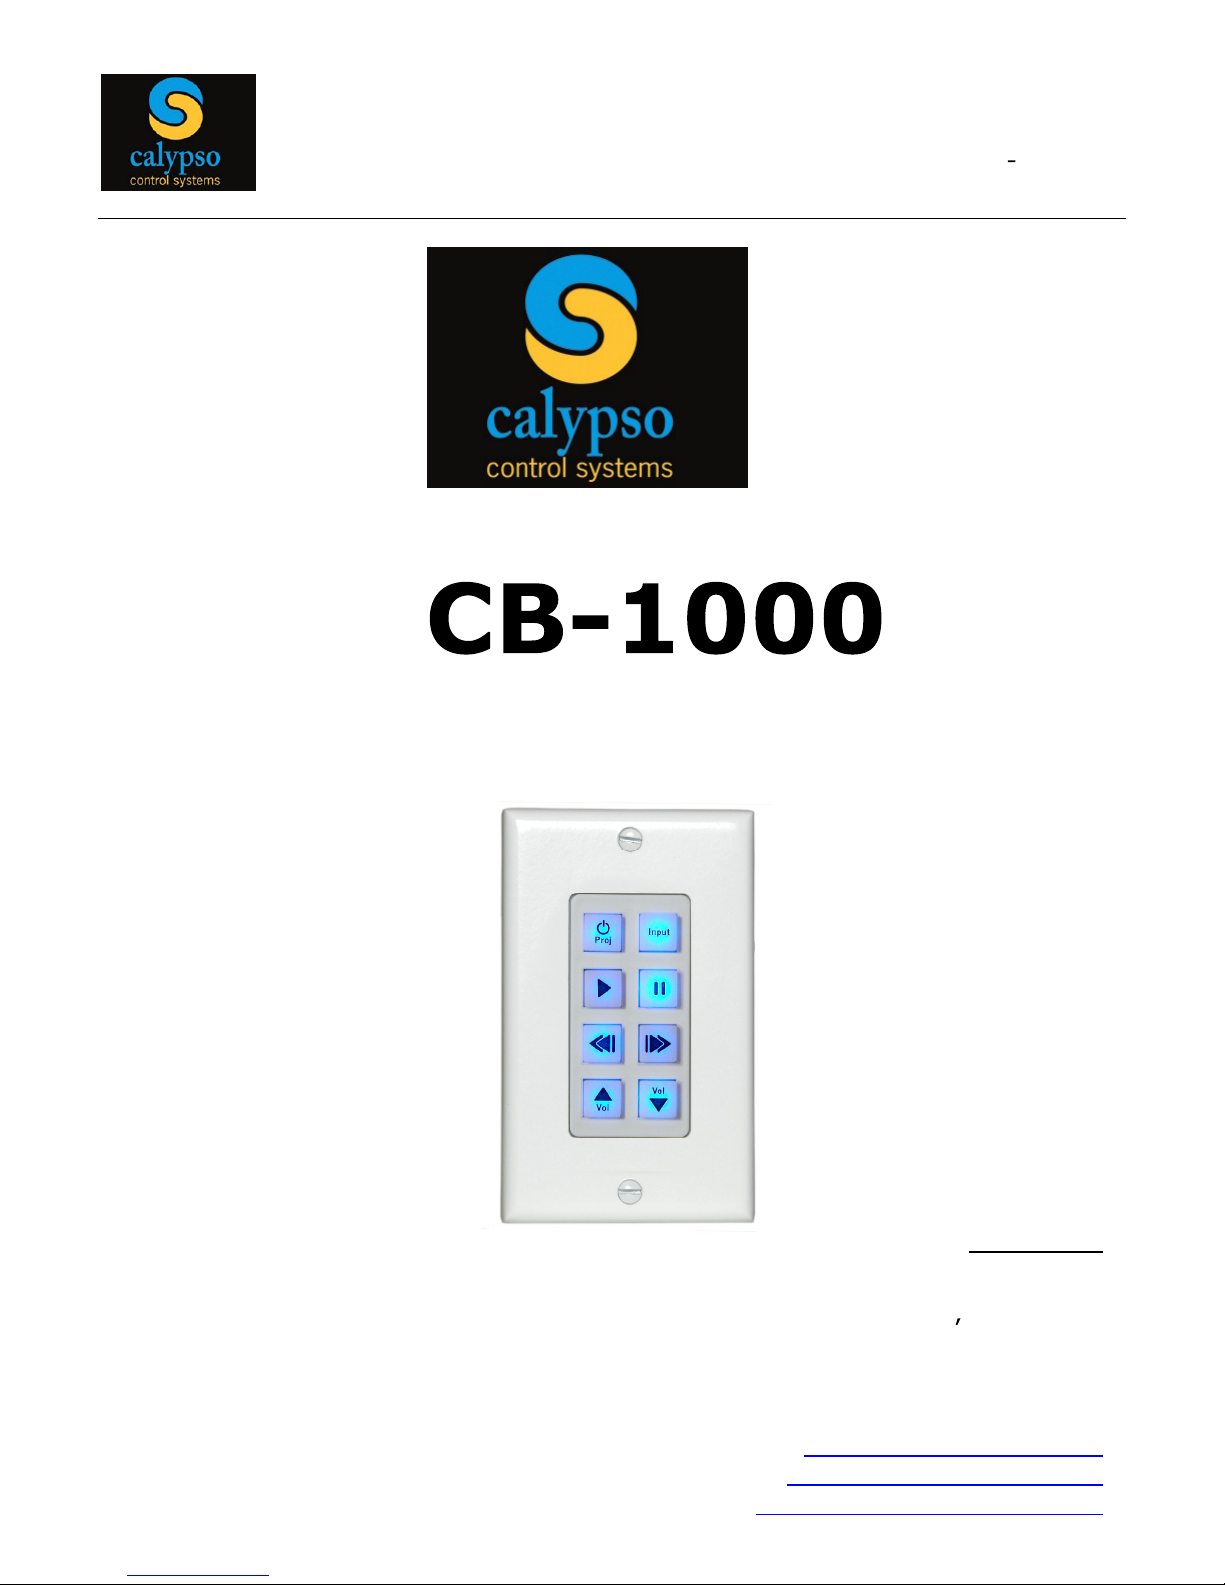
Chapter 1: Introduction to the CB-1000
1.1 CB-1000 Overview
The CB-1000 is a programmable single-gang wall-mount button controller designed to provide
intuitive control over standard AV devices such as projectors, DVD players and audio amplifiers.
By utilizing rubberized tactile push buttons the CB-1000 combines a familiar and flexible
interface with reliability, ease of use, and style. The CB-1000 functions as a stand-alone button
panel with a single IR output, which can be split to control multiple devices, or can be used in
combination with Calypso Pro I/O and ION controllers to add serial, relay or network control for
any number of devices. In addition, the CB-1000 includes two powerful new features: password
protection and a 24 hour IR output
event timer.
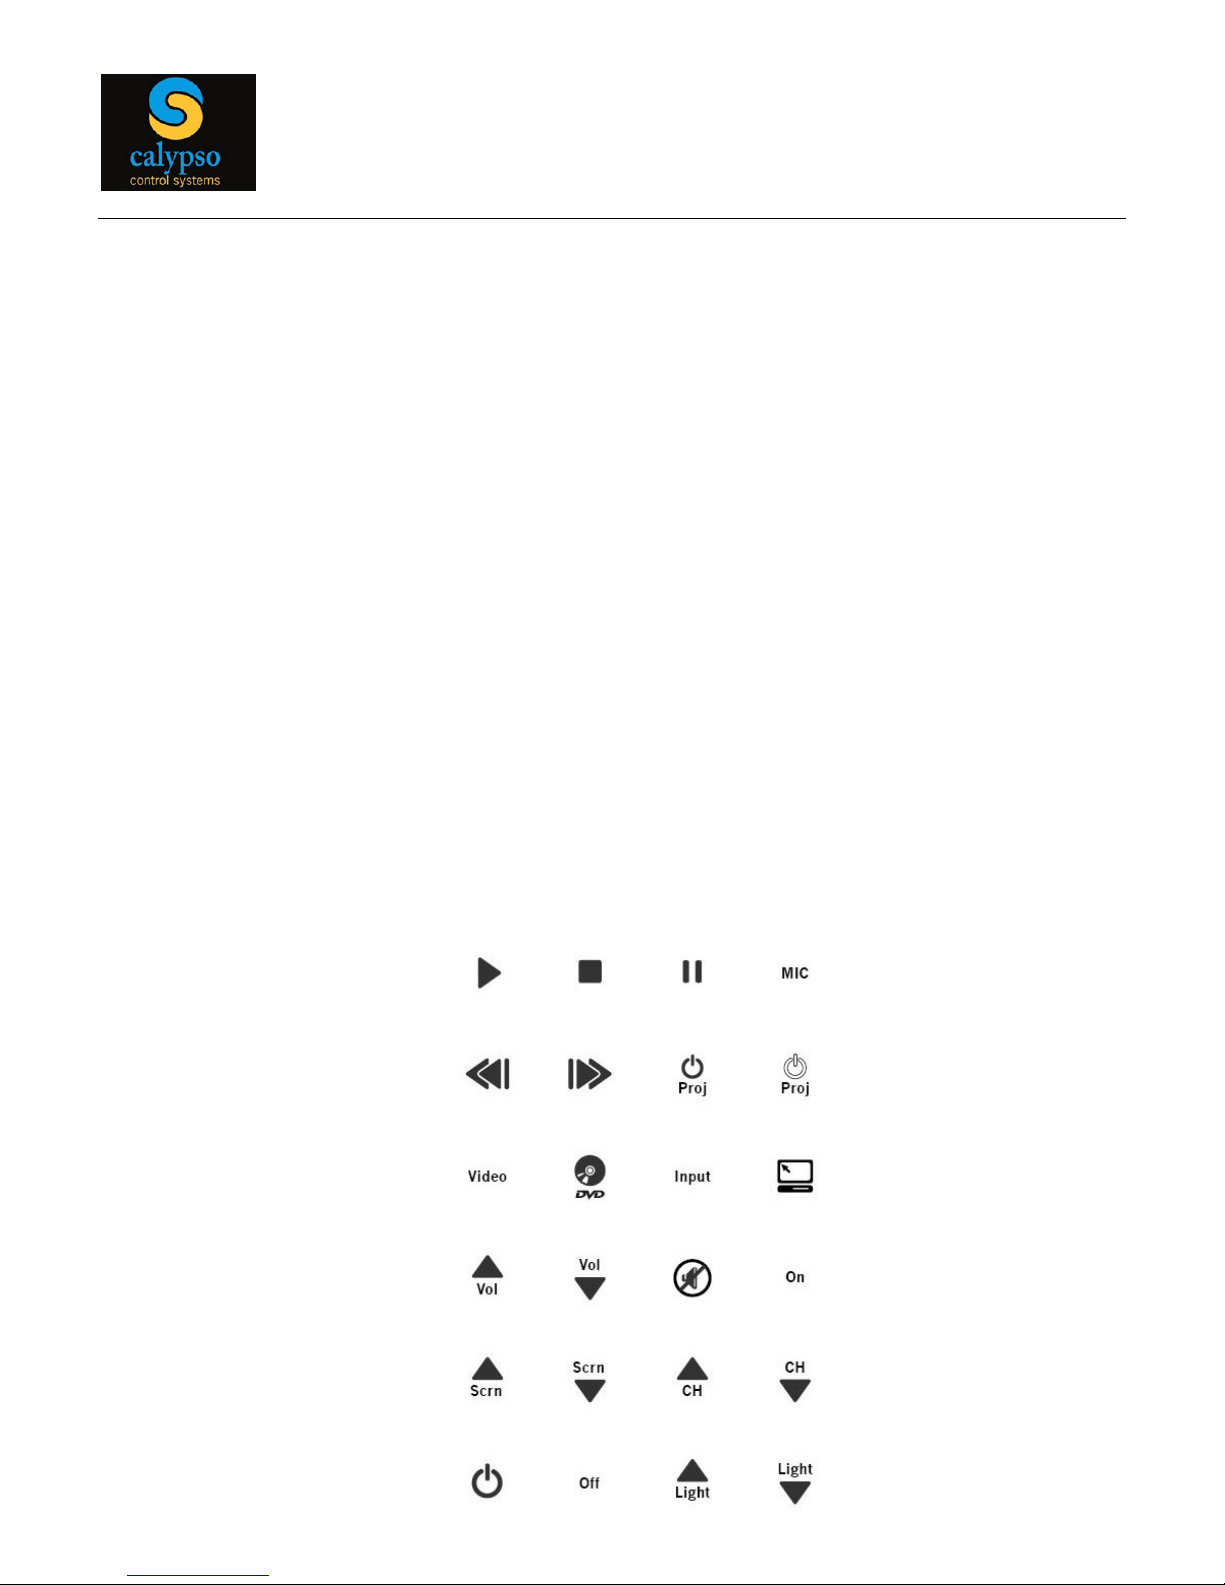
The CB-1000 interface can be field-configured with a variety of labeled push buttons. With
features including rotating IR codes, built-in IR learning, a selectable audible click, and
automated cloning, the CB-1000 fits into a wide range of professional control applications. CB1000 Utility Software is used for setup and cloning, through an on-board 3-pin serial
programming port.
Push Button Label Set
Page 3
Page
3
1.2 Connecting to the CB-1000
Connect to the CB-10
00 through its 3-pin phoenix style serial program port, used in combination
with the CB-1000 Utility Software. Several steps are necessary, however, before you begin
programming the unit with the Java based CB-1000 configuration utility.
1.2.1 Build a Se
rial Programming Cable
Using the 3-pin connector (included), build a serial cable with the 3-pin connector at one end
and a standard 9-pin RS-232 connector at the other end, with the following specifications:
Solder wires to pins 2, 3 and 5 of a female, 9-pin RS-232 connector
Connect the wire on pin 2 (Rx) to the removable connector pin 2 (Tx)
Connect the wire on pin 3 (Tx) to the removable connector pin 1 (Rx)
Connect the wire on pin 5 (Gnd) to the removable connector pin 3 (Gnd)
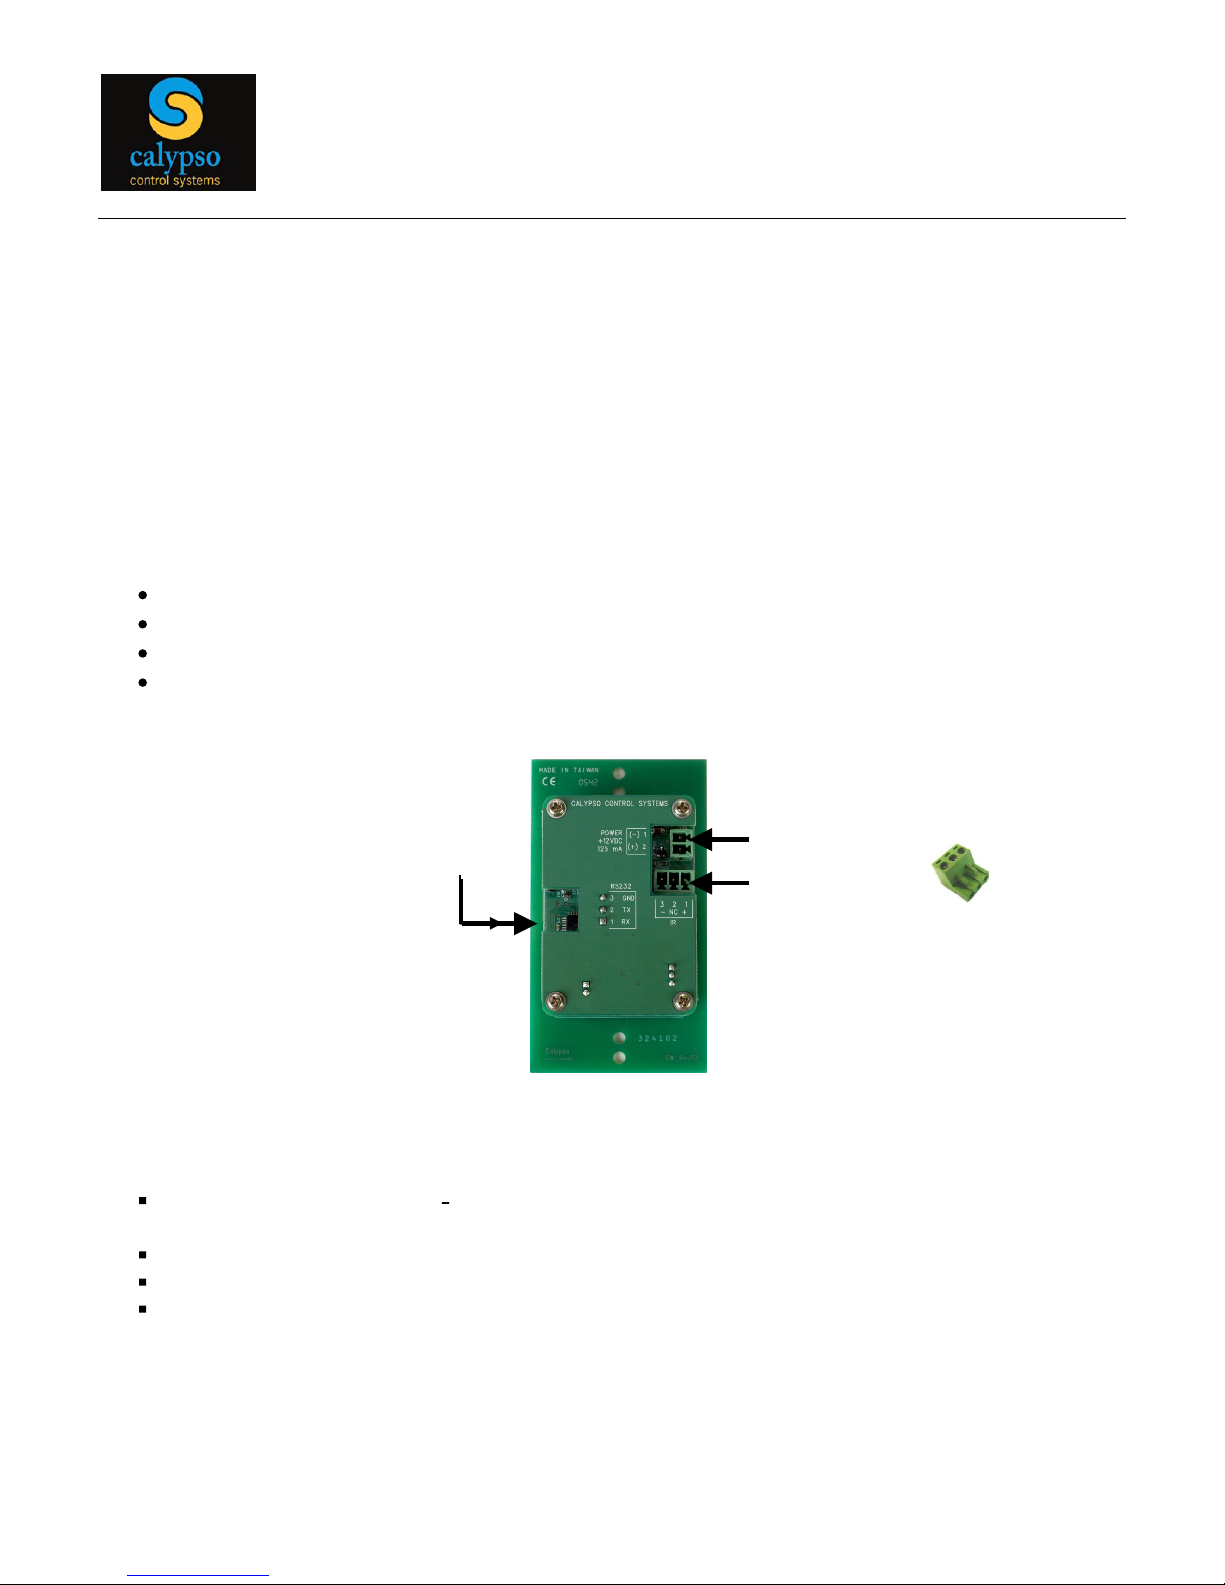
1.2.2 Connecti
ng Power
Attach one end of + and
power wires to a 2-pin removable connector. Attach the other
end of the wires to pins 1 and 2 of a 4-pin removable connector.
Plug the 4-pin power connector into 4-pin block A on the TB-CW.
Plug the 2-pin power connecto
r into the CB-1000 power receptacle
Plug the 12vdc power supply into the TB-CW.
NOTE: When launched the configuration utility tries to auto-connect to the CB-1000, and if
successful the CB-1000 will beep. You can also manually select the com port from the pull
down selection box.
Power
IR
Serial
3-pin Connector
CB-1000 Rear View
Page 4
Page
4
1.2.3 Connecting IR
Attach IR+ to Pin 1 and IR- to Pin 3 on a 3-pin Phoenix connector at one end and to pins
3 and 4 of the 4-pin Phoenix connector at the other end
Plug the 4-pin connector into TB-CW block A
Plug the 3-pin IR co
nnector into the CB-1000 IR receptacle
1.2.4 Install and Run CB-1000 Software
CB-1000 software is provided on the CD that accompanies the CB-1000 button panel and is
also available for download from the Calypso web site, under the Support tab. The soft
ware
is installed as any standard computer with Java installed and which supports the RXTX
native serial Java library. Versions of the RXTX library are provided for Windows and MAC
OS X. After installation:
Insert the CD into your computers drive.
Cre
ate a folder on you computer and place the CB-1000 config Zip file into this folder.
Un-Zip the Zip file and copy all of the files into the newly created folder.
Launch the application named CBconfig.exe. The application automatically detects
active seria
l ports on your computer and initiates communications with the CB-1000. For
this reason,
the CB-1000 should be connected with power applied before launching the
config application.
NOTE: If you are using a
USB-Serial converter be sure to install the requ
ired USB driver onto
your computer. Failure to do so may result in the computer not recognizing the connection.
The CB-1000 will beep to acknowledge communications.
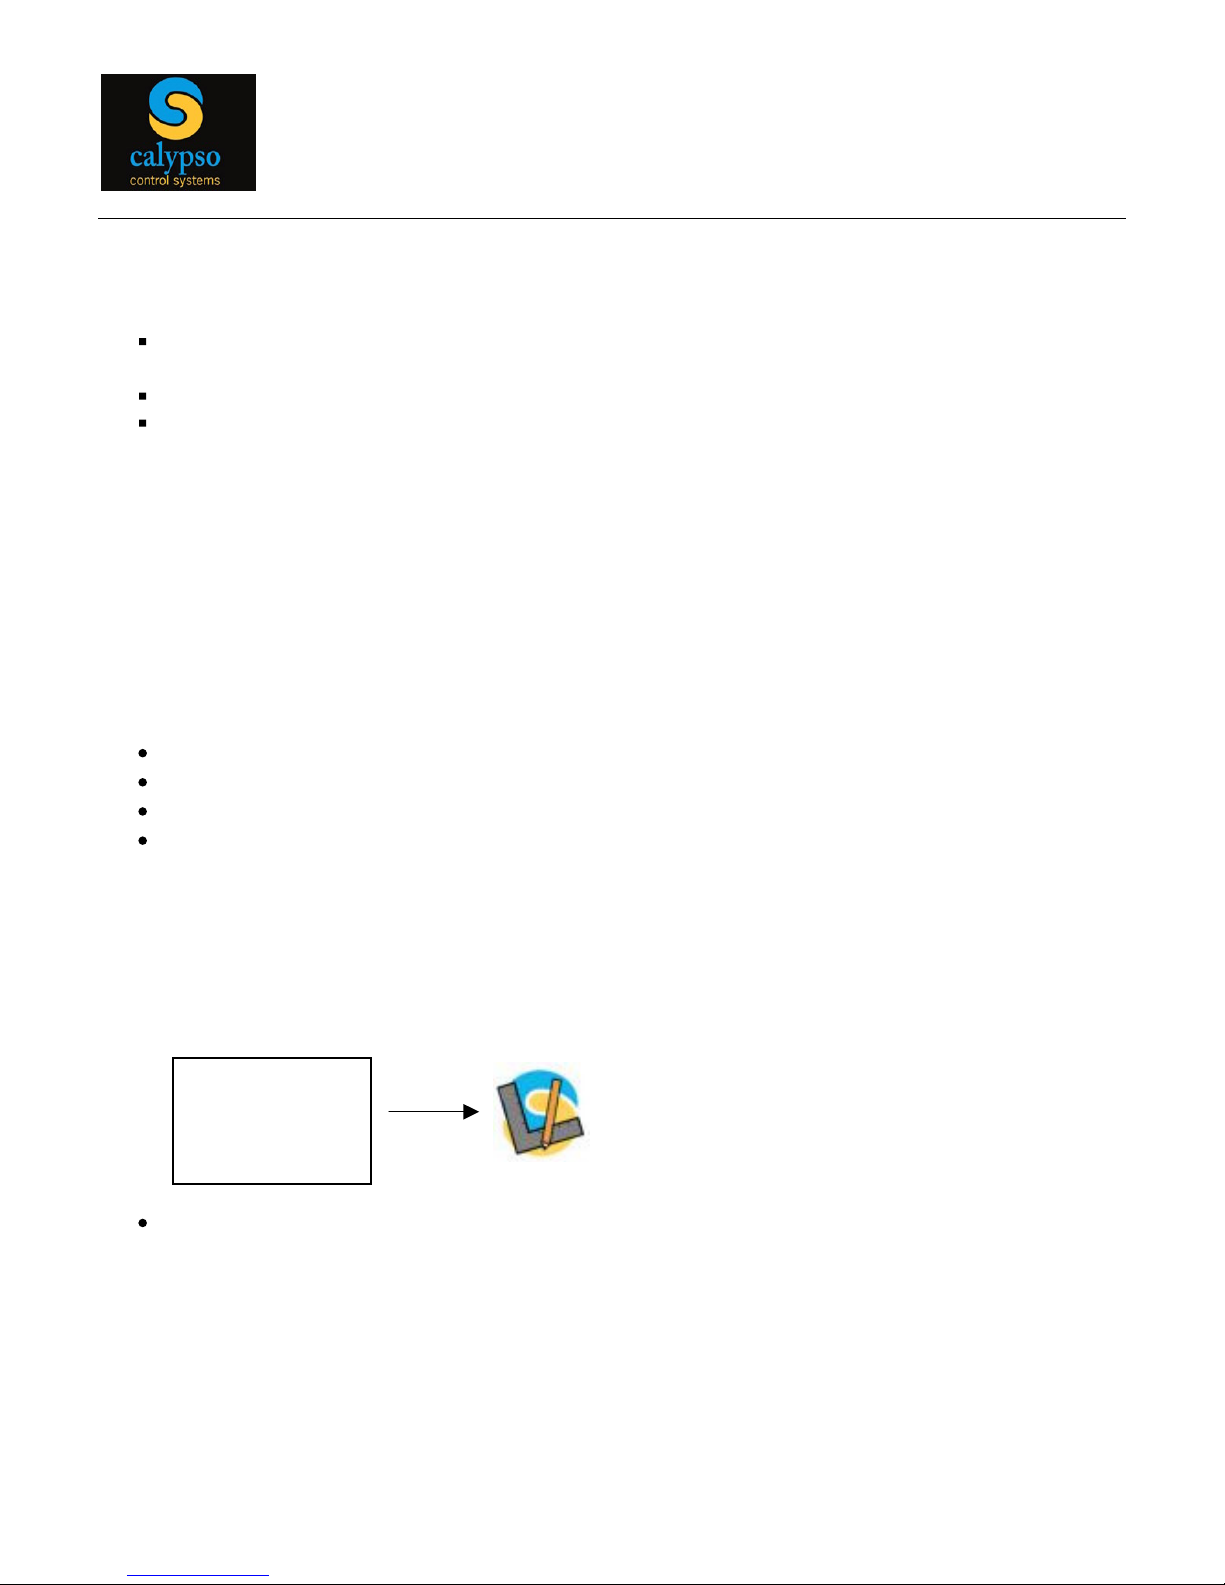
Click on this
Icon to run the
CB
-
1000 config
utility
Page 5
Page
5
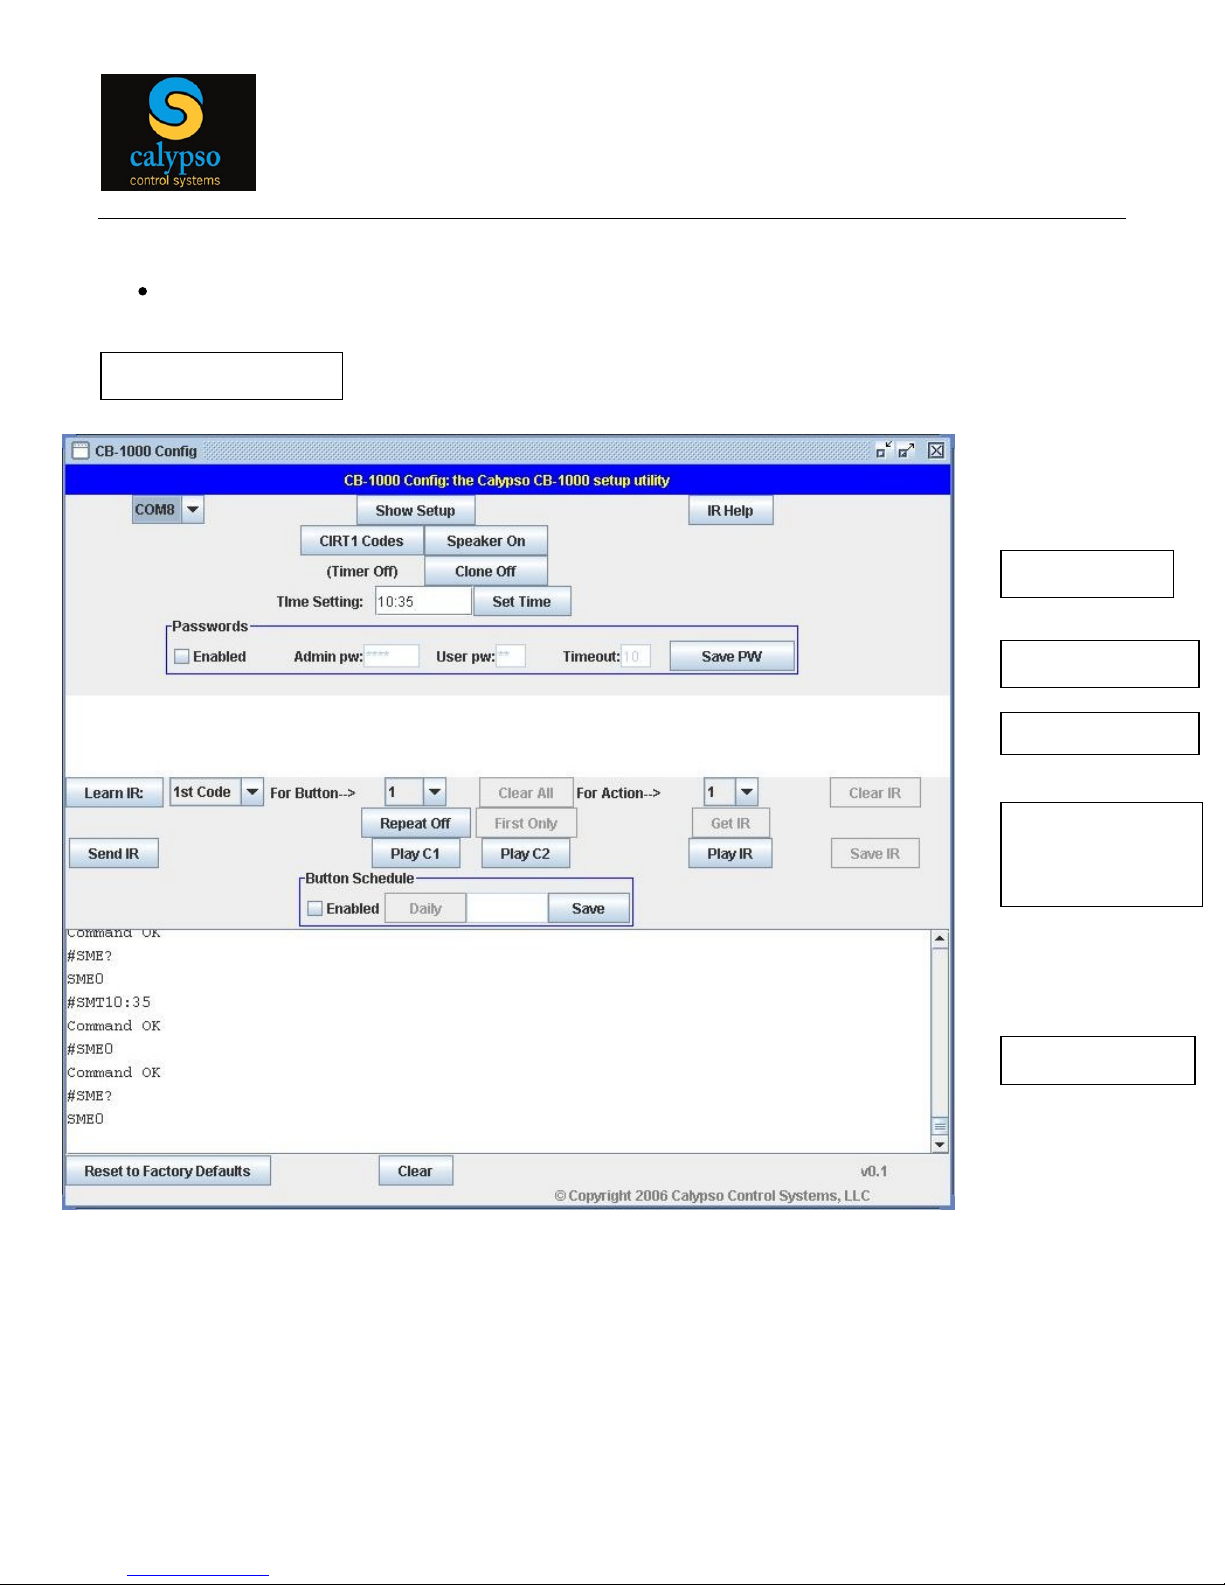
When connected, the CB Config interface shown below will appear.
Status Window
IR Edit Windo
w
Initial Setup
Set Passwords
IR Learning and
Button
Assignments
Com Port Selection
Page 6

Page
6
Chapter 2: CB-1000 Setup
Once serial communication is established, CB-1000 Software is used to configure and program
the CB-1000. The upper section of CB Config sets CB-1000 options and facilities IR learning,
while the lower section of the interface shows current CB-1000 settings and acknowledges each
serial command as it is executed. Using CB Config is as easy as clicking on each button and
selecting the desired option.
2.1 IR Mode
The CB-1000 can transmit either pre-programmed CIRT
codes
, used when commands are sent to other Calypso
controllers, or it can learn Universal IR codes. Use
button A
to toggle between
Universal Learn, CIRT1 and CIRT2 modes.
2.2 Speaker On
The built-in speaker, used to play an audible click upon a button
pre
ss, can be turned on or off by toggling
button B
.
2.3 Clone
Clone mode may be turned on or off by toggling
button C
. Turning Clone On places the CB
-
1000 into a parent clone mode. Accordingly, when the parent unit is connected to a 2
nd
child
unit (i
n Clone Off mode) via the serial cable, all configuration and IR settings from the parent unit
are copied to the child unit. Both units must be powered up and the child unit will beep in
unison with the parent upon completion of cloning.
ABC
Page 7

Page
7
2.4 Timer
The CB-1000 includes a timer feature, which allows it to automatically send out IR commands
based on a set time. For instance, you can set the CB-1000 to always turn a projector off at
10:00PM. Each button can have a separate timed event attached
to it. In addition, there are 4
extra virtual buttons available for timed events only.
NOTE
: the CB-1000 will lose the time
setting upon removal of power, but time can be reset at installation time by either the config utilty
(set up to minute accuracy)
or by the front panel buttons (hour selections).
Setting a timed event:
There are two timer modes: Daily and Repeat . Daily sets the timer to
send out the buttons IR command each day at the set time (note the 24 hour clock). Repeat
sends out the butt
ons IR command at the set interval in the format
hh:mm
. Selecting the
Daily/Repeat button will toggle between the modes. The Enabled box needs to be checked and
then Save button needs to be clicked before a timed event is stored.
Setting the tim
er from the front panel in the event of a loss of power:
If a power outage occurs
and the timer function has been enabled the CB-1000 will keep the scheduled times in its
memory but the current time will need to be re-entered. The CB-1000 will blink butt
ons (HR) and
(SET) to indicate that a loss of power has occurred and the time needs to be reset. This can be
accomplished easily from the front panel. Pressing button (HR) increments the time in hours
from midnight until the current time is reached and but
ton (SET) sets the time. For example, if
the current time is 9:00AM then you would press button (HR) nine times and then press button
(SET) to set the time. Keep in mind that from the front panel the time can only be adjusted by the
hour. If up to minute a
ccuracy is important then you would need to wait until the top of the hour
to set the time or use the config utility.
2.5
Password Protection
Passwords can be set for two different levels: Admin and User . The Admin password is a four
digit selection +
(ENT) while the user password is a two digit selection + (ENT). A time out is set
that determines how long the CB-1000 operates between button presses before reverting back
to requiring a password. The (ENT) button lights up to show that a password is re
quired before
operation. Password enabled is saved if power is lost but the CB-1000 will flash the first six
buttons to indicate that it requires a new user password to be set. The Admin password is saved
in the event of a power outage. Admin can change a
User password from the front panel at any
time by entering the Admin password + (ENT) followed by the new User password + (ENT).
Page 8
Page
8
Chapter 3: IR Learning
When operating in Universal IR mode, IR codes must be learned by the CB-
1000 and assigned
to each b
utton. Keeping in mind that the CB-1000 is capable of assigning up to 4 unique IR
codes to each button (e.g., called actions ), one must (a) learn the IR code, typically using the
original manufacturer s IR remote control, and then (b) assign that code t
o a combination of
button and action numbers (e.g., button = 1, action = 1).
Because each button can have a stack of up to 4 actions, after IR learning is complete, one
can define how the stack is handled on a button by button basis. Action modes inclu
de (a) First
Only
where a button press transmits the first code in the stack, (b) Step
where a button press
transmits the current action then steps to the next one in the stack and (c) All Actions
where a
button press transmits all actions within that
buttons stack sequentially.
3.1 Learn IR Codes
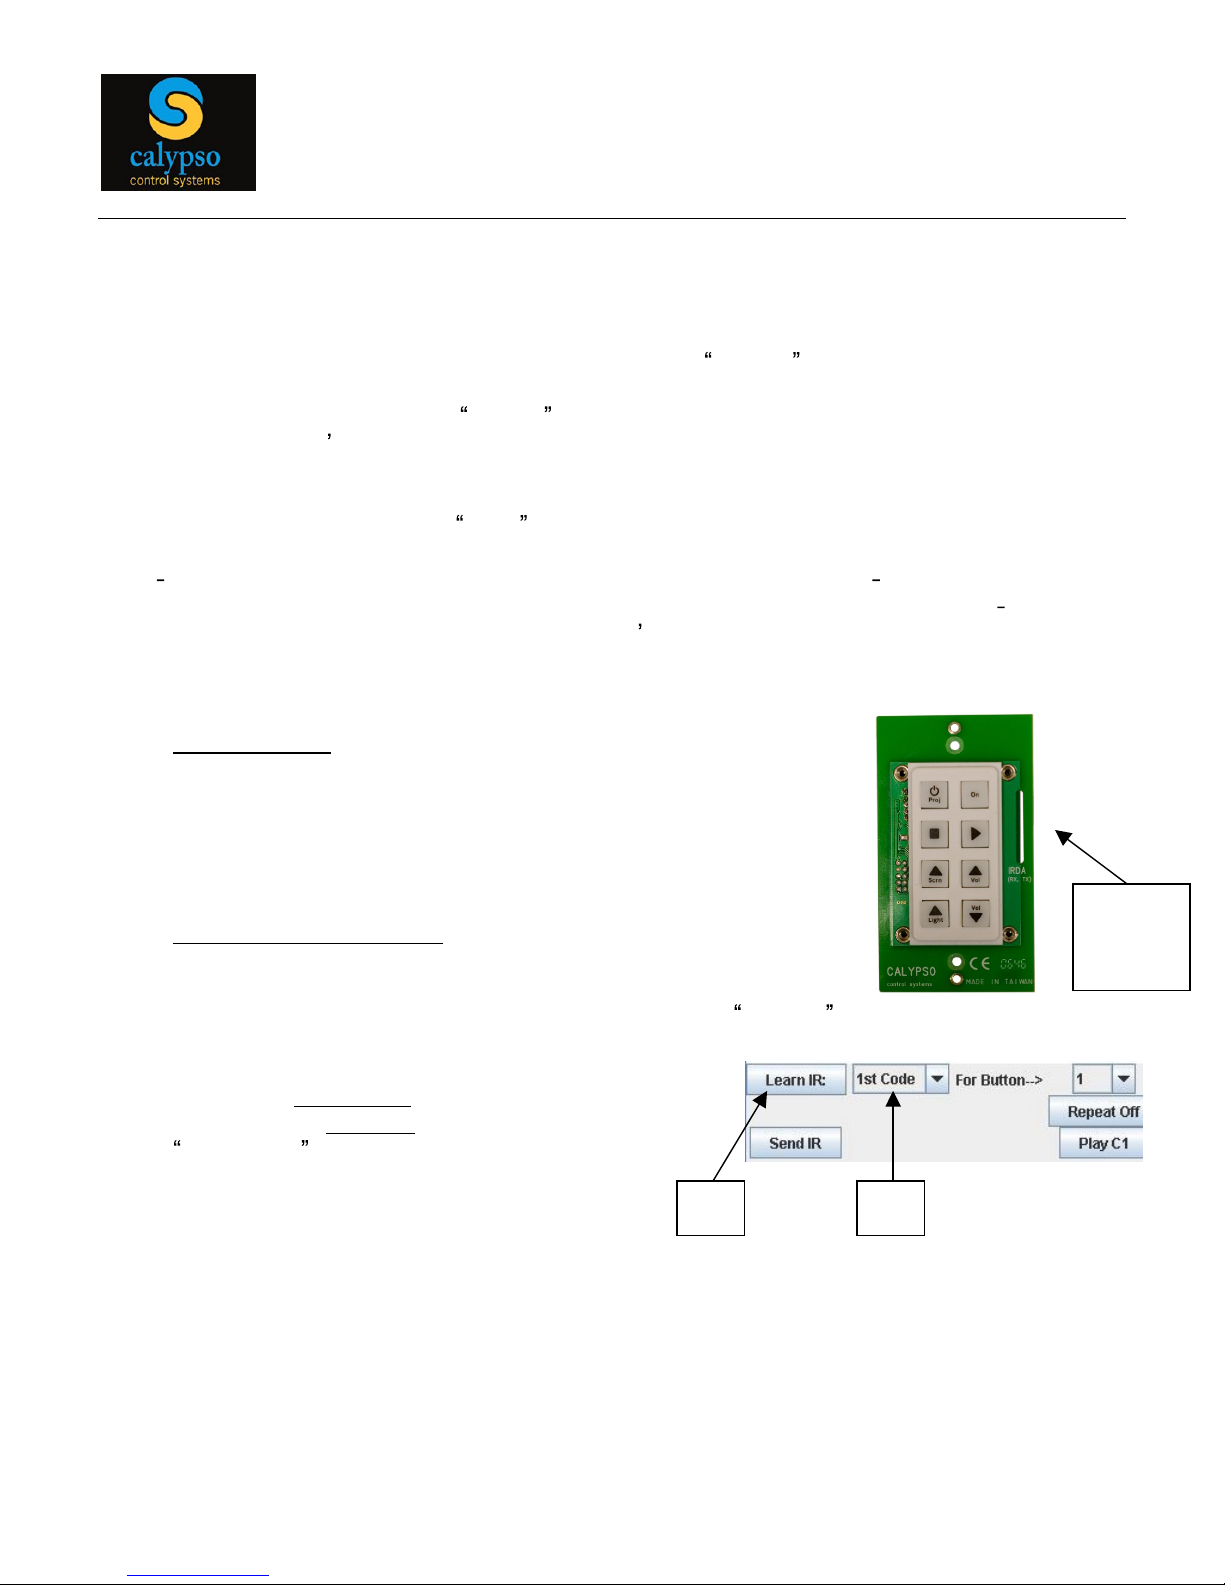
3.1.1 Where to Point
. While it is possible to have the CB-1000 learn
IR codes by pointing the remote control through the middle of
the unit, best results are achieved when the CB-1000 face
plate is removed and t
he IR remote control being used is
pointed through the slot on the right side of the unit, within 3
inches of the surface.
3.1.2 Learn IR / Multiple Codes
. Remote controls often transmit
consecutive IR codes in response to a single button press and
devices bei
ng controlled commonly require consecutive IR
codes to trigger an event. Accordingly, the CB
-1000 learn IR
function provides options for learning the 1st, 2nd or 3rd IR code received in a sequence.
After using
pulldown A
to select which code to
l
earn, click on
button B
to place the CB-1000 into
learn mode . When in learn mode, the CB-
1000
will beep one time and the red, center LED will
light.
IR
Learner
Slot
A
B
Page 9

Page
9
Point the remote control through the IR Learner slot and press the desired button one
time. When
the code is successfully learned, the CB-1000 will beep one time, the red
LED will turn off and the IR string will appear in the Edit Window of the CB-1000 Software
Utility.
This is how a learned IR screen will appear. The data in the box represents th
e Calypso
header information + the captured IR codes.
IR Command Header:
When an IR command is learned the CB-1000 inserts an IR Header into the front of the
command. Each
Hex
byte of this header contains information pertaining to certain IR
paramet
ers and defines how the IR signal is to be transmitted. It is helpful to understand the
first 6 bytes of this header when dealing with difficult IR devices.
Example IR header:
40 00 03 00 00 13
BYTE 1: Carrier frequency of the IR command (30Khz, 32khz, 36khz, 38khz, 40khz and
56khz) that is informational and cannot be changed.
BYTE 2: Idle time
a user adjustable delay time between IR bursts when the IR command is
sent more than once. Allowable timing increments are 04h
1C (must be in Hex form!), wi
th
5ms delay for each increasing hex value. For example, a idle time value of 0A (decimal 10)
would insert a delay of 50ms between the IR bursts. Default is 00h, which means that the
controller will use the idle time that is part of the learned IR code.
BYTE 3: Repeat - selects how many times the IR command is to be repeated. Allowable
values are from 01h to FFh
(must be in Hex form!)
. Default is 03h and 00h is invalid.
BYTE 4: Repeat Mode - three selections: 00h = repeat the entire IR command, 01 = repe
at
the IR header only once, 02h = repeat the IR command with an offset. Default is 00h.
BYTE 5: Offset - selects an offset value if a repeat command needs to drop Bytes in addition
to the header. Allowable values are 00h to 78h
(must be in Hex form!)
.
BY
TE 6: Data Length
displays the size of the data string in Hex form including the header.
Page 10
Page
10
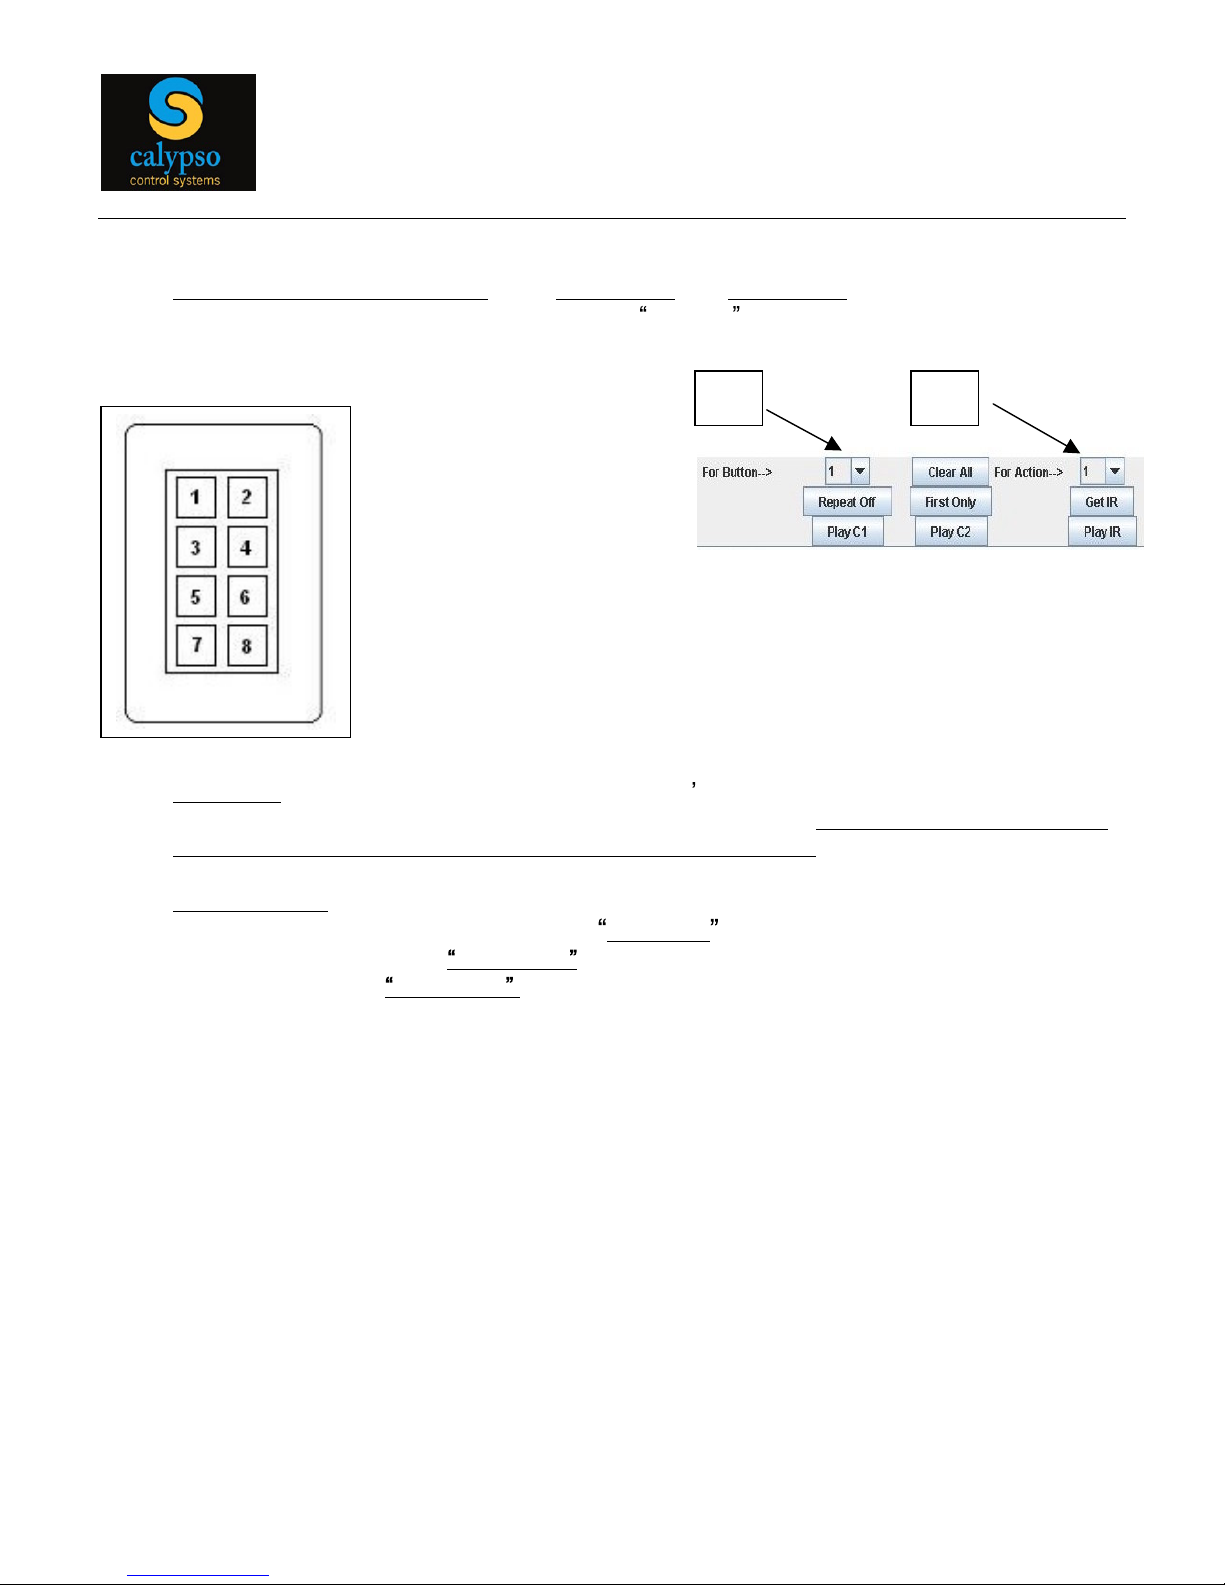
3.1.3 Assign IR to Buttons / Actions
. Use
pulldown C
and
pulldown D
to select a combination
of button and action numbers. Clicking the Save IR button will save the co
des and set
up for the selected button.
3.1.4 IR Repeat
. Turning Repeat On forces the Button s IR code to fire repeatedly as long as
the button is held down (e.g., Volume Up or Volume Down).
Be sure to have the desired
button number s
elected before toggling the IR Repeat button
.
3.1.5 Button Actions
. For each button (1-8), use the pulldown to select between three ways of
using the stored IR codes. When set to
First Only
, the button press fires the first action
in the stack. When set to
Sequential
, the unit rotates to the next action on each button
press. When set to
All Actions ,
a button press fires all actions within the stack.
D
Button order for configuration
C
Page 11

Page
11
Chapter 4: Changing Buttons
4.1
Installing and Replacing Buttons
Unscrew the Decora faceplate
Remo
ve the white plastic button holder by squeezing the 2 white tabs on the back of the
circuit board.
Once the white plastic holder has been removed the buttons will now be loose and can be
replaced.
Replace the white plastic holder over the new buttons
Repla
ce the faceplate and screws. Do not over-tighten the screws or the faceplate will
crack.
Page 12
Page
12
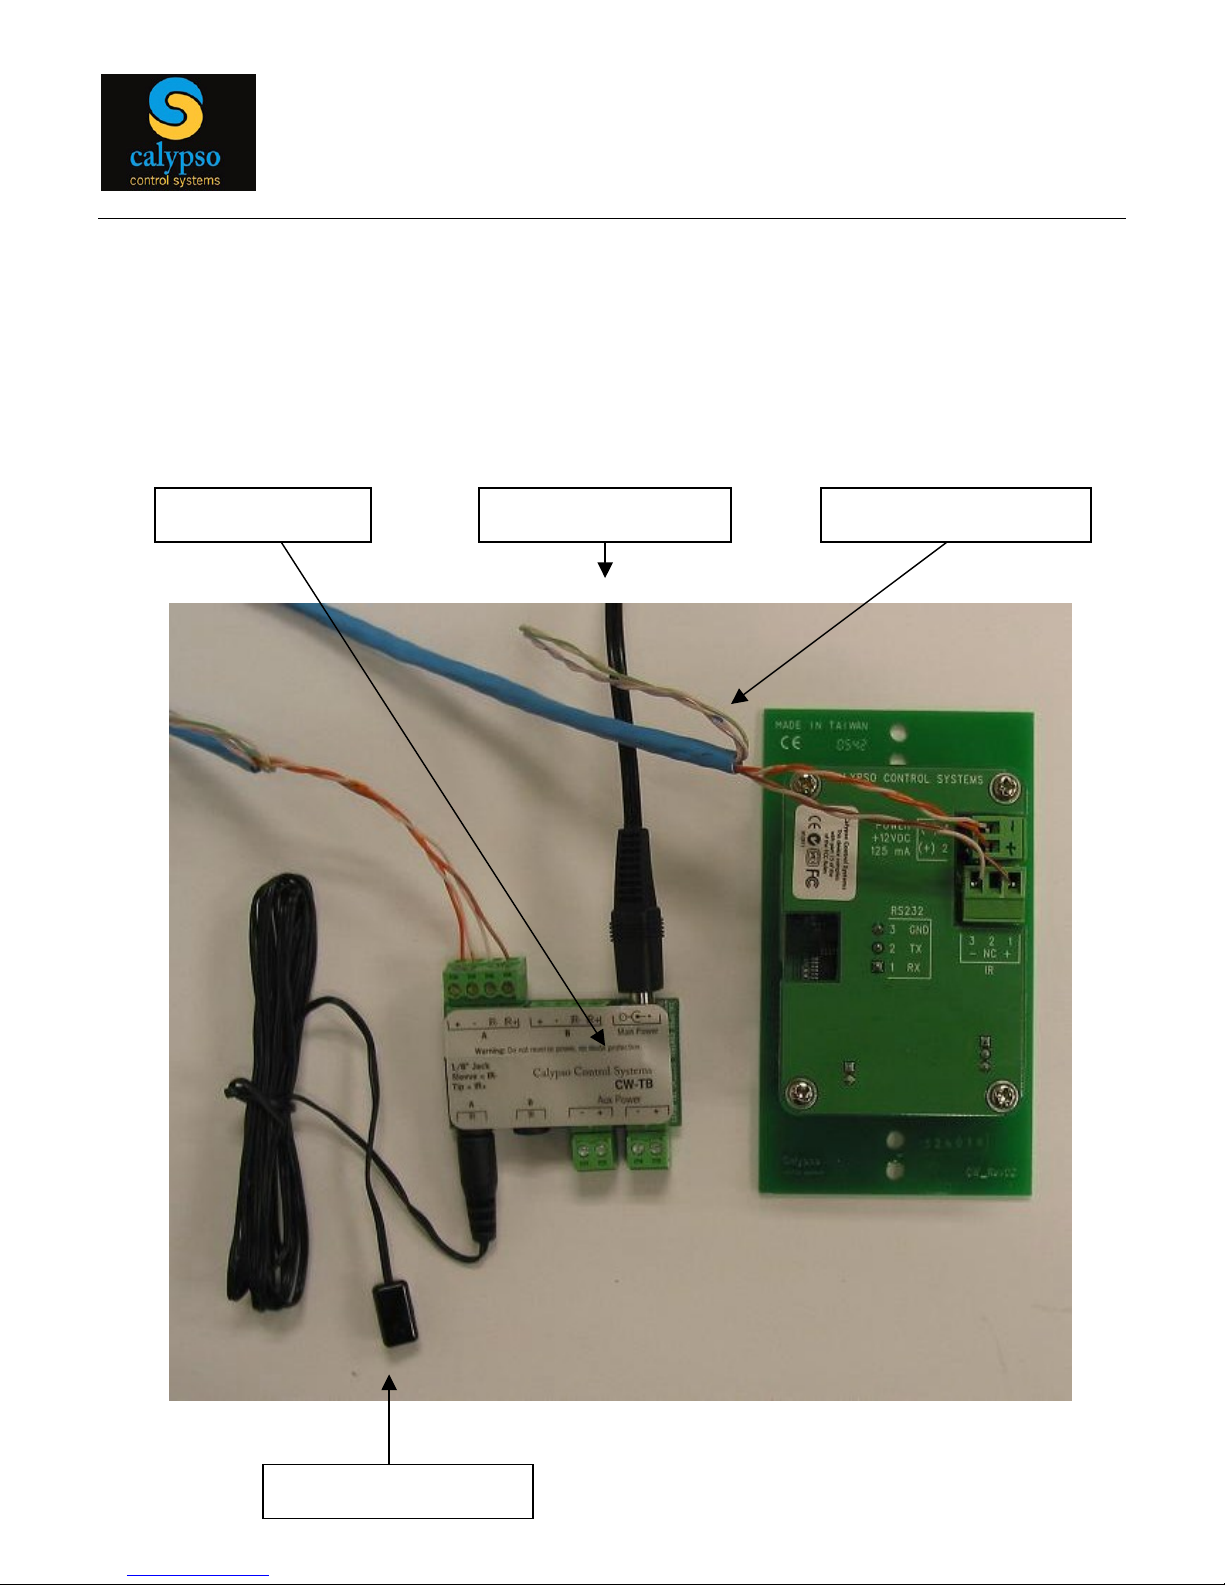
Chapter 5: Installation and Wiring
The CB-1000 fits into a standard, single-gang wall-mount electrical box (not provided) and
comes with a 12v external power s
upply and two Phoenix-style, removable wiring blocks: one for
power and one for IR. Also included is a terminal block that helps to simplify wiring.
12VDC Power Supply
Terminal Block
CAT 5 (or similar) Wire
Devi
ce IR Emitter Cable
Page 13

Page
13
Chapter 6: Using CIRT (Calypso IR Triggers) Codes
The CB-
1000
emits IR codes that can control almost any IR device. Since most devices have
unique codes, the CB-1000 needs to be able to learn these codes so they can be stored and
emitted. Calypso devices that can be controlled via IR are no different, they also require unique
IR codes. The set of IR codes for Calypso are referred to as CIRT codes. A CIRT code is
basically an IR signal that is represented by a 4 digit code to simplify entering numbers into
triggers. These codes are stored in the CB-1000 as CIRT1 and CIRT2. If a Calypso device is to
be triggered via IR then these codes should be used, they all already in memory. The important
step to remember is that the CIRT code from the CB-1000 needs to match the CIRT code in the
Calypso device. Below is the set of CIRT codes that can be pre-set to the CB-1000 buttons.
These codes would then match to the same codes in a Calypso controller event database.
CB-1000 Set To CIRT1:
CB-1000 Set To CIRT2:
Button 1
-
01E1
02D1
Button 2
-
01E2
02D2
Button 3
-
01E3
02D3
Button 4
-
01E4
02D4
Button 5
-
01E5
02D5
Button 6
-
01E6
02D6
Button 7
-
01E7
02D7
Button 8
-
01E8
02D8
Virtual Buttons used for the built in scheduler only
Button 9
-
01E9
02D9
Button 10
- 01EA
02DA
Button 11
- 01EB
02DB
Button 12
- 01EC
02DC
Page 14

Page
14
Calypso Control Systems 3-
year Product Warranty Statement
This Non-Transferable warranty is provided to original purchasing end user, herein referred as
customer, of Calypso Control Systems product line defined as: Pro I/O, ION-e, ION-LT, IONLT2, UT-500, ION-4s, ION-8r, ION-16i, CB-1000, CA-500, CA-1000 and CA-1050, herein
referred as product .
This warranty is applicable to product sold or distributed to customer by an authorized Calypso
Control Systems Dealer, OEM, Value Added Reseller or sold directly to the end user by
Calypso
Control Systems, LLC. This warranty becomes effective from the moment the end user
completes purchase and receives product. This warranty shall remain in effect for 3 years from
the moment of purchase as long as the original customer of the product continues to own and
use the product.
Terms
Calypso Control Systems warrants that product shall be materially free of defects in material
and workmanship under normal use and service during the warranty period. In the event that
Calypso Control Systems receives notice from the customer during the warranty period that
product does not conform to this warranty, Calypso Control Systems shall, at its sole option,
either repair or replace the non-conforming product. The warranty on the replacement or
repair
ed product shall continue for the duration of the original warranty. All returned product
becomes the property of Calypso Control Systems.
Procedures
A product may only be returned with the prior written approval of Calypso Control Systems.
Such approval shall reference a Return Material Authorization number (RMA) issued by
authorized Calypso Control Systems technical support personnel. Transportation costs, if any,
incurred in connection with the return of a defective item to Calypso Control Systems shall be
borne by the Customer. Transportation costs incurred in connection with the re-delivery of a
repaired or replaced item to the Customer shall be borne by Calypso Control Systems.
However, such costs shall be borne by the Customer if Calypso Control Systems, reasonably
determines that the product is not defective. If Calypso Control Systems determines, in its sole
discretion, that the allegedly defective product is not covered by the terms of the warranty
provided hereunder, or that a warranty claim is made after the warranty period, the cost of repair
by Calypso Control Systems, including all shipping expenses, shall be reimbursed by the
Customer. Calypso Control Systems shall have no liability with respect to data contained in any
system returned to C
alypso Control Systems.
Page 15

Page
15
Exclusions
The foregoing warranties and remedies are for the Customers exclusive benefit and are non-
transferable. Any and all warranties shall be void regarding System components that are
damaged or rendered unserviceable by: (1) acts or omissions of non-Calypso Control Systems
personnel; (2) misuse, theft, vandalism, fire, water, or other peril; (3) alterations of or additions
to the System or any element thereof performed by personnel not certified by Calypso Control
Systems to perform such alterations and additions or (4) the Customer s failure to operate the
product in conformance with Calypso Control Systems published operating parameters,
including environmental specifications.
Disclaimer of Warranty
TO THE EXTENT ALLOWED BY APPLICABLE LAW, THE LIMITED WARRANTIES
REFERRED TO IN THE PARAGRAPHS ABOVE SHALL BE IN LIEU OF ALL OTHER
WARRANTIES WHETHER EXPRESSED, IMPLIED, STATUTORY, OR OTHERWISE.
CALYPSO CONTROL SYST
EMS,
LLC SPECIFICALLY DISCLAIMS ANY IMPLIED
WARRANTIES OF MERC
HANTABILITY OR FITNESS FOR A PARTICULAR PURPOSE.
Limitation of Liability
TO THE EXTENT ALLOWED BY APPLICABLE LAW, CALYPSO CONTROL SYST
EMS
, LLC
AND ITS SUPPLIERS EXCLUDE THEMSELVES FROM ANY LIABILITY FOR ANY LOST
REVENUE OR PROFIT, LOSS OF BUSINESS, LOSS OF INFORMATION OR DATA, OR FOR
SPECIAL, INDIRECT, CONSEQUENTIAL, INCIDENTAL, OR PUNITIVE DAMAGES OF ANY
KIND CAUSED OUT OF OR IN CONNECTION WITH THE SALE, INSTALLATION,
MAINTENANCE, USE, PERFORMANCE, FAILURE, OR INTERRUPTION OF ITS PRODUCTS,
EVEN IF
CALYP
SO CONTROL SYSTEMS, LLC AND ITS AUTHORIZED RESELLERS HAVE
BEEN ADVISED OF THE POSSIBILITY OF SUCH DAMAGES. IN NO EVENT SHALL
CALYPSO CONTROL SYST
EMS
, LLC OR ITS SUPPLIER S TOTAL LIABILITY TO THE
CUSTOMER, WHETHER IN CONTRACT NEGLIGENCE, STRICT LIABILITY, TORT OR
OTHERWISE, EXCEED THE PRICE PAID BY THE CUSTOMER. THE FOREGOING
LIMITATIONS SHALL APPLY EVEN IF ANY REMEDY PROVIDED HEREIN SHALL FAIL ITS
ESSENTIAL PURPOSE. THIS LIMITATION OF LIABILITY, HOWEVER, WILL NOT APPLY TO
ANY CLAIMS FOR PERSONAL INJURY
 Loading...