

Page 1
LTR20111058, Rev. B
4/27/11
Page 2

Preparing for Your New Portable Spa
Bather Load . . . . . . . . . . . . . . . . . . . . . . . . . . . .18
Planning the Best Location.................3
Preparing a Good Foundation...............3
Electrical Installation .....................4
RCD Wiring Diagram ......................6
Filling and Powering Up Your Portable Spa ....8
Operating Your Spa
Electronic Control Operation ...............9
Diagnostic Messages.....................11
Jets...................................13
LED Light Operation .....................13
Clear Water Plan
The Key to Clear Water ...................14
Testing and Adjusting Spa Water...........15
Sanitation..............................16
Cleaning the Filter.......................18
Starting the Spa with Fresh Water..........19
Maintenance Schedule ...................20
Troubleshooting Water Clarity Problems.....21
Cleaning and Maintenance
Removing the Access Panel ...............22
Draining Your Portable Spa ...............22
Winterizing (Cold Climate Draining) ........23
Installing Cover Latches ..................23
Covering Your Spa.......................24
Cleaning and Replacing the Filter...........24
Cleaning the Cover ......................24
Cleaning the Shell .......................25
Appendix
Replacement Parts ......................26
Limited Warranty........................27
Cleaning the Filter Basket.................18
Copyright 2011 LMS, Inc. All rights reserved. Duplication without written
consent is strictly prohibited.
Cal Spas® is a registered trademark.
Due to continuous improvement programs, all models, operation, and/or
specications are subject to change without prior notice.
LTR20111058, Rev. B
4/27/11
100-981
Cal Spas Chemicals ......................29
CONTACT INFORMATION
For customer service, please contact your autho-
rized dealer immediately. If you need additional
information and/or assistance, contact:
LMS Customer Service Department
1462 East Ninth Street
Pomona, CA 91766.
Telephone: 800-CAL-SPAS (US and Canada)
Telephone: 909-623-8781 (International)
Fax: 909-629-3890
Page 3
www. c a ls p as . co m
Important Safety Instructions
READ AND FOLLOW ALL INSTRUCTIONS.
1
Read This First!
WARNING:
To reduce the risk of injury, do not permit children to
use this product unless they are closely supervised
at all times.
DANGER -- Risk of accidental drowning:
Do not allow children to be in or around a spa unless
a responsible adult supervises them. Keep the spa
cover on and locked when not in use. See instructions
enclosed with your cover for locking procedures.
DANGER -- Risk of electric shock:
Install the spa at least 5 feet (1.5 meters) from all
metal surfaces. As an alternative, a spa may be installed within 5 feet of metal surfaces if each metal
surface is permanently bonded by a minimum #8
AWG solid copper conductor to the outside of the
spa’s control box.
WARNING -- To reduce the risk of injury:
The spa water should never exceed 104˚F (40˚C).
Water temperatures between 100˚F (38˚C) and
104˚F (40˚C) are considered safe for a healthy adult.
Lower water temperatures are recommended for
young children and when spa use exceeds 10 minutes.
DANGER -- Risk of injury:
The suction ttings in this spa are sized to match
the specic water ow created by the pump. Should
the need arise to replace the suction ttings, or the
pump, be sure the ow rates are compatible.
Never operate the spa if the suction tting or lter
baskets are broken or missing. Never replace a suc-
tion tting with one that is rated less than the ow
rate marked on the original suction tting.
DANGER -- Risk of electric shock:
Do not permit any external electrical appliances,
such as lights, telephones, radios, televisions, and
etc., within ve feet (1.5 meters) of the spa. Never
attempt to operate any electrical device from inside
the spa.
The use of alcohol, drugs or medication before or
during spa use may lead to unconsciousness, with
the possibility of drowning.
Persons suffering from obesity, a medical history of
heart disease, low or high blood pressure, circulatory
system problems or diabetes should consult a physician before using the spa.
High water temperatures have a high potential for
causing fetal damage during pregnancy. Women who
are pregnant, or who think they are pregnant, should
always check with their physician prior to spa usage.
HYPERTHERMIA DANGER:
Prolonged exposure to hot air or water can induce
hyperthermia. Hyperthermia occurs when the inter-
nal temperature of the body reaches a level 3˚F to
6˚F above the normal body temperature of 98.6˚F
(or 2˚C to 4˚C above 37˚C). While hyperthermia
has many health benets, it is important not to allow
your body’s core temperature to rise above 103˚F
(39.5˚C).
Symptoms of excessive hyperthermia include dizziness, lethargy, drowsiness and fainting. The effects
of excessive hyperthermia may include:
2011 Genesis Portable Spa
LTR20111058, Rev. B
Persons using medications should consult a physician
before using the spa since some medications may
induce drowsiness while others may affect heart rate,
blood pressure and circulation.
Failure to perceive heat•
Failure to recognize the need to exit spa or hot •
tub
Unawareness of impending hazard•
Fetal damage in pregnant women•
Physical inability to exit the spa•
Unconsciousness•
WARNING: The use of alcohol, drugs, or medication
can greatly increase the risk of fatal hyperthermia.
Page 4
www. c a ls p as . co m
2
DANGER -- Risk of electric shock:
Replace a damaged power cord immediately.•
Do not bury the power cord.•
Connect to a grounded, grounding-type receptacle only.•
Read This First!
WARNING: People with infectious diseases should not use a spa or hot tub.
WARNING: To avoid injury, exercise care when entering or exiting the spa or hot tub.
WARNING: Do not use drugs or alcohol before or during the use of a spa or hot tub to avoid unconscious-
ness and possible drowning.
WARNING: Do not use a spa or hot tub immediately following strenuous exercise.
WARNING: Prolonged immersion in a spa or hot tub may be injurious to your health.
CAUTION: Maintain water chemistry in accordance with manufacturer’s instructions.
SAVE THESE INSTRUCTIONS.
2011 Genesis Portable Spa
LTR20111058, Rev. B
Page 5
www. c a ls p as . co m
Preparing for Your New Portable Spa
Most cities and counties require permits for exterior construction and electrical circuits. In addition, some
communities have codes requiring residential barriers such as fencing and/or self-closing gates on property to
prevent unsupervised access to the property by children. Your dealer can provide information on which permits
may be required and how to obtain them prior to the delivery of your spa.
Planning the Best Location
Safety First
Do not place your spa within 10 feet (3 m) of overhead power lines.
Consider How You Will Use Your Spa
How you intend to use your spa will help you determine where you should position it. For example,
will you use your spa for recreational or therapeutic
purposes? If your spa is mainly used for family recreation, be sure to leave plenty of room around it for
activity. If you will use it for relaxation and therapy,
you will probably want to create a specic mood
around it.
Plan for Your Environment
If you live in a region where it snows in the winter or
rains frequently, place the spa near a house entry. By
doing this, you will have a place to change clothes
and not be uncomfortable.
Consider Your Privacy
In a cold-weather climate, bare trees won’t provide
much privacy. Think of your spa’s surroundings during all seasons to determine your best privacy options. Consider the view of your neighbors as well
when you plan the location of your spa.
Provide a View with Your Spa
Think about the direction you will be facing when
sitting in your spa. Do you have a special landscaped
area in your yard that you nd enjoyable? Perhaps
there is an area that catches a soothing breeze during the day or a lovely sunset in the evening.
Keep Your Spa Clean
In planning your spa’s location, consider a location
where the path to and from the house can be kept
clean and free of debris.
Prevent dirt and contaminants from being tracked
into your spa by placing a foot mat at the spa’s entrance where the bathers can clean their feet before
entering your spa.
Allow for Service Access
Many people choose to install a decorative structure
around their spa. If you are installing your spa with
any type of structure on the outside, such as a gazebo, remember to allow access for service. It is always
best to design special installations so that the spa
can still be moved, or lifted off the ground.
3
Preparing for Your New Portable Spa
Preparing a Good Foundation
Damage caused by inadequate or improper
foundation support is not covered by the warranty.
It is the responsibility of the spa owner to provide a
proper foundation for the spa.
We strongly recommended that you have a qualied,
licensed contractor prepare the foundation for your
spa.
2011 Genesis Portable Spa
LTR20111058, Rev. B
Place the spa on a level concrete slab not less than
3” / 8 cm thick. If you are installing the spa indoors,
pay close attention to the ooring beneath it. Choose
ooring that will not be damaged or stained.
If you are installing your spa on an elevated wood
deck or other structure, consult a structural engineer
or a contractor to ensure the structure will support
the weight of 150 pounds per square foot.
Page 6
www. c a ls p as . co m
4
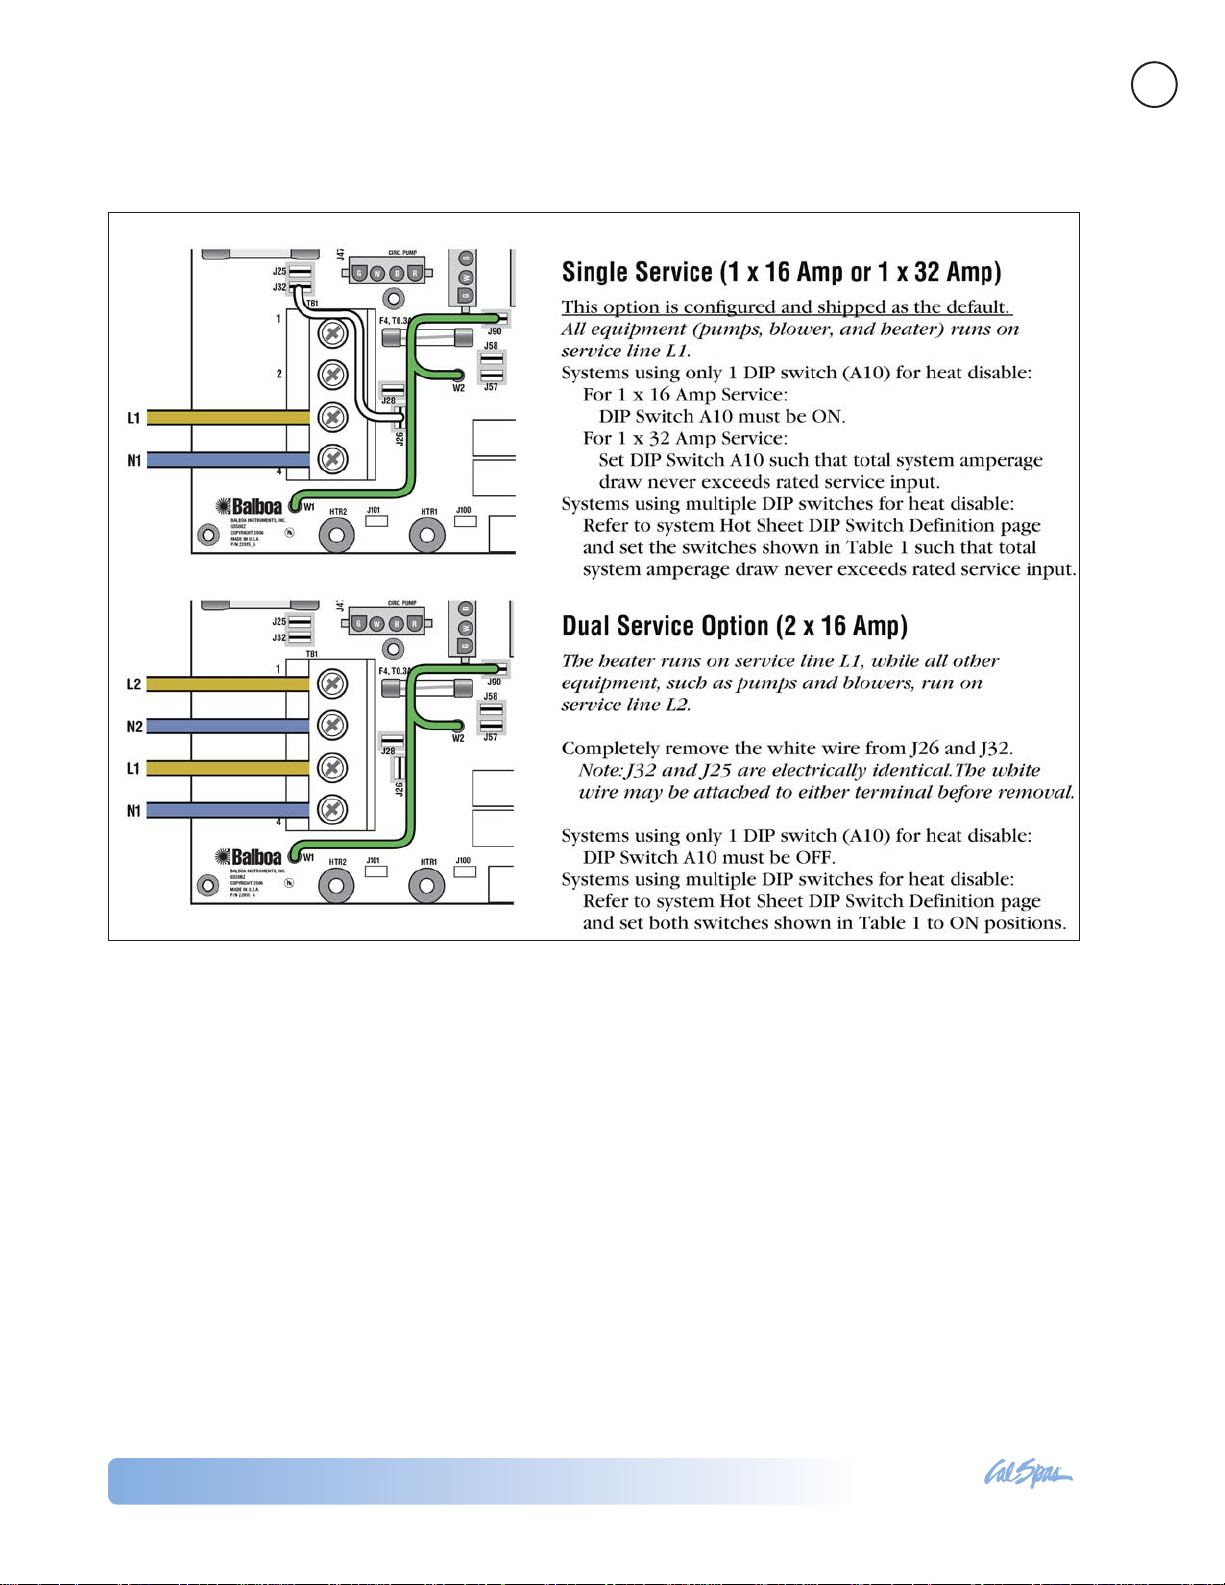
Electrical Installation
110V / 60 Hz
This product is a cord-connected spa with a pump
heater, lighting xture, and spa side control. The operating power is 110V AC.
A licensed electrician may be required to upgrade
your standard receptacle and/or circuit breaker. Always follow applicable local, state and federal codes
and guidelines.
The spa is equipped with a 15 amp GFCI cord and
plug kit.
Plug the spa into a dedicated electrical line with a 15
amp breaker.
Always use a weatherproof-covered receptacle. Receptacle shall be located not less than 5 feet (1.5
m) from and not exceeding 10 feet (3.0 m) from the
inside wall of the spa (NEC 680.43(A)).
Do not use extension cords. Using an extension cord
Preparing for Your New Portable Spa
will void your warranty.
Do not bury the power cord. If your cord becomes
damaged, replace it before next usage.
If you need to replace your cord, replace it with a
15 amp GFCI connection. The cord may not be longer than 15 feet (4.6 m). You can order a replacement GFCI and cord kit from Cal Spas, part number
ELE09700086.
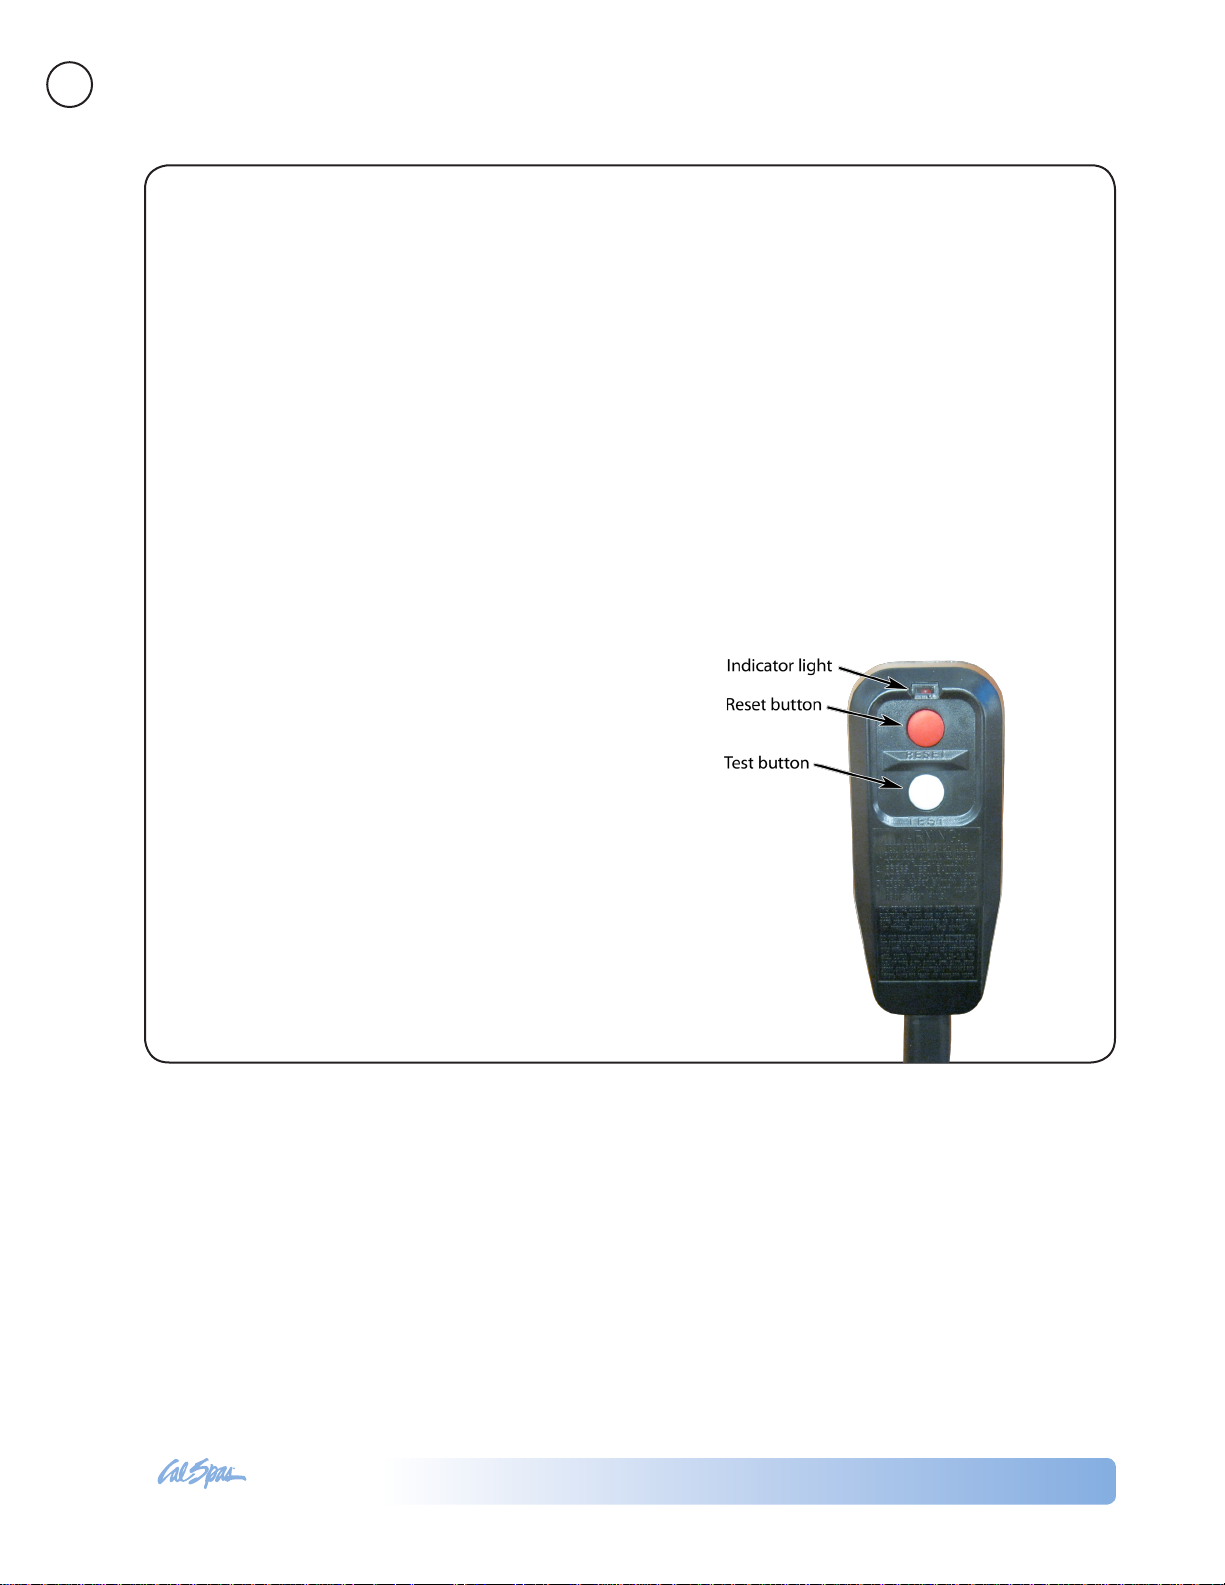
Testing the GFCI
Test the GFCI plug prior to rst use and periodically
when the spa is powered.
Plug in the GFCI into the power outlet. The indi-1.
cator should turn on.
Press the TEST button. The GFCI will trip, the 1.
indicator will turn off, and the spa will stop operating.
Press the RESET button. The GFCI will reset, the 2.
indicator will turn on again, and the spa will turn
back on.
The spa is now safe to use.
If the GFCI trips while the spa is in use, press the
RESET button. If the GFCI does not reset, unplug the
spa and call your local Cal Spas dealer for service. DO
NOT USE THE SPA!
2011 Genesis Portable Spa
LTR20111058, Rev. B
Page 7

www. c a ls p as . co m
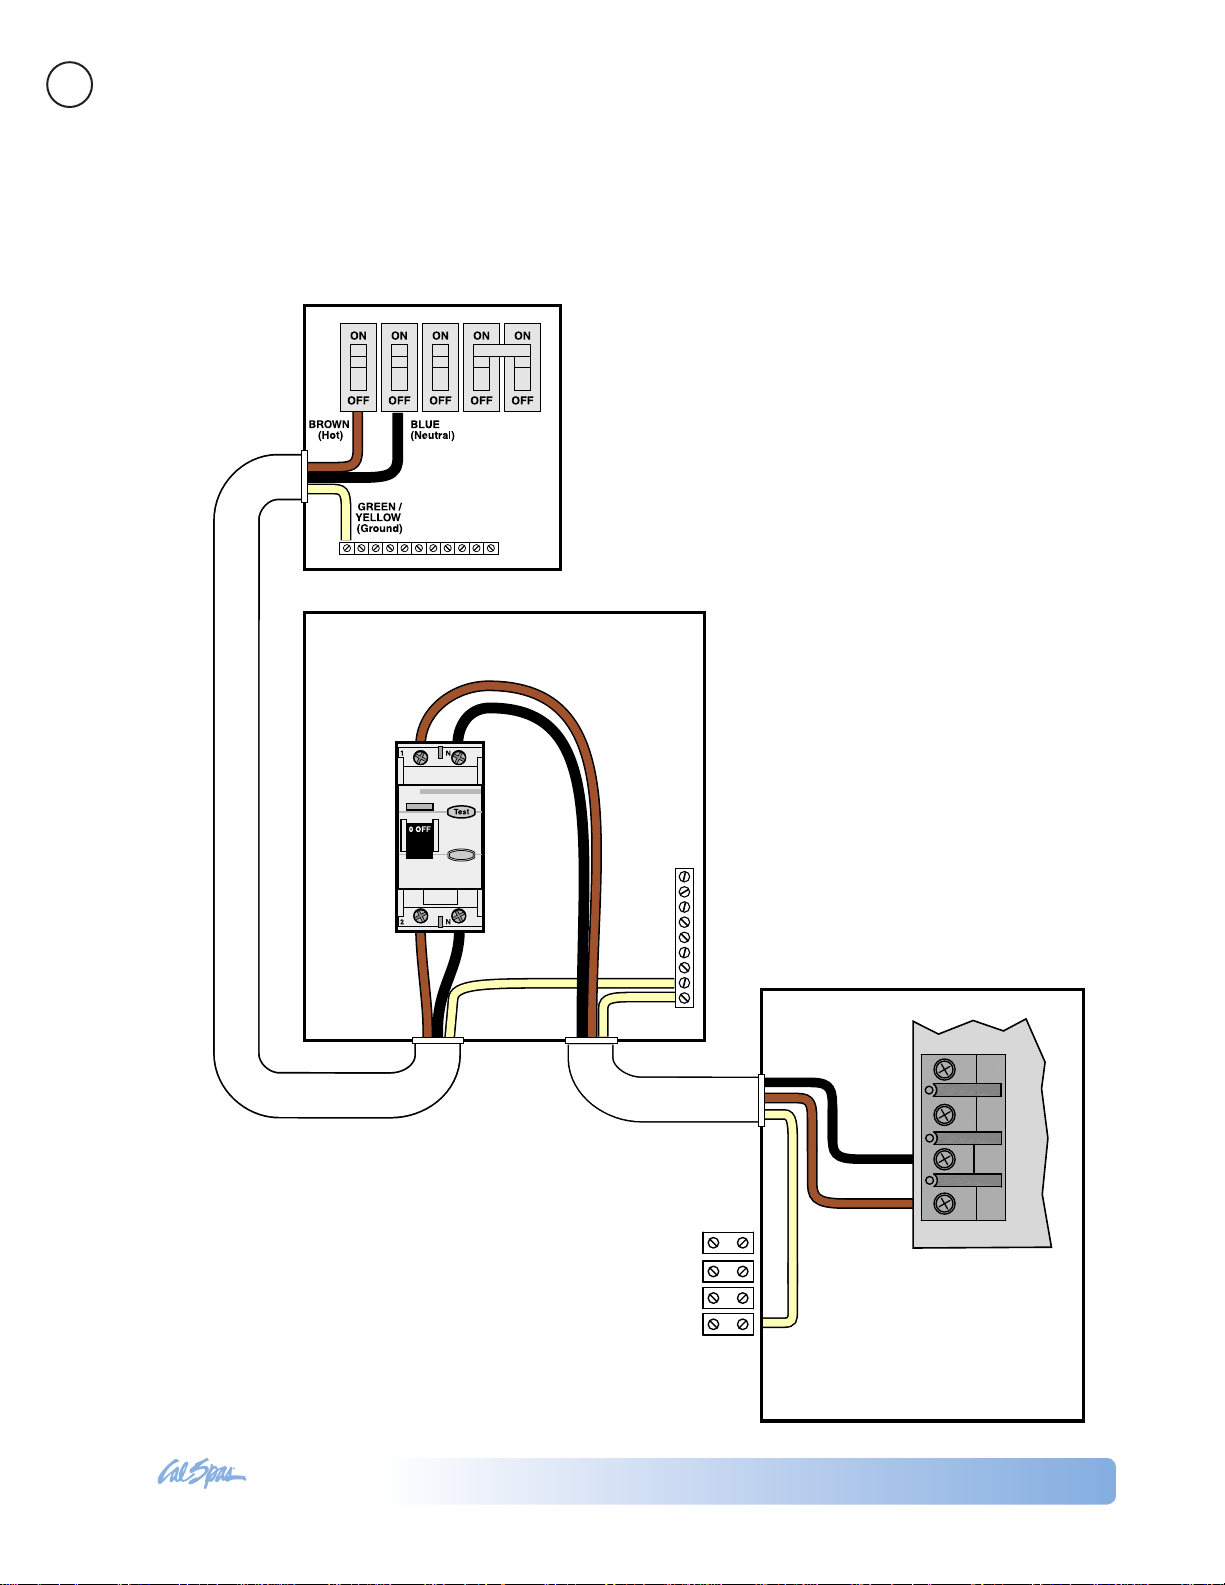
230V / 50 Hz
All 230V spas must be permanently connected (hardwired) to the power supply. These instructions describe the only acceptable electrical wiring procedure.
Spas wired in any other way will void your warranty
and may result in serious injury.
This is the only acceptable electrical wiring procedure. Spas wired in any other way will void your warranty. See the wiring diagram on page 6.
The electrical wiring of this spa must meet the requirements of any applicable local, state, and federal
codes. The electrical circuit must be installed by an
electrical contractor and approved by a local building
/ electrical inspector.
RCD and Wiring Requirements
Your spa will require either one 32 amp RCD or two
16 amp RCDs, installed with three #10 AWG copper
wires.
The power supplied to the spa must be on a dedicated RCD protected circuit with no other appliances
or lights sharing the power.
5
Preparing for Your New Portable Spa
Use copper wire with THHN insulation. Do not use
aluminum wire.
When wires larger than #6 AWG are required, install
a junction box near the spa and use #6 AWG wire
between the junction box and the spa.
Wire runs over 26 m must increase wire gauge to
the next lower number. For example: A normal 50
amp RCD with four #8 AWG copper wires run over
26 m would require you to go to four #6 AWG copper wires.
Testing the RCD Breaker
Test the RCD breaker prior to rst use and periodically when the spa is powered. To test the RCD breaker
follow these instructions (spa should be operating):
Press the TEST button on the RCD. The RCD will 1.
trip and the spa will shut off.
Reset the RCD breaker by switching the breaker 2.
to the full OFF position, wait a moment, then turn
the breaker back on. The spa should have power
again.
2011 Genesis Portable Spa
LTR20111058, Rev. B
Page 8
www. c a ls p as . co m
6
GREEN/
YELLOW
(Ground)
GREEN/
YELLOW
(Ground)
GREEN/
YELLOW
(Ground)
CIRCUIT BOARD
RCD Wiring Diagram
Preparing for Your New Portable Spa
2011 Genesis Portable Spa
LTR20111058, Rev. B
Page 9
www. c a ls p as . co m
Circuit Board Connection
7
Preparing for Your New Portable Spa
2011 Genesis Portable Spa
LTR20111058, Rev. B
Page 10
www. c a ls p as . co m
8
Filling and Powering Up Your Portable Spa
Never ll your spa with soft water.
Soft water makes it impossible to maintain the proper water chemistry and may cause the wa-
ter to foam, which will ultimately harm the nish of the spa and void your warranty.
Preparing for Your New Portable Spa
Once the spa has been placed on an approved 1.
surface and has been correctly wired by a licensed
electrician, inspect all plumbing connections in the
equipment area of your spa. Ensure that these
connections are secure and that they did not loosen during shipment.
If equipped, open all gate valves in the equipment 2.
area. Before operating the spa, these valves must
be in the up or “open” position.
VERY IMPORTANT!
Never run the spa with the gate valves
closed or without water circulating for
long periods of time. Be careful not to
over-tighten the plumbing ttings.
Remove the cartridge from lter canister.3.
Place a garden hose in the lter canister and ll 4.
your spa with regular tap water about six
inches from the top.
VERY IMPORTANT!
Always ll the spa through the lter
canister! Failure to do so may cause
air to be trapped in the ltration system and prevent the pumps from operating properly.
Presoak the lters in spa water.5.
VERY IMPORTANT!
You must presoak the lters before
inserting them in the lter canister.
Dry lters can allow air into the l-
tration system which can cause pump
failure.
Once the water is at the correct level and air is 6.
bled, plug in the spa into a dedicated electrical
outlet.
Note: When the power is turned on to the spa,
the controls will perform a diagnostic check for
approximately ve minutes. When the diagnostic
is complete, the spa will automatically operate at
lter speed and continue heating until the spa water temperature reaches the default temperature
of 100˚F.
If no water is owing when the pump is running, 8.
there could be an air pocket at the suction side of
the pump. Shut off power to the spa and loosen
the pump union on the suction side of the pump
to bleed the air. When air is bled, turn power
back on.
Install the pre-soaked lters into the lter canis-9.
ter.
The spa is now ready for use.
2011 Genesis Portable Spa
LTR20111058, Rev. B
Page 11

www. c a ls p as . co m
Operating Your Spa
Electronic Control Operation
Initial Start up
When rst powered up, your spa will perform
a self-diagnostic check and go into priming
mode. When the control panel displays PR,
IMMEDIATELY do the following:
Press the JETS button to turn on the 1.
pump and let it run for 10 seconds. The
pump should be running in low speed.
Press the JETS buttons again and let the 2.
pump run in high speed for 10 seconds.
Press the JETS button again to turn off 3.
the pump. The pump should be left in
the off position for 10 to 15 seconds.
Repeat steps 1 through 3 until water is owing 4.
through all the jets and all air is removed from the
plumbing.
When the spa has nished priming, the heater will be
activated and the water temperature will be maintained
in standard mode. The spa will heat to 100°F (37.5°C)
at start up until the set temperature is changed as
described below.
Temperature Adjustment
(Range 80°F to 104°F, 26°C to 40°C)
The electronic control panel displays the actual water temperature in degrees Fahrenheit. The displayed
temperature will only be current after the pump has
been running for at least two minutes.
To display the temperature that the spa is set to:
Press either the • Up or Down button. The tem-
perature setting will ash.
While the display is ashing, each time you press •
the Up or Down button, the set temperature will
change up or down one degree.
9
Operating Your Spa
heating mode, the heating system will only acti-
vate during ltration times.
Ec• will display solid if temperature is not current
and will alternate with spa temperature if mea-
sured temperature is current.
Economy mode will heat the water to the set tem-•
perature while Sleep mode, indicated by a SL on
the main display, will also only activate the heater
during the ltering cycles but will only heat the
water to within 20°F (10°C) of the set tempera-
ture. Like Economy mode, SL will display solid
when temperature is not current and will alternate
with actual temperature when it is current.
Switching Modes
Press either the • Up or Down button followed by
the Light button.
Press the same sequence to switch to the next •
mode.
Jets
Press the Jets button:
Standard, Economy and Sleep Heating
Modes
Your new spa is equipped with a heating feature that
gives you complete control of the heating system.
When the spa is powered up, it will automatically start
in standard heating mode.
St• will light briey on the main display. In this
mode, the heating system will automatically maintain the set spa temperature. In the economy-
2011 Genesis Portable Spa
LTR20111058, Rev. B
Once to activate low speed pump.•
Twice to activate high speed.•
Three times to turn pump off.•
Light
Press the Light button to turn on the light. Press it
once again to turn the light off. All optional lighting
such as the control panel light and cabinet perimeter
lighting is controlled by the Light button and will turn
on and off with the spa light.
Page 12

www. c a ls p as . co m
10
Automatic Time outs
These features will automatically turn themselves off
during periods of continuous use:
Setting Filtration Cycles
Operating Your Spa
Your spa is programmed to lter twice a day. The
rst cycle will begin 6 minutes after the spa is turned
on and the second cycle 12 hours later. The factory
has programmed the cycle to last for 2 hours but
this can be switched to 4, 6, or 8 hours depending
on your requirements. The default lter time is two
hours.
Your new spa comes equipped with an electric heater. Following the directions listed below will ensure the
most efcient operation:
NOTE: This method is only for spa usage under two hours a week.
To set ltration time, turn off the power to the spa
at the time of day you would like one of the ltration
Low speed pump After 2 hours•
High speed pumps After 15 minutes•
Spa light After 4 hours•
cycles to begin, then turn back on after 30 seconds.
When power has been restored, press either the Up
or Down button then the Jets button. Press either
the Up or Down button again to change the ltering
cycle duration. When desired duration is selected
press the Jets button to exit.
The low speed pump will run for the duration of the
ltering cycle and if an ozone system is installed it
will be activated. During ltering, FC will appear on
the main display.
Keep the spa’s operating temperature 5˚F below the desired usage temperature when not in use. One •
or two hours before use, set the temperature to the desired temperature.
If the spa usage exceeds two hours a week, the set temperature should remain at the desired usage •
temperature.
Allowing the water temperature to lower more than 10˚F below the desired usage temperature and reheating
it prior to usage will cause the heater to operate longer than it normally would maintaining the desired temperature. Doing this will increase your operating cost and makes your heater work more than necessary.
2011 Genesis Portable Spa
LTR20111058, Rev. B
Page 13

www. c a ls p as . co m
Diagnostic Messages
Message Meaning Action Required
No message
on display
dr Insufcient water detected in
drY Insufcient water detected in
Ec Indicates heater is in Economy
-- Temperature unknown After the pump has been running for two minutes, the
HFL A difference in readings between
ICE Potential freeze condition detected. No action required. The pumps and the blower will
LF Persistent low ow problems.
OHS Overheat protection. The spa has
1) Spa temperature is unknown. 1) After pump has been running for 2 minutes temperature will be displayed.
2) Spa is in Economy or Sleep
mode.
3) Power has been cut off to the
spa.
heater. Spa will be shut down for
15 minutes.
heater. Spa is shut down.
(Displays on third occurrence of dr
message.)
Mode.
temperature sensors has been
detected indicating a possible water
ow problem.
Heater is shut down, but other spa
functions continue to run normally.
Displays on the fth occurrence of
the HL or HFL message within 24
hours.
shut down. One of the sensors
has detected that the spa water is
110°F.
2) In Economy or Sleep mode, the pump may be off
for hours outside a lter cycle. If you wish to see the
current spa temperature, either switch to Standard
mode or turn Jets1 on for at least two minutes.
3) The control panel will be disabled until power returns. Spa settings and time of day will be preserved
for 30 days with a battery back-up.
Check water level in spa. Rell if necessary. Make
sure pumps are been primed and lter cartridges are
clean. Press any button to reset or wait 15 minutes
and spa will automatically reset. If message spa does
not reset, call your dealer or service organization.
Follow directions for dr message and press any button
to reset spa. Spa will not automatically reset when dry
or dY is displayed.
None.
temperature will be displayed.
Make sure spa is lled to proper level and that pumps
are primed and lter cartridges are clean. If message
does not reset, call your dealer or service organization.
automatically activate regardless of spa status.
Follow action required for HL or HFL message. Heat-
ing capacity of the spa will not reset automatically.
Press any button to reset.
DO NOT ENTER THE WATER. Remove the spa cover
and allow water to cool. At 107°F, the spa should
automatically reset. If spa does not reset, shut off
the power to the spa and call your dealer or service
organization.
11
Operating Your Spa
2011 Genesis Portable Spa
LTR20111058, Rev. B
Page 14

www. c a ls p as . co m
12
Operating Your Spa
Message Meaning Action Required
OHH Overheat protection (spa is shut-
down). One sensor has detected
118˚F (48˚C) at the heater.
Pr When your spa is rst actuated, it
will go into priming mode.
SL Indicates heater is in Sleep Mode. None.
SnA
Snb
SnS Sensors are out of balance.
Spa is shut down. The sensor that
is plugged into the sensor “A” or
“B” jack is not working.
DO NOT ENTER THE WATER!
Remove the spa cover and allow spa to cool below
107˚F (42˚C). Press any button on the topside display to reset spa. If spa will not reset after spa has
cooled, turn off power for approximately 30 seconds
and then turn power back on. If display message is
repeated then shut the power off to the spa and call
your dealer or service organization.
The priming mode will last for up to four minutes and
then the spa will begin to heat and maintain the water
temperature in the Standard mode.
If the problem persists, contact your dealer or service
organization. (May appear temporarily in an overheat
situation and disappear when the heater cools.)
Contact your dealer or service organization.
If this is alternating with the •
temperature, it may just be a
temporary condition.
If the display shows only this •
message (periodically blinking),
the spa is shut down.
ST Indicates heater is in Standard
Mode.
None.
2011 Genesis Portable Spa
LTR20111058, Rev. B
Page 15

www. c a ls p as . co m
13
Operating Your Spa
Jets
Almost all of the jets in your spa are adjustable.
Rotating the face of an adjustable jet to the left
(counter-clockwise) will decrease the amount of
water ow through the jet. Rotating the face of an
adjustable jet to the right (clockwise) will increase
the amount of water ow through the jet. (See ex-
ample shown below.)
Neck jets adjust in the opposite directions (counter-
clockwise to increase, clockwise to decrease).
LED Light Operation
Press the LIGHT button on the topside control panel to turn the spa light on. If your spa has LED
lights, they will also light up at the same time as
the spa light.
The LED lights operate in three three modes:
Cycle: 1. The rst time you press the LIGHT but-
ton, the lights will cycle through all the colors
in this order:
White
Cyan
Magenta
Blue
Yellow/green
Green
Red
To cycle through the different color choices,
press the button repeatedly. Each time you
press the button, you advance to the next color.
Flashing white: 2. When you have cycled
through all the colors, the next time you push
the LIGHT button, the LED lights will ash
white.
Fading cycle: 3. The next time you push the
LIGHT button, the lights will gradually fade
from one color to the next in the order shown
above.
2011 Genesis Portable Spa
LTR20111058, Rev. B
Page 16

www. c a ls p as . co m
14
Filtration
Ing et augait alit esto dolut dio doleniam quat am vel etue
vendiam quis duip ea ating et utem quam, sendit, velesequisit am dunt niscil ilit alit nonumsan utatin utat num voloreril
in ut pratie dionull umsandio consed dolumsandit at. Rat,
consequi tinim ilisi bla feuis euguerc ilisi.
Em verit iliqui endiam nulluptat lamcore minibh elestio numsandip eraesectem diatio ercing ea cortis delissed dunt
utpatisi.
Ut vel ut wis atis nonullut augiam augait lore dolore erci te ea
consequat.
Met prate er sit dolor iriureetuer si.
Feummy nullamcore magna ad dio er
sequamconum nis eu feugiamet, vent
et wisis ero dolore dip exeraestie estie
vel inisci elisl ut diat, cons aut alit lut
lore tin hent adiam iustrud molor
sustis essit wiscilit wisi.
Regularity
Ing et augait alit esto dolut dio doleniam quat am vel etue
vendiam quis duip ea ating et utem quam, sendit, velesequisit am dunt niscil ilit alit nonumsan utatin utat num voloreril
in ut pratie dionull umsandio consed dolumsandit at. Rat,
consequi tinim ilisi bla feuis euguerc ilisi.
Em verit iliqui endiam nulluptat lamcore minibh elestio numsandip eraesectem diatio ercing ea cortis delissed dunt
utpatisi.
Ut vel ut wis atis nonullut augiam augait lore dolore erci te ea
consequat.
Met prate er sit dolor iriureetuer si.
Feummy nullamcore magna ad dio er
sequamconum nis eu feugiamet, vent
et wisis ero dolore dip exeraestie estie
vel inisci elisl ut diat, cons aut alit lut
lore tin hent adiam iustrud molor
sustis essit wiscilit wisi.
Sanitation
Ing et augait alit esto dolut dio doleniam quat am vel etue vendiam quis
duip ea ating et utem quam, sendit,
velesequisit am dunt niscil ilit alit nonumsan utatin utat num voloreril in ut
pratie dionull umsandio consed
dolumsandit at. Rat, consequi tinim ilisi bla feuis euguerc ilisi.
Em verit iliqui endiam nulluptat lamcore minibh elestio numsandip eraesectem diatio ercing ea cortis delissed dunt
utpatisi.
Ut vel ut wis atis nonullut augiam augait lore dolore erci te ea
consequat.
Met prate er sit dolor iriureetuer si. Feummy nullamcore
magna ad dio er sequamconum nis eu feugiamet, vent et
wisis ero dolore dip exeraestie estie vel inisci elisl ut diat, cons
aut alit lut lore tin hent adiam iustrud molor sustis essit wiscilit wisi.
Chemical Balance
Ing et augait alit esto dolut dio doleniam quat am vel etue vendiam quis
duip ea ating et utem quam, sendit,
velesequisit am dunt niscil ilit alit nonumsan utatin utat num voloreril in ut
pratie dionull umsandio consed
dolumsandit at. Rat, consequi tinim
ilisi bla feuis euguerc ilisi.
Em verit iliqui endiam nulluptat lamcore minibh elestio numsandip eraesectem diatio ercing ea cortis delissed dunt
utpatisi.
Ut vel ut wis atis nonullut augiam augait lore dolore erci te ea
consequat.
Met prate er sit dolor iriureetuer si. Feummy nullamcore
magna ad dio er sequamconum nis eu feugiamet, vent et
wisis ero dolore dip exeraestie estie vel inisci elisl ut diat, cons
aut alit lut lore tin hent adiam iustrud molor sustis essit wiscilit wisi.
F
i
l
t
r
a
t
i
o
n
R
e
g
u
l
a
r
i
t
y
C
h
e
m
i
c
a
l
B
a
l
a
n
c
e
S
a
n
i
t
a
t
i
o
n
Your Key
To Clear
Water
Clear Water Plan
This section is intended for new spa owners with
no experience with water chemistry. Everyone’s experience with maintaining water quality is different,
but there are some general concepts you need to
know.
Water maintenance is not difcult, although it requires regular attention. The most important thing
to understand about taking care of your spa water is
that preventive action is much easier than correcting
Clear Water Plan
water quality issues.
The Key to Clear Water
Excellent water quality is a simple matter of four things:
Regularity
Clear water requires regular maintenance.
Establish a routine based on a regular
schedule for your spa water maintenance.
Maintaining your water quality helps the enjoyment of your spa and extends your spa’s
life by preventing damage from neglect and
chemical abuse.
See page 20 for the schedule of recommended maintenance.
Sanitation
Sanitizers kill bacteria and
viruses and keep the water
clean. A low sanitizer level
will allow microbes to grow
quickly in the spa water.
We recommend using either chlorine or bromine as your sanitizer.
Spa owners with an ozonator also need to
add sanitizer, although their requirements
are different.
See page 16 for learn how to use sanitizer.
Contents of this section:
Testing and Adjusting Spa Water
Sanitation
Filtration
Bather Load
Starting the Spa with Fresh Water
Maintenance Schedule
Troubleshooting Water Clarity Problems
Cleaning your lter regularly is the easiest
and most effective single thing you can do
to keep your water clear.
A clogged or dirty lter will cause the heater
and pump to work harder than they need
to, possibly causing them to fail.
The spa’s heating system will only function
with the proper amount
of water ow through the
system.
See page 18 for lter clean-
ing instructions.
You will need to test and
adjust the chemical balance of your spa water. Al-
though this is not difcult,
it needs to be done regularly.
Depending on your choice of sanitizer, you
need to test the level of calcium hardness,
total alkalinity, and pH. Spa owners with
a Cal Clarity bromine generator also need
to check total dissolved solids and phosphates.
See page 16 for learn how to balance your
spa water.
Filtration
Chemical Balance
2011 Genesis Portable Spa
LTR20111058, Rev. B
Page 17

www. c a ls p as . co m
Testing and Adjusting Spa Water
8.2
8.0
7.8
7.6
7.4
7.2
7.0
6.8
6.6
Too alkaline,
causes scaling
Ideal balance
Too acidic,
causes corrosion
Need to lower the pH level
Need to raise the pH level
You have two types of testing methods to choose from:
The • reagent test kit is a method which provides a high level of accuracy. It is available in either liquid
or tablet form.
Test strips • are a convenient testing method commonly used by spa owners.
15
Clear Water Plan
Balancing the Total Alkalinity
Total alkalinity (TA) is the measure of the total levels of carbonates, bicarbonates, hydroxides, and
other alkaline substances in the water. TA can be
considered a “pH buffer”. It is the measure of the
ability of the water to resist changes in pH level.
The recommended total alkalinity is 80 - 120
ppm.
If the TA is too low, the pH level will uctuate wide-
ly from high to low. Low TA can be corrected by
adding Cal Spas “pH-Alkalinity Up”.
If the TA is too high, the pH level will tend to be too
high and may be difcult to bring down. High TA
can be corrected by adding Cal Spas “pH-Alkalinity
Down”.
When the TA is balanced, it normally remains stable, although adding water with high or low alkalinity will raise or lower the TA level.
Balancing the pH
The pH level is the measure of the balance between
acidity and alkalinity.
Balancing the Calcium Hardness
Calcium hardness (CH) is a measure of the total
amount of dissolved calcium in the water. Calcium
helps control the corrosive nature of the spa’s water and is why soft water is not recommended. The
low calcium content of soft water is very corrosive
to the equipment and can cause staining of the spa
shell.
The recommended calcium hardness is 150
- 200 ppm.
If the CH is too low, add Cal Spas “Liquid Hardness
Increaser”.
If the CH is too high, dilute the spa water with soft
water or, if this is not available, add Cal Spas “Stain
and Scale Defense”.
When the CH is balanced, it normally remains stable, although adding soft water or very hard water
will raise or lower the CH level.
If the pH is too low, it can cause corrosion of metal xtures and the heating element. Low pH can be corrected
by adding pH-Alkalinity Up.
If the pH is too high, it can cause scaling by allowing
metals or minerals to form deposits and stain spa surfaces. High pH can be corrected by adding pH-Alkalinity
Down.
Testing For: Ideal Range (ppm) Chemicals To Use:
Total Alkalinity 80 120 pH-Alkalinity Up pH-Alkaliity Down
Calcium Hardness 150 200 Liquid Hardness Increaser Stain and Scale Defense
pH 7.4 7.6 pH-Alkalinity Up pH-Alkaliity Down
2011 Genesis Portable Spa
LTR20111058, Rev. B
Minimum Maximum To Raise To Lower
Page 18

www. c a ls p as . co m
16
Sanitation
After you ll your spa, you need to decide which chemical sanitizer you wish to use. Consult your Cal Spas
dealer for the right decision with regards to your lifestyle and spa usage.
We recommend either bromine or chlorine as your sanitizer. Both work well when maintained regularly.
Sanitizers kill bacteria and other organic waste by breaking them down to non-harmful levels and are ltered
Clear Water Plan
out.
Make sure you follow all instructions and use only Cal Spas brand chemicals.
Whichever plan you decide on, follow it completely and don’t take shortcuts. It will provide you with clean,
safe, clear spa water with a minimum of effort. Spa owners with the ozonator still need to use a chemical
sanitizer. See page 17 for instructions.
DO NOT use trichlor. Trichlor is very acidic and the hot temperature of the spa causes it to
dissolve too quickly. It will cause damage to your spa and will void your warranty.
Using Chlorine as a Sanitizer
If you choose to use chlorine as a sanitizer, only use granulated chlorine, not liquid chlorine. We recommend
you use only Cal Spas “Chlorinating Granules”.
Once a week, check the chlorine level using either a test strip or a reagent kit. See the table on the following
page for the ideal range.
Add one or two tablespoons of Cal Spas “Chlorinating Granules” to the spa water weekly. Note that chlorine
dissipation rate will be faster at higher water temperatures and slower at lower temperatures.
When you add chlorine, open all of the jets and run the spa at high speed with the cover open for at least
30 minutes.
Follow the maintenance schedule on page page 20.
Using Bromine as a Sanitizer
Bromine is a very effective sanitizer that produces low chemical odors. Unlike chlorine, it can break down
bacteria and other impurities to a safe level with a low burn-out rate.
Bromine is available in both granulated and tablet form. Use granulated bromine to establish your bromine
base. Use tablets to maintain it. The lter cartridge provided with your spa has an internal chamber for bromine tablets. Do not use a oater.
When you begin with fresh water, add 2 ounces of Cal Spas Go Brom. Open all of the jets and run the spa at
high speed. This is your base bromine level as the tablets will take a while to dissolve.
Add two ounces of Oxidizer Shock. Open all of the jets and run on high speed with the cover half open for
at least 30 minutes.
Follow the maintenance schedule on page page 20.
2011 Genesis Portable Spa
LTR20111058, Rev. B
Page 19

www. c a ls p as . co m
Testing For: Ideal Range
Chemicals To Use:
(ppm)
Minimum Maximum To Raise To Lower
Chlorine level
Without ozonator
With ozonator
Bromine level
Without ozonator
With ozonator
3.0 5.0
Chlorinating Granules
2.0 4.0
6.7 11.0
Go Brom
5.7 10.0
Shocking the Water
In addition to using a chemical sanitizer, you will periodically need to shock the water. Shocking the water
helps remove burned-out chemicals, bacteria, and other organic material from your spa’s water and improves your sanitizer’s effectiveness.
Do not use chlorinating shock, which will damage your spa’s jets and pump seals. The only shock you should
use is Cal Spas Oxidizer Shock. It is an easy way to maintain either chlorine or bromine chemical plans.
For best results use the directions below.
17
Clear Water Plan
Add one ounce of Cal Spas Oxidizer Shock:
Once a week•
After heavy bather loads•
If water has a strong odor•
Spa must be running with all of the jets on high for 30 minutes with the cover open. If necessary, repeat
oxidizer shock in 30 minute intervals.
Chemical Safety
Read and follow all printed instructions listed on bottles and packages. Failure to
follow chemical directions may result in serious injury, sickness, or even death.
Do not exceed chemical dosages as recommended
in the Clear Water Plan or on chemical bottles and
packages.
Never change chemical brands or types without com-
pletely draining, ushing and thoroughly cleaning the
spa and cover rst.
Never mix chemicals together.
Do not allow chemicals to come in contact with skin,
eyes or clothing. Remove and wash clothing that may
have been exposed to chemical contact prior to wearing them again.
Inhaling or ingesting chemicals will cause serious in-
jury, sickness, or even death.
Chemicals must be stored completely out of the
reach of children in an area that is well vented, cool,
and dry. Failure to provide a proper area for chemical
storage may result in serious injury, sickness, re explosion and even death. Do not store your chemicals
inside the equipment area of your spa.
2011 Genesis Portable Spa
LTR20111058, Rev. B
Page 20

www. c a ls p as . co m
18
Cleaning the Filter
The lter is the part of your spa that removes the debris from the water and needs to be cleaned on a regular
basis to maximize your spa’s ltering performance and heating efciency.
In addition to spraying off the lter weekly to remove surface debris, your lter should be deep cleaned periodically to dissolve scale and particles that get lodged deep within the lter bers and impede the ltration
process. Even if the lter looks clean, scale and particles can clog the bers and prevent water from owing
through the lter resulting in the most common spa problem—no heat, caused by a dirty lter.
Clear Water Plan
We recommend you clean your lter once a month and replace it once a year or as necessary.
Remove the lter by turning it counterclockwise, unscrewing the bottom threads, then pulling it up and 1.
out.
Place the dirty lter into a bucket of water deep enough to cover the lter. Add 8 oz of Cal Spas “Liquid 2.
Filter Cleaner” to the bucket of water.
Note: It is a good idea to keep a spare lter to use in the spa while the dirty lter is being deep cleaned.
This way, you can rotate the lters and both will last longer.
Soak the lter for a minimum of 24 hours.3.
Spray the lter with a water hose. Spray each pleat carefully.4.
Reinstall the lter. Do not overtighten.5.
Cleaning the Filter Basket
You will need to clean the lter basket periodically. To remove the lter basket, twist the weir skimmer
counter-clockwise and lift up to remove it. You can do this while the spa is lled, but make sure you rst turn
off the jet pump.
Bather Load
“Bather Load” is the term used to describe the number of people using a spa, combined with the length
of usage, and the frequency of usage. All these factors have a great effect on the spa water. The higher
the bather load, the more chemicals need to be add-
ed and a longer ltration time will be needed.
All versions of the Cal Spas Clear Water Plan are
designed for spas with average bather load (3 to
4 people, 15 minutes of usage, three times a week
at 100 degrees) If your bather load exceeds these
guidelines, and you experience water quality prob-
lems, increase the amount of ltration rst, (go to the
next higher ltration number) then if water quality
is still not adequate, consult the advice of your Cal
Spas dealer for additional chemical or system recommendations. Be sure to give them your bather load
information.
2011 Genesis Portable Spa
LTR20111058, Rev. B
Page 21

www. c a ls p as . co m
Starting the Spa with Fresh Water
19
Clear Water Plan
We recommend you use Cal Spas chemicals only.
Other brands of chemicals may have similar names
and/or usage descriptions but due to manufacturing
differences, use of other chemicals can increase the
likelihood of under- or over-dosing the spa chemicals. Damage to the spa or spa’s components from
improper chemicals or chemical usage is not covered
under the spa’s warranty.
Prior to lling a spa for the rst time, or after a routine draining, you will want to follow this start-up
plan to extend water life and performance.
As with all chemical dosages listed in these Clear Water Plans, start-up dosages are intended for 500-gal-
lon spas. Please adjust the chemical dosages to the
capacity of your particular spa.
Clean the surface of the spa with Cal Spas “Multi-1.
Purpose Cleaner”.
Apply a protective coat of Cal Spas “Fast Sheen” 2.
to the acrylic surface.
Fill the spa to the proper water level with normal 3.
tap water. (Do not use soft water.)
Use test strip and balance the spa water.4.
Adjust total alkalinity (acceptable range is •
80-120ppm).
Adjust pH if necessary (between 7.2 to 7.8).•
Pour in 16 oz of Cal Spas “Metal Protector” in the 5.
center of the spa.
Add Stain and Scale Prevention.6.
Add either chlorine or bromine (but not both).7.
Chlorine: Add two tablespoons of Cal Spas “Chorine
Granules” to the spa water.
Bromine: Add 2 oz of Cal Spas “Go Brom” to estab-
lish a bromine base.
Add 2 Cal Spas “Bromine Tablets” to bro-
mine oater.
Turn on jets for 15 minutes. Leave spa uncov-8.
ered during this time.
Put cover on spa and allow to heat up to desired 9.
temperature.
Water level is very important to the operation of your spa. If the water level
is too low or too high, your spa will not operate properly. The water level
should be about six inches from the top when the spa is not being used.
2011 Genesis Portable Spa
LTR20111058, Rev. B
Page 22

www. c a ls p as . co m
20
Maintenance Schedule
Eachtimeyourellthespa
Prior to each use Test the spa water using either test strips a reagent test kit. Adjust
Clear Water Plan
Once a week Test the spa water using either test strips a reagent test kit. Adjust
Once a month Deep clean your spa’s lter. (Follow lter cleaning instruction at
Every two to four months Drain and clean your spa with “Multi-Purpose Cleaner”.
Once a year
Follow the section “Starting the Spa with Fresh Water”.
chemical levels as necessary.
chemical levels as necessary.
beginning of Clear Water Plan)
Polish the acrylic surface with “Fast Sheen”.
Clean and treat spa cover with “Cover Protector”.
Rell your spa, following the section “Starting the Spa with Fresh
Water”.
Replace lter cartridges if the pleats appear frayed.
We recommend that your spa water be changed every 4 to 6 months. You may nd the need to change your
spa water more frequently with heavy use. When empty, your spa should be cleaned with a non-abrasive
cleaner, such as Cal Spas™ All Surface Cleaner, and then rinsed thoroughly.
2011 Genesis Portable Spa
LTR20111058, Rev. B
Page 23

www. c a ls p as . co m
Troubleshooting Water Clarity Problems
Problem Probable Causes Possible Solutions
Cloudy Water Dirty lter•
Clean lter•
21
Clear Water Plan
Excessive oils / organic mat-•
ter
Improper sanitization•
Suspended particles / organ-•
ic matter
Overused or old water•
Water Odor Excessive organics in water•
Improper sanitization•
Low pH•
Chlorine Odor Chloramine level too high•
Low pH•
Musty Odor Bacteria or algae growth• Shock spa with sanitizer – if problem is vis-•
Organic buildup /
scum ring around
spa
Algae Growth High pH•
Eye Irritation Low pH•
Buildup of oils and dirt• Wipe off scum with clean rag – if severe, •
Low sanitizer level•
Shock spa with sanitizer•
Add sanitizer•
Adjust pH and/or alkalinity to recommended •
range
Run jet pump and clean lter•
Drain and rell the spa•
Shock spa with sanitizer•
Add sanitizer•
Adjust pH to recommended range•
Shock spa with sanitizer•
Adjust pH to recommended range•
ible or persistent, drain, clean and rell the
spa
drain the spa, use a spa surface and tile
cleaner to remove the scum and rell the spa
Shock spa with sanitizer and adjust pH•
Shock spa with sanitizer and maintain sani-•
tizer level
Adjust pH•
Skin Irritation / Rash Unsanitary water•
Stains Total alkalinity and/or pH •
Scale High calcium content in •
2011 Genesis Portable Spa
LTR20111058, Rev. B
Low sanitizer level•
Free chlorine level above 5 •
ppm
too low
High iron or copper in •
source water
water – total alkalinity and
pH too high
Shock spa with sanitizer and maintain sani-•
tizer level
Shock spa with sanitizer and maintain sani-•
tizer level
Allow free chlorine level to drop below 5 ppm •
before spa use
Adjust total alkalinity and/or pH•
Use a stain and scale inhibitor•
Adjust total alkalinity and pH – if scale re-•
quires removal, drain the spa, scrub off the
scale, rell the spa and balance the water
Use a stain and scale inhibitor •
Page 24

www. c a ls p as . co m
22
Cleaning and Maintenance
Removing the Access Panel
You will need to remove the access panel in order to drain your Genesis spa.
Unplug the spa.1.
Remove the screws from the access panel.2.
Remove the access panel and set it aside.3.
Cleaning and Maintenance
Replace the access panel when you are nished. Do not overtighten the screws.
Do not run the spa with the access panel removed!
Draining Your Portable Spa
Your spa should be drained every four to six months and relled
with fresh tap water. The following is the recommended method
for draining your spa.
Turn off the power at the breaker.1.
Remove the lter.2.
Remove the access panel as described above.3.
Locate hose ending with the 3/4 inch hose-bib xture.4.
Hook up the female end of a garden hose to the drain t-5.
ting.
Place the other end of the garden hose where you would like 6.
the water to drain to.
Twist the hose-bib xture counterclockwise to open the 7.
drain.
Let the spa drain completely, then remove the garden hose.8.
Twist the hose-bib xture clockwise to close it.9.
2011 Genesis Portable Spa
LTR20111058, Rev. B
Page 25

www. c a ls p as . co m
Winterizing (Cold Climate Draining)
In many areas of the country, the temperature drops
below 32˚F (0°C). We recommend that you always
have your spa full of water and running at normal spa
temperatures (80˚F to 100˚F, 26.7°C to 37.8°C). This
will help reduce the risk of freezing in your spa and
your spa’s equipment.
Warning:Ifyoundtheneedtodrainyourspa,
please be aware of the potential of freezing in
your spas equipment and plumbing. Even if the
directions below are followed perfectly, there
is no guarantee that your spa will not suffer
freeze damage.
Freeze damage is not covered by your warranty.
Open all lter covers.1.
Remove the lter baskets and lters.2.
Drain your spa completely as described in the in-3.
structions above.
Remove drain plugs from the front of the 4.
pumps.
Disconnect the unions from both sides of the 5.
pump.
Use a wet/dry vacuum to blow any remaining 6.
water out of the jets and equipment area.
Cover your spa with a good spa cover and an allweather tarp to ensure that neither rain nor snow
enters the spa.
Installing Cover Latches
You will need a drill with a 3/32” drill bit and a Phillips screwdriver.
23
Cleaning and Maintenance
Your cover will have four clips attached to the ends of the four latches, two on each end of the spa cover.
There will also be a small bag with 12 screws.
Place the cover on the spa with the latches placed 1.
where you want to mount them on the spa.
Insert three screws in the latch clip and fasten it to the spa shell. 3.
Make sure they are snug, but do not overtighten them. Do the
same for the remaining latches. Drill and attach latch clips to the
shell one at a time.
Using the latch clips as a guide, drill three 2.
holes for the mounting screws.
When you have nished inserting 4.
all of the screws, use the latch
key to unlock the cover latches.
2011 Genesis Portable Spa
LTR20111058, Rev. B
Page 26

www. c a ls p as . co m
24
Covering Your Spa
Important! Keep the spa covered when not in use!
Covered spas will use less electricity in maintaining your set temperature.•
Covering your spa will protect your spa’s nish from the sun’s ultraviolet rays.•
You are required to keep the spa covered to maintain warranty coverage.•
Covering your spa helps prevent children from drowning in the spa.•
See the manual enclosed with your cover for instructions on mounting the locks and how to lock and unlock
the cover.
In addition, while the spa cover is rigid, it is not designed to support any weight. Therefore, as a safety
precaution and to preserve the life of your cover, you must not sit, stand, or lie on it, nor should you place
objects of any kind on top of it.
Cleaning and Maintenance
Cleaning and Replacing the Filter
Filtration is one of the most important steps you can take to ensure clean, clear water. It is far less expensive
to x water clarity problems by ltering your spa than by using excessive amounts of chemicals, excessive
ltration times, or by water replacement.
In addition, you need to regularly clean out the lter basket mounted on top of the lter well.
See the section “Clear Water Plan” on page 14 for more information on cleaning your lter.
Cleaning the Cover
Vinyl and Leather Cleaner
Because the cover is constantly exposed to weather, you should protect it as part of your
monthly maintenance plan. Cal Spas Vinyl and Leather Cleaner is specically designed to
protect spa covers from chemical and ultraviolet light damage. It accomplishes this without
leaving an oily residue behind that is normally associated with common automotive vinyl protectants. Cal Spas Vinyl and Leather Cleaner should be used sparingly. Incorrect usage may
cause water clarity issues.
Periodic Maintenance
Remove spa cover from spa.1.
Allow spa cover to dry completely.2.
Spray Vinyl and Leather Cleaner to cover evenly and wipe dry.3.
Allow spa cover to dry completely.4.
Reinstall cover on spa.5.
Warning: Do not use automotive vinyl protectants on spa covers. These products are generally oil-based
and will cause severe water clarity issues that are difcult to correct.
2011 Genesis Portable Spa
LTR20111058, Rev. B
Page 27

www. c a ls p as . co m
Cleaning the Shell
All-Purpose Cleaner (Spa Finish Cleaning)
Cal Spas All-Purpose Cleaner is an essential part of maintaining your spa’s nish. Through
normal use, the spa’s nish can accumulate dirt, oil, and calcium causing a rough feel and
unsightly scum lines. Cal Spas All-Purpose Cleaner is a low detergent, non-abrasive cleaner
specically formulated to clean the spa without damaging its acrylic nish.
The most effective solution to minimize cleaning time is prevention. When the following steps
are followed, the spa’s nish will actually start to resist most of the elements that cause calcium build-up and make scum line clean up easier.
25
Cleaning and Maintenance
PriortoSpaStart-UpandRelling
Spray Cal Spas Multi-Purpose Cleaner directly on 1.
to the spa’s nish.
Wipe clean with a clean soft cloth.2.
Repeat on heavily calcied areas.3.
Wipe spa thoroughly with a wet sponge, rinsing 4.
often with a bucket of clean water.
Allow spa to dry completely.5.
Apply a coat of Cal Spas Fast Sheen to the spa’s 6.
entire nish with a soft towel or sponge.
Allow Fast Sheen to dry until white and pow-7.
dery.
Buff clean with a soft cloth, rotating frequently.8.
Fast Sheen (Spa Finish Protecting Wax)
Cal Spas Fast Sheen is an essential part of maintaining your spa’s nish. Through normal use,
the spa’s nish can accumulate dirt, oil, and calcium, causing a rough feel and unsightly scum
lines. Cal Spas Fast Sheen is a non-oil based wax that is specically formulated to protect the
spa’s nish from the chemicals and minerals associated with normal spa use.
Periodic Maintenance
Spray Cal Spas Multi-Purpose Cleaner directly to 1.
the spa’s nish.
Wipe clean with a clean soft cloth.2.
Wipe spa thoroughly with a wet sponge, rinsing 3.
often in a bucket of clean water.
Cal Spas Multi-Purpose Cleaner should not be sprayed
directly into the spa water. Incorrect usage of this
product will cause water clarity issues.
The most effective solution to minimize cleaning time is prevention. When the following steps
are followed, the spa’s nish will actually start to resist most of the elements that cause calcium build-up and make scum line clean-up easier.
PriortoSpaStart-UpandRelling
Spray Cal Spas Multi-Purpose Cleaner directly to 1.
the spa’s nish.
Wipe clean with a soft cloth.2.
Repeat on heavily calcied areas.3.
Wipe spa thoroughly with a wet sponge, rinsing 4.
often in a bucket of clean water.
Allow the spa to dry completely.5.
2011 Genesis Portable Spa
LTR20111058, Rev. B
Apply a coat of Cal Spas Fast Sheen to the spa’s 6.
entire nish with a soft cloth or sponge.
Allow Fast Sheen to dry until white and pow-7.
dery.
Buff clean with a soft cloth, rotating frequently.8.
IMPORTANT: Cal Spas Fast Sheen should not be used
on spas full of water. Only apply to clean, cool, dry
surfaces. Incorrect product usage may cause water
clarity issues.
Page 28

www. c a ls p as . co m
26
Appendix
Replacement Parts
Appendix
ELE 2” Euro No Eyeball
PLU282050W
MED 3” Directional for 2 Jet
Body
PLU282053W
Main Drain, Super Hi Flo
Suction 2” Silver
PLU21400132
Waterfall
PLU21800700
Jets
Drain
Waterfall
Covers
G418T 72” x 72”
Basic Rust 4” - 2.5” ACC01200616
Basic Gray 4” - 2.5” ACC01200617
Basic Slate 4” - 2.5” ACC01200618
Basic Palomino 4” - 2.5” ACC01200619
G318R 78” Round
Basic Rust 4” - 2.5” ACC01002550
Basic Gray 4” - 2.5” ACC01002551
Basic Slate 4” - 2.5” ACC01002552
Basic Palomino 4” - 2.5” ACC01002553
G518L / G618B 78” x 78”
Basic Rust 4” - 2.5” ACC01002540
Basic Gray 4” - 2.5” ACC01002541
Basic Slate 4” - 2.5” ACC01002542
Basic Palomino 4” - 2.5” ACC01002543
Filters
Filter Cartridge, 50 Sq Ft,
Anti-Bacterial
FIL11100201
Light
Light Mini 2” Diameter
LIT16000151
Power Cord
GFCI Plug and Cord, 15’
ELE09700086
2011 Genesis Portable Spa
LTR20111058, Rev. B
Page 29

www. c a ls p as . co m
Limited Warranty
This limited warranty is effective for Genesis portable spas manufactured after January 1, 2011.
Cal Spas portable spas are warranted to be free from defects in material and workmanship. This warranty starts
from date of manufacture and ends either by specied time-frame listed below, owner-transfer, reloca-
tion, or installation of any component other than by manufacturer.
This limited warranty is only valid on portable spas delivered in the United States and Canada. However, it does
not apply to special offers and events and extends through the selling dealer to the original purchaser at the
original site of installation.
Spa Shell / Structural
LMS warrants against the loss of water through the spa shell due to defects in materials and/or workmanship
for a period of one year.
Interior Surface
LMS warrants against cracks, blisters, peeling, discoloration and delamination of interior surfaces for a period
of one year.
27
Appendix
Equipment
LMS warrants the spa’s electrical and electronic components, specically, the control system and pumps, against
malfunction due to defects in materials and/or workmanship for a period of one year.
Components
LMS warrants manufacturer-installed ozonator and LED light source against malfunction due to defects in materials and/or workmanship for one year.
Manufacturer Warranty
Spa cover warranty is extended through the manufacturer of the product. Spa cover is warranted for 90 days
unless otherwise specied. For more information, see their warranties in the owner’s information package that
was delivered with your spa for more information.
Authorized Repairs and Service
The factory authorized selling dealer is responsible for performing all necessary repairs. To obtain service, contact the selling dealer.
If the consumer is unable to obtain satisfactory customer service from the selling dealer, written notication
must be given to the LMS Customer Relations Department within 30 days of the reported failure.
Warranty Performance
In the event of repairs or replacement of components under warranty, shipping costs are the responsibility of
the spa owner. There will be no charge for parts or labor on a covered item. Cost of labor is based on at rate
schedule determined by LMS and distributed to dealers.
The LMS service agent may assess a reasonable travel or mileage charge per service call, which may include
diagnostic time.
If LMS determines that repair of a covered item is not feasible, LMS reserves the right to replace the defective
merchandise with merchandise equivalent or equal in value to the original merchandise.
In the event of warranty product replacement requiring a returned goods authorization (RGA), all removal,
replacement, installation and shipping costs are the responsibility of the spa owner.
2011 Genesis Portable Spa
LTR20111058, Rev. B
Page 30

www. c a ls p as . co m
28
Proration of Warranty
Units determined by the Company to be non-repairable
will be replaced on a prorated basis with the same
or a comparable unit. The user will be charged one
percent of the current retail cost for each full month
Appendix
of ownership from the date of purchase through the
date failure is determined to be non-repairable. This
charge will be waived during the rst twelve months
of ownership.
Acts That Will Void This Warranty
This warranty is void if the spa has been subject to
negligence, alteration, misuse, abuse, repairs by nonLMS authorized personnel, incorrect electrical installa-
tion, installation by unqualied personnel, installation
without a permit if required by local codes, installation
of any component other than by the manufacturer,
acts of God (including, but not limited to, acts of nature and surrounding environments), and any other
cases beyond the control of LMS.
Examples of common acts invalidating this warranty
include, but are not limited to:
Use of spa in a non-residential application.•
Scratches caused by normal use.•
Operation of spas water temperature out of the •
normal operating range of 32˚F (0°C) to 118˚F
(47.8°C).
Damage caused by incorrect water level (low, •
overow, etc.).
Damage caused by extreme weather conditions •
(hot, cold, etc.).
Damage caused by dirt, sand and calcium.•
Damage caused by clogged lter cartridges. See •
lter cleaning recommendations in this owner’s
manual.
Damage caused by continued operation of this spa •
with either a known or an unknown problem.
Damage caused by tri-chlor, acids, chlorine tab-•
lets, any oating chemical devices, or any spa
chemicals not authorized by LMS.
Damage caused by improper water chemistry. •
(High levels of chlorine, bromine, calcium, pH and
other excessive chemical levels.)
Damage caused by direct sunlight. Spas should •
always be covered when not in use.
Damage caused as a result of failure to follow op-•
erating instructions as dened within this owner’s
manual.
Damage caused by incorrect electrical installation, •
electrical brownout, voltage spikes, or operation
of spa out of voltage range by more than ±10%.
Spas improperly installed or placed on non-ap-•
proved surfaces.
For relocating your spa without voiding your warranty,
contact Customer Service for relocation procedures.
Disclaimers
This limited warranty is made with the express understanding that the spa is not an essential device or
medical device as dened under State and Federal
Law. LMS shall not be liable for loss of use of the spa
or other incidental or consequential costs, expense or
damages, which may include but are not limited to
removal of permanent deck or other custom xtures
or the necessity for crane removal. Any implied warranty shall have duration equal of the applicable warranty stated above. Under no circumstances shall LMS
or any of its representatives be held liable for injury
to any person or damage to any property, however
arising.
Legal Remedies
This limited warranty gives you specic legal rights
and you may have other rights, which may vary from
state to state.
Customer Service
See your Cal Spas dealer for a copy of the applicable
warranty, details, and any questions you may have regarding the warranty coverage on your spa.
2011 Genesis Portable Spa
LTR20111058, Rev. B
Page 31

www. c a ls p as . co m
Cal Spas Chemicals
29
Appendix
2011 Genesis Portable Spa
LTR20111058, Rev. B
Page 32

Locating the product serial number
The serial number of your spa is located on a metal plate attached to the
base of the equipment pack inside the equipment area of the spa. You
will need this number to properly register your spa and activate coverage.
Write this information in the space provided below.
Spa Model: __________________________________________________
Spa Serial Number: ___________________________________________
Date Purchased: _____________________________________________
Date Installed: _______________________________________________
Dealer’s Phone Number: _______________________________________
Dealer’s Address: _____________________________________________
CONTACT INFORMATION
For customer service, please contact
your authorized dealer immediately. If
you need additional information and/or
assistance, please contact:
LMS Customer Service Department
1462 East Ninth Street
Pomona, CA 91766.
Telephone: 800-CAL-SPAS (US and Canada)
Telephone: 909-623-8781 (International)
Fax: 909-629-3890
www.calspas.com
 Loading...