

Page 1

NOTICE
RASOIR FEMININ
GEBRUIKSAANWIJZING
DAMESSCHEERAPPARAAT
INSTRUCTIONS
LADY SHAVERS
MODELE 7517 :
SECTEUR + PILE
MODEL 7517 :
ELEKTRICITEITSNET + BATTERIJ
MODEL 7517 :
MAINS + BATTERY OPERATED
EQN 940 - 03/98
Page 2
C
D
A
B
E
F
G
I
J
H
1
Page 3
2 3
4 5
6 7
Page 4

A lire attentivement avant emploi...
F
Nous vous remercions de votre confiance et de votre fidélité aux produits
CALOR.V ous venez d’acheter l’un de nos derniers modèles de rasoirs féminins. Livré avec une notice d’emploi, une carte de garantie et une liste des
centres de service après-vente.
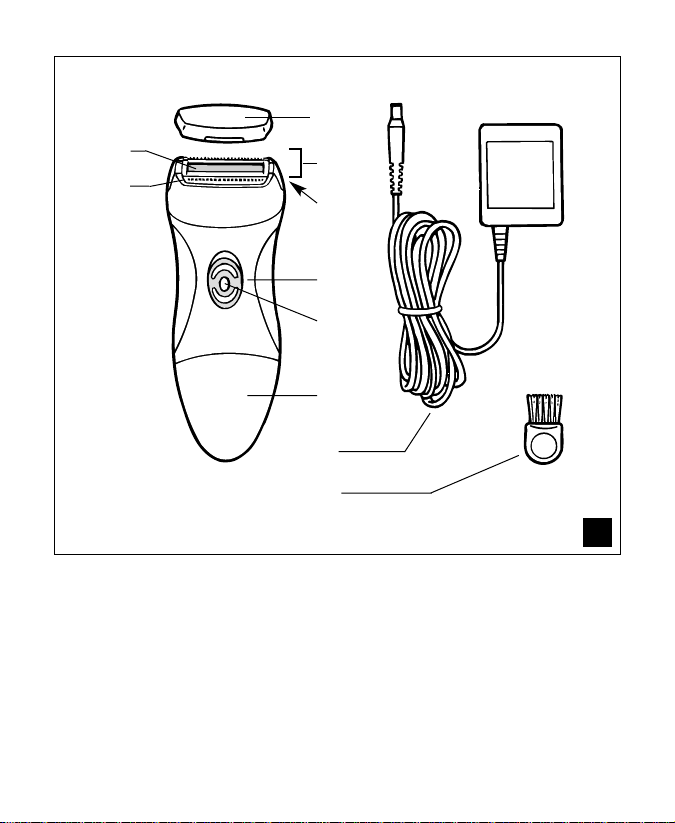
1 - DESCRIPTION FIG 1
A. Capot de protection
B. Tête de rasage
C. Micro-grille de rasage
D. Tondeuse
E. Commande déverrouillage tête
F. Interrupteur marche/arrêt
G. Interrupteur de verrouillage
H. Brosse de nettoyage
I. Capot d’accès aux piles
J. Cordon et bloc d’alimentation
2 - POUR VOTRE SECURITE
Tension de fonctionnement :
En mode secteur : 230 V AC.Vérifiez que cette tension correspond à celle
de votre installation. Toute erreur de branchement peut causer des dommages irréversibles non couverts par la garantie.
En mode pile : avec 2 piles de 1.5 V DC. N’utilisez que des piles de
1,5 V AA de type LR6.
Cet appareil est réservé à un usage domestique et personnel
seulement.
tant : Ne pas immerger ni l’appareil, ni le cordon et bloc d’ali-
Impor
mentation dans l’eau.
Cet appareil ne peut pas être utilisé sous la douche, ni dans le bain.
Ne pas laisser l’appareil durant un temps prolongé à des
températures inférieures à 0° et supérieures à 40° (sous une vitre en
plein soleil par exemple).
Page 5

Ne pas exposer longuement l’appareil aux effets directs des ra y ons du soleil.
Ne jamais utiliser l’appareil en cas d’anomalie de fonctionnement, ni après
une chute (des dommages non visibles peuvent être préjudiciables à votre
sécurité).
Pour tout problème d’après-vente adressez-vous à votre re vendeur habituel
ou à un réparateur agréé (voir liste livrée avec votre appareil).
Lorsque l’appareil est en marche, les tondeuses ne doivent pas entrer
en contact avec les cils,les cheveux, les vêtements ou tout autre objet,
afin d’éviter tout risque de blessure ou de blocage. Ne jamais laisser à
la portée des enfants.
N’utilisez pas l’appareil : sur le visage, sur une peau blessée ou irritée,si vous souffrez d’affections dermatologiques : eczéma, varices,
inflammations cutanées, grains de beauté, acné, verrues, marques de
naissance, etc.
3 - CONSEILS D’UTILISATION
A. PREPARATION DE LA PEAU
Avant de vous raser : vérifiez que la peau est parfaitement propre et sèche.
N’appliquez ni crème ni lait hydratant
B. LA MISE EN SERVICE DU RASOIR
Important : En aucun cas, ce rasoir ne doit être utilisé sous l’eau.
Fonction secteur
Adaptez le cordon sur le rasoir. Branchez le bloc d’alimentation dans une
prise électrique (230 V). Appuyez sur le bouton de verrouillage (G) tout en
commutant l’interrupteur en position (1) (marche).
Fonction pile
Le rasoir fonctionne av ec 2 piles alcalines de type LR6 (1,5 V AA).L’appareil
doit être déconnecté du réseau électrique avant enlèvement des piles.Pour
la mise en place et/ou le remplacement des piles, ouvrir le boîtier de l’appareil en tirant le capot d’accès aux piles vers le bas (FIG 2). Respectez le
sens d’introduction des piles.Appuyez sur le bouton de verrouillage (G) tout
en commutant l’interrupteur en position (1) (marche).
F
Page 6

C. LE RASAGE
F
1) Retirez le capot de protection de la tête de rasage.
2) Mettez l’interrupteur en position 1 (marche).
3) Commencez à vous raser :
pour les jambes :
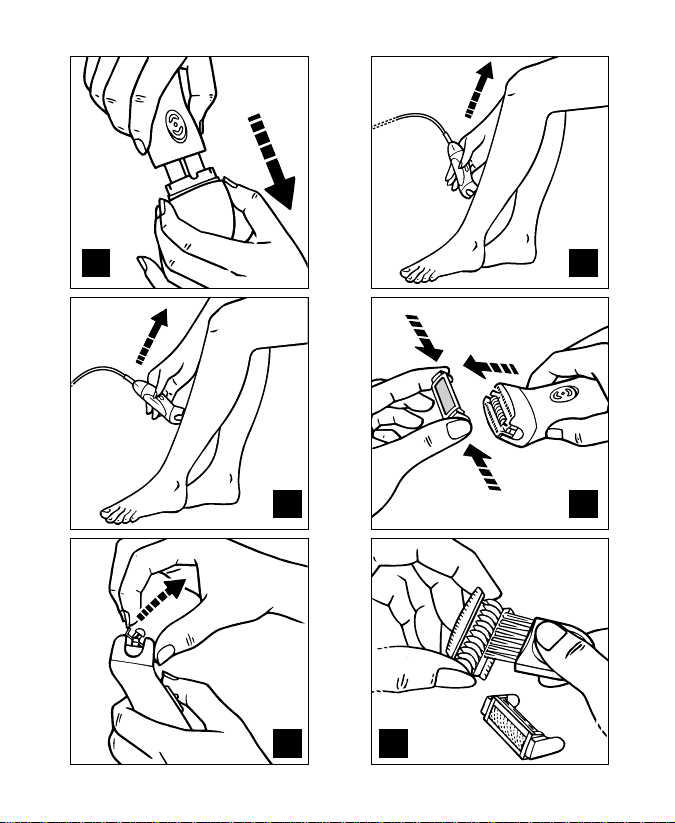
pour les poils longs : utilisez d’abord la tondeuse. Tenez l’appareil légèrement incliné vers vous et déplacez-le lentement à rebrousse-poils (FIG 3).
Pour les poils courts : utilisez la micro-grille. Tenez l’appareil
perpendiculairement et déplacez-le lentement à rebrousse-poils (FIG 4).
pour les aisselles et le maillot :
Pour les poils longs :utilisez la tondeuse. Tenez l’appareil légèrement incli-
né vers vous et déplacez-le lentement à rebrousse-poils.
Pour les poils courts : utilisez la micro-grille. Tenez l’appareil
perpendiculairement et déplacez-le lentement à rebrousse-poils.
Pour une meilleure efficacité, tendez la peau avec l’autre main pour faire
ressortir les poils. Vous obtiendrez ainsi un rasage précis et peu irritant.
En cas d’irritation vous pouvez appliquer un peu de talc. Attendez 24
h avant d’appliquer un parfum ou un déodorant sous les aisselles.
4) Pour arrêter, ramenez l’interrupteur en position O (arrêt).L’interrupteur de
verrouillage sera activé automatiquement.
5) Débranchez le bloc d’alimentation après utilisation et replacez le capot
de protection.
D. LE NETTOYAGE
Important : nettoyez systématiquement la tête de rasage de l’appareil après chaque utilisation.
Un entretien régulier de la tête de rasage préserve son
efficacité et prolonge la vie de votre rasoir.
1) Vérifiez que votre rasoir est bien débranché.
2) Retirez le capot de protection.
3) Dégagez le support grille en appuyant sur les commandes de déverrouillage et en tirant vers le haut (FIG 5). Eliminez soigneusement tous les
Page 7

poils en soufflant sur et sous la micro-grille.Nettoyez également, à l’aide de
la brosse la tête de rasage. N’utilisez jamais la brosse pour nettoyer la
micro-grille.
4) Une fois par mois en cas d’utilisation régulière :
Après avoir retiré le support grille (FIG 5), dégagez l’ensemble bloc lames
+ tondeuses en faisant pivoter la tête de haut en bas (FIG 6). Nettoyez le
avec la brosse fournie (FIG 7). Nettoyez également, à l’aide de la brosse ,
la partie supérieure de l’appareil recevant la tête de rasage. De temps à
autre, lubrifiez légèrement l’ensemble bloc-lames + tondeuses exclusivement avec une huile de type huile pour machine à coudre.Remettez en
place l’ensemble bloc lames + tondeuses.Replacez la micro-grille de rasage sur l’appareil.
ATTENTION ! N’appuyez pas sur la micro-grille lors de sa remise en
place.
5) Remettez en place le capot de protection de la tête de rasage. Une légère usure de la tête de rasage est normale après un certain temps d’utilisation. Vous pouvez la changer en vous adressant à l’un de nos centres de
service après-vente agréés (liste jointe).
4 - GARANTIE
Cet appareil est garanti 1 an. La garantie ne couvre pas les dommages
résultant d’un usage intensif, d’un maniement, d’une utilisation ou d’un
entretien non approprié ainsi que du non respect des instructions d’emploi.
La garantie est annulée en cas d’intervention de personnes non autorisées
ou en cas d’emploi de pièces de rechange autres que d’origine. Pour tout
problème ou question concernant votre rasoir , contacter votre revendeur ou
l’un des centres de service après-vente (voir liste jointe). Ce rasoir est
conforme aux directives communautaires européennes de sécurité et de
compatibilité électromagnétique.
F
Page 8

Zorgvuldig lezen voor gebruik...
NL
Wij danken u voor het vertrouwen dat u als trouwe klant in CALOR producten hebt. U hebt zojuist een van onze nieuwste modellen damesscheerapparaten gekocht. Geleverd met een gebruiksaanwijzing, garantiebewijs en
een lijst met klantenservice centra.
1 - BESCHRIJVING AFBEELDING 1
A. Beschermkapje
B. Scheerkop
C. Microscheerrooster
D. Tondeuse
E. Knop voor het ontgrendelen van de scheerkop
F. Aan/uit schakelaar
G. Knop voor het vergrendelen van de scheerkop
H. Schoonmaakborsteltje
I. Deksel batterijtoevoer
J. Snoer en voedingseenheid
2 - VOOR UW VEILIGHEID
Werkingsspanning :
Bij gebruik van het elektriciteitsnet : 230 V AC. Controleer of deze spanning
overeenkomt met uw netspanning.Bij een foutieve aansluiting kan onherstelbare schade ontstaan en kan de garantie vervallen.
Bij gebruik van batterijen :met 2 batterijen van 1,5 V DC.Gebruik alleen batterijen van 1,5 V AA type LR6.
Dit apparaat is uitsluitend bestemd voor huishoudelijk en persoonlijk
gebruik.
Belangrijk
onderdompelen in water.
Dit apparaat is niet geschikt voor onder de douche of in bad.
Laat het apparaat nooit langere tijd blootgesteld aan temperaturen
onder 0° of boven 40° (bijvoorbeeld in de felle zon voor het raam).
Het apparaat niet langere tijd aan direct zonlicht blootstellen.
: Het apparaat, het snoer en de voedingseenheid nooit
Page 9

Het apparaat nooit gebruiken wanneer dit niet meer naar behoren werkt of
gevallen is (niet zichtbare beschadigingen kunnen uw veiligheid in gevaar
brengen).
Voor problemen kunt u zich tot uw gebruikelijke verkoper of tot een erkend
reparateur (zie hiervoor de bij uw apparaat geleverde lijst) wenden.
Wanneer het apparaat aanstaat, dient u er voor te zorgen dat de tondeuses niet in contact komen met wimpers, haren, kleding of andere
voorwerpen, om verwondingen en blokkeren van het apparaat te voorkomen. Houd het apparaat buiten bereik van kinderen.
Gebruik het apparaat niet : op het gezicht,op een geblesseerde of geïrriteerde huid of wanneer u last hebt van huidaandoeningen : eczeem,
spataderen, ontstekingen, moedervlekken, acne, wratten, striae etc.
3 - GEBRUIKSADVIES
A. HET VOORBEREIDEN V AN DE HUID
Voor het scheren : controleer eerst of uw huid goed schoon en droog is.
Gebruik geen crème of hydraterende bodymilk.
B. DE INWERKSTELLING VAN UW SCHEERAPPARAAT
Belangrijk : Gebruik het scheerapparaat nooit onder water.
Functie elektriciteitsnet
Breng het snoer aan op het scheerapparaat.Sluit de voedings-eenheid aan
op een stopcontact (230 V). Controleer of de vergrendelingsknop (G) niet
ingedrukt is. Als dit wel het geval is, druk deze dan opnieuw in.
Functie batterij
Uw scheerapparaat werkt op twee alkalinebatterijen type LR6
(1,5 V AA). Haal de stekker uit het stopcontact voor u de batterijen verwijdert. Voor het inbrengen of het verwisselen van de batterijen opent u het
scheerapparaat door het deksel van de batterijtoevoer naar beneden te
trekken (Afbeelding 2). Let op de manier waarop de batterijen geplaatst
dienen te worden. Druk op de vergrendelingsknop (G) en zet tegelijkertijd
de aan/uit schakelaar op stand 1 (aan).
NL
Page 10

C. HET SCHEREN
1) Verwijder het beschermkapje van de scheerkop.
NL
2) Zet de schakelaar op stand 1 (aan).
3) Begin met scheren :
voor de benen :
voor de langere haartjes : gebruik eerst de tondeuse. Houd het apparaat
enigszins schuin naar u toe en beweeg het langzaam tegen de groeirichting
van de haartjes in (afbeelding 3).
voor de kortere haartjes : gebruik het microrooster. Houd het apparaat loodrecht en beweeg het langzaam tegen de groeirichting van de haartjes in
(afbeelding 4).
voor de oksels en de bikinilijn :
voor de langere haartjes : gebruik de tondeuse. Houd het apparaat enig-
szins schuin naar u toe en beweeg het langzaam tegen de groeirichting van
de haartjes in.
Voor de kortere haartjes : gebr uik het microrooster. Houd het apparaat loodrecht en beweeg het langzaam tegen de groeirichting van de haartjes in.
Trek met de andere hand de huid strak voor een nog perfecter
resultaat. Het scheren is zeer precies en irriteert nauwelijks.
Als uw huid toch geïrriteerd is,kunt u een beetje talk opbrengen.Wacht
voor het opbrengen van parfum of deodorant 24 uur.
4) Voor het uitschakelen van het apparaat z et u de schakelaar op stand 0.De
vergrendelingsknop wordt hierbij automatisch geactiveerd.
5) Haal de voedingseenheid uit het stopcontact en plaats het
beschermkapje weer op de scheerkop.
Opbergen : Om te voorkomen dat uw apparaat aangaat (of zich
ontlaadt) tijdens het opbergen (of op reis in uw koffer), drukt u de vergrendelingsknop in.
D. REINIGEN
Belangrijk : reinig de scheerkop na elk gebruik.
Een regelmatige reiniging van de scheerkop zorgt voor een lang-
durige doelmatige werking en verlengt de levensduur van uw
apparaat.
Page 11

1) Controleer of uw scheerapparaat daadwerkelijk uitgeschakeld is.
2) Verwijder het beschermkapje.
3) Verwijder het rooster door op de ontgrendelingsknoppen te drukken en
dit naar boven te trekken (afbeelding 5).Verwijder zorgvuldig alle haartjes
door tegen beide zijden van het rooster te blazen.Reinig ook de scheerkop
met behulp van het borsteltje.Gebruik het borsteltje nooit voor het reini-
gen van het microrooster.
4) Bij regelmatig gebruik eenmaal per maand :
Na het verwijderen van het rooster (afbeelding 5), verwijder het blok met de
scheermessen en de tondeuses door de scheerkop van boven naar onder
te draaien (afbeelding 6).Reinig het met het geleverde borsteltje (afbeelding
7). Reinig ook het bovenste gedeelte van uw scheerapparaat met behulp
van het borsteltje.Vet van tijd tot tijd het blok met de scheermessen en de
tondeuses enigszins in. Doe dit uitsluitend met een type olie dat geschikt is
voor bijvoorbeeld naaimachines.
Plaats het blok met de scheermessen en de tondeuses terug. Plaats het
micro scheerrooster terug op het apparaat.
LET OP : Druk bij het terugplaatsen niet op het microrooster.
5) Plaats het beschermkapje van de scheerkop terug op het apparaat. Na
verloop van tijd is een lichte slijtage van de scheerkop normaal. U kunt dit
laten vervangen bij een van onze erkende klantenservice centra (zie bijgevoegde lijst).
4 - GARANTIE
Voor dit apparaat geldt een garantie van een jaar. De garantie dekt geen
schade dat ontstaat door intensief gebruik, door ongeschikt behandelen,
gebruik of onderhoud of door het negeren van de gebruiksaanwijzingen. De
garantie vervalt bij reparatie door niet erkende personen of bij gebruik van
niet oorspronkelijke onderdelen.Voor problemen of vragen kunt u terecht bij
uw verkoper of een van onze erkende klantenservice centra (zie bijgevoegde lijst). Dit scheerapparaat voldoet aan de elektromagnetische compatibiliteits- en veiligheidsrichtlijnen van de Europese Unie.
NL
Page 12

Please read carefully before use...
Thank you for choosing CALOR products. You have just purchased one of
our lady shaver models.It is supplied with instructions for use, a guarantee
GB
card and a list of after-sales service centres.
1 - DESCRIPTION FIG 1
A. Protective cover
B. Shaving head
C. Micro-screen
D. Clippers
E. Head release control
F. On/off switch
G. Locking switch
H. Cleaning brush
I. Battery compartment cover
J. Power lead and power supply unit
2 - FOR YOUR SAFETY
Operating voltage :
Mains operation: 230 V AC. Ensure that this voltage corresponds to your
mains voltage. Incorrect connection to the power supply may cause irreparable damage, which is not covered by the guarantee.
Battery operation : requires 2 x1.5 V DC batteries.Ensure that only LR6 1.5
V AA batteries arer used.
The appliance is designed for domestic and personal use only.
tant : Do not immerse the appliance, the power lead or the
Impor
power supply unit in water.
This appliance cannot be used in the shower or the bath.
Do not leave the appliance for long periods of time at temperatures
below 0° or above 40° (behind a window, in direct sunlight, for
example).
Page 13

Do not axpose the appliance to direct sunlight, for long periods of time.
Never use the appliance if it is not working properly or if it has been dropped (non-visible damage may make the appliance unsafe).
For all after-sales problems, please consult y our retailer or an approved service centre (see enclosed list).
When the appliance is in use, the clippers must not come into contact
with eyelashes, hair, clothing or any other objects, in order to avoid
any injury risk or jamming. Always keep the appliance out of the reach
of children.
Do not use the appliance: on your face, on broken or irritated skin, or
if you suffer from dermatological conditions : ecz ema, varicose veins,
skin inflammation, beauty spots, acne, warts, birth marks, etc.
3 - TIPS FOR USE
A. PREPARING Y OUR SKIN
Before shaving : ensure that your skin is perfectly clean and dry. Do not
apply cream or moisturising milk.
B. USING THE SHAVER
Important :This shaver must never be used under water.
Mains operation
Fit the lead to the shaver .Plug the power supply unit into an electrical mains
socket (230 V).Ensure that the locking switch (G) is not activ ated.Otherwise
press it again.
Battery operation
The shaver operates with two LR6 type alkaline batteries (1.5 V AA). The
appliance must be unplugged from the mains supply before removing the
batteries.To insert and/or replace the batteries, open the shaver’s casing by
pulling the battery cover downwards (FIG 2). Insert the batteries in the correct direction, as indicated. Press the locking switch (G) while turning the
On/Off swich On (1).
C. SHAVING
1) Remove the shaving head’s protective cover.
GB
Page 14

2) Turn the switch to 1 (on).
3) Start shaving :
Legs :
GB
Long hair : use the clippers first. Hold the appliance slightly tilted towards
you and move it slowly against the lie of the hair (FIG 3).
Short hair : use the microscreen. Hold the appliance at r ight angles to the
skin and move it slowly against the lie of the hair (FIG 4).
Underarms and bikini line :
Long hair: use the clippers. Hold the appliance slightly tilted towards you
and move it slowly against the lie of the hair.
Short hair: use the micro-screen. Hold the appliance at right angles to the
skin and move it slowly against the lie of the hair.
To improve efficiency, stretch your skin with your other hand, in order to raise
the hairs. In this way, you will obtain a closer shave, with little or no irritation.
If your skin becomes irritated,apply a small quantity of talcum powder.
Wait for 24 h before applying perfume or deodorant under your arms.
4) To stop the shaver, turn the switch back to position O (off). The locking
switch will be actived automatically.
5) Unplug the power supply unit after use and replace the protective cover.
Storage : To prevent your appliance from being turned on (or discharging)
while in storage (or while travelling, in your suitcase), press the locking
switch.
D. CLEANING
Important : always clean the appliance’s shaving head after use.
Regular maintenance of the shaving head preserves the shaver’s
efficiency and extends its lifespan.
1) Ensure that your shaver is unplugged.
2) Remove the protective cover.
3) Release the micro-screen support by pressing on the locking clips and
pulling upwards (FIG 5).Carefully remove all hair by blowing on and beneath the micro-screen.Clean the shaving head also, with the brush.Never use
the brush to clean the micro-screen.
Page 15

4) Once per month, if the appliance is used regularly :
After removing the micro-screen support (FIG 5), release the blade unit +
clipper assembly by pivoting the head from top to bottom (FIG 6). Clean it
with the brush supplied (FIG 7). Also use the brush to clean the upper par t
of the appliance, onto which the shaving head is fitted. From time to time,
lightly oil the blade unit + clipper assembly, with a sewing machine type oil
only.
Replace the blade unit + clipper assembly. Replace the micro-screen onto
the appliance.
CAUTION ! Do not press against the micro-screen when replacing it.
5) Replace the shaving head’s protective cover. Slight wear to the shaving
head is normal after a certain per iod of use. To change it, please contact
one of our approved after-sales service centres (see enclosed list).
4 - GUARANTEE
This appliance is guaranteed for 1 year. The guarantee does not cover
damage resulting from intensive use, from incorrect handling, use or maintenance, or from failure to respect the user instructions. The guarantee is
rendered null and void in the event of repair work by unauthorised persons
or use of non-original spare parts. For any problems or questions concerning your shaver, please contact your retailer or one of the after-sales service centres (see enclosed list). This shaver complies with European community safety and electromagnetic compatibility directives.
GB
Page 16

EQN 940 - 03/98
 Loading...