

California Faucets Roman Tub Set User Manual
Tel: 714-891-7797
Fax: 714-891-2478
Toll Free: 800-822 -8855
www.calfau cets.com
Calif ornia Fa u cets reserves the right to make modi f icatio n and spec ificatio n changes at any tim e. Please visit ww w.calfaucets. com for most curren t technical data.
CALIFORNIA FAUCETS RECOMMENDS THAT ALL PLUMBING PRODUCTS BE INSTALLE D BY A LICENSED ROFESS IONAL
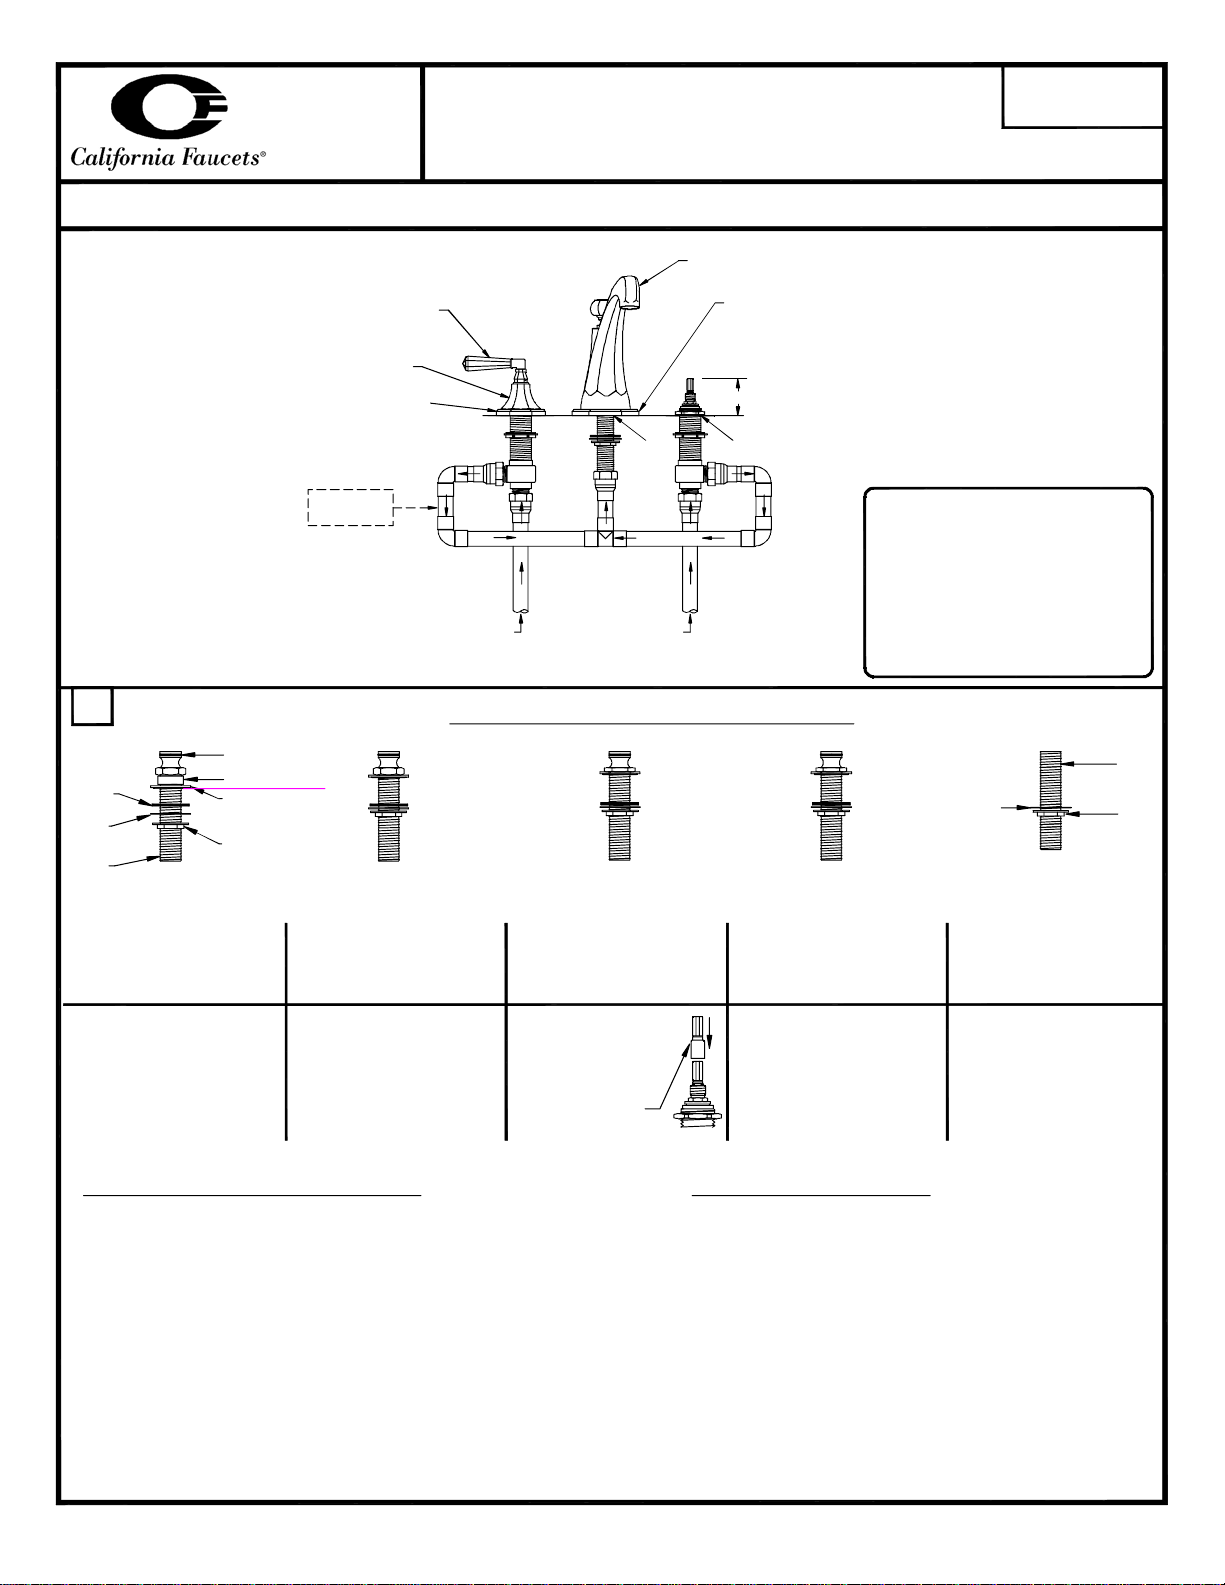
Handle
Escutcheon
Base Ring
(if applicable)
ROMAN TUB SET
Spout
Base Ring
(if applicable)
"A"
Hole Size
ø1"
ø1-1/4"
Hole Size
INSTALLATION
INSTRUCTIONS
Use Rigid
Copper Pipe
Hot
Inlet
1
Rubber
Washer
Plastic
Washer
Shank
Fig. 2A
Quick Connect
Model #: QC-50
Use With Rough Kit #:
08-75-50
For Series #:
5008
O-Ring
Brass Spacer
Brass Washer
w/ O-Ring
Brass Nut
Fig. 2B
Quick Connect
Model #: QC-99
Use With Rough Kit #:
08-75-99
For Series #:
3208 3308 3408 3508
Roman Tub Spout Connectors
Fig. 2C
Use With Rough Kit #:
3608 3808 4008 4208
4408 4508 4608 4708
5108 5508 5708 5808
Series 6308 uses
Broach Adapter
5908 6008 6108 6408
6708 6808 6908 E208
For all Quick Connects except: 08-75-75
-Remove brass nut, plastic washer and rubber washer from
Quick Connect assembly.
-Ensure that O-ring is properly seated in brass washer.
-Insert Quick Connect assembly through hole in deck.
-Place Rubber Washer, Plastic Washer and Brass Nut onto
Shank from below and firmly tighten.
-Seat Spout onto Quick Connect.
-Rotate Spout to desired position and tighten setscrew.
-Use thread sealant to seal all fittings with threads.
Cold
Inlet
Fig. 1
Quick Connect
Model #: QC-63
08-75-63
For Series #:
6308
Fig. 3
NOTE:
-Must use rigid copper piping
(not flex) for all connections
between spout and valves.
-It is also recommended that an
access panel be provided for
all Roman Tub installations.
3/4"
Shank
Fig. 2D
Quick Connect
Model #: QC-63
Use With Rough Kit #:
08-75-65
For Series #:
4808
4808X
6508
6608
Washer
Fig. 2E
3/4" Nipple
Model #: QC-75
Use With Rough Kit #:
08-75-75
For Series #:
5308
6208
7008
7208
Nut
7308
For Quick Connect 08-75-75
-Apply thread selant to one end of the Shank and
tighten into Spout.
-Place spout base ring (if applicable) onto deck, over
the spout shank.
-Insert Shank through deck hole and from below place
Washer and Nut onto Shank.
-Rotate Spout to desired postion and firmly tighten nut.
-Use thread sealant to seal all fittings with threads.
RT_ii_140122
IMPORTANT: All soldering shall be performed prior to attaching fitting to Valves and Quick
Connect, otherwise severe damage may take place and void warrantee
P 1
Install valve bodies:
2
NOTE: Hot & cold valves are labeled: cold=blue & hot=red.
-Remove top nut and turn bottom nut with fiber washer down
the valve until it stops.
Top
Nut
Sink/
Countertop
-Insert valve through hole from below and install top nut
(if applicable), and adjust to proper height, see Fig. 4A
(also refer to "A" dimension).
-Tighten the bottom nut to secure the valve.
-Install trim parts (base ring if applicable), escutcheon and
Fiber Washer
Bottom Nut
Valve Bo dy
handle and tighten handle set screws with Allen key provided.
REMINDER: Please retain allen key as handles may
require re-tightening with normal use.
Decorative
Base Ring
Installation Note for series:
# 32, 33, 34, 35, 36, 43, 57, 60, 61, 67, 68 & 69.
The trim to those products do not require a top nut to be installed
Valve
on the valve (See Fig. 4A)
The decorative base ring and escutcheon takes the place of the
top nut. (See Fig. 4B).
Piping:
3
-Install piping (not provided) to connect hot & cold valves to
connector tee (see Fig. 1).
NOTE: The manufacturer recommends these connections be made in hard copper.
Fig. 4A
Fig. 4B
"A"
DIMENSION
"A" Dimension is
"A"
from top of counter/tub
top to tip of stem broach.
Series # Handle Diverter
3208 2 3/8" 2 3/8"
3308 2 3/8" 2 3/8"
3408 2 3/8" 2 3/8"
3508 2 3/8" 2 3/8"
3608 2 3/8" 2 3/8"
3808 2 5/8" 2 5/8"
4008 2 5/8" 2 5/8"
4208 2 5/8" 2 5/8"
4408 2 3/8" 2 3/8"
4508 2" 2"
4608 2 1/2" 2 1/2"
4708 2 1/2" 2 1/2"
4808,X 2 5/16" 2 5/16"
5008 2 1/4" 2 1/4"
5108 2 1/2" 2 1/2"
5308 2 1/4" 2 1/4"
5508 2 5/8" 2 5/8"
5708 2" 2"
5808 2 5/8" 2 5/8"
5908 2 5/8" 2 5/8"
6008 2 1/4" 2 1/4"
6108 2 1/4" 2 1/4"
6208 1 1/8" 1 1/8"
6308 3" 3"
6408 2 5/8" 2 5/8"
6508 2" 2"
6608 2" 2"
6708 2 1/4" 2 1/4"
6808 2 3/8" 2 3/8"
6908 2 3/8" 2 3/8"
E208 2 11/16" 2 11/16"
RT_ii_140122
P 2
 Loading...