

Calibre UK VANTAGE-HD User Manual

VANTAGE-HD
OPERATORS Manual
Issue 1.0.2
28 March 2006 © Calibre UK Ltd

Welcome to the Vantage-HD Manual
For technical support please see the Home Theater section of our website
http://www.calibreuk.com/home_theater.php
If the web site does not provide the information you require, please contact your dealer, installer or
distributor in the first instance, or if they are unable to resolve your query please
.
e-mail vantage-support@calibreuk.com
.
COPYRIGHT & LIMITED WARRANTY
This document and the software described within it are copyrighted with all rights reserved. Under copyright laws,
neither the documentation nor the software may be copied, photocopied, reproduced, translated, or reduced to
electronic medium or machine readable form, in whole or in part, without prior written consent of Calibre UK Ltd
("Calibre"). Failure to comply with this condition may result in prosecution.
Calibre provides a limited warranty for Vantage-HD covering defects in manufacture and materials for a period of
12 months from date of purchase. This warranty covers parts and labor within this period but excludes shipping
charges and expressly excludes damage or defects caused by misuse, abuse, modification, alteration or failure
during firmware/software upgrading.
In the event of product failure, contact your dealer, installer or distributor for return/repair information. Unsolicited
product shipments to Calibre will not be processed for repair. DO NOT ship product directly to Calibre unless your
supplier has expressly instructed you to do so and has provided you with a returns authorisation number which
they have obtained from Calibre on your behalf for the purpose of this return.
Calibre does not warrant that this product will function properly in every hardware/software environment. Although
Calibre has tested the software within this product and reviewed the documentation, CALIBRE MAKES NO
WARRANTY OR REPRESENTATION, EITHER EXPRESS OR IMPLIED, WITH RESPECT TO THIS
HARDWARE OR SOFTWARE OR DOCUMENTATION, THEIR QUALITY, PERFORMANCE,
MERCHANTABILITY, OR FITNESS FOR A PARTICULAR PURPOSE. THE SOFTWARE CONTAINED WITHIN
VANTAGE-HD AND ALL DOCUMENTATION ARE LICENSED 'AS IS', AND YOU, THE LICENSEE, BY MAKING
USE THEREOF, ARE ASSUMING THE ENTIRE RISK AS TO THEIR QUALITY AND PERFORMANCE. IN NO
EVENT WILL CALIBRE BE LIABLE FOR DIRECT, INDIRECT, SPECIAL, INCIDENTAL, OR CONSEQUENTIAL
DAMAGES ARISING OUT OF THE USE OR INABILITY TO USE THE SOFTWARE OR DOCUMENTATION,
even if advised of the possibility of such damages. In particular, and without prejudice to the generality of the
foregoing, Calibre has no liability for any programs or data stored or used with Calibre software, including costs of
recovering such programs or data.
Calibre UK Ltd
Cornwall House, Cornwall Terrace
Bradford, West Yorkshire
BD8 7JS, England
Telephone +44 (0)1274 394125
Fax + 44 (0)1274 730960
Email vantage@calibreuk.com
Web-site www.calibreuk.com
Calibre UK Ltd
P O Box 44
Fair Oaks
California 95628
USA
Phone 916 961 1261
Email vantage@calibreuk.com
Web-site www.calibreuk.com
Copyright (c) 2006 All World-wide Rights Reserved
All trade marks acknowledged
Calibre operates a policy of continued product improvement, therefore specifications are subject to change without
notice as products are updated or revised.
E&OE.
Issue 1.0.2 28 March 2006 © Calibre UK Ltd Page i

CONTENTS
Contents ii
PRODUCT DESCRIPTION................................................................................................................ 1
1.1. Product Overview ................................................................................................ 1
1.2. Packing List ......................................................................................................... 1
1.3. You Will Need...................................................................................................... 1
1.4. Physical Dimensions ........................................................................................... 1
1.5. Controlling Your Vantage-HD.............................................................................. 1
1.6. Serial Control....................................................................................................... 2
1.7. Infrared Control ................................................................................................... 2
1.8. Firmware Updates ............................................................................................... 2
1.9. Rear Panel Connections ..................................................................................... 2
CONNECTING VANTAGE-HD TO THE DISPLAY DEVICE ............................................................. 3
2.1. Correct Installation Order .................................................................................... 3
CONNECTING VANTAGE-HD INPUTS ............................................................................................ 9
3.1. Introduction.......................................................................................................... 9
3.2. Resetting An Input Channel ............................................................................... 10
FREEING INPUT CHANNELS........................................................................................................... 11
4.1. Freeing a Video Channel..................................................................................... 11
4.2. Freeing an Audio Channel................................................................................... 11
SELECTING AN INPUT ..................................................................................................................... 12
5.1. Via the OSD ........................................................................................................ 12
5.2. Via the Front Panel.............................................................................................. 12
5.3. Via the Numeric Buttons on the Remote ............................................................. 12
ADJUSTING AN INPUT ..................................................................................................................... 13
6.1. Introduction.......................................................................................................... 13
PICTURE IN PICTURE ...................................................................................................................... 16
7.1. Introduction.......................................................................................................... 16
INFORMATION MENU ...................................................................................................................... 18
8.1. Introduction.......................................................................................................... 18
CONFIGURATION MENU ................................................................................................................. 19
9.1. Introduction.......................................................................................................... 19
OUTPUT MODE DETAILS ................................................................................................................ 21
10.1. Introduction.......................................................................................................... 21
10.2. Audio Output Formats ......................................................................................... 22
INPUT SIGNAL DETAILS .................................................................................................................. 23
11.1. Introduction.......................................................................................................... 23
11.2. Video Inputs ........................................................................................................ 23
11.3. Component Video Input....................................................................................... 23
11.4. SDI Input (optional) ............................................................................................. 23
11.5. HDMI Input .......................................................................................................... 23
11.6. Computer (SVGA) Inputs .................................................................................... 23
11.7. Audio Input Formats ............................................................................................ 24
POWER SUPPLY SPECIFICATION.................................................................................................. 25
12.1. Introduction.......................................................................................................... 25
REGULATORY APPROVALS............................................................................................................26
13.1. CE and FCC Compliance .................................................................................... 26
ENVIRONMENTAL AND SAFETY..................................................................................................... 27
14.1. Operating............................................................................................................. 27
14.2. Storage ................................................................................................................ 27
14.3. Safety Issues ....................................................................................................... 27
HDMI CONNECTION ADVICE ..........................................................................................................28
WARRANTY & SERVICE ADVICE.................................................................................................... 30
Issue 1.0.2 28 March 2006 © Calibre UK Ltd Page ii

PRODUCT DESCRIPTION
1.1. Product Overview
Vantage-HD is a state of the art digital image processor which provides market leading HD&
SD per-pixel multiple Iow-angle aperture-adjusted motion-adaptive de-interlacing and
automatic film pull-down correction for 3:2, 2:2 and non-standard and broken cadences,
significantly outperforming the capabilities of benchmark competitor products.
Vantage-HD features studio-grade image processing algorithms from Teranex for the very
best scaling, film and video noise reduction, MPEG artifact reduction and automatic audio
time-line correction to maintain lip-sync
multiple HDMI and analog input channels, digital, analog and optical audio support and optional HDSDI compatibility.
Vantage-HD has special algorithms for plasma image enhancements, significantly reducing plasma
noise and improving grayscale reproduction. Image quality on large-screen LCDs are also much
improved by Vantage-HD. For projectors, Vantage-HD features the sharpest most flexible keystone
correction on the market and there is also an image warping option available for complex geometric
correction
1.2. Packing List
The following items are included with your Vantage-HD, if any items are missing please
contact your distributor.
1. Vantage-HD
2. Power supply
3. Power cord
4. CD containing this manual
5. Remote control + batteries
6. Warranty card
Vantage-HD is a very flexible video and audio router with
1.3. You Will Need
The following items will be required but are not supplied with your Vantage-HD
1.4. Physical Dimensions
The Vantage-HD is approximately 16.4" (416mm) by 10" (253mm) by 3.4" (85mm) WxDxH
NOTE dimensions are excluding optional rack mounting kit.
1. A suitable display device - see section 17 for details of the output modes supported by
Vantage-HD
2. Cable to connect to your display device
3. A signal source - see section 11 for details of the supported inputs
4. Cable to connect to your signal source
5. Audio processor and cable (required if not using HDMI to connect to the display device).
An optional 19" by 2U rack mounting kit is available. Each bracket is attached by 2x 10-32
1/2" long pan head screws.
1.5. Controlling Your Vantage-HD
Setting up and controlling your Vantage-HD is achieved by a simple to use On Screen
Display (OSD), moving around the OSD can be achieved by using the navi-keys on the front
of the Vantage-HD or by using the remote control
Batteries are not installed when the unit ships to maximise their life.
PLEASE ENSURE THAT THE BATTERIES ARE INSERTED IN THE W AY SHOWN
WITHIN THE BATTERY COMPARTMENT OF THE REMOTE CONTROL.
WHEN BATTERIES BECOME DISCHARGED PLEASE REMOVE THEM IMMEDIATELY
AND DISPOSE OF THE IN ACCORDANCE WITH THE INSTRUCTIONS SUPPLIED BY
THE BATTERY MANUFACTURER
Issue 1.0.2 28 March 2006 © Calibre UK Ltd Page 1 of 30

IF THE REMOTE CONTROL IS TO BE LEFT UNUSED FOR AN EXTENDED PERIOD OF
TIME PLEASE REMOVE THE BATTERIES TO PREVENT POSSIBLE DAMAGE CAUSED
BY LEAKING
1.6. Serial Control
Vantage-HD has a serial port which allows for the unit to be controlled via an integrated
home control system. The connector on Vantage-HD is a 9 way D-Type (female).
Pin 2 = Tx Pin 3 = Rx Pin 5 = Ground
The type of cable required will depend on your home control system but typically a 9 way
Male to 9 way Female connected straight through will allow serial control.
The serial control codes can be downloaded from www.calibreuk.com
serial control may require the application of a firmware upgrade to your unit via its USB port.
1.7. Infrared Control
The infrared control codes can be downloaded from www.calibreuk.com
1.8. Firmware Updates
Calibre operates a policy of continued product improvement as a result we may periodically
issue firmware updates, these are downloaded to the Vantage-HD via the USB port.
Full details of the updates and how to download them are available on our website
www.calibreuk.com
1.9. Rear Panel Connections
The following inputs are located on the rear panel of the Vantage-HD
, please also note that
1. Composite video via RCA jack (2x)
2. S-Video via 4 way mini DIN socket (2x)
3. Component video with or without separate sync via 3/4 RCA jack (2 sets)
4. HDMI version 1.1 (2x)
5. Expansion slot for input expander cards - takes HDMI card or HD-SDI card
6. Computer (SVGA) via 15 way HDD
7. Analog audio stereo pairs via RCA jack (4 sets)
8. S/PDIF coaxial audio (2x)
9. S/PDIF optical audio (2x)
10. Power jack
The following outputs are located on the rear panel of Vantage-HD
1. Analog video output via 15 way HDD (1x)
2. HDMI version 1.1 (1x)
3. Analog audio stereo pair via RCA jack (1 set)
4. S/PDIF coaxial audio (1x)
5. S/PDIF optical audio (1x)
Figure 1 below details the connections to Vantage-HD.
Figure 1 Rear Panel Connections
Issue 1.0.2 28 March 2006 © Calibre UK Ltd Page 2 of 30

CONNECTING VANTAGE-HD TO THE DISPLAY DEVICE
2.1. Correct Installation Order
The flow chart below details the correct order in which to install your Vantage-HD, following
this order will ensure trouble free installation.
Issue 1.0.2 28 March 2006 © Calibre UK Ltd Page 3 of 30
Connect to
1.
display device
Connect Vantage-HD SVGA (RGBHV) output or HDMI output to your
display device. If connecting a DVI display device you need to use an
HDMI to DVI converter which we recommend you locate at the display
end of the cable.
Connect Vantage-HD audio Coaxial, Optical or Analog output to audio
processor, if HDMI audio output is not being used.
Connect audio
2.
output
3. Connect input
Connect Power
4.
Configure the
5.
display device
Switch on
6.
Vantage-HD
Set Vantage- HD
7.
output mode
Note: For best audio performance it is recommended that Coaxial or
Optical audio be used, not HDMI audio. Some HDMI sources do not
correctly comply with HDMI specifications which can cause audio
distortion or loss of audio. If this is experienced, please change to using
Coaxial or Optical audio, or consult the supplier of that HDMI source
device.
Connect input video and audio signals to Vantage-HD.
Connect power supply provided with Vantage-HD to Vantage-HD power
inlet jack.
THIS POWER SUPPLY CARRIES A LABEL SHOWING THAT ITS DC
OUTPUT IS 5V at 7A. DO NOT CONNECT ANY OTHER POWER
SUPPLY TO VANTAGE-HD WHICH WILL NOT BE COVERED UNDER
YOUR PRODUCT WARRANTY
Connect the Vantage-HD PSU to your mains outlet and turn on the mains
outlet if it is switched
Turn on your display device and select the input channel to which you
have connected Vantage-HD
Turn on Vantage-HD by pressing the Power (bottom right) button on the
front panel, or by pressing the On button on the remote control.
A new Vantage-HD unit will power up in 640x480 @ 60Hz output mode
since this should be compatible with all common display devices. If your
Vantage-HD has previously been connected it may power up in a
different mode. If this mode is not compatible with your display you can
easily revert to the 640x480 @ 60Hz output mode by simultaneously
pressing the front panel Input key and OK key (OK is the center key of
the 5-button navi-key).
Press the Menu key to bring up the OSD menu. Scroll to the Output
Settings menu using the top/bottom navi-keys. Go into that menu by
pressing the right navi-key.
First choose your type of display by using the up/down navi-keys to scroll
to the Display menu item (if not already highlighted) and pressing OK (the
center button of the navi-key). The options which appear are:
Select display
8.
device type
Issue 1.0.2 28 March 2006 © Calibre UK Ltd Page 4 of 30
a) LCD - for direct-view LCD displays
b) Plasma - for plasma displays
c) Projector - for solid-state (digital) projectors such as DLP,
LCD, LCOS, DILA or any other type of digital projector
Choosing the appropriate type of display is important since menu items
such as temporal noise reduction and how the OSD is generated are preset to different default values depending on the display type and different
menu items appear or are hidden such as keystone correction.

Select display
9
device
resolution
Picture 1 Select Display Device Type
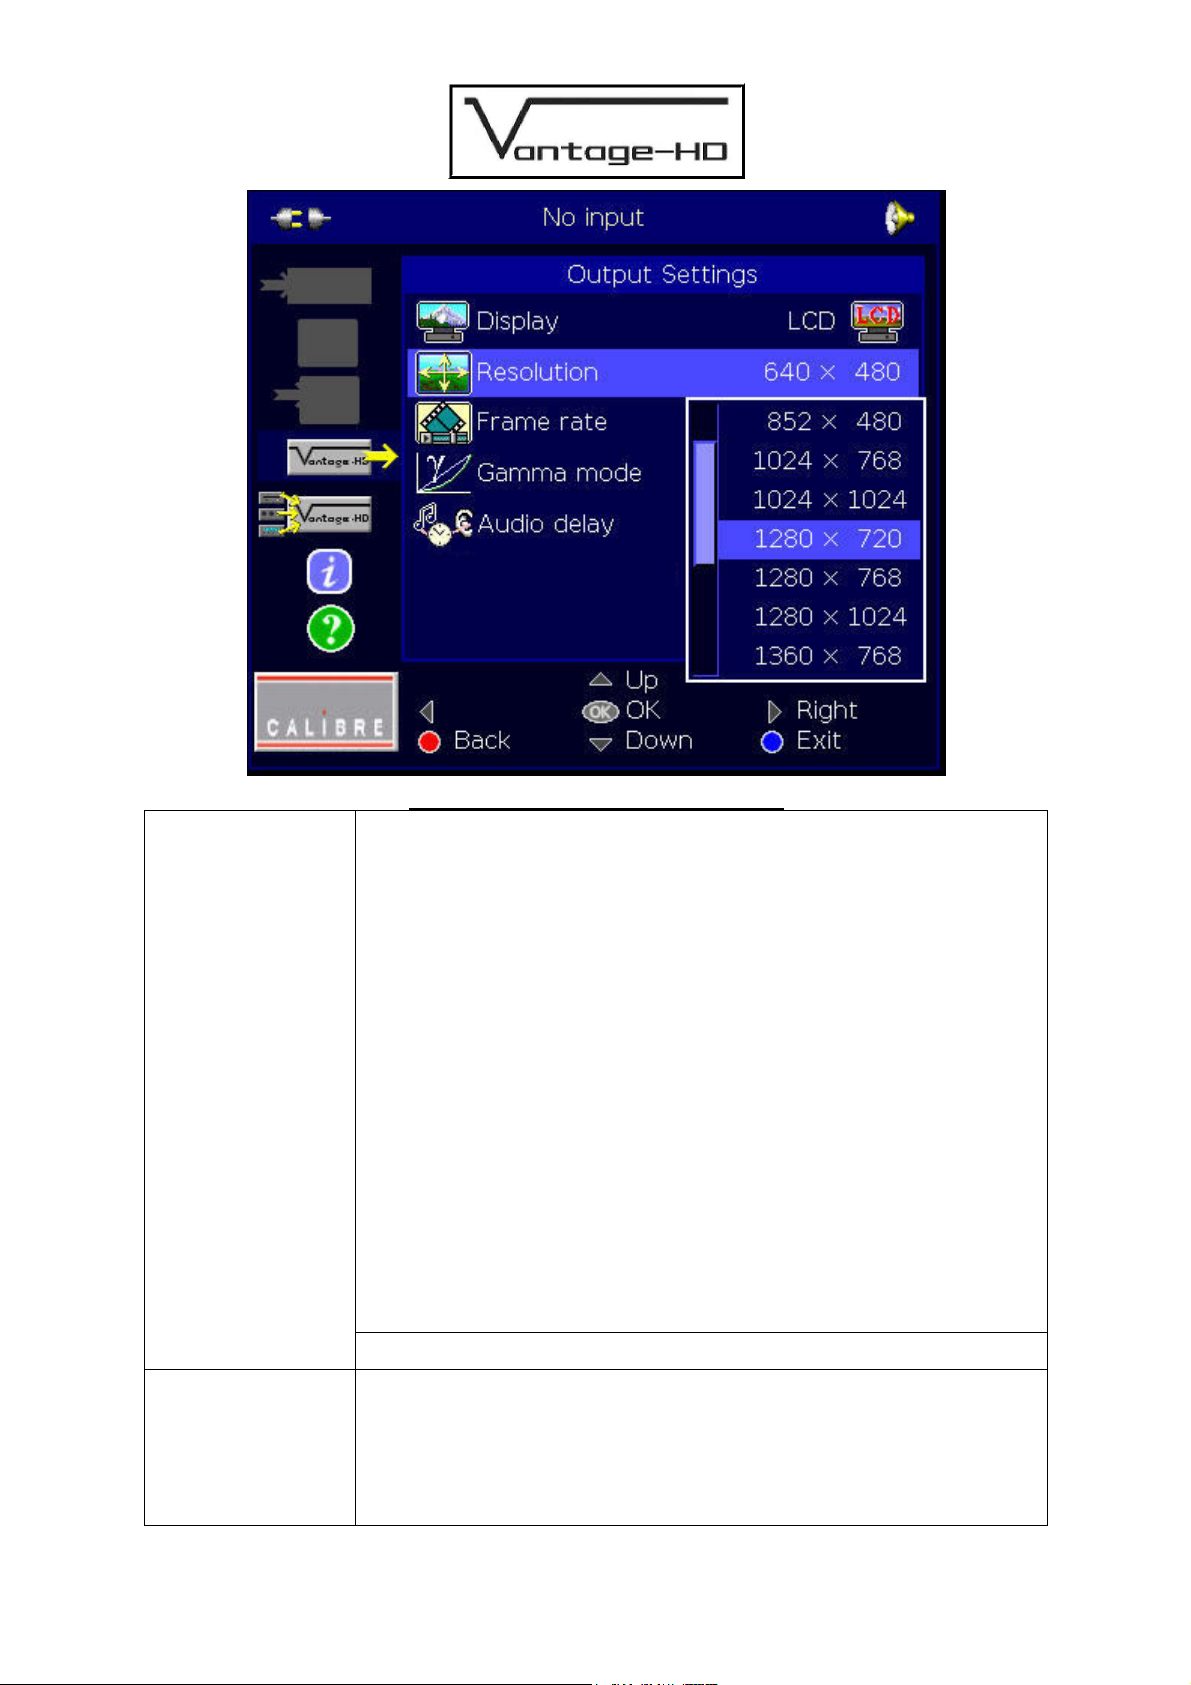
Choose the correct display resolution by scrolling down to the Resolution menu
item and pressing OK to display the list of available modes. Note the scroll bar at
the left of the list - it is too long to display the full list on screen so you must
scroll up and down it to see all modes.
For best performance it is critical that you select a mode which is equal to
the native resolution of the display device you are using, provided that the
display supports its native mode. This is to ensure that the internal
scaling within your display device is not operating.
Depending on the mode you choose, Vantage-HD may have to re-boot to
change resolution. If this occurs you need to re-enter the Output menu by
pressing Menu, scrolling to Output Menu with the up/down keys and
entering the Output Menu with the right key
Issue 1.0.2 28 March 2006 © Calibre UK Ltd Page 5 of 30
Select Output
10
Frame Rate
Picture 2 Select Display Device Resolution
Select the Frame Rate option on the menu. This determines whether the output
of Vantage-HD remains at a constant 59.94Hz, constant 50Hz, or automatically
switches between the two depending on the type of incoming signal being
displayed
Auto mode gives best motion performance in a viewing scenario where you are
looking at content which may be 59.94Hz or 50Hz (North America and anywhere
using the NTSC system usually runs at 59.94Hz, Europe and anywhere using
PAL or SECAM usually runs at 50Hz; there are exceptions though in both
cases.) However when Auto mode is selected there may be display glitches or
display re-sync delays when switching between inputs or when the input signal is
lost - this is due to output frame rate changes affecting the operation of your
display device. Additionally, some HDMI display devices will not operate
correctly in Auto mode due to limitations inherent within those displays.
If you are only using 59.94Hz sources, or only using 50Hz sources, it is strongly
recommended you select fixed 59.94Hz or 50Hz respectively so as to improve
the input switching characteristics.
Selecting 50Hz output mode with 59.94Hz input material, or vice versa, causes
frame rate conversion to occur. This can cause slight degradation in motion
performance so is not recommended, but can be used for display devices which
are not compatible with the incoming field rate.
Note: 60Hz display devices should correctly display 59.94Hz modes.
Image
11
Projection
Image Projection - allows correction for the orientation and location of the
projector relative to the screen. Press OK to show list then scroll up/down list
with up/navi-keys, press OK to choose the correct mode. Options are:
a) Front Table - projector is in front of screen and correct way up
b) Front Ceiling - projector is in front of screen but upside down
c) Rear Table - projector is behind screen but right way up
d) Rear Ceiling - projector is behind screen and upside down
Issue 1.0.2 28 March 2006 © Calibre UK Ltd Page 6 of 30

Optimize Display
12
Device Setup
When connecting your display via the SVGA (RGBHV) connector it is imperative
that the pixel clock and phase settings are correctly adjusted on the menu
system of your display device. For information on how to access these features
see the user manual supplied with your display device. Note: You must set
Vantage-HD to the native resolution of your display device BEFORE adjusting
the pixel clock and phase settings on your display.
To set the pixel clock, with no input displayed on Vantage-HD but with the OSD
present and the blue background shown, adjust the pixel clock setting (on your
display device, not on Vantage-HD) to remove all vertical noise bands from the
blue background. Correct adjustment will cause the vertical bands to move
further apart and reduce in number until they eventually disappear. Many good
displays will automatically select the correct pixel clock setting, but some will not.
IMPORTANT: See Chapter 10 - Output Mode Details for detailed information on
output mode timings including information on the correct pixel clock setting - the
total number of pixel clocks per line. See also Note (b) below when using
1366x768/1360x768 modes.
To set the pixel phase, first set the pixel clock correctly (see above) and
then adjust the pixel phase to remove all horizontal jitter and noise from
the background and the OSD, in particular you should adjust for best
sharpness of the OSD text and graphics.
PIXEL CLOCK AND PHASE ADJUSTMENTS W ITHIN THE DISPLAY
DEVICE ARE NOT APPLICABLE WHEN USING A DVI OR HDMI DISPLAY
DEVICE.
Notes: a) Some 1024x1024 plasmas do not correctly support 1024x1024 native
resolution, in this case you must unfortunately select 1024x768 or 1280x768,
experiment to see which gives best performance.
b) There are two 1366x768 modes and a 1360x768 mode provided. This is
because some types of plasma and LCD with this resolution need
different signal timings compared with those which are considered
standard for this format. As a general rule, 1366x768 modes will give
better performance than 1360x768 but some displays do not support
1366x768 modes. The key difference between the two 1366x768 modes
is the length of line blanking. Pick the 1366x768 mode which allows you
to correctly set the pixel clock on your display device and which does not
cause bad clamping. (If the picture appears very dark or very bright then
it is incorrectly clamped due to the selected mode not being compatible
with your display - try the other 1366x768 mode or the 1360x768 mode
instead).
c) 852x480 mode may need to be used for plasma screens with resolutions
of 852 or 853 pixels. Many 853 pixel plasma displays do not actually
support incoming modes with an odd number of input pixels.
d) Never pick a mode with more display lines than the native format of your
display device, selecting a higher resolution mode will not increase the
system performance, it will instead degrade the picture significantly since
it will cause the internal scaler within your display to downsize the picture
resulting in loss of detail and artifacts.
Depending on the frame rate mode you choose, Vantage-HD may have to reboot to change resolution. If this occurs you need to re-enter the Output menu
by pressing Menu, scrolling to Output Menu with the up/down keys and entering
the Output Menu with the right key.
Issue 1.0.2 28 March 2006 © Calibre UK Ltd Page 7 of 30
 Loading...