

Page 1

User Guide
Calibrated Software, Inc.
Page 2

Copyright 2008 Calibrated Software, Inc. All rights reserved.
Your rights to the software are governed by the accompanying Software License Agreement. Please read the entire User Guide and Software License
Agreement before installation, ordering or use. By installing, ordering or using this software you are agreeing to the Software License Agreement.
All company and product names referenced on this website or, listed as external resource links, are copyrights of their respective companies.
All information in this manual is subject to change without notice. No part of the document may be reproduced or transmitted in any form, or by any
means, electronic or mechanical, including photocopying or recording, without the express written permission of Calibrated Software, Inc. Calibrated is a
trademark of Calibrated Software, Inc.
Calibrated MPEG2-X Create Options application contains the following source code:
Portions of this software use Expat XML Parser with the following Software License:
Export Software License: “Copyright (c) 1998, 1999, 2000 Thai Open Source Software Center Ltd
Permission is hereby granted, free of charge, to any person obtaining a copy of this software and associated documentation files (the "Software"), to
deal in the Software without restriction, including without limitation the rights to use, copy, modify, merge, publish, distribute, sublicense, and/or sell
copies of the Software, and to permit persons to whom the Software is furnished to do so, subject to the following conditions:
The above copyright notice and this permission notice shall be included in all copies or substantial portions of the Software.
THE SOFTWARE IS PROVIDED "AS IS", WITHOUT WARRANTY OF ANY KIND, EXPRESS OR IMPLIED, INCLUDING BUT NOT LIMITED TO THE
WARRANTIES OF MERCHANTABILITY, FITNESS FOR A PARTICULAR PURPOSE AND NONINFRINGEMENT. IN NO EVENT SHALL THE
AUTHORS OR COPYRIGHT HOLDERS BE LIABLE FOR ANY CLAIM, DAMAGES OR OTHER LIABILITY, WHETHER IN AN ACTION OF
CONTRACT, TORT OR OTHERWISE, ARISING FROM, OUT OF OR IN CONNECTION WITH THE SOFTWARE OR THE USE OR OTHER
DEALINGS IN THE SOFTWARE.”
www.calibratedsoftware.com
Portions of this software are copyrighted. © 2007 The FreeType Project (www.freetype.org). All rights reserved.
Portions of this software are copyrighted: The OpenGL Extension Wrangler Library
Copyright (C) 2002-2008, Milan Ikits <milan ikits[]ieee org>
Copyright (C) 2002-2008, Marcelo E. Magallon <mmagallo[]debian org>
Copyright (C) 2002, Lev Povalahev
All rights reserved.
Redistribution and use in source and binary forms, with or without modification, are permitted provided that the following conditions are met:
Redistributions of source code must retain the above copyright notice, this list of conditions and the following disclaimer.
Redistributions in binary form must reproduce the above copyright notice, this list of conditions and the following disclaimer in the
documentation and/or other materials provided with the distribution.
The name of the author may be used to endorse or promote products derived from this software without specific prior written permission.
THIS SOFTWARE IS PROVIDED BY THE COPYRIGHT HOLDERS AND CONTRIBUTORS "AS IS" AND ANY EXPRESS OR IMPLIED WARRANTIES,
INCLUDING, BUT NOT LIMITED TO, THE IMPLIED WARRANTIES OF MERCHANTABILITY AND FITNESS FOR A PARTICULAR PURPOSE ARE
DISCLAIMED. IN NO EVENT SHALL THE COPYRIGHT OWNER OR CONTRIBUTORS BE LIABLE FOR ANY DIRECT, INDIRECT, INCIDENTAL,
SPECIAL, EXEMPLARY, OR CONSEQUENTIAL DAMAGES (INCLUDING, BUT NOT LIMITED TO, PROCUREMENT OF
SUBSTITUTE GOODS OR SERVICES; LOSS OF USE, DATA, OR PROFITS; OR BUSINESS INTERRUPTION) HOWEVER CAUSED AND ON ANY
THEORY OF LIABILITY, WHETHER IN CONTRACT, STRICT LIABILITY, OR TORT (INCLUDING NEGLIGENCE OR OTHERWISE) ARISING IN ANY
WAY OUT OF THE USE OF THIS SOFTWARE, EVEN IF ADVISED OF THE POSSIBILITY OF SUCH DAMAGE.
MPEG-2 Notice:
ANY USE OF THIS PRODUCT OTHER THAN CONSUMER PERSONAL USE IN ANY MANNER THAT COMPLIES WITH THE MPEG-2 STANDARD
FOR ENCODING VIDEO INFORMATION FOR PACKAGED MEDIA IS EXPRESSLY PROHIBITED WITHOUT A LICENSE UNDER APPLICABLE
PATENTS IN THE MPEG-2 PATENT PORTFOLIO, WHICH LICENSE IS AVAILABLE FROM MPEG LA, L.L.C, SEE HTTP://WWW.MPEGLA.COM.
Page 3

Contents
GETTING STARTED ..................................................................................................... 8
Overview ............................................................................................................................................................................. 8
DEMO MODE Limitation ..................................................................................................................................................... 9
Known Issues and Limitations .......................................................................................................................................... 10
Windows Requirements and Installation .......................................................................................................................... 11
Installing on Windows .............................................................................................................................................. 11
Uninstalling on Windows .......................................................................................................................................... 12
MAC OSX Requirements and Installation ........................................................................................................................ 13
Installing on Mac OSX .............................................................................................................................................. 14
Uninstalling on Mac OSX ......................................................................................................................................... 15
MOV ENCODE OPTIONS ............................................................................................ 16
Overview ........................................................................................................................................................................... 16
Options Interface ............................................................................................................................................................... 16
Version .............................................................................................................................................................................. 17
License .............................................................................................................................................................................. 17
Encode Options ................................................................................................................................................................ 18
Quick Colorspace Setup .......................................................................................................................................... 18
Supported Colorspaces ............................................................................................................................................ 18
RGB to YUV Matrix .................................................................................................................................................. 19
444 to 422 Chroma Sampling .................................................................................................................................. 20
RGB to YUV Gamma Correction ............................................................................................................................. 20
Watermark (For Color Testing) ......................................................................................................................................... 20
WINDOWS APPLICATIONS ....................................................................................... 21
Overview ........................................................................................................................................................................... 21
Adobe After Effects CS6/CC/CC2014 - MOV ................................................................................................................... 22
Getting Started ......................................................................................................................................................... 22
Output Module Settings for 8-bit YUV422 Export in AE ........................................................................................... 22
Page 4

Adobe Premiere Pro CS6/CC/CC2014 - MOV ................................................................................................................. 23
Getting Started ......................................................................................................................................................... 23
Using a Preset Setting for 8-bit YUV422 Export in PPro ......................................................................................... 23
Manually configuring for 8-bit YUV422 Export in PPro ............................................................................................ 24
Adobe Media Encoder CS6/CC/CC2014 - MOV .............................................................................................................. 25
Getting Started ......................................................................................................................................................... 25
Using a Preset Setting for 8-bit YUV422 Export in AME ......................................................................................... 25
Manually configuring for 8-bit YUV422 Export in AME ............................................................................................ 26
Avid Media Composer 6.0 & Greater - MOV .................................................................................................................... 27
Getting Started ......................................................................................................................................................... 27
Export Settings ......................................................................................................................................................... 27
QuickTime Player Pro 7.6/7.7 - MOV ............................................................................................................................... 28
Adobe After Effects CC/CC2014 - MXF............................................................................................................................ 29
Getting Started ......................................................................................................................................................... 29
Exporting .................................................................................................................................................................. 29
Adobe AME & Premiere Pro CS6/CC/CC2014 - MXF ...................................................................................................... 30
Getting Started ......................................................................................................................................................... 30
MPEG2-X MXF Export in PPro/AME ....................................................................................................................... 30
Other Windows applications ............................................................................................................................................. 33
MAC OSX APPLICATIONS ......................................................................................... 34
Overview ........................................................................................................................................................................... 34
Final Cut Pro 7 - MOV ...................................................................................................................................................... 35
Final Cut Pro X - MOV ...................................................................................................................................................... 36
Getting Started ......................................................................................................................................................... 36
Exporting in FCP X ................................................................................................................................................... 36
Compressor 3.5.3/4.1.2 - MOV ......................................................................................................................................... 37
Getting Started ......................................................................................................................................................... 37
Using a Preset Setting for exporting in Compressor ................................................................................................ 37
Adobe After Effects CS6/CC/CC2014 - MOV ................................................................................................................... 38
Getting Started ......................................................................................................................................................... 38
Output Module Settings for 8-bit YUV422 Export in AE ........................................................................................... 38
Page 5

Adobe Premiere Pro CS6/CC/CC2014 - MOV ................................................................................................................. 39
Getting Started ......................................................................................................................................................... 39
Using a Preset Setting for 8-bit YUV422 Export in PPro ......................................................................................... 39
Manually configuring for 8-bit YUV422 Export in PPro ............................................................................................ 40
Adobe Media Encoder CS6/CC/CC2014 - MOV .............................................................................................................. 41
Getting Started ......................................................................................................................................................... 41
Using a Preset Setting for 8-bit YUV422 Export in AME ......................................................................................... 41
Manually configuring for 8-bit YUV422 Export in AME ............................................................................................ 42
Avid Media Composer 6.0 & Greater - MOV .................................................................................................................... 43
Getting Started ......................................................................................................................................................... 43
Export Settings ......................................................................................................................................................... 43
QuickTime Player Pro 7.6/7.7 - MOV ............................................................................................................................... 44
Adobe After Effects CC/CC2014 - MXF............................................................................................................................ 45
Getting Started ......................................................................................................................................................... 45
Exporting .................................................................................................................................................................. 45
Adobe AME & Premiere Pro CS6/CC/CC2014 - MXF ...................................................................................................... 46
Getting Started ......................................................................................................................................................... 46
MPEG2-X MXF Export in PPro/AME ....................................................................................................................... 46
Final Cut Pro X - MXF ....................................................................................................................................................... 49
Getting Started ......................................................................................................................................................... 49
Exporting from FCP X .............................................................................................................................................. 49
Final Cut Pro 7 - MXF ....................................................................................................................................................... 50
Getting Started ......................................................................................................................................................... 50
Using a Preset Setting for exporting in FCP7 .......................................................................................................... 50
Compressor 3.5.3/4.1.2 - MXF ......................................................................................................................................... 51
Getting Started ......................................................................................................................................................... 51
Using a Pre-made MXF Preset for exporting in Compressor 3.5.3/4.1.2 ................................................................ 51
Creating a MXF Preset in Compressor 3.5.3 ........................................................................................................... 53
Creating a MXF Preset in Compressor 4.1.2 ........................................................................................................... 54
MXF Options Panel in Compressor 3.5.3/4.1.2 ....................................................................................................... 56
Other Mac OSX applications ............................................................................................................................................ 59
SOFTWARE LICENSE ................................................................................................ 60
Software License Agreement ............................................................................................................................................ 60
After Purchase - Software License Instructions ................................................................................................................ 60
Page 6

Refund Policy .................................................................................................................................................................... 60
TROUBLESHOOTING ................................................................................................. 61
General Questions ............................................................................................................................................................ 61
DEMO MODE watermark still visible after licensing ......................................................................................................... 61
VERSION HISTORY .................................................................................................... 62
Page 7

1
Getting Started
Overview
Calibrated MPEG2-X Create is a QuickTime Codec(Encode Only) that enables you to encode QuickTime MPEG2-X MOV
files** from 3rd party applications that support QuickTime.
Calibrated MPEG2-X Create supports encoding to the following QuickTime XDCAM Compression Types**:
XDCAM Long-GOP at 50Mb, 80Mb, 100Mb, 140Mb, 180Mb, 220Mb, 280Mb
“Calibrated MPG2X LG 1080i29.97” – FourCC ‘xd5b’ - 1920x1080 interlaced footage at 29.97fps
“Calibrated MPG2X LG 1080i25” – FourCC ‘xd5c’ - 1920x1080 interlaced footage at 25fps
“Calibrated MPG2X LG 1080p59.94” – FourCC ‘xdh2’ - 1920x1080 progressive footage at 59.94fps
“Calibrated MPG2X LG 1080p50” – FourCC ‘xdh2’ - 1920x1080 progressive footage at 50fps
“Calibrated MPG2X LG 1080p29.97” – FourCC ‘xd5f’ - 1920x1080 progressive footage at 29.97fps
“Calibrated MPG2X LG 1080p25” – FourCC ‘xd5e’ - 1920x1080 progressive footage at 25fps
“Calibrated MPG2X LG 1080p23.976” – FourCC ‘xd5d’ - 1920x1080 progressive footage at 23.976fps
“Calibrated MPG2X LG 720p59.94” – FourCC ‘xd59’ - 1280x720 progressive footage at 59.94fps
“Calibrated MPG2X LG 720p50” – FourCC ‘xd5a’ - 1280x720 progressive footage at 50fps
“Calibrated MPG2X LG 720p29.97” – FourCC ‘xd51’ - 1280x720 progressive footage at 29.97fps
“Calibrated MPG2X LG 720p25” – FourCC ‘xd55’ - 1280x720 progressive footage at 25fps
“Calibrated MPG2X LG 720p23.976” – FourCC ‘xd54’ - 1280x720 progressive footage at 23.976fps
XDCAM I-Frame Only at 50Mb, 80Mb, 100Mb, 140Mb, 180Mb, 220Mb, 280Mb
“Calibrated MPG2X I 1080i29.97” – FourCC ‘xd5b’ - 1920x1080 interlaced footage at 29.97fps
“Calibrated MPG2X I 1080i25” – FourCC ‘xd5c’ - 1920x1080 interlaced footage at 25fps
“Calibrated MPG2X I 1080p59.94” – FourCC ‘xdh2’ - 1920x1080 progressive footage at 59.94fps
“Calibrated MPG2X I 1080p50” – FourCC ‘xdh2’ - 1920x1080 progressive footage at 50fps
“Calibrated MPG2X I 1080p29.97” – FourCC ‘xd5f’ - 1920x1080 progressive footage at 29.97fps
“Calibrated MPG2X I 1080p25” – FourCC ‘xd5e’ - 1920x1080 progressive footage at 25fps
“Calibrated MPG2X I 1080p23.976” – FourCC ‘xd5d’ - 1920x1080 progressive footage at 23.976fps
“Calibrated MPG2X I 720p59.94” – FourCC ‘xd59’ - 1280x720 progressive footage at 59.94fps
“Calibrated MPG2X I 720p50” – FourCC ‘xd5a’ - 1280x720 progressive footage at 50fps
“Calibrated MPG2X I 720p29.97” – FourCC ‘xd51’ - 1280x720 progressive footage at 29.97fps
“Calibrated MPG2X I 720p25” – FourCC ‘xd55’ - 1280x720 progressive footage at 25fps
“Calibrated MPG2X I 720p23.976” – FourCC ‘xd54’ - 1280x720 progressive footage at 23.976fps
You can control the bitrate by using the quality slider in the QuickTime export window.
Quality 20 or less is 50Mb
Quality 21 to 40 is 80Mb
Quality 41 to 60 is 100Mb
Quality 61 to 70 is 140Mb
Quality 71 to 80 is 180Mb
Quality 81 to 90 is 220Mb
Quality 91 and greater is 280Mb
The stand-alone Calibrated MPEG2-X Create Info application is only used to get information about whether the software
is licensed – all of the options for Calibrated MPEG2-X Create can only be set within the application using Calibrated
MPEG2-X Create software
Page | 8
Page 8

DEMO MODE Limitation
Calibrated MPEG2-X Create will have watermarks of the Calibrated MPEG2-X Create Logo burned into any encoded
video when running in DEMO MODE. This is the only DEMO MODE limitation – everything else is fully functional. The
burned in DEMO MODE watermarks cannot be removed from the encoded video. After ordering and licensing
Calibrated MPEG2-X Create you will have to re-encode any files that you had created while running the software
in DEMO MODE. Using the software in DEMO MODE is for testing only and should not be used for commercial purposes.
Please note that if you are rendering using multiple render nodes (i.e. different computers) then each computer would
need its own separate license.
Page | 9
Page 9

Known Issues and Limitations
The following known issues and limitations are associated with Calibrated MPEG2-X Create codec:
Calibrated MPEG2-X Create for Windows will crash if run on a computer system that does not support SSE3
instructions which were introduced in Pentium 4 processors circa 2004 (see the Windows Requirements section).
Calibrated MPEG2-X Create supports encoding to both 8-bit YUV422 – however it is up to the application
using Calibrated MPEG2-X Create to send that colorspace, HOWEVER it is up to the application using
Calibrated MPEG2-X Create to send 8-bit YUV422 to the codec. Please see the “Enable Colorspace
Watermark” in the Options Chapter to learn how to see what colorspace an application is sending to Calibrated
MPEG2-X Create, and also see the Windows Applications Chapter or Mac OSX Applications Chapter to learn
more about how to configure Calibrated MPEG2-X Create for popular applications.
Calibrated MPEG2-X Create does not convert frames from interlaced to progressive or vise-versa, please make
sure that you have selected the appropriate MPEG2-X ‘Compression Type’ to match the type of video frames you
will be encoding from.
Calibrated MPEG2-X Create does not convert the frame rate of video, please make sure that you have selected
the appropriate MPEG2-X ‘Compression Type’ to match the frame rate of the video you will be encoding from.
Please make sure that you have selected the appropriate MPEG2-X ‘Compression Type’ to match the resolution
of the video you will be encoding from.
You cannot choose the ‘QuickTime Movie’ export option in FCP 7 – please use the ‘Send to Compressor’
option in FCP 7 to export. If you try to export from FCP 7 using the ‘QuickTime Movie’ Option (i.e. not
using Compressor to export) then I-Frame only export works but Long-GOP exporting will give you an
error when trying to export. Also (for reasons unknown), pressing the ‘Advanced’ button in FCP 7 to get
the Options for the Calibrated MPEG2-X Create codec will crash FCP 7.
If you get a ‘codec error’ or ‘encode failure’ message when trying to encode from an application – usually that
means that the application you are encoding from does not support the colorspace you are trying to encode to (i.e
most likely 8-bit YUV422 colorspace), please see the Windows Application Chapter or the Mac OSX Application
chapter to see how to properly setup the Encode Options for different applications.
Various applications reading/writing from QuickTime can treat QuickTime Gamma differently (which can make
video seem brighter or darker) – please see the Windows Applications Chapter or Mac OSX Applications Chapter
to learn more about how to configure Calibrated MPEG2-X Create for popular applications.
Quicktime Framework cannot write files over 2GB to network volumes (AFP, SMB). Returns -1309
(fileBoundsErr).
Calibrated MPEG2-X Create is for encoding XDCAM MOV files only. To view or playback XDCAM .MOV files in
applications that support QuickTime, you need to have Calibrated{Q} XD Decode installed on your computer and
properly licensed. Some applications like Avid Media Composer (6.0 or greater) or Adobe CC applications should
be able to natively import the created MOV files
IMPORTANT FOR COMPRESSOR – always remember to set the ‘Field Version’ in the Options settings for the
version of Compressor that you are using if you are creating your own custom preset.
Encoding XDCAM .MOV files with a BitRate greater than 50Mb is not supported by Sony Cameras (i.e. would not
be able to view the native footage thru a Sony Camera or Deck)
Page | 10
Page 10

Windows Requirements and Installation
Ensure your PC meets the following requirements prior to installing Calibrated MPEG2-X Create:
Pentium 4 processor with SSE3 support or greater; recommended at least Intel Core 2 Duo with two cores or two
physical processors
32/64-bit Windows 7 or Vista (Business or Ultimate) or Windows 32-bit XP with SP3 (Win XP 64-bit is NOT
supported)
BETA Support for 32/64-bit Windows 8 - our software should work fine on Windows 8; however QuickTime Player
does not officially support Windows 8 yet.
QuickTime Player 7.6.6 or higher
Virtual OS is NOT supported
To view or playback XDCAM .MOV files in applications that support QuickTime, you need to have Calibrated{Q}
XD Decode installed on your computer and properly licensed. Some applications like Avid Media Composer (6.0
or greater) or Adobe CC applications should be able to natively import the created MOV files.
Calibrated MPEG2-X Create supports encoding from 8-bit YUV422 colorspace, HOWEVER it is up to the
application using Calibrated MPEG2-X Create to send that colorspace to the codec. Please see the
“Enable Colorspace Watermark” in the Options Chapter to learn how to see what colorspace an application is
sending to Calibrated MPEG2-X Create, and also see the Windows Applications Chapter or Mac OSX
Applications Chapter to learn more about how to configure Calibrated MPEG2-X Create for popular applications.
Installing on Windows
To install Calibrated MPEG2-X Create on a Windows Computer:
1. Quit any applications using QuickTime.
2. Run the Calibrated MPEG2-X Create Installer:
a. Microsoft Redistributables will be installed (if they don’t already exist on the computer)
b. A folder named Calibrated will be created in the [System Drive]\Program Files directory*. This Calibrated
folder will contain the Calibrated MPEG2-X Create Info application (CalibratedMPEG2XCreateInfo.exe),
presets and the Calibrated MPEG2-X Create User Guide.
c. The CalibratedMPEG2XCreate.qtx will be auto-copied to the [System Drive]\Program
Files\QuickTime\QTComponents directory. *
d. (On 64-bit computers with PPro) The ExpCalibratedMPEG2XCreateOP1a.prm will be installed to the plugins
directory of the highest version of Adobe products.
e. (On 64-bit computers) The SMDK-VC100-x64-4_5_1.dll will be auto-copied to the [System
Drive]/Windows/System32 directory.
3. Restart your computer
* For 64-bit Windows 7 or Vista, this will be the [System Drive]\Program Files (x86)\ directory
Page | 11
Page 11

Uninstalling on Windows
To uninstall Calibrated MPEG2-X Create on a Windows Computer:
1. If LICENSED, please use the Calibrated License Manager to DEACTIVATE your Software License before
uninstalling
2. Go to the Control Panel>Add/Remove Programs.
3. Select and uninstall Calibrated MPEG2-X Create from the list of programs.
4. Restart your computer.
Page | 12
Page 12

MAC OSX Requirements and Installation
Ensure your Mac meets the following requirements prior to installing Calibrated MPEG2-X Create:
MacIntel Computer Only; recommended at least Intel Core 2 Duo with two cores or two physical processors
Mac Intel with OSX 10.6.8(Snow Leopard) or 10.7.5(Lion) or 10.8.5(Mountain Lion) or 10.9.4 (Mavericks)
BETA Support ONLY for OS X 10.10 ( Yosemite )
QuickTime Player 7.6.6 or higher
To view or playback XDCAM .MOV files in applications that support QuickTime, you need to have either FCP7,
FCP X, or Calibrated{Q} XD Decode installed on your computer and properly licensed. Some applications like
Avid Media Composer (6.0 or greater) or Adobe CC applications should be able to natively import the created
MOV files
Calibrated MPEG2-X Create supports encoding from 8-bit YUV422 colorspace, HOWEVER it is up to the
application using Calibrated MPEG2-X Create to send that colorspace to the codec. Please see the
“Enable Colorspace Watermark” in the Options Chapter to learn how to see what colorspace an application is
sending to Calibrated MPEG2-X Create, and also see the Windows Applications Chapter or Mac OSX
Applications Chapter to learn more about how to configure Calibrated MPEG2-X Create for popular applications.
You cannot choose the ‘QuickTime Movie’ export option in FCP 7 – please use the ‘Send to Compressor’
option in FCP 7 to export. If you try to export from FCP 7 using the ‘QuickTime Movie’ Option (i.e. not
using Compressor to export) then I-Frame only export works but Long-GOP exporting will give you an
error when trying to export. Also (for reasons unknown), pressing the ‘Advanced’ button in FCP 7 to get
the Options for the Calibrated MPEG2-X Create codec will crash FCP 7.
Page | 13
Page 13

Installing on Mac OSX
To install Calibrated MPEG2-X Create on a Mac Computer:
1. Quit any applications using QuickTime.
2. Run the Calibrated MPEG2-X Create Installer:
a. A folder named Calibrated will be created in the /Applications directory. This Calibrated folder will contain
the Calibrated MPEG2-X Create Options application (CalibratedMPEG2XCreateInfo.app will be located in the
/Applications/Calibrated/Applications/Options folder), presets, and the Calibrated MPEG2-X Create User
Guide.
b. The CalibratedMPEG2XCreate.component will be auto-copied to the “/Library/QuickTime” directory.
c. The ExpCalibratedMPEG2XCreateOP1a.prm will be installed to the plugins directory of the highest version of
Adobe products.
d. The CalibratedMPEG2XCreatePlugin.plugin will be installed to the /Library/Application Support/Apple
QMaster directory.
3. Please run the Presets installer to install exporting presets for Compressor 3.5 or Compressor 4.1
4. Restart your computer
Page | 14
Page 14

Uninstalling on Mac OSX
To uninstall Calibrated MPEG2-X Create on a Mac OSX Computer:
1. If LICENSED, please use the Calibrated License Manager to DEACTIVATE your Software License before
uninstalling
2. If no other Calibrated Software is installed, then delete the directory:
/Applications/Calibrated
then skip Step 2 and go to Step 3
3. If other Calibrated Software is installed, then only delete:
a. /Applications/Calibrated/Applications/Options/CalibratedMPEG2XCreateInfo.app
b. /Applications/Calibrated/Plugins/QuickTime/CalibratedMPEG2XCreate.component
c. /Applications/Calibrated/Docs/ Calibrated-MPEG2-X-Create-UserGuide.pdf
d. /Applications/Calibrated/Plugins/PPro/ ExpCalibratedMPEG2XCreateOP1a.prm
e. /Applications/Calibrated/Plugins/Compressor/CalibratedMPEG2XCreatePlugin.plugin
4. Delete the files:
/Library/QuickTime/ CalibratedMPEG2XCreate.component
/Library/Application Support/Apple QMaster/CalibratedMPEG2XCreatePlugin.plugin
/Library/Application Support/Adobe/Common/Plug-ins/7.0/ ExpCalibratedMPEG2XCreateOP1a.prm
IMPORTANT - that’s the Library folder on the Main Harddrive (i.e. the root folder) NOT the Library folder in your
User Directory – and you must manually go to this folder and delete the component as Spotlight may not index
System Folders.
5. Restart your computer.
Page | 15
Page 15

2
MOV Encode Options
Overview
This chapter describes the settings available in the Calibrated MPEG2-X Create Options interface.
Important Note: The stand-alone Calibrated MPEG2-X Create Info application is used to let you know whether the
software is running in DEMO MODE or LICENSED and where to download the latest version – all of the encoding options
for Calibrated MPEG2-X Create QuickTime codec can only be set within the application using Calibrated MPEG2-X
Create codec – look for a ‘settings’ or ‘options’ button in the application using the codec. Please see the ‘Windows
Applications’ or ‘Mac OSX Applications’ chapter for more details.
Options Interface
The Calibrated MPEG2-X Create Options interface contains the version number of the currently installed Calibrated
MPEG2-X Create and indicates whether the codec is running in DEMO MODE or LICENSED MODE, and where to
download the latest version.
Please note that the encode options are not global but local to the specific application and instance of when you are using
the codec. Important Note: The options can only be set from within the application that is using Calibrated MPEG2-X
Create – look for a ‘settings’ or ‘options’ button in the application. You should always set the options of Calibrated
MPEG2-X Create in the application BEFORE every encode, please see the ‘Windows Applications’ or ‘Mac OSX
Applications’ chapter for more details.
You can control the bitrate by using the quality slider in the QuickTime export window.
Quality 20 or less is 50Mb
Quality 21 to 40 is 80Mb
Quality 41 to 60 is 100Mb
Quality 61 to 70 is 140Mb
Quality 71 to 80 is 180Mb
Quality 81 to 90 is 220Mb
Quality 91 and greater is 280Mb
**DEMO MODE Limitation - Calibrated MPEG2-X Create will have watermarks of the Calibrated MPEG2-X Create Logo burned into any encoded video
when running in DEMO MODE. This is the only DEMO MODE limitation – everything else is fully functional. The burned in DEMO MODE watermarks
cannot be removed from the encoded video. After ordering and licensing Calibrated MPEG2-X Create you will have to re-encode any files that
you had created while running the software in DEMO MODE. Using the software in DEMO MODE is for testing only and should not be used for
commercial purposes.
Page | 16
Page 16
Version
The version box shows the version of Calibrated MPEG2-X Create you are running and it display a webpage link of where
to download the latest version.
License
The license box is where you see your Software License status. It will display a green LICENSED if you are properly
licensed. Please note that the stand-alone Calibrated License Manager application is used to license the software.
Please see the ‘Software License’ chapter in this User Guide for more information.
**DEMO MODE Limitation - Calibrated MPEG2-X Create will have watermarks of the Calibrated MPEG2-X Create Logo
burned into any encoded video when running in DEMO MODE. This is the only DEMO MODE limitation – everything else
is fully functional. The burned in DEMO MODE watermarks cannot be removed from the encoded video. After
ordering and licensing Calibrated MPEG2-X Create you will have to re-encode any files that you had created while
running the software in DEMO MODE. Using the software in DEMO MODE is for testing only and should not be used for
commercial purposes.
Page | 17
Page 17

The following encode options are available for Calibrated MPEG2-X Create
Important Note: The options can only be set from within the application that is using Calibrated MPEG2-X Create – look
for a ‘settings’ or ‘options’ button in the application. You may have to set the options of Calibrated MPEG2-X Create in
the application BEFORE every encode depending on the application using the codec, please see the ‘Windows
Applications’ or ‘Mac OSX Applications’ chapter for more details.
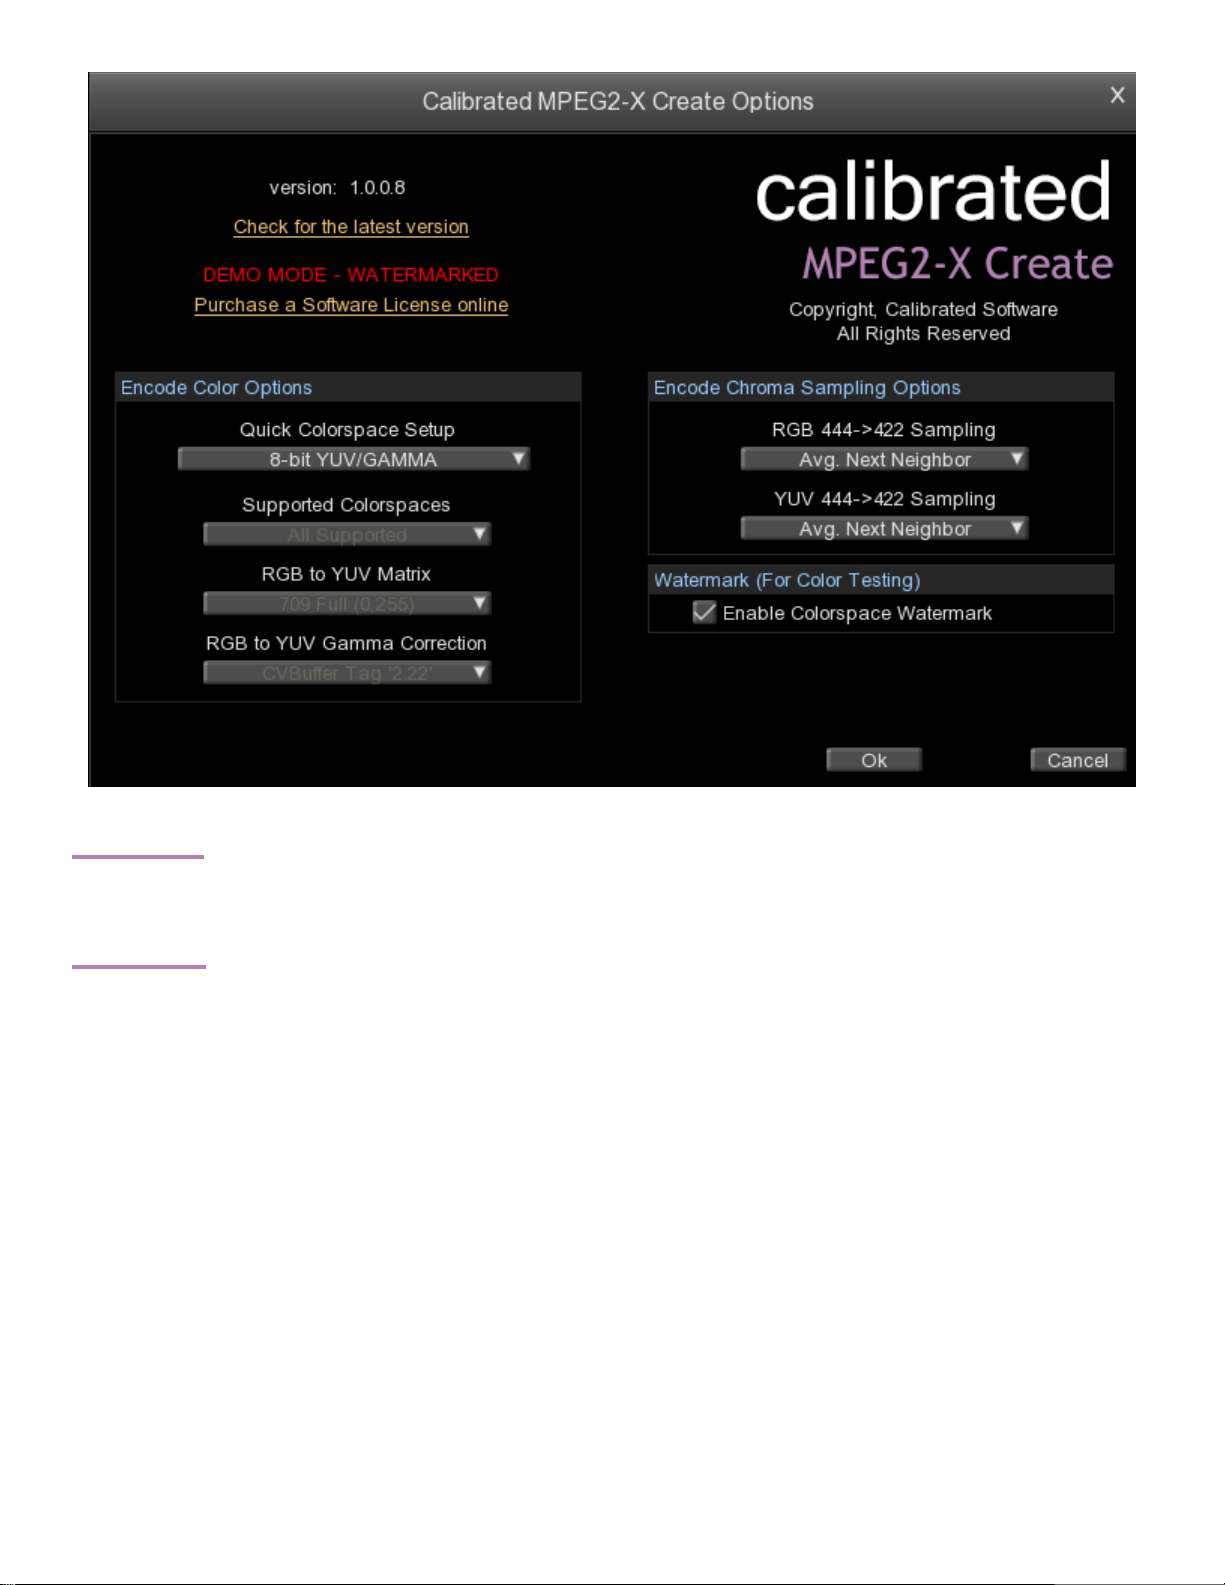
Encode Options
Quick Colorspace Setup
These are the following quick setup options - please see the ‘Windows Applications’ or ‘Mac OSX Applications’
chapter to see which setup is best for your application. Some applications may not export and give a codec error
if a Colorspace is selected that the application does not support – usually this happens with 8-bit YUV422
Custom – this setup enables you to
8-bit YUV 422/Gamma – this setup requests incoming video frames to be 8-bit YUV 422 with a 2.22 Gamma.
8-bit YUV 422 – this setup requests incoming video frames to be 8-bit YUV 422 with a Source Gamma (i.e
disregards Gamma).
8-bit RGB/FULL/GAMMA – this setup requests incoming video frames to be 8-bit RGB with a 2.22 Gamma – the
8-bit RGB->8-bit YUV conversion is done using the 709 FULL RANGE Matrix.
8-bit RGB/FULL - this setup requests incoming video frames to be 8-bit RGB with a Source Gamma (i.e.
disregards Gamma) – the 8-bit RGB->8-bit YUV conversion is done using the 709 FULL RANGE Matrix.
8-bit RGB/SMPTE - this setup requests incoming video frames to be 8-bit RGB with a Source Gamma (i.e.
disregards Gamma) – the 8-bit RGB->8-bit YUV conversion is done using the 709 SMTPE RANGE Matrix.
Supported Colorspaces
There are five Colorspace options:
“All Supported” –8-bit YUV422, and 8-bit RGB(A) 444(4) are requested colorspaces – please note though that
when requesting all supported colorspaces that this can cause an application to report a ‘codec error’ if that
application does not support 8-bit YUV422 exporting.
"8bit YUV & 8bit RGB" – 8-bit YUV422 and 8-bit RGB(A) 444(4) are requested colorspaces – please note
though that when requesting these colorspaces that this can cause QuickTime to internally convert 8-bit RGB to
8-bit YUV422 if an application sends 8-bit RGB video frames – the internal RGB->YUV conversion by QuickTime
may introduce unintended Gamma changes/corrections (this may vary from application to application and also
depends on the RGB to YUV Gamma Correction setting too)
"8bit RGB" - 8bit RGB(A) 444(4) is the requested colorspace
Page | 18
Page 18

RGB to YUV Matrix
Setting the YUV Matrix enables you to control how RGB is converted to YUV.
There are four RGB to YUV Matrix options:
601 SMPTE (16,235)
601 Full (0,255)
709 SMPTE (16,235)
709 Full (0,255) (DEFAULT)
Generally, 601 equations are used for SD video and 709 equations are used for HD video.
The Full option (the default value) converts RGB, which has black-white levels of 0-255 (0-65536 for 16-bit RGB), to YUV
with black-white levels of 16-235 (64-940 for 10-bit YUV). The SMPTE option will convert RGB to YUV with black-white
levels of 16-235 (64-940 for 10-bit YUV). The Full option is usually the preferred workflow option since RGB is viewed at
having a black/white level of 0-255 for 8-bit RGB material (0-65536 for 16-bit RGB) in most applications. Using the
SMPTE option, users can preserve the super black/white values of YUV data when converting from RGB, but this option
should only be used for specific workflows where you are working with RGB data in the SMPTE range.
Important Note: The RGB to YUV Matrix setting will ONLY be used if an application sends RGB data to the code. If an
application sends YUV data for a video frame then the RGB to YUV Matrix setting will have no effect on the YUV data
being handed to the codec for encoding.
Page | 19
Page 19

444 to 422 Chroma Sampling
There are two options:
Duplicate Values
Average Next Neighbors (DEFAULT)
This controls how chroma is interpolated when converting from RGB 444 -> YUV 422. ‘Average Neighbors’ will produce
smoother colors when converting; ‘Duplicate Values’ was added to essentially ‘turn off’ the averaging.
Important Note: The 444 to 422 Chroma Sampling setting will ONLY be used if an application sends RGB data to the
code. If an application sends YUV data for a video frame then the 444 to 422 Chroma Sampling setting will have no
effect on the YUV data being handed to the codec for encoding.
RGB to YUV Gamma Correction
This settings enables you to control how Gamma is handled when converting RGB to YUV.
There are four options:
Off – all Gamma Correction is turned off and the Source Gamma is used from the incoming frame.
CVBuffer Tag '2.22' – The video buffer is ‘tagged’ with 2.22 – this means that QuickTime will auto-correct
incoming video frames to 2.22 Gamma.
CPU Gamma 1.8->2.22 – Source Gamma is requested from the incoming RGB Video Frame; however when
converting from RGB->YUV via CPU a 1.8 to 2.22 Gamma Correction is applied. (1.8 is QuickTime Apple
Platform Gamma for RGB)
CPU Gamma 2.5->2.22 – Source Gamma is requested from the incoming RGB Video Frame; however when
converting from RGB->YUV via CPU a 2.5 to 2.22 Gamma Correction is applied. (2.5 is QuickTime Windows
Platform Gamma for RGB)
Watermark (For Color Testing)
This option watermarks the video in the almost-top-left corner ( the watermark is adjusted about 400 pixels in from the left
side so that it is not covered up by watermarks from our Decode codecs) – it is IMPORTANT to disable this option when
doing real work as the watermark will be a part of the encoded video – this option is just meant for quick checks for the
user to see what colorspace Calibrated MPEG2-X Create is being handed by the calling application. The watermark is a
black rectangle. The top text will be 8-bit YUV422 – this indicates what the XDCAM video was encoded as. The bottom
text will either say Received 8-bit YUV422, Received 8-bit RGB444, or Received 8-bit RGBA4444 – this indicates the
colorspace of the video frame that the calling application is sending to be encoded.
Page | 20
Page 20

3
Windows Applications
Overview
This chapter describes using Calibrated MPEG2-X Create for Windows in a few popular Windows applications.
Important Note: The Calibrated MPEG2-X Create options page can only be accessed from within the application that is
using Calibrated MPEG2-X Create – look for a ‘settings’ or ‘options’ button in the application - You may have to set the
options of Calibrated MPEG2-X Create in the application before every encode.
When encoding, please select the MPEG2-X Compression Type that best matches your project/sequence settings:
XDCAM Long-GOP at 50Mb, 80Mb, 100Mb, 140Mb, 180Mb, 220Mb, 280Mb
“Calibrated MPG2X LG 1080i29.97” – FourCC ‘xd5b’ - 1920x1080 interlaced footage at 29.97fps
“Calibrated MPG2X LG 1080i25” – FourCC ‘xd5c’ - 1920x1080 interlaced footage at 25fps
“Calibrated MPG2X LG 1080p59.94” – FourCC ‘xdh2’ - 1920x1080 progressive footage at 59.94fps
“Calibrated MPG2X LG 1080p50” – FourCC ‘xdh2’ - 1920x1080 progressive footage at 50fps
“Calibrated MPG2X LG 1080p29.97” – FourCC ‘xd5f’ - 1920x1080 progressive footage at 29.97fps
“Calibrated MPG2X LG 1080p25” – FourCC ‘xd5e’ - 1920x1080 progressive footage at 25fps
“Calibrated MPG2X LG 1080p23.976” – FourCC ‘xd5d’ - 1920x1080 progressive footage at 23.976fps
“Calibrated MPG2X LG 720p59.94” – FourCC ‘xd59’ - 1280x720 progressive footage at 59.94fps
“Calibrated MPG2X LG 720p50” – FourCC ‘xd5a’ - 1280x720 progressive footage at 50fps
“Calibrated MPG2X LG 720p29.97” – FourCC ‘xd51’ - 1280x720 progressive footage at 29.97fps
“Calibrated MPG2X LG 720p25” – FourCC ‘xd55’ - 1280x720 progressive footage at 25fps
“Calibrated MPG2X LG 720p23.976” – FourCC ‘xd54’ - 1280x720 progressive footage at 23.976fps
XDCAM I-Frame Only at 50Mb, 80Mb, 100Mb, 140Mb, 180Mb, 220Mb, 280Mb
“Calibrated MPG2X I 1080i29.97” – FourCC ‘xd5b’ - 1920x1080 interlaced footage at 29.97fps
“Calibrated MPG2X I 1080i25” – FourCC ‘xd5c’ - 1920x1080 interlaced footage at 25fps
“Calibrated MPG2X I 1080p59.94” – FourCC ‘xdh2’ - 1920x1080 progressive footage at 59.94fps
“Calibrated MPG2X I 1080p50” – FourCC ‘xdh2’ - 1920x1080 progressive footage at 50fps
“Calibrated MPG2X I 1080p29.97” – FourCC ‘xd5f’ - 1920x1080 progressive footage at 29.97fps
“Calibrated MPG2X I 1080p25” – FourCC ‘xd5e’ - 1920x1080 progressive footage at 25fps
“Calibrated MPG2X I 1080p23.976” – FourCC ‘xd5d’ - 1920x1080 progressive footage at 23.976fps
“Calibrated MPG2X I 720p59.94” – FourCC ‘xd59’ - 1280x720 progressive footage at 59.94fps
“Calibrated MPG2X I 720p50” – FourCC ‘xd5a’ - 1280x720 progressive footage at 50fps
“Calibrated MPG2X I 720p29.97” – FourCC ‘xd51’ - 1280x720 progressive footage at 29.97fps
“Calibrated MPG2X I 720p25” – FourCC ‘xd55’ - 1280x720 progressive footage at 25fps
“Calibrated MPG2X I 720p23.976” – FourCC ‘xd54’ - 1280x720 progressive footage at 23.976fps
You can control the bitrate by using the quality slider in the QuickTime export window.
Quality 20 or less is 50Mb
Quality 21 to 40 is 80Mb
Quality 41 to 60 is 100Mb
Quality 61 to 70 is 140Mb
Quality 71 to 80 is 180Mb
Quality 81 to 90 is 220Mb
Quality 91 and greater is 280Mb
Page | 21
Page 21

Adobe After Effects CS6/CC/CC2014 - MOV
Getting Started
1. Please make sure you have QuickTime Player 7.6 or 7.7 installed
2. IMPORTANT: Please make sure you have the Adobe Performance booster installed: This modified Adobe XML
file is necessary to export at the proper 8-bit YUV422 color levels in Adobe After Effects. You can learn
more and download it by clicking here.
3. To preserve the maximum bit depth, please make sure you have the ‘Preview’ in the After Effects ‘Composition
Settings’ to UNCHECKED.
Output Module Settings for 8-bit YUV422 Export in AE
1. [Optional] – if you are working with an interlaced project and exporting to an interlaced compression type,
please be sure to set the ‘Field Render’ properly in the ‘Render Settings’ of the Render Queue in AE
2. In the ‘Output Module Settings’, please choose ‘QuickTime’ for the format
3. Make sure the Depth is set to ‘Millions of Colors’
4. Click on the ‘Format Options’ button and the ‘QuickTime Options’ window will pop-up
a. Choose the Calibrated MPEG2-X Create Compression Type that best matches your Composition Settings in
the ‘Video Codec’ drop down menu. (Please see the ‘Overview’ section at the beginning of this chapter to see
what Compression Type matches best with your Composition Settings)
b. Make sure the ‘Quality’ slider is set to the bitrate you wish to encode to
c. Make sure the Width/Height is set to either 1920x1080 or 1280x720 and PAR is at Square Pixels (1.0)
d. Press the ‘Ok’ button in the ‘QuickTime Options’ window and the window will close
5. And you’re ready to render
Page | 22
Page 22

Adobe Premiere Pro CS6/CC/CC2014 - MOV
Getting Started
1. Please make sure you have QuickTime Player 7.6 or 7.7 installed
2. Please make sure you have the Adobe Performance booster installed: This modified Adobe XML file is
necessary to properly export at 8-bit YUV422 in all versions of Adobe Premiere Pro. You can learn more and
download it by clicking here.
3. To preserve the maximum bit depth, please make sure you have the ‘Maximum Bit Depth’ and ‘Maximum Render
Quality’ CHECKED in the Premiere Pro ‘Sequence Settings’.
4. You can then choose to either manually configure the export setting or you can use one of our pre-built preset to
configure the export settings.
Using a Preset Setting for 8-bit YUV422 Export in PPro
1. Calibrated MPEG2-X Create ships with pre-configured Adobe Export Presets that can be used in Premiere
Pro/AME CS6.0 o greater. If you’d like to manually configure the export in PPro, please go to the next section
Manually configuring for 8-bit YUV422 Export in PPro
2. In the ‘Export Settings’, please choose ‘QuickTime’ for the format
3. If you’ve already installed the preset that you want to use just choose it from the ‘Preset’ drop-down menu and
skip to step 5. If you haven’t installed the preset you want to use please go to step 4 on how to import a preset.
4. To import the preset you want to use - press the ‘Import Preset’ button on the Adobe Export Panel - the ‘Import
Preset’ button is circled in red in the picture below
In the window that pops-up, please go to the below folder and choose the preset best matches your Sequence
Settings. There is also ReadMe PDF in the below folders that describes the presets to help you better choose.
Mac OSX: /Applications/Calibrated/Presets/MPEG2X Create/PPro/QuickTime – CC – CC2014
Windows 64-bit*: [System Drive]:\Program Files (x86)\Calibrated\Presets\MPEG2X Create\PPro\ QuickTime – CC – CC2014
*on Windows 32-bit OS use the ‘Program Files’ folder
Please choose presets for CS6 from the folder ‘QuickTime – CS6’ for CS6
5. Click on the ‘Video’ Tab in the ‘Export Settings’
a. Make sure that ‘Use Maximum Render Quality’ is CHECKED
b. Make sure that ‘Use Previews’ is NOT CHECKED
6. And you’re ready to export
Page | 23
Page 23

Manually configuring for 8-bit YUV422 Export in PPro
1. In the ‘Export Settings’, please choose ‘QuickTime’ for the format
2. Click on the ‘Video’ Tab in the ‘Export Settings’
a. Choose the Calibrated MPEG2-X Create Compression Type that best matches your Sequence Settings in the
‘Video Codec’ drop down menu. (Please see the ‘Overview’ section at the beginning of this chapter to see
what Compression Type matches best with your Sequence Settings)
b. Make sure the ‘Quality’ slider is set to the bitrate you want to export to
c. Make sure the Width/Height are at either 1920x1080 or 1280x720 and PAR is at Square Pixels (1.0)
d. Make sure the Field Type matches the Calibrated MPEG2-X Compression Type you are exporting to -choose
‘Upper First’ for interlaced compression types or ‘Progressive’ for progressive compression types.
e. Make sure the ‘Frame Rate’ matches the Calibrated MPEG2-X Compression Type you are exporting to –
please see the ‘Overview’ section at the beginning of this chapter to see the proper frame rates for the
different MPEG2-X Compression Types.
f. Make sure that ‘Render at Maximum Depth’ is CHECKED
g. Make sure that the Bit Depth is set to ’24 bit’
h. Make sure that ‘Use Maximum Render Quality’ is CHECKED
i. Make sure that ‘Use Previews’ is NOT CHECKED
3. And you’re ready to export
Page | 24
Page 24

Adobe Media Encoder CS6/CC/CC2014 - MOV
Getting Started
1. Please make sure you have QuickTime Player 7.6 or 7.7 installed
2. Please make sure you have the Adobe Performance booster installed: This modified Adobe XML file is
necessary to properly export at 8-bit YUV422 in all versions of Adobe Premiere Pro. You can learn more and
download it by clicking here.
3. Exporting an Adobe Premiere Pro Project or Sequence from AME: To preserve the maximum bit depth,
please make sure you have the ‘Maximum Bit Depth’ and ‘Maximum Render Quality’ CHECKED in the Premiere
Pro ‘Sequence Settings’ for any sequence in the Premiere Pro Project.
4. Exporting an After Effects Composition from AME: To preserve the maximum bit depth, please make sure you
have the ‘Preview’ in the After Effects ‘Composition Settings’ to UNCHECKED.
5. You can then choose to either manually configure the export setting or you can use one of our pre-built preset to
configure the export settings.
Using a Preset Setting for 8-bit YUV422 Export in AME
1. Calibrated MPEG2-X Create ships with pre-configured Adobe Export Presets that can be used in Premiere
Pro/AME CS6 or greater. If you’d like to manually configure the export in AME, please go to the next section
Manually configuring for 8-bit YUV422 Export in AME
2. In the ‘Export Settings’, please choose ‘QuickTime’ for the format
3. If you’ve already installed the preset that you want to use just choose it from the ‘Preset’ drop-down menu and
skip to step 6. If you haven’t installed the preset you want to use please go to step 4 on how to import a preset.
4. Right-click on the source you are exporting from AME and from the drop-down menu choose’ Export Settings’ for
the Adobe Export Panel window to appear. To import the preset you want to use - press the ‘Import Preset’ button
on the Adobe Export Panel - the ‘Import Preset’ button is circled in red in the picture below
In the window that pops-up, please go to the below folder and choose the preset best matches your Sequence
Settings. There is also ReadMe PDF in the below folders that describes the presets to help you better choose.
Mac OSX: /Applications/Calibrated/Presets/MPEG2X Create/PPro/QuickTime – CC – CC2014
Windows 64-bit*: [System Drive]:\Program Files (x86)\Calibrated\Presets\MPEG2X Create\PPro\ QuickTime – CC – CC2014
*on Windows 32-bit OS use the ‘Program Files’ folder
Please choose presets for CS6 from the folder ‘QuickTime – CS6’ for CS6
5. Click on the ‘Video’ Tab in the ‘Export Settings’
a. Make sure that ‘Use Maximum Render Quality’ is CHECKED
b. Make sure that ‘Use Previews’ is NOT CHECKED
6. And you’re ready to export
Page | 25
Page 25

Manually configuring for 8-bit YUV422 Export in AME
1. Right-click on the source you are exporting from AME and from the drop-down menu choose’ Export Settings’ for
the Adobe Export Panel window to appear. In the ‘Export Settings’, please choose ‘QuickTime’ for the format
2. Click on the ‘Video’ Tab in the ‘Export Settings’
a. Choose the Calibrated MPEG2-X Create Compression Type that best matches your Sequence Settings in the
‘Video Codec’ drop down menu. (Please see the ‘Overview’ section at the beginning of this chapter to see
what Compression Type matches best with your Sequence Settings)
b. Make sure the ‘Quality’ slider is set to the bitrate you wish to encode to
c. Make sure the Width/Height are at either 1920x1080 or 1280x720 and PAR is at Square Pixels (1.0)
d. Make sure the Field Type matches the Calibrated MPEG2-X Compression Type you are exporting to -choose
‘Upper First’ for interlaced compression types or ‘Progressive’ for progressive compression types.
e. Make sure the ‘Frame Rate’ matches the Calibrated MPEG2-X Compression Type you are exporting to –
please see the ‘Overview’ section at the beginning of this chapter to see the proper frame rates for the
different MPEG2-X Compression Types.
f. Make sure that ‘Render at Maximum Depth’ is CHECKED
g. Make sure that the Bit Depth is set to ’24 bit’
h. Make sure that ‘Use Maximum Render Quality’ is CHECKED
i. Make sure that ‘Use Previews’ is NOT CHECKED
3. And you’re ready to export
Page | 26
Page 26

Avid Media Composer 6.0 & Greater - MOV
Getting Started
1. Please make sure you have QuickTime Player 7.6 or 7.7 installed
2. IMPORTANT: Please note that Avid Media Composer appears to only export thru QuickTime using 8-bit RGB
colorspace which will be converted to 8-bit YUV422 and then encoded to XDCAM in Calibrated MPEG2-X Create.
Export Settings
1. In the ‘Export As’, please choose ‘QuickTime Movie’ for the format
2. Click on the ‘Custom’ Option and then press the ‘Format Options…’ button
a. The QuickTime ‘Movie Settings’ window will pop-up – press the ‘Settings…’ button in the Video section and
the ‘Standard Video Compression Settings’ window will pop-up
b. Choose the Calibrated MPEG2-X Create Compression Type that best matches your Sequence Settings in the
‘Compression Type’ drop down menu. (Please see the ‘Overview’ section at the beginning of this chapter to
see what Compression Type matches best with your Sequence Settings)
c. Press the ‘Codec Settings’ button and the Calibrated MPEG2-X Create Options window will pop-up, click on
the word ‘options’ in the window and make sure the EITHER ‘8-bit RGB/FULL’ OR ‘8-bit RGB/SMPTE’ (
please see 3.c below) is selected for the ‘Quick Colorspace Setup’ and then press the ‘Ok’ button and the
Calibrated MPEG2-X Create Options window will close.
d. Click the OK button on both the ‘Standard Video Compression Settings’ window and the ‘Movie Settings’
window for them to close.
3. In the Video Format Settings:
a. Make sure the Width/Height are at either 1920x1080 or 1280x720 (please pick the resolution that matches
your Compression Type).
b. Make sure that the ‘Display Aspect Ratio’ is set to ‘Native Dimensions’
c. For Interlaced Projects - Make sure the File Field Order matches the Calibrated MPEG2-X Compression
Type you are exporting to - choose ‘Odd (Upper Field Firs)t’ for interlaced compression types
d. COLOR LEVELS – if you selected ‘8-bit RGB/FULL’ in 2.c above please choose ‘RGB” for your Color Level
– if you selected ‘8-bit RGB/SMPTE’ in 2.c above please choose ‘601/709” for your Color Level.
4. And you’re ready to export
Page | 27
Page 27

QuickTime Player Pro 7.6/7.7 - MOV
To export to any format you need to have QuickTime Player Pro 7.6/7.7 from Apple – HOWEVER – due to differences in
how QuickTime Gamma is handled with different QuickTime codecs it is RECOMMENDED that you do NOT use
QuickTime Player Pro 7.6/7.7 for exporting using Calibrated MPEG2-X Create for Windows.
Page | 28
Page 28

Adobe After Effects CC/CC2014 - MXF
Getting Started
1. Please make sure you have AME CC or AME CC2014 is installed. ( Exporting from AE CS6 is not supported)
Exporting
1. When exporting from an AE Composition, please choose the ‘Add to Adobe Media Encoder Queue…’
2. See the AME section for rest of details on exporting
Page | 29
Page 29

Adobe AME & Premiere Pro CS6/CC/CC2014 - MXF
Getting Started
Please make sure you have ExpCalibratedMPEG2XCreateOP1a.prm installed in the Adobe\Common\Plugins\7.0\ for CC/CC2014 support, and in the Adobe\Common\Plug-ins\6.0\MediaCore directory for CS6 support.
MPEG2-X MXF Export in PPro/AME
1. In the ‘Export Settings’, please choose the format ‘Calibrated OP1a MPEG2-X MXF’
2. Click on the ‘Video’ Tab in the ‘Export Settings’ (see picture below)
a. The ‘Video Codec’ should automatically be set to the Resolution and FrameRate that best matches your
Sequence Settings.
b. The ‘Video BitRate’ will be automatically set to 180Mb and I-frame only.
c. Make sure the # Rendering Procs is set to ‘Maximum’ - this means our plugin will use all processors on the
computer for encoding. When set to ‘Medium’ then our plugin will use half the number of processors and
when set to ‘Minimum’ then our plugin will use 2 processors.
d. Make sure that ‘Use Maximum Render Quality’ is CHECKED if you want the best render quality from Adobe;
however exports could take a little longer.
e. Make sure that ‘Use Previews’ is NOT CHECKED if you want the best render quality from Adobe; however
exports could take a little longer.
3. Click on the ‘Audio’ Tab in the ‘Export Settings’ (see picture below)
a. The ‘Audio Codec’ should automatically be set to Uncompressed
b. The ‘Sample Rate’ should be set to 48000 Hz
c. In CC/CC2014 - The ‘Channels’ should be set to the number of channels that closet matches your Sequence
Settings IMPORTANT: For CS6, the number of channels always defaults to 2.
d. The ‘Sample Size’ will always default to 16-bit audio. Please choose ’24-bit’ for 24 bit audio.
4. Click on the ‘MetaData Tab in the ‘Export Settings’ (see picture below)
a. In the ‘TimeCode’ section you can override the TimeCode that the plugin will use for the exported file. By
default, the plugin will use the TimeCode given to it by PPro/AME, but you can CHECK the ‘Override
Sequence TimeCode’ to enter in a new TimeCode to use.
b. The ‘MXF MetaData’ section will enable you to enter in MetaData for the MXF file. By default, the values of
[Empty] mean not to use that MetaData.
5. And you’re ready to export
Page | 30
Page 30

‘Video Tab’ in the ‘Export Settings’ for PPro/AME CC
‘Audio Tab’ in the ‘Export Settings’ for PPro/AME CC
Page | 31
Page 31

‘MetaData Tab’ in the ‘Export Settings’ for PPro/AME CC
Page | 32
Page 32

Other Windows applications
When encoding XDCAM MOV files from other Windows applications, please be aware of the following:
1. Even though Calibrated MPEG2-X Create supports encoding from 8-bit YUV422 colorspace, it is up to the
application using Calibrated MPEG2-X Create to send that colorspace to the codec. From our research, many
applications only support 8-bit RGB(A) colorspaces when encoding to a MOV file.
2. Various applications reading/writing from QuickTime can treat QuickTime Gamma differently (which can make
video seem brighter or darker).
3. Calibrated MPEG2-X Create does not convert frames from interlaced to progressive or vise-versa, please make
sure that you have selected the appropriate MPEG2-X ‘Compression Type’ to match the type of video frames you
will be encoding from.
4. Calibrated MPEG2-X Create does not convert the frame rate of video, please make sure that you have selected
the appropriate MPEG2-X ‘Compression Type’ to match the frame rate of the video you will be encoding from.
5. Always make sure that you have selected the appropriate MPEG2-X ‘Compression Type’ to match the resolution
of the video you will be encoding from.
Page | 33
Page 33

Mac OSX Applications
4
Overview
This chapter describes using Calibrated MPEG2-X Create for Windows in a few popular Windows applications.
Important Note: The Calibrated MPEG2-X Create options page can only be accessed from within the application that is
using Calibrated MPEG2-X Create – look for a ‘settings’ or ‘options’ button in the application - You may have to set the
options of Calibrated MPEG2-X Create in the application before every encode.
When encoding, please select the MPEG2-X Compression Type that best matches your project/sequence settings:
XDCAM Long-GOP at 50Mb, 80Mb, 100Mb, 140Mb, 180Mb, 220Mb, 280Mb
“Calibrated MPG2X LG 1080i29.97” – FourCC ‘xd5b’ - 1920x1080 interlaced footage at 29.97fps
“Calibrated MPG2X LG 1080i25” – FourCC ‘xd5c’ - 1920x1080 interlaced footage at 25fps
“Calibrated MPG2X LG 1080p59.94” – FourCC ‘xdh2’ - 1920x1080 progressive footage at 59.94fps
“Calibrated MPG2X LG 1080p50” – FourCC ‘xdh2’ - 1920x1080 progressive footage at 50fps
“Calibrated MPG2X LG 1080p29.97” – FourCC ‘xd5f’ - 1920x1080 progressive footage at 29.97fps
“Calibrated MPG2X LG 1080p25” – FourCC ‘xd5e’ - 1920x1080 progressive footage at 25fps
“Calibrated MPG2X LG 1080p23.976” – FourCC ‘xd5d’ - 1920x1080 progressive footage at 23.976fps
“Calibrated MPG2X LG 720p59.94” – FourCC ‘xd59’ - 1280x720 progressive footage at 59.94fps
“Calibrated MPG2X LG 720p50” – FourCC ‘xd5a’ - 1280x720 progressive footage at 50fps
“Calibrated MPG2X LG 720p29.97” – FourCC ‘xd51’ - 1280x720 progressive footage at 29.97fps
“Calibrated MPG2X LG 720p25” – FourCC ‘xd55’ - 1280x720 progressive footage at 25fps
“Calibrated MPG2X LG 720p23.976” – FourCC ‘xd54’ - 1280x720 progressive footage at 23.976fps
XDCAM I-Frame Only at 50Mb, 80Mb, 100Mb, 140Mb, 180Mb, 220Mb, 280Mb
“Calibrated MPG2X I 1080i29.97” – FourCC ‘xd5b’ - 1920x1080 interlaced footage at 29.97fps
“Calibrated MPG2X I 1080i25” – FourCC ‘xd5c’ - 1920x1080 interlaced footage at 25fps
“Calibrated MPG2X I 1080p59.94” – FourCC ‘xdh2’ - 1920x1080 progressive footage at 59.94fps
“Calibrated MPG2X I 1080p50” – FourCC ‘xdh2’ - 1920x1080 progressive footage at 50fps
“Calibrated MPG2X I 1080p29.97” – FourCC ‘xd5f’ - 1920x1080 progressive footage at 29.97fps
“Calibrated MPG2X I 1080p25” – FourCC ‘xd5e’ - 1920x1080 progressive footage at 25fps
“Calibrated MPG2X I 1080p23.976” – FourCC ‘xd5d’ - 1920x1080 progressive footage at 23.976fps
“Calibrated MPG2X I 720p59.94” – FourCC ‘xd59’ - 1280x720 progressive footage at 59.94fps
“Calibrated MPG2X I 720p50” – FourCC ‘xd5a’ - 1280x720 progressive footage at 50fps
“Calibrated MPG2X I 720p29.97” – FourCC ‘xd51’ - 1280x720 progressive footage at 29.97fps
“Calibrated MPG2X I 720p25” – FourCC ‘xd55’ - 1280x720 progressive footage at 25fps
“Calibrated MPG2X I 720p23.976” – FourCC ‘xd54’ - 1280x720 progressive footage at 23.976fps
You can control the bitrate by using the quality slider in the QuickTime export window.
Quality 20 or less is 50Mb
Quality 21 to 40 is 80Mb
Quality 41 to 60 is 100Mb
Quality 61 to 70 is 140Mb
Quality 71 to 80 is 180Mb
Quality 81 to 90 is 220Mb
Quality 91 and greater is 280Mb
Page | 34
Page 34

Final Cut Pro 7 - MOV
1. Please make sure you have FCP7.0.3 installed (earlier versions of FCP have not been tested)
2. Please make sure you have installed the Calibrated MPEG2-X Create presets for Compressor 3.5
3. Please use the ‘Send to Compressor’ option in FCP 7 to export MOV files using Calibrated MPEG2-X Create.
Please see the Compressor sections in this chapter for more details.
IMPORTANT: You cannot choose the ‘QuickTime Movie’ export option in FCP 7 – please use the ‘Send to
Compressor’ option in FCP 7 to export. If you try to export from FCP 7 using the ‘QuickTime Movie’
Option (i.e. not using Compressor to export) then I-Frame only export works but Long-GOP exporting will
give you an error when trying to export. Also (for reasons unknown), pressing the ‘Advanced’ button in
FCP 7 to get the Options for the Calibrated MPEG2-X Create codec will crash FCP 7.
Page | 35
Page 35

Final Cut Pro X - MOV
Getting Started
1. Please make sure you have FCP X 10.1.2 or greater installed
2. Please make sure that the Calibrated MPEG2-X Create Compressor 4 presets are installed in the folder
For Compressor 4.1.2 use this folder:
/Users/[YOUR_ACCOUNT]/Library/Application Support/Compressor/Settings
(Please note that is the Library folder from your User directory and you need to install the presets to every user
account that will use the presets)
If the presets are NOT in the above folder, you can either run the Calibrated MPEG2-X Create Compressor
presets installer or you can manually copy them to that folder from this folder:
/Applications/Calibrated/Presets/MPEG2X Create/Compressor 4.1/Calibrated MPEG2-X Create MOV
To clarify, you would copy the folder ‘Calibrated MPEG2-X Create MOV’ to the Compressor/Settings directory
above.
Please restart your computer if you had to manually install the presets.
3. Please note that if you are rendering using multiple render nodes (i.e. different computers) then each computer
would need it’s own separate license of Calibrated MPEG2-X Create.
Exporting in FCP X
1. In FCP X, you can choose to export using the ‘Add Destination’ option in the ‘Share’ menu and choosing a
Compressor setting, or you can choose to ‘Send to Compressor’ and export using Compressor. If you choose to
‘Send to Compressor’ please go to the section ‘Using a Preset Setting for exporting in Compressor ‘ in the
‘Compressor 3.5/4.1’ chapter in this User Guide after sending the job to Compressor on how to best setup the
export.
2. After choosing the ‘Add Destination’ option and choosing the ‘Compressor Settings’ option, a window will pop-up
letting you choose which Compressor preset you want to use for the export. In the window, open the ‘Custom’
folder.
3. Under the ‘Custom’ folder will be the folder ‘Calibrated MPEG2-X Create MOV files’, please look under this folder
for the presets. Choose the preset that best matches your resolution, frame rate, and field type that you want to
encode into.
4. And you’re ready to export
Page | 36
Page 36

Compressor 3.5.3/4.1.2 - MOV
Getting Started
1. If you are using Compressor 3.5, please make sure you have Compressor 3.5.3 installed, and if you are using
Compressor 4, please make sure you have Compressor 4.1.2 installed. Earlier versions of Compressor have not
been tested.
2. Please make sure that the Calibrated MPEG2-X Create Compressor presets are installed in the folder
For Compressor 3.5.3 use this folder:
/Users/[YOUR_ACCOUNT]/Library/Application Support/Compressor/
For Compressor 4.1.2 use this folder:
/Users/[YOUR_ACCOUNT]/Library/Application Support/Compressor/Settings
(Please note that is the Library folder from your User directory and you need to install the presets to every user
account that will use the presets)
If the presets are NOT in the above folder, you can either run the Calibrated MPEG2-X Create Compressor
presets installer or you can manually copy them to that folder from this folder:
/Applications/Calibrated/Presets/MPEG2X Create/Compressor [version]/Calibrated MPEG2X Create MOV
To clarify, you would copy the folder ‘Calibrated MPEG2-X Create MOV’ to the Compressor folder for the version
you are using.
Please restart your computer if you had to manually install the presets.
3. For FCP7 Sequences: To preserve the maximum bit depth, please make sure you have the ‘Render 8-bit YUV’
selected OR any of the other YUV processing options selected in your FCP7 ‘Sequence Settings’ if you send a
sequence to Compressor 3.5.3.
4. Please note for Compressor 3.5.3 – that the Calibrated MPEG2-X Create Compressor Presets the ‘Frame
Controls’ are turned OFF in Compressor 3.5.3. This means that the proper field dominance (Upper Field First or
Progressive) is assumed to match the Calibrated MPEG2-X Create Compression Type you are encoding into.
5. Please note that if you are rendering using multiple render nodes (i.e. different computers) then each computer
would need it’s own separate license of Calibrated MPEG2-X Create.
Using a Preset Setting for exporting in Compressor
1. If you’ve already installed our MPEG2-X Create Compressor Presets skip to step 2. If you haven’t installed the
presets, please go to the above section ‘Getting Started’ to learn how to install our Calibrated MPEG2-X Create
Compressor presets.
2. In the Compressor ‘Settings’ window, please open the ‘Settings’ tab and navigate to the ‘Custom’ folder.
3. Under the ‘Custom’ folder will be the folder ‘Calibrated MPEG2-X Create MOV files’, please look under this folder
for the presets. Choose the preset that best matches your resolution, frame rate, and field type that you want to
encode into.
4. And you’re ready to export
Page | 37
Page 37

Adobe After Effects CS6/CC/CC2014 - MOV
Getting Started
1. Please make sure you have QuickTime Player 7.6 or 7.7 installed
2. IMPORTANT: Please make sure you have the Adobe Performance booster installed: This modified Adobe XML
file is necessary to export at the proper 8-bit YUV422 color levels in Adobe After Effects. You can learn
more and download it by clicking here.
3. To preserve the maximum bit depth, please make sure you have the ‘Preview’ in the After Effects ‘Composition
Settings’ to UNCHECKED.
Output Module Settings for 8-bit YUV422 Export in AE
1. [Optional] – if you are working with an interlaced project and exporting to an interlaced compression type,
please be sure to set the ‘Field Render’ properly in the ‘Render Settings’ of the Render Queue in AE
2. In the ‘Output Module Settings’, please choose ‘QuickTime’ for the format
3. Make sure the Depth is set to ‘Millions of Colors’
4. Click on the ‘Format Options’ button and the ‘QuickTime Options’ window will pop-up
a. Choose the Calibrated MPEG2-X Create Compression Type that best matches your Composition Settings in
the ‘Video Codec’ drop down menu. (Please see the ‘Overview’ section at the beginning of this chapter to see
what Compression Type matches best with your Composition Settings)
b. Make sure the ‘Quality’ slider is set to the bitrate you wish to encode to
c. Make sure the Width/Height is set to either 1920x1080 or 1280x720 and PAR is at Square Pixels (1.0)
d. Press the ‘Ok’ button in the ‘QuickTime Options’ window and the window will close
5. And you’re ready to render
Page | 38
Page 38

Adobe Premiere Pro CS6/CC/CC2014 - MOV
Getting Started
1. Please make sure you have QuickTime Player 7.6 or 7.7 installed
2. Please make sure you have the Adobe Performance booster installed: This modified Adobe XML file is
necessary to properly export at 8-bit YUV422 in all versions of Adobe Premiere Pro. You can learn more and
download it by clicking here.
3. To preserve the maximum bit depth, please make sure you have the ‘Maximum Bit Depth’ and ‘Maximum Render
Quality’ CHECKED in the Premiere Pro ‘Sequence Settings’.
4. You can then choose to either manually configure the export setting or you can use one of our pre-built preset to
configure the export settings.
Using a Preset Setting for 8-bit YUV422 Export in PPro
1. Calibrated MPEG2-X Create ships with pre-configured Adobe Export Presets that can be used in Premiere
Pro/AME CS6.0 o greater. If you’d like to manually configure the export in PPro, please go to the next section
Manually configuring for 8-bit YUV422 Export in PPro
2. In the ‘Export Settings’, please choose ‘QuickTime’ for the format
3. If you’ve already installed the preset that you want to use just choose it from the ‘Preset’ drop-down menu and
skip to step 5. If you haven’t installed the preset you want to use please go to step 4 on how to import a preset.
4. To import the preset you want to use - press the ‘Import Preset’ button on the Adobe Export Panel - the ‘Import
Preset’ button is circled in red in the picture below
In the window that pops-up, please go to the below folder and choose the preset best matches your Sequence
Settings. There is also ReadMe PDF in the below folders that describes the presets to help you better choose.
Mac OSX: /Applications/Calibrated/Presets/MPEG2X Create/PPro/QuickTime – CC – CC2014
Windows 64-bit*: [System Drive]:\Program Files (x86)\Calibrated\Presets\MPEG2X Create\PPro\ QuickTime – CC – CC2014
*on Windows 32-bit OS use the ‘Program Files’ folder
Please choose presets for CS6 from the folder ‘QuickTime – CS6’ for CS6
5. Click on the ‘Video’ Tab in the ‘Export Settings’
a. Make sure that ‘Use Maximum Render Quality’ is CHECKED
b. Make sure that ‘Use Previews’ is NOT CHECKED
6. And you’re ready to export
Page | 39
Page 39

Manually configuring for 8-bit YUV422 Export in PPro
1. In the ‘Export Settings’, please choose ‘QuickTime’ for the format
2. Click on the ‘Video’ Tab in the ‘Export Settings’
a. Choose the Calibrated MPEG2-X Create Compression Type that best matches your Sequence Settings in the
‘Video Codec’ drop down menu. (Please see the ‘Overview’ section at the beginning of this chapter to see
what Compression Type matches best with your Sequence Settings)
b. Make sure the ‘Quality’ slider is set to the bitrate you want to export to
c. Make sure the Width/Height are at either 1920x1080 or 1280x720 and PAR is at Square Pixels (1.0)
d. Make sure the Field Type matches the Calibrated MPEG2-X Compression Type you are exporting to -choose
‘Upper First’ for interlaced compression types or ‘Progressive’ for progressive compression types.
e. Make sure the ‘Frame Rate’ matches the Calibrated MPEG2-X Compression Type you are exporting to –
please see the ‘Overview’ section at the beginning of this chapter to see the proper frame rates for the
different MPEG2-X Compression Types.
f. Make sure that ‘Render at Maximum Depth’ is CHECKED
g. Make sure that the Bit Depth is set to ’24 bit’
h. Make sure that ‘Use Maximum Render Quality’ is CHECKED
i. Make sure that ‘Use Previews’ is NOT CHECKED
3. And you’re ready to export
Page | 40
Page 40

Adobe Media Encoder CS6/CC/CC2014 - MOV
Getting Started
1. Please make sure you have QuickTime Player 7.6 or 7.7 installed
2. Please make sure you have the Adobe Performance booster installed: This modified Adobe XML file is
necessary to properly export at 8-bit YUV422 in all versions of Adobe Premiere Pro. You can learn more and
download it by clicking here.
3. Exporting an Adobe Premiere Pro Project or Sequence from AME: To preserve the maximum bit depth,
please make sure you have the ‘Maximum Bit Depth’ and ‘Maximum Render Quality’ CHECKED in the Premiere
Pro ‘Sequence Settings’ for any sequence in the Premiere Pro Project.
4. Exporting an After Effects Composition from AME: To preserve the maximum bit depth, please make sure you
have the ‘Preview’ in the After Effects ‘Composition Settings’ to UNCHECKED.
5. You can then choose to either manually configure the export setting or you can use one of our pre-built preset to
configure the export settings.
Using a Preset Setting for 8-bit YUV422 Export in AME
1. Calibrated MPEG2-X Create ships with pre-configured Adobe Export Presets that can be used in Premiere
Pro/AME CS6 or greater. If you’d like to manually configure the export in AME, please go to the next section
Manually configuring for 8-bit YUV422 Export in AME
2. In the ‘Export Settings’, please choose ‘QuickTime’ for the format
3. If you’ve already installed the preset that you want to use just choose it from the ‘Preset’ drop-down menu and
skip to step 6. If you haven’t installed the preset you want to use please go to step 4 on how to import a preset.
4. Right-click on the source you are exporting from AME and from the drop-down menu choose’ Export Settings’ for
the Adobe Export Panel window to appear. To import the preset you want to use - press the ‘Import Preset’ button
on the Adobe Export Panel - the ‘Import Preset’ button is circled in red in the picture below
In the window that pops-up, please go to the below folder and choose the preset best matches your Sequence
Settings. There is also ReadMe PDF in the below folders that describes the presets to help you better choose.
Mac OSX: /Applications/Calibrated/Presets/MPEG2X Create/PPro/QuickTime – CC – CC2014
Windows 64-bit*: [System Drive]:\Program Files (x86)\Calibrated\Presets\MPEG2X Create\PPro\ QuickTime – CC – CC2014
*on Windows 32-bit OS use the ‘Program Files’ folder
Please choose presets for CS6 from the folder ‘QuickTime – CS6’ for CS6
5. Click on the ‘Video’ Tab in the ‘Export Settings’
a. Make sure that ‘Use Maximum Render Quality’ is CHECKED
b. Make sure that ‘Use Previews’ is NOT CHECKED
6. And you’re ready to export
Page | 41
Page 41

Manually configuring for 8-bit YUV422 Export in AME
1. Right-click on the source you are exporting from AME and from the drop-down menu choose’ Export Settings’ for
the Adobe Export Panel window to appear. In the ‘Export Settings’, please choose ‘QuickTime’ for the format
2. Click on the ‘Video’ Tab in the ‘Export Settings’
a. Choose the Calibrated MPEG2-X Create Compression Type that best matches your Sequence Settings in the
‘Video Codec’ drop down menu. (Please see the ‘Overview’ section at the beginning of this chapter to see
what Compression Type matches best with your Sequence Settings)
b. Make sure the ‘Quality’ slider is set to the bitrate you wish to encode to
c. Make sure the Width/Height are at either 1920x1080 or 1280x720 and PAR is at Square Pixels (1.0)
d. Make sure the Field Type matches the Calibrated MPEG2-X Compression Type you are exporting to -choose
‘Upper First’ for interlaced compression types or ‘Progressive’ for progressive compression types.
e. Make sure the ‘Frame Rate’ matches the Calibrated MPEG2-X Compression Type you are exporting to –
please see the ‘Overview’ section at the beginning of this chapter to see the proper frame rates for the
different MPEG2-X Compression Types.
f. Make sure that ‘Render at Maximum Depth’ is CHECKED
g. Make sure that the Bit Depth is set to ’24 bit’
h. Make sure that ‘Use Maximum Render Quality’ is CHECKED
i. Make sure that ‘Use Previews’ is NOT CHECKED
3. And you’re ready to export
Page | 42
Page 42

Avid Media Composer 6.0 & Greater - MOV
Getting Started
1. Please make sure you have QuickTime Player 7.6 or 7.7 installed
2. IMPORTANT: Please note that Avid Media Composer appears to only export thru QuickTime using 8-bit RGB
colorspace which will be converted to 8-bit YUV422 and then encoded to XDCAM in Calibrated MPEG2-X Create.
Export Settings
1. In the ‘Export As’, please choose ‘QuickTime Movie’ for the format
2. Click on the ‘Custom’ Option and then press the ‘Format Options…’ button
a. The QuickTime ‘Movie Settings’ window will pop-up – press the ‘Settings…’ button in the Video section and
the ‘Standard Video Compression Settings’ window will pop-up
b. Choose the Calibrated MPEG2-X Create Compression Type that best matches your Sequence Settings in the
‘Compression Type’ drop down menu. (Please see the ‘Overview’ section at the beginning of this chapter to
see what Compression Type matches best with your Sequence Settings)
c. Press the ‘Codec Settings’ button and the Calibrated MPEG2-X Create Options window will pop-up, click on
the word ‘options’ in the window and make sure the EITHER ‘8-bit RGB/FULL’ OR ‘8-bit RGB/SMPTE’ (
please see 3.c below) is selected for the ‘Quick Colorspace Setup’ and then press the ‘Ok’ button and the
Calibrated MPEG2-X Create Options window will close.
d. Click the OK button on both the ‘Standard Video Compression Settings’ window and the ‘Movie Settings’
window for them to close.
3. In the Video Format Settings:
a. Make sure the Width/Height are at either 1920x1080 or 1280x720 (please pick the resolution that matches
your Compression Type).
b. Make sure that the ‘Display Aspect Ratio’ is set to ‘Native Dimensions’
c. For Interlaced Projects - Make sure the File Field Order matches the Calibrated MPEG2-X Compression
Type you are exporting to - choose ‘Odd (Upper Field Firs)t’ for interlaced compression types
d. COLOR LEVELS – if you selected ‘8-bit RGB/FULL’ in 2.c above please choose ‘RGB” for your Color Level
– if you selected ‘8-bit RGB/SMPTE’ in 2.c above please choose ‘601/709” for your Color Level.
4. And you’re ready to export
Page | 43
Page 43

QuickTime Player Pro 7.6/7.7 - MOV
To export to any format you need to have QuickTime Player Pro 7.6/7.7 from Apple – HOWEVER – due to differences in
how QuickTime Gamma is handled with different QuickTime codecs it is RECOMMENDED that you do NOT use
QuickTime Player Pro 7.6/7.7 for exporting using Calibrated MPEG2-X Create for Windows.
Page | 44
Page 44

Adobe After Effects CC/CC2014 - MXF
Getting Started
1. Please make sure you have AME CC or AME CC2014 is installed. ( Exporting from AE CS6 is not supported)
Exporting
1. When exporting from an AE Composition, please choose the ‘Add to Adobe Media Encoder Queue…’
2. See the AME section for rest of details on exporting
Page | 45
Page 45

Adobe AME & Premiere Pro CS6/CC/CC2014 - MXF
Getting Started
Please make sure you have ExpCalibratedMPEG2XCreateOP1a.prm installed in the Adobe\Common\Plugins\7.0\ for CC/CC2014 support, and in the Adobe\Common\Plug-ins\6.0\MediaCore directory for CS6 support.
MPEG2-X MXF Export in PPro/AME
1. In the ‘Export Settings’, please choose the format ‘Calibrated OP1a MPEG2-X MXF’
2. Click on the ‘Video’ Tab in the ‘Export Settings’ (see picture below)
a. The ‘Video Codec’ should automatically be set to the Resolution and FrameRate that best matches your
Sequence Settings.
b. The ‘Video BitRate’ will be automatically set to 180Mb and I-frame only.
c. Make sure the # Rendering Procs is set to ‘Maximum’ - this means our plugin will use all processors on the
computer for encoding. When set to ‘Medium’ then our plugin will use half the number of processors and
when set to ‘Minimum’ then our plugin will use 2 processors.
d. Make sure that ‘Use Maximum Render Quality’ is CHECKED if you want the best render quality from Adobe;
however exports could take a little longer.
e. Make sure that ‘Use Previews’ is NOT CHECKED if you want the best render quality from Adobe; however
exports could take a little longer.
3. Click on the ‘Audio’ Tab in the ‘Export Settings’ (see picture below)
a. The ‘Audio Codec’ should automatically be set to Uncompressed
b. The ‘Sample Rate’ should be set to 48000 Hz
c. In CC/CC2014 - The ‘Channels’ should be set to the number of channels that closet matches your Sequence
Settings IMPORTANT: For CS6, the number of channels always defaults to 2.
d. The ‘Sample Size’ will always default to 16-bit audio. Please choose ’24-bit’ for 24 bit audio.
4. Click on the ‘MetaData Tab in the ‘Export Settings’ (see picture below)
a. In the ‘TimeCode’ section you can override the TimeCode that the plugin will use for the exported file. By
default, the plugin will use the TimeCode given to it by PPro/AME, but you can CHECK the ‘Override
Sequence TimeCode’ to enter in a new TimeCode to use.
b. The ‘MXF MetaData’ section will enable you to enter in MetaData for the MXF file. By default, the values of
[Empty] mean not to use that MetaData.
5. And you’re ready to export
Page | 46
Page 46

‘Video Tab’ in the ‘Export Settings’ for PPro/AME CC
‘Audio Tab’ in the ‘Export Settings’ for PPro/AME CC
Page | 47
Page 47

‘MetaData Tab’ in the ‘Export Settings’ for PPro/AME CC
Page | 48
Page 48

Final Cut Pro X - MXF
Getting Started
1. Please make sure you have FCP X 10.1.2 or greater installed
2. Please make sure that the Calibrated MPEG2-X Create Compressor 4.1.2 presets are installed in the folder
For Compressor 4.1.2 use this folder:
/Users/[YOUR_ACCOUNT]/Library/Application Support/Compressor/Settings
(Please note that is the Library folder from your User directory and you need to install the presets to every user
account that will use the presets)
If the presets are NOT in the above folder, you can manually copy them to that folder from this folder:
/Applications/Calibrated/Presets/MPEG2-X Create/Compressor/Calibrated MPEG2-X Create MXF
To clarify, you would copy the folder ‘Calibrated MPEG2-X Create MXF ‘ to the Compressor folder for the version
you are using. Please restart your computer if you had to manually install the presets.
3. Please note that if you are rendering using multiple render nodes (i.e. different computers) then each computer
would need it’s own separate license of Calibrated MPEG2-X Create.
4. IMPORTANT: When exporting from FCP, if the number of output audio channels is smaller than the number of
FCP audio channels then each output audio channel is a mix of all FCP audio channels.
5. IMPORTANT: FCP7 cannot import XDCAM MXF files with those use of third party applications like Calibrated{Q}
MXF Import for OSX.
Exporting from FCP X
1. In FCP X, you can choose to export from FCP X using the ‘Share’ option, or you can choose to ‘Send to
Compressor’ and export using Compressor. If you choose to ‘Send to Compressor’ please go to the ‘Compressor
3.5.3/4.1.2’ chapter on how to export from Compressor. For using the ‘Share’ option from FCP X, please continue
to step 2.
2. After choosing the ‘Share’ option, please choose the ‘Add Destination…’ and the ‘Destinations’ window will pop-
up. Click on the ‘Compressor Settings’ button and under the ‘Custom’ folder will be the Calibrated MPEG2-X MXF
presets. The presets are organized by resolution, field type and framerate. Choose the preset that best matches
your source resolution, frame rate, and field
3. Preset Defaults:
a. Video: The video bitrate will be the maximum bitrate for that resolution/framerate – 100Mb
b. Audio: The default audio will be 16-bit 48Khz uncompressed audio
c. TimeCode: The default TimeCode will be to use the Start TimeCode from the source (if possible)
d. MetaData: The default MetaData will be as follows:
(i) P2 Creator will default to the ‘Creator’ in the FCP X Share MetaData
4. You can also create your own presets in Compressor. Please go to the Compressor 3.5.3/4.1.2 chapter to learn
how to create your own presets.
5. And you’re ready to export
Page | 49
Page 49

Final Cut Pro 7 - MXF
Getting Started
6. Please make sure you have FCP7.0.3 installed (earlier versions of FCP have not been tested)
7. Please make sure that the Calibrated MPEG2-X Create Compressor MXF presets are installed in the folder
For Compressor 3.5.3 use this folder:
/Users/[YOUR_ACCOUNT]/Library/Application Support/Compressor/
8. For FCP7 Sequences: To preserve the maximum bit depth, please make sure you have the ‘Render 8-bit YUV’
selected OR any of the other YUV processing options selected in your FCP7 ‘Sequence Settings’ if you send a
sequence to Compressor 3.5.3.
9. IMPORTANT: When exporting from FCP, if the number of output audio channels is smaller than the number of
FCP audio channels then each output audio channel is a mix of all FCP audio channels.
10. IMPORTANT: FCP7 cannot import XDCAM MXF files with those use of third party applications like Calibrated{Q}
MXF Import for OSX.
Using a Preset Setting for exporting in FCP7
1. In the ‘File->Send To’ menu options, please choose ‘Compressor’ option
2. And you’re ready to export – please go to the Compressor 3.5.3/4.1.2 chapter on how to export from Compressor
3.5.3 by using one of our ready-made presets or by creating your own preset.
Page | 50
Page 50

Compressor 3.5.3/4.1.2 - MXF
Getting Started
1. If you are using Compressor 3.5, please make sure you have Compressor 3.5.3 installed, and if you are using
Compressor 4, please make sure you have Compressor 4.1.2 installed. Other versions of Compressor have not
been tested.
2. Please make sure that the Calibrated MPEG2-X Create Compressor presets are installed in the folder
For Compressor 3.5.3 use this folder:
/Users/[YOUR_ACCOUNT]/Library/Application Support/Compressor/
For Compressor 4.1.2 use this folder:
/Users/[YOUR_ACCOUNT]/Library/Application Support/Compressor/Settings
(Please note that is the Library folder from your User directory and you need to install the presets to every user
account that will use the presets)
If the presets are NOT in the above folder, you can use our presets installer to install them or manually copy them
to the above folder(s) from this folder:
/Applications/Calibrated/Presets/MPEG2-X Create/Compressor/Calibrated MPEG2-X Create MXF
To clarify, you would copy the folder ‘Calibrated MPEG2-X Create MXF ‘ to the Compressor folder for the version
of Compressor that you are using.
Please restart your computer after installing.
3. For FCP7 Sequences: For FCP7 Sequences: To preserve the maximum bit depth, please make sure you have
the ‘Render 8-bit YUV’ selected OR any of the other YUV processing options selected in your FCP7 ‘Sequence
Settings’ if you send a sequence to Compressor 3.5.3.
4. Please note that if you are rendering using multiple render nodes (i.e. different computers) then each computer
would need its own separate license of Calibrated MPEG2-X Create.
Using a Pre-made MXF Preset for exporting in Compressor 3.5.3/4.1.2
1. If you’ve already installed our MPEG2-X Create Compressor Presets skip to step 2. If you haven’t installed the
presets, please go to the above section ‘Getting Started’ to learn how to install our Calibrated MPEG2-X Create
Compressor presets.
2. In the Compressor ‘Settings’ window, please open the ‘Settings’ tab and navigate to the ‘Custom’ folder.
3. The presets are organized by resolution, field type and framerate. Choose the preset that best matches your
source resolution, frame rate, and field
4. Preset Defaults:
a. Video: The video bitrate will be defaulted to 180Mb I-Frame Only
b. Audio: The default audio will be 16-bit 48Khz uncompressed audio with either 2, or more discrete
audio channels.
c. TimeCode: The default TimeCode will be to use the Start TimeCode from the source (if possible)
d. MetaData: The default MetaData will be as follows:
Page | 51
Page 51

(i) MXF Source Package Name will default to the ‘Author’ from the Compressor Job
Annotation
5. You can also create your own presets in Compressor. Please go to the section to learn how to create your own
presets.
Page | 52
Page 52

Creating a MXF Preset in Compressor 3.5.3
IMPORTANT – always remember to set the ‘Field Version’ in the Options settings for the version of Compressor
that you are using
First select the ‘+’ button in the Settings window and choose ‘Calibrated OP1a MPEG2-X MXF’ in the drop-down menu
This will add a new ‘Untitled Calibrated OP1a MPEG2-X MXF’ preset in the Settings window. Make sure that this new
preset is highlighted and then press the ‘Options’ button to open the preset options.
By pressing the ‘Option’ button you will bring up the ‘Options’ panel to configure the preset. See the section below:
Options Panel in Compressor 3.5.3/4.1.2 for setting the different options in your new preset.
Page | 53
Page 53

Creating a MXF Preset in Compressor 4.1.2
IMPORTANT – always remember to set the ‘Field Version’ in the Options settings for the version of Compressor
that you are using
First select the ‘+’ button in the Settings window and choose ‘New Setting…’ in the drop-down menu
In the window that pops-up, choose ‘Calibrated OP1a MPEG2-X MXF’ from the list of formats
This will add a new ‘Untitled Calibrated OP1a MPEG2-X MXF’ preset in the Settings window. Make sure that this new
preset is highlighted and then press the ‘Configure’ button to open the preset options panel.
Page | 54
Page 54

By pressing the ‘Configure’ button you will bring up the ‘Options’ panel to configure the preset. See the section below:
Options Panel in Compressor 3.5.3/4.1.2 for setting the different options in your new preset.
Page | 55
Page 55

MXF Options Panel in Compressor 3.5.3/4.1.2
Calibrated MPEG2-X Create supports creating the following OP1a XDCAM MXF files:
XDCAM Long-GOP at 50Mb, 80Mb, 100Mb, 140Mb, 180Mb, 220Mb, 280Mb
“Calibrated MPG2X LG 1080i29.97” - 1920x1080 interlaced footage at 29.97fps
“Calibrated MPG2X LG 1080i25” –1920x1080 interlaced footage at 25fps
“Calibrated MPG2X LG 1080p59.94” –1920x1080 progressive footage at 59.94fps
“Calibrated MPG2X LG 1080p50” –1920x1080 progressive footage at 50fps
“Calibrated MPG2X LG 1080p29.97” –1920x1080 progressive footage at 29.97fps
“Calibrated MPG2X LG 1080p25” –1920x1080 progressive footage at 25fps
“Calibrated MPG2X LG 1080p23.976” –1920x1080 progressive footage at 23.976fps
“Calibrated MPG2X LG 720p59.94” –1280x720 progressive footage at 59.94fps
“Calibrated MPG2X LG 720p50” –1280x720 progressive footage at 50fps
“Calibrated MPG2X LG 720p29.97” –1280x720 progressive footage at 29.97fps
“Calibrated MPG2X LG 720p25” –1280x720 progressive footage at 25fps
“Calibrated MPG2X LG 720p23.976” –1280x720 progressive footage at 23.976fps
XDCAM I-Frame Only at 50Mb, 80Mb, 100Mb, 140Mb, 180Mb, 220Mb, 280Mb
“Calibrated MPG2X I 1080i29.97” – 1920x1080 interlaced footage at 29.97fps
“Calibrated MPG2X I 1080i25” –1920x1080 interlaced footage at 25fps
“Calibrated MPG2X I 1080p59.94” –1920x1080 progressive footage at 59.94fps
“Calibrated MPG2X I 1080p50” –1920x1080 progressive footage at 50fps
“Calibrated MPG2X I 1080p29.97” –1920x1080 progressive footage at 29.97fps
“Calibrated MPG2X I 1080p25” –1920x1080 progressive footage at 25fps
“Calibrated MPG2X I 1080p23.976” –1920x1080 progressive footage at 23.976fps
“Calibrated MPG2X I 720p59.94” –1280x720 progressive footage at 59.94fps
“Calibrated MPG2X I 720p50” –1280x720 progressive footage at 50fps
“Calibrated MPG2X I 720p29.97” –1280x720 progressive footage at 29.97fps
“Calibrated MPG2X I 720p25” –1280x720 progressive footage at 25fps
“Calibrated MPG2X I 720p23.976” –1280x720 progressive footage at 23.976fps
48Khz Uncompressed audio with 2, 4, 6, 8, 10, 14, 16, 24, or 32 Channels at either 16-bits or 24-bits.
(continued next page)
Page | 56
Page 56

The below Options panel can help you configure your preset in Compressor
1. Video Options
a. Video Codec: This lets you set the resolution, framerate, and field type that you wish to encode into
b. Video BitRate: This lets you set the bitrate of the encoded video
c. Field Version: IMPORTANT – you must set this for the version of Compressor that you are using
d. Sequence Type:
(i) I-Frame Only
(ii) Long-Gop
e. # of CPU’s for Encoding: This lets you set the amount of CPU’s used for the encoding.
(i) Max = all available CPU’s up to 10.
(ii) Med = half of all available CPU’s up to 10
(iii) Min=1 or 2 CPU’s (depending on computer)
2. Audio Options - IMPORTANT: When exporting from FCP, if the number of output audio channels is smaller than the number of FCP
audio channels then each output audio channel is a mix of all FCP audio channels.
a. Audio Rate: Always set to 48 kHz
b. Audio BitRate: 16-bits or 24-bits (default is 16-bits)
c. Audio Auto: The below options will let the preset tell Compressor the Audio Layout that the plugin wants
to receive. Please note that no matter which Audio Layout option is selected – the exported media will
only store audio in a 2, 4, 6, 8, 10, 14, 16, 24, or 32 channel discrete configuration.
(i) The ‘Use # of Audio Channels From Source ( if possible)’ option is the default option and this
option will tell Compressor to send the exact number of source audio channels in as discrete
audio channels.
(ii) The ‘Use Audio Layout From Source (if possible)’ option will tell Compressor to send the exact
number of source audio channels in the source audio layout.
Page | 57
Page 57

(iii) The ‘Manually set Audio Layout’ option will let you manually set the audio layout to tell
Compressor to send to the plugin
d. Audio Layout: This is where you would manually set the ‘Audio Layout’ if the ‘Audio Auto’ option is set to
‘Manually set Audio Layout’. Please note that no matter which Audio Layout is manually selected – the
exported media will only store audio in a 2, 4, 6, 8, 10, 14, 16, 24, or 32 channel discrete configuration.
3. TimeCode Options
a. Use Start TimeCode From Source (if possible) – by default the preset is set to use the start timecode from
the source media for the exported media. By unchecking this option the user can manually add in a new
start timecode for the exported media
b. Enter Start TimeCode – this is where you would manually enter in the new start timecode for the exported
media if the ‘Use Start TimeCode From Source’ is UNCHECKED
4. MetaData Options – The default MetaData mapping is described below. The user can adjust how the
metadata is mapped (or set) by either (i) selecting a different Compressor MetaData mapping for the
MetaData field or (ii) the user can UNCHECKED the box next to the MetaData field to manually enter in
metadata.
a. Source Package Name will default to the ‘Author’ from the Compressor Job Annotation or ‘Creator’ from
FCP X ‘Share’ MetaData
Page | 58
Page 58

Other Mac OSX applications
When encoding XDCAM MOV files from other Mac OSX applications, please be aware of the following:
1. Even though Calibrated MPEG2-X Create supports encoding from 8-bit YUV422 colorspace, it is up to the
application using Calibrated MPEG2-X Create to send that colorspace to the codec. From our research, many
applications only support 8-bit RGB(A) colorspaces when encoding to a MOV file
2. Various applications reading/writing from QuickTime can treat QuickTime Gamma differently (which can make
video seem brighter or darker).
3. Calibrated MPEG2-X Create does not convert frames from interlaced to progressive or vise-versa, please make
sure that you have selected the appropriate MPEG2-X ‘Compression Type’ to match the type of video frames you
will be encoding from.
4. Calibrated MPEG2-X Create does not convert the frame rate of video, please make sure that you have selected
the appropriate MPEG2-X ‘Compression Type’ to match the frame rate of the video you will be encoding from.
5. Always make sure that you have selected the appropriate MPEG2-X ‘Compression Type’ to match the resolution
of the video you will be encoding from.
Page | 59
Page 59

Software License
5
Software License Agreement
By downloading, installing, ordering, or using the software - you are agreeing to the Software License Agreement. You
can download or view the Software License Agreement on our website:
http://www.calibratedsoftware.com/SoftwareLicenseAgreement.php
After Purchase - Software License Instructions
After payment is received for your order, you will be able to use an Activation Key to license the software to a computer
using the Calibrated License Manager application. Please see the Calibrated License Manager User Guide for details:
http://www.calibratedsoftware.com/downloads/Calibrated-LicenseManager-UserGuide.pdf
A single Software License for the software can only be used on a single partition on a single physical computer system
ONLY. A single Software License for the software will remove the DEMO MODE limitation(s) of the SOFTWARE for that
single partition on a single physical computer system that the Software License is licensed to.
Refund Policy
A refund for the purchase price of an order may only be given if you have NOT generated a Software License for your
order or used an Activation Key to license the software to a computer, AND the refund request is within 30 days of the
order purchase date. For more details, please see our official refund policy here.
Page | 60
Page 60

6
Troubleshooting
General Questions
1. I cannot see any of the ‘Calibrated MPEG2-X’ Compression Types when trying to export from my application?
Calibrated MPEG2-X Create may not be properly installed:
On Mac OSX, please make sure that the CalibratedMPEG2XEncodeCodec.component is in the
/Library/QuickTime folder (that’s the Library folder on the Main Harddrive NOT the Library folder in the User
directory)
On Windows, make sure QuickTime Player 7.6.6 or greater is installed, and that the
CalibratedMPEG2XEncodeQ.qtx component is in the [System Drive]/Program Files/QuickTime/QTComponents
folder (on Windows 64-bit systems it would be the Program Files (x86) folder)
And make sure you have restarted your computer after installing.
DEMO MODE watermark still visible after licensing
1. Did you restart your computer after licensing?
If you haven’t, then please restart
2. Did you re-export the files from your application?
The burned in DEMO MODE watermarks cannot be removed from video encoded while in DEMO MODE. After
ordering and licensing Calibrated MPEG2-X Create you will have to re-encode any files that you had created
while running the software in DEMO MODE.
3. Did you generate and enter in your Software License?
If not, please see the ‘Software License’ chapter in this User Guide on how to generate and enter in your Software
License after purchase. If you are properly licensed, then the ‘about’ page of the Calibrated MPEG2-X Create
Options applications should say LICENSED in green.
Page | 61
Page 61

7
Version 1.0.0
Released
Version History
Page | 62
Page 62

 Loading...