

Thank you for purchasing the
RDD 772BTi
DVD/VCD/CD/MP3/USB/SD/MMC Player
Bluetooth,
Operating Instructions
with FM/MW Tuner
Safety Precautions
MUTE
OK
Thank you fo r pur chasing this p ro du ct .
Plea s e re a d th r ough the s e op e r ating
instructions so you will know how to operate
your model properly. After you have finished
reading the instructions, keep this manual in
a safe place for future reference.
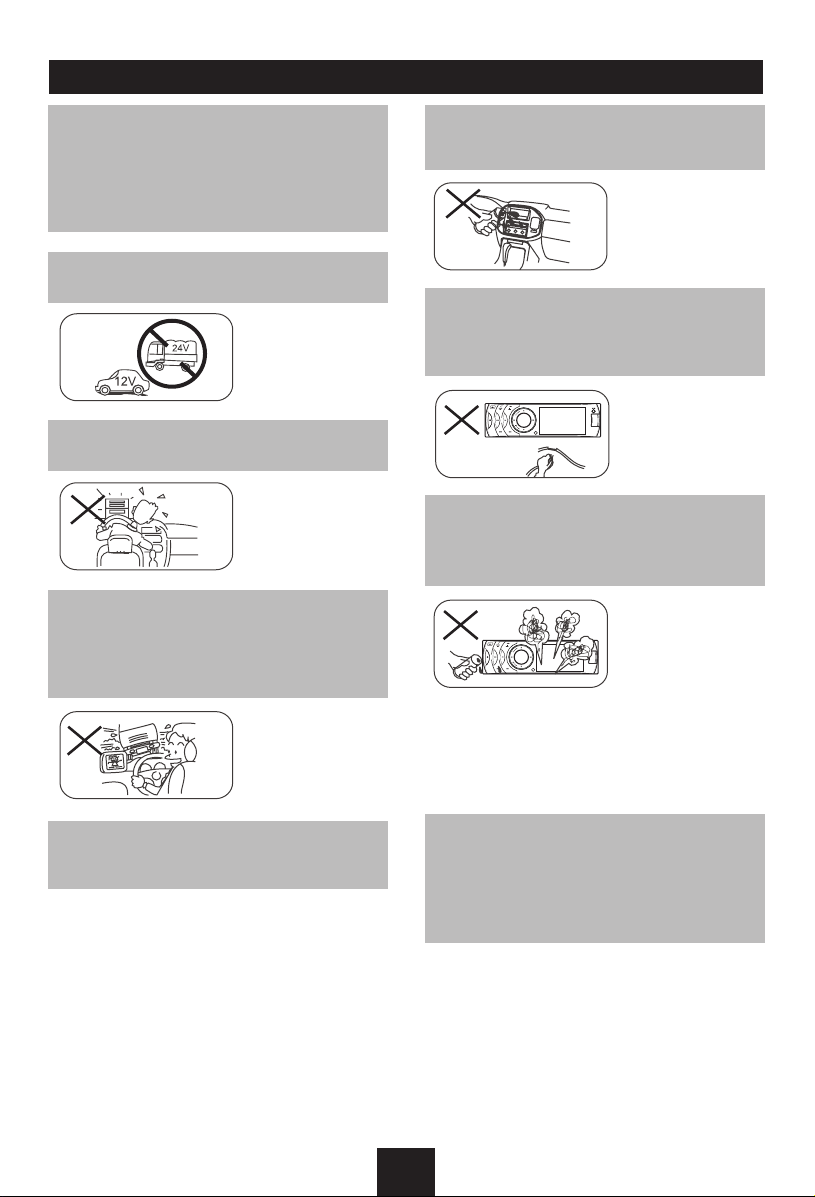
Only connect the unit to a 12-volt power
supply with negative grounding.
Never install this unit where the operation &
condition for safety driving is restrained.
Never use the video display function in the
front when driving to prevent the violation of
laws & regulations and also to reduce the
risk of traffic accident except using for rear
view video camera.
Ne v er expo se th is unit , a mpl ifi er, and
speakers to moisture or water for preventing
electric sparks or fires.
Please don't change the fuse on the power
cord without professional guidance, using
improper fuse may cause damage to this unit
or even cause fire.
Please power off this unit at once and send it
back to the after-sales service center or the
dealer/distributor you purchased from if one
of the following symptoms is found:
(a). No audio output;
(b). No image output;
(c). Water or other obstacle enters the unit;
(d). Smoking;
(e). Peculiar smell.
To ensure safe driving, please adjust the
volume to a safe & comfortable level in case
of emergency situations.
To pro vide a clear demonstration and an
alternative for easy understanding of the
operation of th is unit, graphic illus trati on
was used. However, this illustration is not
necessary printed as the actual image found
on the unit.
1
Safety Information Contents
Caution
This product is a CLASS 1 LASER PRODUCT.
Use of controls or adjustments or performance
of pr ocedures other than those specified
herein may result in h azardous ra diation
exposure. Do not open the covers and do
not repair it by yourself. Refer servicing to
qualified personnel.
Two Laser Products
Wave length: CD: 780nm DVD: 650nm
La ser power : No h azard ou s radia ti on is
emitted with safety protection.
To reduce the risk of fire electric shock, and
annoying interference, use only the included
components.
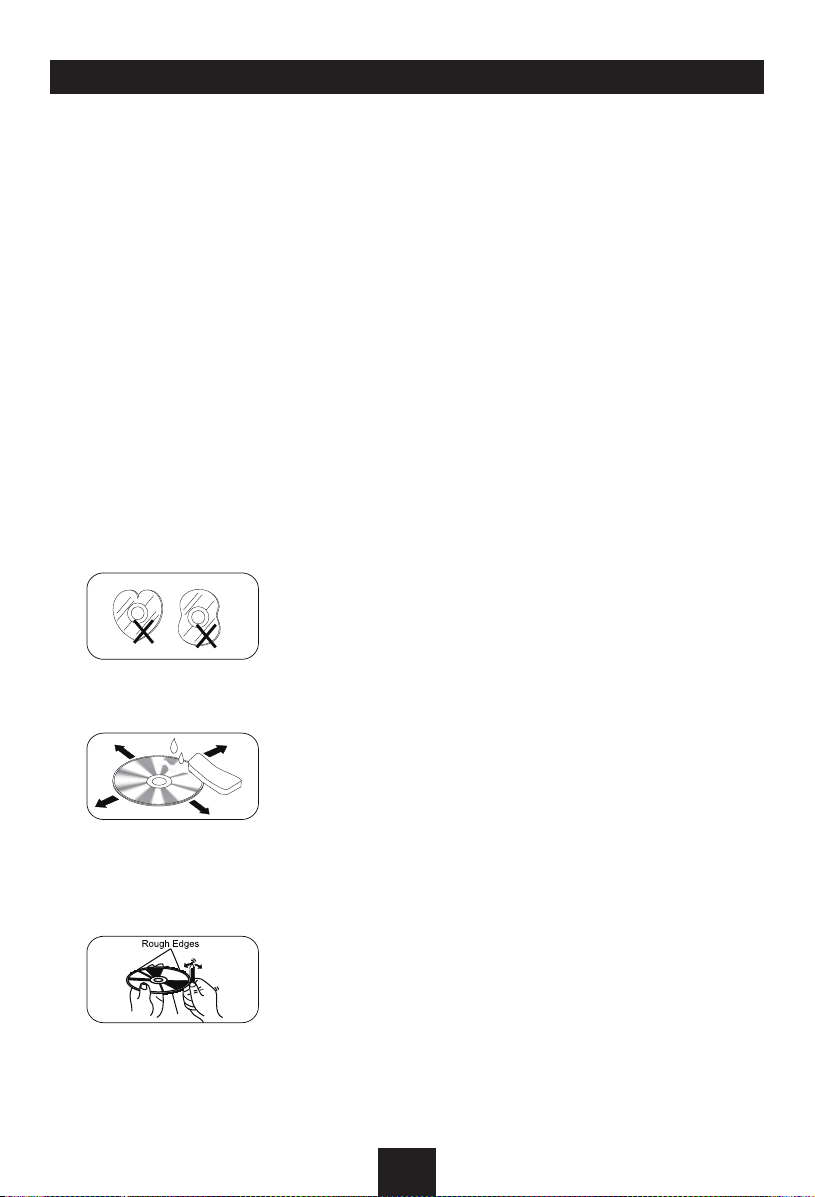
Caution of Disc Using
1. Never insert a 3-inch ( 8cm ) CD contained
in the adapter or an irregula rly shaped
CD. The unit may not be able to eject it,
resulting in a malfunction.
2. Disc Cleaning. Use a dry, soft cloth to wipe
the disc from center to edge, only neutral
detergent can be used.
Safety Precautions .........................................1
Safety Information ..........................................2
Features .........................................................3
Panel Controls ................................................4
Remote Controls.............................................5
USB/SD/MMC/MP3 Playback.........................6
Basic Operations ............................................7
Rotary Knob Menu.................................... 8-11
Radio Mode ..................................................12
RDS (Radio Data System, optional) .............13
Disc Mode............................................... 14-17
Bluetooth Mode ...................................... 18-19
iPod/iPhone Mode ........................................20
Device Connections................................ 21-23
Installation Guide .................................... 23-25
Anti-Theft System .........................................25
Troubleshooting ............................................26
Care and Maintenance .................................27
Specications ...............................................28
3. When playing a new disc. New disc may
have some rough spots around the inner
and outer edges. If such a disc is used,
remove these rough spots with a pencil or
ball-point pen, etc.
2
Features
DVD-R/RW Compatibility
It is possible to playback DVD-R/RW discs
recorded with the video format and Video
Recording format.
Video CDs Featuring PBC
Compatibility
It is possible to playback Video CDs featuring
PBC (playback control).
WMA and MP3 Compatibility
It is possible to playback WMA and MP3 files.
About WMA
The unit can playback WMA data.
Windows Media and the Windows logo are
tr ad e marks or reg is tered tra de marks of
Microsoft Corporation in the United States
and/or other countries.
This unit may not operate correctly depending
on the application used to encode WMA files.
About MP3
Supply of this product only conveys a license
for private, non-commercial use and does not
convey a license nor imply any right to use
this product in any commercial (i.e.revenuegenerating) realtime broadcasting (terrestrial,
sa te llite, cab le a nd /o r an y ot he r me dia),
broad-casting/streaming via internet, intranets
and/or other networks or in other electronic
content distribution systems, such as payaudi o or audio-o n- de m and applications.
An ind epe nde nt lice nse f or such use is
required. For details, please visit http://www.
mp3licensing.com.
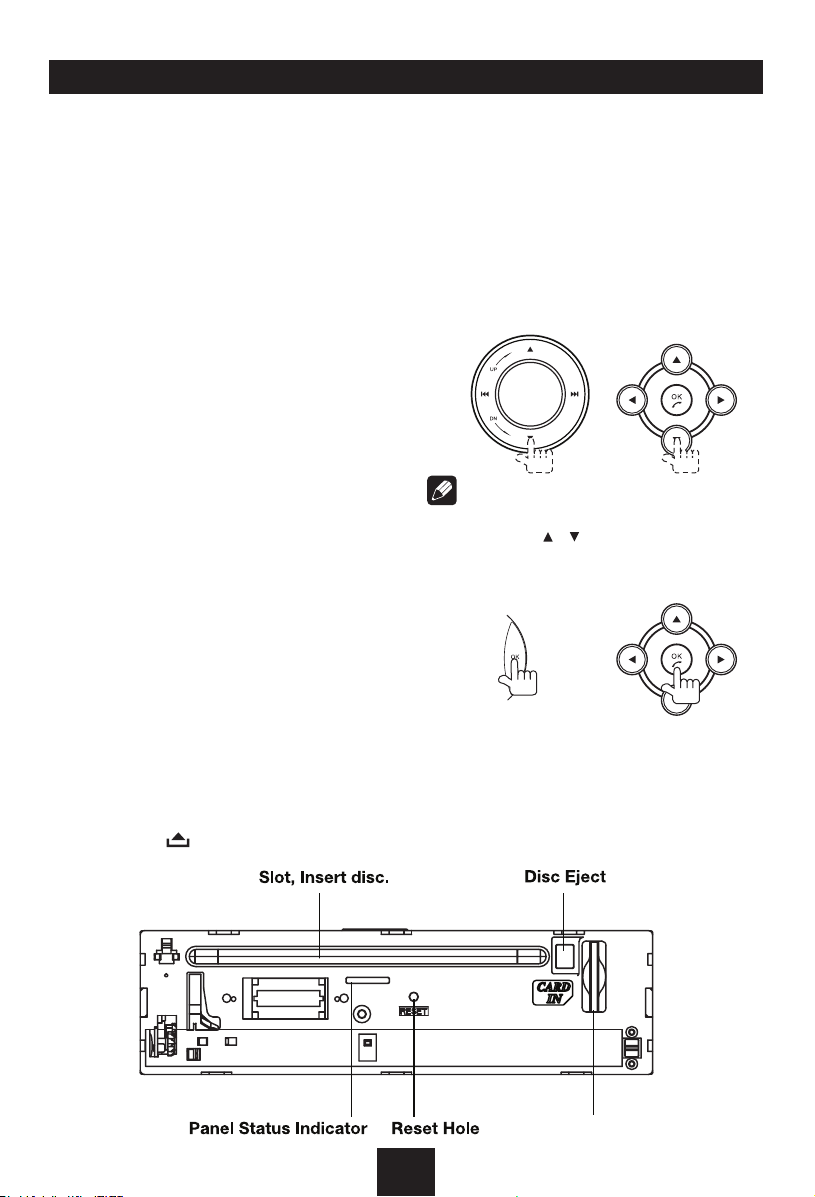
Button Operation Explanations
Some frequent operations
1) Move cursor
Note:
In Setting mode, the VOL knob has the same
function as the / button to select setting
items.
2) Conrm
Press the button to open the
panel.
Music Card Slot
3

Panel Controls
Power on/off: Press to turn on/off the unit.
1. Panel open
2. - Pl ay /Pa u se (i n DV D , CD an d MP 3/W M A
modes)
- Band swit ch : FM1 -F M2-FM3-AM 1- AM 2 (in
Radio mode)
- Dial/Receive call (press briefly, in BT mode)
- Switch the HFP voice between unit and HFP
devic e (press more tha n 2 secon ds, in BT
mode)
- RDS program type (press and hold more than 2
seconds, in Radio mode)
3. - Preset scan (press briefly, in Radio mode)
- Auto preset (press more than 2 seconds, in
Radio mode)
- Stop (in CD, MP3/WMA, and DVD video mode)
Terminate call
-
4. - Press to navigate up among option items (in
DVD, CD and MP3/WMA modes)
- Play the previous preset radio station (in Radio
mode)
5. 3 inch TFT display
6. Power on/off (press more than 2 seconds)
7. - Short press to select playing mode:
• RADIO
• DISC(whendiscinserted)
• USB(whenUSBinserted)
• SD(whenSD/MMCinserted)
• AUX ( fro nt a ud io & v id eo i np ut. Ext er na l
peripheral devices with RCA audio and video
outputs can be connected with the unit.)
• BT
- Long press to return to main source menu when
in any mode, then use navigate button to select
the de sir ed mod e, and pre ss OK butto n to
confirm.
8. Mute
9. - Confirm operation
- Stop auto seeking (in Radio mode)
- Connect or disconnect HFP/A2DP. (press more
than 2 seconds, in BT mode)
- Answer the incoming call.
- Dial out
(in BT mode)
10. - Can cel so ur ce selec t men u and ret ur n to
previous menu
- When play back pictures/videos, press to show
information.
- Display off (press more than 2 seconds)
Press any button to resume.
11. - Search the previous station automatically (press
briefly, in Radio mode).
- Search the previous station manually, and each
press to seek step by step (press more than 2
seconds, in Radio mode).
- Press to search the previous track or chapter (in
CD, MP3/WMA, and DVD video mode).
- Fast backward by 2, 4, 8, 16 step (press more
than 2 seconds, in CD, MP3/WMA and DVD
video mode).
- Press to navigate left among option items
12. - Press to navigate down among option items (in
DVD, CD and MP3/WMA modes)
- Pla y the next pr eset radio station (in Radio
mode)
13. - Rotate the knob to adjust volume level
- Press to select Audio/video Setting, press
on the main unit or on the remote control to
adjust level.
- Press more than 2 seconds to Setting menu.
14. - Search the next station auto matically (press
briefly, in Radio mode).
- Search the next station ma nually, and each
press to seek step by step (press more than 2
seconds, in Radio mode).
- Search the next track or chapter (in CD, MP3/
WMA, and DVD video mode).
- Fast forward by 2, 4, 8, 16 step (press more
than 2 seconds, in CD, MP3/WMA and DVD
video mode).
- Press to navigate right among option items
15. Remote sensor
16. USB port
17. AV in
/
4
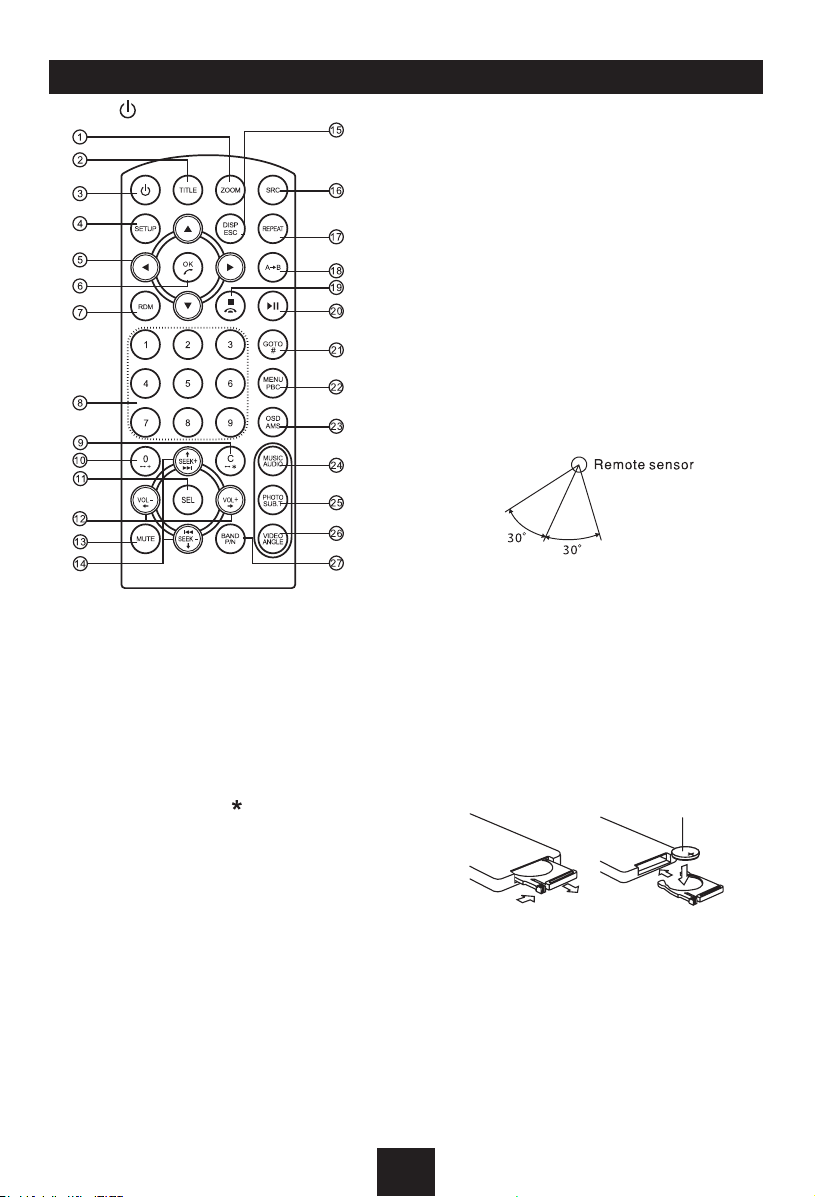
Remote Controls
Press to turn on/off the unit.
1. Zoom (DVD/VCD only)
2. Title (DVD only)
3. Power on/off
4. Setup
5. Menu cursor
6. - Confirm operation
- Dial/Receive call (in BT mode)
7. Random playback
8. Digit buttons
9. - Short press to clear the input number. (in BT
mode)
- Long press to iInput “ ”
10. - Short press to input number “0”
- Long press to input “+”
11. Select Audio/Video Setting, then rotate the
knob to adjust level.
12. Volume
13. Mute
14. - Radio tune
- Track skip/seek
15. - DISP: Display time/clock (Video mode)
- ESC: Return to previous menu
16. Source switch
17. Repeat
18. Repeat A-B
19. - Stop/Return
Terminate call
-
20. Play/Pause
21. - Goto search (DVD/VCD only)
- Input “#” (in BT mode)
(in BT mode)
22. - DVD menu
- PBC (for VCD 2.0 or up)
23. - OSD: On screen display
- AMS: Search and store stations
automatically
Swtch audio channel.
24. -
- Switch DVD audio language
- Show music list.
25. - Select DVD or DivX subtitle language.
- Show photo list
26. - Select a difference angle/version of the
current DVD scene.
- Show video list
27. - Video system PAL/NTSC/AUTO
- Radio band (in Radio mode)
Remote Control Operating Range
The re mot e contr o l c an o per a te w ith i n
a distance of 3~5m.
Replacing the lithium battery
Wh en the ra ng e o f o per ation of th e c ard
remote control becomes short or no function,
replace the lithium battery with a new one.
Make sure the battery polarity replacement is
correct.
1. Pull out the battery holder while pressing
the stopper.
2. Insert the button-type lithium battery with
the (+) mark facing upward. Insert the battery
holder into the remote control.
(CR 20 25)
1 2
Warning
• Store the battery wherechildren cannot
reach. If a child accidentally swallows the
battery, consult a doctor immediately.
• Do not recharge, short, disassembl e or
heat the battery or dispose it in a fire.
• Donotleavethebatterywithothermetallic
materials. Otherwise, the battery may start
to give off heat, crack or catch fire.
• Whenthrowingawayorsavingthe battery,
wrap it in tape and insulate.
5
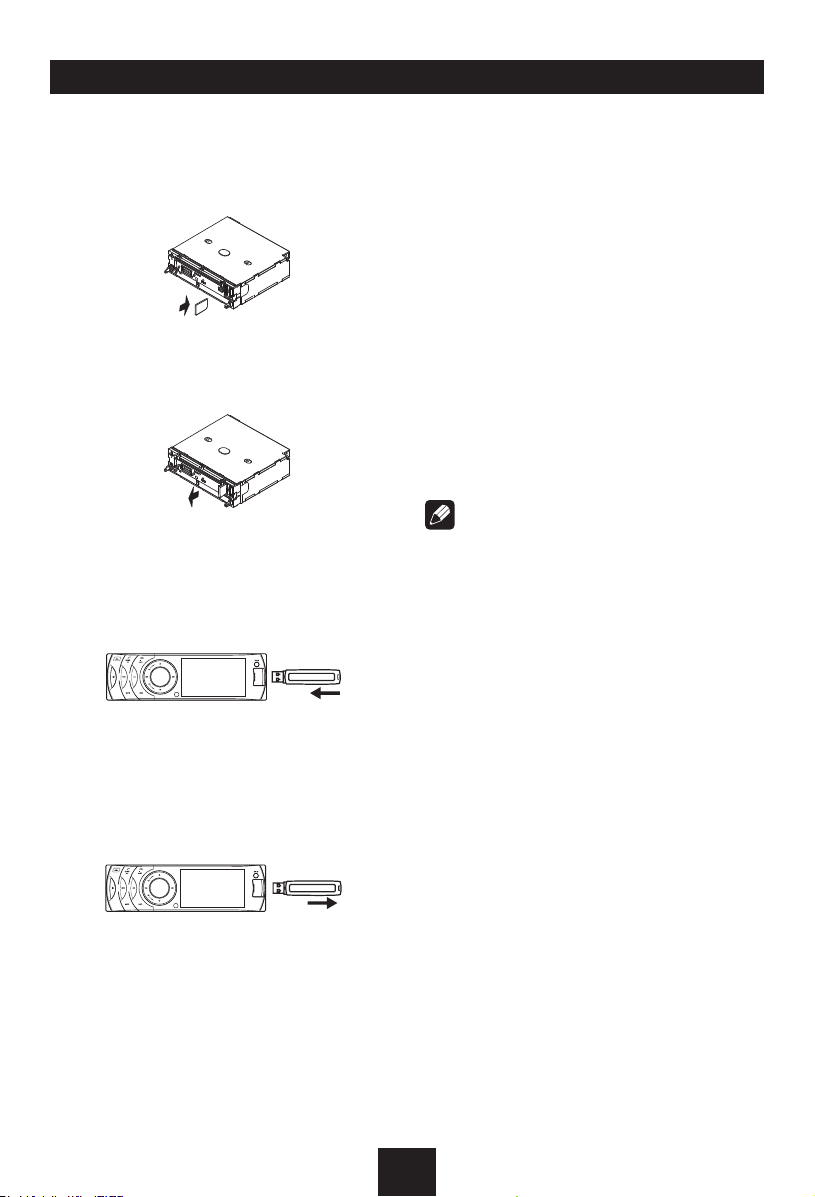
USB/SD/MMC/MP3 Playback
1. Load SD/MMC Card
Insert the SD/MMC card into the slot, with
the front side at right.
The unit will play the music automatically
and the LCD will show CARD.
2. Take out SD/MMC Card
Press
SRC
mode, slightly press SD/MMC card, take
out the card when it pops out.
button and switch to non CARD
3. Load USB Equipment
Open the cap, in se rt the US B into t he
connector and the unit will play the music
in the USB memory automatically, and the
LCD will show USB.
USB/SD/MMC Notes
US B fun ctions (flas h mem ory ty pe) MP 3
music play
1. SD/MMC card support
2. USB flas h memo r y 2 i n 1 (SD/ M MC)
support
3. FAT 12/FAT 16FAT 32 is possible
- FAT 12/16 (dir : 200 supp ort, file: 50 0
support)
- FAT 32 (dir: 200 support, file: 500 support)
4. File name: 32 byte/dir name: 32 byte /tag
name: 32 byte
5. Tag (id3 tag ver 2.0)
- Title/artist/album: 32 byte support
6. Multi card reader not support
7. USB 1.1 support
USB 2.0 support
(it can not support USB 2.0 speed. Just, get
the same speed with USB 1.1)
Note:
Not all kinds of USB devices are compatible
with the unit.
4. Take out USB Equipment
Press
SRC
mode, then take off the USB stick, close
the cap.
button and switch to non USB
6
Basic Operations
Turn on/off the Power
1. Press to turn on the unit.
The unit goes back to the last status after
power on.
2. Long press
Mute
Press the MUTE
Note:
• Do ing t he o pera t i on a bove aga i n or
adjusting volume will release muting.
• Mut e icon appe ar s on t he T FT d uring
muting.
Adjust the Volume
Rotate the knob on the panel or press VOL +/on the remote control to increase or decrease
the volume.
The adjustable range of volume is 0 to 39.
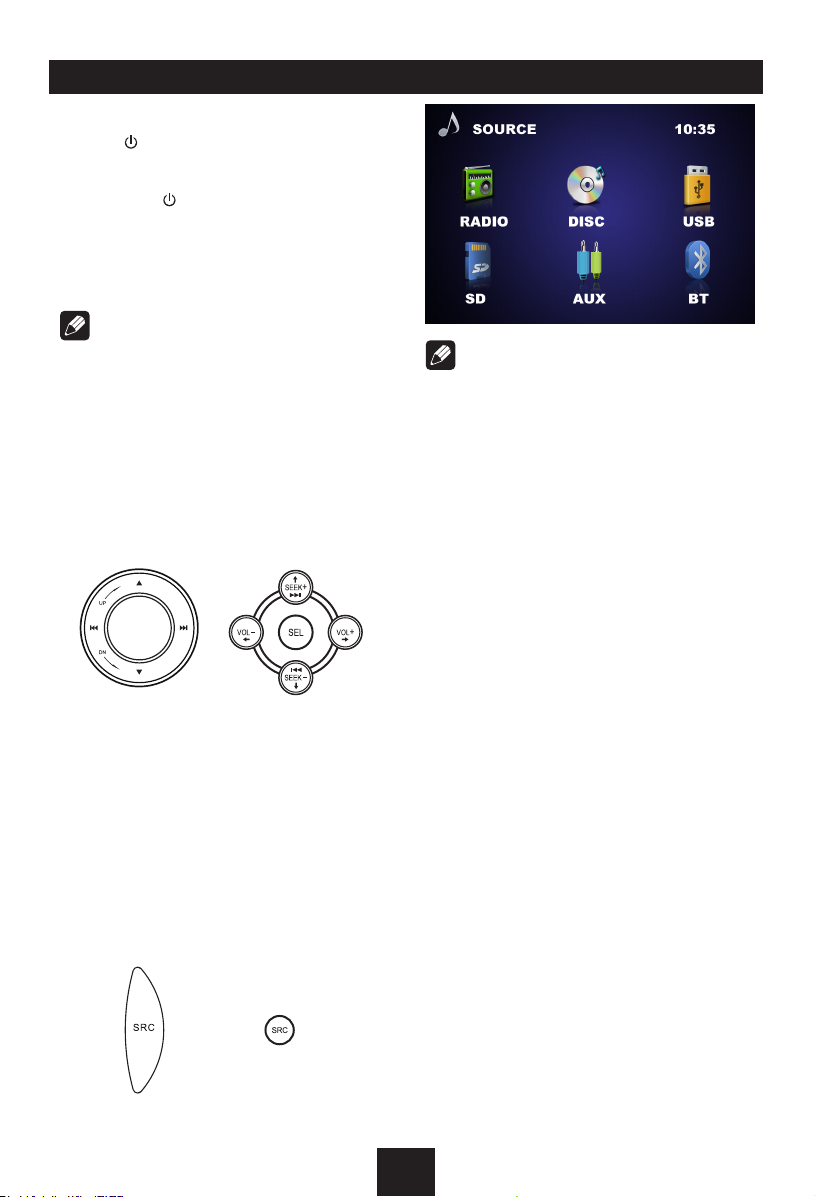
Playing Source Selection
Method 1
Short pr ess the SRC button on th e panel
or remote control to cycl e thro ugh all the
available sources.
to power off.
button
to cut the sound.
Note:
• When somedevicesare not ready, they
cannot be selected.
• Youshouldstopswitchingwhentheplaying
source you desired has been selected and
wait for some seconds, the unit will auto
enter the playing source mode you have
selected.
When Parking Brake Applied
1. If 'PRK SW' cable is connected to hand
brake switch, the video display of the TFT
monitor will be controlled by driving status,
system setup and input video sources.
2. Wh en the c ar is moving a he ad, if the
video disc is played, the screen appears
“Warning!!! It is illegal to view video! while
driving or operating a motor vehicle. Set
parking brake to view video.”. The above
wa rn in g sc re en w il l pr event the dr iver
watching images. The passengers at the
rear seats can watch normally.
Method 2
In any mode, long press the SRC button on
the panel or remote control to enter main
source menu, then use navigate button to
select the desired mode, and press OK to
confirm.
When Reverse Driving
If the rear view video camera is connected,
the unit automatically switches to CAMERA
source during reverse driving. The unit returns
to the original work mode after the reverse
driving is done.
7
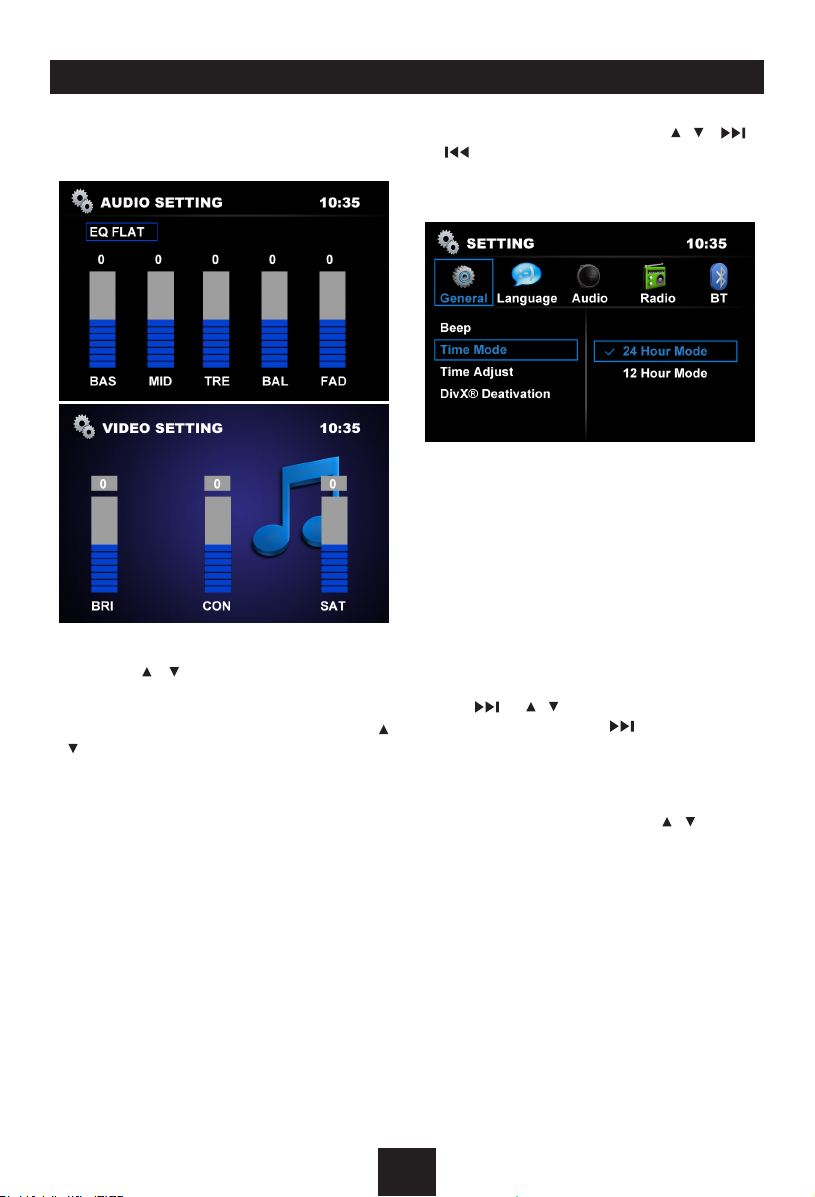
Rotary Knob Menu
1. Rotate the knob to adjust volume level.
2. Short press to access the Audio&VIDEO
Setting menu.
Each press the knob to change the AUDIO
mode: EQ/Bass/Middle/Treble/Balance/Fader,
and press
remote control to adjust level.
Each press the knob to change the VIDEO
mode: Bright/Contrast/Saturation, and press
/ on the main unit or on the remote control to
adjust level.
EQ : USE R/F LAT /P OP/ ROC K/C LA SSI C/
JAZZ
The Equalizer function applies preset sound
effects to the unit’s audio output signal. Turn
the rotary encoder to select from the following
equalizer options: USER, FLAT, POPULAR,
ROCK, CLASSIC, JAZZ. With the equalizer
function activated, if bass or treble is adjusted,
the EQ Mode wi ll revert to “USER”. When
the equalizer function is activated, the most
recently selected bass/treble levels cannot be
adjusted. When the equalizer function is not
active, the unit will return to the most recently
selected bass and treble levels.
/ on the main unit or on the
3. Press the knob more than 2 seconds to
enter Setting mode, then Use
and OK key to select setting items.
General Setting
Beep: On/ Off
The beep tone feature allows the selection of
an audible beep tone to be heard each time
the menu is accessed.
Time Mode
24 Hour Mode: the clock displays in the type
of 24 hours such as 20:18.
12 Hour Mode: the clock displays in the type
of 12 hours such as 11:18 AM.
Time Adjust
Press
Eac h time yo u p r ess
segment of the clock display:
Hour-Minute
As you select segments of the clock display
the segment selected will be highlighted. Then
you can rotate the knob or press / to put a
clock right.
®
Deactivation
DivX
Display the DivX® activation information.
In order to play DivX® VOD (video on demand)
co ntent s on thi s unit , the uni t must fir st
be registe red with a DivX® VO D cont ents
provider.
DivX® Registration
To show the DivX® registration code and web
site.
or
/
key to set hour and minute.
t o sele c t o n e
/ / /
8

Rotary Knob Menu
Parental control
1 Wh en “Enter pas sword” appears on the
display, input a 4-digit password by remote
control (Original password: 8888), press
OK or E N TER butt o n t o c onf i rm an d
“Correct Password” appears.
2 Press OK or ENTER, then rotate the knob
or press / key to select a rating level.
The rating is from 1 to 8:
(1) with the most limits when playing.
(8) with the least limits when playing.
3 Press the OK or ENTER button to conrm.
Set Password
1 When “Enter password” appe ars on the
display, input the old password by remote
control, pr es s OK or ENTER bu tt on to
conrm and “Correct Password” appears.
2 Press the OK or ENTER, enter a new 4-digit
password by the remote control, press the
OK or ENTER button to conrm.
3 Then input the new passwo rd aga in for
double confirm, press the OK or ENTER
button an d “Set Password S uccessful”
appears.
• Original password: 8888
• If you forget your password, enter original
password to unlock.
Default Settings
Load the default settings.
When the selection menu appears, press
key to select Yes or No, press OK or ENTER
button to conrm.
Aspect Ratio:
4:3: For 4:3 TV picture.
16:9: For 16:9 wide screen TV.
Note:
There is no 16:9 specification for VCD; for
VCD the video output only in 4:3 format; in our
setting menu, 4:3 or 16:9 setting is for video
monitor setting, but not mean that DVD will
output video signal in 4:3 or 16:9 format; which
means current our TFT is in 16:9, when we
play vcd, if we want to keep the video signal
without distortion, the video should not be set
to full screen like 16:9.
Mirror: On/Off
This option allows for selection of a mirror
image view when a rear view backup camera
(sold separately) is connected to the CAMERA
IN input on the back of the radio.
knob or press
Back Camera
Select back camera Battery, Ground or Off.
Battery: When the polarity of the connected
le ad is posit iv e whi le t he gear shi ft is in
REVERSE (R) position
Ground: When the polarity of the connected
lead is negative while the gear shift is in
REVERSE (R) position
Off: The back camera is disabled.
AUX
Select auxiliary device on or off.
Text Scroll
Select Text Scroll on or off.
Parking: On/Off
When it is in Parking “On” mode, if you play
the video disc, the screen will show “Warning!!!
It is illegal to vi ew video! whil e driv ing or
operating a motor vehicle. Set parking brake
to view video.
SWC: Power/Mute/Source/Vol+/Vol-/Seek
Rotate the knob or press / key
steering wheel control function.
Color Select
Select the key backlight color Color1,2,3...12
or User.
Color Scan
Select Color Scan on or off.
/ key to select “On” or “Off”.
”.
Rotate the
to select
9

Rotary Knob Menu
Language Setting
Language
Select one language that you are familiar with
to display system menu.
Subtitle
Select one language that you are familiar with
to display DVD subtitles.
If the DVD disc has the su btitle file in the
sel e cted la ngu a ge, th e subt i t le wi l l b e
displayed in the selected language.
If the DVD disc does not contain the subtitle
file in the selected language, the subtitle will
be displayed in the default language.
Audio
Select one dialogue language that you are
familiar with when playing back DVD discs.
selected language.
If the DVD disc does not contain the selected
la nguage, t he D VD M ENU/T IT LE wil l be
displayed in the default language.
Audio Setting
Loudness: On/Off
When listening to music at low volumes, this
feature will selectively boost certain bass and
treble frequencies.
SubWoofer:
Selecting 80Hz, 120Hz or 160Hz to activate
subwoofer-out.
Selecting subwoofer off to activate rear lineout.
Sub Volume:
Select subwoofer volume: 0 to 33.
• Sub Volume cou ldn’t be adjusted when
SubWoofer Off is selected.
Note:
If the DVD di sc h as the audio file in the
selected language, the dialogues you listened
to will be in the selected language.
If the DVD disc does not contain the audio file
in the selected language, the dialogues you
listened to will be in the default language.
You can change the language by pressing
MUSIC/AUDIO key of the remote controller.
DVD Menu
Select one language that you are familiar with
to display DVD menu.
Note:
If the DVD disc has the selected language,
the DVD MENU/TITLE will be displayed in the
10

Rotary Knob Menu
Radio Setting
LOC DX:
Select radio local or distant.
LOC: Only stations with strong signal can be
received.
DX: Stations with strong and weak signals can
be received.
Stereo / Mono:
Select FM stereo or mono.
AF: On/Off
Choose AF (Alternative Frequency) on or off.
AF ON: AF function is activated.
AF OFF: AF function is disabled.
Remark: AF indicator on LCD will flash until
RDS information is received. If RDS service
is not available in your area, turn off the AF
mode.
TA: On/Off
C h o os e TA (Tr aff i c A n no un c e m en ts
Identification) on or off.
When TA mode is turned on, the TA indicator
will blink.
When trafc announcement is received, the TA
indicator will display. The unit will temporarily
switch to the tuner mode (regardless of the
current mode) and be gin broadcasting the
announcement at TA volume level. After the
traffic announcement is over, it will return to
the previous mode and volume level. When
TA is turned on, SEEK, SCAN, AMS function
can only be received or saved when traffic
program identication (TP) code is received.
CT: On/Off
Some stations broadcast the time and date
within the encoded RDS signal. The clock
time is automatically adjusted when “CT” is
set to “ON”.
TA Volume: 00-33
Choose TA-VOL level.
Regional: On/Off
Choose AF function to implement or ignore the
regional code (of the PI) and only stations in
the current region can be tuned automatically.
RE G ON: AF f un ct io n wil l imp le me nt the
regional code (of the PI) and only stations in
the current region can be tuned automatically.
REG OFF: AF function will ignore the regional
code (of the PI) and stat ions in the other
regions can also be tuned automatically.
BT Setting
Bluetooth:
If the Bluetooth is setting is On, then the BT
will be available , otherwise the BT will never
work and in disable status.
Connect:
If the Con ne ct is set to Auto, th en BT o f
the unit will connect automatically with the
HFP device which is already paired in every
disconnect status ( Bluetooth must be “On”).
Auto Answer:
If the Au to Answ er is s e t to Au to, t h en
BT of the u ni t will answer the i n- co ming
call automatical ly when the BT is alre ady
connected with your HFP device( Bluetooth
must be “On”), otherwise you have to answer
the in-coming call by press answer button of
the remote or panel.
Pairing Code:
Change the pin code by the remote control.
Default pin code is “1234”.
11

Radio Mode
Accessing Radio Mode
Press the SRC button on the front panel or
remote control to switch to the Radio source.
1
4
5
6
7
8
2
3
1. Source Indicator
2. Radio Station Frequency
3. Time/Clock
4. RDS Information
5. AM/FM Band
6. Current Preset Channels
7. EQ Indicator
8. AF Indicator
Selecting a Band
Press BAND once or more to select FM1 FM2 - FM3 - AM1 - AM2.
Display shows wave band, frequency, and
preset station number if already stored.
Selecting a Station
Press the or tuning button to tune to
another station.
Tuning
- AUTO SEEK
Press the or buttons to seek the next/
previous station automatically.
- MANUAL SEEK
Press and hold the or buttons to enter
manual tuning mode. Press the buttons again
to move the radio frequency number up or
down one step.
Note:
During manual seeking, if the pause between
two operating steps is longer than 5 seconds,
press
auto seeking.
the
or buttons
, the unit will enter
Preset Mode
Six numbered preset buttons store and recall
stations for each band. The stored stations
(P1-P6) for the current band can be viewed on
the screen.
Storing Stations
- Auto storing
1. Select a band (if needed).
2. Press
3. Hol d
- Manual Storing
1. Select a band (if needed), then select a
2. Press and hold a preset button (numbers
3. The preset number and station is displayed
AM S
station P1 - P6 for 5 seconds each.
6 st ron ges t ava ila ble s tat ion s w ill b e
automatically saved in the preset button
(numbers 1-6).
station.
1-6) on the remote control.
and highlighted.
bri efl y to sca n the p re set
AM S
mo r e tha n 2 sec o nds , the
Recalling a Station
1. Select a band (if needed).
2. Pre ss a r emo te cont ro l p reset but ton
(numbers 1-6) to select the corresponding
stored station.
12

RDS (Radio Data System, optional)
RDS servic e availabilit y varies with areas.
Pl ea se u nd er stand if R DS s er vi ce i s no t
available in your area, the following service is
not available.
PTY Reception (Program Type)
RDS FM stations provide a program type
identication signal.
Example: news, rock, info, sport, etc.
RDS Basics
AF (Alternative Frequency): When the radio
si gnal str ength i s poor, ena bli ng t he AF
function will allow the unit to automatically
se ar ch a no ther sta ti on w it h th e sa me P I
(program identication) as the current station
but with stronger signal strength.
PS (Program Service name): The name of
station will be displayed instead of frequency.
Trafc Announcements
Some RDS FM stations periodically provide
trafc information.
TP (Trafc Program Identication)
Broadcasting of trafc information
TA (Trafc Announcements Identication)
Radio announcements on trafc conditions
EON (Enhanced Other Networks)
Whe n EO N da ta i s re ceiv e d , t h e EO N
indicator lights and the TA and AF functions
are enhanced.
TA: Traffic information can be received from
the current station or stations in other network.
AF: The frequency list of preset RDS stations
is updated by EON data. EON enables the
radio to make fuller use of RDS information.
It con stantly updates the AF list of preset
stations, including the one that currently tuned
into. If you preset a station around the area at
your home, you will later be able to receive the
same station at an alternative frequency, or
any other station serving the same program,
EON also keeps track of locally available TP
stations for quick reception.
PTY Mode:
Press BAND
on the Program Type reception, the previous
PTY type is shown
the desired programtype.The selected PTY
type is shown and searching starts if no other
function is selected for 2 seconds. If there is
no corresponding programtype, NOPTY is
shown and the unit will return to normal mode.
more than 2 seconds
, then use / to select
to turn
13

Disc Mode
Accessing Disc Mode
If a disc is already in the disc slot but is not
playing, press the SRC button on the front
panel or on the remote control to switch to
the DISC source. To play les from an SD or
USB that is already inserted, choose the SD
or USB source. The disc playback screen is
indicated below:
1 3
4
5
6
2
1. Source Indicator
2. Current Track/Total Track
3. Name of the Song Display
4. Audio Folder
5. Picture Folder
6. Video Folder
Insert a Disc
Press to flip down the panel. Insert the disc
into the slot, and the unit will change to disc
mode automatically.
Note:
• Please confirm whether thereis a discin
the unit before you insert another one.
• Theunitwillexitcurrentplayingsourceand
enter DVD mode when one disc is inserted.
Eject the Disc
Press to flip down the panel. Press to
eject the disc.
Note:
• After ejecting thedisc, the unitrevertsto
radio mode.
• You can ejectadisc withtheunitpowered
off. The unit remains off after the disc is
ejected.
Disc Playback
1. When disc inserted, display shows Loading.
For MP3 or disc with mixed files, reading
time may exceed 1 minute.
2. ERROR will be displayed if error found in
disc operation.
3. For VCD/CD, VCD or CD icon will appear
on the display.
4. While MP3/WMA files playback, MP3/WMA
icon will appear on the display.
5. F or DVD, DVD icon will a ppear on the
display and TITLE appears. Press
or
to play.
ENTER
File Type Supported
Audio le: MP3(*.mp3), WMA(*.wma)
Video le:
MP4(*.avi,DIVX3.11/4.0/5.0/6.0)
MPEG 2 (*.vob)
MPEG 1 (*.dat)
Picture le: JPEG (*.jpg)
MP3 le:
ISO 9660 or ISO 9660 + Joliet format - Max.
30 characters.
Max. nested directory is 8 levels.
The max. album number is 99.
The max. length of each track is 99 minutes
59 seconds.
Supported sampling frequency for MP3 disc:
8KHz to 48KHz (44.1KHz preferably).
Supported bit-rates of MP3 disc are: 32 - 320
kbps (128 kbps preferably).
14

Disc Mode
Disc and File NOT Supported
*.AAC, *.DLF, *.M3U, *.PLS, MP3 PRO files
and files with DRM.
Open session discs.
Audio/Picture/Video File Playback
When AUDIO/PICTURE/VIDEO file is played,
Category/Folder/File list will be displayed on
the screen, and file/folder name being played
will be displayed on top. Current selected item
will be highlighted.
The list lets you see the list of track titles or
folder names on a disc. If you select a folder
on the list, you can view its contents.
For Audio Files
1. Press
2. Use / to select AUDIO folders.
3. Press OK,
4. Use
5. During the file playing, press to stop, then
ESC
to return to playlist menu.
on the remote control to display all available
audio file folders.
select desired file, press OK,
front panel or
to start play.
press
on the front panel or
/ to enter file list and use / to
ENTER
on the remote control
to return.
ENTER
on the
For Picture Files
1. Press
2. Use / to select PICTURE folders.
3. Press OK, on the front panel or
4. Use
5. During the file playing, press to stop and
ESC
to return to playlist menu.
on the remote control to display all available
picture file folders.
/ to enter file list and use / to
select desired file, press OK, on the
front panel or
to slide show the pictures.
return to the sub-root.
ENTER
on the remote control
ENTER
front panel or
to start play.
5. During the file playing, press
return to the sub-root.
Note:
1. If the selected f older does not co ntain
any playab le tr ack, the track list is not
displayed.
During the folder select ing,
2.
to the upper folder (parent folder). If the
uppermost folder is listed,
used.
ENTER
on the remote control
to stop and
press
ESC
MP3/WMA Notes
MP 3 a nd WMA (Win dow s Med ia Au dio )
music file s are digital audio f iles that are
compressed to allow more files to be stored.
Th is unit c an pla y MP3 /WMA a nd vid eo
directly from files contained on a CD-R/RW,
DVD- RO M, DVD+RW, DVD-RW, D VD +R ,
DVD-R and DVD-VIDEO, or an SD card or
USB D evice. Many ty pes of software are
available for converting audio files into MP3/
WMA formats. Nero or Roxio Easy CD Creator
are recommended. This unit can play MP3
(MPEG1, 2, 2.5 Audio Layer 3). However, the
MP3 recording media and accepted formats
are limited.
Entering ID3 Tag
This unit supports ID3 tag version 1.0.
For character codes, refer to the table to the
below.
ESC
cannot be
For Video Files
1. Press
2. Use
3. Press OK,
4. Use / to enter file list and use / to
ESC
to return to playlist menu.
/ to select VIDEO folders.
on the remote control to display all available
on the front panel or
video file folders.
select desired file, press OK, on the
ENTER
15

()
0
1
2
♪
①
♪
②
5
♪
⑧
♪
⑦
6
7
♪
⑨
♪
③
3
4
♪
④
♪
⑤
♪
⑥
Lay er1 Lay er 2 Lay er 3 La yer 4 La yer 5
○ Ro ot Fo lde r
Fo lde r
♪ Fil e
Disc Mode
Entering File and Folder Names
Names us ing the code list ch aract ers are
the only file names an d folder names that
can be entere d and disp layed. Using any
other character will cause the file and folder
names to be displayed incorrectly. The unit
recognizes and plays only les with the MP3/
WMA extension.
Note:
A le name entered with characters not on the
code list may not play correctly.
MP3 Playing Order
When selected for playing, files and folders
(Folder Search, File Search or Folder Select)
are accessed in the order in which they were
written to the media. As a result, the order in
which they are expected to be played may
not match the order in which they are actually
played. You may be able to set the order in
which MP3/WMA files are to be played by
assigning file n am es beginning wi th play
sequence numbers such as "01" to "99". For
example, a medium with the following folder/
le hierarchy is subject to Folder Search, File
Search or Folder Select as shown below.
only other folders. In the example above, the
unit will display folders 3, 4, 6, and 8, but not
2 and 7 since they do not contain any tracks
directly. Folder 5 is not recognized at all since
it is at the fourth level.
Electronic Shock Protection
• 10secondsforCD-DA(CDA)
• >45secondsforMP3recordedat44.1kHz,
128kbps
• >90secondsforWMArecordedat44.1kHz,
128kbps
Stop Playback Temporarily
- D u r ing pla y b ack, pr e ss t o pa use
playback.
- The sound will be muted.
- Display "PAUSE" in the TV screen.
Press
To resume normal play, repeat the operation.
again to continue playback.
Stop Playback Entirely
During DVD, VCD, CD, MP3 playback:
1. Press key once stopping the playback
and the relevant location on the disc is
saved, press
from the saved disc location.
2. Press
twice to cease the playback. Press
to s ta rt t he playbac k fro m the very
beginning the Title page of the DVD or the
first track of VCD / CD.
to resume the playback
The player will on ly recognize three folder
levels and does not display folders containing
Select Desired Track
- Press or to skip to the previous/next
track.
- Use 1-9 on the remote control to select
desired track number.
Fast Forward/Backward During
Playback
Press or for more than 2 seconds once
or more toselect X2, X4, X8, X1 6, to fast
backward or forward track during playback.
- D uri n g t he fa s t f orw a rd or backw a rd
operation, press bri ef ly to playback
again.
- D uri n g t he fa s t f orw a rd or backw a rd
operation, the volume will be muted.
16
Disc Mode
Repeat
During playback, press REPEAT once o r
more.
- RPT icon will appear on the display.
- For VCD/CD: Display appears Repeat single
Repeat all
- For DVD: Display appears Repeat Chapter
Repeat Title Repeat Off
- For File disc: Display appears Repeat single
Repeat folder Repeat all
Repeat A B
Select desired passage to repeat playback.
- Press
- Press
Di sp la y shows
- Press
GOTO
Goto desired title/chapter or time point directly
of video.
1 Press
2. Use / button on the front panel or the
The options of the search menu depends
3. U se / butto n to select des ired title/
4. Press OK or
PBC - Playback control ( for VCD
2.0 or up)
1. If you insert a VCD with PBC, press
2. When PBC is set to Off, playback starts
3. When PBC is set to On, the PBC menu
A B
Display shows
A B
passage start to replay.
A B
shows
GOTO
search menu display on top of the screen.
remote control to select Title, Chapter or
Time, if necessary.
on the video type, it maybe display only
one or two of the options.
cha pte r or inpu t t he nu mber by d igi t
buttons.
PBC
button to set the PBC On/Off.
from the begi n n i n g of th e 1s t tr a c k
automatically.
will be displayed, use navigation buttons
or digit buttons to select desired track,
press OK or
playback, then the PBC will be set to Off
automatically.
once to select starting point.
Rep A-
.
again to select ending point.
Rep A-B
once again to exit. Display
Rep A B Off
button on the remote control,
ENTER
ENTER
, and se le ct ed
.
button to confirm.
button to confirm the
MENU/
DVD Audio Select
Pr e s s MU SI C / A U D I O t o se le c t audi o
language to listen if the DVD has multiple
audio languages.
VCD Audio Select
Press MUSIC/AUDIO to select audio channel
to listen.
DVD Subtitle Select
Press PHOTO/SUB.T to select the subtitle
lan guage to show if the DVD has multiple
language subtitles.
DVD Title Select
Press TITLE to display title or chapter list, use
cursor or digit number to select, press OK or
ENTER to play.
DVD Angle Select
Press VIDEO/ANGLE to select different angle
to view if the DVD has multiple-angle views.
Picture Mirror
When yo u vi e w a pi c t u r e, p r e ss /
repeatedly to mirror the picture vertically, and
press / repeatedly to mirror the picture
horizontally.
ZOOM
Pr ess ZOO M but ton , the pic tur e wil l be
zoomed accordingly.
17

Bluetooth Mode
Bluetooth Operation
The Bluetooth allows you to utilize your car’s
built-in audio system for wireless mobile phone
or music ha ndsfree communication. Some
Bl ue to ot h mob il e ph on es hav e the audio
features, and some portable audio players
support Bluetooth feature. This system can
play audio data stored in a Bluetooth audio
device. The car stereo with Bluetooth will be
able to retrieve phonebook contacts, received
call, dialled call, missed call, incoming calls,
outgoing call and listen to music.
Note:
• Do not leave the microphone of Bluetooth
handsfree in the places with wind passing
such as air outlet of the air conditioner, etc.
This may cause a malfunction.
• If leave it in the places subjected to direct
sun, high temperature can cause distortion,
disco l o r a t i on w h i c h ma y re s u l t i n a
malfunction.
• This system will not operate or may operate
im pr operly wit h so me B luetoot h aud io
players.
• The unit cannot guarantee the compatibility
of all mobile phones together with the unit.
Pairing
1. S wi tc h the Bluetooth on in t he system
setting menu. (see BT Setting)
2. Turn on Bluetooth function of your mobile
phone.
3. E nter mob il e phone’s Blu etooth set up
menu.
4. Search for new Bluetooth devices.
5. Select RDD 772BTi from the pairing list on
the mobile phone.
6. Enter the password. (Default “1234”)
7. After pairing successfully, the unit will show
"HFP: Connected", "A2DP: Connected".
If the connection doesn't es tablish after
pairing, Use / button on the front panel
or remote control to select HFP or A2DP,
then long press OK button to connect it
manually.
Main menu
Press the SRC button to switch the source to
“BT”.
“BLUETOOTH” must be ON to access to the
BT source.
1 3
4
5
6
7
Source indicator
Device name
Time
Status indicator
HFP/A2DP status
Device Information
Indication message
2
Making a call
Press the SRC button to switch the source to
“BT”. Input numbers by remote control then
press OK button on the front panel or ENTER
button on the remote control to dial out.
Answering a call
You can answer an incoming call by pressing
the OK or ENTER button.
* P res s b ut ton on the fro nt pan el or
re mo te c on trol to han g up the c ur rent
conversation or reject an incoming call.
Transfer the call
Press button on the front panel or remote
control to switch the HFP voice between unit
and HFP device.
Note:
Some cell ular phon es may not be able to
transfer the Phone Book data.
Call from Phonebook
Lon g press button on the front panel or
remote control will toggle between BT main
menu and phone book menu when BT device
is connected, if BT is not connected, the menu
could not be switched to phone book menu
18

Bluetooth Mode
1 3
4
8
7
Phone book list
Use
/ button on the front panel or remote
control to select from:
1 Missed Calls
2 Received Calls
3 Dialed Calls
4 Phone Book
Press OK button on the front panel or ENTER
button on the remote control to loading the
data, then the numbers list on the display.
Use / button on the front panel or remote
control to select a number, press OK button
on the front panel or ENTER button on the
remote control to dial out.
2
Audio Streaming Operations
What is audio streaming?
Audio streaming is a technique for transferring
audio data su ch th at it ca n be proc essed
as a steady and continuous stream. Users
can stream music from their external audio
player to their car stereo wirelessly and listen
to th e tracks through th e car’s speakers.
Please consult your nearest dealer for more
information on the product of wireless audio
streaming transmitter offered.
System will always return to Radio mode if
audio streaming is disconnected.
Note:
Be sure to read the chapter "Pairing" before
proceeding.
Play / Pause a track
1. P res s the but ton t o p au se audi o
playback.
2. To resume audio playback, press the
button again.
Selecting a track
Track-up
1. Press the button on the front panel or
remote to move to the beginning of the next
track.
2. E a ch ti m e t he butt o n i s p res s ed,
playback proceeds to another track in the
advancing direction.
Track-down
1. Press the on the front panel or remote
to move the to beginning of the previous
track.
2. E a ch ti m e t he butt o n i s p res s ed,
playback proceeds to previous track in the
reverse direction.
Note:
Playing order will depend on Bluetooth audio
player. When button is pressed, some
A2DP devices will restart the current track
depends on the duration of playback.
CAUTION
Please avoid operating your connected
mobile phone while audio streaming as
this may cause noise or sound choppy on
the song playback.
Audio streaming may or may not resume
after t e l e p h o n e in t e r r u p t as t h i s is
dependent on mobile phone.
19

iPod/iPhone Mode
iPod/iPhone Playback
Connect an optional iPod or iPhone to the unit
by iPod/iPhone cabel. Connect the USB port
to the USB connector on the front of the panel,
and insert the video-out line in the AV-in jack.
When connecting a device, the unit will read
the files automatically. The track information
display on the screen once playback start.
Main Menu
During playback, press ESC button to return
to the ipod playlist menu. press ESC again to
return to the ipod main menu.
4
Use
con t r ol to se l ect “M U S IC”, “V IDEO ” or
"PHOTO".
Select “MUSIC”, press OK or ENTER button,
then use / button to select PLAYLISTS
/ ARTISTS / ALBUM / SONGS / GENRES /
COMPOSERS / PODCASTS.
Use / button and OK or ENTER button to
select a desired option.
Press / button for more than 5 seconds to
skip a whole page.
Select “ V I D E O ” , pres s OK or EN T E R
but t on, th e n u s e / b utt on to s e lec t
MO V IE / MUSI C V IDE O S / T V S HOW S
/ V I D E O P O D C A S T S / R E N T A L /
VID E O I TUN E S U / VI DEO PL A Y LIST S .
Use / button and OK or ENTER button to
select a desired option.
1 3
Source indicator
Track number
Time
Category
/ button on the front panel or remote
2
“Unit does not support photo browsing, Please
play the iPod photo by controlling iPod.”
* During video and photo playback, press
ESC button will e xit video mode, a nd
return back to the ipod video playlist or
ipod main menu.
1 3
5
6
7
Playback information
EQ indicator
Playback status
Elapsed time/Total time
2
8
Stop playback temporarily
- Durin g play ba ck, p re ss but to n to
pause playback.
- The sound will be muted.
- Press again to continue playback.
Select desired track/chapter
- Pres s / b utto n to s k ip to th e
previous/next track/chapter.
Fast forward/backward
Press the / button on the front panel
for more than 2 seconds to fast backward or
forward track during playback.
- D u ring the fa s t f orw a rd or b ack w ard
operation, press briefly to playback
normally again.
- Dur i ng th e f a st fo r war d or b ack w ard
operation, the volume will be muted.
Select “PHOTO”, press OK or ENTER button
shown as below:
20

Device Connections
Notes of connection
• To avoid short cir cu it i n th e elec tr ical
system, ensure that the negative battery
cable is disconnected before installation.
• To prevent short circuit inthe wiring and
damaging to this unit, secure all wirings
with cable clamp or adhesive tape. Route
the wirings in a secured, out of heating
place without touching any moving parts
such as gear shift, handbrake, and seat
rails to prevent the wiring insulation being
melted / wore off.
• Neverpasstheyellow powercord through
th e i nst all ati on hole i nto the en gin e
co m par tme nt and co nne ct to t he car
batter y. Otherwise, a high possibility of
serious short circuit to the electrical system
may be occurred.
• Replacing a n ew f us e with 15A rating
when the old one is broken, us ing no
fuse or f us e wit h improper rating may
cause damage to this unit or even fires.
Parking Brake Cable Connections
If a proper fuse is installed and electrical
problems still occur, please contact with
any professional car shops for inquiry.
• DONOTconnectotherequipmentswiththe
car battery to avoid battery overheating.
• Pleasemakesureallthewiringconnections
& the cables of the Speakers a re we ll in su lated . Otherwis e, t his unit may b e
damaged by short circuit.
• IfthereisnoACCavailable,pleaseconnect
ACC lead to the power supply with a switch.
• Ifan externalpoweramplifier is connected,
please don't connect P.CONT lead to the
power lead of the external power amplifier,
otherwise, electric spark or other damage
may be resulted.
• Nevergroundthespeakeroutputtoprevent
the damage to the built-in power amplifier.
• Th e mi n imum rat i ng o f t h e s p eake r s
connectedto this unitis50W with4to8Ω
impedance.
Reverse Driving Cable Connections
21

Device Connections
Sub-out
Wiring Diagram
Amplifier
(Yellow)
(Yellow)
Camera-in
Video-out
Bluetooth microphone
(Black)
(Black)
Fuse 15A
Bluetooth Antenna
L(White)
R(Red)
Connector
Rear Line-out(Gray)
ISO Connector
(Green)
Reverse
Radio Antenna
(Active high level input)
(Pink)
Parking SW
SWC (Steering Wheel Control)
(Active low level input)
(Black)
(Green/
White)
22

Device Connections
Installation Guide
Using the ISO Connector
1. If yo ur c ar is equi p ped wi th th e I S O
connector, then connect the ISO connectors
as illustrated.
2. F o r co n n ec t i on s w i th o u t th e I SO
connectors, check the wiring in the vehicle
ca ref ul ly before con necti ng, i nc orr ect
connection may cause serious damage to
this unit.
Cut the connector; connect the colored
leads of the power cord to the car battery,
as shown in the color code table below for
speaker and power cable connections.
/Blue
Function
Rear Right (+) - Purple
Rear Right (-) - Purple /
Black Stripe
Front Right (+) - Gray
Front Right (-) - Gray /
Black Stripe
Front Left(+) - White
Front Left(-) - White /
Black Stripe
Rear Left (+) - Green
Rear Left (-) - Green/
Black Stripe
Location
1
2
3
4
5
6
7
8
Connector A Connector B
Battery 12V(+)/Yellow
ANT/Amp control
ACC+/Red
Ground/Black
Preparation
1. Disconnect battery
Before yo u begin, a lways disconne ct the
battery negative terminal.
Note:
If the unit is to be installed in a car equipped
with an on-board drive or navigation computer,
do not disconnect the battery cable. If the
cable is disconnected, the computer memory
may be lost. Under these conditions, use extra
caution during installation to avoid causing a
short circuit.
2. Remove transport screws
IMPORTANT:
Remove these two transport screws
before installation. Otherwise, the DVD
player will not work.
3. Remove unit from sleeve
Lift latches on both sides of sleeve to remove
half-sleeve from the unit.
Mounting Sleeve Installation
1. Slide the mounting sleeve off the chassis.
If it is locked into position, use the removal
tools (supplied) to disengage it.
2. Ch ec k the das hb oa rd openi ng size by
sliding the mounting sleeve into it.
If the opening is too small, carefully cut or
file as necessary until the sleeve easily
slides into the opening. Do not force the
sleeve into the opening or cause it to bend
or bow. Check for sufficient space behind
the dashboard for the unit chassis.
This unit can be installed in any dashboard
with a suitable 183 mm (W) x 53 mm (H)
opening as shown above. The dashboard
should be 4.75 mm - 5.56 mm thick in order
to be able to support the unit.
3. Locate the series of bend tabs along the
top, bottom, and sides of the mounting
23

Installation Guide
sleeve. With the sleeve fully inserted into
the dashboard opening, bend as many of
the tabs outward as necessary to firmly
secure the sleeve to the dashboard.
CAUTION:
For proper operation of the DVD player,
th e cha ssis must be mou nt ed w it hi n
20 of horizontal. Make sure the unit is
mounted within this limitation.
4. Place the unit in front of the dashboard
op en ing so the wir in g can be broug ht
through the mounting sleeve. Follow the
wiring diagram carefully and make certain
all connections are secure and insulated
wi th wire nut s or ele ct rical ta pe. Af ter
completing the wiring connections, turn the
unit on to confirm operation (vehicle ignition
must be on). If the unit does not operate,
re-check all wiring until the problem is
corrected.
5. Make sure the radio is right-side up, then
carefully slide the radio into the mounting
sleeve until it is fully seated and the spring
clips lock it into place.
6. Se cur e the rea r of the u ni t to the c ar
body using the mounting bolt and rubber
cushion.
7. Te st th e un i t us i n g the “Operati o n ”
instructions that follow.
Kit Installation
If y o ur v e h icle req u i r es t h e us e of an
installation kit to mount this unit, follow the
instructions included with the installation kit to
attach the unit to the mounting plate supplied
with the kit.
1. Wire and test the unit as outlined in the
Mounting Sleeve Installation instructions.
2. Install the radio/mounting plate assembly
to th e sub-dash bo ard accord in g to t he
instructions in the installation kit.
3. Replace the dashboard trim panel.
ISO Installation
This unit has threaded holes in the chassis
si de panels which may be u se d wit h the
original factory mounting brackets of some
vehicles to mount the radio to the dashboard.
Please consult with your local car stereo shop
for assistance on this type of installation.
1. Remove the existing factory radio from the
dashboard or ce nter console mounting.
Save all hardware and brackets as they will
be used to mount the new radio.
2. Carefully unsnap the plastic frame from the
front of the new unit chassis. Remove and
discard the frame.
3. Remove the factory mounting brackets and
Mounting bolt
rubber cushion
Transport
screws
24

Installation Guide
hardware from the existing unit and attach
them to the new unit. Do not exceed M5 x
9mm maximum screw size. Longer screws
may da mag e compo n ent s insi d e t h e
chassis.
4. Wir e t h e n ew un i t a s o utl i ned in the
Mounting Sleeve Installation instructions.
5. Mou n t t h e n ew u nit as semb l y t o t h e
dashb oard or center consol e usin g the
reverse procedure of step 1.
Reset
The RESET button is located behind the front
panel and can only be accessed with the front
panel opened. Resetting the unit will erase
the time and preset memories. It should only
be activated upon initial installation after all
wiring is complete, or if there is a malfunction
of any of the switches on the unit. In these
circumstances, pressing the RESET button
will clear the system and return the unit to
default operation.
Fuse
When replacing a fuse, make sure the new
fuse is the correct type and amperage. Using
an incorrect fuse could damage the radio.
Anti-Theft System
Thi s un i t is de sign e d wi t h a fl i p -dow n
detachable panel.
The panel can be detached and taken with
you, helping to deter theft. To detach the front
panel, perform the following steps:
Remove the Panel
1. Press to switch off the power of the unit.
2. Press
3. Grasp the right side to release the front
panel and then pull it at an angle to remove
the right side from the chassis.
4. Sto re th e fro n t pan e l in th e s upp lie d
carryi ng case to protect it from dirt and
damage, and take it with you to prevent
theft.
Re-attach the Front Panel
1. With the panel laying flat (in the “open”
position), insert the left side of the panel in
place until correctly engaged.
2. Gently press the right side of the panel until
the mechanism locks it into place.
3. Lift upward to close the panel.
to flip down the panel.
Reconnect Battery
Wh en wir ing is comple te, rec onnec t th e
battery negative terminal.
Remove the Unit
1. Remove the panel and the trim plate.
2. Remove the trim ring by firmly grasping one
side and pulling.
3. Insert the removal keys straight back until
the y lock, then pull the radio out. If the
removal keys are inserted at an angle, they
will not lock properly and will not release
the unit.
25

Troubleshooting
If you suspect something is wrong, immediately switch power off. Immediately stop using it
and call the store where you purchased it. Never try to repair the unit by yourself because it is
dangerous to do so.
Problem Possible cause Solution
General
No Power
No Sound
The unit or screen does
not function normally.
DVD mode
The unit does not play
disc.
S o u n d s k i p s d u e to
vibration.
TUNER mode
U n a b l e t o r e c e i v e
stations.
Poor quality reception of
radio station.
Preset stations are lost.
USB/SD/MMC mode
Un abl e to inse rt USB
device or SD/MMC card.
The USB device or SD/
MMC card cann o t b e
read.
Remote control
Th e re mote contro l is
not working or does not
work properly
Car ignition is not on.
Cable is not properly
connected.
Fuse is burnt.
Volume is set at minimum or
the mute function is on.
The unit system is unstable. Press the RESET button.
T h e d i s c i s i n s e r t e d
incorrectly.
The disc is dirty or damaged.
Mounting angle is over 30˚.
Mounting is unstable.
The antenna is not connected
properly.
The an t e n n a is n o t fully
extended or it is broken.
The ba t t e r y ca b l e is n o t
properly connected.
Th e m emo ry ca rd or U SB
device has been inserted the
wrong way round.
NTFS format is not supported.
The b a t t e r i e s ar e lo w or
empty.
Turn your car key in the ignition.
Check cable connection.
Replace fuse with a new fuse of the
same capacity.
Check the volume or switch the mute
function off.
Disc must be inserted with the label
side facing up. Clean the disc and
check for damage. Try another disc.
Adjust mounting angle to less than 30˚.
Mo u nt the unit secu rel y w ith t he
supplied parts.
Connect the antenna properly.
Ful l y e x t end th e an ten n a and i f
broken, replace it with a new one.
Connect the permanent live on the
un it t o the perma ne nt liv e on the
vehicle.
Insert it the other way around.
Ch eck that the U SB/SD/M MC f ile
system is in FAT or FAT32 format.
Due to different formats, some models
of US B stor a g e d evic e s o r M P 3
players may not be read.
Change the batteries.
26

Care and Maintenance
DVD Player
The following guidelines will help you extend the life of your DVD player:
1. When cleaning the vehicle interior, do not get water or cleaning fluids on the unit.
2. The DVD player will not operate properly in extreme hot/cold or under damp conditions. In
case of such conditions, wait until the vehicle interior reaches a normal temperature or any
condensation on the disc player lens has evaporated before using the player.
3. Always remove the disc when the player is not in use.
4. The unit is designed with a vibration dampening disc mechanism to minimize interruption of
disc play due to normal vibration in a moving vehicle. However, occasional sound skips may
occur when driving on very rough roads. This will not scratch or damage the disc, and normal
play will resume when the rough conditions cease.
CD-R and CD-RW Capability
Depending on medi a type and method of "recording/burning", some CD -R/RWs may be
incompatible with this unit. After "recording/burning", the session must be closed. Please refer
to your software's recommended procedures for closing a disc/session. Review your recording
software to familiarize yourself with the correct "recording/burning" procedures. We recommend
usingthelatestversionsofROXIOTMorNEROTMburningsoftware.
In addition, this unit will only recognize the CDDA (Compact Disc Digital Audio), .MP3 and .WMA
formats "recorded / burned" onto a CD-R/RW. This unit does not support .WAV, .OGG or other
formats.
Disc Care and Handling
Dirt, dust, scratches and warpage can cause skips in the playback and deterioration of sound
quality. Please follow these guidelines to take care of your compact discs.
1. Do not touch the disc surface.
2. Never use chemicals such as record sprays or household cleaners to clean discs, as they can
irreparably damage the disc’s surface.
3. Discs should be kept in their storage cases when not in use.
4. Do not expose discs to direct sunlight, high temperatures or high humidity for long periods.
5. Carefully wipe fingerprints, dust and dirt from the disc’s playing surface with a soft cloth.
Wipe in a straight motion from the inside to the outside of the disc.
6. Do not put sticker paper, tape or disc labels on disc surfaces, as internal damage may occur.
27

Specications
General
Power supply 12VDC (11V-16V), Test voltage 14.4V, negative ground
Maximum power output 45W x 4 channels
Continuous power output 20W x 4 channels (4
Suitable speaker impedance 4-8ohm
Pre-Amp output voltage 2.0V (CD play mode: 1KHz, 0dB, 10K
Fuse 15A
Dimensions (WxHxD) 178 x 50 x 166mm
Weight 1.7kg
Sub-out 2.0V (CD play mode: 61Hz, 0dB, 10K load)
Aux-in level
500mV
3 Inch (16:9) TFT LCD
Display resolution (dot)
Active area (mm)
Screen size (inch) 2.96 (Diagonal)
Dot pitch (mm)
Contrast ratio 300
Brightness 350nits
960(W)×240(H)
65.52×36.84
0.06825 x 0.1535
FM Stereo Radio
Frequency range: 87.5-108.0MHz (Europe)
87.5-107.9MHz (America)
Usable sensitivity 8dB
Frequency response 30Hz-15KHz
Stereo separation 30dB(1KHz)
Image response ratio 50dB
IF response ratio 70dB
Signal/noiseratio >55dB
μ
10% T.H.D.)
load)
AM(MW) Radio
Frequency range 522-1620KHz (Europe)
530-1710KHz (America)
Usable sensitivity (S/N=20dB) 30dBμ
Disc Player
System Disc digital audio system
Frequency response 20Hz - 20KHz
Signal/noiseratio >80dB
Total harmonic distortion Less than 0.20% (1KHz)
Channelseparation >60dB
Video signal format system NTSC/PAL 60/PAL/AUTO
Video output 1
0.2V
Components
Mounting sleeve 1
Machine screws M5x6 mm 4
Mounting bolt (50 mm) 1
Wire connector 1
Removable face plate case 1
Trim plate 1
Removal key 2
Operating Instructions 1
Rubber cushion 1
Remote control 1
Specifications and the design are subject to
change without notice due to improvements.
28
Note:
 Loading...