

Page 1
HWC 501
Please keep network available
USER MANUAL
• GB • FR • DE • NL •
4264 AE Veen • The Netherlands
CALIBER EUROPE BV • Kortak ker 10
WWW.CALIBER.NL
forms/wheeliebin.pdf
webshop.caliber.nl/media/
bin icon, please see:
of items with the Wheelie
For all info on the disposal
BUTTONS AND CONNECTIONS INSTALLATION INSTRUCTIONS #1 INSTALLATION INSTRUCTIONS #2
1. Microphone
3. Doorbell button
5. Reset 1
Wireless Wired
10. Reset 2
8. Charging
indicator
9. Mini USB
1. Built-in microphone
- To listen while live view or using
6. Micro SD slot
For Micro SD card, to be able to
the intercom
- To record audio
7. Connector for the battery pack
2. Indication LED
- LED will blink rapidly in RED
8. Charging indiator for the
while searching for a
new connection
- LED will blink rapidly in BLUE
while reconnecting
9. Mini USB power inp ut
to charge the batter y pack with
- LED will be solid RED while
restarting
- LED will be solid BLUE while
ON and connected
10. Reset 2
Reset the battery pack to factory
3. Doorbell button
To ring the bell
4. Built-in speaker
For talk back in 2-way intercom
function
5. Reset button
To reset to factory settings
11. DC input
5V/1A (use for wired connection)
Mounting
For mounting instructions please
consult the separate installment
sheet
2. Status light
4. Speaker
6. SD card slot
7. Battery pack connector
11. External
power port
Back of doorbell
record (max. 128GB)
battery pack
the included charge adapter
settings
Optional chime ‘HWC 501CH’
• sold separately •
Normally the doorbell ‘rings’
on your phone . This USB
powered chime is an extra
ringer. E.G to be placed in your
living room
Warning: Make sure the camera
to be within range of the Wi-Fi
network to ensure a successful
connection between the camera
and router.
Attention: Assurez-vous que la
caméra est à portée du réseau
Wi-Fi an d’assurer une connexion
réussie entre la caméra et le routeur.
Warnung: Stellen Sie sicher, dass die Kamera in Reichweite des Wi-Fi-
Netzwerks ist, um ein erfolgreiches Verbinden zwischen Kamera und Router
sicherzustellen.
Waarschuwing: Zorg ervoor dat de camera zich binnen bereik van het
Wi-Fi-netwerk bevindt om een goede verbinding tussen de camera en de
router te garanderen.
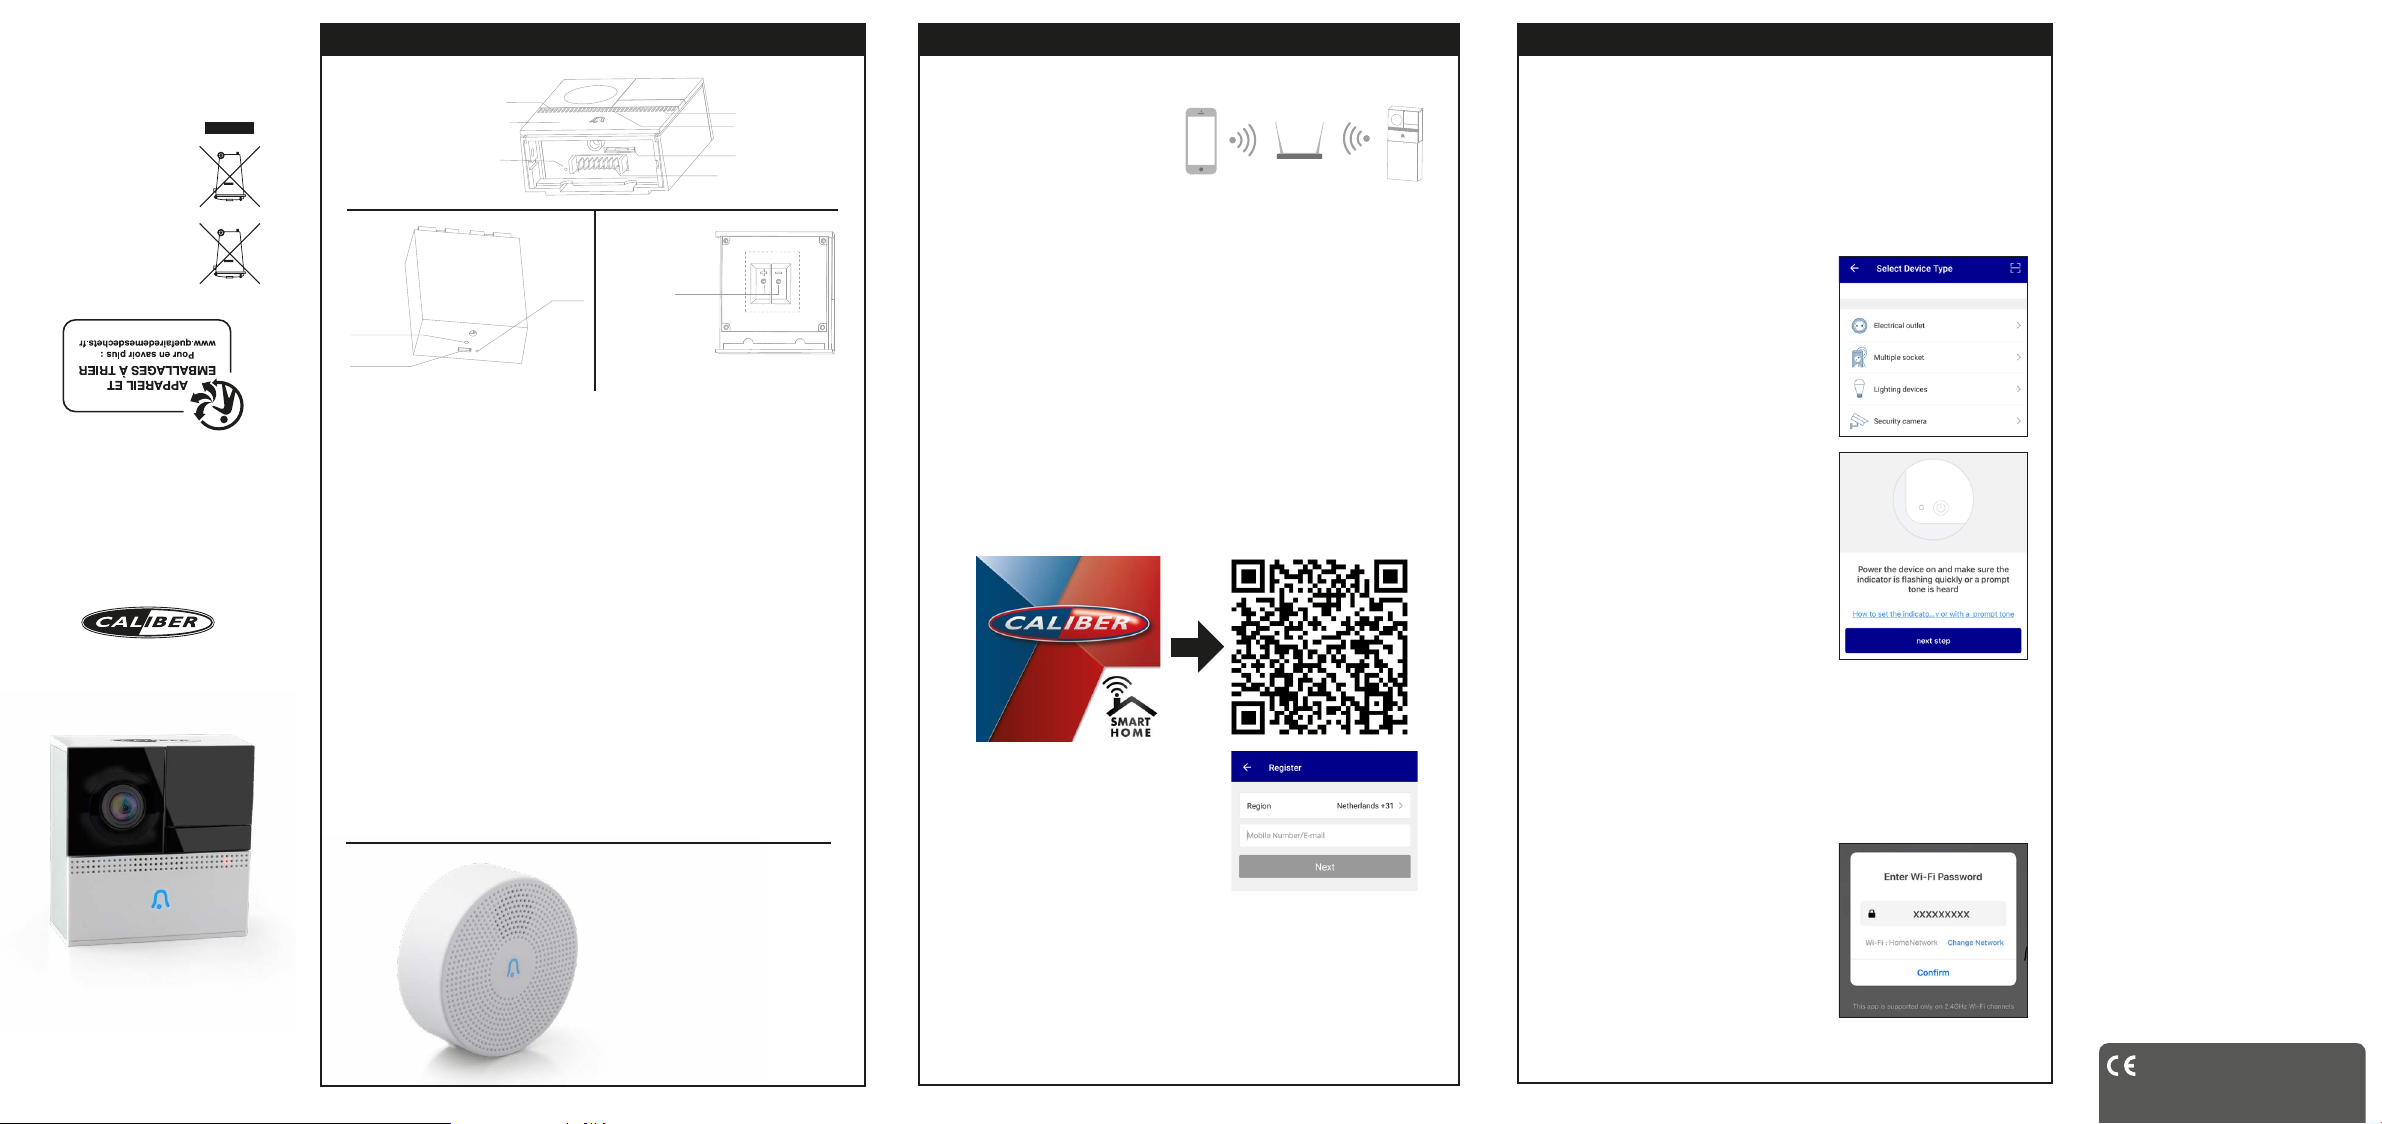
Wi-Fi Conguration instructions
1. Scan QR code to download and install “Caliber Smart Home”
Instructions de conguration Wi-Fi
1. Scannez le code QR pour télécharger et installer « Caliber Smar t Home »
Anweisungen zur WLAN-Konguration
1. Scannen Sie den QR-Code, um „Caliber Smart Home“ herunterzuladen
und zu installieren
Wi-Fi-conguratie instructies
1. Scan QR-code om “Caliber Smart Home” te downloaden en te installeren
2. Sign in with cell phone number or email
2. Authentiez-vous à l’aide de votre numéro
de téléphone portable ou de votre
adresse e-mail
2. Melden Sie sich mit Ihrer Handynummer
oder E-Mail-Adresse an
2. Log in met je mobiel nummer of e-mail
3. Make sure the device on which the app is installed, is connected to the
Wi-Fi network on which you want the camera to be too.
3. Assurez-vous que le périphérique sur lequel l’application est installée est
connecté au réseau Wi-Fi sur lequel vous souhaiter également installer la
caméra.
Stelle Sie sicher, dass das Gerät, auf dem die App installiert wird, mit dem
3.
Wi-Fi-Netzwerk verbunden ist, über das auch die Kamera funktionieren soll.
3. Zorg ervoor dat het apparaat waarop de app geïnstalleerd is verbonden
is met het Wi-Fi netwerk waarmee de camera ook verbonden moet gaan
worden.
Once the camera is plugged in it will be powered ON and the indication LED
will ash rapidly.
Une fois la caméra branchée, elle sera allumée et le voyant LED clignotera
rapidement.
Wenn die Kamera eingesteckt ist, wird sie eingeschaltet (ON) und die
Anzeige-LED blinkt schnell.
Nadat de camera van stoom voorzien wordt zal deze automatisch A AN gaan
en zal de indicatie LED snel knipperen.
4. Click “+” at the up right corner to select and
add the device.
4. Cliquez sur «+» dans le coin supérieur droit
pour sélectionner et ajouter le périphérique.
4. Klicken Sie auf “+” in der oberen rechten
Ecke, um das Gerät auszuwählen.
4. Druk op de “+” in de rechter bovenhoek om
een apparaat te kiezen en toe te voegen.
5. The APP will ask if the indication LED is
ashing and if the startup tone was heard.
Then click “next step”.
If this is not the case, please reset the
camera holding the reset-button for approx.
10 seconds.
5. L’APPLICATION demandera si la LED
d’indication clignote et si la tonalité de
démarrage a été entendue.
Cliquez ensuite sur «étape suivante».
Si ce n’est pas le cas, veuillez réinitialiser
l’appareil photo en maintenant enfoncé le
bouton de réinitialisation pendant environ 10 secondes.
5. Die APP wird fragen, ob die Anzeige-LED blinkt und ob der Startup-Ton
zu hören war.
Dann klicken Sie auf “nächster Schritt”.
Wenn dies nicht der Fall ist, dann setzen Sie die Kamera zurück, indem
Sie die Reset-Taste ca. 10 Sekunden lang gedrückt halten.
5. De APP zal vragen of de indicatie LED knippert en of de opstarttoon
gehoord is. Klik dan op “Volgende stap”.
Mocht het niet het geval zijn, reset de
camera dan dmv de reset-knop ca. 10
seconden in te houden.
6. Check if the Wi- Fi network is correc t, ll in
the corresponding password and conrm.
Note that the password can only contain
letters and numbers, no special characters.
6. Vériez si le réseau Wi-Fi est correct,
entrez le mot de passe correspondant et
conrmez.
Notez que le mot de passe ne peut contenir que des lettres et des chif fres,
aucun caractère spécial.
SPECIFICATIONS
Image sen sor 1/4inch 720 p CMOS sensor
Viewing angle 150º
Compre ssion For mat H.264 Ma in Prole
Max.Fra me rate 1-25fps
Audio Inp ut Two way audio Full dup lex
Network Protocol HTTP,DHCP,DNS,RTSP
WIFI WiFi802.11b/g/n,
Storage mode Local storage / client storage
Interf ace Micro SD/TF,
Motion detection Support motion detection
Power DC5V/1.0A or B atter y
Rechargeable Battery 6000mAh
Working environment Working Temperature -20~50°C
Standby time 10 months
Working t ime 4 mon ths (measur ed with 10
calls pe r day)
Camera si ze 58 mm (L) x 26mm (W) x 60mm (H)
Camera si ze + battery
Installation Wall mounting
IP rated IP65
1. PRODUCT DESC RIPTION
The camera i s a Wi-Fi based item t hat can work with E.G A mazon Alexa
by voice cont rol. You can either cont rol it with Androi d and iOS based APP
by phone, anyw here, at any time.
The latest inf ormation on this to pic you can nd onlin e:
CALIBER.NL/calibersmarthome
2.F EATUR ES
• Works with Am azon Alexa by voice c ontrol
• Remote view an d control via APP any where anytime
• Scene cont rol: works with othe r smart product s
• OTA upgrade suppo rted
We are continu ously improving /updating our produ cts and product
informati on. It’s therefore p ossible that ther e is a slight differe nce between
the descri ption in this manual t o the operation of th e product.
If somethin g is different or not c lear; always chec k our website for the
most current version.
The (app) images and illustrations used are indicative and may vary
per device and version
GB Caliber hereby declares that the item HWC501 is in compliance
with the essential requirements and other relevant provisions of
Directive 2011/65/EU (RoHS) and 2014/53/EU (RED) FR Par la
présente Caliber déclare que l’appareil HWC501 est conforme aux
exigences essentielles et aux autres dispositions pertinentes de
la directive 2011/65/EU (RoHS) et 2014/53/EU (RED) DE Hiermit
erklärt Caliber, dass sich das Gerät HWC501 in Übereinstimmung
mit den grundlegenden Anforderung und übrigen einschlägigen
Bestimmungen der Richtlinie 2011/65/EU (RoHS) und 2014/53/
EU (RED) bendet. IT Con la presente Caliber dichiara che questo
HWC501 è conforme ai requisiti essenziali ed alle alte disposizioni
pertinenti stabilite dalla directtiva 2011/65/EU (RoHS) e 2014/53/EU
(RED) ES Por medio de la presente Caliber declara que el HWC501
cumple con los requisitos esenciales y otra disposiciones aplicables o
exigibles de la Directiva 2011/65/EU (RoHS) y 2014/53/EU (RED) PT
Caliber declara que este HWC501 está conforme com os requisitos
essenciais e outras disposições da Directiva 2011/65/EU (RoHS)
e 2014/53/EU (RED) S Härmed intygar Caliber att denna HWC501
Pro står i överensstämmelse med de väsentliga egenskapskrav och
övriga relevanta bestämmelser som framgår av direktiv 2011/65/EU
(RoHS) och 2014/53/EU (RED) PL Niniejszym Caliber oświadcza,
źe HWC501 jest zgodne z zasadniczymi wymaganiami oraz innymi
stosownymi postanowieniami Dyrektywy 2011/65/EU (RoHS) i
2014/53/EU (RED) DK Undertegnede Caliber erklærer hermed, at
følgende udstyr HWC501 overholder de væsentlige krav og øvrige
relevante krav i direktiv 2011/65/EU (RoHS) og 2014/53/EU (RED) EE
Käesolevaga kinnitab Caliber seadme HWC501 vastavust direktiivi
2011/65/EU (RoHS) ja 2014/53/EU (RED) pöhinõuetele ja nimetatud
direktiivist tulenevatelle teistele asjakohastele sätetele.LT Šiuo Caliber
deklaruoja, kad šis HWC501 atitinka esminius reikalavimus ir kitas
2011/65/EU (RoHS) ir 2014/53/EU (RED) Direktyvos nuostatas. FI
Caliber vakuuttaa täten että HWC501 tyyppinen laite on direktiivin
2011/65/EU (RoHS) ja 2014/53/EU (RED) oleellisten vaatimusten ja
sitä koskevien direktiivin muiden ehtojen mukainen. IS Hér með lýsi
Caliber yr ϸvi að HWC501 erί samræmi við grunnkröfur og aðrar
kröfur, sem gerðar eru í tilskipun 2011/65/EU (RoHS) og 2014/53/EU
(RED) NO Caliber erklærer herved at utstyret HWC501 er i samsvar
med de grunn-leggende krav og øvrige relevante krav i drektiv 2011/65/
EU (RoHS) og 2014/53/EU (RED) NL Hierbij verklaart Caliber dat het
toestel HWC501 in overeenstemming is met de essentiële eisen en
de andere relevante bepalingen van richtlijn 2011/65/EU (RoHS) en
2014/53/EU (RED)
Latest declaration form can be found at:
www.caliber.nl/media/forms/DeclarationHWC501.pdf
suppor t up to 128GB SD
8~24V DC trough power converter
58mm (L) x 2 6mm (W) x 130mm (H)
Page 2
INSTALLATION INSTRUCTIONS #3 INSTALLATION INSTRUCTIONS #4 INSTALLATION INSTRUCTIONS #5
6. Kontrollieren Sie, ob das Wi-Fi-Netzwerk das richtige ist, geben Sie das
entsprechende Passwort ein und bestätigen Sie.
Achtung: das Passwort darf nur aus Buchstaben und Ziffern bestehen.
Sonderzeichen sind nicht erlaubt.
6. Controleer of het Wi-Fi netwerk het juiste is, vul het bijbehorende
wachtwoord in en bevestig.
Let op dat wachtwoorden alleen letters
en cijfers mogen bevatten, geen speciale
tekens.
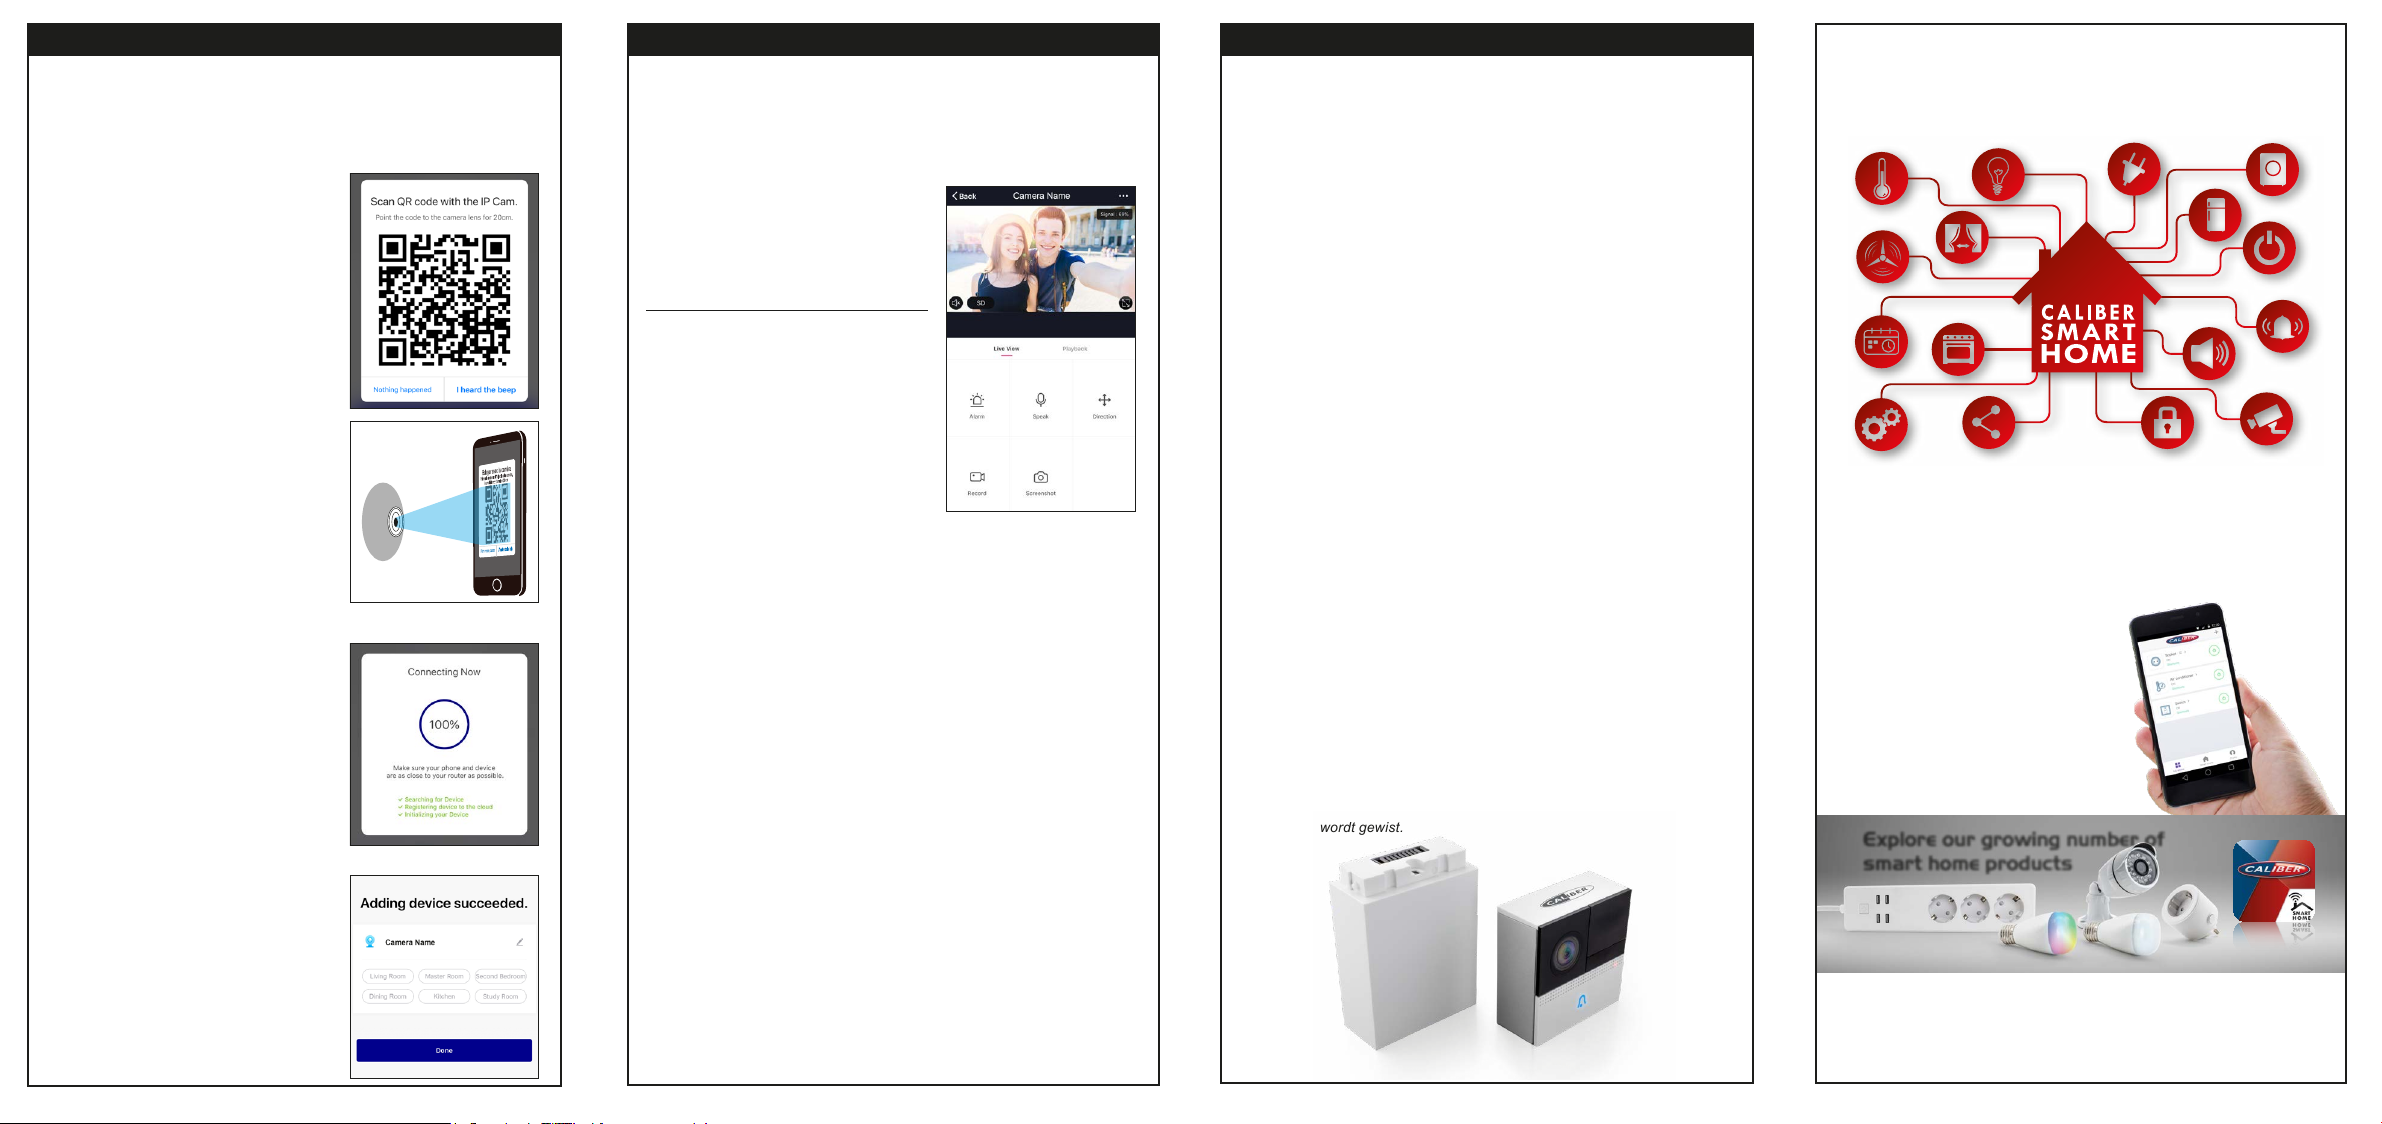
7. The APP then will show an QR code on
screen.
(1) hold this screen approx. 20 cm in front of
the camera lens, maybe move it around
a little, till a tone is heard.
(2) then conrm by clicking “I heard the beep”.
7. L’APPLICATION afchera alors un code QR
à l’écran.
(1) maintenez cet écran pendant environ 20
cm devant l’objectif de la caméra, déplacez- le
un peu, jusqu’à ce qu’une tonalité se fasse
entendre.
(2) puis conrmez en cliquant sur «J’ai
entendu le bip».
7. Die APP zeigt dann einen QR-Code auf dem
Bildschirm an.
(1) Halten Sie diesen Bildschirm ca. 20 cm vor
die Kameralinse, eventuell bewegen Sie
ihn etwas, bis ein Ton zu hören ist.
(2) bestätigen Sie dann durch Klick auf “Ich habe den Beep gehört”.
7. De APP zal dan een QR code op het
display tonen.
(1) houdt het display op ca. 20 cm voor
de lens van de camera, beweeg het
misschien wat op en neer, tot een toon
gehoord wordt.
(2) bevestig dan dmv de knop “Toon gehoord”.
8. The APP will connect the camera.
Please wait patiently till the action is
completed.
8. L’APPLICATION va c onnecter la caméra.
Attendez patiemment que l’action soit
terminée.
8. Die APP verbindet nun die Kamera.
Bitte haben Sie etwas Geduld, bis der
Vorgang abgeschlossen ist.
8. De APP zal zich koppelen met de camera.
Wacht geduldig tot deze handeling is
voltooid.
9. When the camera is successfully added
you can give it a personal identication
name and can choose which group you’d like it to be in.
9. Une fois la caméra ajoutée avec succès, vous pouvez lui attribuer un nom
d’identication personnel et choisir le groupe dans lequel vous souhaitez
qu’elle se trouve.
9. Wenn die Kamera erfolgreich hinzugefügt wurde, können Sie ihr einen
persönlichen Identikationsnamen geben
und können auswählen in welcher Gruppe
sie sein soll.
9. Als het appartaat succesvol toegevoegd is,
kun je deze voorzien van een persoonlijke
indenticatie naam en kiezen in welke
groep deze toebehoort.
Through the APP the camera can be viewed
and controlled remotely.
Some of the functions are e.g.:
• Live View (real time view)
• Playback (only if an SD card is installed and
the camera is set to record)
• Record and screenshot
(record the live feed or make a screenshot
and save it to your mobile device)
Note: controls and functions can var y
according to camera type/version and set
settings.
Grâce à l’application, la caméra peut être visualisée et contrôlée à distance.
Cert aines des fonctions sont par exemple:
• Vue en direct (vue en temps réel)
• Lecture (uniquement si une carte SD est installée et que l’appareil photo est
conguré pour enregistrer)
• Enregistrement et capture d’écran (enregistrer le ux en direct ou faire une
capture d’écran et l’enregistrer sur votre appareil mobile)
Remarque: les commandes et les fonctions peuvent varier en fonction du
type / de la version de la camera et des paramètres dénis.
Über die APP kann man die Kamera aus der Ferne einsehen und steuern.
Einige der Funktionen sind z.B.:
• Live-Ansicht (Echtzeitansicht)
• Wiedergabe (nur wenn eine SD- Karte installiert ist und die Kamera auf
Aufnahme eingestellt ist)
• Aufnahme und Screenshot (Livefeed aufnehmen oder einen Screenshot
des Livefeeds aufnehmen und auf Ihrem mobilen Gerät speichern)
Anmerkung: die Steuerungen und Funktionen können je nach Kameratyp/version und Einstellungen unterschiedlich sein.
Via de APP kan op afstand het camerabeeld bekeken en de camera bediend
worden. Sommige van de functies zijn bijvoorbeeld.:
• Live View (realtime beeld)
• Opnamen (alleen als er een SD kaart geïnstalleerd is en de camera
ingesteld is om opnamen te maken)
• Opnemen en foto
(neem live beeld op of maak een foto en sla deze rechtstreeks op, op het
mobile apparaat)
Let op: bediening en functies kunnen varieren per cameratype/-versie en
aangegeven instellingen.
Remove device
To remove the camera from the APP and Wi-Fi network:
1. Open the APP
2. Click the icon in the upper right corner, and then click “Remove Device”
button in the list
3. When remove the device is successful, the LED will start to blink rapidly.
Note: The ‘ remove procedure’ will clear the camera memory which means
erasing all information about Wi-Fi network and conguration.
Retirer l’appareil
Pour retirer la caméra du réseau APP et Wi-Fi:
1. Ouvrez l’applic ation
2. Cliquez sur l’icône dans le coin en haut à droite, puis cliquez sur le bouton
« Remove Device » (« Retirer l’appareil »)
3. Une fois le retrait de l’appareil ef fectué avec succès, la caméra LED
commence à clignoter rapidement.
Remarque : La « procédure de retrait » efface la mémoire W i-Fi de la
caméra, ce qui signie qu’elle supprime toutes les informations relatives au
réseau et à la conguration Wi- Fi.
Gerät entfernen
So entfernen Sie die Kamera aus dem APP- und Wi-Fi-Netzwerk:
1. Öffnen Sie die App
2. Klicken Sie auf das Symbol rechts oben und danach auf die Taste
„Gerät entfernen“
3. Wenn das Gerät erfolgreich entfernt wurde, beginnt die LED schnell zu
blinken.
Hinweis: Der „Entfernen-Vorgang“ löscht den WLAN-Speicher des Kamera.
Dies bedeutet, dass alle Informationen über das WLAN-Netzwerk und die
Konguration entfernt werden.
Apparaat verwijderen
De camera verwijderen uit de APP en Wi-Fi-netwerk:
1. Open de APP
2. Klik op het pictogram in de rechterbovenhoek en klik vervolgens op de
knop “Apparaat verwijderen” in de lijst
3. Wanneer het apparaat succesvol is verwijderd, zal de LED beginnen met
snel knipperen.
Let op: De ‘verwijderingsproc edure’ zal het geheugen van de camera
wissen, wat betekent dat alle informatie over het Wi -Fi -net werk en de
conguratie wordt gewist.
CALIBER SMART HOME
- LIVING IN COMFORT -
With ‘Caliber smart home’ products you can be sure everything is
controllable with ONE APP. We chose to partner with Tuya, a platform
for smart home products which allows great control; not just camera
view but a whole range of possibilities
• Scheduler
• Scenario’s
(E.G: lights ON when came ra detects movement)
• Combine products
• Share settings with the whole family
• See caliber.nl/calibersmarthome
for more info & demo’s
Explore our growing number of
smart home products
CALIBER.NL/CALIBERSMARTHOME
FOR DEMO’S & INSTRUCTIONS
 Loading...