

Page 1
Page 2

Contents
SafetyInformation.......................................................................................2
Introduction..................................................................................................4
Controls........................................................................................................5
MonitorStowedView
.................................................................
……….....5
MonitorOpenView
.....................................................................
……….....6
RemoteControl
..........................................................................
……….....7
Operation
......................................................................................
……….....9
Openthemonitor
.......................................................................
……….....9
Stowthemonitor
........................................................................
……….....9
Turntheplayeron/off
.................................................................
…..….......9
Adjustthedisplay
.......................................................................
…..….......10
CareandMaintenance...............................................................................10
Usetheremotecontrol...............................................................................11
Replacethebatteryintheremotecontrol
..................................
……….....11
PlayUSBdeviceandSD/MMCcard
..........................................
……….....12
InstallationandWiring
................................................................
…........….12
What'sinthebox
........................................................................
……….....12
Beforeyoubegin
........................................................................
……….....12
MountingandWiringPrecautions
..............................................
……….....14
Installationprocedure
.................................................................
……….....15
Wiringdiagram
...........................................................................
……….....14
SystemSetup
...............................................................................
…........….15
Specifications
...............................................................................
…........….16
Troubleshooting
...........................................................................
....……….17
Page 3

Safety
I
nformation
v ThankyouforbuyingtheRoofMountTFTLCDMonitor.Pleasereadthis
manualcarefullybeforeusingtheplayerinordertogetthemostoutofall
thefeaturesandfunctions.Keepthismanualinasafeplace,asitcanbe
avaluabletoolinhelpingyoutounderstandallthefeaturesandfunctions.
v
Donotoperatetheunitinanywayotherthandescribedwithinthismanual.
Failuretofollowtheinstructionswithinthemanualwillinvalidateyour
warranty.
v
SAFETYFIRST!Donotinstallthedisplaywhereitmay(i)obstructthe
driver’svision,(ii)impairtheperformanceofanyofthevehicle’soperating
systemsorsafetyfeatures,includingairbags,or(iii)impairthedriver’s
abilitytosafelyoperatethevehicle.
v Whenusingthesystem,makesureyouarefirmlysecuredbyyourseat
belttoensureyoudonotaccidentallyhityourheadonthescreenduring
suddenbrakingorotherincidents.Ifyouareeverinanaccident,injuries
canbemoresevereiftheseatbeltisnotproperlybuckled.
v Donotattempttoinstallorserviceyourdisplaybyyourself.Installationor
servicingofthedisplaybypersonswithouttrainingandexperiencein
electronicequipmentandautomotiveaccessoriesmaybedangerousand
couldexposeyoutotheriskofelectricshockorotherhazards.
v
Becarefulnottodrainthecarbatterywhileusingtheunitwiththecar
enginestopped.Toavoiddrainingthebattery,itissuggestedthatthe
vehicleenginealwaysisrunningwhileusingtheunit.
v
Donotdisassembleoraltertheunitinanyway.Failuretodosocancause
damagetotheunitandinvalidthewarranty.
v Nevercleanthesurfaceofthescreenwithchemicalsolventorcorrosive
detergent,whichmaycausepermanentdamagetotheTFTLCDscreen.
v Avoidinstallingtheunitwhereverisunderdirectsunlightornearhotair
vent.Pleasenotethatthenormalworkingtemperatureoftheunitis
between-5℃ to+50℃.Iftheinternaltemperatureofthevehicleis
extremelyhigh,ashortcoolingdownperiodisnecessarybeforeoperating
theunit.
v
Ifthetemperatureinsidethecarisverylowandthemonitorisusedsoon
afterswitchingontheheater,moisturemayformonthepaneloftheunit.
Turnofftheunitimmediately!Failuretodosomaycausetheinternal
componentstoshort.Allowtheunittorestforaboutonehourtoallowthe
condensationtodisappearbeforecontinueoperation.
v Inextremelycoldtemperatures,themovementofthepicturemaybeslow
andthepicturemaybedark.Itisnotamalfunction.Theunitwillwork
normallyonceitreachesitsoperatingtemperature.
v DonotdroporhittheLCDpanelwithahardobject,asitmaycause
permanentdamagetotheLCDpanel.ShouldLCDpanelbreak,avoid
Page 4

touchingglassandfluid.Ifdo,pleasecleanitwithplentyofwaterandask
formedicalattentionimmediately.
v
Duetodifferentcarspecifications,pleasekindlyensuethatthedisplay
monitorisproperlylocatedandnotobstructingtheair-conditioningvent.
v AvoidinsertinganyforeignobjectsintotheslotofthediscPlayer.Failure
toobservethismaycausemalfunctionduetotheprecisemechanismof
thisunit.
v Protectyourdisc.Whenyouleavethecar,besuretoejectthediscfrom
thisunitandstoreitseparatelyawayfromdirectsunlight.
v Heatandhumiditymaydamagethediscandyoumaynotbeabletoplayit
again.
v
UsethesuppliedscrewstofixthemonitorMetalMountingPlate.
Page 5

Introduction
ThisplayerisaRoofMount10.2"TFT-LCDColorDisplaythatcanbeusedas
astand-alonedisplay,orcanbeintegratedintoamobilemultimediasystem.
Thisplayerhasthefollowingfeatures:
² 10.2"TFT-LCDcolormonitor(16:9)
²
RoofMountingApplication
²
Pixel(dots):800RGB(W)x480(H)
² WideViewingangle(up/down/left/right):45/65/65/65
²
NTSCandPALCompatible
²
AdjustableContrast/Brightness/Color/Tint
² ManualViewingAngleAdjustment
²
VerticalAngleAdjustable:up/down<120
0
²
WhiteLEDDomeLight
² AutomotiveStartupProtection
²
OnScreenDisplay
²
2xAVInput
² 1xAVOutput
²
SupportSD/MMCcardandUSB
Page 6
Controls
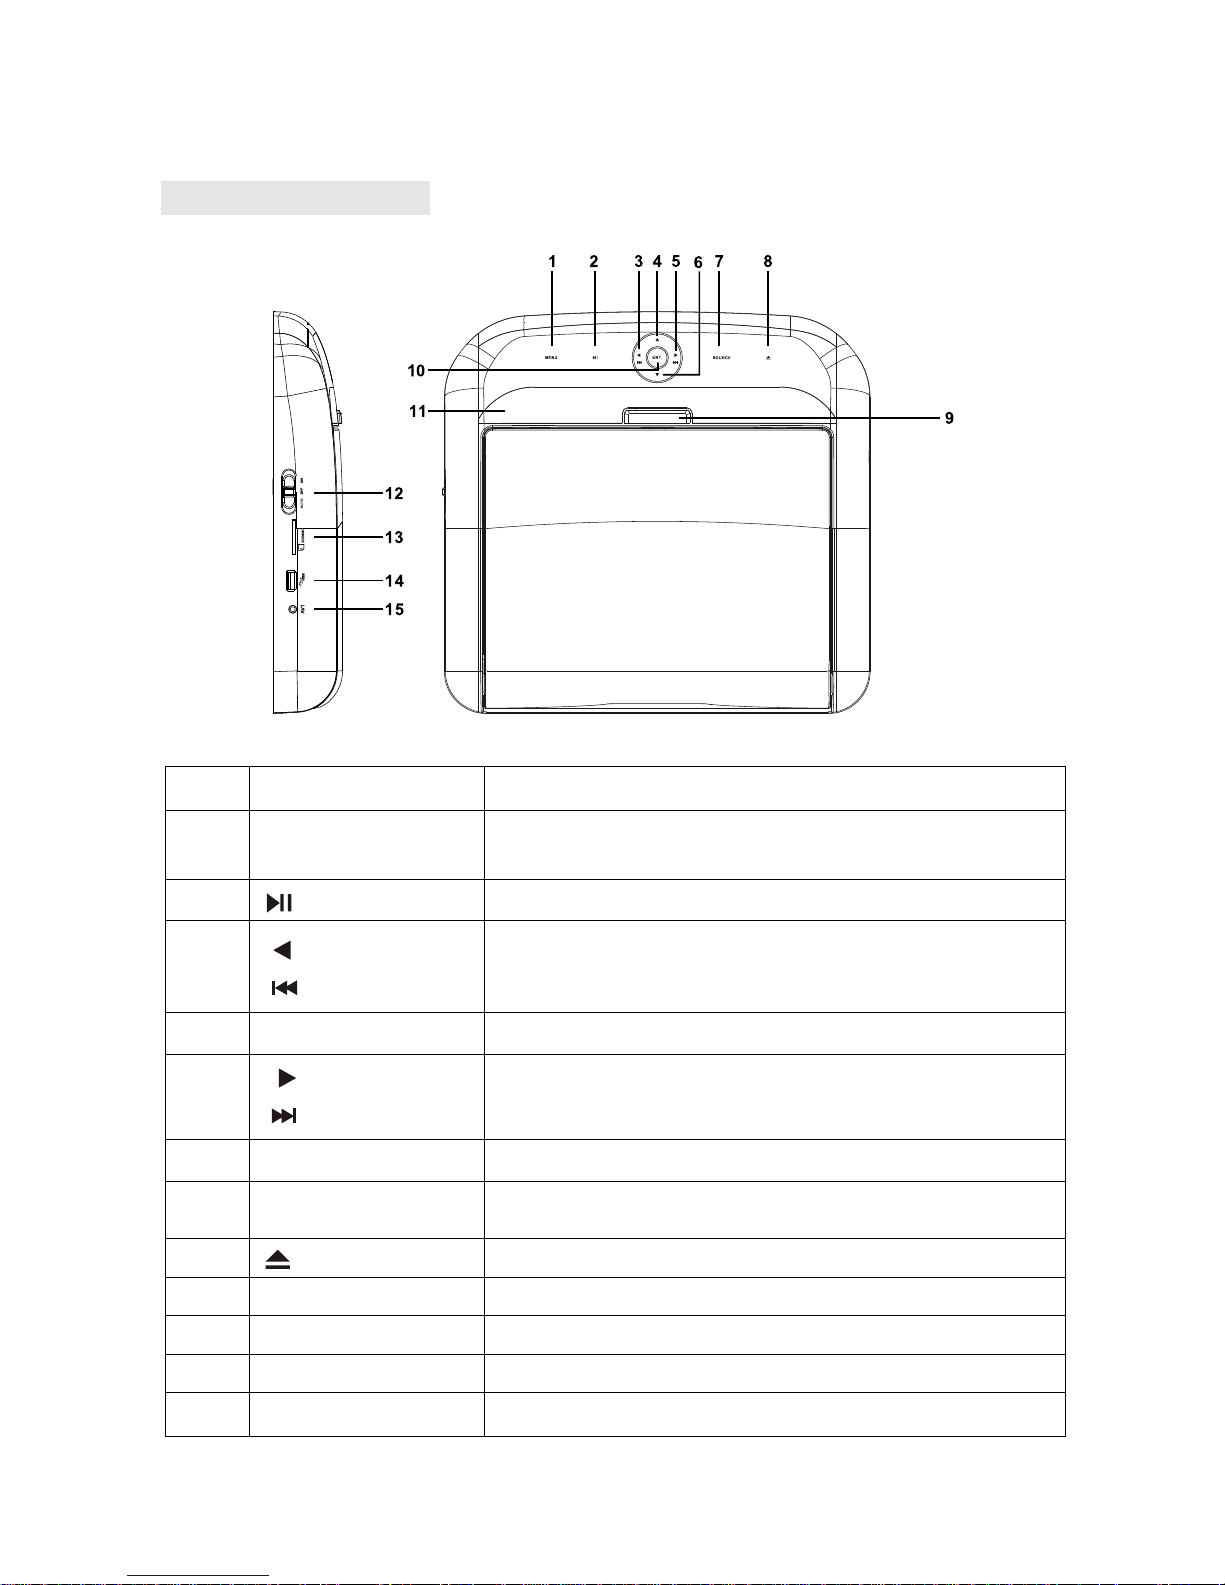
Monitor Stowed View
Item Name FunctionorControl
1 MENU
Touch
and
hold
todisplay
the
OSD
menu
,
touch
again
to
close
the
OSD
menu
.2Play
or
pause
.
3
Previous
Chapter
or
Track
/
Navigation
Left
;
Press
and
hold
to
fast
reversef
at
2x,4x,8x,16x
,
32x
and
normal
speed.
4 ▲
Navigation
Up
.5Next
Chapter
or
Track
/
Navigation
Right
;
Press
and
hold
to
fast
forward
at
2x,4x,8x,16x
,
32x
and
normal
speed.
6 ▼
Navigation
Down
.
7 SOURCE
Selects
the
video
input
source:
AV1,AV2,USB
,
SD/MMC
.
8
No
use
on
TR0101.
9 Panelopenswitch
Press
to
release
the
monitor
Panel
.
10 ENT.
Enter
/
Confirm
choose.
11 Domelight
To
illuminate
in
the
car.
12 DomelightSwitch Turnson/offthedomelight.Whentheswitchis
Page 7
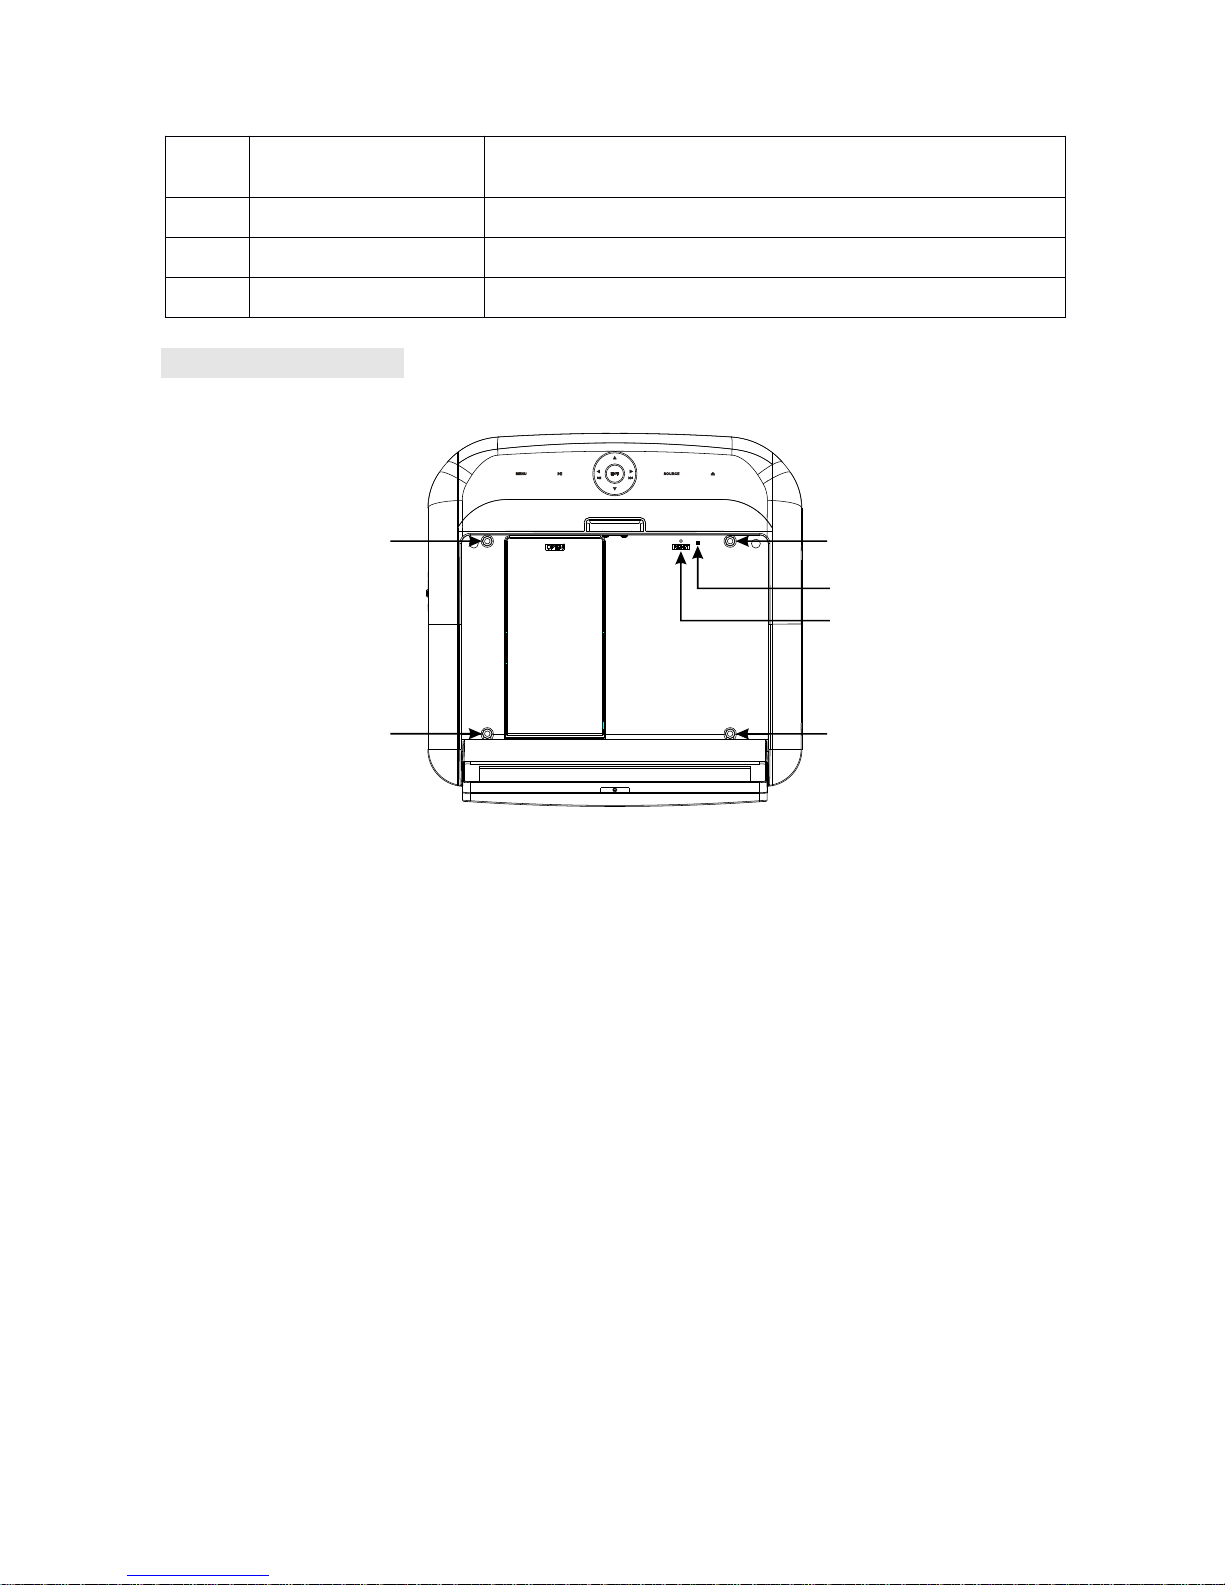
Monitor Open View
settoAUTO,thedomelightturnsonwhenthe
door
is
open
.
15 SD/MMCcardslot
Insert
theSDcard
or
MMC
card.
16 USBsocket
Connect
USB
device.
17 AV1INsocket
External
equipment
audio/video
in
socket.
Sc re w ho le
Sc re w ho le
Re se t hole
Po we r off
Sc re w hole
Sc re w hole
Page 8
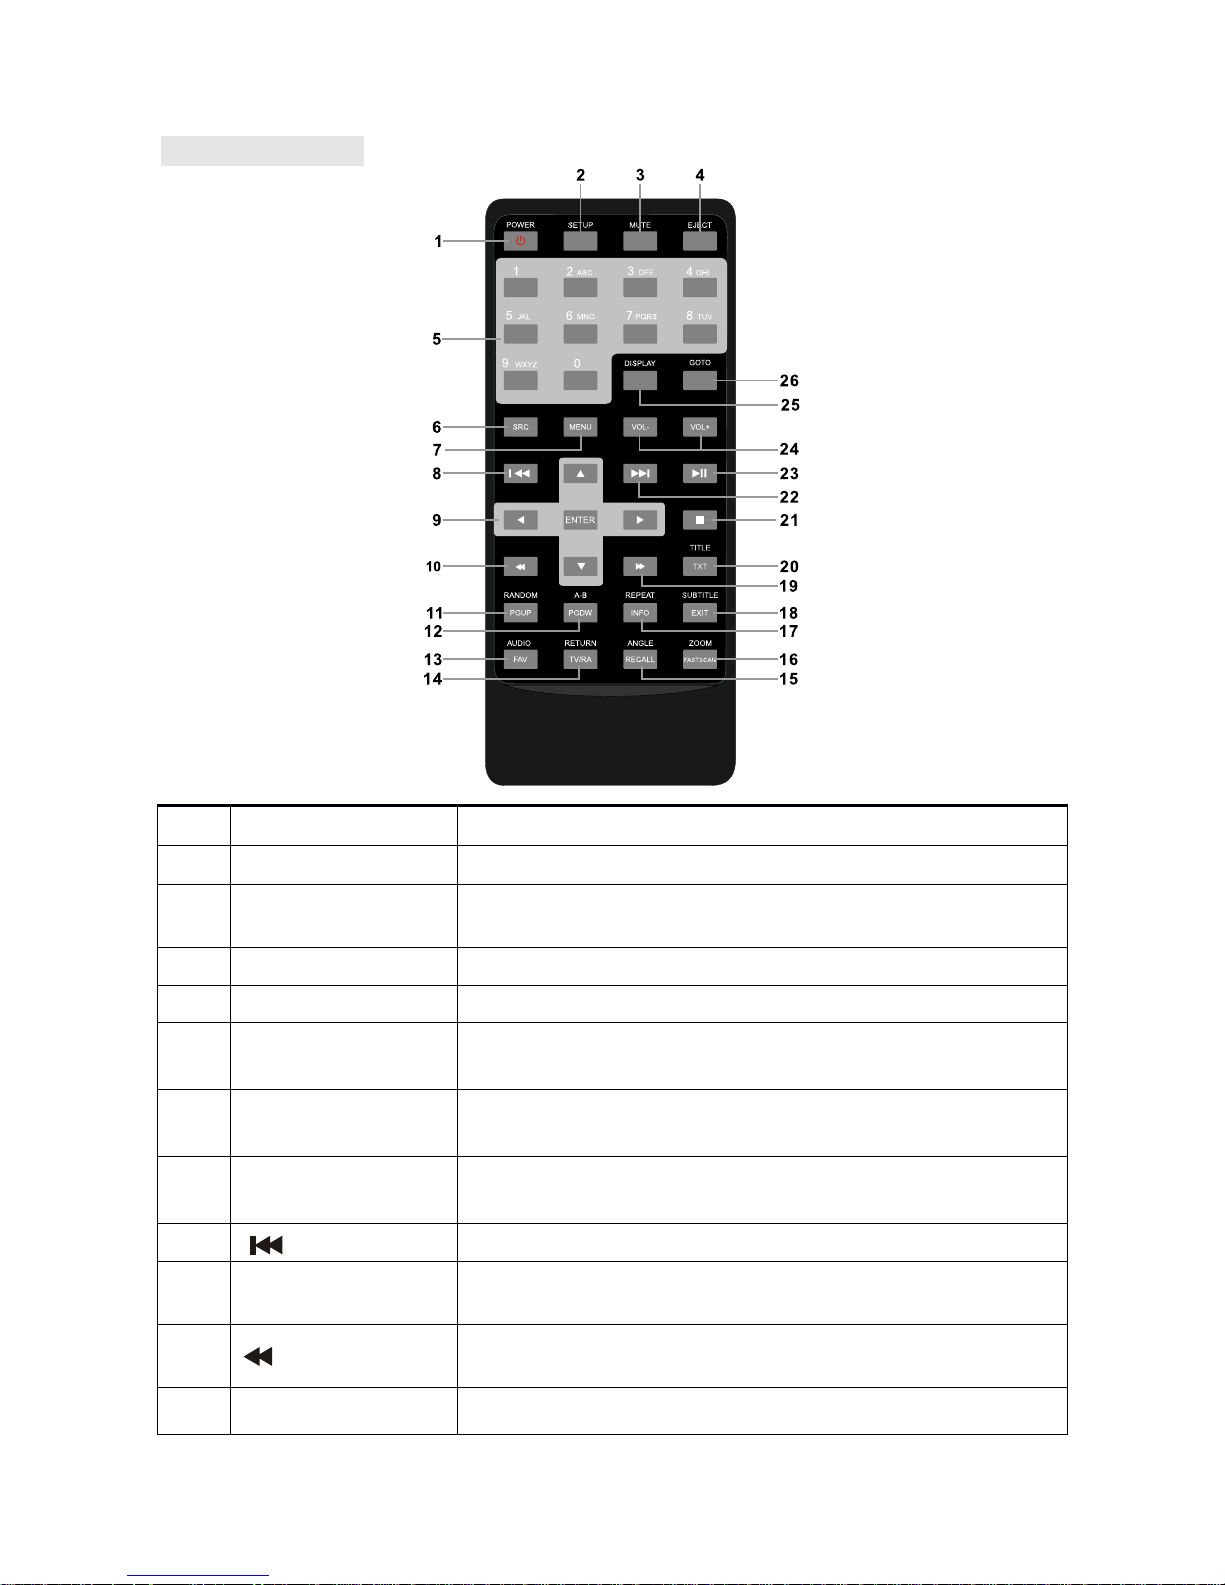
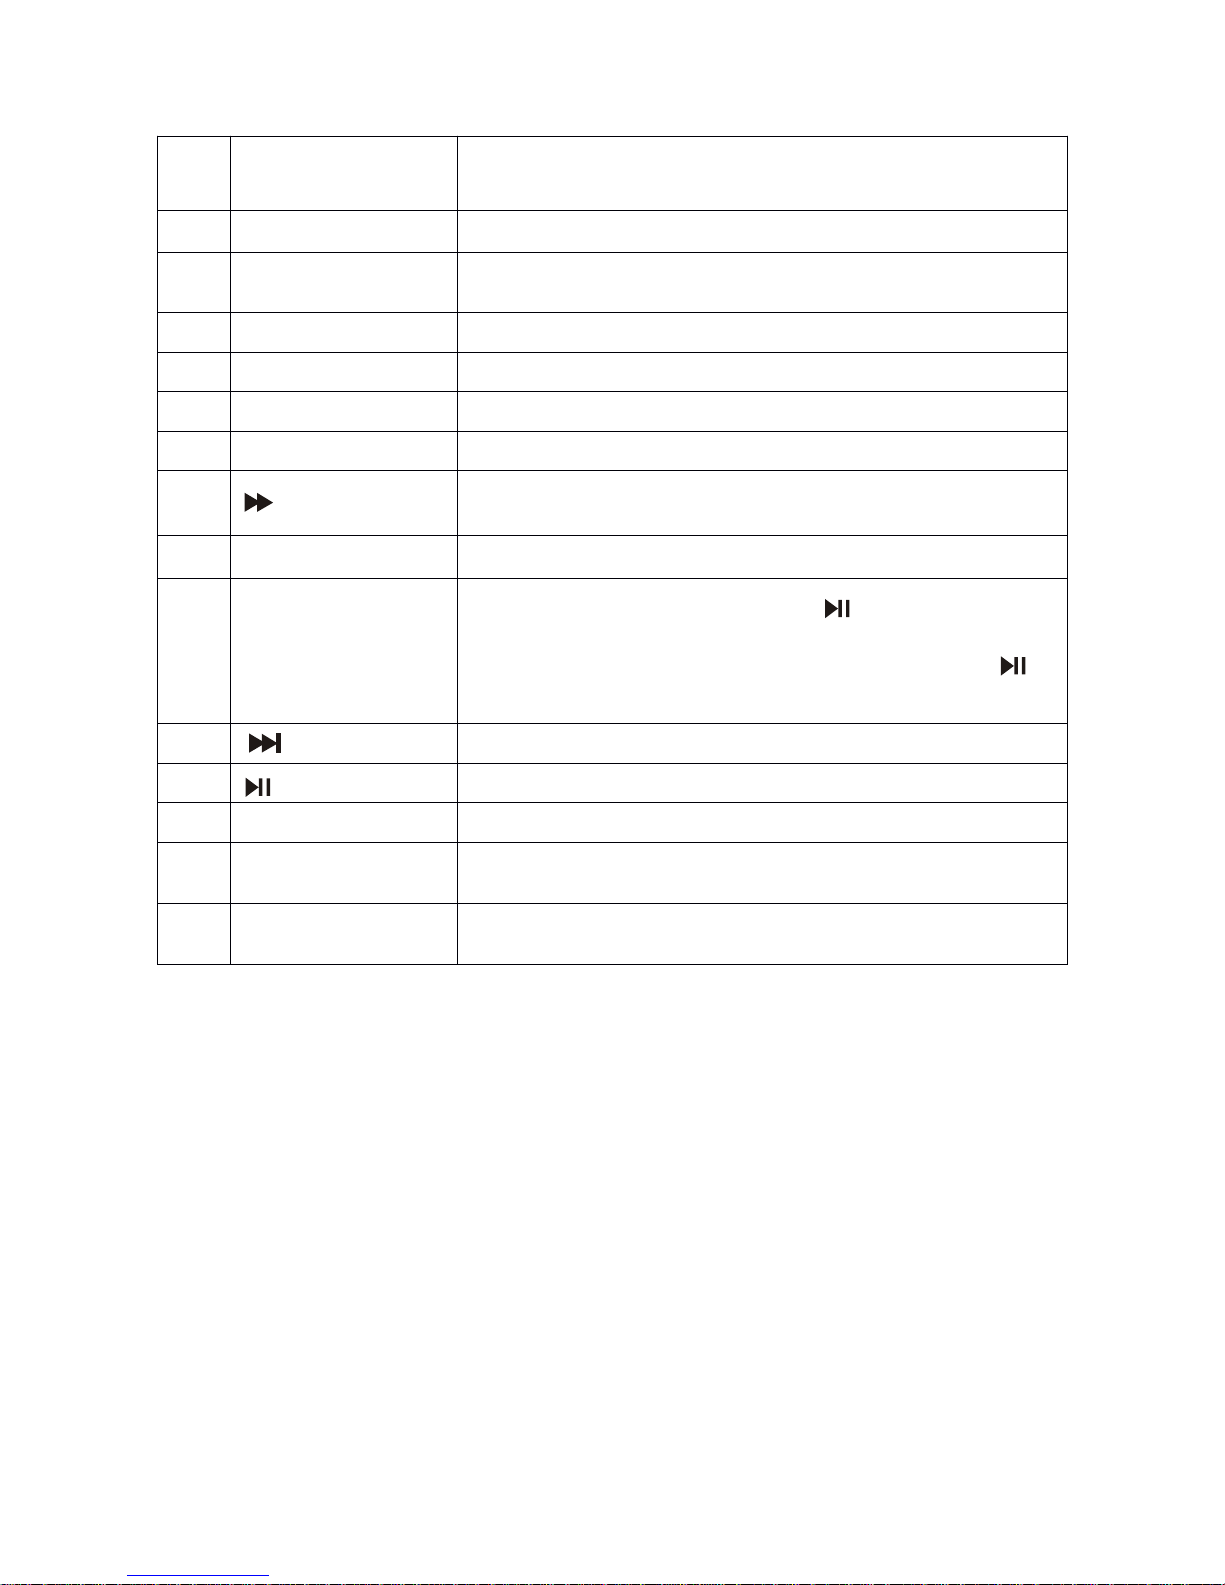
Remote Control
Item
Name
Function
or
control
1
POWER
Turnonorturnofftheplayer.
2
SETUP
Press
to
access
the
setup
menu
to
modify
the
player
settings.
3
MUTE
T
urn
the
sound
onoroff.
4
EJECT
E
ject
the
disc.
5
0-9Numberkey
Press
to
enter
numbers
directly,
such
as
for
settings
or
track
numbers.
6
SRC
Selects
the
video
input
source:
AV1,AV2,USB
and
SD/MMC
.
7
MENU
Press
and
hold
todisplay
the
OSD
menu
,
press
again
to
close
the
OSD
menu
.
8 Presstogotothepreviouschapterortrack.
9
Arrowsand
ENTER
Navigation
Up/Left/Right/Down
and
confirm
choose
.
10
Fastreverse
Press
to
fast
reverse
playback
at
2x,
4x,
8x,16x
and
32x
speeds.
11
RANDOM
Press
to
play
chapters
or
tracks
in
random
order.
Page 9
12
A-B
Press
to
repeat
playback
from
point
Atopoint
B./Move
down
a
page
in
the
channel
list
.
13
AUDIO
No
use
on
TR0101
.
14
RETURN
Press
to
return
the
main
menu,
press
again
to
return
the
last
position
of
playback.
15
ANGLE
No
use
on
TR0101
.
16
ZOOM
Press
to
set
the
zoom
for
movie
viewing.
17
REPEAT
Press
to
repeat
one
/
folder
/
all/off.
18
SUBTITLE
No
use
on
TR0101
.
19
Fastforward
Press
to
fast
forward
playback
at
2x,
4x,
8x,16x
and
32x
speeds.
20
TITLE
No
use
on
TR0101
.
21
■ Stop
Press to stop playback, press or ENTER
button to start playing at the last position ; Press
this button twice to fully stop playback, press or
ENTER button to start playing at the begin .
22
Press
togoto
the
next
chapter
or
track.
23
Play
or
pause
.
24
VOL-/+
Press
to
decrease
/
increase
the
volume.
25
DISPLAY
Presstodisplaytheplaybackinformation(suchas
title,chapter,trackandtime).
26
GOTO
Presstostartplaybackataselectedchapter,track
ortime.
Page 10
Ope
ra
tion
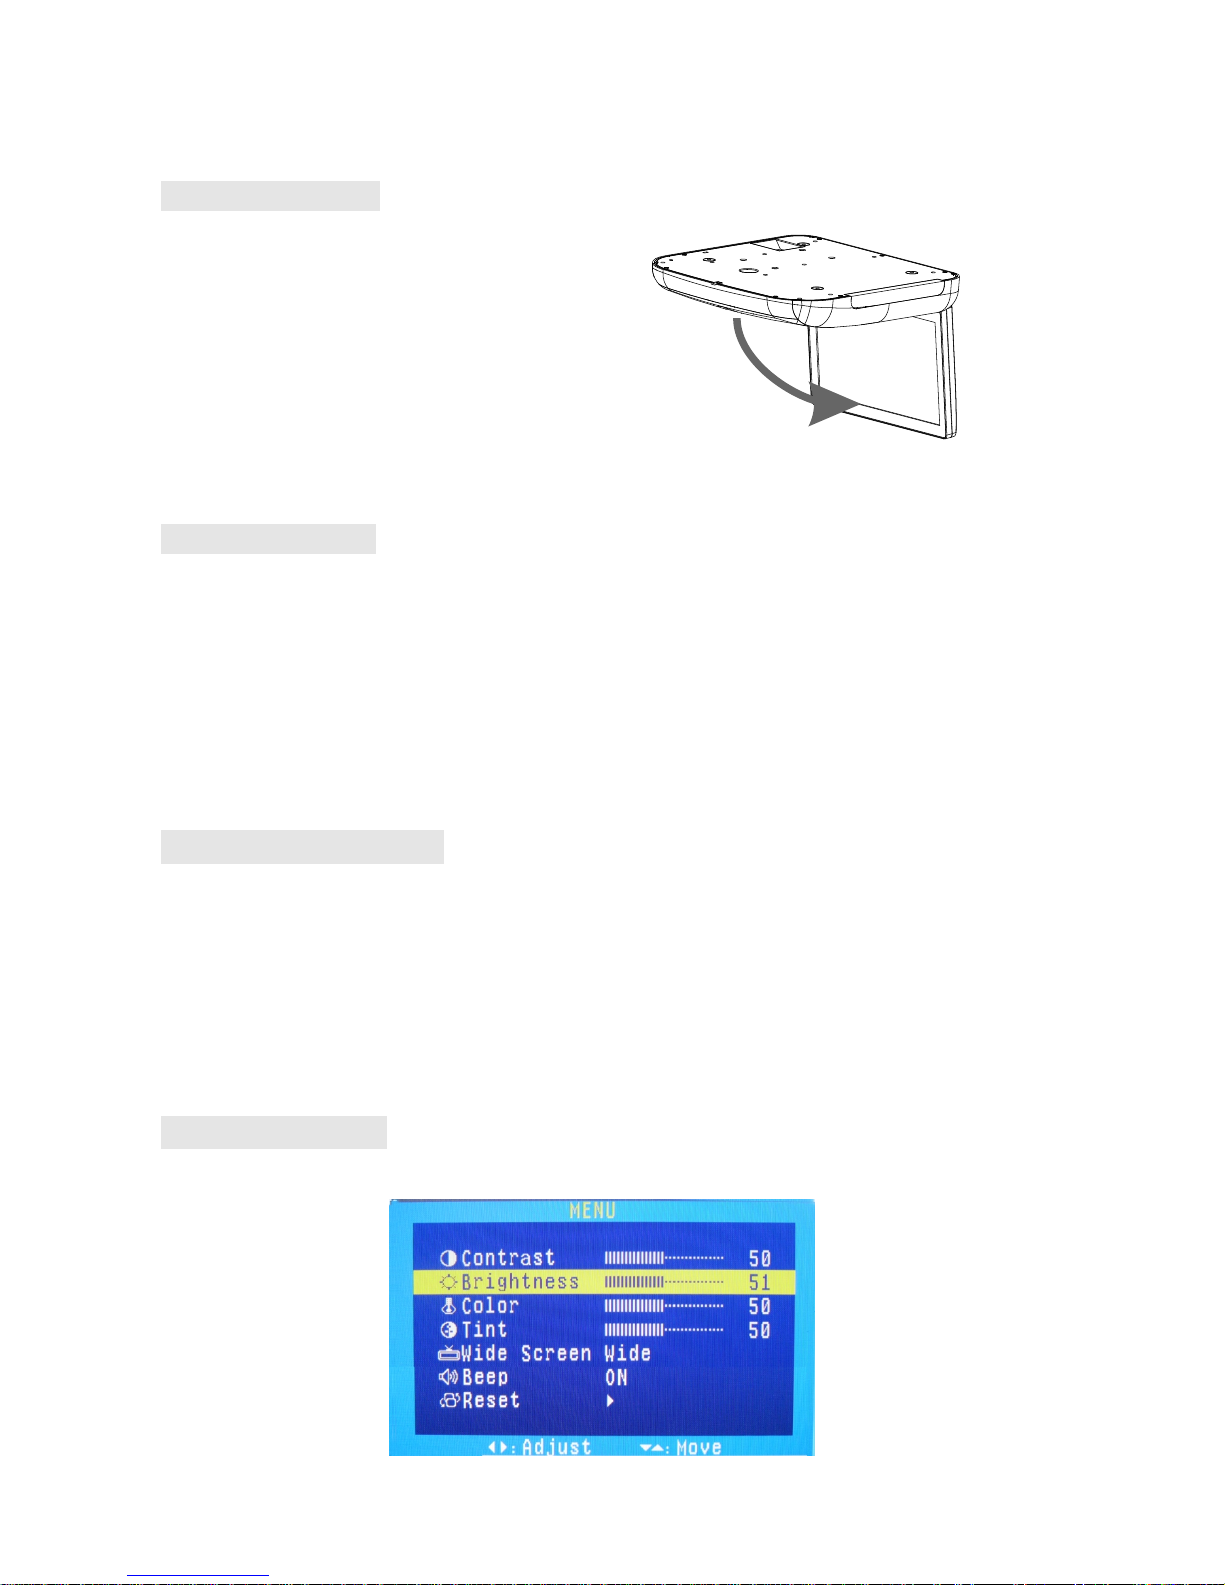
Open
the
monitor
1.
PressthePanelopenbuttontolower
theoverheadmonitorscreen.
2.
GentlyswingtheLCDdownandadjust
theangleforviewing.
CAUTION:TheLCDopenstoamaximum
angleof120° degrees.Donotattempttoopenitfurther.
Stow
the
monitor
Gentlypushthebacksideofthedisplaypaneluntilitclicksintotheoverhead
housing.Themonitorturnsoffautomaticallywhenyoureturnittotheclosed
position.
Note:Whenclosingthedisplaypanel,donotletcordsorotheritemsget
caughtbetweenthedisplayandtheoverheadhousing.Doingsocan
eriouslydamagethescreen.
Foryoursafety,closetheLCDpanelwhenyouarenotusingit.
Turn the player on / off
1.Usethesystemwiththevehiclerunningorwiththeignitionkeyswitchin
the"accessory"position.
2.Tolowerthescreen,pressthePanelOpenbuttonandmovethescreen
intoaviewingpositive.Thesystemwillpoweronautomatically.
3.Touch
SOURC
E
icontoswitchthemode.
4.Stowthemonitororpressthepowerbuttonontheremotecontroltoturn
theplayeroff.
Adjust the display
1.
Touchandholdthe MENU buttontodisplayadjustmenu(OSD).
Page 11

2.IntheOSDMENU,press ▼or ▲ buttontosequentiallyselecteachmenu
item.
Contrast
Adjuststhedifferencesbetweenthelightanddarkareasof
theimage
Bright
ness
Makesthewholeimagelighterordarker
Color
Adjustscolorbasedonthecolorspectrum
Tint
AdjuststheintensityofthecolorwheninNTSCmode.
Wide
Screen
Selectstheaspectratiooftheimagewide,normal.
Beep
Selectthebeepsoundwhentoucheachiconorbutton.
R
eset
Returnsallmenuvaluestotheirdefaultsettings.
3.Pressthe ◄ or ► buttontochangethevaluesofselectedoption.
Care and Maintenance
Cleaningthemonitor
l
Useaclean,soft,dryclothtogentlywipedustanddirtfromthescreen.
l Donotusebenzene,thinner,carcleaner,orothercleaners.These
substancesmaydamagethemonitorsystemorcausethepainttopeel.
l
ThesurfaceoftheLCDcanbeeasilyscratched.Donotrubitwith
anythingabrasive.
Servicingthemonitor
Intheeventthattroublearises,neveropenthemonitorcase,disassemblethe
playerorattempttorepairityourself.Theinternalpartsarenotserviceableby
user.Openinganycomponentswillvoidthewarranty.
CAUTION:
Changesormodificationstothisproductnotapprovedbythe
manufacturermayvoidthewarranty.
Use the remote control
l Usetheremotecontrolonlyinsidethevehicle.
l Usetheremotecontrolnofurtherthanfivefeet(threemeters)fromthe
sensor.
l Directsunlight(oraverybrightlight)reducessensitivitytoremotesignals.
Donotusetheplayerindirectsunlight.
l
Anyobjectthancomesbetweentheinfraredsensorandtheremote
controlmaydisruptreception.
Replace the battery in the remote control
Thebatteryneedschangingwhenthebuttonsontheremotestopworkingor
whenyouhavetomoveclosetoplayerfortheremotetowork.
Precautions
Page 12
l Disposeofusedbatteriesproperty.
l Donotdisposeofusedbatteriesthrowingthemintofire.Ifyoudoso,they
mayexplode.
l Donotshortthepositive(+)andnegative(-)terminals.
l Keepthebatteryanditsholderawayfromyoungchildren.Theymay
chokeonthebatterywhileattemptingtoswalloworchewonit.
Note: ThebatterytypemustbeCR2025.Donotreplacewithanyother
batterytype.
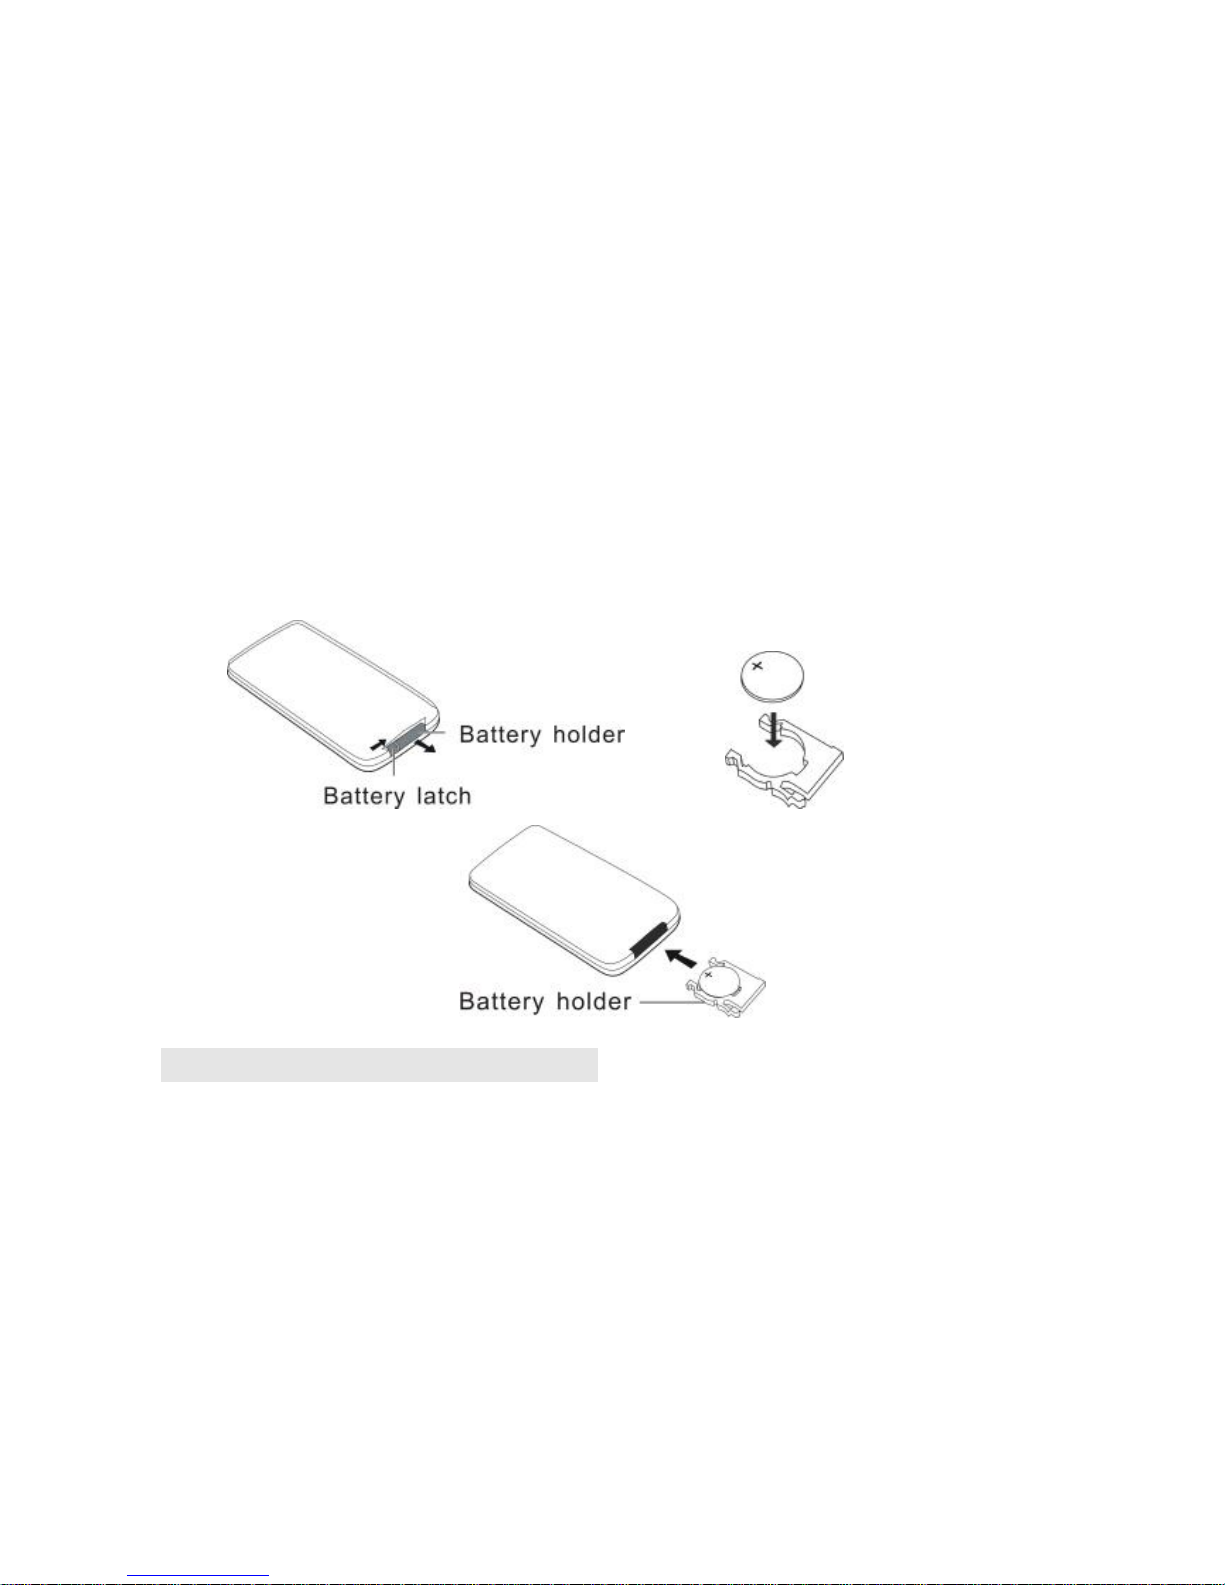
Procedure
1.
Turntheremoteup-side-down.
2.
Simultaneouslyslidethebatterylatchinthedirectionofthearrowandpull
thebatteryholderoutoftheslot.
3.
Removetheoldbattery.
4.
Placethenewbatteryintheslotwiththeplus(+)sideup.
5.Pushthebatteryholderbackintotheslotuntilitlocksinplace.
Play USB device and SD/MMC card
1.InsertaUSBdeviceintotheUSBsocketofthemainunit.
2.
Touch
SOURCE
buttononthepanelorpress
SRC
buttonontheremote
controlformorethan2secondstoswitchtotheUSBmode.Thesystem
willplayUSBdeviceautomatically.
3.
Usethearrowbuttonstoselectafiletypeandpressentertoplayit.
4.
PlayingSD/MMCcardisthesameoperationofUSBdevice,pleaserefer
tothestepsofplayingUSBdevice.
Page 13
Installation
and
Wiring
Donotattempttoinstallorserviceyourplayerbyyourself.Installationand
servicinginelectronicequipmentandautomotiveaccessories.Ifyoudonot
haveknowledgeorexperiencethisinstallationmaybedangerousandcould
exposeyoutotheriskofelectricshockorotherhazards.
Readtheseinstructionsandprecautionscarefully.Improperinstallationcan
damagethemonitorandthevehicle.
What's in the box
Inadditiontothismanual,theboxcontains:
Note:Useonlythecontentsofthispackagetoinstallandusethesystem.
Usingaccessoriesnotprovidedwiththisplayermaydamagetheplayer.
Installation Instructions
n
Topreventshortcircuits,removethekeyfromtheignitionanddisconnect
theterminalofbattery.
n Makeproperinputandoutputcableconnectionsforeachunit.
n
Connectthewireharnessinthefollowingorder:groundwire,batterywire,
ignitionwire.Connectthewireharnessconnectorwiththedisplayunit.
n Reconnecttheterminalofthebattery.
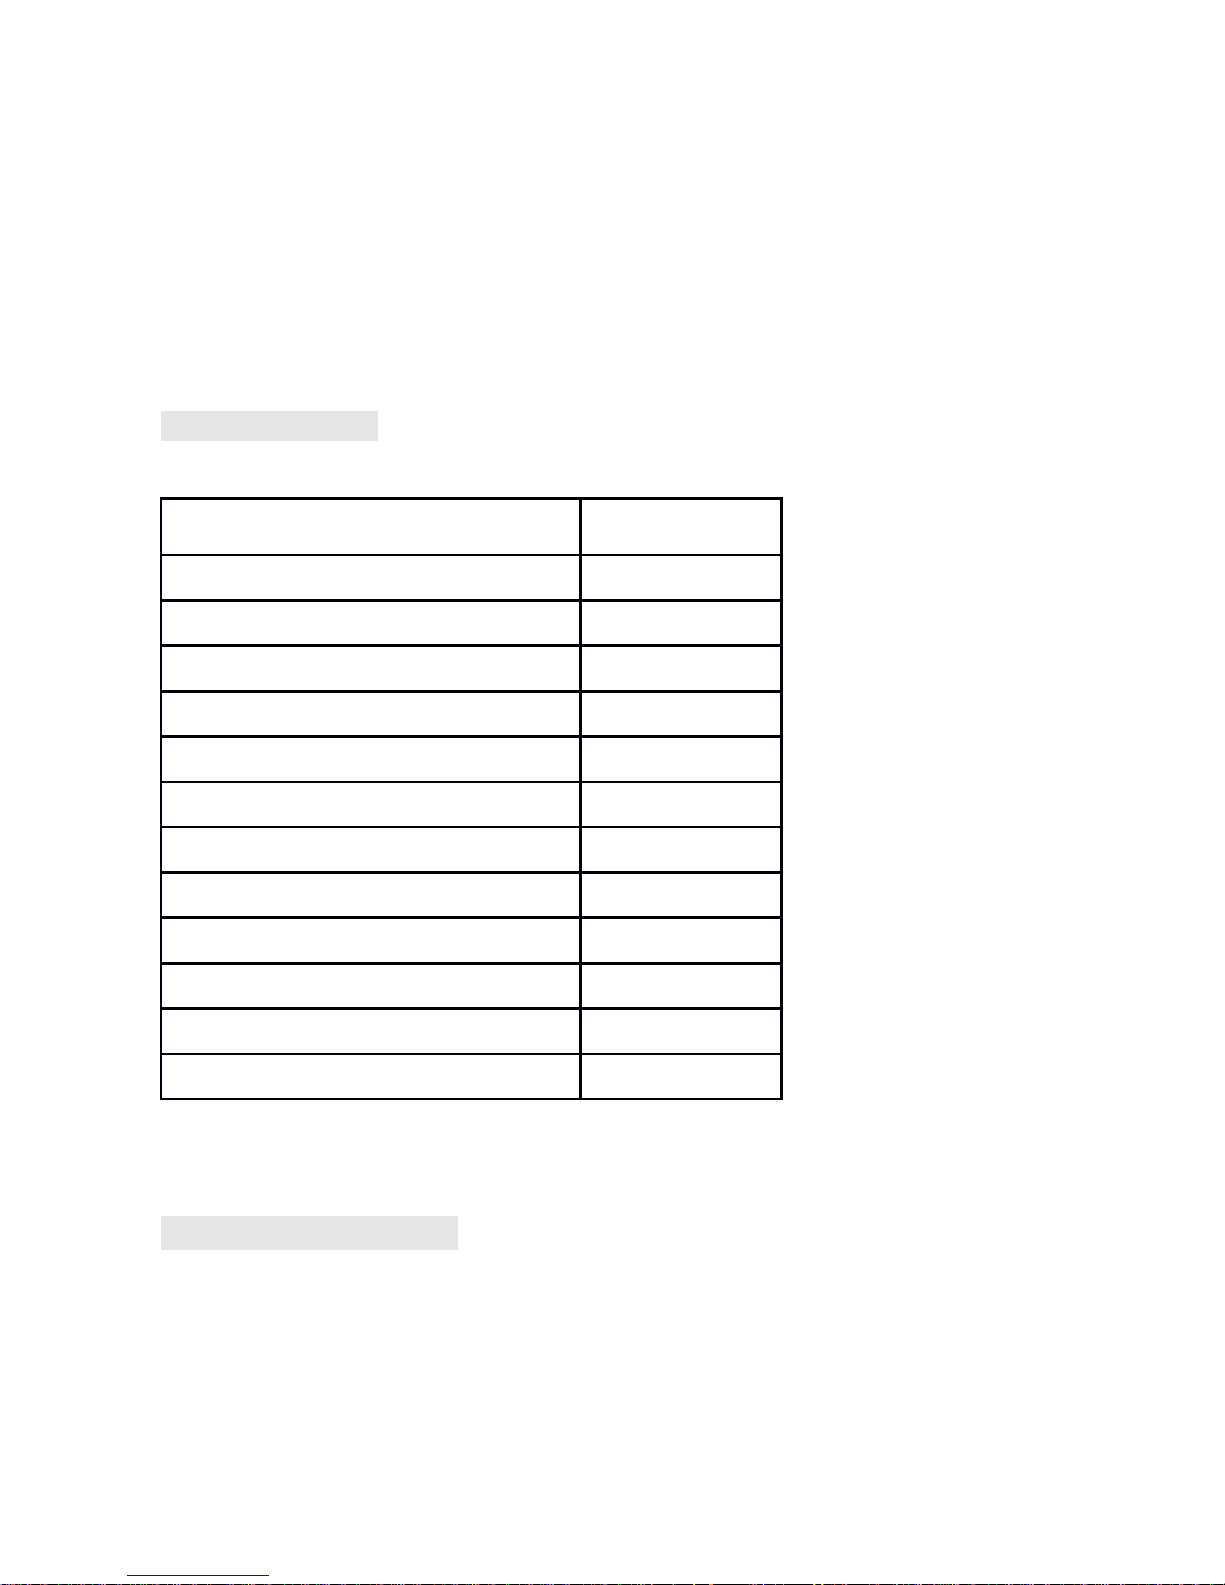
PartsName Quantity
Player 1
Remotecontrolwithbattery 1
Powercable 1
AV1INcable 1
AV2INcable 1
AVOUTcable 1
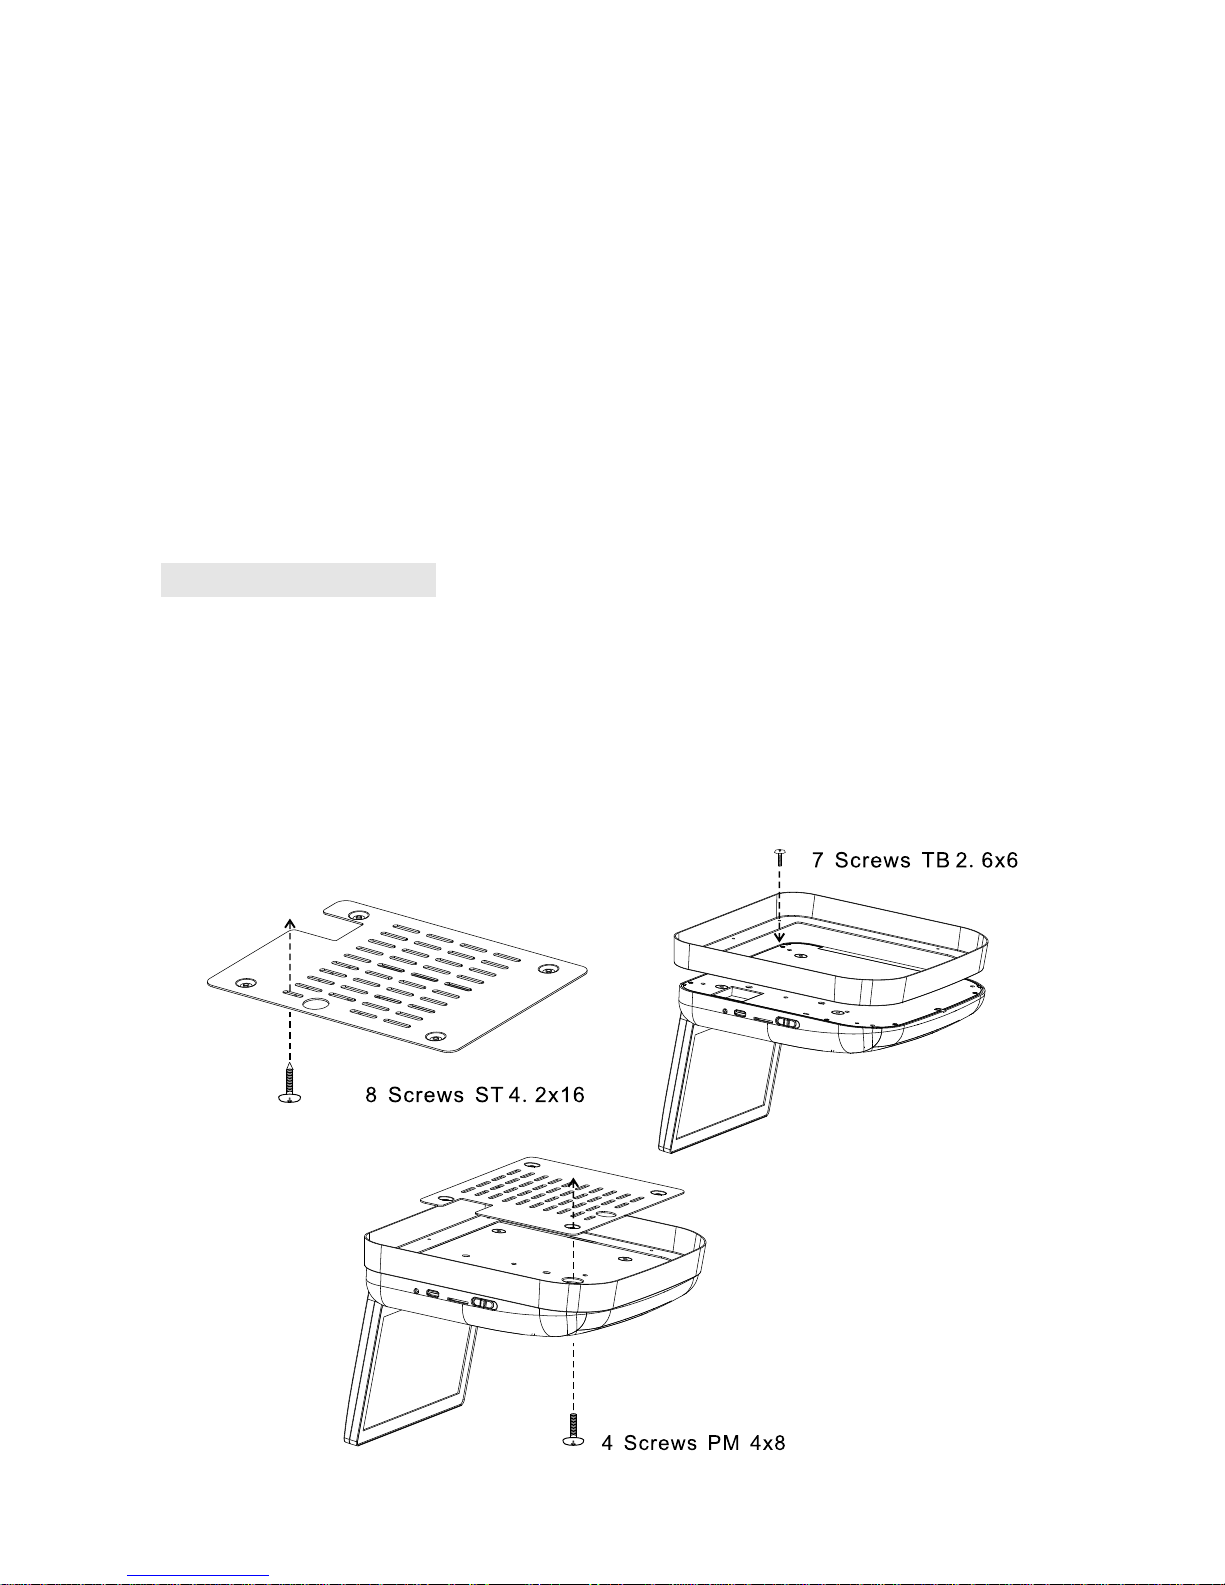
ST4.2x16screw 8
TB2.6x6screw 7
PM4x8screw 4
InstallationBracket 1
TrimRing
1
Usermanual 1
Page 14
Notes:
■ DoremembertoconnecttheredwiretotheACCoftheignitionswitch.Or
thebatterychargemightbedrainedoffprematurely.
■ Ifthefuseisopened,firstmakesurethatthecableshavenotcauseda
shortcircuit,andthenreplacetheoldfusewithanewoneofthesame
ratings.
■ Donothaveunconnectedcablesorterminalstouchthemetalonthecaror
anyotherconductingmaterial.
■ Topreventshortcircuits,donotremovethecapsfromunusedterminalsor
fromtheendsoftheunconnectedcables.
■ Afterthedisplayunitisinstalled,checkandmakesurethebrakelights,
blinkers,wiper,etc.onthevehicleareworkingproperly.
■ Insulateunconnectedwireswithvinyltapeorothersimilarmaterial.
Installation procedure
1. ScrewtheInstallationBrackettothebeamorplywoodusingtheST4.2x16
screws.
2.InstallingthetrimringontheplayerusingtheTB2.6x6screws.
3.
Pluginpowerharnessandaudio/videosourcecablesintotheoverhead
monitor.
4.AttachtheplayertotheInstallationBracketusingthePM4x8.
5.
Checkthecar’sbrakelights,blinkers,wiper,etc.toensuretheyare
workingproperty.
Page 15
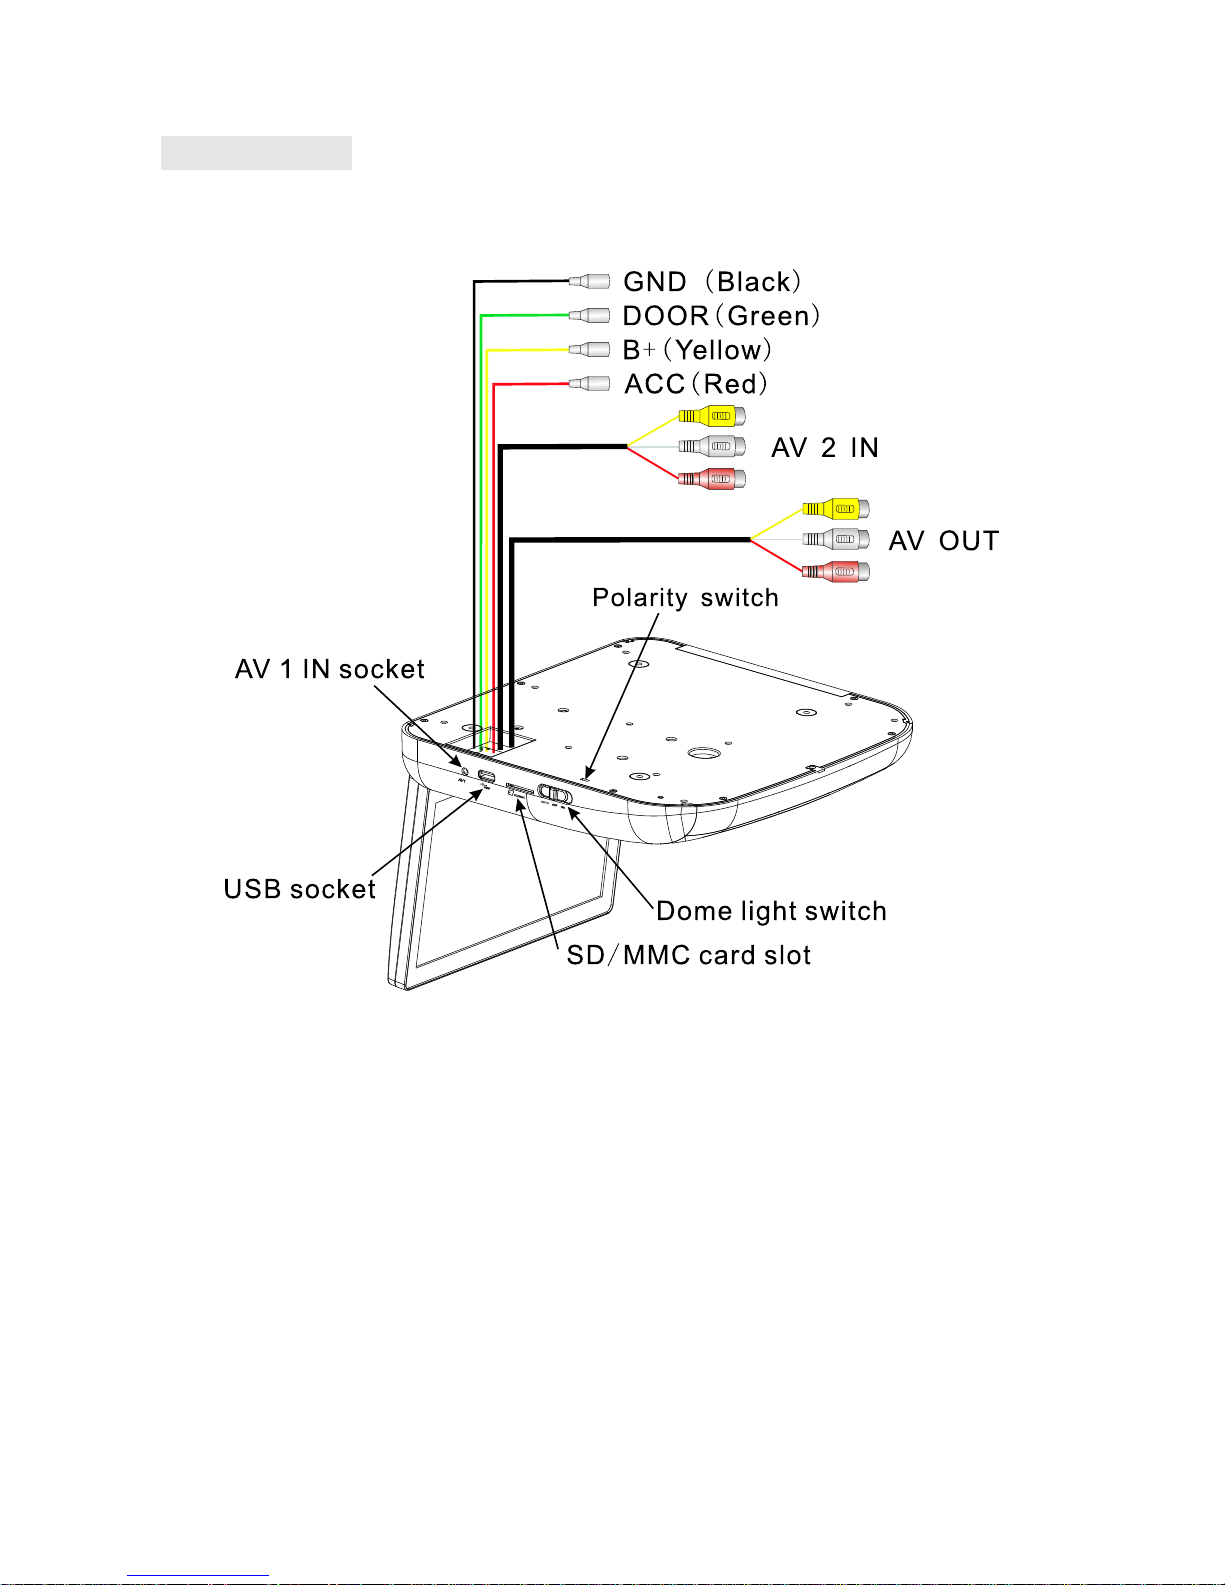
Wiring diagram
Note:Slidethepolarityswitchto"-"ifyourvehicle'spowersupply
systemisnegative;Slidethepolarityswitchto"+"ifyourvehicle's
powersupplysystemispositive.
Page 16

System
Setup
1.
Press SETUP ontheremotecontroltoaccessthesetupmenu.
2.Press ▲/▼ buttontoselectamongmenuitems.
3.Press ◄
/
►
buttontochangethevaluesofselectedoption.
4.
Press ▲/▼ buttontoselecttheoptionyouwishtochange.
5.Press
ENTER
toconfirmyourselection.
6.Press ◄ toreturnthepreviousgrademenu
.
7.
Press
SETUP
toexitthesetupmenu.
Menu Description
GENERALSETUP
PAGE
ANGLE
MARK:
Selectsadifferentangleifthebackof
theDVDjacketcontainsamultipleanglesicon.
·ON ·OFF
OSD
LANG:
SelectsalanguageforDVDplaymenu.
·ENGLISH ·FRENCH ·SPANISH ·ITALIAN
CAPTIONS:
SelectsthecaptionforDVDplay.
·ON ·OFF
SCREEN
SAVER:
Protectsthescreenifitpausedabout
5minutes.
·ON ·OFF
SPEAKERSETUP
PAGE
DOWNMIX:
AppliestoDolbydigitalsound.
·LT/RT ·STEREO
PREFERENCE
PAGE
TV
TYPE:
SelectstheTVsystem.
·PAL ·NTSC
AUDIO:
Selectstheaudiotracklanguage.
· ENGLISH · FRENCH · SPANISH · GERMAN
·CHINESE ·RUSSIAN ·THAI
SUBTITLE:
Selects the language of the subtitles
displayedonthescreen.
· ENGLISH · FRENCH · SPANISH · GERMAN
·CHINESE ·RUSSIAN ·THAI ·OFF
DISC
MENU:
Selectsthelanguageofthecurrentdisc.
· ENGLISH · FRENCH · SPANISH · GERMAN
·CHINESE ·RUSSIAN ·THAI
Page 17
Specifications
Specificationsanddesignaresubjecttochangewithoutnotice.
PARENTAL:
Restrictstheviewingofmoviestochildren
ofappropriateagelevelsonly.Youcanselect1to8.
1KIDSAF (safeforchildren)
2G(generalaudience)
3PG (parentalguidancesuggested)
4PG13 (somematerialunsuitableforchildrenunder13)
5PGR (somematerialunsuitableforchildrenunder17)
6R(somematerialunsuitableforunder17)
7NC17 (notrecommendedviewingforchildrenunder17)
8ADULT (Onlyforadultsduetographiccontent.Thisisthe
defaultsetting.)
Afteryouselecttheparentalsetting,pressENTER,then
enterthe4-digitpassword(defaultis3308).PressENTER
againtoconfirm.
PASSWORD:
Letsyouchangethe4-digitpassword
usingthenumberkeysontheremotecontrol.The
defaultpasswordis3308,butnolongerworksafteryou
changethepassword.
DEFAULT
:
Resetsallsettingstothefactorydefaults.
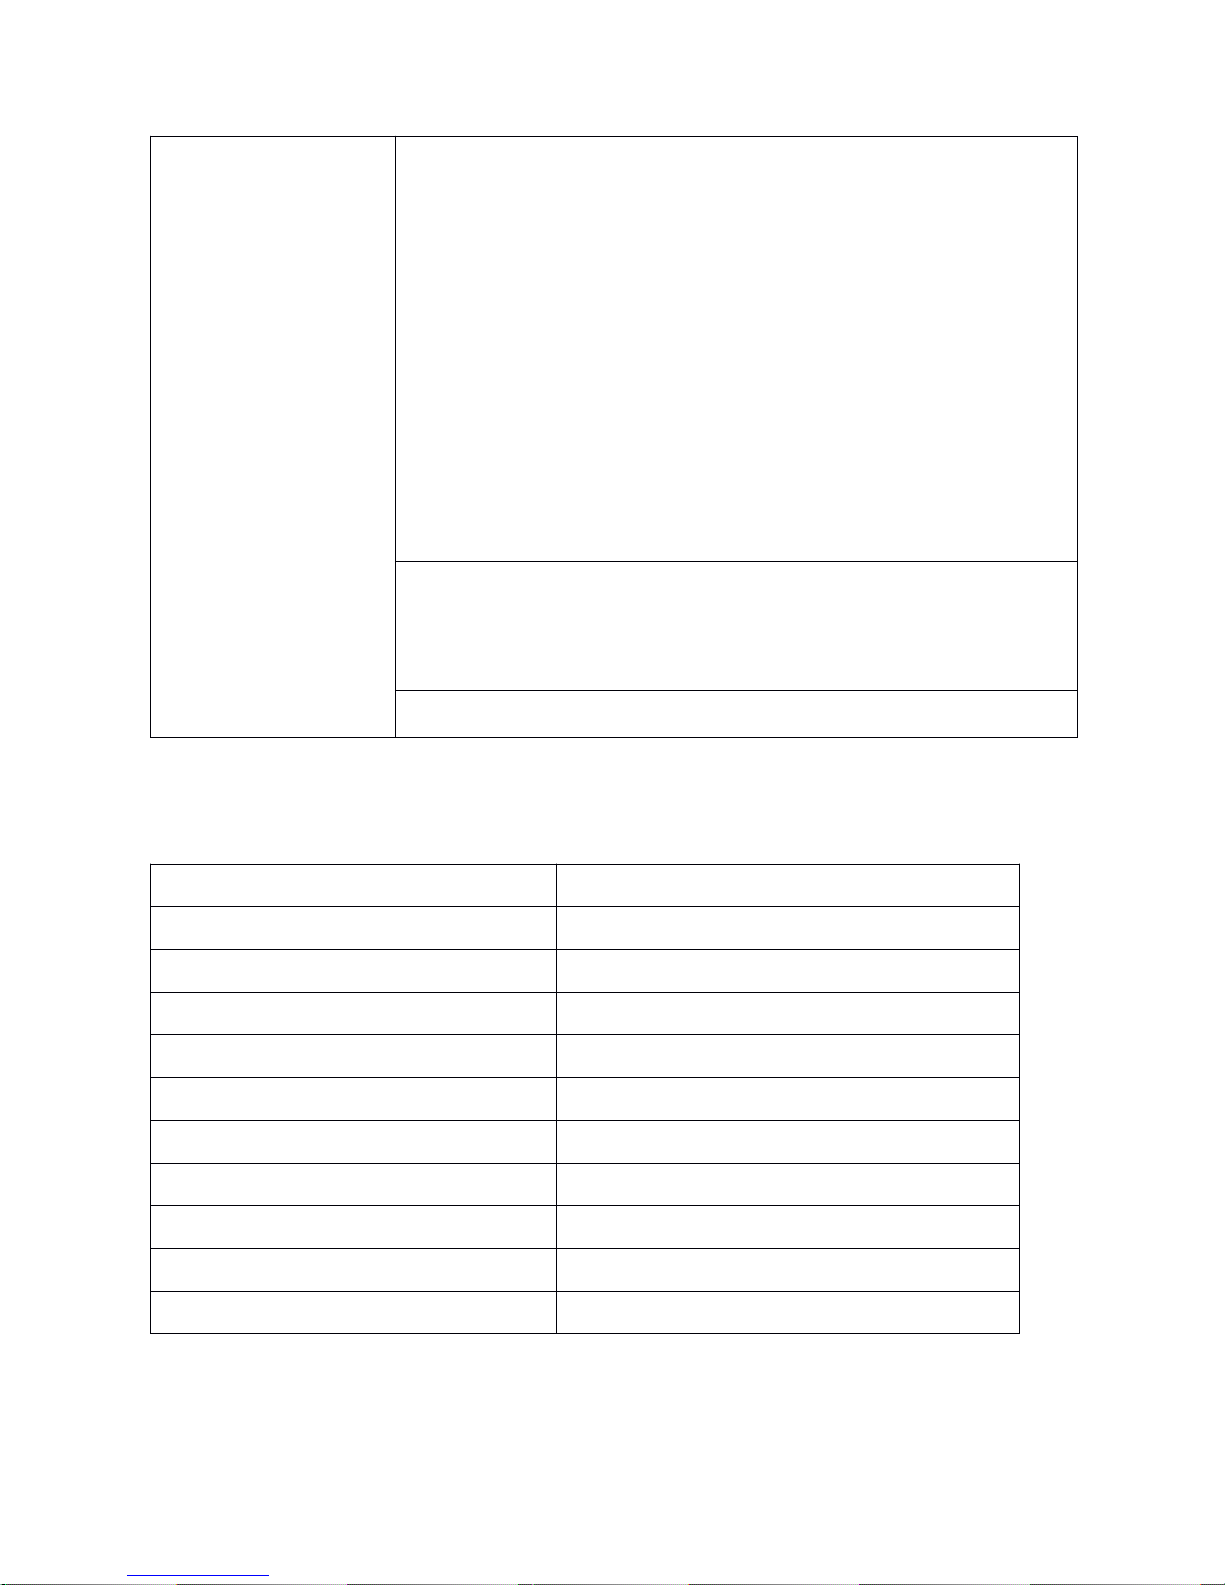
PowerSource Vehiclebattery(DC+10V~+18V)
OperatingVoltage DC+14V
Mechanism ManualOpen/Close
DisplayAngle VerticalAdjustable:Up/Down<120°
Pixel 800RGB(W)x480(H)
HighBrightness 350cd/m
2
Viewingangle(up/down/left/right) 45/65/65/65
Operatingcurrent <2000mA(TypicalVDD=14V)
DomeLight <2W
OperationTemperature -10℃ to+50℃
StorageTemperature -20°Cto+70°C
Page 18

T
roubleshooting
Ifoperationfreezes,thescreengoesblackortheunitshouldotherwisenot
functionproperly,tryturningtheunitonandoff.Iftheunitdoesnotrespond,
presstheresetswitchontheFrontPanel.
Problem
Cause
Solution
Theplayer
suddenlystoppedworkingor
thescreenwent
black
Playererror
Tryturningtheplayeroffandon
.
Iftheplayerstilldoesn’t
respond,presstheresetbutton.
Playerdoesn’t
turnon
Thecarignition(or
ACC/Accessory)isoff
Insertthekeyintotheignition
andturnittoACC/Accessory.
Condensationintheplayer
Waitforaboutonehouroruntil
condensationevaporates.
Playeroperates
erratically
Batteryneedsreplacing Replacethebattery.
Looseconnections
Checkandtightenall
connections.
Blurpictureon
thescreen.
Interferedbyshortdistancedstrong
interference.
(E.g.highvoltagewire,
transformationstationor
aircraftetc…)
Movethevehicleawayfrom
theinterference.
Thepictureon
thescreenis
dark.
1.Theequipmentlocates
atalowtemperature
area.
2.
Brightnessissettoo
low.
1.Thisisthecharacteristicsof
LCDdisplayinlowtemperature,
itwillrestoretonormal
brightnessafterstartingthe
displayforfewminutes.
2.Adjustthebrightnesssetting.
 Loading...