

Page 1
ENGLISH
1
SPECIFICATIONS
GENERAL
Power Supply DC 11 -14V
Polarity Negative Ground
Speaker impedance 4 ohms
Power Output 4 x 55W
CD PLAYER
System Compact disc audio system
Usable disc Compact disc
Sampling frequency 44.1KHz
No of quantization bits 1bit
Frequency 5-20,000Hz
Number of channels 2 stereo
S/N Ratio 70dB
RADIO SECTION
FM
Frequency Range 87.5-108 Mhz
Usable Sensitivity Better than 15dB at S/N 30 dB
Stereo Separation 25 dB at 1KHz
S/N Ratio 50 dB
AM/MW
Frequency Range 522-1620 Khz
Intermediate Frequency 450KHz
Usable Sensitivity Better than 45dB
S/N Ratio 40 dB
REMARK :
Specifications subject to change without notice.
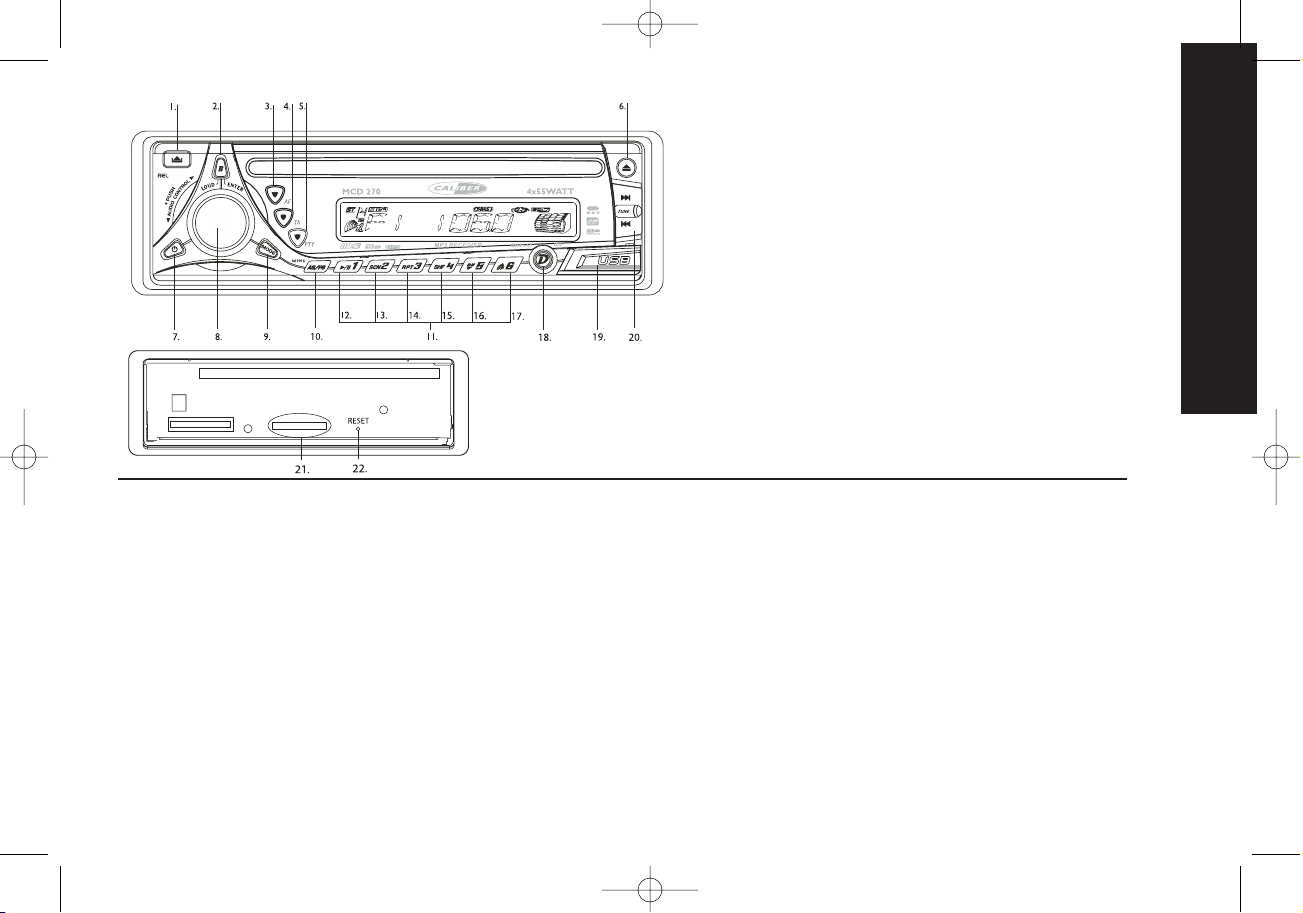
1. PANEL RELEASE BUTTON
2. BAND/LOUD BUTTON
3.AF BUTTON
4.TA BUTTON
5. PTY BUTTON
6. DISC EJECT
7. POWER BUTTON
8. ROTARY VOLUME KNOB
AUDIO SELECT BUTTON/ MP3 ENTER BUTTON
9. MODE BUTTON
10.AUTOMATICALLY STORE/PRESET SCAN (AS/PS)/MENU BUTTON
11. PRESET STATIONS BUTTONS (1~6)
12.PAUSE BUTTON
13. SCAN BUTTON
14. REPEAT BUTTON
15. SHUFFLE (RANDOM) BUTTON
16. PREVIOUS FOLDER BUTTON
17. NEXT FOLDER BUTTON
18. DISPLAY BUTTON/ MP3 ID3 BUTTON
19. USB COVER
20.TUNING UP/DOWN,TRACK UP/DOWN BUTTONS
21. SD/MMC CARD INPUT
22. RESET BUTTON
MCD 270 manual 18-08-2006 11:21 Pagina 1
Page 2
ENGLISH
2
DISC PLAY
PRECAUTIONS
• Use only in a 12-volt DC negative-ground electrical system.
• Disconnect the vehicle's negative battery terminal while mounting and connecting the
unit.
• When replacing the fuse, be sure to use one with an identical amperage rating.
•Using a fuse with a higher amperage rating may cause serious damage to the unit.
•DO NOT attempt to disassemble the unit. Laser beams from the optical pickup are dangerous to the eyes.
• Make sure that pins or other objects do not get inside the unit; they may cause malfunctions, or create safety hazards such as electrical shock or laser beam exposure.
• If you have parked the car for a long time in hot or cold weather, wait until the temperature in the car become normal before operating the unit.
• Keep the volume at a level at which you can hear outside warning sounds (horns
sirens, etc.).
CD NOTES
•Playing a defective or dusty CD can cause dropouts in sound.
• Hold CDs as illustrated.
• DO NOT touch the unlabeled side.
• DO NOT attach any seal, label or data protection sheet to either side of a disc.
• DO NOT expose a CD to direct sunlight or excessive heat.
• Wipe a dirty CD from the center outward with a cleaning cloth.
• Never use solvents such as benzine or alcohol.
• This unit cannot play 3-inch ( 8cm ) CDs.
• NEVER insert a 3-inch CD contained in the adapter
or an irregularly shaped CD.
• The unit may not be able to eject it, resulting in a
malfunction.
BEFORE OPERATION
• DO NOT raise the volume level too much,as this
will block outside sounds, making driving dangerous.
• Stop the car before performing any complicated
operation.
CAUTION
DO NOT open covers and do not repair by yourself.
Consult the dealer or an experienced technician for help.
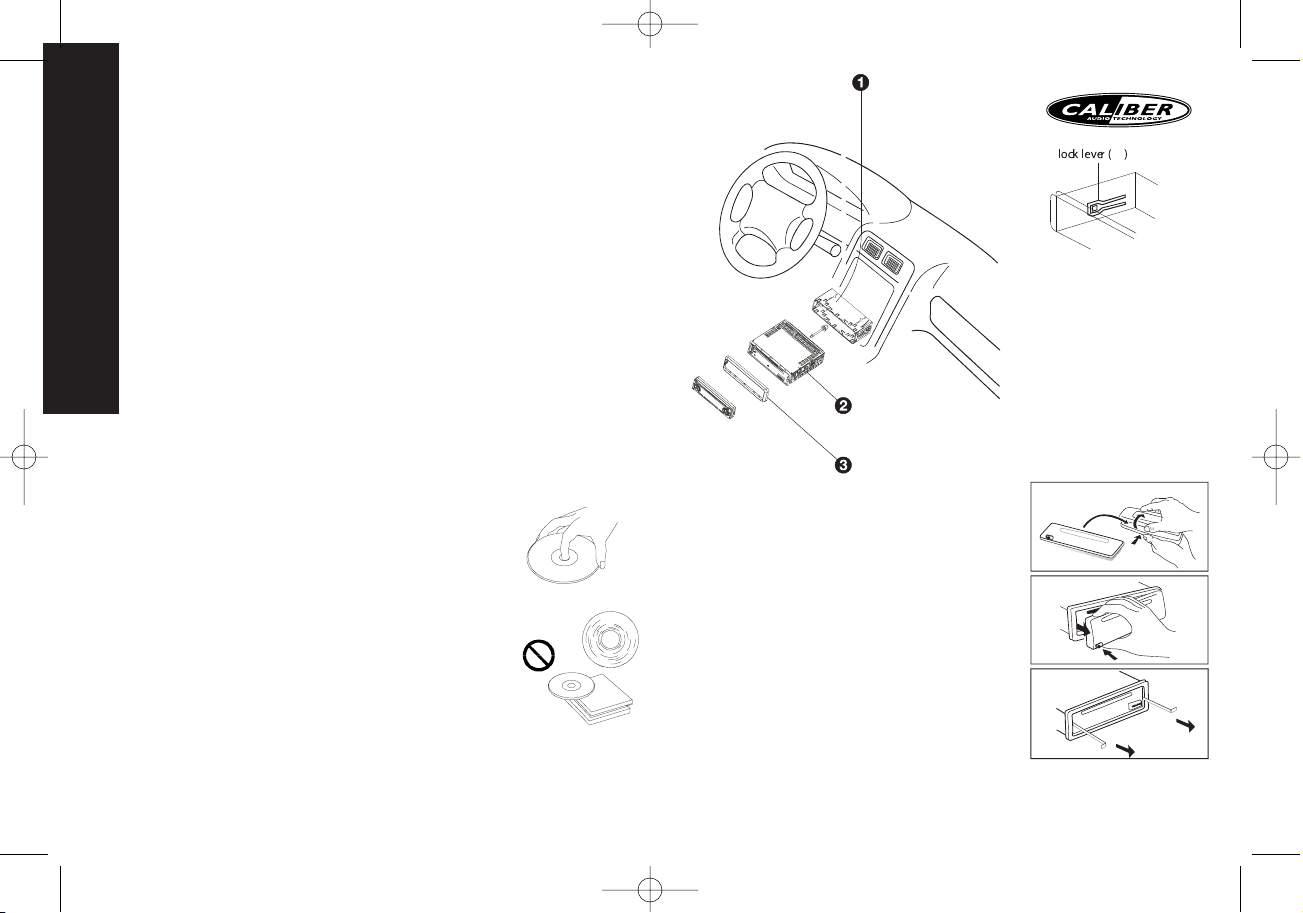
Installation procedures
First complete the electrical connections, and then
check them for correctness.
Anti-Theft System
This unit is equipped with a detachable panel.
Removing this panel makes the radio totally inoperable.
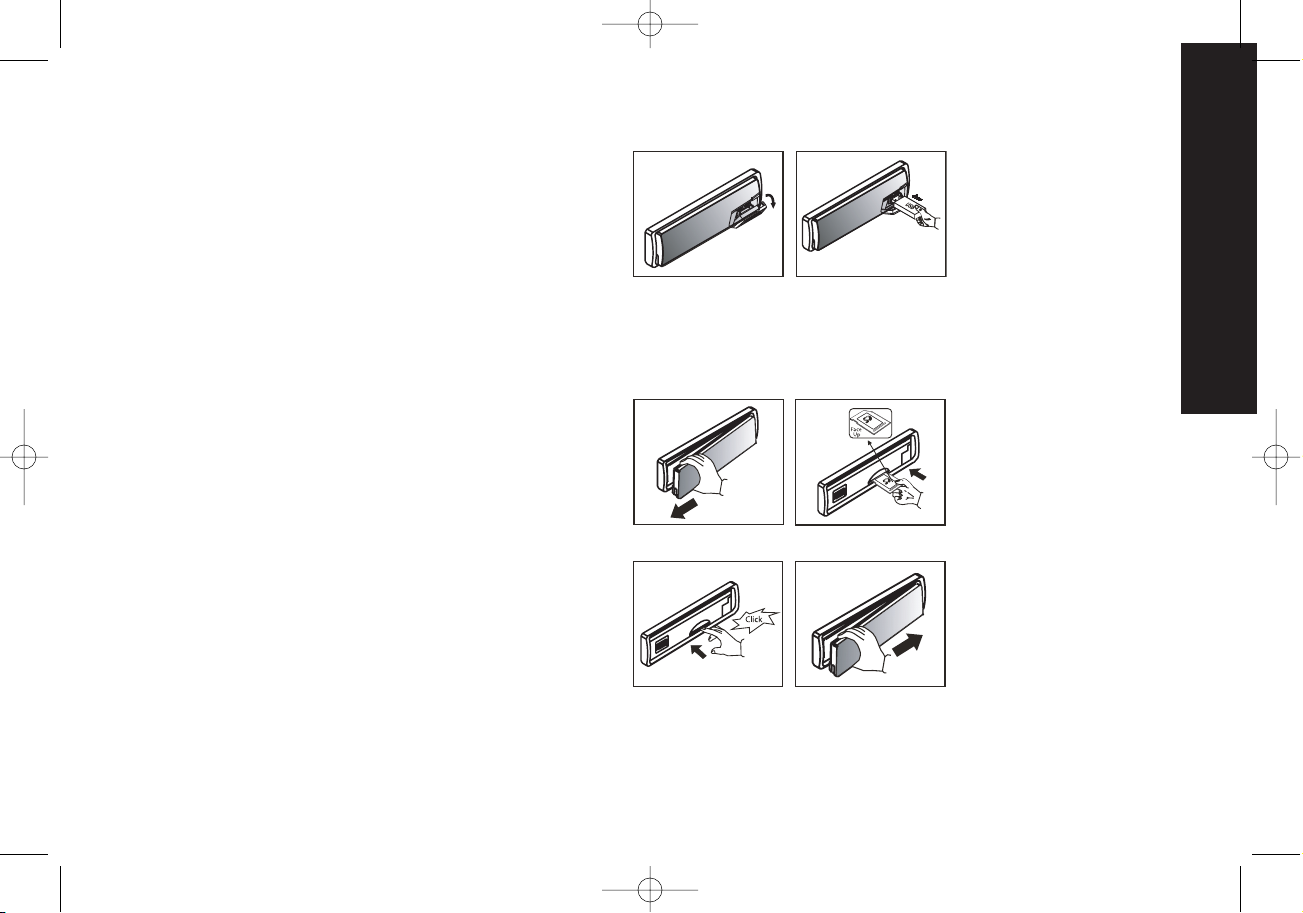
Removing the panel
1. Switch off the power of the unit.
2. Remove the detachable panel.
3. Gently press the button of the case and open the
cover. Place the panel into the case and take it with you
when you leave the car.
Install detachable panel
1.Fix right part of face plate in the right part of panel slot
of the unit.
2.Press down the left side of the face plate until it clicks
into the panel slot of the unit.
Remove the unit
Switch of the power of the unit.
1. Remove the panel and the trim plate.
2. Insert both T-Keys into hole in front of the set until
they lock.
3. Pull out the unit.
1. Insert mounting bracket into the
dashboard, and bend the mounting
tabs out with a screwdriver. (Make
sure that lock lever is flush with
the mounting bracket. Not projecting outward)
2. Secure the rear of the unit After
fixing mounting bolt and power
connector,fix the rear of the unit
to the car body by rubber cushion.
3. Insert trimplate
MCD 270 manual 18-08-2006 11:21 Pagina 2
Page 3

ENGLISH
3
BASIC OPERATIONS
ON/OFF
Switch on the unit by pressing POWER button(7) or any other button on the radio
(except eject) when system is on, press POWER button(7) to turn off the unit.
FACEPANEL RELEASE
Press REL button (1) to remove the facepanel.
SOUND ADJUSTMENT
Press button (8) volume knob to enter the sound set up,the sound set up will change
in the following order Volume, Bass, Treble, Balance, Fader and back to Volume.
Press button (2) “BAND/LOUDNESS” longer then 3 seconds then Loudness will be
activated or disactivated.
SOURCE
Press button (9) “MODE“ to switch between CD, USB,SD/MMC and radio.
BEEPS 2ND, BEEP ALL, BEEP OFF
Press button (8) “VOLUME KNOB” longer then 3 seconds. Now press the volume
knob until you see “BEEP” in the display.You can rotate the volume knob to select the
following options:
BEEP 2ND Beeps only when the second function of the dual function button is selected (long press).
BEEP ALL Beeps when any button is pressed.
BEEP OFF To disable the beep option.
RADIO OPERATIONS
BAND SELECTION
At tuner mode, press button (2) shortly to select the desired band.The reception
band will change in the following order: FM1,FM2, FM3 and MW
STATION SELECTION
Press up or down button (20) shortly to activate automatic seek function. Press for 2
seconds until “ MANUAL” appeared on the display, the manual tuning
Mode is selected. If the buttons are not touched for more then 3 seconds it automatic goes back to “AUTO SEEK”
AUTOSTORE AS
-Automatic Memory Storing
Press func button (10) “AS/PS” longer then three seconds , activate AS.The radio searches
for the 6 strongest stations and stores them into the preset of the currently selected band.
NOTE: Any stations that were previously stored in this memory bank are replaced by
a new station.
PRESET SCAN PS
Press func button (10) “AS/PS” for less then three seconds.The unit will pause for ten
seconds at each preset station. Press button (10) “AS/PS” again to stop scanning when
the desired station is reached.
Station store and recall
Press any one of the preset buttons (12 to 17) to recall a station which had been stored in the memory.Press a preset button for 2 seconds, previous preset station is
overwritten by current tuned frequency.
RDS (RADIO DATA SYSTEM) OPERATIONS
The RDS data are the PI, PS,TP, PTY,TA and AF data.
PI: Program indentification code
Code for identifying program
PS: Program service name
Broadcast station name data expressed
In alphanumerically character
TP:Traffic program identification
Identification data for traffic information broadcasting station
TA :Traffic announcement identification
Identification data showing traffic information is being transmitted or not
AF:Alternative frequencies
Frequency list of broadcasting station transmitting the same program
SETTING AF MODE
Press button (3) AF for less then three seconds to select AF to be ON or OFF
Whenever AF is switched on, symbol “AF” appears on the display.
The tuner will return to Alternative Frequencies whenever the reception signals getting worse.“ALARM” will be displayed when an emergency broadcasting is
received;meanwhile sound output level will be adjusted to the preset output level
automatically when the volume control is set at minimum.
USING PTY TO SELECT PROGRAM
The PTY function allows you to search for stations with a particular program type.
To select your program type, press the button (5) “PTY” less then three seconds.
Display will show:“pop music” or “news.
Now you can select the music type or speech type using preset keys 1 to 6 for your
selection as listed table:
Preset number PTY “pop” group PTY in “news” group
1 pop m, rock m news,affairs,info
2 easy m, light m sport,educatie,drama
3 classics, other m culture, science, varied
4 jazz, country weather, finance, childeren
5 nation m, oldies social, religion, phone in
6folk m travel, leisure, document
MCD 270 manual 18-08-2006 11:21 Pagina 3
Page 4
ENGLISH
4
While selecting PTY engagement, its selection is implemented by preset button as
described in notes.When PTY is selected, the radio starts to search corresponding
PTY information is detected. If corresponding PTY information is not found ,normal
radio reception is resumed.After the text “NON PTY” is at the display for 5 seconds.
LISTENING TO TRAFFIC ANNOUNCEMENT
Traffic announcement can interrupt CD play or radio listening when broadcast.
Briefly press the button (4) “TA” to select the TA mode on or off.When TA mode is
on, you will hear the traffic announcement when broadcast. During traffic announcement ,you can interrupt it by short press of TA button (4).Without switching off the
TA mode. By doing so, the set will return to the previous operating mode. Long press
on TA button(4) allows ON/OFF selection of EONTA LOCAL/EONTA DX
EONTA LOCAL will only allow traffic announcement from strong station to come through.
EONTA DX selection will allow all received announcements to interrupt CD play or
radio listening.
ADVANCED RDS SETTINGS
Press the volume knob (8) for more then three seconds to enter the advanced RDS
settings menu.
A) TA SEEK or TA ALARM
- TA SEEK mode:
When TP information gets lost at the current station for retune time which is set by
RETUNE SHORT (30 sec.) or RETUNE LONG (90 sec.), the radio starts to retune
to next same PI station.
-
TA ALARM mode:
When TP information gets lost at the current station beeps will be heard.
B) PI SOUND or PI MUTE
- In some countries, there is a possibility of having 2 different stations with same
frequencies but different PI.
If PI SOUND is selected, radio will switch to the new PI station for few seconds
before switch back to current PI station.
If PI MUTE is selected, radio will mute when a new PI station is received.
C) RETUNE L or RETUNE S.
When PI information is not caught for retune time, the radio starts to retune to next
same PI station.
RETUNE L mode: Retune time selected as 90 seconds.
RETUNE S mode: Retune time selected as 30 seconds.
D) MASK DPI or MASK ALL
- MASK DPI mode: Masked only the AF which has different PI.
- MASK ALL mode: Masked the AF which has different PI and any other interfering
non PI station which having the same transmitting frequency.
CD OPERATIONS
This CD player is suitable for 12cm disc, do not use irregular shaped CD.
SELECT TRACKS
During CD operations, press button (20) “ ” for next track. Press button (20)
“ ” for previous track.Tracknumber shows on display.
During CD operation, hold button (20) “ ” for fast forward. Hold button (20)
“ ” for fast reverse. Cd will starts from when you release the button.
PAUSE
Press button (12) “ ” to pause the CD player. Press it again to resume play.
REPEAT THE SAME TRACK
Press button (14) “RPT” to continuously repeat the same track. Press
it again to stop repeat.
SCAN TRACKS
Press button (13) “SCN” to play first several seconds of each track of current CD.Press
again to stop intro and listen to track.
PLAY TRACKS IN SHUFFLE
Press button (15) “SHF” to play all tracks on CD in random order. Press again to cancel the function.
EJECT
Press button (6) “ ” to stop playing and eject the CD.
PLAYING A CD-R/RW
Depending on the type of CD-R/RW CD, surface condition of the CD, as well as writer, certain CD-R/RW CD may not operate normally on this unit.
MP3 FUNCTION
How to select MP3 files
1. SEARCHING TRACK
By using volume knob. Rotate the volume knob to scroll through the numbers, then
press MP3 enter button (2) to confirm.
2. SEARCHING BY DIRECTORY AND TRACK NAME
By using volume knob (8). Under MP3 play mode, press MP3 menu button (10) twice,
the display shows “*”. Rotate the volume knob (8) for selecting the character. In this
search mode, select button (8) use as move cursor. Press band/loud button (2) use as
MP3 confrim button. The unit searches files and directories which have the same character which is inputted by the user.The unit shows these sorted files and directories
MCD 270 manual 18-08-2006 11:21 Pagina 4
Page 5
ENGLISH
5
by volume knob (8) (rotate anti-clockwise first). If the selected name is directory, the
user can go into the selected directory by press MP3 confirm button (2) and continue
to search the directory or file name in the directory by volume knob (8) (rotate anticlockwise first).The selected file can be played by pressing MP3 enter button (2).
3. SEARCHING FROM DIRECTORY
By using volume knob (8). Under MP3 play mode, press MP3 menu button (10) three
times, then the first directory name is shown. Rotate volume knob (8) (rotate anticlockwise first) to navigate through the directory list, press MP3 enter button (2) to
select the desired directory.The display will show “\\”. To select the tracks under the
selected directory, by rotate volume knob (8) (rotate anti-clockwise first) then press
MP3 enter button (2) to confirm when desired track is found.
4. NAVIGATING THROUGH DIRECTORY BY USING PREVIOUS/NEXT FOLDER
(M5/M6) BUTTONS
Press next folder (M6) or previous folder (M5) buttons to skip in the current directory
.On
a multi-level directories CD, the movement will take place at the current level until
last folder is reached.At this point press previous folder (5) again,it will move to the next
level or directory
ID3 INFORMATION DISPLAY
Press display button (18) repeatedly to display ID3 TAG information. If the MP3 file is
available with ID3 TAG, pressing the display button (18) repeatedly will show information in the following sequence:
Song title -> Artist -> Album title -> Year -> Comments
If any of the ID3 TAG information is not available,pressing the display button repeatedly will show information in the following sequence:
Unknown Song title -> Unknown Artist -> No Album title -> Unknown Year -> No
Comments
If the MP3 file is without ID3 TAG, pressing the display button (18), and “NO ID3 TAG”
will be displayed on the display.The file name and track number of the MP3 file will scroll
repeatedly through the display during the playing of the MP3 file.
SD/MMC OPERATIONS
USB DRIVE OPERATIONS
Flip open the USB cover.
Plug in the USB drive.The unit
automatically starts playing.
Note: To stop USB playback, unplug the USB drive and the unit will automatically
switch to radio mode. If you want to select another source you can use button (9)
“mode” to select the desired source.You can leave the card in the unit.
Detach the control panel. Insert the SD/MMC Card
with Label up side.
Push in untill a “click”
sound is heard.
Close the control panel.
Note: If you want to select another source you can use button (9) “mode” to select
the desired source.You can leave the card in the unit.
Press button (20) “up/down” to go through the tracklist.
MCD 270 manual 18-08-2006 11:21 Pagina 5
Page 6
ENGLISH
6
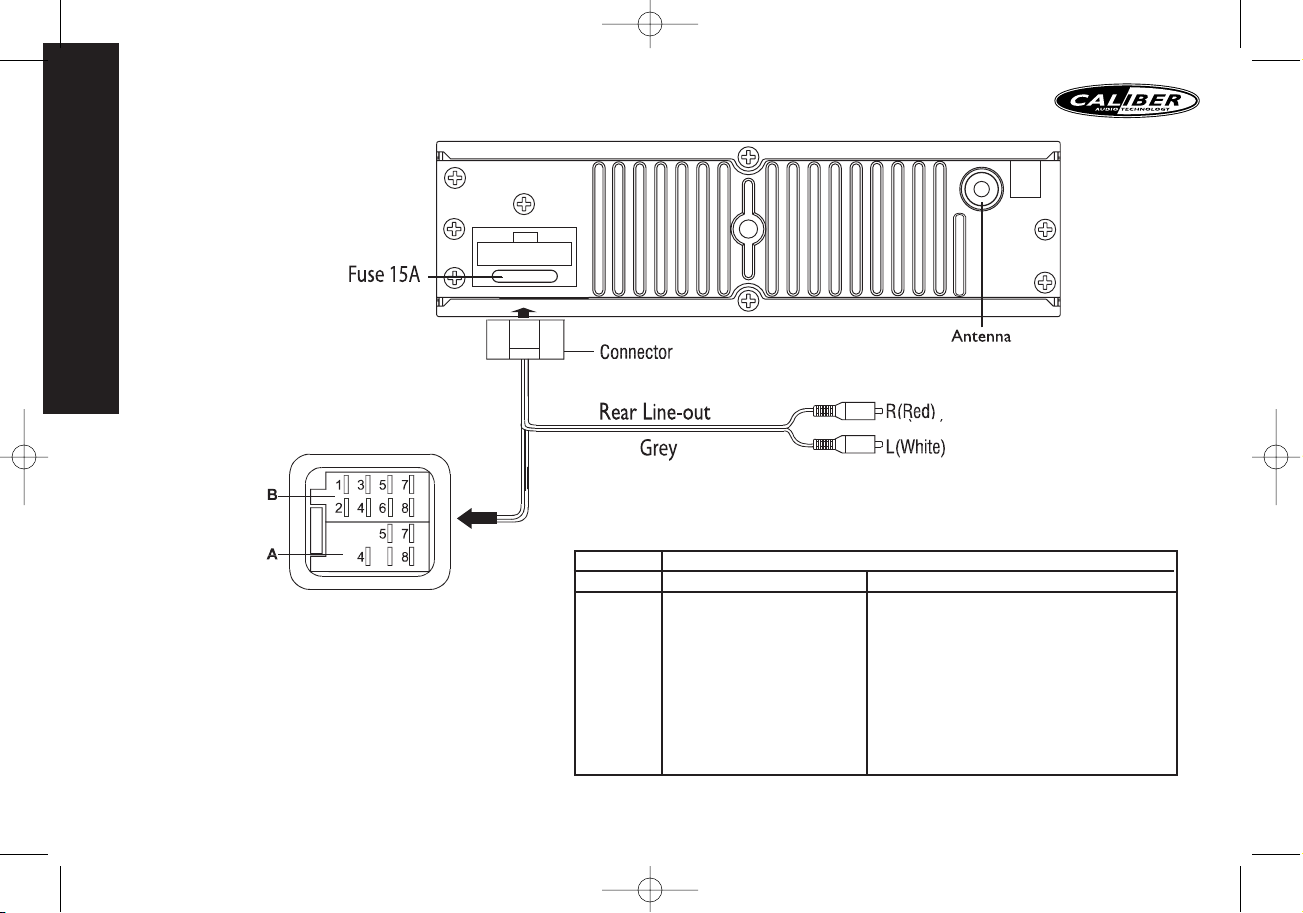
Location Function
AB
1 Rear right (+) - Purple
2 Rear right (-) - Purple / Black stripe
3Front right (+) - Gray
4 Accu 12V(+) Front right (-) - Gray / Black stripe
5 Auto Antenna Front Left (+) - White
6Front Left (-) - White / Black stripe
7ACC+ Rear left (+) - Green
8Ground Rear Left (-) - Green / Black Stripe
MCD 270 manual 18-08-2006 11:21 Pagina 6
Page 7

ENGLISH
7
Cause
The car ignition switch is not on
The fuse is blown
Presence of disc inside the player
Inserting the disc in reverse direction
The disc is extremely dirty or defective
Temperature inside the car is too high
Condensation
Volume is in minimum
Wiring is not properly connected
The installation angle is more than 30 degrees
The disc is extremely dirty or defective
The built-in microcomputer
is not operating properly due to noise
The antenna cable is not connected
The signals are too weak
Mechanism error
Servo Focus error
Solution
If the power supply is properly connected to the car
accessory terminal,switch the ignition key to "ACC"
Replace the fuse
Remove the disc in the player, then insert a new one
Insert the compact disc with the label facing upward
Clean the disc or try to play a new one
Cool off or until the ambient temperature
returns to normal
Leave the player off for an hour, then try again
Adjust volume to a desired level
Check wiring connection
Adjust the installation angle less than 30 degrees
Clean the compact disc, then try to play a new one
Front panel is not properly fixed into its place
Press the RESET button.
Insert the antenna cable firmly
Select a station manually
Press the reset button to correct the problem.If the
error code does not disappear, consult your nearest service dealer.
Press the reset button to correct the problem.If the
error code does not disappear, consult your nearest service dealer.
Problem
No power
Disc cannot be
loaded or ejected
No sound
Sound skips
The operation keys do not work
The radio does not work
Error 1
Error 2
TROUBLESHOOTING
Before going through the check list,check wiring connection. If any of the problems persist after check list has been made, consult your nearest service dealer.
MCD 270 manual 18-08-2006 11:21 Pagina 7
Page 8

CARACTÉRISTIQUES
GENERALITES
Alimentation électrique DC 11 -14V
Polarité Mise à la terre négative
Impédance haut-parleur 4 ohms
Puissance sortie 4 x 55W
LECTEUR CD
Système Système audio compact disc
Disque utilisable Compact disc
Taux d’échantillonnage 44,1KHz
Nbre de bits de quantification 1 bit
Fréquence 5-20,000Hz
Nombre de canaux 2 stéréo
Rapport Signal sur Bruit 70 dB
SECTION RADIO
FM
Gamme de fréquences 87,5-108 Mhz
Sensibilité utilisable Supérieure à 15dB à S/B 30 dB
Séparation stéréo 25 dB à 1KHz
Rapport Signal / Bruit 50 dB
MW
Gamme de fréquences 522-1620 Khz
Fréquence intermédiaire 450KHz
Sensibilité utilisable Supérieure à 45dB
Rapport Signal sur Bruit 40 dB
REMARQUE :
Caractéristiques sous réserve de modifications sans préavis
1. TOUCHE DEBLOCAGE PANNEAU
2. TOUCHE GAMME (BAND/LOUD)
3. TOUCHE AUDIOFREQUENCE (AF)
4. TOUCHE TA
5. TOUCHE PTY
6. DISC EJECT
7. TOUCHE ALIMENTATION (POWER)
8. BOUTON DE REGLAGE DE VOLUME
TOUCHE DE SELECTION AUDDIO/ TOUCHE ENTREE MP3
9. TOUCHE MODE
10. TOUCHE MEMORISATION AUTOMATIQUE / BALAYAGE STATIONS
PREREGLEES (AS/PS) TOUCHE BALISES MP3-ID3
11. TOUCHES STATIONS PREREGLEES (1~6)
12. BOTÓN PAUSE
13. TOUCHE SCAN
14. TOUCHE RPT
15. BOTÓN SHUFFLE (RANDOM)
16. BOUTON DOSSIER PRÉCÉDENT
17. BOUTON DOSSIER SUIVANT
18. TOUCHE ECRAN D’AFFICHAGE/TOUCHE MP3 ID3
19. ENTRÉE USB
20. TOUCHES ACCORD HAUT/BAS, PLAGE SUIVANTE/PRECEDENTE
21. LECTEUR DE CARTE SD/MMC
22. TOUCHE DE RÉINITIALISATION
FRANÇAIS
8
MCD 270 manual 18-08-2006 11:21 Pagina 8
Page 9

DISC PLAY
PRÉCAUTIONS
• N’utilisez que dans un système électrique 12 volts CD de polarité négative.
• Déconnectez la borne négative de la batterie du véhicule lors du montage et de la
connexion de l’unité.
• Lors du remplacement du fusible, veillez à un fusible avec un ampérage identique.
Utiliser un fusible avec un ampérage supérieur peut causer de graves dommages à l’unité.
• N’essayez PAS de démonter l’unité. Les rayons laser du capteur optique sont dangereux pour les yeux.
• Vérifiez que les broches ou autres objets ne pénètrent pas dans l’unité ; ils peuvent
entraîner des dysfonctionnements, ou créer des risques pour la sécurité tels que des
chocs électriques ou une exposition au rayon laser.
• Si vous avez parqué la voiture pendant un long moment par temps froid ou chaud,
attendez que la température dans la voiture redevienne normale avant de mettre l’unité en marche.
• Maintenez le volume à un niveau qui vous permet d’entendre les bruits d’avertissement extérieurs (klaxons, sirènes, etc.).
Remarques relatives aux CD
• La lecture de CD poussiéreux ou défectueux peut entraîner des per tes sonores.
•Tenez les CD comme illustré.
• NE touchez PAS la face du CD sans étiquette.
• Ne posez aucun sceau, aucune étiquette ni aucune feuille de protection de données
d’un côté ou l’autre du disque.
• N’exposez PAS un CD à la lumière directe du soleil
ou à une chaleur excessive.
• Essuyez un CD sale du centre vers l’extérieur à l’aide
d’un chiffon nettoyant.
N’utilisez jamais de solvants tels que de la benzine ou
de l’alcool.
• Ce lecteur ne peut jouer de CD 3 pouces ( 8 cm ).
• N’insérez JAMAIS un CD 3 pouces contenu dans l’adaptateur ou un CD de
forme irrégulière.
L’unité pourrait ne pas pouvoir le rejeter, ce qui
entraînerait un dysfonctionnement.
Avant la mise en marche
• N’augmentez PAS trop le niveau sonore, car cela vous
empêcherait d’entendre les sons extérieurs, rendant
la conduite dangereuse.
•Arrêtez la voiture avant d’effectuer toute opération compliquée.
ATTENTION
N’ouvrez PAS les caches et n’effectuez aucune réparation vous-même. Consultez le distributeur ou un technicien expérimenté si vous avez besoin d’aide.
Ce lecteur est équipé d’un panneau détachable motorisé
coulissant. Le panneau peut être détaché et emmené avec
vous, ce qui vous aidera à décourager les voleurs.
Retrait du panneau
1. Appuyez sur le bouton PWR pendant plus de 2 secondes pour mettre l’unité hors tension.
2. Déboîtez un peu la partie gauche du panneau, ensuite
déboîtez le panneau à partir de la droite.
3. Appuyez doucement sur le bouton du boîtier du panneau et ouvrez l’étui.
Placez le panneau dans le boîtier et emmenez-le avec
vous lorsque vous quittez la voiture.
Installation du panneau
1. Insérez le panneau dans l’ouverture de l’unité.
2. Poussez sur le panneau avant jusqu’à ce qu’il se mette
en place.
Retrait du lecteur
1. Enlevez le panneau et la plaque de garniture.
2. Insérez les deux T-Keys dans les trous à l’avant de l’appareil jusqu’à ce qu’ils s’emboîtent.
3. Sortez l’unité.
1. Insérez le manchon de montage
dans le tableau de bord et pliez les
pattes de montage vers l’extérieur
avec un tournevis.Vérifiez que le
levier de verrouillage ( ) est dans l’alignement du manchon de montage.
(Qu’il ne ressort pas vers l’extérieur)
2. Fixez l’arrière de l’unité.
Après avoir installé le boulon de
fixation et la prise d’alimentation,
fixez l’arrière de l’unité à la voiture
par le tampon en caoutchouc.
3. Installez la plaque de garniture.
FRANÇAIS
9
MCD 270 manual 18-08-2006 11:21 Pagina 9
Page 10

OPÉRATIONS DE BASE
ON/OFF
Pour allumer l’appareil, pressez le bouton POWER (7) ou un autre bouton de la radio
(sauf le bouton EJECT) quand le système est en marche.
Pressez le bouton POWER (7) pour éteindre l’appareil.
DÉTACHEMENT DU CACHE DE PROTECTION
Pressez le bouton REL (1) pour enlever le cache de protection.
AJUSTEMENT DU SON
Pressez le bouton du volume (8) pour entrer les paramètres du son.Le réglage du
son propose des ajustements dans l’ordre suivant :Volume, Bass,Aigus, Balance, Fader
et retour au Volume. Pressez le bouton (2) “BAND/LOUDNESS” plus de 3 secondes
puis l’intensité sera activée ou désactivée.
SOURCE
Pressez le bouton (9) “MODE” pour choisir la fonction CD,USB, SD/MMC ou radio.
BEEPS 2ND, BEEP ALL, BEEP OFF
Pressez le bouton du volume (8) plus de 3 secondes. Maintenant pressez le bouton du
volume jusqu’à ce que l’indication “BEEP” s’affiche sur l’écran.
Vous pouvez tourner le bouton du volume pour sélectionner les options suivantes:
Le bip BEEP 2ND est activé seulement quand la seconde fonction du bouton de fonction double est sélectionnée (appui long).
Le bip BEEP ALL est activé lorsque n’importe quel bouton est pressé.
Le bip BEEP OFF désactive l’option bip.
PARAMÈTRES DE LA RADIO
SÉLECTION DE LA BANDE
En mode tuner, pressez le bouton (2) légèrement pour sélectionner la bande désirée.
La bande de réception affiche le choix suivant: FM1, FM2,FM3 et MW.
SÉLECTION DE LA STATION
Pressez ou relevez le bouton (20) légèrement pour activer la fonction recherche.
Pressez 2 secondes jusqu’à ce que l’indication “MANUAL” apparaisse sur l’écran. Le
mode tuning manuel est alors sélectionné.
Si les boutons ne sont pas touchés pendant plus de 3 secondes, la fonction revient
automatiquement sur “AUTO SEEK”.
MÉMORISATION AUTOMATIQUE AS
Mémorisation automatique
Pressez le bouton (10) “AS/PS” plus de 3 secondes pour activer la fonction AS. La
radio cherche les 6 stations de radio les plus fortes et les enregistre dans le programme actuel de sélection de bande.
NOTE: Toutes les stations enregistrées précédemment dans la mémoire sont rempla-
cées par les nouvelles stations de radio sélectionnées.
LE PROGRAMME SCAN PS
Pressez le bouton (10) “AS/PS” moins de 3 secondes. L’appareil se mettra en pause
pour 10 secondes à chaque station programmée. Pressez le bouton (10) “AS/PS” une
nouvelle fois pour arrêter la recherche lorsque la station désirée est trouvée.
MÉMORISATION DES STATIONS ET RAPPEL
Pressez n’importe quel bouton du programme (de 12 à 17) pour rappeler une station
mémorisée. Pressez un bouton programme 2 secondes, et la station précédente est
alors remplacée par la fréquence actuelle.
LES OPÉRATIONS RDS (SYSTÈME DE DONNÉES RADIO)
Les données RDS sont les données PI, PS,TP,PTY,TA et AF.
PI: Code d’identification de programme
Code pour identifier les programmes
PS: Programme de service de noms
Données expresses sur les stations d’émission
Par caractère alphabétique
TP:Identification du programme du trafic routier
Identification des données pour les stations d’émission du trafic routier
TA : Identification de l’annonce du trafic routier
Identification des données indiquant si les informations concernant le trafic ont
été transmises ou non
AF: Fréquences alternatives
Liste des fréquences des stations d’émission diffusant les mêmes programmes
METTRE EN MODE AF
Pressez le bouton (3) AF moins de 3 secondes pour activer ou désactiver le mode AF.
Dès que le mode AF est activé, le symbole “AF” apparaît sur l’écran.Le tuner retourne aux fréquences alternatives dès que le signal de réception devient mauvais.
L’indication “ALARM” s’affiche lorsque une information importante est diffusée.
Lorsque le contrôle du volume est réglé sur le minimum, le réglage du son se fait
automatiquement grâce aux paramètres programmés.
UTILISER LA FONCTION PTY POUR SÉLECTIONNER UN PROGRAMME
La fonction PTY vous permet de chercher des stations avec des types de programmes
particuliers. Pour sélectionner un type de programme, pressez le bouton (5) PTY moins
de trois secondes. L’écran affiche:“pop music” ou “news”. Maintenant vous pouvez sélectionner le type de musique ou de speech que vous souhaitez en utilisant les boutons du
programme de 1 à 6 pour faire une sélection, comme décrit dans le tableau ci-dessous:
Numéro programmé
Groupe de musique Groupe de paroles
1 POP M, ROCK M ACTUALITES,AFFAIRES, INFOS
2
VARIETES,MUSIQUE LEGERE
SPORT, EDUCATION,THEATRE
3 JAZZ, COUNTRY METEO, FINANCES, ENFANTS
4 CLASSIQUE CULTURE,SCIENCE,DIVERS
5NATIONAL, NOSTALGIE
SOCIAL, RELIGION, DEBATS TELEPHONIQUES
6 FOLK VOYAGES,LOISIRS, DOCUMENTAIRES
FRANÇAIS
10
MCD 270 manual 18-08-2006 11:21 Pagina 10
Page 11

Lorsque le mode PTY est activé, la sélection se fait en pressant le bouton comme décrit dans la
partie note. Lorsque le mode PTY est sélectionné,la radio commence à chercher les informations
PTY correspondantes. Si aucune information PTY correspondante n’est trouvée, la réception
radio normale reprend.Après, l’indication “NON PTY” est affichée à l’écran pendant 5 secondes.
ECOUTER L’ANNONCE DU TRAFIC ROUTIER
L’annonce du trafic routier peut être interrompue par la lecture d’un CD ou l’écoute de la
radio.Pressez légèrement le bouton (4) “TA” pour activer ou désactiver le mode TA.Lorsque
le mode TA est activé, vous entendez l’annonce du trafic routier. Pendant l’annonce du trafic
routier, vous pouvez l’interrompre par un court appui sur le bouton TA (4).Sans désactiver
le mode TA. De cette façon,le réglage revient au mode d’opération précédent. Un appui long
sur le bouton TA (4) vous permet d’activer ou désactiver le EONTA LOCAL/EONTA DX.
EONTA LOCAL permet seulement la diffusion d’informations sur l’état du trafic routier à partir d’une radio forte.
La sélection EONTA DX permet l’interruption de lecture d’un CD ou d’écoute de la
radio pendant la réception d’informations.
POSITION DU RDS AVANCÉ
Pressez le bouton du volume (8) plus de trois secondes pour afficher le menu du programme avancé RDS.
A) TA SEEK OU TA ALARM
- Mode TA SEEK:
Lorsque l’information TP est perdue sur la station actuelle, re-régler en pressant
RETUNE SHORT (30 secondes) ou RETUNE LONG (90 secondes),ainsi la radio
commence à chercher la prochaine station identique PI.
- Mode TA ALARM:
Lorsque l’information TP est perdue sur la station en cours, vous entendrez des bips.
B) PI SOUND OU PI MUTE
- Dans certains pays, il peut y avoir 2 stations différentes avec la même fréquence mais des
PI différent. Si le mode PI SOUND est sélectionné, la radio se met sur la nouvelle station
PI pour quelques secondes avant de revenir sur la station PI en cours.Si le mode PI MUTE
est sélectionné, la radio se mettra en mode silence lorsque un nouveau PI sera reçu.
C) RETUNE L OU RETUNE S
Lorsque l’information PI n’est pas saisie pour un réglage de l’heure, la radio commen
ce à se régler sur la prochaine station identique PI.
Mode RETUN L: Le temps de réglage sélectionné est 90 secondes.
Mode RETUN S: Le temps de réglage sélectionné est 30 secondes.
D) MASK DPI OU MASK ALL
- Mode MASK DPI: Cache seulement le AF qui a un PI différent.
- Mode MASK ALL:Cache le AF qui a un différent PI et les autres stations non PI inter
férant qui ont une fréquence de transmission identique.
FONCTIONNEMENT DU LECTEUR CD
Le lecteur CD convient pour les disques de 12 cm. Ne pas utiliser de disques non conformes.
SÉLECTION DES PLAGES
Pendant la lecture du CD,pressez le bouton (20) “ ” pour aller à la chanson suivante. Pressez le bouton (20) “ ” pour sélectionner la chanson précédente. Le numéro de la chanson s’affiche sur l’écran.
Pendant la lecture du CD, restez appuyé sur le bouton (20)
“”
pour une avance rapide. Restez appuyé sur
“ ”
pour un retour rapide. La lecture du CD commence à partir du moment où vous relâchez le bouton.
PAUSE
Pressez le bouton (12) “ ” pour interrompre momentanément la lecture du CD.
Pressez le bouton une nouvelle fois pour relancer la lecture du CD.
RÉPÉTITION DE LA MÊME PLAGE
Pressez le bouton (14) “RPT” pour répéter continuellement la même chanson. Pressez
le bouton une nouvelle fois pour arrêter la répétition.
LECTURE RAPIDE DES PISTES
Pressez le bouton (13) “SCN” pour jouer les premières secondes de chaque piste du CD en cours
de lecture. Pressez une nouvelle fois pour arrêter la lecture des intros et écouter les chansons.
LECTURE AU HASARD
Pressez le bouton (15) “SHF” pour jouer toutes les pistes du CD dans le désordre.
Pressez une nouvelle fois le bouton pour annuler la fonction.
EJECTER
Pressez le bouton (6) “ ” pour arrêter la lecture et éjecter le CD.
LECTURE D’UN CD TYPE CD-R/RW
Selon le type de CD CD-R/RW, l’état de la surface du CD, ainsi que la codification peuvent
empêcher certains CD type CD-R/RW de fonctionner normalement dans cet appareil.
FONCTION MP3
Comment sélectionner les fichiers MP3
1. CHERCHER LES PISTES
En utilisant le bouton du volume. Tourner le bouton du volume pour faire défiler les
FRANÇAIS
11
MCD 270 manual 18-08-2006 11:21 Pagina 11
Page 12

pistes, et pressez le bouton (2) MP3 pour confirmer.
2. RECHERCHE PAR RÉPERTOIRE ET NOM DES PISTES
En utilisant le bouton du volume (8). Sous le mode de lecture MP3, pressez le bouton de
menu MP3 (10) deux fois, l’écran affiche “*”.Tourner le bouton du volume (8) pour sélectionner les caractères. Dans ce mode de recherche, utiliser le bouton de sélection (8)
comme un curseur. Pressez le bouton band/loud (2) utilisé comme un bouton de confirmation pour le MP3. L’appareil cherche des fichiers et répertoires qui ont les mêmes caractères rentrés par l’utilisateur. Ces fichiers et répertoires peuvent être visualisés par le bouton volume (8) (tourner dans le sens contraire des aiguilles d’une montre).Si le nom sélectionné est dans le répertoire, l’utilisateur peut aller dans le répertoire sélectionné en pressant le bouton de confirmation MP3 (2) et continuer sa recherche de répertoire ou de nom
de fichier en utilisant le bouton volume (8) (tourner dans le sens contraire des aiguilles
d’une montre).Le fichier sélectionné peut être écouté en pressant le bouton d’entrée MP3.
3. RECHERCHE À PARTIR DU RÉPERTOIRE
En utilisant le bouton volume (8).En mode MP3, pressez le bouton menu MP3 (10) trois fois,puis
le premier nom de répertoire s’affiche.Tourner le bouton du volume (8) (dans le sens contraire
des aiguilles d’une montre) pour naviguer à travers la liste de répertoire, pressez le bouton d’entrée MP3 (2) pour sélectionner le répertoire désiré. L’écran affiche “\\”. Pour choisir une piste
dans le répertoire sélectionné, tournez le bouton du volume (8) (dans le sens contraire des aiguilles d’une montre), puis pressez le bouton d’entrée MP3 (2) pour confirmer une chanson.
4. NAVIGUER À TRAVERS LE RÉPERTOIRE EN UTILISANT LES BOUTONS FICHIERS
PRÉCÉDENT/SUIVANT (M5/M6).
Pressez les boutons fichier suivant (M6) ou fichier précédent (M5) pour aller directement
dans le répertoire en cours. Dans les répertoires à plusieurs sous parties, le mouvement se
met en place au niveau actuel jusqu’à ce que le dernier fichier soit atteint.A ce point, pressez fichier précédent (5) une nouvelle fois pour aller au niveau ou répertoire précédent.
ECRAN D’INFORMATION ID3
Pressez le bouton écran (18) pour afficher de façon répétitive les informations ID3 TAG.
Si le fichier MP3 est disponible avec le ID3 TAG,presser le bouton écran (18) de façon répétitive affichera les informations dans l’ordre suivant:
Titre de la chanson -> Artiste -> Titre de l’album -> Année -> Commentaires
Si les informations ID3 TAG ne sont pas disponibles, en pressant le bouton écran (18) de
façon répétitive, les informations s’afficheront dans l’ordre suivant:
Titre de chanson inconnu -> Artiste inconnu -> Pas de titre d’album -> Année inconnue > Pas de commentaires
Si le fichier MP3 n’a pas d’ ID3 TAG, en pressant le bouton écran (18), l’indication “NON
ID3 TAG” s’affichera sur l’écran. Le nom du fichier et le numéro de la piste du fichier MP3
défileront de façon répétitive sur l’écran pendant la lecture du fichier MP3.
FRANÇAIS
12
OPERATIONS SD/MMC
COMMANDES D` OPERATIONS DE L` USB
Ouvrez la couverture de
l` USB.
Branchez la commande de l` USB.
L'unité commence automatiquement à jouer.
Notez: Pour arrêter le playback de l' USB, débranchez la commande de l' USB et l'unité commutera automatiquement au mode radio. Si vous voulez choisir une autre
source vous pouvez utiliser le bouton (9) "mode" pour choisir la source désirée.Vous
pouvez laisser la carte dans l'unité.
Détachez le panneau de
commande.
Insérez la carte de SD/MMC
avec l'étiquette en haut.
Enfoncez jusqu'à ce qu'un
bruit de "clic" soit entendu.
Fermez le panneau de
commande.
Notez: Si vous voulez choisir une autre source vous pouvez utiliser le bouton (9)
"mode" pour choisir la source désirée.Vous pouvez laisser la carte dans l'unité.
Appuyez sur le bouton (20) "haut/bas" pour voir la liste de chansons.
MCD 270 manual 18-08-2006 11:21 Pagina 12
Page 13

FRANÇAIS
13
Emplacement Fonction
AB
1Arrière droit (+) – mauve
2Arrière droit (+) – mauve / ligne noire
3Avant droit (+) – gris
4 Batterie 12V(+) Avant droit (+) – gris / ligne noire
5 Antenne automatique Avant gauche (+) – blanc
6Avant gauche (+) – blanc / ligne noire
7ACC+ Arrière gauche (+) – vert
8Ground Arrière gauche (+) – vert / ligne noire
MCD 270 manual 18-08-2006 11:21 Pagina 13
Page 14

Cause
Le contact du véhicule n’est pas mis.
Le fusible a sauté.
Un disque se trouve déjà dans le lecteur.
Le disque est introduit incorrectement.
Le disque est très sale ou il est défectueux.
La température du véhicule est trop élevée.
Condensation
Le volume est au minimum.
Les câbles ne sont pas raccordés correctement.
L’angle d’installation est supérieur à 30 degrés.
Le disque est très sale ou il est défectueux.
Le microprocesseur intégré ne fonctionne pas correctement, probablement en raison de parasites.
Le câble de l’antenne n’est pas raccordé.
Les signaux sont trop faibles.
Erreur Mechanism (mécanisme)
Défaut Servo Focus
Solution
Si l'alimentation est raccordée correctement aux circuits auxiliaires du
véhicule, mettez la clé de contact en position « ACC »
Remplacez le fusible.
Retirez le disque du lecteur, puis introduisez-en un nouveau.
Introduisez le disque l’étiquette imprimée vers le haut.
Nettoyez le disque ou essayez un autre.
Mettez la climatisation en route ou attendez que la température ambiante redescende.
Laissez le lecteur éteint pendant une heure, puis réessayez.
Réglez le volume au niveau approprié.
Vérifiez le câblage.
Montez l’appareil selon un angle de moins de 30 degrés.
Nettoyez le disque, puis essayez un nouveau.
Appuyez sur le bouton RESET. Le panneau avant n’est pas
fixé correctement.
Enfoncez fermement le câble de l’antenne.
Sélectionnez une station manuellement.
Appuyez sur la touche de réinitialisation RESET pour résoudre le problème. Si le code d’erreur ne disparaît pas,
contactez votre revendeur le plus proche.
Appuyez sur la touche de réinitialisation RESET pour résoudre le problème. Si le code d’erreur ne disparaît pas,
contactez votre revendeur le plus proche.
Symptôme
L’a ppareil ne s’allume pas.
Il n’est pas possible de charger
de disque ou le disque ne peut
être éjecté.
Il n’y a pas de son.
Le son saute.
Les touches et les boutons
ne fonctionnent pas.
La radio ne fonctionne pas.
Error 1
Error 2
RÉSOLUTION DES PROBLÈMES
Avant de consulter la liste suivante, vérifiez le câblage et les connexions.
Si le problème rencontré persiste après avoir contrôlé tous les éléments de la liste, adressez-vous au service après-vente d’un revendeur près de chez vous.
FRANÇAIS
14
MCD 270 manual 18-08-2006 11:21 Pagina 14
Page 15

DEUTSCH
15
SPEZIFIKATIONEN
ALLGEMEINES
Stromversorgung DC 11-14 V
Polung Negativ Erde
Lautsprecher-Impedanz 4 Ohm
Ausgangsleistung 4 x 55 W
CD-DECK
System CD-Digitalaudiosystem
Verwendbare CDs: CD
Abtastfrequenz 44,1 kHz
Anzahl Quantisierungsbits 1 bit
Frequenzgang 5 Hz bis 20 kHz
Kanalzahl 2, Stereo
Rauschabstand 70dB
RADIO-TEIL
FM
Frequenzbereich 87,5 bis 108 MHz
Nutzbare Empfindlichkeit Besser als 15dB bei Rauschabstand 30dB
Stereotrennung 25dB bei 1 kHz
Rauschabstand 50dB
AM/MW
Frequenzbereich 522-1620 KHz
Zwischenfrequenz 450 kHz
Nutzbare Empfindlichkeit Besser als 45dB
Rauschabstand 40dB
BEMERKUNG:
Änderungen der Spezifikationen ohne vorherige Benachrichtigung möglich.
1. BEDIENTEIL-ENTRIEGELTASTE
2. WELLENBEREICHSTASTE
3. AF-TASTE
4. TA-TASTE
5. PTY-TASTE
6. DISC-AUSWURF
7. STROM-AN/AUS-TASTE
8. LAUTSTÄRKEKNOPF
AUDIO-AUSWAHLTASTE/ MP3-ENTER-TASTE
9. MODUSTASTE
10.AUTOMATISCHE SPEICHERUNG / EINSTELLUNGSSCAN (AS/PS) MENU TASTE
11.SENDERVOREINSTELLUNGSTASTEN (1~6)
12.TASTE PAUSE
13.SCAN-TASTE
14.RPT-TASTE
15.TASTE SHUFFLE (RANDOM)
16 VORIGER ORDNER TASTE
17.NÄCHSTER ORDNER TASTE
18.DISPLAY-TASTE/MP3 ID3-TASTE
19.USB-ABDECKUNG
20.ABSTIMMUNG OBEN/UNTEN, TITEL NÄCHSTER/VORIGER TASTEN
21.SD/MMC-KARTENSTECKPLATZ
22.RÜCKSTELLUNGSTASTE
MCD 270 manual 18-08-2006 11:21 Pagina 15
Page 16

16
DISC PLAY
VORSICHTSMASSNAHMEN
• Ausschließlich mit 12-Volt-Gleichstrom und negativer Masseverbindung verwenden.
• Demontieren Sie vor Arbeiten am Fahrzeug die positive Klemme der Fahrzeugbatterie.
• Achten Sie beim Auswechseln der Sicherung darauf, dass die neue Sicherung über die
gleiche Stromleistung verfügt, die Verwendung einer Sicherung mit einer höheren
Stromleistung kann zu schwerwiegenden Schäden am Gerät führen.
•Versuchen Sie UNTER KEINEN UMSTÄNDEN das Gerät zu öffnen. Die
Laserstrahlen des optischen Tonabnehmers können zu schwerwiegenden
Augenschäden führen.
• Stellen Sie sicher, dass keine Stifte oder andere Gegenstände ins Innere des Gerätes
gelangen. Sie können zu Fehlfunktionen oder Sicherheitsrisiken, wie Stromschläge oder
der Bloßstellung der Laserstrahlen führen.
• Wenn das Fahrzeug längere Zeit bei heißem oder kaltem Wetter im Freien abgestellt
war,sollte mit dem Betrieb des Geräts zugewar tet werden, bis die Temperatur sich im
inneren des Fahrzeuges normalisiert hat.
• Die Lautstärke muss auf einen Pegel beschränkt werden, dass Warngeräusche von
außen (Polizei, Sanität usw.) noch hörbar sind.
CD-Hinweise
• Die Wiedergabe defekter oder staubiger CDs kann zu Tonaussetzer führen.
• Die CDs wie abgebildet halten.
• Die unetikettierte Seite nicht mit blossen Händen berühren.
• Befestigen Sie KEINE Aufkleber, Etiketten oder Datenschutzfolien auf der Disc.
• Setzen Sie die CD NICHT der direkten Sonneneinstrahlung oder übermäßiger
Hitze aus.
• Reiben Sie eine verschmutzte CD von der Mitte nach
außen mit einem
Reinigungstuch ab.
Verwenden Sie niemals Lösungsmittel, wie Benzin oder
Alkohol.
• Mit diesem Gerät können keine 8-cm-CD‘s abgespielt werden.
• Legen Sie NIEMALS eine 8-cm-CD mit Adapter oder eine
verformte CD ein.
Es ist möglich, dass sich diese CD’s im Gerät verklemmen,
nicht mehr ausgeworfen
werden können und das Gerät beschädigen.
Vor dem Betrieb
• Den Lautstärkepegel NICHT zu hoch einstellen, Geräusche
von aussen, (Polizei Sanität ect.) müssen
auf jeden Fall noch hörbar sein
• Bedienungen am Gerät die vom Verkehr ablenken, dürfen
nur bei stehendem Fahrzeug ausgeführt werden.
VORSICHT
Abdeckungen NICHT öffnen. Eingriffe oder Reparaturen dürfen nur von ausgebildeten techniker ausgeführt werden. Wenden Sie sich daher bei einem Schadenfall an einen autorisierten Händler oder eine Servicstelle. Unbefugtes öffnen hat den Verlust der Garantieleistung
zur Folge
Dieses Gerät ist mit einer motorisierten, abnehmbaren
Frontblende zum Herunterschieben ausgestattet. Um
Diebstähle zu vermeiden kann die Frontblende abgenommen und mitgenommen werden.
Frontblende entfernen
1. Die PWR-Taste zum Ausschalten des Geräts länger als
2 Sekunden eingedrückt halten.
2. Den linken Teil der Frontblende ein wenig herausziehen,
dann die Frontblende von rechts herausziehen.
3.Sanft auf die Blendenetui-Taste drücken, um den Deckel
zu öffnen.
Die Frontblende in das Etui legen und beim verlassen des
Fahrzeuges mitnehmen.
Anbringen der Frontblende
1.Die Frontblende im Geräteschlitz anbringen.
2.Die Frontblende eindrücken bis sie in die Halterung einrastet.
Das Gerät entfernen
1. Die Frontblende und die Zierleiste entfernen.
2. Die beiden T-Schlüssel in die Öffnung auf der
Vo rderseite des Satzes einführen bis sie festsitzen.
3. Das Gerät herausziehen.
1. Die Montageeinfassung in das
Armaturenbrett einführen und die
Montageklemmen mit einem
Schraubenzieher spreizen.
Sicherstellen, dass der Sperrhebel
mit der Montageeinfassung bündig
ist. (nicht nach außen herausragt)
2. Den hinteren Teil des Gerätes
sichern.
Nach der Befestigung der
Befestigungsschraube und des
Stromanschlusses, befestigen Sie
den hinteren Teil des Gerätes mit
dem Gummipolster an der
Karosserie.
3. Die Zierleiste anbringen.
DEUTSCH
MCD 270 manual 18-08-2006 11:21 Pagina 16
Page 17

DEUTSCH
17
GRUNDLEGENDE BEDIENUNG
EIN/AUS
Schalten Sie das Gerät durch Drücken die Taste POWER (7) oder,wenn die Anlage
bereits eingeschaltet ist, durch Drücken einer anderen Taste (außer EJECT) am Radio
ein. Drücken Sie die Taste POWER (7),um das Gerät auszuschalten.
OBERSCHALE ABNEHMEN
Drücken Sie die Taste REL (1), um die Oberschale zu entfernen.
KLANGEINSTELLUNGEN
Drücken Sie den Lautstärkenregler (8),um in die Klangkonfiguration zu gelangen. Die
Klangkonfiguration wird sich in folgender Reihenfolge verändern:Lautstärke, Bass, Höhe,
Balance, Überblendung und zurück zur normalen Lautstärke. Drücken Sie länger als 3 Sekunden
die Taste “BAND/LOUDNESS” (2) und die Lautstärke wird aktiviert oder deaktiviert.
QUELLE
Drücken Sie die Taste “MODE“ (9), um auf CD, USB, SD/MMC oder Radio zu schalten.
ZWEIFACHER PIEPTON, PERMANENTER PIEPTON, PIEPTON AUS
Drücken Sie den Regler “VOLUME” (8) länger als 3 Sekunden.
Drücken Sie jetzt den Lautstärkenregler, bis Sie “BEEP” auf der Anzeige sehen.
Sie können den Lautstärkeregler drehen,um folgende Optionen auszuwählen:
BEEP 2ND Piept nur, wenn die Sekunden- oder Dualfunktion ausgewählt ist (langes Drücken).
BEEP ALL Piept, wenn irgendeine Taste gedrückt wird.
BEEP OFF Piept, um die Piepmöglichkeit auszuschalten
RADIO
WAHL DES FREQUENZBEREICHES
Im Empfangsmodus drücken Sie kurz die Taste (2), um den gewünschten
Frequenzbereich auszuwählen. Der Bandbereichempfang wird sich in folgender
Reihenfolge ändern: FM1, FM2, FM3 und MW
SENDERWAHL
Drücken Sie kurz die Taste aufwärts/abwärts (20), um die automatische Suchfunktion
zu aktivieren. Drücken Sie für 2 Sekunden, bis ”MANUAL” auf der Anzeige erscheint
und der manuelle Abstimmungsmodus ist ausgewählt.Wenn die Tasten für länger als 3
Sekunden nicht berührt werden, geht es automatisch zurück zu “AUTO SEEK”.
AUTOMATISCHES SPEICHERN AS
- Automatisches Speichern von Daten
Drücken Sie die Funktionstaste “AS/PS” (10) länger als drei Sekunden, um AS zu aktivieren. Das Radio sucht nach den 6 stärksten Sendestationen und speichert sie in den
aktuellen voreingestellten Bandbereich ein.
ANMERKUNG:Sender, die zuvor in dieser Datenbank gespeichert wurden, werden
durch neue Sender ersetzt.
VOREINGESTELLTE ABFRAGE PS
Drücken Sie die Funktionstaste “AS/PS” (10) für weniger als drei Sekunden.Das Gerät wird
bei jeder voreingestellten Sendestation zehn Sekunden pausieren.Drücken Sie die Taste
“AS/PS” nochmals, wenn der gewünschte Sender erreicht ist, um die Abfrage zu stoppen.
Sender speichern und abrufen
Drücken Sie eine der Voreinstellungstasten (12 bis 17),um die eingespeicherten Sender
wieder abzurufen. Drücken Sie eine Voreinstellungstaste für 2 Sekunden und der zuvor
eingestellte Sender wird mit der aktuell eingestellten Frequenz überschrieben.
RDS-BEDIENUNG
Die RDS-Daten sind PI, PS,TP,PTY,TA und AF Daten.
PI: Programmidentifizierungscode
Code zur Programmidentifizierung
PS: Programmnamenservice
Gibt Daten zum Sendernamen wieder.
In alphabetischer Reihenfolge
TP: Verkehrsprogrammidentifizierung
Identifiziert die Senderdaten für den Verkehrsfunk.
TA :Verkehrsfunkidentifizierung
Identifizierung von Daten, zeigt Verkehrsinformationen an, die übermittelt werden oder nicht
AF: Alternative Frequenzen
Frequenzliste von Sendern, die das gleiche Programm übertragen
AF MODUS EINSTELLEN
Drücken Sie die Taste AF (3) länger als drei Sekunden, um den Modus AF EIN oder
AUS zu schalten.Wann immer AF eingeschaltet ist, wird das Symbol “AF” auf der
Anzeige erscheinen. Der Empfänger wird zu alternativen Frequenzen wechseln,wenn
das Empfangssignal schlechter wird.“ALARM” wird angezeigt, wenn ein Notruf empfangen wird.Währendessen wird die Ausgabelautstärke automatisch auf eine voreingestellte Ausgabelautstärke angeglichen, wenn das Lautstärkeniveau auf Minimum gestellt ist.
PTY ZUM PROGRAMM AUSWÄHLEN BENUTZEN
Die Funktion PTY erlaubt es Ihnen, nach Sendern bestimmten Programmtyps zu
suchen. Um Ihren Programmtypen zu bestimmen, drücken Sie die Taste PTY kürzer als
drei Sekunden. Die Anzeige zeigt: “pop music” oder “news”.
Jetzt können Sie einen Musik- oder Sprachtypen auswählen, indem Sie die
Vo reinstellungstasten 1 bis 6 für Ihre Auswahl aus der aufgeführten Tabelle drücken:
Nummer Musikgruppe Sprachgruppe
1 pop m, rock m Nachrichten, Politik, info
2 easy m, light m Sport, Erziehung, Schauspiel
3 classics, other m Kultur,Wissenschaft,Verschiedenes
4 jazz, country Wetter, Finanzen, Kinder
5 nation m, oldies Sozial, Religion, Zuhöreranrufe
6folk m Reise, Freizeit, Dokumentation
MCD 270 manual 18-08-2006 11:21 Pagina 17
Page 18

18
DEUTSCH
Während die Einstellung PTY ausgewählt ist, kann die Auswahl durch Drücken der
Vo reinstellungstasten getroffen werden.Wenn PTY ausgewählt ist,beginnt das Radio
nach entsprechenden PTY-Informationen zu suchen.Werden keine entsprechenden
PTY-Informationen gefunden, wird der normale Radioempfang fortgesetzt. Danach
wird 5 Sekunden lang “NON PTY” in der Anzeige eingeblendet.
VERKEHRSFUNK ANHÖREN
Verkehrsfunk kann die Wiedergabe von CDs oder Radioübertragungen unterbrechen.Drücken Sie
kurz die Taste “TA” (4),um den TA-Modus ein- oder auszuschalten.Wenn der Modus TA eingeschaltet
ist, werden Sie während der Übertragung den Verkehrsfunk hören. Die Verkehrsfunkinformationen
können Sie durch kurzes Drücken der Taste TA (4) beenden, ohne den TA-Modus auszuschalten.
Dadurch wird das Gerät zum vorigen Betriebsmodus zurückkehren. Langes Drücken der Taste TA (4)
erlaubt es Ihnen, zwischen AN/AUS des EONTA LOCAL/EONTA DX zu wählen.
EONTA LOCAL wird nur Verkehrsfunk von starken Sendestationen senden.
EONTA DX wird es allen empfangenen Meldungen erlauben, die Wiedergabe von
CDs oder Radioübertragungen zu unterbrechen.
FORTGESCHRITTENE RDS-EINSTELLUNGEN
Drücken Sie den Lautstärkenregler (8) für länger als drei Sekunden, um in das Menü
Fortgeschrittene RDS-Einstellungen zu gelangen.
A) TA SEEK oder TA ALARM
- MODUS TA SEEK
Wenn die TP-Informationen des aktuellen Senders verschwinden,können durch die
Einstellung RETUNE SHORT (30 Sekunden) oder RETUNE LONG (90 Sekunden) diese wie
der abgestimmt werden. Das Radio beginnt dann, die nächste, ähnliche PI-Station einzustellen.
- MODUS TA ALARM
Wenn die TP-Information verloren geht, ist ein Piepen des aktuellen Senders zu hören.
B) PI SOUND oder PI MUTE
- In einigen Ländern ist es möglich, 2 verschiedene Sender mit der gleichen Frequenz,
aber mit unterschiedlicher PI, zu empfangen.Wenn PI SOUND ausgewählt ist, wird
das Radio für einige Sekunden auf den neuen PI-Sender umschalten, bevor es wieder
zum aktuellen PI-Sender zurückkehrt.Wenn PI MUTE ausgewählt ist, wird das Radio
stumm geschaltet, wenn ein neuer PI-Sender empfangen wird.
C) RETUNE L oder RETUNE S
Wenn die PI-Informationen zum Einstellen der Zeit nicht empfangen werden können,
beginnt das Radio, den nächsten ähnlichen PI-Sender zu suchen.
Modus RETUNE L: Die Neu-Einstellungszeit ist auf 90 Sekunden eingestellt.
Modus RETUNE S: Die Neu-Einstellungszeit ist auf 30 Sekunden eingestellt.
D) MASK DPI oder MASK ALL
- Modus MASK DPI: Überdeckt nur die AF, die eine andere PI haben.
- Modus MASK ALL:Überdeckt die AF, die eine andere PI haben und alle anderen
Sender ohne PI-Informationen, die die gleiche Übertragungsfrequenz haben.
CD BEDIENUNG
Dieser CD-Player ist für 12 cm Discs geeignet.Verwenden Sie keine unregelmäßig
geformten CDs.
TITEL AUSWÄHLEN
Drücken Sie während der laufenden CD-Wiedergabe die Taste “ ” (20) für den nächsten Titel.
Drücken Sie die Taste “ ”
(20) für den vorigen Titel. Die Titelnummer wird auf der Anzeige gezeigt.
Während der CD-Wiedergabe halten Sie die Taste “ ” (20) für schnelle
Vorwärtssuche gedrückt. Halten Sie die Taste “ ” (20) für schnelle Rückwärtssuche
gedrückt. Die CD wird an der Stelle starten, an der Sie die Taste loslassen.
PAUSE
Drücken Sie die Taste “ ” (12), um den CD-Player anzuhalten.
Drücken Sie die Taste erneut, um die Wiedergabe fortzusetzen.
DEN GLEICHEN TITEL WIEDERHOLEN
Drücken Sie Taste “RPT“ (14), um fortwährend den gleichen Titel zu wiederholen.
Drücken Sie die Taste erneut, um die Wiederholung zu stoppen.
TITELABFRAGE
Drücken Sie Taste “SCN” (13), um einige Sekunden eines jeden Titels der momentan abgespielten CD
anzuspielen. Drücken Sie die Taste erneut,um das Anspielen zu stoppen und um den Titel anzuhören.
TITEL IN GEMISCHTER REIHENFOLGE ABSPIELEN
Drücken Sie die Taste “SHF” (15), um alle Titel in zufälliger Reihenfolge wiederzugeben. Drücken Sie die Taste erneut, um diese Funktion zu widerrufen.
AUSGABE DER CD
Drücken Sie die Taste “ ” (6),
um die Wiedergabe zu stoppen und um die CD auszugeben.
EINE CD-R/RW ABSPIELEN
Abhängig von der Art der CD-R/RW CD, des Oberflächenzustands der CD und auch der Beschriftung
der CD-R/RW CD kann es sein,dass sie in diesem Gerät nicht normal abgespielt werden kann.
MP3-FUNKTION
Wie Sie MP3-Dateien auswählen können
1. TITEL SUCHEN
Mit dem Lautstärkeregler. Drehen Sie den Lautstärkeregler,um durch die
Titelnummern zu rollen. Drücken Sie dann die Taste MP3 (2) um zu bestätigen.
2. SUCHEN IM VERZEICHNIS UND MIT TITELNAMEN
Mit dem Lautstärkeregler (8).Im MP3-Modus drücken Sie die zweimal Menütaste MP3 (10); die Anzeige
MCD 270 manual 18-08-2006 11:21 Pagina 18
Page 19

DEUTSCH
19
zeigt “*”. Drehen Sie den Lautstärkeregler (8), um das Zeichen auszuwählen. In diesem Suchmodus können Sie die Taste (8) als bewegten Cursor verwenden.Bestätigen Sie die Eingabe durch Drücken der Taste
band/loud (2). Das Gerät durchsucht Ordner und Dateien nach den Merkmalen, die der Benutzer eingegeben hat. Das Gerät zeigt die geordneten Dateien und Verzeichnisse, wenn Sie den Lautstärkeregler (8)
gegen den Uhrzeigersinn drehen.Wenn der gewählte Eintrag ein Verzeichnis ist, kann der Benutzer in das
Verzeichnis wechseln, indem er die Taste MP3 (2) zur Bestätigung drückt.Der Benutzer kann die Suche
nach Dateien oder Verzeichnissen fortsetzen, indem er den Lautstärkeregler (8) gegen den Uhrzeigersinn
dreht. Die ausgewählte Datei kann abgespielt werden, indem die Taste MP3-Eingabe gedrückt wird.
3. SUCHE IN VERZEICHNISSEN
Mit dem Lautstärkeregler (8).Im Abspielmodus MP3 drücken Sie dreimal die Taste MP3-Menü
(10), um das erste Verzeichnis anzuzeigen. Drehen Sie den Lautstärkeregler (8) gegen den
Uhrzeigersinn, um durch die Verzeichnisliste zu navigieren. Drücken Sie die Taste MP3-Eingabe (2),
um den gewünschten Titel auszuwählen. Das Display zeigt “\\“.Um Titel im ausgewählten
Verzeichnis anzuwählen, drehen Sie den Lautstärkeregler gegen den Uhrzeigersinn.Drücken Sie
dann die Taste MP3-Eingabe (2) zur Bestätigung, wenn Sie den gewünschten Titel gefunden haben.
4. NAVIGIEREN SIE MIT DEN TASTEN VORIGER/NÄCHSTER ORDNER (M5/M6)
DURCH DIE VERZEICHNISSE.
Drücken Sie nächster Ordner (M6) oder voriger Ordner (M5),um das aktuelle
Verzeichnis zu überspringen.Auf einer CD mit vielen Verzeichnisebenen wird die
Navigation auf einer Ebene bleiben, solange der unterste Ordner nicht erreicht ist.
An dieser Position drücken Sie erneut vorigen Ordner (5).Gehen Sie dann zur nächsten Verzeichnisebene oder zum nächsten Verzeichnis.
ID3-DISPLAYINFORMATION
Drücken Sie wiederholt die Taste Display (18),um die ID3 TAG-Informationen anzuzeigen.Wenn die MP3-Datei über einen ID3 TAG verfügt, drücken Sie wiederholt die
Taste Display (18), um die ID3 TAG-Informationen anzuzeigen.
Titel -> Künstler -> Album Titel -> Jahr -> Kommentare
Falls Informationen des ID3 TAG fehlen sollten, drücken Sie wiederholt die Taste
Display, um die Informationen in folgender Reihenfolge anzuzeigen:
Unbekannter Titel -> Unbekannter Künstler -> Kein Album -> Unbekanntes Jahr ->
Keine Kommentare
Wenn die MP3-Datei über keinen ID3 TAG verfügt, drücken Sie die Taste Display und
“NON ID3 TAG” wird angezeigt. Der Dateiname und die Titelnummer der MP3-Datei
werden wiederholt auf dem Display angezeigt, solange die Datei abgespielt wird.
VERWENDEN VON SD/MMC
BENUTZUNG DES USB-LAUFWERKS
Öffnen Sie die Schutzkappe.
Stecken Sie das USB Laufwerk ein.
Das Gerät beginnt die Wiedergabe automatisch.
Hinweis: Um die USB-Wiedergabe anzuhalten,ziehen Sie das USB-Laufwerk heraus. Das
Gerät schaltet automatisch in den Radiomodus.Wenn Sie eine andere Quelle auswählen
möchten, wählen Sie diese mit der Taste (9) „mode“. Sie können die Karte im Gerät lassen.
Nehmen Sie das
Bedienfeld ab.
Stecken Sie eine SD/MMC-Karte mit
dem Aufkleber nach oben ein.
Drücken Sie, bis ein
Klickgeräusch zu hören ist.
Schließen Sie das
Bedienfeld wieder.
Hinweis: Wenn Sie eine andere Quelle auswählen möchten, wählen Sie diese mit der
Taste (9) „mode“. Sie können die Karte im Gerät lassen.
Drücken Sie die Taste (20) „hoch/runter“ um durch die Titelliste zu navigieren.
MCD 270 manual 18-08-2006 11:21 Pagina 19
Page 20

20
DEUTSCH
STELLE FUNKTION
AB
1 Hinten rechts (+)
2 Hinten rechts (-)
3Vorne rechts (+)
4 Batterie 12V(+) Vorne rechts (-)
5 Antenne Vorne links (+)
6
Vorne links (-)
7ACC+ Hinten links (+)
8Ground
Hinten links (-)
MCD 270 manual 18-08-2006 11:21 Pagina 20
Page 21

DEUTSCH
21
Ursache
Der Zündschlüssel wurde nicht gedreht
Die Sicherung ist herausgegangen
Position der CD im Player
CD falsch herum eingelegt
Die CD ist sehr verschmutzt oder fehlerhaft
Temperatur im Auto ist zu hoch
Kondensation
Lautstärke ist auf Minimum eingestellt
Verkabelung wurde nicht richtig durchgeführt
Der Installationswinkel beträgt mehr als 30 Grad
Die CD ist sehr verschmutzt oder fehlerhaft
Der eingebaute Microcomputer funktioniert nicht richtig
aufgrund Geräuschkulisse
Das Antennenkabel ist nicht angeschlossen
Die Signale sind zu schwach
Mechanismusfehler
Servo-Focus-Fehler
Lösung
Wenn die Stromzufuhr richtig mit dem entsprechenden Anschluss des
Autos verbunden ist, drehen Sie den Zündschlüssel in die Position "ACC"
Ersetzen Sie die Sicherung
Entfernen Sie die CD aus dem Player und legen Sie eine
neue ein
Legen Sie die CD mit der Beschriftung nach oben ein
Reinigen Sie die CD oder versuchen Sie, eine neue abzuspielen
Kühlen oder abwarten, bis sich die Innentemperatur normalisiert hat
Lassen Sie den Player für einen Stunde aus und versuchen
Sie es dann erneut
Stellen Sie die Lautstärke auf den gewünschten Pegel
Überprüfen Sie die Verkabelung
Passen Sie den Installationswinkel so an, dass er weniger
als 30 Grad beträgt
Reinigen Sie die CD; versuchen Sie, eine neue spielen zu
lassen
Drücken Sie den RESET-Knopf.
Frontplatte ist nicht richtig eingesetzt
Stecken Sie das Antennenkabel richtig ein
Wählen Sie eine Station von Hand aus
Drücken Sie die Reset-Taste, um das Problem zu beheben.Verschwindet der Fehlercode dennoch nicht,dann
suchen Sie bitte Ihren nächsten Service-Händler auf.
Drücken Sie die Reset-Taste, um das Problem zu beheben.Verschwindet der Fehlercode dennoch nicht,dann
suchen Sie bitte Ihren nächsten Service-Händler auf.
Symptom
Kein Strom
CD lädt nicht oder
wird nicht ausgeworfen
Kein Ton
Ton springt
Die Bedienungsknöpfe
funktionieren nicht
Das Radio funktioniert nicht
Error 1
Error 2
STÖRUNGSBEHEBUNG
Ehe Sie die Checkliste durchgehen, überprüfen Sie die Verkabelung.
Sollte eines der Probleme nach Konsultieren der Checkliste nicht behoben sein, kontaktieren Sie Ihren Händler.
MCD 270 manual 18-08-2006 11:21 Pagina 21
 Loading...