

Page 1
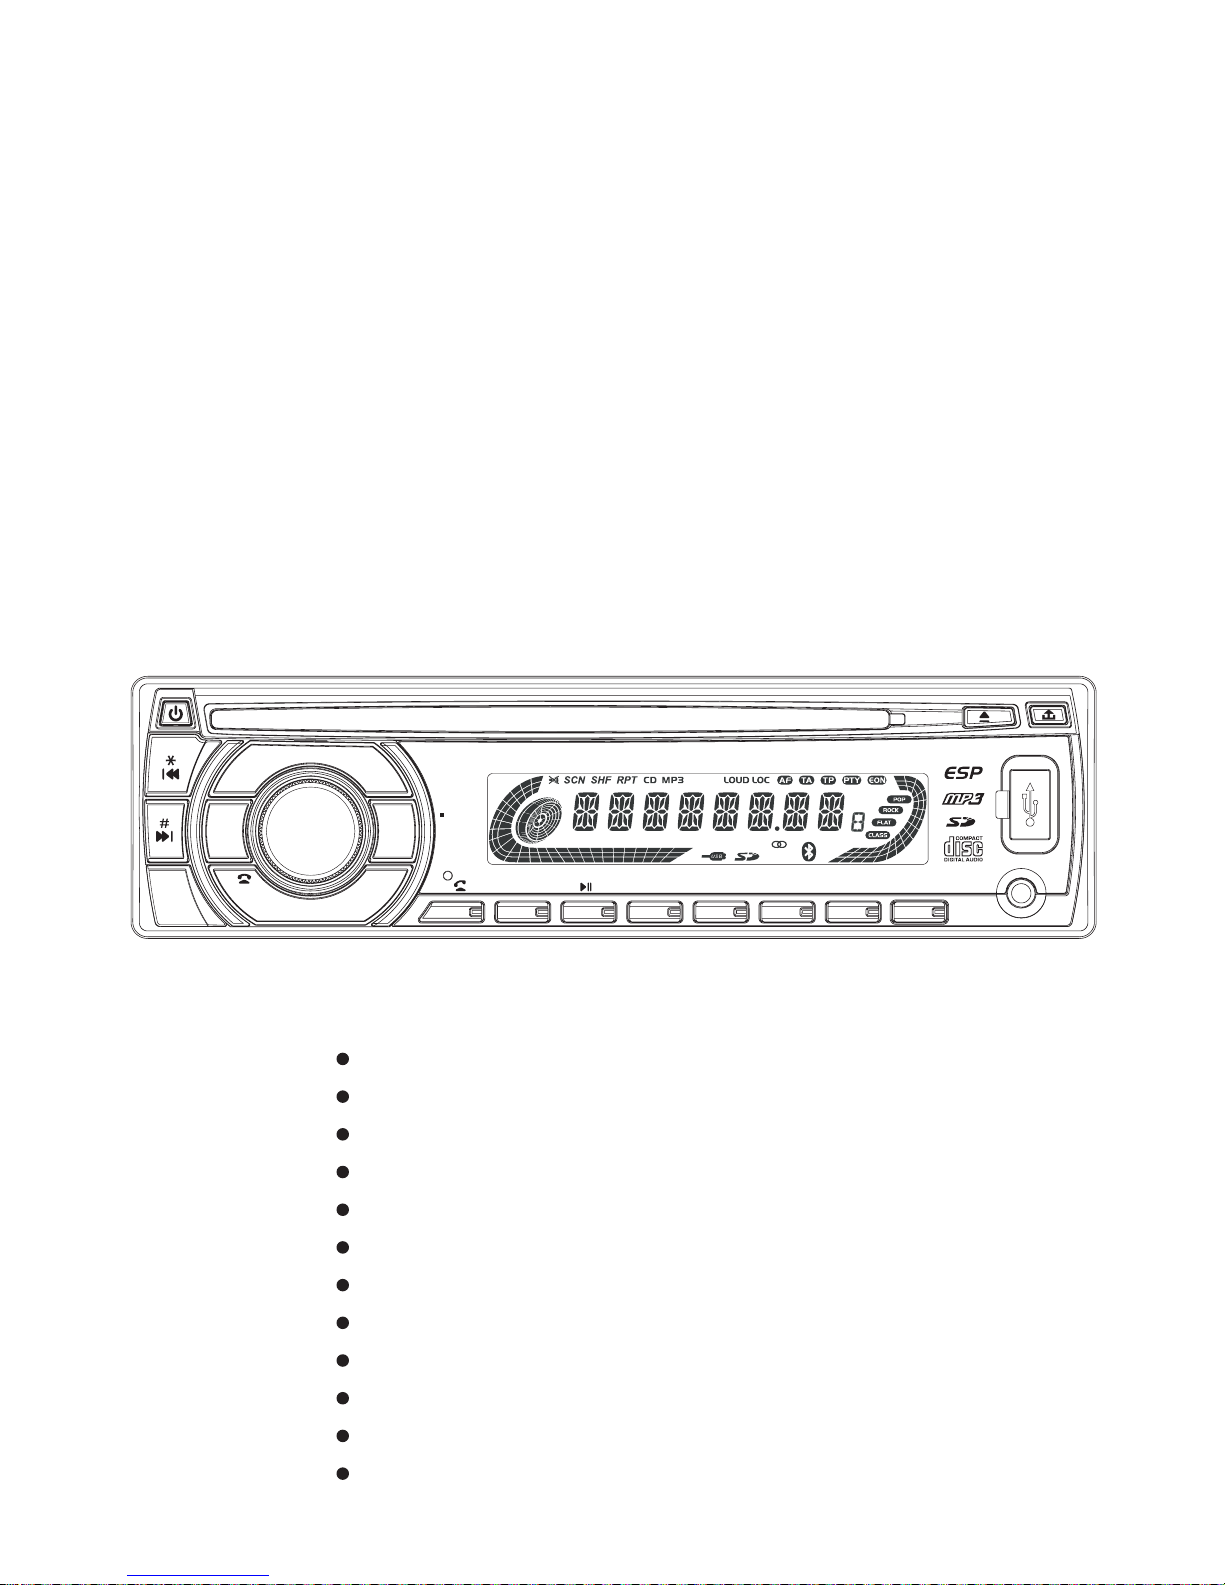
MCD263BT
BUILT-IN BLUETOOTH CD/MP3 CAR RADIO
4 x 75 W High Power Output
PLL Synthesizer Tuner
Anti-Shock Mechanism
LCD Digital Display
USB Port & SD/MMC Memory Card Slot
ISO Connectors for Power Supply and Speaker Outputs
FM Stereo Radio
RCAOut&AUXINSocket
Support A2DP Function
RDS (Radio Data System) Function
Built-in Bluetooth hands-free System
Full Detachable Panel
User’s Manual
AUX I N
Push
SEL
TA
AF
MENU
BAND
PTY
MOD
MIC
01
SCN
2
RPT
3
4
5
6
CAR CD/MP3 PLAYER WITH ESP
SHF
7
8
DISP
9
ENT
AMS
-10
+10
Page 2

Page 3

Page CONTENTS
01 Contents
02 Installation
04 Using the detachable front panel
05 Wiring Diagram
06 Operations
General Operations
0 Radio Operations
CD/MP3 Operations
1 Mixed-CD Operations
1
1 Disc Notes
06
07
12 USB Device Operations
13 SD/MMC Card Operations
3 AUX in Operations
13 Bluetooth hands-free Function
17 Trouble Shooting
Location and Function of Keys
9
09 RDS (Radio Data System) Operations
11 /WMA Disc
2
15 Specifications
6
Page 4
Notes:
- Choose the mounting location where the
unit will not interfere with the normal driving
function of the driver.
- Before finally installing the unit, connect
the wiring temporarily and make sure it is all
connected up properly and the unit and the
system work properly.
- Use only the parts included with the unit to
ensure proper installation. The use of
unauthorized parts can cause malfunctions.
- Consult with your nearest dealer if
installation requires the drilling of holes or
other modifications of the vehicle.
- Install the unit where it does not get in the
driver's way and cannot injure the
passenger if there is a sudden stop, like an
emergency stop.
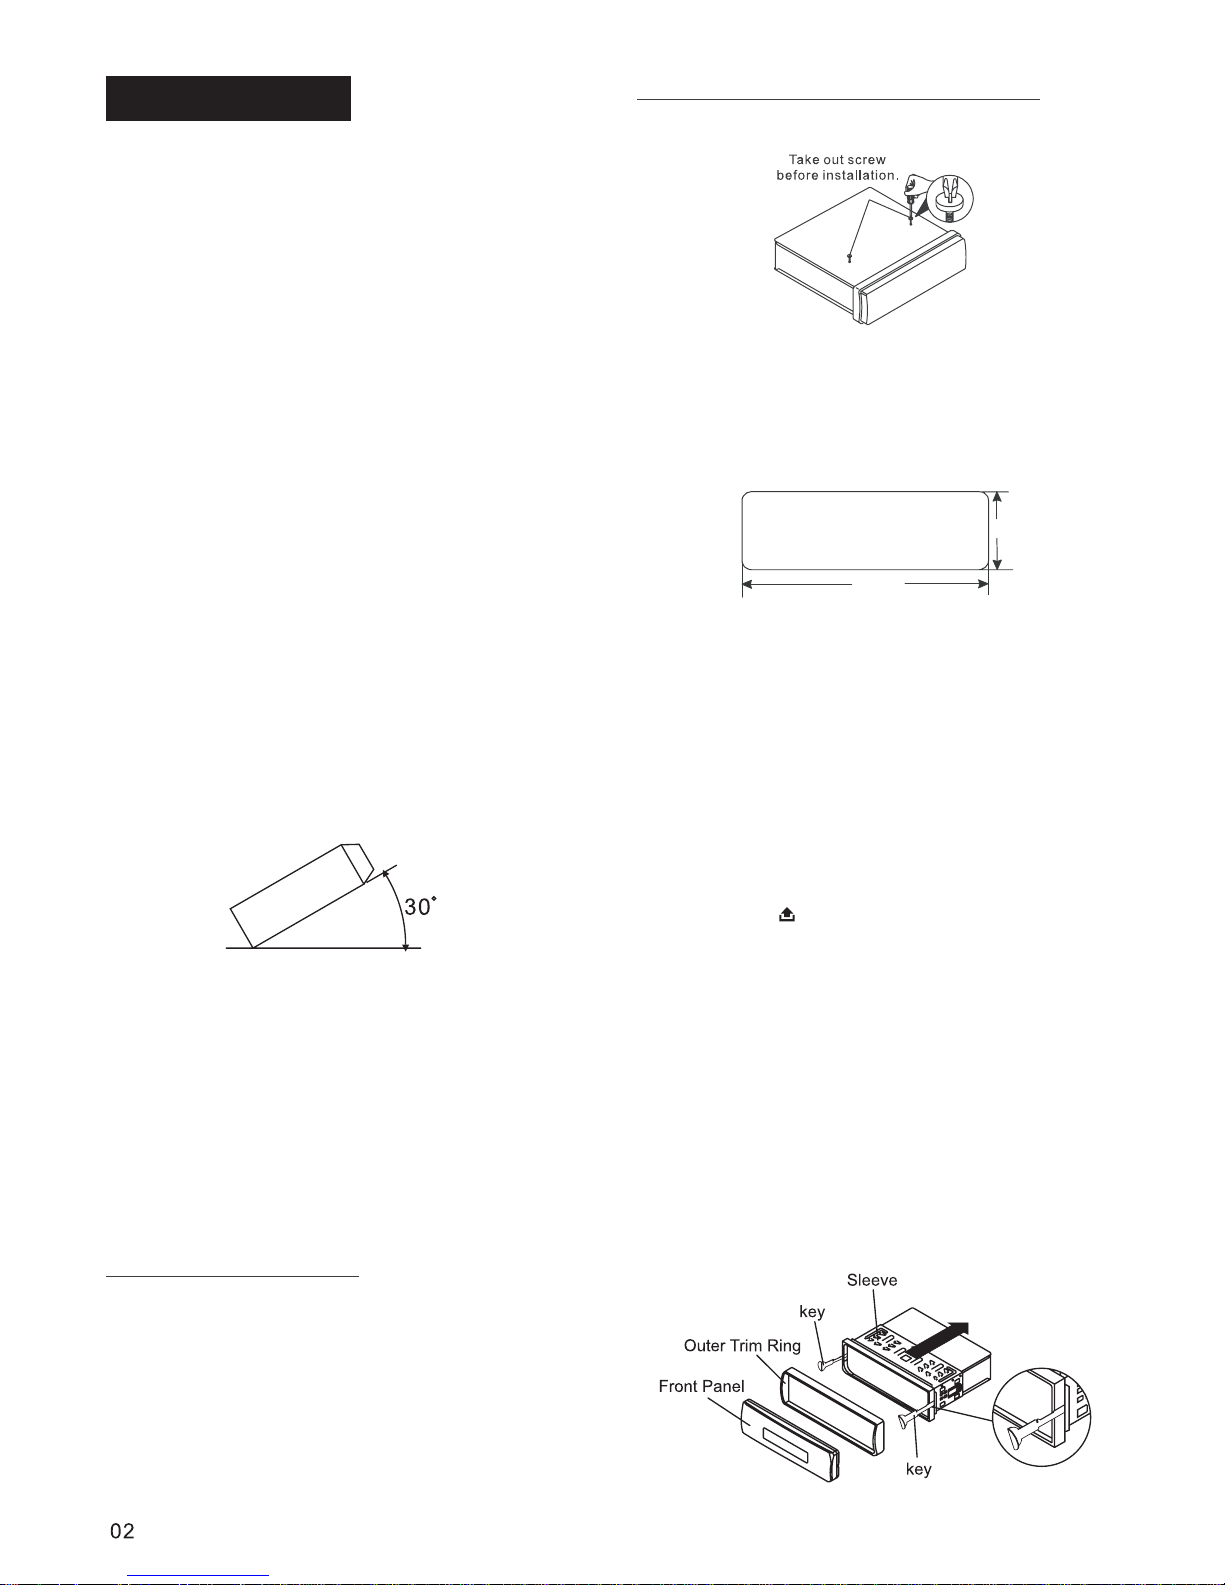
- If installation ang e exceeds 30°from
horizontal, the unit might not give its
optimum performance
l
- Avoid installing the unit where it would be
subject to high temperature, such as from
direct sunlight, or from hot air, from the
heater, or where it would be subject to dust,
dirt or excessive vibration.
Din Front/Rear-Mount
This unit can be properly installed either
from 'Front' (conventional DIN Front-mount)
or 'Rear' (DIN Rear-mount installation,
utilizing threaded screw Holes at the sides
of the unit chassis). For details, refer to the
following illustrated installation methods.
Installing the unit
Be sure you test all connections first, and
then follow these steps to install the unit.
1. Make sure the ignition is turned off, and
then disconnect the cable from the vehicle
battery's negative (-) terminal.
5. The two supplied keys release tabs
inside the unit's sleeve so you can remove
it. Insert the keys as far as they will go (with
the notches facing up) into the appropriate
slots at the middle left and right sides of the
unit. Then slide the sleeve off the back of
the unit.
2. Disconnect the wire harness and the
antenna.
3. Press the button on the front panel and
remove the control panel (For details, refer
to 'using the detachable front panel').
4. Lift the top of the outer trim ring then pull
it out to remove it.
Installation Opening
This unit can be installed in any dashboard
having an opening as shown below:
Installation
1. DIN FRONT-MOUNT (Method A)
53mm
182mm
Take Out Screw Before Installation
Before install the unit, please remove the
two screws.
Page 5
7. Reconnect the wire harness and the
antenna and be careful not to pinch any
wires or cables.
8. Slide the unit into the sleeve until it locks
into place.
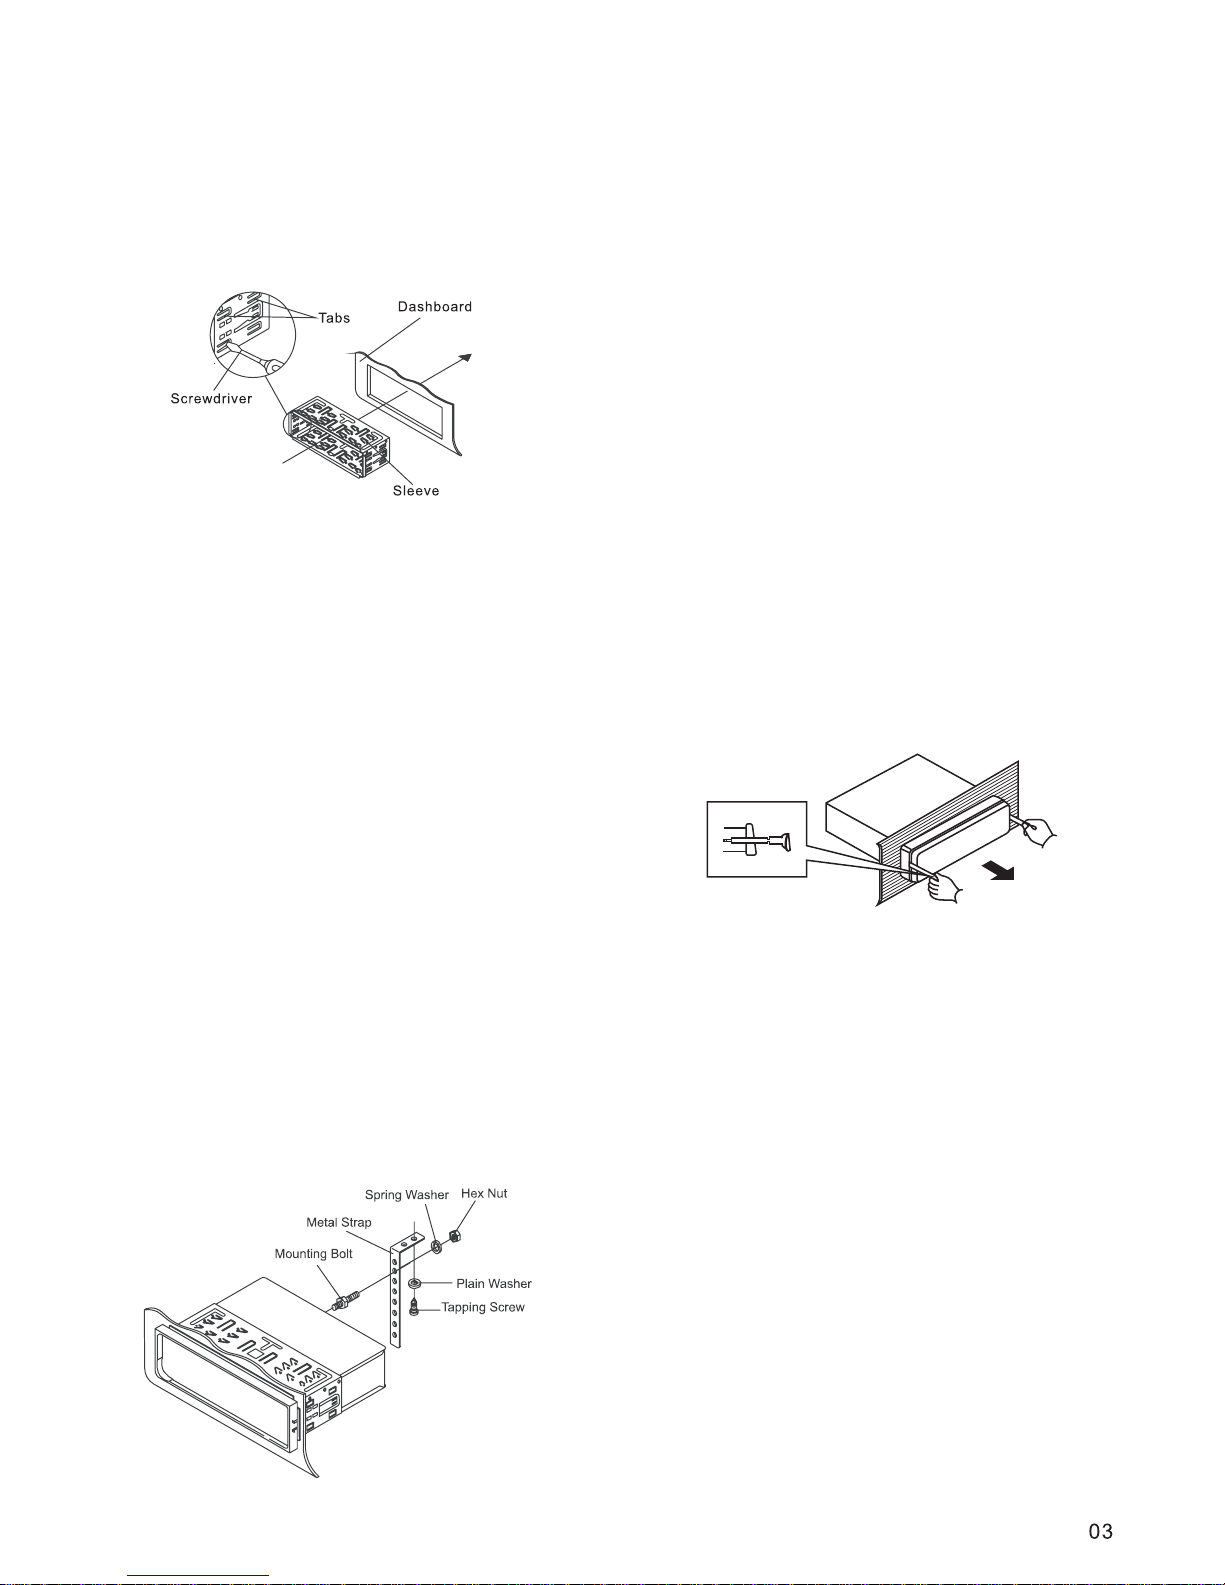
9. To further secure the unit, use the
supplied metal strap to secure the back of
the unit in place. Use the supplied hardware
(Hex Nut (M5mm) and Spring Washer) to
attach one end of the strap to the mounting
bolt on the back of the unit. If necessary,
bend the metal strap to fit your vehicle's
mounting area. Then use the supplied
hardware (Tapping Screw (5x25mm) and
Plain Washer) to attach the other end of
metal strap to a solid metal part of the
vehicle under the dashboard. This strap
also helps ensure proper electrical
grounding of the unit.
Note: Install the short threading terminal of
the mounting bolt to the back of the unit and
the other long threading terminal to the
dashboard.
6. Mount the sleeve by inserting the sleeve
into the opening of the dashboard and bend
open the tabs located around the sleeve
with a screwdriver. Not all tabs will be able
to make contact, so examine which ones
will be most effective. Bending open the
appropriate tabs behind the dashboard to
secure the sleeve in place.
10. Reconnect the cable to the vehicle
battery's negative (-) terminal. Then
replace the outer trim ring and install the
unit's front panel (see the steps of 'to install
the front panel').
1. Make sure the ignition is turned off, and
then disconnect the cable from the vehicle
battery's negative (-) terminal.
2. Remove the metal strap attached the
back of the unit (if attached).
3. Press the release button to remove the
front panel.
4. Lift the top of the outer trim ring then pull
it out to remove it.
5. Insert both of the supplied keys into the
slots at the middle left and right sides of the
unit then pull the unit out of the dashboard.
Removing the unit
Page 6
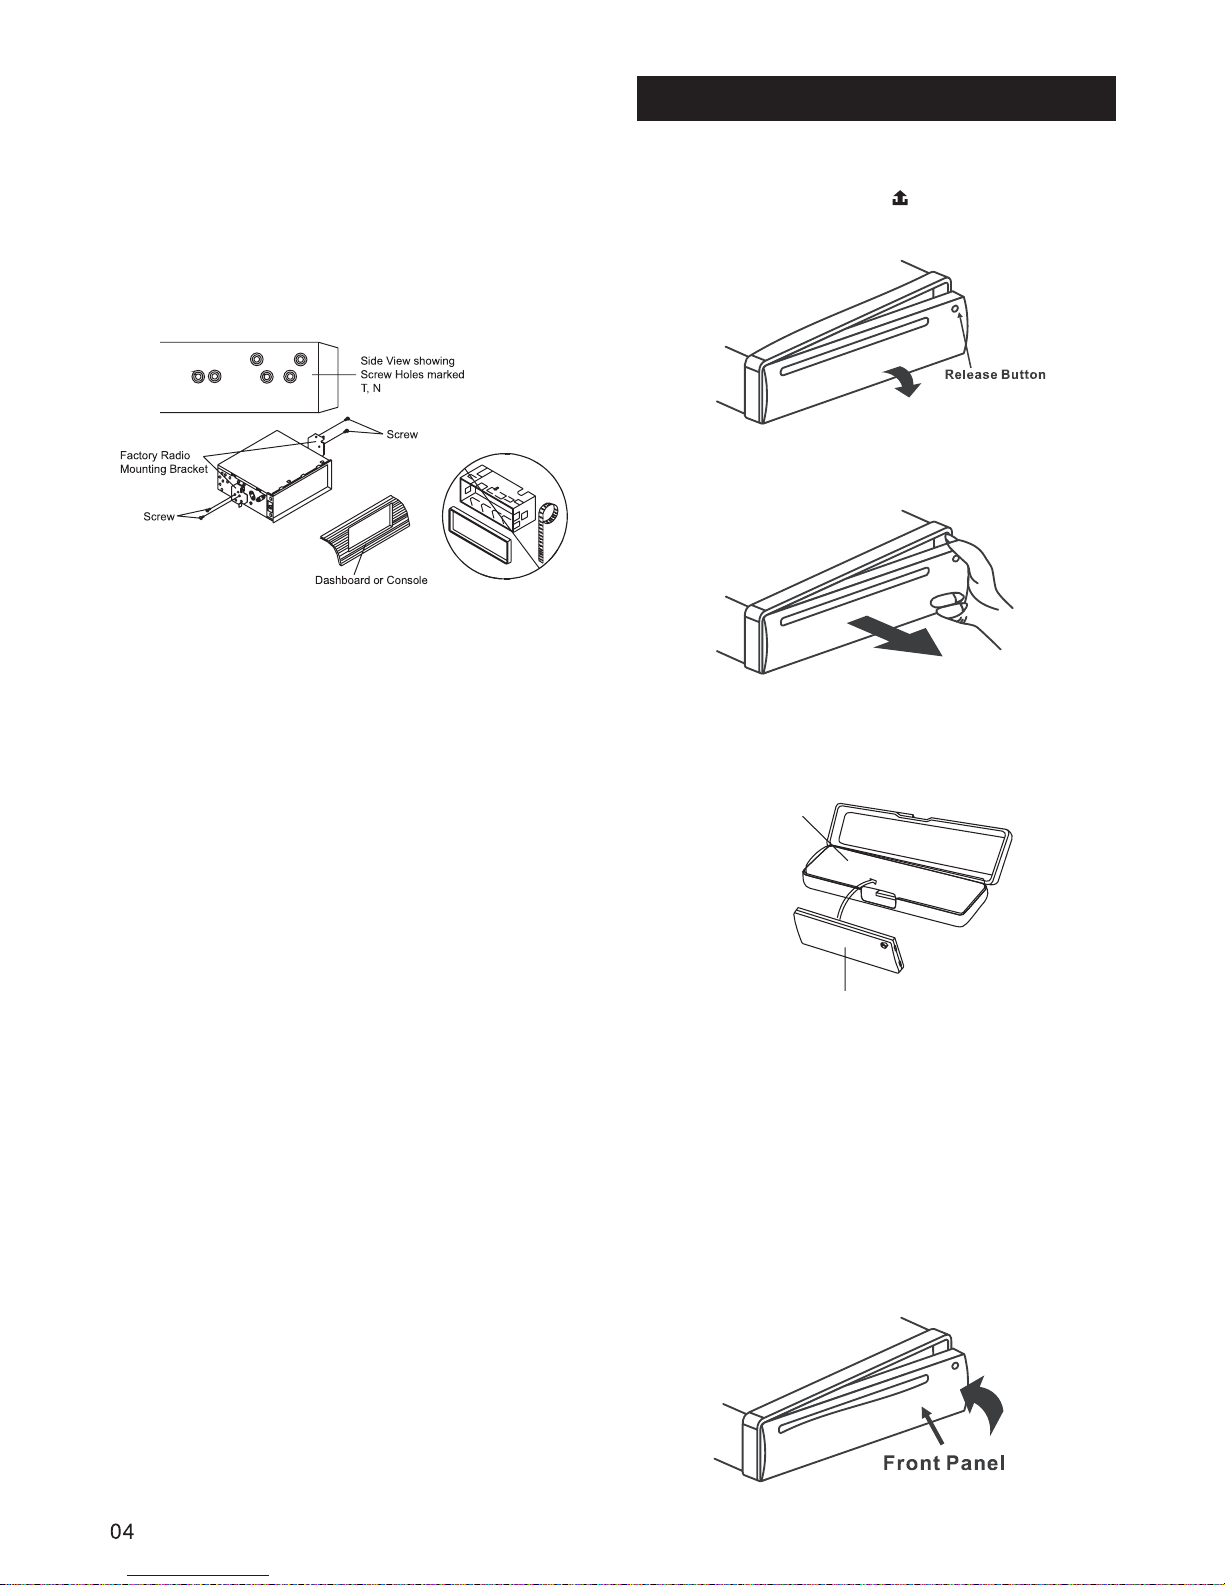
If your vehicle is a Nissan, Toyota, follow
this mounting instruction. Use the screw
holes marked T (Toyota), N (Nissan)
located on both sides of the unit to fasten
the unit to the factory radio mounting
brackets supplied with your vehicle.
Fasten the unit to the factory radio
mounting brackets. Align the screw holes
on the bracket with the screw holes on the
unit, and then tighten the screws (5x5mm)
on each side.
the outer trim ring, sleeve and the
metal strap are not used for method B
installation.
Note:
2. DIN REAR-MOUNT (Method B)
Using The Detachable Front Panel
REMOVING THE FRONT PANEL
1 Press the release button on the
front panel..
2 Pull off the front panel..
3 Store the front panel in the protective
case provided for safekeeping..
TO ATTACH THE FRONT PANEL
To install the front panel, insert the
panel into the housing and make sure the
panel is properly installed. Otherwise,
abnormality occurs on the display or
some keys will not function properly.
front panel
protective case
Page 7
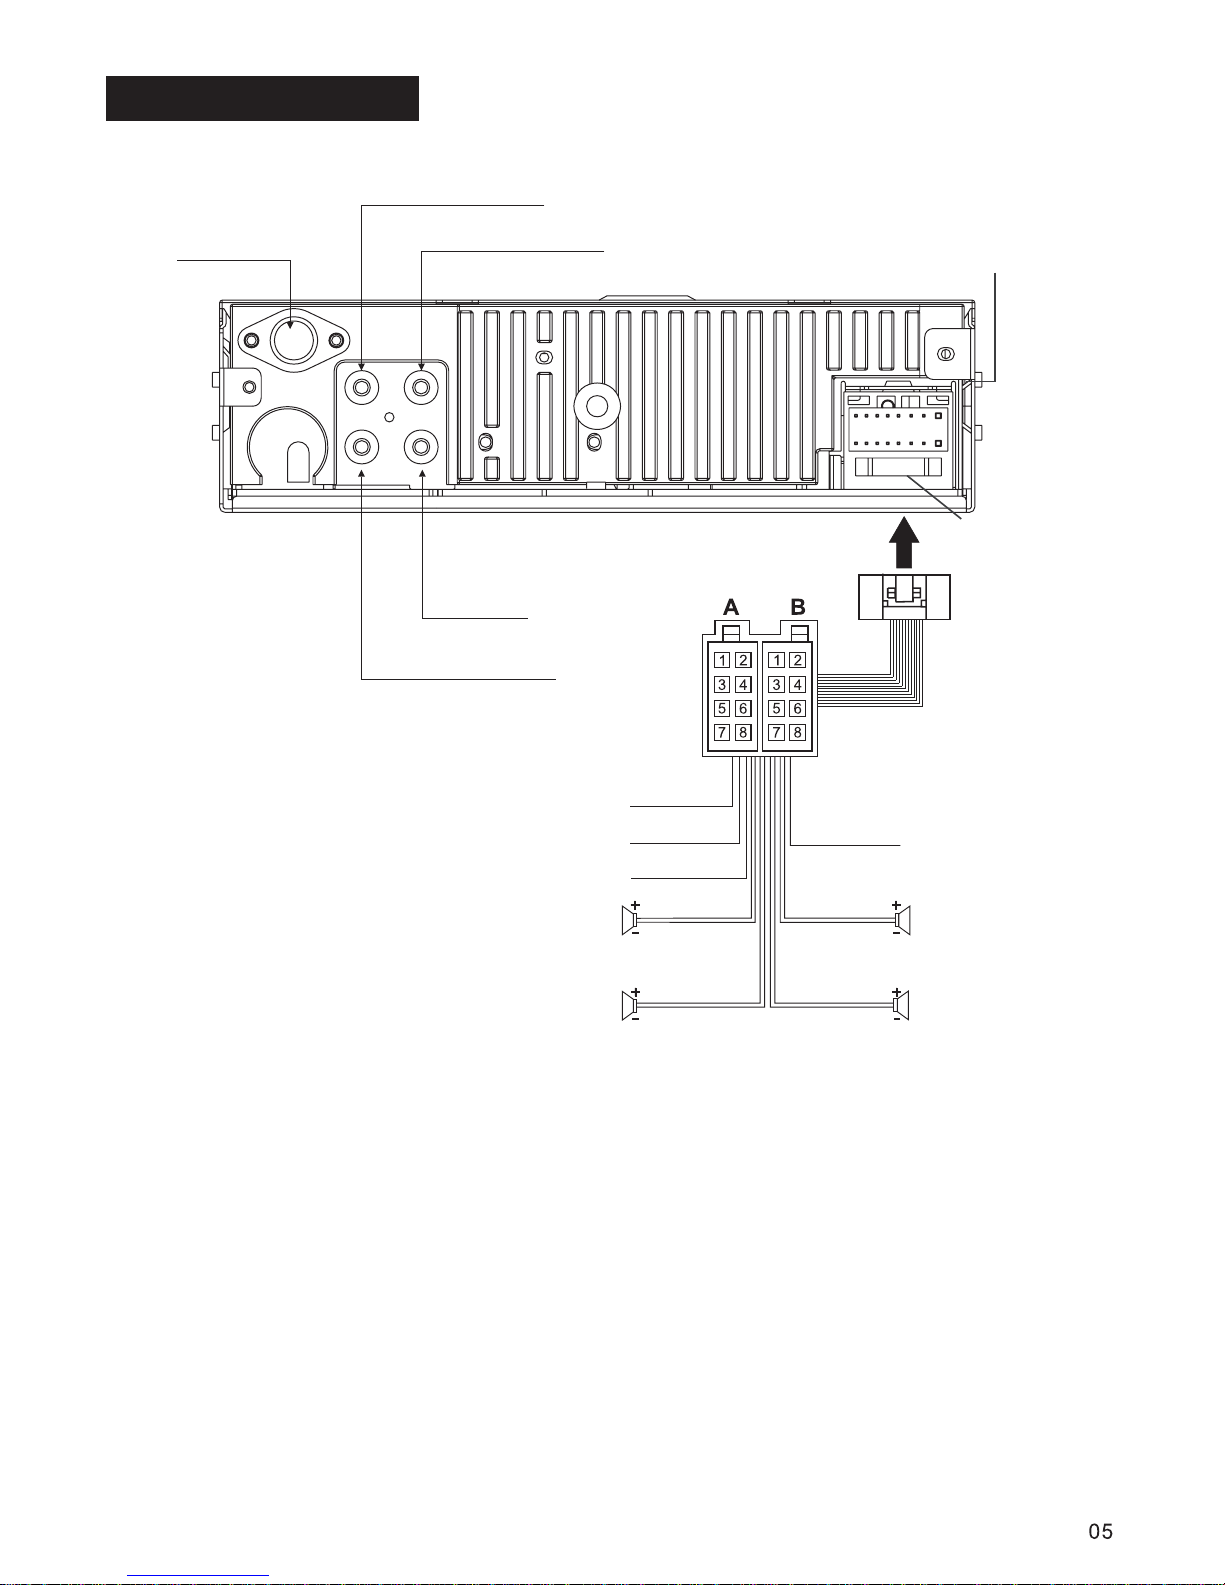
Wiring Diagram
L
R
FUSE
ISO CONNECTOR
ISO connector:
Part A:
A1:
A2:
A3:
A4:
A5:
A6:
A7:
A8:
Part B:
B1:
B2:
B3:
B4:
B5:
B6:
B7:
B8:
No Connect
No Connect
No Connect
Battery B+ (Yellow)
Antenna (Blue)
No Connect
Accessory (Red)
Ground B- (Black)
Rear Right + (Violet)
Rear Right - (Violet/Black)
FrontRight+(Grey)
Front Right - (Grey/Black)
Front Left + (White)
Front Left - (White/Black)
Rear Left + (Green)
Rear Left - (Green/Black)
WHITE
WHITE / BLACK
GREEN
GREEN / BLACK
VIOLET
VIOLET / BLACK
GREY
GREY / BLACK
FRONT
4ohm
LEFT
SPEAKER
REAR
4ohm
RIGHT
SPEAKER
TO MEMORY B+
GROUND B-
ACC B+
BLUE
RED
YELLOW
FRONT
4ohm
REAR
4ohm
BLACK
TO ANTENNA
Antenna Socket
RCA connector to rear right output (Red)
RCA connector to rear left output (White)
RCA connector to front right output (Red)
RCA connector to front left output (White)
Bluetooth Antenna
FUSE 15A
Page 8
AUX IN
Push
SEL
TA
AF
MENU
BAND
PTY
MOD
MIC
01
SCN2RPT
3
4
5
6
CAR CD/MP3 PLAYER WITH ESP
SHF
7
8
DISP
9
ENT
AMS
-10
+10
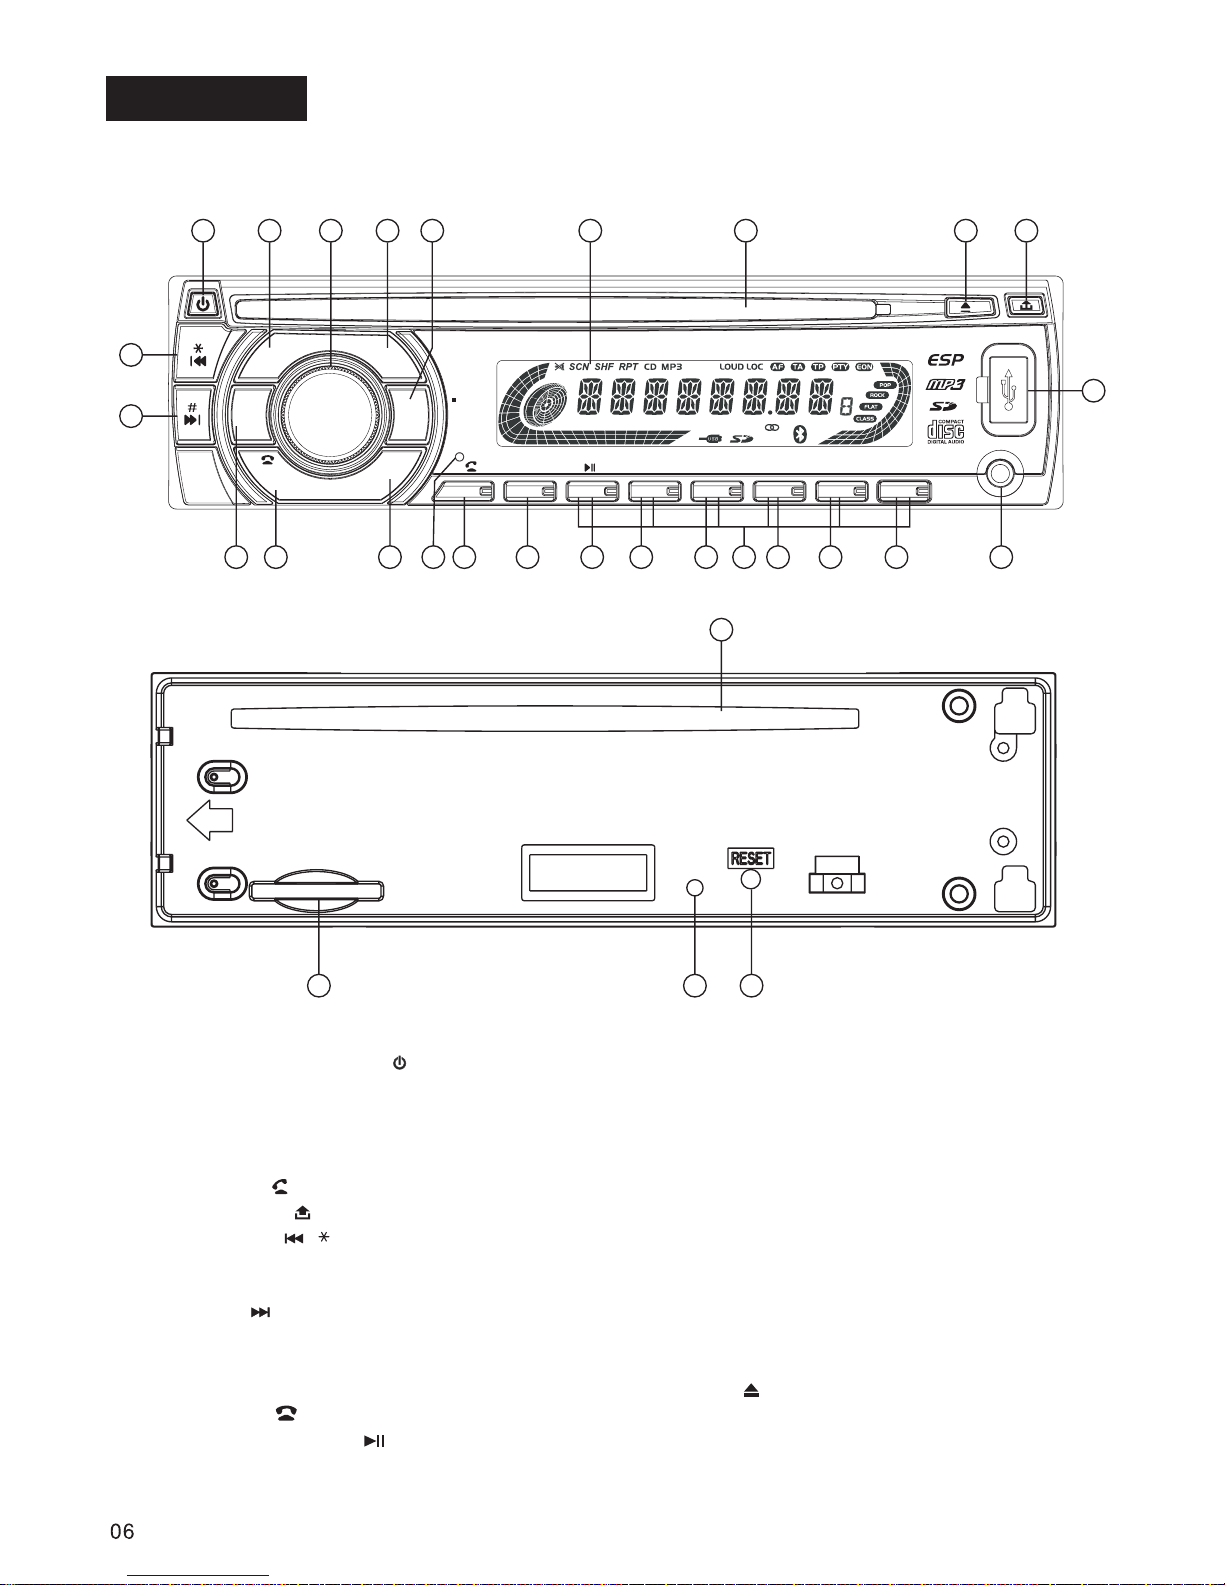
Operations
Location and Function of Keys
Front panel:
(1)
(2)
(3)
(4)
(5)
(6)
(7)
(8)
(9)
(10)
(11)
(12)
(13)
Power on/off Button ( ), Mute Button
Volume Control,
Built-in Microphone for bluetooth function
TEL Menu Button (MENU)
LCD display
Mode / Button
Release ( ) Button
DOWN ( )/ Button
Tune down, Seek down, previous track,
fast reverse
UP ( ) /# Button
Tune up, Seek up, next track, fast forward
AMS( ) Button,
Numeric 0 Button, MP3 Search Button
BAND, ,ENTER Button
Playing/Pausing( ), Numeric 1 Button
Scan(SCN) Playback, Numeric 2 Button
Audio/Menu Selector (SEL)
Auto-storage/ Preset memory Scan
Repeat(RPT) Playback, Numeric 3 Button
Preset Station (1-6) Buttons
Random(SHF) Playback / Numeric 4 Button
Playing the -10 track / Numeric 5 Button
Playing the + 10 track / Numeric 6 Button
TA, Numeric 7 Button
AF/REG/ Numeric 8 Button
PTY Button
DISP(Display), Numeric 9 Button
AUX Input Jack
USB Port
SD/MMC Memory Card Slot
Disc slot
Eject ( ) key
Anti-theft LED Indicator
Reset Button
(14)
(15)
(16)
(17)
(18)
(19)
(20)
(21)
(22)
(23)
(24)
(25)
(26)
(27)
(28)
(29)
Descriptions of Function Controls
The front facet after removing the front panel:
12
7
11
1 2
3
4
5
6
8
9
10
13
14
151716
19 20
18
21
26
25
24
23
22 27
28
26
29
Page 9
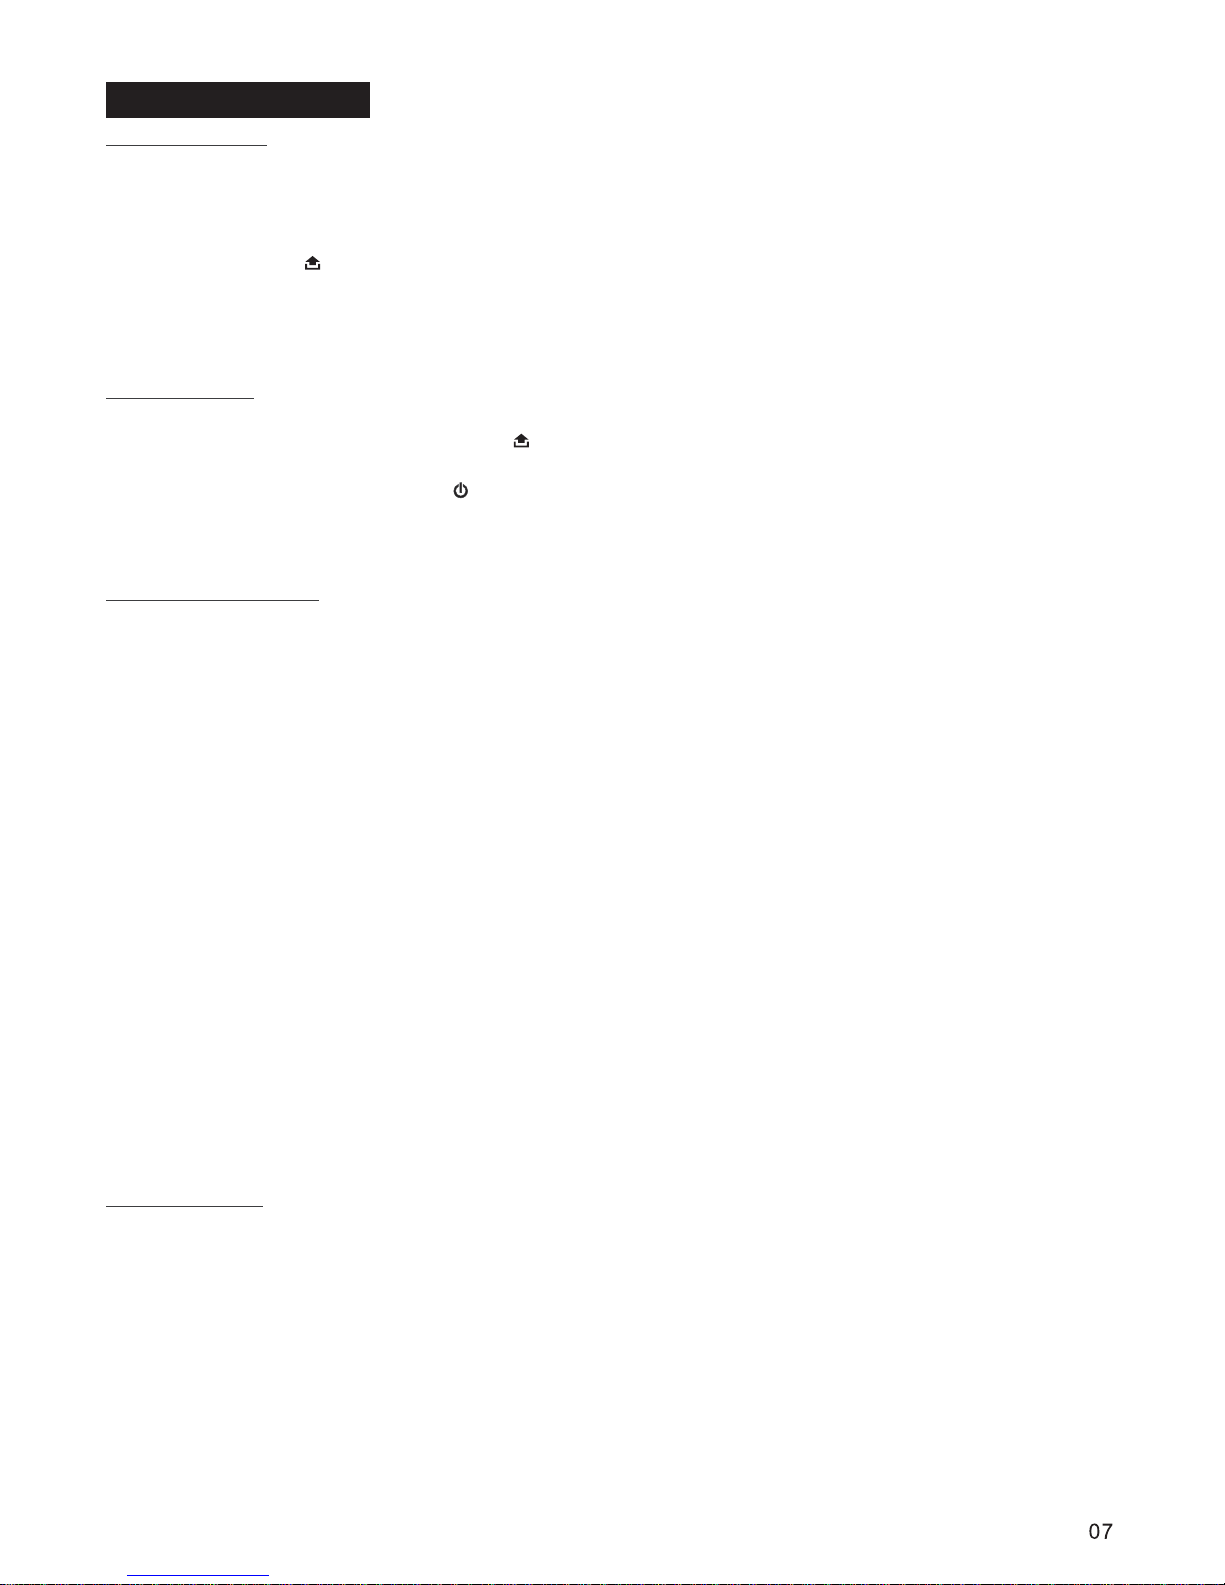
Reset the unit
Power on/off
1.Turn off the unit power.
2.Press the ( ) button and remove the
front panel, then press the button
with a ballpoint pen or similar object to
restart the unit.
()onthe
head unit or remote control
- Rotate the volume control to adjust
volume level.
- Press the button short and repeatedly
to select the
volume, bass, treble,
balance and fader.
- Rotate the volume control to adjust level of
the selected sound mode:
- VOL:0,1 ~ 44,45
- BAS / TRE: -7, -6 ~,0, ~ +6,+7,
- BAL: 8L,7L, ~,0, ~, 7R,8R
-FAD:8F,7F,~,0,~,7R,8R
1. In each mode, w
Press the button and hold for more
than 2 seconds to access system setup
menu mode, then
“INVOL 17”(Initial Volume) “ADJ 00:00”
(adjust the clock) “BEEPALL”(beep tone
REL
RESET
SEL
Note:
SEL
In power off mode, switch on the unit by
pressing any button except the ( )
button. When the system is on, press and
hold the on/off button
for about 2
sceconds to turn off the unit.
REL
POWER
Sound adjustment
System menu
g
g
When operating the unit for the first time,
after replacing the car battery or changing
the connections, you must reset the unit.
the sound setting that you
would like to adjust:
hen the unit has not been
adjusted for about 5 seconds, the current
setting will be saved and it returns to the
previous mode.
2. When using preset EQ modes, you
cannot have access to Bass and Treble
settings.
press the button
momentarily to select the menu items in
sequence as follows:
SEL
mode) “TAVOL 17” (traffic announcement
volume) “EON ON” (EON on/off) “DSP
NONE” (equalizer mode) “LOUD OFF”
g
gg
g
(loudness on/off) “LOC OFF” (local
stations on/off) “STEREO” (STEREO/
MONO) “ALRM ON”(Alarm on/off) EXIT
After selecting the desired menu item,
to select the mode
of the selected item.
“ ” will be visible on the LCD
display, r to adjust
the initial volume of this unit.
“ ” will be visible on the LCD
display,
to adjust hour,
to adjust minute.
The car audio device is equipped with 3
beep tone modes.
The beep sound is on
when any key is pressed.
The beep sound will be
heard when you hold down a button with a
dual function, which activates the second
function of this button.
The beep sound is
disabled.
This function allows you to define the
minimum volume for the traffic
announcements. The adjustable range is
0~45. The defaulted value is 17.
to adjust the volume of the
traffic announcements.
The car audio device is equipped with 4
preset equalization modes.
to select one of the EQ
modes with following sequence:
DSP NONE (OFF)
ROCK POP FLAT
g
g
gg
gg
gg
INITIAL VOLUME:
INVOL 17
CLOCK ADJUST:
ADJ 00.00
BEEP TONE MODE:
- Beep ALL mode:
- Beep 2nd mode:
-Beepoffmode:
Traffic announcement volume:
EON ON/OFF:
DSP EFFECT:
to choose EON
ON or EON OFF.
r
r
r
one of
the beep tone modes.
otate the volume control
otate the volume control
otate the volume control clockwise
otate the volume control
counter-clockwise
Rotate the volume control to select
Rotate the
volume control
Rotate the volume control
Rotate the
volume control
Rotate the volume control
CLAS(classical)
.
LOUD ON/OFF:
to choose
loudness on or off.
General Operations
Page 10

LOCAL RECEPTION ON/OFF:
ALARM ON/OFF
MUTE
DISP
-:
to switch local
reception ON or OFF mode.
to
choose stereo or mono audio effect.
is
R
Rotate the volume control
In power on mode, briefly press the
button ( ) to toggle mute on or off.
-During disc, USB, SD/MMC card playback,
if you switch to other mode, and then return
the previous mode again, the unit will
resume playing from the point that it was
interrupted.
Press the button repeatedly to display
as follows:
In radio mode: CT -> PTY(Type of
program) -> PS(Name of the station) ->
FREQUENCY ->
In CDP/USB/SD/MMC mode: CT->
PTY(Type of program) -> FREQUENCY -
Mute on/off
INFORMATION DISPLAY
In urban areas, most stations are strong
enough and “LOCAL ON” mode should be
selected. Switch to LOCAL OFF mode to
search for stations with weaker signals.
When receiving an RDS station
Rotate the volume control
otate the volume control
STEREO/MONO
,MODE
MODE
:
FM station is received in stereo mode.
However, if the signal weak or reception
is not as good as you would like, switching
to MONO mode usually improves the overall
sound quality.
The
muted state will be also released when the
Volume control button is used.
In power on mode, press the button
repeatedly to select the different modes as
the following sequence: TUNER, DISC (with
a CD/MP3/WMA disc inside the disc slot) ,
USB(with USB device inserted) , SD/MMC
(with SD/MMC card inserted), AUX IN
mode.
- During disc, USB, SD/MMC card playback,
if you turn off the unit and then switch on it,
the unit will resume playing from the point
that it was interrupted.
To select playback mode
Last position memory feature
to choose
ALARM ON or EALARM OFF.
>PS(Name of the station) -> Track number
/Running time or other information ->
* CT or PTY
information, the display shows “
” or “PTY NONE”.
In radio mode:CT->PTY NONE-> PS
NONE ->FREQUENCY ->
In CDP/USB/SD mode: CT -> PTY NONE
-> FREQUENCY -> PS NONE -> Track
number /Running time or other information
The selected information is displayed for
5 seconds, then the radio goes back to the
first display mode after 5 seconds.
- receiving a non RDS station:
ESP Function
If the unit does not receive
NO
CLOCK
When
This CD/MP3 car radio has the electronic
shockproof feature.
So that if the unit skips due to rough road
conditions, the playback of the disc will be
uninterrupted.
Designed as a theft deterrent, the red LED
will flash when the unit is turned off
and face plate removed.
Anti-theft LED Indicator
Page 11
Short pressing the button, it scans
each preset stations in the memories of the
current band. Each preset station will blink
for 5 seconds with releasing mute, then go
to next station, finally the radio will go to
play the start preset station. Press the
again to stop preset scanning.
Pressing the button for more than 2
seconds, it will enter auto store mode.
The whole band is scanned and the six
strongest stations are stored into the preset
memories, after scanning is finished.
Press the button short toggles AF
mode on or off. There are 3 state the “AF”
icon on the LCD display:
AF switching mode off.
AF switching mode on,and
has RDS information.
AF switching mode on, but
RDS information is not received yet.
When AF switching mode is selected, the
radio checks the signal strength of the AF
all the time. The interval of checking time of
each AFs depends on the signal strength of
current station, from a few minute for strong
station to few seconds for weak station.
Every time that new AF is stronger than
current station, it switches over to that
frequency for very short time. Because the
mute time of AF switching or checking time
is very short, it is almost inaudible in case of
normal program. During FM mode, whenAF
is on, manual store, Auto store/preset scan
function can only receive and save RDS
program.
Press the button for longer 2
seconds to toggle on or off region mode .
Some broadcasting stations change their
program from normal broadcasting to
regional broadcasting for a certain time
period.
the
current listening program remains
unchanged
it allows the
reception moved to the regional station
AMS
AMS
- Auto store:
AMS
AF/REG
Icon “AF” off:
Icon “AF” on:
Icon “AF” blink:
AF/REG
Setting Alternative Frequencies
Regional Program Operation
RDS (Radio Data System) Operations
When regional mode on, the radio accepts
RDS stations with regional variants,
; When regional mode off, the
radio ignores regional variants,
.
To select a radio band
Auto/ Manual tuning
BAND
- Automatic search mode:
- Manual search mode:
In tuner mode, Press the button
repeatedly to select a radio broadcasting
band you would like to hear. The FM band is
toggled cyclically through the
tuning bands: ->FM 1-> FM 2 -> FM 3 -> .
Briefly press the or button, the auto
search will start. It will search upward or
downward for the strong signal radio station
within the current band. In auto tuning,
press the or button to stop tuning.
Pressing and holding the or button for
about 2 seconds until “MANUAL” appears
on LCD display, it will change into manual
search mode.
Press the or button short and
repeatedly to manually search upward or
downward step by step for the desired radio
station within the current band.
In manual search process, if the both
buttons haven’t been pressed within 5
seconds, it will change into automatic
search mode automatically, “AUTO” will be
visible on the LCD display.
or
:9
:9
:9
:9
:9
To store / recall a preset radio stations
Auto store / Preset scan
You can store up to a total of 18 FM radio
stations in the memory, manually or
automatically.
- Select a band (if needed)
- Select a station by buttons
-Pressandholdapresetbutton( - )
which you want to store the station for at
least 2 seconds, the current station will
be saved into the relevant preset memory
bank. When a RDS station is being
stored, the relevant PI, PS, AF list are
stored.
- Select a band (if needed).
- Press a preset button (1-6) briefly to
recall the stored station. In case of RDS
mode, the strongest AF is selected after
AF searching.
- To store a station:
16
- To recall a station:
- Preset scan:
Radio Operations
Page 12

Pressing and holding the button for
more than 2 seconds to enter the PTY
menu. The default type is NEWS.
Rotate the voluem control to select different
PTY as follows:
NEWS->AFFAIRS->INFO->SPORT->
EDUCATE -> DRAMA -> CULTURE ->
SCIENCE -> VARIED -> POP M -> ROCK M
-> EASY M -> LIGHT M -> CLASSICS ->
OTHER M -> WEATHER -> FINANCE
-> CHILDREN -> SOCIAL -> RELIGION
-> PHONE IN -> TRAVEL -> LEISURE ->
JAZZ->COUNTRY->NATIONM->
OLDIES -> FOLK M -> DOCUMENT ->
TEST -> ALARM -> NEWS
If no button is pressed for 5 seconds, it
returns to normal state.
Press the button briefly to toggle the
PTY search on or off. When PTY search
mode is on, and the or button is
pressed, PTY search will be started. PTY
search stops when it finds the station that
has the selected program type, otherwise,
the “NOT FND” will be visible on
the LCD display. During the PTY search
process, press any key to stop the PTY
search.
Using PTY select function
PTY
PTY
:9
Using PTY Search Function
Using the Traffic Announcement
Press the button to toggles mode on
or off. Deafault is off.
- When TA mode is on, but no traffic
announcement is transmitted, only TP icon
blinks.
- When TA mode is on and TP signal is
available from the current station, TP icon
stops blinking and is turned on.
- When TA RDS signal is available from the
current station, TA icon is turned on.
- When TA mode is on and a traffic
announcement is transmitted:
a. The volume set will be set to TA volume.
b. It is possible to interrupt disc (CD/ MP3 /
WMA), USB/IPOD/SD/MMC, AUX IN or
mode, it will
switch temporarily to radio mode.
c. Text “Traffic” appears on the LCD
TA TA
(not found)
the current radio station
display.
d. Return to original setting after the traffic
announcement has been finished.
e. When you insert a new media
(DISC/SD/MMC/USB), TP mode will be
forced to turn off automatically, and the
mode will be changed.
f. When you press the button, TP
mode will be forced to turn off
automatically, and the mode will be
changed.
The current traffic announcement is
cancelled by pressing this key. But the
mode will not be off.
MODE
TA
TA interruption function
Note:
1. If TA is on, auto tuning function stops at
the station where TA signal is available.
2. If PTY search is on, auto tuning function
acts as same as PTY Search.
3. If AF is on, auto tuning function stops at
the RDS station.
4. If PTY, AF and TP is on, PTY search will
be done, and next TP search, and finally AF
search.
Page 13
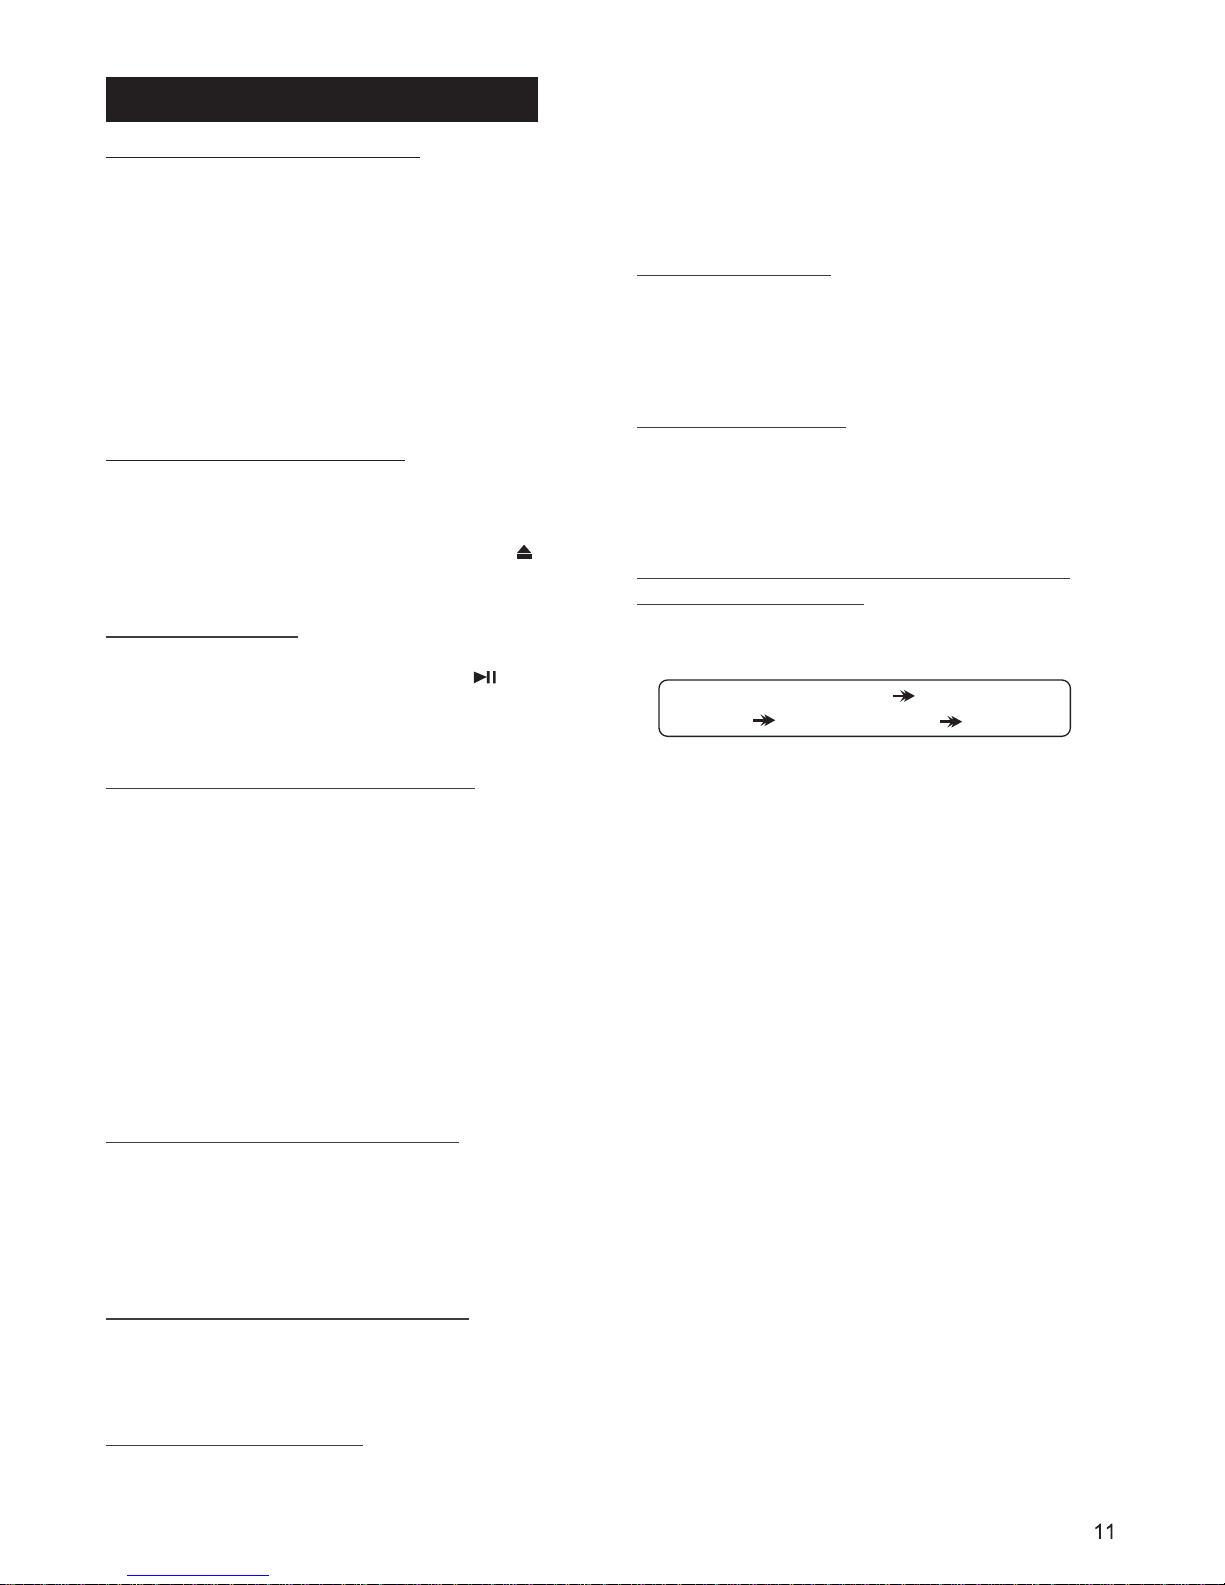
CD/MP3/WMA DISC OPERATIONS
Switching to CD/MP3 mode
Loading/Removing a Disc
1. If there is no CD/MP3 disc inserted in the
player:
Gently insert a CD/MP3 disc with the
printed side facing up into the disc slot until
you feel some resistance. The disc is draw
into the driver automatically. The CD/MP3
playback begins.
2. If a CD/MP3 disc is already inserted in
the player, press button to switch to
the CD/MP3 mode.
1. Insert a disc into the disc slot with the
printed side facing upward, the player will
play the disc automatically.
2.To eject the disc, press the ( )
button.
MODE
EJECT
Playing/Pausing
Playing the previous/ next track
Playing forward and backward
Playing the 10 track up or down
Introduction playback
In media (CD/MP3/WMA /USB/SD/ MMC or
A2DP) playback mode, press the button
to interrupt the play back.
Press again to resume the playback.
- In media (CD/MP3/WMA /USB/SD/ MMC
or A2DP) playback mode, briefly press the
button to play the next track.
, briefly press the
button to play the previous track.
ress the button to play the current track
from the beginning
.
In CD or MP3/WMA file playback process,
press and hold the button to fast
forward or fast reverse. Release the
buttons when the desired location is found,
and normal play starts.
In CD or MP3/WMA file playback process,
press the , button to play the
previous or next 10 track or file.
You can play the beginning of each track or
file for 10 seconds on the current disc in
5 (-10) 6 (+10)
:
9
9
:9
When played time of the current track or
file is less than 2 seconds
- When played time is more than 2 seconds,
p
of the current track or
file
or
back
sequence.
In CD or MP3/WMA file playback, briefly
press the button to play the first 10
seconds segment of each one of current
disc. Press again to stop scanning and play
the currently selected track or file.
In CD or MP3/WMA file playback, briefly
press the button to
Press again to stop repeat
playback and resume normal playback.
In CD or MP3/WMA file playback, briefly
press the button to
You can access 3 different types of track
search modes for MP3/WMA format:
File number search File name
search Folder search Exit
a) In playback of files with MP3 or WMA
format, press the button once to
access the file number search mode which
allow you to quickly find a specific MP3/
WMA title by its serial number, and the
“00 ”
You can select a file directly, after
entering file number search mode.
Rotate the volume control to select the
number of your favorite file with high speed.
Finally press button to
confirm and play the selected file.
SCN
RPT
SHF
File number search mode:
AMS
BAND (ENTER)
The file name search mode:
Repeat playback
Random playback
Select the track or file for playback in
MP3 or WMA format
*-----
*******
continuously play
the current track.
play all tracks or
files of the disc in random sequence. Press
again to cancel random playing.
will be shown on the LCD display.
b)
This file name search function requires only
three character as search keyword, it will
allow you to quickly find an MP3 title by its
name.
a) To access this feature, press the
button twice, the “A ” will be shown
on the LCD display and the first character
(“A”) will be blinking.
b)Then change the blinking character by
rotating the volume control. The character
will be changed from “A” through “Z” and “0”
through “9” in the order ofA~Z and 0~9.
AMS
Page 14

Press the button to confirm the
character entered and advance to the next
character.
c) When mached files was found, rotate the
volume control or press the / button to
change and select your desired file among
these files with same search keyword, then
press the (ENTER) button to start
play the searched file.
If the file was not found, “NO MATCH”
message will be visible on the display.
The folder search mode will allow you to
quickly find an MP3 title under a specific
group folder.
a) In playback of file with MP3 or WMA
format, press the button three times to
access the first folder mode.
b) Rotate the volume control or press the
/ button to change and select your
desired folder (If there are no root Folder in
the disc, the LCD will display “ROOT/”)
c) Once the folder has been selected, press
the button to start play, the
first the track or file of the selected folder
will be played.
In the
folder name, file name,
information will be scrolling on the
LCD display automatically.
As long as the current playing MP3 music
contains relevant ID3 tag information in
version 1.0/2.0 format, the 3 items
underlined above will be scrolling on the
LCD display, otherwise, they will not
appear.
SEL
BAND
Folder search mode:
AMS
BAND(ENTER)
Note:
:9
:
9
ID3 information of MP3 file
title, artist and
album
playback of discs with MP3 format,
If available, the unit can play the mixedmode CD disc (the disc contains both CD
audio tracks and MP3/WMA files).
Under a default mode, the unit will first
play all the MP3/WMA formatted songs and
than play the CD formatted songs.
Mixed-Mode CD Operations
The unit is equipped with a USBportonthe
front panel of the unit, you can connect a
USB stick through the USB port.
When you insert a USB stick through the
port, the unit will search the MP3 files and
start to play it automatically.
If insert a disc into the disc slot while read
the file in the USB device, the unit will
playing the disc first. If you want to play the
file in the USB device, press the
button to switch to USB mode.
- Use the USB adaptor cable, if necessary.
- The operations of playing MP3/WMA files
intheUSBisthesameastheMP3/WMA
operation described in the CD/MP3/WMA
disc operations.
- When reading the USB stick, please don't
touch or remove it.
- If following the instruction above, the unit
can't read the file in the USB stick, please
check if the device is in good condition, or
take it out then insert it into the USB port
once more.
- The main unit can only support the
standard USB-memory device.
- USB MP3 player is not a standard which
means different brand name or different
models have their own standard.
So this product cannot support all MP3
players.
- When connecting an MP3 player and there
is a normal battery in the player (non
rechargeable battery), you should remove
the battery from the MP3 player and then
connect it to the USB port. Otherwise, it
may cause battery burst.
- When reading a USB device, be sure not
to remove it from the USB port (change
mode beforehand).
Using the USB stick:
MODE
Note:
USB Playing Operations
Page 15

This unit equipped with you a memory card
slot.
When you insert a SD/MMC card into the
memory card slot, the player will reading
the SD/MMC card automatically.
If insert a disc into the disc slot while read
the SD/MMC card, the unit will playing the
disc. If you want to play the file in the
SD/MMC card, press the button to
switch to SD/MMC mode.
SD/MMC memory card playing operation is
the same with the MP3 operation described.
- When reading the memory card, please
don't touch or take out the card.
- If following the instruction above, the unit
can't read the card, please check if the card
is in good condition, or take out the card and
then insert it into the card slot once more.
Using the SD/MMC card:
MODE
Note:
SD/MMC Card Operations
Aux In Operations
This car radio has an external auxiliary
input jack, it is compatible with audio output
from an MP3 music player.
So you can listen to sounds and music from
external devices, if you have plugged such
a player into the AUX IN jack. Press the
button to switch to the mode on
or off.
MODE AUX
When link up your mobile phone to this
bluetooth hands-free system, you can dial
or receive calls via this bluetooth device
during driving.
You can also transmit the audio data(music)
from a mobile phone to the CD/MP3 tuner
via this bluetooth device.
Sound and picture will be automatically off
when there is an in-coming call. Voice
comes out from your car speakers and the
built-in mircophone receives your voice.
.
During pairing, please activate your
mobile phone and input pairing code “ ”
and confirm in your mobile phone.
If pairing succeed, the “ ” will not
flashing on the LCD display. Otherwise, the
“ ” will flashing continuously on the LCD
display.
NOTE:
After pairing succeed, the auto-connect
function needs mobile phone supporting. If
your mobile phone don’t support this
function, please use manual-connect
function to connect your mobile phone and
bluetooth.
Connect
The bluetooth module of this car radio will
connect to mobile phone automatically after
pairing succeed. If connection succeed,
“CONNECT” will be visible on the LCD
display, and the “ ” will not flashing on the
LCD display. Otherwise, the “ ” twinkle
continuously on the LCD display.
Disconnect
If bluetooth module has connected with
your mobile phone, turn off the unit by
pressing and hold the button can
disconnect with the bluetooth.
You have to active automatic call
reception so that the mobile phone
accepts incoming calls automatically
In many countries, this is a prerequisite
for legal operation of hands-free
equipment while driving.
1. Pairing
1.1
0000
1.2
2. Connect/disconnect
2.1
2.2
POWER
(See the menu of the hands-free system)
Bluetooth hands-free Function
Page 16

3. DIAL CALL
3.1
3.2 0 9
3.2.1 MENU
3.2.2 0 9
3.2.3
3.3
3.3.1
4. Accept / Reject / End call
4.1
4.2
4.3
5. Call Transfer
6. Caller ID
7. Bluetooth menu wizard
MENU
MENU
PRE NUM :
RECEIVED:
Dial with the mobile phone directly.
Dial with the ~ numeric button.
In connect status, press the
button to activate the bluetooth mode,
Press the “ ~ ” button to input
telephone number. Simultaneously, the
input number will be appeared on the LCD
display.
If a number is wrongly input, press and hold
the button to delete the incorrect number.
press the “ ” button to execute
dialing.
Dial the last number
In connect status, press and hold the
“ ” button to execute redialing.
Accept call
When a ring comes, press the “ ” button
to accept call.
Reject call
When a ring comes, press the “ ” button
to reject the coming call.
End call
When you are talking, press the “ ” button
to hang up the current call.
During talking status, you can transfer
talking to private listening on your phone
from your car audio by pressing and holding
the “ ” button; press and hold the “ ”
button again to get back to car audio.
When a ring comes, the numbers will be
shown on the screen , you can decide
whether or not to answer to, so you avoid
unnecessary trouble and disturb.
In connect status, press and hold the
button to access bluetooth menu, then
press the button repeatedly to view
bluetooth menu. The structure of the
bluetooth menu as follows:
Preset phone number list.
you can save 10 phone numbers total.
List of latest 10 received phone
numbers.
9
DIALED:
MISSED:
AUTO ANS(MANU ANS):
MENU
SEL ENTER)
a) Select preset number list:
b) Edit preset number list:
SEL
09
SEL
09#
*
SEL
c) Dial phone number of menu list:
VOL+ VOL -
d) Switch auto or manual answer
8. A2DP Function
A2DP
8.1
MODE
List of latest 10 outgoing phone
numbers.
List of the latest 10 missed phone
numbers.
Switch auto
answer or manual answer.
Press the button to select the item.
Press the ( to enter the current
menu item. Press the “ ” button again to
exit bluetooth menu.
You can select the next or previous phone
number that saved in the preset number list
by rotating the volume control.
- Press the to enter preset number list.
You can see NONE( - ) on the LCD display,
if you haven’t stored any phone number.
- Then press button to enter editing
status.
- Press the ~ , or to edit phone number,
Simultaneously, the inputted number will be
appeared on the LCD display. If a number is
wrongly input, press and hold the button
to delete the incorrect number.
- After the entire phone number has been
input, press the button to save the
phone number. Press the “ ” button to exit
from phone editing status.
During browse the preset number list or
received list or dialed list or missed list by
pressing press the or button,
you can dial any phone number on the lists
by pressing “ ” button.
Select auto answer or manual answer the
coming phone by rotating the encoder after
enter this preset item.
If your mobile phone support function
( Advance Audio Distribution Profile) that it
is special designed for transmitting stereo
music to bluetooth device. You can listen to
the music stored in your mobile phone by
this car audio.
A2DP function is activated
automatically when user activate it at
mobile phone. Press the button to
switch to A2DP (BT AUDIO) mode from
other source.
9
14
Page 17

8.2
Note:
When playing A2DP, user can control
playback by using the relevant function
control. Eg.:
- Play/pause by pressing button.
- Previous/next track by pressing /
button.
While playing A2DP, if you execute outgoing
call or incoming call, the A2DP function will
be canclled automatically , and you need to
re-activate after phone call.
:9
WARNING:
1. To get the best conversation quality, it is
recommended that the distance between
the mobile phone and the unit is within 3m.
Please don’t put any metal object or any
other obstacle between the path of the
mobile phone and the unit.
2. Phones supported may have some
incompatibility issues depending on the
type & model. Due to numerous
manufacturers and models of mobile
handsets and the continual emergence of
new mobile phones we are unable to offer
an exhaustive list of bluetooth compatible
phones.
1. GENERAL
2. CD PLAYER
3. RADIO
FM
Power Supply Requirements
DC 12 Volts, Negative Ground
Chassis Dimensions
178(W)x160(D)x 50(H) mm
Tone Controls
-Bass(at100Hz) ±10dB
- Treble (at 10 kHz) ±10 dB
Maximum Output Power
4x75 watts
Current Drain
15 Ampere (max.)
Signal to Noise Ratio
>55dB
Channel Separation
>40dB
Frequency Response
20Hz-20KHz
Frequency Coverage
87.5 - 108 0 Mhz
IF
10.7 MHz
Sensitivity (S/N=30dB)
4µV
.
Discs/files played
CD-DA,CD-R/RW/MP3/WMA
Signal to Noise Ratio
55dB(mono)
Stereo Separation
30 dB (65dBu, 1KHz)
Specifications
15
Page 18
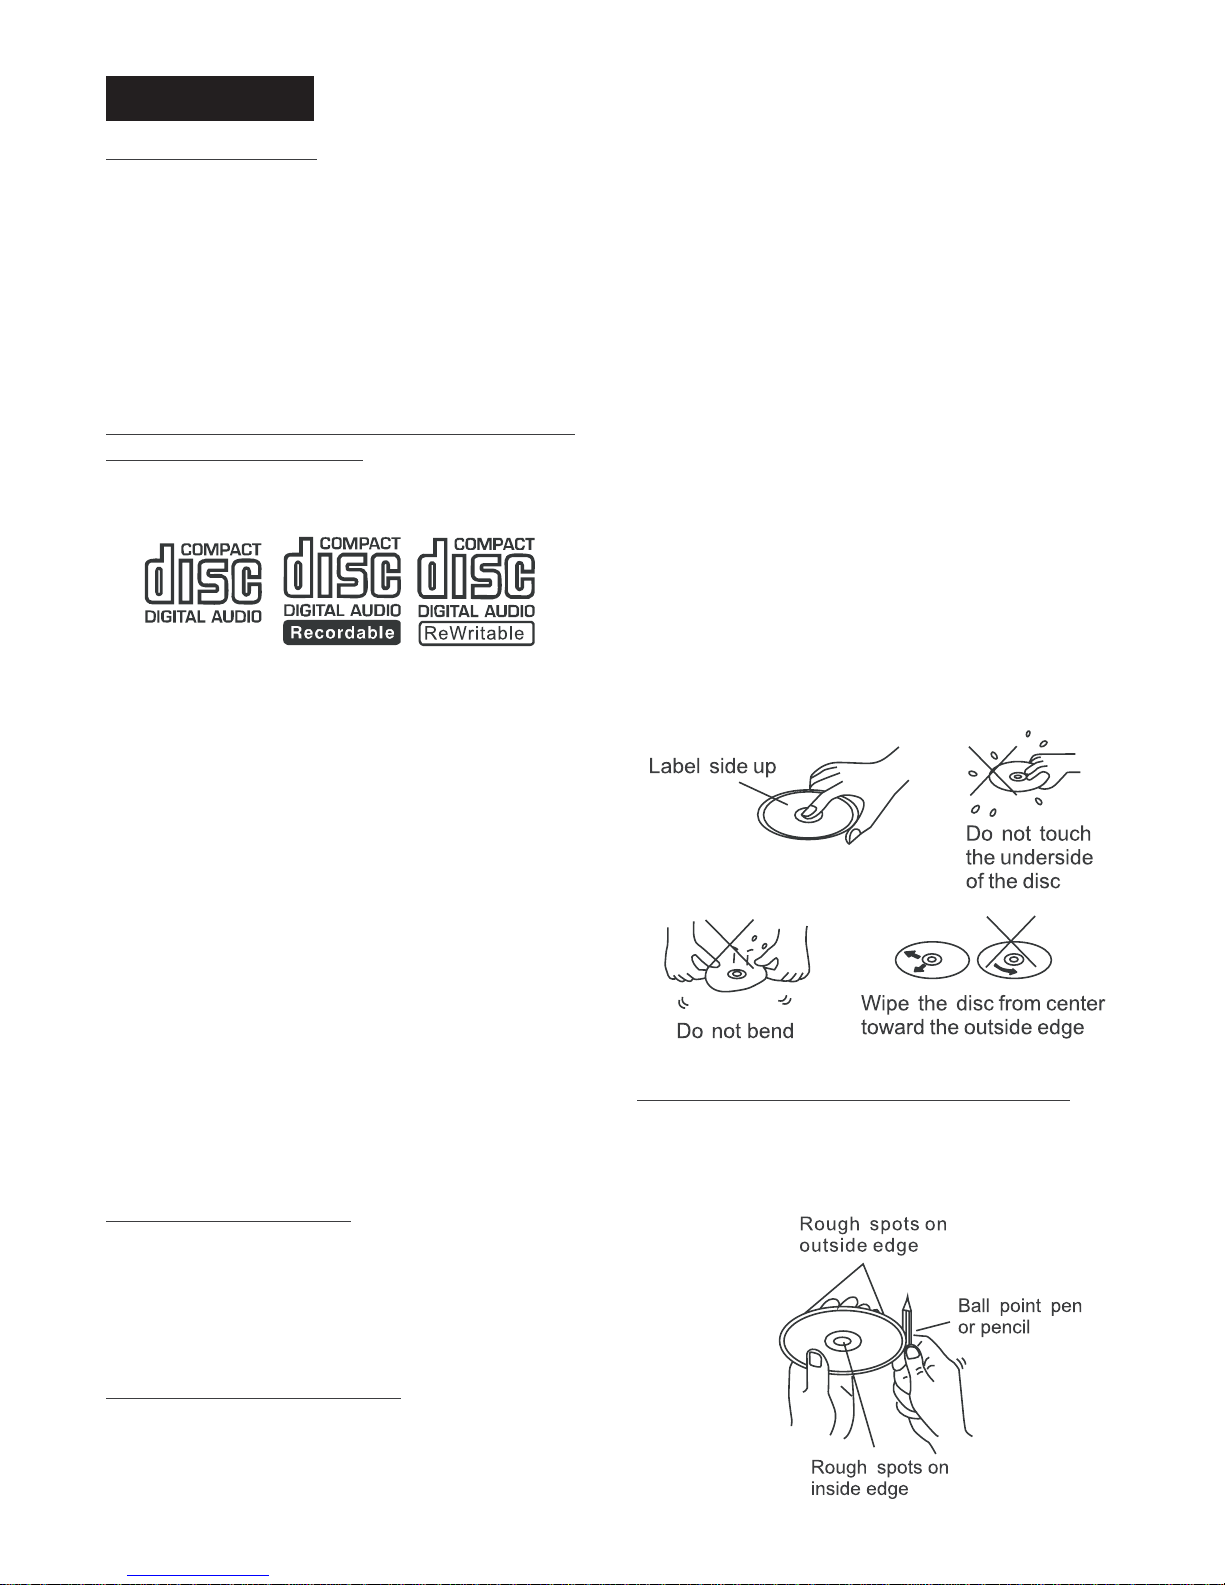
- Do not warp discs.
- A disc should always be kept in its case
when not in use to prevent from damage.
- Do not place discs in the following places:
1. Direct sunlight.
2. Dirty, dusty and damp areas.
3. Near car heaters.
4. On the seats or dashboard.
Use a dry soft cloth to wipe the surface. If
the disc is quite dirty, Use a soft cloth
slightly moistures with isopropyl (rubbing)
alcohol. Never use solvents such as
benzene, thinner or conventional record
cleaners as they may the surface
of the disc.
A disc may become somewhat scratched
(although not enough to make it unusable)
depending on the way it is handled and
conditions in the usage environment. Note
these scratches are not an indication of any
problem with the player.
Disc Cleaning
Note:
damage
2. The unit cannot play a CD-R and CD-RW
that is not finalized. (Please refer to the
manual of your CD-R/CD-RW recorder or
CD-R/CD-RW software for more
information on finalization process).
3. Depending on the recording status,
conditions of the disc and the equipment
used for the recording, some CD-Rs/CDRWs may not be played on this unit (see *1).
*1: To have more reliable play back,
please see following recommendations:
a. Use CD-RWs with speed 1x to 4x and
write with speed 1x to 2x.
b. Use CD-Rs with speed 1x to 8x and
write with speed 1x to 2x.
c. Do not play a CD-RW which has been
written more than 5 times.
d. The car radio supports discs which
comply with the ISO 9660 level 1 or level 2
format, or the Joliet or Romeo format.
1. When naming a MP3 file, be sure the file
name extension is 'MP3'.
2. For a non-MP3 file, even though the file
name extension is 'MP3', the unit cannot
recognize it.
-
.
- Do not place stickers or make scratches
on discs.
C. Notes on MP3 files
D. Handling and Cleaning
Dirty, dusty, scratched and warped discs
will cause malfunctions
A. Notes on discs:
B. Notes on CD-Rs (recordable CDs)/CDRWs (rewritable CDs):
1. Attempting to use non-standard shape
discs (e.g. square, start, and heart) may
damage the unit. Be sure to use round
shape CD discs only for this unit.
2. Do not stick paper or tape, etc, onto the
label side or the recording side of any discs,
as it may cause a malfunction.
1. Be sure to use discs with following marks
only for the unit to play:
Dirty, dusty, scratched and warped discs
will cause a malfunction.
Disc Notes
E Precautions when using new discs.
A new disc may have irregularities. It will
sometimes be necessary to remove these
rough edges in advance by using a ballpoint
pen or pencil as shown in the illustration.
16
Page 19
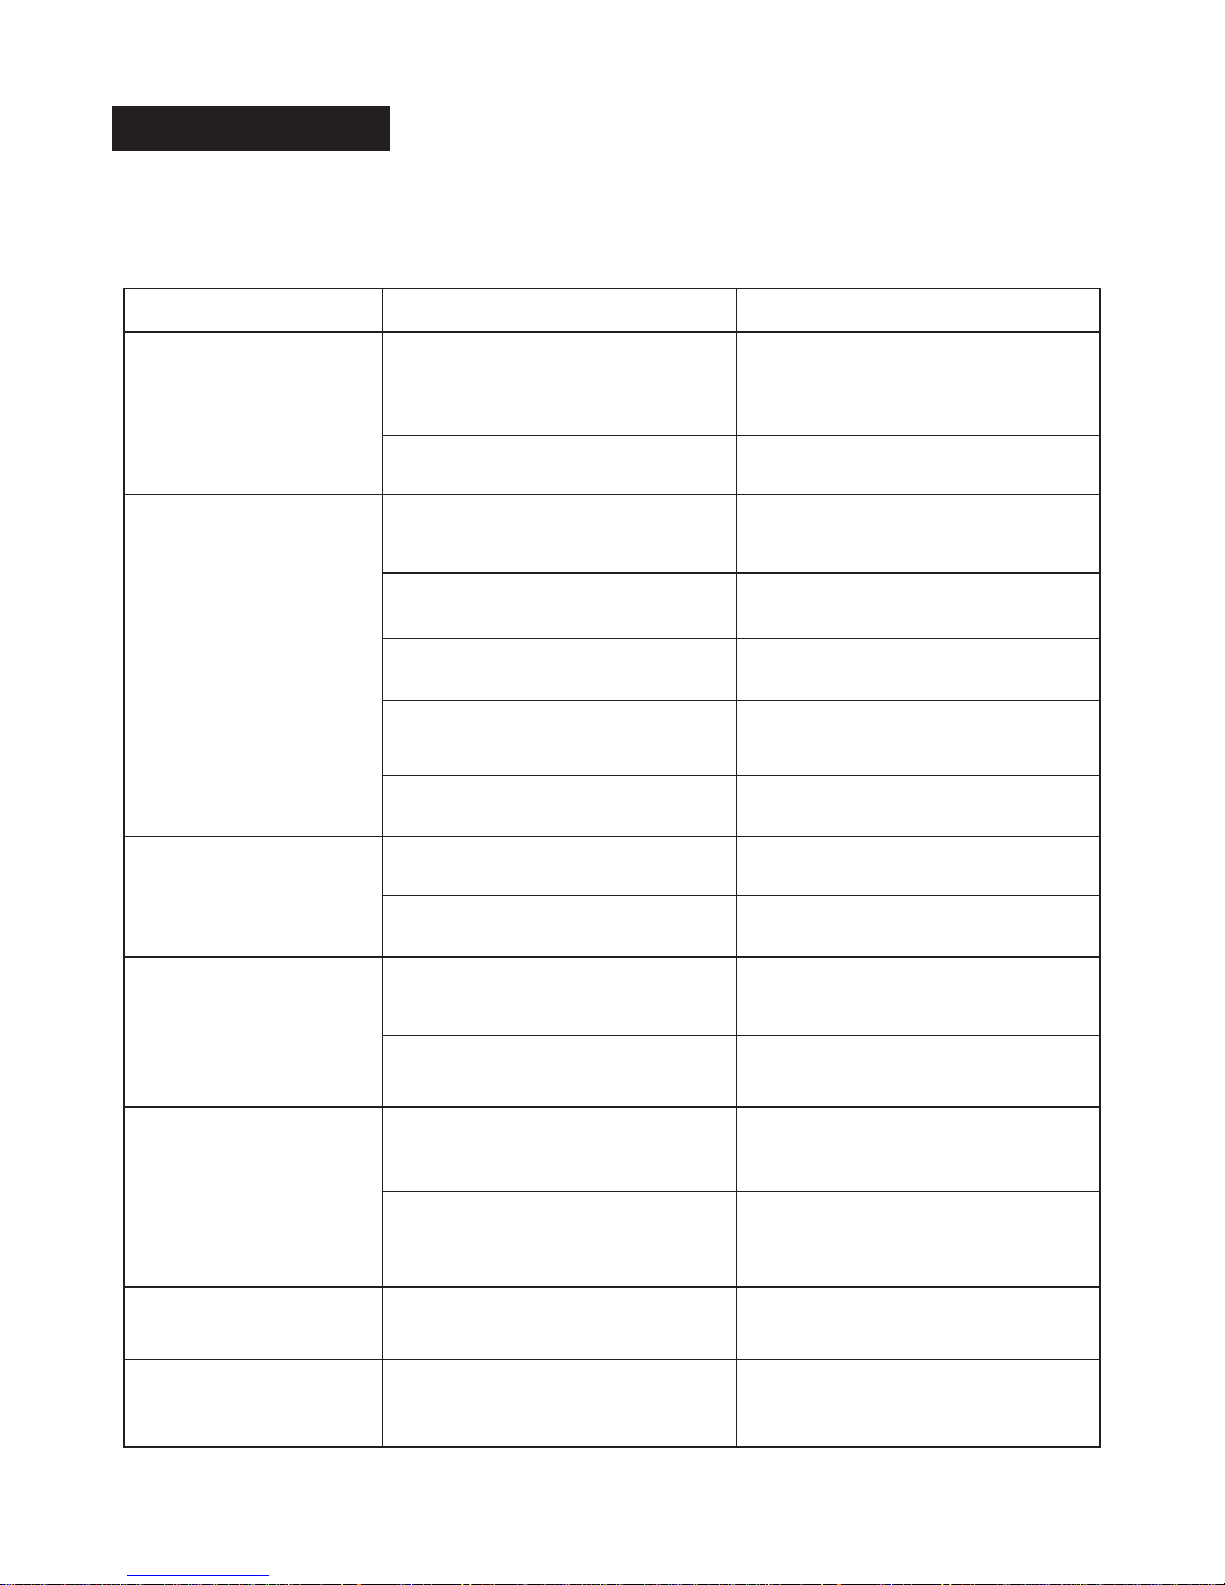
Trouble Shooting
Symptom Cause Solution
No power
The car ignition switch have
not turn on.
If the power supply is connected to
the car accessory circuits, but the
engine is not moving, switch the
ignition key to “ACC”.
The fuse has been blown. Replace a new one.
Presence of CD disc inside
the player.
Remove the disc from the player,
and insert a new one.
Disc can not be loaded
or ejected.
Inserting the disc in reverse
direction.
Insert the CD with the lab l facing
upward.
e
The surface of CD is extremely
dirty or has been scraped.
Clean the disc or try to replace
a new one.
Temperature inside the car
is too high.
Cool off or until the ambient
temperature return to normal.
Condensation
Leave the player off for an hour or so,
and then try again.
No sound
Volume is in minimum
.
Adjust volume to a desired level.
The wiring is not properly
connected
.
Check wiring connection.
Sound skips
The installation angle is
more than 30 .
0
Adjust the installation angle
less than 30
0
.
The surface of CD is extremely
dirty or has been scraped.
Clean the disc or try to replace
a new one.
The operation keys
do not work
1. The built-in microcomputer
is not operating properly due to noise.
2. The front panel has not
properly installed.
1. Press the RESET button
to restore the program.
2. Fixed the front panel into
its place.
No radio reception. The antenna cable is not connected.
Insert the antenna cable firmly into
the antenna socket of this CD player.
In automatic search mode
the radio does not stop at
a transmitting station.
The transmission signals are
too weak.
Select a radio station manually.
The following chart will help in solving most problems that may occur. If you still have questions
after going through the checklist, please consult your local customer service representative.
Before going through this check list, refer the wiring and operating procedures.
17
Page 20

 Loading...