

Page 1

ENGLISH
2
SPECIFICATIONS
GENERAL
Power requirement DC 12V
Current consumption 15A
Power output 4 X 55W
FM SECTION
Frequency range 87.5 to 108 MHz
Usable sensitivity 3uV
I.F frequency 10.7MHz
LINE-OUT
Output 1 Volt
CD PLAYER
System Compact Disc Audio System
Usable disc Compact Disc
Signal format Sampling frequency 44.1KHz
No. of quantization BITs 1 BIT
Frequency characteristics 5-40Hz-5dB 10K-20KHz-5dB
Signal to noise radio 70dB (1KHz) (IEC-A NET WORK)
Number of channels 2 STEREO
Chassis dimensions (mm) 184 (W) X 54 (H) X 170 (D)
1. OPEN button
2. SEL (Volume/Bass/Treble/Balance/Fader)
3. TRACK UP/DOWN buttons
4. APS/MP3 button
5. TA button
6. MODE button
7 -8-9-10-11-12.PRESET MEMORY buttons
13. PTY button (Program Type)
14. CLOCK button
15. AF button (Alternative Frequencies)
16. BAND button
17. POWER button
18. Flashing LED
19. RESET button
Page 2

ENGLISH
3
OPERATION
For CD/RW + RDS + MP3 model with optional subwoofer function
1. OPEN button
Press it to flip down the front panel.Then you can insert the CD disc into the CD
compartment or press the Eject button to eject the disc.
2. SEL ( AUDIO MODE SELECT)/ +/- buttons
Press SEL button to change the mode in the sequence of:
A. The volume level can be adjusted at any time by pressing the audio level + or -
button as select mode has been initially defaulted at volume mode.
B. The volume level is also obtained by stepping through the SEL button until the
function VOL is displayed and then press + or - button to adjust the sound level.
C.Press SEL button to select the BAS,TRE, BAL, FAD mode, then press +/- button
to adjust the level.
D. Press SEL button, hold for more than 2 seconds and select + or - button, so a
beep sound can be heard.
3. TRACK UP /DOWN buttons
A. During CD mode, pressing the >> button will allow you to track forwards. Hold
it to skip forwards.
B. During MP3 mode, pressing the >>button will allow you to track forwards.Hold
it to skip forwards. For MP3 playing, these two buttons act as the digit 8 & 9 key.
C.
During RADIO mode, press and hold >> or << for more than 2 seconds to
manually search a channel.Then press >> or << to automatically search a channel.
4. APS/MP3 button
In radio mode:
When pressed short, the radio searches for each preset station.
When the field strength level is more than the threshold level of stop level,the radio
will hold at that preset number for a few seconds with releasing mute, and then
searches again. In FM band, FM 1, FM 2 and FM 3 are checked one at a time.When
pressed long (more than 1 second),the radio searches from the current frequency
and checks the signal strength level until 1 cycle search is finished.And then the 6
strongest stations are preset to the corresponding preset number.The AS operation
is implemented in each selected band.When the AS operation is finished, the radio
executes the preset scan.
In MP3 mode:
Press 0-9 and ENTER button to play the track, number 1-108.
5. TA button
TA function (traffic announcement)
When pressed short, it is activated as TA mode on or off.
When TA mode is on and traffic announcement is transmitted:
1. When the unit is in CD mode, it will switch to radio mode temporarily.
2. Temporary switch over to an EON (Enhanced Other Networks) linked station
when EON detects a traffic announcement on that other program.
3. If the volume level was under the threshold point, it will be raised to the
threshold point. But if the user changed the volume level which was more than
the threshold point (min.TA volume level),it will be set to the last level.
When pressed long, EON TA LOCAL / EON TA DISTANCE mode is selected:
The purpose of this key is to reduce unwanted EON TA switching, when EON TA
information was received from current station and the radio switched to that EON
linked station, but no information could be received because the EON linked
station is located too far from that area.
So the radio is switched back to the current station.
In above operation,the user may listen to a wrong program or mute sound for a while.
EON TA LOCAL mode
When the field strength level of EON linked is less than the threshold level, the radio
does not switch to that station, and the user can hardly hear any disturbances.
When EON TA LOCAL mode is selected, EON TA LO on the numeric display is
indicated for a few seconds.
EON TA DISTANCE mode
EON TA switching is trying to implement the information of the current station.
When EON TA DISTANCE mode is selected, EON TA DX on the numeric display
is indicated for a few seconds.
6. MODE button
Press it repeatedly to select CDP, AUX and RADIO mode in sequence and circulation.
For SUBWOOFER function (optional), press and hold for more than 2 seconds to
select SUBWOOFER mode.
For MP3 playing, this button can act as the digit 7 key.
7-8-9-10-11-12. PRESET MEMORY buttons
A. To memorize the current frequency, press any one of the six preset buttons and
hold for more than 2 seconds.
B. To r ecall the preset memory, press one of the preset buttons (1-6).
VOL BAS TRE BAL FAD
(Volume) (Bass) (Treble) (Balance) (Fader)
Page 3

ENGLISH
4
C.Radio mode
When pressed short, these keys select a preset station directly. When pressed
longer than one second, the current station is stored in the preset memory bank.
When PTY mode is selected, the preset memory buttons are shared as follows:
PTY music group - PTY speech group - OFF MUSIC SPEECH
a. POP M, ROCK M a. NEWS,AFFAIRS, INFO
b. EASY M, LIGHT M b. SPORT, EDUCATE, DRAMA
c. CLASSICS, OTHER M c. CULTURE, SCIENCE,VARIED
d. JAZZ, COUNTRY d. WEATHER, FINANCE,CHILDREN
e. NATION M, OLDIES e. SOCIAL, RELIGION, PHONE IN
f. FOLK M f. TRAVEL, LEISURE,DOCUMENT
D. In CDP mode, press 1PAU button to pause CDP playing, press it again to resu-
me CDP playing.
E. In CDP mode, press 2SCN button to play the first 10 seconds of each song, press
it again to stop scanning and retain playing the song currently selected.
F. In CDP mode, press 3RPT button to play the current track repeatedly.
Press it again to cancel this mode.
G.In CDP mode, press 4SHF button to play the tracks in random order.
Press it again to cancel this mode.
13. PTY (Program type) button
This key is operated as follows:
PTY MUSIC GROUP - PTY SPEECH GROUP - PTY OFF
While selecting PTY TYPE, its selection is implemented by preset buttons as
described in preset key. When PTY is selected, the radio starts to search corresponding PTY information, and stops if the corresponding PTY information is
detected. If corresponding PTY information does not exist anymore, PTY type
automatically exits to normal mode.
14. CLOCK button
Press it to display time on the LCD for a few seconds.Press it, hold and then press
<< or >> button to adjust hour or minute. For MP3 playing, this button can act as
the digit 0 key.
15. AF button (alternative frequencies)
When pressed short, AF switching mode is selected and the state of AF switching
mode is displayed by AF segment in LCD.
Segment off:AF switching mode off.
Segment on:AF switching mode on: Has RDS information.
Segment flashing:AF switching mode is selected, but RDS information is not received yet.
When AF switching mode is selected, the radio checks the signal strength of the AF
all the time.The interval of checking time of each AF depends on the signal strength
of the current station, from a few minutes for a strong station to a few seconds for
a weak station.Every time that a new AF is stronger than the current station, it switches over to that frequency for a very short time, and NEW FREQUENCY is displayed for 1-2 seconds. Because the mute time of AF switching or checking time is
very short, it is almost inaudible in case of a normal program.When pressed long,
regional mode on /off is activated.
Regional mode ON
AF switching or PI SEEK is implemented to the station where all PI codes are the
same as the current station. REG of individual segment is turned on also, together
with displaying REG ON on the numeric display for a few seconds.
Regional mode OFF
The regional code in the format of PI code is ignored when AF switching or PI SEEK
is implemented. REG of individual segment is turned off together with displaying
REG OFF on the numeric display for a few seconds.
16. BAND button
Press it to select your desired radio band and the band which is selected will be
displayed on the LCD. Press it and hold for more than 2 seconds to activate LOUD
mode.
LOUD MODE:
When reducing the volume to half level,press it to enhance the bass effect.
For MP3 playing, this button can act as the ENTER key.
17. POWER button
Press it to turn the unit on or off.
18. Flashing LED
If the front panel is not on the main unit, LED will be flashing.
19. RESET button
The RESET button is placed on the housing and must be activated with either a
ballpoint pen or a thin metal object. The RESET button is to be activated for the
following reasons:
- Initial installation of the unit when all wiring is completed.
- All the function buttons do not operate.
-Error symbol on the display.
Note: If RESET button is pressed, the unit can't work yet;please use a cotton swab
soaked in isopropyl alcohol to clean the socket on the back of the front panel.
Page 4
ENGLISH
5
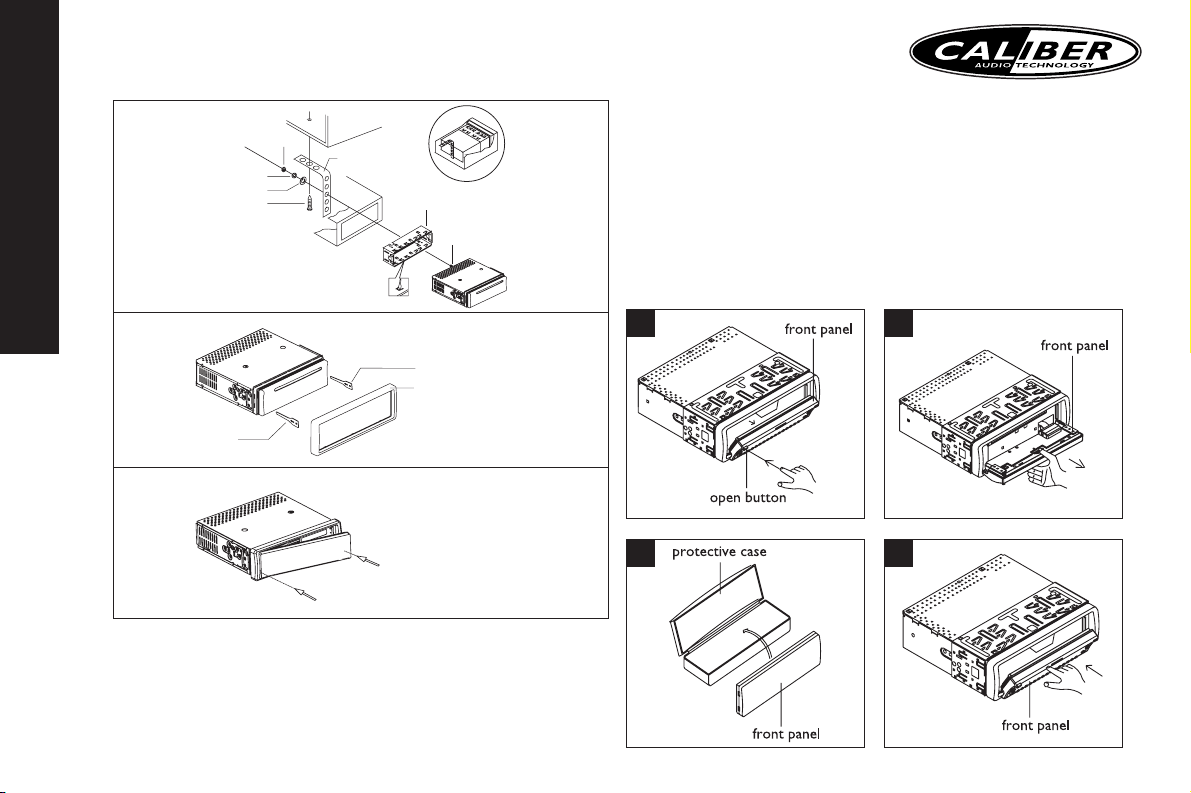
INSTALLATION
Caution: Do not install the detachable panel before connecting the wire.
1. The unit is designed for negative terminal of the battery which is connected to the
vehicle metal. Please confirm it before installation.
2. If the car interior is extremely hot, as after being parked in the sun, do not use the
player until the car has been driven for a while to cool off the interior.
3. Press the OPEN button to flip down the front panel (see fig. 1), then take away the
front panel (see fig. 2) and put it in the protective case (see fig. 3) for safe keeping.
4. Install the front panel back into its bracket and then push it back to the position for
playing (see fig. 4).
1
3
2
4
hex nut
spring washer
plain washer
tapping screw
dash board
metal mounting
strap
console
slide bracket
housing
hex bolt
key plate
key plate
plastic trim out
While installing the frontpanel,
please mount the left side first,
then push the right side.
Page 5
ENGLISH
6
DISC PLAY
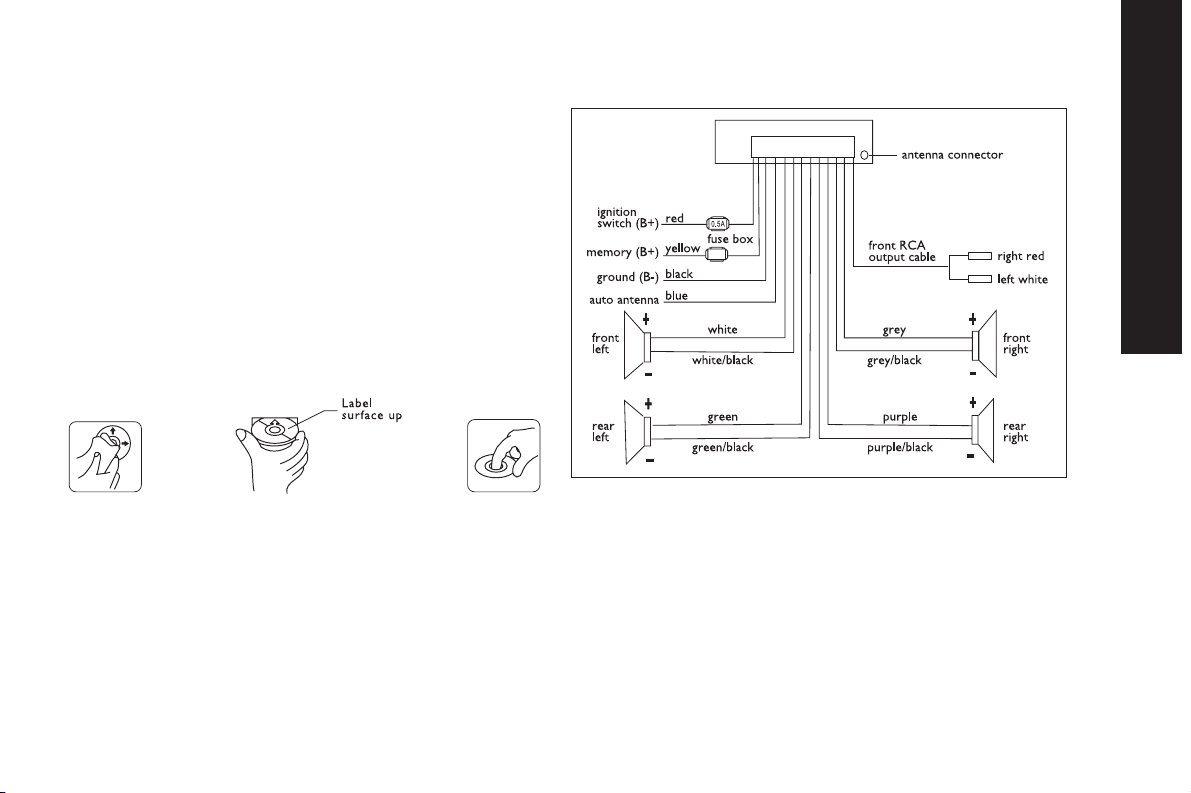
Cleaning discs
Before playing,clean the disc with a clean, lint-free.
Flip the disc in the direction of the arrow.
Note 1:
Do not use solvents such as benzine, thinners. Commercially available cleaners or anti
static spray damage the unit.
Do not insert a disc with the label surface down. Doing so may damage the unit.
Note 2:
Do not try to insert another disc when one has been already inserted.
Doing so may damage the unit.
Handle the disc by its edge.And to keep the disc clean, do not touch the surface.
Do not stick paper or tape on the disc.
Do not expose the disc to direct sunlight or heat sources such as hot air ducts, or leave it
in a car parked in direct sunlight where there can be a considerable rise in temperature.
WIRING DIAGRAM
NOTE:
In spite of having any kinds of speaker system, you must use 4 ohms impedance of
speaker to reduce the distortion during high volume level.
Page 6

ENGLISH
7
Cause
The car ignition switch is not on
The fuse is blown
Presence of disc inside the player
Inserting the disc in reverse direction
The disc is extremely dirty or defective
Temperature inside the car is too high
Condensation
Volume is in minimum
Wiring is not properly connected
The installation angle is more than 30 degrees
The disc is extremely dirty or defective
The built-in microcomputer
is not operating properly due to noise
The antenna cable is not connected
The signals are too weak
Solution
If the power supply is properly connected to the car
accessory terminal,switch the ignition key to "ACC"
Replace the fuse
Remove the disc in the player, then insert a new one
Insert the compact disc with the label facing upward
Clean the disc or try to play a new one
Cool off or until the ambient temperature
returns to normal
Leave the player off for an hour,then try again
Adjust volume to a desired level
Check wiring connection
Adjust the installation angle less than 30 degrees
Clean the compact disc, then try to play a new one
Press the RESET button.
Front panel is not properly fixed into its place
Insert the antenna cable firmly
Select a station manually
Problem
No power
Disc cannot be
loaded or ejected
No sound
Sound skips
The operation keys do not work
The radio does not work
TROUBLESHOOTING
Before going through the check list, check wiring connection. If any of the problems persist after check list has been made, consult your nearest service dealer.
Page 7

FRANÇAIS
8
FICHE TECHNIQUE
GÉNÉRALITÉS
Puissance nécessaire 12 V CC
Consommation 15A
Puissance de sortie 4 X 55 W
SECTION FM
Gamme de fréquence 87,5 à 108 MHz
Sensibilité utilisable 3uV
Fréquence FI 10,7 MHz
LIGNE DE SORTIE
Sortie 1 Volt
LECTEUR DE CD
Système Système audio pour disques compacts
Disque utilisable Disque compact
Format de signal Taux d’échantillonnage 44,1 KHz
Nbre de bits de quantification 1 BIT
Réponses aux fréquences 5-40Hz-5dB 10K-20KHz-5dB
Rapport signal sur bruit 70dB (1KHz) (IEC-A NET WORK)
Nombre de canaux 2 STEREO
Dimensions du châssis (mm) 184 (W) X 54 (H) X 170 (D)
1. Bouton OUVRIR
2. Boutons SEL (SÉLECTION MODE AUDIO)/ +/-
3. Boutons TRACK UP /DOWN
4. Bouton APS/MP3
5. Bouton TA
6. Bouton MODE
7 -8-9-10-11-12.Boutons PRESET MEMORY
13. Bouton PTY (type de programme)
14. Bouton CLOCK
15. Bouton AF
16. Bouton BAND
17. Bouton POWER
18. Voyant DEL clignotant
19. Bouton RESET
Page 8

FRANÇAIS
9
FONCTIONNEMENT DE BASE
Pour modèle CD/RW + RDS + MP3 avec fonction subwoofer en option
1. Bouton OUVRIR
Appuyez dessus pour que le panneau avant s'incline. À ce moment-là, vous pouvez
introduire le disque CD dans le compartiment pour CD ou appuyer sur le bouton
Éjecter pour éjecter le disque.
2. Boutons SEL (SÉLECTION MODE AUDIO)/ +/-
Appuyez sur le bouton SEL pour changer le mode dans l’ordre suivant:
A. Le volume peut être réglé à tout moment en appuyant sur le bouton du niveau
sonore + ou – car le mode sélectionné a été au départ défini par défaut comme
étant le mode volume.
B. Le volume peut aussi s’obtenir en utilisant le bouton SEL jusqu’au moment où la
fonction VOL s’affiche et en appuyant alors sur le bouton + ou – pour régler le
volume sonore.
C.Appuyez sur le bouton SEL pour sélectionner les modes BAS,TRE, BAL,FAD puis
appuyez sur le bouton +/- pour régler leur niveau.
D. Appuyez sur le bouton SEL, maintenez-le enfoncé pendant plus de 2 secondes et
sélectionnez le bouton + ou – jusqu’à ce que vous entendiez un « bip ».
3. Boutons TRACK UP /DOWN
A. En mode CD, si vous appuyez sur le bouton >>, vous avancerez une plage plus
loin. Maintenez-le enfoncé pour sauter plus loin encore.
B. En mode MP3, si vous appuyez sur le bouton >>, vous avancerez une plage plus
loin. Maintenez-le enfoncé pour sauter plus loin encore. Ces deux boutons peuvent servir comme touches numériques 8 ou 9, pour lire du MP3..
C.
En mode RADIO, appuyez et maintenez enfoncé >> ou << pendant plus de 2
secondes pour chercher manuellement un canal. Appuyez ensuite sur >> ou <<
pour chercher automatiquement un canal.
4. Bouton APS/MP3
En mode radio :
Si la pression exercée est brève,la radio balaie à la recherche de chaque station présélectionnée.
Lorsque le niveau de puissance est supérieur au seuil du niveau d'arrêt, le poste de
radio reste plusieurs secondes sur la présélection concernée, mode de silence
désactivé, puis recommence le balayage. En bande FM, FM1, FM2 et FM3 sont
balayés un à un. Si vous appuyez plus longuement sur le bouton (plus d’1 seconde),
la radio effectue une recherche à partir de la fréquence actuellement réglée et
détermine la puissance des signaux trouvés au cours d'un cycle de recherche.Les 6
stations les plus puissantes sont mémorisées dans les boutons de présélection
correspondants. L’opération AS est effectuée pour chaque bande sélectionnée. Une
fois l’opération AS terminée, la radio effectue le balayage présélectionné.
En mode MP3 :
Appuyez sur 0-9 et le bouton ENTER pour lire la plage, numéro 1-108.
5. Bouton TA
Fonction TA (informations routières)
Une brève pression a pour effet d’activer le mode TA, indépendamment de son état actuel.
Lorsque le mode TA est activé et qu’il y a diffusion d'informations routières :
1. Si l’appareil est en mode CD, il passe temporairement en mode radio.
2. L'appareil bascule temporairement sur une station d'un autre réseau EON
(Enhanced Other Networks) lorsque la fonction EON détecte des informations
routières sur cette autre station.
3. Si le niveau du volume est inférieur au seuil défini, il est augmenté à ce niveau
seuil. Cependant, si le niveau du volume supérieur au seuil (niveau de volume TA
minimal) a été modifié par l’auditeur, le volume est réglé au dernier niveau.
Une pression prolongée permet de sélectionner le mode EON TA LOCAL/EON TA
DISTANCE :
Le but de cette fonction est de réduire les basculements EON TA non désirés,
quand des informations EON TA sont reçues de la station d’origine et que la radio
bascule sur l’autre station EON le temps du message, mais ne peut pas recevoir
d’informations parce que cette station est trop éloignée.
La radio rebascule alors sur la station d'origine.
Dans ce cas, l'auditeur peut entendre un programme radio erroné ou un silence
pendant quelques instants.
Mode EONTA LOCAL
Lorsque la puissance du signal d'une autre station EON est inférieure au niveau de
seuil, la radio ne bascule pas sur cette station et aucune perturbation n'est audible.
Lorsque le mode EONTA LOCAL est sélectionné, EONTA LO apparaît sur
l'afficheur numérique pendant quelques secondes.
Mode EONTA DISTANCE
La commutation EONTA s’efforce d’implémenter les informations de la station
actuelle.
Lorsque le mode EONTA DISTANCE est sélectionné, EONTA DX apparaît sur
l'afficheur numérique pendant quelques secondes.
Page 9

FRANÇAIS
10
6. Bouton MODE
Appuyez de manière répétée sur le bouton pour sélectionner les modes CDP,AUX
et RADIO l’un après l’autre.
Pour la fonction SUBWOOFER (en option), appuyez-le et maintenez-le enfoncé
pendant plus de 2 secondes pour sélectionner le mode SUBWOOFER.
Ce bouton peut servir de touche numérique 7 pour lire du MP3
.
7-8-9-10-11-12. Boutons PRESET MEMORY
A. Pour mémoriser la fréquence actuelle, appuyez sur l'un des six boutons
présélectionnés et maintenez-le pendant plus de 2 secondes.
B. Pour revenir à la mémoire présélectionnée, appuyez sur l’un des boutons de
présélection (1-6).
C.Mode radio
Si la pression exercée est brève, ces touches sélectionnent directement une
station présélectionnée. Si la pression est supérieure à une seconde, la station
actuelle est enregistrée dans l’organe de mémoires présélectionnées. Quand
le mode PTY est sélectionné, les boutons de mémoire présélectionnées se
répartissent comme suit :
Groupe musique PTY – Groupe parole PTY - OFF MUSIC SPEECH (parole &
musique désactivés)
a. POP M (musique pop), ROCK M (musique rock)
b. EASY M (musique d’ambiance), LIGHT M (musique légère)
c. CLASSICS (classique), OTHER M (autre musique)
d. JAZZ, COUNTRY
e. NATION M (musique nationale), OLDIES (musique rétro)
f. FOLK M (musique folklorique)
a. NEWS,AFFAIRS, INFO (nouvelles, services, infos)
b. SPORT, EDUCATE, DRAMA (sport, éducatif, théâtre)
c. CULTURE, SCIENCE,VARIED (culture, sciences, divers)
d. WEATHER, FINANCE, CHILDREN (météo, finances, enfants)
e. SOCIAL, RELIGION, PHONE IN (société, religion, forum)
f. TRAVEL, LEISURE,DOCUMENT (voyages, loisirs, documentaires)
D. En mode CDP, appuyez sur la touche 1PAU pour suspendre temporairement la
lecture CDP et appuyez à nouveau pour reprendre la lecture CDP.
E. En mode CDP, appuyez sur le bouton 2SCN pour lire les 10 premières secondes
de chaque chanson et appuyez à nouveau pour interrompre le balayage et poursuivre la lecture de la chanson sélectionnée.
F. En mode CDP, appuyez sur le bouton 3RPT pour répéter la lecture de la plage
en cours.Appuyez à nouveau sur le bouton pour annuler ce mode.
G.En mode CDP, appuyez sur le bouton 4SHF pour lire les plages dans un ordre
aléatoire.Appuyez à nouveau sur le bouton pour annuler ce mode.
13. Bouton PTY (type de programme)
Cette touche fonctionne comme suit :
GROUPE MUSIQUE PTY – GROUPE PAROLE PTY - PTY DÉSACTIVÉ
Lorsque le mode PTY est sélectionné, sa sélection est mise en œuvre par le biais
des boutons de présélection, comme décrit dans la touche de présélection. Lors de
la sélection de PTY, la radio commence à rechercher des informations PTY correspondantes et s’arrête lorsque les informations PTY appropriées sont détectées. Si
des informations PTY correspondantes n’existent plus, le type PTY revient automatiquement en mode normal.
14. Bouton CLOCK
Appuyez dessus pour afficher l’heure pendant quelques secondes sur l’affichage
LCD. Maintenez le bouton enfoncé puis appuyez sur le bouton << ou >> pour
régler les heures ou les minutes. Ce bouton peut servir de touche numérique 0
pour lire du MP3.
15. Bouton AF (Fréquences alternatives)
Lorsque vous appuyez brièvement, le mode commutation AF est sélectionné et
l’état du mode de commutation AF est affiché par le segment AF dans le LCD.
Segment éteint : le mode commutation AF est désactivé.
Segment allumé : le mode commutation AF est activé: a des informations RDS.
Segment clignotant : le mode commutation AF est sélectionné,mais les informations
RDS ne sont pas encore reçues. Lorsque le mode commutation AF est sélectionné,
la radio vérifie constamment la force du signal de l’AF. L’intervalle du délai de
vérification de chaque AF dépend de la force du signal de la station actuelle, de
quelques minutes pour une station forte à quelques secondes pour une station
faible. Chaque fois qu’une nouvelle AF est plus forte que la station actuelle,elle commute vers cette fréquence pendant un moment très bref et NEW FREQUENCY
s’affiche durant 1 à 2 secondes.. Comme le délai de sourdine de la commutation AF
ou de la vérification du délai est très court, il est presque inaudible pour un
programme normal. Une pression prolongée sur le bouton permet d’activer le
mode régional on/off.
Mode régional activé
La commutation AF ou PI SEEK est implémentée vers la station où tous les codes PI
sont identiques à la station actuelle. La fonction REG du segment individuel est activée
et l'affichage REG ON apparaît pendant quelques secondes sur l'affichage numérique.
Mode régional désactivé
Le code régional en format de code PI est ignoré lors de la mise en oeuvre de la
commutation AT ou du PI SEEK. La fonction REG du segment individuel est désactivée et REG OFF s’affiche pendant quelques secondes sur l'affichage numérique.
Page 10

FRANÇAIS
11
16. Bouton BAND
Appuyez dessus pour sélectionner votre bande radio souhaitée et la bande sélectionnée s’affiche sur l’affichage LCD. Maintenez-le enfoncé pendant plus de 2 secondes pour activer le mode LOUD.
MODE LOUD :
Lorsque vous réduisez le volume de moitié, appuyez dessus pour augmenter l’effet
des basses.
Ce bouton peut servir de touche ENTER pour lire du MP3.
17. Bouton POWER
Appuyez dessus pour allumer ou éteindre l’appareil.
18. Voyant DEL clignotant
Si le panneau avant n’est pas sur l'appareil principal,le voyant DEL se met à clignoter.
19. Bouton RESET
Le bouton RESET est placé sur le boîtier et est activé soit à l’aide d’un stylo à bille
soit d’un objet métallique à fine pointe. Le bouton de réinitialisation doit être activé dans les situations suivantes :
- à l’installation initiale de l’appareil, une fois le câblage terminé ;
- lorsque les boutons de fonction ne répondent pas ;
- lorsque le symbole d’erreur apparaît sur l’affichage.
Remarque : Si l'appareil ne fonctionne pas après une pression sur le bouton RESET,
nettoyez les contacts situés à l'arrière du panneau avant à l'aide d'un tampon d'ouate imbibé d'alcool isopropylique.
INSTALLATION
Avertissement : n’installez pas le panneau détachable avant de brancher le
fil électrique.
1. Le système est conçu pour la borne négative de la batterie qui est connectée à la
partie métallique du véhicule.Veuillez le confirmer avant l’installation.
2.
S’il fait très chaud à l’intérieur du véhicule, par exemple, après l’avoir garé au soleil, n'utilisez pas le lecteur avant d’avoir un peu roulé et d’avoir pu ainsi refroidir l'intérieur.
3. Appuyez sur le bouton OPEN pour faire basculer le panneau avant (voir ill.1) puis
enlevez ce dernier (voir ill.2) et rangez-le dans l’étui de protection (voir ill. 3) pour
le conserver en toute sécurité.
4. Remettez le panneau avant dans son support et repoussez-le pour qu'il soit en
mesure de fonctionner (voir ill. 4).
Page 11

FRANÇAIS
12
LECTURE DU DISQUE
Nettoyage des disques
Avant de passer le disque, nettoyez-le avec un chiffon propre, non pelucheux.
Faites basculer le disque dans le sens de la flèche.
Remarque 1:
N’utilisez pas de solvants,tels que du benzène, des diluants.Les nettoyants disponibles dans
le commerce ou les sprays antistatiques peuvent endommager l’appareil. N’introduisez pas
de disque, l’étiquette imprimée vers le bas.Vous risqueriez d’endommager l’appareil.
Remarque 2:
N’essayez pas d’insérer un autre disque lorsqu’un disque se trouve déjà dans l’appareil.
Vous risqueriez d’endommager l’appareil. Manipulez le disque par ses bords. Et pour
garder le disque propre, ne touchez pas sa surface.
Ne collez pas de papier ou de bande adhésive sur le disque.
N'exposez pas le disque aux rayons directs du soleil ou à des sources de chaleur telles
que des conduits d'air chaud et ne le laissez pas dans un véhicule garé au soleil, en
raison de l'augmentation importante de température qui peut s'y produire.
CONNEXION ÉLECTRIQUE
REMARQUE :
Quelles que soient les enceintes acoustiques dont vous disposez, vous devez utiliser un
haut-parleur ayant une impédance de 4 ohms pour réduire la distorsion lorsque le
niveau du volume sonore est élevé.
1
3
2
4
Page 12

FRANÇAIS
13
Cause
Le contact du véhicule n’est pas mis.
Le fusible a sauté.
Un disque se trouve déjà dans le lecteur.
Le disque est introduit incorrectement.
Le disque est très sale ou il est défectueux.
La température du véhicule est trop élevée.
Condensation
Le volume est au minimum.
Les câbles ne sont pas raccordés correctement.
L’angle d’installation est supérieur à 30 degrés.
Le disque est très sale ou il est défectueux.
Le microprocesseur intégré ne fonctionne pas correctement,
probablement en raison de parasites.
Le câble de l’antenne n’est pas raccordé.
Les signaux sont trop faibles.
Solution
Si l'alimentation est raccordée correctement aux circuits auxiliaires du véhicule, mettez la clé de contact en position « ACC »
Remplacez le fusible.
Retirez le disque du lecteur, puis introduisez-en un nouveau.
Introduisez le disque l’étiquette imprimée vers le haut.
Nettoyez le disque ou essayez un autre.
Mettez la climatisation en route ou attendez que la température
ambiante redescende.
Laissez le lecteur éteint pendant une heure, puis réessayez.
Réglez le volume au niveau approprié.
Vérifiez le câblage.
Montez l’appareil selon un angle de moins de 30 degrés.
Nettoyez le disque, puis essayez un nouveau.
Appuyez sur le bouton RESET. Le panneau avant n’est pas fixé
correctement.
Enfoncez fermement le câble de l’antenne.
Sélectionnez une station manuellement.
Symptôme
L’a ppareil ne s’allume pas.
Il n’est pas possible de charger
de disque ou le disque ne peut
être éjecté.
Il n’y a pas de son.
Le son saute.
Les touches et les boutons
ne fonctionnent pas.
La radio ne fonctionne pas.
RÉSOLUTION DES PROBLÈMES
Avant de consulter la liste suivante, vérifiez le câblage et les connexions.
Si le problème rencontré persiste après avoir contrôlé tous les éléments de la liste, adressez-vous au service après-vente d’un revendeur près de chez vous.
Page 13

DEUTSCH
14
SPEZIFIKATIONEN
ALLGEMEINES
Strombedarf GS 12V
Laufender Verbrauch 15A
Stromausgang 4 X 55W
FM-BEREICH
Frequenzbereich 87.5 to 108 MHz
Verwendbare Empfindlichkeit 3uV
I.F Frequenz 10.7MHz
LINE-OUT
Ausgang 1 Volt
CD PLAYER
System Compact Disc Audio System
Verwendbares Format CD (Compact Disc)
Signalformat Abtastfrequenz 44.1KHz
Anzahl Quantisierungs-BITs 1 BIT
Frequenzeigenschaften 5-40Hz-5dB 10K-20KHz-5dB
Signal zu Geräusch Radio 70dB (1KHz) (IEC-A NET WORK)
Anzahl der Kanäle 2 STEREO
Gehäuseabmessungen (mm) 184 (B) X 54 (H) X 170 (D)
1. OPEN-Knopf (Öffnen)
2. SEL ( AUSWAHL DES AUDIO-MODUS) / +/- Knöpfe
3. TRACK UP /DOWN-Knöpfe (Titelauswahl)
4. APS/MP3-Knopf
5. TA-Knopf
6. MODE-Knopf
7 -8-9-10-11-12.PRESET MEMORY-Knöpfe
13. PTY (Programm-Typ)-Knopf
14. CLOCK-Knopf
15. AF-Knopf (Alternative Frequenzen)
16. BAND-Knopf
17. POWER-Knopf
18. Blinkende LED-Anzeige
19. RESET-Knopf
Page 14

DEUTSCH
15
BETRIEB
Für CD/RW + RDS + MP3 Modell mit optionaler Subwoofer-Funktion
1. OPEN-Knopf (Öffnen)
Drücken Sie auf diesen Knopf, um die Frontplatte herunterzulassen. Sie können
dann eine CD in das CD-Fach einlegen oder den EJECT-Knopf betätigen, um die
eingelegte CD zu entnehmen.
2. SEL ( AUSWAHL DES AUDIO-MODUS) / +/- Knöpfe
Drücken Sie den SEL-Knopf, um den Modus in folgender Reihenfolge zu ändern:
A. Der Lautstärkepegel kann jederzeit angepasst werden,indem Sie den Audio-Level
+ oder – Knopf drücken, da der Auswahlmodus standardmäßig auf
Lautstärkemodus (Volume-Modus) eingestellt ist.
B. Der Lautstärkemodus ist auch zugänglich, indem der SEL-Knopf gedrückt wird
bis die Funktion VOL angezeigt wird. Drücken Sie dann den + oder – Knopf, um
die Lautstärke anzupassen.
C.
Drücken Sie den SEL-Knopf, um die BAS,TRE ,BAL und FAD Modi auszuwählen.
Betätigen Sie dann jeweils den +/- Knopf,um die gewünschte Einstellung vorzunehmen.
D. Drücken Sie den SEL-Knopf und halten Sie diesen für mehr als zwei Sekunden
gedrückt.Wählen Sie den + oder – Knopf und ein Piep-Signal ertönt.
3. TRACK UP /DOWN-Knöpfe (Titelauswahl)
A. Im CD-Modus können Sie durch Betätigen des >> Knopfes zum nächsten Titel
übergehen. Halten Sie den Knopf gedrückt, um nach vorn zu springen.
B.
Im MP3-Modus können Sie durch Betätigen des >> Knopfes zum nächsten Titel übergehen. Halten Sie den Knopf gedrückt, um nach vorn zu springen. Beim Abspielen
einer MP3 haben diese Knöpfe dieselbe Funktion wie die Tastennummern 8 und 9.
C.
Halten Sie im RADIO-Modus >> oder << für länger als zwei Sekunden gedrückt,
um manuell einen Kanal zu suchen. Drücken Sie dann >> oder <<, um automatisch
nach einem Kanal zu suchen.
4. APS/MP3-Knopf
Im Radio-Modus:
Bei kurzem Drücken sucht das Radio nach jeder voreingestellten Station.
Wenn der Feldstärkepegel höher als der Schwellenwert des Stopp-Levels ist, hält
der Suchlauf für einige Sekunden bei dieser Voreinstellung an, ehe die Suche fortgesetzt wird. Im FM-Band werden FM 1, FM 2 und FM 3 gleichzeitig überprüft. Wird
lange gedrückt (länger als eine Sekunde), sucht das Radio von der aktuell ausgewählten Frequenz und prüft den Signalstärkepegel bis ein Suchzyklus durchlaufen ist.
Dann werden die sechs Stationen mit dem stärksten Signal mit der entsprechenden
Nummer voreingestellt. Die AS-Funktion ist in jedem ausgewählten Band enthalten.
Ist die AS-Funktion beendet, führt das Radio den voreingestellten Scan durch.
Im MP3-Modus:
Drücken Sie 0-9 und die ENTER-Taste, um die Titel Nummer 1 – 108 zu spielen.
5. TA-Knopf
TA-Funktion (Verkehrsdurchsage)
Bei kurzem Drücken ist die Funktion als TA-Modus ON (an) bzw. OFF (aus)
aktiviert.TA-Modus ist an und Verkehrsdurchsage wird gesendet:
1.
Befindet sich das Gerät im CD-Modus, schaltet es zeitweise auf den Radio-Modus um.
2.
Vorübergehendes Umschalten zu einer mit EON (Enhanced Other Networks) verbundenen Station, wenn EON in diesem anderen Programm eine Verkehrsdurchsage entdeckt.
3.
War der Lautstärkepegel unterhalb des Schwellenwertes, wird er bis zum Schwellenwert
angehoben. Hat der Benutzer aber den Lautstärkepegel, der über dem Schwellenwert lag,
geändert (min.TA-Lautstärkepegel), wird die Lautstärke an dem letzten Pegel angepasst.
Bei langem Drücken wird EON TA LOCAL / EON TA DISTANCE-Modus ausgewählt:
Ziel dieser Tastenfunktion ist es, ungewünschtes EON TA Wechseln zu reduzieren,
wenn EON TA Information von der aktuell ausgewählten Station empfangen wurde
und das Radio zu der mit EON verbundenen Station umgeschaltet hat, aber keine
Information erhalten werden konnte, da die EON Station zu weit entfernt liegt.
So wird das Radio wieder zur aktuellen Station umgeschaltet.
Im obigen Vorgang kann es dazu kommen, dass der Hörer ein falsches Programm
oder eine zeitlang keinen Ton empfängt.
EONTA LOCAL-Modus
Ist der Feldstärkepegel der EON-Station geringer als der Schwellenwert,schaltet das
Radio nicht zu dieser Station um; der Benutzer hört so gut wie keine Störungen.
Wenn der EONTA LOCAL-Modus ausgewählt wird, ist EONTA LO eine paar
Sekunden lang auf dem Zahlendisplay zu sehen.
EONTA DISTANCE-Modus
EON TA Wechsel versucht die Information der aktuell angewählten Station einzusetzen. Ist der EONTA DISTANCE-Modus ausgewählt,wird EONTA DX für einige
Sekunden auf dem Zahlendisplay angezeigt.
6. MODE-Knopf
Drücken Sie diesen Knopf wiederholt,um der Reihe nach CDP-,AUX- und RADIOModus auszuwählen. Für die SUBWOOFER-Funktion (optional) halten Sie den
VOL BAS TRE BAL FAD
(Volume) (Bass) (Treble) (Balance) (Fader)
Page 15

DEUTSCH
16
Knopf für länger als zwei Sekunden gedrückt.
Beim Abspielen einer MP3 kann dieser Knopf als Zahlentaste 7 fungieren.
7-8-9-10-11-12. PRESET MEMORY-Knöpfe
A. Zum Speichern der aktuell ausgewählten Frequenz drücken Sie einen der sechs
voreingestellten Knöpfe und halten diesen länger als zwei Sekunden gedrückt.
B. Um die PRESET MEMORY-Funktion wieder abzurufen, drücken Sie einen der
voreingestellten Knöpfe (1-6).
C.Radio-Modus
Bei kurzem Drücken wählen diese Knöpfe direkt eine voreingestellte Station aus.
Drücken Sie länger als eine Sekunde, wird die aktuelle Station in der voreingestellten Memory Bank abgespeichert. Wenn der PTY-Modus (ProgrammtypModus) ausgewählt ist, sind die PRESET MEMORY-Knöpfe wie folgt belegt:
PTY music group (Musikgruppe) - PTY speech group (gesprochene Programme)
- OFF MUSIC SPEECH
a. POP M, ROCK M
b. EASY M, LIGHT M
c. CLASSICS, OTHER M
d. JAZZ, COUNTRY
e. NATION M, OLDIES
f. FOLK M
a. NEWS,AFFAIRS, INFO (Nachrichten, Business, Information)
b. SPORT, EDUCATE, DRAMA (Sport, Bildung, Hörspiel)
c. CULTURE, SCIENCE,VARIED (Kultur,Wissenschaft, Diverses)
d. WEATHER, FINANCE, CHILDREN (Wetter,Finanzmarkt, Kinder)
e. SOCIAL, RELIGION, PHONE IN (Soziales, Religion,Anrufen)
f. TRAVEL, LEISURE, DOCUMENT (Reisen, Freizeit, Doku)
D. Drücken Sie im CDP-Modus den 1PAU-Knopf, um das CDP-Abspielen zu
unterbrechen. Drücken Sie nochmals, um weiter abzuspielen.
E. Drücken Sie im CDP-Modus den 2SCN-Knopf, um die ersten zehn Sekunden von
jedem Titel anzuspielen. Drücken Sie erneut, um den Scan-Vorgang abzubrechen
und den ausgewählten Titel weiter zu spielen.
F. Drücken Sie im CDP-Modus den 3RPT-Knopf, um den ausgewählten Titel
wiederholt zu spielen. Drücken Sie nochmals, um diesen Modus zu verlassen.
G.Drücken Sie im CDP-Modus den 4SHF-Knopf, um die Titel in zufälliger
Reihenfolge abzuspielen. Drücken Sie nochmals, um diesen Modus zu verlassen.
13. PTY (Programm-Typ)-Knopf
Die Knopffunktion ist folgende:
PTY MUSIC GROUP (Musikgruppe) - PTY SPEECH GROUP (gesprochene
Programme) - PTY OFF (Programmtyp-Modus aus)
Während PTY TYPE ausgewählt wird, wird die Auswahl der voreingestellten Knöpfe –
wie unter PRESET-Knopf beschrieben – durchgesetzt. Wenn PTY ausgewählt wird,
beginnt das Radio mit dem Suchen entsprechender PTY-Information und stoppt, wenn
die entsprechende PTY-Information gefunden wurde. Existiert keine entsprechende
PTY-Information mehr, geht der PTY-TYPE automatisch in den normalen Modus über.
14. CLOCK-Knopf
Drücken Sie diesen Knopf, um die Zeitangabe für einige Sekunden auf dem Display
erscheinen zu lassen. Halten Sie den Knopf gedrückt und betätigen Sie dann den <<
oder >> Knopf, um die Stunden- oder Minutenangabe zu verändern. Bei MP3 kann
dieser Knopf als Zahlentaste 0 fungieren.
15. AF-Knopf (Alternative Frequenzen)
Durch kurzes Drücken wird der AF-Wechselmodus ausgewählt. Der Status des AFWechselmodus wird über das AF-Segment auf dem LCD-Bildschirm angezeigt.
Segment wird nicht angezeigt:AF-Wechselmodus ist aus.
Segment wird angezeigt:AF-Wechselmodus ist an.RDS-Information wird empfangen.
Segment blinkt: AF-Wechselmodus ist ausgewählt, RDS-Information wurde aber
noch nicht empfangen.
Ist der AF-Wechselmodus ausgewählt, überprüft das Radio die Signalstärke der AF fortlaufend. Die Intervalle beim Überprüfen der einzelnen AF sind abhängig von der Signalstärke
der ausgewählten Station. Sie dauern wenige Minuten bei einem starken Signal und wenige
Sekunden bei einem schwachen. Immer wenn eine neue AF stärker als die aktuell ausgewählte ist, wird für kurze Zeit auf diese Frequenz umgeschaltet, und NEW FREQUENCY
(neue Frequenz) wird für 1-2 Sekunden angezeigt. Da das tonlose Intervall des AF-Wechsels
bzw. die Überprüfungszeit sehr kurz sind, ist dies bei einem normalen Programm fast nicht
zu hören.Bei längerem Drücken des Knopfes wird Regional-Modus on/off (ein/aus) aktiviert.
Regional-Modus ON
AF-Wechsel oder PI SEEK wird bei der Station eingesetzt, bei welcher alle PI-Kodes
mit denen der aktuell ausgewählten Station übereinstimmen. REG oder individuelles Segment wird ebenfalls eingeschaltet, wobei REG ON für einige Sekunden auf
dem Zahlendisplay angezeigt wird.
Regional-Modus OFF
Der Regional-Kode im PI-Kode-Format wird ignoriert, wenn AF-Wechsel oder PI
SEEK eingesetzt wird. REG oder individuelles Segment wird abgeschaltet, wobei
REG OFF für einige Sekunden auf dem Zahlendisplay angezeigt wird.
16. BAND-Knopf
Drücken Sie auf diesen Knopf, um Ihr gewünschtes Radioband auszuwählen. Das
ausgewählte Band erscheint auf der LCD-Anzeige. Halten Sie den Knopf für länger
Page 16

DEUTSCH
17
als zwei Sekunden gedrückt, um den LOUD-Modus zu aktivieren.
LOUD-Modus:
Betätigen Sie beim Reduzieren der Lautstärke auf den halben Pegel den Knopf, um
den Bass-Effekt zu verstärken.
Bei MP3 kann dieser Knopf als ENTER-Taste dienen.
17. POWER-Knopf
Drücken Sie diesen Knopf, um das Gerät ein- bzw. auszuschalten.
18. Blinkende LED-Anzeige
Ist die Frontplatte nicht am Hauptgerät, blinkt die LED.
19. RESET-Knopf
Der RESET-Knopf befindet sich am Gehäuse und muss entweder mit einem
Kugelschreiber oder einem dünnen Metallgegenstand betätigt werden. Der RESETKnopf sollte unter folgenden Umständen aktiviert werden:
- Erstmalige Installation des Gerätes nachdem sämtliche Verkabelungsarbeiten abgeschlossen sind.
- Sämtliche Funktionsknöpfe sprechen nicht an.
- Error-Symbol auf dem Display.
Achtung:Wenn der RESET-Knopf gedrückt wurde, ist das Gerät noch nicht betriebsbereit; benutzen Sie bitte ein in Isopropylalkohol getränktes Baumwolltuch, um die
Fassung auf der Rückseite der Frontplatte zu reinigen.
INSTALLATION
Achtung: Installieren Sie die abnehmbare Platte nicht, ehe Sie die
Verkabelung durchgeführt haben.
1.
Das Gerät ist für den negativen Pol der Batterie konzipiert,welcher mit dem Metall des
Fahrzeugs verbunden ist. Bitte überprüfen Sie dies, ehe Sie mit der Installation beginnen.
2. Gebrauchen Sie den Player nicht, wenn der Autoinnenraum stark aufgehitzt ist -
etwa nachdem das Fahrzeug eine Weile in der Sonne geparkt war. Warten Sie, bis
das Auto eine Weile gefahren wurde und der Innenraum sich abgekühlt hat.
3. Drücken Sie den OPEN-Knopf, um die Frontplatte herunterzulassen (siehe Fig. 1).
Nehmen Sie die Frontplatte heraus (siehe Fig. 2) und legen Sie sie in die Schutzhülle
(siehe Fig. 3) zur sicheren Aufbewahrung.
4. Setzen Sie die Frontplatte wieder in die Halterung ein und schieben Sie es zurück
in die Ausgangsposition, um wieder die Abspielfunktion wahrnehmen zu können
(siehe Fig. 4).
Page 17

DEUTSCH
18
DISC PLAY
Reinigungs-CDs
Reinigen Sie die CD vor dem Abspielen mit einem sauberen faserfreien Tuch.
Drehen Sie die CD,wie es der Pfeil anzeigt.
Hinweis 1:
Gebrauchen Sie keine Flüssigkeiten wie z.B. Benzin oder Verdünner. Im Handel erhältliche Reinigungsmittel oder antistatisches Spray beschädigen das Gerät.Legen Sie die CD
nicht mit der Oberseite nach unten ein, da dies das Gerät beschädigen kann.
Hinweis 2:
Versuchen Sie nicht eine weitere CD einzulegen, wenn bereits eine eingelegt worden ist,
da dies das Gerät beschädigen kann. Fassen Sie die CD an ihren Enden an. Berühren Sie
nicht die Oberfläche, um Verschmutzungen zu vermeiden.
Befestigen Sie kein Papier oder Klebeband auf der CD. Setzen Sie die CD keinem direkten Sonnenlicht oder Hitzequellen aus, wie z.B. heißen Luftrohren. Lassen Sie die CDs
auch nicht im Auto liegen, wenn dieses direkt in der Sonne geparkt wird, da das einen
beachtlichen Temperaturanstieg im Innenraum zur Folge hat.
ELEKTRISCHE VERBINDUNG
ACHTUNG:
Sie müssen bei jedem Lautsprechersystem einen Wellenwiderstand von 4 Ohm gewährleisten, um einer verzerrten Tonwiedergabe bei einem hohen Lautstärkepegel vorzubeugen.
1
3
2
4
Page 18

DEUTSCH
19
Ursache
Der Zündschlüssel wurde nicht gedreht
Die Sicherung ist herausgegangen
Position der CD im Player
CD falsch herum eingelegt
Die CD ist sehr verschmutzt oder fehlerhaft
Temperatur im Auto ist zu hoch
Kondensation
Lautstärke ist auf Minimum eingestellt
Verkabelung wurde nicht richtig durchgeführt
Der Installationswinkel beträgt mehr als 30 Grad
Die CD ist sehr verschmutzt oder fehlerhaft
Der eingebaute Microcomputer funktioniert nicht richtig aufgrund Geräuschkulisse
Das Antennenkabel ist nicht angeschlossen
Die Signale sind zu schwach
Lösung
Wenn die Stromzufuhr richtig mit dem entsprechenden Anschluss des
Autos verbunden ist, drehen Sie den Zündschlüssel in die Position "ACC"
Ersetzen Sie die Sicherung
Entfernen Sie die CD aus dem Player und legen Sie eine neue ein
Legen Sie die CD mit der Beschriftung nach oben ein
Reinigen Sie die CD oder versuchen Sie, eine neue abzuspielen
Kühlen oder abwarten, bis sich die Innentemperatur normalisiert hat
Lassen Sie den Player für einen Stunde aus und versuchen Sie es
dann erneut
Stellen Sie die Lautstärke auf den gewünschten Pegel
Überprüfen Sie die Verkabelung
Passen Sie den Installationswinkel so an, dass er weniger als
30 Grad beträgt
Reinigen Sie die CD; versuchen Sie, eine neue spielen zu lassen
Drücken Sie den RESET-Knopf.
Frontplatte ist nicht richtig eingesetzt
Stecken Sie das Antennenkabel richtig ein
Wählen Sie eine Station von Hand aus
Symptom
Kein Strom
CD lädt nicht oder
wird nicht ausgeworfen
Kein Ton
Ton springt
Die Bedienungsknöpfe
funktionieren nicht
Das Radio funktioniert nicht
STÖRUNGSBEHEBUNG
Ehe Sie die Checkliste durchgehen, überprüfen Sie die Verkabelung.
Sollte eines der Probleme nach Konsultieren der Checkliste nicht behoben sein, kontaktieren Sie Ihren Händler.
 Loading...