

Page 1
RDS
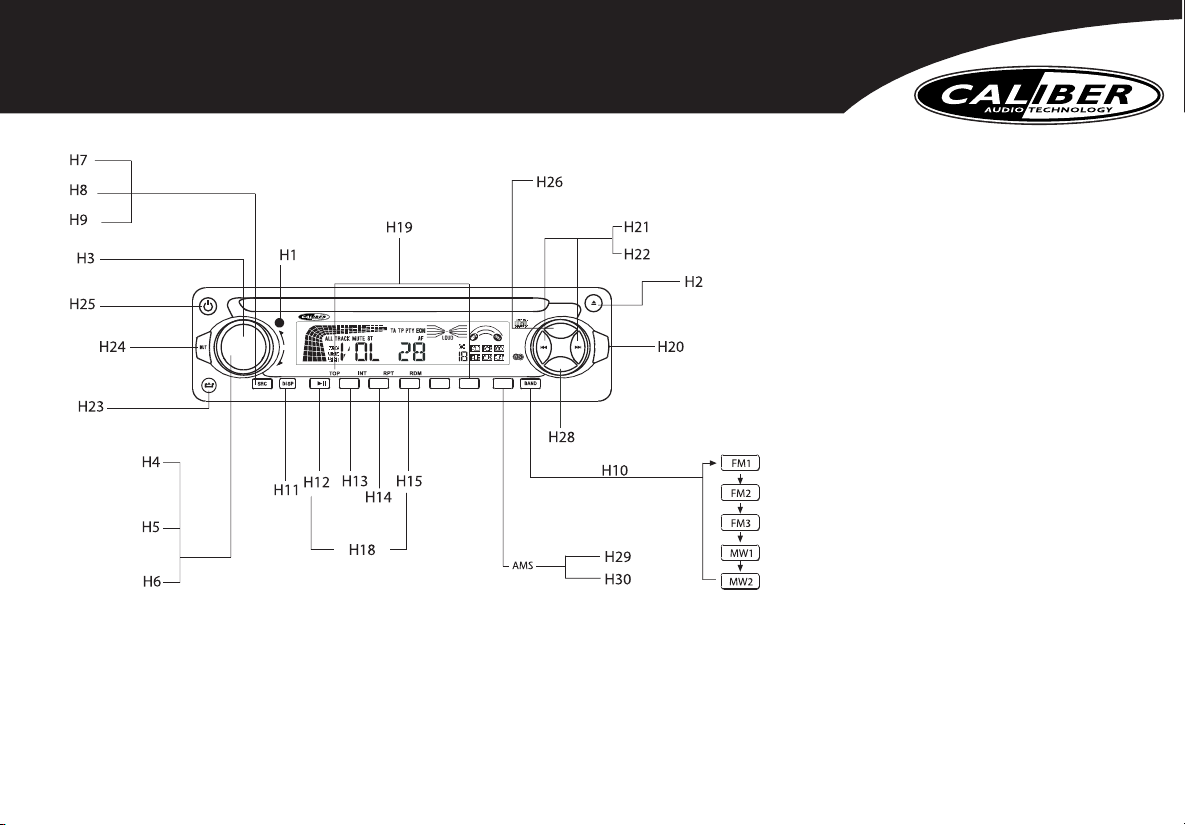
Panel controls
H1 Remote sensor
H2 Disc eject
H3 Adjust volume level
H4 Push to select VOL/BAS/TRE/BAL/FAD
H5 Push more than 2 sec. to menu mode
H6 File search
H7 Radio
H8 Disc Play (when disc is in)
H9 Aux-in (optional)
H10 Band switch
H11 Display switch
H19 Press to tune in a preset station. Hold for more than 2
seconds to store station.
Radio Preset
H12 Play/Pause
Top play ( Press more than 2 sec.)
H13 Intro play (10 sec.)
H14 Track Repeat Play
H15 Track Random Play
H18 Disc Playback
H20 TA ( Traffic Announcements Identification )
H21 Radio Tune
H22 Track Seek
H23 Panel open/close
H24 Press less than 2 seconds for mute
H25 Press more than 2 seconds to Power off
H26 Press once to enter MUSIC TYPE
Press twice to enter SPEECH type
H28 Alternative Frequency list
AMS H29 Radio preset scan
H30 Radio auto preset
GB 2
MCD 220
DN
VOL
UP
1
2
ARTIST
3
ALBUM
MUSIC
45
4x 70W
CSP
6
PTY
RDS
AMS
TA
AF
Page 2
FM1
FM2
FM3
MW1
MW2
R1
R2
R3
R4
R5
R6
R10
R11
R12
R13
R14
R15
R16
R17
R18
R19
R20
R21
R23
R22
R24
R25
R26
R7
R8
R9
Safety Information
PRECAUTIONS
• Use only in a 12-volt DC negative-ground electrical system.
• Disconnect the vehicle's negative battery terminal while mounting and connecting the unit.
• When replacing the fuse, be sure to use one with an identical amperage rating.
•Using a fuse with a higher amperage rating may cause serious damage to the unit.
• DO NOT attempt to disassemble the unit. Laser beams from the optical pickup are dangerous to the eyes.
• Make sure that pins or other objects do not get inside the unit; they may cause malfunctions,
or create safety hazards such as electrical shock or laser beam exposure.
• If you have parked the car for a long time in hot or cold weather, wait until the temperature
in the car become normal before operating the unit.
• Keep the volume at a level at which you can hear outside warning sounds (horns sirens, etc.).
CD Notes
• Playing a defective or dusty CD can cause dropouts in sound.
•Hold CDs as illustrated.
• DO NOT touch the unlabeled side.
• DO NOT attach any seal, label or data protection sheet to either side of a disc.
• DO NOT expose a CD to direct sunlight or excessive heat.
• Wipe a dirty CD from the center outward with a cleaning cloth.
• Never use solvents such as benzine or alcohol.
• This unit cannot play 3-inch ( 8cm ) CDs.
• NEVER insert a 3-inch CD contained in the adapter or an irregularly shaped CD.
• The unit may not be able to eject it, resulting in a malfunction.
Before operation
• DO NOT raise the volume level too much, as this will block outside sounds, making driving dangerous.
• Stop the car before performing any complicated operation.
CAUTION
DO NOT open covers and do not repair by yourself. Consult the dealer or an experienced technician for help.
Contents
Panel Controls . . . . . . . . . . . . . . . . . .2
Remote Controls (optional) . . . . . . . .3
Safety Information . . . . . . . . . . . . . . . .4
Button Tips . . . . . . . . . . . . . . . . . . . . .5
Menu Function (No RDS) . . . . . . . . . .6
RDS (optional) . . . . . . . . . . . . . . . . . .7
RDS (continued) . . . . . . . . . . . . . . . . .8
RDS (continued) . . . . . . . . . . . . . . . . .9
RDS Menu Function . . . . . . . . . . . . .10
RDS Menu Function (continued) . . . .11
Electrical Connections . . . . . . . . . . .12
Installation Guide . . . . . . . . . . . . . . .13
Anti-Theft System . . . . . . . . . . . . . . .14
Tr ouble Shooting . . . . . . . . . . . . . . . .15
Specifications . . . . . . . . . . . . . . . . . .16
* In addition to ordinary CDs, this unit
can play back a CD - R or CD - RW.
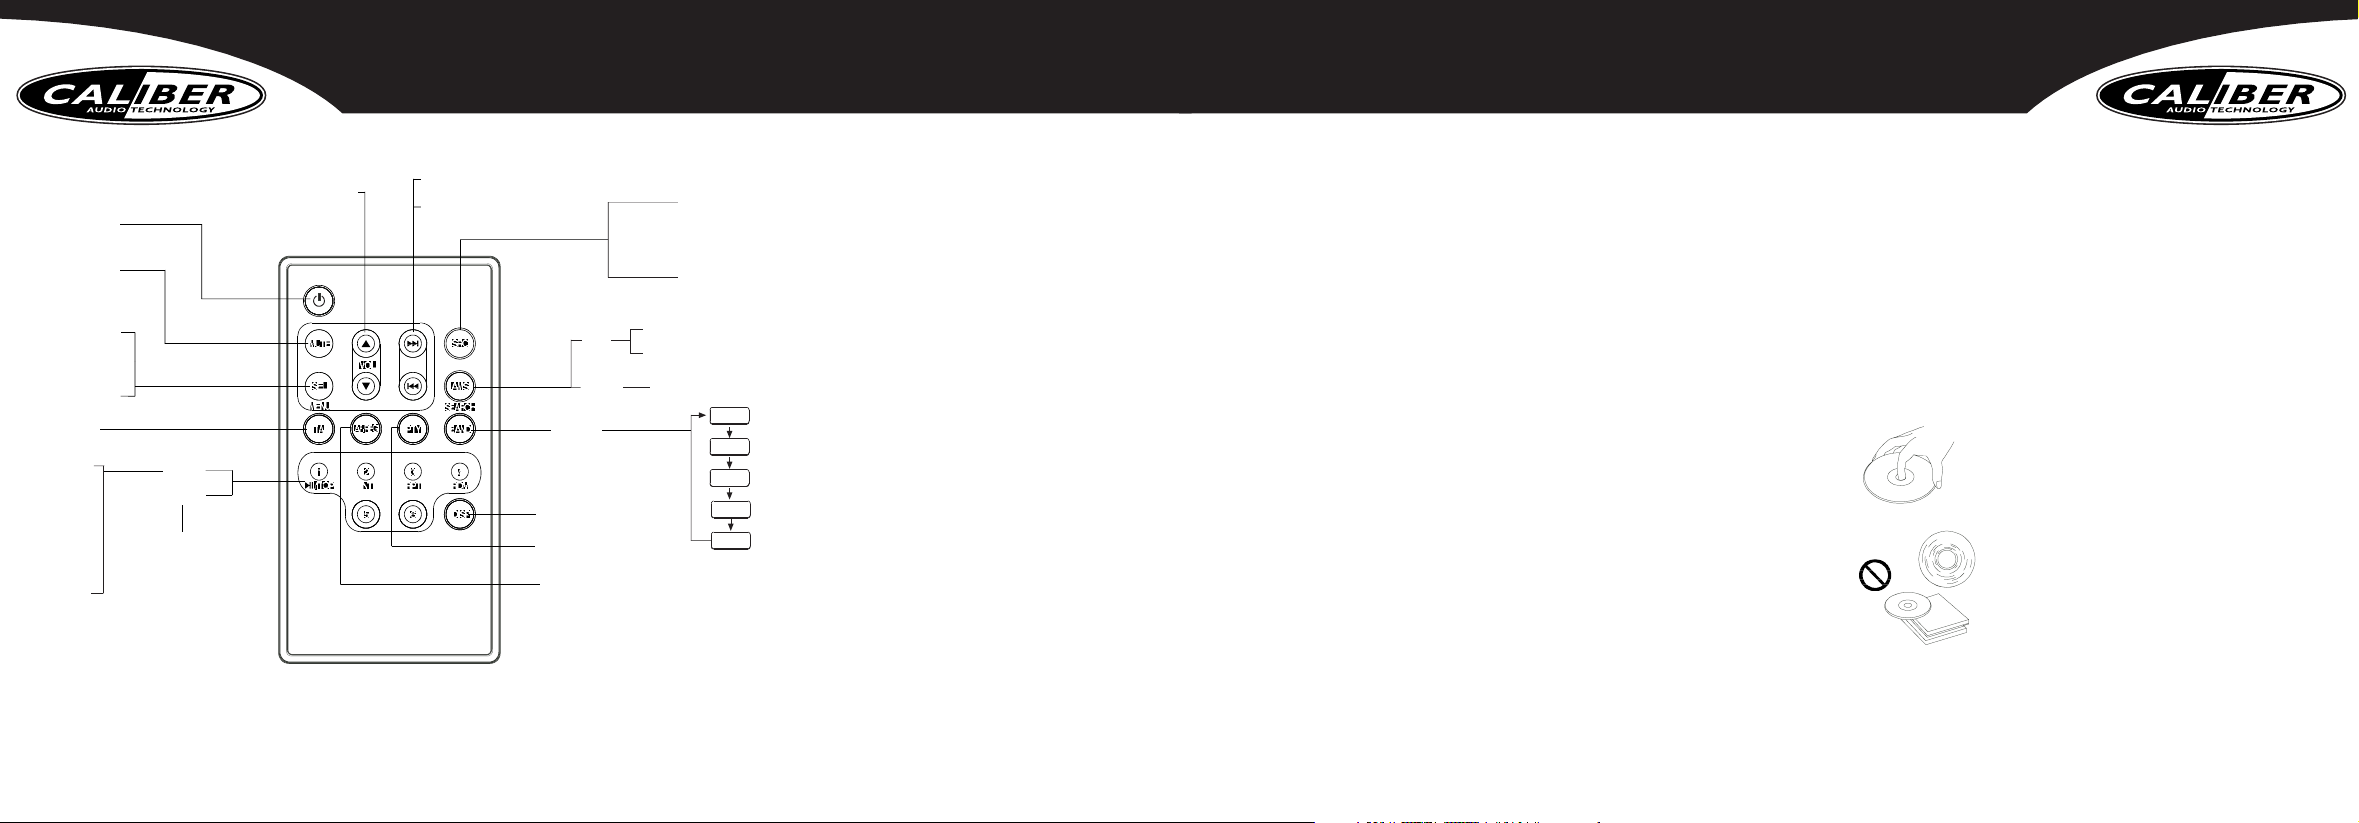
Remote Controls (Optional)
R1 Power on/off
R2 Mute
R3 Push to select VOL/BAS/TRE/BAL/FAD, use Volume button to
adjust level.
R4 Push more than 2 seconds to Menu mode
R5 Traffic Announcements Identification
R6 Play / Pause Top play ( press more than 2 sec.)
R7 Intro play(10 sec.)
R8 Track Repeat Play
R9 Track Random Play
R10 Disc Playback
R11 Radio Preset
R12 Press to tune in a preset station. Hold for more than 2 sec. to
store station.
R13 Volume
R14 Radio Tune
R15 Track Seek
R16 Radio
R17 Disc Play (when disc is in)
R19 Radio Preset scan
R20 Radio Auto Preset
R18 AMS
R21 SEARCH
R22 MP3 track / file search
R23 Band switch
R24 Display switch
R25 Program type
R26 Alternative Frequency list
Region
GB 3 GB 4
Page 3

Button Tips Menu Function (No RDS)
AMS:Auto memory store
Press briefly to scan the preset station 1-6 for 5 seconds each. Hold more than 2 seconds, the 6 strongest available
station will be automatically saved in the memory of preset button 1 - 6.
Radio
Press briefly either side of the button to tune in the station that you have known it’s frequency.
Hold it more than 2 seconds, tuning will automatically activate and stop when signals of the next
station are received.
Disc playback
Press briefly either side of the button to go to the next or previous track.
Hold it to fast forward or reverse back the track.
Set clock
Press disp button, time displays. Press again more than 2 seconds, time display blinks.
Rotate the knob clockwise to set hours. Rotate the knob anticlockwise to set minutes.
Press the button more than 2 seconds to enter menu mode , then each press changes the mode as follows:
DSP mode > BEEP ON/OFF mode >SEEK 1/2 mode (only in tuner mode) >VOL LAST/ADJ mode
DSP mode: rotate the knob to choose DSP sound effect:
POP > ROCK > CLASSIC > FLAT > DSP OFF
BEEP ON/OFF mode :
Rotate the knob to choose sound on or off.
SEEK 1/2 mode: rotate the knob to choose radio seek mode 1 or 2 .
SEEK 1: searching station will stop when next station is received.
SEEK 2: searching station will stop when >> or << button is released and next
station is received.
VOL LAST / ADJUST MODE
Press knob to choose VOL LAST : the turn-on volume
level is the volume level of latest power off.
Rotate knob to choose VOL ADJ,
then press + / - button to set the turn-on volume level .
GB 5 GB 6
DN
VOL
UP
VOL
DN
UP
Page 4

RDS (continued)
Traffic Announcements
Some RDS FM stations periodically provide traffic information.
TP (Traffice Program Identification) Broadcasting of traffic information
TA (Traffic Announcements Identification) Radio announcements on traffic conditions
TA Mode
Press TA button to turn on/off TA.
When TA mode is on and TA indicater on LCD is displayed.
When traffic announcement is transmitted, regardless of the mode, reception will begin at volume level 20 if volume
level is below 20.
After the traffic announcement is over, it will return to previous mode and volume level.
When TA is turned on, SEEK, SCAN, AMS function can be received or saved when traffic program identification (TP)
code is received.
EON ( Enhanced Other Networks )
When EON data is received, the EON indicator lights and the TA and AF functions are expanded as follows.
TA:Traffic information from the current and other network stations can be received.
AF: The frequency list of preset RDS stations is updated by EON data. EON enables the radio to make fuller use of
RDS information.
It constantly updates the AF list of preset stations, including that currently tuned in to. If you preset a station for
from home, you will later be able to receive the same station at an alternative frequency, or any other station
serving the same program, EON also keeps track of locally available TP stations for quick receptions.
GB 8
RDS (Radio Data System-Optional)
RDS service availability varies with areas. Please understand if RDS service is not available in you area, the following
service is not available, either.The following functions are available when receiving RDS stations.
RDS Basics
AF( Alternative Frequency list ) When reception is poor, an RDS station broadcasting the same program is tuned in
automatically.
PS Display ( Program Service name ) The name of station is displayed instead of
frequency.
AF Mode : Press AF button less than 1 second to switch AF mode on and off.
AF indication on LCD will flash until RDS information is received.
The frequency is changed only for programs within the region.
The frequency is changed also for programs outside the region.
REG Mode : Press AF button more than 1 second to switch REG mode on and off.
During FM mode when AF is on, radio seek, scan and AMS functions can only
receive and save RDS program.
CT Service (Clock Time)
When receiving an RDS station, the CT ( Clock Time ) service automatically
adjusts the time.
NO CT is displayed in areas where CT service is not available.
GB 7
Page 5
RDS Menu Function
Press the button more than 2 sec. to enter menu mode, then each press changes the mode as follows:
TA mode > MASK mode > DSP mode > LOUD ON/OFF mode > BEEP ON/OFF
VOL mode < LOCAL / DX mode < ST/MO mode < SEEK 1/2 mode (only in tuner mode)
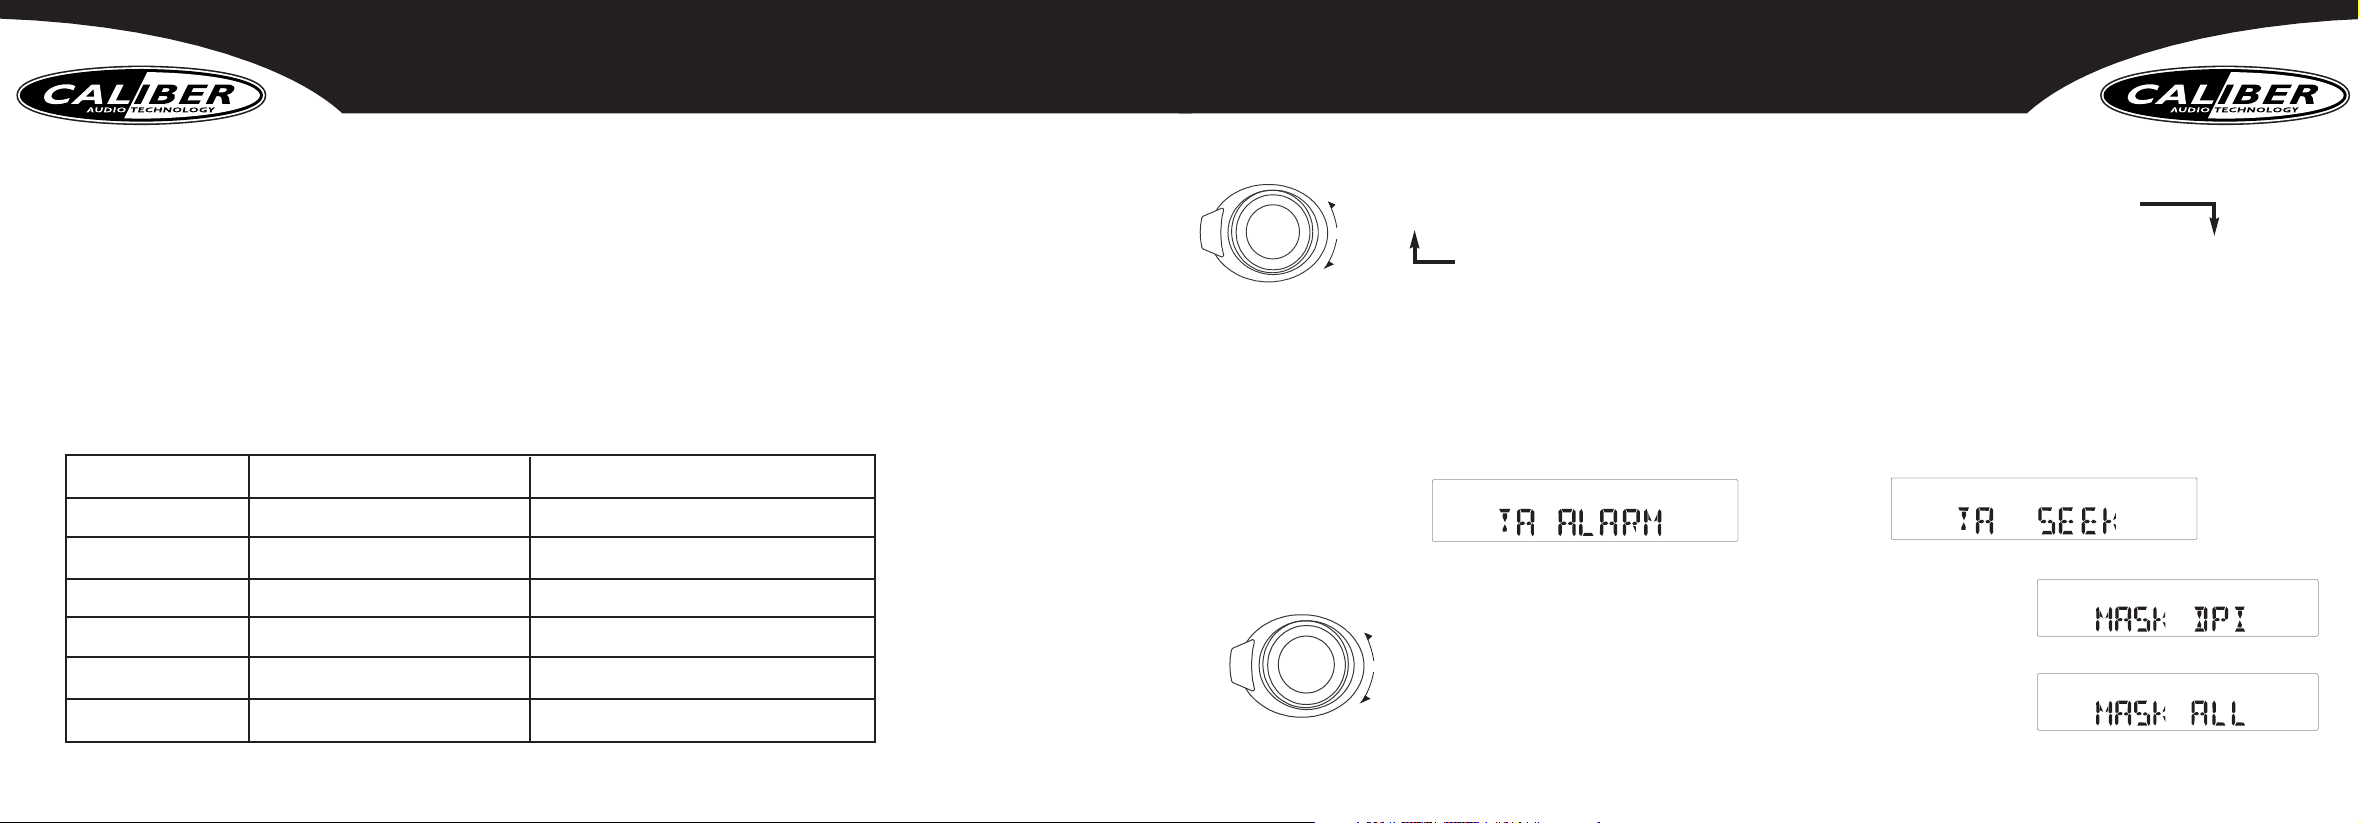
TA mode: Rotate the knob to choose TA ALARM or TA SEEK mode,When TA is turned on and no traffic program
identification code has been received during the specified time, no TA/TP is displayed and according to the MENU
SELECT, alarm is set off, or TA SEEK is activated.
TA ALARM mode: NO TA/TP is displayed and alarm is set off. TA SEEK mode:TA SEEK is activated
MASK mode:
Rotate the knob
to choose MASK DPI
or MASK ALL mode.
MASK DPI mode :
Only the AF which has different program
identification is masked.
MASK ALL mode :
The AF which has different program
identification and NO RDS signal with
high field strength is masked.
GB 10
RDS (continued)
PTY Reception (Program Type)
RDS FM stations provide a program type identification signal.
Example: news, rock, info, sport, etc.
PTY mode: press PTY button to turn PTY on, previous PTY type is displayed and searched if no button is pressed
for 2 seconds. If there is no corresponding program type. No PTY is displayed.
PTY Type Preset
Press PTY once to enter MUSIC type or press PTY twice to enter SPEECH type.
Then use buttons 1 - 6 to select the desired program type.
Preset no. Music type Speech type
1 POP M / Rock M News / Affairs / Info
2 M.O.R. M/ Light M Sport / Educate / Drama
3Classic M / Other M Culture / Science / Varied
4 Jazz M / Country M Weather / Finance / Children
5 National M / Oldies M Social / Religion / Phone In
6Folk M / Folk Travel / Hobbies / Document
GB 9
DN
VOL
UP
DN
VOL
UP
Page 6

Electrical Connections
Wiring Diagram
Location Function
AB
1 Rear right (+) - Purple
2Tel mute Rear right (-) - Purple / Black stripe
3Front right (+) - Gray
4 ACC+ Front right (-) - Gray / Black stripe
5 Auto Antenna Front Left (+) - White
6Front Left (-) - White / Black stripe
7 Battery 12V(+) Rear left (+) - Green
8Ground Rear Left (-) - Green / Black Stripe
GB 12
RDS Menu Function (continued)
DSP mode: Rotate the knob to choose DSP sound effect: POP > ROCK > CLASSIC > FLAT > DSP OFF
LOUD mode: Rotate the knob to choose loud on or off.
BEEP ON/OFF mode: Rotate the knob to choose button beep sound on or off.
SEEK 1/2 mode: Rotate the knob to choose radio seek mode 1 or 2 .
SEEK 1: searching station will stop when next station is received.
SEEK 2: searching station will stop when << or >> button is released
and next station is received.
LO/DX mode: Rotate the knob to choose tuner sensitivity local or distant.
ST/MO mode: Rotate the knob to choose FM stereo or mono.
VOL LAST / ADJUST MODE
Press knob to choose VOL LAST:
the turn-on volume level is the volume level
of latest power off.
Rotate knob to choose VOL ADJ, then rotate
the knob to set the turn-on volume level .
GB 11
DN
VOL
UP
Page 7
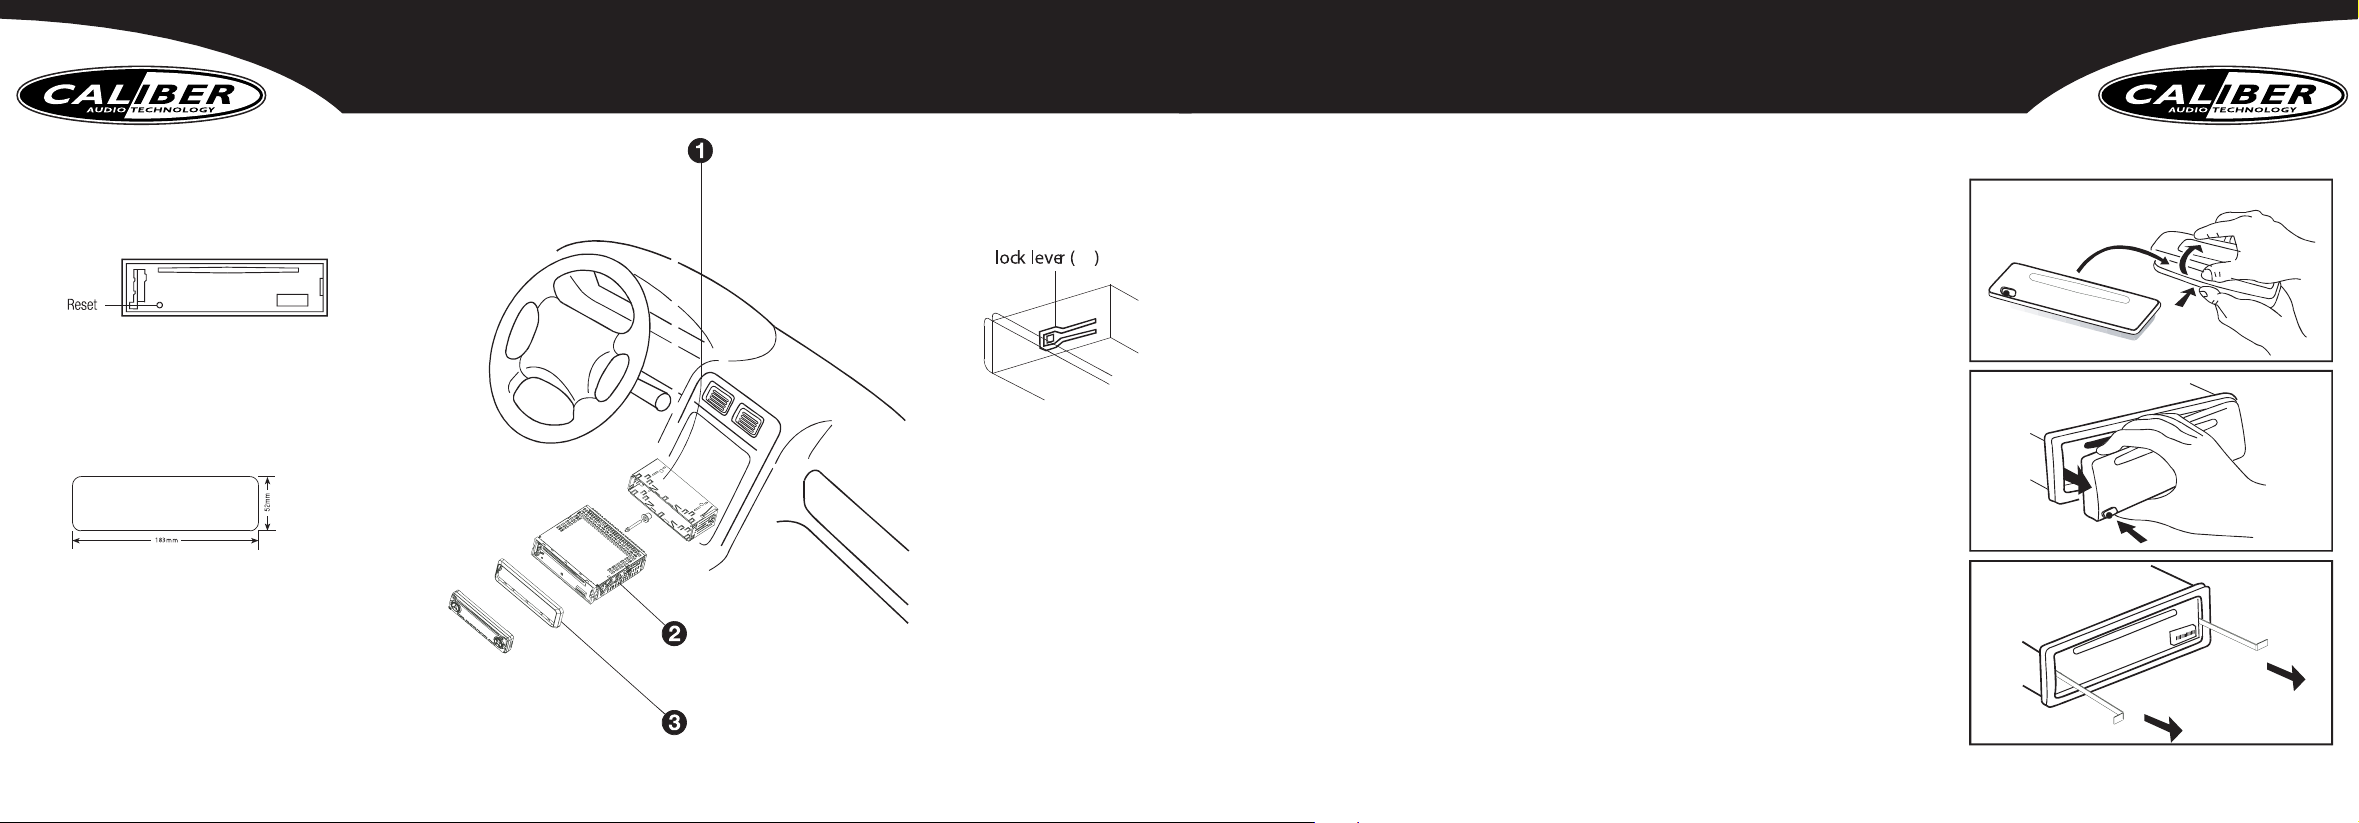
Anti-Theft System
Anti-Theft System
This unit is equipped with a detachable panel.
Removing this panel makes the radio totally inoperable.
Removing the panel
1. Switch off the power of the unit.
2. Remove the detachable panel.
3. Gently press the button of the case and open the cover.
Place the panel into the case and take it with you when you leave the car.
Install detachable panel
1.Fix right part of face plate in the right part of panel slot of the unit..
2.Press down the left side of the face plate until it clicks into the panel slot of
the unit.
Remove the unit
Switch of the power of the unit.
1. Remove the panel and the trim plate.
2. Insert both T-Keys into hole in front of the set until they lock.
3. Pull out the unit.
GB 14
Installation Guide
Installation procedures
First complete the electrical connections, and then check them for
correctness.
Reset
Press the Reset button with a pointed object
to reset the unit to the original status.
(Note: Pressing the reset button will erase the
clock setting and stored stations.)
Installation Opening
This unit can be installed in any dashboard
having an opening as shown above.The
dashboard should be 4.75mm - 5.56mm thick
in order to be able to support the unit.
1. Insert mounting collar into the dashboard, and bend
the mounting tabs out with a screwdriver.
(Make sure that lock lever is flush with the mounting
collar. Not projecting outward)
2. Secure the rear of the unit
After fixing mounting bolt and power connector, fix the
rear of the unit to the car body by rubber cushion.
3. Insert trimplate
GB 13
Page 8

Specifications
General
Power supply: 12V DC (11V-16V)
Test voltage 14,4V negative ground
Maximum power output: 70W x 4 channels
Continuous power output: 28W x 4 channels
Suitable speaker impedance: 4-8 ohm
Pre-Amp output voltage: 5V (CD play mode: 1kHz, 0dB, 10K load)
Fuse: 15A
Dimensions (WxHxD) 178 x 50 x 155mm
Weight: 1.7kg
FM Stereo Radio
Frequency range: 87.5 - 108.0MHz (Europe Model)
87.5 - 107.9MHz (USA Model)
Usable sensitivity: 8dB
Frequency response: 30Hz - 15kHz
Stereo separation: 30dB (1kHz)
Image response ratio: 50dB
IF response ratio: 70dB
Signal / noise ratio: 55dB
MW (AM) Radio
Frequency range: 522 - 1620KHz (Europe Model)
530 - 1710KHz (USA Model)
Usable sensitivity (S/N= 20dB) 30dB
Disc Player
System: Disc digital audio system
Frequency response: 20Hz - 20kHz
Signal / noise ratio: > 86dB
Total harmonic distortion: Less than 0.20% (1kHz)
Dynamic range: 95dB
Channel separation: > 60dB
Components
Mounting collar: 1
Ta pping screws M5 x 6mm 4
Mounting bolt (50mm) 1
Wire connector 1
Removable face plate case 1
Trim plate 1
T- k e y 2
Operating instructions 1
Rubber cushion 1
Remote control optional
Note: Specifications and the design are subject to change without notice
due to improvements in technology.
GB 16
Trouble shooting
If you suspect something wrong immediately switch power off. Do not use the unit in abnormal condition, for example
without sound, or with smoke or foul smell can cause fire or electric shock, immediately stop using it and call the
store where you purchased it. Never try to repair the unit yourself because it is dangerous to do so.
General
• No power or no sound
Car’s engine switch is not on.Turn your car’s key to ACC or ON.
Cable is not correctly connected. Check connection
Fuse is burnt. Replace fuse.
Check volume or mute on / off.
Disc
• Disc is inside but no sound.
Disc is upside down. Place disc in the correct direction, and the label
side up.
Disc is dirty or damaged. Clean disc or change another disc.
• Disc sound skips, tone quality is low.
Disc is dirty or damaged. Clean CD or change CD.
• Sound skips due to vibration
Mounting angle is over 30º.Adjust mounting angle to less than 30º.
Radio
• Much noise in broadcasts
Station is too far, or signals are too weak. Select other stations of higher signal level.
• Preset station is reset
Battery cable is not correctly connected. Connect the battery cable to
the terminal that is always live.
Error Display Messages
• No file
Disc is not CD
• ERR-7
Disc upside down
• ERR-10
Recovery error, check the disc.
• ERR-3
Disc mechanism error. Press eject button to eject the disc. In case that
the disc cannot be ejected by pressing the eject button, press the reset
switch and press the eject button again. If still not ejecting consult
your dealer.
GB 15
Page 9

Panneau de commandes
RDS
H1 Capteur infrarouge
H2 Disc eject
H3 Volume up / down
H4 Appuyez pour sélectionner VOL/BAS/TRE/BAL/FAD,utilisez le bouton
Volume pour régler le niveau
H5 Appuyez pendant plus de 2 secondes pour accéder au mode menu
H6 File search
H7 Radio
H8 Disc Play (lorsque le disque est à l’intérieur)
H9 Aux-in (facultatif)
H10 Commutateur de bande
H19 Appuyez pour régler sur une station préprogrammée
Appuyez pendant plus de 2 secondes pour enregistrer la station
Radio Preset
H12 Play/Pause
To p play ( Appuyez pendant plus de 2 secondes)
H13 Intro play (10 sec.)
H14 Track Repeat Play
H15 Track Random Play
H18 Disc Playback
H20 TA ( Traffic Announcements Identification )
H21 Radio Tune
H22 Track Seek
H23 Ouverture / fermeture du panneau
H24 Appuyez pendant plus de 2 secondes pour passer en mode Mute
H25 Appuyez pendant plus de 2 secondes pour mettre hors tension
H26 Appuyez une fois pour accéder autype MUSIC ou deux fois pour
accéder au type RADIO D’INFOS
H28 Alternative Frequency list
AMS H29 Radio preset scan
H30 Radio auto preset
FR 3
Informations relatives à la sécurité
PRÉCAUTIONS
• N’utilisez que dans un système électrique 12 volts CD de polarité négative.
• Déconnectez la borne négative de la batterie du véhicule lors du montage et de la connexion de l’unité.
• Lors du remplacement du fusible, veillez à un fusible avec un ampérage identique.
Utiliser un fusible avec un ampérage supérieur peut causer de graves dommages à l’unité.
• N’essayez PAS de démonter l’unité. Les rayons laser du capteur optique sont dangereux pour les yeux.
• Vérifiez que les broches ou autres objets ne pénètrent pas dans l’unité ; ils peuvent entraîner des
dysfonctionnements, ou créer des risques pour la sécurité tels que des chocs électriques ou une exposition
au rayon laser.
• Si vous avez parqué la voiture pendant un long moment par temps froid ou chaud, attendez que la
température dans la voiture redevienne normale avant de mettre l’unité en marche.
• Maintenez le volume à un niveau qui vous permet d’entendre les bruits d’avertissement extérieurs
(klaxons, sirènes, etc.).
Remarques relatives aux CD
• La lecture de CD poussiéreux ou défectueux peut entraîner des per tes sonores.
•Tenez les CD comme illustré.
• NE touchez PAS la face du CD sans étiquette.
• Ne posez aucun sceau, aucune étiquette ni aucune feuille de protection de données
d’un côté ou l’autre du disque.
• N’exposez PAS un CD à la lumière directe du soleil ou à une chaleur excessive.
• Essuyez un CD sale du centre vers l’extérieur à l’aide d’un chiffon nettoyant.
N’utilisez jamais de solvants tels que de la benzine ou de l’alcool.
• Ce lecteur ne peut jouer de CD 3 pouces ( 8cm ).
• N’insérez JAMAIS un CD 3 pouces contenu dans l’adaptateur ou un CD de
forme irrégulière.
L’unité pourrait ne pas pouvoir le rejeter, ce qui entraînerait un dysfonctionnement.
Avant la mise en marche
• N’augmentez PAS trop le niveau sonore, car cela vous empêcherait d’entendre les
sons extérieurs, rendant la conduite dangereuse.
•Arrêtez la voiture avant d’effectuer toute opération compliquée.
ATTENTION
N’ouvrez PAS les caches et n’effectuez aucune réparation vous-même. Consultez le distributeur ou un technicien expérimenté si vous avez besoin d’aide.
Ta b le des matières
Informations relatives à la sécurité . . .2
Panneau de commandes . . . . . . . . . . .3
Commandes à distance (facultatives) . .4
Conseils sur les boutons . . . . . . . . . . .5
Fonction de menu (No RDS) . . . . . . .6
RDS (facultatif) . . . . . . . . . . . . . . . . . .7
RDS (suite) . . . . . . . . . . . . . . . . . . . . .8
RDS (suite) . . . . . . . . . . . . . . . . . . . . .9
Fonction de menu RDS . . . . . . . . . . .10
Fonction de menu RDS (suite) . . . . .11
Raccordements électriques . . . . . . . .12
Guide d’installation . . . . . . . . . . . . . .13
Système anti--vol . . . . . . . . . . . . . . . .14
Résolution de problèmes . . . . . . . . .15
Spécifications . . . . . . . . . . . . . . . . . .16
* Outre les CD ordinaires, ce lecteur peut
lire les CD - R ou CD - RW.
FR 2
MCD 220
DN
VOL
UP
1
ARTIST
ALBUM
MUSIC
45
3
2
4x 70W
CSP
6
PTY
RDS
AMS
TA
AF
Page 10

Conseils sur les boutons
AMS :Auto Memory Store
Appuyez brièvement pour balayer les stations préprogrammées 1-6 pendant 5 secondes chacune. Maintenez plus de 2
secondes, les 6 stations fortes disponibles seront automatiquement sauvegardées en mémoire des boutons de préprogrammation 1 à 6.
Radio :
appuyez brièvement de chaque côté du bouton pour régler la station dont vous connaissez la
fréquence.
Maintenez-le pendant plus de 2 secondes, le tuning s’activera automatiquement et s’arrêtera
lorsque les signaux de la prochaine station sont reçus.
Disc playback : appuyez brièvement de chaque côté du bouton pour passer à la plage suivante ou précédente.
Appuyez sur cette touche et maintenez-la pour avancer rapidement ou rembobiner la plage.
RÉGLAGE DE L’HEURE
Appuyez sur le bouton DISP et l’heure s’affiche.Appuyez à nouveau pendant plus de 2
secondes et l’affichage de l’heure clignote.Appuyez sur - pour définir les minutes et sur +
pour définir les heures.
Faites tourner le bouton dans le sens des aiguilles d’une montre pour définir les heures.
Faites tourner le bouton dans le sens contraire des aiguilles d’une montre pour définir es minutes.
FR 5
Remote Controls (Optional)
FM1
FM2
FM3
MW1
MW2
R1
R2
R3
R4
R5
R6
R10
R11
R12
R13
R14
R15
R16
R17
R18
R19
R20
R21
R23
R22
R24
R25
R26
R7
R8
R9
R1 Power on/off
R2 Mute
R3 Appuyez pour sélectionner VOL/BAS/TRE/BAL/FAD,utilisez le
bouton Volume pour régler le niveau
R4 Appuyez pendant plus de 2 secondes pour accéder au mode
menu
R5 Traffic Announcements Identification
R6 Play / Pause Top play ( appuyez pendant plus de 2 sec.)
R7 Intro play(10 sec.)
R8 Plage Repeat Play
R9 Track Random Play
R10 Disc Playback
R11 Radio Preset
R12 Appuyez pour régler sur une station préprogrammée.
Appuyez pendant plus de 2 secondes pour enregistrer la station.
R13 Volume
R14 Radio Tune
R15 Track Seek
R16 Radio
R17 Disk Play (lorsque disque est dedans)
R19 Radio Preset scan
R20 Radio Auto Preset
R18 AMS
R21 SEARCH
R22 MP3 track / file search
R23 Commutateur de bandes
R24 Commutateur d’affichage
R25 Types de programme
R26 Alternative Frequency list
Région
FR 4
DN
VOL
UP
Page 11

La disponibilité du service RDS varie selon les régions. Notez que si le service RDS n’est pas disponible dans vous
région, le service suivant n’est pas disponible non plus. Les fonctions suivantes sont disponibles lorsque vous recevez
des stations RDS.
Bases du service RDS
AF( Alternative Frequency list ) : lorsque la réception est mauvaise, une station
RDS diffusant le même programme est réglé automatiquement.
PS Display ( Program Service name ) : le nom de la station est affiché au lieu de la
fréquence.
Mode AF : appuyez sur le bouton AF moins d’1 seconde pour activer ou désactiver
le mode AF.
L’indication AF sur l’écran LCD clignotera jusqu’à ce que les informations RDS
sont reçues.
Mode REG : appuyez sur le bouton AF plus d’1 seconde pour activer ou désactiver
le mode REG.
La fréquence n’est modifiée que pour les programmes dans la région.
La fréquence est également modifiée pour les programmes en dehors de la région.
CT Service (Clock Time)
Lorsque vous recevez une station RDS, le service CT ( Clock Time ) règle automatiquement l’heure.
NO CT est affiché dans les régions où le service CT n’est pas disponible.
FR 7
Fonction de menu (Pas de RDS)
Appuyez sur le bouton pendant plus de 2 secondes pour accéder au mode menu, ensuite cha
que fois que vous appuyez,le mode comme suit :
Mode DSP > BEEP ON/OFF > Mode SEEK 1/2 (uniquement en mode Tuner) > Mode VOL LAST/ADJ
Mode DSP: faites tourner le bouton pour choisir un effet sonore DPS :
appuyez sur le bouton - /+ POP > ROCK > CLASSIC > FLAT > DSP OFF
Mode BEEP ON/OFF: faites tourner le bouton pour activer ou désactiver le bip du bouton.
Mode SEEK 1/2: faites tourner le bouton pour choisir le mode Radio seek 1 ou 2.
SEEK 1: la recherche de stations s’arrêtera lorsque la prochaine station est reçue.
SEEK 2: la recherche de stations s’arrêtera lorsque le bouton << ou >> est relâché et
que la prochaine station est reçue.
MODE VOL LAST / ADJUST
Appuyez sur le bouton pour choisir VOL LAST: lorsque vous allumez, le niveau de
volume est le volume sonore utilisé lors de la dernière mise hors tension.
Faites tourner le bouton pour choisir VOL ADJ: faites ensuite tourner le bouton
pour définir le niveau de volume lorsque vous allumez.
DN
UP
VOL
FR 6
Page 12

RDS ( suite )
PTY Reception ( Type de programme )
Les stations FM RDS proposent un signal d’identification du type de programme.
Exemple : news, rock, infos, sport, etc.
Mode PTY : appuyez sur le bouton PTY pour activer le mode PTY, le précédent type PTY est affiché et cherche si
aucun bouton n’est enfoncé pendant 2 secondes. S’il n’y a aucun type de programme correspondant, NO PTY n’est affiché.
Préprogrammation de types PTY
Appuyez une fois sur le bouton PTY pour entrer le type de musique ou appuyez sur le bouton PTY pour entrer le
type de radio d’infos. Utilisez ensuite les boutons 1 à 6 pour sélectionner le type de programme souhaité.
N° de présélection TYPE MUSIQUE TYPE RADIO
1 POP M / Rock M Actualités / Affaires / Infos
2
Grand publique M/ Ambiance M
Sport / Education / Théâtre
3 Classique M / Autre M Culture / Sciences / Variétés
4 Jazz M / Country M Météo / Finances / Enfants
5 Nationale M / Souvenirs M
Société / Religion / Tribune Téléphonique
6Folk M / Folk Voyages / Hobbys / Documentaire
FR 9
RDS ( suite )
Annonces de trafic
Certaines stations FM RDS donnent régulièrement des informations de trafic.
TP ( Traffic Program Identification ) Diffusant des informations sur le trafic
TA ( Traffic Announcements Identification ) Annonces radio sur les conditions de trafic
MODE TA : appuyez sur le bouton TA pour activer/désactiver le mode TA.
Lorsque le mode TA est activé et que l’indicateur TA est affiché sur l’écran LCD.
Lorsqu’une annonce relative au trafic est transmise, quel que soit le mode.
La réception commencera au volume niveau 20 si le niveau de volume est inférieur à 20
Lorsque l’annonce trafic est terminée, il reviendra au mode et au niveau de volume précédents
Lorsque le mode TA est activé, les fonctions SEEK, SCAN et AMS peuvent être reçues et sauvegardées lorsque le code
TP (Traffic Program Identification) est reçu.
EON ( Enhanced Other Networks )
Lorsque les données EON sont reçues, les indicateurs EON et les fonctions TA et AF sont développées comme suit.
TA : des informations relatives au trafic des stations du réseau actuel et d’autres réseaux peuvent être reçues.
AF: la liste de fréquences des stations RDS préprogrammées est mise à jour par les données EON. EON permet à la
radio d’utiliser pleinement les informations RDS. Il met constamment à jour la liste AF des stations préprogrammées, y
compris celle qui est actuellement réglée. Si vous préprogrammez une station de chez vous, vous pourriez ensuite
recevoir la même station à une autre fréquence ou d’autres stations diffusant le programme, EON suit également les
stations TP localement disponibles pour des réceptions rapides.
FR 8
Page 13

Fonction de menu RDS (suite)
Mode DSP: faites tourner le bouton pour choisir un effet sonore DPS :
POP > ROCK > CLASSIC > FLAT > DSP OFF
Mode LOUD: faites tourner le bouton pour activer ou désactiver le mode Loud.
BEEP ON/OFF mode: faites tourner le bouton pour activer ou désactiver le bip du bouton.
Mode SEEK 1/2: faites tourner bouton pour choisir le mode radio seek 1 ou 2.
SEEK 1: la recherche de station s’arrêtera lorsque la prochaine station est reçue.
SEEK 2: la recherche de station s’arrêtera lorsque le bouton << ou >> est relâché et
que la prochaine station est reçue.
Mode LO/DX : faites tourner le bouton pour choisir la sensibilité du tuner locale ou distante.
Mode ST/MO : faites tourner le bouton pour choisir FM stereo ou mono.
MODE VOL LAST / ADJUST
Appuyez sur le bouton pour choisir VOL LAST:
lorsque vous allumez, le niveau de
volume est le volume sonore utilisé lors de la
dernière mise hors tension.
Faites tourner le bouton pour choisir VOL ADJ,
faites ensuite tourner le bouton pour définir le
niveau de volume lorsque vous allumez.
FR 11
Fonction de menu RDS
Appuyez sur le bouton pendant plus de 2 secondes pour accéder au mode menu, ensuite chaque fois que
vous appuyez, le mode change comme suit :
Mode TA > Mode MASK > Mode DSP > Mode LOUD ON / OFF > BEEP ON / OFF
Mode VOL > Mode LOCAL / DX > Mode ST / MO > Mode SEEK1/2 (uniquement en mode Tuner)
Mode TA :
Faites tourner le bouton pour choisir le mode TA ALARM ou TA SEEK. Lorsque le mode TA est activé et qu’aucun code d’identification de programme de trafic n’a été reçu durant la période spécifiée, aucun TA/TP n’est affiché et,selon le MENU
SELECT, l’alarme est déclenchée ou TA SEEK est activé.
Mode TA ALARM: NO TA/TP est affiché et l’alarme est déclenchée. Mode TA SEEK: TA SEEK est activé.
Mode MASK :
Faites tourner le bouton
pour choisir le mode
MASK DPI ou MASK ALL.
Mode MASK DPI :
Seul l’AF qui a une identification de programme différente est masqué.
Mode MASK ALL :
L’AF qui a une identification de programme
différente et le signal NO RDS avec une
intensité de champ élevée est masqué.
FR 10
DN
VOL
UP
DN
VOL
UP
DN
VOL
UP
Page 14

Guide d’installation
Procédures d’installation
Terminez d’abord les raccordements électriques et vérifiez ensuite
qu’ils sont corrects.
Réinitialisation
Appuyez sur le bouton Reset avec un objet
pointu pour réinitialiser l’unité à son état original.
Remarque : appuyer sur le bouton Reset efface
les réglages de l’heure et les stations de radio
préprogrammées.
Ouverture d’installation
Ce lecteur peut être installé dans tout
tableau de bord ayant une ouverture telle
que présentée ci-dessus. Le tableau de bord
doit être épais de 4,75 mm à 5,56 mm afin
de supporter le lecteur.
1. Insérez le manchon de montage dans le tableau de
bord et pliez les pattes de montage vers l’extérieur
avec un tournevis.Vérifiez que le levier de verrouillage
( ) est dans l’alignement du manchon de montage.
(Qu’il ne ressort pas vers l’extérieur)
2. Fixez l’arrière de l’unité.
Après avoir installé le boulon de fixation et la prise d’alimentation, fixez l’arrière de l’unité à la voiture par le tampon en caoutchouc.
3. Installez la plaque de garniture.
FR 13
Raccordements électriques
Schéma de câblage
Emplacement Fonction
AB
1Arrière droit (+) – mauve
2Tel Mute Arrière droit (+) – mauve / ligne noire
3Avant droit (+) – gris
4 ACC+ Avant droit (+) – gris / ligne noire
5 Antenne automatique Avant gauche (+) – blanc
6Avant gauche (+) – blanc / ligne noire
7 Batterie 12V(+) Arrière gauche (+) – vert
8Ground Arrière gauche (+) – vert / ligne noire
FR 12
Page 15

Résolution de problèmes
Si vous suspectez un problème : mettez immédiatement le lecteur hors tension. N’utilisez pas l’unité dans des conditions anormales,
par exemple sans son, en présence de fumée ou de mauvaise odeur, car cela peut entraîner un incendie ou un choc électrique.
Arrêtez immédiatement de l’utiliser et appelez le magasin où vous lavez acheté. N’essayez jamais de réparer l’unité vous-même car
cela peut être dangereux.
Généralités
• Absence d'alimentation ou absence de son
Le commutateur du moteur de la voiture n’est pas allumé.
Tournez la clé de votre voiture sur ACC ou ON.
Le câble n’est pas correctement connecté.Vérifiez le raccordement
Le fusible a sauté. Remplacez le fusible.
Vérifiez le volume ou l’activation ou la désactivation de la fonction Mute.
Disque
• Le disque est à l’intérieur mais il n’y a pas de son
Le disque est à l’envers. Placez le disque dans le bon sens, avec
l’étiquette vers le dessus.
Le disque est sale ou endommagé. Nettoyez le disque ou utilisez un
autre disque.
• Le son du disque saute, la qualité du son est faible.
Le disque est sale ou endommagé. Nettoyez le disque ou utilisez un
autre disque.
• Le son du disque saute à cause des vibrations.
L’angle de montage est de plus 30°.
Réglez l’angle de montage à moins de 30°
Montage instable. Montez l’unité solidement à l’aide des éléments de
montage. Mounting angle is over 30º. Adjust mounting angle to less
than 30º.
Radio
• Beaucoup de bruit lors des diffusions
La station est trop loin ou les signaux sont trop faibles.
Sélectionnez d’autres stations avec un niveau de signal supérieur
• Beaucoup de bruit lors des diffusions
La station préprogrammée est réinitialisée.
Le câble de la batterie n’est pas correctement raccordé. Raccordez le
câble de la batterie au terminal qui est toujours activé.
Affichage de messages d’erreur
• No file
Le disque n’est pas un CD
• ERR-7
Le disque est à l’envers
• ERR-10
Erreur de récupération, vérifiez le disque.
• ERR-3
Erreur du mécanisme du disque.Appuyez sur le bouton H2 pour éjecter le disque. Si le disque ne peut être éjecté en appuyant sur le bouton H2, appuyez sur le commutateur RESET et appuyez
à nouveau sur le bouton H2. Si vous ne pouvez toujours pas éjecter le
disque, consultez votre distributeur.
FR 15
Système anti-vol
Ce lecteur est équipé d’un panneau détachable motorisé coulissant.
Enlever ce panneau peut empêcher toute utilisation de la radio.
Installation du panneau amovible dans le boîtier
1. Mettez le lecteur hors tension.
2. Enlevez le panneau amovible.
3.Appuyez doucement sur le bouton du boîtier et ouvrez l’étui. Placez le
panneau dans le boîtier et emmenez-le avec vous lorsque vous quittez la voiture.
Installation du panneau amovible
1. Fixez la partie droite de la plaque frontale dans la partie droite de
l’ouverture du panneau du lecteur.
2. Poussez le côté gauche de la plaque frontale vers le bas jusqu’à ce qu’il se
mette en place de l’ouverture du panneau du lecteur.
Retrait du lecteur
Mettez le lecteur hors tension.
1. Enlevez le panneau et la plaque de garniture.
2. Insérez les deux T-Keys dans les trous à l’avant de l’appareil jusqu’à ce qu’ils
s’emboîtent.
3. Sortez l’unité.
FR 14
Page 16

Sicherheitshinweise
VORSICHTSMASSNAHMEN
• Ausschließlich mit 12-Volt-Gleichstrom und negativer Masseverbindung verwenden.
• Demontieren Sie vor Arbeiten am Fahrzeug die positive Klemme der Fahrzeugbatterie.
• Achten Sie beim Auswechseln der Sicherung darauf, dass die neue Sicherung über die gleiche
Stromleistung verfügt, die Verwendung einer Sicherung mit einer höheren Stromleistung kann zu
schwerwiegenden Schäden am Gerät führen.
•Versuchen Sie UNTER KEINEN UMSTÄNDEN das Gerät zu öffnen. Die Laserstrahlen des optischen
Tonabnehmers können zu schwerwiegenden Augenschäden führen.
• Stellen Sie sicher, dass keine Stifte oder andere Gegenstände ins Innere des Gerätes gelangen. Sie können
zu Fehlfunktionen oder Sicherheitsrisiken, wie Stromschläge oder der Bloßstellung der Laserstrahlen führen.
• Wenn das Fahrzeug längere Zeit bei heißem oder kaltem Wetter im Freien abgestellt war, sollte mit dem
Betrieb des Geräts zugewartet werden, bis die Temperatur sich im inneren des Fahrzeuges normalisiert hat.
• Die Lautstärke muss auf einen Pegel beschränkt werden, dass Warngeräusche von außen (Polizei, Sanität
usw.) noch hörbar sind.
CD-Hinweise
• Die Wiedergabe defekter oder staubiger CDs kann zu Tonaussetzer führen.
• Die CDs wie abgebildet halten.
• Die unetikettierte Seite nicht mit blossen Händen berühren.
• Befestigen Sie KEINE Aufkleber, Etiketten oder Datenschutzfolien auf der Disc.
• Setzen Sie die CD NICHT der direkten Sonneneinstrahlung oder übermäßiger
Hitze aus.
• Reiben Sie eine verschmutzte CD von der Mitte nach außen mit einem
Reinigungstuch ab.
Verwenden Sie niemals Lösungsmittel, wie Benzin oder Alkohol.
• Mit diesem Gerät können keine 8-cm-CD‘s abgespielt werden.
• Legen Sie NIEMALS eine 8-cm-CD mit Adapter oder eine verformte CD ein.
Es ist möglich, dass sich diese CD’s im Gerät verklemmen, nicht mehr ausgeworfen
werden können und das Gerät beschädigen.
Vor dem Betrieb
• Den Lautstärkepegel NICHT zu hoch einstellen, Geräusche von aussen, (Polizei Sanität
ect.) müssen
auf jeden Fall noch hörbar sein
• Bedienungen am Gerät die vom Verkehr ablenken, dürfen nur bei stehendem Fahrzeug
ausgeführt werden.
VORSICHT
Abdeckungen NICHT öffnen. Eingriffe oder Reparaturen dürfen nur von ausgebildeten techniker ausgeführt werden.
Wenden Sie sich daher bei einem Schadenfall an einen autorisierten Händler oder eine Servicstelle. Unbefugtes öffnen hat den Verlust der Garantieleistung zur Folge
Inhaltsverzeichnis
Sicherheitshinweise . . . . . . . . . . . . . . .2
Frontbedienung . . . . . . . . . . . . . . . . . .3
Fernbedienung (optional) . . . . . . . . . .4
Tastenfunktionen . . . . . . . . . . . . . . . . .5
Menüfunktion (Kein RDS) . . . . . . . . . .6
RDS (optional) . . . . . . . . . . . . . . . . . .7
RDS (Fortsetzung) . . . . . . . . . . . . . . .8
RDS (Fortsetzung) . . . . . . . . . . . . . . .9
RDS Menüfunktion . . . . . . . . . . . . . .10
RDS Menüfunktion (Fortsetzung) . . .11
Elektrische Anschlüsse . . . . . . . . . . .12
Einbauhinweise . . . . . . . . . . . . . . . . .13
Anti-Diebstahlsystem . . . . . . . . . . . .14
Fehlerbehebung . . . . . . . . . . . . . . . . .15
Technische Daten . . . . . . . . . . . . . . .16
* Zusätzliche zu den gängigen CDs kann
dieses Gerät CD - R oder CD – RW
wiedergeben.
D 2
Spécifications
Généralités
Alimentation électrique : 12V CD (11V-16V) Tension test
14,4V, mise à la terre négative
Puissance de sortie totale : 70Wx4 canaux
Puissance de sortie continue : 28Wx4 canaux (4 ,10% T.H.D.)
Impédance des enceintes adéquate : 4-8 ohm
Tension de sortie Pré-Amp : 5V (mode lecture CD :1KHz, 0dB,
10K charge)
Fusible : 15A
Dimensions (LxHxP) 178x50x155mm
Poids : 1,7kg
Niveau Aux-in : 300mV
Radio FM Stéréo
Gamme de fréquences : 87,5–108,0MHz (MODÈLE EUROPÉEN)
87,5–107,9 MHz ( MODÈLE USA )
Sensibilité disponible : 8dB
Sensibilité à l’atténuation (S/N=50dB) : 12dB
Réponse en fréquence : 30 Hz-15kHz
Séparation stéréo 30dB(1kHz)
Ratio de réponse image 50dB
Ratio de réponse IF 70dB
Rapport signal / bruit 55dB
Radio MW
Gamme de fréquences : 522-1620 KHz ( MODÈLE EUROPÉEN )
530-1710 KHz ( MODÈLE USA )
Sensibilité disponible : (S/N=20dB)
Lecteur de disques
Système : Système audio numérique de disques
Réponse en fréquence : 20Hz - 20kHz
Rapport signal / bruit : >86dB
Distorsion harmonique totale :moins de 0,20%(1 kHz)
Dynamic range: 95dB
Séparation de canaux : >60dB
Composants
Manchon de montage 1
Vis taraudeuses M5x6 mm 4
Boulon de fixation (50 mm) 1
Serre-fils 1
Boîtier pour le panneau avant amovible 1
Plaque de garniture 1
T- k e y 2
Instructions générales 1
Tampon en caoutchouc 1
Télécommande Facultatif
FR 16
Page 17

Fernbedienung (Optional)
FM1
FM2
FM3
MW1
MW2
R1
R2
R3
R4
R5
R6
R10
R11
R12
R13
R14
R15
R16
R17
R18
R19
R20
R21
R23
R22
R24
R25
R26
R7
R8
R9
R1 Ein-/Ausschalten
R2 Stummschaltung
R3 Eindrücken zur Auswahl:VOL/BAS/TRE/BAL/FAD, Lautstärke-Taste
verwenden, um den Pegel einzustellen
R4 Länger als 2 Sekunden für den Menü-Modus eindrücken
R5 Verkehrsmeldungen-Kennung
R6 Play / Pause Top play (länger als 2 Sek. eindrücken)
R7 Titel-Anspielung (10 Sek.)
R8 Titel-Wiederholung
R9 Titel-Zufallswiedergabe
R10 Disc-Wiedergabe
R11 Radio-Voreinstellung
R12 Zum Abstimmen eines voreingestellten Senders eindrücken.Zum
Speichern eines Senders länger als 2 Sekunden eingedrückt halten.
R13 Lautstärke
R14 Radioabstimmung
R15 Titelsuche
R16 Radio
R17 Disc-Wiedergabe (wenn Disc eingelegt ist)
R19 Radio Voreinstellungs-Scan
R20 Radio Auto-Voreinstellung
R18 AMS
R21 SEARCH (Suche)
R22 MP3-Titel- / Dateisuche
R23 Bandbreiten-Schalter
R24 Display-Schalter
R25 Programmart
R26 Alternative Frequenzliste
Region
D 4
RDS
Spécifications
H1 Fernsensor
H2 Disc-Auswurf
H4 Drücken zur Auswahl von VOL/BAS
TRE/BAL/FAD +/- Taste zur Auswahl des Pegels drücken
H5 Länger als 2 Sekunden für den Menü-Modus eindrücken.
H6 Dateisuche
H7 Radio
H8 Disc-Wiedergabe (wenn Disc eingelegt ist)
H9 Aux-Eingang (optional)
H10 Loud-Taste (Bass- und Hochtonanteile)# Anzeige-Taste
H19 Zur Abstimmung auf einen voreingestellten Sender drücken
Länger als 2 Sekunden eingedrückt halten, um Sender zu speichern
Radio-Voreinstellung
H12 Play/Pause
Top Play (länger als 2 Sek. eindrücken)
H13 Titel-Anspielung (10 Sek.)
H14 Titel-Wiederholung
H15 Titel-Zufallswiedergabe
H18 Disc playback
H20 Verkehrsmeldungen-Kennung
H21 Radio-Abstimmung
H22 Titel-Suche
H23 Blende öffnen/schließen
H24 Zur Stummschaltung länger als 2 Sekunden drücken
H25 Zum Ausschalten länger als 2 Sekunden drücken
H26 Zur Einstellung der MUSIC-Art einmal drücken
Zur Einstellung der SPEECH-Art zweimal drücken
H27 Rückstell-Taste
H28 Alternative Frequenzliste
AMS H29 Radio Voreinstellungs-Scan
H30 Radio Audio-Voreinstellung
D 3
MCD 220
DN
VOL
UP
1
ARTIST
ALBUM
MUSIC
45
3
2
4x 70W
CSP
6
PTY
TA
RDS
AMS
AF
Page 18

Menü-Funktion (Kein RDS)
Die Taste für länger als 2 Sekunden eindrücken, um zum Menü-Modus gelangen, daraufhin verändert jeder
Druck den Modus folgendermaßen:
DSP Modus > BEEP ON/OFF > SEEK 1/2 (nur im Tuner-Modus) > VOL LAST/ADJ Modus
DSP Modus: Den Drehknopf drehen zur Auswahl des DSP Soundeffekts:
POP > ROCK > CLASSIC > FLAT > DSP OFF
BEEP ON/OFF Modus: Den Drehknopf zum Ein- oder Ausschalten des Pieptons drehen.
SEEK 1/2 Modus: Den Drehknopf drehen zur Auswahl des Radiosuchmodus 1 oder 2 .
SEEK 1: Sendersuche stoppt, wenn der nächste Sender empfangen wird.
SEEK 2: Sendersuche stoppt, wenn die << oder >> Taste freigegeben und der nächste
Sender empfangen wird.
VOL LAST / ADJUST MODUS
Den Drehknopf drücken zur Auswahl von VOL LAST:
Die Lautstärke beim Einschalten entspricht dem Pegel beim letzten Ausschalten.
Den Drehknopf drehen zur Auswahl von VOL ADJ,
daraufhin den Drehknopf drehen, um die Lautstärke beim Einschalten einzustellen.
DN
UP
VOL
D 6
Tasten-Hinweise
AMS :Auto Memory-Speicherung
Kurz eindrücken, um die voreingestellten Sender 1-6 für jeweils 5 Sekunden zu scannen.Wenn sie länger als 2
Sekunden eingedrückt gehalten wird, werden die 6 am stärksten verfügbaren Sender automatisch im Speicher der
Voreinstellungstaste 1-6 gespeichert.
Radio:
Die entsprechende Seite der Taste kurz eindrücken, um auf den Sender abzustimmen,
dessen Frequenz bekannt ist.Wenn die Taste länger als 2 Sekunden eingedrückt wird,
ist die Abstimmung automatisch aktiviert und stoppt, wenn Signale des nächstgelegenen
Senders eingehen.
Disc-Vor- und Rücklauf:
Kurz auf die entsprechende Seite der Taste drücken, um den vorigen oder den
folgenden Titel auszuwählen. Zum schnellen Vor- oder Rücklauf des Titels eingedrückt halten.
Uhr einstellen:
Beim Eindrücken der DISP Taste, wird die Zeit angezeigt. Beim erneuten Eindrücken für länger als 2 Sekunden blinkt
die Zeit-Anzeige auf. Den Drehknopf zur Einstellung der Stunden im Uhrzeigersinn drehen. Den Drehknopf
zur Einstellung der Minuten entgegen dem Uhrzeigersinn drehen.
D 5
DN
VOL
UP
Page 19

RDS ( Fortsetzung )
Verkehrsmeldungen
Certaines stations FM RDS donnent régulièrement des informations de trafic.
TP ( Traffic Program Identification ) Diffusant des informations sur le trafic
TA ( Traffic Announcements Identification ) Annonces radio sur les conditions de trafic
MODE TA : Manche RDS FM-Sender stellen regelmäßig Verkehrsmeldungen zur
Verfügung.
TP ( Verkehrsfunk-Kennung ) Übertragung der Verkehrshinweise
TA ( Verkehrsmeldungs-Kennung ) Radiomeldungen zu den Verkehrsbedingungen
TA Modus: Die TA-Taste zum Ein-/Ausschalten von TA drücken.
Wenn der TA-Modus eingeschaltet und die TA-Anzeige auf dem LCD angezeigt wird.
Wenn Verkehrsmeldungen übertragen werden, ungeachtet des Modus, wird dies bei einem Lautstärkepegel von 20
beginnen, wenn dieser unter 20 liegt. Nachdem die Verkehrsmeldungen vorüber sind, wird es zum vorherigen Modus
und Lautstärkepegel zurückkehren.Wenn auf TA abgestimmt wurde, können SEEK, SCAN und die AMS-Funktion empfangen oder gespeichert werden, wenn der Verkehrsmeldungen-Kennungscode (TP) empfangen wird.
EON ( Erweiterte Sonstige Netzwerke )
Wenn EON-Daten empfangen werden, leuchtet die EON-Anzeige auf und die TA- und AF-Funktionen werden folgendermaßen erweitert.
TA:Verkehrsmeldungen vom aktuellen und sonstigen Netzwerksendern können empfangen werden.
AF: Die Frequenzliste der voreingestellten RDS-Sender wird durch die EON-Daten aktualisiert. EON ermöglicht es
dem Radio, die RDS-Informationen vollständiger zu nutzen.
Es aktualisiert fortlaufend die AF-Liste der voreingestellten Sender, einschließlich des gegenwärtig eingestellten
Senders.Wenn von zu Hause aus ein Sender voreingestellt wird, werden Sie später dazu in der Lage sein, den gleichen
Sender oder einen anderen Sender, der das gleiche Programm überträgt, auf einer alternativen Frequenz zu empfangen.
EON erfasst auch lokal verfügbare TP Sender für den Schnellempfang.
D 8
RDS ( Radio-Datensystem Optional)
Die Verfügbarkeit des RDS-Dienstes hängt von der jeweiligen Region ab und funktioniert nur, wenn der empfangene
Sender auch RDS ausstrahlt.
RDS Basisfunktionen
AF( Alternative Frequenzliste ) Wenn der Empfang schwach ist, wird automatisch auf einen alternativen RDS-Sender
abgestimmt, der das gleiche Programm ausstrahlt.
PS-Display ( Programm-Service-Name ) Anstatt der Frequenz wird der Name des
Senders angezeigt.
AF-Modus : Die AF-Taste kürzer als 1 Sekunde eindrücken, um den AF-Modus einbzw. auszuschalten.
AF-Anzeige auf dem LCD leuchtet auf bis die RDS-Informationen eingegangen sind.
REG-Modus : Die AF-Taste länger als 1 Sekunde eindrücken, um den REG-Modus
ein- und auszuschalten.
Die Frequenz wird lediglich für Programme innerhalb der Region geändert.
Die Frequenz wird auch für Programme außerhalb der Region geändert.
Bei eingeschaltetem AF können während des FM-Modus Radiosuche, Scan- und AMS-Funktionen ausschließlich RDSProgramme empfangen und speichern.
CT Service (Uhrzeit )
Beim Empfang eines RDS-Senders, stellt der CT-Dienst (Uhrzeit) die Uhrzeit
automatisch ein.
In Gebieten, wo kein CT-Dienst verfügbar ist, wird NO CT angezeigt.
D 7
Page 20

RDS Menü-Funktion
Die Taste länger als 2 Sekunden eindrücken, um zum Menü-Modus zu gelangen, daraufhin wird jeder
Druck den Modus folgendermaßen verändern:
TA Modus > MASK Modus > DSP Modus LOUD ON / OFF > Modus BEEP ON / OFF
VOL Modus > LOCAL / DX Modus > ST / MO Modus > SEEK1/2 Modus (nur im Tuner-Modus)
TA Modus: Den Drehknopf drehen zur Auswahl des TA ALARM oder TA SEEK Modus.Wenn TA eingeschaltet ist und kein
Verkehrsfunk-Kennungscode während der angegebenen Zeit eingegangen ist, wird kein TA/TP angezeigt und entsprechend
dem MENU SELECT, ist der Alarm ausgeschaltet oder TA SEEK ist aktiviert.
TA ALARM Modus : TA SEEK Modus:
NO TA/TP wird angezeigt und der Alarm ist ausgeschaltet. TA SEEK ist aktiviert.
MASK Modus:
Den Drehknopf drehen
zur Auswahl des MASK
DPI oder MASK ALL
Modus.
MASK DPI Modus :
Nur die AF, die eine unterschiedliche
Programmkennung hat, wird maskiert.
MASK ALL Modus :
Die AF, die eine unterschiedliche
Programmkennung und KEIN RDS Signal
mit hoher Feldstärke hat, wird maskiert.
D 10
RDS ( Fortsetzung )
PTY Empfang ( Programmart )
RDS FM Sender stellen ein Signal zur Programmartkennung zur Verfügung.
Beispiel: Nachrichten, Rock, Info, Sport, usw.
PTY-Modus: die PTY Taste zum Einschalten von PTY eindrücken, vorige PTY-Art wird angezeigt und gesucht, wenn keine
Taste für 2 Sekunden eingedrückt wird.Wenn es keine entsprechende Programmart gibt, wird NO PTY angezeigt.
PTY Voreinstellung der Art
PTY einmal eindrücken, um die MUSIC-Art einzugeben oder
PTY zweimal eindrücken, um die SPEECH-Art einzugeben.
Dann die Tasten 1-6 zur Auswahl der gewünschten Programmart eindrücken.
VOREINSTELLUNGS-NR. MUSIC-ART SPEECH-ART
1 POP M / Rock M Nachrichten / Aktuelles / Info
2 M.O.R. M/ Light M Sport / Bildung / Drama
3Classic M / Other M Kultur / Wissenschaft / Buntes
4 Jazz M / Country M Wetter / Finance / Kindersendungen
5 National M / Oldies M Gesellschaftliches / Religion / Hörersendungen
6Folk M / Folk Reise / Hobbies / Dokumentation
D 9
DN
VOL
UP
DN
VOL
UP
Page 21

Elektrische Anschlüsse
Schaltplan
STELLE FUNKTION
AB
1 Hinten rechts (+)- lila
2Tel mute Hinten rechts (-)- lila/schwarzer Streifen
3Vorne rechts (-)4 ACC+ grauer/schwarzer Streifen
5 Antenne Vorne links (+)- weiß
6
Vorne links (-)- weißer/schwarzer Streifen
7 Batterie 12V(+) Hinten links (+)- grün
8Ground
Hinten links (-)- grüner/schwarzer Streifen
D 12
RDS Menü-Funktion (Fortsetzung)
DSP Modus: Den Drehknopf drehen zur Auswahl eines DSP Soundeffekts:
POP > ROCK > CLASSIC > FLAT > DSP OFF
LOUD Modus: Den Drehknopf drehen zum Ein- oder Ausschalten der Bass- und Hochtonanteile eindrücken.
BEEP ON/OFF Modus: Den Drehknopf zum Ein- oder Ausschalten des Pieptons drehen.
SEEK 1/2 Modus: Den Drehknopf zur Auswahl des Radio-Such-Modus 1 oder 2 drehen.
SEEK 1: Die Sendersuche stoppt, wenn der nächste Sender empfangen wird.
SEEK 2: Die Sendersuche stoppt, wenn die << oder >> Taste freigegeben und der
nächste Sender empfangen wird.
LO/DX Modus: Den Drehknopf drehen zur Auswahl der Tunerempfindlichkeit,lokal oder fern.
ST/MO Modus: Den Drehknopf drehen zur Auswahl von FM Stereo oder Mono.
VOL LAST / ADJUST MODUS
Den Drehknopf eindrücken zur Auswahl des
VOL LAST :die Lautstärke beim Einschalten
entspricht dem Pegel beim letztmaligen
Ausschalten.
Den Drehknopf drehen zur Auswahl des VOL ADJ,
dann den Drehknopf zur Einstellung der Lautstärke beim
Einschalten drehen.
D 11
DN
VOL
UP
Page 22

Anti-Diebstahlsystem
Das Gerät ist mit einer abnehmbaren Frontblende ausgestattet.
Durch das Entfernen der Frontblende ist das Radio nicht mehr bedienbar und
daher für Diebe uninteressant.
Die abnehmbare Frontblende im Etui unterbringen
1.Gerät ausschalten.
2.Abnehmbare Frontblende entfernen.
3.Sanft auf die Etui-Taste drücken, um den Deckel zu öffnen. Die Frontblende
in das Etui legen und beim verlassen des Fahrzeuges mitnehmen.
Abnehmbare Frontblende anbringen
1.Den rechten Teil der Frontblende am rechten Teil des Blendenschlitzes des
Gerätes befestigen.
2.Die linke Seite der Frontblende eindrücken, bis sie im Blendenschlitz des
Gerätes einrastet.
Das Gerät entfernen
Das Gerät ausschalten.
1. Die Frontblende und die Zierleiste entfernen.
2. Führen Sie beide T-Schlüssel in die Öffnung an der Vorderseite des Satzes ein
bis sie festsitzen.
3. Ziehen Sie das Gerät heraus.
D 14
Einbauhinweise
Einbauhinweise
Zuerst die elektrischen Anschlüsse erstellen und sie anschliessend
auf Korrektheit überprüfen.
Rückstellen
Die Rückstelltaste mit einem angezeigten Objekt
zur Rückstellung des Gerätes in seinen
ursprünglichen Zustand eindrücken..
Bitte beachten:Wenn die Rückstell-Taste gedruckt wird,
werden damit die Uhrzeit-Einstellung und die gespeicherten
Sender gelöscht.
Einbauöffnung
Das Gerät kann in jeden Einbauplatz mit
obenerwähnten Massen eingebaut werden.
Zur sicheren Stützung des Gerätes sollte
die Wanddicke des Einbauortes 4,75mm–5,56mm betragen.
1. Die Montageeinfassung in das Armaturenbrett einführen und die Montageklemmen mit einem
Schraubenzieher spreizen. Sicherstellen, dass der
Sperrhebel ( ) mit der Montageeinfassung bündig ist.
(nicht nach außen herausragt)
2. Den hinteren Teil des Gerätes sichern.
Nach der Befestigung der Befestigungsschraube und des
Stromanschlusses, befestigen Sie den hinteren Teil des
Gerätes mit dem Gummipolster an der Karosserie.
3. Die Zierleiste anbringen.
D 13
Page 23

Technische Daten
Allgemeines
Stromversorgung: 12V DC(11V-16V) Testspannung
14.4V, negative Masseverbindung
Maximale Ausgangsleistung: 70Wx4 Kanäle
Konstante Ausgangsleistung: 28Wx4 Kanäle (4 ,10% T.H.D.)
Entsprech. Lautsprecherwiderstand: 4-8 Ohm
Vor-Amp Ausgangsspannung: 5V ( CD play Modus: 1KHz, 0dB,
10K Last )
Sicherung: 15A
Abmessungen (BxHxT) 178x50x155mm
Gewicht: 1,7kg
Aux-Eingang-Niveau: 300mV
FM Stereo Radio
Frequenz-Bandbreite: 87.5 - 108.0 MHz
(EUROPA-MODELL )
87.5 - 107.9 MHz ( USA-MODELL )
Nutzempfindlichkeit: 8dB
Quieting Sensitivity (S/N=50dB): 12dB
Frequenzbereich: 30Hz-15kHz
Stereotrennung: 30dB(1kHz)
Bildbereichs-Rate: 50dB
Zwischenfrequenzbereichs-Rate: 70dB
Signal/Rausch-Rate 55dB
MW Radio
Frequenzbereich: 522-1620 KHz ( EUROPE MODEL )
530-1710 KHz ( USA MODEL )
Nutzempfindlichkeit: (S/N=20dB)
Disc-Player
System: Disc Digitales Audiosystem
Frequenzbereich: 20Hz - 20kHz
Signal/Rausch-Rate: >86dB
Gesamte harmonische Verzerrung: Weniger als 0,20%(1 kHz)
Dynamic range: 95dB
Kanaltrennung: >60dB
Bauteile
Montagering 1
Gewindeschrauben M5x6mm 4
Montagebolzen (50mm) 1
Drahtanschluss 1
Abnehmbares Frontblenden-Etui 1
Zierleiste 1
T-Schlüssel 2
Bedienungsanleitung 1
Gummipolster 1
Fernbedienung Optional
Die technischen Daten sind freibleibend und können jederzeit zum
Zwecke technischer Verbesserungen geändert werden.
D 16
Fehlerbehebung
Bei Verdacht auf Fehlfunktion sollten Sie unverzüglich den Strom ausschalten. Bei Nichtfunktion, Rauch- oder Geruchsentwicklung
Gerät niemals einschalten, dies kann zu Brand oder zur Zerstörung des Gerätes führen. Kontaktieren Sie Ihren Händler oder eine
autorisierte Servicstelle.Versuchen Sie niemals das Gerät zu öffnen, Sie setzen sich damit gesundheitliche Schäden aus.
Allgemeines
• Kein Strom oder kein Ton
Die Zündung ist nicht eingeschaltet. Drehen Sie den Zündschlüssel auf
ACC oder ON.
Das Kabel ist nicht korrekt angeschlossen.Anschluss überprüfen.
Sicherung ist durchgebrannt. Sicherung auswechseln.
Lautstärke überprüfen bzw. Stummschaltung (Ein / Aus).
Disc
• Disc wurde eingelegt, aber kein Ton.
Disc wurde verkehrt eingelegt. Disc mit Ettikette nach oben einlegen
Disc ist verschmutzt oder beschädigt Disc reinigen oder andere Disc
einlegen.
• Disc-Ton überschlägt sich, mäßige Tonqualität.
Disc ist verschmutzt oder beschädigt. CD reinigen oder andere CD
einlegen.
• Ton überschlägt sich aufgrund von Schwingungen.
Montagewinkel beträgt mehr als 30º Montagewinkel auf weniger als
30º einstellen
Unstabile Befestigung. Das Gerät sicher mit den Befestigungsteilen
befestigen.
Radio
• Erhebliches Rauschen bei der Übertragung
Sender ist zu weit entfernt oder die Signale sind zu schwach.
Alternativen Sender auswählen.
• Voreingestellter Sender wird rückgestellt.
Batteriekabel nicht korrekt angeschlossen
Das Batteriekabel an die Klemme mit Dauerstrom anschliessen.
Angezeigte Fehlermeldungen
• No file
Disc ist keine CD
• ERR-7
Disc wurde verkehrt eingelegt
• ERR-11
Recovery fehler, andere CD einlegen.
• ERR-3
Disc-Mechanismus-Fehler
Die H2 Taste zum Disc-Auswurf drücken.
Für den Fall, dass die Disc durch Drücken der H2 Taste nicht ausgeworfen werden kann, die RESET Taste drücken und dann die H2 Taste
erneut drücken.Wenn die Disc immer noch nicht ausgeworfen wird,
wenden Sie sich bitte an Ihren Händler
D 15
 Loading...