

Page 1

Thank you for choosing a Caliber product. In doing so you’ve demonstrated a
desire to own the finest in Car Audio Technology. Caliber strives to provide you
with the finest products possible, and is always looking for ways to please our
customers even more.
Properly installed, your Caliber CXQ20 will provide years of high quality sonic
reproduction. Before installing this Equalizer/crossover in your vehicle, please
read this entire manual carefully, in order to protect your vehicle, and get the
maximum performance of your mobile sound system.
Caliber Warranty
Due to the complexity of our products, we strongly recommend that this
Equalizer/crossover is installed by your authorized Caliber dealer. If properly
installed by your dealer we provide a warranty for 12 month from the date of
purchase.
If you install this Equalizer/crossover yourself, we wish you lots of fun and succes
in doing so. If you follow our guidelines, you’ll get the best result. Our warranty,
however, will be limited to and not exceed 30 days from the date of purchase.
Caliber Accessories
To r ealize the exceptional performance of which this Equalizer/crossover is capable, it is necessary that power sources, signal sources, speakers and interconnects are of the highest quality. Remember that Caliber is a specialized manufacturer of all sorts of Car Audio components.We also manufacture everything
needed for the ‘optimal’ Car Audio System (except the car). So be sure to ‘Get
Connected’ with Caliber and ask your local Caliber dealer for our accessories.
Important
The quality of installation may effect the performance and reliability of a Caliber
CXQ20 Equalizer/crossover. If you have any doubts or questions regarding
installation or use, don’t hesitate to contact your official Caliber dealer.
A Caliber dealer is selected for his knowledge in auto sound, and has been trained
to give you great advice and service.You can always count on him to give you
advice for any technical problems and will keep you informed on the latest products by Caliber.
We wish you lots of enjoyable moments with your newest toy.Adjust the sound
to perfection, but keep paying attention to the road whilst doing so.
1
BEFORE YOU START
Page 2

6Low Pass Output Level Control
This allows you to adjust the output level to match both the input level of
your subwoofer amplifiers and the relative level to the High Pass output.
7 Remote Low Pass Level control
Docking port for the jack of the supplied CXR Remote control.This gives
you the possibility to adjust your Low Pass Level on dash.
8Low Pass Output Peak LED
This indicator will illuminate constantly when the output voltage reaches
or surpasses 15V RMS maximum out for the Low Pass output.
9Low Pass Crossover Frequency Selector
Adjusting this four position switch, you may select between crossoverpoints
60Hz / 80Hz / 100Hz / 120Hz for the Low Pass (sub-woofer) output.
10 High Pass Output
Docking ports for the RCA connectors leading to your High Pass amplifiers
or alternative crossover.
11 High Pass Output Level Control
This allows you to adjust the output level to match both the input level of
your High Pass amplifiers and the relative level to the Low Pass output.
12 High Pass Output Peak LED
This indicator will illuminate constantly when the output voltage reaches
or surpasses 15V RMS maximum out for the High Pass output.
13 High Pass Crossover Frequency Selector
Adjusting this four position switch, you may select between crossoverpoints
80Hz / 100Hz / 120Hz or Full Range for the High Pass output.
14 Power Terminals
”+” Connect to the vehicle’s positive 12V supply (+12V DC)
”-” Connect to the vehicle’s ground (-12V DC)
”R” Connect to the head unit’s remote turn on leads.
”D/R” Delayed Remote output. Connect to all the amplifiers and crossovers
following the CXQ20.This will delay the turn on of these units by 2 seconds
after the system is powered up.
15 Fuse 1A The 1A fuse will help to protect the CXQ20 in case of a short.
16 Power Indicator LED
Lights up when the CXQ20 is powered up and properly installed.
Specifications CXQ20
General
Frequency response 10Hz to 30KHz ±1dB
T.H.D. 0.02%
Signal to noise ratio >100dB
Channel separation >80dB
Input level 7V to 0.2V
Input impedance 20KΩ
Maximum output level 15V
Output impedance 50Ω Balanced
Crossover
Crossover frequencies
High-pass 80/100/120Hz and Full Range
Low-pass 60/75/85Hz and Full Range
Crossover slope 18dB
Dimensions W x L x H (mm) 280 x 180 x 35 (mm)
Features CXQ20 (See illustration on the inside cover)
1 Input
Docking ports for the RCA connectors arriving from the source unit’s
output.
2 Input Level Control
Input sensitivity control adjusts to your source unit’s output.
3 Equaliser On/Off switch
This switch allows you to bypass the equalizer by switching it to the off
position
4 Input Peak LED
This indicator will illuminate when the input level is too high and clipping is
occurring. If the LED is illuminating, back the input level control (2) to a
less sensitive setting.
5Low Pass Output
Docking ports for the RCA connectors leading to your sub-woofer amplifier.
2 3
SPECIFICATIONS AND FEATURES
SPECIFICATIONS AND FEATURES
Page 3
Signal input
The next to connect is your signal input. Choose the correct length and style of
RCA patch cables for your needs. Better RCA’s, such as the ones from the
Caliber CL 600 and CL 800 Get Connected Series, have gold-plated connectors
and multiple layers of shielding for better noise rejection. (Consult your official
Caliber dealer about these cables and RCA’s).
Be extra careful when running your RCA patch cables. Car environments are
notorious for poorly insulated wires.This means that hiss, engine noise and fan
noise can easily be picked up trough RCA cables, if ran incorrectly.As a precaution, avoid placing your RCA’s near large wire looms and electronic fans whenever possible.
Connect the patch cables to the RCA output of your source unit. Run the RCA
cables to the location of the CXQ20, and connect them to the input RCA connectors of the CXQ20. Be sure to connect the right channel to the right channel, and the left to the left.(In an audio system the right always has red RCA connectors, and the left RCA connectors are white or black).
Signal output
Once you have connected the inputs, it is time to connect the outputs. Be careful to connect, via RCA patch cables, the correct output to the correct amplifier.
Ta ke good care in the balance of your signal (Right to right, and left to left).
Now that you have connected all your signal and power cables, it is time to connect your battery again, and place the 1A fuse in the fuseholder.
Crossover
Determing the best crossoverpoints for your speakers is critical.The size of the
speakers, their powerhandling caracteristics and frequency range have to be
taken into consideration.Also the location of the speakers has to be evaluated
before the best crossoverpoints can be choosen.
A good ear, and proberbly some advice from your official Caliber dealer can help
you a lot when you are adjusting your crossovers.
5
SIGNAL INPUT / OUTPUT
4
MOUNTING AND CONNECTING YOUR CXQ20
Mounting your CXQ20
Find a steady, secure area to mount your CXQ20. Be sure it is accessible, but not in
an area where the equalizer sliders or any other adjustments may be bumped by
accident. Use the chassis of the CXQ20 as a template and mark the locations of the
mounting holes. Predrill the mounting holes using a 2,5 mm diameter drill bit and
use the screws supplied with your CXQ20 to fasten your equalizer/crossover. Make
sure the screws are tightened securely.
Getting your power started
REMEMBER TO ALWAYS DISCONNECT BATTERY GROUND
BEFORE WORKING ON A VEHICLE’S ELECTRICAL SYSTEM
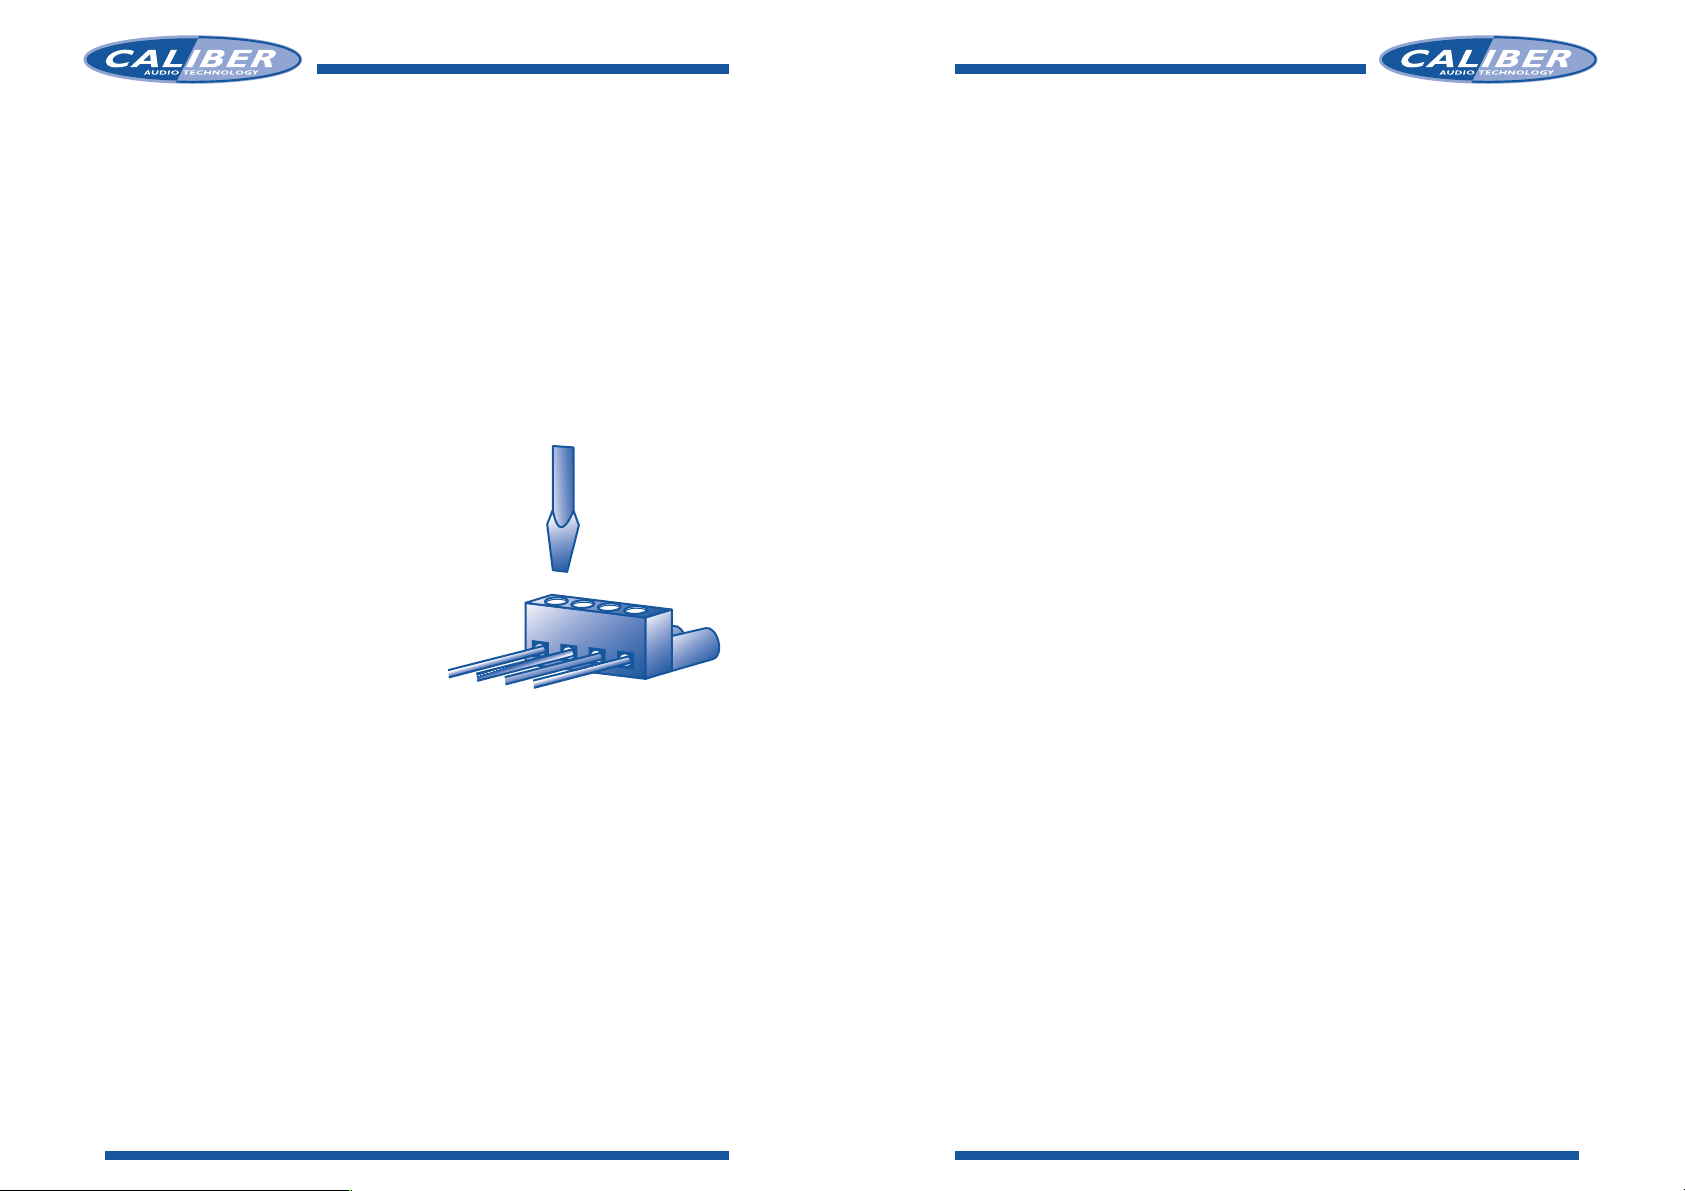
• First, the +12V terminal is connected. The +12V ter-
minal is the first slot(A) from the left of the powerconnector. Use the same +12V source as you are
using for your amplifiers, in order to avoid picking up
noise due to voltage differences.
Don’t forget to add an inline fuseholder holding a
1A fuse at the beginning of the powercable for the
CXQ20.This to protect both your vehicle
and audiosystem in case of a short.
•Second, the -12V ground terminal must be connected.The -12V ground is the
second slot(B) from the left of the powerconnector.This cable has to be fastened securely to the chassis of the vehicle with the same gauge cable as the positive cable (the same amount of power has to run through it). Ensure that all
paint, undercoating or any other insulation is removed from the area where you
want to make your ground connection to.
• Third to connect is your remote turn-on.The R (remote turn on) is the third
slot(C) from the left of the powerconnector.Many radio-cassette and CD-players
have an output terminal for connection of the Remote turn on. If you don’t have
such an output, a separate switch must be installed to control your remote
on/off functions.
• The last terminal to connect is your Delayed Remote output.The D/R (Delayed
Remote output is the first slot (D) from the right of your powerconnector.The
delayed remote output should be connected to all the amplifiers and crossovers
following the CXQ20, so they can be started with a 2 seconds delay.
+
-
D/R
R
A B C D
screwdriver
Page 4

9 Match the level of the more dominating of the two outputs to the weaker one.
Make sure the Peak Output LED is not illuminating. If the Peak Output LED is
illuminating, lower the output level control slightly until the distortion is no longer noticeable and the LED has stopped flickering.Again, if there is more gain
needed, adjust the input level control on the amplifier.
10 Take a few minutes now to listen to the system to determine if the settings
are satisfactory. Adjust the volume knob to several different levels and fine
tune your settings. Do this using music tracks you know well.
11 Depress the equalizer On/Off switch (2) once again so the equalizer gets in
its “On” position.
Equalization
How does an equalizer work?
Simply put, an equalizer corrects deviations in frequency over a given bandwidth.
The slider knobs on the CXQ20 are each numbered with the center of the frequency “Q” they adjust. By sliding the adjustment knobs up or down, you can
boost or cut a particular frequency to smooth the response of your system and
acquire the desired sound.
Adjusting your equalizer
Adjusting your CXQ20 is not an easy task. Caliber recommends the use of a
Real Time Analyzer (RTA).Without a RTA it will be hard to distinguish the dips
and peaks, and to value how much to adjust them.Wheter you use a RTA or
adjust your systen by the taste of your ear, always follow these basic steps.
1Always start with the frequencies that need to be cut or reduced.This has a
very simple reason. If you boost a frequency up 3, 6 or 12dB the system
noise will be boosted up with an equal amount. Cutting of frequencies first
will also cut of system noise.
2Remember to adjust no more than two frequency bands at one time. This
makes it much easier to distinguish wheter the changes make an improvement or not. Since the CXQ20 is typically mounted in the trunk it’s important to listen to the changes in response after each setting in the drivers- or
passengersseat. Because there is where you want it to sound great.
Level Adjustments
By now you’re probably really anxious to listen to your improved audio system.
But before you turn on your radio, you have to complete some very important
adjustments in order to fine tune your system.These are the level controls.
Follow the steps below starting with the preliminary adjustments.
1 Before you do anything, set the input- and output levels to a safe level,
then set the Equalizer to your personal taste of sound. Now you can
start adjusting all the input and output levels for a maximum performance.
2 Adjust the input level control (2) of your CXQ20 to 2/3 of the maximum.
3Preset the High Pass - (11) and Low Pass output level controls (6) to slightly
above the minimum gain.Depress the equalizer On/Off switch (2) to its “Off”
position.
4 Set the input levels of your amplifiers to 25%.
5 Activate the radio power. Set the tone controls, balance and fader controls to
the center or flat position.
And now it is time to make some serious music.Find a couple of dynamic tracks on
your favorite CD,insert the CD into the CD-player, and follow the level adjustments
given to you in points 6 to 11.
6 Adjust the volume of your radio to 75% of the maximum volume. Listen care-
fully to make sure the music is not clipping. Continue to play the tracks you
chose throughout the rest of the adjustment period.
7 Check the input peak LED (4) on your CXQ20 and make sure it is not illumina-
ting. Adjust the input level control (2) up until the Peak LED (4) starts to
flash.Then back of the level control slightly so the Peak LED will stop flashing. In
some cases the input Peak LED will not illuminate,not even at full maximum level.
This is OK, because in this case your radio might not have a high output level.
8Turn the output level controls (6 or 11) up until onset or audible distortion is
heard.Make sure the Peak Output LED (8 or 12) is not illuminating at this point.
Now, lower the output level slightly until the distortion is no longer noticeable
and/or Peak Output LED is not longer flickering. Make a note that most amplifiers will not accept an input level of 9V,so your output level controls should not
be over 75% of their max. If more gain is needed, adjust the input level control
on your amplifier.
6 7
LEVEL ADJUSTMENTS
HOW DOES AN EQUALIZER WORK
Page 5

Nous vous remercions d’avoir porté votre choix sur un produit Caliber.Vous
manifestez ainsi votre souhait de bénéficier de la technologie Car Audio la plus
évoluée. Caliber ne recule devant aucun effort pour vous proposer les meilleurs
produits et recherche sans cesse à satisfaire davantage encore ses clients.
Correctement installé, votre Caliber CXQ20 reproduira pendant de longues
années un son d’une qualité parfaite.Au préalable, lisez attentivement ce manuel afin de protéger votre véhicule et de profiter au mieux des performances de
votre installation Car Audio.
Garantie Caliber
Vu la complexité de nos produits, nous vous conseillons vivement de confier l’installation de cet égaliseur/filtre répartiteur à un revendeur agréé Caliber.Votre
appareil bénéficiera ainsi d’une garantie de 12 mois à partir de la date d’achat.
Si vous installez vous-même l’égaliseur/filtre répartiteur, nous vous souhaitons
de mener à bien cette tâche. En suivant nos recommandations, vous ne devriez
guère éprouver de difficultés. Toutefois, notre garantie est alors limitée à 30
jours à partir de la date d’achat.
Accessoires Caliber
Pour permettre à cet égaliseur/filtre répartiteur d’atteindre le niveau de performances exceptionnel dont il est capable, il est nécessaire que les sources d’alimentation, les sources des signaux, les haut-parleurs et les raccordements
soient d’une parfaite qualité. N’oubliez pas que Caliber n’est pas simplement un
fabricant de composants car audio. Nous produisons également tout ce dont
vous avez besoin pour réaliser un système Car Audio “optimal” (à l’exception
du véhicule !). N’oubliez donc pas de choisir du matériel Caliber pour tous vos
raccordements et renseignez-vous sur notre gamme d’accessoires auprès de
votre revendeur Caliber.
Important
La qualité d’installation peut avoir une incidence sur les performances et la fiabilité de l’égaliseur/filtre répartiteur Caliber CXQ20. Si vous avez des question
ou des doutes concernant l’installation ou l’utilisation de l’appareil, n’hésitez pas
à contacter votre revendeur Caliber.
Un revendeur Caliber est sélectionné pour sa connaissance des installations
audio pour véhicule et a reçu la formation requise pour vous conseiller judicieusement et assurer l’entretien correct de votre système Car Audio. Il est toujours
là pour résoudre vos problèmes techniques et vous renseigner sur les nouveautés de la gamme Caliber.
Nous vous souhaitons de passer d’agréables moments en compagnie de votre
nouvelle acquisition. Réglez l’appareil jusqu’à obtenir un son parfait,tout en restant attentif à la route.
3Always use extreme caution in boosting frequencies. For every 3dB of boost,
twice the amount of power is needed from the amplifier for that particular
frequency. For example:Your amplifier is supplying 25W at a particular frequency.When you boost up this frequency with 3dB, your amplifier will need
to supply 50W, and with a 6dB boost it will need to supply even 100W (that’s
4x the power).If too much boost is applied, the chances are your amplifier will
clip at these frequencies and possibly damage your speakers and amplifier.
4Avoid equalizing more than + / - 6dB. If you have such a large deviation that
more than 6dB adjustment is needed, chances are that you have a phase problem.This can be in part due to the location of the speakers, or as simple as a
polarity problem at one or more speakers.
Checking the level settings once more
Now that you’ve had your fun in equalizing your system to your likings, it is time
to check the output levels of your CXQ20 once again.Since you have been playing
with power, in cutting or boosting certain frequencies, the output level may have
been affected. Play the dynamic track you had chosen for the initial level settings
once again, turn the volume on your radio to 3/4 of the maximum and adjust the
outputs accordingly. If distortion is heard, or the Peak Output LED’s are illuminating, turn your output levels down. If on the otherhand you have a drop in volume
now, you can very slowly increase the output levels as long as the Peak Output
LED’s do not illuminate.
BE CAREFUL NOT TO OVERDRIVE YOUR AMPLIFIERS
The Caliber CXR Sub-woofer Level Remote Control
Now here is an accessory which came with your CXQ20 that you are going to
have a lot of fun with. It gives you the complete control over your sub-woofer
level, from the front seat of your vehicle, and allows you to adjust the amount of
bass to the type of music you are playing.
The CXR Remote Control is easy to mount and comes with a 5 meter cable with
clip on telephone jacks at both sides. It will take you about 10 minutes to install
this Remote control on your dashboard.After you have plugged in your telephone jacks in the remote control and the CXQ20, you must turn up the Low Pass
output level a little.
And now:
Start your engine, turn on your audio,crank up the volume,
pay attention (to the road), sit back, relax and enjoy your
new Caliber sound system.
8 9
CHECKING THE SETTINGS / REMOTE CONTROL
AVANT DE COMMENCER
Page 6

7 Réglage à distance du niveau passe-bas
Prises cinch pour raccorder la télécommande CXR fournie. Ceci vous permet de régler le niveau passe-bas à partir du tableau de bord.
8 LED de crête de sortie passe-bas
Cet indicateur s’allumera lorsque le voltage de sortie atteint ou dépasse le
niveau maximum de 15 V RMS pour la sortie passe-bas.
9 Sélecteur de fréquences de répartition passe-bas
En réglant de sélecteur à quatre positions,vous pouvez sélectionner un point
de répartition entre 60Hz/75Hz/85Hz/Full pour la sortie passe-bas (subwoofer).
10 Sortie passe-haut
Prises cinch pour raccorder le câble menant à vos amplificateurs passe-haut
ou au filtre répartiteur alternatif.
11 Réglage du niveau de sortie passe-haut
Ceci vous permet de régler le niveau de sortie pour accorder tant le niveau
d’entrée des amplificateurs de votre subwoofer que le niveau relatif à la sortie passe-bas.
12 LED de crête de sortie passe-haut
Cet indicateur s’allumera lorsque le voltage de sortie atteint ou dépasse le
niveau maximum de 15 V RMS pour la sortie passe-haut.
13 Sélecteur de fréquences de répartition passe-haut
En réglant le sélecteur à quatre positions, vous pouvez sélectionner un point
de répartition entre 80 Hz / 100 Hz / 120 Hz ou la bande passante pour la
sortie passe-haut.
14 Bornes de puissance
“+” A relier à la borne positive d’alimentation 12V (+ 12 V DC)
“-” A relier à la borne de masse du véhicule (- 12 V DC)
“R” A relier au câble de commande à distance de l’unité principale
“D/R” Sortie de commande à distance retardée. A relier à tous les amplificateurs et filtres répartiteurs montés en aval du CXQ20. Ceci retardera de
2 secondes la mise en service de ces appareils après la mise en marche du
système.
15 Fusible IA Le fusible IA protégera le CXQ20 dans le cas d’un court-circuit.
16 LED de mise en service Ce témoin s’allumera lorsque le CXQ20 est cor-
rectement installé et mis en service.
Caractéristiques du CXQ20
Généralités
Réponse en fréquence 10 Hz - 30 kHz ± 1 dB
Distorsion harmonique totale 0,02%
Rapport signal/bruit (pondération A) > 100 dB
Séparation des canaux > 80 dB
Niveau d’entrée 7 V - 0.2 V
Impédance d’entrée 20 kOhms
Niveau de sortie maximum 15 V
Impédance de sortie 50 ohms balancé
Filtre répartiteur
Fréquences de répartition
Passe-haut 80/100/120 Hz et bande passante
Passe-bas 60Hz/75Hz/85Hz/Full
Pente de répartition 18 dB
Dimensions (p x l x h - mm) 280 x 180 x 35 (mm)
Fonctionnalités du CXQ20
(voir illustration à l’intérieur de la couverture)
1 Entrée
Prises cinch pour raccorder le câble en provenance de la sortie de l’unité source
2 Réglage du niveau d’entrée
A l’aide du réglage de la sensibilité d’entrée, vous réglez la sortie de l’unité source.
3 Sélecteur marche/arrêt de l’égaliseur
Ce sélecteur vous permet de dériver l’égaliseur en le mettant en position d’arrêt.
4 LED de crête d’entrée
Cet indicateur s’allumera lorsque le niveau d’entrée est trop élevé et que
des coupures surgissent.Si le témoin est allumé, réglez le niveau d’entrée sur
une position moins sensible (2).
5 Sortie passe-bas
Prises cinch pour raccorder le câble menant vers votre amplificateur de subwoofer.
6 Réglage du niveau de sortie passe-bas
Ceci vous permet de régler le niveau de sortie pour accorder tant le niveau
d’entrée des amplificateurs de votre subwoofer que le niveau relatif à la sortie passe-haut.
10 11
CARACTERISTIQUES ET FONCTIONNALITES
CARACTERISTIQUES ET FONCTIONNALITES
Page 7

Signal d’entrée
A présent, il est temps de connecter le signal d’entrée. Choisissez la longueur et
le type de câbles de connexion à prise cinch en fonction de vos besoins. Les
meilleurs câbles à prise cinch, comme par exemple les câbles Caliber CL 600 et
CL 800 issus de la gamme Get Connected, disposent de connecteurs plaqués or
ainsi de plusieurs de couches de protection pour une meilleure suppression des
bruits. (Consultez votre revendeur Caliber agrée pour plus d’informations sur
ces câbles.)
Soyez particulièrement vigilant en tirant vos câbles de connexion à prise cinch.
Les voitures sont en effet réputées pour la faible isolation de leurs fils. Ceci signifie que des sifflements, les bruits du moteur et du ventilateur pénètrent facilement dans les câbles cinch, si ceux-ci n’ont pas été correctement posés.Evitez
donc au maximum de poser vos câbles à proximité d’importants jeux de fils et
de ventilateurs électroniques.
Connectez les câbles de connexion à la sortie cinch de votre unité source.Posez
les câbles cinch en direction de l’emplacement du CXQ20 et reliez les aux connecteurs cinch d’entrée du CXQ20.Veillez à raccorder le canal droit à l’entrée
droite et le gauche à l’entrée gauche. (Dans un système audio, le canal droit a
toujours des connecteurs cinch rouges et les connecteurs cinch gauches sont
blancs ou noires.)
Signal de sortie
Une fois que vous avez connecté les entrées, il vous faut connecter les sorties.
Veillez à raccorder, via les câbles de connexion à prise cinch, les sorties aux
amplificateurs correspondants (ampli de subwoofer - ampli de passe-haut).Soyez
très attentif à la balance du signal (canal droit - entrée droit, canal gauche entrée gauche).
Maintenant que vous avez connecté vos câbles d’alimentation et de signal, raccordez à nouveau votre batterie et placez le fusible 1A dans le porte-fusible.
Filtre répartiteur
Il est capital de déterminer les points de répartition optimaux pour vos hautparleurs. La taille des HP, leur capacité de traitement de puissance et la gamme
de fréquences doivent être pris en considération. L’emplacement des haut-parleurs doit également être évalué avant de pouvoir sélectionner les meilleurs
points de répartition.
Une ouïe fine et quelques conseils de votre revendeur agrée Caliber vous seront probablement très utiles pour le réglage de votre filtre répartiteur.
Avant de monter votreCXQ20, vous devez choisir soigneusement l’emplacement où vous allez l’installer.Assurez-vous qu’il est certes accessible, mais également à l’arbri de modifications malencontreuses des glissières de l’ègaliseur ou
d’autres réglages. Dès que vous avez choisi l’emplacement adéquat, marquez la
surface de montage en utilisant le châssis du CXQ20 comme gabarit. Perces des
trous de 2,5 mm de section aux emplacements marqués et fixez le CXQ20 a
l’aide des vis autotaraudeuses fournies d’orgine.
Raccordement de l’alimentation
DEBRANCHEZ TOUJOUR LA MASSE DE LA BATTERIE AVANT
D’INTERVENIR SUR LE SYSTEME ELECTRIQUE D’UN VEHICULE
•Premièrement,la borne +12V doit être raccordée. C’est la première fente (A)
de gauche sur le connecteur d’allimentation. Utilisez la même source +12V
que celle employée pour vos amplis,ceci afin d’éviter
les bruits suite à une différence de voltage. N’oubliez
pas d\ajouter un porte-fusible en ligne comportant
un fusible 1A au début du câble d’alimentation du
CXQ20. Ceci protégera tant votre véhicule que
votre système dans le cas d’un court-circuit.
• Deuxièmement,la borne de masse -12V doit être
raccordèe. C’est la seconde fente (B) à
guache sur le connecteur d’alimentation.
Ce câble doit être solidement fixé au
châssis du véhicule en utilisant du câble de même section que le câble positif
(étant donné qu’il acheminer du courant de même intensité).Assurez-vous que
l’endroit où vous effectuez le raccordement de la masse est exempt de peinture, de revêtement de protection ou de toute autre forme d’isolant.
•Troisièmement, vous devez raccorder le câble de commande à distance. Le
R (Remote turn on) est la troisième fente (C) à gauche du connecteur d’alimentation. De nombreux radiocassettes et lecteurs CD possèdent une
borne de sortie destinèe au raccordement de la commande à distance. Si
votre appareil n’est pas équipé d’une telle sortie, vous devez installer un
commutateur distinct qui commandera les fonctions de marche/arrêt.
• La derniére borne à connecter est la sortie de commande à distance
retardée. Le D/R (Delayed Remote output) est la première fente (D) à droite sur votre connecteur d’alimentation. La sortie D/R doit être raccord´é
aux amplificateurs et filtres répartiteurs montés en aval du CXQ20. Ceci
retardera de 2 secondes la mise en service de ces appareils après la mise en
marche du système.
12 13
MONTAGE ET RACCORDEMENT DE VOTRE CXQ20
SIGNAL D’ENTREE DE SORTIE
Tournevis
screwdriver
A B C D
+
-
R
D/R
Page 8

9 Accordez le niveau de la sortie la plus dominante au niveau de la sortie la
plus faible. Assurez-vous que le LED de crête de sortie est éteint. Si le LED
de crête de sortie est allumé, diminuez légèrement le niveau de sortie jusqu’à ce que vous n’entendiez plus de distorsion et que le LED s’arrête de
clignoter. Une nouvelle fois, si vous nécessitez une amplification plus importante, ajustez le niveau d’entrée de votre amplificateur.
10 A présent, prenez le temps quelques minutes pour écouter le système et
vérifier si les réglages sont satisfaisants. Réglez le bouton de volume à différents niveaux et perfectionnez vos réglages. En faisant cela,écoutez des morceaux de musique que vous connaissez bien.
11 Appuyez une nouvelle fois sur le sélecteur marche/arrêt de l’égaliseur pour
le mettre en position “On”.
Egaliseur
Comment fonctionne un égaliseur
Un égaliseur corrige les écarts de fréquences sur une certaine largeur de bande.
Chacune des glissières du CXQ20 est numérotée avec le centre de la fréquence “Q” qu’elles règlent. En glissant les touches de réglage vers le haut ou vers le
bas, vous pouvez renforcer ou couper une certaine fréquence pour égaliser la
réponse de votre système et obtenir la sonorité souhaitée.
Réglez votre égaliseur
Régler le CXQ20 n’est pas chose aisée. Caliber recommande l’usage d’un analyseur en temps réel (RTA) pour faciliter la distinction entre les creux et les crêtes
et pour évaluer le réglage. Que vous utilisiez un RTA ou que vous régliez votre
système en vous fiant à votre ouïe, suivez dans tous les cas les étapes suivantes.
1 Commencez toujours par les fréquences à couper ou à réduire, pour la simple
raison que si vous renforcez une fréquence de 3, 6 ou 12 dB,le bruit du système
sera également renforcé proportionnellement. En réduisant d’abord certaines
fréquences, vous réduirez le bruit du système par la même occasion.
2 Ne réglez jamais plus de deux bandes de fréquences en même temps. Ainsi,
vous pourrez plus facilement vérifier si les changements apportent ou non
une amélioration. Puisque le CXQ20 est monté dans le coffre, il est important d’écouter les changements de réponse après chaque modification,à partir du siège conducteur ou passager. C’est précisément à ces endroits que la
sonorité doit être optimale.
Régler les niveaux
A ce stade-ci, vous êtes probablement impatient d’entendre votre nouveau
système audio.Toutefois, avant d’allumer votre radio, vous avez encore à effectuer quelques réglages fins importants, à savoir les réglages des niveaux. Suivez
les étapes ci-dessous en commençant par les réglages préliminaires.
1Avant de commencer,reglez les niveaux d’entrée et de sortie à un niveau sans
risque. Adjustez le égaliseur à votre gôut de musique personnelle.
2 Réglez le niveau d’entrée (2) de votre CXQ20 à 2/3 de son niveau maximum.
3 Réglez les niveaux de sortie passe-haut (11) et passe-bas (6) légèrement au-
dessus du gain minimum. Appuyez sur le sélecteur marche/arrêt de l’égaliseur pour le mettre en position “Off”, et les bandes de l’égaliseur à zéro.
4 Fixez les nivaux d’entrée de vos amplificateurs à 25% maximum.
5 Activez la radio. Réglez la tonalité, la balance et l’atténuateur sur position
centrale ou horizontale.
A présent, passons aux choses sérieuses. Choisissez quelques titres dynamiques
sur votre CD favori, insérez le CD dans le lecteur CD et effectuez les réglages
de niveaux repris ci-dessous (de 6 à 11).
6 Réglez le volume de votre radio à 75% du volume maximum. Ecoutez atten-
tivement et assurez-vous qu’il n’y a pas de coupures dans la musique.
Continuez à lire les titres que vous avez choisi tout au long du processus de
réglage des niveaux.
7 Vérifiez le LED de crête d’entrée (4) sur votre CXQ20 et assurez-vous qu’il
est éteint. Ajustez le niveau d’entrée jusqu’à ce que le témoin lumineux de
crête se mette à clignoter. Diminuez légèrement le niveau jusqu’à ce que le
témoin s’arrête de clignoter. Dans certains cas, le LED de crête d’entrée ne
s’allumera pas, même pas au niveau maximum. Ceci est normal puisque votre
radio n’est peut-être pas équipée d’un niveau de sortie élevé.
8 Augmentez le réglage du niveau de sortie (6 ou 11) jusqu’à ce vous enten-
diez clairement une distorsion.Assurez-vous que le LED de crête de sortie
(8 ou 12) est éteint. A présent, diminuez le niveau de sortie jusqu’à ce que
vous n’entendiez plus de bruit et/ou que le LED de crête de sortie ne clignote plus. Remarquez que la plupart des amplificateurs n’acceptent pas de
niveau d’entrée de 9 V;les réglages de niveaux de sortie ne dépasseront donc
pas 75% de leur maximum. Si vous nécessitez une amplification plus importante, ajustez le niveau d’entrée de votre amplificateur.
14 15
REGLER LES NIVEAUX
COMMENT FONCTIONNE UN EGALISEUR
Page 9

Wir danken Ihnen, daß Sie sich für ein Caliber-Produkt entschieden haben. Mit
diesem Kauf haben sie sich zum höchsten Qualitätsmaßstab in der Car-AudioTechnik bekannt. Caliber möchte Ihnen ein optimales Produkt bieten und
bemüht sich konsequent, die Zufriedenheit seiner Kunden stetig zu steigern.
Ihr Caliber-System CXQ20 wird Ihnen den sachgemäßen Einbau durch jahrelange hochwertige Wiedergabe danken. Bevor Sie das Gerät in Ihrem Fahrzeug
montieren, lesen Sie jedoch bitte diese Bedienungsanleitung sorgfältig und vollständig durch, um Schäden am Fahrzeug zu vermeiden und eine optimale
Leistung Ihrer Audio-Anlage zu erzielen.
Caliber-Gewährleistung
Bei unseren Produkten handelt es sich um hochwertige technische Systeme.Wir
empfehlen daher nachdrücklich, den Einbau Ihres Equalizer/FrequenzweichenSystems durch eine Caliber-Vertragswerkstatt vornehmen zu lassen. Bei sachgemäßem Einbau durch die Fachwerkstatt gewähren wir eine Garantie von 12
Monaten ab dem Kaufdatum.
Falls Sie das System lieber selbst montieren möchten, wünschen wir Ihnen dabei
viel Spaß und Erfolg. Um optimale Ergebnisse zu erzielen, befolgen Sie bitte
unbedingt die in dieser Anleitung enthaltenen Hinweise. Wir können in diesem
Fall allerdings nur eine eingeschränkte Gewährleistung von 30 Tagen ab dem
Kaufdatum übernehmen.
Caliber-Zubehör
Damit dieses System seine überlegene Leistung voll entwickeln kann, müssen
Spannungsversorgung, Signalquellen, Lautsprecher und Verbindungstechnik von
höchster Qualität sein. In diesem Zusammenhang erlauben wir uns den Hinweis
auf unser umfassendes Angebot von Car-Audio-Komponenten. Das CaliberProduktprogramm umfaßt sämtliche Systemteile, die Sie zur optimalen HiFiWiedergabe im Auto benötigen, d.h. alle Komponenten, die nicht zum Fahrzeug
selbst gehören. Verwenden Sie daher auch zum Anschluß des Geräts nach
Möglichkeit nur Caliber-Originalteile und fragen Sie Ihren örtlichen CaliberVer tragshänder nach unserem Zubehörprogramm.
Wichtiger Hinweis
Die Leistung und Zuverlässigkeit Ihrer Caliber-Equalizer/FrequenzweichenSystems CXQ20 hängt entscheidend von dem sachgemäßen Einbau und der
Qualität der verwendeten Komponenten ab. Falls Sie Zweifel oder Fragen zur
Installation des Systems haben sollten, wenden Sie sich bitte jederzeit an Ihren
Caliber-Fachhändler.
Die Mitglieder des Caliber-Händlernetzes sind aufgrund ihrer besonderen CarAudio-Qualifikation ausgewählt und in Beratung und Kundendienst geschult.Sie
können Ihre Fragen kompetent beantworten und informieren Sie auch gern
über die aktuelle Caliber-Produktentwicklung.
3Soyez toujours extrêmement vigilant lorsque vous renforcez des fréquences.
Pour chaque amplification de 3 dB,l’amplificateur doit fournir le double de puissance pour cette fréquence. Par exemple : votre ampli fournit 25 W à une certaine fréquence. Lorsque vous amplifiez cette fréquence de 3 dB, l’ampli devra
fournir 50 W et avec un renforcement de 6 dB, il devra fournir 100 W (4x plus
de puissance). En exagérant l’amplification, vous risquez de dérégler votre ampli
à ces fréquences et d’endommager aussi bien votre ampli que vos haut-parleurs.
4 Evitez d’égaliser de plus de +/- 6 dB. Si l’écart est tel qu’un réglage de 6 dB
est nécessaire, vous avez peut-être un problème de phase. Ceci peut être en
partie du à l’emplacement des haut-parleurs, ou, simplement, à un problème
de polarité d’un ou de plusieurs haut-parleurs.
Revérifier les réglages de niveau
Maintenant que vous avez égalisé le système en fonction de vos préférences, il
est temps de revérifier les niveaux de sortie de votre CXQ20. Puisque vous avez
expérimenté avec les puissances, en amplifiant ou en atténuant certaines fréquences, le niveau de sortie a peut-être été modifié. Repassez le morceau de
musique dynamique que vous aviez choisi pour le réglage initial des niveaux,
mettez le volume de votre radio à 3/4 de son volume maximum et réglez les
sorties en conséquence. Si vous entendez des distorsions, ou si les LED de crête
de sortie sont allumés, réduisez vos niveaux de sortie. Si, par contre, vous avez
une baisse de volume, augmentez progressivement les niveaux de sortie sans
que les LED de crête de sortie ne s’allument.
VEILLEZ A NE PAS SURPILOTER VOS AMPLIS
Régler la télécommande Caliber CXR pour le niveau de subwoofer
Voici un accessoire, livré avec le CXQ20, qui vous procurera bien du plaisir. Il
vous permet en effet de commander le niveau du subwoofer depuis le siège
avant de la voiture, et de régler la quantité de graves en fonction du genre de
musique que vous écoutez.
Facile à monter, la télécommande CXR est livrée d’origine avec un câble de 5
mètres équipé de jacks téléphone enfichables aux deux extrémités. En 10 minutes, vous aurez installé cette télécommande sur votre tableau de bord. Une fois
que vous aurez enfiché les jacks téléphones dans la télécommande et dans le
CXQ20, vous devrez légèrement augmenter le niveau de sortie passe-bas.
Maintenant :
Démarrez le moteur, allumez l’installation audio, montez
le volume, soyez attentif (à la route), installez-vous confortablement, détendez-vous et appréciez pleinement votre
nouvelle installation Caliber.
16 17
VERIFIER LES REGLAGES / TELECOMMANDE
VOR DEM EINBAU
Page 10

7Fernbedienung des Tiefpaß-Ausgangspegelreglers
Buchse zum Anschluß der mitgelieferten CXR-Fernbedienung. Diese ermöglicht die Einstellung des Tiefpaß-Ausgangspegels vom Armaturenbrett aus.
8 LED-Meldeleuchte “Tiefpaß-Ausgangspegel überschritten”
Diese LED leuchtet auf, wenn die Spannung des Tiefpaßfilter-Ausgangssignals
einen Wert von 15V RMS erreicht bzw. überschreitet.
9 Umschalter für die Tiefpaßfilter-Schnittfrequenz
Dieser Schalter verfügt über vier Schaltstellungen und dient zur Auswahl der
gewünschten Schnittfrequenz für den Tiefpaßfilter (Subwoofer-Ausgang). Zur
Wahl stehen die Frequenzen 60Hz/75Hz/85Hz/Full
10 Hochpaß-Ausgang
Cinch-Buchsen zum Anschluß der Kabel zu den Hochpaß-Verstärkern bzw.
einer weiteren Frequenzweiche.
11Hochpaß-Ausgangspegelregler
Zur Abstimmung des Signalausgangspegels auf den Eingangsbereich der
Subwoofer-Verstärker sowie der Pegeldifferenz zum Tiefpaßfilter-Ausgang.
12LED-Meldeleuchte “Hochpaß-Ausgangspegel überschritten”
Diese LED leuchtet auf, wenn die Spannung des Hochpaßfilter-Ausgangssignals
einen Wert von 15V RMS erreicht bzw. überschreitet.
13Umschalter für die Hochpaßfilter-Schnittfrequenz
Dieser Schalter verfügt über vier Schaltstellungen und dient zur Auswahl der
gewünschten Schnittfrequenz für den Hochpaßfilter-Ausgang. Zur Wahl stehen
die Frequenzen 80 / 100 / 120 Hz sowie ungefilterte Wiedergabe (Full Range).
14Spannungsversorgung
“+” Anschluß für den Pluspol der 12-Volt-Anlage des Fahrzeugs (+12Vdc)
“-” Anschl. für den Minuspol der 12-Volt-Anlage des Fahrzeugs (“Masse” -12Vdc)
“R” Anschluß für die Ferneinschaltfunktion des Hauptgeräts
“D/R” Ferneinschaltverzögerung. Diese Kontakte sind mit allen Verstärkern
und Frequenzweichen zu verbinden,die dem Equalizer CXQ20 nachgeschaltet
sind. Sie bewirken, daß die Einschaltung dieser Geräte nach der Einschaltung
des Systems um 2 Sekunden verzögert erfolgt.
151A-Sicherung Zusätzlicher Kurzschlußschutz des Geräts
16LED-Meldeleuchte “Ein/Aus”
Diese LED leuchtet beim Einschalten des ordnungsgemäß installierten
CXQ20-Systems auf.
Technische Daten CXQ20
Allgemeines
Frequenzgang 10 Hz - 30 kHz ( 1 dB
Klirrfaktor 0,02%
Rauschabstand > 100 dB
Kanaltrennung > 80 dB
Eingangspegel 0.2 - 7 V
Eingangsimpedanz 20 KΩ
Max. Ausgangspegel 15 V
Ausgangsimpedanz 50Ω symmetrisch
Frequenzweiche
Schnittfrequenzen
Hochpaß 80/100/120 Hz und ungefiltert
Tiefpaß 60Hz/75Hz/85Hz/Full
Übergangssteilheit 18 dB
Abmessungen B x L x H (mm) 280 x 180 x 35 (mm)
Leistungsmerkmale CXQ20 (siehe Abbildung inneren Umschlagseite)
1 Eingang
Cinch-Buchsen zum Anschluß der Kabel vom Ausgang des signal-erzeugenden
Geräts .
2 Eingangspegelregler
Ermöglicht eine Anpassung der Eingangsempfindlichkeit an den Ausgang des
signalerzeugenden Geräts.
3 Equalizer-EIN/AUS-Schalter
Dieser Schalter ermöglicht eine Umgehung des Equalizers durch Abschaltung
des Equalizer-Teils.
4 LED-Meldeleuchte “Eingangspegel überschritten”
Diese LED leuchtet auf, wenn der zulässige Eingangspegelbereich überschritten ist und die automatische Pegelbegrenzung einsetzt.In diesem Fall muß der
Eingangspegel-Regler (2) auf eine weniger empfindliche Stellung zurückgedreht werden.
5 Tiefpaß-Ausgang
Cinch-Buchsen zum Anschluß der Kabel zu dem Subwoofer-Verstärker.
6 Tiefpaß-Ausgangspegelregler
Zur Abstimmung des Signalausgangspegels auf den Eingangsbereich der
Subwoofer-Verstärker sowie der Pegeldifferenz zum Hochpaßfilter-Ausgang.
18 19
LEISTUNGSMERKMALE UND TECHNISCHE DATEN
LEISTUNGSMERKMALE
Page 11

Signaleingang
Nehmen Sie nun den Anschluß der Signaleingänge vor. Wählen Sie hierzu
Verbindungskabel mit Cinch-Stecker der benötigten Länge und Ausführung.
Hochleistungsstecker, wie sie z.B.im Rahmen der Caliber-”Get Connected”-Serie
CL 600 und CL 800 angeboten werden, verfügen über vergoldete Kontakte und
mehrfache Abschirmung zwecks besserer Rauschunterdrückung.(Erkundigen Sie
sich ggf. bei Ihrem Caliber-Vertragshändler nach diesen Kabeln und CinchSteckertypen).
Die Verlegung der Anschlußkabel ist mit äußerster Sorgfalt vorzunehmen.
Unzureichend isolierte Leitungen sind im Fahrzeug nicht selten. Bei falscher
Kabelführung können Ihre Equalizer-Anschlußkabel daher leicht Störungen bzw.
Motor- und Gebläsegeräusche aufnehmen. Beachten Sie die Grundregel, daß die
Anschlußkabel nicht in unmittelbarer Nähe größerer Kabelbäume oder elektronisch gesteuerter Gebläse verlegt werden sollten.
Schließen Sie Ihre Anschlußkabel an den Ausgang des signalgebenden Hauptgeräts
an, verlegen Sie sie bis zum Einbauort des CXQ20-Systems und verbinden Sie
sie dort mit den entsprechenden Cinch-Signaleingangsbuchsen.Achten Sie darauf,
daß der linke Kanal auf den linken Eingang und der rechte Kanal auf den rechten Eingang gelegt werden (bei modernen Audio-Systemen sind die CinchSteckverbinder des rechten Kanals grundsätzlich rot,diejenigen des linken Kanals
dagegen weiß oder schwarz).
Signalausgang
Schließen Sie nach den Eingangskabeln nun die Ausgangskabel an.Achten Sie auf
die Polarität (rechter Kanal an rechter Verstärkereingang, linker Kanal an linker
Verstärkereingang) und daß jeder Ausgang mit dem dazugehörigen Verstärker
verbunden wird (Subwoofer-Verstärker, Hoch-/Mitteltöner-Verstärker).
Nachdem auf diese Weise der Anschluß der Ein- und Ausgänge vorgenommen
wurde, ist die Fahrzeugbatterie wieder anzuschließen und die 1-A-Sicherung in
den Sicherungshalter einzusetzen.
Einstellung der Frequenzweichen-Schnittfrequenzen
Die Wahl der optimalen Schnittfrequenzen für die verwendeten Lautsprecher ist
für die Qualität der Wiedergabe von großer Bedeutung. Dabei sind sowohl der
Einbauort der Lautsprecher als auch ihr Kennverhalten und Frequenzbereich zu
berücksichtigen.Auch die Lage der Lautsprecher kann für die Wahl der optimalen
Schnittfrequenz eine Rolle spielen.
Voraussetzung für die korrekte Einstellung der Frequenzweiche ist in jedem Fall ein
feines Gehör. Im Zweifelsfall ist Ihnen Ihr Caliber-Vertragshändler gerne behilflich.
Einbau des CXQ20
Wählen Sie hierzu einen stabilen, sicheren Einbauort aus. Dieser sollte so
beschaffen sein, daß das Gerät einerseits leicht erreichbar,anderseits jedoch vor
unbeabsichtiger Berührung (z.B. zufällige Verstellung der Equalizer-Schieberegler
oder sonstiger Bedienungselemente) geschützt ist. Verwenden Sie zur
Markierung der Befestigungslöcher das Chassis des CXQ20 als Schablone.
Bohren Sie die Befestigungslöcher mit einem 2,5mm Bohrer vor und befestigen
Sie das Gerät mit Hilfe der mitgelieferten Schrauben. Kontrollieren Sie die
Schrauben abschließend noch einmal auf festen Sitz.
Anschluß der Spannungsversorgung
• Beginnen Sie mit dem Anschluß der +12V-Leitung. Hierzu ist die +12V-Zuleitung
mit dem ersten Anschluß “A” des Klemmenblocks (erste Klemme von links) zu
verbinden. Das andere EndeDieses Spannungskabels
muß an derselben Stelle angeschlossen werden, von
der Sie auch die +12V-Spannung für die Verstärker
beziehen, um Störungen durch Spannungsdifferenzen
zu vermeiden.Vergessen Sie nicht, am Ausgangspunkt
der +12V-Zuleitung für das CXQ20-Gerät eine
Sicherungshalter mit 1A-Smelzsicherung in die
Leitung zu schalten. Diese schützt im Falle eines
Kurzschlusses sowohl das Fahrzeug als
auch Ihr Audio-System.
• Schließen Sie nun die -12V-Leitung
(Masse) an. Hierfür ist der Anschluß (B) des Klemmenblocks (zweite Klemme
von links) vorgesehen. Das andere Ende der Masseleitung ist fest mit der
Fahrzeugmasse zu verbinden.Die Masseleitung muß denselben Querschnitt
wie die +12V-Zuleitung aufweisen, da Sie dieselbe Leistung übertragen muß.
Achten Sie darauf, daß der Anschlußbereich der Masseleitung am Fahrzeug
frei von Lack, Unterbodenschutz oder sonstigen nichtleitendem Material ist.
• Schließen Sie nun die Fernainschaltung (R) an. Verwenden Sie hierzu am
Klemmenblock den dritten Anschluß von links (C). Viele Radio/CassettenSysteme und CD-Abspielgeräte verfügen heute über einen Ausgang zum
Anschluß dieser Ferneinschaltung. Wenn ein solcher Ausgang an Ihrem Gerät
nicht vorhanden ist, muß ein separater Schalter zur Fernbetätigung der Ein/AusFunktion montiert werden.
• Zuletzt ist noch der Ausgang für die Einschaltverzögerung (D/R, Delayed
Remote) anzuschließen.Verbinden Sie dieses Kabel am Klemmenblock mit dem
Ersten Anschluß von rechts (D).Die Einschaltverzögerung ist mit allen
Verstärkern und etwaigen Frequenzweichen zu verbinden, die dem CXQ20
nachgeschaltet sind, damit ihre Einschaltun mit einer Verzögerung von 2
Sekunden erfolgen kann.
20 21
EINBAU UND ANSCHLUSS DES CXQ20
SIGNAL EIN/AUSGÄNGE
Schraubenzieher
screwdriver
A B C D
+
-
R
D/R
Page 12

9 Regeln Sie den Signalpegel des dominanteren Ausgangs auf denjenigen des
schwächeren Ausgangs zurück. Achten Sie darauf, daß die LED-Meldeleuchte
“Eingangssignal überschritten” dabei nicht aufleuchtet. Falls diese Meldeleuchte doch zu blinken beginnt,muß der Ausgangspegel-Regler wieder soweit
zurückgedreht werden, bis keine Verzerrung mehr hörbar und die LED erloschen ist.Wenn die Verstärkung in dieser Stellung zu gering ist,sollte wiederum
eine Justierung an den Eingangspegel-Reglern des Verstärkers vorgenommen
werden.
10Hören Sie sich die Wiedergabe einige Minuten lang an, um den Sound zu kont-
rollieren. Probieren Sie nacheinander verschiedene Lautstärke-Einstellungen
aus und nehmen Sie ggf. eine Feinabstimmung Ihrer Einstellungen vor.
Verwenden Sie dazu Musiktitel, die Sie genau kennen.
11Drücken Sie erneut die Equalizer-EIN/AUS-Taste (2), um den Equalizer ein-
zuschalten.
Equalizer-Funktion
Wie funktioniert ein Equalizer?
Ein Equalizer ist ein System, das - vereinfacht ausgedrückt - Frequenzabweichungen
innerhalb einer gegebenen Bandbreite korrigiert.Neben den Schiebereglern des
CXQ20-Systems ist jeweils die Mittenfrequenz “Q” des Frequenzbandes angegeben, das sich mit dem betreffenden Regler einstellen läßt. Durch Aufwärtsoder Abwärtsverschiebung der Regler läßt sich eine bestimmte Frequenz verstärken oder unterdrücken, um den Frequenzgang Ihrer Anlage zu glätten und
den gewünschten Sound einzustellen.
Einstellung des Equalizers
Die Einstellung Ihres CXQ20-Systems ist ein kompliziertes Unterfangen.Caliber
empfiehlt hierzu die Verwendung eines Echtzeit-Frequenzanalysegeräts (RTASystem). Ohne ein solches Gerät lassen sich die Senken und Spitzen in der
Wiedergabe - und damit die Notwendigkeit einer Justierung - nur schwer differenzieren.Unabhängig davon,ob Sie mit einem solchen RTA-Gerät arbeiten oder
sich bei der Einstellung ganz auf Ihr Gehör verlassen, sollten stets folgende
Grundschritte durchgeführt werden:
1 Beginnen Sie stets mit den Frequenzen, die Sie unterdrücken oder abschwächen
wollen.Hierfür gibt es einen einfachen Grund: wenn Sie eine Frequenz z.B. um
3, 6 oder 12 dB anheben, wird damit zugleich das Systemrauschen verstärkt.
Indem Sie zunächst die unerwünschten Frequenzen herausfiltern, wird auch
der Rauschanteil reduziert.
2 Stellen Sie nie mehr als zwei Frequenzbänder zugleich ein. Andernfalls läßt
sich kaum noch feststellen, ob sich die Wiedergabe verbessert hat oder nicht.
Da das CXQ20-System in der Regel im Kofferraum Ihres Fahrzeugs montiert
ist, sollten Sie nach jeder Veränderung unbedingt auf dem Fahrer- bzw.
Beifahrersitz Platz nehmen,um den Sound zu kontrollieren - immerhin ist dies
der Ort, an dem es auf optimalen Hörgenuß ankommt.
Jetzt werden Sie auf den Sound ihres optimierten Audio-Systems sicher schon
sehr gespannt sein. Bevor Sie Ihr Radio einschalten, sind jedoch noch einige
wichtige Feinabstimmungsmaßnahmen erforderlich, um die Signalpegel des
Systems optimal abzugleichen. Führen Sie hierzu zunächst die folgenden
Vor einstellungen durch:
1 Stellen Sie zuerst die Ein-und Ausgangspegler-Regler auf einen risikofreies
Niveau. Stellen Sie jetzt der Equalizer ein auf Ihren persönlichen Musik geschmack.
2 Stellen Sie den Eingangspegel-Regler (2) Ihres CXQ20-Systems auf 2/3 des
Endwerts.
3 Stellen Sie die Ausgangspegel-Regler für den Hochpaßfilter (11) und den
Tiefpaßfilter (6) auf knapp über den Mindestwert.Schalten Sie den EqualizerEIN/AUS-Schalter (3) in Stellung “OFF” und stellen Sie alle Equalizer-
Bandregler in Nullstellung.
4 Regeln Sie die Eingangspegel Ihrer Verstärker auf 25% vom Maximalwert ein.
5 Schalten Sie das Radio ein. Stellen Sie sämtliche Ton-, Balance- und Überblen-
dregler in ihre Neutral- bzw. Mittelstellung.
Führen Sie nun den ersten Musiktest durch.Wählen Sie hierzu ein paar Titel aus
Ihrer Lieblings-CD aus (diese sollten einen entsprechend dynamischen Frequenzgang aufweisen). Legen Sie die CD in das CD-Abspielgerät ein und führen Sie
nun die Signalpegel-Einstellungen gemäß nachstehenden Schritten 6 - 11 durch.
6 Stellen Sie die Lautstärke Ihres Radios auf 75% des Skalenendwerts. Hören
Sie genau hin - das Signal darf nicht “abgeschnitten” klingen (Verzerrung durch
Ansprechen der Signalbegrenzung). Lassen Sie die gewählten CD-Titel wäh-
rend der folgenden Einstellungen weiterlaufen.
7 Achten Sie auf die LED-Meldeleuchte “Eingangssignal überschritten” (4) an
Ihrem CXQ20-System. Diese LED darf nicht aufleuchten. Drehen Sie den
Eingangspegel-Regler (2) soweit auf, bis die LED-Meldeleuchte “Eingangssignal
überschritten” gerade zu blinken beginnt, und regeln Sie dann soweit zurück,
bis die LED gerade wieder erlischt. In einigen Fällen bleibt die LED-
Meldeleuchte “Eingangssignal überschritten” auch bei ganz aufgedrehtem
Regler dunkel. Lassen Sie sich hiervon nicht irritieren - vermutlich ist der
Ausgangspegel Ihres Radios nicht sehr stark.
8Drehen Sie die Ausgangspegel-Regler für den Hochpaßfilter (11) und den
Tiefpaßfilter (6) soweit auf, bis das System hörbar zu verzerren beginnt. Die
LED-Meldeleuchte “Ausgangssignal überschritten” (8 bzw. 12) darf dabei
jedoch noch nicht aufleuchten. Regeln Sie nun den Ausgangspegel langsam
zurück, bis keine Verzerrung mehr hörbar ist bzw. die LED-Meldeleuchte
“Ausgangssignal überschritten” nicht mehr blinkt. Berücksichtigen Sie bitte,
daß die meisten Verstärker nur Eingangssignale bis max.9 V verarbeiten können
- Ihre Ausgangspegel-Regler sollten daher nicht über 75% vom Höchstwert
stehen.Wenn eine höhere Verstärkung benötigt wird,sollten Sie diese an den
Eingangspegel-Reglern Ihres Verstärkers justieren.
22 23
SIGNALPEGEL-EINSTELLUNG
FUNKTIONSWEISE VON EQUALIZERN
Page 13

3 Gehen Sie mit dem Anheben von Frequenzen so sparsam wie möglich um. Für
jede Frequenzverstärkung um 3 dB nimmt der Verstärker bei der Wiedergabe
dieser Frequenz die doppelte Leistung auf. Leistet Ihr Verstärker also z.B.
25W auf einer bestimmten Frequenz und wird die Verstärkung dieser
Frequenz am Equalizer um 3 dB erhöht, muß der Verstärker zu ihrer
Wiedergabe immerhin 50 W aufbringen - bei einer Anhebung um 6 dB sind
es bereits 100 W (dies entspricht dem Vierfachen der normalen Leistung).Bei
zu starker Frequenzanhebung besteht daher die Gefahr, daß der Verstärker
“abzuregeln” beginnt - Verzerrungen oder Schäden an Lautsprechern oder
Verstärker können die Folge sein.
4Vermeiden Sie es grundsätzlich, Frequenzveränderungen um mehr als ( 6 dB
vorzunehmen.Wenn die Abweichung vom Sollfrequenzgang so stark ist, daß
eine Justierung um mehr als 6 dB erforderlich ist,liegt mit hoher Wahrschein-
lichkeit eine Phasenstörung vor. Diese kann durch den Einbauort der Laut-
sprecher, aber auch durch falsche Polung eines oder mehrerer Lautsprecher
bedingt sein.
Endkontrolle der Einstellungen
Nachdem Sie Ihr System mit Hilfe des Equalizers nach Ihrem persönlichen
Geschmack eingestellt haben, sollte unbedingt noch eine abschließende
Kontrolle der Ausgangspegel vorgenommen werden. Durch die Anhebung und
Abschwächung einzelner Frequenzen ändert sich das Leistungscharakteristik des
Geräts und damit evtl. auch die Stärke des Ausgangssignals. Legen Sie noch einmal den dynamischen CD-Titel ein, den Sie für den anfänglichen Grundabgleich
des CXQ20-Systems verwendet hatten.Stellen Sie die Lautstärke des Radios auf
3/4 des Höchswerts ein und justieren Sie die Ausgangspegel nach Bedarf. Falls
eine Verzerrung hörbar wird oder die LED-Meldeleuchten “Ausgangssignal überschritten” aufleuchten, muß der Eingangspegel entsprechend reduziert werden.
Ist dagegen durch den Abgleich des Equalizers die Lautstärke zurückgegangen,
können Sie den Ausgangspegel vorsichtig soweit erhöhen, bis die LED-Meldeleuchten “Ausgangspegel überschritten” gerade noch nicht aufleuchten.
VERMEIDEN SIE AUF JEDEN FALL EINE ÜBERSTEUERUNG DES
VERSTÄRKER-EINGANGS!
Caliber-CXR-Fernbedienung zur Subwoofer-Regelung
Dieses Zubehörteil, das im Lieferumfang Ihres CXQ-Systems enthalten ist,bietet
Ihnen ein Höchstmaß an Bedienungskomfort. Sie können damit die Lautstärke
Ihres Subwoofers vom Fahrersitz aus regulieren und den Baßanteil der Wiedergabe optimal der jeweiligen Musik anpassen.
Die CRX-Fernbedienung ist problemlos zu installieren und wird mit einem 5 m
langen Anschlußkabel geliefert, das beidseitig mit Klemmbuchsen abgeschlossen
ist. Die Montage am Armaturenbrett nimmt etwa 10 Minuten in Anspruch. Nach
erfolgtem Anschluß der Steckverbinder an der Fernbedienung sowie am CXQ20System empfiehlt es sich, den Ausgangspegel der Tiefpaßstrecke leicht zu erhöhen.
24
KONTROLLE DER EINSTELLUNGEN/FERNBEDIENUNG
 Loading...