

Cal Flame Chef C300L, Chef C250B, Chef C200, Chef C225, Chef C300R Owner's Manual
...
Duplication without written consent is strictly prohibited
www.calspas.com
$5.00
USA
Changing The Way You Barbecue
™
Changing The Way You Barbecue
™
Rev 06/01/2003
E
1
C
9
7
N
I
9
S
C
o
m
m
i
t
m
e
n
t
t
o
y
t
i
l
a
u
Q
d
n
a
e
c
n
E
e
l
l
x
e
c

Owner’s Manual
USA and Canada
Chef Series
Master Chef Series
Gourmet Series
Duplication without written consent is strictly prohibited.
This owners manual is for BBQ Grills and Outdoor Kitchens Manufactured after June 13, 2002
Sold and Delivered in USA and Canada
Due to our continuous improvement program, all models, operation, and/or specifications are subject to
change without prior notice.
LTR17002359
Rev 06/01/2003
Stainless Steel Carts
Drop - In Grills

Welcome
To The Cal Spas Family
Congratulations on the purchase of your new Cal Flame BBQ. Welcome to our
family. You can feel confident knowing that you have purchased one of the
most technologically advanced outdoor cooking environments in the industry.
Your new Cal Flame BBQ is backed by the world wide recognized name in
value, reliability and customer service, Cal Spas.
Customer Information:
We want to learn more about you. After reading this manual, please complete
and submit the attached Product Registration Card or register online, phone,
fax or mail. Your feedback will be used to help us serve you, our
valued customer better, and register your new BBQ Grill or Outdoor Kitchen
warranty.
Cal Spas has been manufacturing Home Resort Products since 1979, and is
considered a pioneer and leader in the industry. Through our State-of-the-Art
manufacturing facility in Pomona, California, we manufacture not only world
class Outdoor Kitchens, but also an entire line of Home Resort Products.
Those products include, but are not limited to Spas, Gazebos, Saunas, jetted
bathtubs, billiard tables, and much, much more. Cal Spas is devoted to
bringing you a total environment of peace, tranquility, and pure enjoyment with
our extensive line of Home Resort Products.
Cal Spas Information:
Rev 06/01/2003
Cal Flame
1462 East Ninth Street
Pomona, CA. 91766
Telephone: (909) 623-8781
Fax: (909) 865-3287
www.calspas.com
Cal Flame practices the most safety processes and encorage our cutomers
to do the same. WARNING! Read this manual carefully and completely before
using your grill to reduce the risk of fire, shock, burn or any other hazards and
injuries, ensuring proper installation and servicing.
SAFETY
INSTRUCTIONS

Table of Contents
Safety:
Warnings and Notices....................................1
Warranty Registration....................................2
Model and Serial Number Location................2
Safety Instructions.........................................3
Installation:
Installation Location.......................................7
Built-in Installation..........................................7
Cabinet Cutout Dimensions...........................8
Gas Requirements.........................................9
Side Burner Installation................................13
Access Door.................................................14
Leak Testing Procedure...............................15
Features of Your Grill....................................16
Stainless steel BBQ Cart Features...............17
Spiders and Insects Warnings......................18
Before Using Your Grill.................................18
Getting Familiure with your Cal Flame BBQ.18
Operation:
Using Your Grill............................................25
Grilling Hints.................................................25
Light & Electrical Connections and locking
wheel casters..................................26
Grill Operation..............................................27
Refridgerator and Tap by Danby...................27
Lighting the Grill Burners..............................27
Manually lighting the Grill Burners................28
Using Your Rotisserie...................................29
Manually lighting the Rotisserie....................30
Using the Side Burner..................................31
Manually lighting the Side Burner.................32
Flame Height................................................32
Cleaning and Maintenance:
Grill Racks...................................................33
Warming Rack.............................................33
Drip Pan......................................................34
Stainless Steel.............................................34
After Use Care.............................................35
Island Cabinet Care.....................................35
Grill Burners................................................35
Miscilaneous
Troubleshooting...................................36 & 37
Cal Flame Entertainment System................38
Parts & Accessories.............................42 & 43
Warranty Information...................................44
Equipment Check Off List............................45
Rev 06/01/2003

WARNINGS AND NOTICES
General Safety Requirements:
1. Installation of this appliance must conform
with local codes and with either the National
Fuel Gas Code, ANSI Z223.1, or CAN/CGAB149.1, Natural Gas Installation Code or
CAN/CGA-B149.2 Propane Installation Code.
2. The utilization of an external electrical
source requires that when installed, this gas
appliance must be electrically grounded in
accordance with local codes and the National
Electrical Code ANSI/NFPA 70, or in Canada
CSA C22.1.
3. This grill and side burner and inline shut off
valve must be disconnected prior to
performing any pressure testing of gas line
above 1/2 psi (3.5kPa).
4. When using a self-contained LP-gas
supply system, make sure that the tank is
properly marked with either the U.S.
Department of Transportation (DOT) or
National Standards of Canada CAN/CSAB339
5.
WARNING:
California Proposition 65:
The burning of gas cooking fuel generates
some byproducts that are on the list of
substances which are known by the State of
California to cause cancer or reproductive
harm.
To minimize exposure to these substances,
always operate this unit as described in this
manual and only operate in well ventilated
areas.
WARNING:
Use of this product in any other way than
described in this manual may result in fire
or explosion, causing property damage,
personal injury or even death.
WARNING:
Always have a licensed electrician and
contractor install electrical and gas lines.
Incorrect installation in either case may
result in fire or explosion, causing property
damage, personal injury or even death.
IF YOU SMELL GAS:
1. Shut off gas to grill
2. Extinguish any open flame
3. Open lid
4. If odor persists, immediately call
your gas supplier or your fire
department
DO NOT TRY TO FIX THE
PROBLEM YOURSELF.
1
Rev 06/01/2003
Customer Information
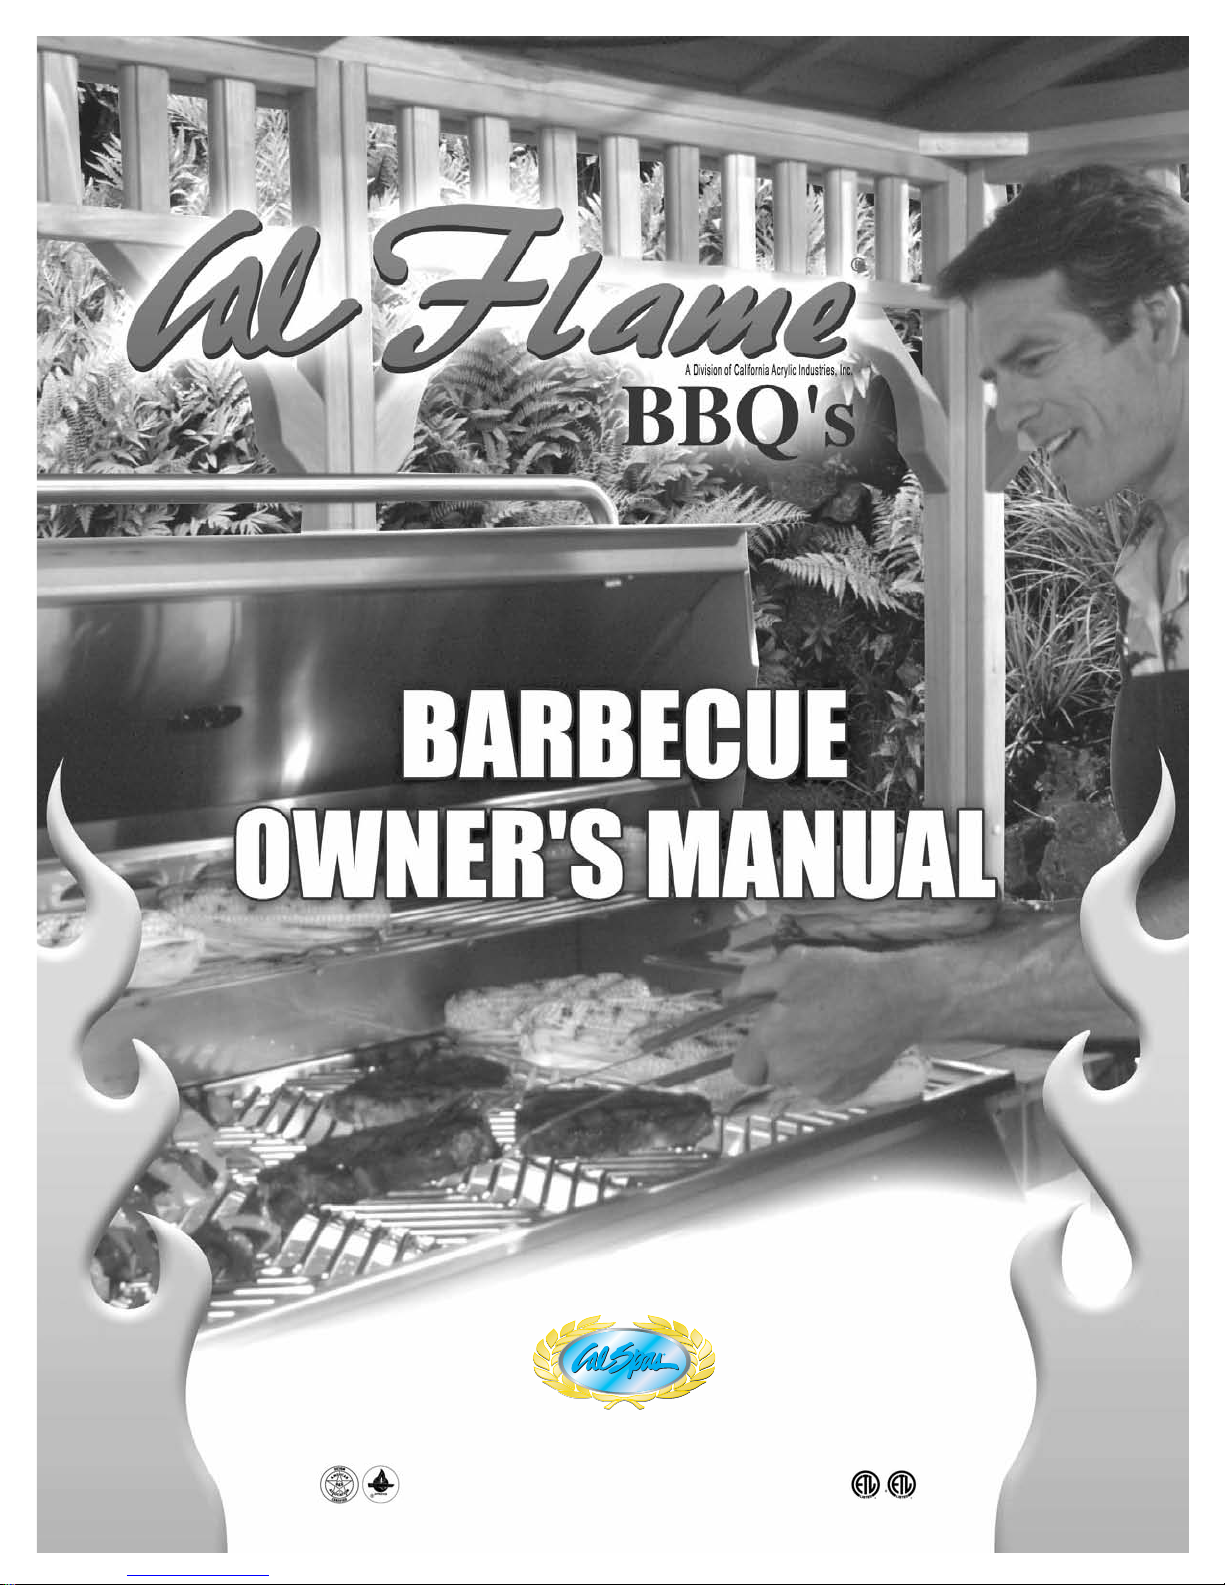
Locating Products Serial Number:
BBQ Islands Only:
Your new Cal Flame Island BBQ serial number is located on a metal plate inside the
door below the grill on the floor. You will need this number to properly register your
BBQ and activate warranty coverage.
BBQ Grill Inserts Only:
Your new Cal Flame grill serial number is located in the drip pan area on the inside left
wall. You will need to pull out the drip pan to view.
Stainless Steel Carts:
Your New Cal Flame Stainless Steel Cart serial number is serial number is located on a
metal plate inside the door below the grill on the floor. You will need this number to
properly register your BBQ and activate warranty coverage.
Please write this number in the space provided for future reference:
Serial Number: ___________________________Delivery Date:___________________
Warranty Registration:
It is very important to properly register your BBQ’s warranty. As mentioned on the
previous pages, you can do this two ways. You may register at www.calspas.com or
complete the enclosed Product Registration Card. Each will only take a few minutes of
your time and will ensure that your purchase is registered. With this information we are
able to activate your warranty and offer assistance in the future for parts and
accessories ordering.
2
Rev 06/01/2003

SAFETY INSTRUCTIONS
Please read before installing and operating your new Cal Flame Grill
1. Your new gas grill should be professionally installed by a licensed contractor.
Refer to the instructions in this manual to ensure proper and safe installation
and operation.
2. If You Smell Gas:
2.1 Shut off gas to grill
2.2 Extinguish any open flame
2.3 Open lid
2.4 If odor persists, immediately call your gas supplier or your fire
department
DO NOT TRY TO FIX THE PROBLEM YOURSELF.
3. Caution:
To prevent fire and smoke damage, remove all packaging material before
operating grill.
4. Before you start cooking:
Clean the grill thoroughly with hot, soapy water. This is necessary to remove
residuals and solvents, oil and grease which may have remained from
the manufacturing process. The grates should also be thoroughly cleaned in
the same manner.
5. Spiders and other insects can nest in the burners of the grill and block the
gas and airflow to the burner ports. This creates a dangerous condition that
can result in a fire from behind the valve panel. Inspect and clean the
burners periodically; follow guidelines in Cleaning and Maintenance section of
this manual.
3
Rev 06/01/2003

SAFETY INSTRUCTIONS
(continued)
6. In the event a burner goes out and gas escapes, turn off burner knobs, open
the grill hood fully and let it air out. Do not attempt to use the grill or any
other island feature until the gas has had time to dissipate.
7. Unless specifically recommended in this manual, do not repair or replace any
part of the grill. A qualified technician should perform all service. Any repairs
made by a non-C.A.I. approved dealer technician will void your warran-
8. Never use the grill without the drip pan in place and pushed all the way to the
rack located just under the grill. Without it, hot grease could leak downward
and produce a fire or explosion hazard.
9. Keep any electrical supply cord, or the rotisserie motor cord away from the
heated areas of the grill.
10. Never use the grill or side burner in windy conditions. If located in a
consistently windy area (oceanfront, mountaintop, etc.) a windbreak will be
required. Always adhere to the specified clearances listed in this manual.
11. The area surrounding your new grill should be kept clean, and free from
flammable liquids and other combustible materials such as mops, rags,
brooms, as well as solvents, cleaning fluids, and gasoline.
12. Do not use the grill as a storage area for flammable or plastic items, which
may ignite. Do not store any materials inside or near the BBQ island. Any
LPG (Propane) cylinder not in use, should not be stored in the vicinity of this
or any other appliance.
13. Never line grill or side burners with tin foil.
14. When the unit is not in use, be sure to turn off the gas at the LPG tank.
4
Rev 06/01/2003

SAFETY INSTRUCTIONS
(continued)
15. Never locate this appliance in an enclosed room or under sealed overhead
structure or any other type of enclosed area such as a garage, shed, or
breeze way. Keep clear of trees and shrubs.
16. Do not place this grill under or near windows or vents that can be opened into
your home.
Precautions Regarding Children
1) Never leave children unattended in the
area where the grill is being used.
2) Do not store items of interest to children
around or below the grill, or island
3) Never allow children to sit or stand on
any part of the grill or island.
Use Precautions
1) Never leave the grill and side burners
unattended while using high flame
settings. Boilovers cause smoking, and
greasy boilovers may ignite.
2) Always use the proper size pan.
Select utensils with flat bottoms large
enough to cover the burner. The use of
under sized utensils exposes the sides
of the utensils to direct contact with a
portion of the flame. This can scorch
utensils,and hamper cleanup.
Excessive flames on large stainless
steel pots can result in permanent
discoloration. For best results, we
recommend commercial quality
aluminum pans and utensils.
3) Always position handles of utensils
inward, so they do not extend over
adjacent work areas or cooking areas.
This reduces the risk of burns, ignition of
flammable materials, and spillage due to
accidental contact with the utensils.
4) Do not use water on grease fires. Never
pick up a flaming pan. Turn appliance
off and smother the flaming pan with a
tight-fitting lid, cookie sheet or flat tray.
For flaming grease outside of the pan,
smother with baking soda, or use a dry
chemical or foam type fire extinguisher.
5) Never let clothing, potholders or other
flammable materials come in contact
with or close to any grate, burner or
hot surface until it has cooled. Fabric
may ignite and result in personal injury.
6) When using the grill, do not touch the
grill rack, burner grate or immediate
surroundings, as these areas become
extremely hot and could cause burns.
7) Proper apparel is a safety consideration.
Never wear loose fitting or hanging
garments while using your new grill.
5
Rev 06/01/2003

SAFETY INSTRUCTIONS
(continued)
8) Only use dry potholders - do not use a towel or other bulky cloth in place of
potholders. Moist or damp potholders used on hot surfaces could cause burns from
steam.
9) Do not heat any unopened glass or metal container of food on the grill. Pressure may
build up and cause the container to burst resulting in serious harm or damage to the
grill.
10) Do not use charcoal in this grill or side burner.
SAVE THIS MANUAL FOR FUTURE
REFERENCE!
6
11) Do not attempt to move stainless steel cart while hot or in use.
15) Do not block the vents located in the cabinet area of your Cal Flame Island and
Stainless Steel Cart as gas may build up incase of leak and cause serious damage.
14) Do not exceed 50 pounds of weight on the fold out work surfaces.
13) Do not lean, sit or stand on the stainless steel cart including the fold out work surfaces.
12) It is extremely important to lock all caster wheels even on flat even surfaces.
16) Your grill must be plugged into a permanent, grounded 110 VAC outlet with a
dedicated 15amp GFCI breaker. Do Not use an extension cord to supply power to
your Cal Flame Island, Grill or Cart. Such use may result in fire, electrical shock or
other personal injury. Do not install a fuse in the neutral or ground circuit. A fuse in the
neutral or ground circuit may result in an electrical shock hazard. Do not ground this
appliance to a gas supply pipe or hot water pipe. Keep any electrical supply cord
and the fuel supply hose away from any heated
17) Do not reach over your grill or any other surfaces when hot or in use
Rev 06/01/2003
INSTALLATION OF YOUR NEW GRILL
Safe and satisfactory operation of your new grill depends upon its proper installation. The
installation, adjustments and service of your new grill must be performed by C.A.I. qualified
installers and service technicians. This is necessary to ensure proper operation and also
prevent accidents.
Location (Outdoor Use Only)
When determining a suitable location, take into account concerns such as exposure to wind,
proximity to traffic paths, and windows that open into the home. Keeping in mind natural
gas line runs need to be as short as possible. Locate the grill only in a well ventilated area
Built-in Installation
Your new grill is designed for easy installation into a non-combustible enclosure.
The supporting deck and counter must be level and flat. When determining the final
location of your grill, it is required that ventilation be provided in the enclosure so that gas
will not become entrapped in the event of a leak. Make sure that you have one vent placed
at floor level and the other at 5 inches above floor level. See page 10 for more details.
Built-in Design Models
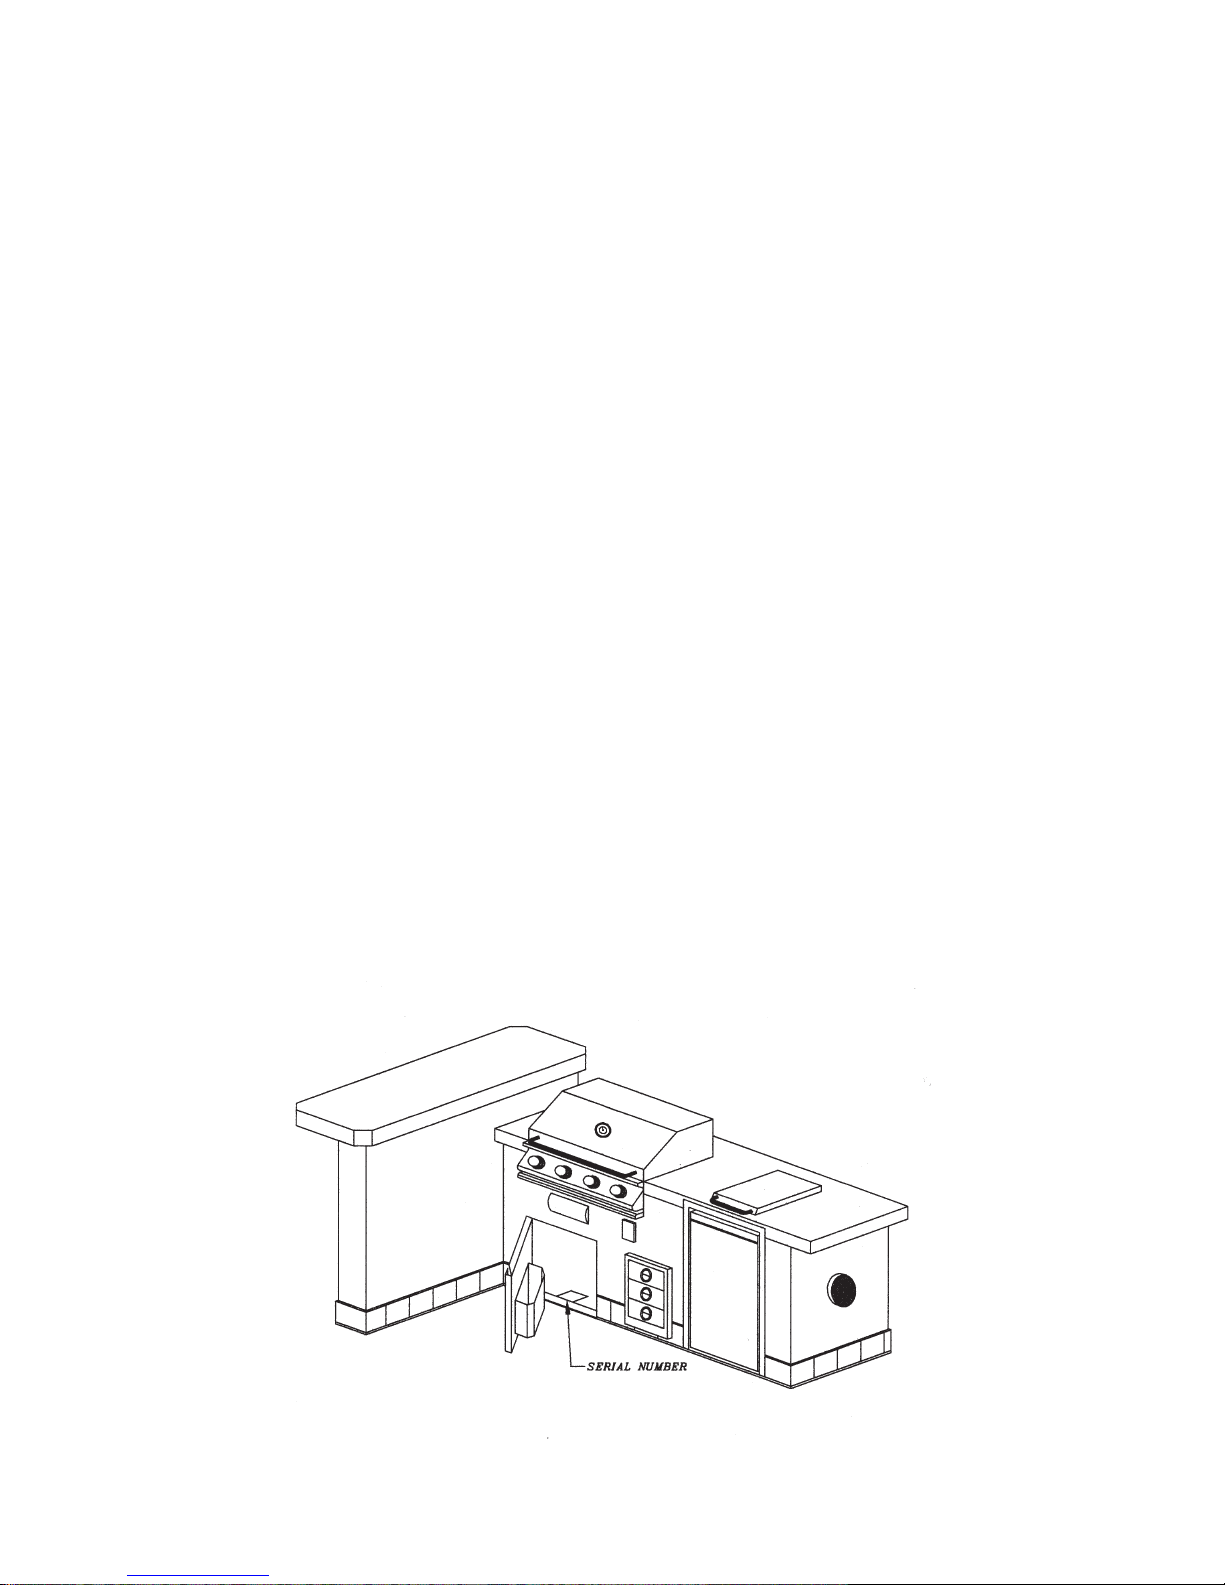
If using a rear wall, locate a weatherproof electrical outlet on the side of the grill that the
rotisserie motor will be located on. The rotisserie motor requires a 110/120-volt supply. The
power supply cord on the motor is equipped with a 3 prong (grounded) plug for protection
against shock hazard. Do not cut or remove the grounding prong from the plug.
Locate BBQ Islands grills and stainless steel carts in well ventilated areas, and only on
solid, flat foundations (I.e. Cement slab or Deck).
Do NOT place BBQ Islands / Outdoor Kitchens or stainless steel carts on dirt or grass.
7
When planning your Cal Flame Island or cart location, be sure to consider the shortest gas
line run possible. Also, take into consideration the necessity of having a 110 volts power
source. For use of your appliances (i.e. lights, rotisserie, refrigerator, receptacles, etc.).
Rev 06/01/2003
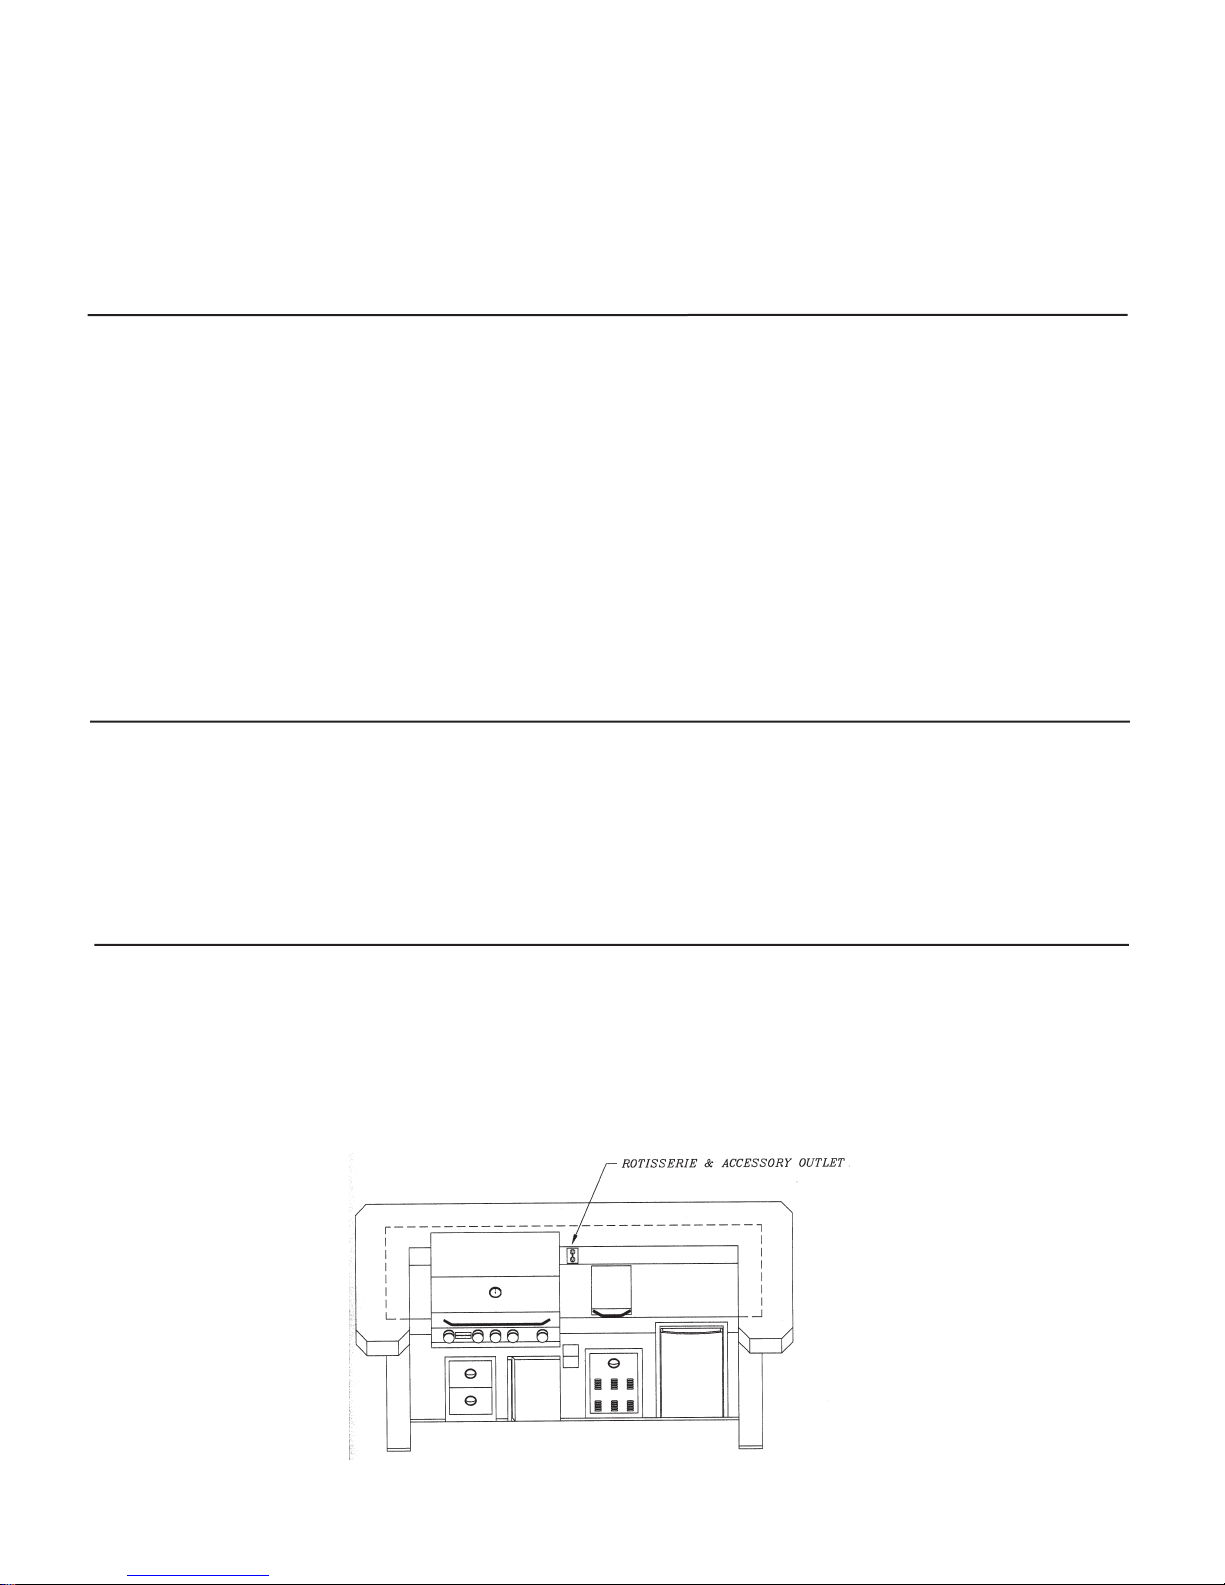
CABINET CUT OUT DIMENSIONS
FOR GAS GRILL AND ACCESSORIES
Side Burner
8
Rev 06/01/2003
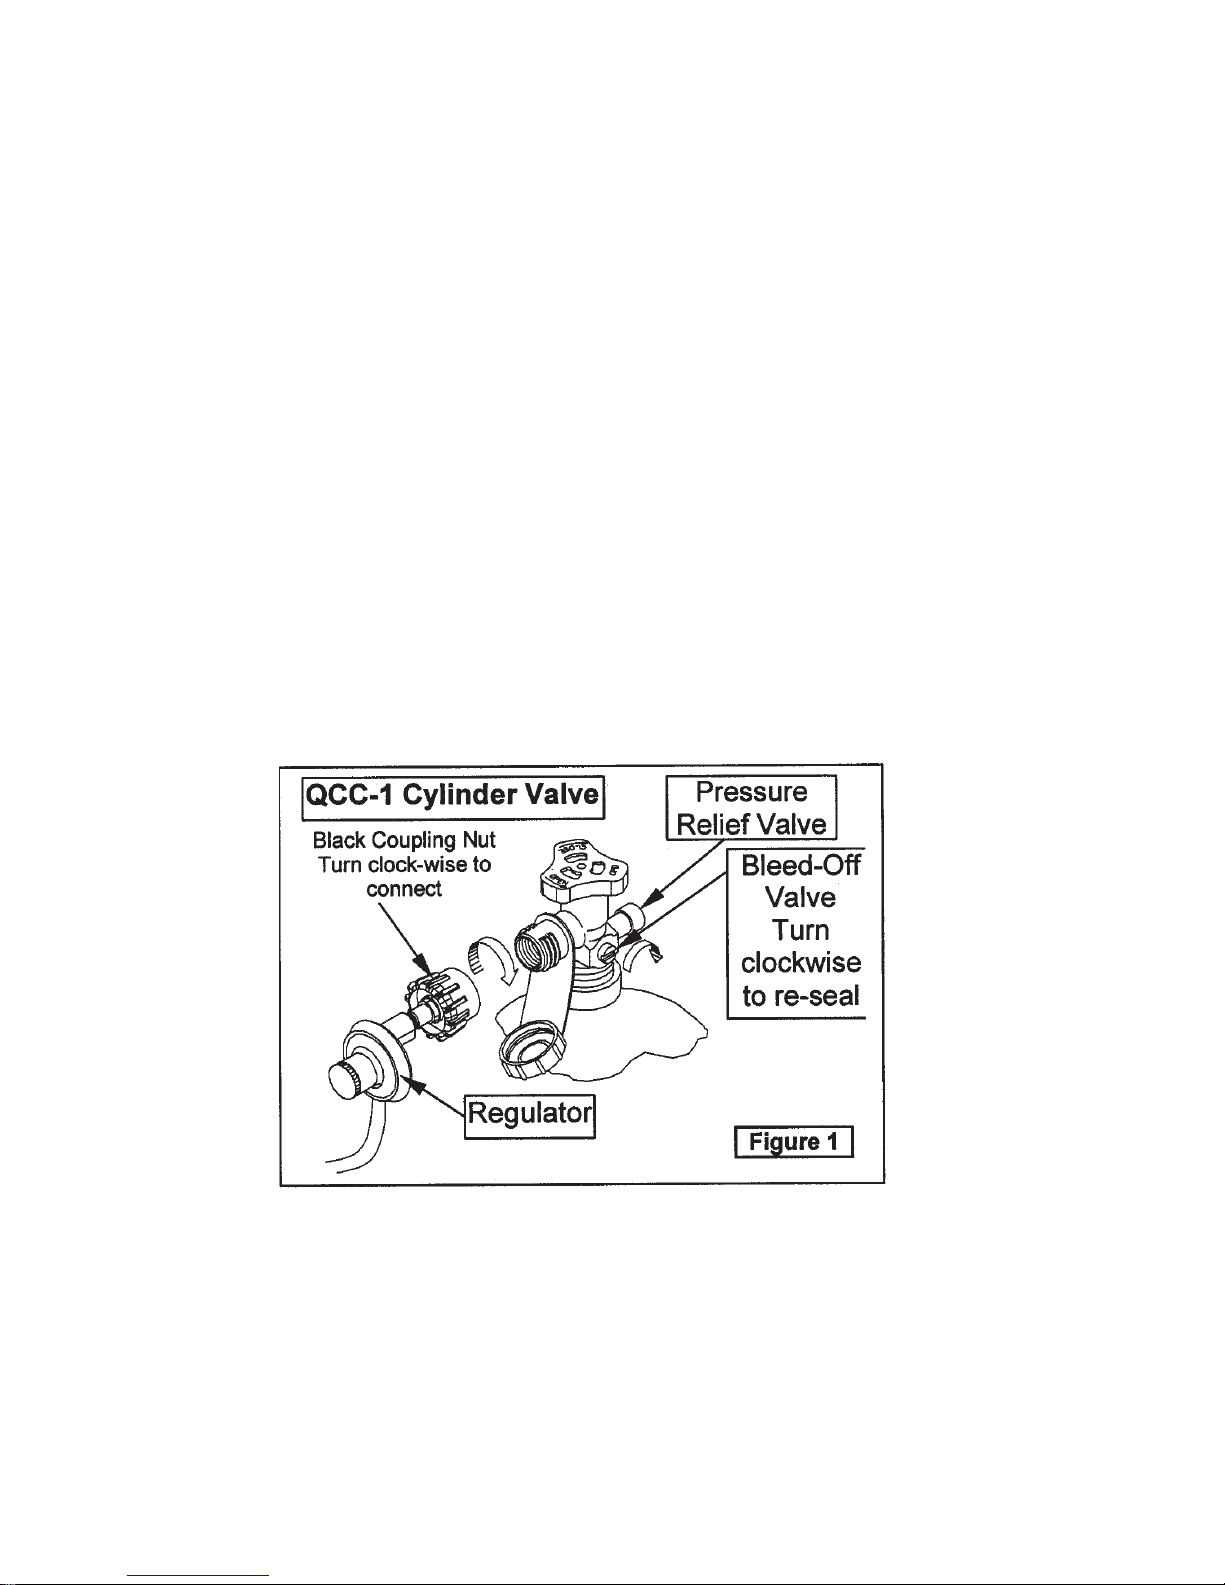
LP GAS REQUIREMENTS
LP Gas Requirements
Always check the rating plate (see page 5 for location) to make sure the gas supply you
are hooking up to is the gas type the grill is manufactured for.
IMPORTANT: Your new grill will work on LP gas. You cannot switch a LPG system to
natural gas. Please ensure you are connecting the proper gas type to your grill.
LP Gas Hook Up
9
Rev 06/01/2003

NOTE: An enclosure for an LP gas cylinder shall be vented by openings at the level
of the cylinder valve and at floor level. The effectiveness of the opening(s) for
purposes of ventilation shall be determined with the LP-gas supply cylinder in
place. This shall be accomplished in one of the following manners:
1) One side of the enclosure shall be completely open; or
2) Enclosures that have four sides, complete with a top and bottom:
a. At least two ventilation openings at cylinder valve level shall be provided in the
sidewall, equally sized, spaced at 180 degrees (3.14 rad), and unobstructed.
Each opening shall have a total free area of not less than fi” square inch per
pound (7.1 cm≈/kg) of stored fuel capacity, and not less than a total free area
of 10 square inches (64.5 cm≈).
b. Ventilation opening(s) shall be provided at floor level and shall have a total
free area of not less than fi square inch per pound (7.1 cm≈/kg) of stored fuel
capacity and not less than a total free area of 10 square inches (64.5cm≈). If
ventilation openings at floor level are in a sidewall, there shall be at least two
openings. The bottom of the openings shall be at floor level and the upper
edge no more than 5 inches (127 mm) above the floor. The openings shall be
equally sized, spaced at 180 degrees (3.14 rad) and unobstructed.
c. Every opening shall have minimum dimensions so as to permit the entrance of
a 1/8 inch (3.2 mm) diameter rod.
LP Gas Manifold Pressure
For plumbed-in LP installation, use a convertible regulator and set it for LP gas.
LP Gas Pressure Regulator
LP Gas Supply Pressure
Maximum line pressure for plumbed in Propane is 14" W.C., fi psi (3.5 kPa).
Minimum line pressure for propane is 11" W.C.
The unit must be used with the gas pressure regulator. The regulator will control and
maintain a uniform gas pressure in the manifold. The burner orifices have been sized for
the gas pressure delivered by the regulator.
LP GAS REQUIREMENTS
(CONTINUED)
10
Rev 06/01/2003

Transporting the LP Gas Supply Cylinder
Only one cylinder should be transported at a time. Transport cylinder in an upright and
secure manner
with control valve turned off and the dust cap in place.
LPG Cylinder Specification
Any LP gas supply cylinder used with this grill must be approximately 12 inches in diameter
and 18 inches high. The maximum fuel capacity is 20 lbs. of propane, or 5 gallons. Full
cylinder weight should be approximately 38 lbs. (43.7 lbs. nominal water capacity.) Always
use the cylinder dust cap on the cylinder valve outlet during transport and when the cylinder
is not connected to the grill.
LP GAS REQUIREMENTS
(CONTINUED)
11
Rev 06/01/2003
 Loading...