

Cal Flame C-200, C-225, C-250, C-250B, C-300L Owner's Manual
...
GRILLS
ISLANDS
CARTS
CONVECTION 3000 GRILL
2004 OWNER’S MANUAL
$5.
00
Duplication without written consent is strictly prohibited.
This Owner’s Manual is for barbecues manufactured after May 19, 2004
Due to continuous improvement programs, all models, operation, and/or specifications are subject to change without prior notice.
LTR17006331
www.calspas.com

Owner’s Manual Page 1
Owner’s Manual Table of Contents
Benefits of Owning a Cal Flame Barbecue ..........................................................................................2
Safety Precautions.................................................................................................................................3
Safety Instructions ................................................................................................................................4
Contact Information ..............................................................................................................................6
Warranty Information ............................................................................................................................6
Set-up and Delivery ..............................................................................................................................7
Grill Operation - Drop-In Grills............................................................................................................8
Grill Operation - Islands......................................................................................................................13
Grill Operation - Carts ........................................................................................................................22
Convection 3000 4-Burner Grill ........................................................................................................24
Grill Installation ..................................................................................................................................28
Installation of New Side Burner..........................................................................................................30
Installation of New Access Doors ......................................................................................................31
Sports Bar Canopy ..............................................................................................................................32
Liquid Propane (LP) Requirements ....................................................................................................37
Natural Gas (NG) Requirements ........................................................................................................39
Leak Testing Procedure ......................................................................................................................40
Cleaning and Maintenance Procedures ..............................................................................................41
Troubleshooting Procedures................................................................................................................43
Appendix ............................................................................................................................................45
Waterfall Operation ......................................................................................................................................45
Cal Flame Entertainment System ....................................................................................................46
Part Numbers....................................................................................................................................54
Lifetime Warranty ............................................................................................................................57
Cal Flame Program Charts ..............................................................................................................58
Notes ................................................................................................................................................60
Table of Contents

Page 2 Owner’s Manual
Benefits Owner’s Manual
BENEFITS OF OWNING A CAL FLAME BARBECUE
Owning a barbecue allows you to have a wonderful outdoor place to cook a nutritious family meal. It offers a
place for you to socialize with family and friends. Abarbecue provides a great focal point in your backyard when
having parties, family get-together or just to hang out with your kids. Owning a barbecue can add character to
your patio and/or yard.
As with any new improvement to an existing area, precautions must be made before development can take place.
Throughout this manual, the owner will encounter 3 product lines - Barbecues, Firepits/fireplaces, and Carts.
Each product line will have similar lighting methods.
IT IS THE OWNERS RESPONSIBILITY TO ENSURE THAT AN EXISTING NATURAL GAS LINE
IS INSTALLED AND SAFE TO USE. CAL SPAS HIGHLY RECOMMENDS THAT THE OWNER
HAVE A LICENSED TECHNICIAN RUN ALL NATURAL GAS LINES AND CONNECT ALL
NATURAL GAS HOOK-UPS. CAL SPAS IN NO WAY WILL BE HELD RESPONSIBLE FOR AN
IMPROPERLY CONNECTED GAS LINE.
THE LIGHTING INSTRUCTIONS FOR THE ISLANDS AND CARTS IS IDENTICAL. PLEASE
FOLLOW THESE INSTRUCTIONS CAREFULLY, AS ANY DEVIATION MAY RESULT IN SERIOUS
INJURY, OR POSSIBLY DEATH.

SAFETY PRECAUTIONS
1. This gas barbeque must be installed and operated in accordance with the installation requierements of your
local gas authority or the appropriate installation code in the area of installation. In the absence of local codes
with either the National Fuel Gas code, ANSI Z223.1 / NFPA 54, or CAN/CGA-B149.1, Natural Gas and
Propane Installation code.
2. If an external source is utilized, this gas grill, when installed, must be electronically grounded in accordance
with the local codes or, in the absence of local codes, with the National Electric Code, ANSI/NFPA 70. Or the
Canadian Electrical Code, CSAC22.1.
3. This grill is designed for outdoour use only and shall not be used in a building, garage, or any other enclosed
area.
4. This outdoor grill is not intended for use with recreational vehicles and/or boats.
5. Operate this gas grill only in areas free of obstructions for cumbustion and ventilation air.
6. CHECK FOR GAS LEAKS! Once the barbeque has been assembled and installed, make sure the gas valves
are in the “OFF” position. Turn gas “ON” at the source. Use a small brush to applywarm soapy water solution
to all the gas connections (1/2 water, 1/2 dish soap). If a gas leak is present, bubbling at the leak site will occur.
Using an approved pipe thread sealant can repair gas leaks or approved Teflon tape. The flexible gas hose must
be inspected before each use. NEVER USE A NAKED FLAME FOR TESTING LEAKS!
7. BURNERS: The location of the burners to the main orifice is vital for safe operation. check to assure the
valve orifices are inside the burner tubes before using the gas grill. If the venturi of the burner is not correctly
positioned over the valve orifices, explosion and/or fire may occur when lighting the gas grill. Be careful not to
damage the ceramic spark electrodes. (See figure 41)
8. HOSE ASSEMBLY AND SAFETY: If the hose shows signs of deterioration or damage, use a soap and
water solution and then test the entire outer surface of the hose while under pressure. Replace at the first sign
of a leak or if age cracking becomes apparent. Remember to turn the gas supply off before disconnecting. The
hose must remain free of kinks and sharp bends. Never puncture or put stress on the hose fittings. Replace the
hose only with the manufacturers original equipment. Hose is located in the drip pan area on the right side wall.
Pull out drip pan for inspection.
9. HOSE: If the hose shows signs of deterioration or damage, use a soap and water solution to test the entire
outer surface of the hose while under pressure, checking for bubbles at the leak site. Replace the hose at the
first sign of a leak or if age cracking becomes apparent. Remember to turn off the gas before removing the
hose.
10. Keep any electrical cord and the fuel supple hose away from any heated surfaces.
Owner’s Manual Safety Precautions
Owner’s Manual Page 3

Owner’s Manual Page 4
Owner’s Manual Safety Instructions
SAFETY INSTRUCTIONS
Please read before installing and operating your new Cal Flame grill.
1. Your new gas grill should be professionally installed by a licensed contractor. Refer to the instructions in this
manual to ensure proper and safe installation and operation.
2. IF YOU SMELL GAS:
A. Shut off gas to grill.
B. Extinguish any open flame.
C. Open lid.
D. If odor persists, immediately call your gas supplier or your fire department.
DO NOT TRY TO FIX THE PROBLEM YOURSELF..
3. CAUTION
:To prevent fire and smoke damage, remove all packaging material before operating grill.
4. Before you start cooking: Clean the grill thoroughly with hot, soapy water. This is necessary to remove
residuals and solvents, oil and grease which may have remained from the manufacturing process. The grates
should also be thoroughly cleaned in the same manner.
5. Spiders and other insects can nest in the burners of the grill and block the gas and airflow to the burner ports.
This creates a dangerous condition that can result in a fire from behind the valve panel. Inspect and clean the
burners periodically; follow guidelines in the Cleaning and Maintenance section of this manual.
6. In the event that a burner goes out and gas escapes, turn off the burner knobs, open the grill hood fully and
let it air-out. Do not attempt to use the grill or any other island feature until the gas has had time to dissipate.
7. Unless specifically recommended in this manual, do not repair or replace any part of the grill. A qualified
technician should perform all of the service. Any repairs made by a non- C.A.I. approved dealer technician
will void your warranty.
8. Never use the grill without the drip pan in place and pushed all the way to the rack located just under the
grill. Without it, hot grease could leak downward and produce a fire or explosion hazard.
9. Keep any electrical supply cord, or the rotisserie motor card away from the heated areas of the grill.
10. Never use the grill or side burner in windy conditions. If located in a consistently windy area (oceanfront,
mountaintop, etc.) a windbreak will be required. Always adhere to the specified clearances listed in this
manual.
11. The area surrounding your new grill should be kept clean, and free from flammable liquids and other
combustible materials such as mops, rags, brooms, as well as solvents, cleaning fluids, and gasoline.
12. Do not use the grill as a storage area for flammable or plastic items, which may ignite. Do not store any
materials inside or near BBQ island. Any LPG (Propane) cylinder not is use, should not be stored in the
vicinity of this or any other appliance.
13. Never line grill or side burners with tin foil.
14. When the unit is not in use, be sure to turn off the gas at the LPG tank.
15. Never locate this appliance in an enclosed room or under sealed overhead structure or any type of enclosed
area such as a garage, shed, or breezeway. Keep clear of trees and shrubs.
16. Do not place this grill under or near windows or vents that can be opened into your home.

Safety Instructions Owner’s Manual
Page 5 Owner’s Manual
Precautions Regarding Children
1. Never leave children unattended in the area where the grill is being used.
2. Do not store items of interest to children around or below the grill or island.
3. Never allow children to sit or stand on any part of the grill or island.
Use Precautions
1. Never leave the grill and side burners unattended while using high flame settings. Boil-overs cause
smoking and greasy boil-overs may ignite.
2. Always use the proper size pan. Select utensils with flat bottoms large enough to cover the burner. The use
of under-sized utensils exposes the sides of the utensils to direct contact with a portion of the flame. This
can scorch utensils, and hamper cleanup. Excessive flames on large stainless steel pots can result in
permanent discoloration. For best results, we recommend commercial quality aluminum pans and utensils.
3. Always position handles of utensils inward, so they do not extend over adjacent work areas or cooking
areas. This reduces the risk of burns, ignition of flammable materials, and spillage due to accidental
contact with the utensils.
4. Do not use water on grease fires. Never pick up a flaming pan. Turn appliance off and smother the
flaming pan with a tight-fitting lid, cookie sheet or flat tray. For flaming grease outside of the pan,
smother with baking soda, or use a dry chemical or foam-type fire extinguisher.
5. Never let clothing, potholders or other flammable materials come in contact with or close to any grate,
burner or hot surface until it has cooled. Fabric may ignite and result in personal injury.
6. When using the grill, do not touch the grill rack, burner grate, or immediate surroundings, as these areas
become extremely hot and could cause burns.
7. Proper apparel is a safety consideration. Never wear loose fitting or hanging garments while using your new
grill.
8. Only use dry potholders - do not use a towel or other bulky cloth in place of potholders. Moist or damp
potholders used on hot surfaces could cause burns.
9. Do not heat any unopened glass or metal container of food on the grill. Pressure may build up and cause
the container to burst resulting in serious harm or damage to the grill.
10. Do not use charcoal in this grill or side burner.
11. Do not attempt to move stainless steel cart while hot or in use.
12. It is extremely important to lock all caster wheels even on flat even surfaces.
13. Do not lean, sit or stand on the stainless steel cart, including the foldout work surfaces.
14. Do not exceed 50 pounds of weight on the foldout work surfaces.
15. Do not block the vents located in the cabinet area of your Cal Flame Island and Stainless Steal Cart as gas
may build up incase of leak and cause serious damage.
16. Your grill must be plugged into a permanent, grounded 110 VAC outlet with a dedicated 15A GFCI
breaker. Do not use an extension cord to supply power to your Cal Flame Island, Grill or Cart. Such use
may result in fire, electrical shock or other personal injury. Do not install a fuse in the neutral or ground
circuit. A fuse in the neutral or ground circuit may result in an electrical shock hazard. Do not ground this
appliance to a gas supply pipe or hot water pipe. Keep any electrical supply cord and the fuel supply hose
away from any heated surfaces.
17. Do not reach over your grill or any other surfaces when hot or in use.
SAVE THIS MANUAL FOR FUTURE REFERENCE

CONTACT INFORMATION
For customer service, please contact your authorized dealer immediately. If you need additional information
and/or assistance, please contact:
C.A.I. Customer Service Department
1462 East Ninth Street
Pomona, CA 91766
Toll Free 1-800-CAL-SPAS
Fax 1-909-629-3890
WARRANTY INFORMATION
See your Cal Flame Barbecue dealer for a copy of the applicable warranty, details and any questions you may
have regarding the warranty coverage on your barbecue.
Warranty Limitations
The Limited Warranty is void if the barbecue has been subject to negligence, alteration, misuse, abuse, repairs
by non- C.A.I. authorized representatives, incorrect electrical installation, acts of God and any other cases
beyond the control of C.A.I. Examples of common acts invalidating this warranty include but are not limited to:
Scratches caused by normal use.
Damage caused by extreme weather conditions. (Hot, Cold, etc.)
Damage caused by dirt, sand, and/or water damage.
Damage caused by continued operation of the barbecue with either known or unknown problems.
Damage caused by direct sunlight.
Damage caused as a result of failure to follow the operating instructions as defined in this Owner’s Manual.
This Limited Warranty applies only to barbecues normally used for personal, family, or household purposes.
This Limited Warranty specifically excludes commercial barbecues.
Warranty Exclusions
C.A.I. warranties the barbecues from defects in material and workmanship for a period of one year from the
original date of purchase.
Barbecue stereo systems are delivered with their own manufacture warranty. For more information, please see
their warranties in the owner’s information package that was delivered with your barbecue for more information.
Locating Product Serial Number
qqqqqqqqqqqqqqql
BBQ Islands
Your new Cal Flame Island BBQ serial number is located on a metal plate inside the door below the grill on the
door. You will need this number to properly register your BBQ and activate coverage.
Please write this number in the space provided for future reference:
Serial Number:____________________________ Delivery Date:_________________
REMINDER
: PLEASE DO NOT FORGET TO REGISTER YOUR NEW PRODUCT AT
WWW.CALSPAS.COM
6wner’s Manual Page 6
Contact and Warranty Information Owner’s Manual

DELIVERY AND SET-UP
Please make a record of the following. It will be valuable if service is required.
Barbecue Model:
Barbecue Serial Number:
Date Purchased:
Date Installed:
Barbecue Dealer’s Phone Number:
Barbecue Dealer’s Address:
Most cities and counties require permits for exterior construction and electrical circuits. In addition, some
communities have codes requiring residential barriers such as fencing and/or self-closing gates on property to
prevent unsupervised access to the property by children under the age of 5. Your dealer can provide information
on which permits may be required and how to obtain them prior to the delivery of your equipment.
PLANNING THE BEST LOCATION FOR YOUR BARBECUE
Safe and satisfactory operation of your new grill depends upon its proper installation. The installation,
adjustments and service of your new grill must be performed by C.A.I. qualified installers and service
technicians. This is necessary to ensure proper operation and also prevent accidents.
Location (Outdoor Use Only)
When planning your Cal Flame Island or cart location, be sure to consider the shortest gas line run possible. Also,
take into consideration the necessity of having a 100v power source. For use of your appliances (i.e. lights,
rotisserie, refrigerator, receptacles, etc.).
When determining a suitable location, take into account concerns such as exposure to wind, proximity to traffic
paths, and windows that open into the home. Keeping in mind natural gas line runs need to be as short as
possible. Locate the grill only in a well ventilated area.
Locate BBQ Islands grills and stainless steel carts in well ventilated areas, and only on solid, flat
foundations (i.e. cement slab or deck). Do not place BBQ Islands/ Outdoor Kitchens or stainless steel carts
on dirt or grass.
Built-In Installation
Your new grill is designed for easy installation into a non-combustible enclosure. The supporting deck and
counter must be level and flat. When determining the final location of your grill, it is required that ventilation be
provided in the enclosure so that gas will not become entrapped in the event of a leak. Make sure that you have
one vent placed at floor level and the other at 5” above floor level.
Built-In Design Models
If using a rear wall, locate a weather proof electrical outlet on the side of the grill that the rotisserie motor will
be located on. The rotisserie motor requires a 110/120v supply. The power supply cord on the motor is equipped
with a 3-prong (grounded) plug for protection against shock hazard. Do not cut or remove the grounding prong
from the plug.
Page 7 Owner’s Manual
Owner’s Manual Delivery and Set-Up

Owner’s Manual Page 8
Drop-In Grills Owner’s Manual
GRILL OPERATION - DROP-IN GRILLS
Grilling
Grilling requires high heat for searing and proper browning. Most foods are cooked at the HI heat setting for
the entire cooking time. However, when grilling large pieces of meat or poultry, it may be necessary to turn the
heat to a lower setting after the initial browning. This cooks the food through without burning the outside. Foods
cooked for a long time or basted with a sugary marinade may need to lower heat setting near the end of the
cooking time. Warming rack is used for defrosting or for keeping food warm while grilling.
Grilling Hints
The cooking of meat, whether rare, medium, or well done, is affected to a large degree by the thickness of the
cut. Expert chefs say it is impossible to have a rare piece of meat with a thin cut.
The cooking time is affected by the kind of meat, also by the size and the shape of the cut, the temperature of
the meat when cooking begins, and the cooking degree desired.
When defrosting meats, it is recommended that it be done overnight in the refrigerator as opposed to a
microwave. This generally yields a juicier cut of meat.
Use a spatula instead of tongs or a fork to turn the meat. A spatula will not puncture the meat and let the juices
run out.
To get the juiciest meats, add seasoning or salt after the cooking is finished and turn the meat only once (juices
are lost when the meat is turned several times). Turn the meat just after the juices begin to bubble to the surface.
Trim any excess fat from the meat before cooking. To prevent steaks or chops from curling during cooking, slit
the fat around the edges at 2-inch intervals.
Do not leave the grill unattended while cooking.
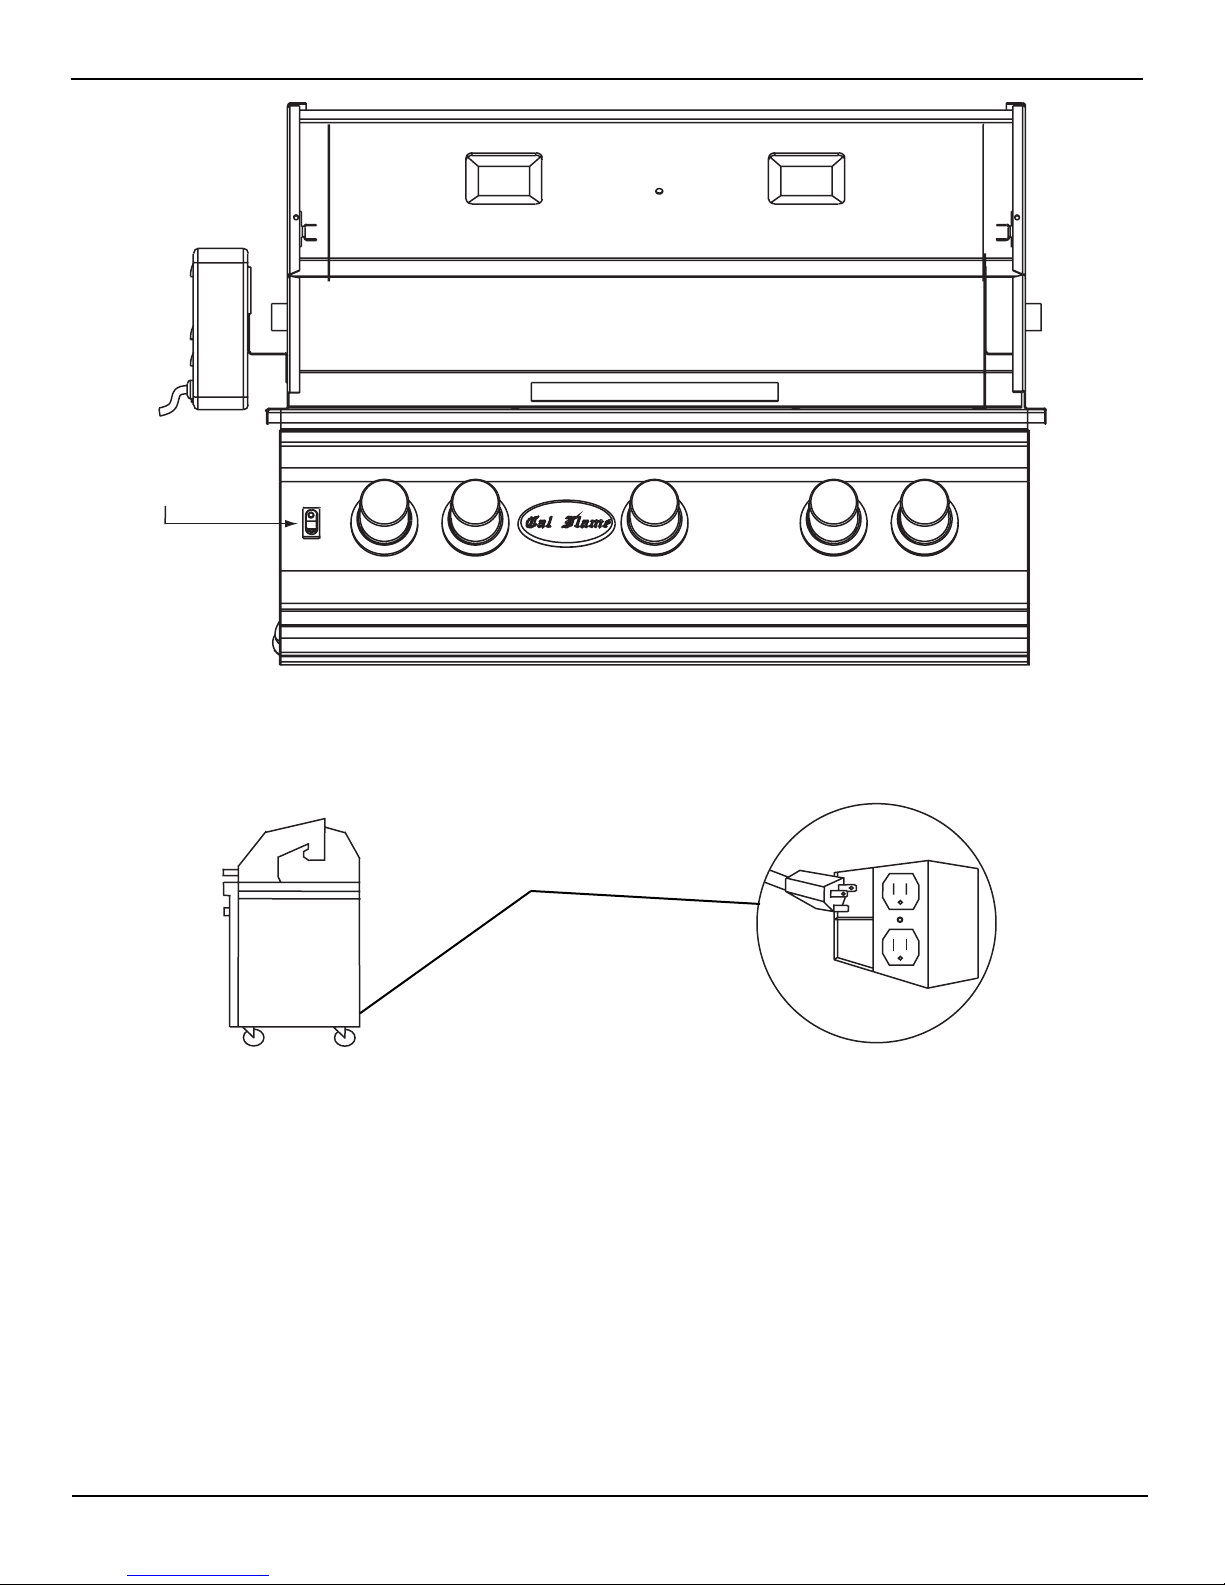
Light (Illumination) Operation
Your Cal Flame Grill is equipped with either 1-halogen light (CR-3000) or 2-halogen lights (CR-4000 &
CR-5000). This feature is added for safety when cooking in non-illuminated areas. Also, for convenience when
cooking in poorly illuminated areas or simply for an inviting display of deliciously grilled food.
The On/Off switch controlling your halogen light(s) is located at the control panel on the front lower left side
(see Figure 25).
Your grill is equipped with a grounded (3 prong) 120 VAC plug located in the lower, left, rear corner of your
cart and must be plugged into a permanent, grounded 120 VAC outlet with a dedicated 15amp GFI breaker. DO
NOT cut or remove the ground prong as this may result in fire, electrical shock or other
personal injury. This electrical source provides power to the lights, refrigerator and rotisserie.
NOTE
: On units with the rotisserie option, an additional outlet will be needed to utilize the rotisserie
burner.
W
ARNING: Lock all casters on all cart wheels even when installed on flat level surfaces.
Owner’s Manual Drop-In Grills
Page 9 Owner’s Manual
On/Off Switch
Figure 1. Light Operation
GFI Circuit
120VAC 3-Prong (grounded)
male plug. Plug male end into
the GFI outlet.
Operating the Grill
Make sure all burner controls are off. Do not attempt to light the burners if the smell of gas is present. Check the
connection with a soap and water solution after attaching the hose. For LP units, make sure there is gas in the
tank and it is sitting upright. For natural gas units, make sure the shut off valve is on.
1. Make sure the drip tray is in place.
2. Light the grill burners using the instructions below.
3. Turn the control knob to HI and preheat the grill for 15 minutes. The top cover is to be closed during the
appliance preheat period.
4. Place the food on the grill and cook to desired completion. Adjust heat setting, if necessary. The control
knob may be set to any position between HI and LOW.
5. Allow the grill to cool and clean the drip tray after each use.
Figure 2. GFI Breaker.

Drop-In Grills Owner’s Manual
Owner’s Manual Page 10
Lighting The Grill Burners
1. Open the hood.
2. Keep your face as far away from the burners as possible.
3. Rapidly rotate the burner knob counter clockwise past light position (You will hear a loud click) to high.
4. Listen for the "Whoosh" sound. If the burner does not light on the first try, repeat immediately.
5. If the burner does not light after three attempts, turn the control knobs to the OFF position. Wait 5 minutes
until the gas clears before attempting to light it again.
7. Repeat the procedure or try "Manual Lighting procedure" below.
8. Upon successful lighting, repeat the process on the other burners you wish to light.
9. To shut off burners rotate knob and turn to OFF. It is normal to hear a popping sound when the burners
returned off.
Manually Lighting The Grill Burners
1. Open the hood.
2. If you have just attempted to light the burner, allow 5 minutes for any accumulated gas to dissipate.
3. Slide out the drip tray from the grill.
4. Keep your face as far away from the burners as possible.
5. Using only a long stem match, hold near the burner ports.
6. Push in and turn counter clockwise the grills gas control knob just past the LIGHT position to HIGH.
7. Listen for the "Whoosh" sound. If the burner does not light after 5 seconds, turn the control knobs to the
OFF position. Wait 5 minutes until the gas clears before attempting to light it again.
8. If the burner does not light after several attempts see Troubleshooting Guide in the back of this manual.
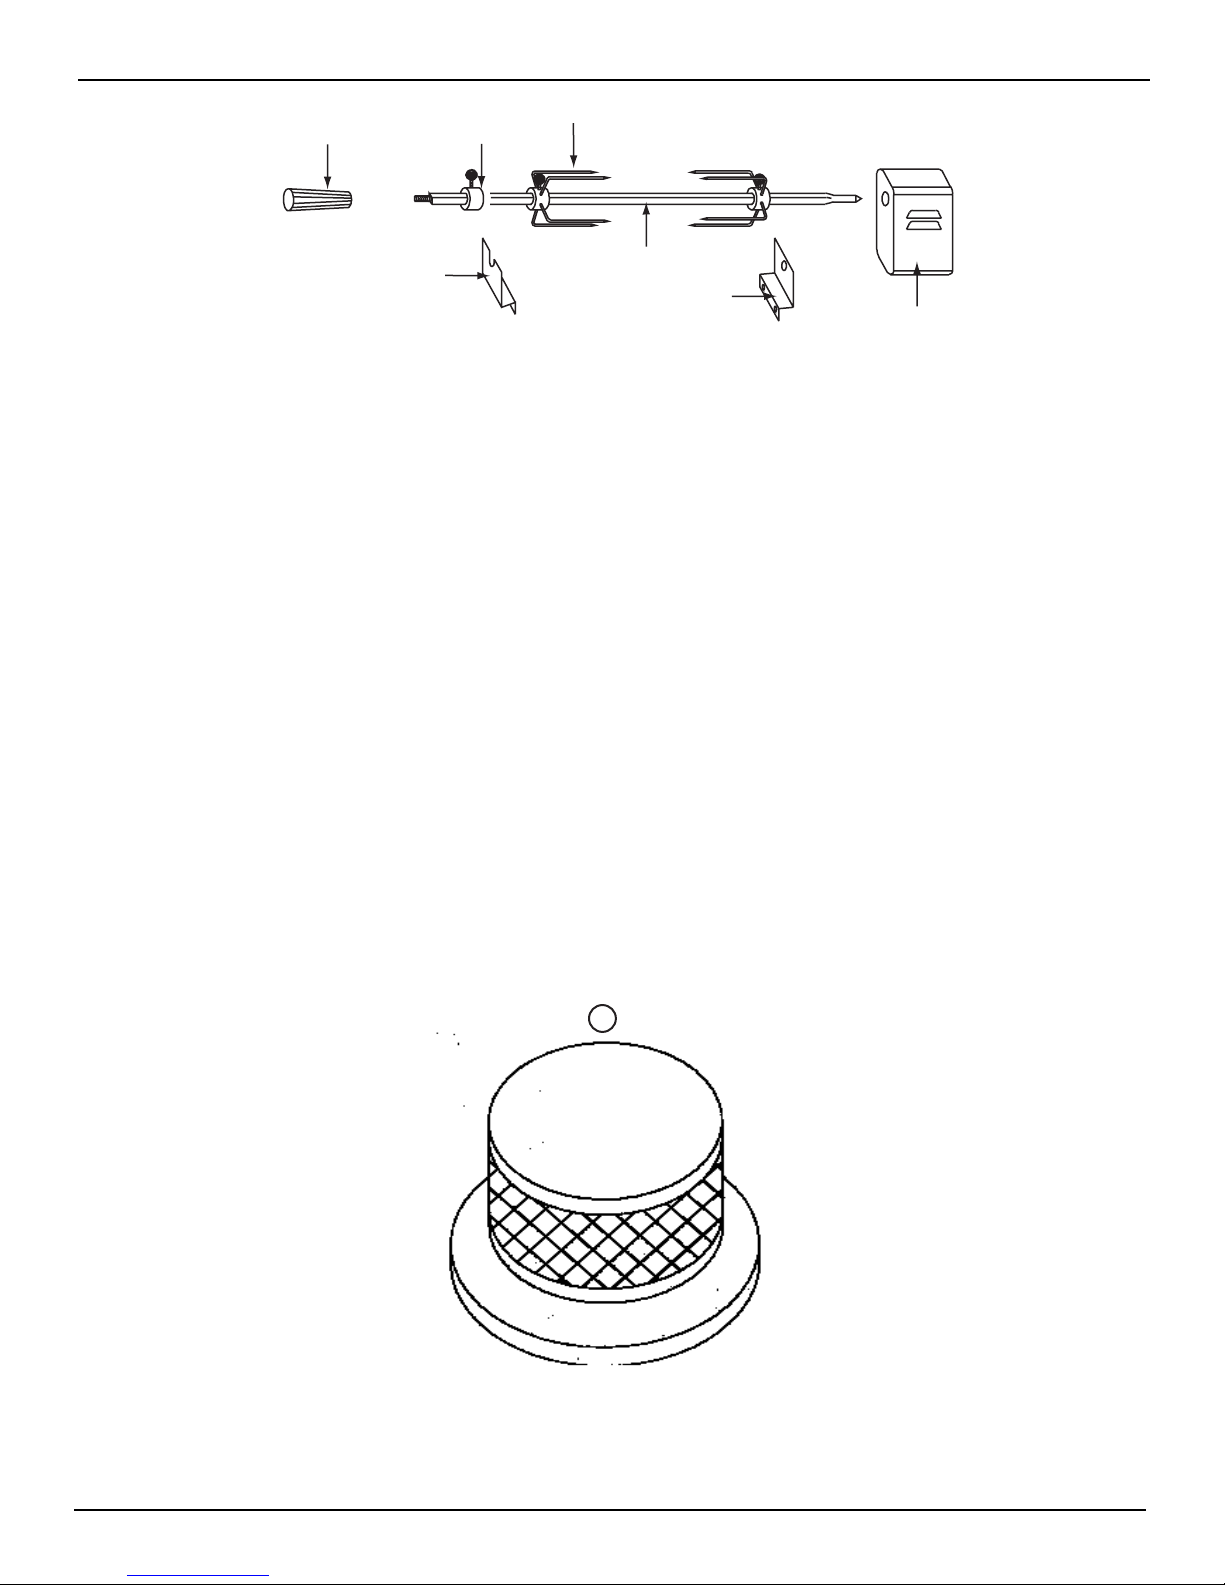
Using Your Rotisserie
The rotisserie burner is an infrared type, which provides intense searing radiant heat. Preferred by professional
chefs over other methods, this intense heat is ideal for searing in the natural juices and nutrients found in quality cuts of meat.
Cooking with the Rotisserie
The rotisserie system is designed to cook items from the back using infrared heat. The location of the burner
allows the placement of a rotisserie-basting pan (included) beneath the food to collect juices and drippings for
basting and gravy. To flavor the contents of the basting pan, you can add herbs, onion, garlic, or spices.
Operating The Rotisserie
1. To load the rotisserie rod, hold the handle firmly while sliding one of the fork assemblies (prongs facing
away from the handle) onto the rod. Push the rod through the center of the food, then slide the other
holder (prongs toward the food) onto the rod. Center the meat on the rod and push the fork assemblies
firmly together. Tighten the thumbscrews. To secure any loose portions of your meat, use butcher string
(never use nylon or plastic string). Place basting pan under the food to collect the drippings.
2. To use the rotisserie, first mount the motor on the left side of the grill. Place securely onto support bracket.
3. The rod of the rotisserie system is assembled into the motor by placing the pointed end into the motor and
resting the threaded end on the support at the side of the grill. Once the rod is pushed as far as possible into
the motor, the grooved end of the rod should rest on the right side bracket.
4. If necessary, to offset unbalanced loads, slide the counter weight on to the rod. With the counter weight
loose, allow the loaded rod to rotate and come to a stop. Now rotate the counter weight above the rod in a
vertical position and tighten the thumbscrew. You can slide the counter weight away from or closer to the
rotisserie rod as needed for balanced operation. Once lit, the rotisserie burner will reach cooking
temperature in about 1 minute. The orange/red glow will even out in about 5 minutes.
Owner’s Manual Drop-In Grills
Page 11 Owner’s Manual
Rotis Spit Handle
Rotis Spit Bracket
Rotis Spit Bushing
Rotis Spit Fork
Rotis Spit Rod
Rotis Motor Bracket
Rotis Motor
Figure 3. Rotisserie Burner Assembly
Lighting The Infrared or Rotisserie Burner
1. Open the hood.
2. Push and hold the rotisserie burner knob in for about 5 seconds to allow gas into the the infrared burner, then
rotate knob rapidly counter clockwise past the light position (You will hear a loud click).
3. If the burner does not light on the first try, repeat immediately.
4. If the burner does not light within 5 seconds, turn the control knob to the OFF position. Wait 5 minutes until
the gas clears before attempting to light it again.
5. Repeat the procedure or try "Manual Lighting procedure" as shown below.
6. Upon successful lighting, repeat the process on any other available IR burner you may wish to light.
Manually Lighting The Infrared or Rotisserie Burner
1. Open the hood.
2. Push and hold the rotisserie burner knob in for about 5 seconds to allow gas into the the infrared burner, then
rotate knob rapidly counter clockwise past the light position (You will hear a loud click).
3. Hold a lit long stem match next to the burner ports.
4. If the burner does not light within 5 seconds, turn the control knob to the OFF position. Wait 5 minutes until
the gas clears before attempting to light it again.
5. If the burner does not light after several attempts see troubleshooting located in the back of this manual.
6. Upon successful lighting, repeat the process on any other available IR burner you may wish to light.
Off
Light
High
Low
Figure 4. Rotisserie Burner Knob.
Drop-In Grills Owner’s Manual
Owner’s Manual Page 12
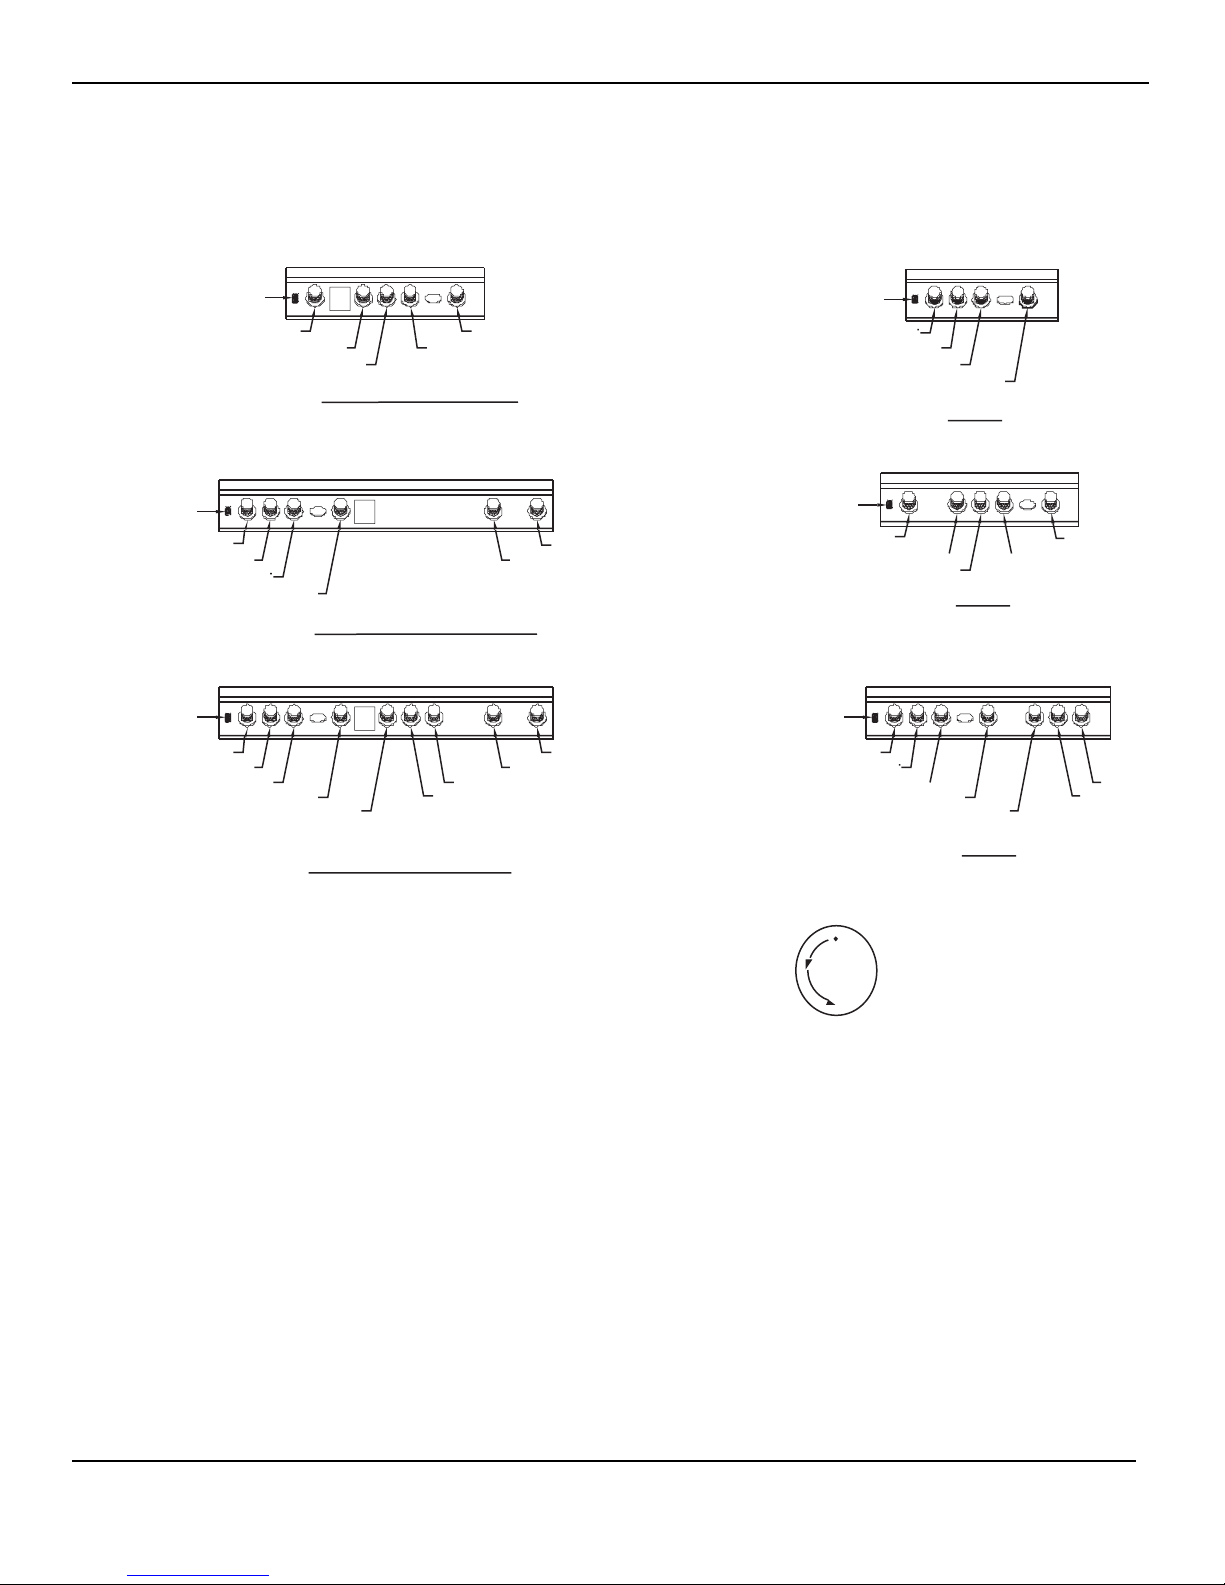
Cal Flame Familiarization
The following controls are for the Cal Flame Drop-In Grills, Stainless Steel Carts, Chef Series, Master Chef
Series & Gourmet Series Islands. Please familiarize yourself with these controls prior to operation of your Cal
Flame BBQ.
Side Burner Rt
Side Burner Lt
Grill
Grill
Grill
Grill
Grill
Grill
Infrared Burner Lt
Light Switch
C-300S, 5 Burner w/ Side Burner
Light Switch
Infrared Burner
Grill
Grill
Grill
Side Burner Rt
Side Burner Lt
CS-3000S, 3 Burner w/ Side Burner
Light Switch
Infrared Burner
Grill
Grill
Grill
Grill
CR4000, 4 Burner, Stand Lone
Light Switch
Grill
Grill
Grill
Infrared Burner
Light Switch
Grill
Grill
Grill
Grill
infrared Burner
4 Burner
3 Burner
Light Switch
Grill
Grill
Grill
Grill
Grill
Grill
Infrared Burner Lt
5 Burner
Grill Knob Operation -
Low
Off
High
Figure 5. Grill Knob Operation

Owner’s Manual Islands
Page 13 Owner’s Manual
GRILL OPERATION - ISLANDS
Grilling
Grilling requires high heat for searing and proper browning. Most foods are cooked at the HI heat setting for
the entire cooking time. However, when grilling large pieces of meat or poultry, it may be necessary to turn the
heat to a lower setting after the initial browning. This cooks the food through without burning the outside. Foods
cooked for a long time or basted with a sugary marinade may need to lower heat setting near the end of the
cooking time. Warming rack is used for defrosting or for keeping food warm while grilling.
Grilling Hints
The cooking of meat, whether rare, medium, or well done, is affected to a large degree by the thickness of the
cut. Expert chefs say it is impossible to have a rare piece of meat with a thin cut.
The cooking time is affected by the kind of meat, also by the size and the shape of the cut, the temperature of
the meat when cooking begins, and the cooking degree desired.
When defrosting meats, it is recommended that it be done overnight in the refrigerator as opposed to a
microwave. This generally yields a juicier cut of meat.
Use a spatula instead of tongs or a fork to turn the meat. A spatula will not puncture the meat and let the juices
run out.
To get the juiciest meats, add seasoning or salt after the cooking is finished and turn the meat only once (juices
are lost when the meat is turned several times). Turn the meat just after the juices begin to bubble to the
surface.
Trim any excess fat from the meat before cooking. To prevent steaks or chops from curling during cooking, slit
the fat around the edges at 2-inch intervals.
Do not leave the grill unattended while cooking.
Light (Illumination) Operation
Your Cal Flame Grill is equipped with either 1-halogen light (CR-3000) or 2-halogen lights (CR-4000 &
CR-5000). This feature is added for safety when cooking in non-illuminated areas. Also, for convenience when
cooking in poorly illuminated areas or simply for an inviting display of deliciously grilled food.
The On/Off switch controlling your halogen light(s) is located at the control panel on the front lower left side.
Your grill is equipped with a grounded (3 prong) 120 VAC plug located in the lower, left, rear corner of your
cart and must be plugged into a permanent, grounded 120 VAC outlet with a dedicated 15amp GFI breaker. DO
NOT cut or remove the ground prong as this may result in fire, electrical shock or other
personal injury. This electrical source provides power to the lights, refrigerator and rotisserie.
NOTE
: On units with the rotisserie option, an additional outlet will be needed to utilize the rotisserie
burner.
W
ARNING
: Lock all casters on all cart wheels even when installed on flat level surfaces.
Operating the Grill
Make sure all burner controls are off. Do not attempt to light the burners if the smell of gas is present. Check
the connection with a soap and water solution after attaching the hose. For LP units, make sure there is gas in
the tank and it is sitting upright. For natural gas units, make sure the shut off valve is on.

Islands Owner’s Manual
Owner’s Manual Page 14
1. Make sure the drip tray is in place.
2. Light the grill burners using the instructions below.
3. Turn the control knob to HI and preheat the grill for 15 minutes. The top cover is to be closed during the
appliance preheat period.
4. Place the food on the grill and cook to desired completion. Adjust heat setting, if necessary. The control
knob may be set to any position between HI and LOW.
5. Allow the grill to cool and clean the drip tray after each use.
Lighting The Grill Burners
1. Open the hood.
2. Keep your face as far away from the burners as possible.
3. Rapidly rotate the burner knob counter clockwise past light position (You will hear a loud click) to high.
4. Listen for the "Whoosh" sound. If the burner does not light on the first try, repeat immediately.
5. If the burner does not light after three attempts, turn the control knobs to the OFF position. Wait 5 minutes
until the gas clears before attempting to light it again.
7. Repeat the procedure or try "Manual Lighting procedure" below.
8. Upon successful lighting, repeat the process on the other burners you wish to light.
9. To shut off burners rotate knob and turn to OFF. It is normal to hear a popping sound when the burners
returned off.
Manually Lighting The Grill Burners
1. Open the hood.
2. If you have just attempted to light the burner, allow 5 minutes for any accumulated gas to dissipate.
3. Slide out the drip tray from the grill.
4. Keep your face as far away from the burners as possible.
5. Using only a long stem match, hold near the burner ports.
6. Push in and turn counter clockwise the grills gas control knob just past the LIGHT position to HIGH.
7. Listen for the "Whoosh" sound. If the burner does not light after 5 seconds, turn the control knobs to the
OFF position. Wait 5 minutes until the gas clears before attempting to light it again.
8. If the burner does not light after several attempts see Troubleshooting Guide in the back of this manual.
Using Your Rotisserie
The rotisserie burner is an infrared type, which provides intense searing radiant heat. Preferred by professional
chefs over other methods, this intense heat is ideal for searing in the natural juices and nutrients found in
quality cuts of meat.
Cooking with the Rotisserie
The rotisserie system is designed to cook items from the back using infrared heat. The location of the burner
allows the placement of a rotisserie-basting pan (included) beneath the food to collect juices and drippings for
basting and gravy. To flavor the contents of the basting pan, you can add herbs, onion, garlic, or spices.
Operating The Rotisserie
1. To load the rotisserie rod, hold the handle firmly while sliding one of the fork assemblies (prongs facing
away from the handle) onto the rod. Push the rod through the center of the food, then slide the other
holder (prongs toward the food) onto the rod. Center the meat on the rod and push the fork assemblies
firmly together. Tighten the thumbscrews. To secure any loose portions of your meat, use butcher string
(never use nylon or plastic string). Place basting pan under the food to collect the drippings. Tighten the
thumbscrew. You can slide the counter weight away from or closer to the rotisserie rod as needed for
balanced operation.

2. To use the rotisserie, first mount the motor on the left side of the grill. Place securely onto support bracket.
3. The rod of the rotisserie system is assembled into the motor by placing the pointed end into the motor and
resting the threaded end on the support at the side of the grill. Once the rod is pushed as far as possible into
the motor, the grooved end of the rod should rest on the right side bracket.
4. If necessary, to offset unbalanced loads, slide the counter weight on to the rod. With the counter weight
loose, allow the loaded rod to rotate and come to a stop. Now rotate the counter weight above the rod in a
vertical position and tighten the Light rotisserie burners following instructions on page 22. Once lit, the
rotisserie burner will reach cooking temperature in about 1 minute. The orange/red glow will even out in
about 5 minutes.
Lighting The Infrared or Rotisserie Burner
1. Open the hood.
2. Push and hold the rotisserie burner knob in for about 5 seconds to allow gas into the the infrared burner, then
rotate knob rapidly counter clockwise past the light position (You will hear a loud click).
3. If the burner does not light on the first try, repeat immediately.
4. If the burner does not light within 5 seconds, turn the control knob to the OFF position. Wait 5 minutes until
the gas clears before attempting to light it again.
5. Repeat the procedure or try "Manual Lighting procedure" as shown below.
6. Upon successful lighting, repeat the process on any other available IR burner you may wish to light.
Manually Lighting The Infrared or Rotisserie Burner
1. Open the hood.
2. Push and hold the rotisserie burner knob in for about 5 seconds to allow gas into the the infrared burner, then
rotate knob rapidly counter clockwise past the light position (You will hear a loud click).
3. Hold a lit long stem match next to the burner ports.
4. If the burner does not light within 5 seconds, turn the control knob to the OFF position. Wait 5 minutes until
the gas clears before attempting to light it again.
5. If the burner does not light after several attempts see troubleshooting located in the back of this manual.
6. Upon successful lighting, repeat the process on any other available IR burner you may wish to light.
Owner’s Manual Islands
Page 15 Owner’s Manual

Islands Owner’s Manual
Owner’s Manual Page 16
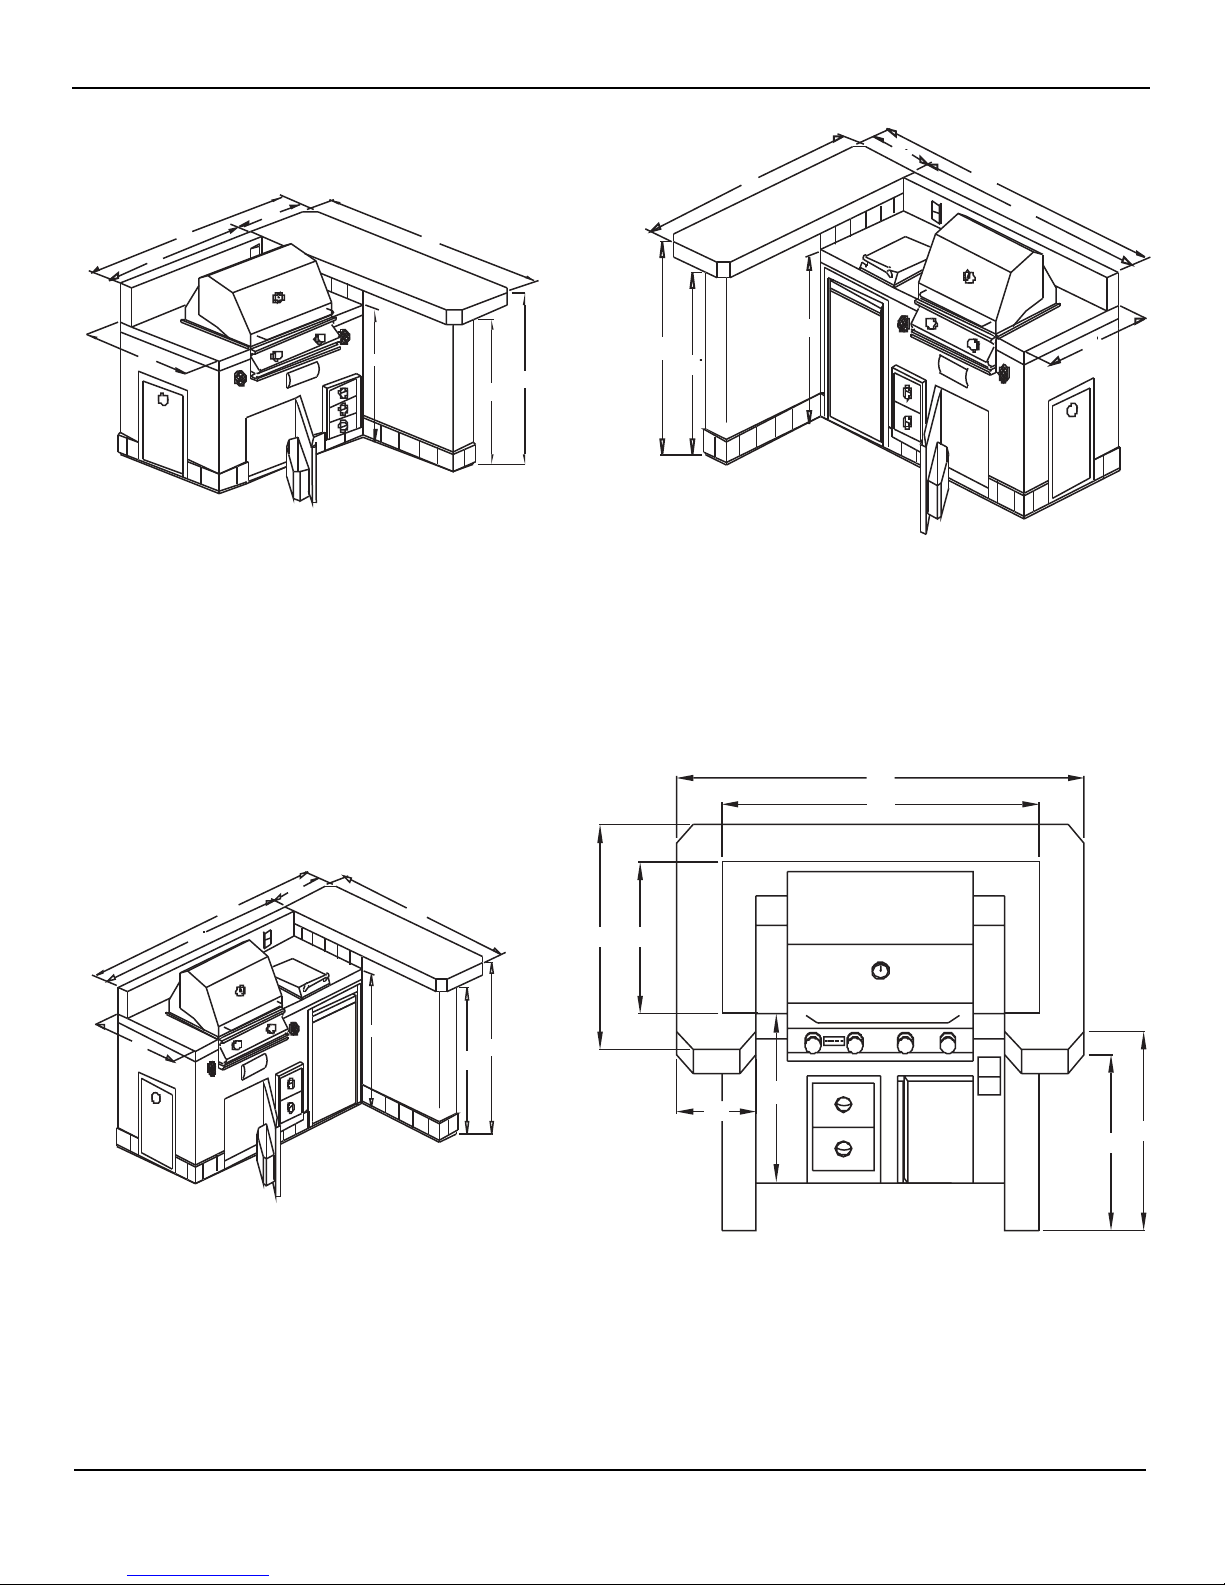
Figure 8. C-200
60"
36"
31"
38"
47"
38"
39"
27"
30"
27"
39"
48"
36"
Figure 7. C-100B
Figure 6. C-100
Owner’s Manual Islands
Page 17 Owner’s Manual
97"
24"
38"
72"
32"
Figure 11. C-250B
96"
44"
40"
38"
66"
18"
48"
35"
44"
41"
7'-0"
Figure 12. C-300L
Figure 9. C-225
Figure 10. C-250
Islands Owner’s Manual
Owner’s Manual Page 18
78"
96"
86"
44"
40"
18"
33"
38"
66"
38"
44"
40"
46"
18"
35"
96"
83"
62"
40"
44"
38"
18"
66"
51"
96"
18"
78"
32"
38"
44"
40"
96"
Figure 15. C-400R
Figure 16. MC-500
Figure 13. C-300R
Figure 14. C-400L
 Loading...