

Cal Flame Bbq Islands Owner's Manual
LTR20091036, Rev. B
3/30/09

Barbecue Island Assembly ..........5
Unit Attachment ......................5
Stucco and Tile Application..............6
Rock / Stone Application ...............7
Granite Kit Instructions ................9
Griddle and Griddle Storage ............10
Light Switch Installation...............11
Cleaning and Maintenance .........12
About Natural Stone ..................12
Granite Top .........................13
Tile ................................14
Synthetic Panel ......................16
Stainless Steel .......................16
Cleaning the Interior of Your Grill .......20
Covering Your Grill ...................21
2009 Warranty...................22
CONTACT INFORMATION
For customer service, please contact your authorized dealer immediately. If you
need additional information and/or assistance, please contact:
Customer Service Department
1462 East Ninth Street
Pomona, CA 91766
Toll Free: 1-800-CAL-SPAS
Fax: 1-909-629-3890
www.calspas.com
Copyright 2008-2009 LMS, Inc. All rights
reserved. Duplication without written
consent is strictly prohibited.
Cal Flame ® is a registered trademark.
Due to continuous improvement programs, all models, operation, and/or
specications are subject to change without prior notice.
LTR20091036, Rev. B
3/30/09
California Proposition 65 Warning:
Chemicals known to the State of California to cause cancer, birth defects or
other reproductive harm are found in
and/or created by the combustion of
natural gas, propane, butane and other
fuels. Always operate this unit as described in the owner’s manual and in
well ventilated areas.

www. c a ls pa s. c o m
Safety Instructions
WARNING: Improper installation, adjustment, alteration,
service or maintenance can cause injury or property damage. Read
the installation, operating and maintenance instructions thoroughly
before installing or servicing this equipment.
Placement and Location
Cal Flame™ grills and carts are designed for outdoor use •
only.
Never locate this appliance in an enclosed room, under a sealed •
overhead structure, or in any type of enclosed area such as a garage, shed, or breezeway. Keep clear of trees and shrubs.
Do not place this grill under or near windows or vents that can be •
opened into your home.
Cal Flame™ grills are not intended for installation in or on recre-•
ational vehicles or boats.
Maintain sufcient distance as to not overheat any overhead com-•
bustible material such as a patio cover.
The area surrounding your new grill should be kept clean and free •
from ammable liquids and other combustible materials such as
mops, rags or brooms, as well as solvents, cleaning uids, and
gasoline.
1
Safety Instructions
Set-Up
Do not use the grill, grill cabinet, or area surrounding the grill as a •
storage area for ammable or plastic items. Do not store the liquid
propane (LP) cylinder in the vicinity of this or any other appliance
when it is not being used.
Before installing built in grills in enclosures, copy all product in-•
formation such as model number, serial number and type of grill
(e.g. natural gas or LP) and store information in a safe place. This
information is located on a plate located behind the grill and is visible when the hood is lowered or on the right side of the chassis.
There is an area on the back cover of this manual where you can
write down this information.
We recommend that a licensed contractor install your Cal Flame™ •
grill. Installation must conform to local codes, or in the absence
of local codes, with either the National Fuel Gas Code, ANSI
Z223.1 / NFPA54, Natural Gas and Propane Installation Code,
2009 Barbecue Islands
LTR2009103, Rev. B

2
www. c a ls pa s. c o m
CSA B149.1, or Propane Storage and Handling Code, B149.2),
as applicable.
Your Cal Flame™ grill or cart must be plugged into a permanent, •
grounded 110V outlet with a dedicated 15A GFCI breaker in accordance with local codes or the National Electrical Code, ANSI /
NFPA 70, or the Canadian Electrical Code, CSA C22.1.
Do not use an extension cord to supply power to your Cal Flame™ •
grill or cart. Such use may result in re, electrical shock or other
Safety Instructions
personal injury. Do not install a fuse in the neutral or ground circuit. A fuse in the neutral or ground circuit may result in an electrical shock hazard. Do not ground this appliance to a gas supply
pipe or hot water pipe. Keep any electrical supply cords and the
fuel supply hose away from any heated surfaces.
To prevent re and smoke damage, remove all packaging material •
before operating grill.
Before you start cooking, clean the entire grill thoroughly with hot, •
soapy water. This is necessary to remove residual solvents, oil and
grease used in the manufacturing process. The grates should also
be thoroughly cleaned in the same manner.
Operation
In the event that a burner goes out, turn burner knobs to the full •
OFF position, fully open the grill hood and let it air out. Do not attempt to use the grill until the gas has had time to dissipate.
Never use the grill if the drip pan is not properly installed. Drip •
pan should be pushed all the way to the rack located just under
the grill. Fire or explosion can result from an improperly installed
drip pan.
Keep all electrical supply cords and the rotisserie motor cord away •
from the heated areas of the grill.
Never use the grill or side burner in windy conditions. If used in a •
consistently windy area a windbreak will be required. Always adhere to the specied clearances listed in this manual.
Never line the grill or side burners with aluminum foil.•
When the unit is not in use, be sure to turn off the gas at the LP •
tank.
2009 Barbecue Islands
LTR20091036, Rev. B

3
www. c a ls pa s. c o m
Do not install or operate your grill unit in such a manner that the •
cross ventilation openings are blocked. Fresh air must be able to
pass though installed vents to safeguard against residual gas ac-
cumulation. Failure to allow proper ventilation may cause re or
explosion.
When handling LP gas line and connectors, do not allow them to •
come in contact with any metal surfaces of the cart or cabinet. Do
not drop LP connectors.
Gas sources to the grill and side burners must be regulated. Do •
not operate grill or side burners if regulators have been removed,
re or explosion can occur.
Never leave the grill and side burners unattended when in use. •
When using pots and pans, boil-overs will cause smoking and
greasy boil-overs may ignite.
Always use the proper size pan. Select utensils with at bottoms •
large enough to cover the burner. The use of under-sized utensils
exposes the sides of the utensils to direct contact with a portion
of the ame. This can scorch utensils and hamper cleanup. Excessive ames on large stainless steel pots can result in permanent
discoloration. For best results, we recommend commercial quality
aluminum pans and utensils.
Always position handles of utensils so they do not extend over ad-•
jacent work areas or cooking areas. This reduces the risk of burns,
ignition of ammable materials, and spillage due to accidental con-
tact with the utensils.
Safety Instructions
Do not use water on grease res. Never pick up a aming pan. •
Turn the appliance off and smother the aming pan with a tighttting lid, a cookie sheet or a at tray. For aming grease outside
of the pan, smother it with baking soda or use a dry chemical or
foam-type re extinguisher.
Never allow clothing, pot holders or other ammable materials •
come in contact with or be close to any grate, burner or hot sur-
face until it has fully cooled. Never wear loose tting or hanging
garments while using your grill. Fabric may ignite and result in
personal injury.
When using the grill, do not touch the grill rack, burner grate, or •
immediate surroundings as these areas become extremely hot and
can cause burns.
2009 Barbecue Islands
LTR2009103, Rev. B

4
www. c a ls pa s. c o m
Only use dry pot holders and do not use a towel or other bulky •
cloth in place of pot holders. Moist or damp pot holders used on
hot surfaces can cause burns.
Do not heat any unopened glass or metal container of food on the •
grill. Pressure may build up and cause the container to burst, pos-
sibly resulting in serious personal injury or damage to the grill.
Do not reach over your grill or any other surfaces when hot or in •
use.
Safety Instructions
Maintenance and Repair
Spiders and other insects can nest in the burners of the grill and •
block the gas and airow to the burner ports. This creates a dangerous condition that can result in a re behind the valve panel. In-
spect and clean the burners periodically and follow the guidelines
in the Cleaning and Maintenance section of this manual.
Unless specically recommended in this manual, do not repair or •
replace any part of the grill. A qualied technician should perform
all service. Any repairs made by a non- LMS approved dealer technician will void your warranty.
Storage
When your gas grill is not in use, turn off the gas at the supply •
cylinder.
Storage of a grill or cart indoors is permissible only if the supply •
cylinder is disconnected and removed.
Precautions Regarding Children
Never leave children unattended in the area where the grill is be-•
ing used.
Do not store items of interest to children around or below the grill •
or cart.
Never allow children to sit or stand on any part of the grill or cart.•
2009 Barbecue Islands
LTR20091036, Rev. B
www. c a ls pa s. c o m
Barbecue Island Assembly
Unit Attachment
Place the island sections together on the ground. Make sure the 1.
ground where the barbecue is placed is as level as possible for best
alignment.
NOTE: If the ground is not
level, use shims to level out
the island sections. This needs
to be done before you intall
the bolts.
Connect the speakers, 2.
lights, and main power
cables before sliding the
sections together.
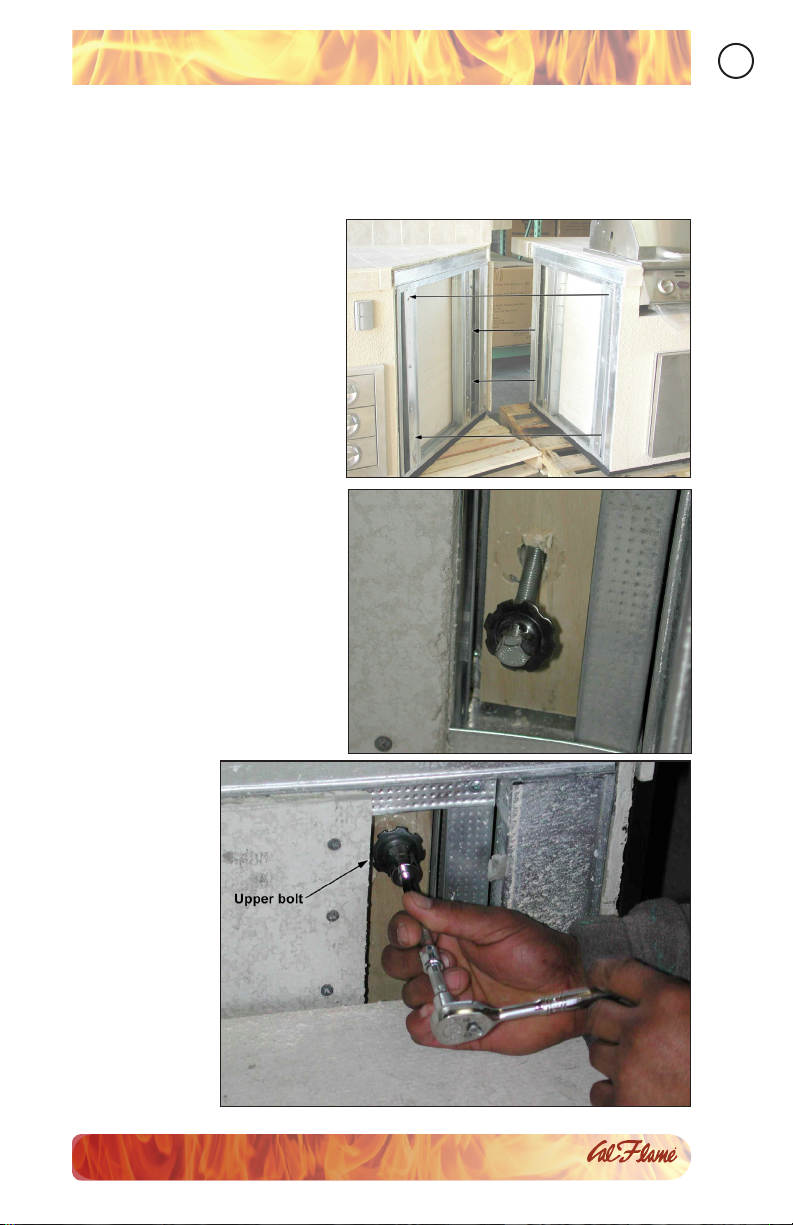
Insert the bolts through 3.
the pre-drilled holes from
the inside of the barbecue
island (total of four bolts
on each side).
Tighten all bolts using a 4.
9/16” wrench.
5
Installation / Assembly
2009 Barbecue Islands
LTR2009103, Rev. B

6
www. c a ls pa s. c o m
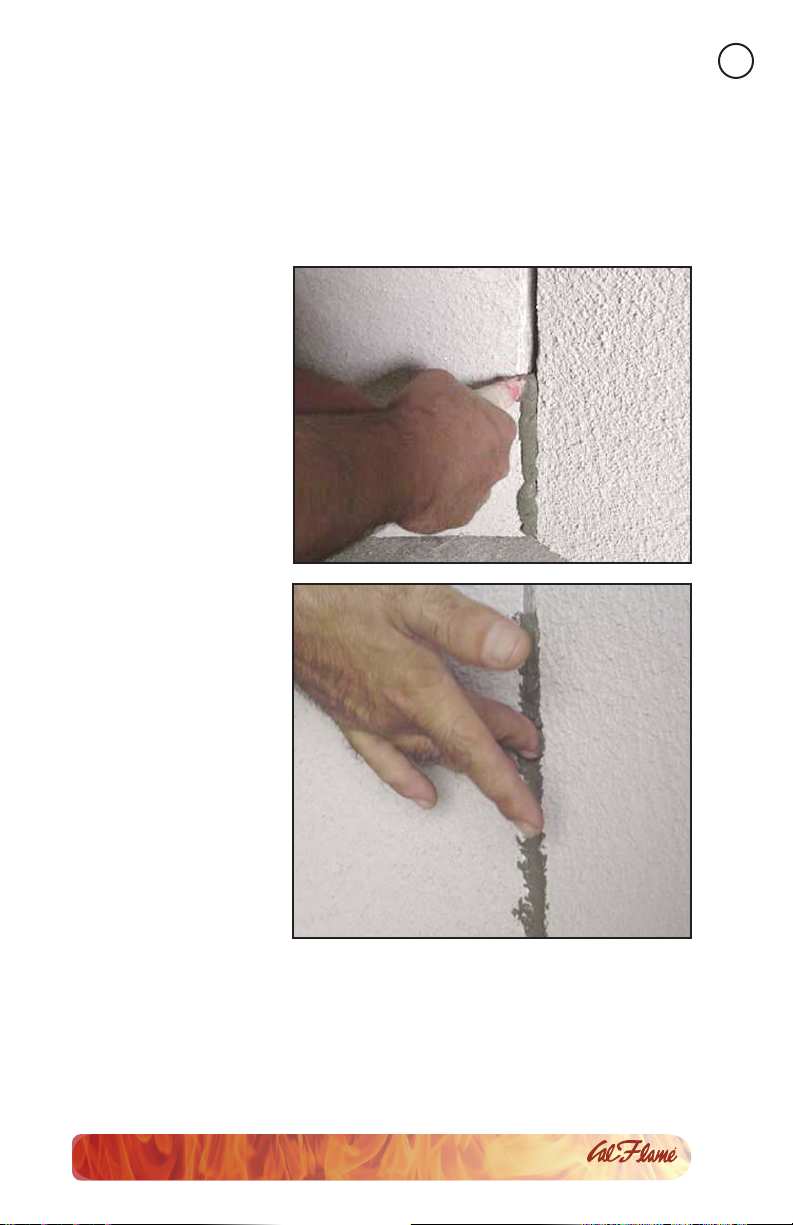
Stucco and Tile Application
Prepare and ll the gap or seam line with speed set.1.
Using your ngertips, push and atten out the speed set into the 2.
seam line.
NOTE: Allow the speed set to dry before proceeding with the next
step.
Using a small brush or hopper gun, apply stucco to the seam line.3.
Mix grout with water in a container.4.
Installation / Assembly
Fill the tile seam line with grout using a small spatula or your n-5.
ger.
Clean the grout with a damp rag.6.
Let the grout and stucco dry for at least three hours.7.
2009 Barbecue Islands
LTR20091036, Rev. B
www. c a ls pa s. c o m
Rock / Stone Application
Place the island sections together on the ground.1.
Make sure the ground where the barbecue is place is as level as 2.
possible for best alignment.
NOTE: If the ground is
not level, use shims to
level out the island sections. This needs to be
done before you place
the bolts.
Connect the speak-3.
ers, lights, and main
power cables before
sliding the sections
together.
Insert the bolts 4.
through the predrilled holes from
the inside of the
barbecue island (total of four bolts on
each side). Tighten
all bolts using a
9/16” wrench.
7
Installation / Assembly
Prepare mortar in a 5.
container.
Apply mortar to 6.
the gaps left open
between the island
assembly (front and
back).
Let it dry for 15 to 30 minutes and brush the area where the mortar 7.
mix was applied.
Prepare grout in a second container.8.
2009 Barbecue Islands
LTR2009103, Rev. B
 Loading...