

Page 1
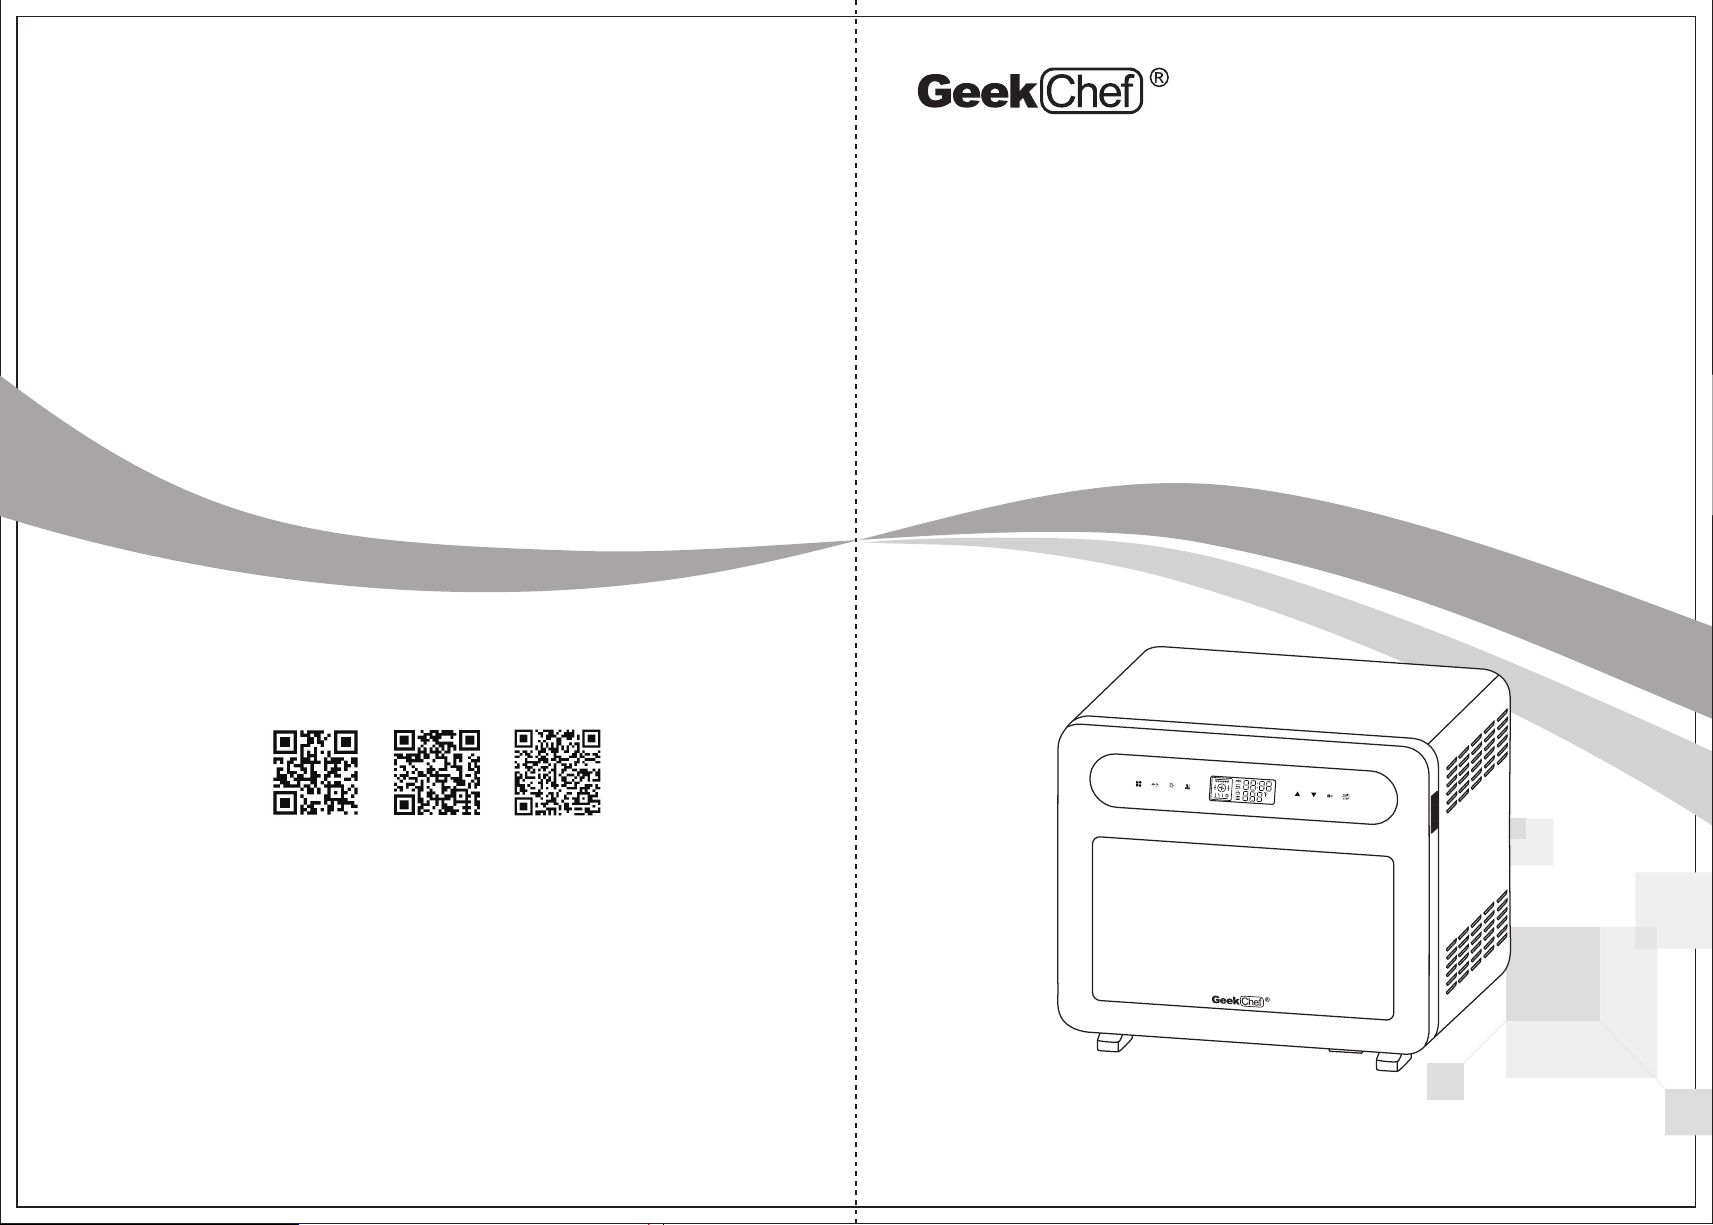
INSTRUCTION MANUAL
Live Your Best Geek Life!
Geek Youtube Geek Geek Facebook
AiroCook
- Air Fryer Oven
Geek Technology Ltd.
1275 Bloomfield Ave
Fairfield, NJ 07004
www.geektechnology.com
Toll Free 1-844-801-8880
Model No: GTO25A
Page 2
TABLE OF CONTENTS
01
IMPORTANT
SAFETY INSTRUCTIONS
Always follow basic safety precautions when using your
Air Fryer Toaster Oven.
READ ALL INSTRUCTIONS BEFORE USE
IMPORTANT SAFETY INSTRUCTIONS
BEFORE USING YOUR AIR FRYER TOASTER OVEN
PRODUCT COMPONENTS
HOW TO USE
CLEANING AND MAINTENANCE
TROUBLESHOOTING
01
03
04
put
06
09
11
LIMITED WARRANTY
13
01
Page 3
Please use utensils fork or wear insulated gloves to avoid high temperature scalds when taking
foods or utensils out of the oven.
The appliance may become hot during use. Do not touch the front door glass or heating elements
inside the cavity. Keep children or user's body parts (especially face) away from the door to avoid
steam scald when the door must be opened.
Do not use the product for storage.
Do not repair the appliance by an unqualified maintainer. Contact customer service for further
support.
Do not use the product if the door or sealing ring is damaged.
After cooking, wait 30 minutes for the inner cavity to cool before cleaning.
The product cannot operate under the mode of an external timer and independent remote control system.
Do not use strong corrosive detergent, gasoline, polishing powder and metal brush to clean any part of
this product.
02
1
BEFORE USING YOUR
AIR FRYER OVEN
2
200mm/
7.87 inch
FOR HOUSEHOLD USE ONLY
SAVE THESE INSTRUCTIONS
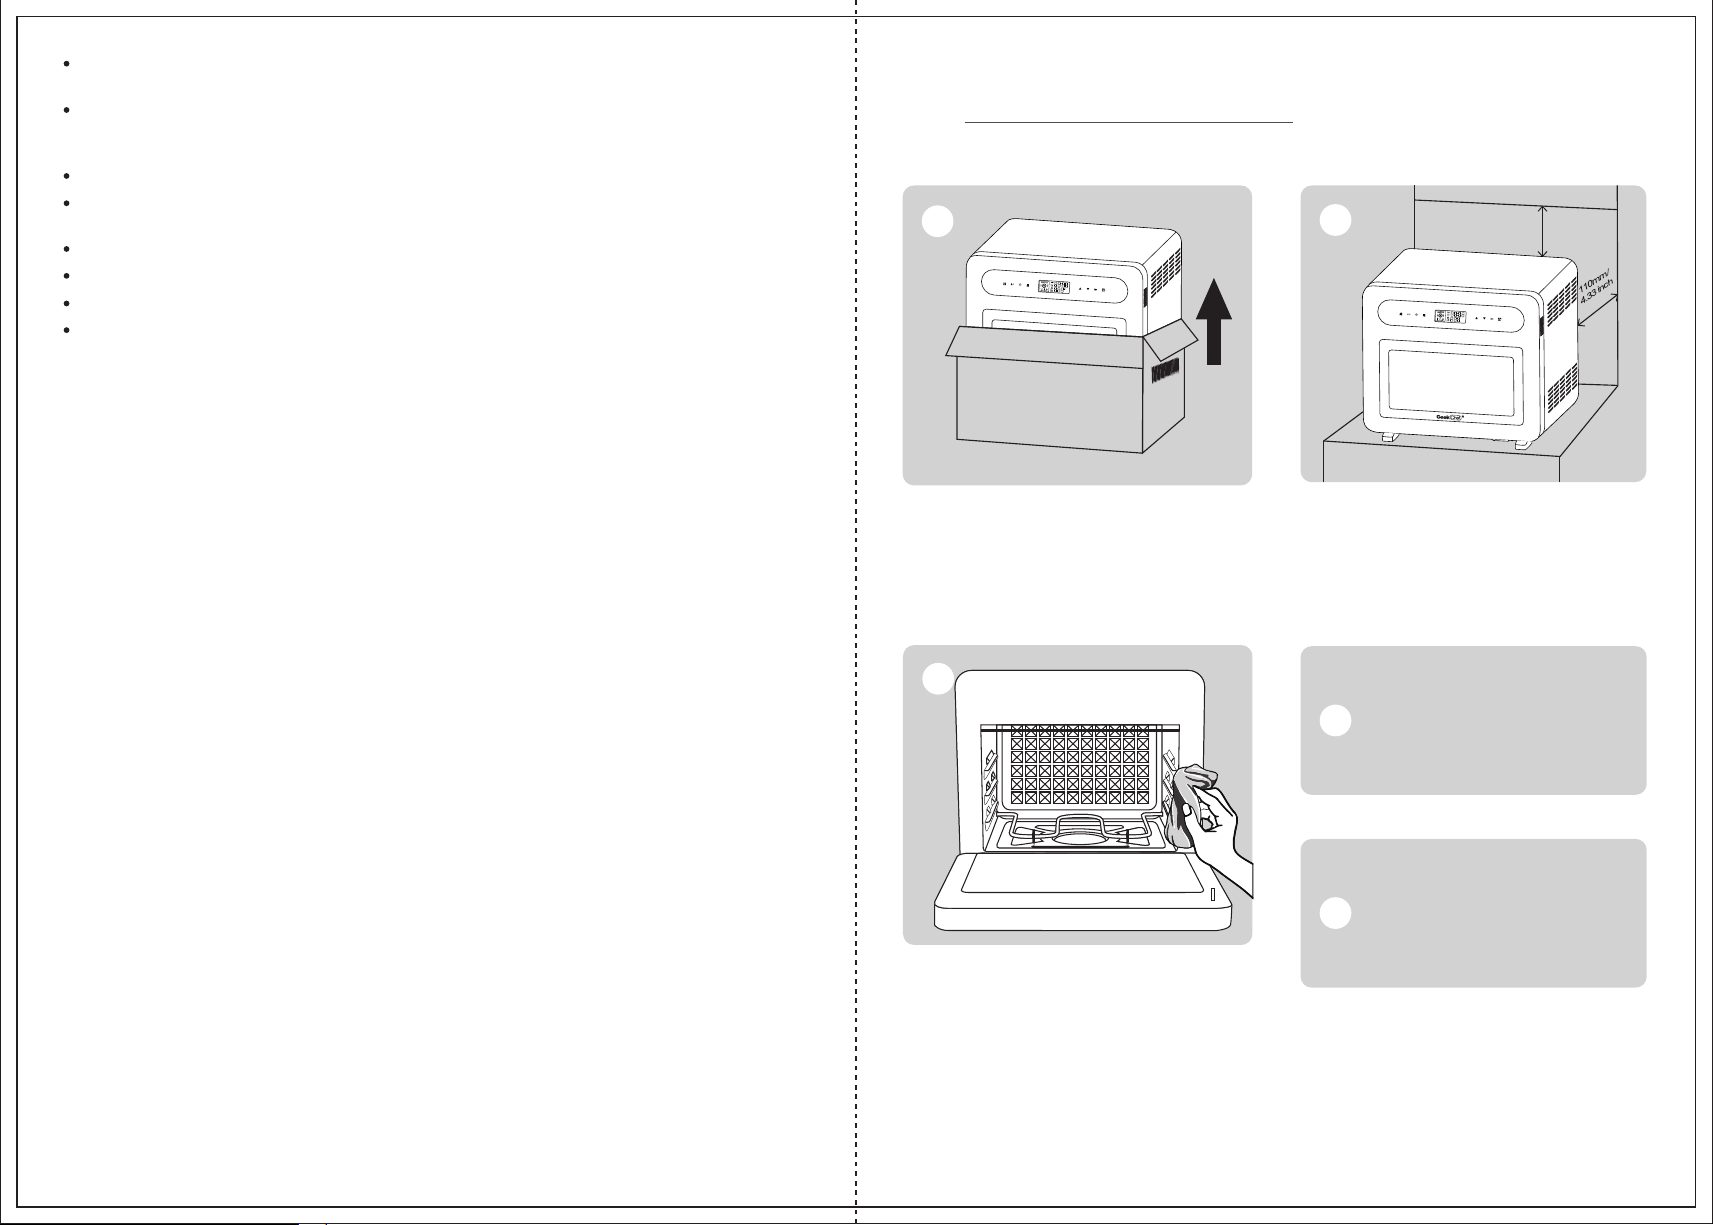
Remove all packaging around and inside the
oven.
3
Wash all accessories and clean the interior of the
Oven. Dry and place accessories back in oven.
Place on a stable, level, heat-resistant surface, away
from anything that can be damaged by heat. Keep at
least 110mm/4.33inch distance between the electrical
outlet and the wall, furniture etc. Keep at least
200mm/7.87inch away from the top wall cabinet.
Before use, ensure that the power and
outlet meet the requirements to operate
4
this product (input power requirements).
Upon first use, it is necessary to run the
oven for 18 minutes at the highest
temperature (450°F) to sterilize and
5
remove any manufacturing odor.
The oven may emit an odor or smoke due
to the heater’s protective film.
0302
Page 4
03
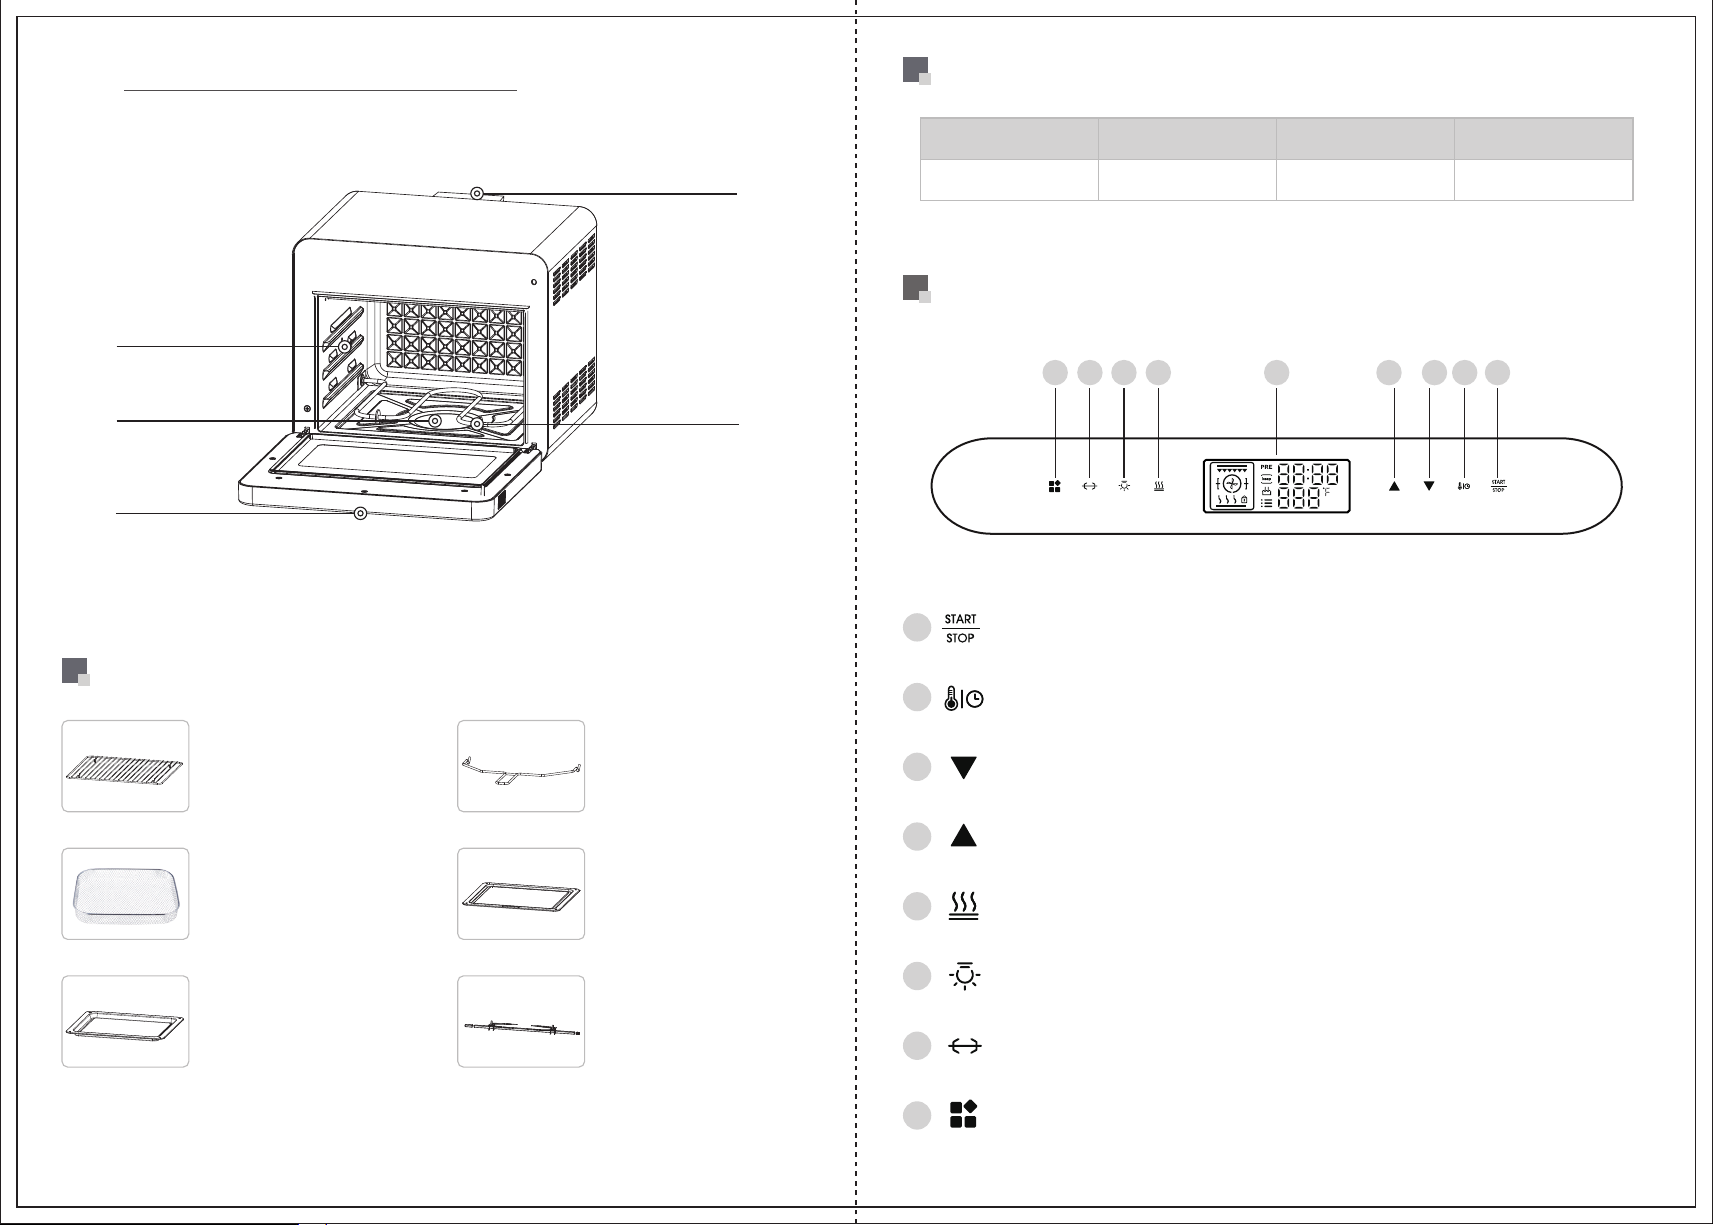
PRODUCT COMPONENTS
TECHNICAL SPECIFICATIONS
Power Voltage Frequency Capacity
Rotisserie Holder
Boiling Pan
Control Panel
ACCESSORIES
Wire Rack
Hold the food to be cooked.
Steam Outlet
Bottom Heating
Element
Fetch Rack
Use to remove the
rotisserie shaft from the oven.
CONTROL PANEL
1
2
3
START / STOP
Touch it to start or stop the program.
TEMPERATURE / TIME SWITCH
Touch it to switch the display between time / temperature.
MINUS
Touch this icon to select the menu or decrease the time or temperature.
120V1650W 60Hz 26Qt / 25L
12345 9678
Air Fryer Basket
Use the Air Fryer Basket in conjunction
with the Air Fry function to optimize
cooking results. Use for fries, chicken
wings, onions etc. It also could be used
as the dehydration basket.
Baking Pan
Use for cookies, cake, turkey etc.
It can also hold the drippings from
the food or oil when air frying.
Cramb Tray
Installed at the bottom of the cavity
and used to collect the crumbs
that fall off while baking or grilling.
Rotisserie
Use for chicken, turkey, meat.
4
5
6
7
8
PLUS
Touch this icon to select the menu or increase the time or temperature.
STEAM SWITCH
Touch it to turn on or off the steam function.
OVEN LIGHT
Touch it to turn the oven light on/off.
ROTISSERIE
Touch it to start or stop the rotisserie function. It is used to cook the foods that need to be rotated.
MENU
Touch it to enter the function selection interface.
0504
Page 5
04
HOW TO USE
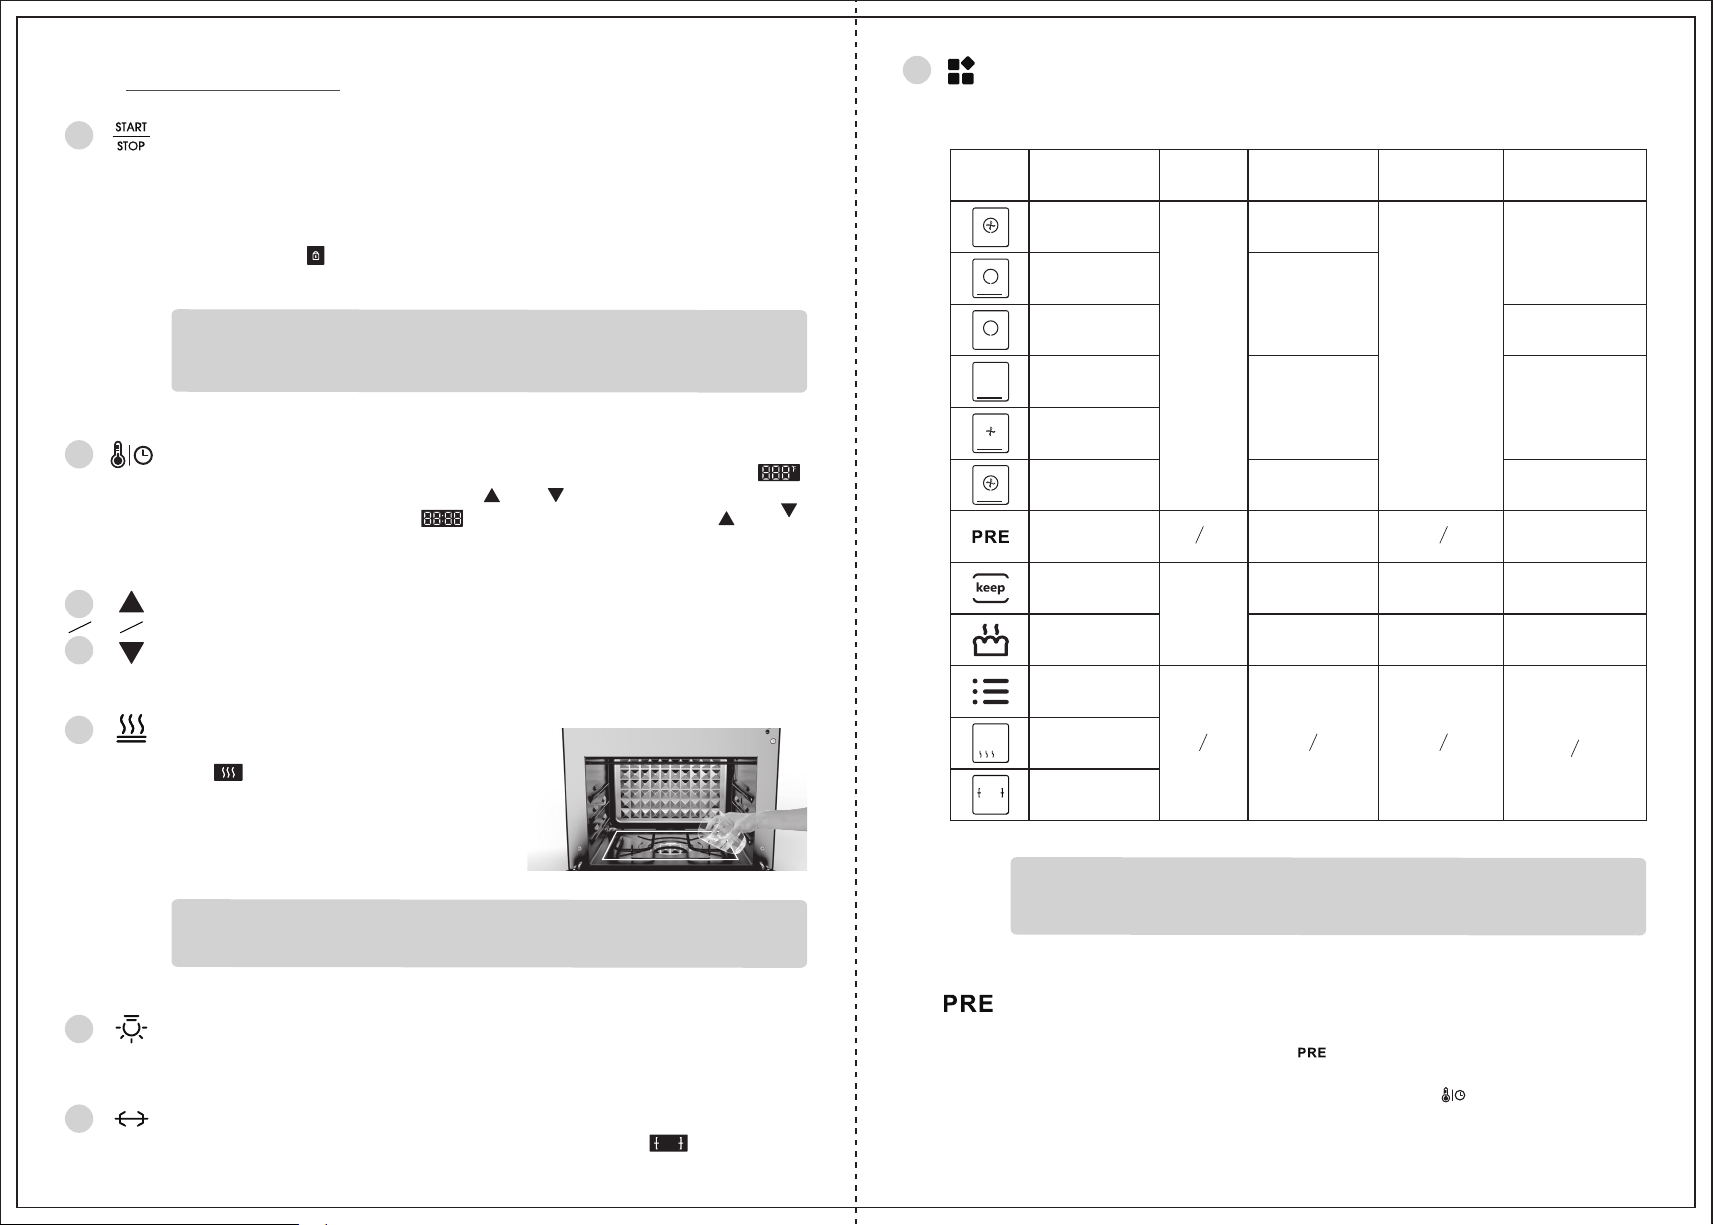
8
Menu
Touch MENU button to select different cooking mode.
1
Start / Stop Switch
Touch START/STOP button to start or stop the program. At the setting mode, the display
will flash, touch this button to start the program, the display will stop flash.
Cooking Mode Display
1.
ICON DESCRIPTION
DEFAULT
TIME
DEFAULT
TEMPERATURE
TIME RANGE
TEMPERATURE
RANGE
Child Lock Function
When the program started, touch START/STOP button 2 seconds to turn on child
lock function, the " " icon will be on, the control panel will be locked.
Touch START/STOP button 2 seconds again to turn the child lock function off.
When the cooking program is finished, the fan will keep working in order
Note
to cool the oven, after 1 minute the fan will stop automatically.
Temperature / Time Switch
2
3
4
5
Touch the TEMP/TIME button to switch temperature and time setting. When the" "
temperature display flash, then touch " " or " " button to increase or decrease
temperature setting. When the " " time display flash, then touch " " or " "
button to increase or decrease time setting.
Plus / Minus
Touch these buttons to increase or decrease the temperature or time, or to select
the menu.
Steam Switch
Touch it to turn steam function on or off.
The " " steam icon will turn on.
Before using steam function, pour water
into the boiling pan, the maximum water
capacity is 500mL, don't over the reference
layer as blew picture shows.
Note
DO NOT put into crumb tray when using steam function.
Air frying
Full baking
Upper heating
30 min
Lower heating
Lower heating
& hot air
Powerful
air frying
Preheat
Keep warm
1 h
Proof
Preset menu
Steam
Rotisserie
1. After 60 seconds, the display will automatically turn off the screen.
Note
2. Press any key on the panel to light up the screen.
300
°F
360
°F
300
°F
360
°F
Same as setting
temperature
140
°F
100
°F
1 min ~ 3 h
1 min ~ 3 h
1 min ~ 24 h
100~450
100~360
100~300
100~450
Same as setting
temperature
90~115
140
°F
°F
°F
°F
°F
°F
6
7
Oven Light
Touch the OVEN LIGHT button to turn oven light on/off.
Rotisserie
Touch ROTISSERIE button turn rotisserie function on/off. The " " rotisserie icon
will turn on.
2.
Preheat Function
When the oven start working, the PRE icon turn on, when the oven temperature
reach the setting temperature, the " " icon turn off and beep 3 times, then the
oven will go on the setting cooking time automatically. If you want to cancel preheat
function, when start the cooking program then touch " " button 2 seconds to
stop preheat.
0706
Page 6
3.
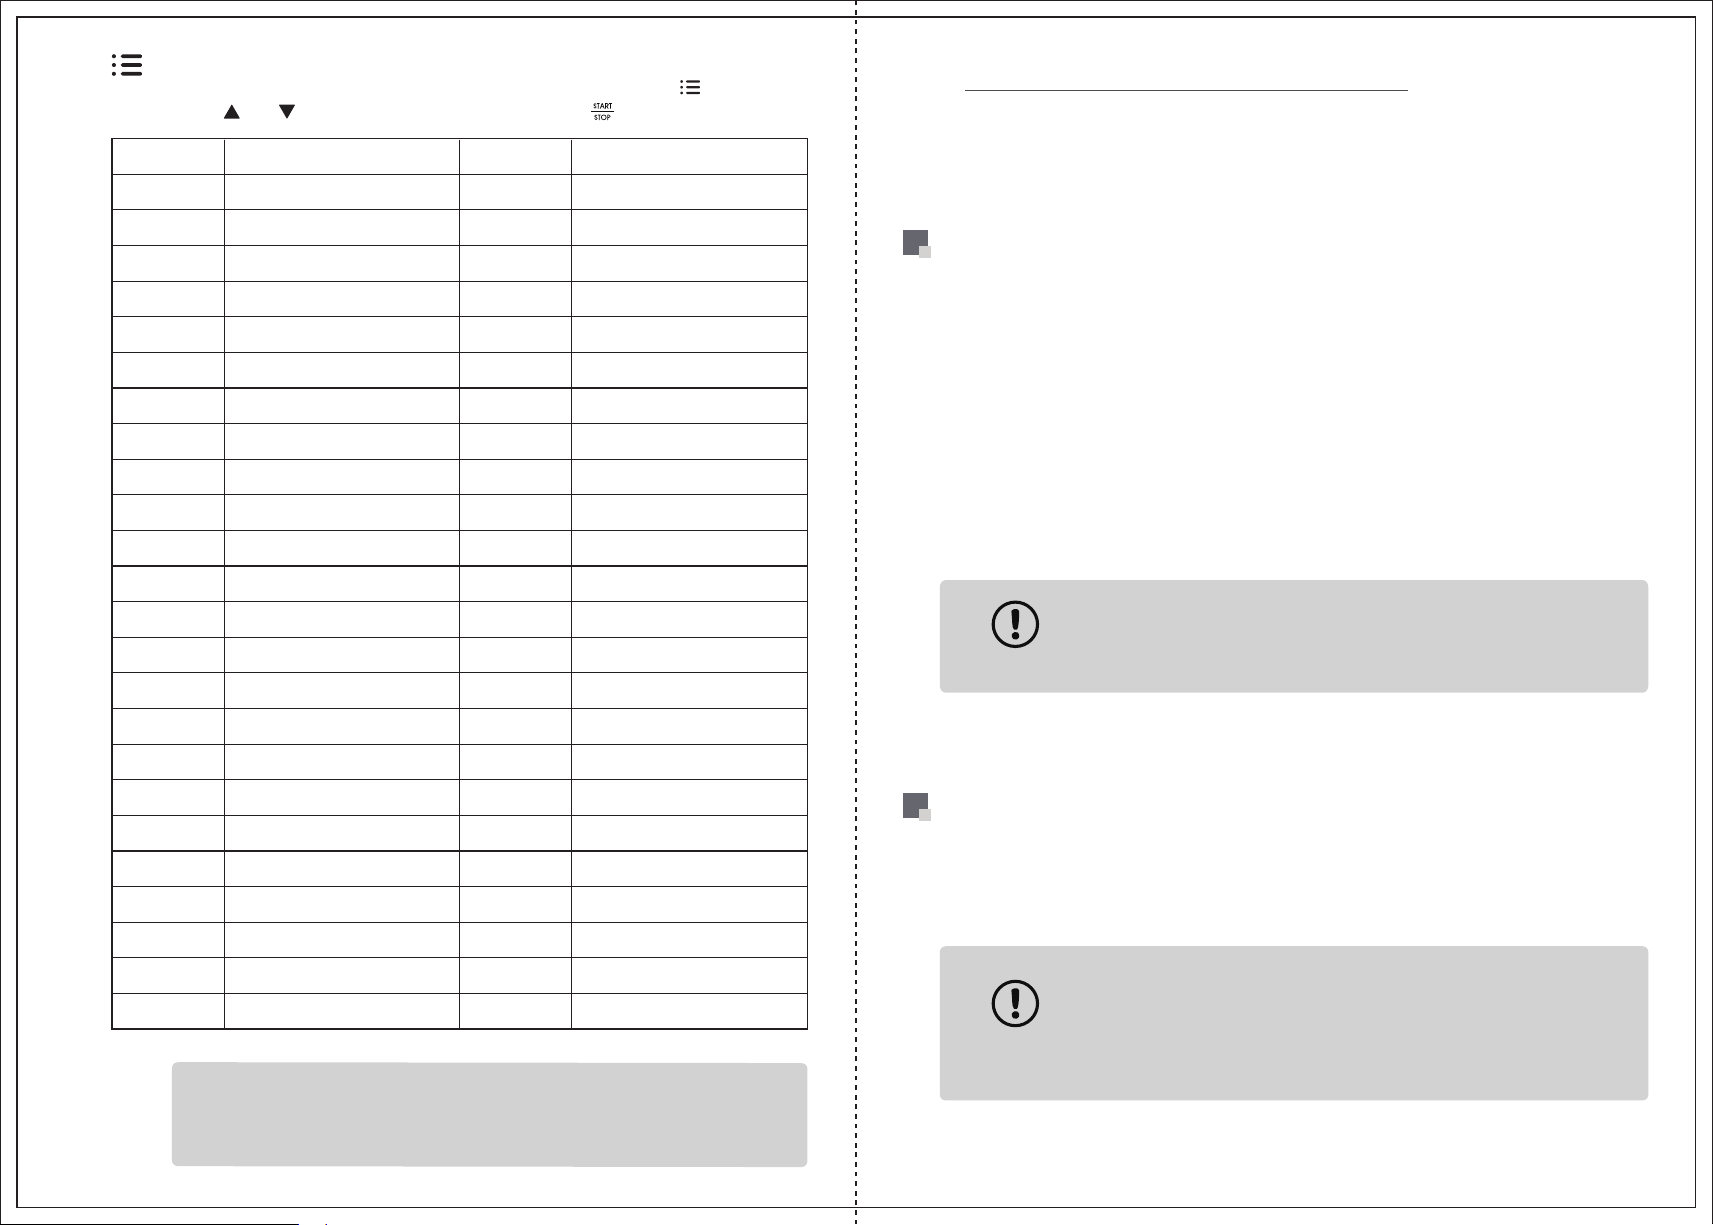
50 Preset Menus
The oven built in 50 preset menus as following chart, when the " " icon flash,
touch " " or " " button to select preset menus, touch " " button to start function.
P-01 Roast P-26 Grilled shrimp
P-02 Broil P-27 Grilled oysters
05
CLEANING AND MAINTENANCE
Before cleaning, unplug your Air Fryer Oven. Allow the oven and all accessories
to cool down completely before disassembling and cleaning.
P-03 Steak P-28 Fish filet
P-04 BBQ beef skewers P-29 Grilled squid
P-05 Lamb chop P-30 Proof
P-06 Seasoning wings P-31 Pie
P-07 Crispy wings P-32 Egg tart
P-08 Honey BBQ wings P-33 Bake
P-09 Chicken drumstick P-34 Cranberry cookies
P-10 Crispy chicken breast P-35 Ladyfingers
P-11 Roast pork belly slices P-36 Cookies
P-12 Crispy spare ribs with garlic P-37 Chiffon cake
P-13 Honey sauce BBQ pork P-38 Pound cake
P-14 BBQ pork skewers P-39 Muffin
P-15 Pork ribs P-40 Cup cake
P-16 Defrost P-41 Cheese cake
P-17 Fries P-42 Bread
P-18 Potato wedges P-43 Buns
P-19 Chicken nuggets P-44 Toast
P-20 Quick pizza P-45 Bagel
P-21 Pepperoni pizza P-46 Baguette
P-22 Hot dog P-47 Whole grain bread
P-23 Corn P-48 Puff
CLEANING THE HOUSING AND DOOR
a.
Wipe the housing with a soft, damp sponge. A non-abrasive liquid cleanser or mild spray
solution may be used to avoid build-up of stains. Apply the cleanser to the sponge, not the
ovens surface, before cleaning.
b.
To clean the glass door, use a glass cleaner or mild detergent and a soft , damp sponge or
soft plastic scouring pad. Do not use an abrasive cleanser or metal scouring pad as these will
scratch the oven’s surface.
Wipe the LED screen with a soft, damp cloth. Apply cleanser to the cloth, do not apply cleanser
c.
directly on to the LED. Cleaning the LED screen surface with a dry cloth and / or abrasive
cleaners may produce scratches.
Always clean the sealing edge of the door and wipe it with a piece of soft dry cloth.d.
To prevent electrocution, do not immerse the appliance or power cord
WARNING
into water or any other liquid.
CLEANING THE INTERIOR
To clean any spattering that may occur while cooking, wipe the walls with a soft, damp sponge.
A non-abrasive liquid cleanser or mild spray solution may be used to avoid build-up of stains. Apply
the cleanser to the sponge, not the interior, before cleaning.
It is necessary to clean residual water in the Boiling Pan and inner cavity after cooking.
P-24 Sweet potato P-49 Dehydrate
P-25 Veggies P-50 Keep warm
The 50 preset menus program don’t preheat the oven automatically, if
Note
you need preheat the oven, increase cooking time instead of preheat
time or preheat the oven manually before cooking.
WARNING
Use extreme caution when cleaning the heating elements. Allow the oven
to cool down completely, and then gently rub a soft, damp sponge or cloth
along the length of the heating element. Do not use any type of cleanser
or cleaning agent. Let all surfaces dry thoroughly prior to before the power
plug into a power outlet and turning the oven on.
0908
Page 7

CLEANING THE CRUMB TRAY
a.
After each use, slide out the crumb tray and discard crumbs. Wipe the tray with a soft, damp
sponge. A non-abrasive liquid cleanser or mild spray solution may be used to avoid build-up
of stains. Apply the cleanser to the sponge, not the tray, before cleaning. Dry thoroughly.
To remove the baked-on grease, soak the tray in warm soapy water then wash with a soft sponge
b.
or soft plastic scouring pad .Rinse and dry thoroughly.
c.
Always ensure to re-insert the crumb tray into the oven after cleaning and prior to inserting the
power plug into a power outlet and turning the oven on.
06
TROUBLESHOOTING
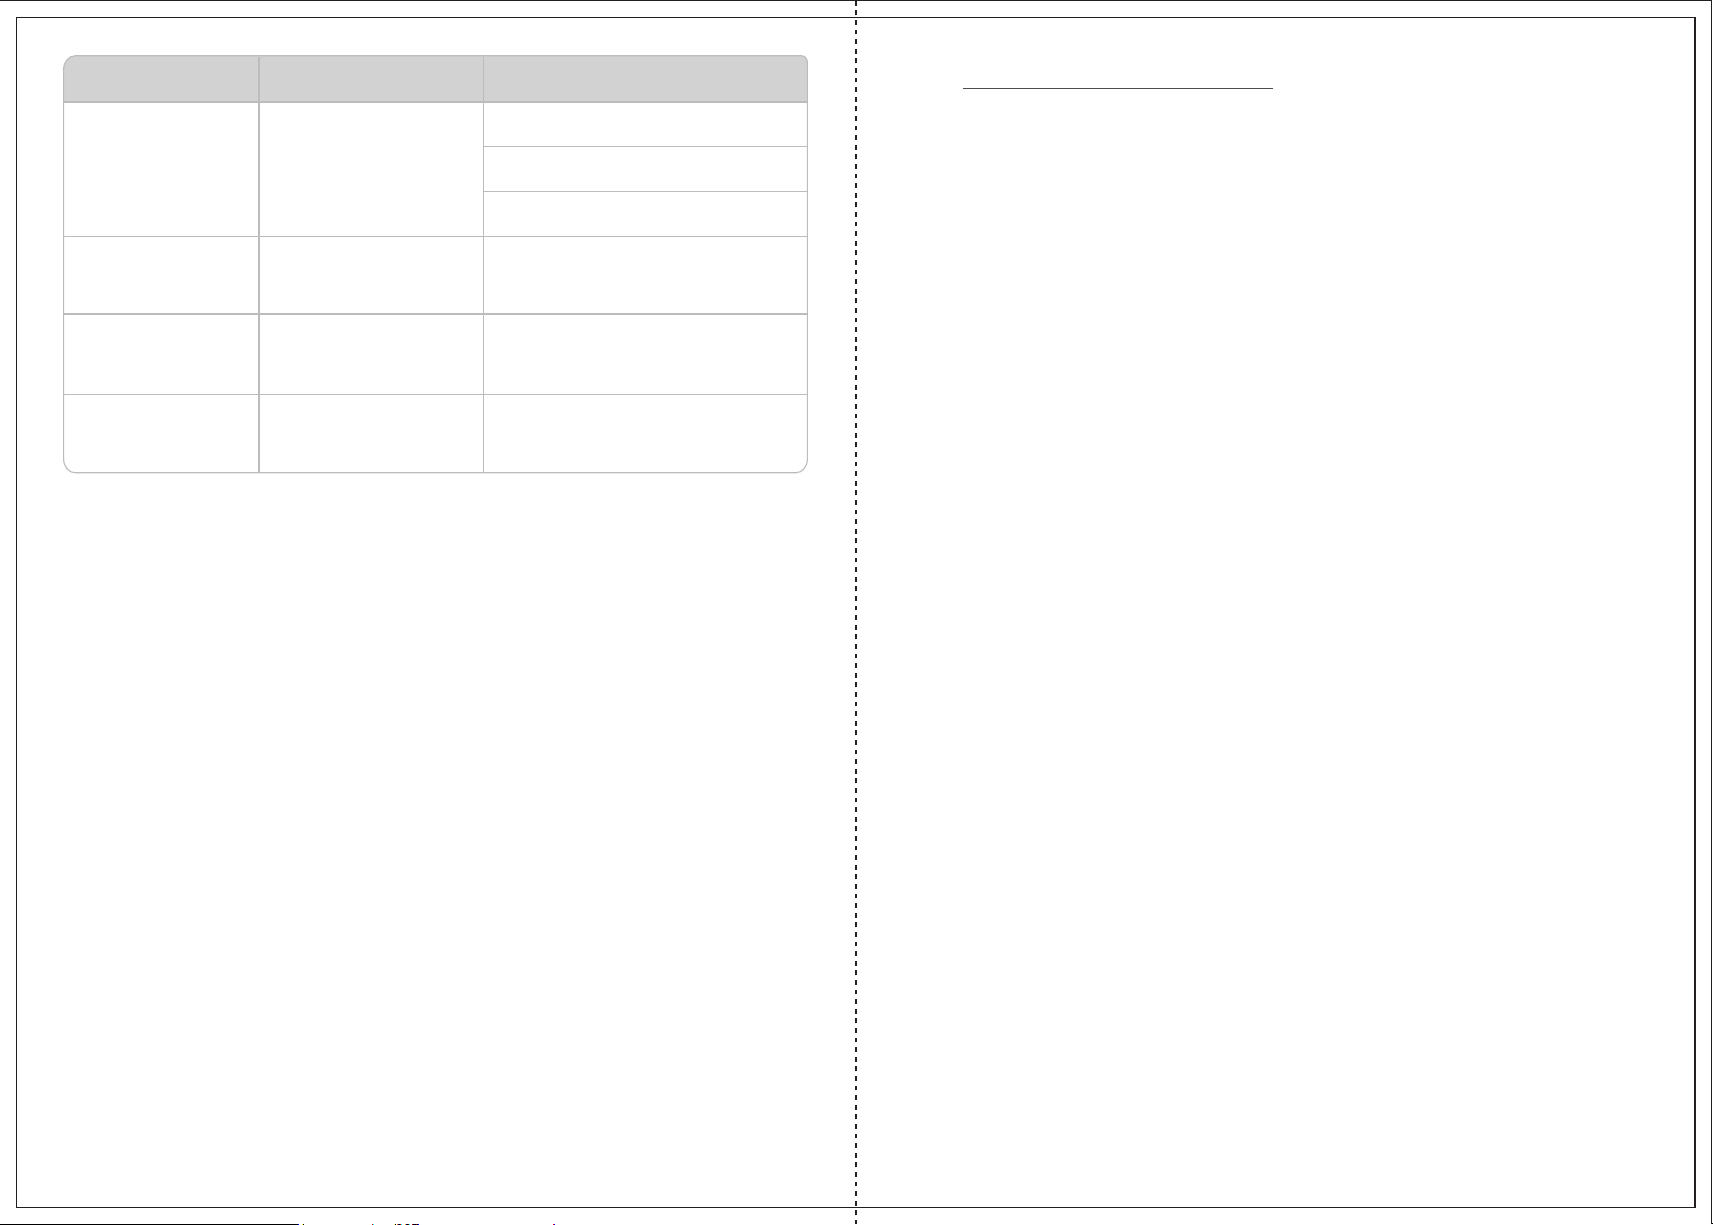
Possible Problem
The oven does NOT work
Steam is coming out from
the top of the oven door
Possible Cause Solution
The appliance is not plugged in
You have not turned on the oven
The door is not closed properly
You are cooking high moisture
content foods
Make sure the oven is plugged in.
Touch the POWER ON / OFF icon to power one.
Make sure the door is closed well.
This is normal. The door is vented to release
steam created from high-moisture content
foods such as frozen breads.
CLEANING THE OVEN RACK, BAKING PAN,
AIR FRYER BASKET, ROTISSERIE AND FETCH RACK.
a.
Wash all accessories in warm soapy water with a soft sponge or soft plastic scouring pad.
Rinse and dry thoroughly. Do not use abrasive cleansers, metal scouring pads or metal
utensils to clean any of the accessories as they may damage the surfaces.
T
o extend the life of your accessories, cleaning them in the dishwasher is not recommended.
b.
STORAGE
a.
Ensure the oven and all accessories are clean and dry.
b.
Ensure the door is closed.
c.
Store the appliance in an upright position, standing level and on its supporting legs.
Do not store appliance when wet or hot.
Do not store in a wet or hot environment.
White smoke is coming
out of the oven
Dark smoke is coming out
of the oven
The ingredients cooked with
the oven are not done
Foods are cooked unevenly
Foods are not crispy
after Air Frying
This is the first time using the oven
You're cooking greasy food
The baking pan , crumb tray , or
heaters still contain grease or oil
residue from previous use
Food is burning
Too much food in the oven at once
Setting temperature too low or
time too short
Choose the incorrect function
Ingredients are stacked or close
to each other during cooking
Baking pan, Air Fry basket or oven
rack position is not adjusted
Ingredients with high moisture
This is normal upon first use. We suggest
setting the oven to the highest temperature
and letting it run empty from 18-20 minutes.
This is normal when cooking greasy foods.
This will not af fect the cooking process.
Ensure each component is properly
cleaned after each use.
Immediately turn of f the oven, be careful
when you take out the food.
Reduce the amount of food
in the oven when cooking.
Set the temperature higher or time longer.
Make sure you cook with the proper function.
Make sure food and ingredients are spread
out evenly.
Adjust oven inserts into the proper position.
Take caution as these components may be hot.
Spraying or brushing a small amount of oil on
food evenly can Increase crispiness.
Display shows Error
Code "E-1"
The oven cavity temperature is
Turn off the oven, wait for the oven cool down.
higher than the safety
temperature setting
If it cannot be solved, then contact Customer.
1110
Page 8
Possible Problem
Display shows Error
Code "E-2"
Display shows Error
Code "E-3" or "E-4"
Display shows Error
Code "E-5" or "E-6"
Possible Cause Solution
The boiling pan temperature
is higher than the safety
temperature setting
Start up the oven, there is no
temperature change after 5 min,
and the oven cavity temperature
is still lower than 95°F/35°C
The temperature sensor is
disconnection or failure
Turn off the "Steam" function, wait for the boiling
pan cool down.
Put enough water into boiling pan.
If it cannot be solved, then contact Customer
Support.
Remove the power cord from the power outlet,
reconnect and operate again. If it cannot be
solved, then contact Customer Support.
Remove the power cord from the power outlet,
reconnect and operate again. If it cannot be
solved, then contact Customer Support.
07
LIMITED WARRANTY
GEEK TECHNOLOGY LTD warrants to the original consumer or purchaser this Geek Chef Air Fryer
Countertop Oven is free from defects in material or workmanship for a period of One (1) year
from the date of purchase. If any such defect is discovered within the warranty period,
GEEK TECHNOLOGY LTD, at its discretion, will repair or replace the Product at no cost. This limited
warranty is good only to the original purchaser of the product and effective only when used in
United States.
For warranty or repair service: Call 1-844-801-8880 and choose the appropriate prompt, or email
[email protected]. Please have your Product’s model number, date code(on rating label),
your name, address, city, state, zip code and phone number ready.
Display shows Error
Code "E-7"
The circuit board has failed
Remove the power cord from the power outlet.
Contact Customer Support.
NO OTHER WARRANTY IS APPLICABLE TO THIS PRODUCT. THIS WARRANTY IS IN LIEU OF
ANY OTHER WARRANTY, EXPERSS OR IMPLIED. INCLUDING WITHOUT LIMITATION, ANY
WARRANTY OF MERCHANTABILITY OR FITNESS FOR A PARTICULAR PURPOSE. TO THE
EXTENT ANY IMPLIED WARRANTY IS REQUIRED BY LAW. IT IS LIMITED IN DURATION TO THE
EXPRESS WARRANTY PERIOD ABOVE. NEITHER THE MANUFACTURER NOR ITS
U.S.DISTRIBUTOR SHALL BE LIABLE FOR ANY INCIDENTAL, CONSEQUENTIAL, INDI RECT,
SPECIAL, OR PUNITIVE DAMAGES OF ANY NATURE. INCLUD ING WITHOUT LIMITATION. LOST
REVENUES OR PROFITS, OR ANY OTHER DAMAGE WHETHER BASED IN CONTRACT, TORT,
OR OTH ERWISE, SOME STATES AND / OR TERRITORIES DO NOT ALLOW THE EXCLUSION
OR LIMITATION OF INCIDENTAL OR CONSEQUENTIAL DAMAGES OR LIMITATIONS ON HOW
LONG AN IMPLIED WARRANTY LASTS. SO THE ABOVE EXCLUSION OR LIMITATION MAY NOT
APPLY TO YOU. THIS WARRANTY GIVES YOU, THE ORIGINAN PURCHASER, SPECIFIC LEGAL
RIGHTS AND YOU MAY ALSO HAVE OTHER RIGHTS THAT VARY FROM STATE TO STATE OR
TERRITORY TO TERRITORY.
1312
 Loading...