

Page 1
User Manual
For more information visit www.caldigit.com
Page 2

Contents
1. Introduction 03
Package Contents 06
T3 Diagram 07
2. Using the T3 08
Connecting the T3 08
How to create a RAID 09
- Mac OS X 09
- Windows 7 & 8 12
Replacing the T3 Drive Module 16
Turning o the T3 18
3. Technical Support & Warranty Information 19
CalDigit
2
Page 3
1. Introduction
The CalDigit T3 is a powerful storage solution that utilizes Thunderbolt technology for impressive
performance and ultimate exibility. This three drive RAID array has the ability to be congured
into RAID 0, 1, or JBOD. The T3 utilizes removable drive modules which allows users to add storage,
transfer drives between other T series enclosures, and archive them after they are full. When
paired with solid state drives (SSDs), the T3 can reach extreme speeds up to 800 MB/s per second.
The T3 oers performance and versatility unrivaled by anything in its class. While priced similarly
to dual bay RAID solutions, the extra drive in the T3 adds additional performance with a minimal
footprint increase. The T3 congured in RAID 0 can deliver up to 500 MB/s when used with regular
HDDs for applications that require high capacity drives. The T3 can also be used as a traditional
dual drive RAID array, leaving you with a spare JBOD drive. The T3 will do everything a dual drive
RAID can do and more. Why settle for two, when you can have three?
CalDigit
3
Page 4

General Use Warnings
Please read the T3 manual thoroughly and familiarize yourself with the product before use.
Only use the T3 in an area with sucient ventilation. Make sure that the fan is not obstructed
to ensure proper air ow, which is essential for heat dissipation. Do not leave or use the T3
near a heat source or direct sunlight.
Avoid using the T3 in extremely hot or cold environments as it will increase the likelihood of
premature drive failure. The safe operating temperature ranges from 40F - 95F (4.4C-35C).
Avoid using the T3 in humid environments. Moisture and condensation can accumulate in
the drive and damage the electrical components, resulting in unit failure and catastrophic
data loss.
Only use the power adapter that has been supplied with the T3. An excessive or inadequate
power supply can result in unstable performance, data corruption, or drive failure.
Make sure to transport your T3 with care. Hard drives are sensitive to shock and rough
handling, and can result in degrading performance or disk failure.
Safety Warnings
Keep the T3 away from liquids and moisture. Exposure to liquids on the T3 can result in
damaging the unit, electric shock, and result in a re hazard. If your T3 gets wet while it is
still o, do not turn it on.
In the case of any issues with the device, do not attempt to repair or open the T3 yourself.
Doing so can result in personal injury, damage the device, and will void the warranty. If you
have any issues, please contact CalDigit technical support.
All electrical devices are susceptible to failure. In order to protect yourself against sudden
data loss, it is highly recommended that you create at least two backups of your data. If you
will be sending a drive back to CalDigit for service, please make sure you have backed up
your data beforehand. CalDigit cannot guarantee the integrity of data on drives that are
returned to us. CalDigit cannot make provisions for data recovery or be held liable for any
data loss.
CalDigit
4
Page 5

The T3 comes with a standard, 1-year limited warranty.
Burst transfer rates will vary from one computer to another. Depending on the host conguration,
average speeds are usually lower.
Weight varies by conguration and manufacturing process.
IMPORTANT
The use of this product is subject to acceptance of the software license agreements
included. This product contains electronic documentation.
1TB (Terabyte) = 1000GB (Gigabyte) = 1,000,000,000 bytes. Total accessible capacity varies depending on operating environment (typically 5-10% less).
CalDigit
5
Page 6
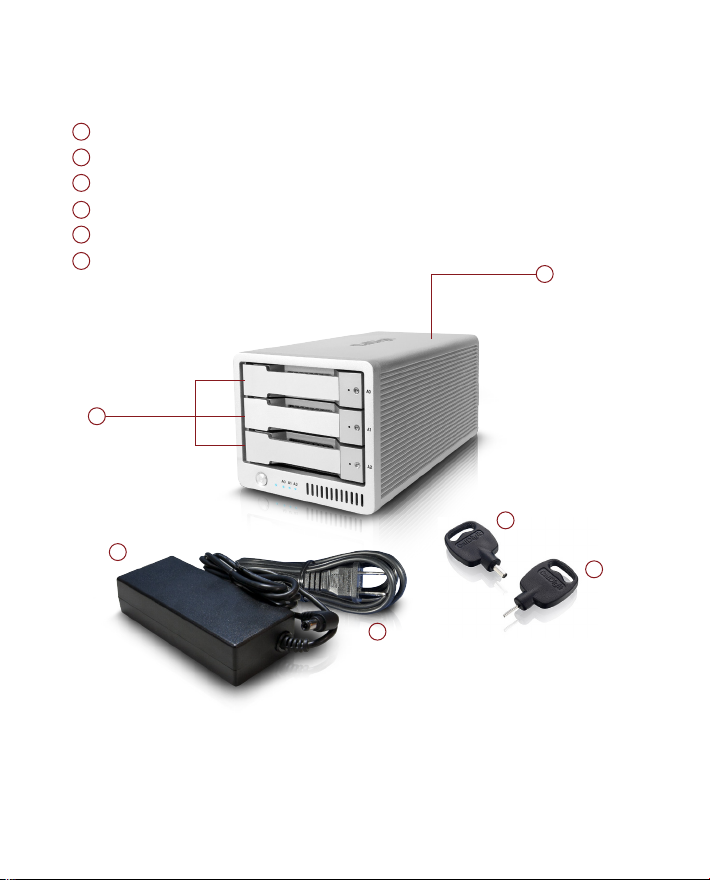
Package Contents
1 1 x T3 RAID
2 3 x CalDigit universal drive modules
3 1 x drive module pin release
4 1 x drive module lock key
5 1 x power supply
6 1 x AC cord
2
5
1
4
3
6
CalDigit
6
Page 7

T3 Diagram
Removable Drive Module
Front Side Power Button
Drive Module Lock
PIN Release
LED Status Lights
Power LED
Smart Fan
Kensington Lock
Dual Thunderbolt™
Ports
CalDigit
AC Power In
7
Page 8

2. Using the T3
Connecting the T3
1 Turn on the computer, make sure you have logged into the OS.
2 Connect a Thunderbolt cable* from your computer to the T3.
3 Connect the power supply to the T3.
4 Press the T3’s power button and it will boot. You will see it mount and it will be ready for use.
PC users will need to format the T3 for Windows OS before the device mounts.
3
*Thunderbolt cable sold separately.
CalDigit
4
8
Page 9

How to create a RAID
The T3 comes formatted as a software RAID 0 using Mac’s HFS + le system.
Windows users must recreate the RAID in the T3 using Window’s disk
NOTE
management software using the NTFS format. Creating a RAID will delete
any information on the hard drives so make sure to back up all your data
before proceeding.
Mac OS X
1 Open “Disk Utility” (Macintosh HD > Applications > Utilities) and select the RAID tab.
2 Enter the name you would like for your RAID volume.
3 Select the format you would like to use, Mac OS Extended (Journaled) is recommended.
2 3
CalDigit
9
Page 10

4 Select the RAID type you would like to use.
Striped RAID Set - RAID 0 - distributes data evenly across all drives in RAID 0. Use this mode
for increased performance. RAID 0 provides no protection against drive failure. It is highly
recommended to have a backup when using the T3 in RAID 0.
Mirrored RAID Set - RAID 1 - creates identical copies of data across all drives in the RAID 1 volume.
RAID 1 is ideal for back up and archiving. This is the most secure form of RAID but does not oer
any performance increase.
Concatenated Disk Set - SPAN (non-RAID) - drives work together but data is not distributed
evenly. After the rst drive in the SPAN set is lled, data then gets saved to the following drive.
SPAN does not oer any performance gains but is useful when using drives of dierent capacities.
It is highly recommended to have a backup when using SPAN because it does not oer any form
of data protection.
CalDigit
10
Page 11

5 Locate the three CalDigit disks on the left panel. Drag and drop each one onto the list on the right.
6 Select the “create” button and Disk Utility will create the RAID.
6
5
7 The volume will mount on your desktop and it will be ready for use.
CalDigit
11
Page 12

Windows 7 & 8
1 Click on the start button, right click on “Computer” to bring down the drop down menu
and select manage.
2 After the “computer management” window opens, select “disk management” on the left side.
CalDigit
12
Page 13

3
If the T3 drives have existing volumes on them, they must be deleted prior to setting up the
RAID. All of the current volumes will be listed in the top portion of disk management. You
can delete the volumes by right clicking on the corresponding T3 drives and selecting “Delete
Volume...”
4
The drives should be showing on the bottom portion of the disk management window with
their space as unallocated.
CalDigit
13
Page 14

5
Right click on the rst T3 disk that you want included in your RAID. You will be presented with
several options on how to congure your drives.
New Simple Volume - JBOD mode, non-RAID - creates a normal volume. Use this mode if you
wish to use your T3 as a JBOD (just a bunch of disks) storage device, letting you create individual
partitions on each of the drives. You can create a new simple volume on one of the drives and RAID
the remaining two if you wish.
New Spanned Volume - SPAN (non-RAID) - drives work together but data is not distributed
evenly. After the rst drive in the SPAN set is lled, data then gets saved to the following drive.
SPAN does not oer any performance gains but is useful when using drives of dierent capacities.
It is highly recommended to have a backup when using SPAN because it does not oer any form
of data protection.
New Striped Volume - RAID 0 - distributes data evenly across all drives in the RAID 0. Use this
mode for increased performance. However, there is no protection against drive failure. It is highly
recommended to have a backup when using the T3 in RAID 0.
New Mirrored Volume - RAID 1 - creates identical copies of data across all drives in the RAID 1
volume. RAID 1 is ideal for back up and archiving. This is the most secure form of RAID but does
not oer any performance increase.
14
CalDigit
Page 15

6
Once you select which RAID you want to use, select the drives that you want and add them to
the list on the right.
7
Assign a mount letter and name the new volume. Select the settings you would like to format
the volume with and select next. The RAID will be created and your volume will mount and
be ready for use.
CalDigit
15
Page 16

Replacing the T3 Drive Module
1
Insert the drive key into the lock on the front of the drive module and turn clockwise to unlock it.
2
Insert the drive pin into the pin release until the handle of the drive module pops open.
CalDigit
16
Page 17

3
Pull the drive module from the T3 enclosure.
4
Insert the new drive in the same orientation as the drive you removed. The key holes should be
on the same side as the drive labeling. Push the drive in all the way and then press in the drive
module handle until it locks securely into place. Please do not use excessive force to insert the
drive or you can damage it. The new drive will mount onto your OS.
CalDigit
17
Page 18

5
To lock the new module into place, insert the drive key into the lock and turn counterclockwise.
Turning o the T3
1
Right click on the T3 volume icon and click “Eject CalDigit T3”. It is important that the T3 is
ejected prior to shutting down to prevent directory/data corruption.
2
After the T3 dismounts, press and hold the power button until the power LED turns o.
CalDigit T3
CalDigit
21
18
Page 19

3. Technical Support & Warranty Information
Technical Support
If you run into any issues while using your T3, please contact
CalDigit Technical Support:
Phone: 1-(714) 572-6668
Email: support@caldigit.com
Website: www.caldigit.com/support.asp
When contacting CalDigit technical support, make sure to be by your computer and have the following information available:
Your T3 serial number
1
Operating system and version
2
Computer make and model
3
Other devices connected to your computer
4
CalDigit Warranty Information
For detailed CalDigit warranty information please see the CalDigit website:
www.caldigit.com/rma/Limited-Warranty.pdf
*Specifications and package contents are subject to change without notice
*Thunderbolt and the Thunderbolt logo are trademarks of Intel Corporation in the U.S. and/or other countries.
CalDigit
19
Page 20

CalDigit T3
www.caldigit.com
© 2014 CalDigit, Inc. All Rights Reserved
 Loading...