

Page 1
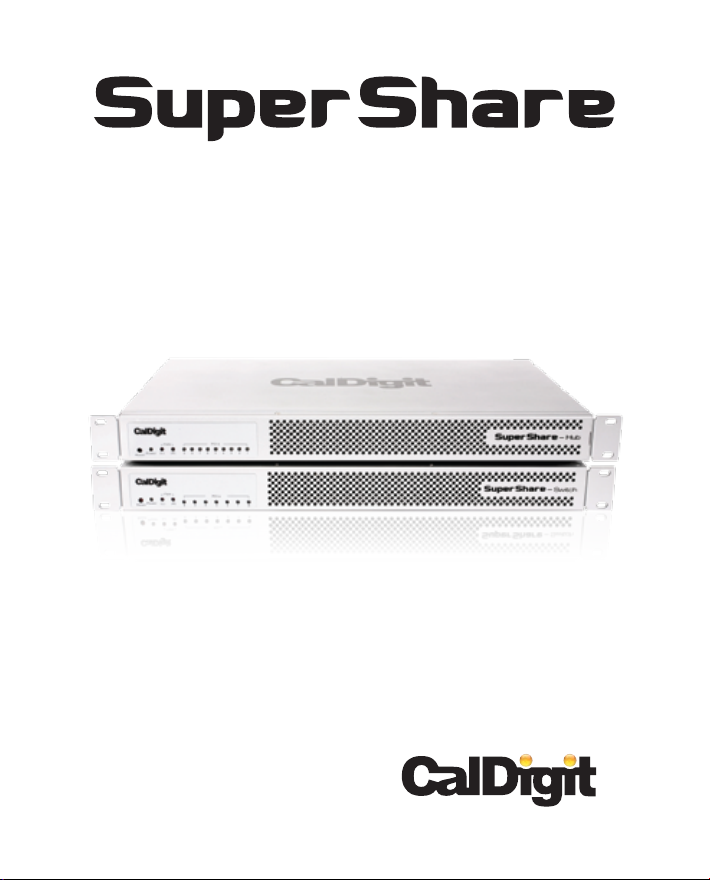
Quick Start Guide
For more information, visit www.caldigit.com
Page 2

Fast, Reliable and Secure Storage Solutions
Apple, Apple Logo, Mac, the Mac logo and Macintosh are trademarks of Apple Inc.
Microsoft, Windows and Windows Logos are registered trademarks of the Microsoft Corporation.
All other trademarks are the property of their respective owners.
*Specications and package contents are subject to change without notice.
Page 3

Contents
Introduction
General Use Warnings
Safety Warnings
Package Contents
Installing SuperShare
Installing HDPro2 or HDPro-24 Storage
Installing SuperShare Host Adapter Card
Installing Optical Cable
Installing PCIe Cable
Power On
Shutting Down
Accessories and Parts
Technical Support & Warranty Information
Technical Support
CalDigit Warranty Information
4
4
4
5
6
6
6
8
9
10
10
11
12
12
12
03
Page 4
Introduction
Thank you for choosing the CalDigit SuperShare, please use the following quick installation
instructions to setup your SuperShare Switch & Hub.
General Use Warnings
Please read the SuperShare manual thoroughly and become familiar with the product
before use.
Only use the CalDigit SuperShare in an area with cool ventilation. Make sure that the fans
are not obstructed to ensure heat dissipation. Do not leave or use the SuperShare near a
heat source such as a heater or direct sunlight.
Avoid using the SuperShare in extremely hot and cold environments as it will increase
the likelihood of premature failure. A safe temperature range is between 40F – 95F.
Avoid using the SuperShare in humid environments. Moisture and condensation can
accumulate and damage the electrical components, resulting in unit failure.
Only use the power adapter that has been supplied with the CalDigit SuperShare. An
excessive or inadequate power supply can result in unstable performance or failure.
Safety Warnings
Keep SuperShare away from liquids and moisture. Direct application of liquids on
SuperShare can result in electric shock, re hazard and damage the unit. If your
SuperShare gets wet while it is still o, do not turn it on.
Do not tamper with or try to repair SuperShare unless you are a certied CalDigit
technician. Doing so can result in personal injury and damage SuperShare. This will also
void your warranty. If you have any issues, contact CalDigit Technical Support.
04
Page 5

Package Contents:
(One) CalDigit SuperShare Switch. (6-Port or 12-Port)
1
(One) CalDigit SuperShare Hub. (7-Port)
2
(Four) Optical Cable. (10M, 30M, 50M or 100M)
3
(One) PCIe (8-lane) cable.
4
(Four) SuperShare Host Adapter Card.
5
(Two) Rack mounting kits. One for Switch, One for Hub.
6
(One) CalDigit SuperShare CD
7
(Two) Power supply kit.
8
Please contact your CalDigit reseller for any faulty or missing parts.
05
Page 6

Installing SuperShare
Installing HDPro2 or HDPro-24 Storage
Please refer to the HDPro2 or HDPro-24 installation procedure or manual. Manuals can be
downloaded from www.caldigit.com/support.asp.
Installing SuperShare Host Adapter Card
1
Turn o your computer and unplug the AC power cord from the wall or power bar.
Please make sure the computer is turned o. Unplug the power cord and wait 5 to 10
minutes allowing he computer’s internal components to cool.
2
Remove cover from computer.
Power Cord Socket
Power Cord Plug
06
Page 7

Locate available PCIe slot on motherboard.
3
Always put the PCI card in Slot #3 or Slot #4 to obtain optimal performance.
4
Hold the PCIe card mrly by the ouside edge, push it into the slot making sure the PCI
5
connectiins t outside the computer.
07
Page 8

Installing Optical Cable
1
Attach the Optical cable to SuperShare Host Adapter Card.
2
Attach the other side of Optical cable to SuperShare Switch.
08
Page 9

Installing PCIe Cable
Attacah the PCIe (x8) cable to SuperShare Switch. (Port-A)
1
Attacah the other side of PCIe cable (x8) to SuperShare Hub. (Port-1)
2
Attach all the PCIe cables from the Storage, HDPro2 or HDPro-24, to SuperShare Hub.
3
(Port-3 to Port 9)
PCIe 8x Cable
PCIe 8x Cable
To Storage (PCIe)
To Workstations (optical)
Installing RAIDShield and Driver to all workstations
Insert the provided CD into the computer DVD/CD drive or visit
1
www.caldigit.com/support.asp.
Go to "Mac Installer" Folder or "Windows Installer" Folder.
2
Launch SuperShare Installer.
3
When installation is complete, shutdown the computers.
4
SuperShare Hub
SuperShare Switch
09
Page 10

Power On
To power on the SuperShare SAN, please follow the steps:
Power on all HDPro2s or HDPro-24s.
1
Wait 5 seconds.
2
Power on SuperShare Hub.
3
Wait 5 seconds.
4
Power on SuperShare Switch.
5
Wait for three beeps from the Switch, this may take up to 2 minutes.
6
Power on all workstations.
7
Shutting Down
When you want to shut down your the SuperShare SAN, please follow the steps:
Shutdown all your workstations.
1
Power o SuperShare Switch.
2
Power o SuperShare Hub.
3
Power o all HDPro2s.
4
Power
10
Page 11

Accessories and Parts
SuperShare Hub with 7 Ports
Part # SS-Hub-7 SKU # 736253
SuperShare Switch with 6 Ports
Part # SS-Switch-6 SKU # 736251
SuperShare Switch with 12 Ports
Part # SS-Switch-12 SKU # 736252
SuperShare 6-Port Switch and 7-Port Hub Bundle
Part # SS-Switch-Hub-6 SKU # 736254
SuperShare 12-Port Switch and 7-Port Hub Bundle
Part # SS-Switch-Hub-12 SKU # 736255
SuperShare Host Adapter Card
Part # SS-HostAdapter SKU # 736256
Optical Cable, 10 Meters in length
Part # SS-OC-10 SKU # 736851
Optical Cable, 30 Meters in length
Part # SS-OC-30 SKU # 736852
Optical Cable, 50 Meters in length
Part # SS-OC-50 SKU # 736853
Optical Cable, 100 Meters in length
Part # SS-OC-100 SKU # 736854
11
Page 12

Technical Support & Warranty Information
Technical Support
If you run into any issues while installing SuperShare please contact CalDigit Technical
Support:
support@caldigit.com
www.caldigit.com/support.asp
1-714-572-6668
When contacting CalDigit Technical Support, make sure to be at your computer and have the
following information available:
• Your CalDigit serial number
• Operating system and version
• Computer brand and model
• Other devices attached to your computer
You can also can post on CalDigit forum at the Creative Cow:
www.ceativecow.net.
CalDigit Warranty Information
For detailed CalDigit warranty information please see the CalDigit website:
www.caldigit.com/rma/Limited-Warranty.pdf
12
Page 13

CalDigit SuperShare Quick Start Guide v1.0
www.caldigit.com
© 2010 CalDigit, Inc. All Rights Reserved
 Loading...